> For the complete documentation index, see [llms.txt](https://docs.digit.org/llms.txt). Markdown versions of documentation pages are available by appending `.md` to page URLs; this page is available as [Markdown](https://docs.digit.org/health/v2.0/deploy/configuration/microplan-service-configuration/microplan-web-service-configuration/setup-microplan/user-tagging.md).
# User Tagging
## Overview
The **User Tagging** screen allows the Microplan Admin to assign registered users to specific roles for the microplan being configured. These users will be responsible for approvals, data validation, and operational tasks.
User assignments are restricted to:
* Users uploaded through **User Management (Bulk Upload)**
* Jurisdictions selected during the **Boundary Selection** step
## Steps
### Step 1: Understand Available Roles
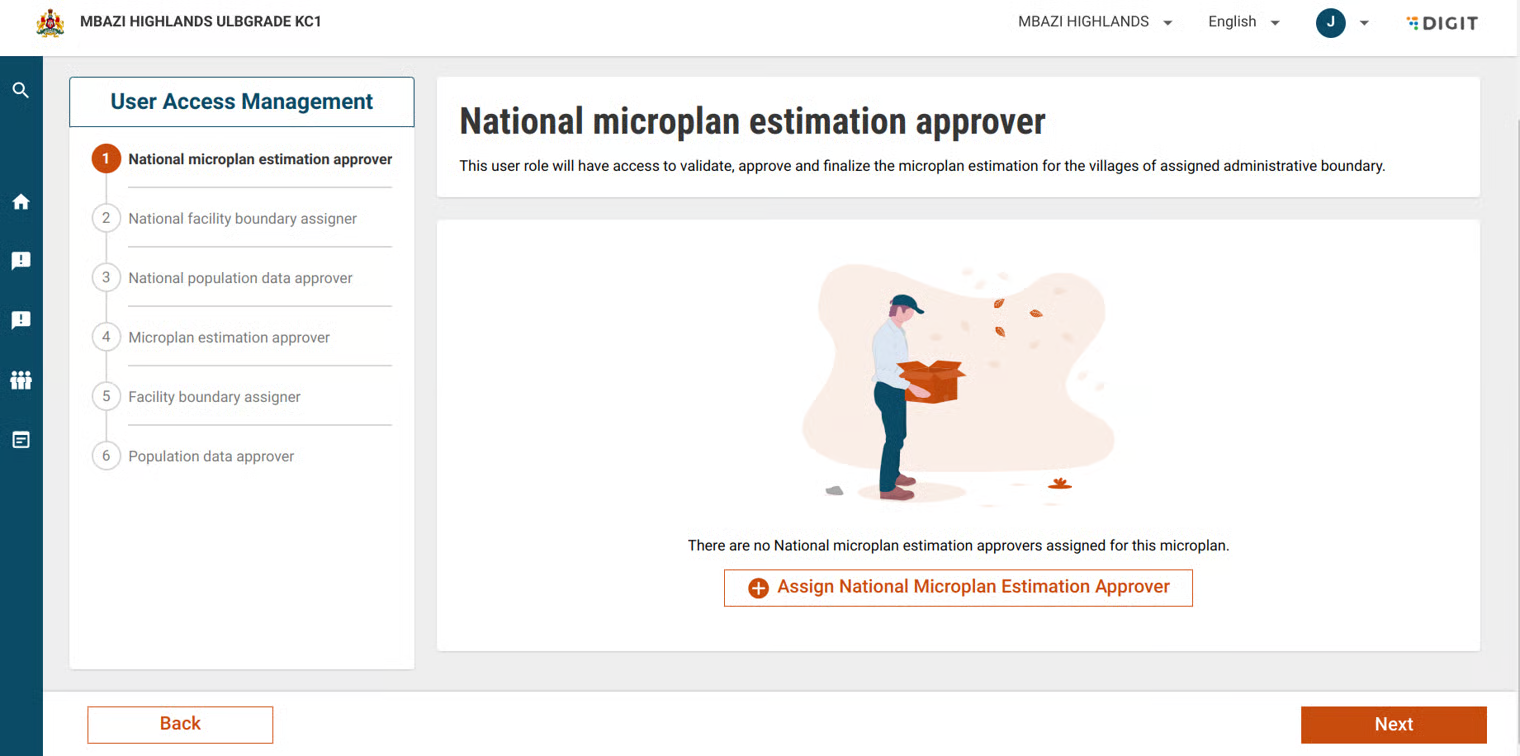
Each microplan includes the following configurable roles:
* National Microplan Estimation Approver
* National Facility Catchment Assigner
* National Population Data Approver
* Microplan Estimation Approver
* Facility Catchment Assigner
* Population Data Approver
Each role has:
* Its own assignment screen
* Its own user list
* Jurisdiction-specific tagging rules
> **Important:** Assigning users to **national-level roles is mandatory**.
### Step 2: Open the Role Assignment Screen
1. Navigate to the **Assign** button for the applicable role in the **User Access Management** screen. For example, click on the *Assign National Microplan Estimation Approver button.*
A pop-up window opens where you can assign or unassign users.
### Step 3: Search for Available Users
The system automatically:
* Fetches users registered under the selected role.
* Filters users based on:
* Role
* Selected jurisdiction boundaries
#### How Search Works (System Behaviour)
* The search request is made via `/health-hrms/employees/_search`, using roles as query parameters (e.g., `roles: ROOT_PLAN_ESTIMATION_APPROVER`). This returns all registered users with the specified role.
* When the page loads, a request to `/plan-service/employee/_search` retrieves all users currently assigned to the current microplan.
### Step 4: Assign a User
To assign a user to the microplan:
1. Locate the user from the available list.
2. Click **Assign**.
#### What Happens in the Background
* Upon clicking the assign button, the `userServiceUuid` from the search response (/health-hrms/employees/\_search) is used as the payload, along with the jurisdiction and role. For the National Microplan Estimation Approver role, the jurisdiction is pre-selected as the national level by default.
* For other roles, the jurisdiction is automatically pre-selected based on the boundaries set in the Boundary Selection screen. This information is then sent to /plan-service/employee/\_create to assign the user to the current microplan.
#### Jurisdiction Rules
* **National roles:**\
Jurisdiction is automatically set to the **national level**.
* **Other roles:**\
Jurisdiction is automatically derived from the boundaries selected in the **Boundary Selection** step.
Once saved, the user becomes officially assigned to the microplan.
### Step 5: Unassign a User
To remove a user from the microplan:
1. Click **Unassign** next to the assigned user.
2. Confirm the action.
#### What Happens in the Background
Clicking the unassign button sets the `active` attribute of `PlanEmployeeAssignment` to `false` via `/plan-service/employee/_create`, updating the microplan accordingly.
### Step 6: Repeat for Other Roles
The process is identical for all roles:
1. Open the role screen.
2. Search available users.
3. Assign or unassign as required.
4. Ensure jurisdiction alignment.
5. Save changes.
## API Details
URL
Role
/plan-service/employee/_search
MICROPLAN_ADMIN
/health-hrms/employees/_search
MICROPLAN_ADMIN
/plan-service/employee/_create
MICROPLAN_ADMIN
---
# Agent Instructions
This documentation is published with GitBook. GitBook is the documentation platform designed so that both humans and AI agents can read, navigate, and reason over technical content effectively. Learn more at gitbook.com.
## Querying This Documentation
If you need additional information that is not directly available in this page, you can query the documentation dynamically by asking a question.
Perform an HTTP GET request on the current page URL with the `ask` query parameter, and the optional `goal` query parameter:
```
GET https://docs.digit.org/health/v2.0/deploy/configuration/microplan-service-configuration/microplan-web-service-configuration/setup-microplan/user-tagging.md?ask=&goal=
```
`ask` is the immediate question: it should be specific, self-contained, and written in natural language.
`goal` is optional and describes the broader end goal you are ultimately trying to accomplish on behalf of the user. GitBook uses it to tailor the answer towards what is most useful for that goal.
The response will contain a direct answer to the question and relevant excerpts and sources from the documentation.
Use this mechanism when the answer is not explicitly present in the current page, you need clarification or additional context, or you want to retrieve related documentation sections.