> For the complete documentation index, see [llms.txt](https://docs.digit.org/llms.txt). Markdown versions of documentation pages are available by appending `.md` to page URLs; this page is available as [Markdown](https://docs.digit.org/health/v2.0/deploy/installation/production-setup/setup-infrastructure/azure/2.-infra-as-code-terraform.md).
# 2. Infra-as-code (Terraform)
To deploy the solution to the cloud there are several ways that we can choose. In this case, we will use terraform Infra-as-code.
## Overview
Terraform is an open-source infrastructure as code ([IaC](https://www.techtarget.com/searchitoperations/definition/Infrastructure-as-Code-IAC)) software tool that allows DevOps engineers to programmatically provision the physical resources an application requires to run.
Infrastructure as code is an IT practice that manages an application's underlying IT infrastructure through programming. This approach to resource allocation allows developers to logically manage, monitor and provision resources -- as opposed to requiring that an operations team manually configure each required resource.
Terraform users define and [enforce infrastructure configurations](https://www.techtarget.com/searchcloudcomputing/tip/How-to-deploy-Terraform-code-in-an-Azure-DevOps-pipeline) by using a JSON-like configuration language called HCL (HashiCorp Configuration Language). HCL's simple syntax makes it easy for DevOps teams to provision and re-provision infrastructure across multiple clouds and on-premises data centres.
## Cloud Resources Required
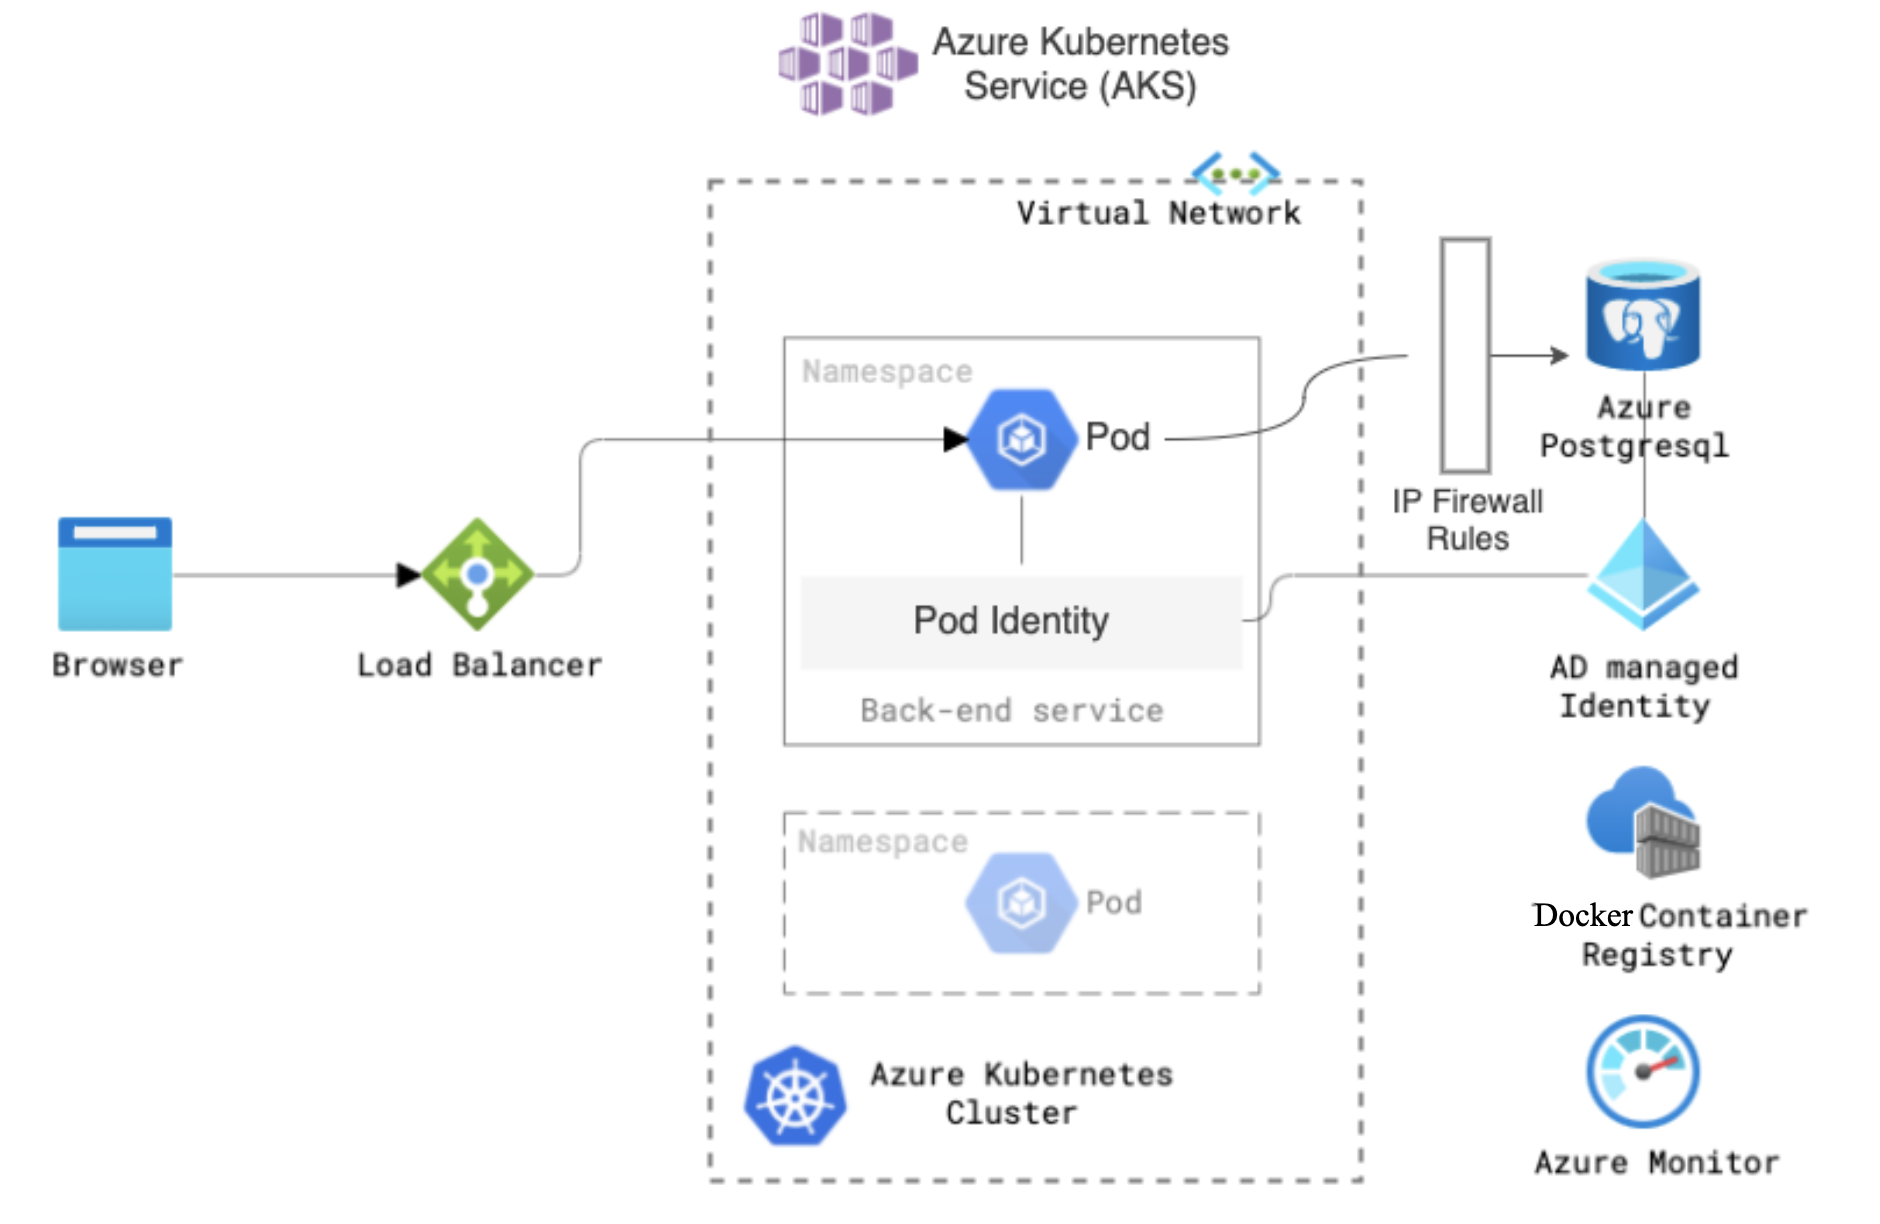
Before we provision the cloud resources, we need to understand and be sure about what resources need to be provisioned by Terraform to deploy DIGIT. The following picture shows the various key components. (AKS, Node Pools, Postgres DB, Volumes, Load Balancer)
## Understand Terraform Script
* Ideally, one would write the terraform script from scratch using this [doc](https://learn.hashicorp.com/collections/terraform/modules).
* Here we have already written the terraform script that one can reuse/leverage that provisions the production-grade DIGIT Infra and can be customized with the user-specific configuration.
## Deployment Steps
1. Clone the following [health-campaign-devops](https://github.com/egovernments/health-campaign-devops) where we have all the sample terraform scripts available for you to leverage.
{% code lineNumbers="true" %}
```
git clone https://github.com/egovernments/health-campaign-devops.git
cd health-campaign-devops
git checkout azure-install
code .
cd infra-as-code/terraform/sample-azure
### You'll see the following file structure
├── sample-azure
│ ├── main.tf
│ ├── outputs.tf
│ ├── providers.tf
│ ├── remote-state
│ │ └── main.tf
│ └── variables.tf
└── modules
├── db
│ ├── aws
│ | ├── main.tf
│ │ ├── outputs.tf
│ | └── variables.tf
│ └── azure
│ ├── main.tf
│ └── variables.tf
└──kubernetes
└── azure
│
├── main.tf
├── outputs.tf
└── variables.tf
```
{% endcode %}
2\. Change the [remote-state/terraform.tfvars](https://github.com/egovernments/health-campaign-devops/blob/azure-install/infra-as-code/terraform/sample-azure/remote-state/terraform.tfvars) according to your requirements.
sample-azure/remote-state/terraform.tfvars
```
environment = ""
resource_group = "-rg"
location = ""
```
3\. Change the [main.tf](https://github.com/egovernments/health-campaign-devops/blob/azure-install/infra-as-code/terraform/sample-azure/main.tf) according to your requirements.\
Update terraform.backend config to match with remote-state once created.
sample-azure/main.tf
```
provider "azurerm" {
features {}
}
terraform {
backend "azurerm" {
resource_group_name = "-rg"
storage_account_name = ""
container_name = "-container"
key = "terraform.tfstate"
}
}
resource "azurerm_virtual_network" "vnet" {
name = "${var.resource_group}-virtual-network"
address_space = ["10.0.0.0/16"]
location = var.location
resource_group_name = var.resource_group
}
resource "azurerm_subnet" "aks" {
name = "${var.resource_group}-aks-subnet"
resource_group_name = var.resource_group
virtual_network_name = azurerm_virtual_network.vnet.name
address_prefixes = ["10.0.0.0/21"]
}
# Give AKS system-assigned identity permission to join the subnet
resource "azurerm_role_assignment" "aks_subnet_network_contributor" {
principal_id = module.kubernetes.aks_principal_id
role_definition_name = "Network Contributor"
scope = azurerm_subnet.aks.id
}
resource "azurerm_subnet" "postgres" {
name = "${var.resource_group}-postgres-subnet"
resource_group_name = var.resource_group
virtual_network_name = azurerm_virtual_network.vnet.name
address_prefixes = ["10.0.8.0/21"]
service_endpoints = ["Microsoft.Storage"]
delegation {
name = "fs"
service_delegation {
name = "Microsoft.DBforPostgreSQL/flexibleServers"
actions = ["Microsoft.Network/virtualNetworks/subnets/join/action"]
}
}
}
# Create Public IP for Internet Gateway
resource "azurerm_public_ip" "public_ip" {
name = "${var.environment}-public-ip"
resource_group_name = var.resource_group
location = var.location
allocation_method = "Static"
sku = "Standard"
}
# Create NAT Gateway (optional, for private subnet internet access)
resource "azurerm_nat_gateway" "nat" {
name = "${var.environment}-nat-gateway"
location = var.location
resource_group_name = var.resource_group
sku_name = "Standard"
}
resource "azurerm_nat_gateway_public_ip_association" "nat_assoc" {
nat_gateway_id = azurerm_nat_gateway.nat.id
public_ip_address_id = azurerm_public_ip.public_ip.id
}
# Associate NAT with private subnet (to give it outbound access)
resource "azurerm_subnet_nat_gateway_association" "nat_private" {
subnet_id = azurerm_subnet.aks.id
nat_gateway_id = azurerm_nat_gateway.nat.id
}
resource "azurerm_private_dns_zone_virtual_network_link" "db_net_link" {
name = "${var.environment}VnetZone.com"
private_dns_zone_name = azurerm_private_dns_zone.db.name
virtual_network_id = azurerm_virtual_network.vnet.id
resource_group_name = var.resource_group
}
resource "azurerm_private_dns_zone" "db" {
name = "${var.environment}.postgres.database.azure.com"
resource_group_name = var.resource_group
}
module "kubernetes" {
depends_on = [azurerm_nat_gateway_public_ip_association.nat_assoc]
source = "../modules/kubernetes/azure"
environment = var.environment
name = var.environment
location = var.location
resource_group = var.resource_group
vm_size = "Standard_E2as_v5"
node_count = 4
vnet_subnet_id = azurerm_subnet.aks.id
}
module "postgres-db" {
source = "../modules/db/azure"
environment = var.environment
resource_group = var.resource_group
location = var.location
sku_name = "B_Standard_B2ms"
storage_mb = "65536"
backup_retention_days = "7"
administrator_login = var.db_user
administrator_password = var.db_password
db_version = var.db_version
delegated_subnet_id = azurerm_subnet.postgres.id
private_dns_zone_id = azurerm_private_dns_zone.db.id
}
```
3\. Declare the variables in [terraform.tfvars](https://github.com/egovernments/health-campaign-devops/blob/azure-install/infra-as-code/terraform/sample-azure/terraform.tfvars)
sample-azure/terraform.tfvars
```
environment = ""
resource_group = "-rg"
location = ""
db_user = ""
```
Save the file and exit the editor.
## Terraform Execution: Infrastructure Resources Provisioning
Once you have finished declaring the resources, you can deploy all resources.
1. `terraform init`: command is used to initialize a working directory containing Terraform configuration files.
2. `terraform plan`: command creates an execution plan, which lets you preview the changes that Terraform plans to make to your infrastructure.
3. `terraform apply`: command executes the actions proposed in a Terraform plan to create or update infrastructure.
After the complete creation, you can see resources in your Azure account.
Now we know what the Terraform script does, the resources graph that it provisions and what custom values should be given with respect to your environment.\
\
The next step is to begin to run the Terraform scripts to provision the infrastructure required to deploy DIGIT on Azure.
1. Use the CD command to move into the following directory, run the following commands 1-by-1 and watch the output closely.
{% code lineNumbers="true" %}
```
##### Create the DIGIT Infra #####
az login
#### using above command you can get subscription id and tenant id
az ad sp create-for-rbac --name \
--role owner \
--scopes /subscriptions/
#### Using above command you are creating client-id and client-secret
export ARM_SUBSCRIPTION_ID= ## update azure account subscription ID
#### health-campaign-devops/infra-as-code/terraform/sample-azure (working directory)
cd remote-state/
terraform init
terraform plan
terraform apply (note storage_account_name from output)
cd ..
terraform init (update storage_account_name from remote-state output)
terraform plan (provide DB password when prompted)
terraform apply (provide DB password when prompted)
```
{% endcode %}
## **Test Kubernetes Cluster**
The Kubernetes tools can be used to verify the newly created cluster.
1. Once the **Terraform Apply** execution is complete, it generates the Kubernetes configuration file, or you can get it from the Terraform state.
2. Use the command below to get the kubeconfig. It will automatically store your kubeconfig in the \~/.kube folder.
```
az aks get-credentials --resource-group --name
```
3. Verify the health of the cluster.
```
kubectl get nodes
```
The details of the worker nodes should reflect the status as Ready for All.
{% hint style="info" %}
***Note:*** Refer to the [HCM deployment](/health/v2.0/deploy/installation/production-setup/deploy-hcm.md) documentation to deploy HCM services.
{% endhint %}
---
# Agent Instructions
This documentation is published with GitBook. GitBook is the documentation platform designed so that both humans and AI agents can read, navigate, and reason over technical content effectively. Learn more at gitbook.com.
## Querying This Documentation
If you need additional information that is not directly available in this page, you can query the documentation dynamically by asking a question.
Perform an HTTP GET request on the current page URL with the `ask` query parameter, and the optional `goal` query parameter:
```
GET https://docs.digit.org/health/v2.0/deploy/installation/production-setup/setup-infrastructure/azure/2.-infra-as-code-terraform.md?ask=&goal=
```
`ask` is the immediate question: it should be specific, self-contained, and written in natural language.
`goal` is optional and describes the broader end goal you are ultimately trying to accomplish on behalf of the user. GitBook uses it to tailor the answer towards what is most useful for that goal.
The response will contain a direct answer to the question and relevant excerpts and sources from the documentation.
Use this mechanism when the answer is not explicitly present in the current page, you need clarification or additional context, or you want to retrieve related documentation sections.