
Loading...
Loading...
Loading...
Loading...
Loading...
Loading...
Loading...
Loading...
Loading...
Loading...
Loading...
Loading...
Loading...
Loading...
Loading...
Loading...
Loading...
Loading...
Loading...
Loading...
Loading...
Loading...
Loading...
Loading...
Loading...
Loading...
Loading...
Loading...
Loading...
Loading...
Loading...
Loading...
Loading...
Loading...
Loading...
Loading...
Loading...
Loading...
Loading...
Loading...
Loading...
Loading...
Loading...
Loading...
Loading...
Loading...
Loading...
Loading...
Loading...
Loading...
Loading...
Loading...
Loading...
Loading...
Loading...
Loading...
Loading...
Registries in DIGIT are trusted data stores that manage core entities like individuals, households, facilities, and products. They provide APIs to create, update, and search these records, ensuring consistent and reusable data across all services.
Services are the functional building blocks of DIGIT, each designed as a microservice to handle a specific piece of business logic. They sit on top of registries, integrate via APIs and events, and together enable scalable, modular health campaign systems.
The section of the documentation details the API endpoints for creating, updating, and searching project type campaigns. It includes request and response structures, validation steps, and flow diagrams.
Filters
Boundary selection dropdown (e.g., district) and "Apply" button to filter results.
Results Display
Shows registers with details such as Project Name, Status, Supervisor Name, and Entries.
Status Filters
Groups results by register status (e.g., Pending for Approval, Approved).
Select Boundary: Choose a district from the dropdown.
Apply Filter: Click "Apply" to filter results.
View Results: Access filtered attendance registers for the selected district.
/registers-inbox/v2/filters/_search
Search registers by filter (district)
PROXIMITY_SUPERVISOR
/registers-inbox/v2/registers/{boundary}/_search
Retrieve registers for a selected boundary
PROXIMITY_SUPERVISOR
New checklist type rendering HCM.CHECKLIST_TYPES HOUSEHOLD, INDIVIDUAL to capture additional data
Option to add children to an individual's HOUSEHOLD_MEMBER_RELATIONSHIP_TYPES
Added parent overview page to render parent details and children under the individual
Added downsync of service to fetch submitted checklists of HOUSEHOLD and INDIVIDUAL checklists.
DISTRIBUTOR


The expense calculator is an implementation-specific service that works in tandem with the expense service. This service holds all the specific business logic for computing expenses and calls the billing service with the correct payload to create a bill. Once the bill is generated, Excel and PDF are generated by the calculator service.
There are three types of bills in HCM:
Wage bill - generated from an approved muster roll and to be paid to wage seekers on completion of work
Base path: /health-expense-calculator/v1/
The API specification is available . To view it in the Swagger editor, click below.
DIGIT backbone services
Persister
MDMS
Attendance
Worker rates
The Expense service allows users to capture the details for expense bills and payments.
Base path: /health-expense/bill/
The API specification is available . To view it in the Swagger editor, click below.
Persister configuration:
The Beneficiary IDGenId feature is to link a unique ID to an individual. UniqueId’s are fetched from the server with the unique DeviceId and user.
Fetching UniqueID’s from the server with device and user combination
Added new ID_TYPE - UNIQUE_BENEFICIARY_ID to link individuals
Added search with UNIQUE_BENEFICIARY_ID
Role: DISTRIBUTOR
Endpoint: /data/_search
Method: POST
RequestInfo: Object containing request information.
SearchCriteria: Object containing search criteria.
id: (Optional) ID of the resource.
tenantId: Tenant identifier.
ResponseInfo: Object containing response information.
ResourceDetails: Array containing the details object of the searched resource.
Client Request: The client sends a POST request to /data/_search.
Request Content: Includes RequestInfo and SearchCriteria.
Validation: The server validates request structure and content.
Response Creation: The server creates a response with info and resource details.
Update & approve attendance
The Proximity Supervisor Flow for managing attendance registers is designed to provide supervisors with a seamless experience for selecting projects, viewing associated attendance records, and managing the details effectively. The flow emphasises ease of navigation, quick access to project and register information, and actionable steps to edit or approve attendance records.
Project Selection: Enables supervisors to pick a specific project to manage.
Registers Inbox: Displays filtered attendance registers for selected boundaries.
View Attendance: Provides detailed attendance information for campaigns and projects.
Edit Attendance: Allows supervisors to update attendee records.
Each step in this flow ensures user-friendly interactions and adheres to the necessary validation rules and role-based permissions for supervisors and project managers.
The Campaign Supervisor Flow is designed to streamline the management of attendance registers and bill generation processes for supervisors overseeing specific projects and boundaries. This flow ensures efficient selection, filtering, and approval of registers and simplifies the generation and tracking of bills. It focuses on clear workflows, actionable feedback, and validation mechanisms to enhance usability and accuracy.
Project and Bill Aggregation Selection: Supervisors select a project and boundary aggregation level to narrow down the scope for attendance registers and billing.
Registers Filtering and Bill Generation: Enables supervisors to filter registers based on boundaries, view attendance data, and generate bills only when all registers are approved.
Bill Management (My Bills): Provides a centralised view of all generated bills, with tools for searching, filtering, and downloading them in preferred formats.
This structured approach empowers supervisors to manage attendance registers and related billing tasks with ease while adhering to necessary validations and role-based permissions.
Description of the attendance service
The Attendance Service is a comprehensive back-end solution designed to support health campaigns by providing efficient and transparent attendance management. It facilitates the streamlined tracking of health campaign workers, volunteers, and contractors, ensuring accurate participation records and enabling informed decision-making.
Note: Deletion of attendees from the system is not recommended, even in cases where participation in the campaign has ceased. Attendance records should instead reflect the status of absent for all days following the departure. This practice ensures the integrity of attendance data, preserves historical records, and supports accurate reporting and auditing processes.
Key functionalities include:
Project
Individual
Expense
Localization
PdfService
Filestore
type: (Optional) Type of the resource (boundary, facility, user, boundaryWithTarget).
status: (Optional) Status of the resource.
Response Dispatch: Sends response back to client.
Error Handling: If errors occur, generate an error response and send it.
Approve Attendance: Facilitates approval with clear validation and comment requirements.
PROXIMITY_SUPERVISOR
manage attendance registers, approving and editing the attendance data
Project Selection
Dropdown to select the project
Action Buttons
Back: Navigate to the previous page.
Next: Proceed to the attendance registers for the selected project.
Select a Project: Choose a project from the dropdown list.
Proceed to Next Screen: Click "Next" to access the registers associated with the project.
Maintaining attendance registers.
Enrolling and managing individuals.
Creating, updating, and searching attendance logs.
Managing staff permissions for attendance-related operations.
Base Path: /health-attendance/
Users cannot proceed without filling out these fields.
Project Selection
Dropdown menu to select the project.
Bill Aggregation Level
Dropdown menu to select the aggregation level (Country, Province, District).
Action Buttons
- Back: Navigate to the previous screen. - Next: Proceed to view registers mapped to the selected project.
Use the dropdown menu to select the project.
Select one of the available aggregation levels (Country, Province, or District) from the dropdown.
Click the "Next" button to navigate to the register filtering screen.
Both fields are mandatory:
If either the Project or Bill Aggregation Level is not selected, an error toast message is displayed if you try to proceed.
RequestInfo: Object containing request information.
Type: (Optional) Type of the resource being downloaded.
TenantId: Tenant identifier.
HierarchyType: Type of hierarchy.
Id: (Optional) ID of the resource being downloaded.
Filters: (Optional) Additional filters for the download request.
campaignId : campaignId
ResponseInfo: Object containing response information.
ResourceDetails: Array containing the details object of the downloaded resource.
Client Request: The client sends a POST request to download data.
Request Validation: Upon receiving the request, the server validates the request structure and parameters.
Data Download Process:
Validation: Validate the download request.
Fetch Data: Fetch existing data of the specified type from the data host service.
Processing: Process the retrieved data as necessary.
Response Creation: After processing the request, the server creates a response containing the details of the latest resource, ensuring that only one result is fetched.
Response Dispatch: The server sends the generated response back to the client.
Error Handling: If errors occur during the process, an error response is generated and sent.
Handling Empty or Missing Downloaded Responses
If the downloaded response is empty or not searched with the provided ID, the system automatically starts regenerating a template of the same type. The generation process is triggered by the backend, not through the UI.
CAMPAIGN_SUPERVISOR
aggregate the bill generation, based on district, province or country and download it for further processing


The Household Registry is a core microservice in DIGIT’s registry framework, enabling the management of households and their members within the Health Campaign Management (HCM) context. It provides structured APIs for CRUD operations and search capabilities, both at the household level and for individual household members.
POST /project-type/search
Body Parameters
RequestInfo: Object containing RequestInfo.
CampaignDetails: Object containing the search criteria for campaigns.
tenantId: Tenant identifier.
ids: Array of campaign IDs to search for.
Success Response
ResponseInfo: Object containing ResponseInfo details.
CampaignDetails: Array containing details of matching campaigns.
totalCount: Total number of matching campaigns.
The client sends a searchCampaign request to the Project Factory Service.
The Project Factory Service validates the request schema and search criteria.
The Project Factory Service constructs a search query based on the provided criteria.
It checks if there are specific search fields like start date, end date, campaign name, etc.
Depending on the campaignsIncludeDates flag, the service adjusts the search conditions accordingly.
The Project Factory Service sends the response back to the client.
The response contains the matching campaign details along with the total count, if applicable.
The Muster Roll service aggregates attendance logs from the attendance service based on some rules and presents an attendance aggregate for a time period (week or month) per individual. This can then be used to compute payments or other semantics.
Base Path: /health-muster-roll
Web Sequence Diagrams
The Transit Post Package is a Flutter module designed to streamline transit post operations, such as selecting posts, scanning resources, and tracking deliveries. Built for seamless integration in larger logistics and delivery systems, it leverages Bloc for robust state management and uses reactive forms for capturing user input efficiently. The module is structured for reusability, testability, and separation of concerns via repository patterns.
The "My Bills" section serves as a centralised dashboard for campaign supervisors to view and manage all bills associated with their assigned projects. By default, the dashboard displays all bills related to the projects under their supervision. Supervisors can search for specific bills or filter them using date ranges or by bill ID.
Interface Elements
Search Filters
Bill ID: Enter a specific Bill ID.
Date Range: Select a start and end date to filter bills within a specific time frame.
This document outlines the flow for creating a campaign using various services in the system. The process involves interactions between multiple services, including the Project Factory, Project Service, Boundary Service, Facility Service, HRMS Service, MDMS Service, FileStore Service, and the database. This flow ensures that the required resources are validated and correctly set up before finalizing the campaign creation.


startDate: The start date for the search.
endDate: End date for the search.
projectType: Type of the project.
campaignName: Name of the campaign.
status: Status of the campaign.
createdBy: Creator of the campaign.
campaignNumber: Number of the campaign.
campaignsIncludeDates: Flag to include campaigns based on dates.
pagination: Object containing pagination settings.
limit: Maximum number of results to return.
offset: Offset for paginated results.
sortOrder: Sort order for results (asc/desc).
sortBy: Field to sort results by.
campaignsIncludeDates is true:It shows only those campaigns whose start date is on or before the provided start date and whose end date is on or after the provided end date.
If campaignsIncludeDates is false:
It shows only those campaigns whose start date is on or after the provided start date and whose end date is on or before the provided end date.
The service executes the constructed query to retrieve matching campaign details from the database.
The user interface is organised into modular pages, each responsible for a distinct step in the transit post workflow. These pages are designed to be simple, responsive, and directly integrated with Bloc state management for dynamic updates.
transit_post_selection.dart UI for displaying and selecting available transit posts. Initiates the delivery process and triggers navigation to the recording step.
transit_post_record_vaccination.dart UI for resource scanning (QR/barcode) and entry of delivery details using reactive forms. Performs validation and provides real-time feedback.
transit_post_acknowledgment.dart Displays a summary and acknowledgement after a successful delivery submission.
transit_post_wrapper.dart Acts as the parent widget, managing navigation and Bloc provisioning for the entire flow.
The application uses the Bloc pattern to ensure predictable state management, clear separation of concerns, and a responsive user interface throughout the transit post workflow. Each Bloc handles a specific stage of the process:
TransitPostSelectionBloc
Manages loading and selection of transit posts.
Events: LoadPosts, SelectPost
States: Loading, Loaded, Selected, Error
TransitPostRecordVaccinationBloc
Handles scanning, form input, and delivery validation.
Events: StartScan, SubmitDelivery, ValidateInput
States: Initial, Scanning, Validated, Delivered, Error
TransitPostAcknowledgmentBloc
Controls the acknowledgement and confirmation stage.
Events: Acknowledge, Reset
States: Pending, Acknowledged
Bloc Integration
Each page provides or consumes its relevant Bloc using BlocProvider or BlocConsumer.
UI reacts to state changes for navigation and updates.
The application follows the Repository pattern to keep business logic independent from data storage and networking, making the system modular, testable, and easy to extend. Two key repository abstractions are defined:
UserActionLocalRepository (abstract)
Handles local persistence (e.g., SQLite, Hive)
Methods: saveDelivery, getPendingDeliveries, markAsAcknowledged
UserActionRemoteRepository (abstract)
Handles remote persistence (API integration)
Methods: submitDelivery, fetchTransitPosts, fetchDeliveryHistory
The application uses the reactive_forms package to manage dynamic and validated data entry during the transit post flow. This approach ensures a structured way to capture delivery details while providing immediate feedback to users.
Dynamic Form Handling – Forms can adapt to different input types such as resource details, quantities, or delivery metadata, enabling flexible data capture for various scenarios.
Built-in Validation – Validation rules are applied directly within the form controls, ensuring data accuracy. Errors and invalid inputs are highlighted in real time, guiding the user to correct issues before submission.
Seamless UI Feedback – The form state is reactive, meaning any change in input instantly reflects in the UI. This creates a smooth user experience with live validation messages and input tracking.
By combining dynamic fields, validation, and real-time feedback, Reactive Forms make the delivery recording process reliable, user-friendly, and less prone to data entry errors.
UI Widgets:
TransitPostSelectionPage
TransitPostRecordVaccinationPage
TransitPostAcknowledgmentPage
TransitPostWrapper
Bloc Classes:
TransitPostSelectionBloc, TransitPostSelectionEvent, TransitPostSelectionState
TransitPostRecordVaccinationBloc, TransitPostRecordVaccinationEvent
Repositories (Abstract):
UserActionLocalRepository
UserActionRemoteRepository
RequestInfo: Object containing RequestInfo.
CampaignDetails: Object containing the details of the campaign to be updated.
id: Unique identifier of the campaign.
tenantId: Tenant identifier.
hierarchyType: Type of hierarchy.
action: Action type (create or draft).
boundaries: Array of boundaries.
resources: Array of resources.
projectType: Type of the project.
deliveryRules: Array of delivery rules.
Success Response
ResponseInfo: Object containing ResponseInfo.
CampaignDetails: The updated campaign details.
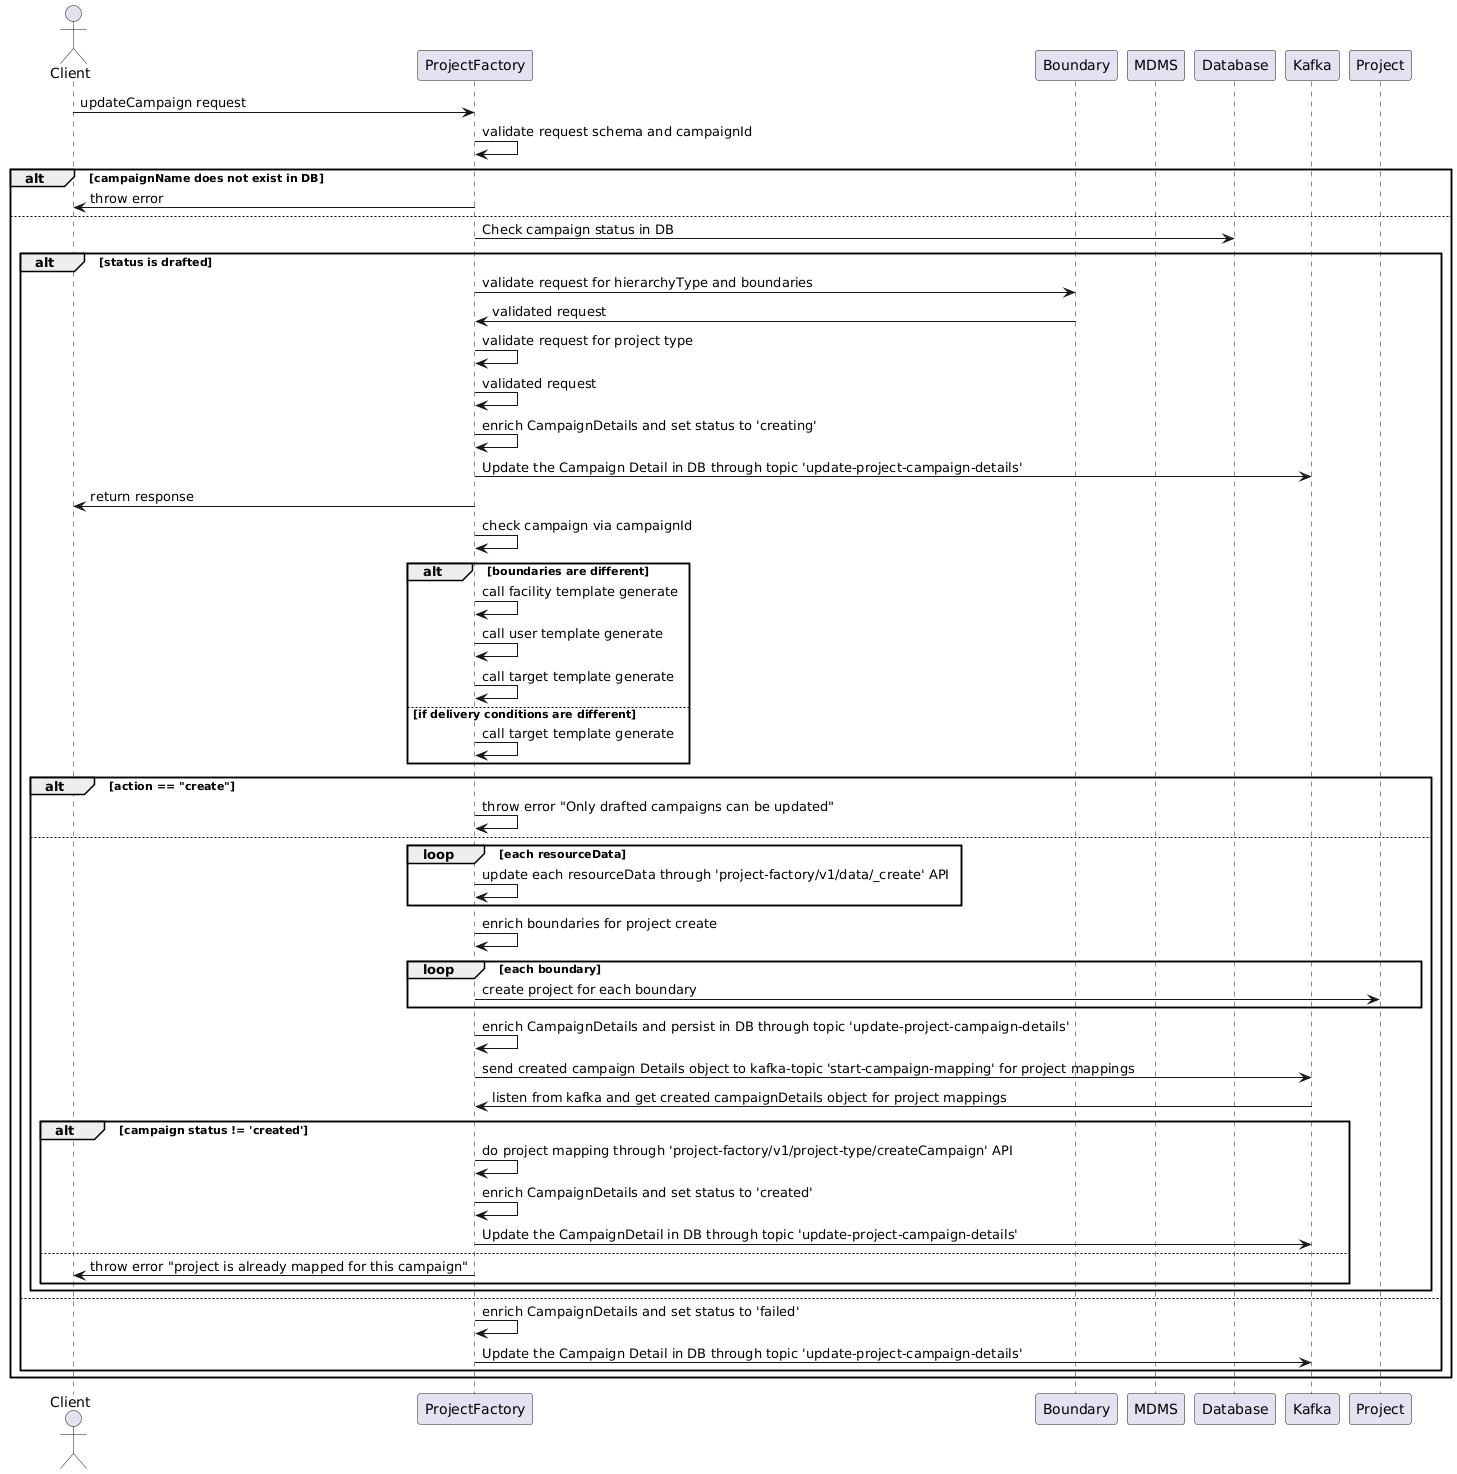
The ProjectFactoryService receives an updateCampaign request from the Client.
The received request schema is validated to ensure it matches the expected format.
Check Campaign Existence
The system checks if the campaign specified in the request exists in the database.
Conditional template generation call
If boundaries are different from the campaign in the database, call:
Facility template generate
User template generate
Target template generate
If delivery conditions are different, call:
Target template generate
Check Campaign Status
If the campaign exists, the system checks its status in the database.
If the campaign status is 'drafted':
Validate Boundaries: Validate the request for hierarchyType and boundaries.
Validate Project Type: It validates the request for the project type code from MDMS.
Enrich Campaign Details: Enrich the campaign details and set the status to 'updating'.
Update Campaign Details: Update the campaign details in the database.
Update Resource Data: Update each resource data associated with the campaign through the /project-factory/v1/data/_update API.
Enrich Boundaries: Enrich the boundaries for the project update.
Update Projects: Update projects associated with each boundary.
Persist Changes: Persist the updated campaign details in the database.
Send to Kafka Topic: Send the updated CampaignDetails object to the Kafka topic for project mappings.
Listen to Kafka: Listen for updates from the Kafka topic to get the updated CampaignDetails object for project mappings.
If the campaign status is not 'created':
Do project mapping through /project-factory/v1/project-type/createCampaign API.
Enrich the CampaignDetails and set the status to 'created'.
Update the CampaignDetail in the database.
If the campaign status is 'created':
Throw an error indicating that the project is already mapped for this campaign.
Enrich the CampaignDetails and set the status to 'failed'.
Update the CampaignDetail in the database.
Handle Non-Drafted Status
If the campaign status is not 'drafted', the system throws an error indicating that only drafted campaigns can be updated.
Send Response
The ProjectFactoryService sends a response to the Client based on the outcome of the update operation.
Action Buttons:
Search: Filters the results based on the provided criteria.
Clear Search: Resets the filters and shows all assigned bills.
Bill List
A table format displays the bills with the following columns:
Bill ID
A unique identifier assigned to each bill (e.g., WB-YYYY-MM-DD-XXXXX).
Date
The creation date of the bill.
Boundary
The geographic boundary associated with the bill (e.g., District, Province).
Project Name
The name of the project for which the bill was generated.
Workers
The total number of workers covered under the bill.
No of Registers
The total number of registers associated with the bill
Status Descriptions
Generated: The bill has been successfully generated. The user can download it in PDF or Excel format.
In Progress: The report is still being generated. The user should wait for completion.
Failed: The report generation failed. The user can:
Retry the process.
Contact support if the issue persists.
API Endpoints
/health-expense/bills/v1/_search
Search bills by project id
/filestore/v1/files/{id}
Download details of a specific bill
Body Parameters:
RequestInfo: Object Containing RequestInfo
ResourceDetails: Details of a given Resource
type: Type of resource to create (e.g., boundarywithTarget)
tenantId: Tenant
fileStoreId: FileStoreId of Target Upload Sheet
action: Action to perform (e.g., validate for target upload)
hierarchyType: Name of Boundary Hierarchy
campaignId: CampaignId
additionalDetails: Additional details (optional)
Success Response:
ResponseInfo: Object Containing ResponseInfo
ResourceDetails: Details of the created resource
Client Initiates Request:
The client sends a POST request to /data/_create endpoint with action: validate.
Validation of Request:
Resource Details Validation:
Check if request.body.ResourceDetails exists and is not empty.
Throw a validation error if missing or empty with the message "ResourceDetails is missing or empty or null".
Schema Validation:
Validate request.body.ResourceDetails against createRequestSchema.
Hierarchy Type Validation:
Validate hierarchyType in request.body.ResourceDetails using validateHierarchyType function.
Tenant ID Validation:
Ensure that request.body.ResourceDetails.tenantId matches request.body.RequestInfo.userInfo.tenantId.
Throw a validation error if they do not match with the message "tenantId is not matching with userInfo".
Different Tab Headers Validation:
Validate whether headers are according to the template across all tabs of different districts.
Target Sheet Validation:
All validations will be on Sheets other than the ReadMe Sheet and Boundary Data Sheet.
Immediate validations:
District Tabs Validation:
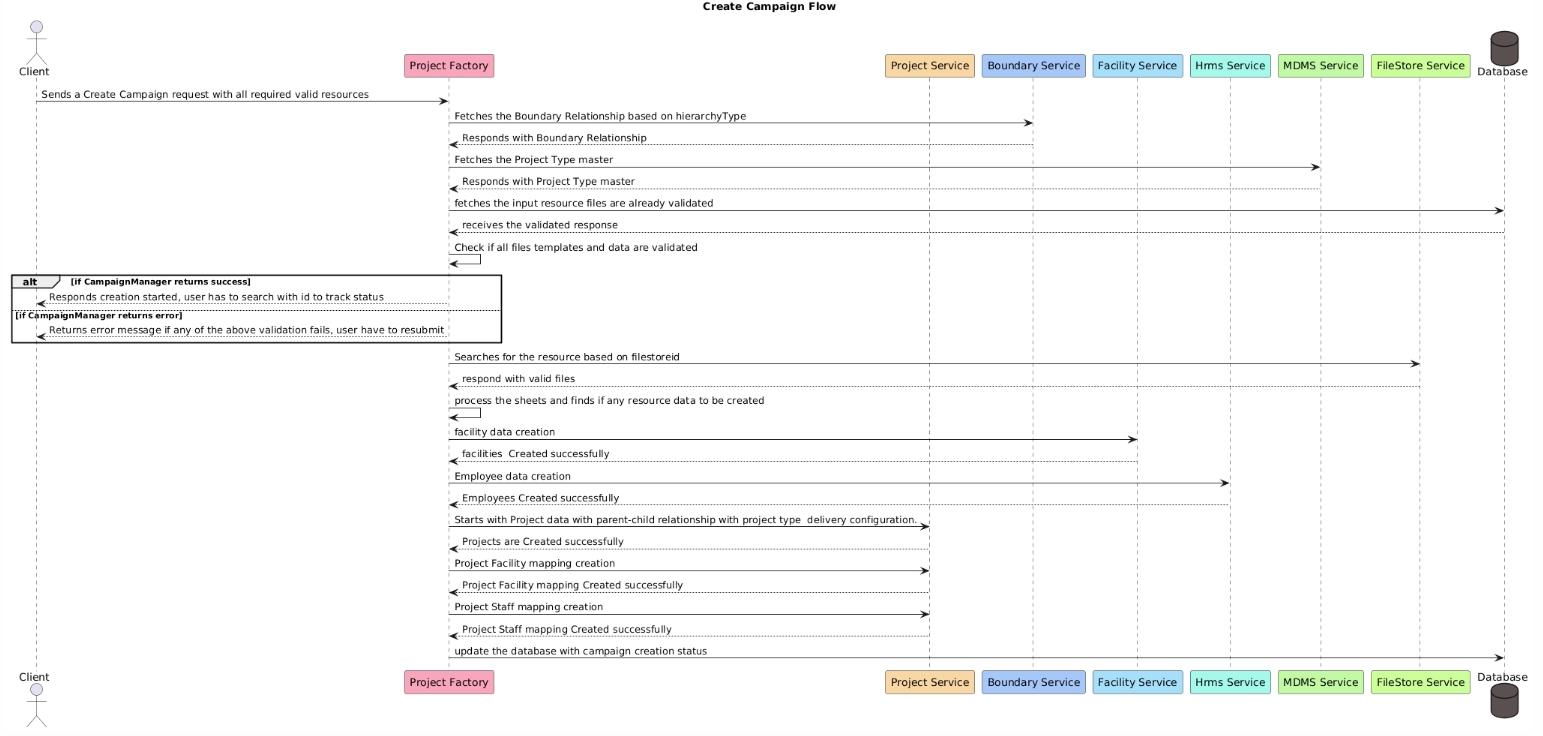
Client: The entity (user or system) initiating the campaign creation request.
CampaignManager (Project Factory): The main controller managing the campaign creation process.
ProjectService: Manages project-related operations, including data creation and mapping.
BoundaryService: Handles fetching of boundary relationships based on hierarchy types.
FacilityService: Responsible for creating facility-related data.
HRMSService: Manages the creation of employee data.
MDMSService: Provides master data such as project types.
FileStoreService: Manages the storage and retrieval of resource files.
Database: Stores campaign-related data and status updates.
Initiate Campaign Creation
The Client sends a request to the CampaignManager to create a campaign with all required and valid resources.
Fetch Boundary Relationship
The CampaignManager requests the BoundaryService to fetch the boundary relationship based on the hierarchy type.
The BoundaryService responds with the relevant boundary relationship data.
Fetch Project Type Master
The CampaignManager requests the MDMSService to fetch the project type master data.
The MDMSService responds with the project type master.
Validate Resource Files
The CampaignManager checks the Database to see if the input resource files have already been validated.
The Database responds with the validation status of the files.
Validation Check
The CampaignManager checks if all file templates and data are validated:
If validation is successful, the CampaignManager informs the Client that the campaign creation process has started, and the user needs to track the status using an ID.
Resource File Retrieval
The CampaignManager interacts with the FileStoreService to search for the resource based on the filestoreid.
The FileStoreService responds with the valid resource files.
Process Resource Data
The CampaignManager processes the retrieved sheets and identifies any resource data that needs to be created.
Facility Data Creation
The CampaignManager sends a request to the FacilityService to create facility data.
The FacilityService responds that the facilities have been created successfully.
Employee Data Creation
The CampaignManager sends a request to the HRMSService to create employee data.
The HRMSService responds that the employees have been created successfully.
Project Data Creation
The CampaignManager sends a request to the ProjectService to create project data with a parent-child relationship based on the project type and delivery configuration.
The ProjectService responds that the projects have been created successfully.
Project-Facility Mapping Creation
The CampaignManager sends a request to the ProjectService to create mappings between projects and facilities.
The ProjectService responds that the project-facility mappings have been created successfully.
Project-Staff Mapping Creation
The CampaignManager sends a request to the ProjectService to create mappings between projects and staff.
The ProjectService responds that the project-staff mappings have been created successfully.
Update Campaign Creation Status
The CampaignManager updates the Database with the status of the campaign creation process.
Validation Failure: If any validation step fails (e.g., invalid data in resource files), the CampaignManager sends an error message to the Client, indicating the failure. The user is required to fix the issues and resubmit the request.
Service Errors: If any of the service interactions (e.g., BoundaryService, MDMSService) return an error, the CampaignManager stops the process and informs the Client of the failure, specifying the nature of the error.
Database Errors: If the Database fails to update the campaign creation status, appropriate error handling and logging mechanisms should be triggered to handle the failure.
Create Campaign API Flow
This document provides an overview of the campaign creation flow, detailing each step and interaction between different services and the database. The flow ensures proper validation and creation of necessary resources, while error handling mechanisms provide robustness to the process.
RequestInfo: Object containing RequestInfo.
CampaignDetails: Object containing the details of the campaign to be created.
tenantId: Tenant identifier.
hierarchyType: Type of hierarchy.
action: Action type (create or draft).
boundaries: Array of boundaries.
resources: Array of resources.
projectType: Type of the project.
deliveryRules: Array of delivery rules.
Additional request info
Success Response
ResponseInfo: Object containing ResponseInfo.
CampaignDetails: The created campaign details.
The client initiates a createCampaign request to the Project Factory Service.
If the action is 'create':
The Project Factory Service validates the request schema.
It also validates the uniqueness of the campaign name in the database.
If the campaign name exists, an error is thrown.
If the action is 'draft':
The Project Factory Service validates the request schema.
It also validates the uniqueness of the campaign name in the database.
If the campaign name exists, an error is thrown.
Boundary and MDMS Validation
For both 'create' and 'draft' actions:
The Project Factory Service validates the request for hierarchy type and boundaries with the Boundary Service.
It validates the request for the project type code from MDMS.
If the action is 'create':
The Project Factory Service validates the request for data resources.
It enriches the CampaignDetails and sets the status to 'creating'.
The CampaignDetails are persisted in the database.
For each resource data, the Project Factory Service creates resources through the /project-factory/v1/data/_create API.
It enriches boundaries for project creation and creates projects for each boundary with the Health Project Service.
The enriched CampaignDetails are persisted in the database.
The CampaignDetails object is sent to a Kafka topic for project mappings.
If the campaign status is not "created", project mappings are performed through the /project-factory/v1/project-type/createCampaign API and the status is updated to 'created'.
If the campaign status is already 'created', an error is thrown, and the status is updated to 'failed'.
If the action is 'draft':
The CampaignDetails are enriched, and the status is set to 'drafted'.
The enriched CampaignDetails are persisted in the database.
Response
The Project Factory Service sends the response back to the client.
The attendance revamp feature adds a tagging system to the attendance module. Tags help categorise and group attendees (e.g., by Skill, Project, Shift) and make it easier to search or filter attendance records. To support this, new APIs, search options, validation rules, and database changes have been introduced.
Tag Field: A new tag field is added to attendees, allowing teams to organise and filter data.
Bulk Tag Update API (POST /attendee/v1/_updateTag):
Allows you to update tags for multiple attendees at once.
Search with Tags:
Tags can be used as an optional filter in /attendee/v1/_search.
Multiple tags supported, with AND/OR filtering.
Schema:
Added a tag column to eg_wms_attendance_attendee.
Indexed for faster searches.
Service Layer:
New method updateAttendeeTag() in AttendeeService for bulk updates.
Repository:
Added new error messages for invalid tags, tenant mismatches, and missing attendees.
Removed unused constants/imports.
Updated version to 1.3.0 in pom.xml to reflect the new feature.
This screen allows Campaign Supervisors to:
Filter attendance registers based on boundaries (Country, Province, and District) tied to the selected project and aggregation level.
View the list of registers within the selected boundary.
Generate bills for the selected boundary if all registers are approved.
Filters Section
no of levels will vary based on the aggregation level selection:
Country: Dropdown menu to select the country (e.g., Mbazi Highlands).
Mandatory Field: Must be selected before applying filters.
Province: Dropdown menu to select the province (e.g., Nampula).
Register Inbox
Project Name: Displays the selected project name.
Aggregation Level: Displays the selected aggregation level (e.g., District level).
Register Status Summary:
Approved Registers
Registers Table
Displays a tabular list of attendance registers for the filtered boundary, with the following columns:
Action Section
Generate Bill Button:
Enabled State: If all registers are approved, this button becomes active, allowing users to trigger the bill generation process and the bill is not already generated.
Disabled State: If any registers are pending approval, the button remains inactive.
User Actions Flow:
Filter Attendance Registers:
Mandatory Filters: The user must select a Country, Province, and District before clicking "Apply".
After clicking Apply, the attendance registers for the selected boundary are displayed.
View Attendance Registers:
If all registers within the selected boundary are approved:
The Generate Bill button is enabled.
Upon clicking Generate Bill, an info message is displayed: "Bill generation in progress. Please wait."
Bill Already Generated:
Boundary Selection:
All three boundary levels (Country, Province, and District) are mandatory for filtering attendance registers.
Error toast message if you click on apply without selecting all mandatory boundaries.
The system verifies the approval status of all registers in the selected boundary before enabling the Generate Bill button.
This document details the web flow for creating a new campaign using the Admin Console. The process involves interactions between various services, including the Project Factory, Boundary Service, MDMS Service, FileStore Service, and the Admin Console. This flow ensures that all necessary data is collected, validated, and processed to create a successful campaign.
This release introduces the Central Instance Deployment Model for the Health Campaign Management (HCM) consolidating multi-tenant operations (can be multiple countries in one server or multiple states in one country) into a single Kubernetes cluster with namespace-level and database schema-level isolation.
The goal is to reduce operational overhead, standardize configurations, and avoid service duplication while still supporting tenant-specific variations where necessary.
Key areas of change include multi-schema database support, standardized Kafka topic conventions, updated Flyway migration scripts, and Helm/environment configuration adjustments to enable smooth centralized deployments across tenants.
Main updates:
When dealing with large-scale data creation on a server based on Excel input, the choice between Python and Node.js depends on factors like performance, ecosystem support, scalability, and ease of development.
Here’s a breakdown of both languages for this use case:
1.Java
Strengths:
Performance: Java delivers high performance for CPU-bound tasks due to its compiled nature and efficient memory management (JVM).
Validate whether all district tabs are present in the Target Sheet uploaded.
Empty Sheet Validation:
Throw a validation error if any Target Sheet is empty.
Root (District) level boundary validation:
Throw a validation error if the root column (District) is empty in any row.
Validations for each row:
Boundary Codes Validation:
Check for missing or empty boundary codes in any row of any sheet.
Check for boundary code columns to be of type string.
Check for the presence of more than one boundary code in a given row of a given Target Sheet.
Check for duplicacy of the boundary code within the given Target Sheet.
Boundary Targets Validation:
Ensure that Target values are not missing and are positive numbers less than 1 Million.
Multi-schema database support
Standardised Kafka topic naming
Updated Flyway migration scripts
Helm and environment configuration improvements for smooth multi-tenant deployments
The new HCM server can now run campaigns for multiple countries in a single Kubernetes cluster, instead of spinning up a new server for every country or disease.
Introduced a common namespace hosting all shared and core services:
These are the services that are tenant agnostic in execution when and can be used by all different tenants configured in the server
Create dedicated tenant namespaces (e.g., tenantA, tenantB) for services requiring country-specific customizations
Encryption and id gen are currently tenant specific services
A single PostgreSQL instance now hosts separate schemas (e.g. public, country1, country2) to isolate tenant data.
Updated Flyway migration process:
The new migrate.sh script loops through all configured schemas automatically.
Ensures all migrations execute across tenants without manual intervention.
Database schema lists and enablement flags are now configurable per service via Helm and environment YAML files.
All Kafka topics now use tenant-prefixed names to avoid cross-tenant collisions.
Example:
country1: c1-save-household-topic
country2: c2-save-household-topic
country3: c3-save-household-topic
Common values.yml now provides baseline DB and service configurations.
App-specific values.yml files override:
Schema lists (db-schemas).
Multi-schema enablement flags.
Most default configurations remain untouched, ensuring backward compatibility for services not requiring multi-schema support.
Internal Gateway configurations are now maintained centrally in a shared Git repository for easier updates.
MDMS v2 configurations for each tenant are consolidated, ensuring consistent metadata management.
All topics now follow a tenant-prefixed convention when the central instance is enabled.
Example: save-household-topic is now c1-save-household-topic(country1) or c2-save-household-topic(country2) if the central instance is enabled.
Persister, Indexer config files must be updated to have the correct topic name and use schema name.
Services running in the common namespace must now define their target schemas explicitly using:
SCHEMA_NAME (comma-separated schema list).
DB_URL (database url without schema name)
IS_ENVIRONMENT_CENTRAL_INSTANCE (boolean flag).
Helm and environment YAMLs must be updated for all multi-schema services.
The new migrate.sh script replaces manual schema-specific migrations.
Existing CI/CD pipelines must be updated to use the new script for deployments.
values.yml for services must include overrides for:
Schema lists.
Enablement flags for multi-schema support.
Charts without overrides will default to single-schema mode (public schema).
Some services must be redeployed into tenant-specific namespaces.
Any scripts or automation referencing old namespaces must be adjusted(public schema reference in database migrations are not allowed).
Encryption Service is modified to not use default public schema for schema migration but use the db url defined in the environment properties.
Stability: Java is ideal for enterprise-grade applications requiring strict type safety and long-term stability.
Weaknesses:
Verbose Development: Java requires more boilerplate code and setup, slowing down initial development compared to Python or Node.js.
Complexity for I/O: Non-blocking I/O requires additional frameworks like Netty or reactive programming (WebFlux), adding complexity.
Startup Time: Java services have longer initialization times and higher memory usage compared to Node.js.
Excel Processing are often more complex and resource-intensive when processing large Excel datasets even with help of Libraries like Apache POI and JExcel .
2. Node.js
Advantages:
Event-Driven & Non-Blocking I/O: Node.js is excellent for I/O-heavy operations such as sending HTTP requests or interacting with APIs/servers concurrently.
Concurrency: With its single-threaded event loop and libraries like async/await, Node.js is efficient for tasks that involve network operations.
Excel Processing Libraries: Node.js has libraries like xlsx and exceljs for reading and writing Excel files. While they are performant, they are not as feature-rich as Python’s pandas.
Stream Support: Node.js natively supports streams, allowing large files to be processed in chunks without loading them fully into memory.
Scalability: Node.js performs well under high loads and can handle a massive number of concurrent connections due to its lightweight architecture.
Disadvantages:
Data Processing: Node.js lacks the robust and mature data manipulation libraries Python offers (e.g., pandas), making it less efficient for complex data transformations.
CPU-Bound Operations: Node.js struggles with CPU-intensive tasks like large-scale data processing since it is single-threaded by default. This can be mitigated using worker threads.
3. Python
Advantages:
Excel Handling Libraries: Python has excellent libraries like pandas, openpyxl, and xlrd for reading, manipulating, and writing Excel files efficiently.
Data Manipulation: Python excels at processing and analyzing large datasets due to its data science-oriented libraries like pandas, NumPy, and Dask (for parallel processing).
Built-in Support for Parallelism: Libraries like multiprocessing or concurrent.futures allow Python to distribute processing of huge datasets across CPU cores.
Ease of Development: Python’s simplicity and extensive ecosystem make it easier to implement and test scripts for such tasks.
Data Export: Python can easily integrate with databases, APIs, or servers for data creation through libraries like requests (HTTP requests) or sqlalchemy (database connections).
Disadvantages:
Slower Execution Speed: Python’s Global Interpreter Lock (GIL) can limit concurrency for I/O-heavy tasks, though libraries like asyncio and threading help mitigate this.
Memory Management: Python can use more memory for extremely large datasets compared to Node.js.
Scalability: If you need to process millions of concurrent requests, Python may require more effort to scale.
When to Choose Node.js:
The task is I/O-intensive (e.g., creating data on other servers via HTTP APIs).
You need high concurrency and scalability.
You are working with large Excel files and want to leverage streaming to avoid loading entire files into memory.
You are already using a Node.js-based ecosystem and prefer to keep it consistent.
When to Choose Python:
You need to process and transform huge datasets in Excel efficiently.
Your task involves heavy data manipulation or analytics.
You prefer working with established libraries like pandas and openpyxl.
Your use case is CPU-bound rather than I/O-bound (e.g., processing Excel locally before sending data to a server).
Hybrid Approach (Optional)
For complex use cases, you can use both:
Use Python for preprocessing and transforming large Excel files.
Use Node.js for efficient HTTP requests to create data on other servers.
Final Recommendation:
If your task involves heavy Excel processing and transformations: Use Python.
If your task focuses on sending data concurrently to other servers: Use Node.js.
If both Excel processing and data creation are important and you’re comfortable with Python, it’s often the better choice due to its ecosystem and ease of data manipulation
Conclusion
Considering the above points, we chose a Node.js implementation for the Project Factory Service. This service involves boundary creation based on the input Excel file, project creation for selected boundaries within a campaign, and the creation of entities such as facilities, users, and the necessary mappings between the created projects and these entities. We utilized the exceljs library to process the input Excel data for entity information, and we have observed that the total data creation like project, project mapping for 3000+ boundaries is completed within 15 minutes with high concurrency.


TransitPostRecordVaccinationStateTransitPostAcknowledgmentBloc, TransitPostAcknowledgmentEvent, TransitPostAcknowledgmentState
Validates attendees, tenant IDs, and tag values to ensure data integrity.
Tag Enrichment:
Only updates the tag field while keeping audit info (createdBy, createdTime) intact.
Supports idempotent and partial updates.
Validation Rules:
Requires tenantId in requests.
Attendees must exist in the system before updates.
Tags must be valid (non-empty).
Prevents cross-tenant updates or invalid inputs.
AttendeeSearchCriteria now includes a tags field (List<String>).
tenantId is mandatory when searching with tags.
Updated attendance-service-persister.yml to handle tags in insert, update, and mapping queries.
Extended to support tag-based search and updates.
Model / DTOs:
Added tag field to IndividualEntry, Attendee, AttendeeUpdateTagRequest, AttendeeUpdateTagResponse, and AttendeeSearchCriteria.
Ensures tags flow consistently from request → service → DB → response.
Mandatory Field: Must be selected before applying filters.
District: Dropdown menu to select the district (e.g., Murrupula).
Mandatory Field: Must be selected before applying filters.
Apply Button: Triggers the filter to display attendance registers for the selected boundary.
Pending Registers: Shows the count of pending registers (e.g., 0).
The filtered registers are shown in a tabular format.
Generate Bill:
The Generate Bill button is enabled only if all the registers within the selected boundary are approved and the bill has not been generated already.
Clicking Generate Bill triggers the bill generation process:
A confirmation pop-up appears with the warning.
Buttons:
Cancel: Returns to the register list.
Proceed: Starts the bill generation process.
A toast message will be shown whether the bill generation started or failed. And an info message will be displayed with the same.
If all registers within the selected boundary are approved, but a bill has already been generated:
An info message is displayed: "Bill has already been generated for this boundary."
Pending Registers:
If some registers within the selected boundary are still pending approval:
An info message is displayed: "Bill cannot be generated until all the registers are approved."
Register ID
Unique identifier for each attendance register
Boundary
Indicates the boundary associated with the register
Supervisor Name
Displays the name of the supervisor associated with the register
Number of Workers
Displays the total number of workers in the register
/health-attendance/v1/_search
Retrieve attendance registers by boundary
/health-expense/bill/v1/_search
Checks if bill is already generated or not
/health-expense-calculator/v1/_calculate
Trigger bill generation for selected boundary
Campaign Details: Displays the campaign name, ID, and dates.
Attendance Officer Details: Name, ID, and contact information.
Attendee Information: Includes register ID, attendee names, and attendance data.
Action Buttons:
Edit Attendance: Allows editing attendance details.
Approve Attendance: Approve the attendance register.
Register Details
Displays Attendance ID, Campaign Name, Project Type, Boundary, and other metadata.
Attendee Table
Lists attendee details, including Name, ID, Designation, and Hours Worked.
Action Button
Enables editing or approving attendance (if conditions are met).
Validation Message
Informs users if the campaign is ongoing and actions are disabled.
Campaign Status:
If the campaign is ongoing, the Edit and Approve buttons are disabled, and only a "Back" button is shown.
Administrators can override this behaviour through MDMS (configurable settings).
Approved Registers:
If the register is already approved, the action buttons are disabled, and a "Back" button is displayed.
Role-Based Permissions:
Only authorised supervisors can access the Edit/Approve features.
a. Step 1: Pop-Up Confirmation
Message: "Editing attendance will affect the number of days for attendees. Do you want to proceed?"
Buttons:
Cancel: Close the pop-up.
Proceed: Navigate to the Edit Attendance screen.
b. Step 2: Edit Attendance Screen
Campaign Worker
NO
Name of attendee
User Name
NO
Username of attendee
Role
NO
Role of attendee
Number of Days
YES
number of days worked by the attendee
Validation:
The number of days worked must be a positive integer and must not exceed the event duration.
Submit Button Behaviour:
Initially disabled until changes are made.
Upon submission:
Displays a success message: "Attendance updated successfully!"
Displays an error message if the update fails.
Approve Attendance Flow
Step 1: Add Comment
Message: "Please add a comment before approving."
Input Field: Allows users to enter comments (mandatory).
Buttons:
Cancel: Closes the pop-up and returns to the view screen.
Submit: Proceeds to the final warning.
Step 2: Confirmation Pop-Up
Message: "Do you want to approve this attendance register?"
Buttons:
Cancel: Closes the pop-up and remains on the view screen.
Proceed: Opens a Comment Entry Pop-Up.
Step 4: Success Page
Message: "Attendance approved"
Action: view another register or go back home.
health-attendance/v1/_search
fetch the registers details
health-individual/v1/_search
fetch the attendee and staff details
/health-muster-roll/v1/_update
to update the attendee attendance and approve registers
/health-muster-roll/v1/_estimate
to fetch estimate data of registers
/health-muster-roll/v1/_search
fetch the muster role data for regiter
Nearby Connections API (Google)
Discovery/Connection: Uses BLE for discovery, Wi-Fi Direct/Hotspot for transfer, and automatically selects the best medium.
Roles:
Advertiser: Device making itself available
Discoverer: Device searching for peers
Supported Topologies
P2P_CLUSTER: Mesh, several devices, low bandwidth, suitable for multiplayer/gaming.
P2P_STAR: One hub, others connect to it, ideal for content sharing.
P2P_POINT_TO_POINT: Direct 1-to-1, highest speed, best for large files.
Wi_Fi_P2P: Wi-Fi Direct, long-range, for games or large files.
Connection Selection Logic
On connection attempt, use:
BLE for initial discovery
Wi-Fi Direct/Hotspot for large/high-speed transfers
Fallback to Bluetooth if Wi-Fi is not available
Input: JSON-encoded Dart Map
Process:
Convert JSON string to UTF-8 bytes
Compress using GZipEncoder
Output: Compressed byte array
Key Generation: 32-byte random key (AES-256)
IV Generation: 16-byte random IV
Algorithm: AES in CBC mode
Process:
Encrypt compressed bytes with AES-CBC using key & IV
Security Notes:
Unique IV per encryption for semantic security
Key+IV must be securely stored or sent with the payload
Purpose: Convert binary (key, IV, encrypted data) to URL/text/QR-compatible string
Process:
Encode each part (key, IV, data) as Base64 URL-safe
Wrap into a JSON:
Encode the full JSON as a final Base64 URL-safe string
Decode Base64:
Outer string → JSON
Extract Payload:
Decode key, IV, data fields from JSON (Base64 → bytes)
Decrypt:
Use AES-CBC with key & IV to decrypt data → compressed bytes
Decompress:
GZipDecoder on decrypted bytes → UTF-8 JSON
Deserialize:
Parse JSON to Dart Map
NearbyConnectionManager
Handles advertising, discovery, connection, and data transfer
ConnectionStrategy
Enum: P2P_CLUSTER, P2P_STAR, P2P_POINT_TO_POINT, WI_FI_P2P
ConnectionEventListener
Handles state changes, errors, and received bytes
SecurePayloadCompressor
compress(Map data): List<int>
decompress(List<int> compressed): Map
AESCipher
encrypt(List<int> data, key, iv): List<int>
decrypt(List<int> encrypted, key, iv): List<int>
Base64PayloadEncoder
encode(key, iv, data): String
decode(String): (key, iv, data)
Sender:
Serialize Map → JSON → UTF-8 bytes
Compress (GZip) → compressed bytes
Generate AES key & IV
Encrypt (AES-CBC) compressed bytes → encrypted bytes
Base64-encode (key, IV, encrypted) → JSON → Base64-encode JSON
Send over a P2P connection
Receiver:
Receive Base64-encoded string
Base64-decode → JSON → extract key, IV, encrypted data
AES decrypt → compressed bytes
Project
Facility
Product
HRMS
MDMS
Boundary
Localisation
Access Control
IdGen
Individual
User
Base Path: /project-factory/
API Contract Link
Swagger Editor - Project Factory API Spec
Project Factory related tables
Table Details
Body Parameters:
RequestInfo: Object containing request information.
Resource Details: Object containing the details of the resource to be created or validated.
type: Type of resource (boundary, facility, user, boundaryWithTarget).
tenantId: Tenant identifier.
fileStoreId: File store identifier.
action: Action type (create or validate).
hierarchyType: Type of hierarchy.
campaignId: Campaign identifier.
additionalDetails: Additional details object (optional).
Success Response:
- ResponseInfo: Object containing response information.
- ResourceDetails: Array containing the detail objects of the created or validated resource.
Client Initiates Request: The client sends a createData request to the Project Factory service.
Validation of Request: The Project Factory service validates the request schema and the provided resource details.
Processing the Request:
If action is 'create':
Enrich resource details, set status to "data-accepted", and persist in the database.
Further creation process happens in the background.
After successful creation, set the status to 'completed' and persist resource details in the database.
If action is 'validate':
Enrich resource details, set the status to "validation-started", and persist in the database.
Further creation process happens in the background.
If file data is invalid, set the status to 'invalid' and persist in the database.
Fail case: If validation or creation fails, set the status to 'failed' and persist in the database with the error cause in additional details.
Response: The Project Factory service sends the response back to the client containing the resource details and status.
Parsing Logic from sheet
The getSheetData function retrieves and processes data from an Excel sheet, validating the structure according to the configuration provided in createAndSearchConfig. The key part of this process is the parseArrayConfig.parseLogic configuration, which specifies how to parse and validate the columns in the sheet. Here's a detailed explanation of how the function works, including the parsing logic:
Parsing Logic Using parseArrayConfig.parseLogic
The parseArrayConfig.parseLogic configuration specifies how each column in the sheet should be processed. Here's how the parsing logic works:
Each column configuration specifies:
sheetColumn: The column letter in the sheet.
sheetColumnName: The expected name of the column in the sheet.
resultantPath: The path where the value will be stored in the resultant JSON.
type: The expected type of the value (e.g., string, number, or boolean).
conversionCondition: Optional conditions for converting values.
Validating Column Names
During the validation step, the function checks that the first-row value matches the expected column name.
Processing Rows
When mapping the rows to JSON, the function uses the resultantPath to place the values in the correct location in the JSON object. It converts values according to the specified type and conversionCondition.
Example Conversion
For a column configuration with type: "boolean" and conversionCondition, the function would convert "Permanent" to true and "Temporary" to an empty string.
In summary, the getSheetData function retrieves and processes data from an Excel sheet, validating the structure and content according to the createAndSearchConfig configuration. The parseArrayConfig.parseLogic configuration specifies how each column should be validated and processed into the resultant JSON format.
User: The person interacting with the Admin Console to set up and create a campaign.
CampaignManager (Admin Console): The main interface that the user interacts with to manage campaign creation.
ProjectFactory: Handles the creation and management of campaign objects and validation processes.
BoundaryService: Provides information about boundary hierarchy and relationships.
MDMSService: Supplies master data such as project types, hierarchy configurations, and operator details.
FileStoreService: Manages the storage and retrieval of files related to the campaign.
1. Campaign Setup Initialisation
User: Initiates the process by visiting the Admin Console to set up a new campaign.
CampaignManager: Receives the request to set up a campaign and starts interacting with various services to gather necessary information.
2. Fetch Master Data
CampaignManager sends a request to MDMSService to fetch required master data, including:
Project types
Hierarchy type configuration
Operator templates
Other necessary templates
MDMSService responds with the requested master data, which is used to configure the campaign.
3. Fetch Boundary Information
CampaignManager requests BoundaryService to fetch boundary hierarchy definitions based on the selected hierarchy type.
BoundaryService responds with the boundary hierarchy definition.
CampaignManager requests BoundaryService to fetch boundary relationship data based on the selected hierarchy type.
BoundaryService responds with the boundary relationship data.
4. User Data Input
User: Fills in the required data, such as boundary delivery configuration and other campaign-specific details within the Admin Console.
CampaignManager: Sends the user-filled information to ProjectFactory to create a campaign object and stores it with an initial action status of "draft".
5. Template Generation
ProjectFactory: Automatically triggers the generation of templates for different resources, including:
Target templates
Facility templates
User templates
6. Template Download and Storage
User: Downloads the generated templates for each resource type through the Admin Console.
CampaignManager: Sends a request to FileStoreService to store the downloaded files.
FileStoreService responds with a filestoreid that uniquely identifies the stored file.
7. Data Validation
CampaignManager: Sends the data and the filestoreid to ProjectFactory for validation.
ProjectFactory responds with a unique validation ID, as the validation process may take some time.
CampaignManager: Periodically checks the status of the validation using the unique validation ID.
8. Validation Outcome
ProjectFactory:
If validation is successful:
Responds with a success message.
CampaignManager: Displays a success message to the user, indicating that they can proceed to the next step.
If validation fails:
Responds with an error message detailing the validation failure.
CampaignManager: Displays the error message to the user, prompting them to correct the errors and re-upload the files.
9. Final Campaign Creation
User: Once all required data is filled in and validated, the user reviews the summary of the campaign data and clicks on the "Create Campaign" button.
CampaignManager: Sends a final request to ProjectFactory with the campaign creation API, marking the action as "create".
10. Campaign Creation Outcome
ProjectFactory:
If the creation is successful:
Responds with a success message indicating that the campaign creation has started.
CampaignManager: Displays a success message to the user, confirming the campaign creation.
If the creation fails:
Responds with an error message detailing the failure.
CampaignManager: Displays the error message to the user, prompting them to correct any issues and try again.
Validation Failures: If validation fails at any stage (e.g., during file validation or input data checks), the CampaignManager will notify the user of the specific issues. The user must resolve these issues and re-upload the necessary data to proceed.
Service Errors: If any of the services (e.g., BoundaryService, MDMSService, ProjectFactory) encounter an error during processing, the CampaignManager will display an error message, detailing the problem and suggesting corrective actions.
This document outlines the end-to-end flow for creating a new campaign using the Admin Console. It ensures that the user provides all required information and that data is validated and processed correctly to create the campaign. This structured approach minimises errors and ensures that all campaigns are set up with the required accuracy and completeness.
Status
The current status of the bill (e.g., Generated, In Progress, Failed).


Endpoint: /data/_generate
Method: POST
RequestInfo: Object containing request information.
Query Parameters:
type: Type of the resource for which data needs to be generated.
tenantId: Tenant identifier.
ResponseInfo: Object containing response information.
GeneratedResource: Array containing the details object of the generated resource.
Client Request: The client sends a POST request to /v1/data/_generate.
Request Validation: After receiving the request, the server validates the request structure and parameters.
Generate Data Process:
Validation: The server validates the generated request.
Fetch Required Columns from MDMS:
Use callMdmsData to get type schema columns in the correct order.
Define Headers:
To add a new column to the Generated sheet, follow these steps:
Search Schema Details
Locate the type schema from the HCM-ADMIN-CONSOLE.adminSchema schema in the workbench.
Identify Column Type
Sheet Data Validation:
This process is sufficient for validating the new column in the generated sheet.
If there's a need to reflect the column in APIs, follow these additional steps:
Update createAndSearch.ts File
Modify the createAndSearch.ts file under the defined type parseLogic object.
Integrate the new column into the appropriate data structures used for API operations.
By following these steps, you can successfully add and validate a new column in the generated sheet and ensure its reflection in the associated APIs.
General Rules
Locked Headers: The headers in the templates for each data type (user, facility, target) are locked and cannot be changed.
Sheet Protection: Certain sheets within the templates will have specific locked areas to ensure data integrity.
README Sheet: Each type of template includes a README sheet which is read-only and locked.
Target Template
Editable Columns: You can only modify the 'Target' column. All other columns are locked and cannot be edited.
Facility Template
Adding Rows: You are allowed to add new rows to create new facilities.
Editable Columns: You can modify the "Boundary Code" and 'Usage' columns.
Locked Sheets: The boundary data sheet within the facility template is locked and cannot be modified.
Dropdown Columns: The following columns are dropdowns:
User Template
Adding Rows: You are allowed to add new rows.
Locked Sheets: The boundary data sheet within the user template is locked and cannot be modified.
Dropdown Columns: The following columns are dropdowns:
Role
Data for Dropdowns
The data for the dropdown columns comes from the mdms (Master Data Management System) under the adminSchema master.
Base URL: project-factory/v1/
Endpoint: /data/_generate
Method: POST
Body Parameters:
RequestInfo: Object containing RequestInfo
Query Parameters:
tenantId: Tenant
type: Type of Resource (e.g., boundary)
Success Response:
Client Initiates Request:
The client initiates a dataGenerate request to the Project Factory Service.
Validation of Request:
Schema Validation: Validate against generateRequestSchema.
Fetch configurable columns from mdms present for each campaign type from schema -[HCM-ADMIN-CONSOLE.adminSchema].
Here is a sample data from the given schema, having configurable columns for Campaign SMC-
Handle Error:
Update the status to failed, add error details, log the error, and produce a message to the update topic.
Downloading the generated boundary template through /data/_generate API:
One can get the filestoreId through the /data/_download API, which will fetch from the database using the ID from the response of /data/_generate API.
This document details the low-level design for handling campaign creation and update flows when a parent campaign is present. The system supports hierarchical campaigns, boundary inheritance, resource template generation, and robust retry mechanisms. This design aims to ensure data consistency, correct parent-child relationships, and efficient error recovery.
New Columns
isActive (boolean): Indicates if the campaign is currently active.
parentId (string): References the parent campaign’s unique ID, if any.
If parentId is present in the request:
On create action:
Parent campaign (parentId
For child campaigns:
The boundaries array in the request must contain only new boundaries.
Existing boundaries are fetched from the parent campaign.
Merged boundaries = parent boundaries + new boundaries (for use in template/resource generation).
Generate templates for all three types: boundary, user, facility.
If actionInUrl = create and parentId is present, templates are generated freshly using both parent and new boundaries.
For newly added boundaries, create new projects/resources only for those.
If existing targets are updated, call update on the respective project with new target mappings.
Facility and user sheets can be edited: updating these updates related mappings (ProjectFacility, ProjectStaff).
If campaign creation or update fails, a retry API allows the process to restart from the failure point.
Retry is stateful and resumes based on the persisted CampaignDetails and status.
Retry API Example:
See below for sample fields (simplified):
After each update and once the campaign is in the "Created" state, templates are consolidated for future updates.
After a campaign reaches the "Created" state:
Uploaded template sheets (Facility, User, Target) are consolidated back to the initial format.
Any subsequent update is handled as the first update (fresh diff against the current state).
In the update flow, facility mappings to boundary codes can be edited and toggled (active/inactive).
Updates propagate to ProjectFacility and ProjectStaff mapping tables.
Request received with or without parentId.
Validation:
If parentId present, validate parent state as per action.
Validation Errors:
If the parent campaign is not in the required state, reject the request.
If new boundaries overlap with the parent, reject or merge as per the business rule.
Retry Errors:
Multiple updates to a Campaign
Once the ongoing campaign is updated and reaches the "Created" state, the updated sheet templates (i.e., Facility, User, and Target) are consolidated back into the format used during the initial "Create" flow.
This ensures that when you attempt to update the campaign again, it will be treated as the first update.
Retry API Payload
Core Principle
At any point in time, only one campaign—either the parent or its successfully completed child—should be considered active and operational. A parent campaign remains active until a child campaign completes successfully and takes over its role.
Validation:
Before creating a new child campaign, verify whether the parent already has a child campaign with:
isActive: true
If such a child exists, reject the request
The child campaign continues with:
isActive: true
status reflecting progress (e.g., inprogress, validating)
The parent campaign remains:
Once the child campaign is fully processed and marked status: 'completed':
Child remains isActive: true
Parent's isActive is updated to false
Why: This marks the official handoff. The child becomes the sole operational campaign, and the parent is retired from active use.
If a child campaign is needed to be cancelled:
Set its isActive: false
Why: The child is clearly marked as non-operational. The parent continues as the active campaign, and a new child can be initiated later.
If a failure occurs during child creation/update:
Keep isActive: true
Set status: 'failed'
Parent remains isActive: true
File: src/server/config/models/searchCampaignDetails.ts
Add:
isChildCampaign?: boolean
parentId?: string
File: src/server/utils/campaignUtils.ts → buildSearchQuery()
Modify query generation:
If isChildCampaign === true, add AND parentId IS NOT NULL
If isChildCampaign === false, add AND parentId IS NULL
If parentId is specified, add AND parentId = $X
1. All child campaigns:
{
"tenantId": "yourTenantId",
"isChildCampaign": true
}
2. Currently active (parent or completed child):
{
"tenantId": "yourTenantId",
"isActive": true,
"status": "completed" // optional
}
3. Cancelled or inactive child campaigns:
{
"tenantId": "yourTenantId",
"isChildCampaign": true,
"isActive": false
}
4. Parent campaigns not yet replaced:
{
"tenantId": "yourTenantId",
"isChildCampaign": false,
"isActive": true
}
In createProjectTypeCampaignService or processBasedOnAction:
Query for existing active children (isActive: true) before proceeding.
On child status transition to completed:
Fetch parent campaign
Set isActive = false
Persist the update ( via Kafka)
Endpoint: POST /project-factory/v1/project-type/cancel-campaign
Purpose: Cancels a campaign by setting:
isActive = false
status = "cancelled" The update is sent via Kafka.
Returns updated campaign with:
isActive: false
status: "cancelled"
Safe to call multiple times. Same result is returned.
Validates inputs
Fetches campaign
Updates status
Produces to Kafka topic
This document outlines the various API flows and interactions for the Project Factory, focusing on resource data creation with retry logic, template generation, campaign update flows, and data search and download processes. The aim is to manage and automate various aspects of resource and campaign data efficiently using the Project Factory services.
Description: This flow describes how the Project Factory handles resource data creation with retry logic. It ensures data consistency and reliability by retrying operations if failures occur.
Sequence of Operations
Client Request Initiation:
The client sends a request to the Project Factory with filestoreid and type.
MDMS Service Interaction:
Description: This flow is triggered when a client sends a generate request with forceUpdate = true. It checks for existing data and creates a new row with the status inProgress if necessary.
Sequence of Operations:
Client Request Initiation:
The client sends a generate request with the specified type and forceUpdate = true.
Validation and Data Check:
Description: This flow is initiated when a generate request is sent due to a boundary change in an ongoing campaign.
Sequence of Operations:
Boundary Change Trigger:
The Project Factory sends a generate request with campaignId, type, and forceUpdate = true.
Validation and Data Check:
Description: This flow allows the client to search and download resource data based on a provided ID and type.
Sequence of Operations:
Client Request Initiation:
The client sends a request with the id and type.
Database Query:
The outlined API flows are crucial for handling resource data creation, management, and retrieval efficiently. They ensure data consistency, integrity, and seamless interaction between various services, making the Project Factory a robust system for managing campaign data. Implementing the retry logic, data validation, and template generation processes helps maintain a reliable and scalable architecture.
This document outlines the flow for updating an existing campaign using various services in the system. The process involves interactions between multiple services, including the Project Factory, Project Service, Boundary Service, Facility Service, HRMS Service, MDMS Service, FileStore Service, and the database. The update flow ensures that the required resources are validated and updated correctly before finalising the campaign update.
Client: The entity (user or system) initiating the campaign update request.
CampaignManager (Project Factory): The main controller managing the campaign update process.
ProjectService: Manages project-related operations, including data creation and mapping updates.
BoundaryService: Handles fetching of boundary relationships based on hierarchy types.
Initiate Campaign Update
The Client sends an update request to the CampaignManager with all required and valid resources.
Fetch Boundary Relationship
Validation Failure: If any validation step fails (e.g., invalid data in resource files or missing required resources), the CampaignManager sends an error message to the Client, indicating the failure. The user is required to fix the issues and resubmit the request.
Service Errors: If any of the service interactions (e.g., BoundaryService, MDMSService, ProjectService) return an error, the CampaignManager stops the process and informs the Client of the failure, specifying the nature of the error.
Database Errors: If the Database fails to update the campaign update status or mark the parent campaign as inactive, appropriate error handling and logging mechanisms should be triggered to handle the failure.
Update Campaign Flow
This document provides a comprehensive overview of the update campaign flow, detailing each step and interaction between different services and the database. The flow ensures proper validation and updating of necessary resources, while error handling mechanisms provide robustness to the process.
{
"key": "<Base64-encoded AES key>",
"iv": "<Base64-encoded IV>",
"data": "<Base64-encoded encrypted data>"
}Table eg_cm_campaign_details {
id varchar(128) [primary key ,not null, unique]
tenantid varchar(64) [not null ,note: 'Tenant identifier']
campaignname varchar(250) [not null ,note: 'Name of the campaign']
projecttype varchar(128) [not null ,note: 'Type of project']
startdate bigint [note: 'Start date in epoch']
enddate bigint [note: 'End date in epoch']
campaigndetails jsonb [note: 'Campaign specific details']
status varchar(128) [not null ,note: 'Status of the campaign']
parentid varchar(128) [note: 'refering to the previous campaign id']
action varchar(64) [not null ,note: 'Action type']
campaignnumber varchar(128) [not null ,note: 'Campaign number']
hierarchytype varchar(128) [not null ,note: 'Hierarchy type']
boundarycode varchar(64) [note: 'Boundary code']
projectid varchar(128) [note: 'Project identifier']
createdby varchar(128) [not null ,note: 'Created by user ID']
lastmodifiedby varchar(128) [note: 'Last modified by user ID']
createdtime bigint [note: 'Creation timestamp']
lastmodifiedtime bigint [note: 'Last modification timestamp']
additionaldetails jsonb [note: 'Additional details']
}Table eg_cm_campaign_process {
id varchar(128) [primary key, not null, unique]
campaignid varchar(128) [not null,note: 'Foreign key to eg_cm_campaign_details.id']
type varchar(128) [not null,note: 'Type of campaign process']
status varchar(128) [not null,note: 'Status of the campaign process']
details jsonb [note: 'Detailed information of the process']
createdtime bigint [note: 'Creation timestamp']
lastmodifiedtime bigint [note: 'Last modification timestamp']
additionaldetails jsonb [note: 'Additional details']
}
Ref: eg_cm_campaign_process.campaignid > eg_cm_campaign_details.id // many-to-oneTable eg_cm_generated_resource_details {
id varchar(128) [primary key,not null, unique]
filestoreid varchar(128) [note: 'File store ID']
status varchar(128) [not null,note: 'Status of the resource']
type varchar(128) [not null,note: 'Type of resource']
tenantid varchar(128) [not null,note: 'Tenant identifier']
count bigint [note: 'Count of resources']
createdby varchar(128) [note: 'Created by user ID']
createdtime bigint [note: 'Creation timestamp']
lastmodifiedby varchar(128) [note: 'Last modified by user ID']
lastmodifiedtime bigint [note: 'Last modification timestamp']
additionaldetails jsonb [note: 'Additional details']
hierarchytype varchar(128) [not null,note: 'Hierarchy type']
campaignid varchar(128) [note: 'Foreign key to eg_cm_campaign_details.id']
}
Ref: eg_cm_generated_resource_details.campaignid > eg_cm_campaign_details.id // many-to-one
Table eg_cm_resource_activity {
id varchar(128) [primary key,not null, unique]
retrycount int [note: 'Number of retry attempts']
type varchar(64) [not null,note: 'Type of activity']
url varchar(128) [not null,note: 'URL for the activity']
requestpayload jsonb [note: 'Request payload']
tenantid varchar(128) [not null,note: 'Tenant identifier']
responsepayload jsonb [note: 'Response payload']
status bigint [note: 'Status code']
createdby varchar(128) [note: 'Created by user ID']
createdtime bigint [note: 'Creation timestamp']
lastmodifiedby varchar(128) [note: 'Last modified by user ID']
lastmodifiedtime bigint [note: 'Last modification timestamp']
additionaldetails jsonb [note: 'Additional details']
resourcedetailsid varchar(128) [not null,note: 'Foreign key to eg_cm_resource_details.id']
}
Ref: eg_cm_resource_activity.resourcedetailsid > eg_cm_resource_details.id // many-to-one
Table eg_cm_resource_details {
id varchar(128) [primary key,not null, unique]
status varchar(128) [note: 'Status of the resource']
tenantid varchar(128) [not null,note: 'Tenant identifier']
filestoreid varchar(128) [note: 'File store ID']
processedfilestoreid varchar(128) [note: 'Processed file store ID']
action varchar(128) [not null,note: 'Action type']
type varchar(64) [not null,note: 'Type of resource']
createdby varchar(128) [note: 'Created by user ID']
createdtime bigint [note: 'Creation timestamp']
lastmodifiedby varchar(128) [note: 'Last modified by user ID']
lastmodifiedtime bigint [note: 'Last modification timestamp']
additionaldetails jsonb [note: 'Additional details']
campaignid varchar(128) [note: 'Foreign key to eg_cm_campaign_details.id']
}
Ref: eg_cm_resource_details.campaignid > eg_cm_campaign_details.id // many-to-one
parseLogic: [
{
sheetColumn: "A",
sheetColumnName: "HCM_ADMIN_CONSOLE_FACILITY_CODE",
resultantPath: "id",
type: "string"
},
{
sheetColumn: "B",
sheetColumnName: "HCM_ADMIN_CONSOLE_FACILITY_NAME",
resultantPath: "name",
type: "string"
},
{
sheetColumn: "C",
sheetColumnName: "HCM_ADMIN_CONSOLE_FACILITY_TYPE",
resultantPath: "usage",
type: "string"
},
{
sheetColumn: "D",
sheetColumnName: "HCM_ADMIN_CONSOLE_FACILITY_STATUS",
resultantPath: "isPermanent",
type: "boolean",
conversionCondition: {
"Permanent": "true",
"Temporary": ""
}
},
{
sheetColumn: "E",
sheetColumnName: "HCM_ADMIN_CONSOLE_FACILITY_CAPACITY",
resultantPath: "storageCapacity",
type: "number"
},
{
sheetColumn: "F",
sheetColumnName: "HCM_ADMIN_CONSOLE_BOUNDARY_CODE_MANDATORY"
}
]{
"sheetColumn": "D",
"sheetColumnName": "HCM_ADMIN_CONSOLE_FACILITY_STATUS",
"resultantPath": "isPermanent",
"type": "boolean",
"conversionCondition": {
"Permanent": "true",
"Temporary": ""
}
}Project Factory retrieves the type schema from the MDMS Service.
MDMS Service returns the schema, which is then validated.
Data Validation:
The Project Factory validates the data against the MDMS schema.
If validation is successful, it informs the client that data processing has started.
If validation fails, an error message is returned, and the user must resubmit.
File Handling:
The Project Factory requests a file download from the FileStore Service.
Upon receiving the file, JSON data is created from the file of the desired type.
Data Creation and Retry Logic:
Data is validated according to the schema.
Normal Create:
Data is created in the respective service, and status is tracked.
A loop continues until retry attempts exceed the maximum retries, or no failed data remains.
Bulk Create with Retry:
Data is created in the respective service, and the status is checked.
A search is conducted using the generateApi search.
The loop continues under the same conditions as the normal create process.
Database Update:
The file is enriched with the created ID and sent back to the FileStore Service.
The updated file is received, and data is persisted in the database with a status of 'created' and the processed filestoreid.
hierarchytype.A check is performed to see if previous data exists. If it does, the data is marked as expired.
Database and Response:
A new row is created with null fileStoreId and status inProgress.
The database is updated, and a successful response is sent back to the client.
Data Fetch and Storage:
The Project Factory fetches the template from the MDMS Service based on the type.
Data is consolidated and stored in the FileStore Service, which returns a filestoreid.
The database is updated with the new filestoreid.
The type is validated against predefined types and hierarchytype.
Previous data is checked, and if found, marked as expired.
The campaign is searched in the database based on the provided campaignId and its parent campaign ID.
Database and Response:
A new row is created with null fileStoreId and status inProgress.
The database is updated, and a response is provided.
File Update and Data Consolidation:
The Project Factory fetches file details from the FileStore Service using the parent campaign object.
The sheet is updated, freezing all the data.
If new boundaries are added, boundary relation data is fetched.
Data is consolidated and stored in the FileStore, and the database is updated with the new filestoreid.
The Project Factory checks the created resource based on the provided ID.
The corresponding resource details row is fetched from the database.
Response to Client:
The Project Factory sends back the created resource response to the client.


Create Campaign
Update Campaign
Manage Resources
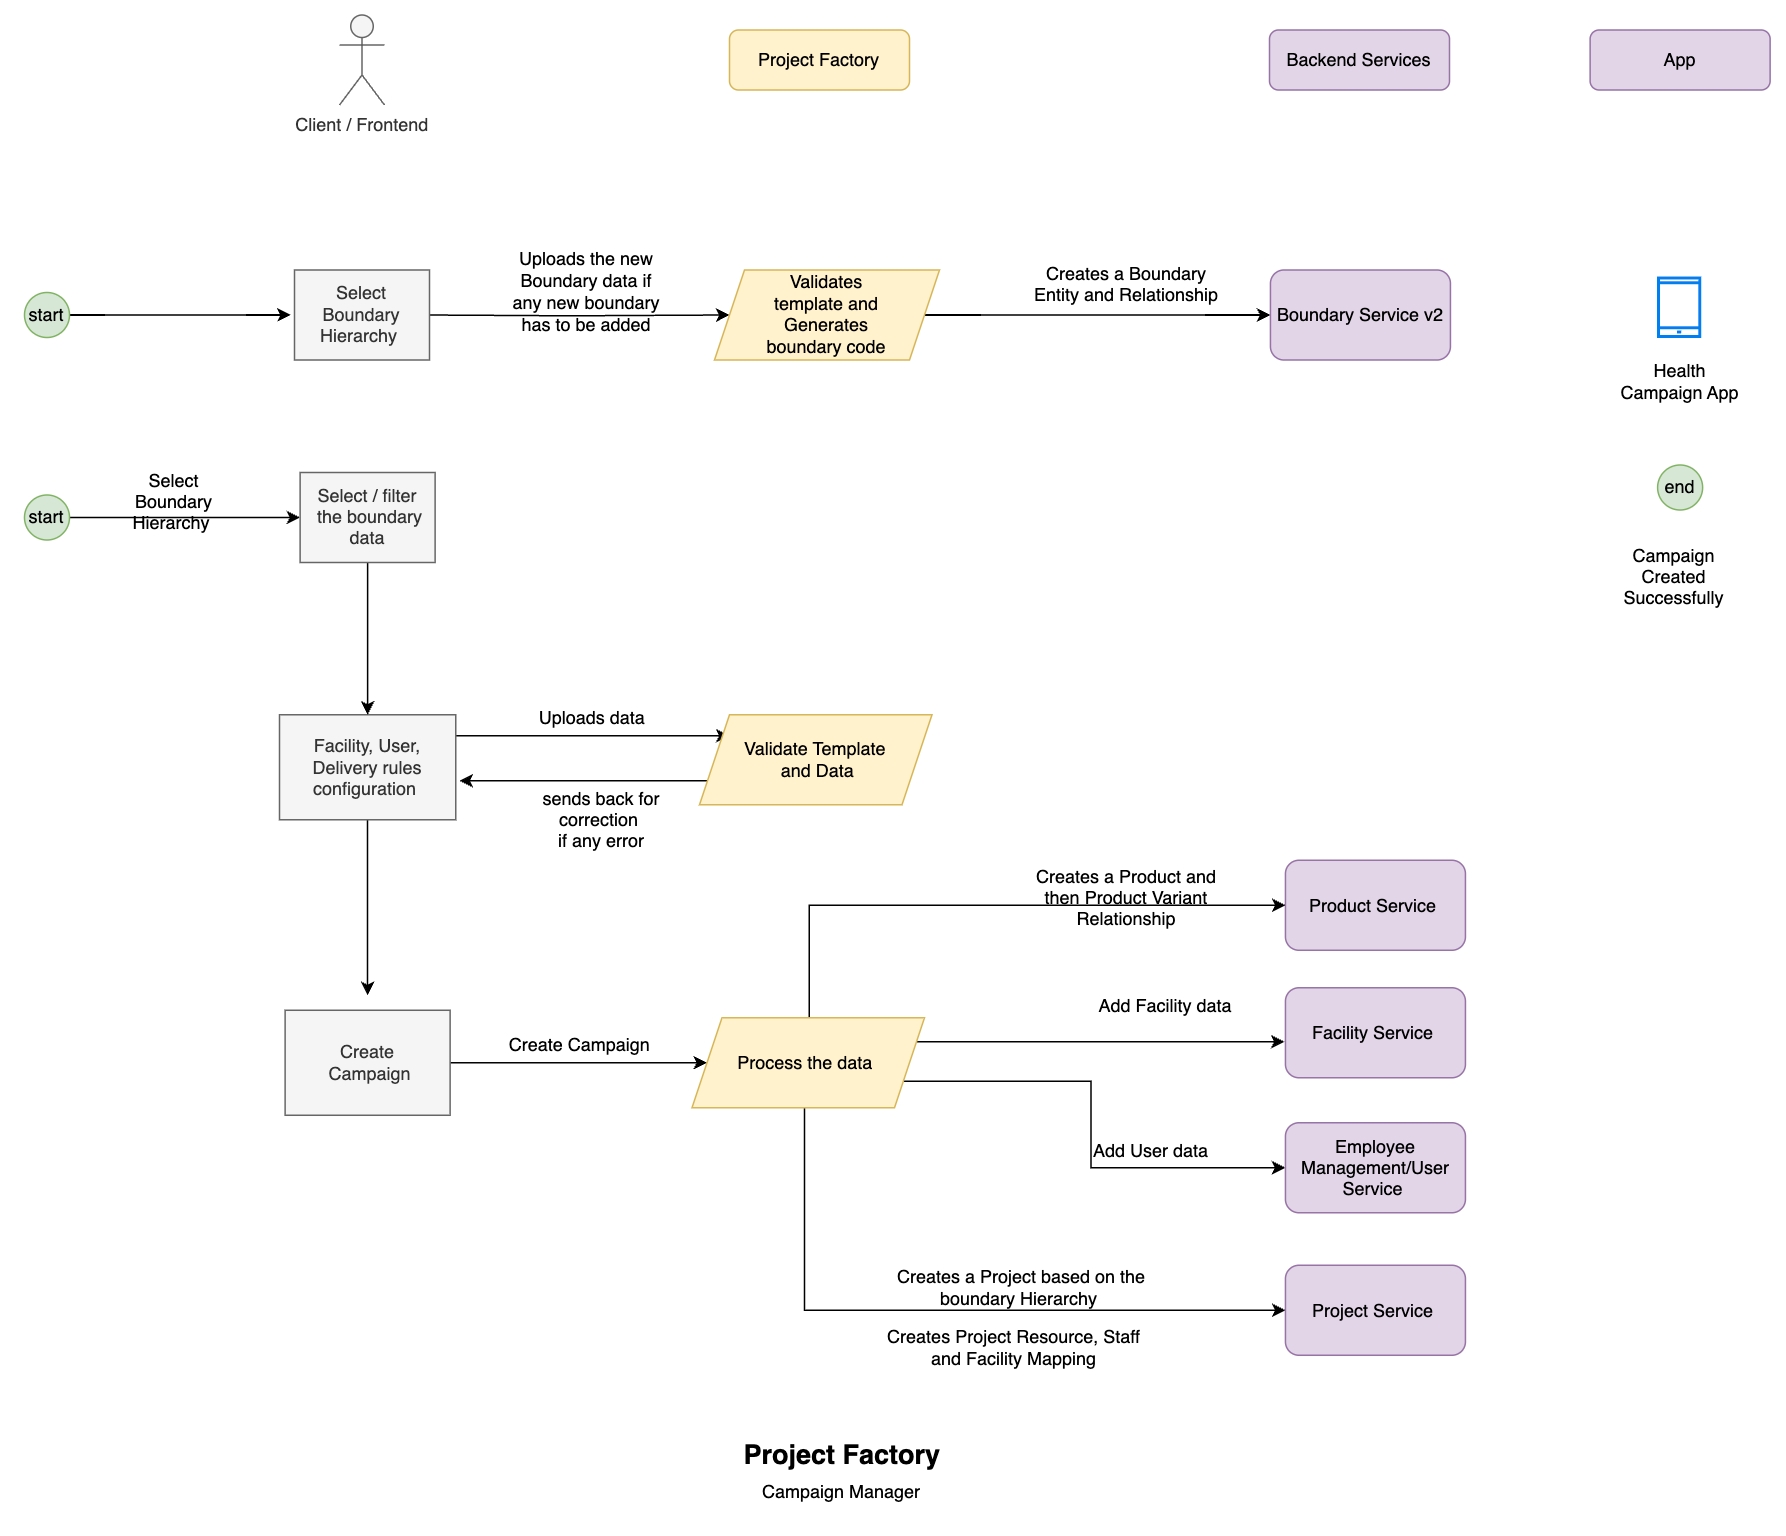


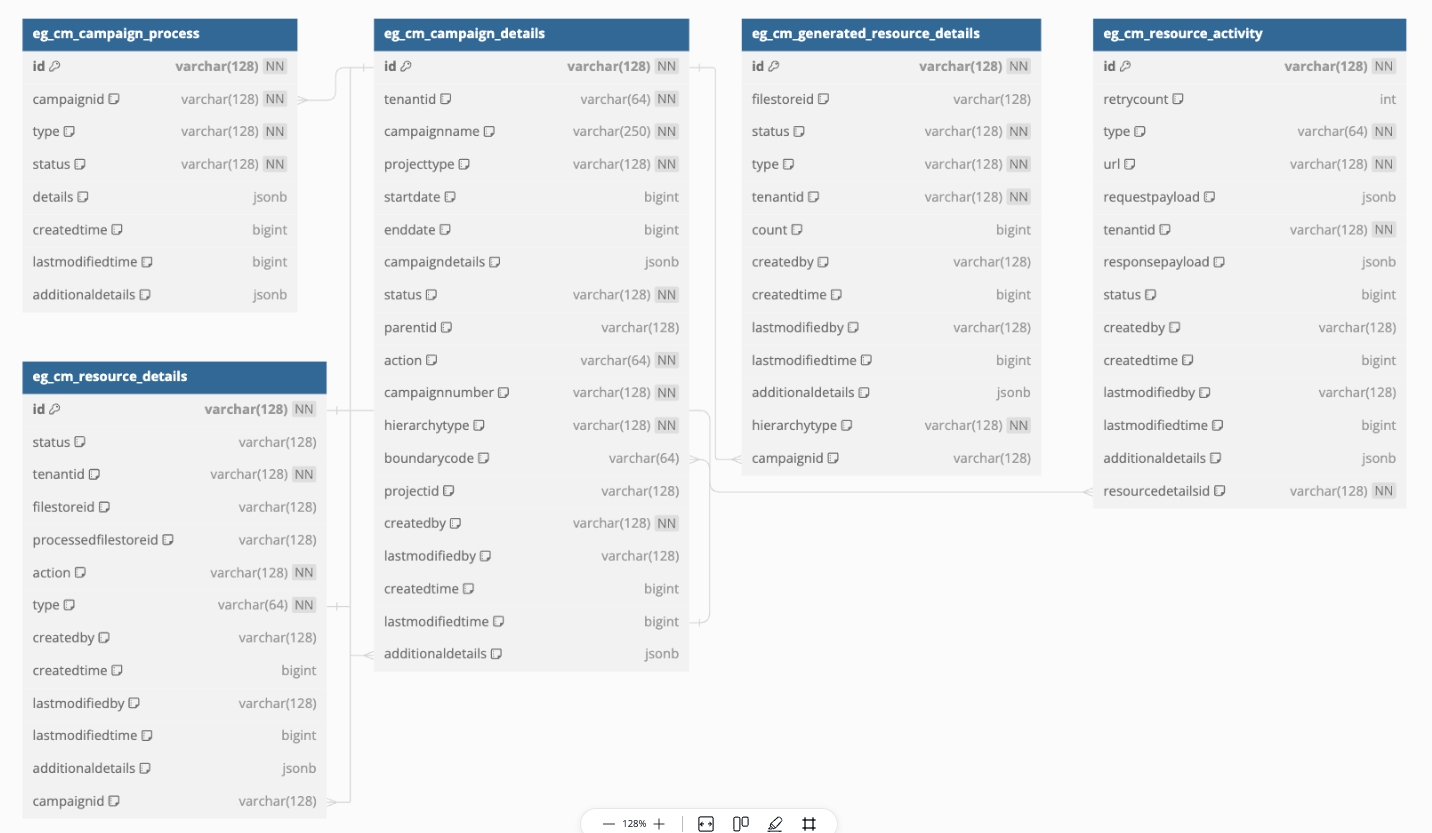
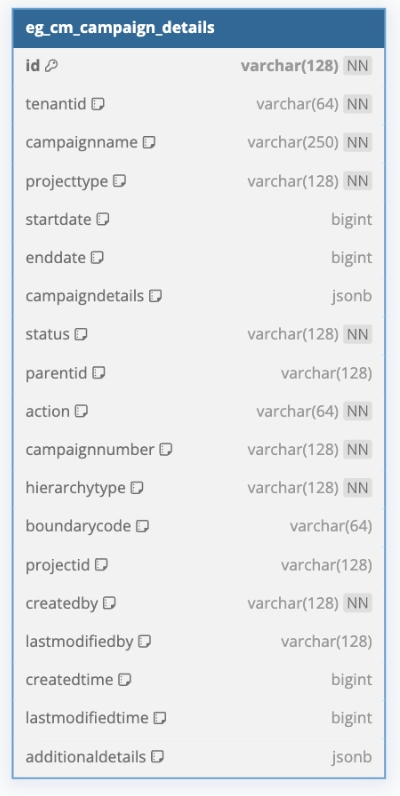
After successful creation, set the status to 'completed' and persist resource details in the database.

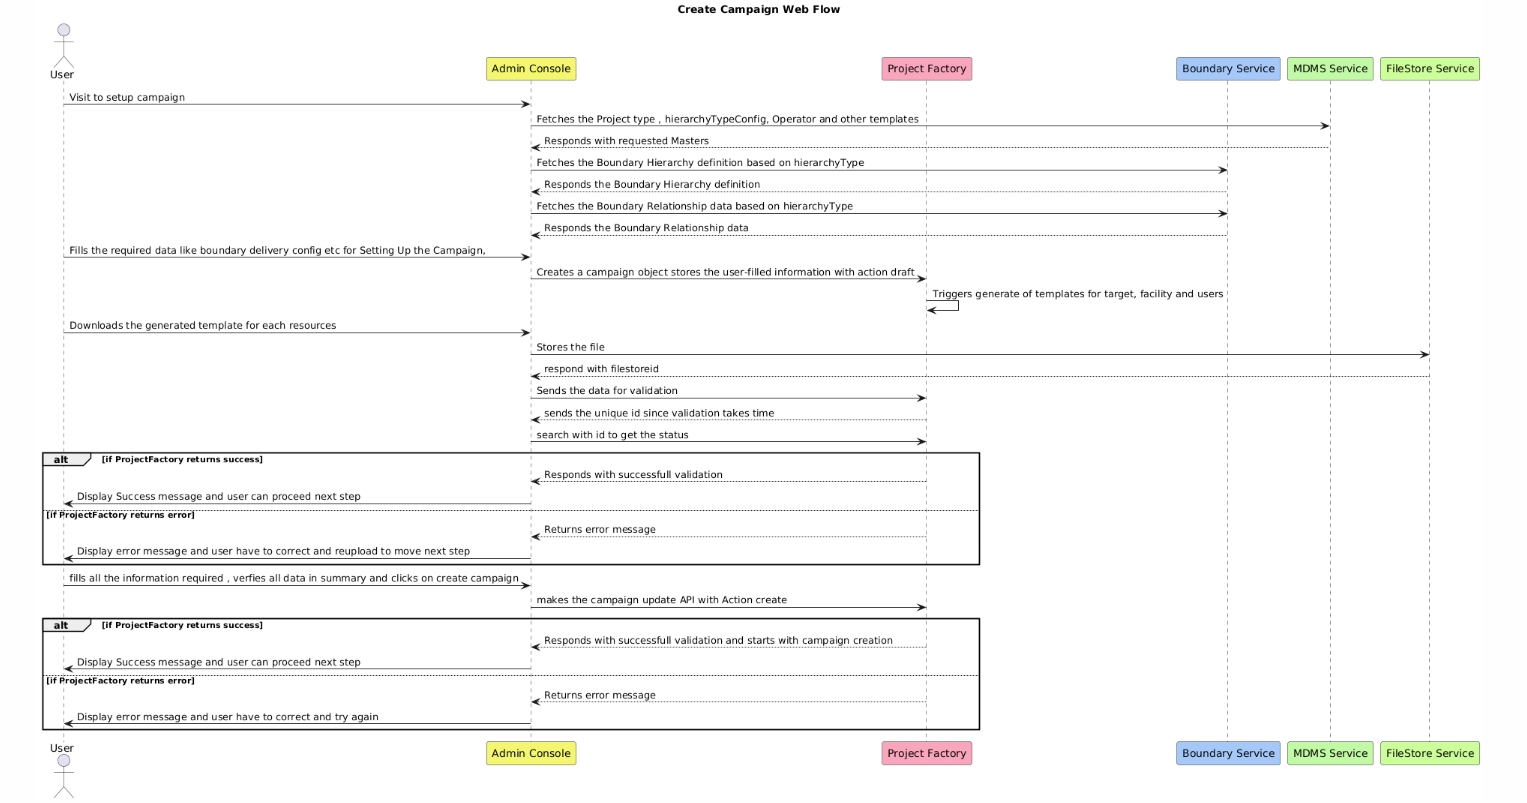
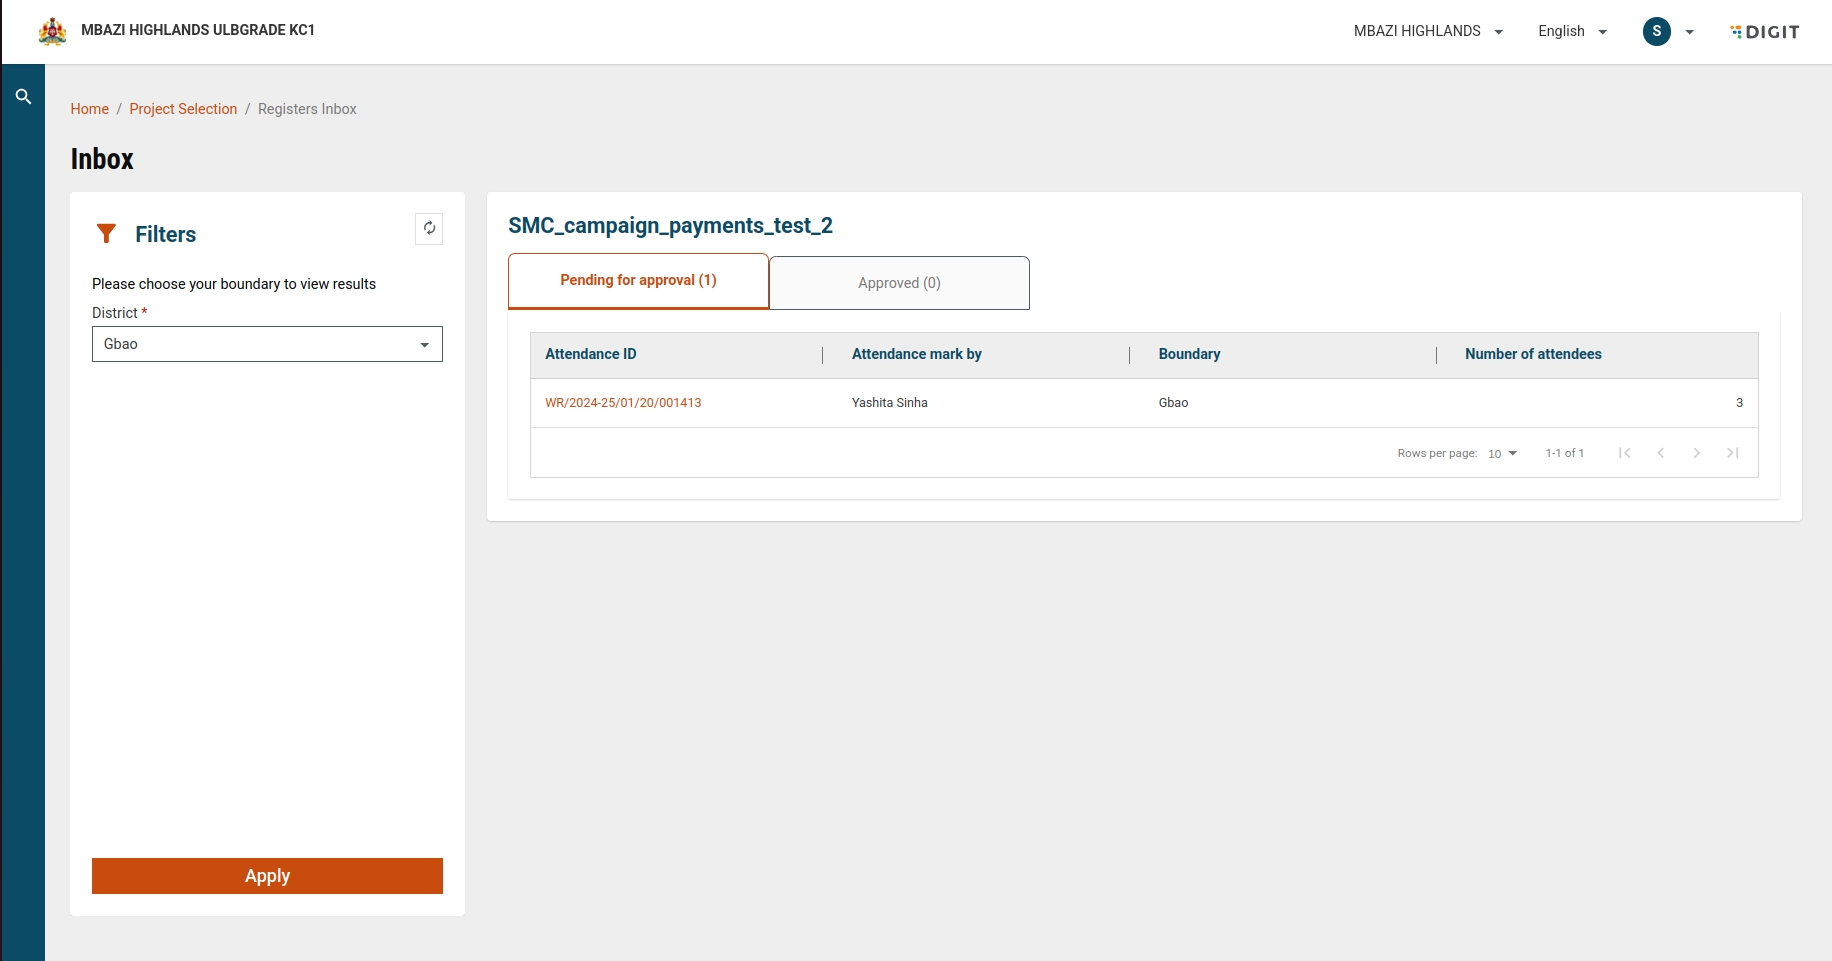
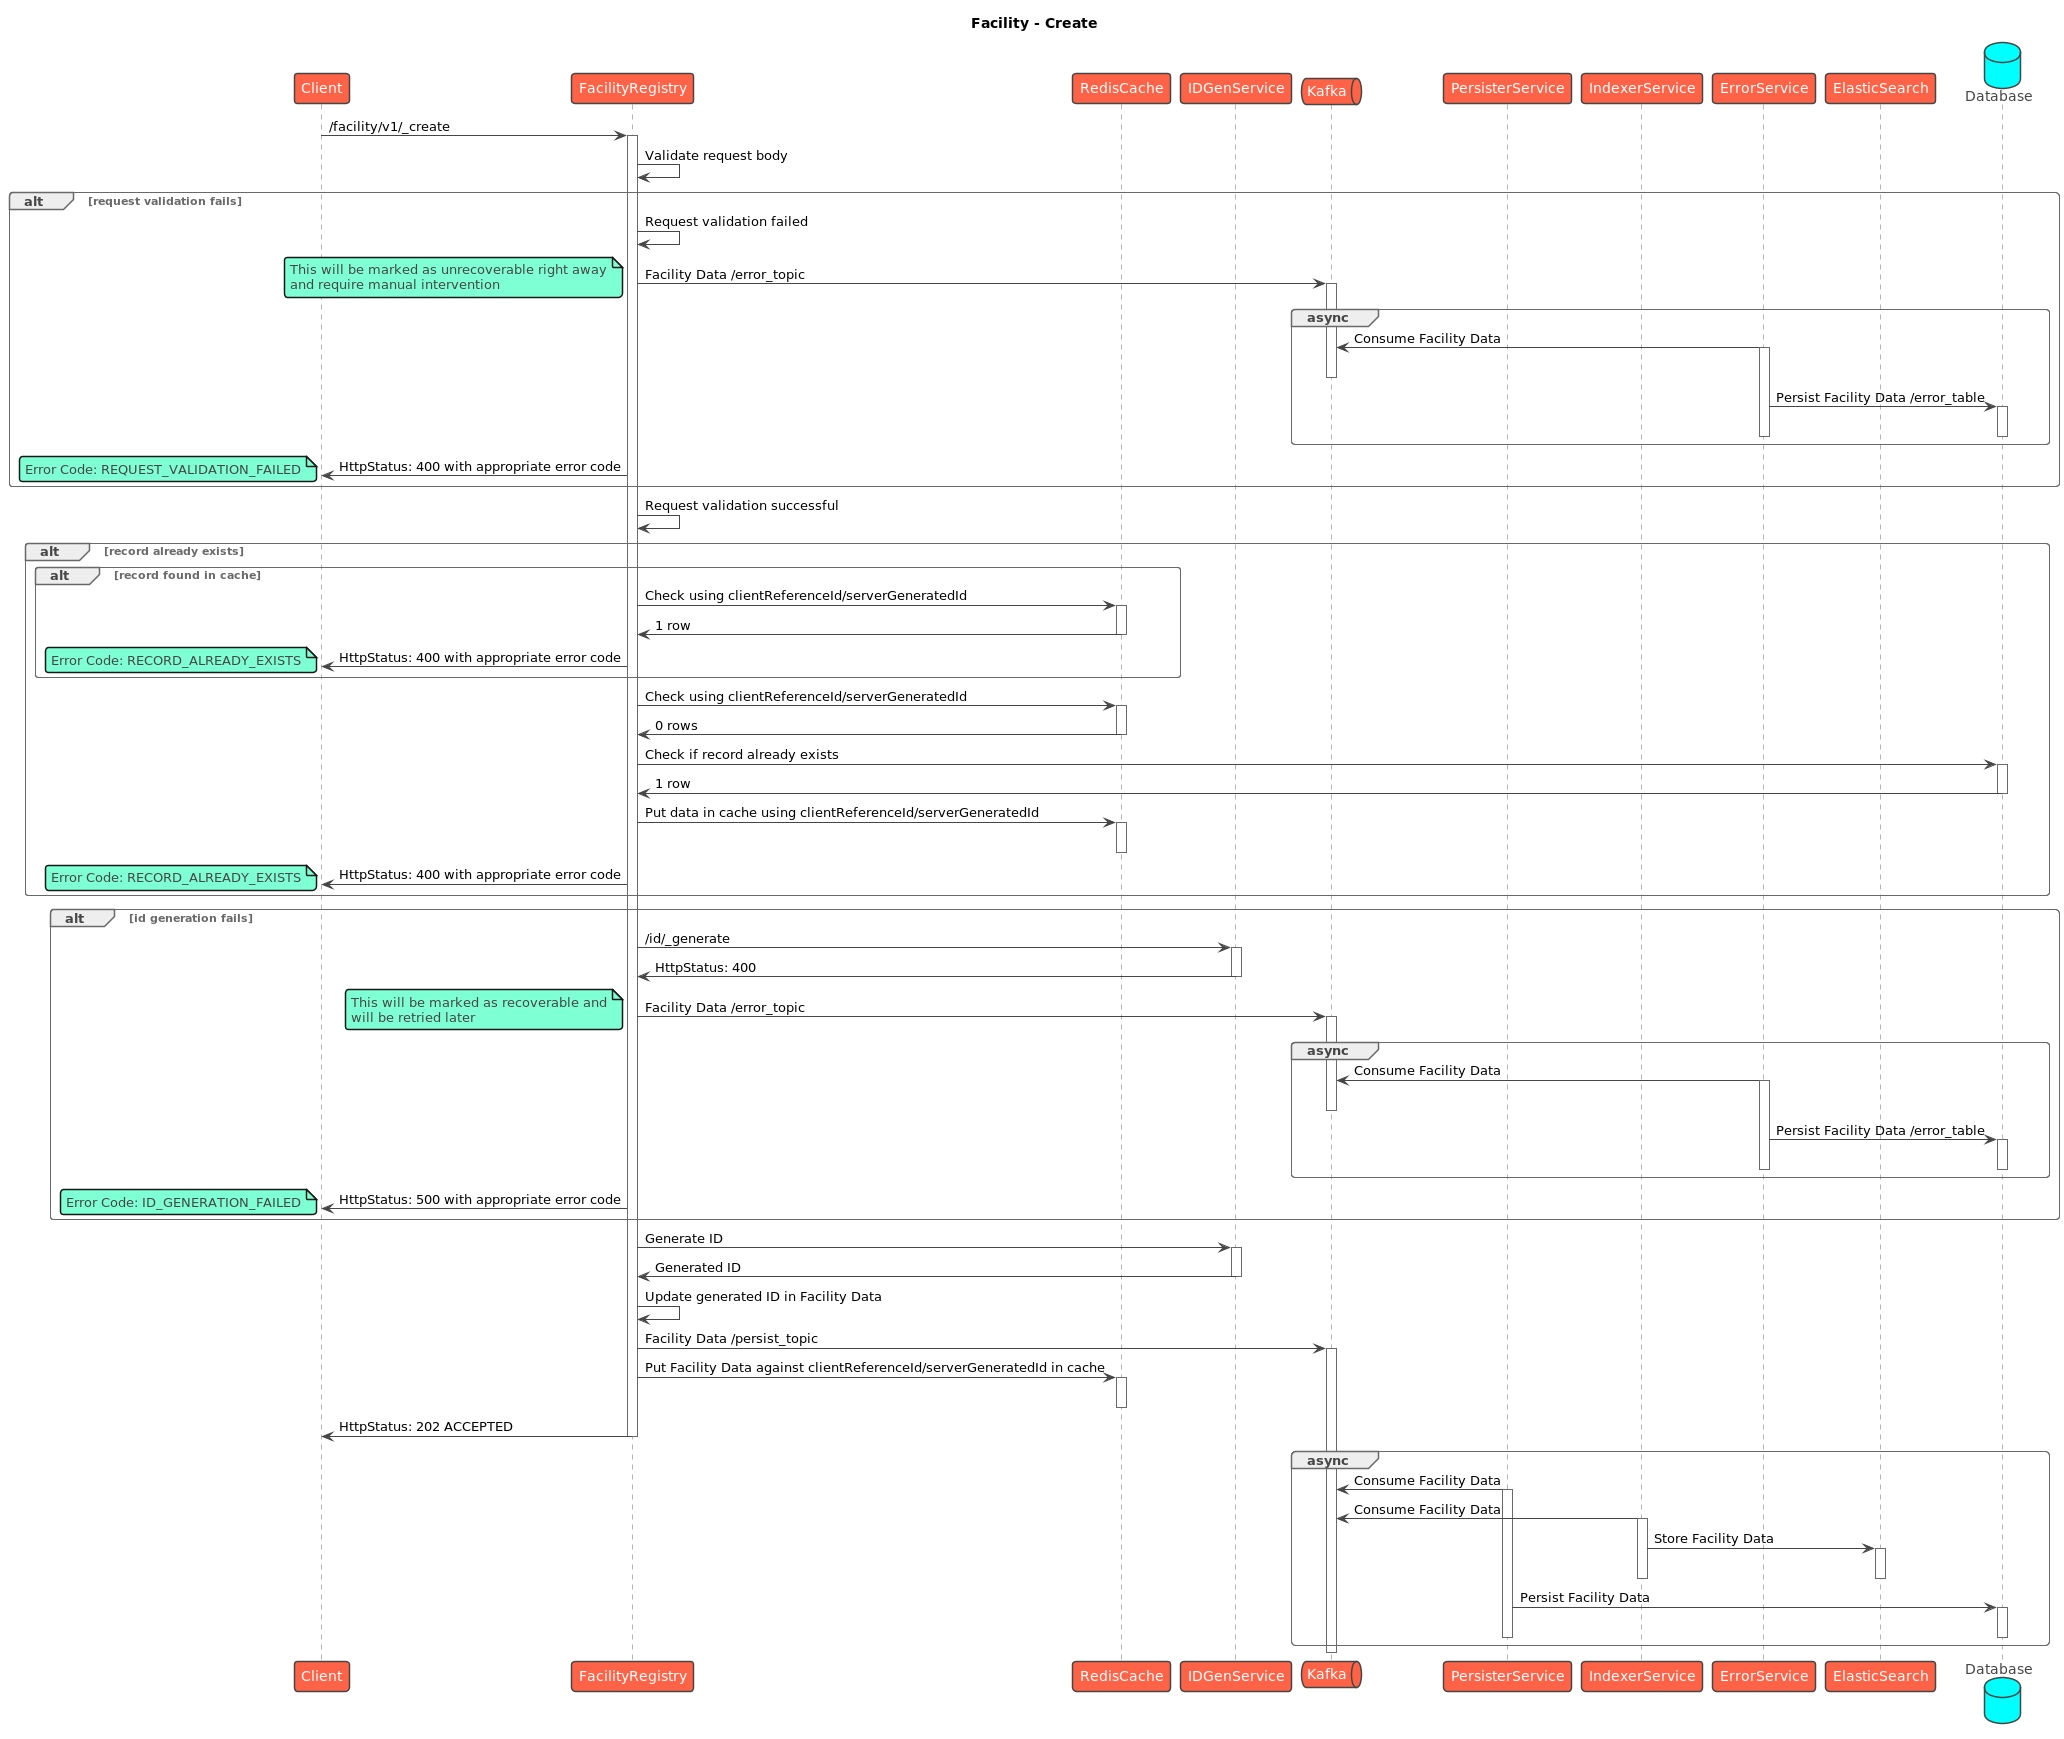
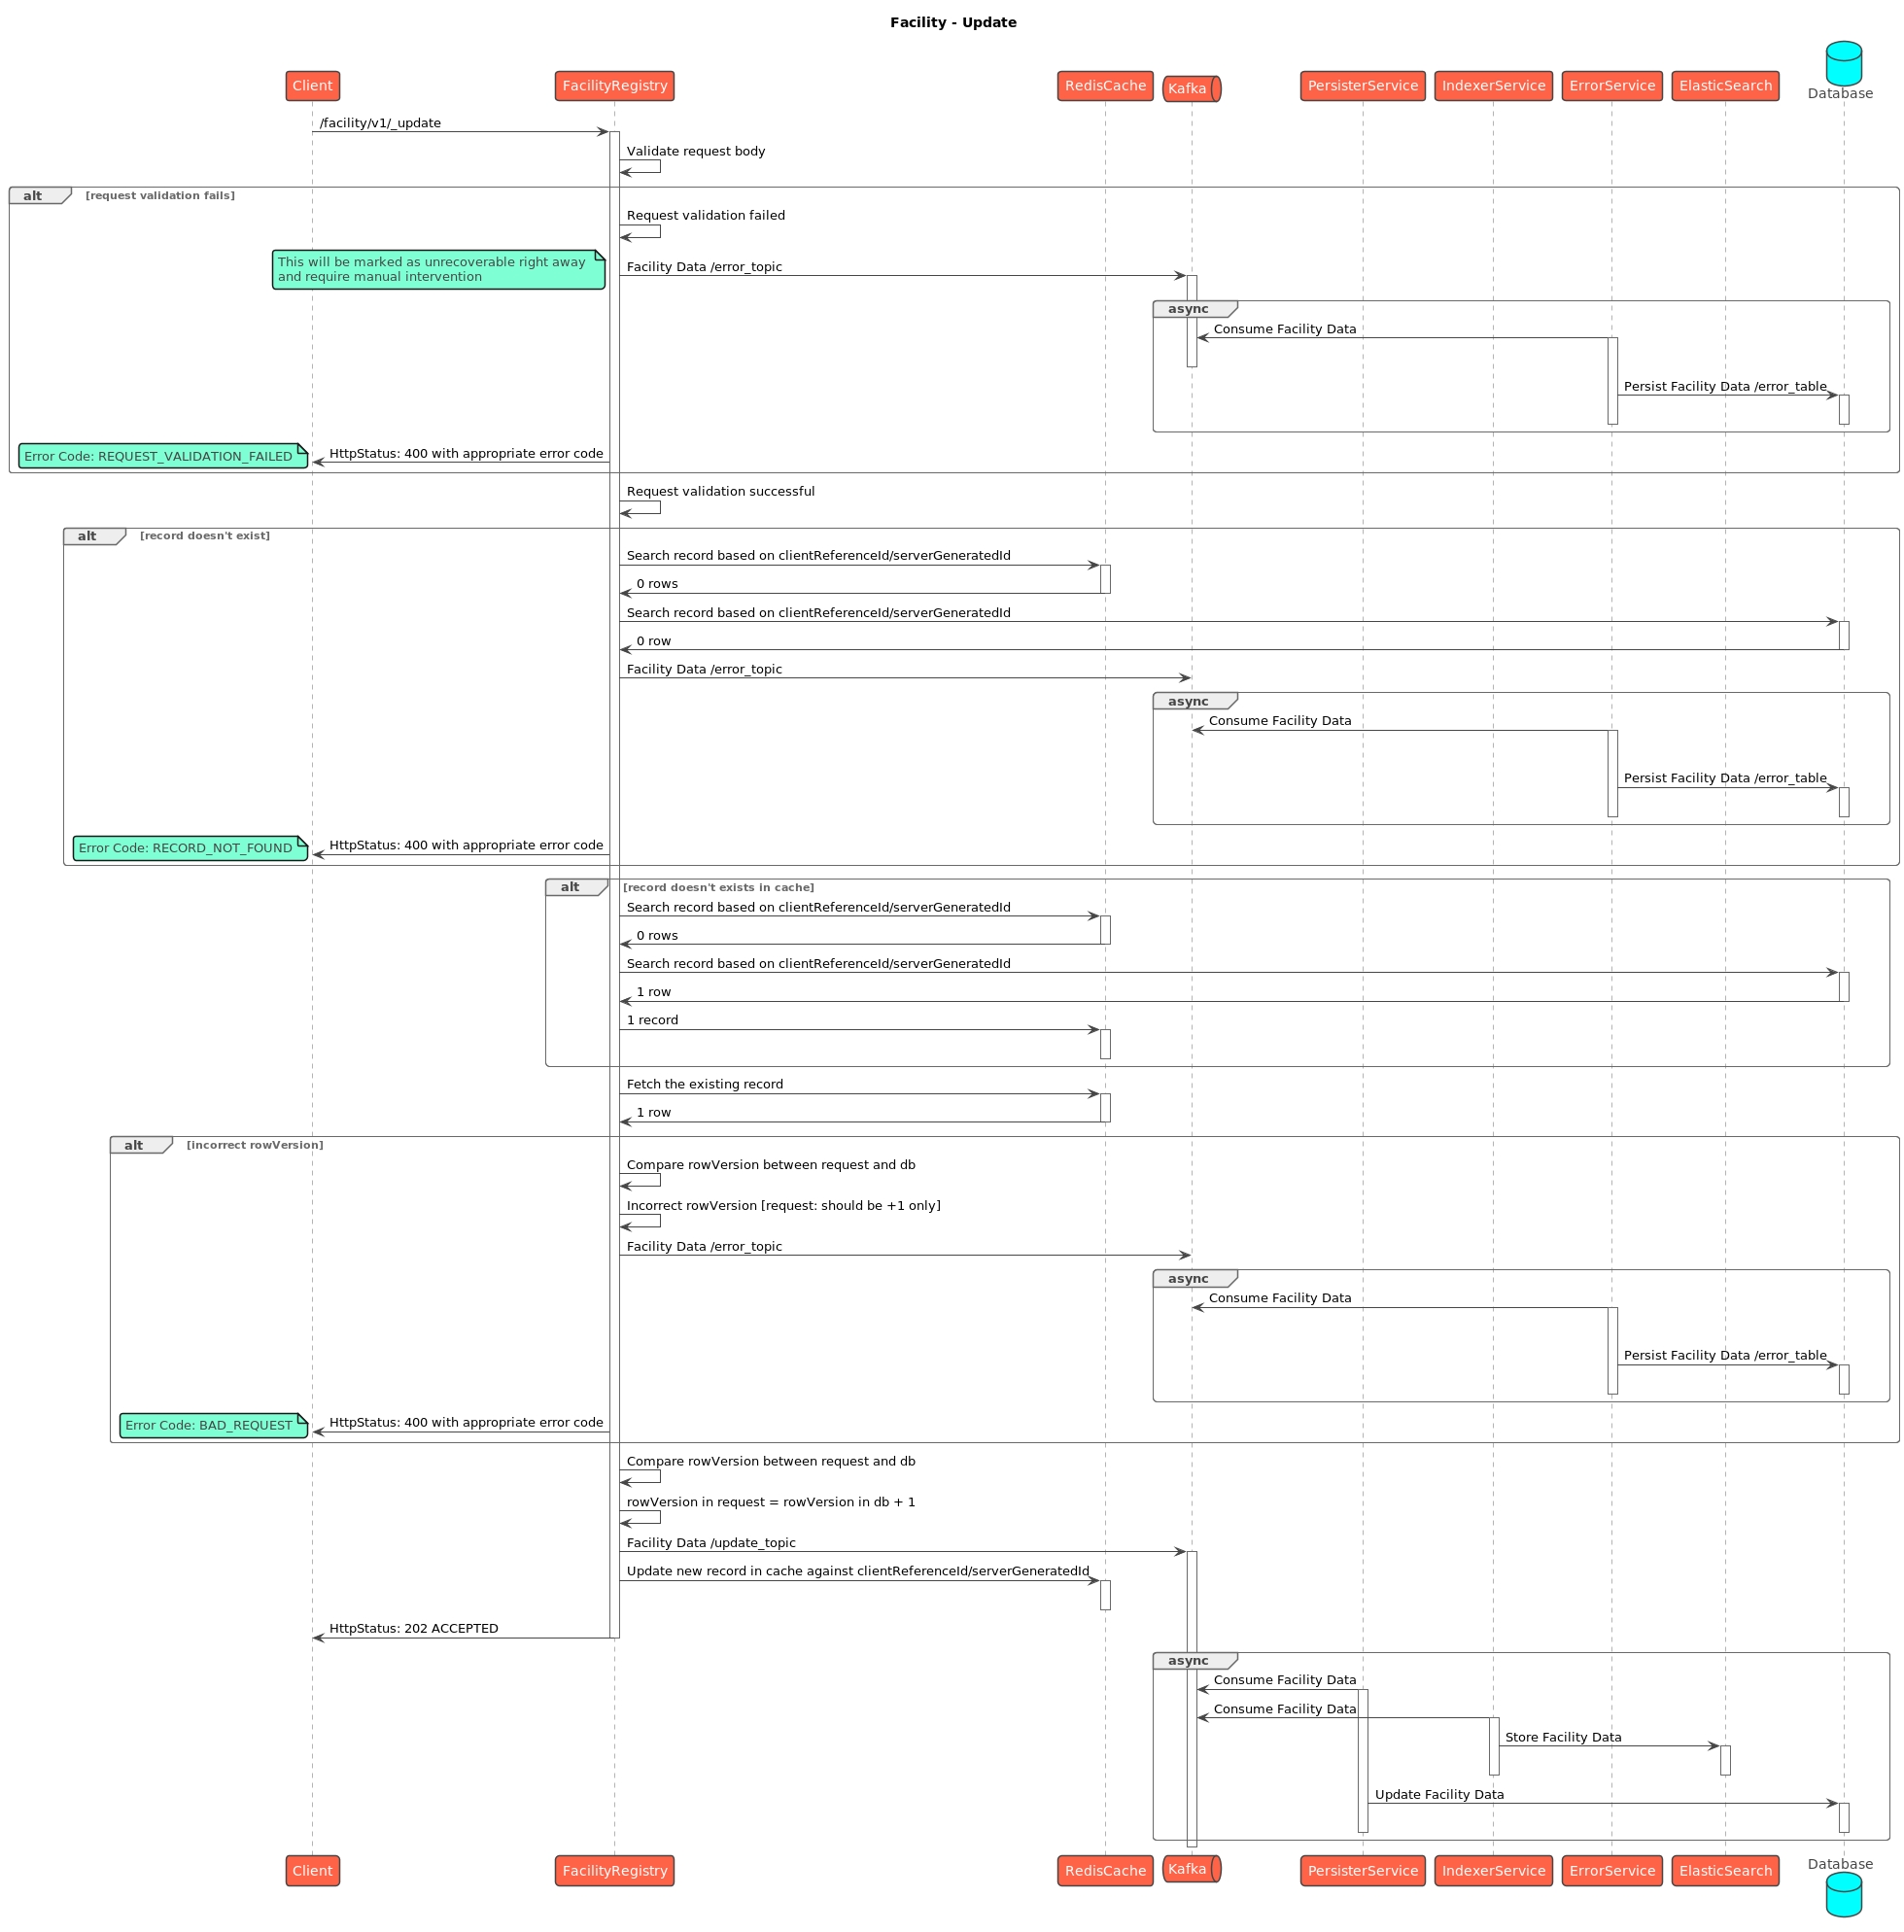
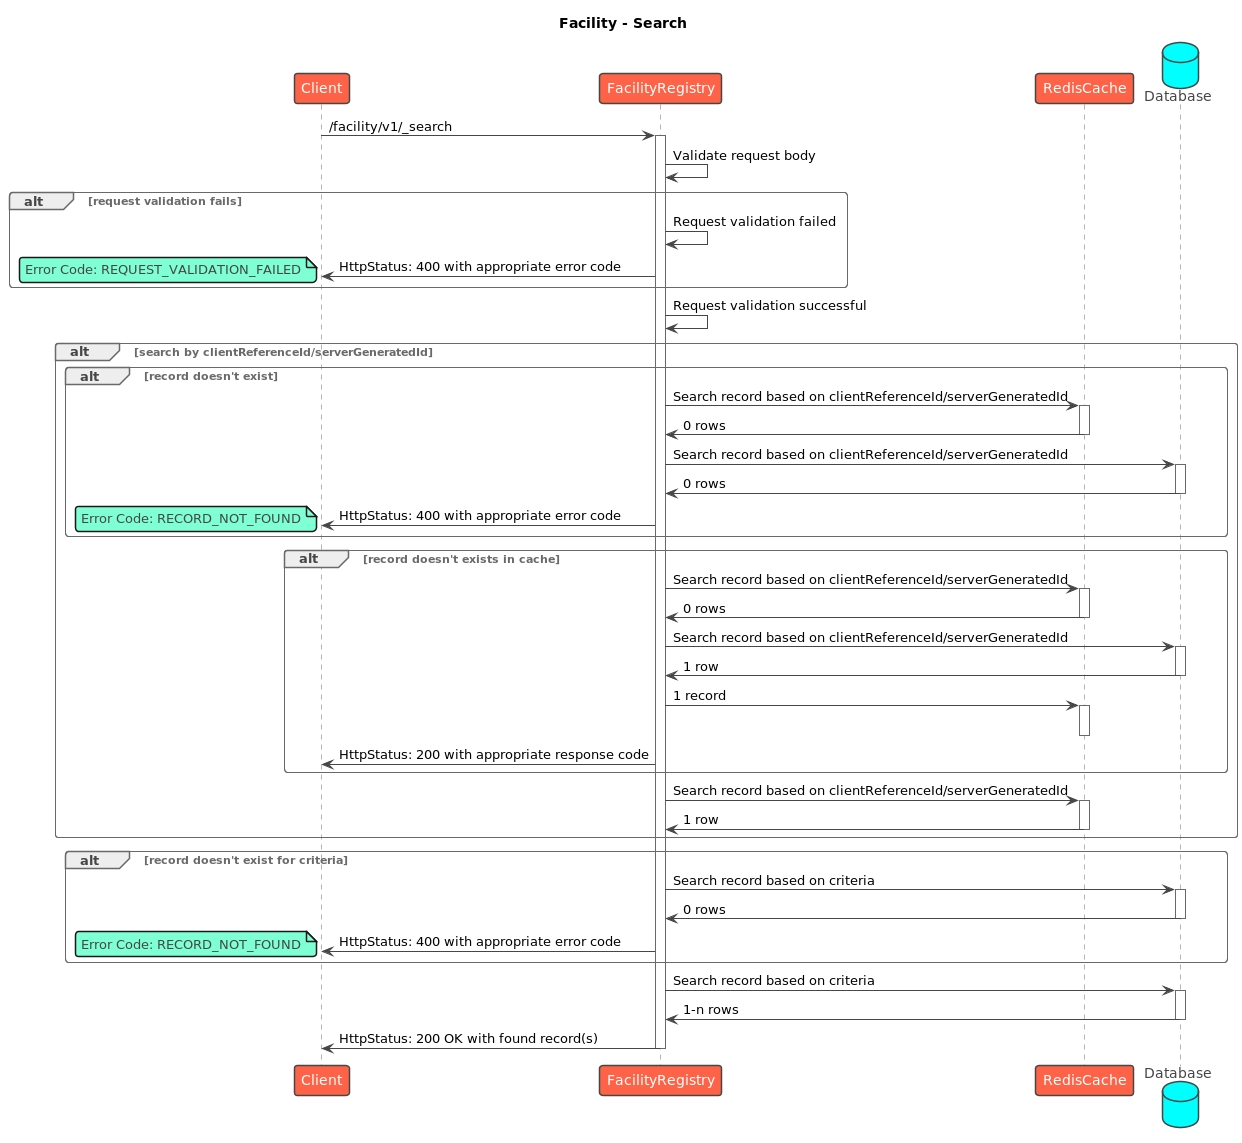
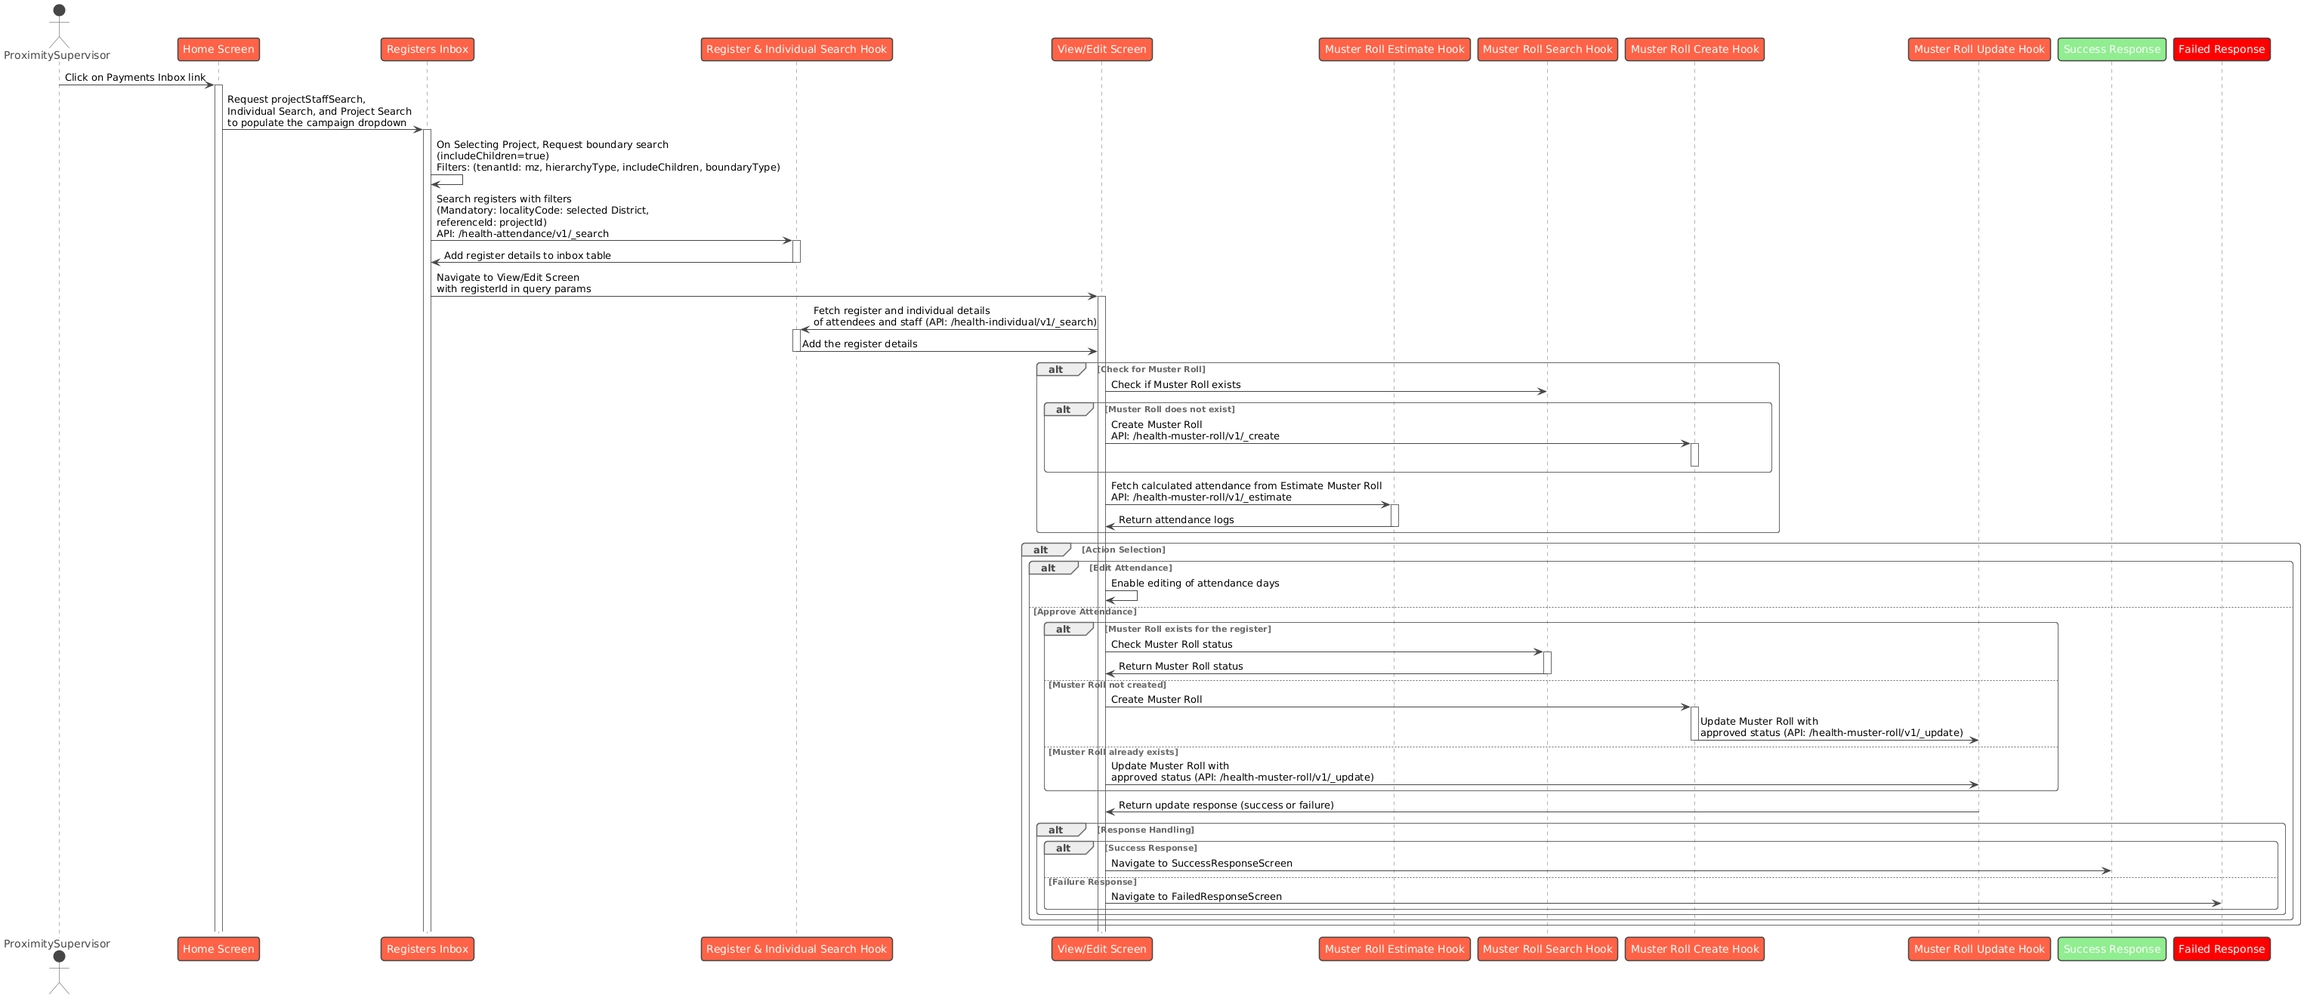
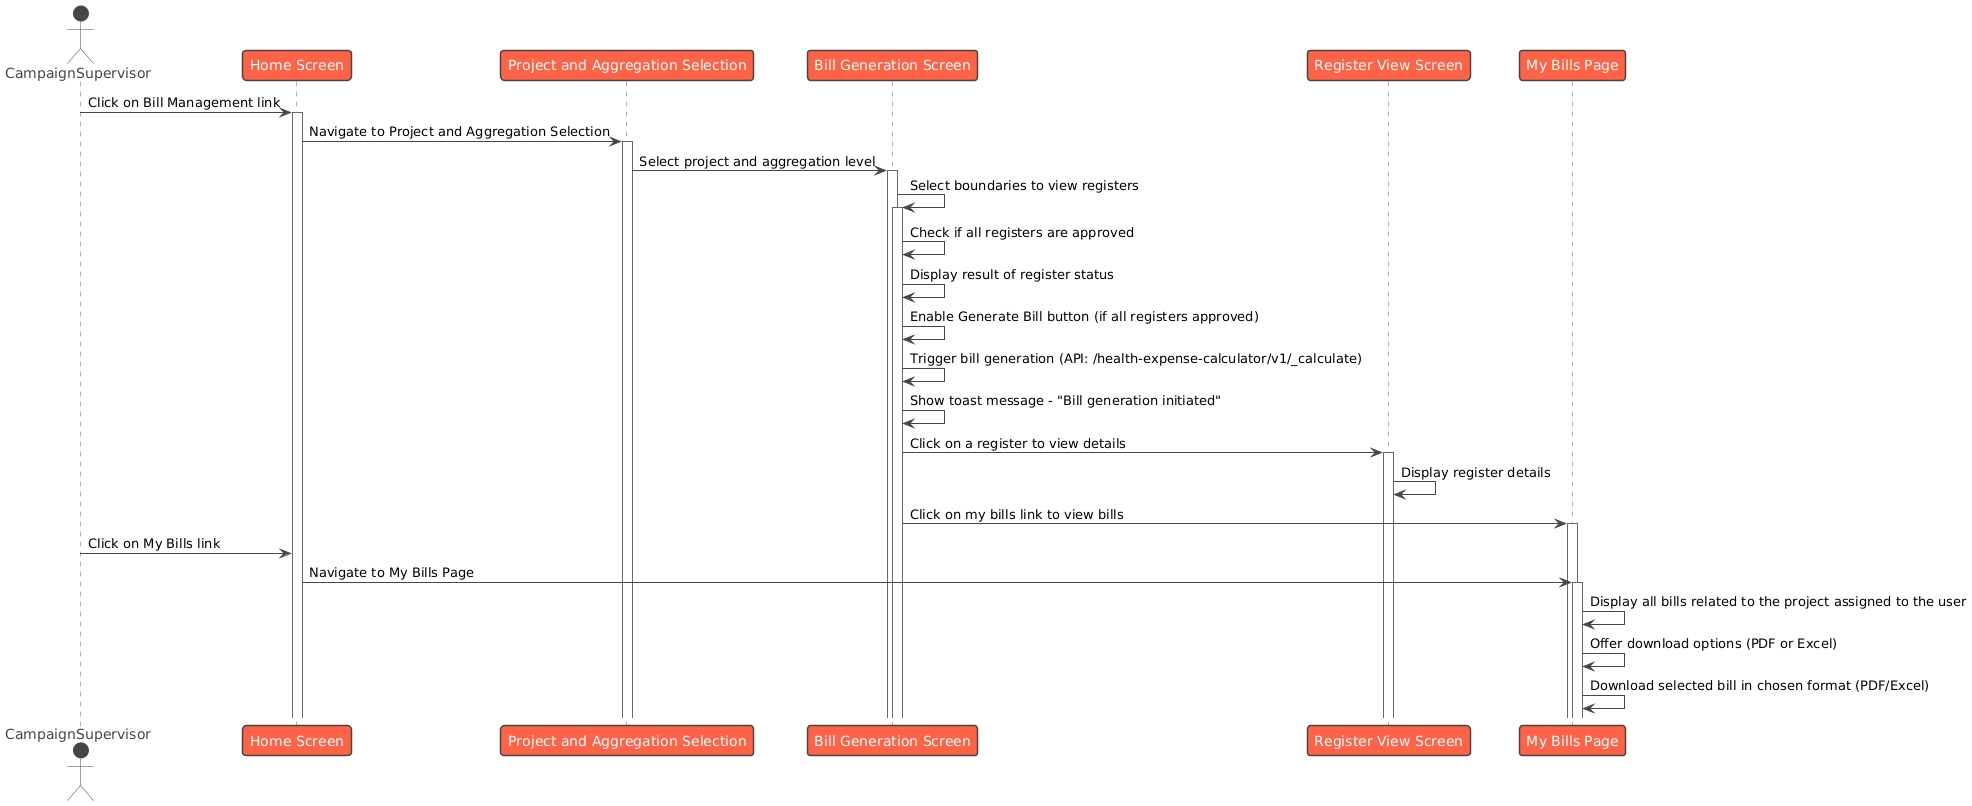
GZip decompress → JSON string
Parse JSON → Map

The template generation process creates structured Excel templates with localized headers, metadata, and placeholder content based on the campaign type.
Defines the sheet structure and metadata for each campaign type:
Purpose: Dynamically generate campaign-specific Excel templates.
Key Method: TemplateClass.generate()
Steps:
Fetch campaign details from DB
Load boundary hierarchy and relationships
Localize boundary data and headers
Generate readme and metadata sheets
Create SheetMap with structured data
Return data to generate Excel
Handles the uploaded Excel file, validates it, and processes the data to create or update entities in the system.
Defines how to process uploaded Excel files:
Purpose: Validate and persist uploaded data.
Key Method: TemplateClass.process()
Steps:
Validate resource details (file, campaign)
Extract data from uploaded sheets
Enrich data using boundary hierarchy
Create/update boundary records
Generate mapping and project data
Process in topological (dependency-resolved) order
Purpose: Perform schema-based and business-rule validations.
Key Method: TemplateClass.process()
Steps:
Validate against schema (column names, types)
Check required vs optional columns
Validate logical integrity (parent-child)
Mark errors in Excel (cell comments, color)
Return annotated Excel for user corrections
Trigger: User requests a template for a specific campaign type (e.g., boundary, user, facility)
Process:
Load configuration from generationTemplateConfigs
Fetch campaign data and related hierarchy
Dynamically import *-generateClass.ts
Call TemplateClass.generate() to generate data
Generate Excel file with formatting, validation, and localization
Upload to file store
Response: Returns fileStoreId and generation status
Upload: User uploads the filled Excel template
🔍 Validation Phase (Optional)
Load validation class (e.g., boundaryValidation-processClass)
Validate against schema and business rules
Annotate errors directly in Excel file
Return Excel for correction
⚙️ Processing Phase
Load processing config and class (e.g., boundary-processClass)
Call TemplateClass.process() to:
Extract and validate data
Enrich using hierarchy
Persist via Kafka (batch insert/update)
Response: Returns processed Excel and summary
const className = `${type}-generateClass`; // or `${type}-processClass`
const classFilePath = path.join(__dirname, '..', 'generateFlowClasses', `${className}.ts`);
const { TemplateClass } = await import(classFilePath);
Plug-and-play support for new types (boundary, user, etc.)
Reduces code duplication
Detects locale from Excel metadata
Supports multilingual sheet names and headers
Error messages and field names localized dynamically
Asynchronous, scalable data ingestion
Sends status, logs, and errors to Kafka
Enables reliable batch processing
Schema-driven validation
Business rule enforcement
Marks errors with cell comments and styles
Supports required vs optional fields
Handles parent-child boundary relationships
Uses topological sorting to maintain dependency order
Supports complex graph-based boundary structures
Type
Description
boundary
Geographic boundary and hierarchy
user
User onboarding and management
facility
Healthcare facility setup
userCredential
Authentication data for users
Each type has:
A generate class for template creation
A process class for data ingestion
A validation class for pre-checking data
boundary: {
sheets: [
{
sheetName: "HCM_README_SHEETNAME",
schemaName: "target-readme",
lockWholeSheet: true
}
]
}
export async function generateResource(responseToSend: any, templateConfig: any) {
// 1. Get localization maps
// 2. Load generate class dynamically
// 3. Generate SheetMap using TemplateClass.generate()
// 4. Create Excel file with localized structure
// 5. Upload to file store
// 6. Send status/event to Kafka
}boundary: {
sheets: [
{
sheetName: "HCM_README_SHEETNAME",
lockWholeSheet: true
}
],
enrichmentFunction: "enrichTargetProcessConfig"
}export async function processResource(ResourceDetails: any, templateConfig: any) {
// 1. Download Excel file from file store
// 2. Extract locale and sheet structure
// 3. Load localization maps
// 4. Dynamically load process/validation class
// 5. Perform validation and/or processing
// 6. Annotate sheet with validation results
// 7. Upload processed file
// 8. Send status/event to Kafka
}hierarchyType: Type of hierarchy.
forceUpdate: (Optional) Boolean indicating whether to force update existing data.
Data Processing:
Fetch Data: Fetches existing data from the database.
Modify Data: Modify the retrieved data as necessary.
Generate New ID: Generates a new random ID and sets the file store ID to null.
Expire Old Data: Marks existing data status as expired.
Generate New Data: Generates new data based on the request parameters.
Update and Persist: Updates and persists the generated request along with the new data.
Force Update Logic:
If the forceUpdate parameter is set to true:
Search and Update: Searches for existing data of the specified type and updates the existing data information.
If the forceUpdate parameter is not provided or set to false:
Fetch Existing Data: Retrieves already persisted data from the database of the specified type.
Response Creation: After processing the request, the server creates a response containing the details of the generated resource.
Response Dispatch: The server sends the generated response back to the client.
Error Handling: If errors occur, generate an error response and send it.
Localise Headers:
Use getLocalizedHeaders with localizationMap.
Localise Sheet Name:
Use getLocalizedName with localizationMap and generate a sheet.
stringProperties for string-based columns.
numberProperties for numeric-based columns.
enumProperties for enumerated columns.
Define New Column
Add the new column to the schema under the appropriate properties section:
String Column: Include attributes such as name, type, maxLength, minLength, isUnique, isRequired, description, and orderNumber.
Number Column: Include attributes such as name, type, maximum, minimum, isRequired, description, orderNumber, and errorMessage.
Enum Column: Include attributes such as name, enum, isRequired, description, and orderNumber.
Ensure Column Uniqueness
Ensure that the isUnique property is correctly set for string columns to enforce uniqueness.
Column Visibility (Future Implementation)
Note that hideColumn and freezeColumn features will be implemented in the next version.
Example :
sheetColumn: A
sheetColumnName: HCM_ADMIN_CONSOLE_FACILITY_CODE
resultantPath: id
type: string
Mapping: Data from column A (HCM_ADMIN_CONSOLE_FACILITY_CODE) in the sheet will be mapped to id in the API data.
Facility Type
Facility Status
Facility Usage
Facility Usage: Facility usage can be 'Active' or 'Inactive'. Active facilities are used in the campaign and require a boundary code to map.
Employment Type
forceUpdate: Boolean type (either true or false)
hierarchyType: Name of Boundary Hierarchy
campaignId: CampaignId
Tenant ID Validation: Ensure tenantId matches in query and RequestInfo.userInfo.
Force Update: Default to "false" if missing.
Hierarchy Type Validation: Validate hierarchyType for the tenantId.
Processing of Generate Request:
Fetch Data from DB:
Retrieve data using getResponseFromDb(request).
Modify Response Data:
Modify the fetched data with getModifiedResponse(responseData).
Generate New Entry:
Create a new entry with getNewEntryResponse(request).
Expire Old Data:
Update the status of old data to expired using getOldEntryResponse(modifiedResponse, request).
Persist Data Changes:
Call updateAndPersistGenerateRequest(newEntryResponse, oldEntryResponse, responseData, request).
Purpose:
If forceUpdate is true and data exists: Mark existing data as expired and create new data.
Boundary Data Processing:
Generate new Boundary Data:
Fetch Boundary Relationships.
If no boundary is found, generate an empty boundary sheet.
Fetch Filters from CampaignId and generate Boundary Data based on those Filters.
If Filters is null, it will generate the whole Boundary Data.
After the Boundary Sheet has been generated, append the ReadMeSheet.
Generate different tabs based on any boundary level configured (here District).
Generating Different Boundary Templates based on Campaign Type
isActive = trueOn update action:
Parent campaign (parentId) must exist and isActive = false (inactive).
To create, merge the parent and new boundaries.
For updates, only new boundaries are considered for new projects.
Template/Resource Generation:
Generate templates for relevant types (boundary, user, facility).
Edit and manage sheets/mappings as per user input.
Retry:
On failure, retry resumes from the last state using the latest CampaignDetails object.
If the retry fails repeatedly, log the state and escalate for manual intervention.
Additional resource/template types can be added.
Retry logic can be enhanced for partial retries and granular checkpoints.
On Validation Pass:
Create the child campaign with:
isActive: true (indicating it's currently being usable)
status: 'draft' (or 'started'/'inprogress' based on next steps)
parentId: set to the parent campaign's ID
The parent campaign remains isActive: true.
Why: This ensures only one active child can exist at a time. The parent retains operational status while the child is in development.
isActive: true
Why: The child is actively being updated, but hasn't yet taken over. The parent remains the official operational campaign.
Why: The failed child still exists and can be retried. The parent remains active. If it’s decided not to retry the child, it can later be cancelled (setting isActive: false).
FacilityService: Responsible for creating and updating facility-related data.
HRMSService: Manages the creation and updating of employee data.
MDMSService: Provides master data such as project types.
FileStoreService: Manages the storage and retrieval of resource files.
Database: Stores campaign-related data and status updates.
The BoundaryService responds with the relevant boundary relationship data.
Fetch Project Type Master
The CampaignManager requests the MDMSService to fetch the project type master data.
The MDMSService responds with the project type master.
Validate Resource Files
The CampaignManager queries the Database to check if the input resource files have already been validated.
The Database responds with the validation status of the files.
Fetch Parent Campaign Object
The CampaignManager queries the Database to fetch the parent campaign object based on the parentCampaignId.
The Database responds with the parent campaign object.
Validation Check
The CampaignManager checks if all file templates and data are validated:
If validation is successful, the CampaignManager informs the Client that the campaign update process has started, and the user needs to track the status using an ID.
If validation fails, the CampaignManager returns an error message, indicating which validation failed, and the user must resubmit the request.
Deactivate Parent Campaign
The CampaignManager updates the Database to mark the parent campaign object as inactive.
Retrieve Resource Files
The CampaignManager interacts with the FileStoreService to search for the resource based on the filestoreid.
The FileStoreService responds with the valid resource files.
Process Resource Data
The CampaignManager processes the retrieved sheets to identify any resource data that needs to be created.
Facility Data Creation
The CampaignManager sends a request to the FacilityService to create facility data.
The FacilityService responds that the facilities have been created successfully.
Employee Data Creation
The CampaignManager sends a request to the HRMSService to create employee data.
The HRMSService responds that the employees have been created successfully.
Search for Parent Project
The CampaignManager sends a request to the ProjectService to search for the previous or parent project.
The ProjectService responds with the project object.
Create New Projects for Added Boundaries
The CampaignManager copies the project content from the parent project while creating new projects for newly added boundaries.
The CampaignManager sends a request to the ProjectService to create project data for newly added boundary data and map it according to its parent.
The ProjectService responds that the projects have been created successfully.
Update Facility Data
The CampaignManager identifies what exact data needs to be updated for facilities.
The CampaignManager sends a request to the ProjectService to create project-facility mapping if any new facilities are added.
The ProjectService responds that the project-facility mapping has been created successfully.
The CampaignManager sends a request to the ProjectService to search for the previous project-facility mapping.
The ProjectService responds with the project-facility mapping data.
The CampaignManager sends a request to the ProjectService to update the project-facility mapping.
The ProjectService responds that the project-facility mapping has been updated successfully.
Update Staff Data
The CampaignManager identifies what exact data needs to be updated for staff.
The CampaignManager sends a request to the ProjectService to create project-staff mapping if any new staff are added.
The ProjectService responds that the project-staff mapping has been created successfully.
The CampaignManager sends a request to the ProjectService to search for the previous project-staff mapping.
The ProjectService responds with the project-staff mapping data.
The CampaignManager sends a request to the ProjectService to update the project-staff mapping.
The ProjectService responds that the project-staff mapping has been updated successfully.
Update Campaign Status
The CampaignManager updates the Database with the campaign update status.
Body Parameters:
RequestInfo: Object containing RequestInfo
Query Parameters:
tenantId: Tenant
type: Type of Resource (e.g., boundaryManagement)
forceUpdate: Boolean type (either true or false)
hierarchyType: Name of Boundary Hierarchy
campaignId: default (Mandatory)
Success Response:
Client Initiates Request:
The client initiates a dataGenerate request to the Project Factory Service.
Validation of Request:
Schema Validation: Validate against generateRequestSchema.
Tenant ID Validation: Ensure tenantId matches in query and RequestInfo.userInfo.
Force Update: Default to "false" if missing.
Hierarchy Type Validation: Validate hierarchyType for the tenantId.
Processing of Generate Request:
Fetch Data from DB:
Retrieve data using getResponseFromDb(request).
Modify Response Data:
Boundary Data Processing:
Generate new Boundary Data:
Fetch Boundary Relationships.
If no boundary is found, generate an empty boundary sheet.
Generating Different Boundary Templates based on Campaign Type
Fetch configurable columns from mdms present for each campaign type from schema -[HCM-ADMIN-CONSOLE.adminSchema].
Here is a sample data from the given schema having configurable columns for Campaign SMC-
Handle Error:
Update status to failed, add error details, log the error, and produce a message to the update topic.
Downloading the generated boundary template through /data/_generate API:
One can get the filestoreId through the /data/_download API, which will fetch from the database using the ID from the response of /data/_generate API.
Note:
Downloaded Template will have one ReadMe sheet, one Boundary Data Tab, and all other tabs on a number of unique districts(or whichever level configured).
Body Parameters:
RequestInfo: Object containing RequestInfo
Query Parameters:
tenantId: Tenant
type: Type of Resource (e.g., boundaryManagement)
forceUpdate: Boolean type (either true or false)
hierarchyType: Name of Boundary Hierarchy
campaignId: default (Mandatory)
Success Response:
In this API the filestore ID will be the ID the geoJson file which will be:
Client Initiates Request:
The client initiates a dataGenerate request to the Project Factory Service.
Validation of Request:
Schema Validation: Validate against generateRequestSchema.
Tenant ID Validation: Ensure tenantId matches in query and RequestInfo.userInfo.
Force Update: Default to "false" if missing.
Hierarchy Type Validation: Validate hierarchyType for the tenantId.
Processing of Generate Request:
Fetch Data from DB:
Retrieve data using getResponseFromDb(request).
Modify Response Data:
Boundary Data Processing:
Generate new Boundary Data:
Fetch Boundary Relationships.
If no boundary is found, generate an empty boundary sheet.
Generating Different Boundary Templates based on Campaign Type
Fetch configurable columns from mdms present for each campaign type from schema - (HCM-ADMIN-CONSOLE.adminSchema).
Here is a sample data from the given schema having configurable columns for the SMC campaign:
Handle Error:
Update status to failed, add error details, log the error, and produce a message to the update topic.
Downloading the generated boundary template through /data/_generate API:
One can get the filestoreId through the /data/_download API which will fetch from db using the id from the response of /data/_generate API.
After successful generation, the sheet you will get from filestoreId will be:
Note: The downloaded template will have one ReadMe sheet, one Boundary Data tab, and all other tabs on a number of unique districts (or whichever level is configured).
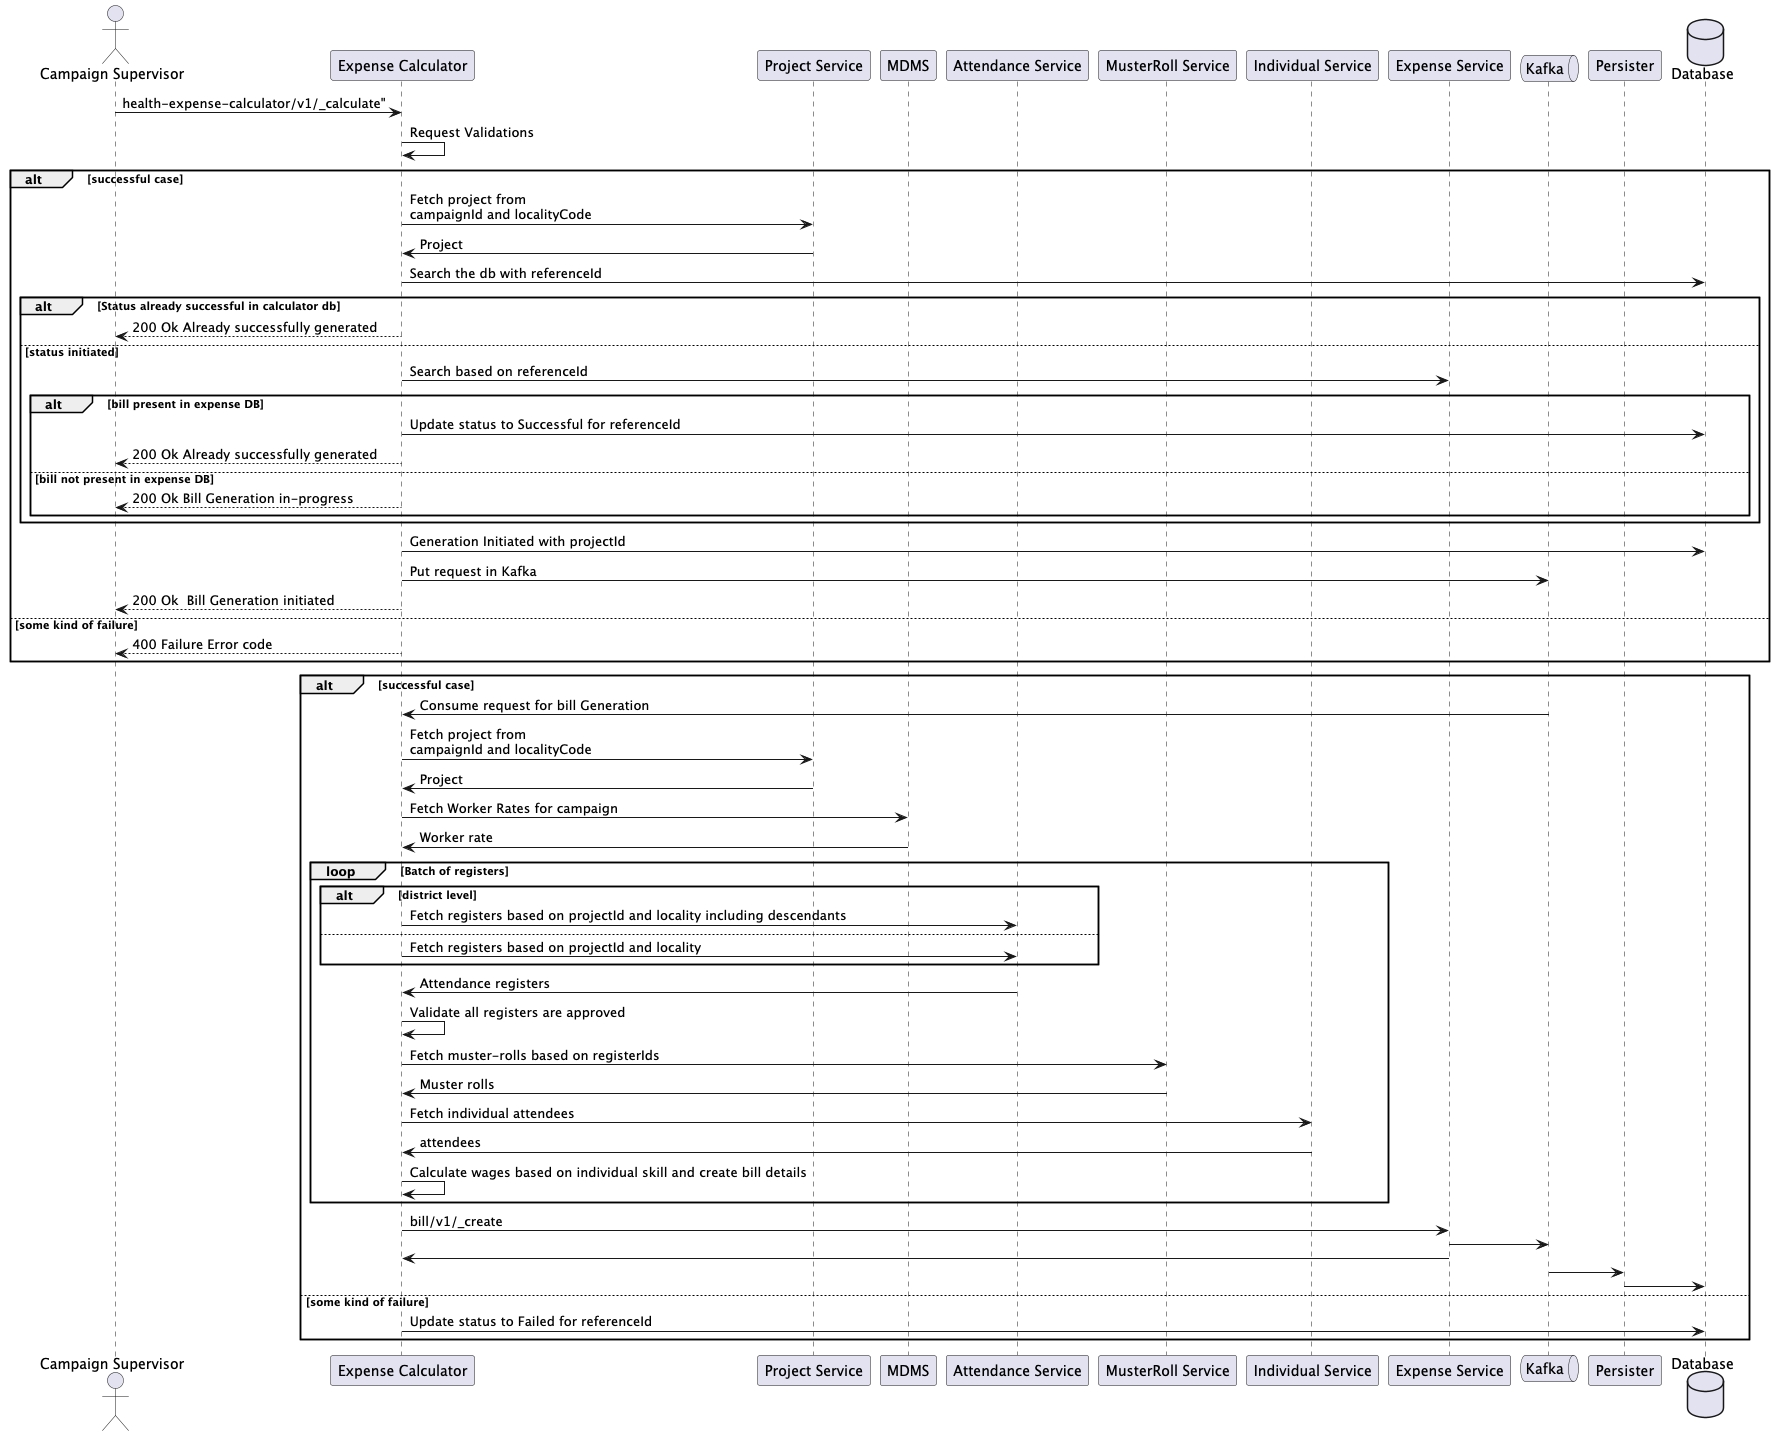
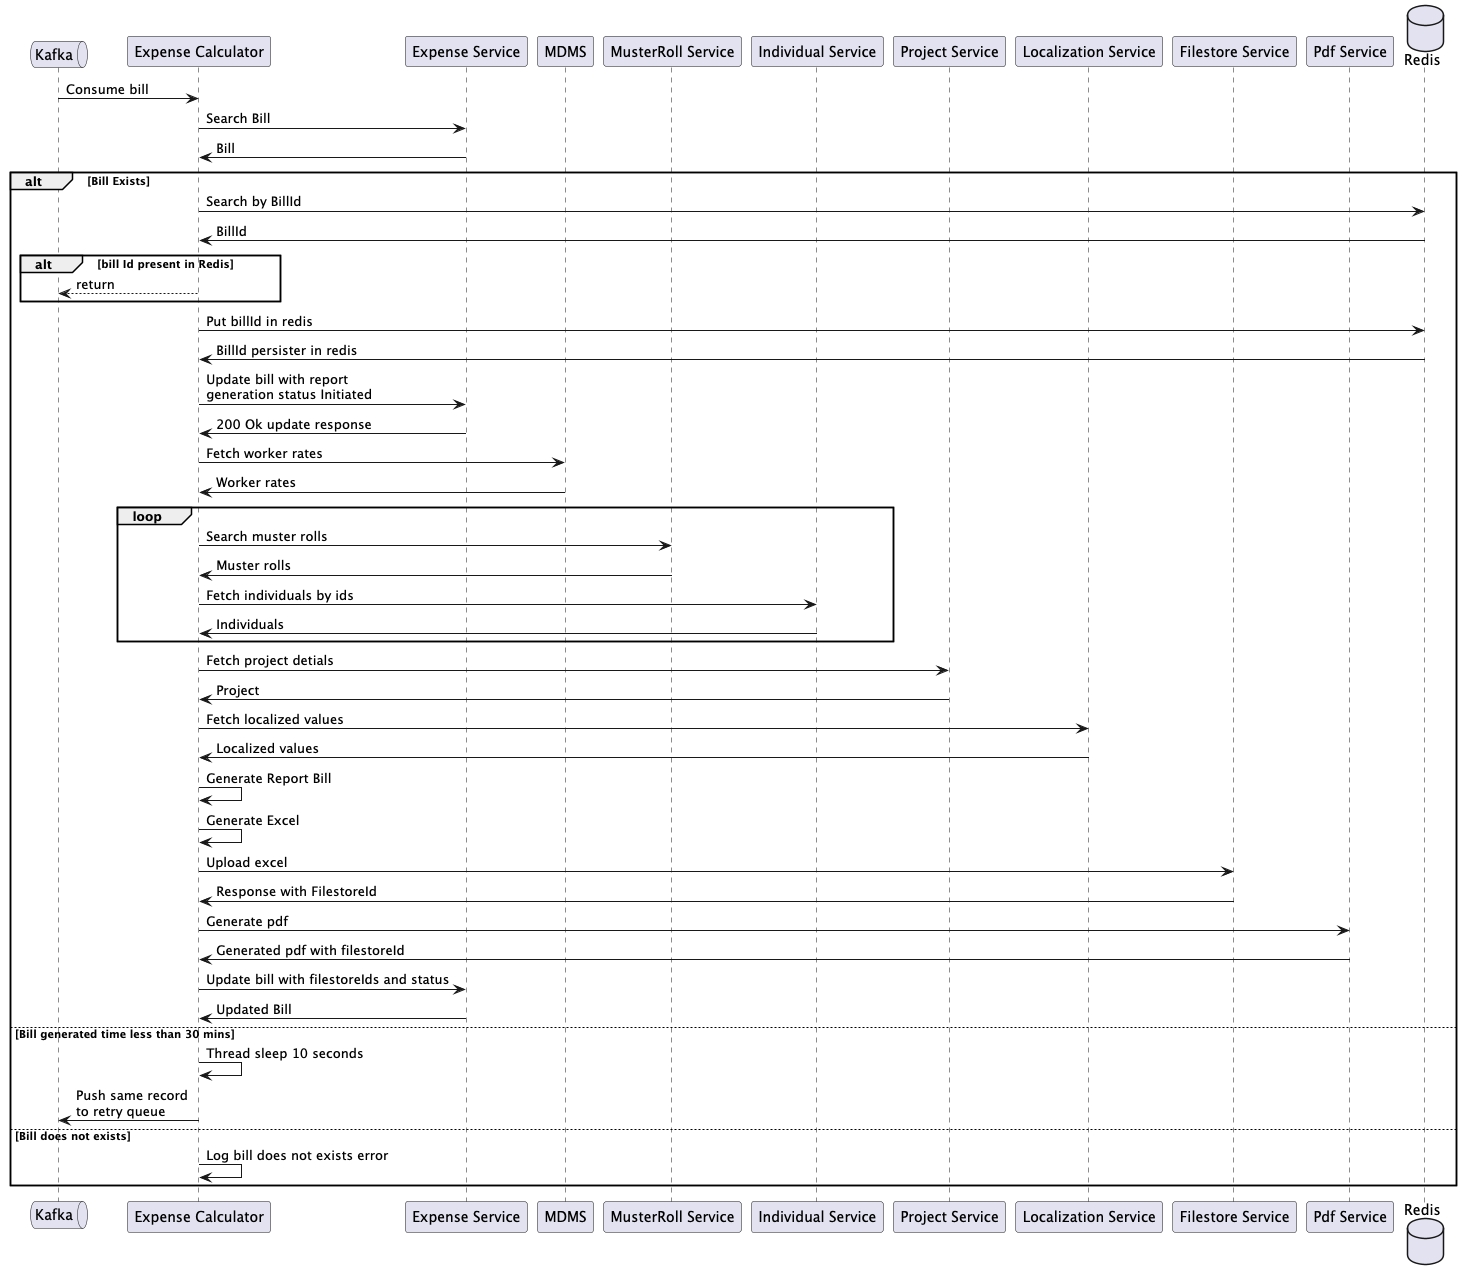
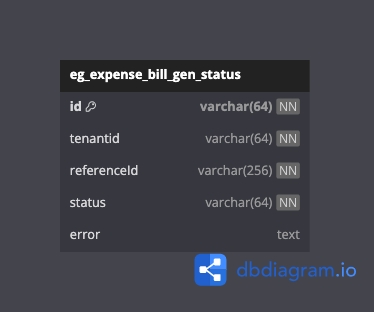
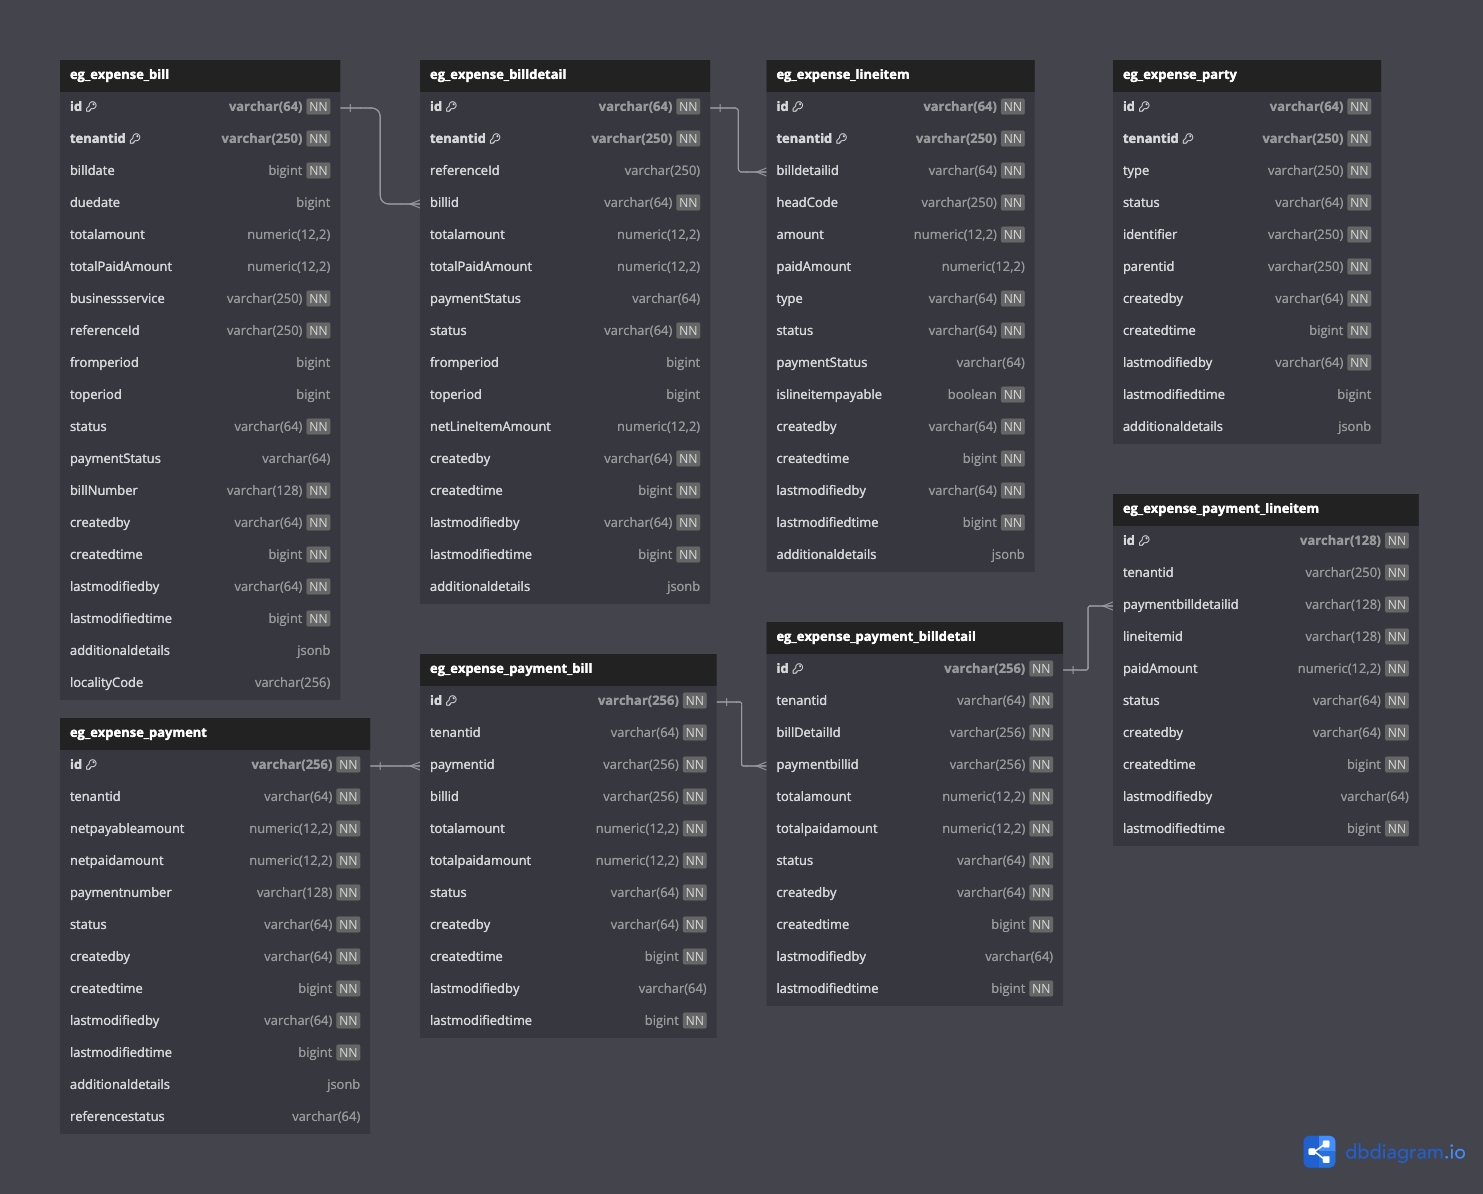
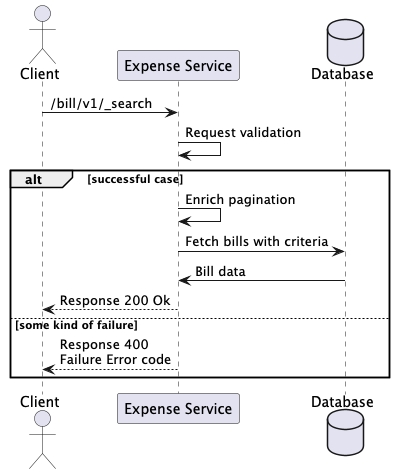
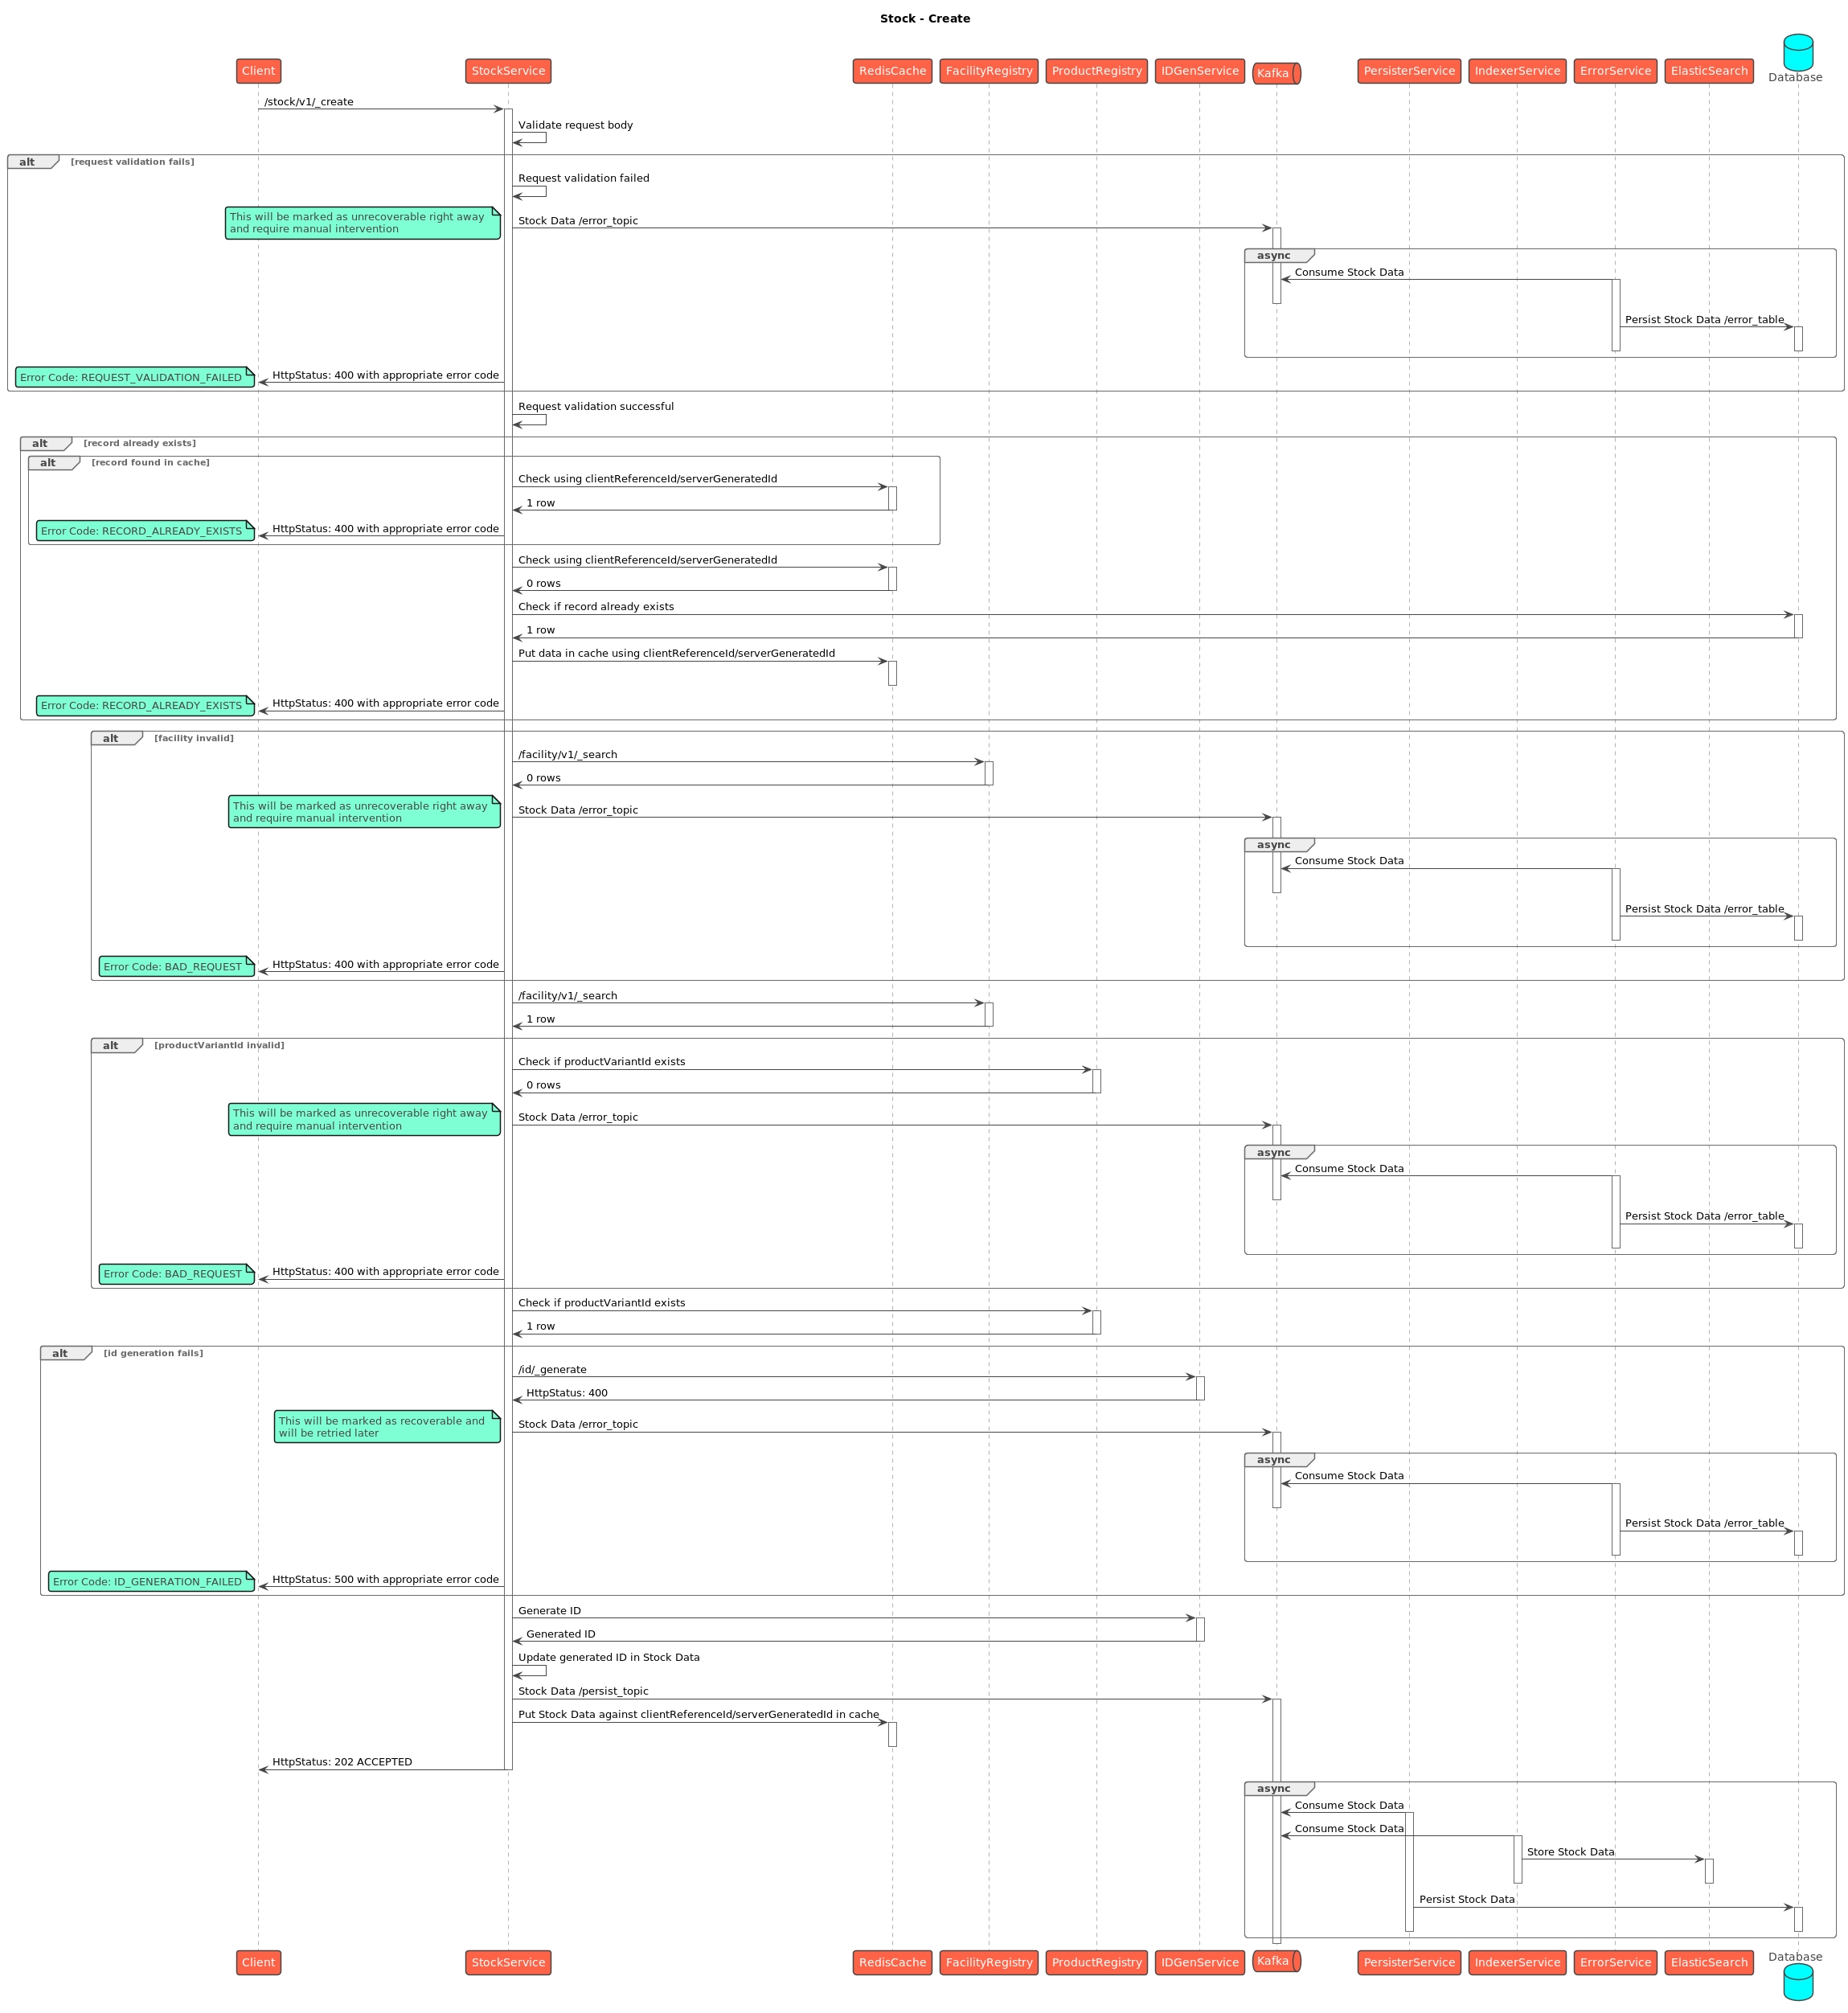
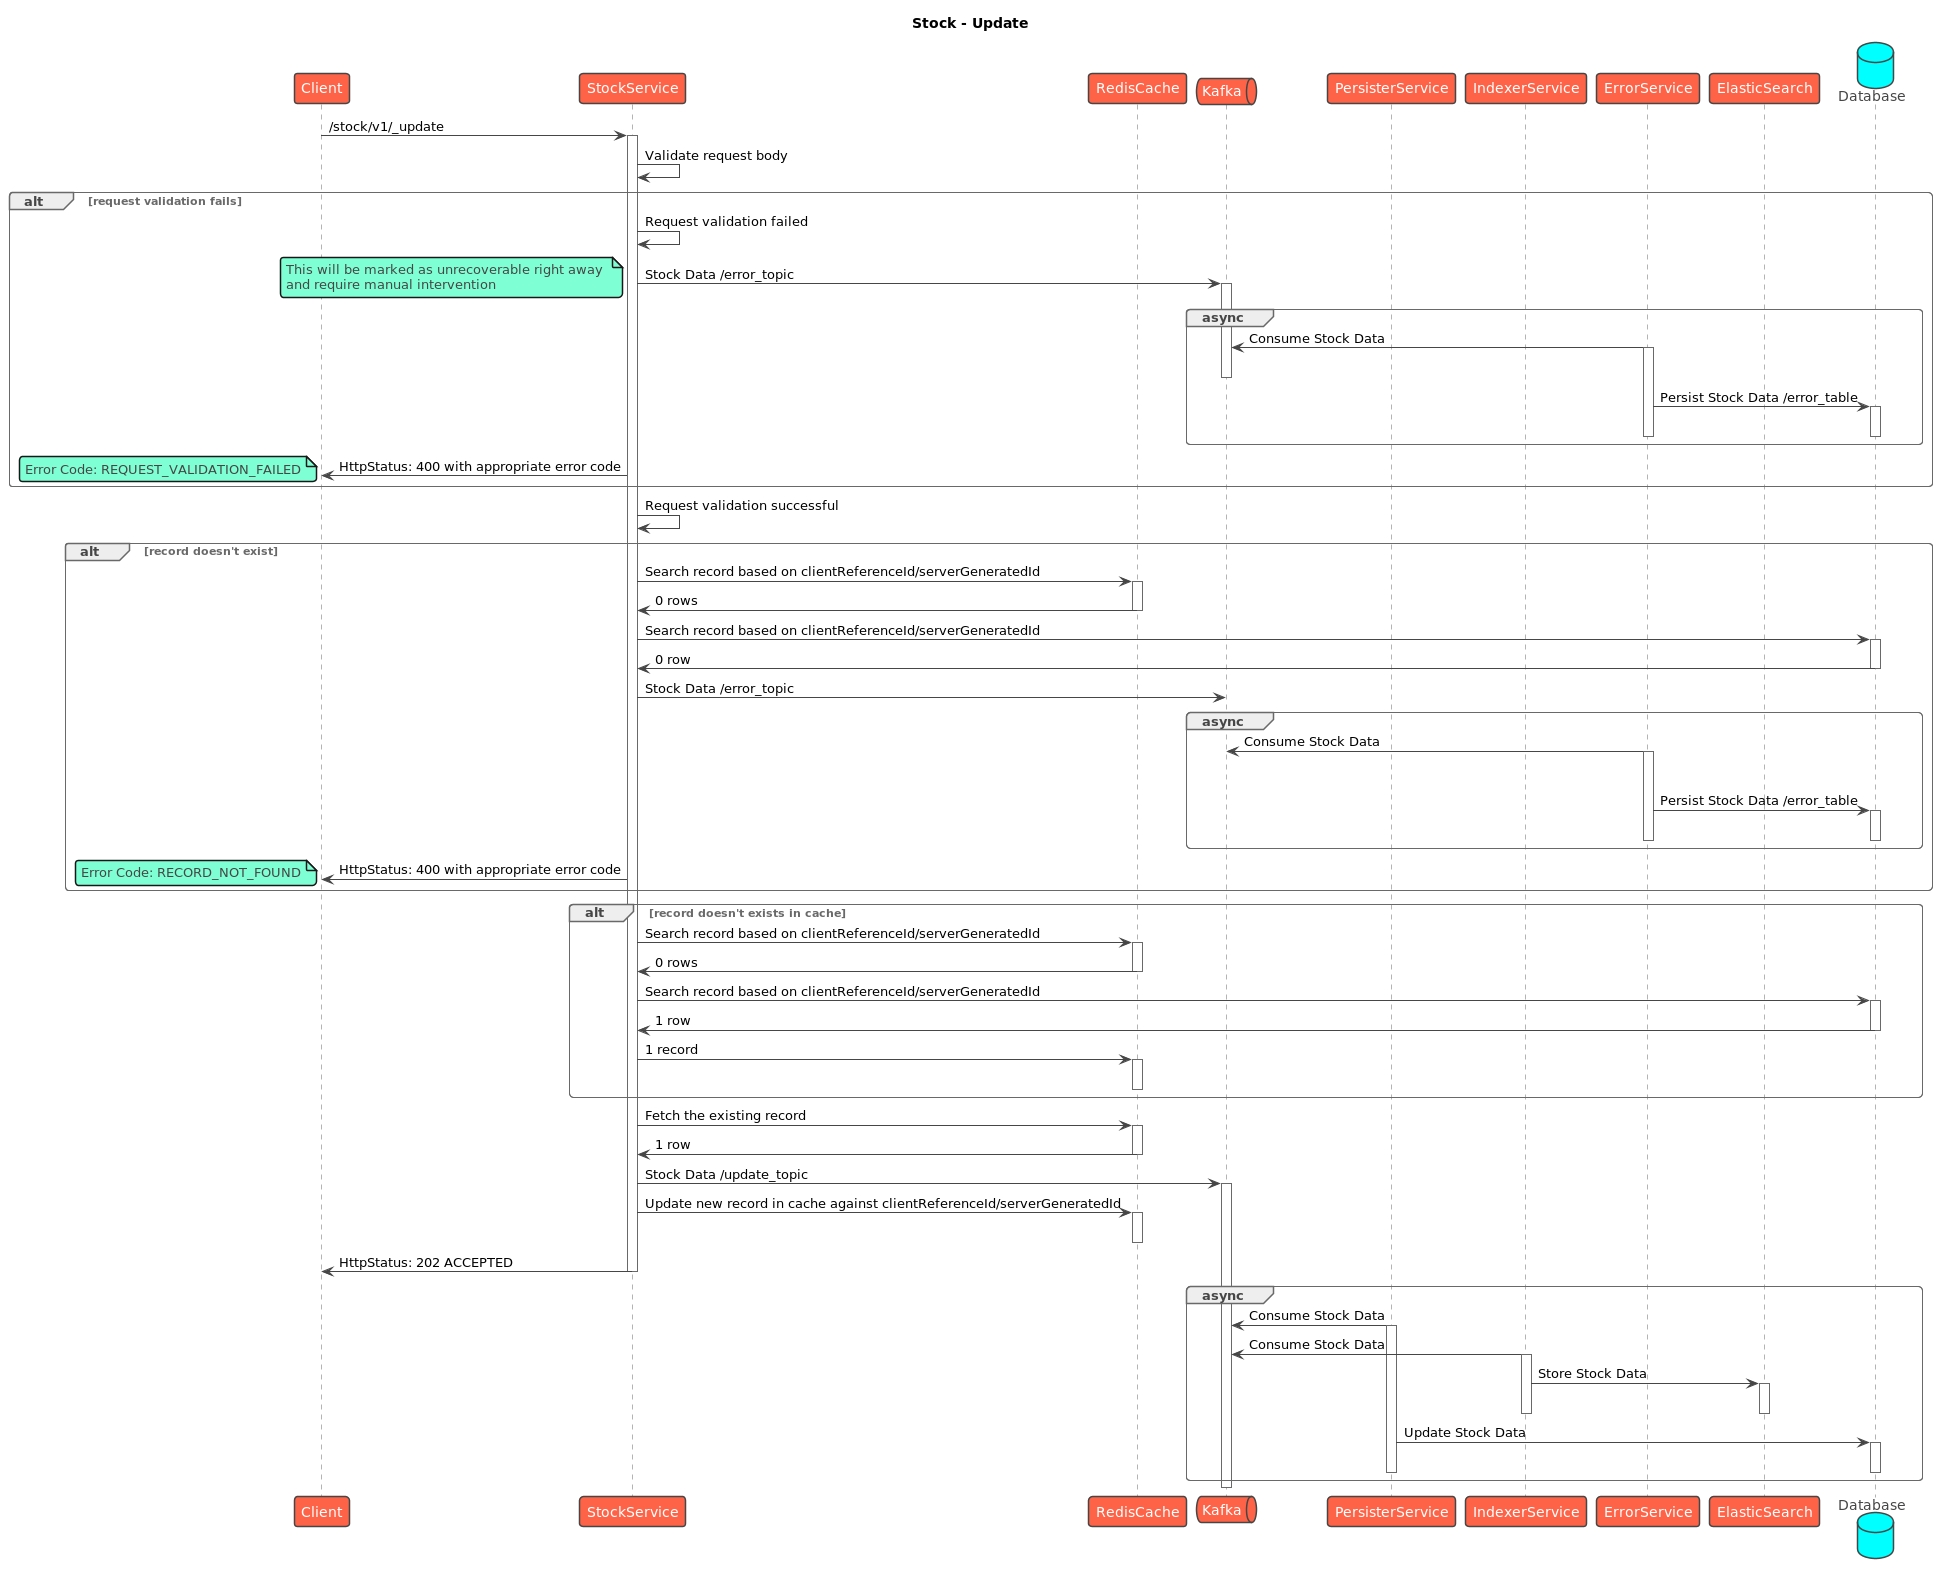
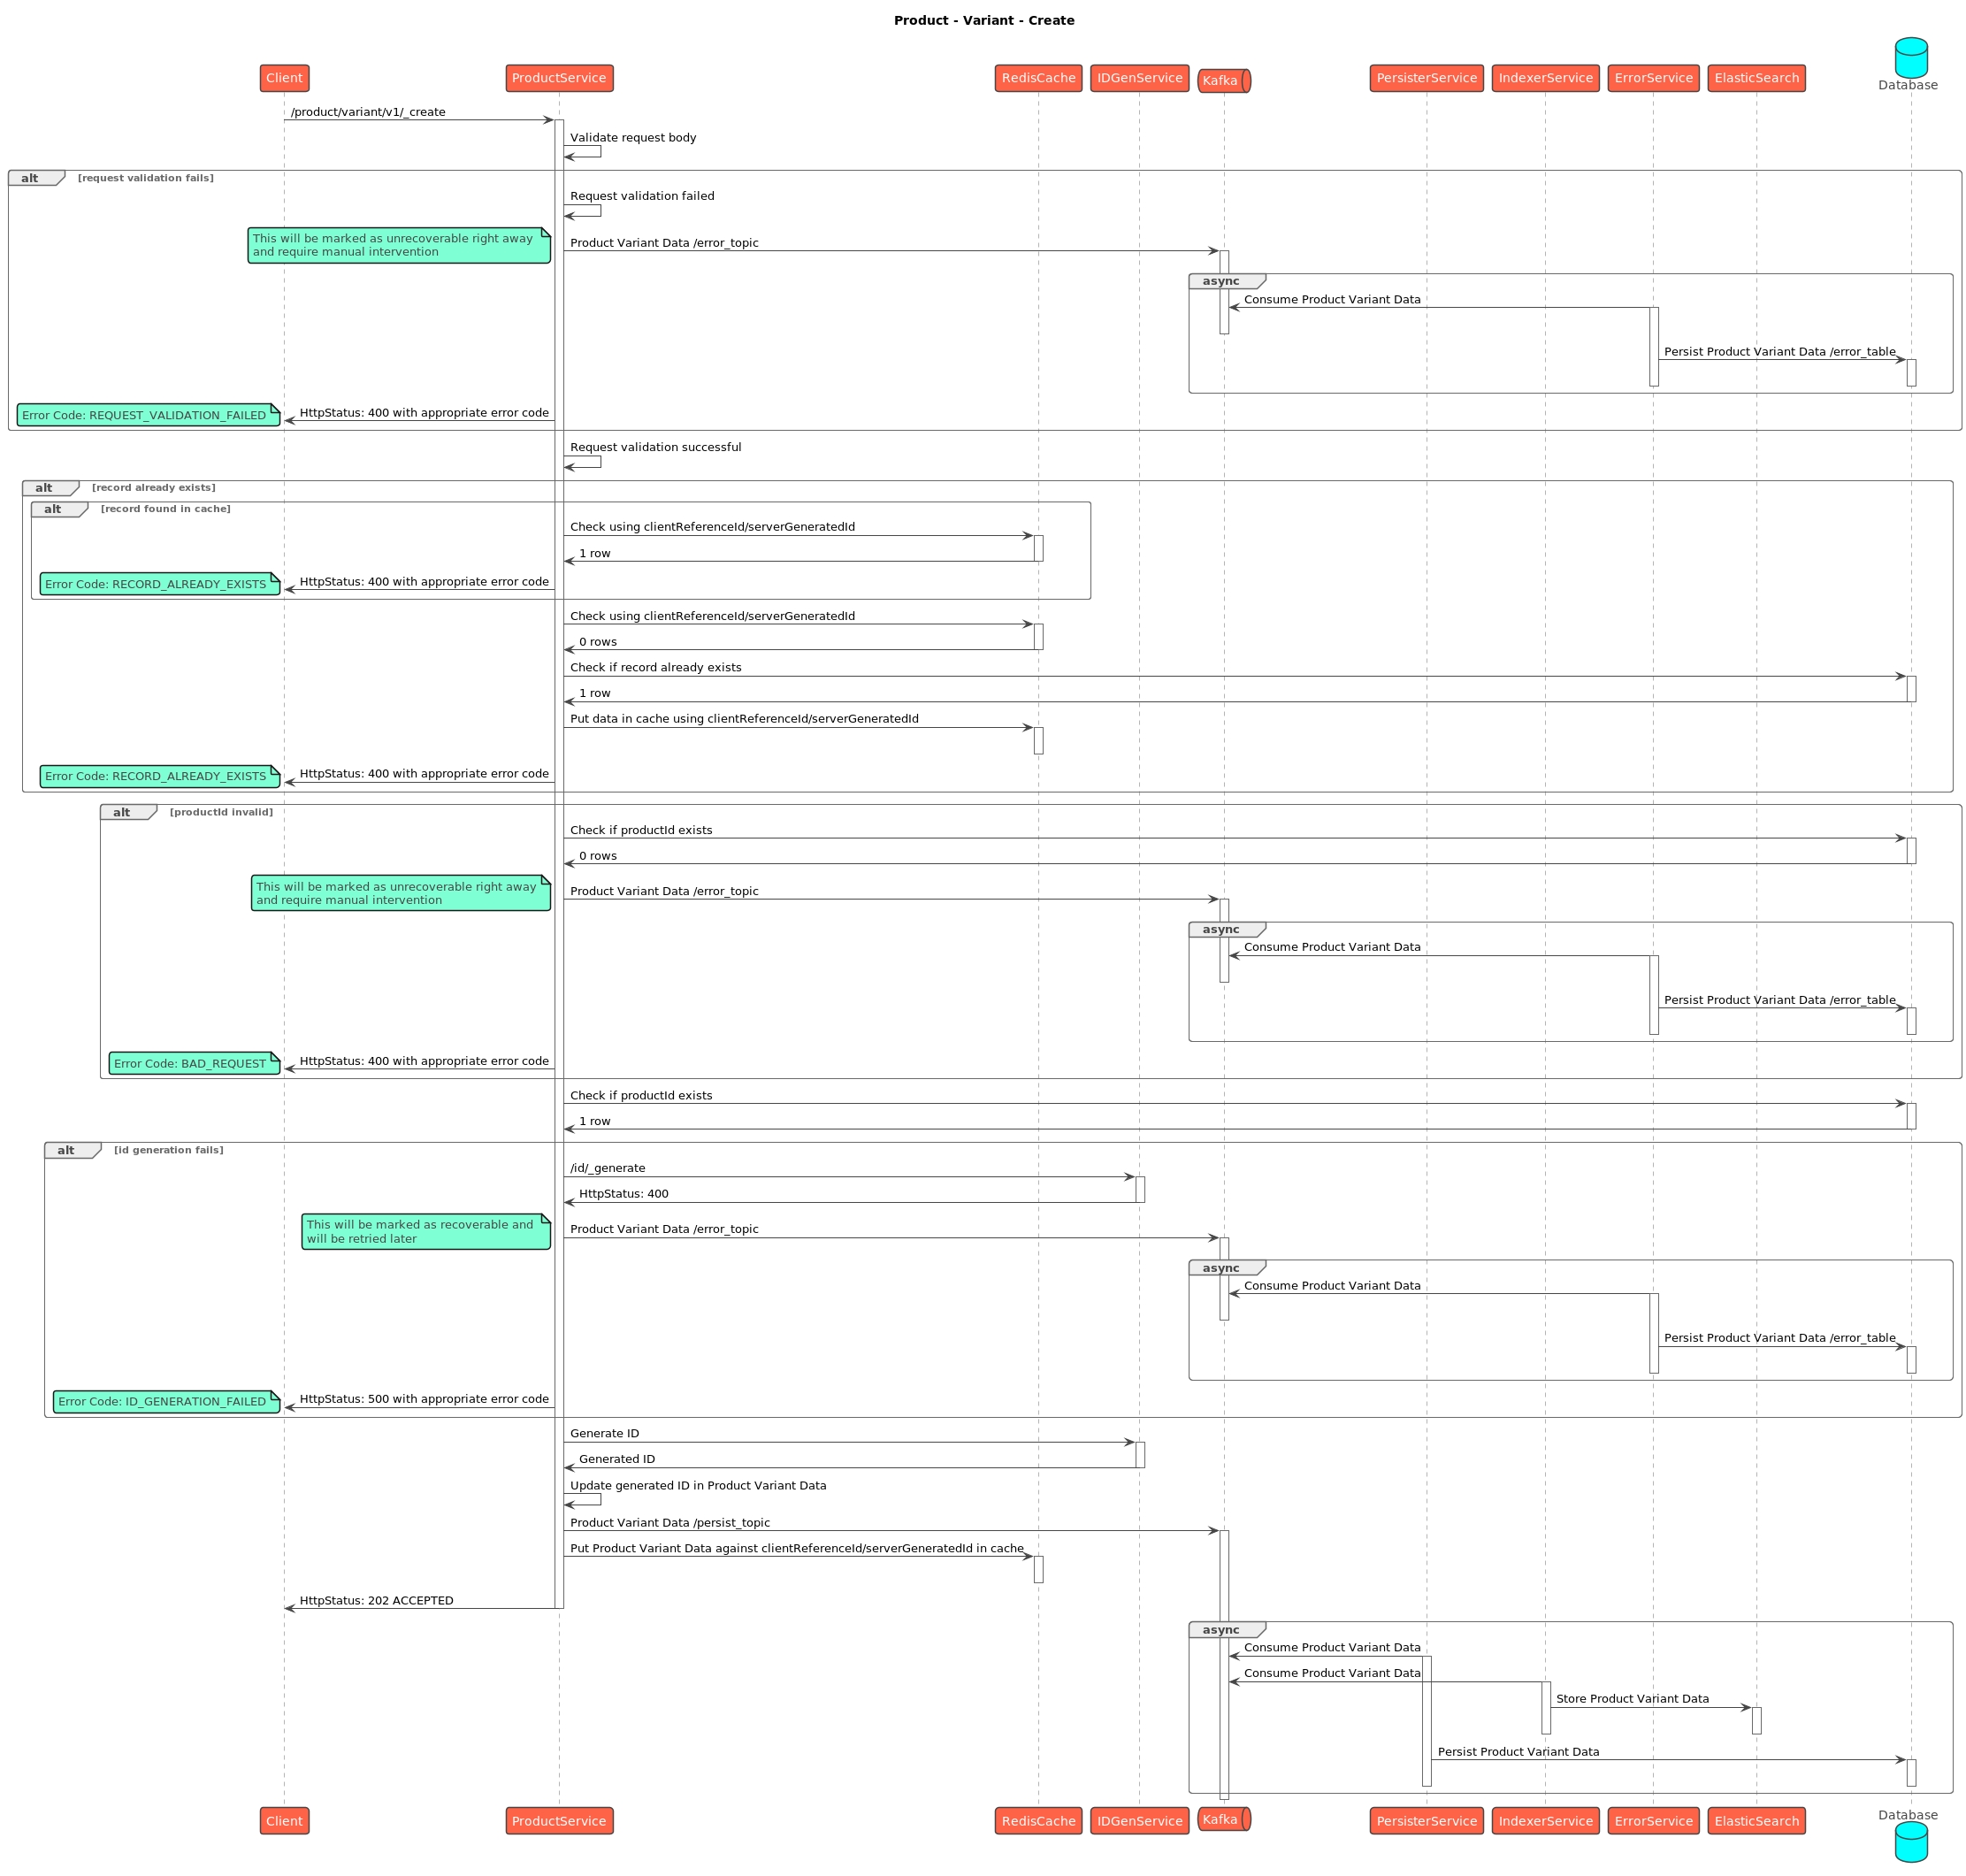
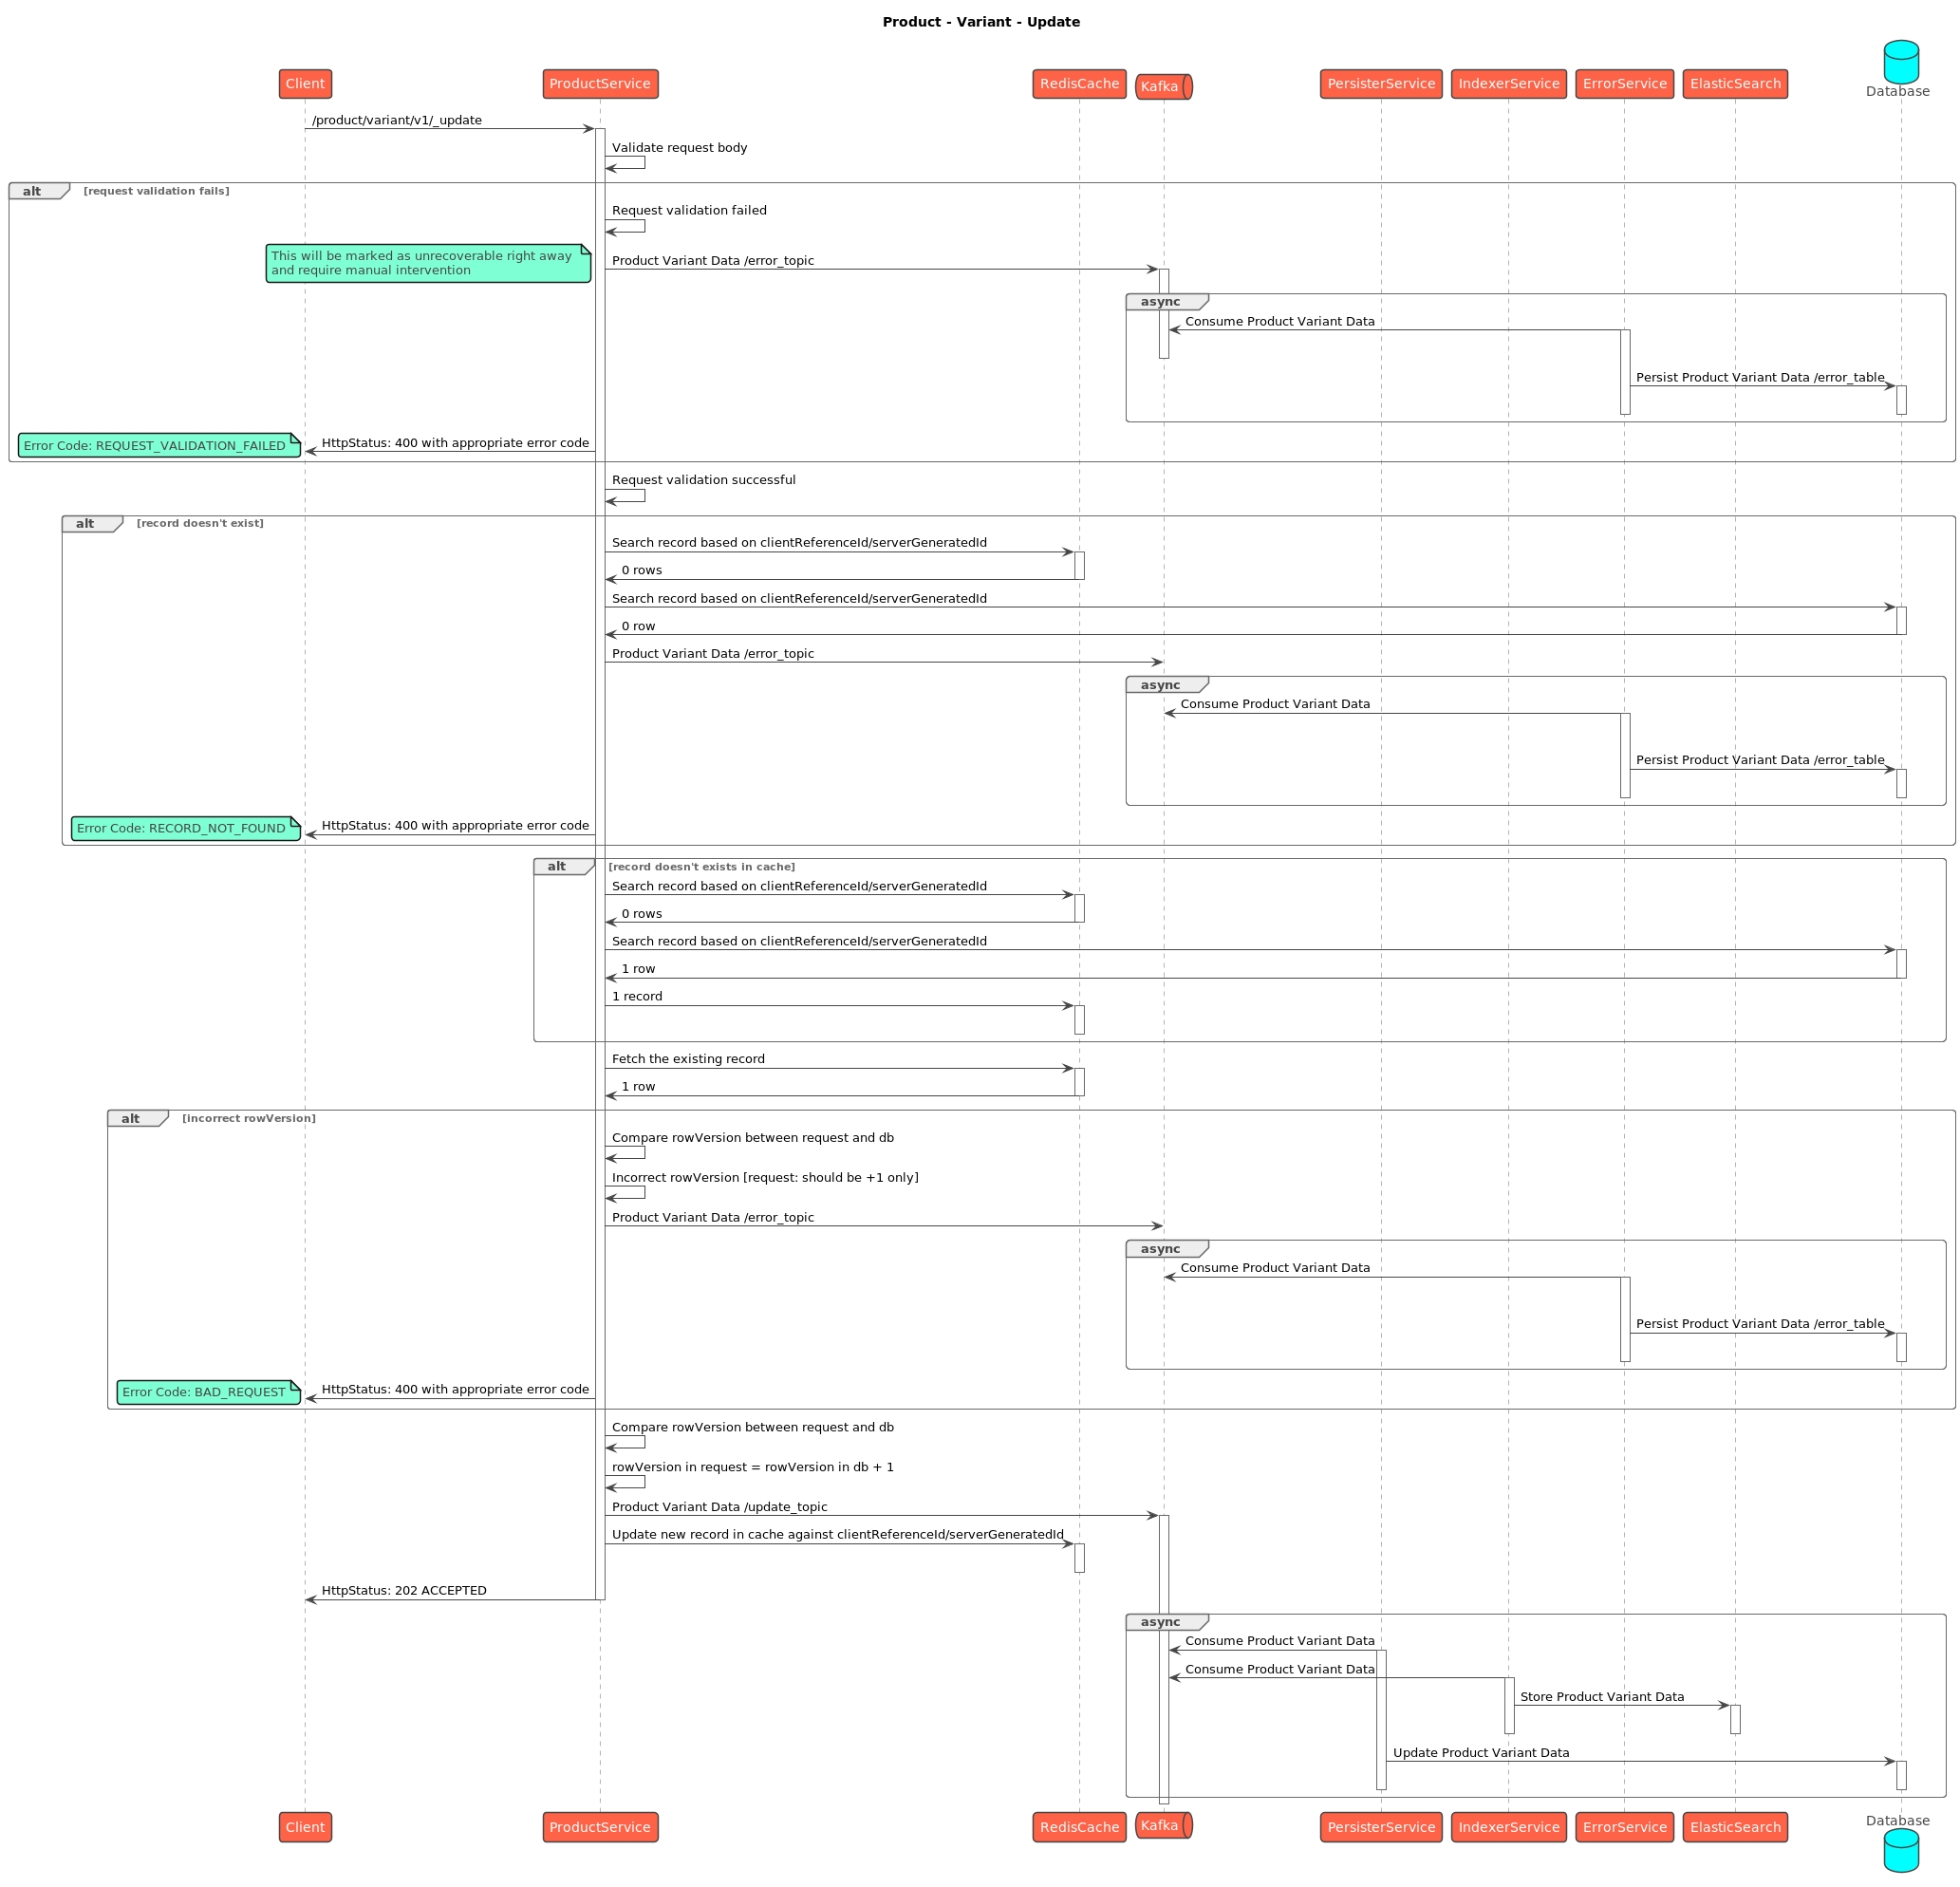

{
"ResponseInfo": {
"apiId": "egov-bff",
"ver": "0.0.1",
"ts": 1716878176955,
"status": "successful",
"desc": "new-response"
},
"GeneratedResource": [
{
"id": "5ef5547e-414f-4164-9c12-644716e4fa71",
"fileStoreid": null,
"type": "boundary",
"status": "inprogress",
"hierarchyType": "ADMIN",
"tenantId": "mz",
"auditDetails": {
"lastModifiedTime": 1716878176947,
"createdTime": 1716878176947,
"createdBy": "867ba408-1b82-4746-8274-eb916e625fea",
"lastModifiedBy": "867ba408-1b82-4746-8274-eb916e625fea"
},
"additionalDetails": {
"Filters": null
},
"count": null
}
]
} "mdms": [
{
"id": "536f6de8-8c90-4631-b401-5a3beabf4893",
"tenantId": "mz",
"schemaCode": "HCM-ADMIN-CONSOLE.adminSchema",
"uniqueIdentifier": "boundary.MR-DN",
"data": {
"title": "boundary",
"$schema": "http://json-schema.org/draft-07/schema#",
"properties": {
"numberProperties": [
{
"name": "HCM_ADMIN_CONSOLE_TARGET_SMC_AGE_3_TO_11",
"type": "number",
"isRequired": true,
"description": "Target at village level - Age 3 to 11 Months (Mandatory and to be entered by the user)",
"orderNumber": 2
},
{
"name": "HCM_ADMIN_CONSOLE_TARGET_SMC_AGE_12_TO_59",
"type": "number",
"isRequired": true,
"description": "Target at village level - Age 12 to 59 Months (Mandatory and to be entered by the user)",
"orderNumber": 3
}
],
"stringProperties": [
{
"name": "HCM_ADMIN_CONSOLE_BOUNDARY_CODE",
"type": "string",
"isRequired": true,
"description": "Boundary Code",
"orderNumber": 1,
"freezeColumn": true
}
]
},
"campaignType": "MR-DN"
},
"isActive": true,
"auditDetails": {
"createdBy": "63a21269-d40d-4c26-878f-4f4486b1f44b",
"lastModifiedBy": "63a21269-d40d-4c26-878f-4f4486b1f44b",
"createdTime": 1718171965428,
"lastModifiedTime": 1718171965428
}
}
]ALTER TABLE CampaignDetails
ADD COLUMN isActive BOOLEAN DEFAULT TRUE,
ADD COLUMN parentId VARCHAR(64) NULL;POST /project-factory/v1/project-type/retry
Body: {
CampaignDetails: { ... }, // Full campaign object
RequestInfo: { ... }
}{
"id": "campaign-uuid",
"tenantId": "mz",
"status": "drafted",
"action": "create",
"campaignNumber": "...",
"isActive": true,
"parentId": "parent-campaign-uuid",
"campaignName": "...",
"projectType": "...",
"hierarchyType": "...",
"boundaries": [...],
"resources": [
{ "type": "facility", "filename": "...", "resourceId": "...", "filestoreId": "..." },
{ "type": "boundaryWithTarget", "filename": "...", "resourceId": "...", "filestoreId": "..." },
{ "type": "user", "filename": "...", "resourceId": "...", "filestoreId": "..." }
],
"deliveryRules": [...],
"auditDetails": { ... }
}{
"ResponseInfo": {
"apiId": "egov-bff",
"ver": "0.0.1",
"ts": 1716878176955,
"status": "successful",
"desc": "new-response"
},
"GeneratedResource": [
{
"id": "5ef5547e-414f-4164-9c12-644716e4fa71",
"fileStoreid": null,
"type": "boundaryManagement",
"status": "inprogress",
"hierarchyType": "ADMIN",
"tenantId": "mz",
"auditDetails": {
"lastModifiedTime": 1716878176947,
"createdTime": 1716878176947,
"createdBy": "867ba408-1b82-4746-8274-eb916e625fea",
"lastModifiedBy": "867ba408-1b82-4746-8274-eb916e625fea"
},
"additionalDetails": {
"Filters": null
},
"count": null
}
]
} "Mdms": {
"tenantId": "mz",
"schemaCode": "HCM-ADMIN-CONSOLE.adminSchema",
"uniqueIdentifier": "boundaryManagement.all",
"data":{
"title": "boundaryManagement",
"$schema": "http://json-schema.org/draft-07/schema#",
"properties": {
"numberProperties": [
{
"name": "HCM_ADMIN_CONSOLE_LAT",
"type": "number",
"isRequired": true,
"description": "Latitude",
"orderNumber": 2
},
{
"name": "HCM_ADMIN_CONSOLE_LONG",
"type": "number",
"isRequired": true,
"description": "Longitude",
"orderNumber": 3
}
],
"stringProperties": [
{
"name": "HCM_ADMIN_CONSOLE_BOUNDARY_CODE",
"type": "string",
"isRequired": true,
"description": "Boundary Code",
"orderNumber": 1,
"freezeColumn": true
}
]
},
"campaignType": "all"
},
"isActive": true
}{
"ResponseInfo": {
"apiId": "egov-bff",
"ver": "0.0.1",
"ts": 1716878176955,
"status": "successful",
"desc": "new-response"
},
"GeneratedResource": [
{
"id": "5ef5547e-414f-4164-9c12-644716e4fa71",
"fileStoreid": null,
"type": "boundaryGeometryManagement",
"status": "inprogress",
"hierarchyType": "ADMIN",
"tenantId": "mz",
"auditDetails": {
"lastModifiedTime": 1716878176947,
"createdTime": 1716878176947,
"createdBy": "867ba408-1b82-4746-8274-eb916e625fea",
"lastModifiedBy": "867ba408-1b82-4746-8274-eb916e625fea"
},
"additionalDetails": {
"Filters": null
},
"count": null
}
]
}{
"type":"FeatureCollection",
"name":"boundary_country_default",
"crs":{
"type":"name",
"properties":{
"name":"urn:ogc:def:crs:EPSG::3857"
}
},
"features":[
{
"type":"Feature",
"properties":{
"country_name":"India",
"country_code":"IND",
"global_id":"3c1b3b06-3958-424b-a160-3e25998cd027",
"source":"WFP, INE",
"source_date":"2007-01-01",
"properties":{
"ADM0_EN":"Mozambique",
"OBJECTID":1,
"ADM0_PCODE":"MZ",
"Shape_Area":67.04187953610,
"Shape_Leng":96.65781689320
},
"population_1":26876090.0
},
"geometry":{
"type":"",
"coordinates":[
100,
200
]
}
}
]
}```postman_json
"Mdms": {
"tenantId": "mz",
"schemaCode": "HCM-ADMIN-CONSOLE.adminSchema",
"uniqueIdentifier": "boundaryGeometryManagement.all",
"data":{
"title": "boundaryGeometryManagement",
"$schema": "http://json-schema.org/draft-07/schema#",
"properties": {
"numberProperties": [
{
"name": "HCM_ADMIN_CONSOLE_LAT",
"type": "number",
"isRequired": true,
"description": "Latitude",
"orderNumber": 2
},
{
"name": "HCM_ADMIN_CONSOLE_LONG",
"type": "number",
"isRequired": true,
"description": "Longitude",
"orderNumber": 3
}
],
"stringProperties": [
{
"name": "HCM_ADMIN_CONSOLE_BOUNDARY_CODE",
"type": "string",
"isRequired": true,
"description": "Boundary Code",
"orderNumber": 1,
"freezeColumn": true
}
]
},
"campaignType": "all"
},
"isActive": true
}
```No data exists, or force update is true: Generate new data.
If forceUpdate is false and data exists: Return the old data.
Modify the fetched data with getModifiedResponse(responseData).
Generate New Entry:
Create a new entry with getNewEntryResponse(request).
Expire Old Data:
Update the status of old data to expired using getOldEntryResponse(modifiedResponse, request).
Persist Data Changes:
Call updateAndPersistGenerateRequest(newEntryResponse, oldEntryResponse, responseData, request).
Purpose:
If forceUpdate is true and data exists: Mark existing data as expired and create new data.
No data exists or force update is true: Generate new data.
If forceUpdate is false and data exists: Return the old data.
Fetch Filters from CampaignId and generate Boundary Data based on those Filters.
If Filters is null, it will generate the whole Boundary Data.
After the Boundary Sheet has been generated, append the ReadMeSheet.
Generate different tabs based on any boundary level configured (here District).
Modify the fetched data with getModifiedResponse(responseData).
Generate New Entry:
Create a new entry with getNewEntryResponse(request).
Expire Old Data:
Update the status of old data to expired using getOldEntryResponse(modifiedResponse, request).
Persist Data Changes:
Call updateAndPersistGenerateRequest(newEntryResponse, oldEntryResponse, responseData, request).
Purpose:
If forceUpdate is true and data exists: Mark existing data as expired and create new data.
No data exists or force update is true: Generate new data.
If forceUpdate is false and data exists: Return the old data.
Fetch Filters from CampaignId and generate Boundary Data based on those filters.
If the filter is null, it will generate the whole Boundary Data.
After the Boundary Sheet has been generated, append the ReadMeSheet.
Generate different tabs based on any boundary level configured (here District).

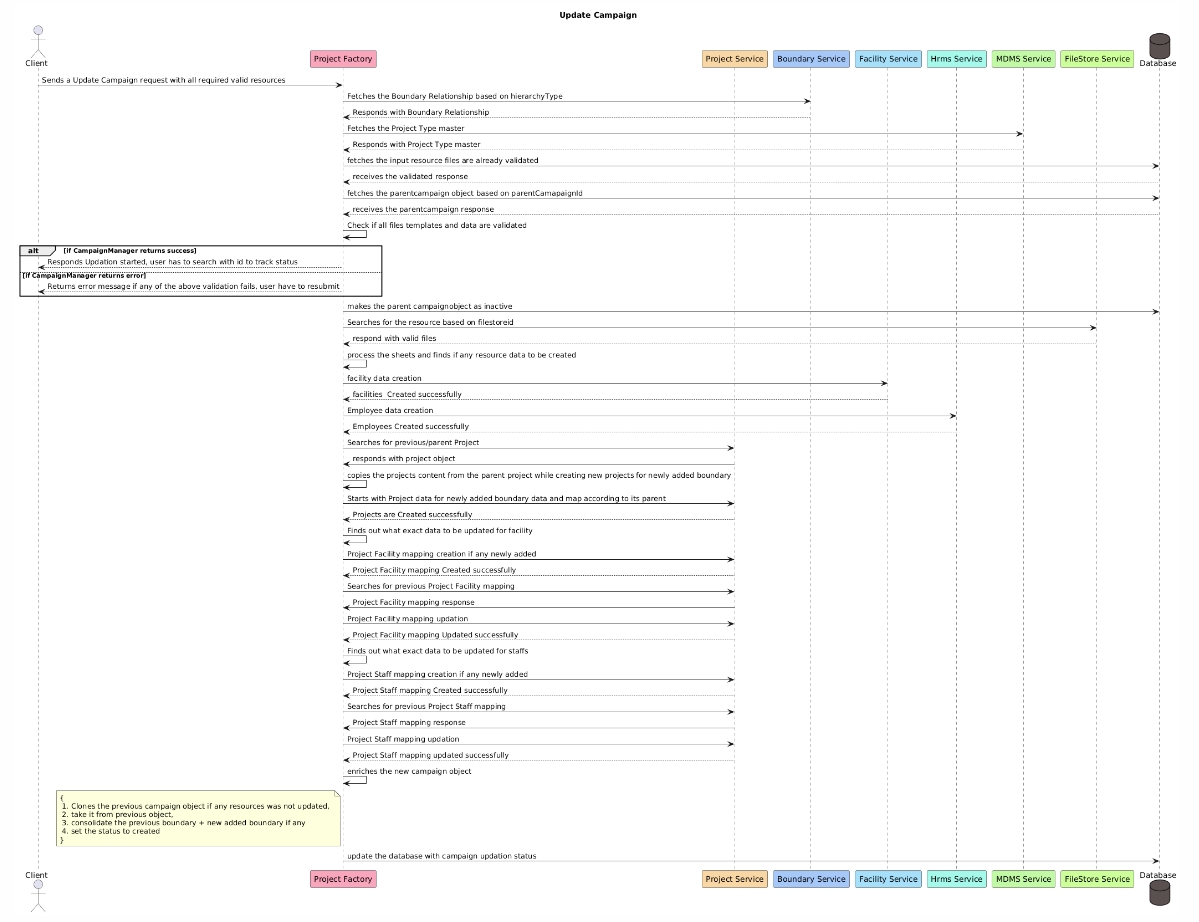
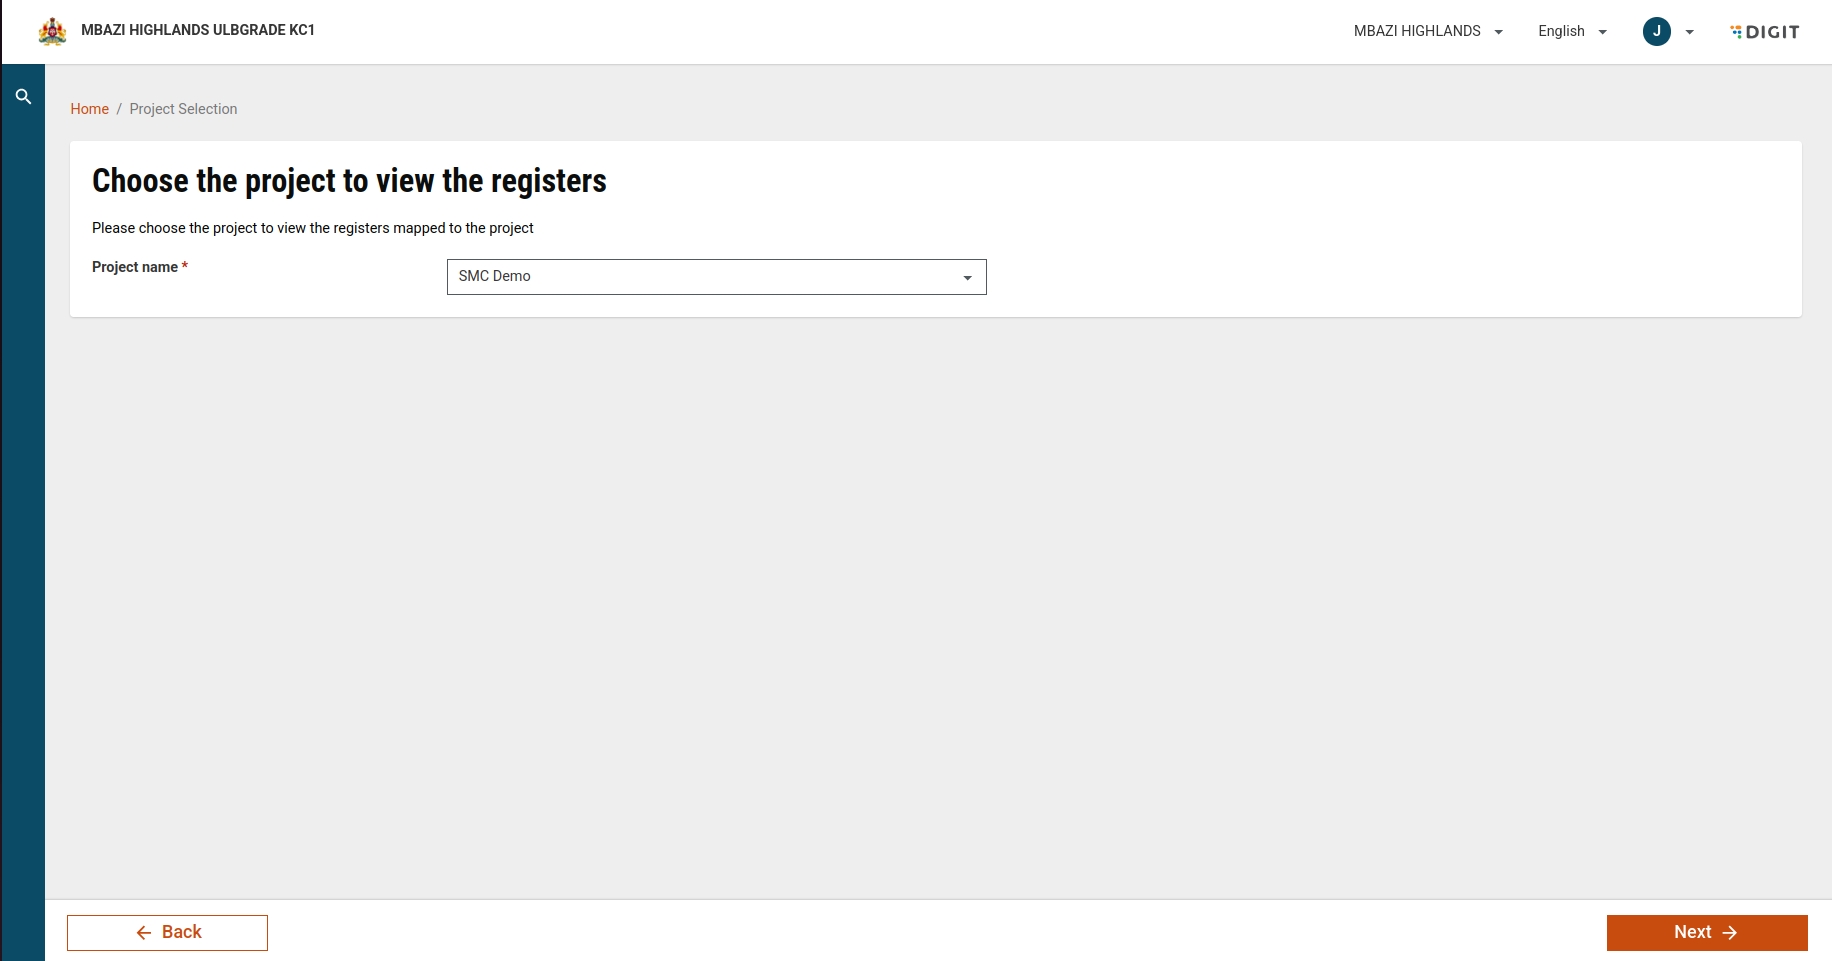
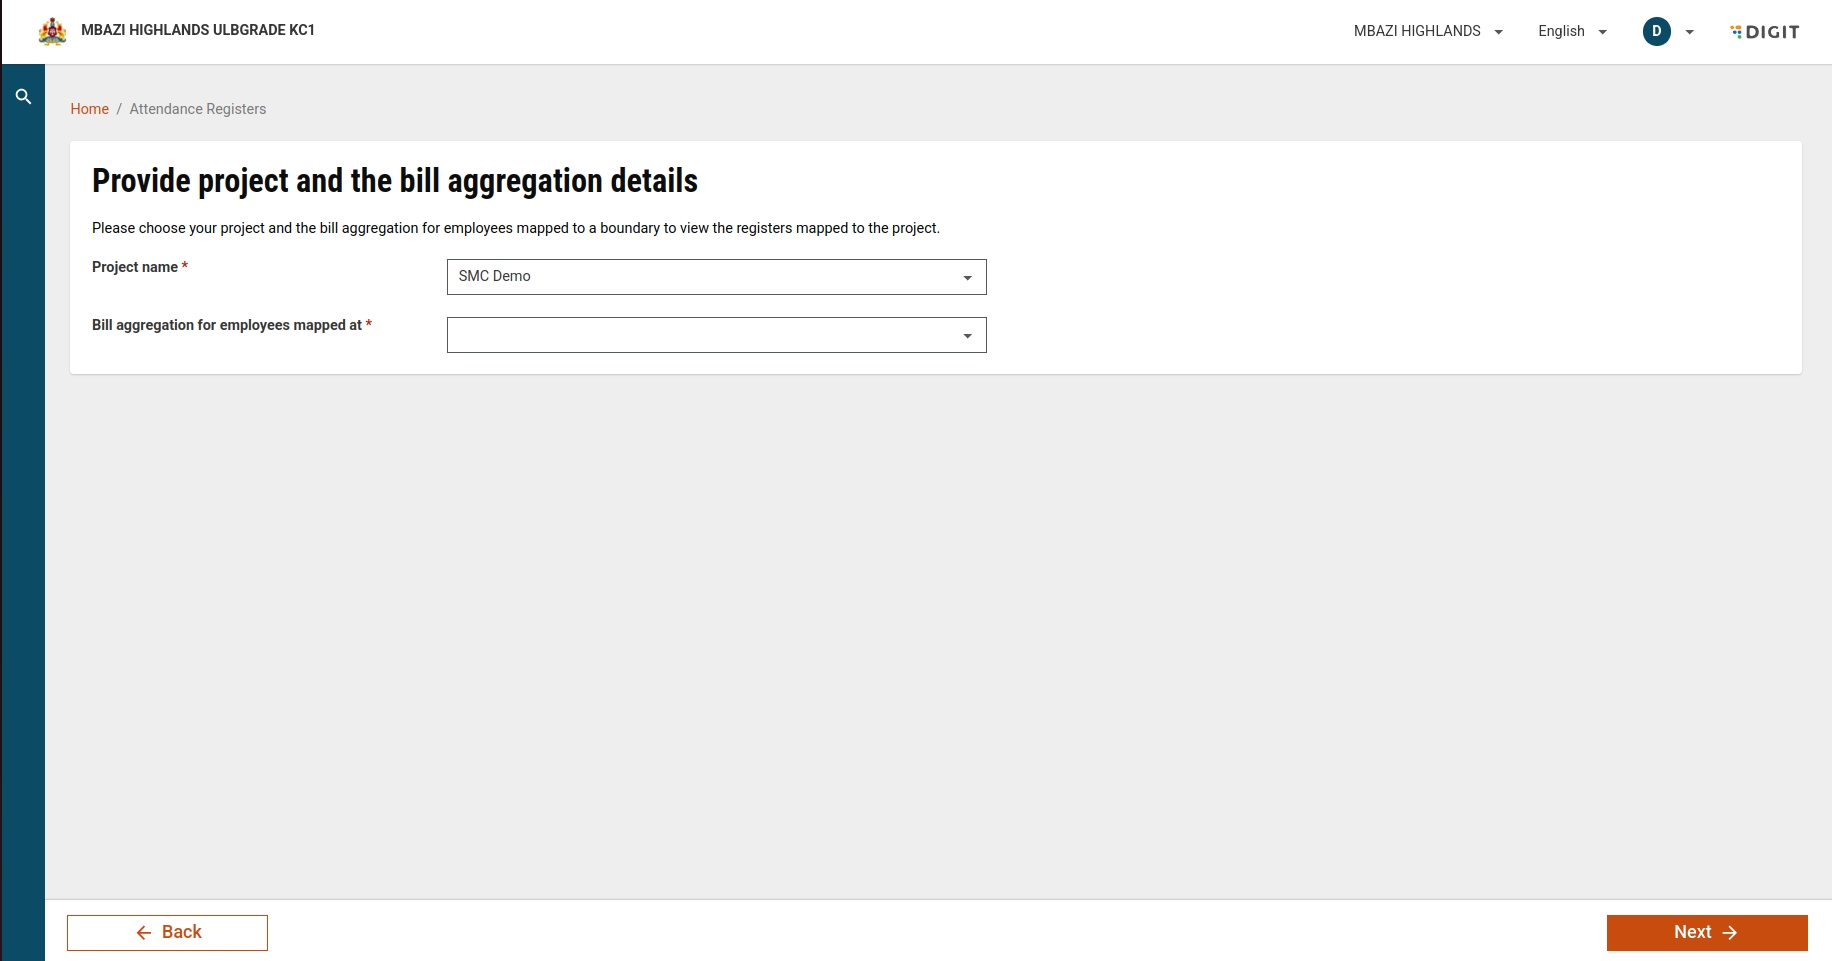

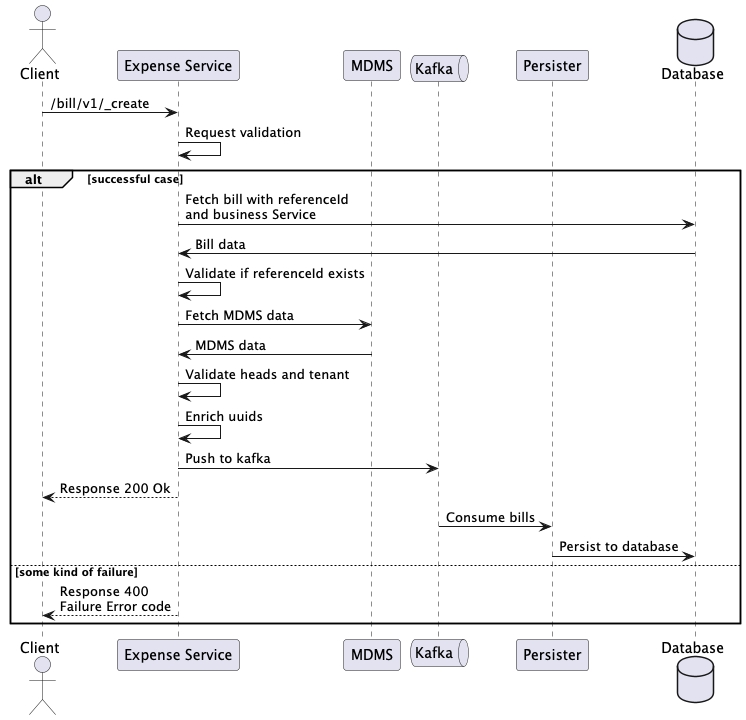
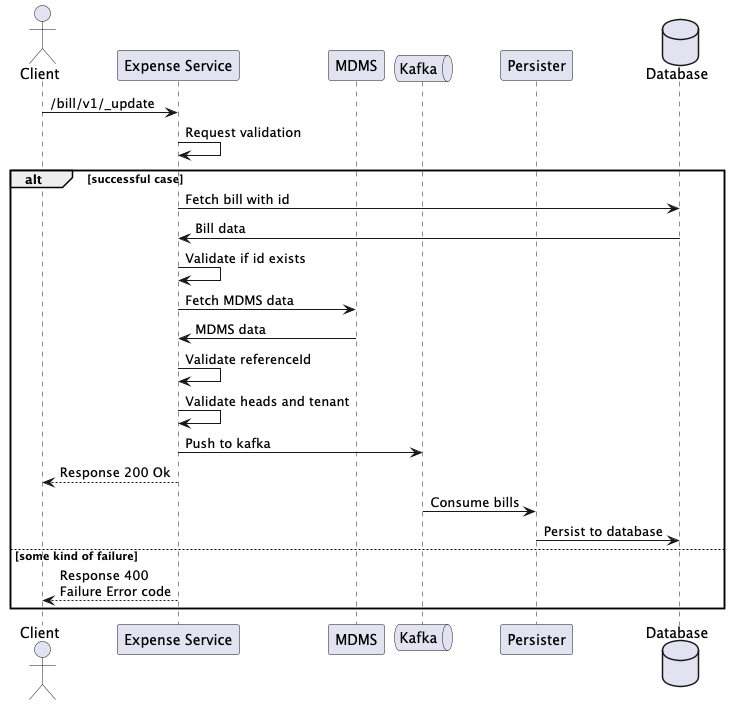

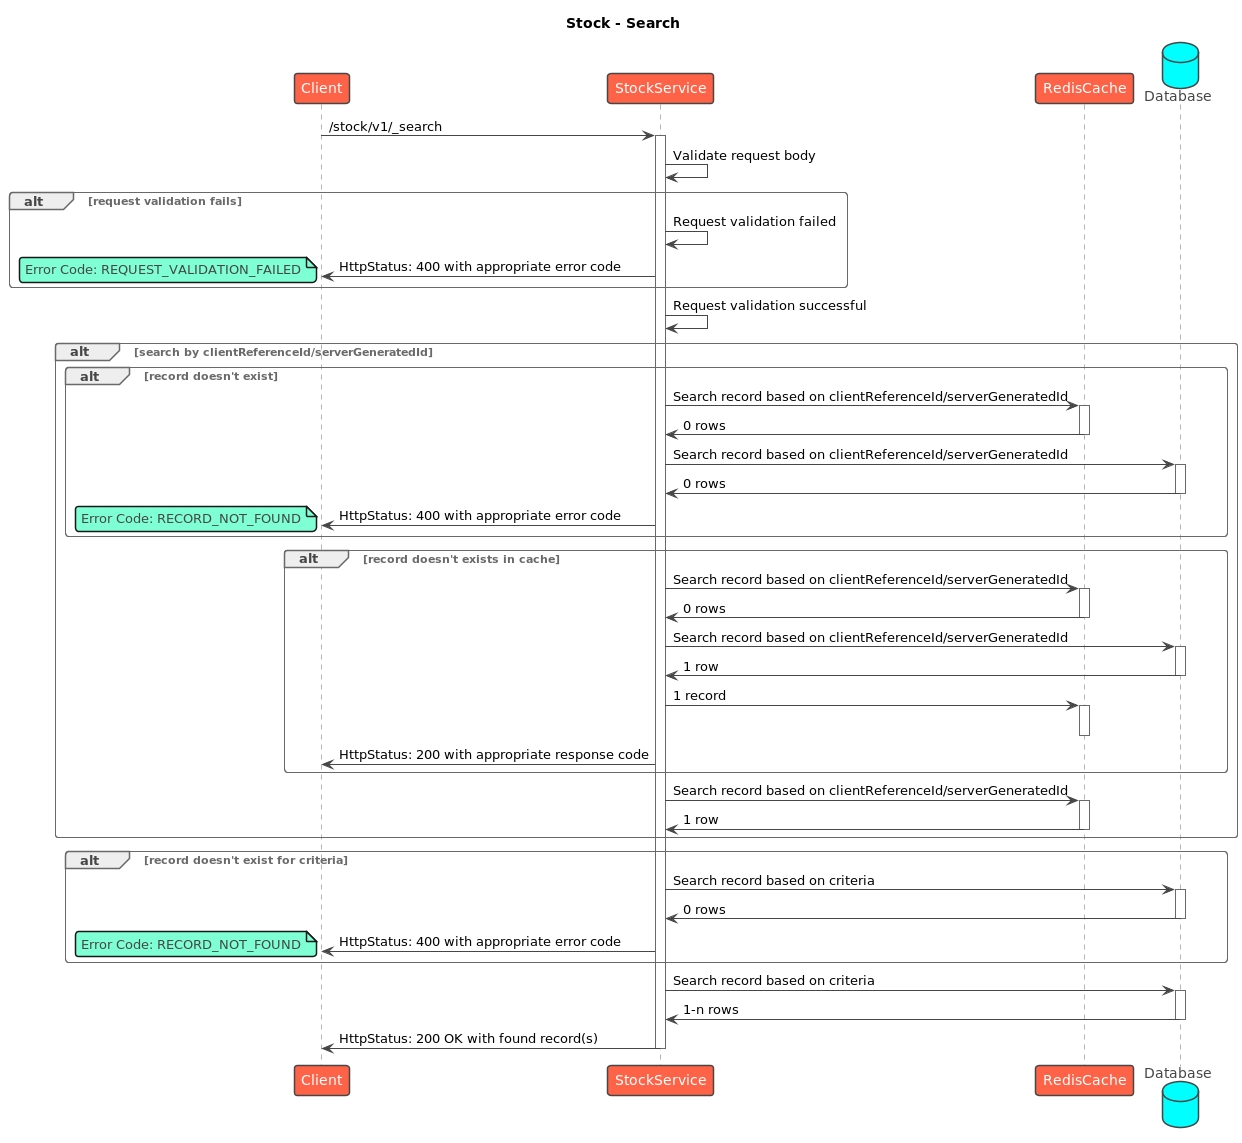
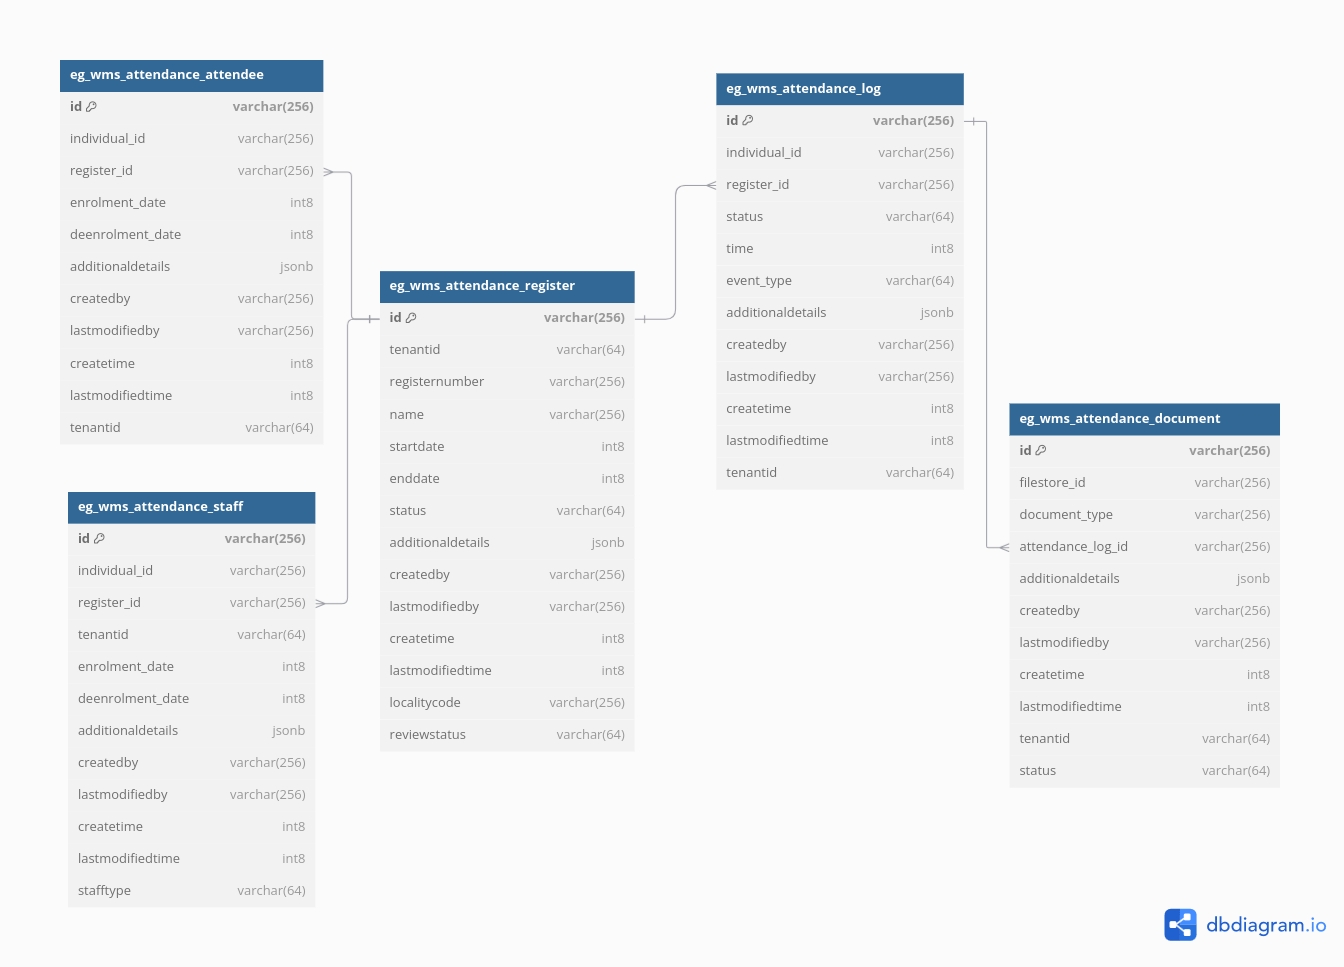
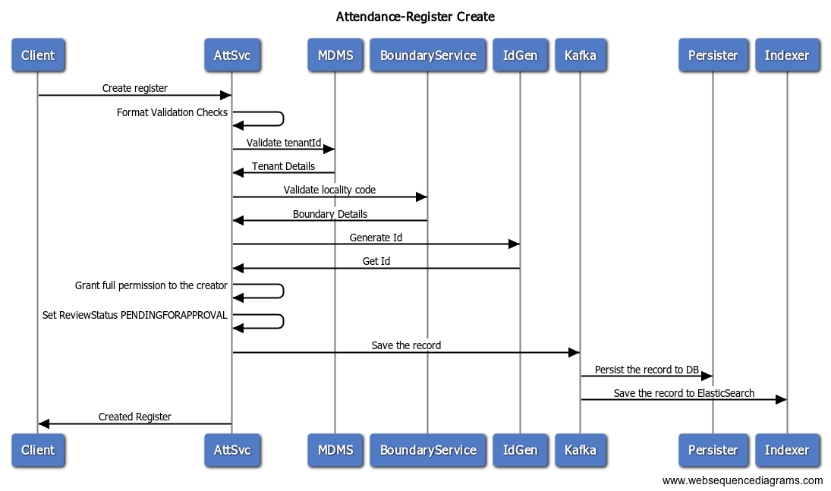

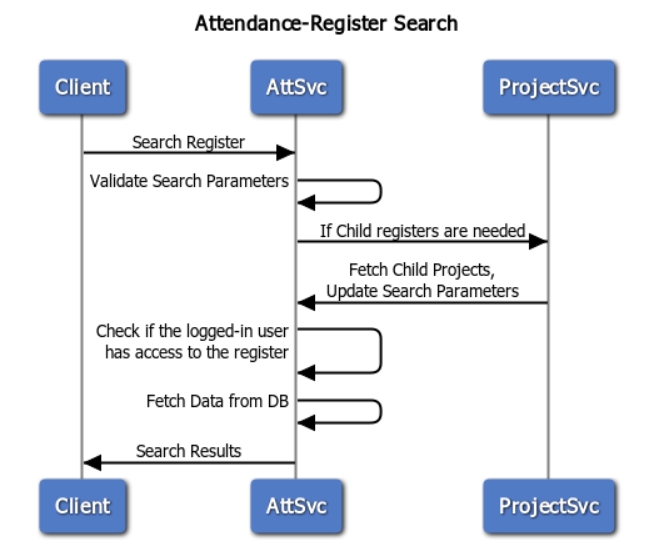
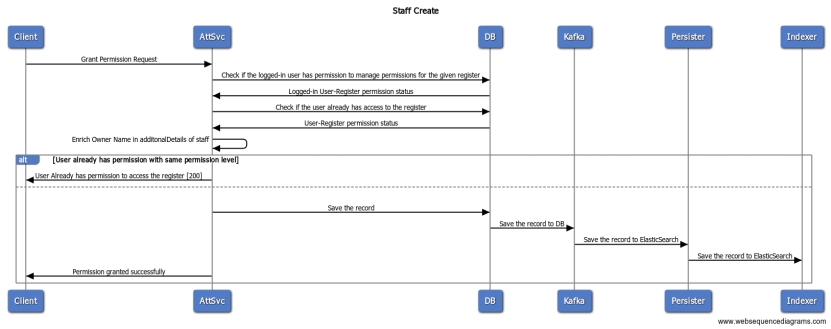
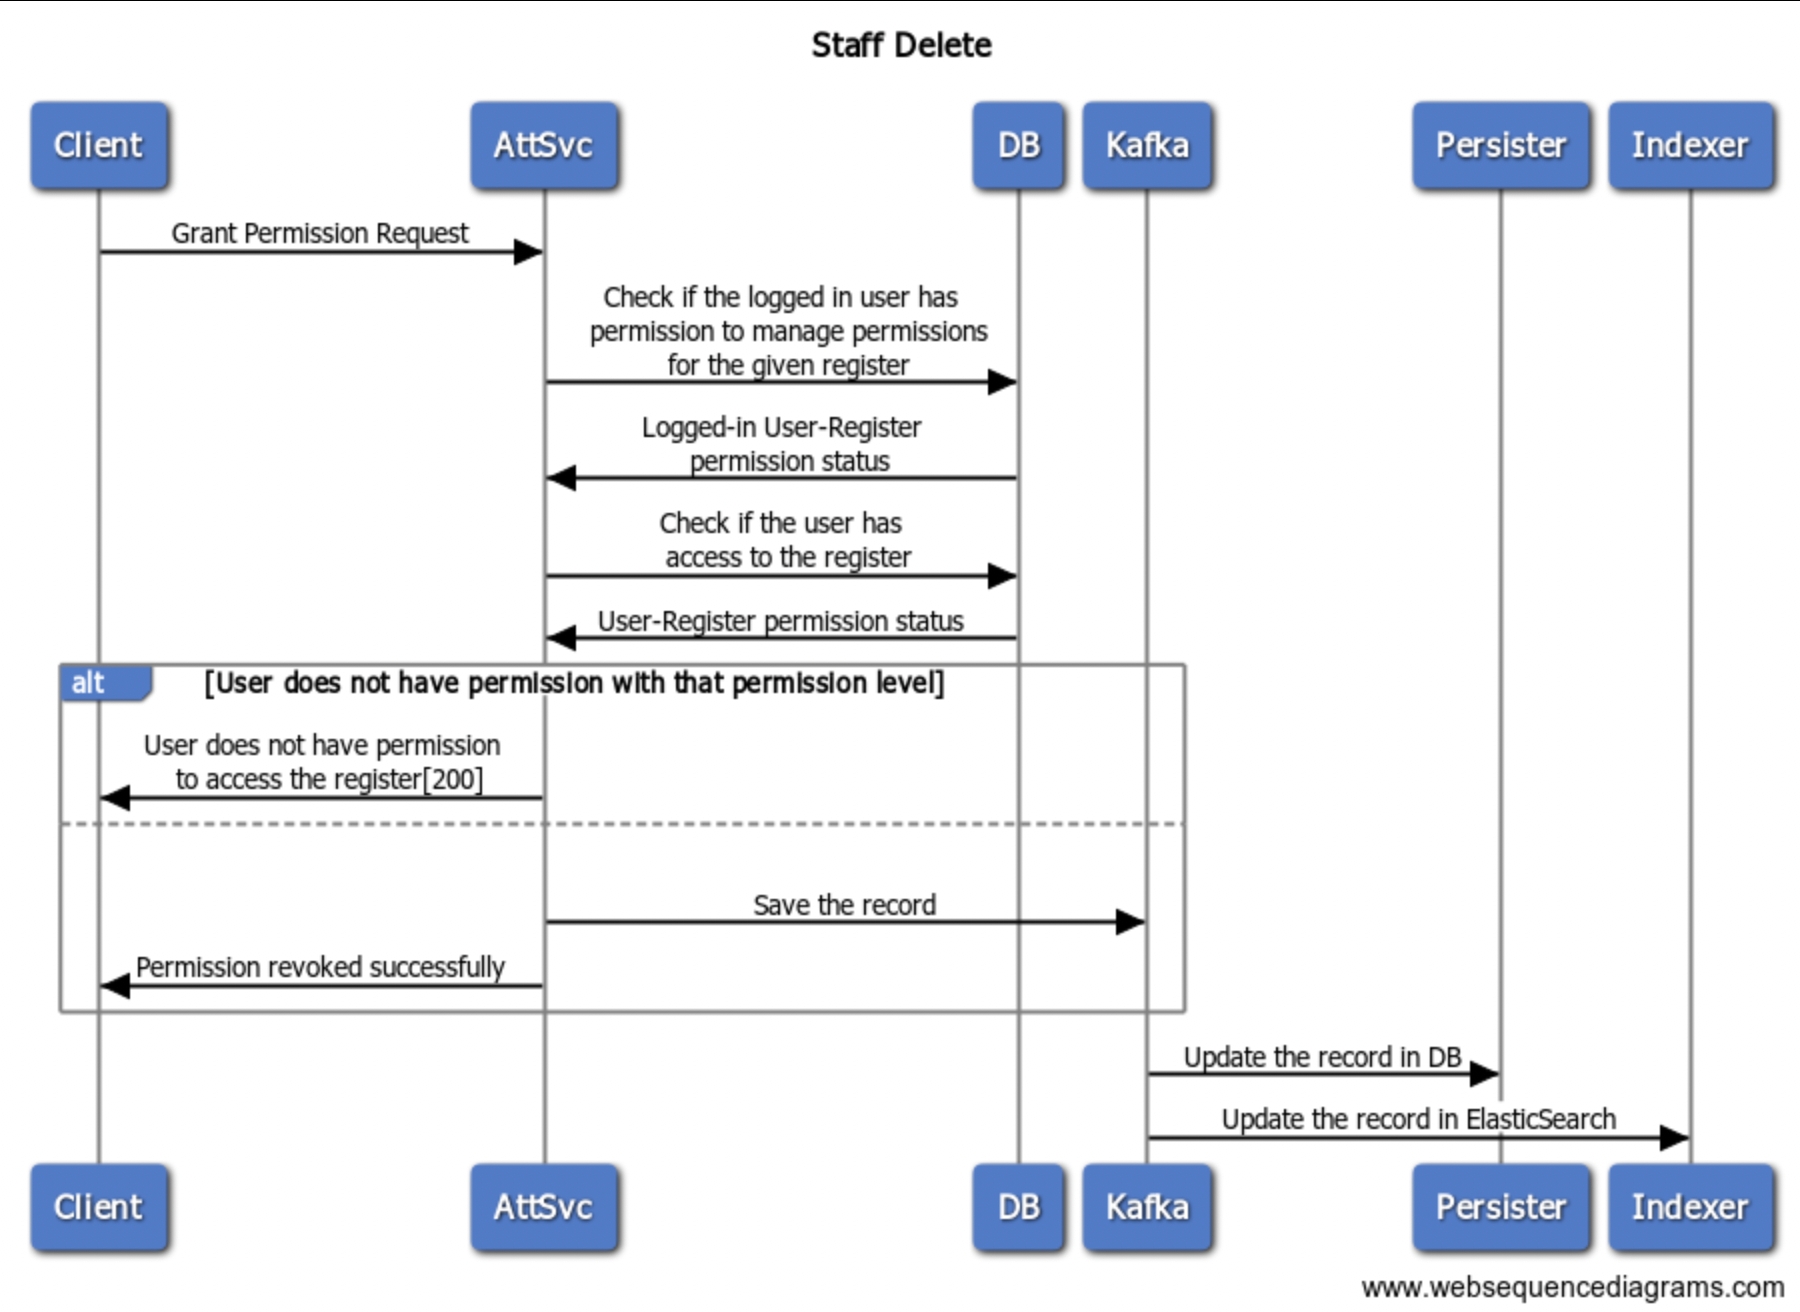
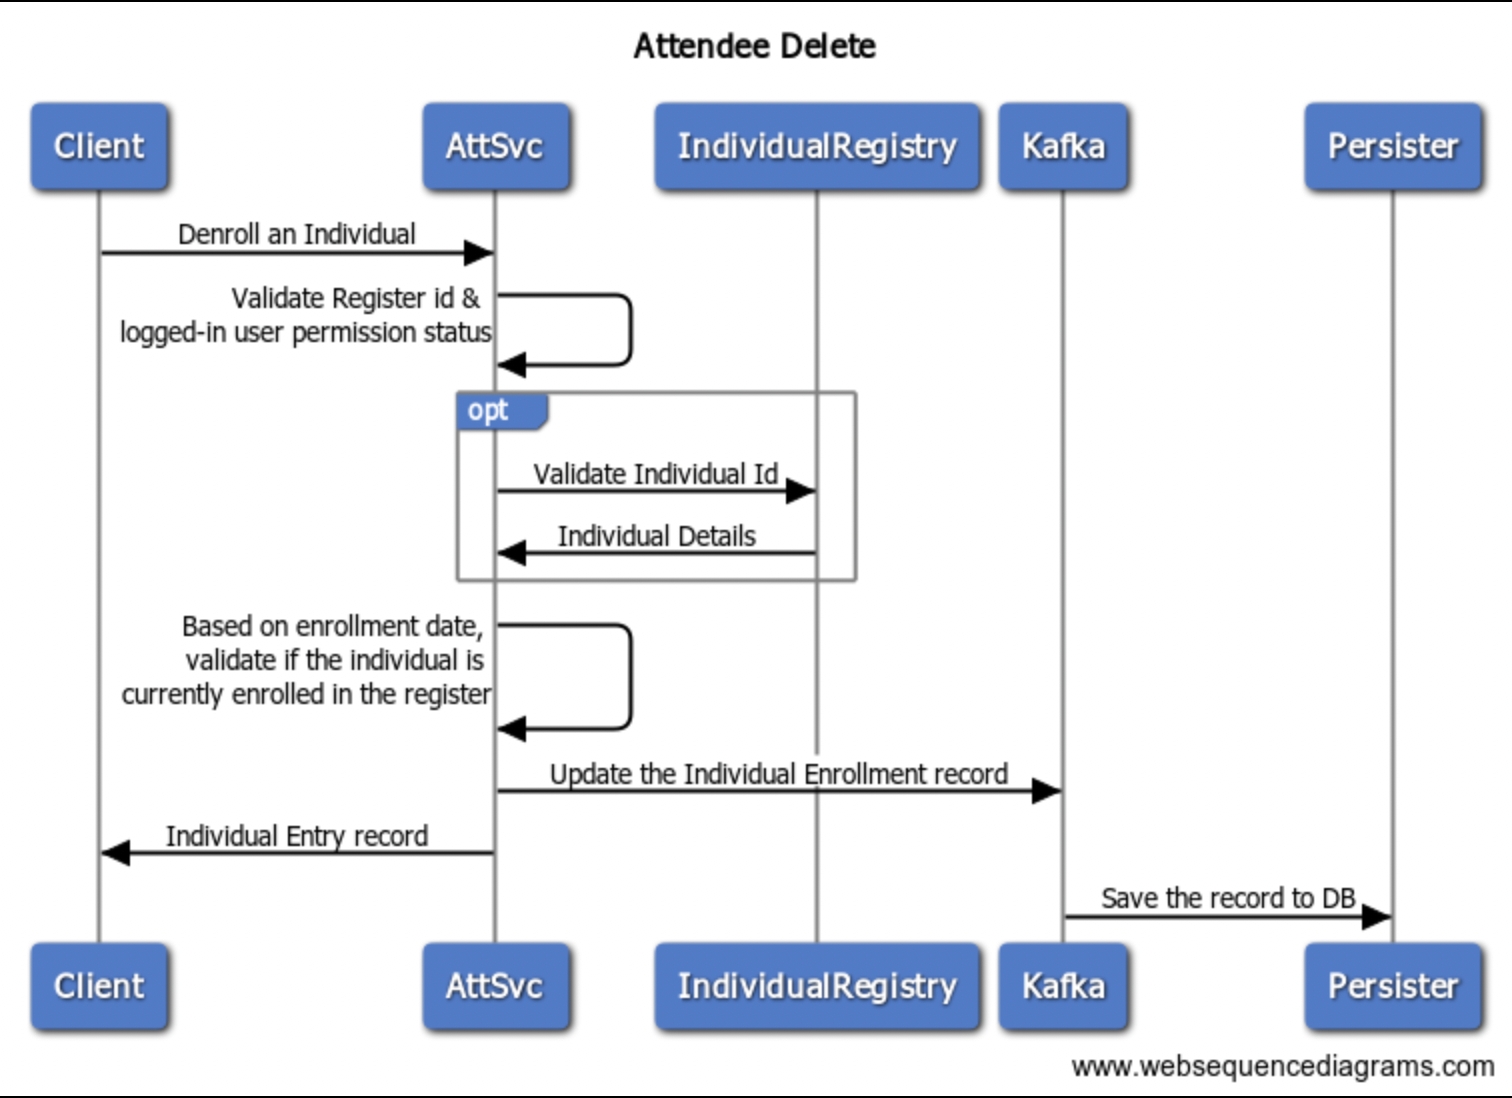
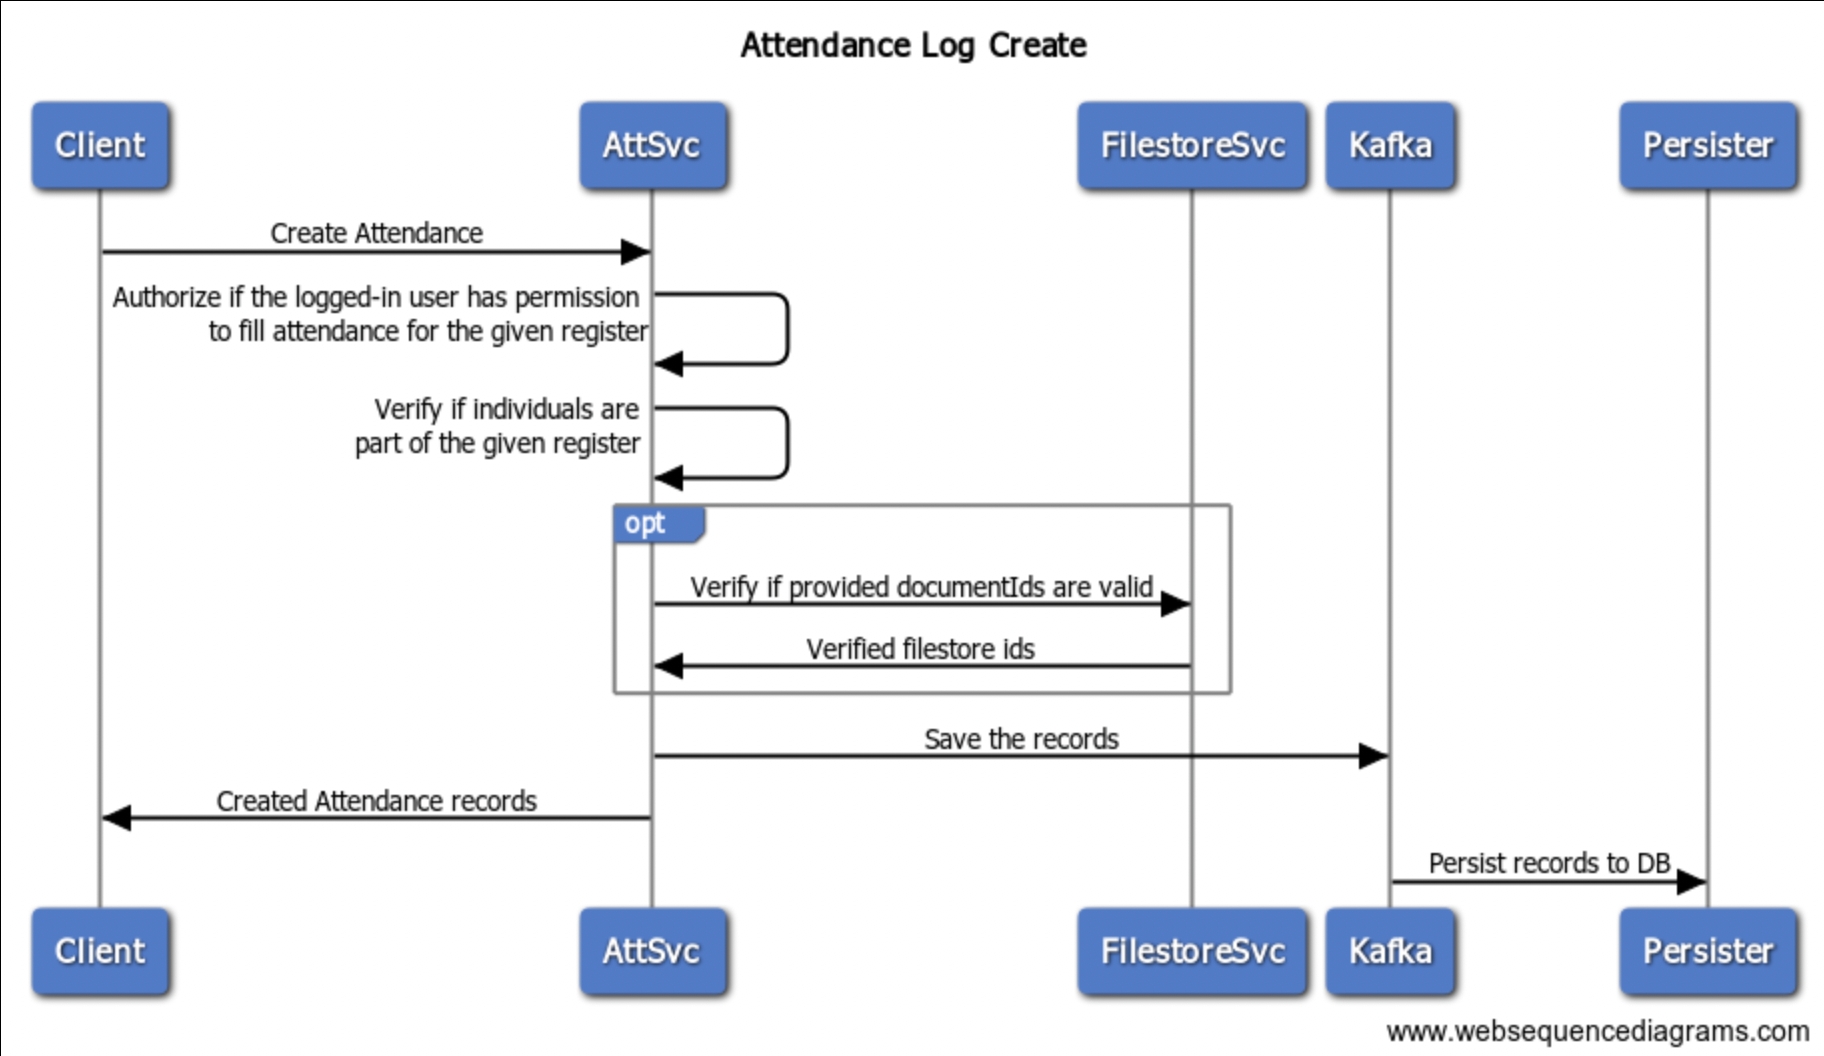
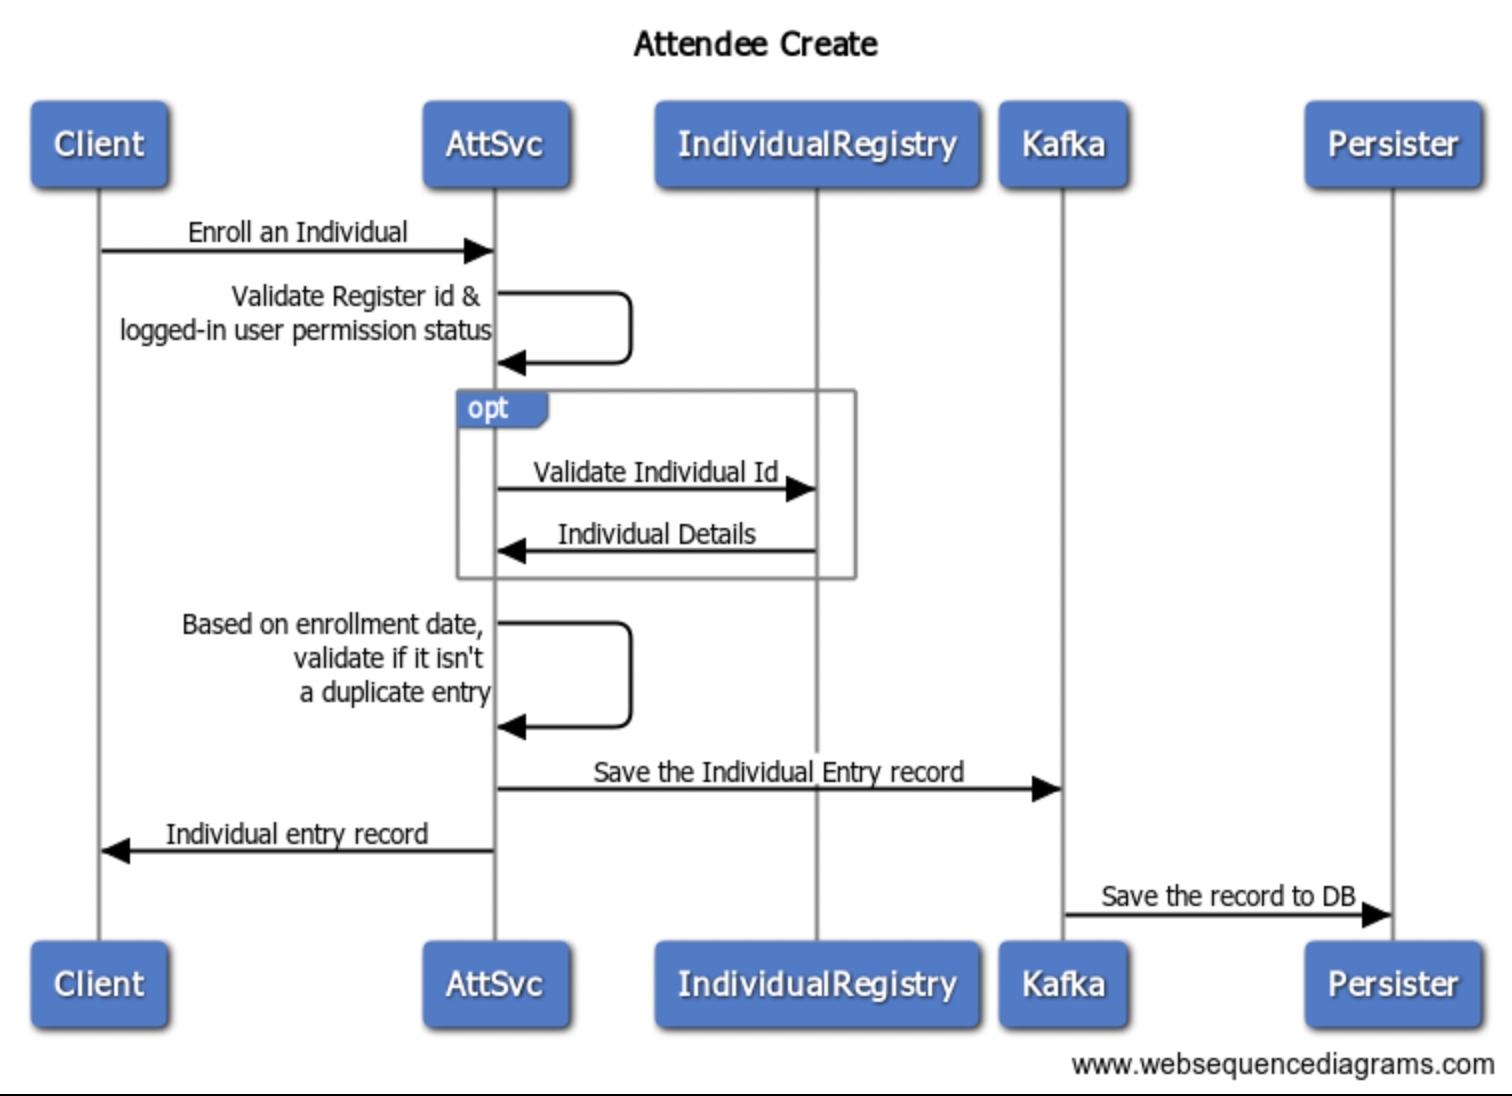
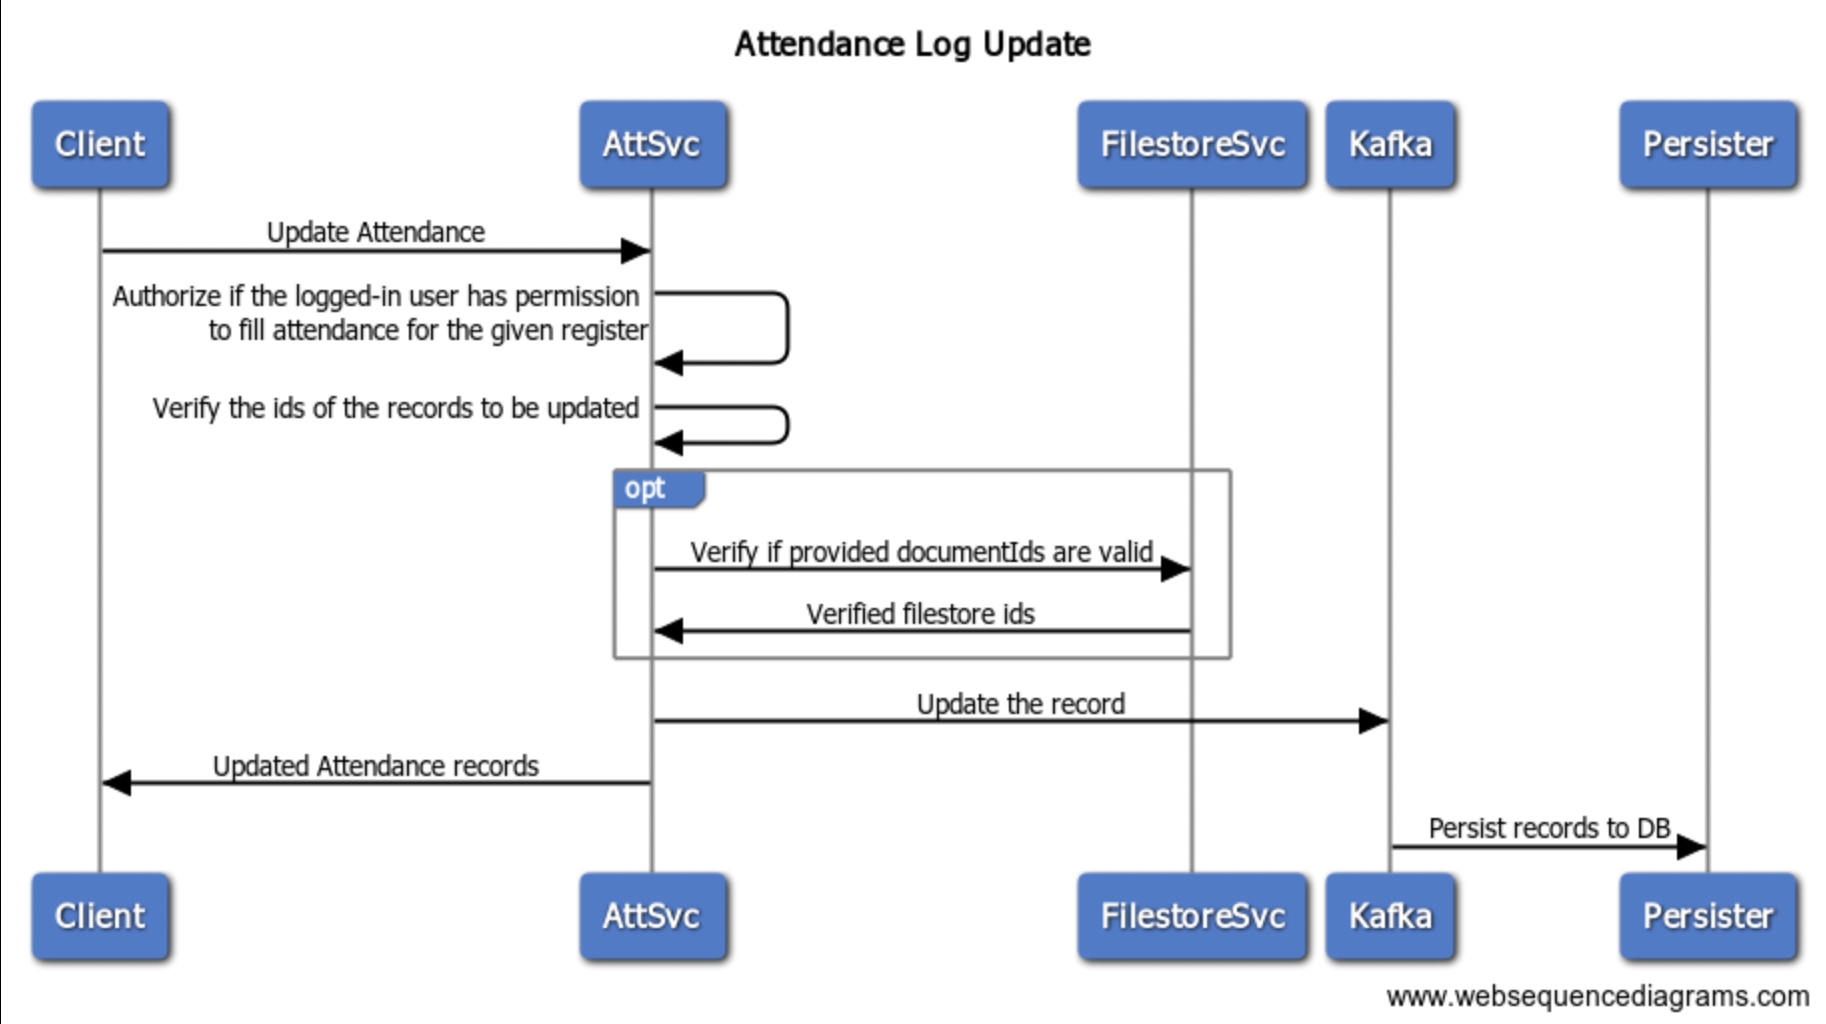
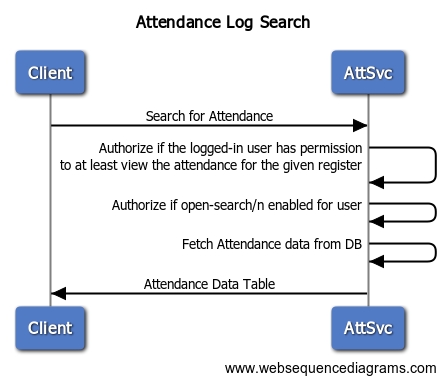
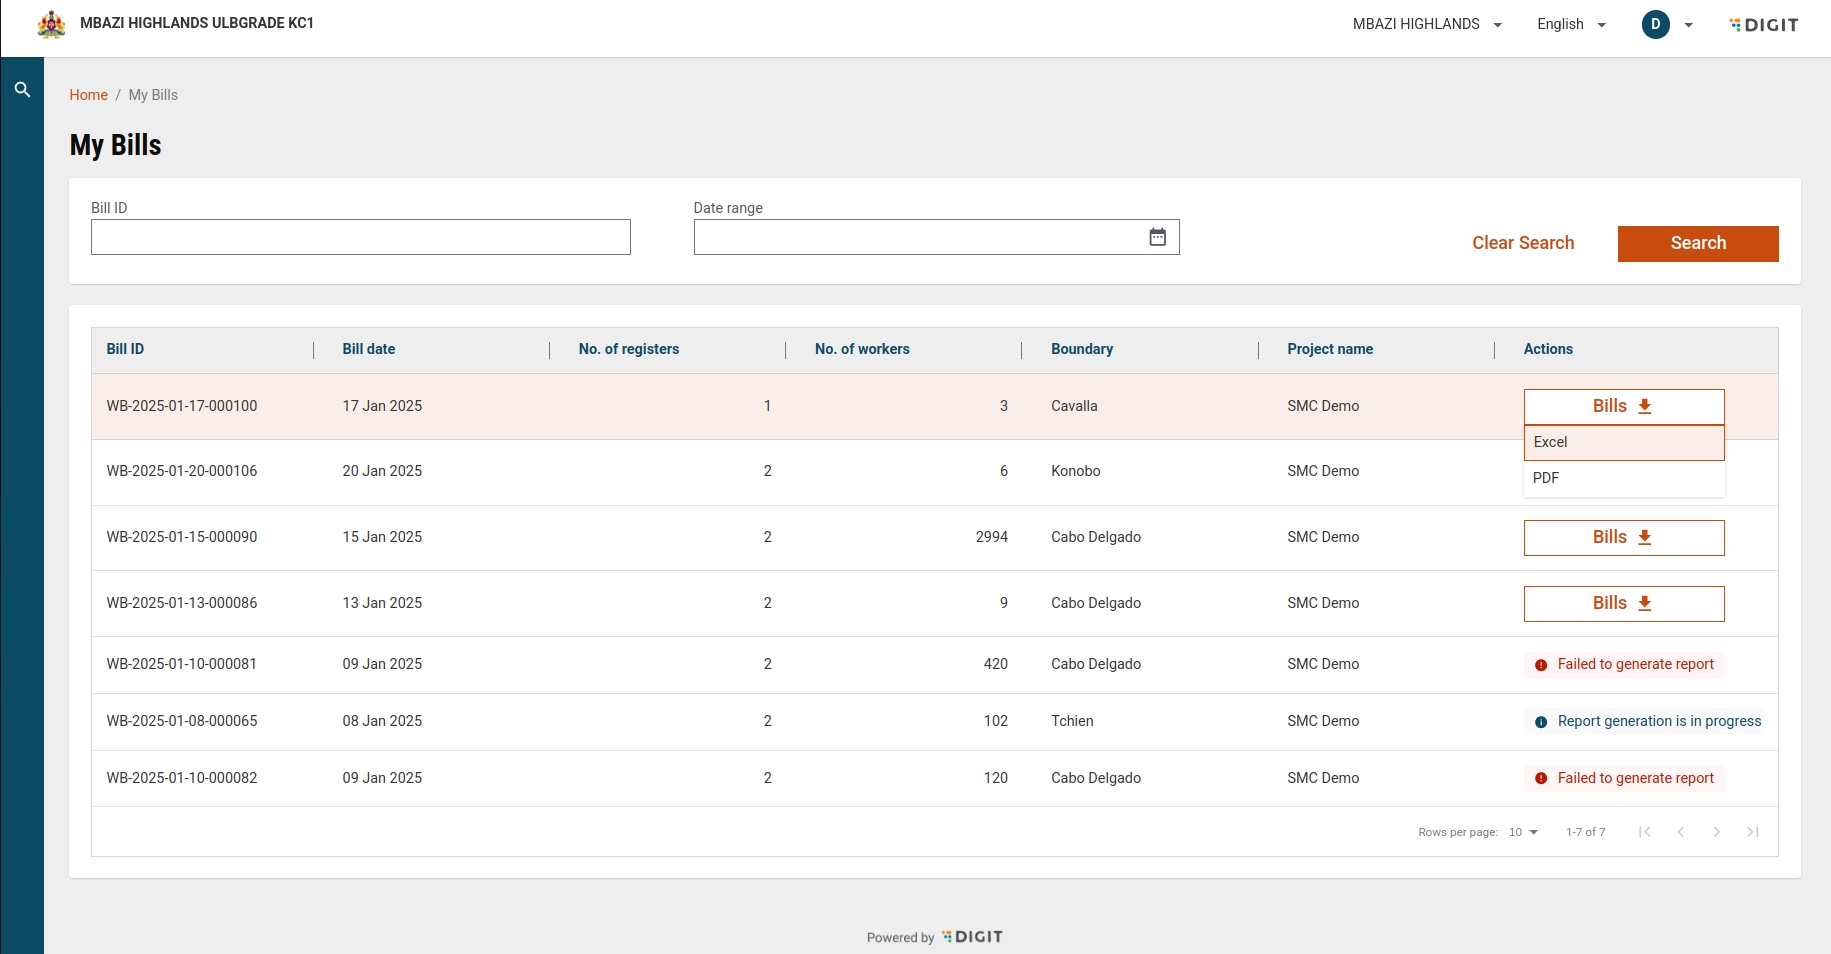


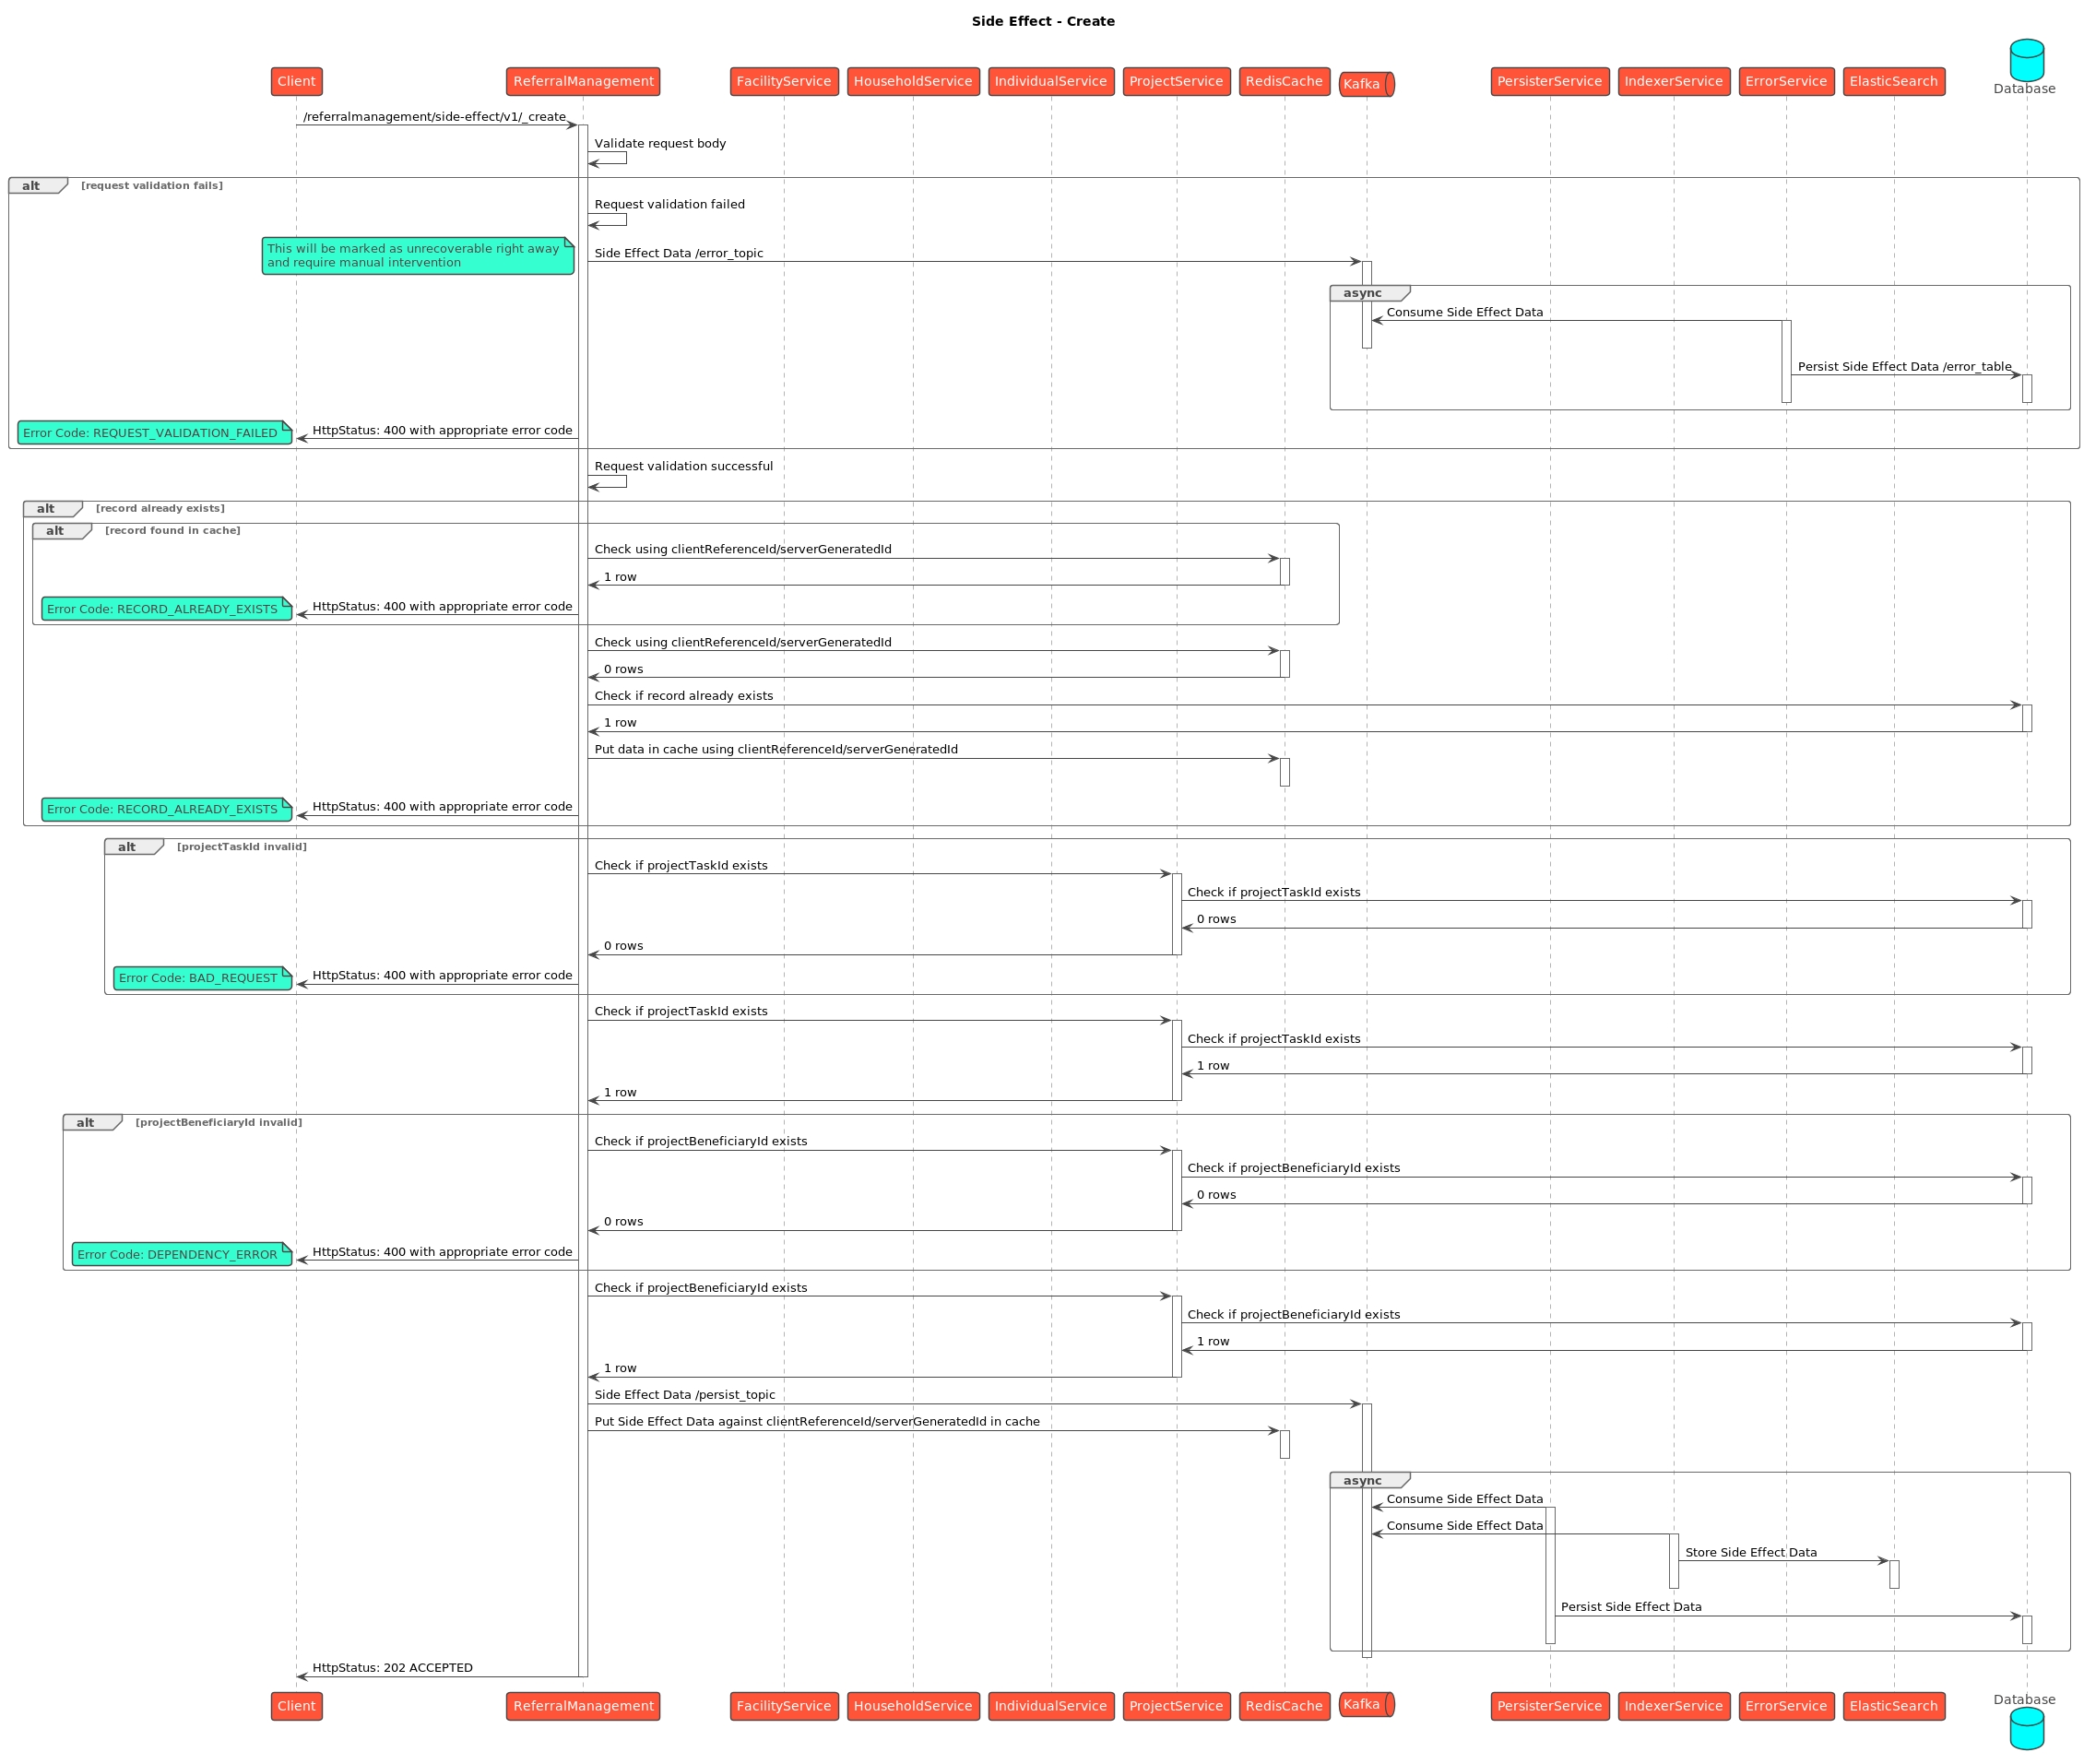
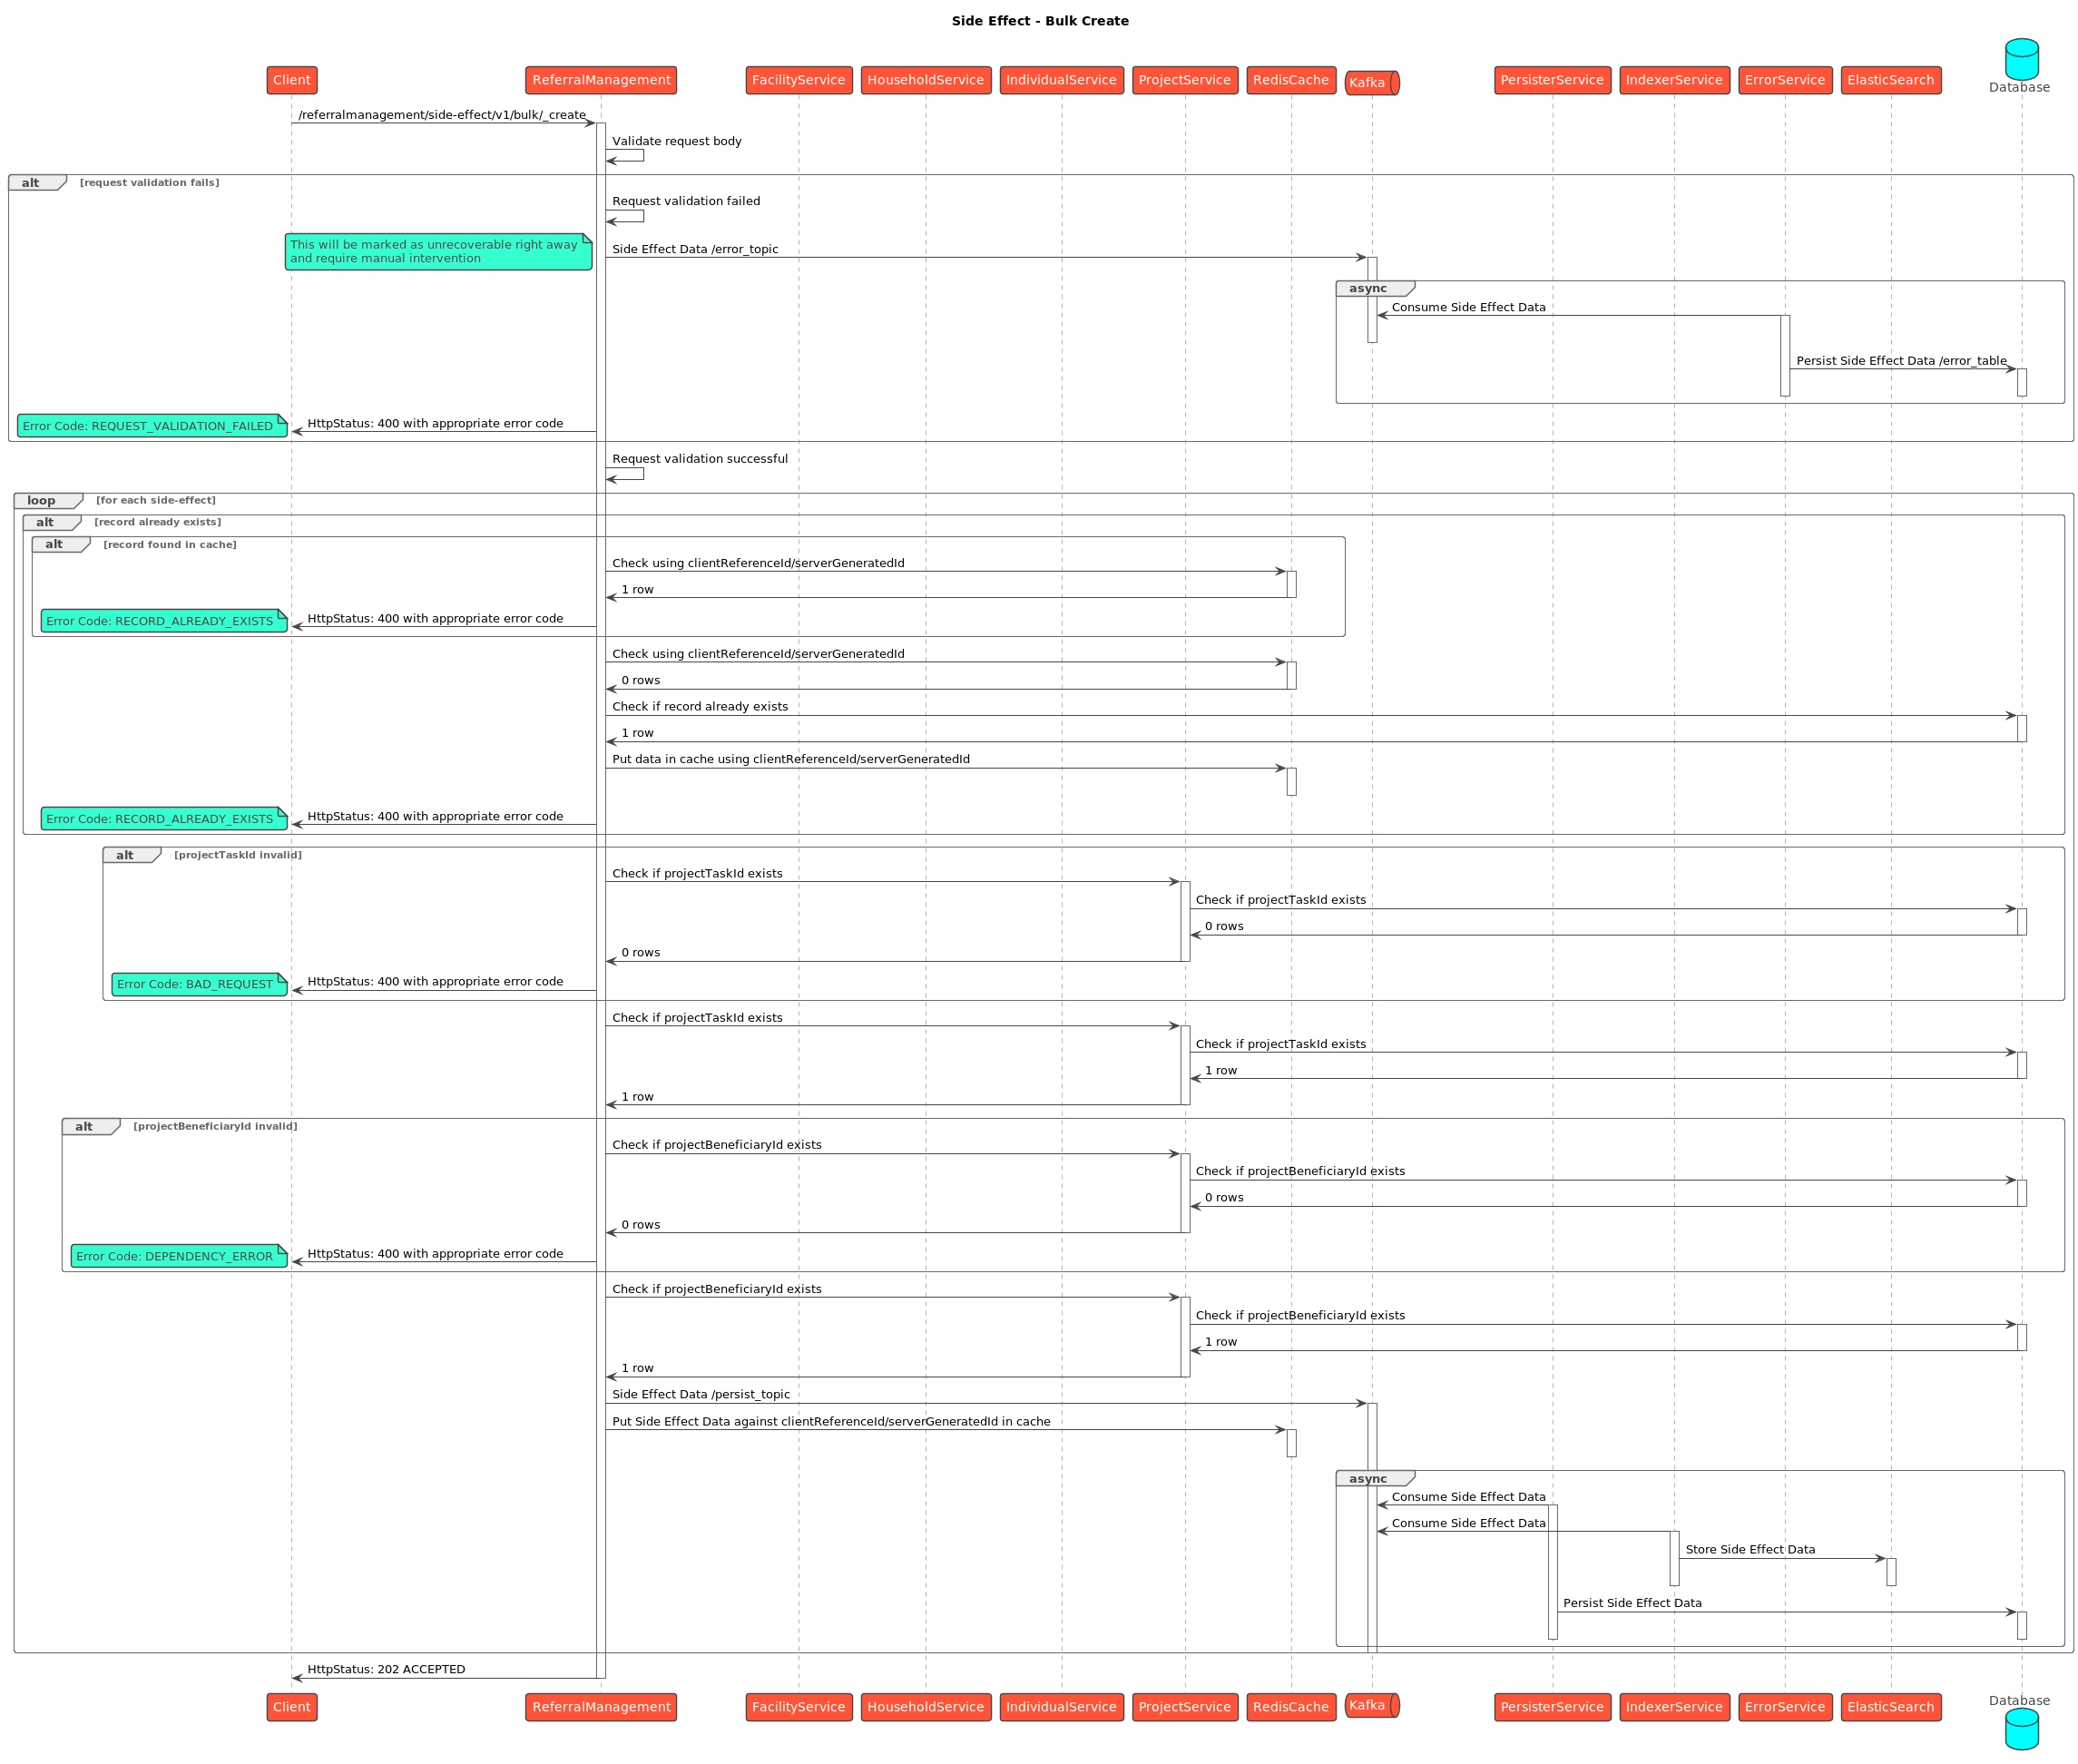
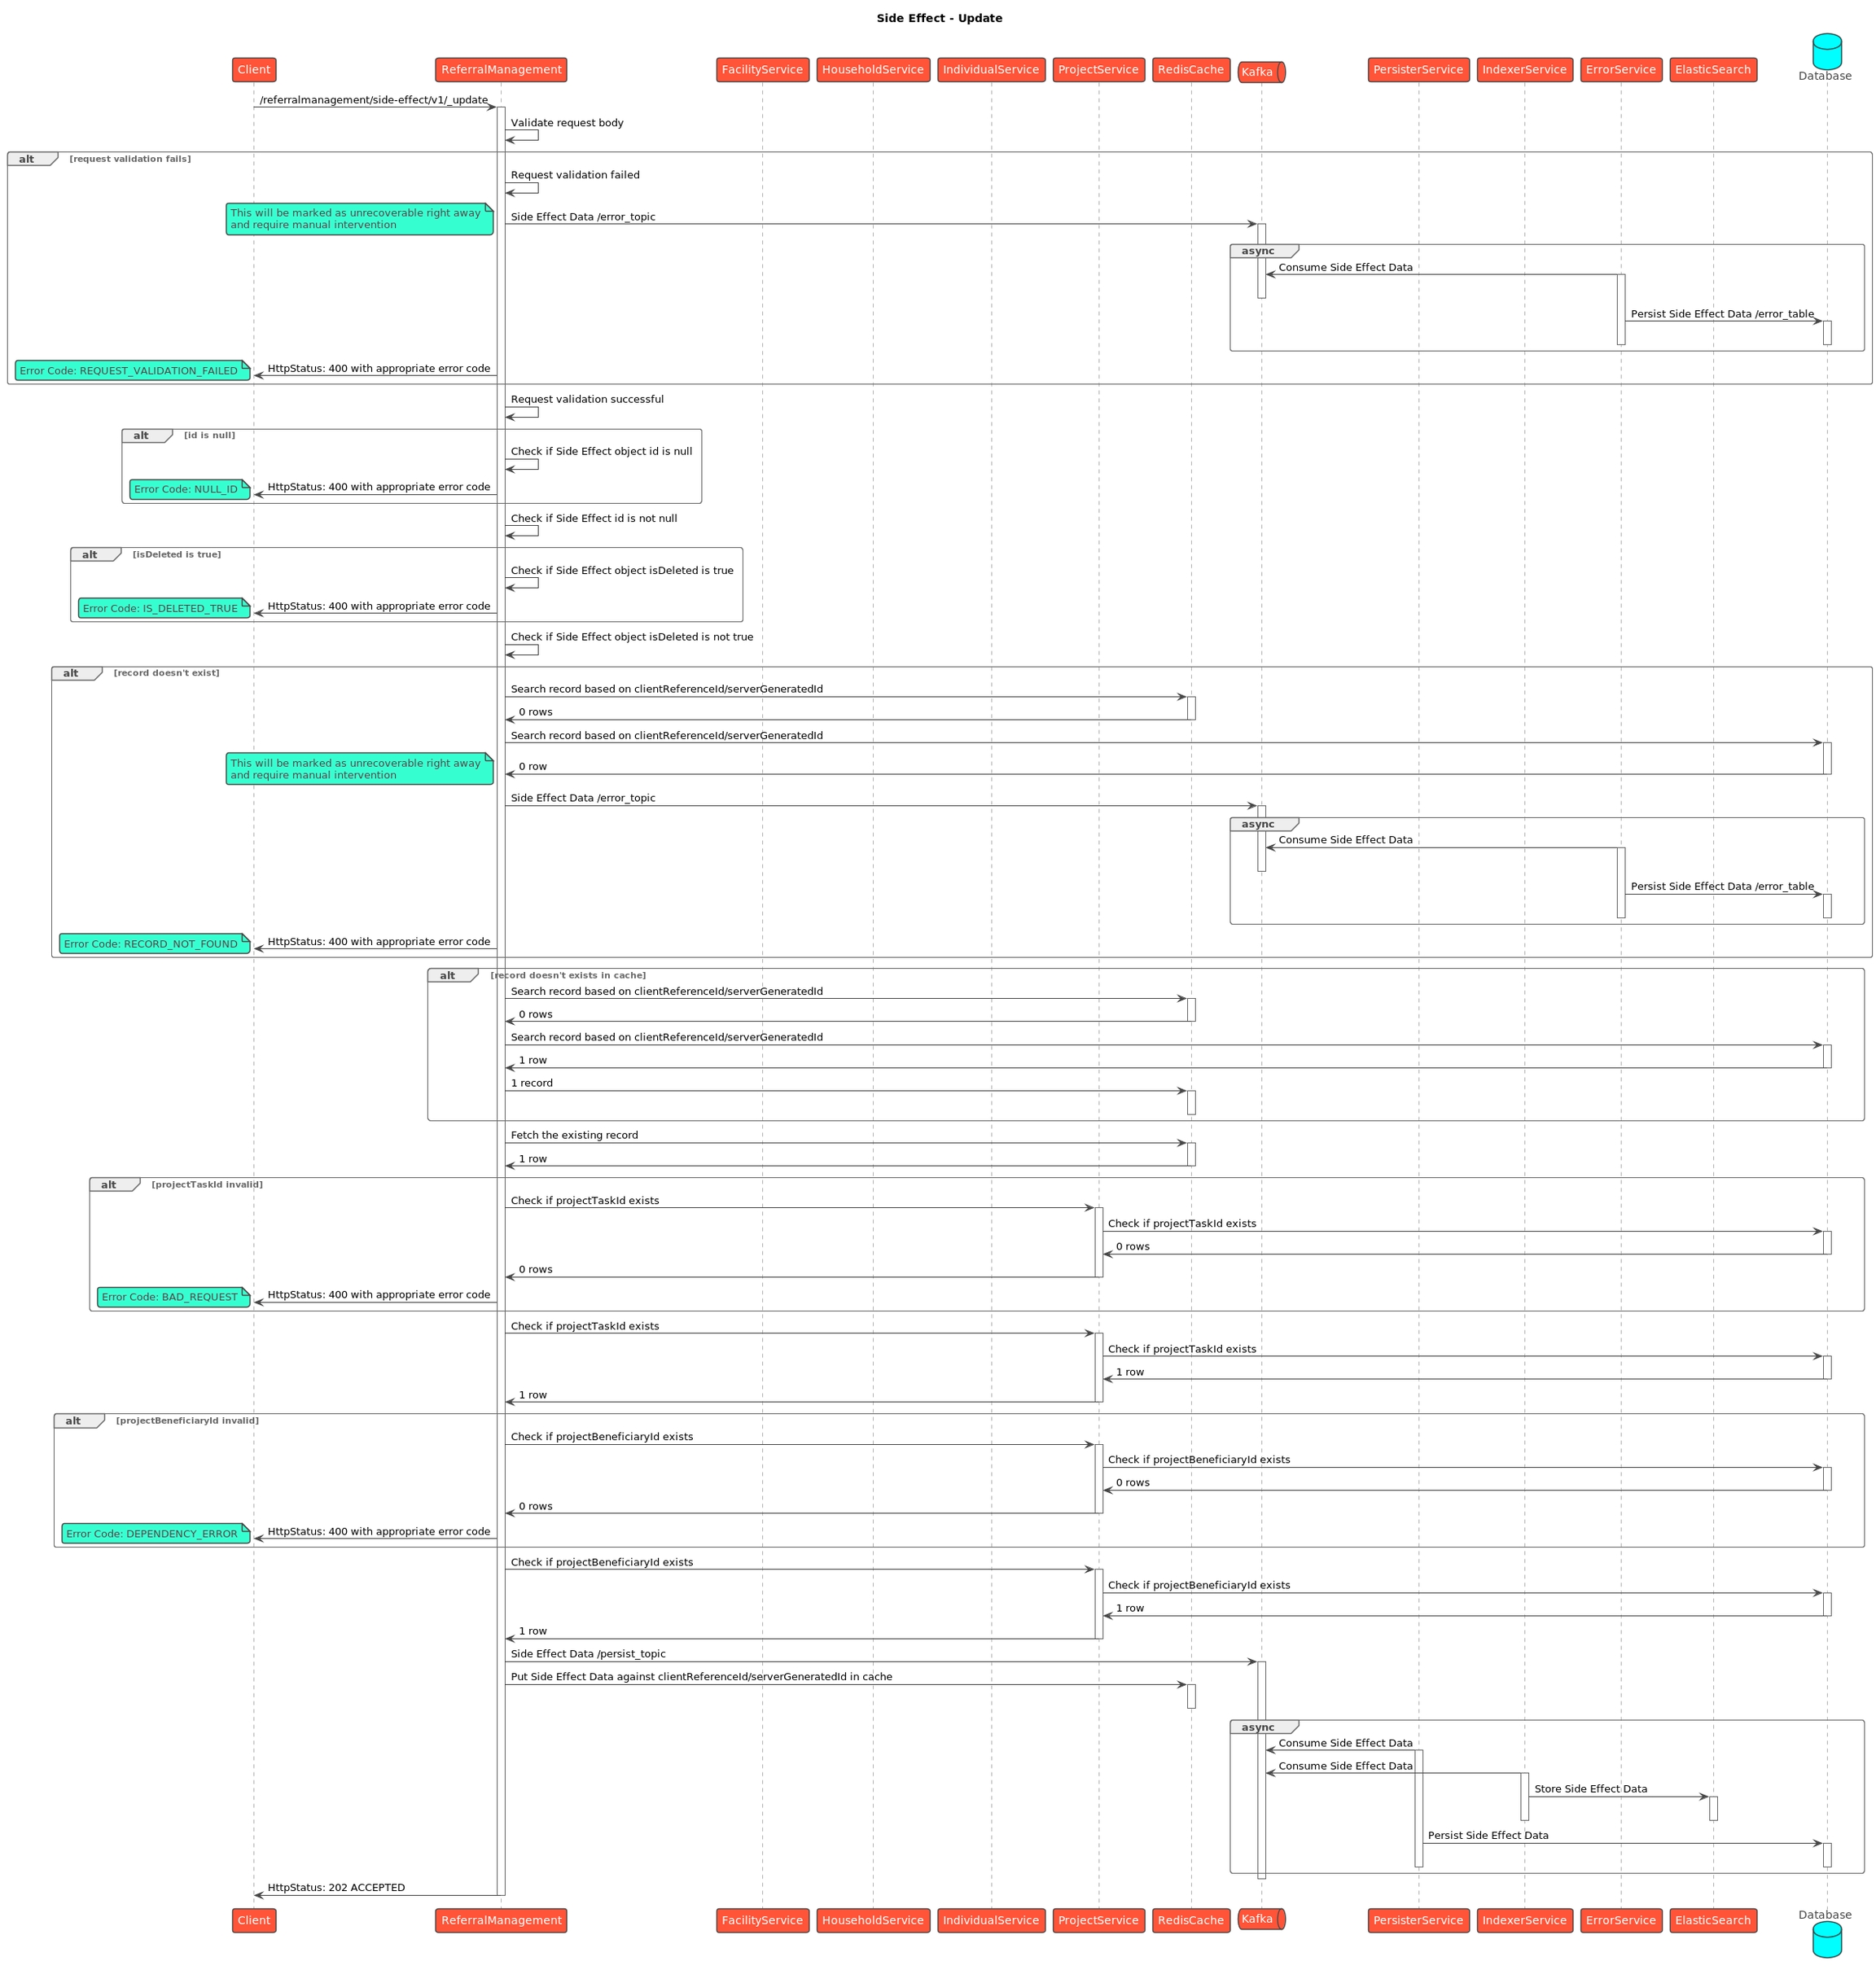
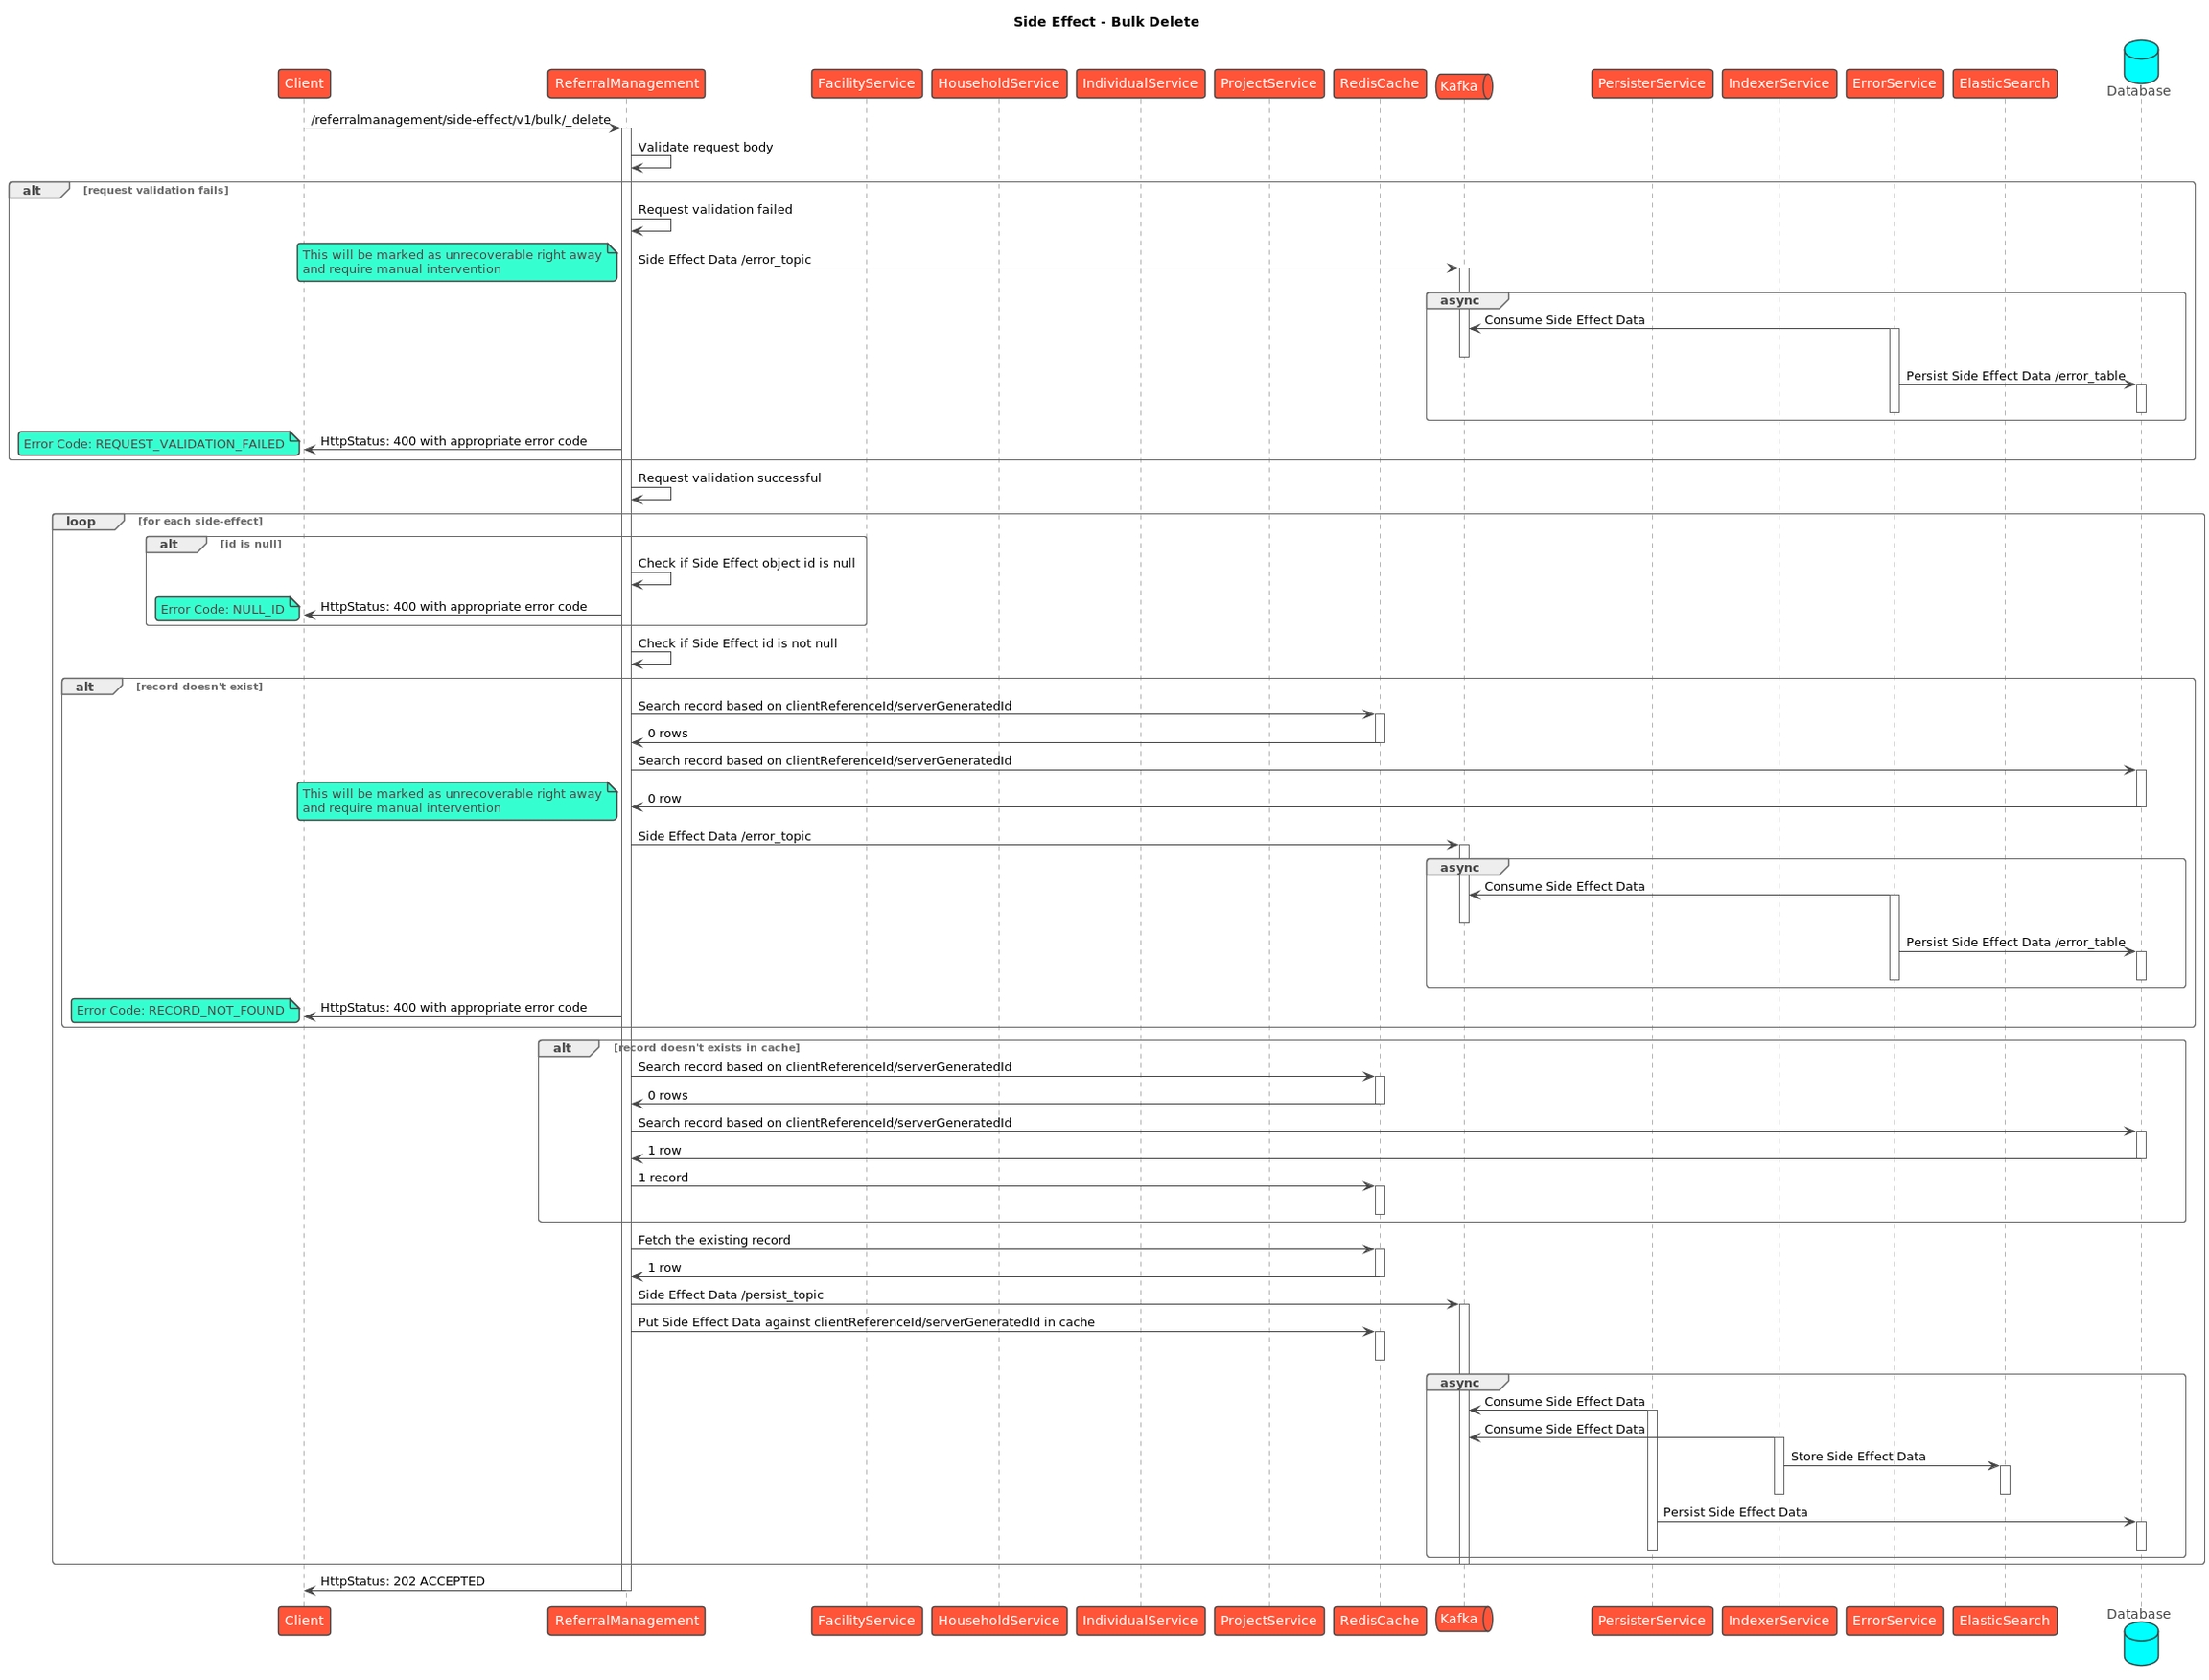
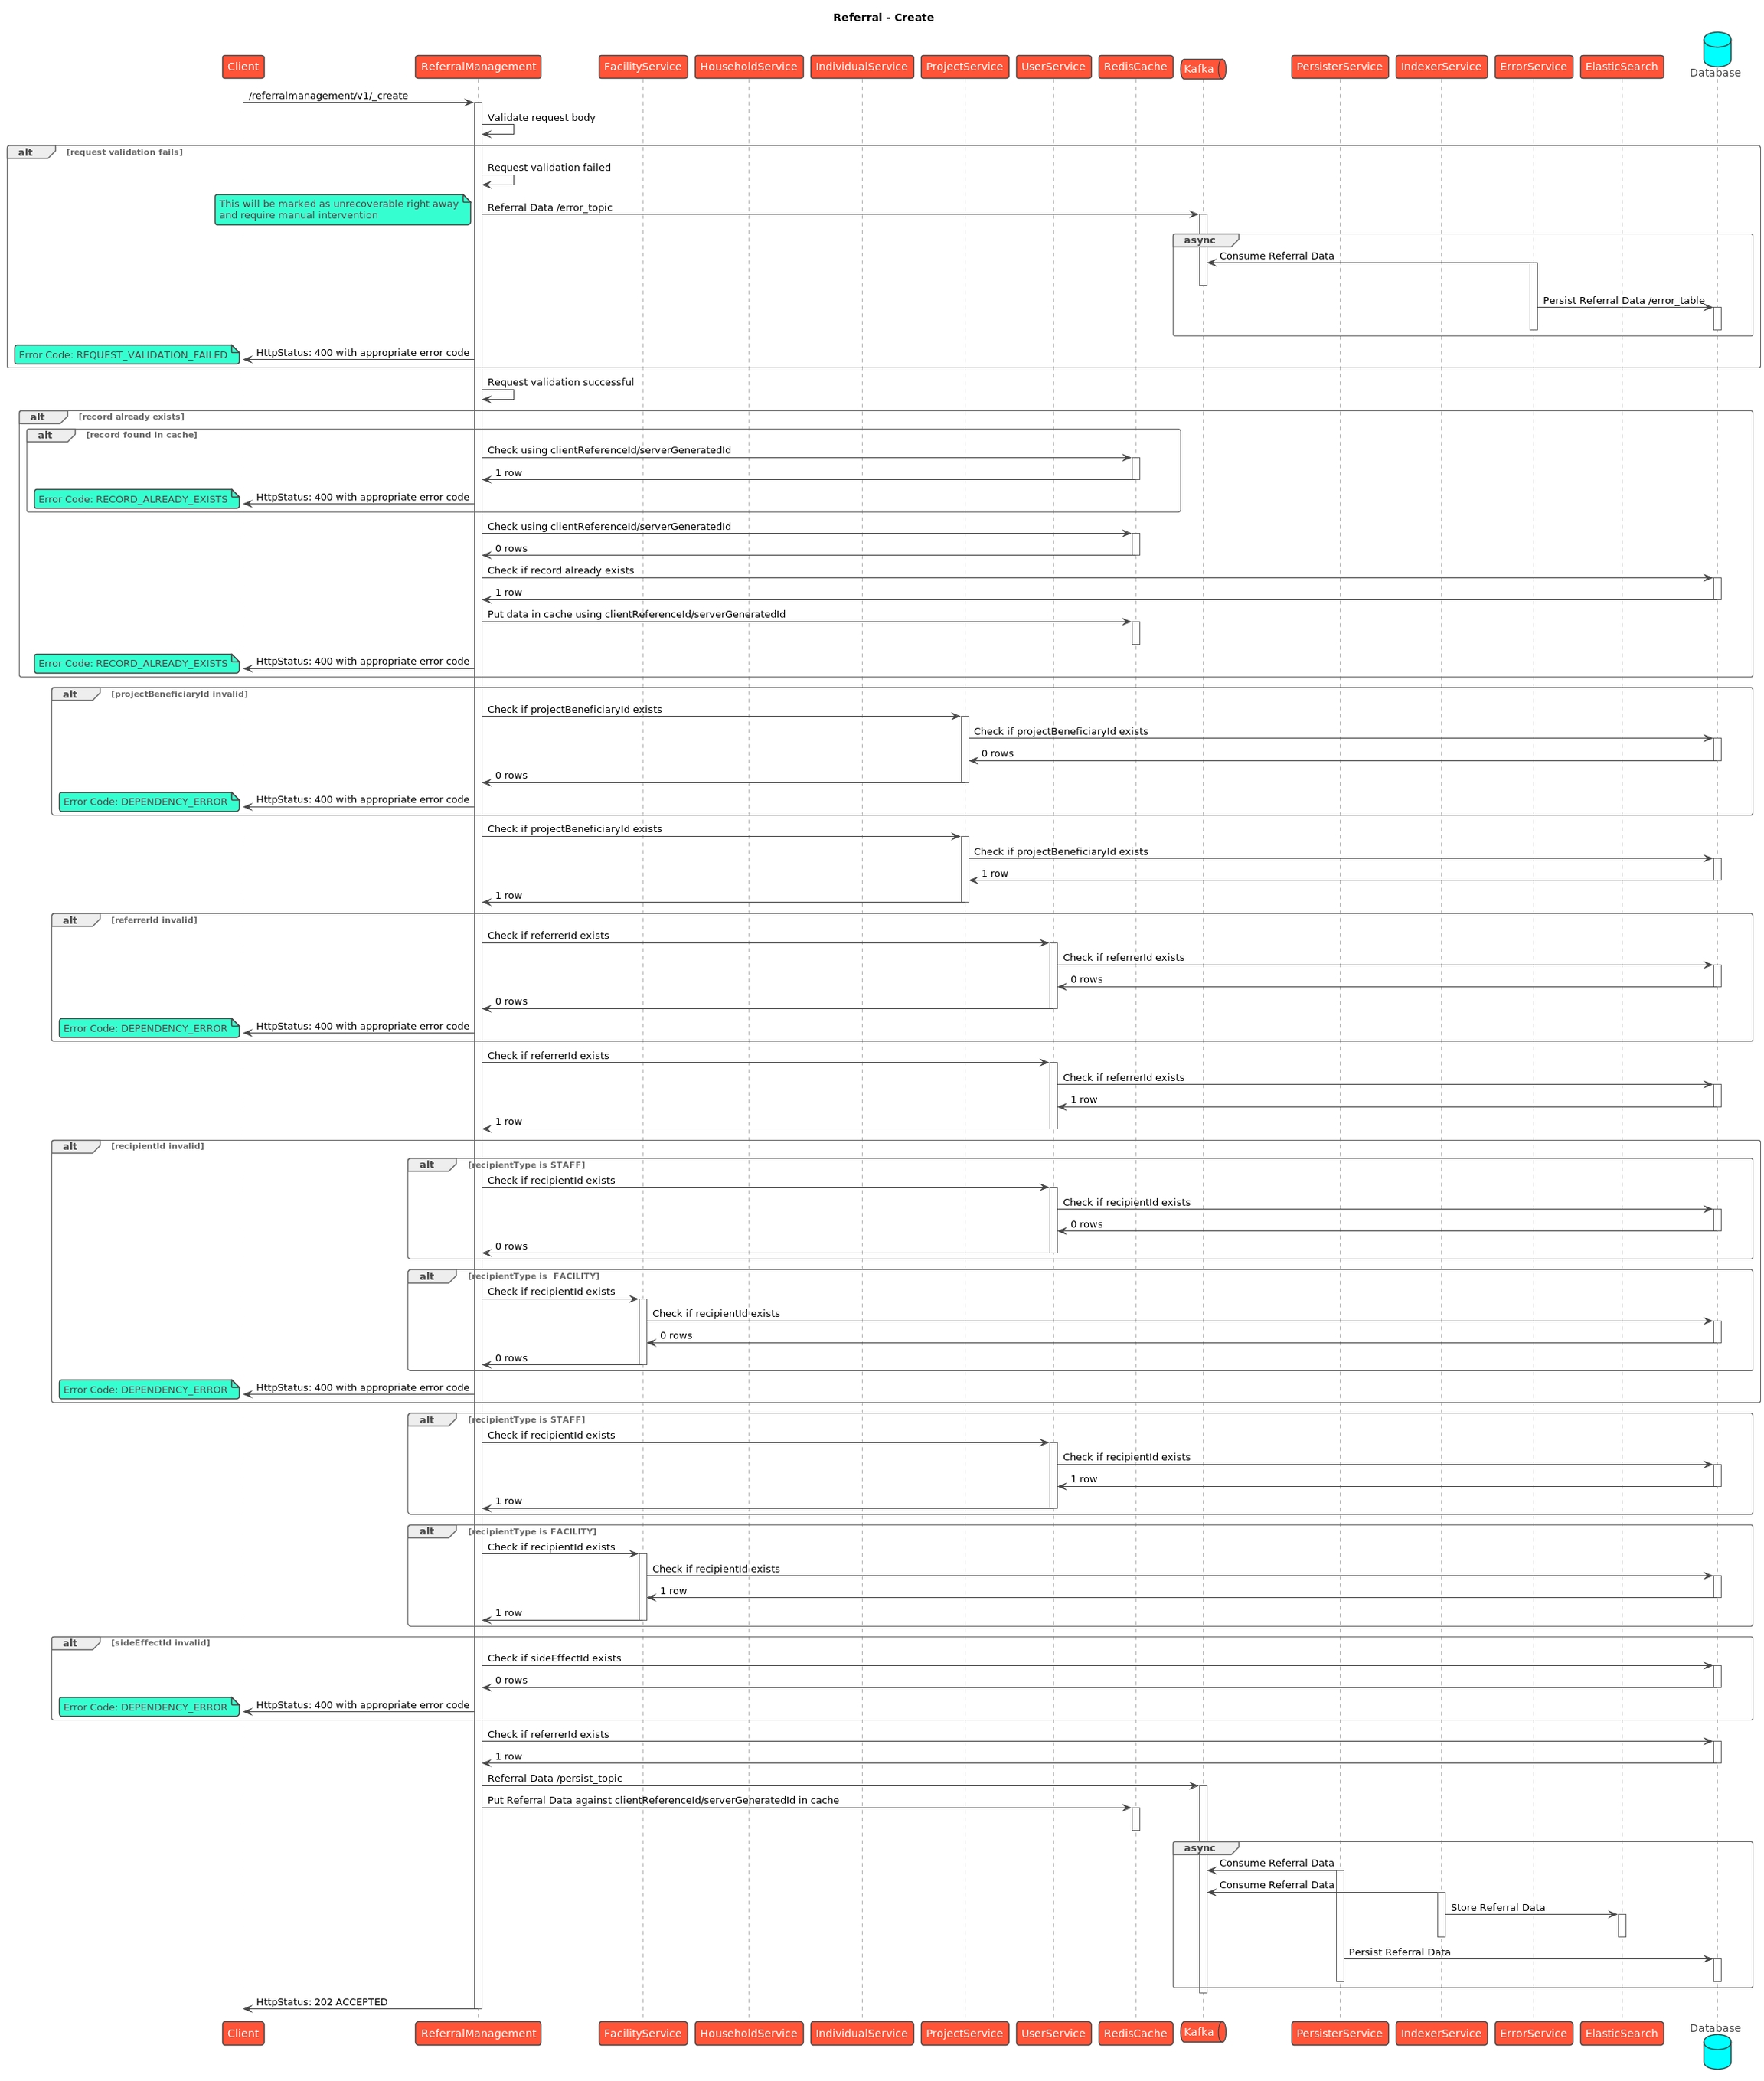
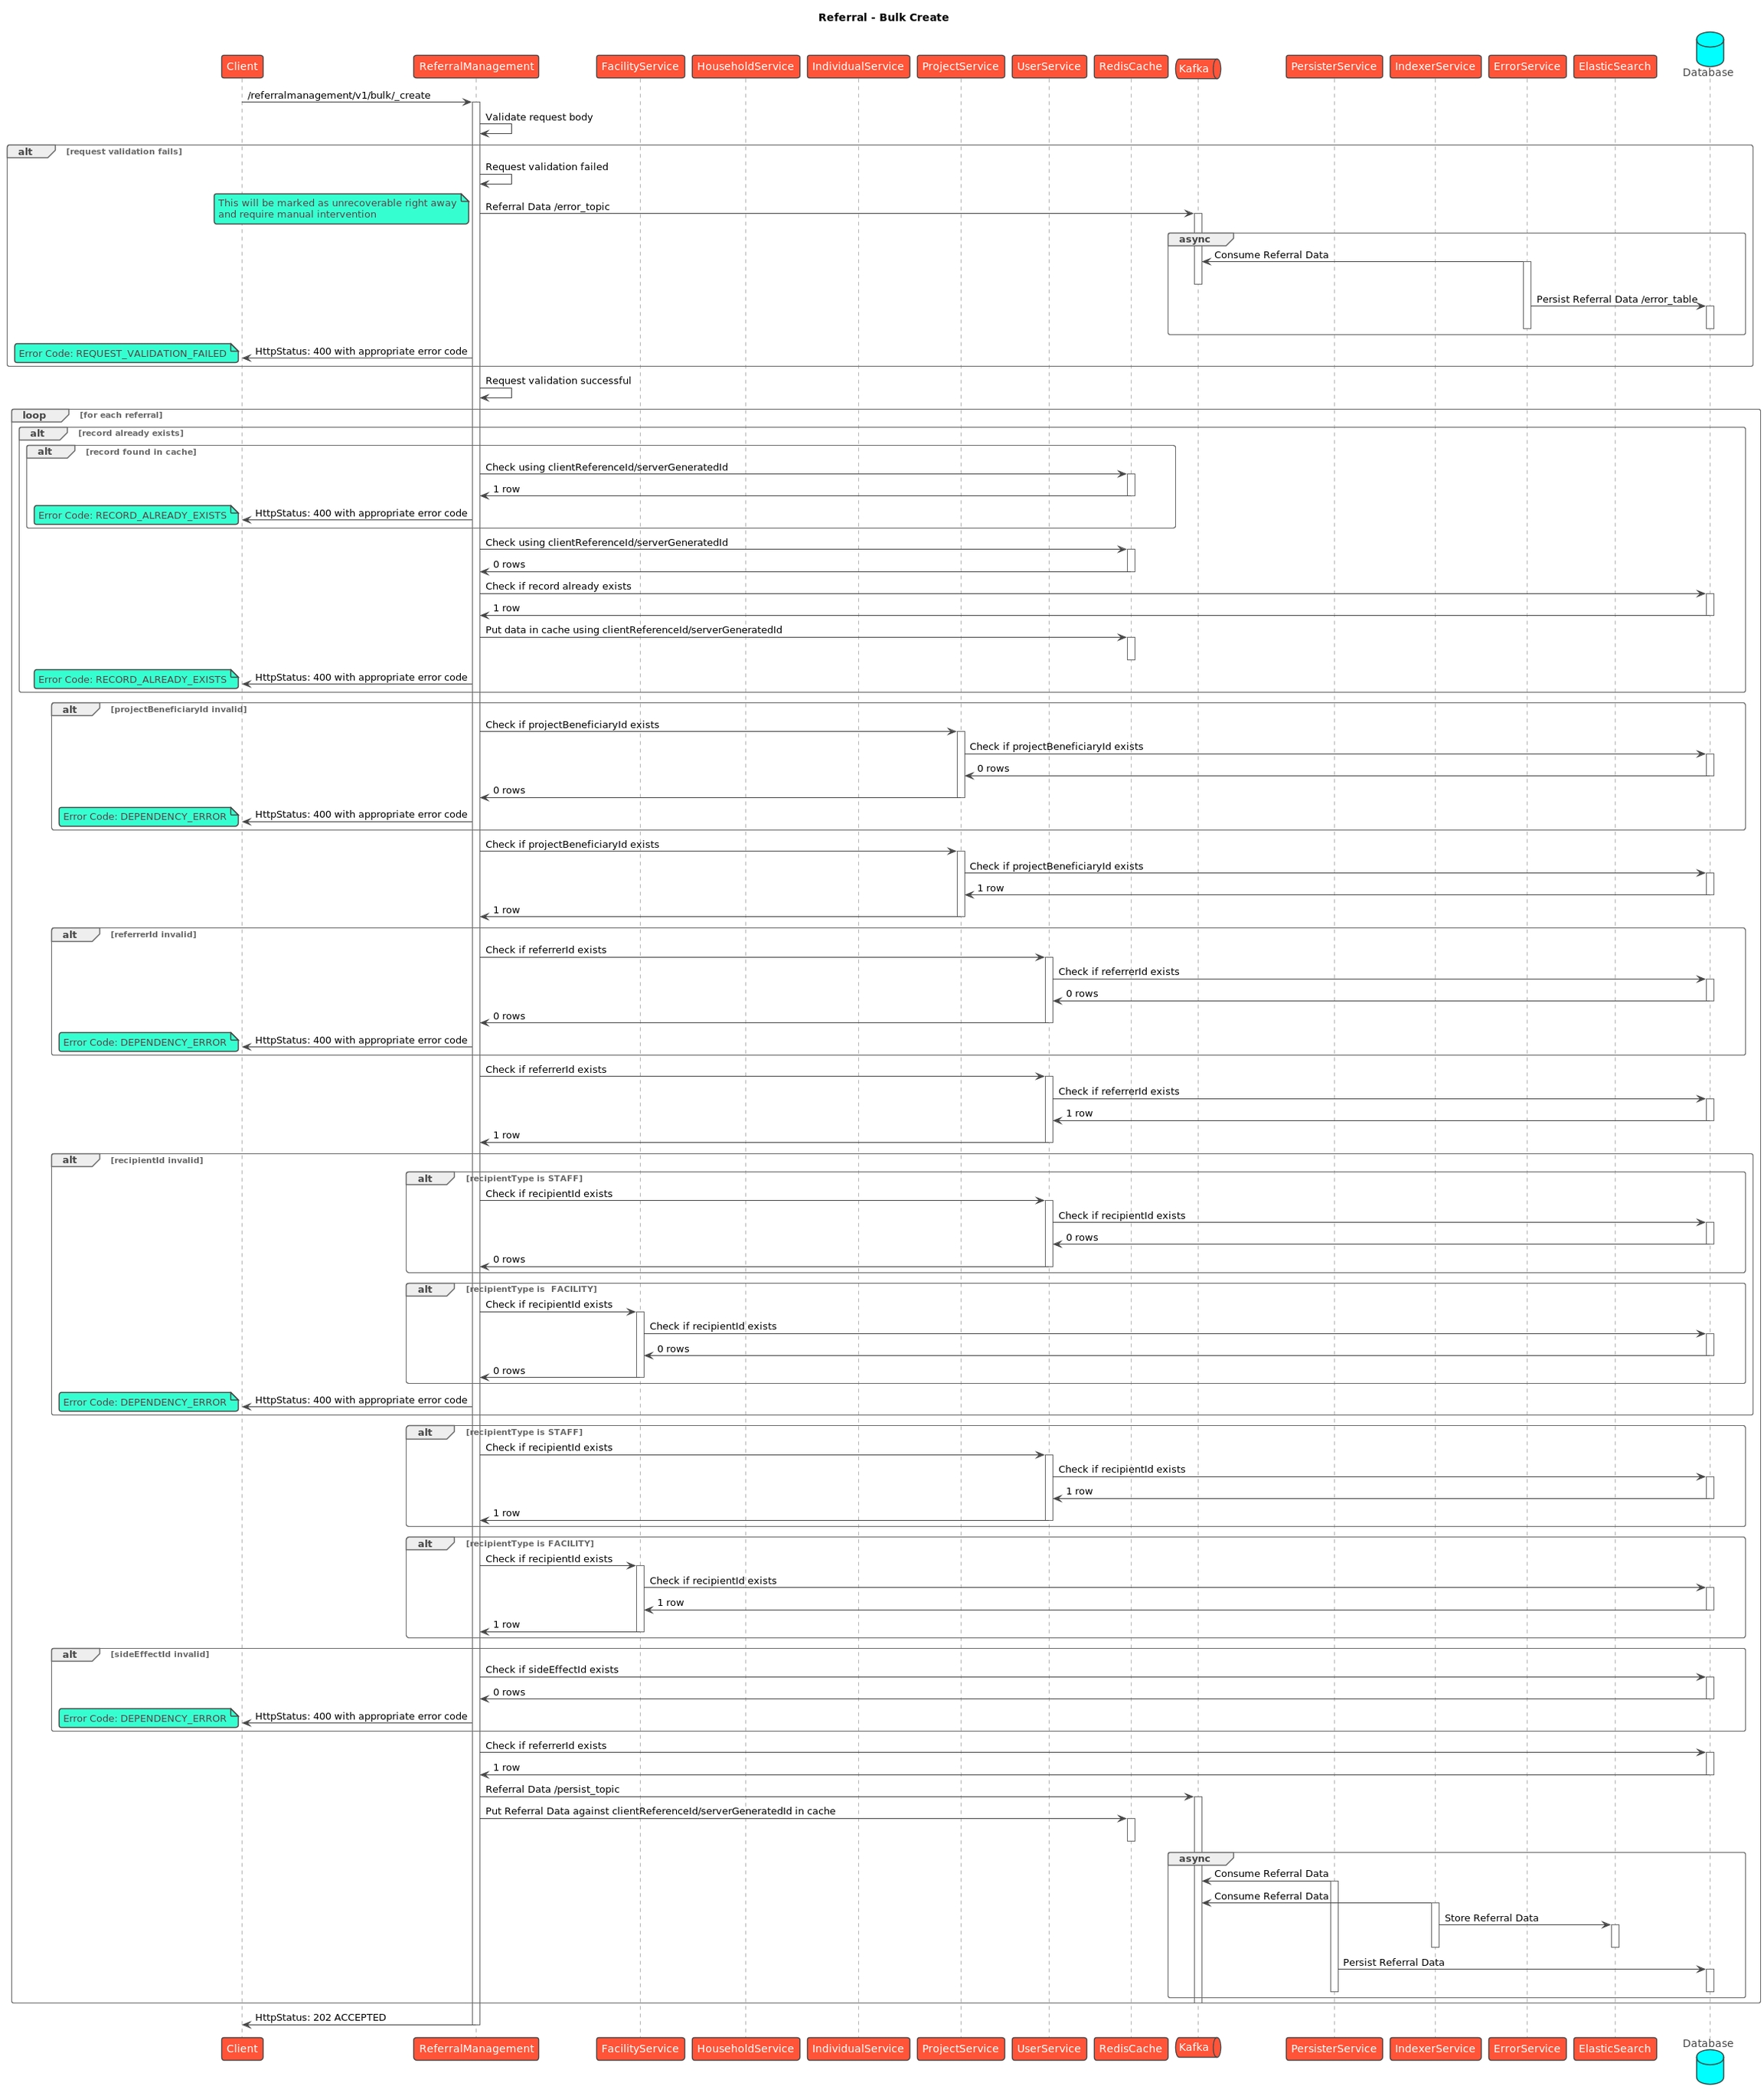
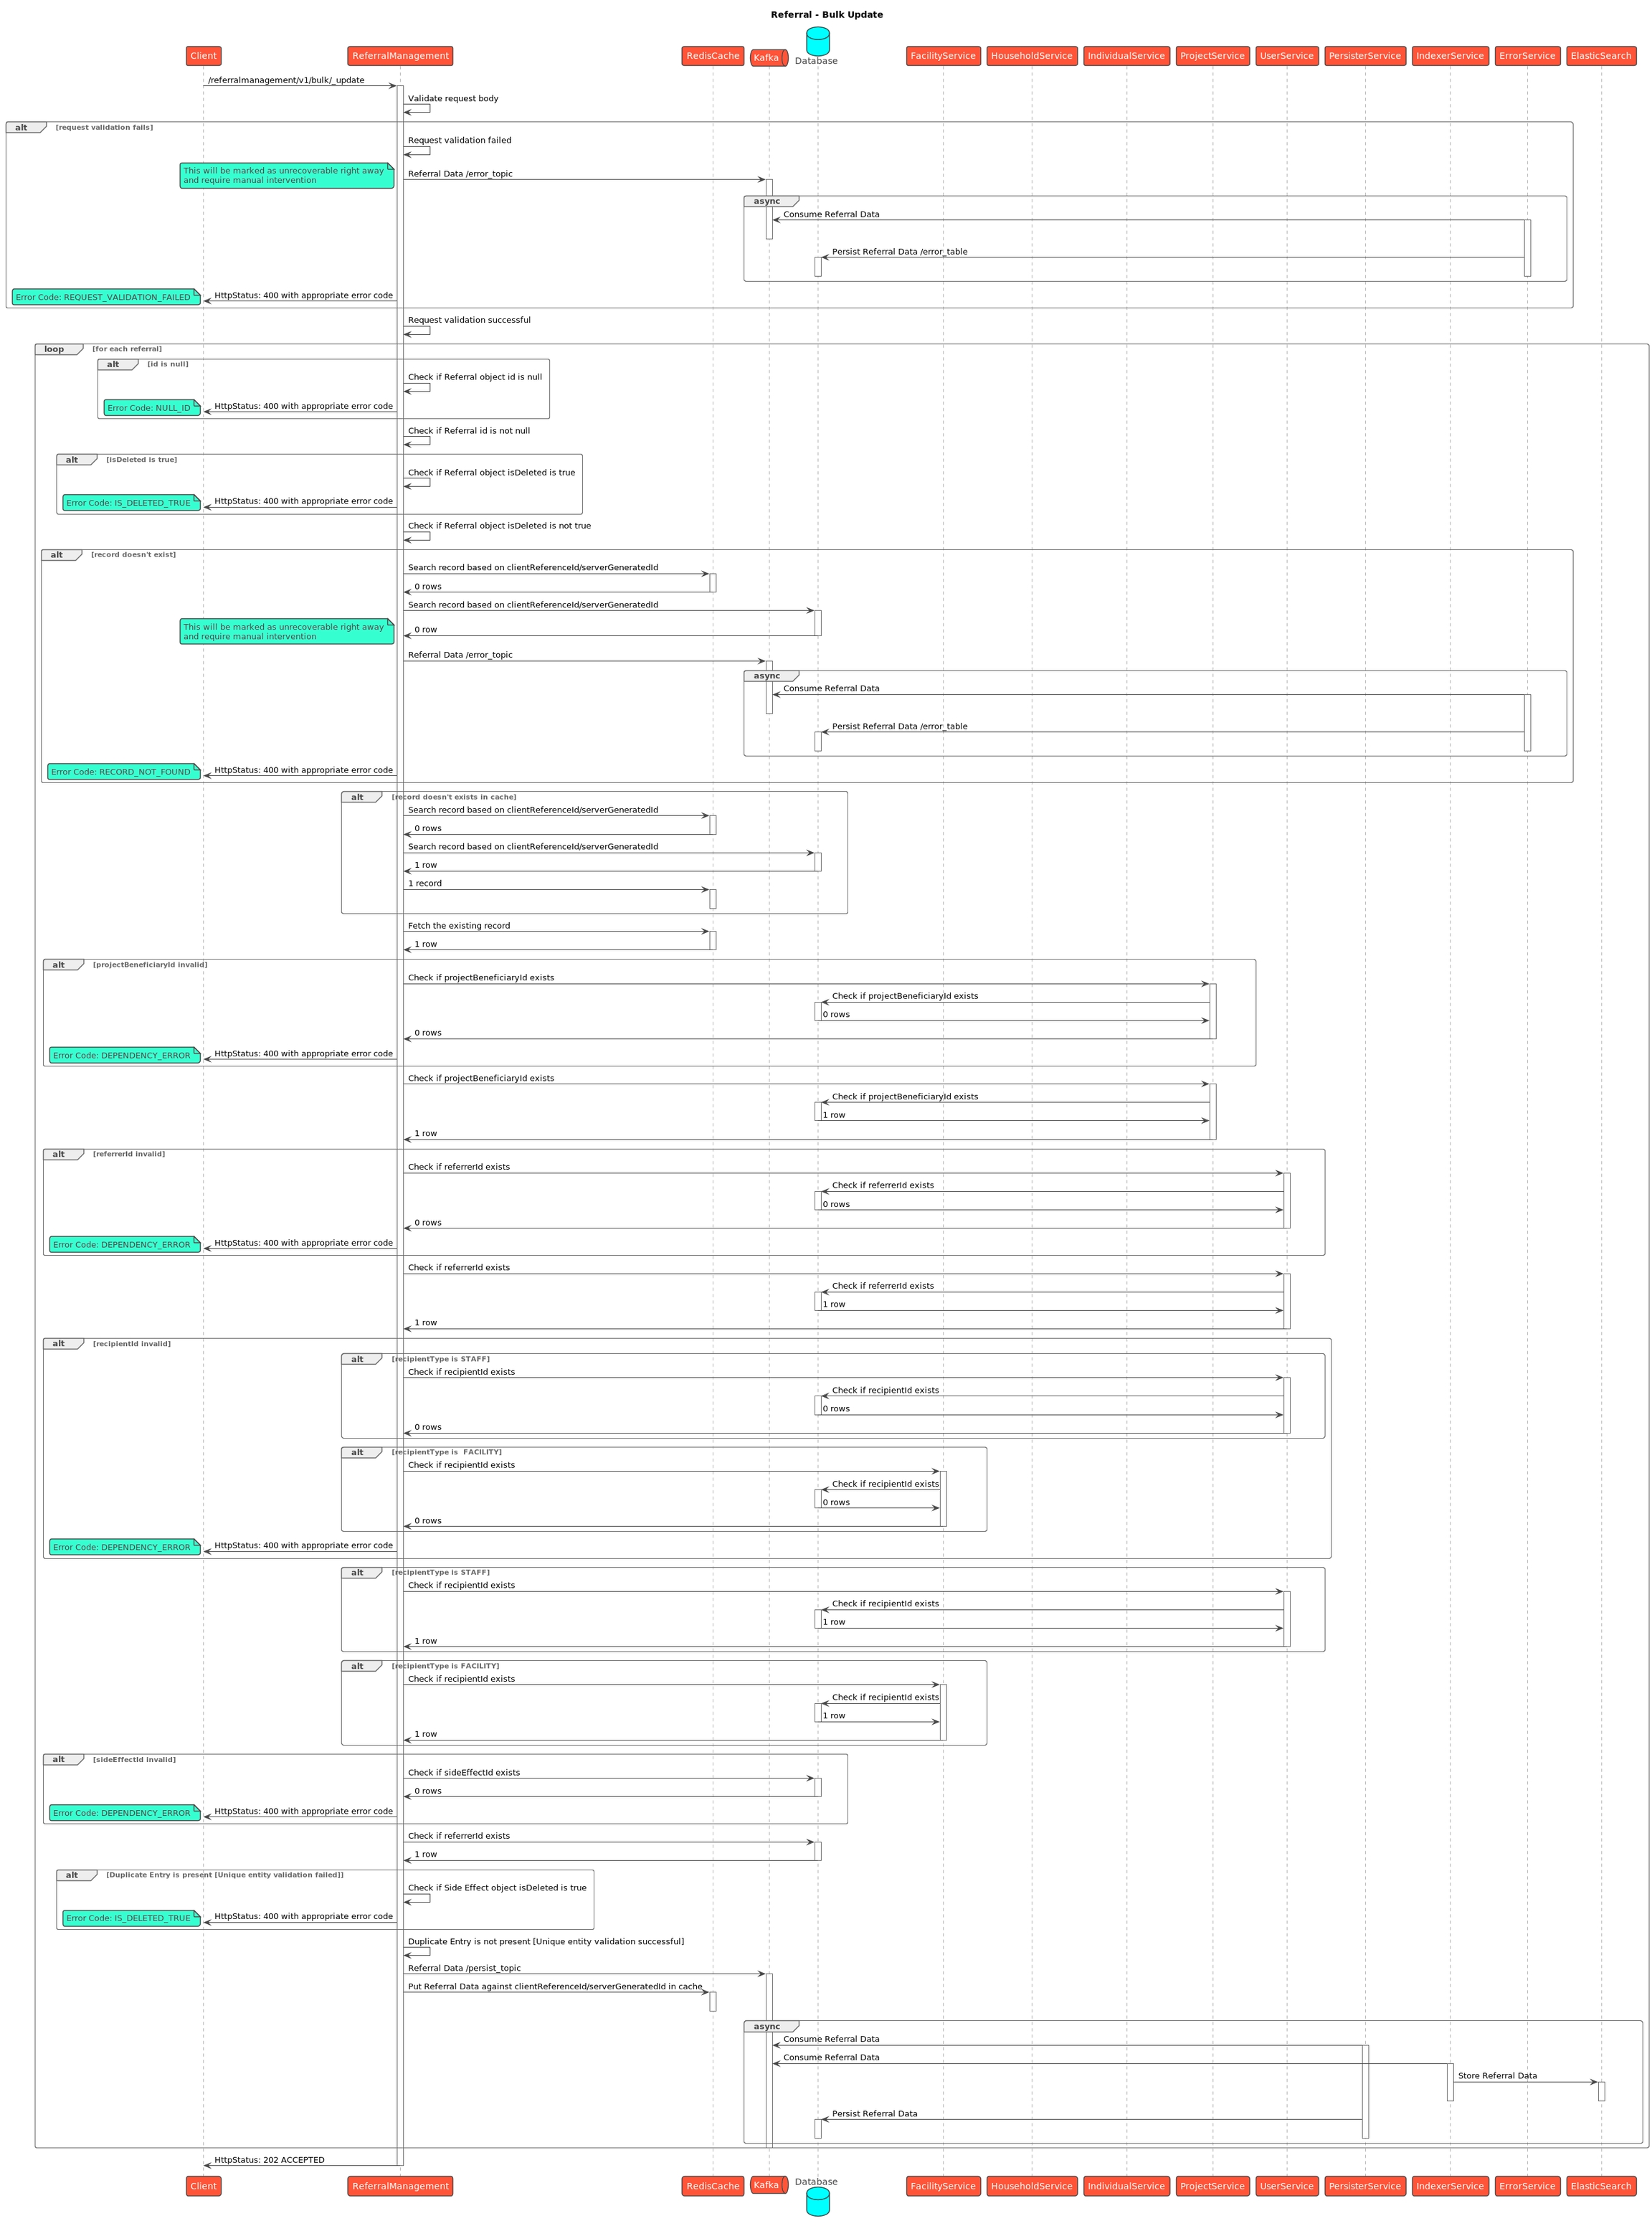
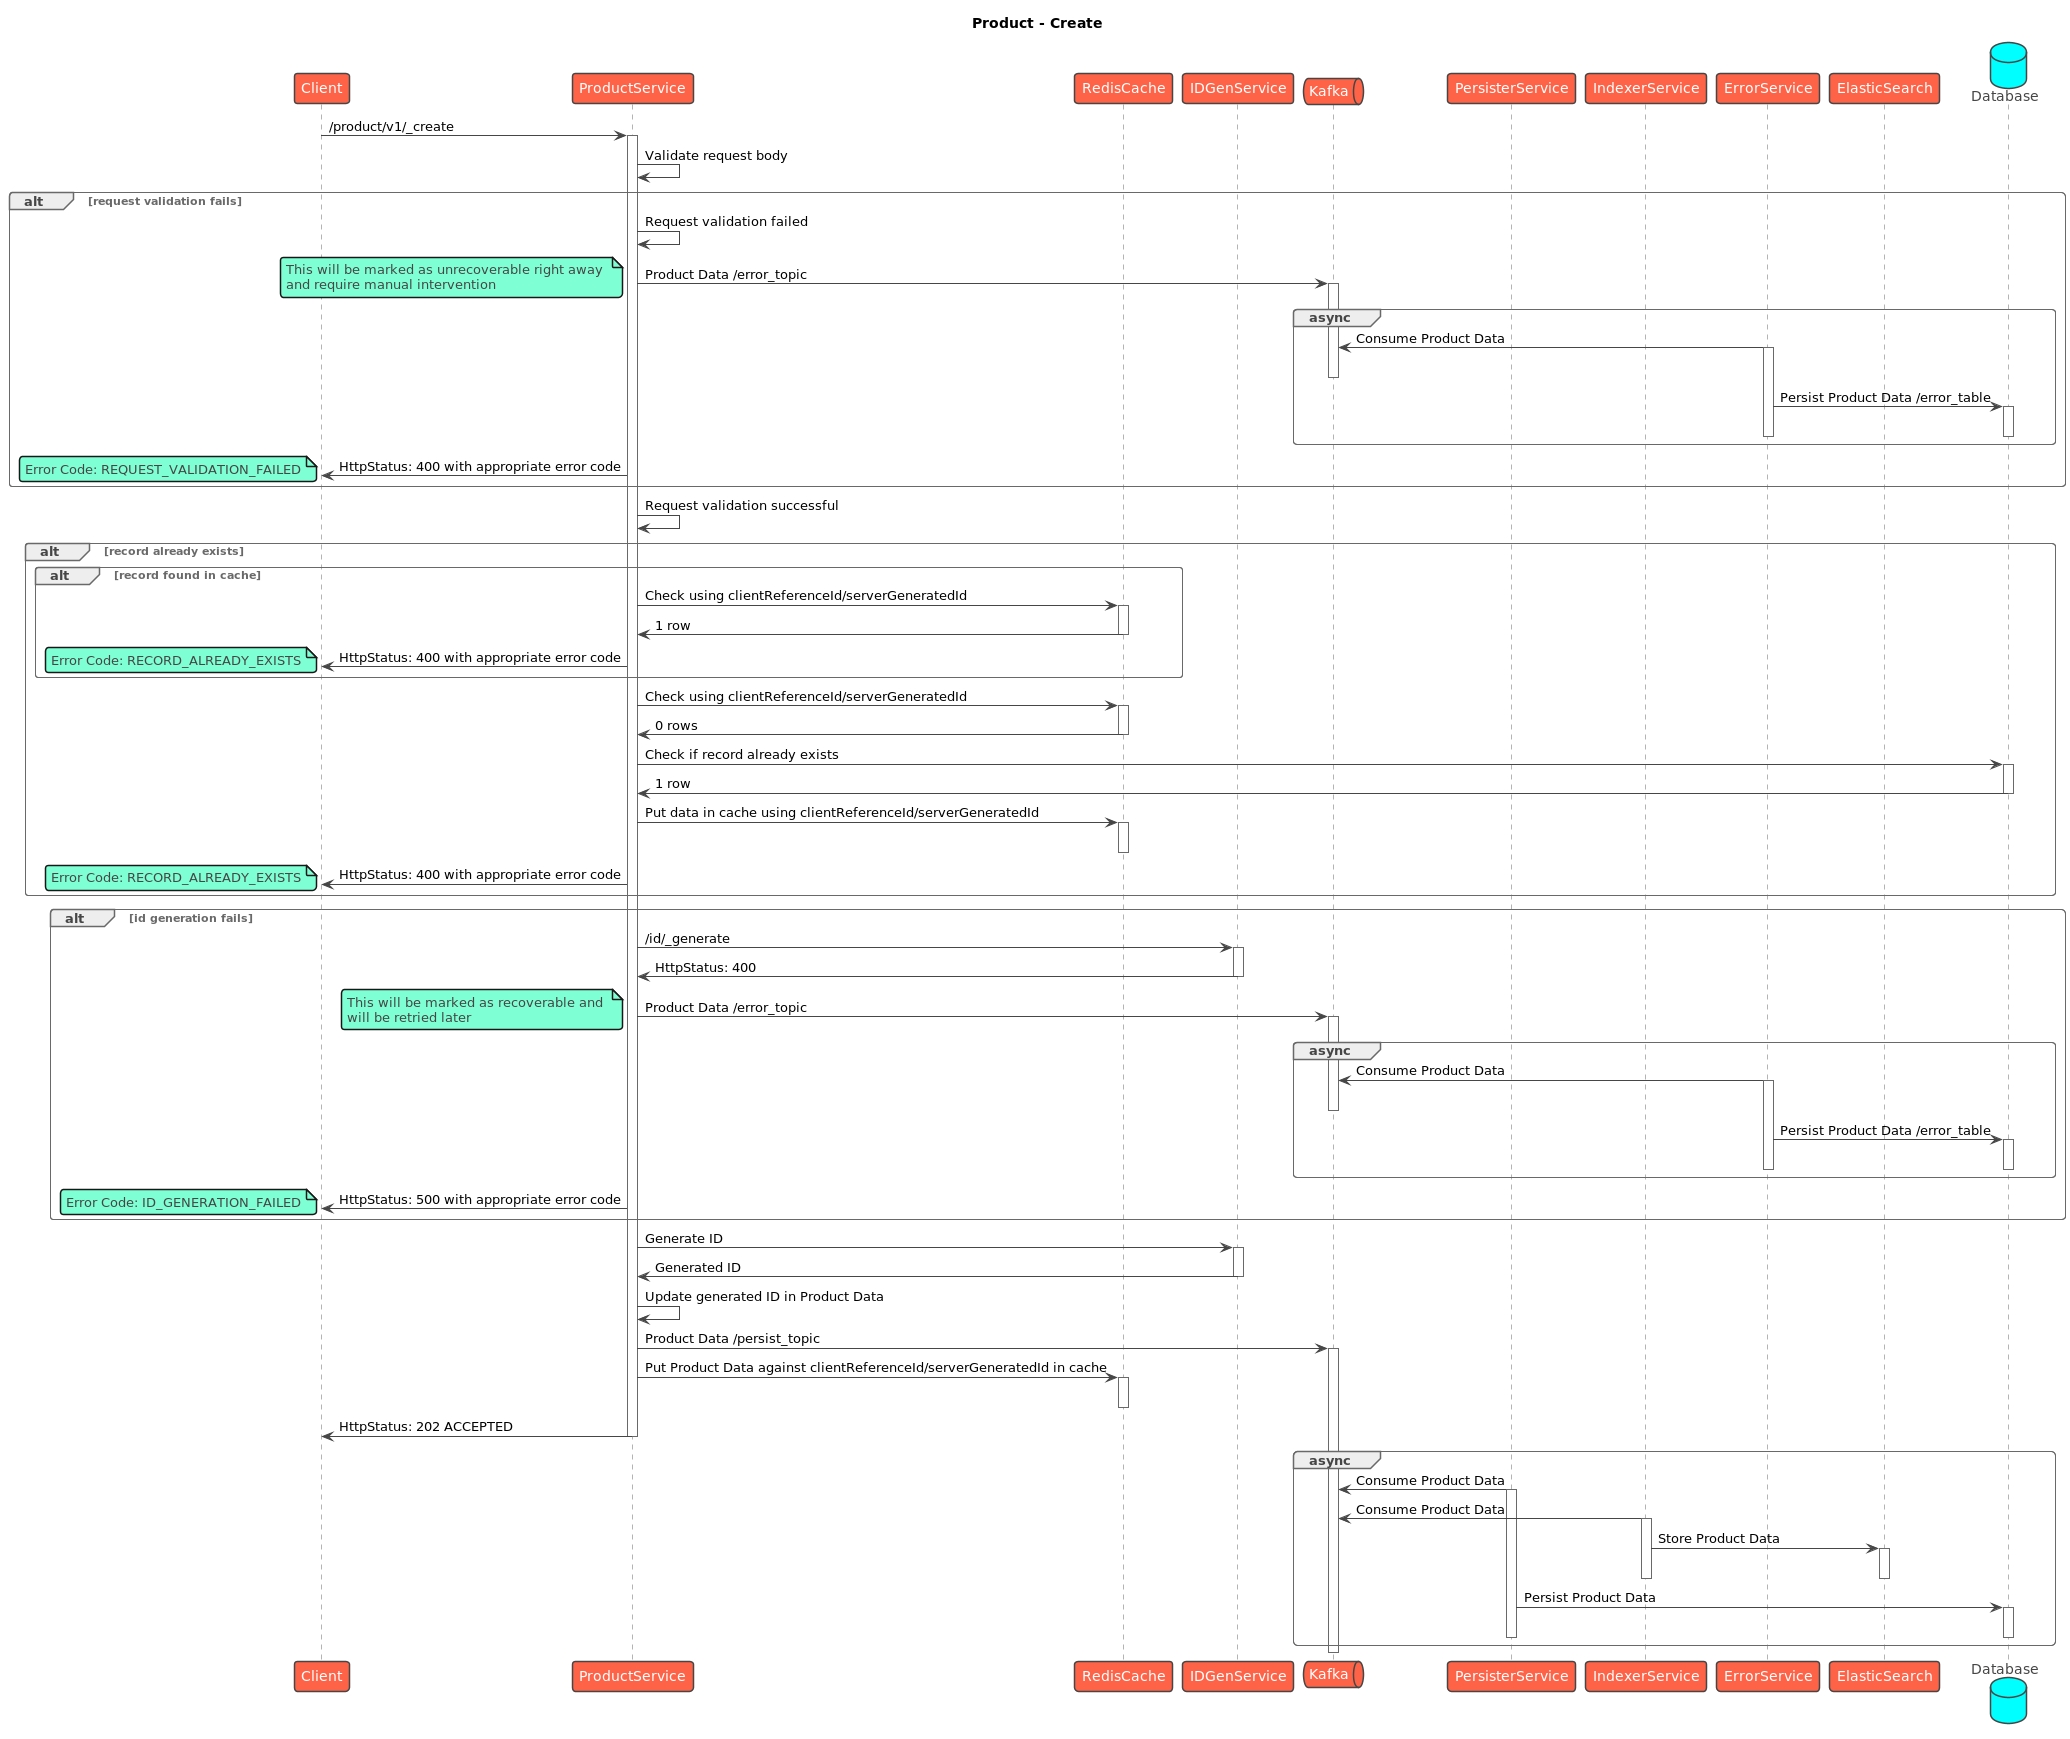

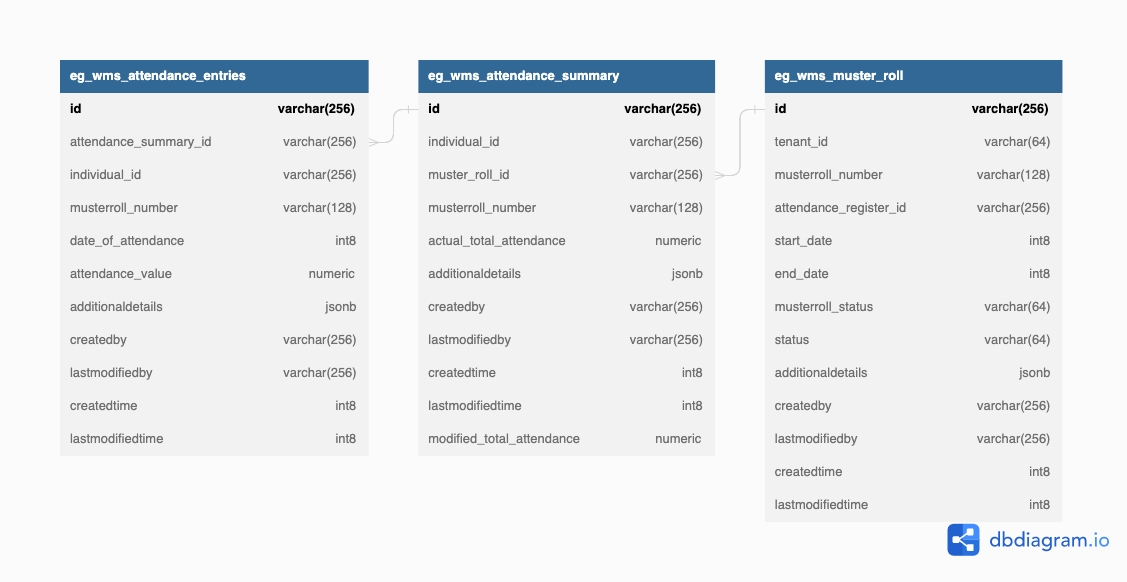
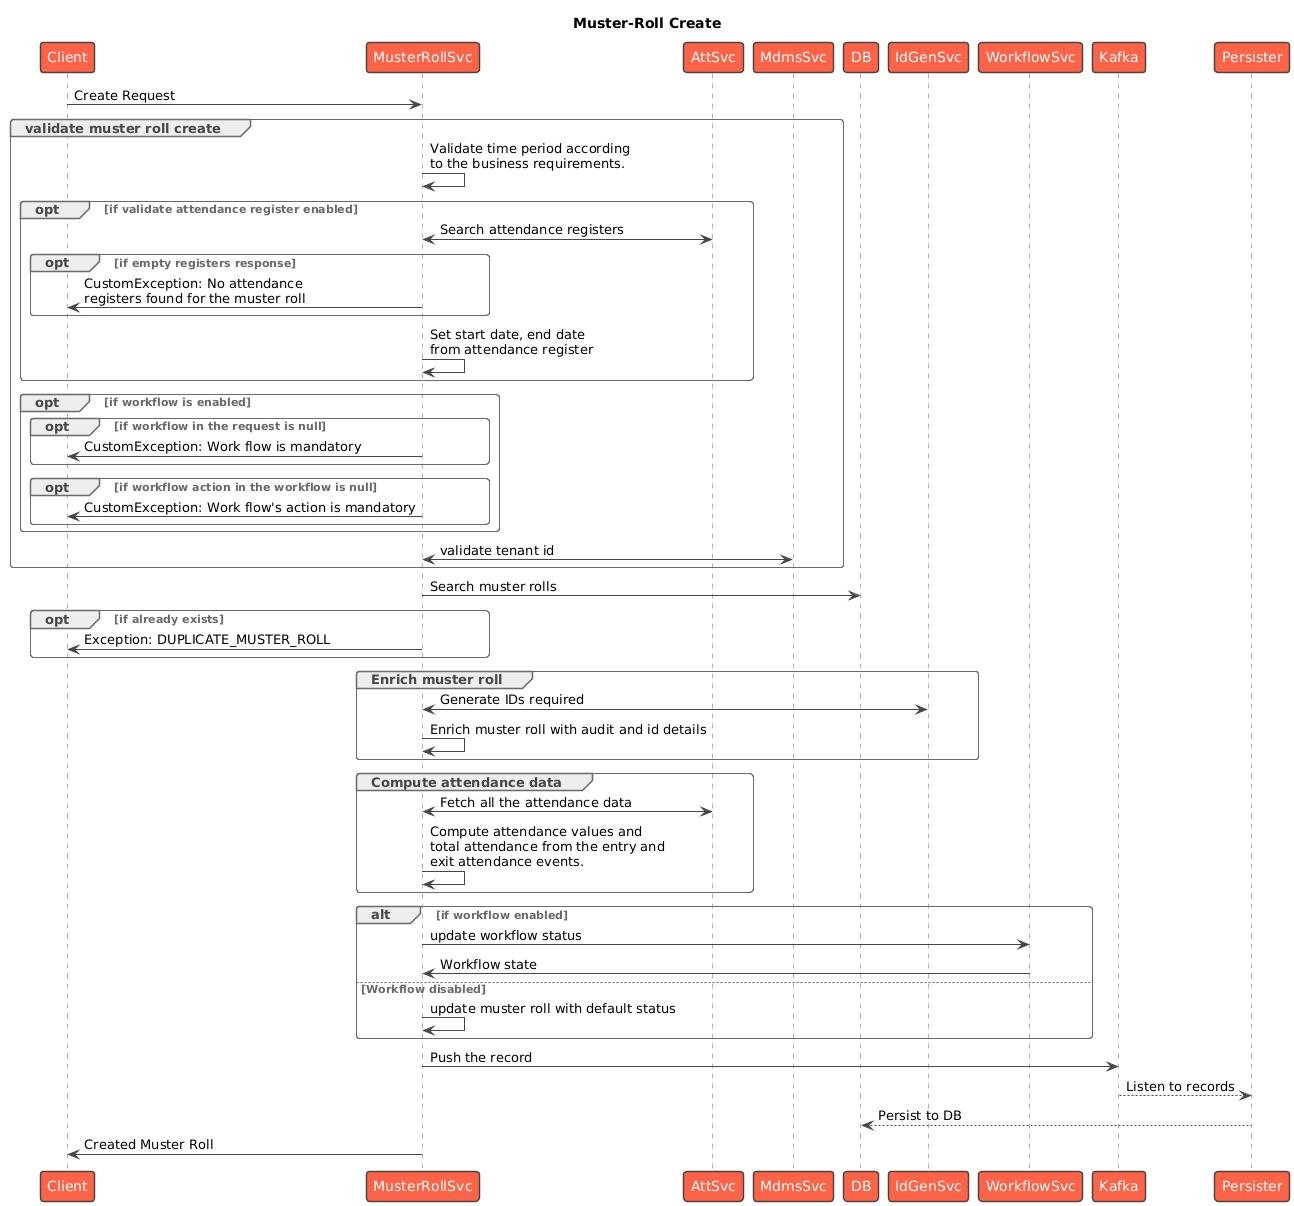
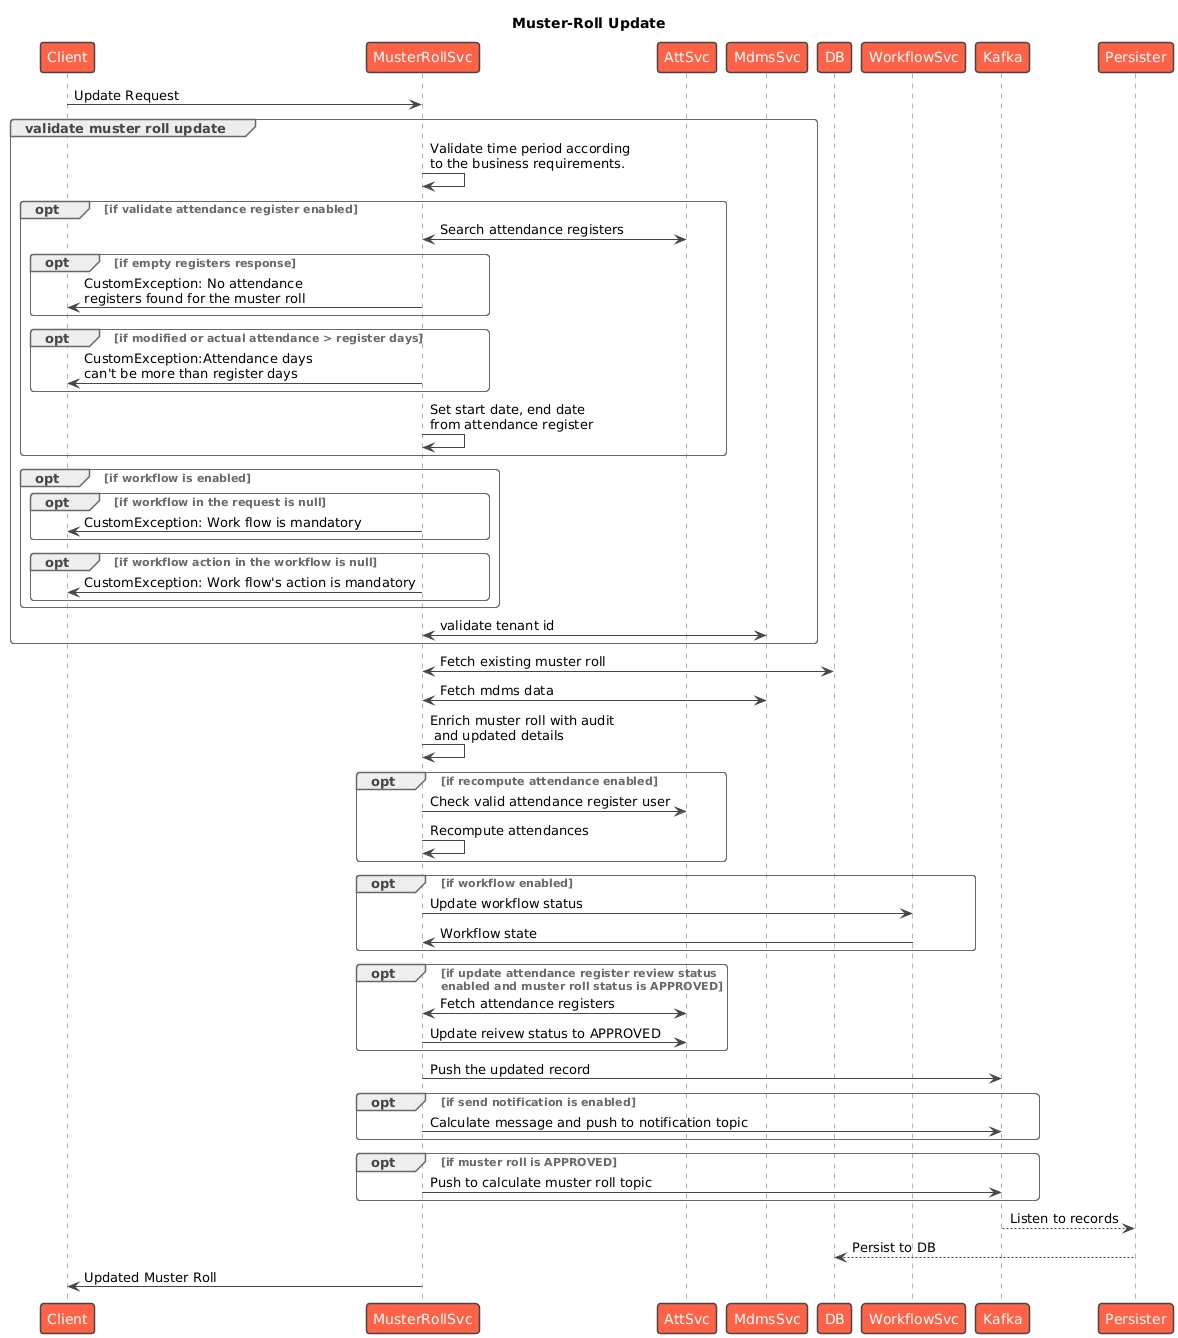
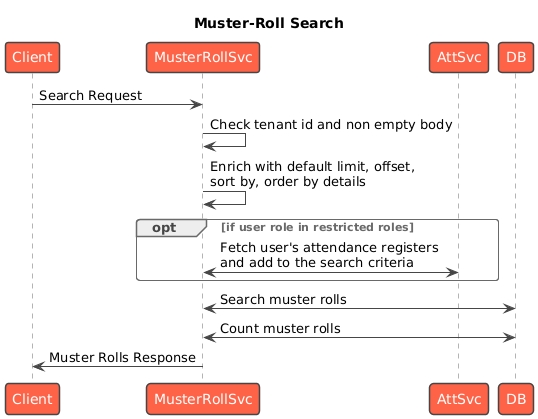
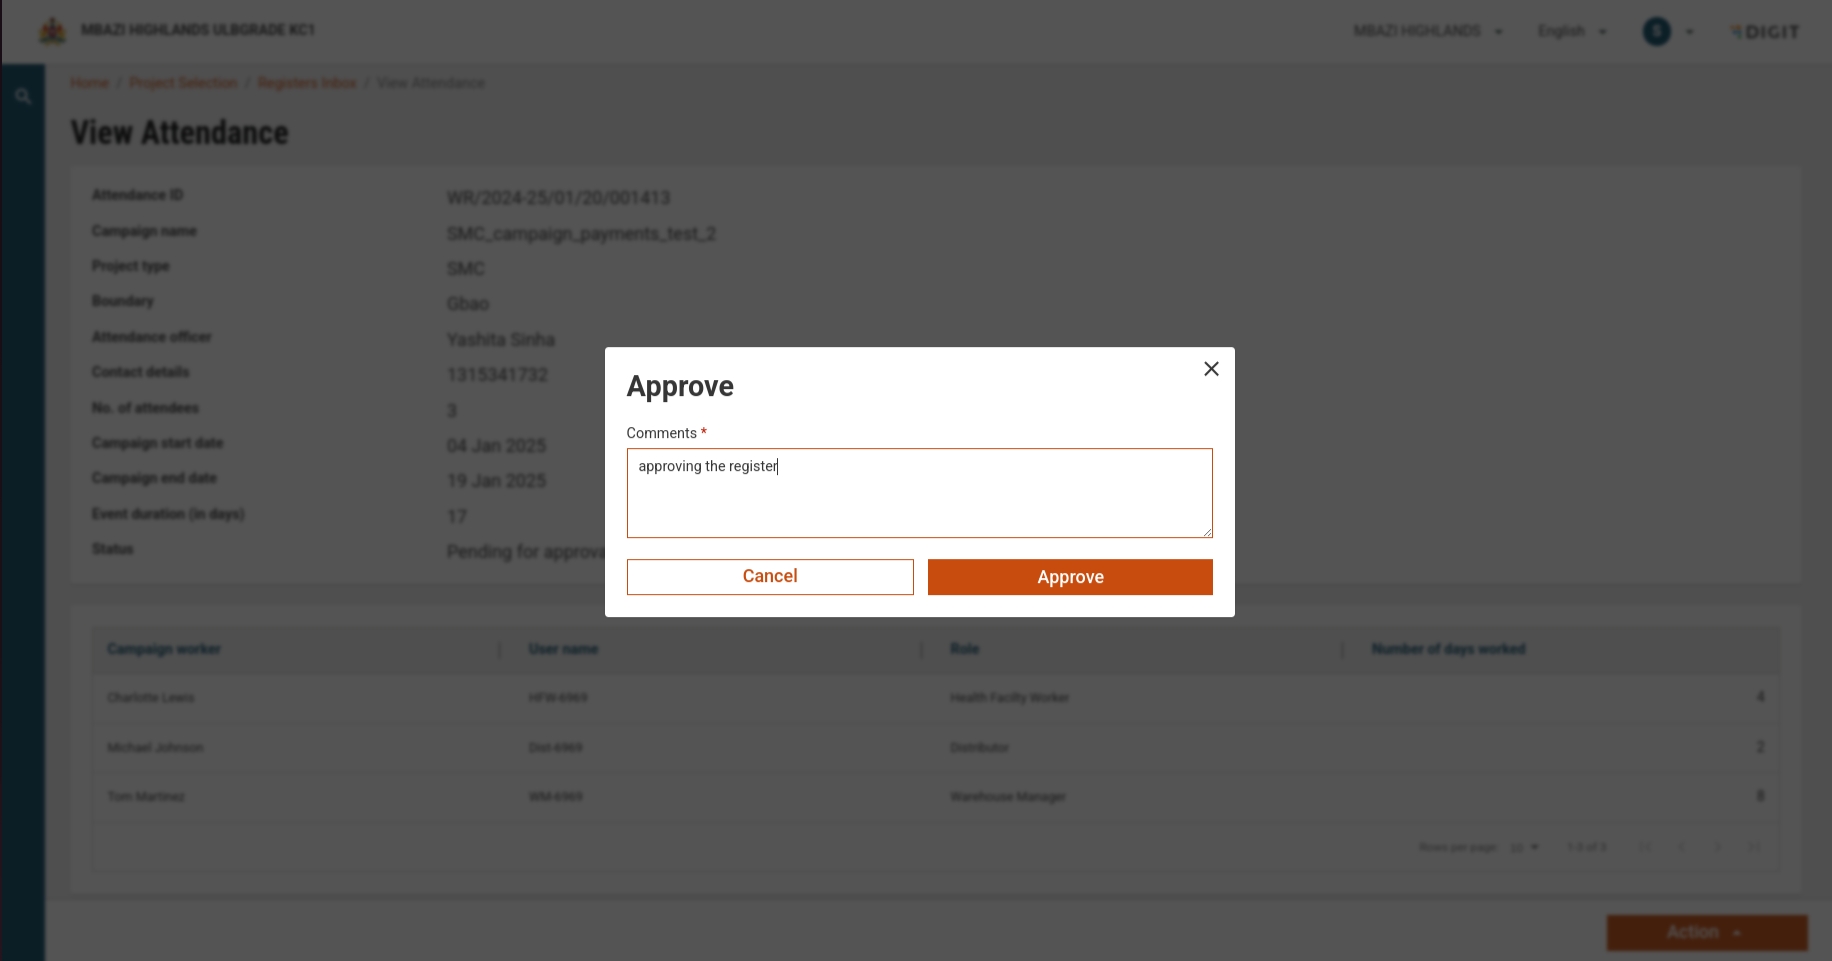
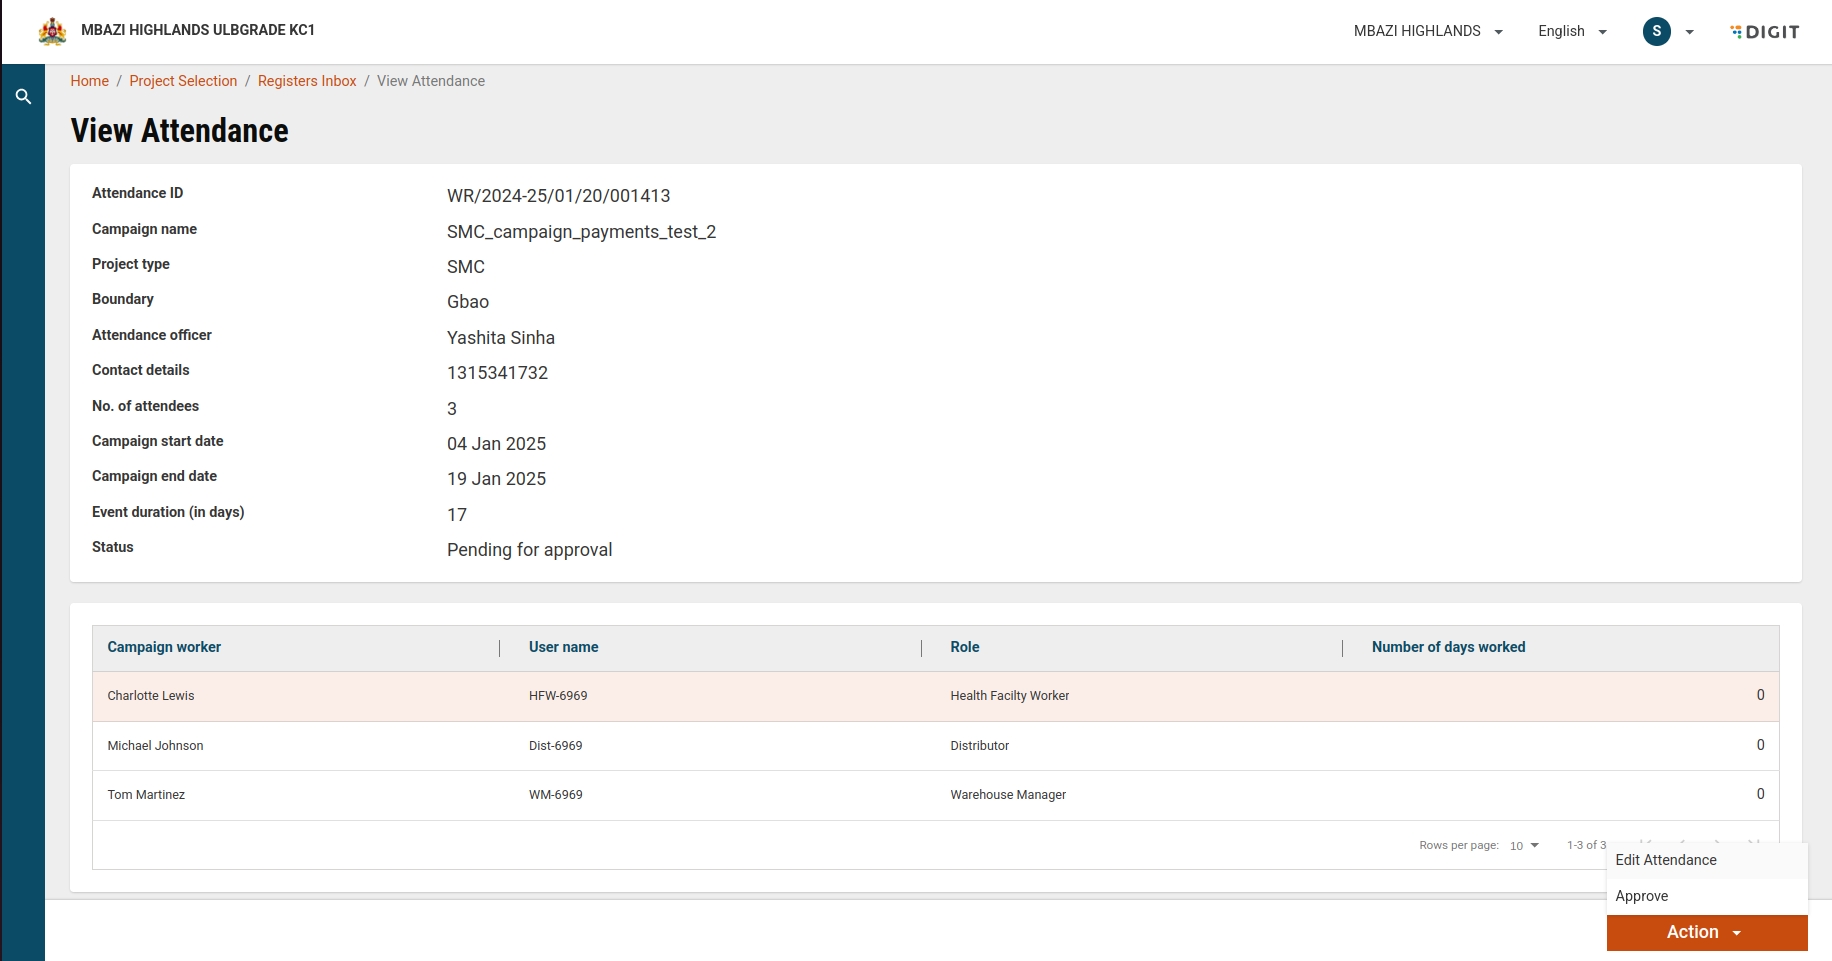
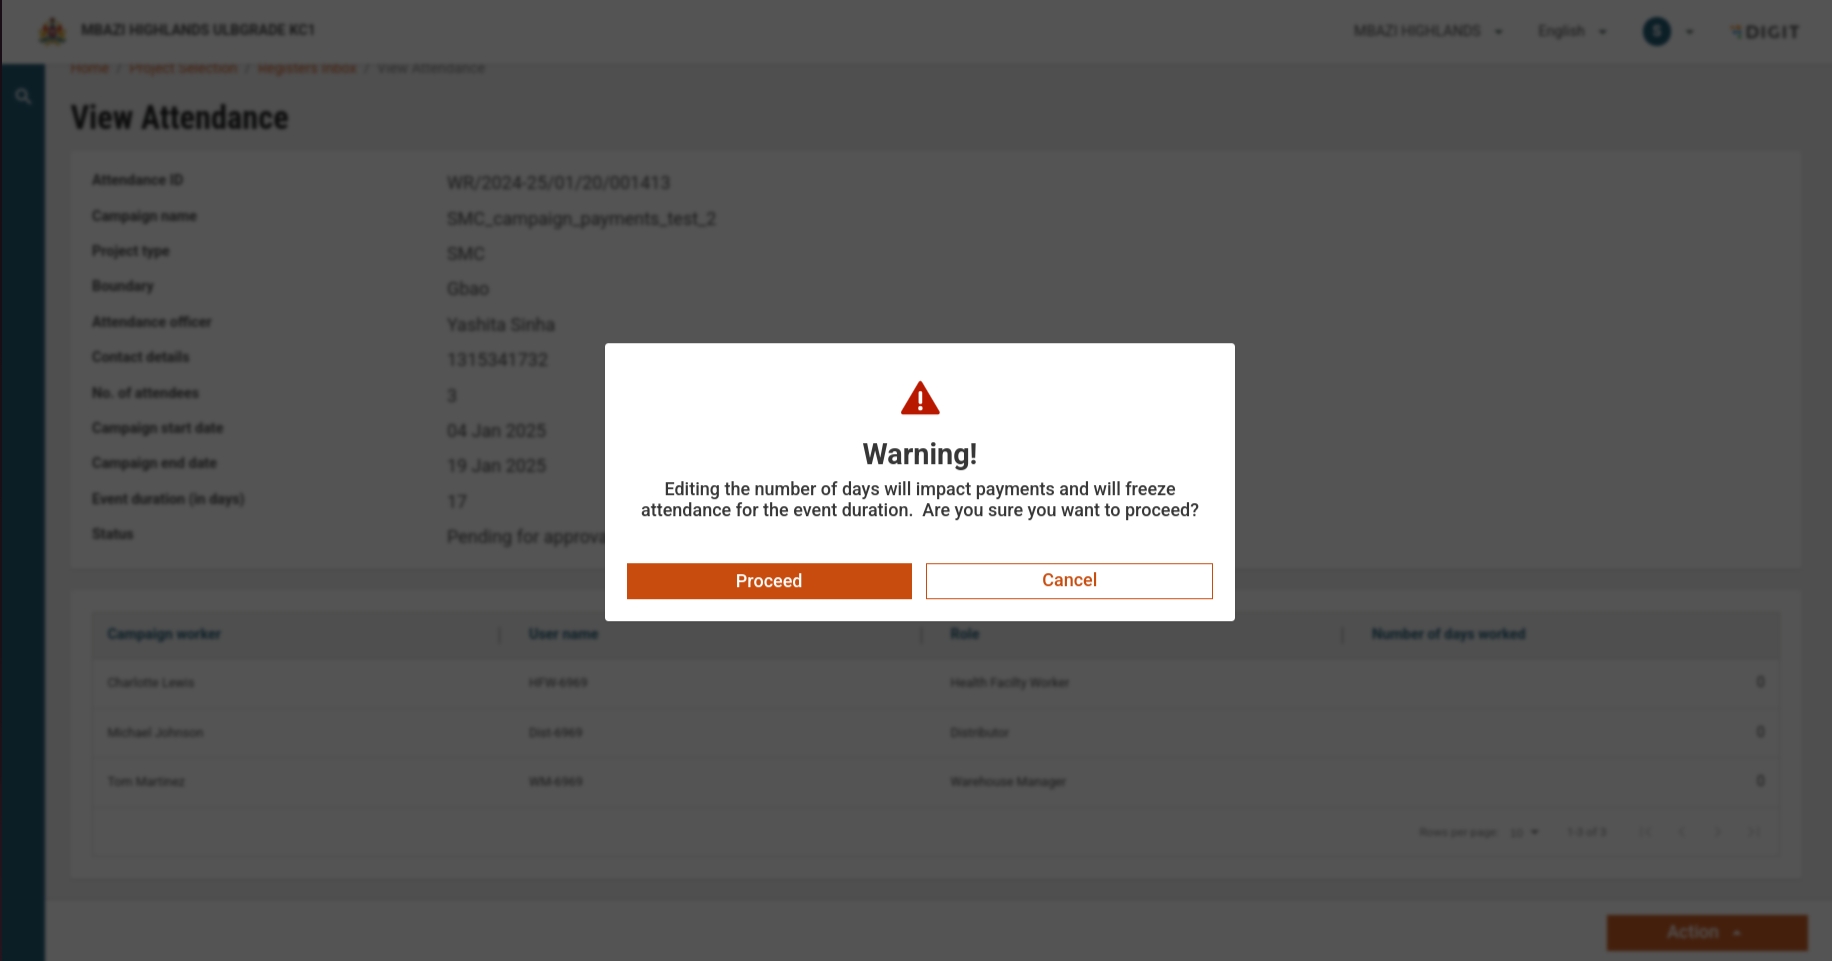
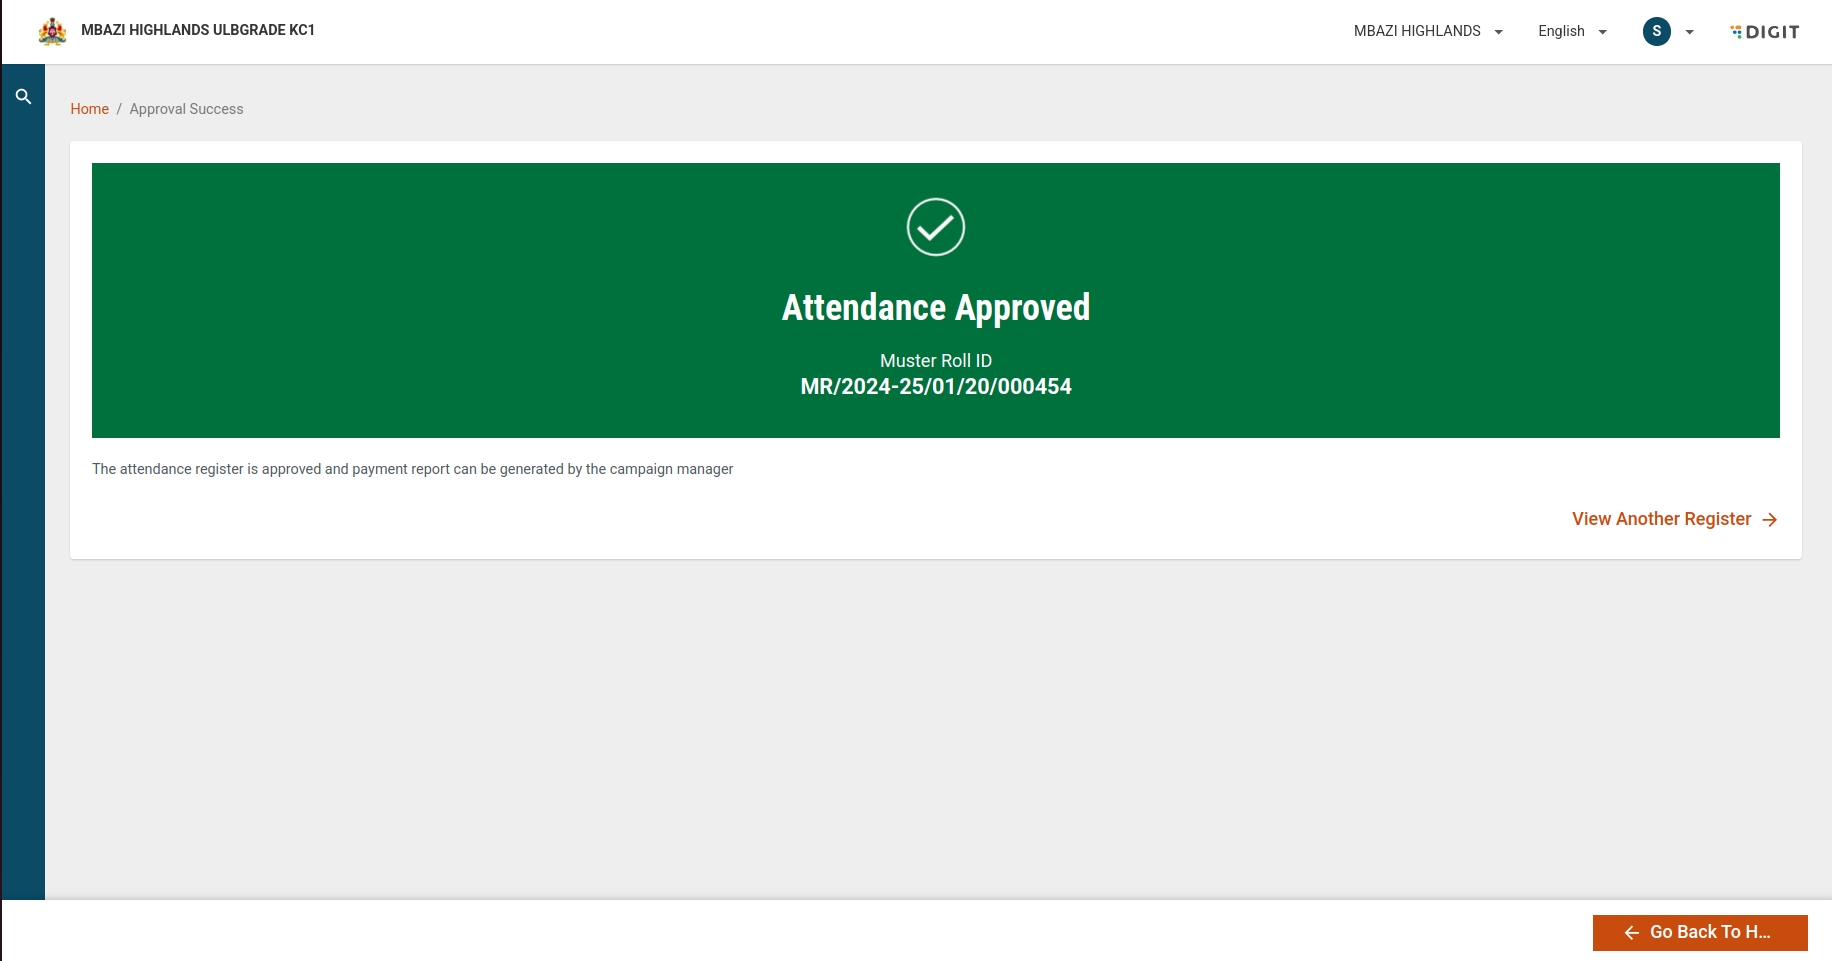
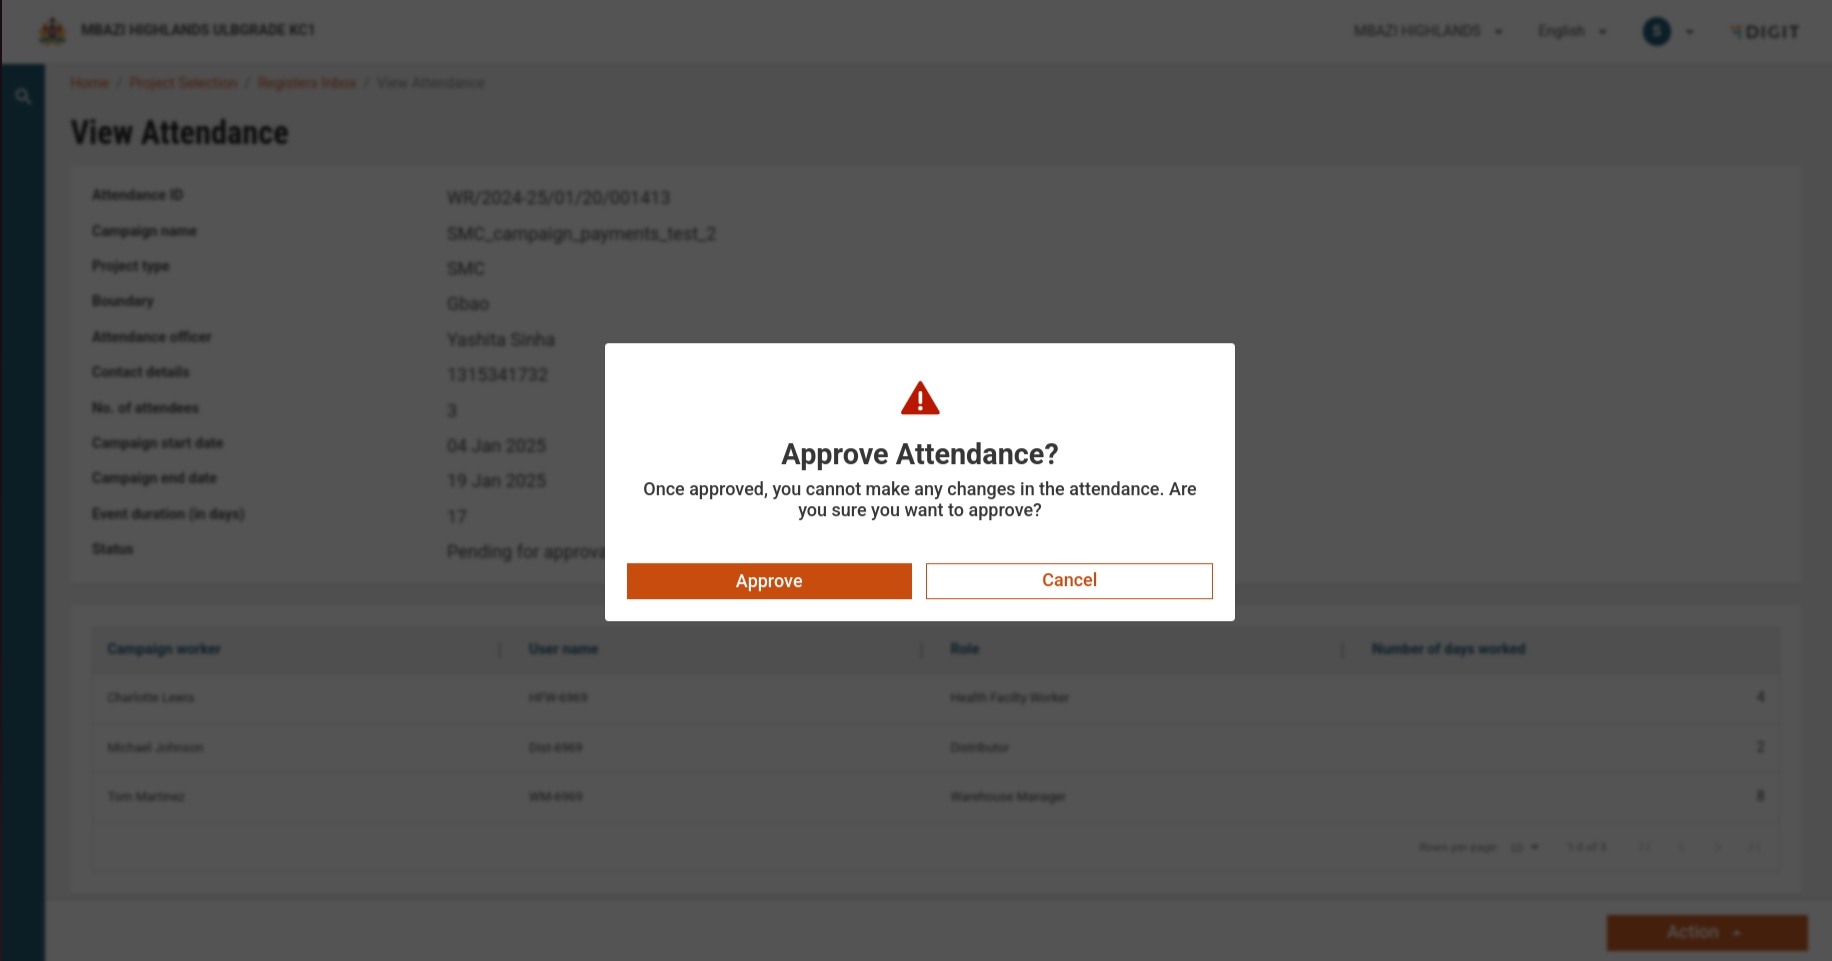
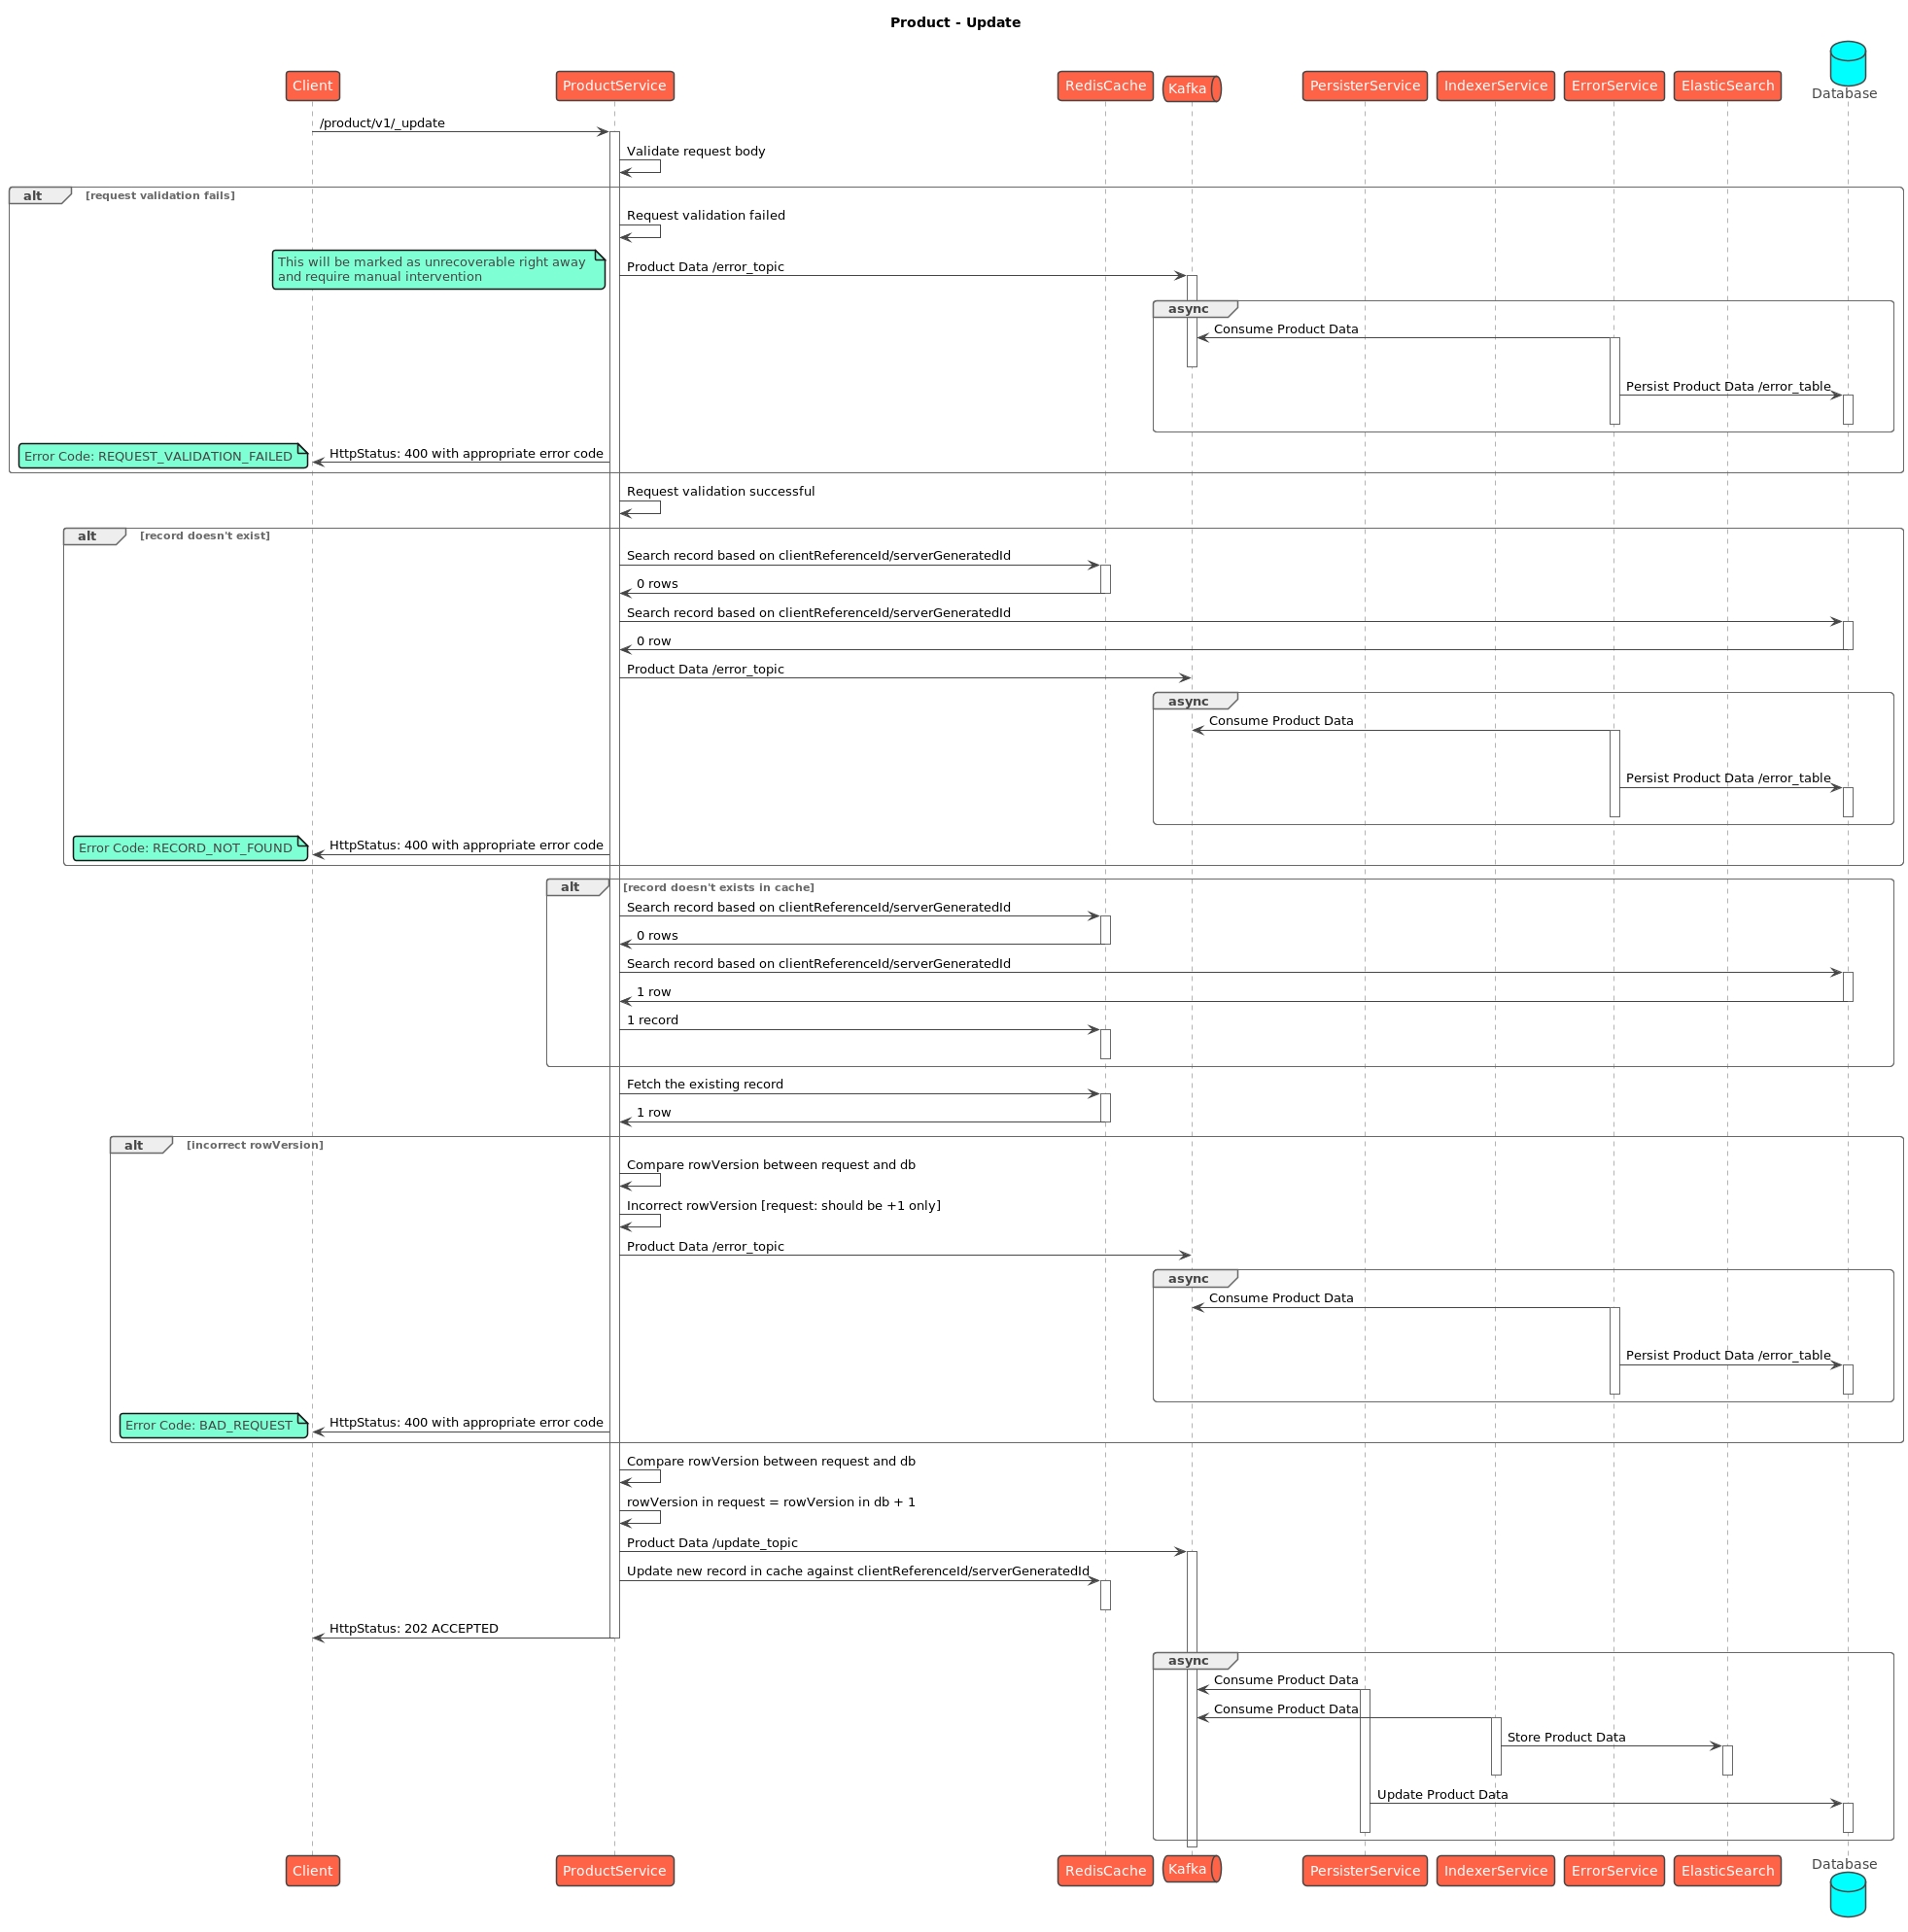
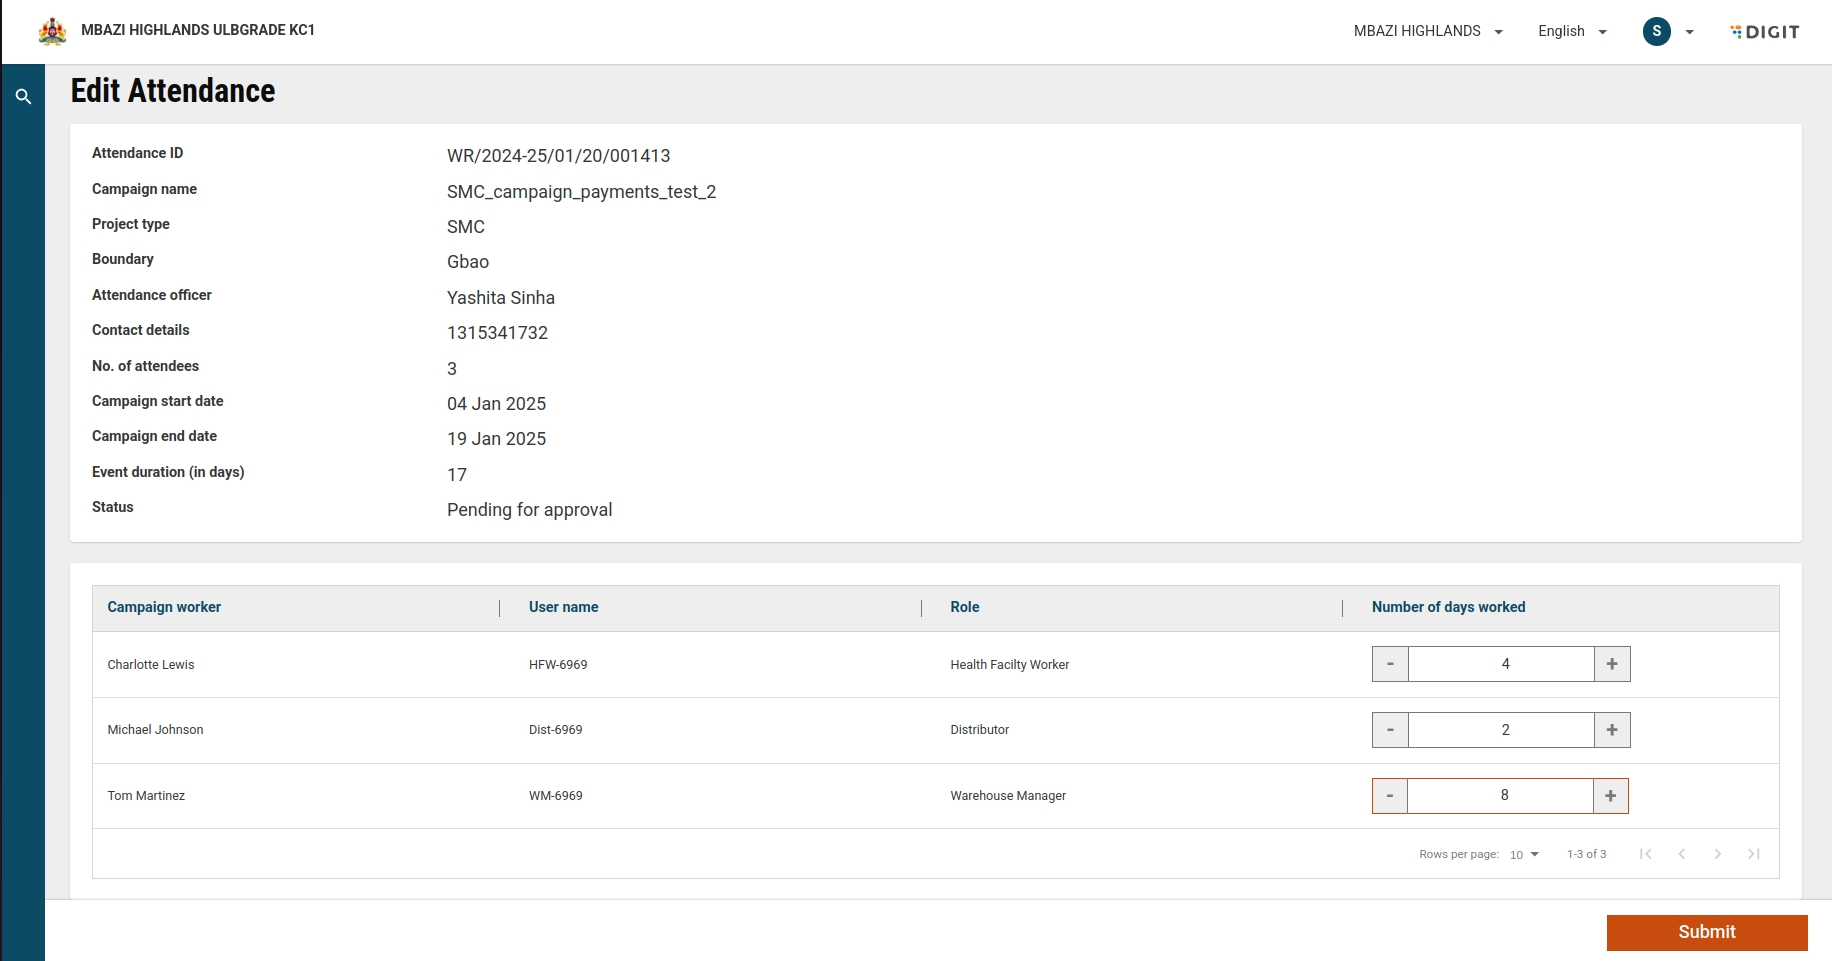
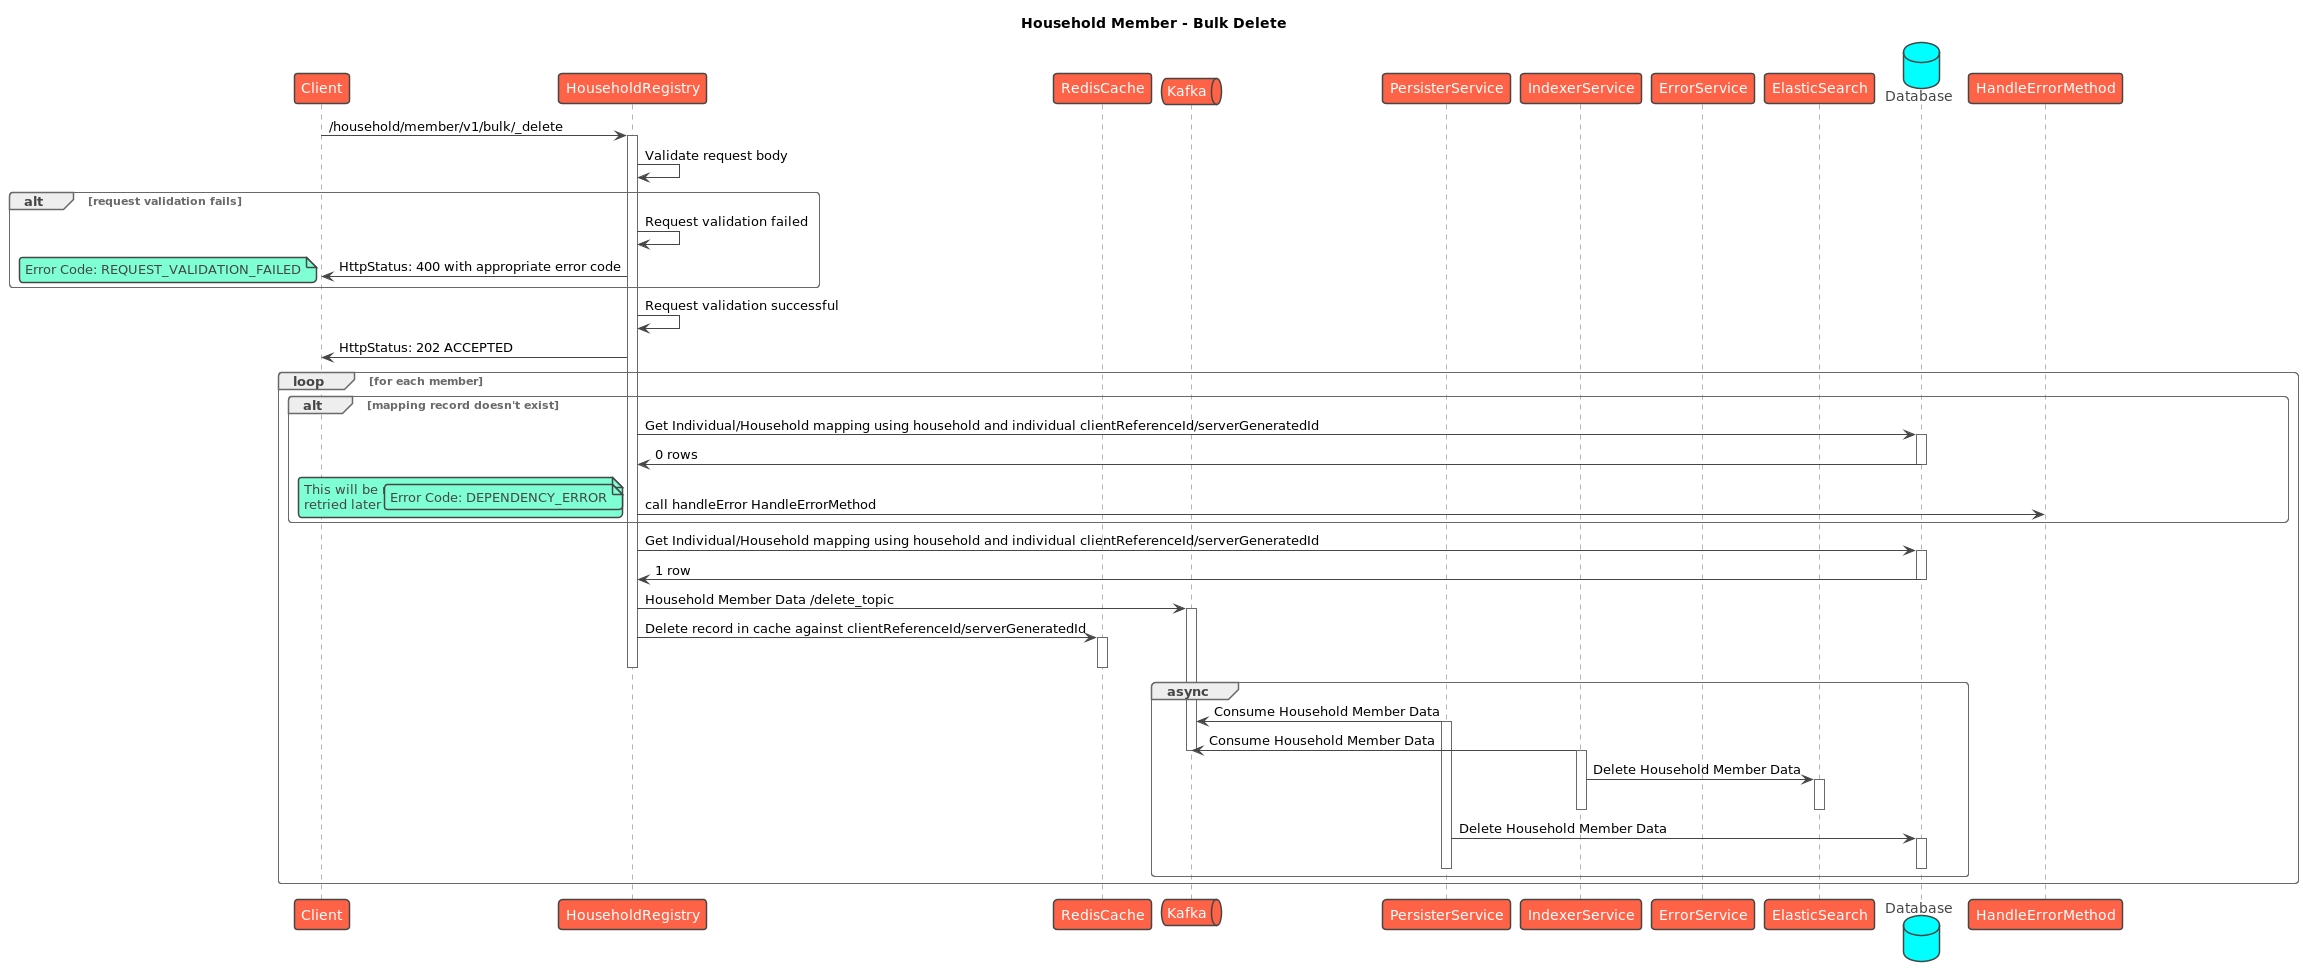

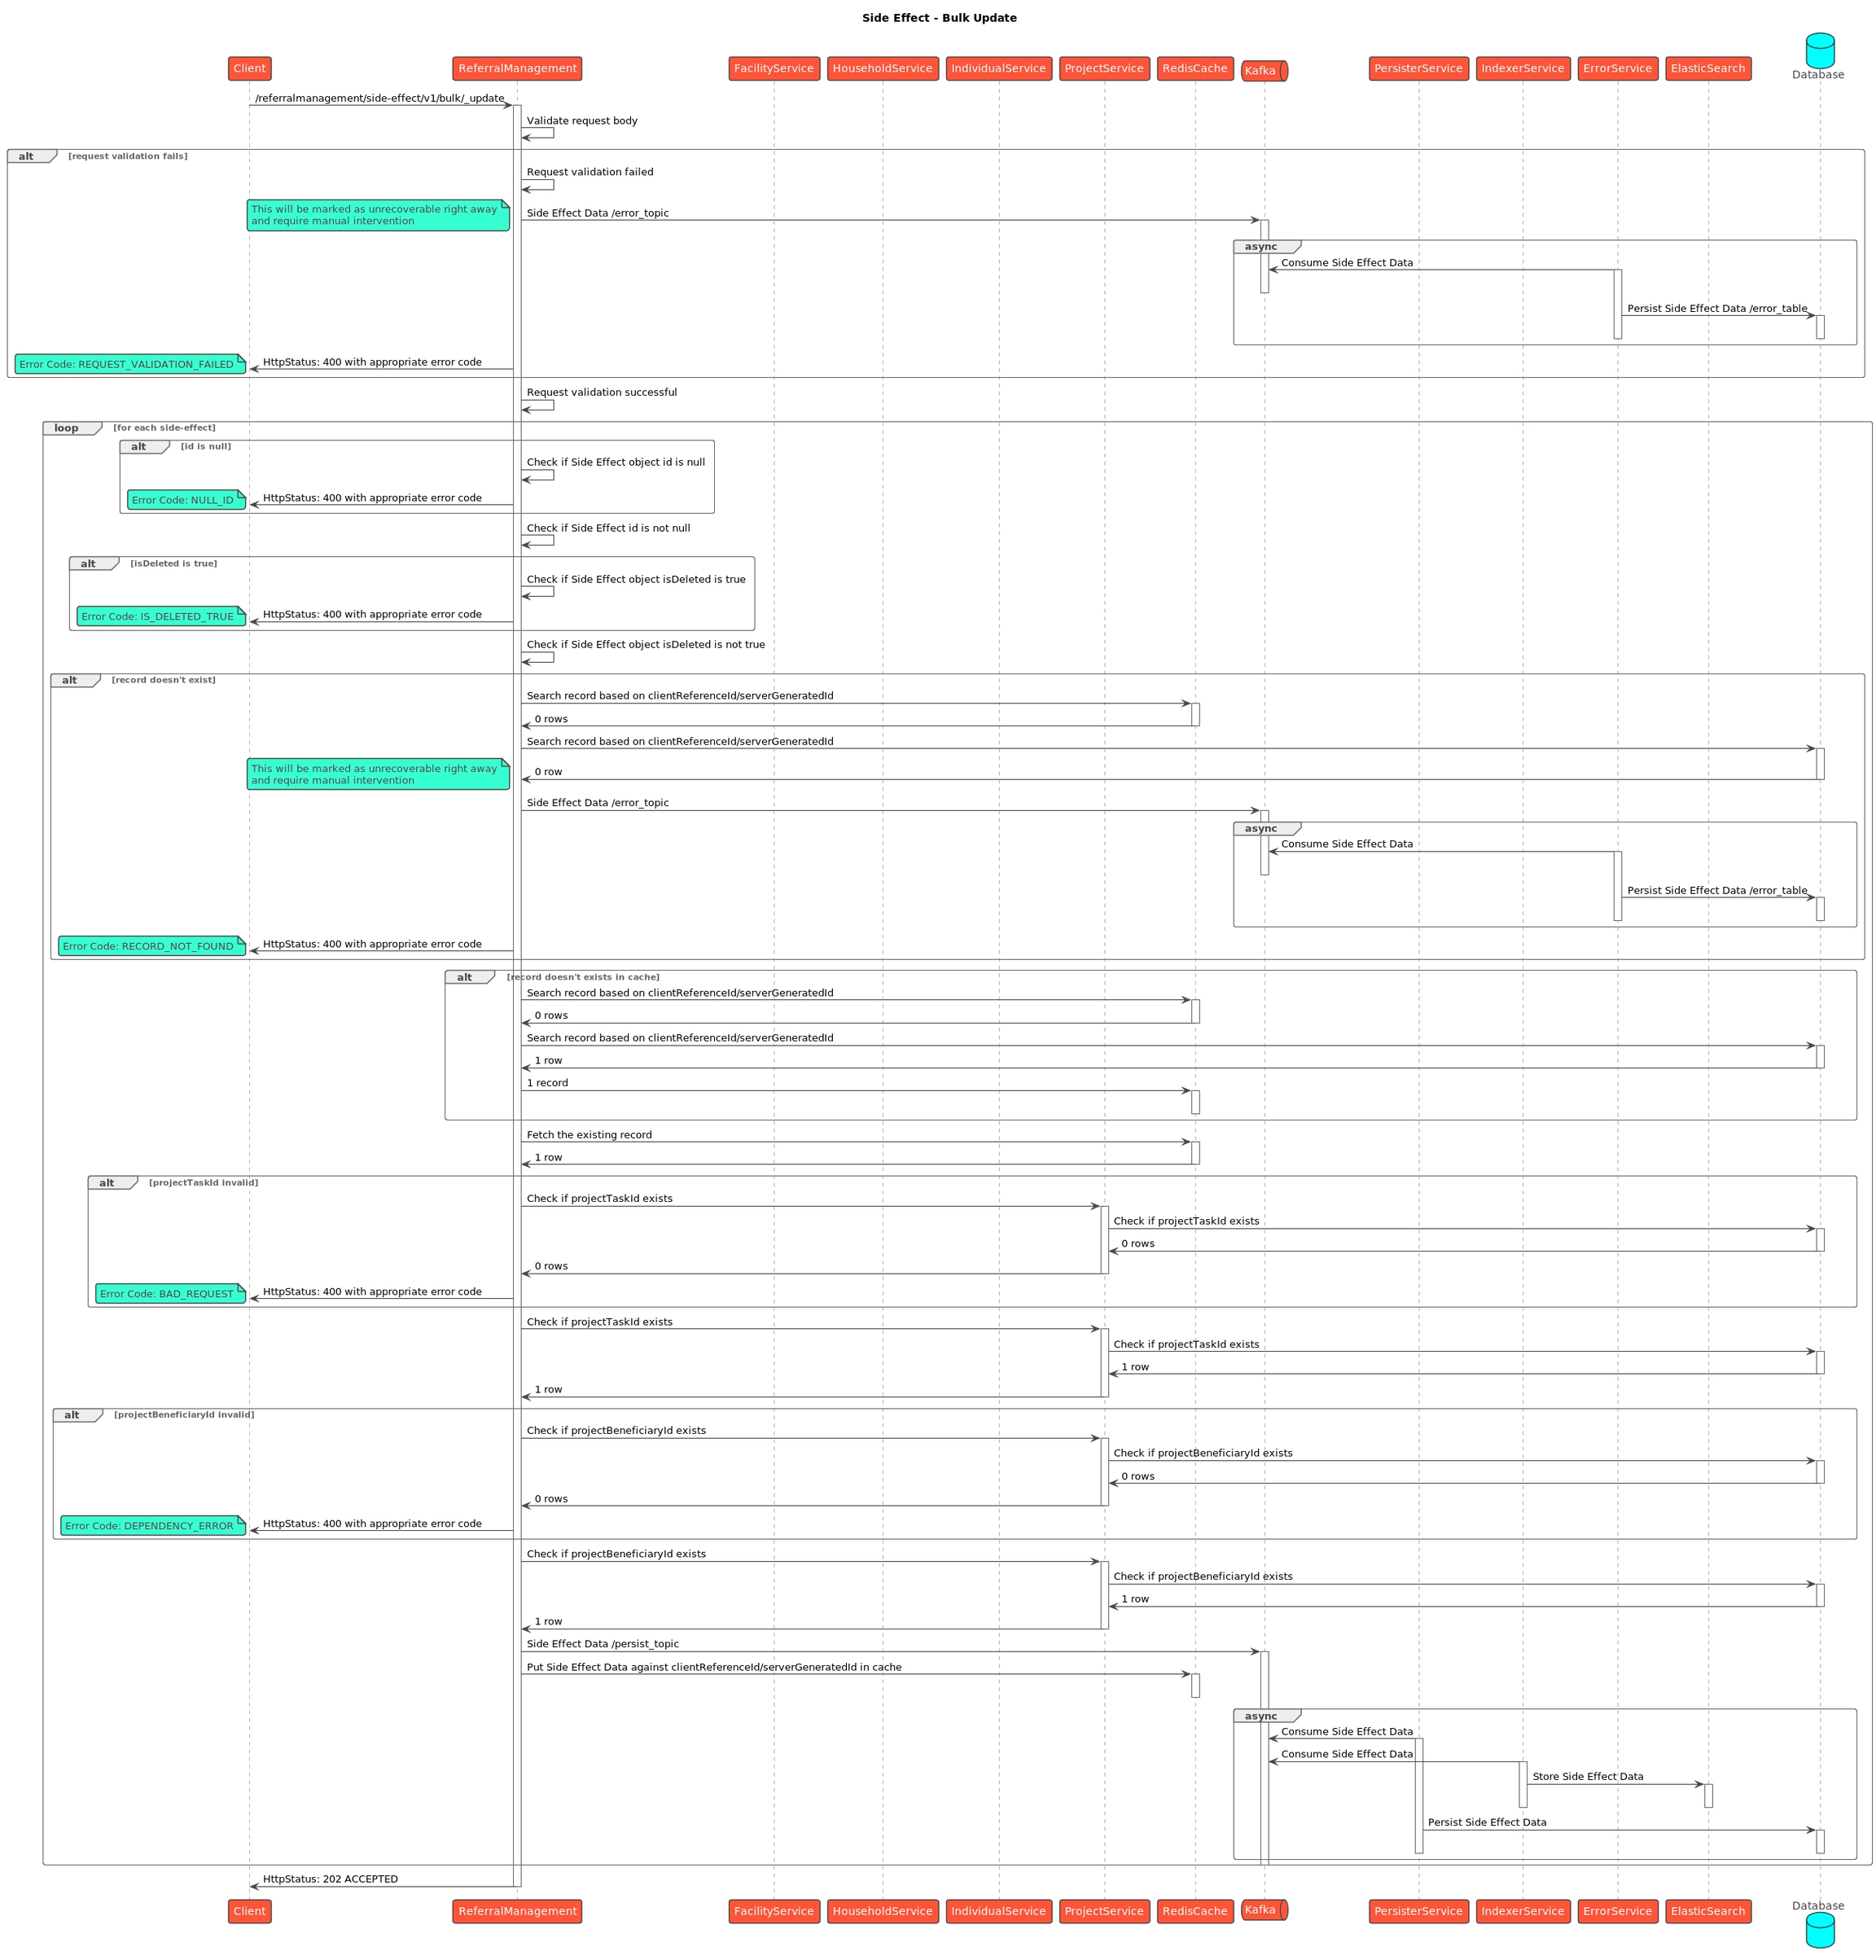
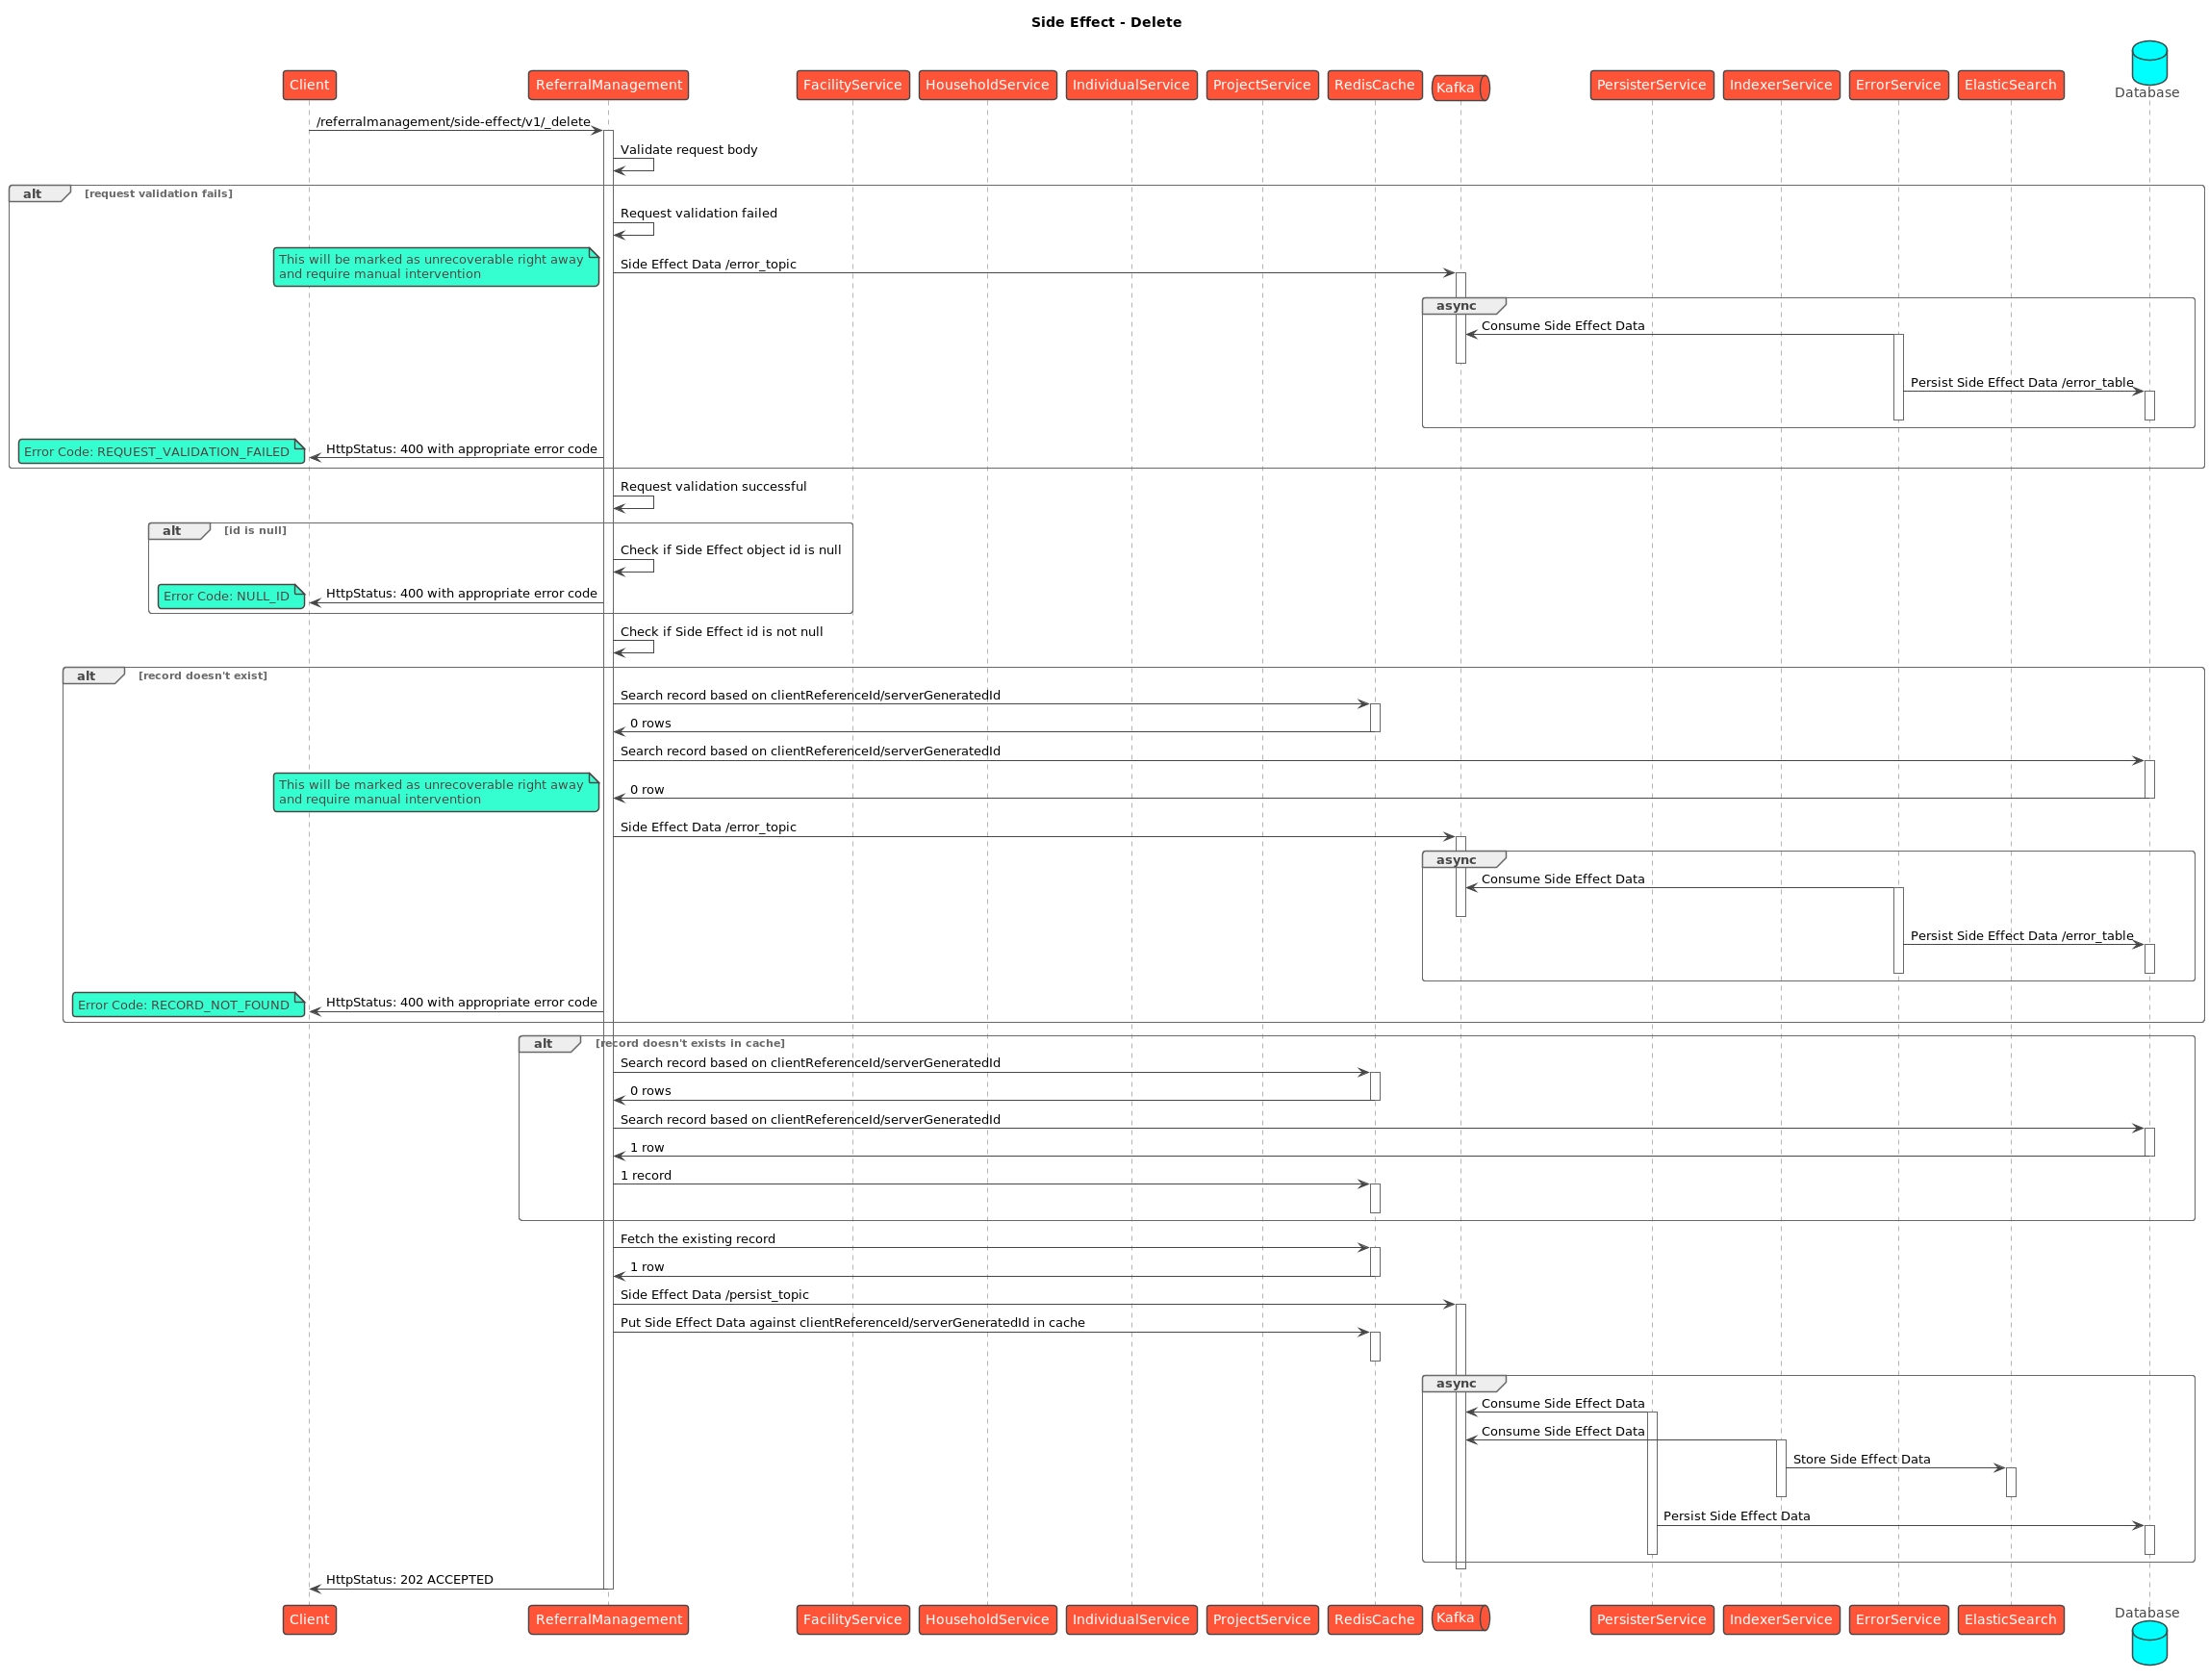
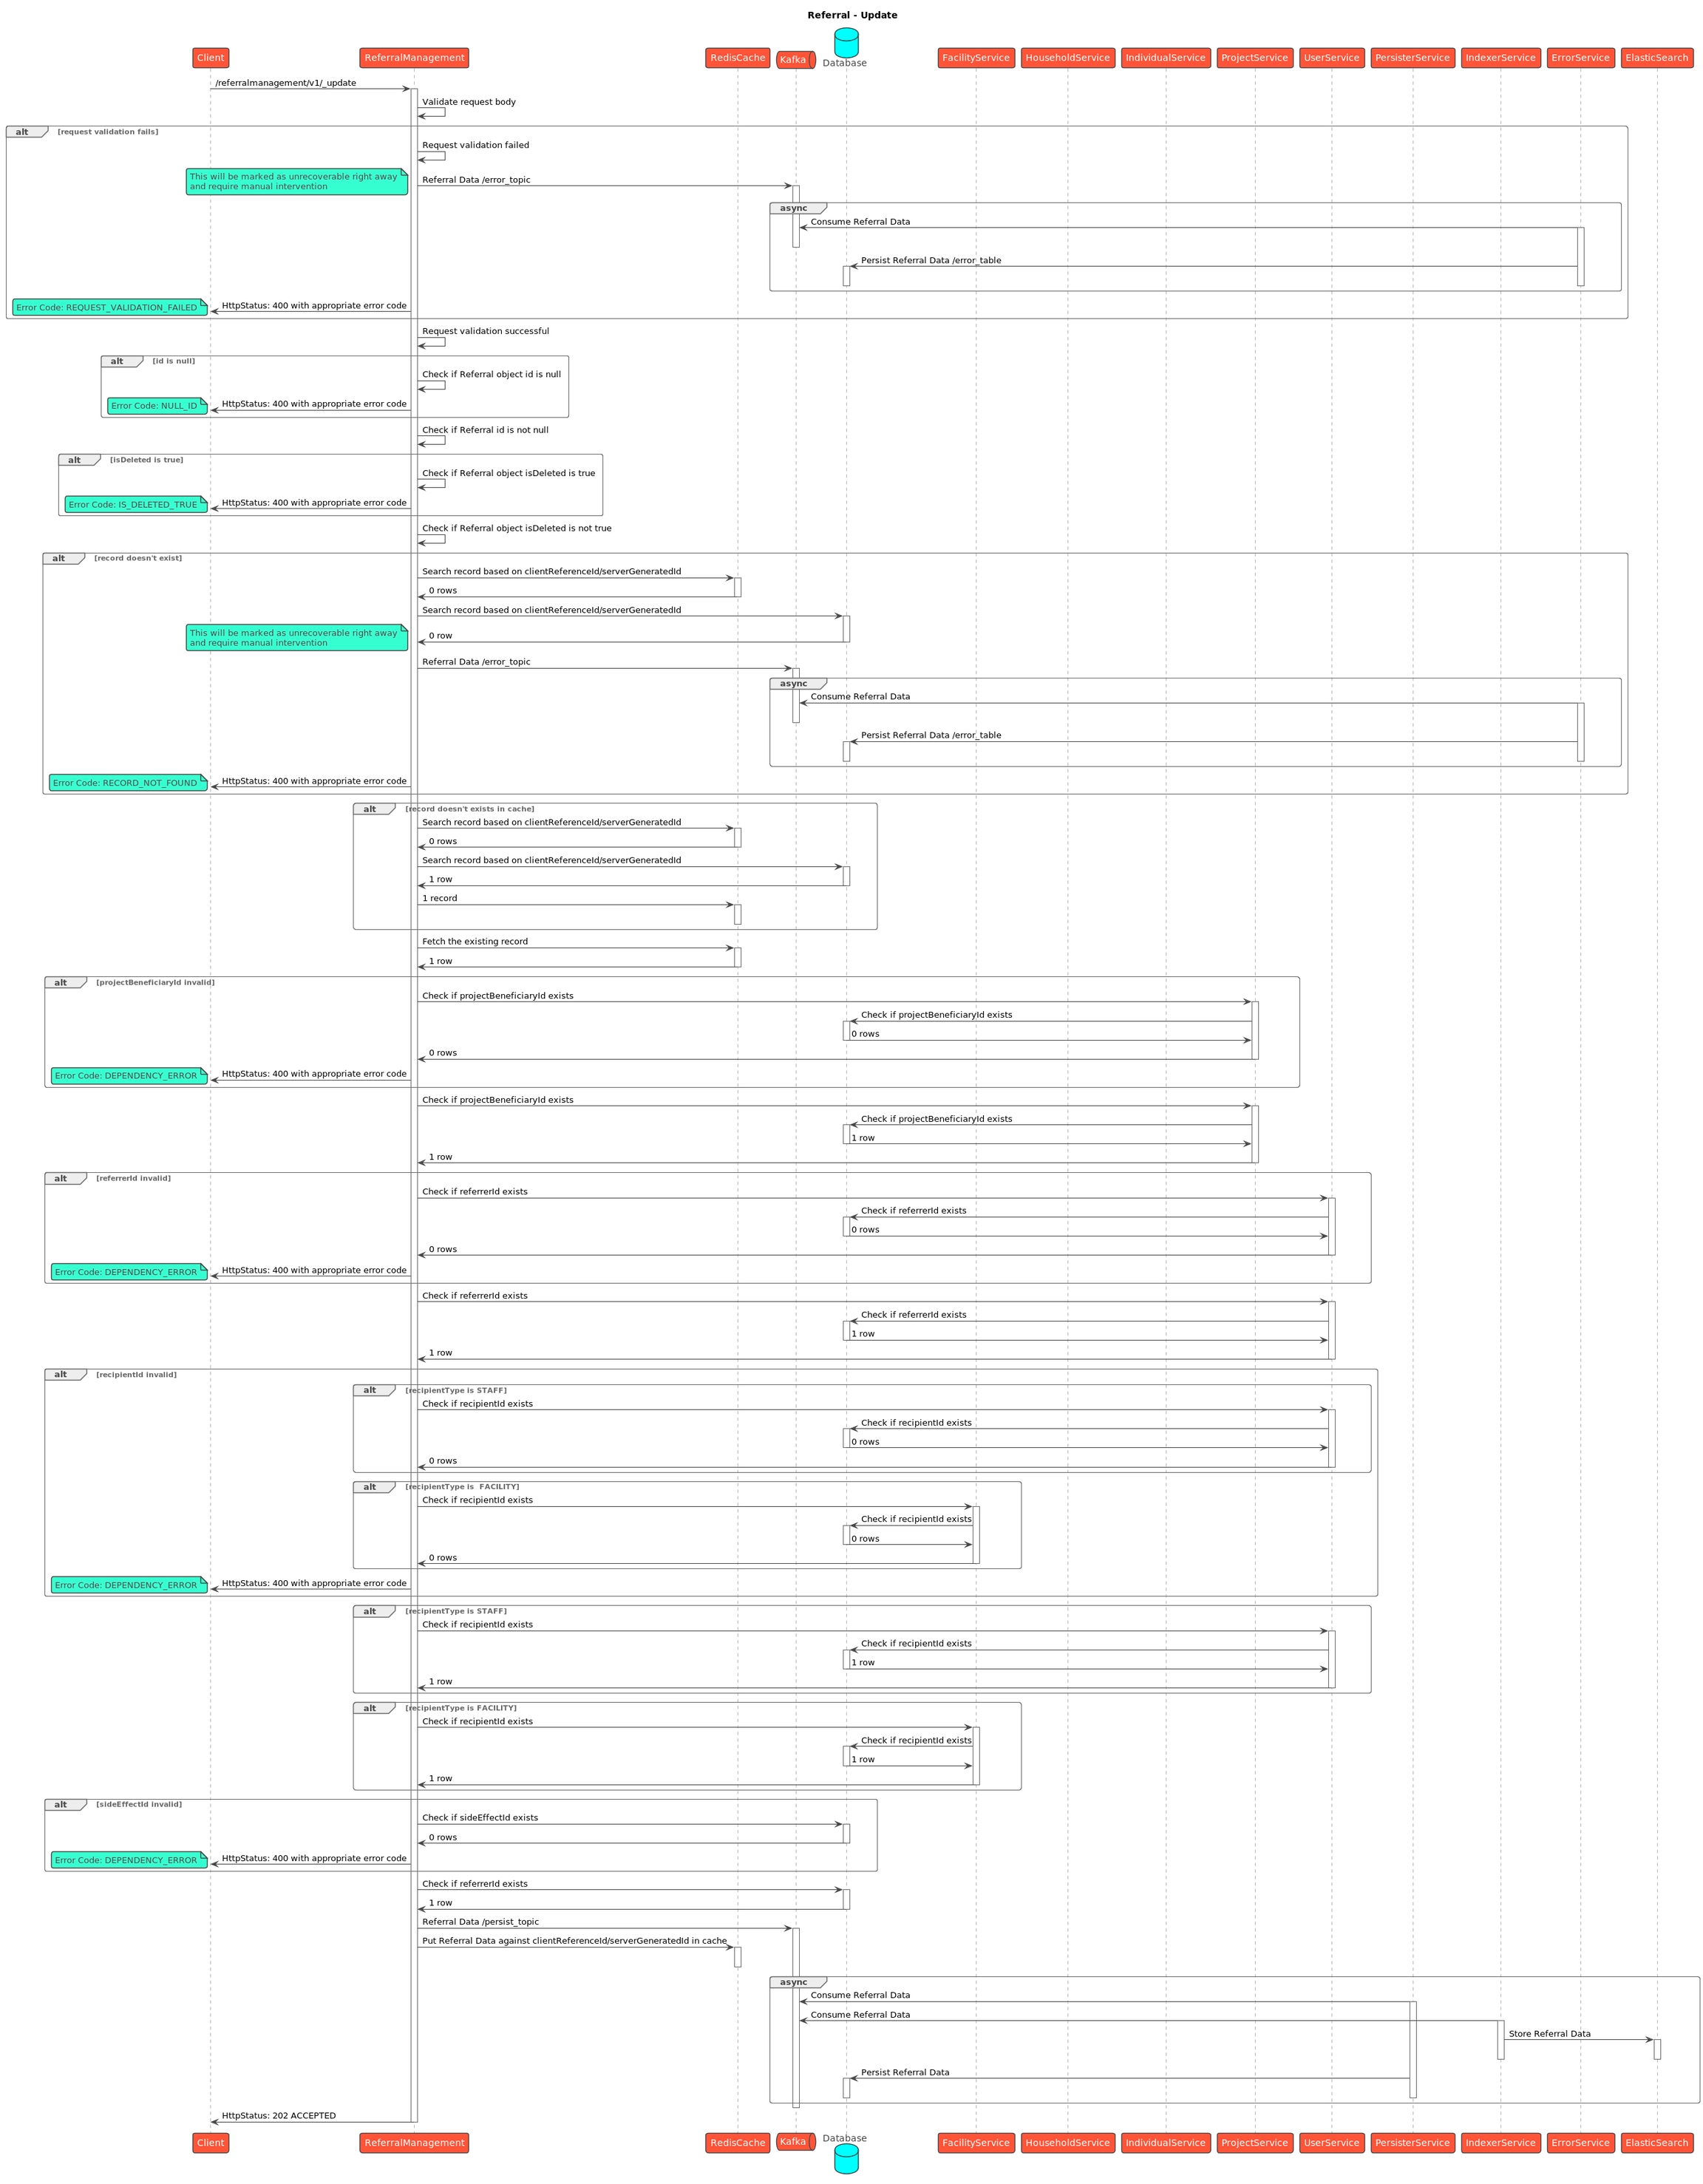
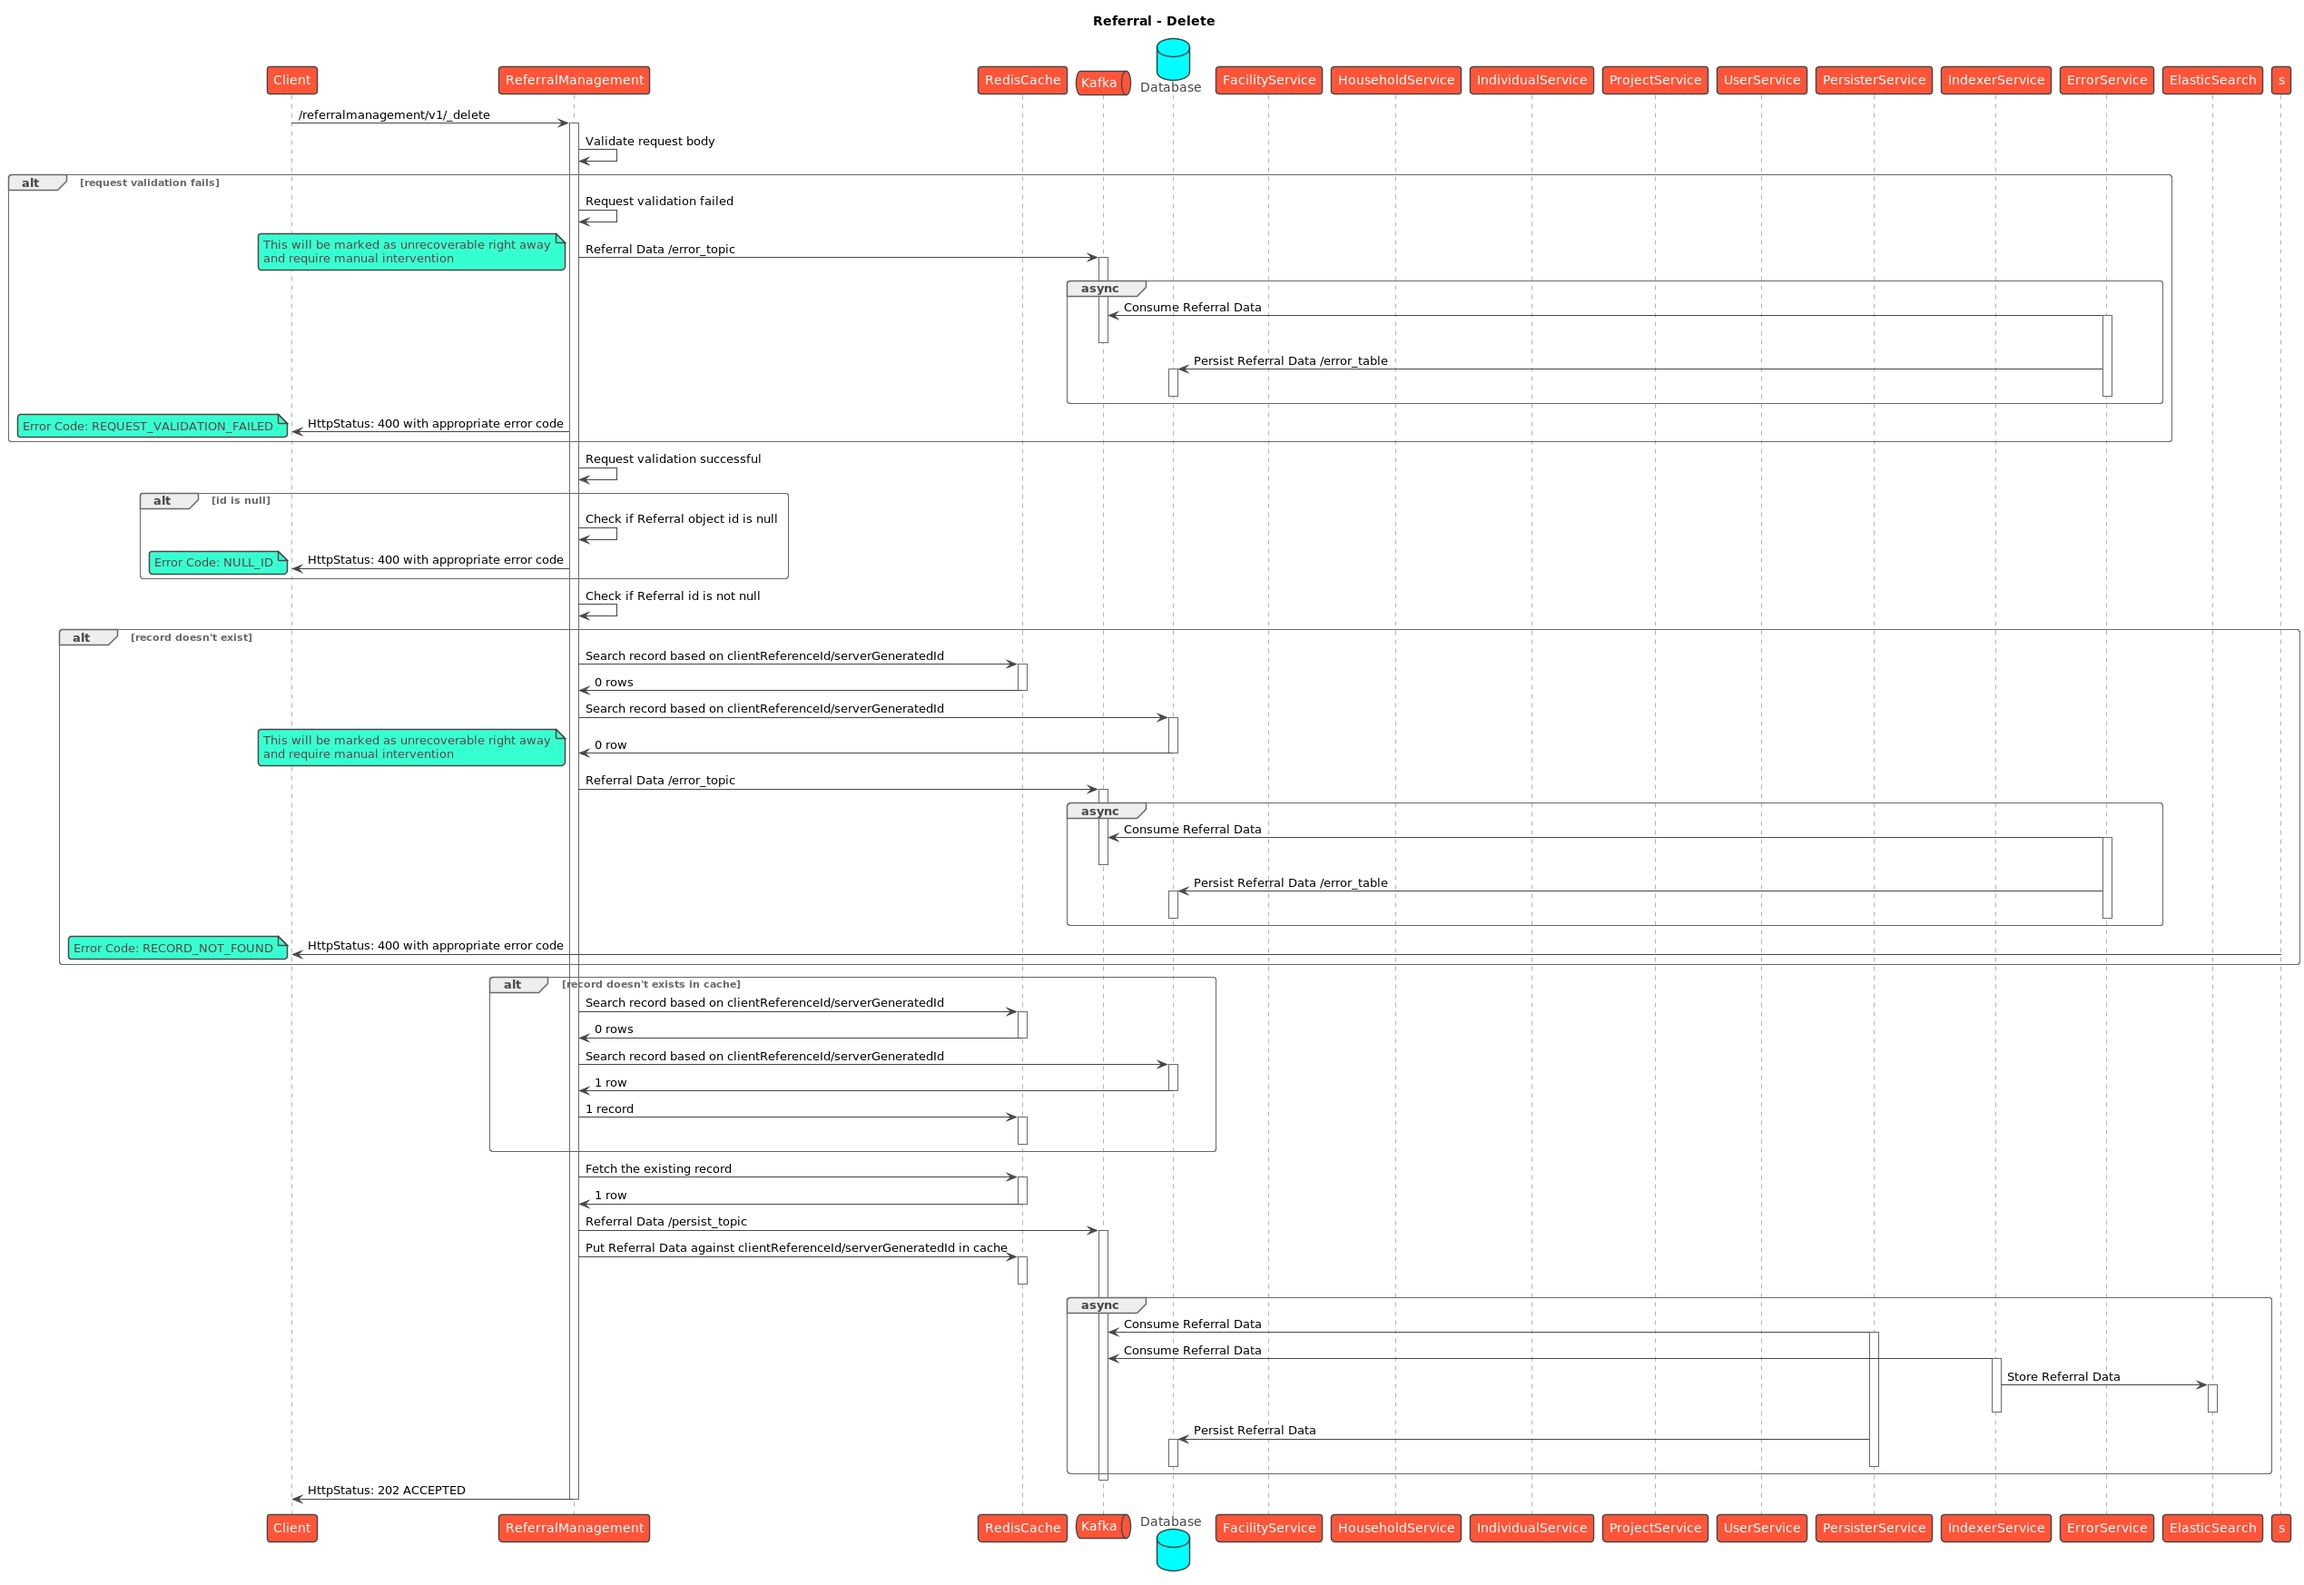
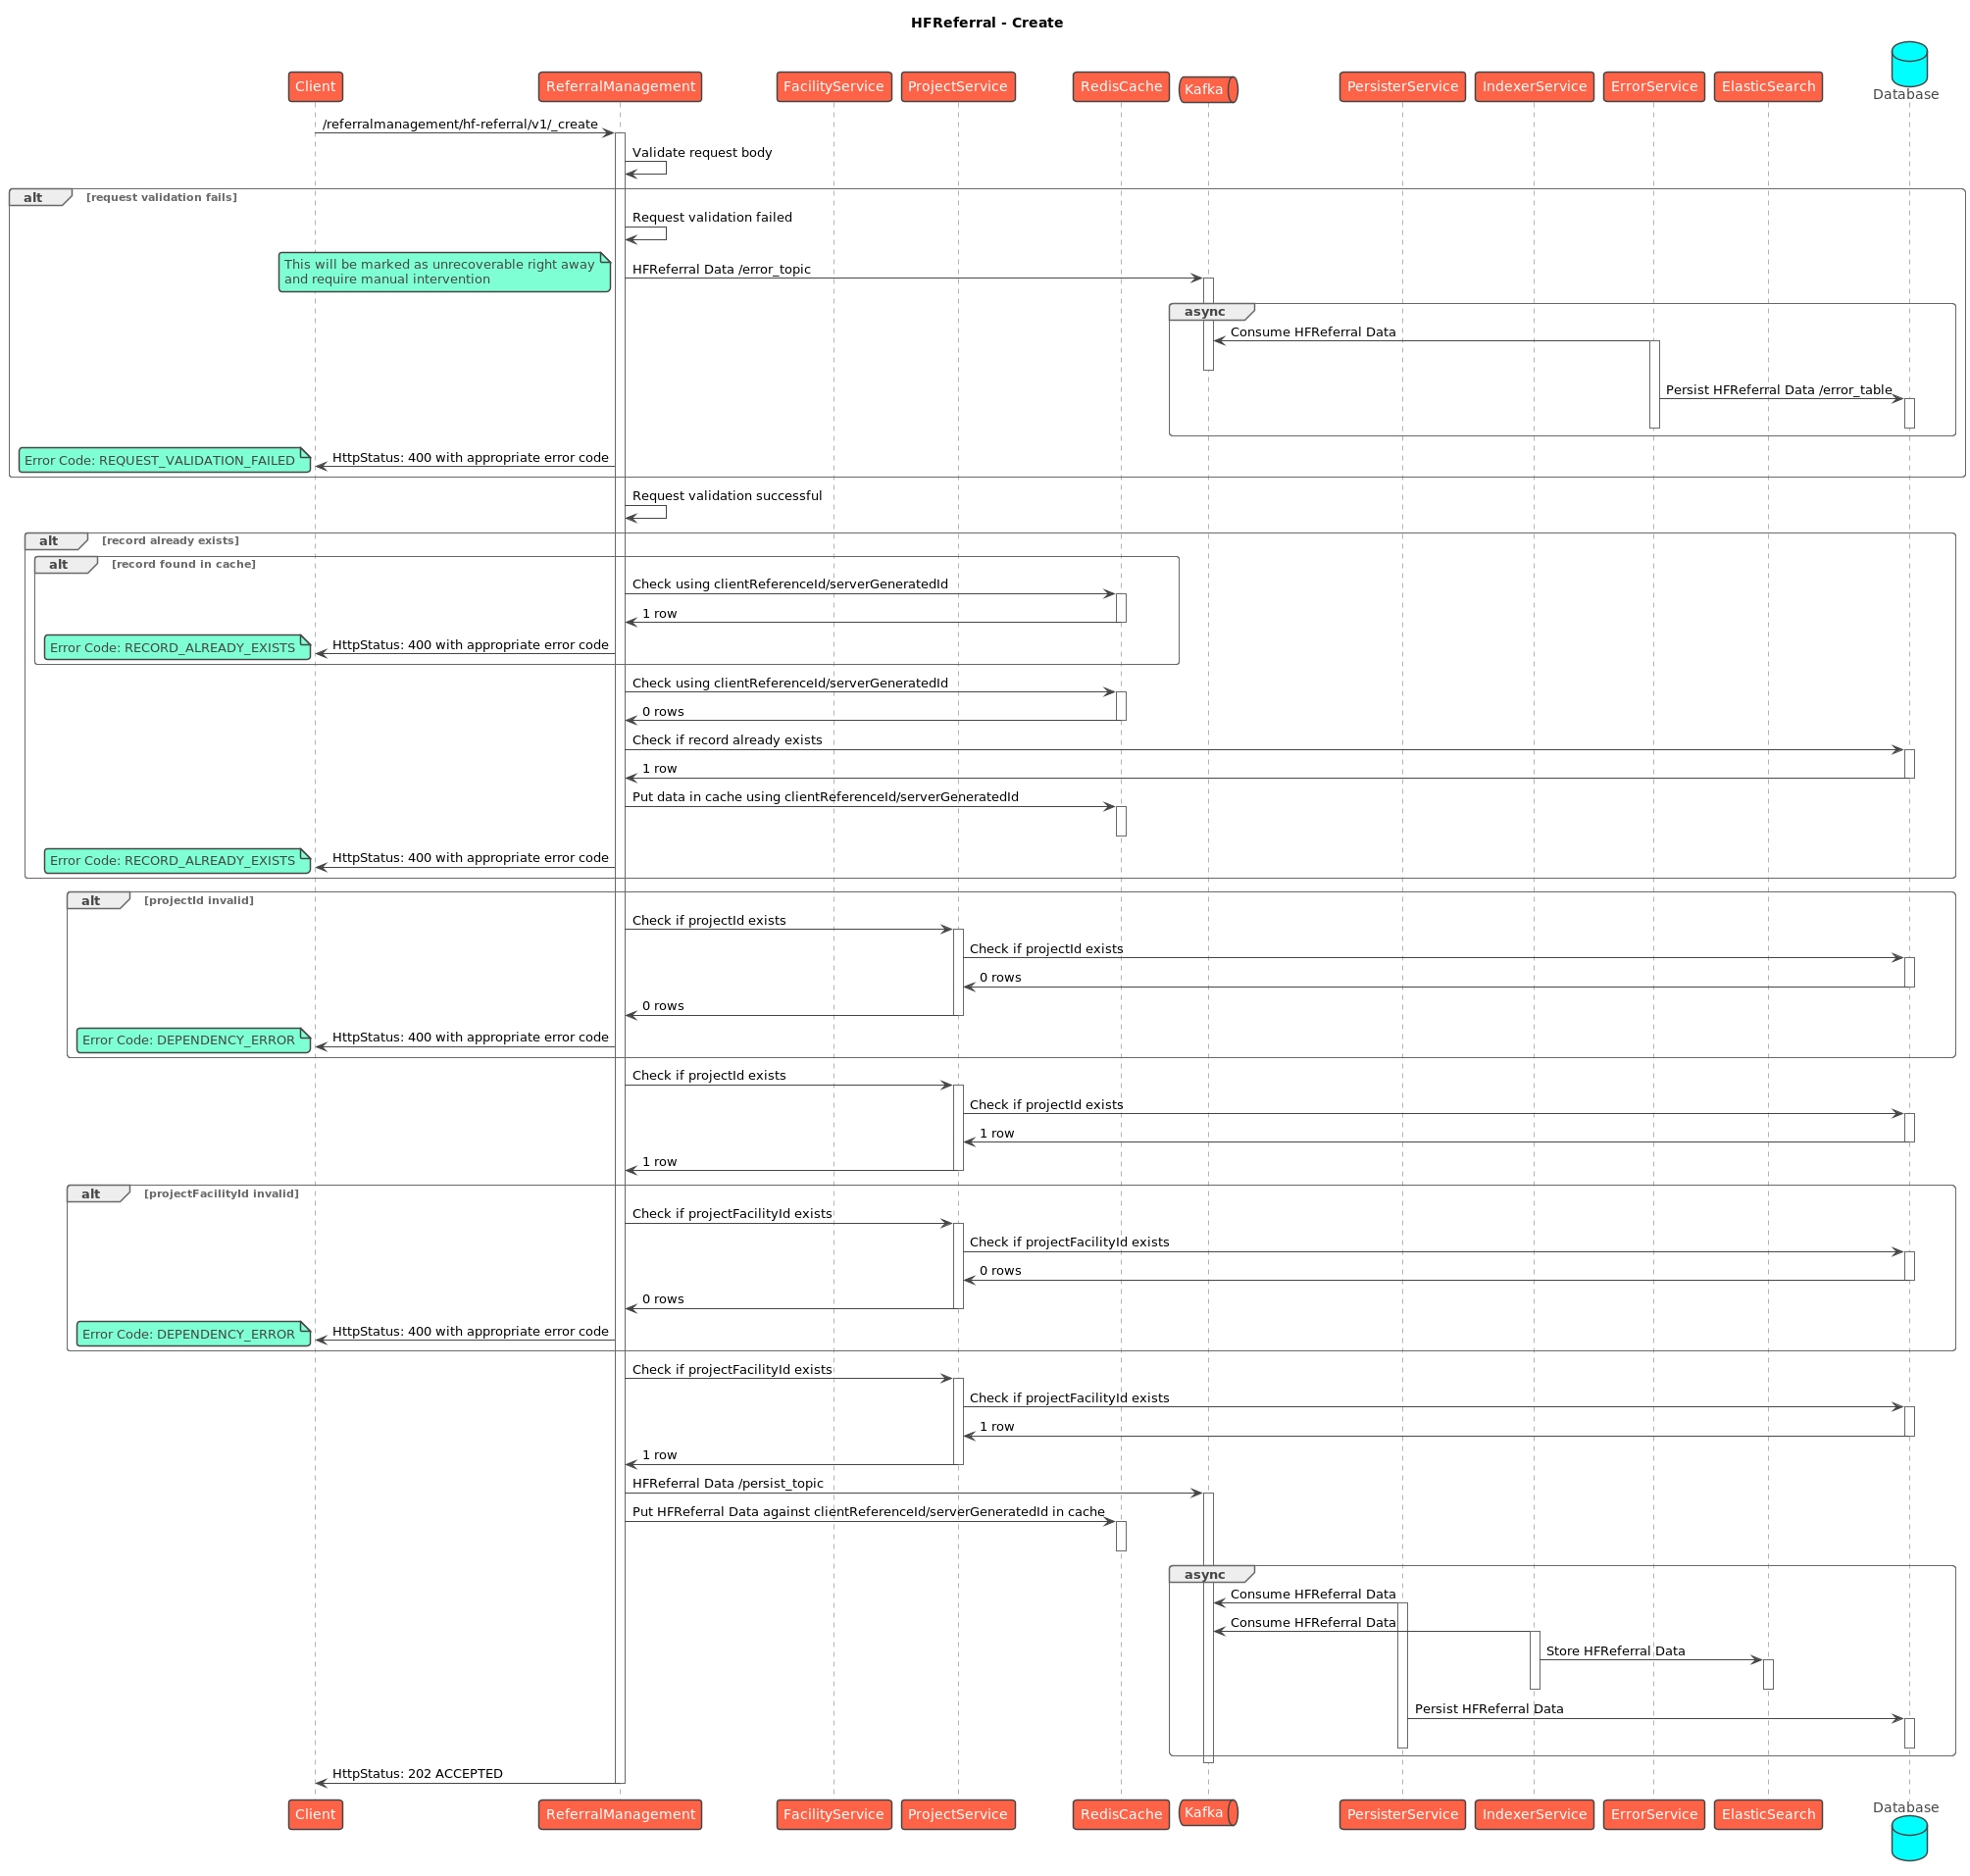
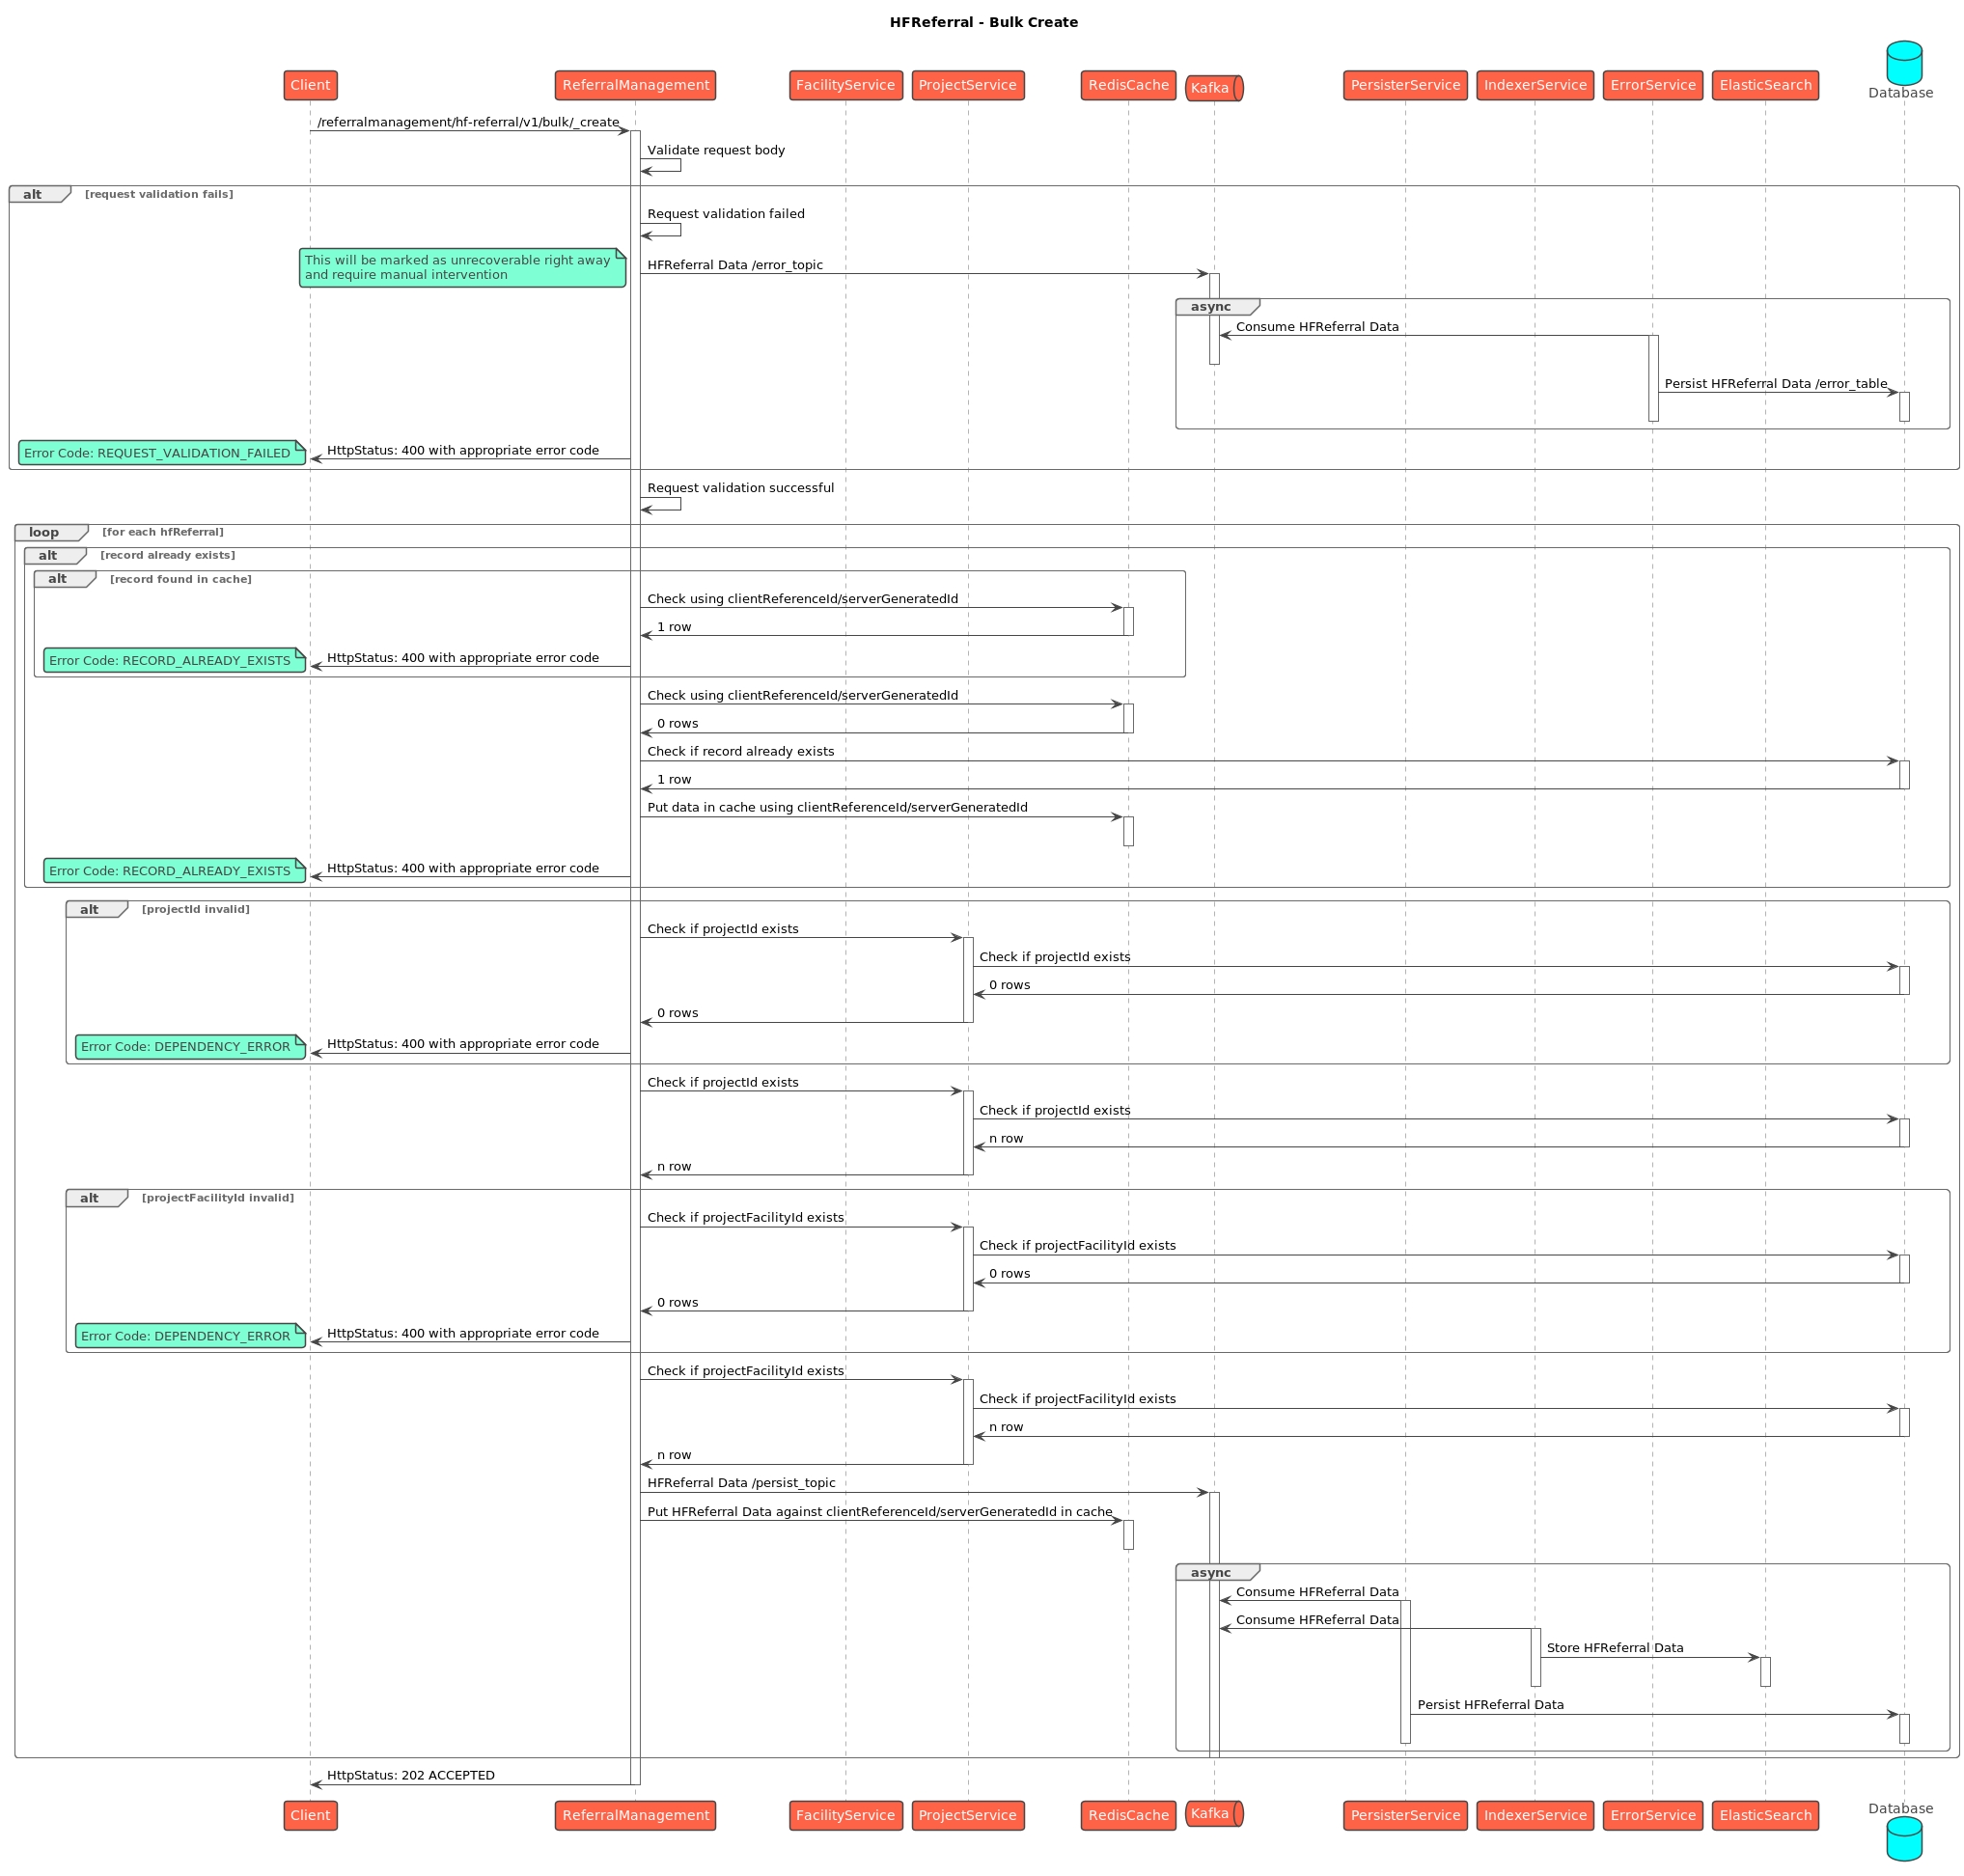
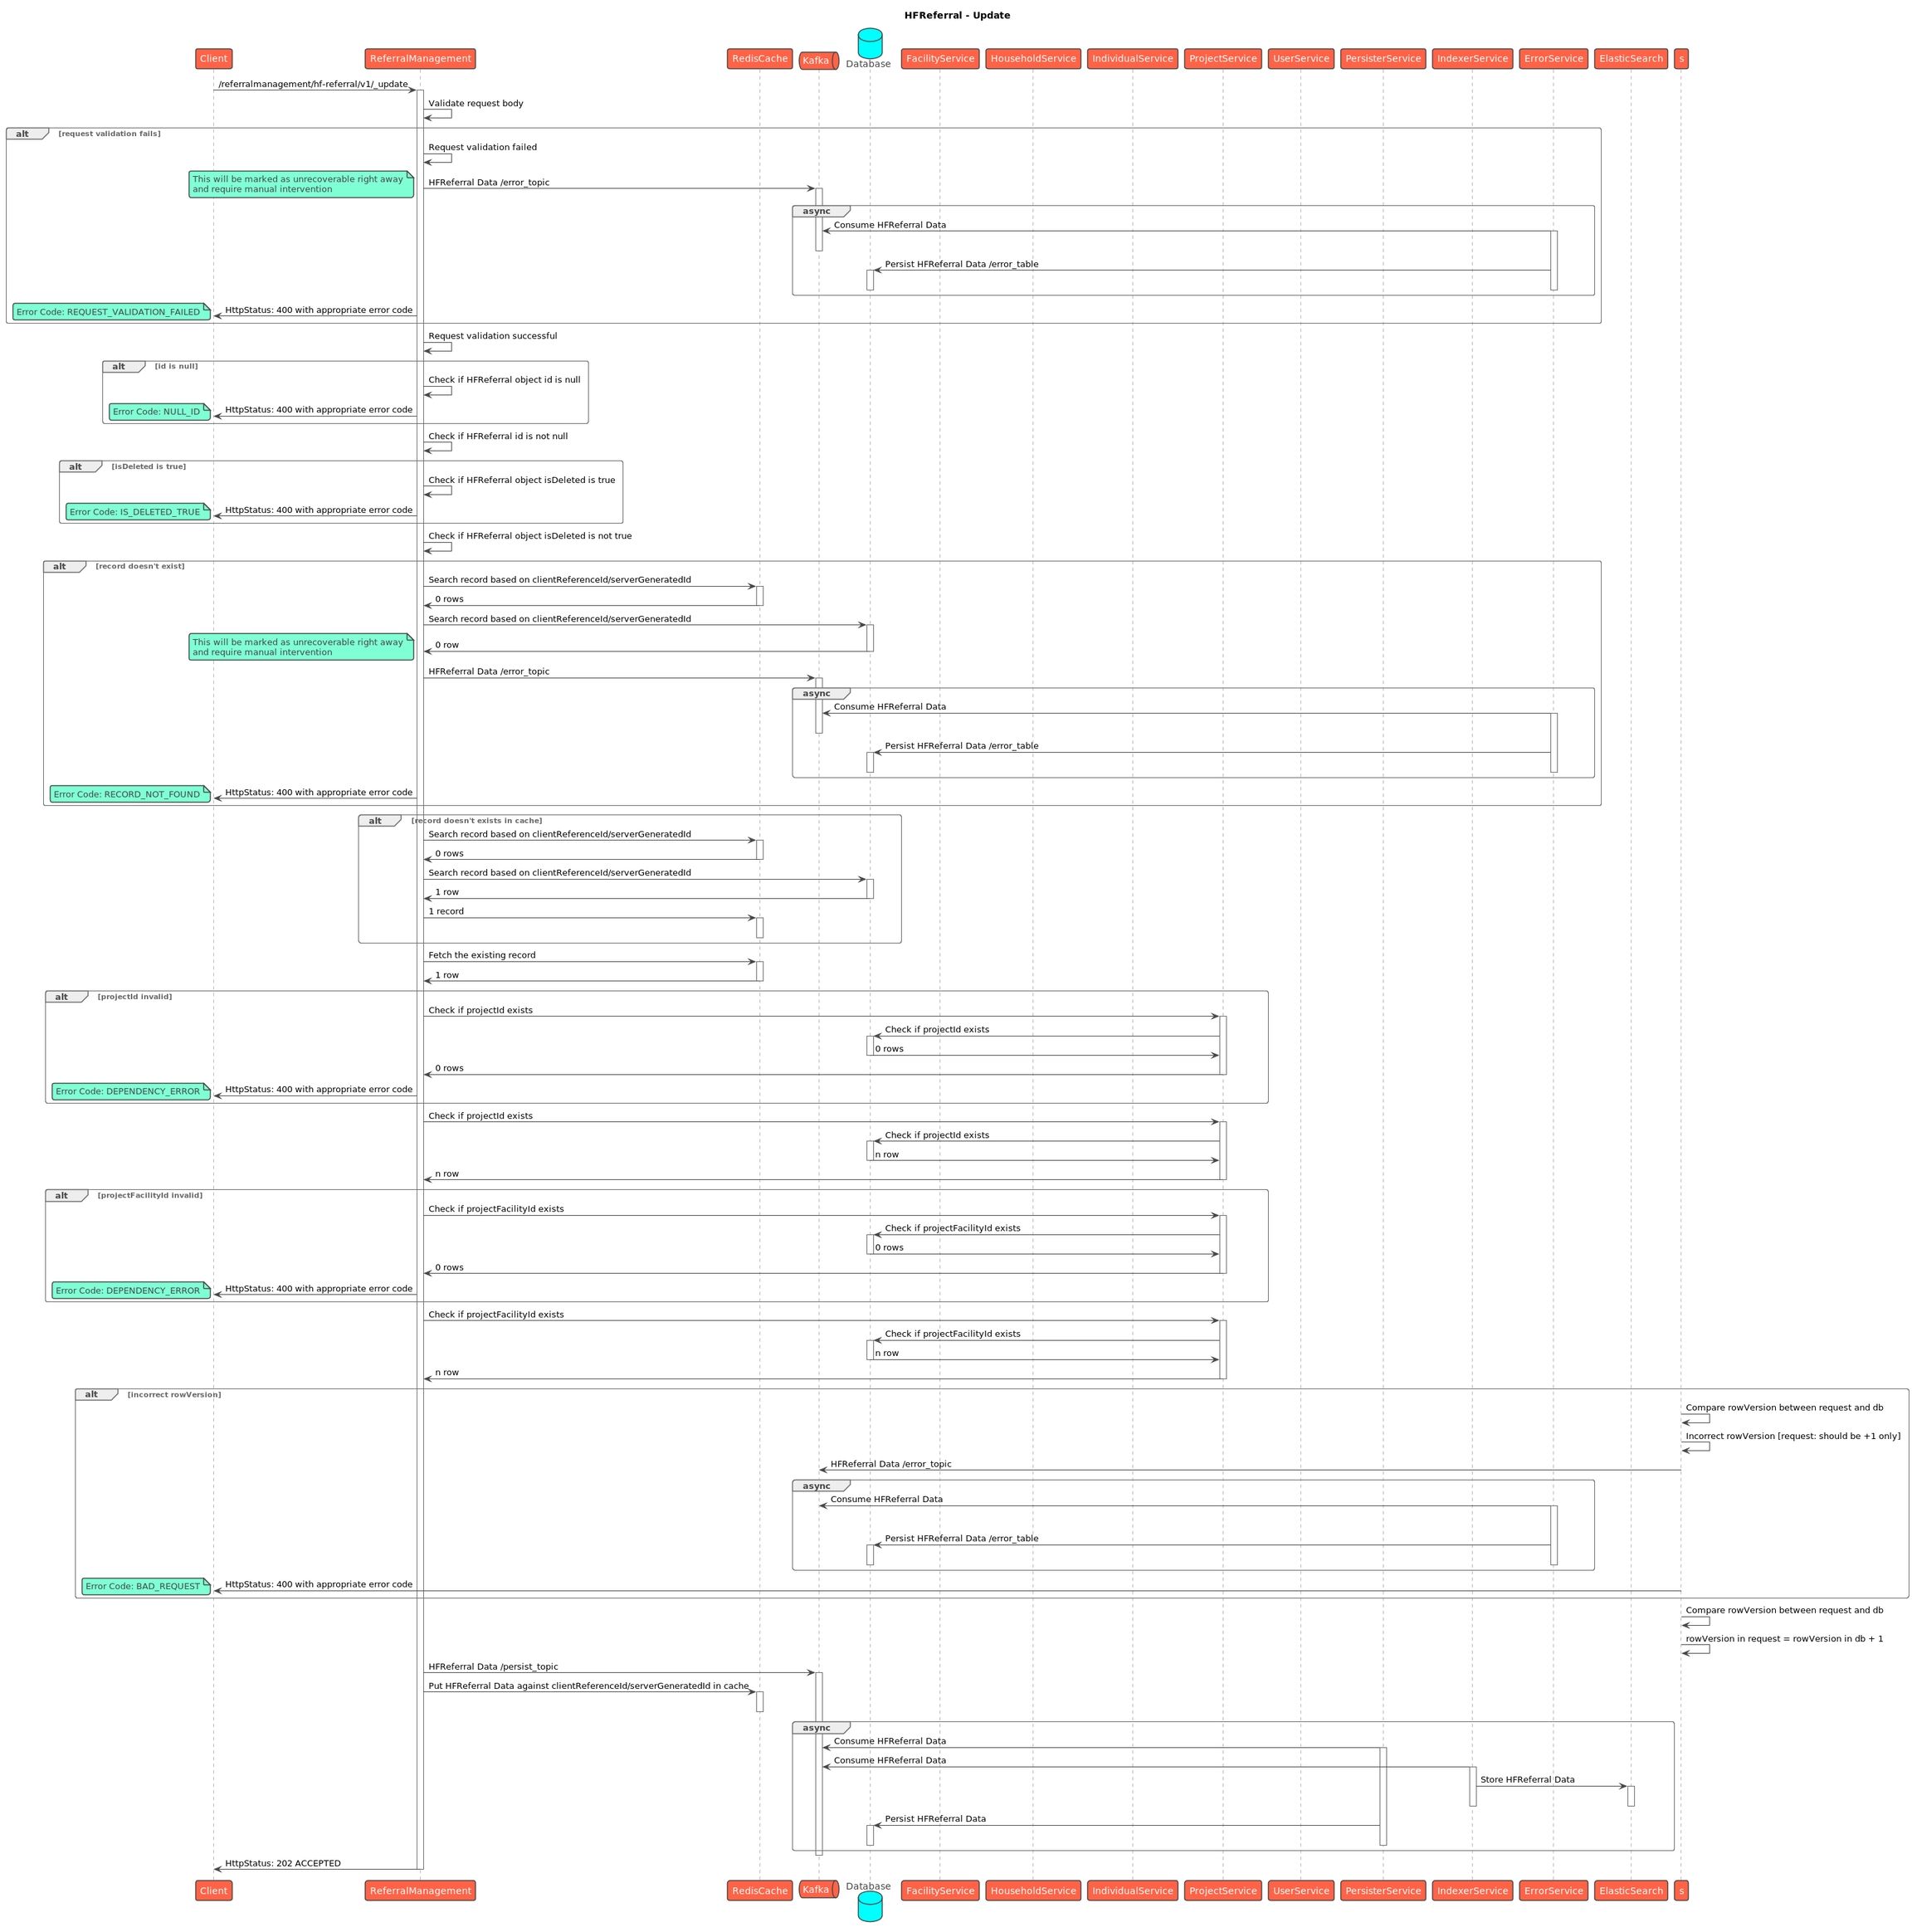
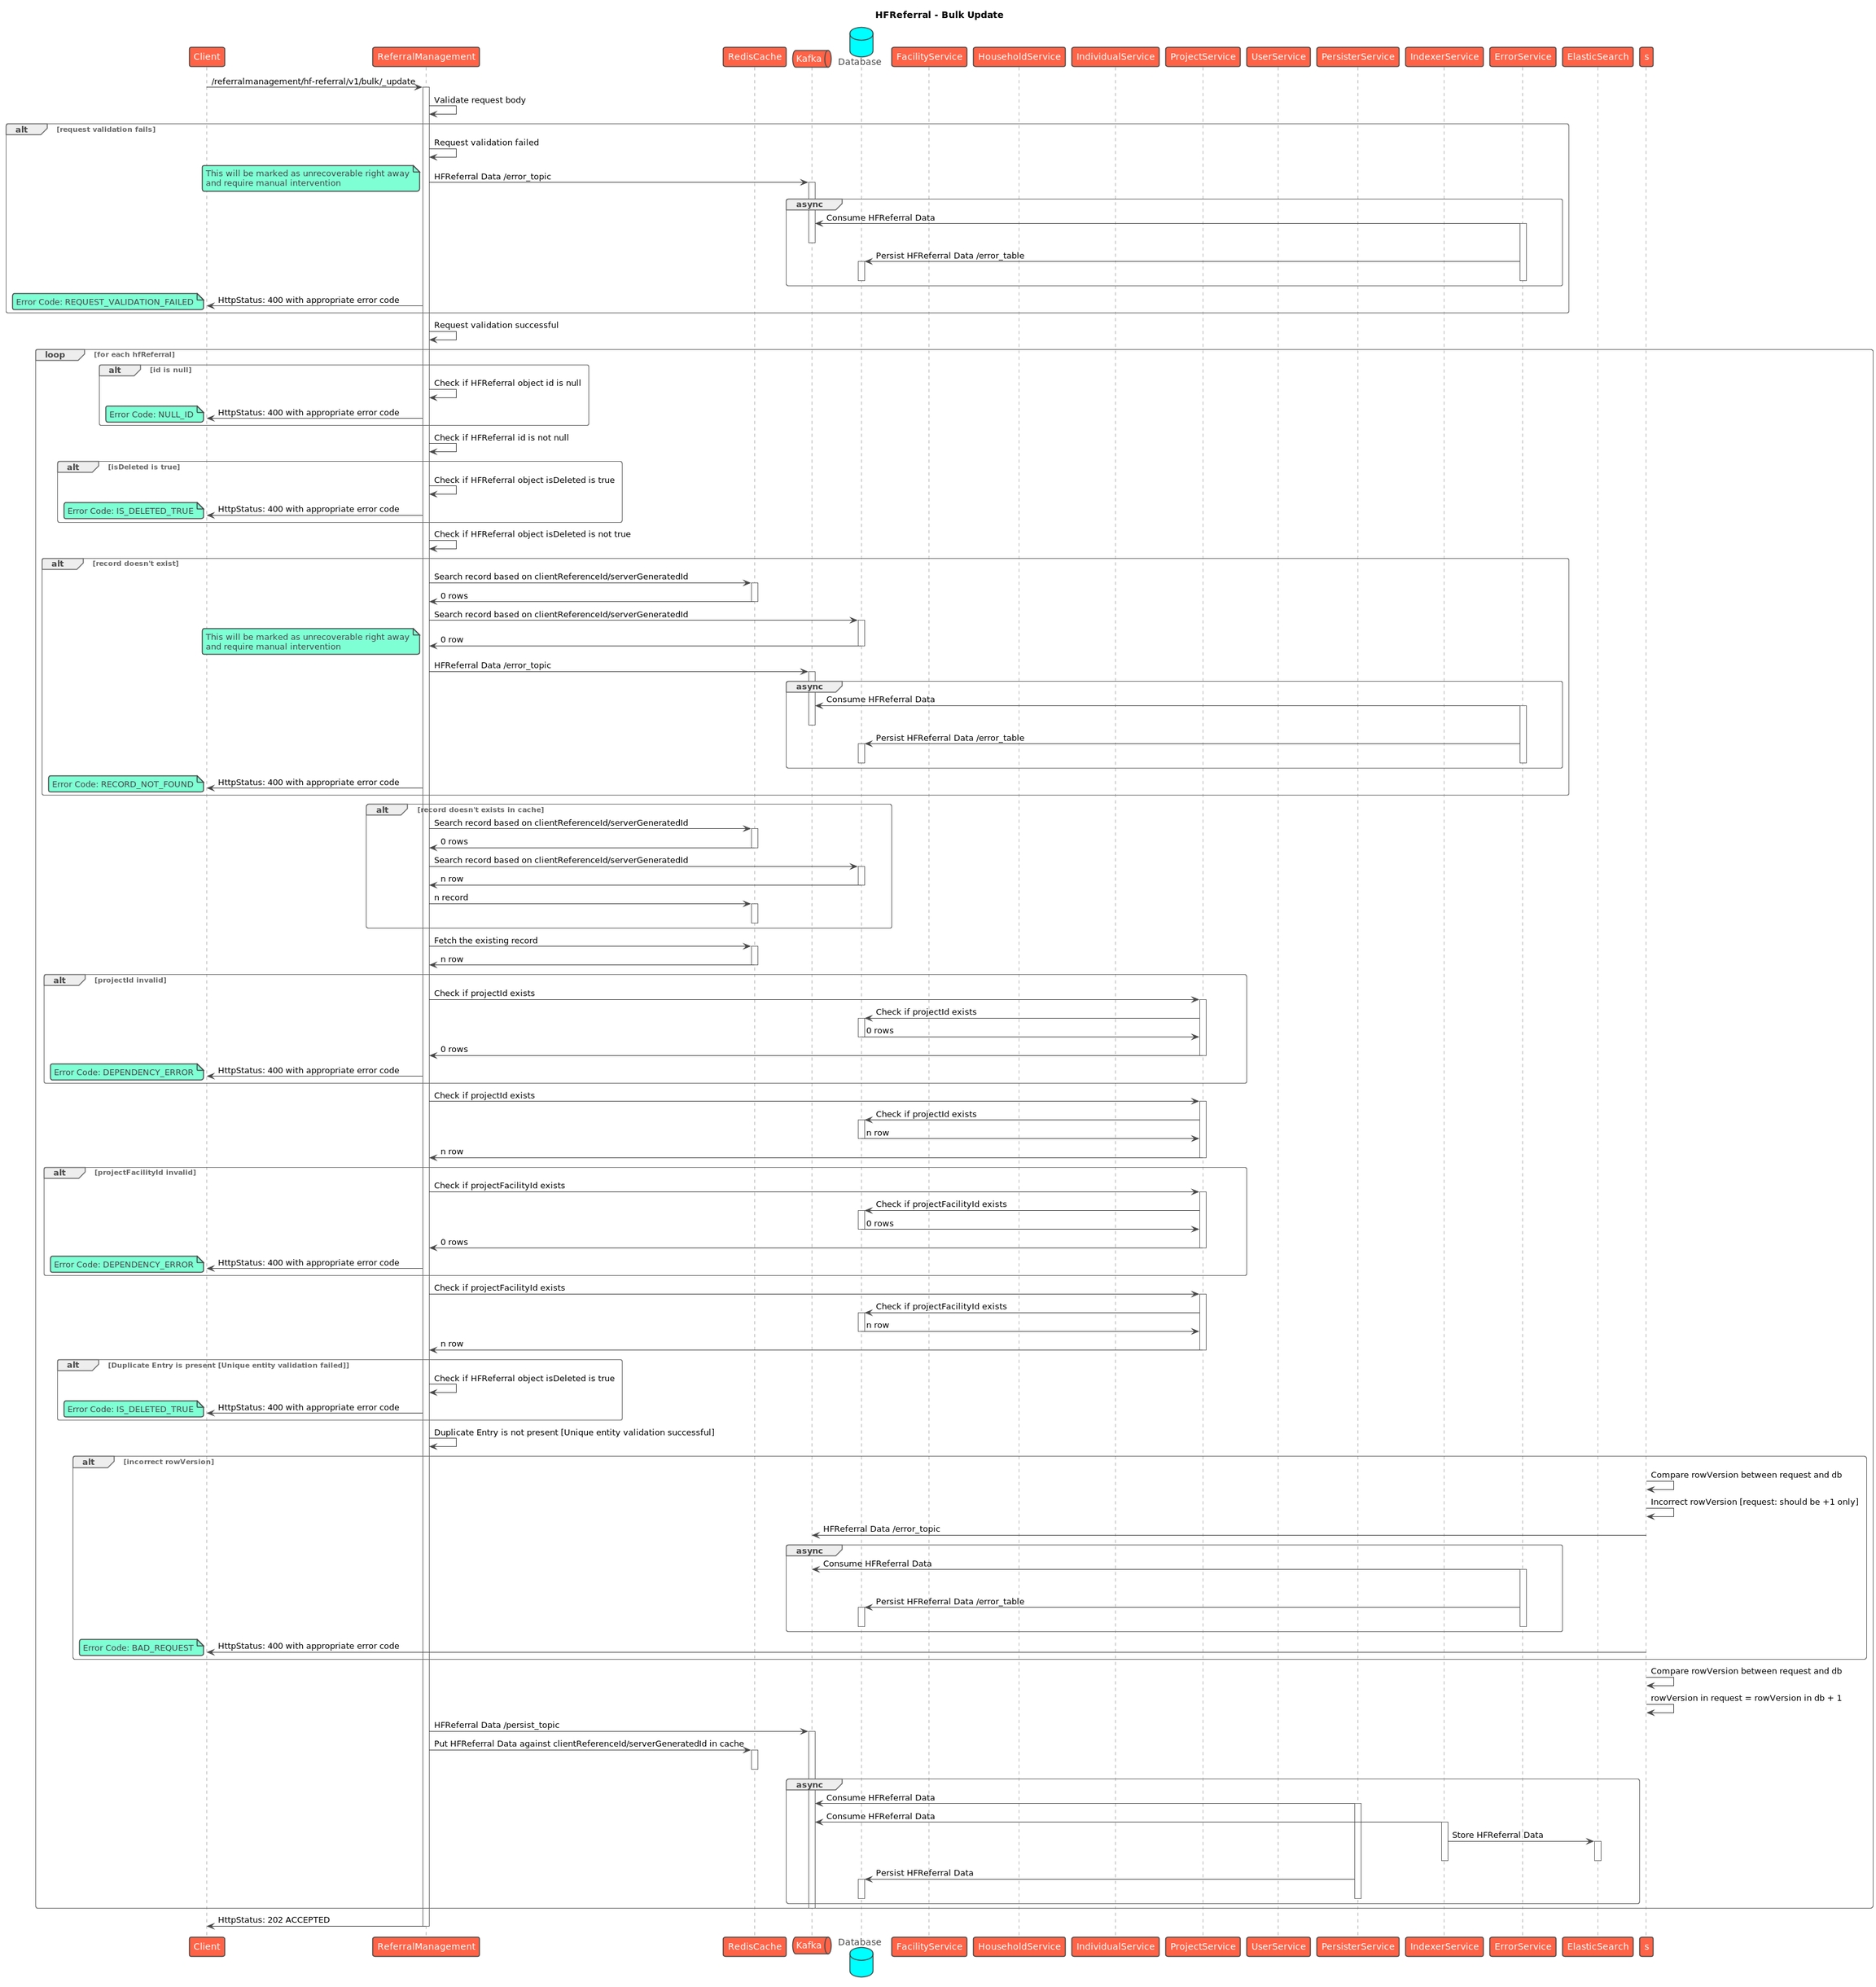

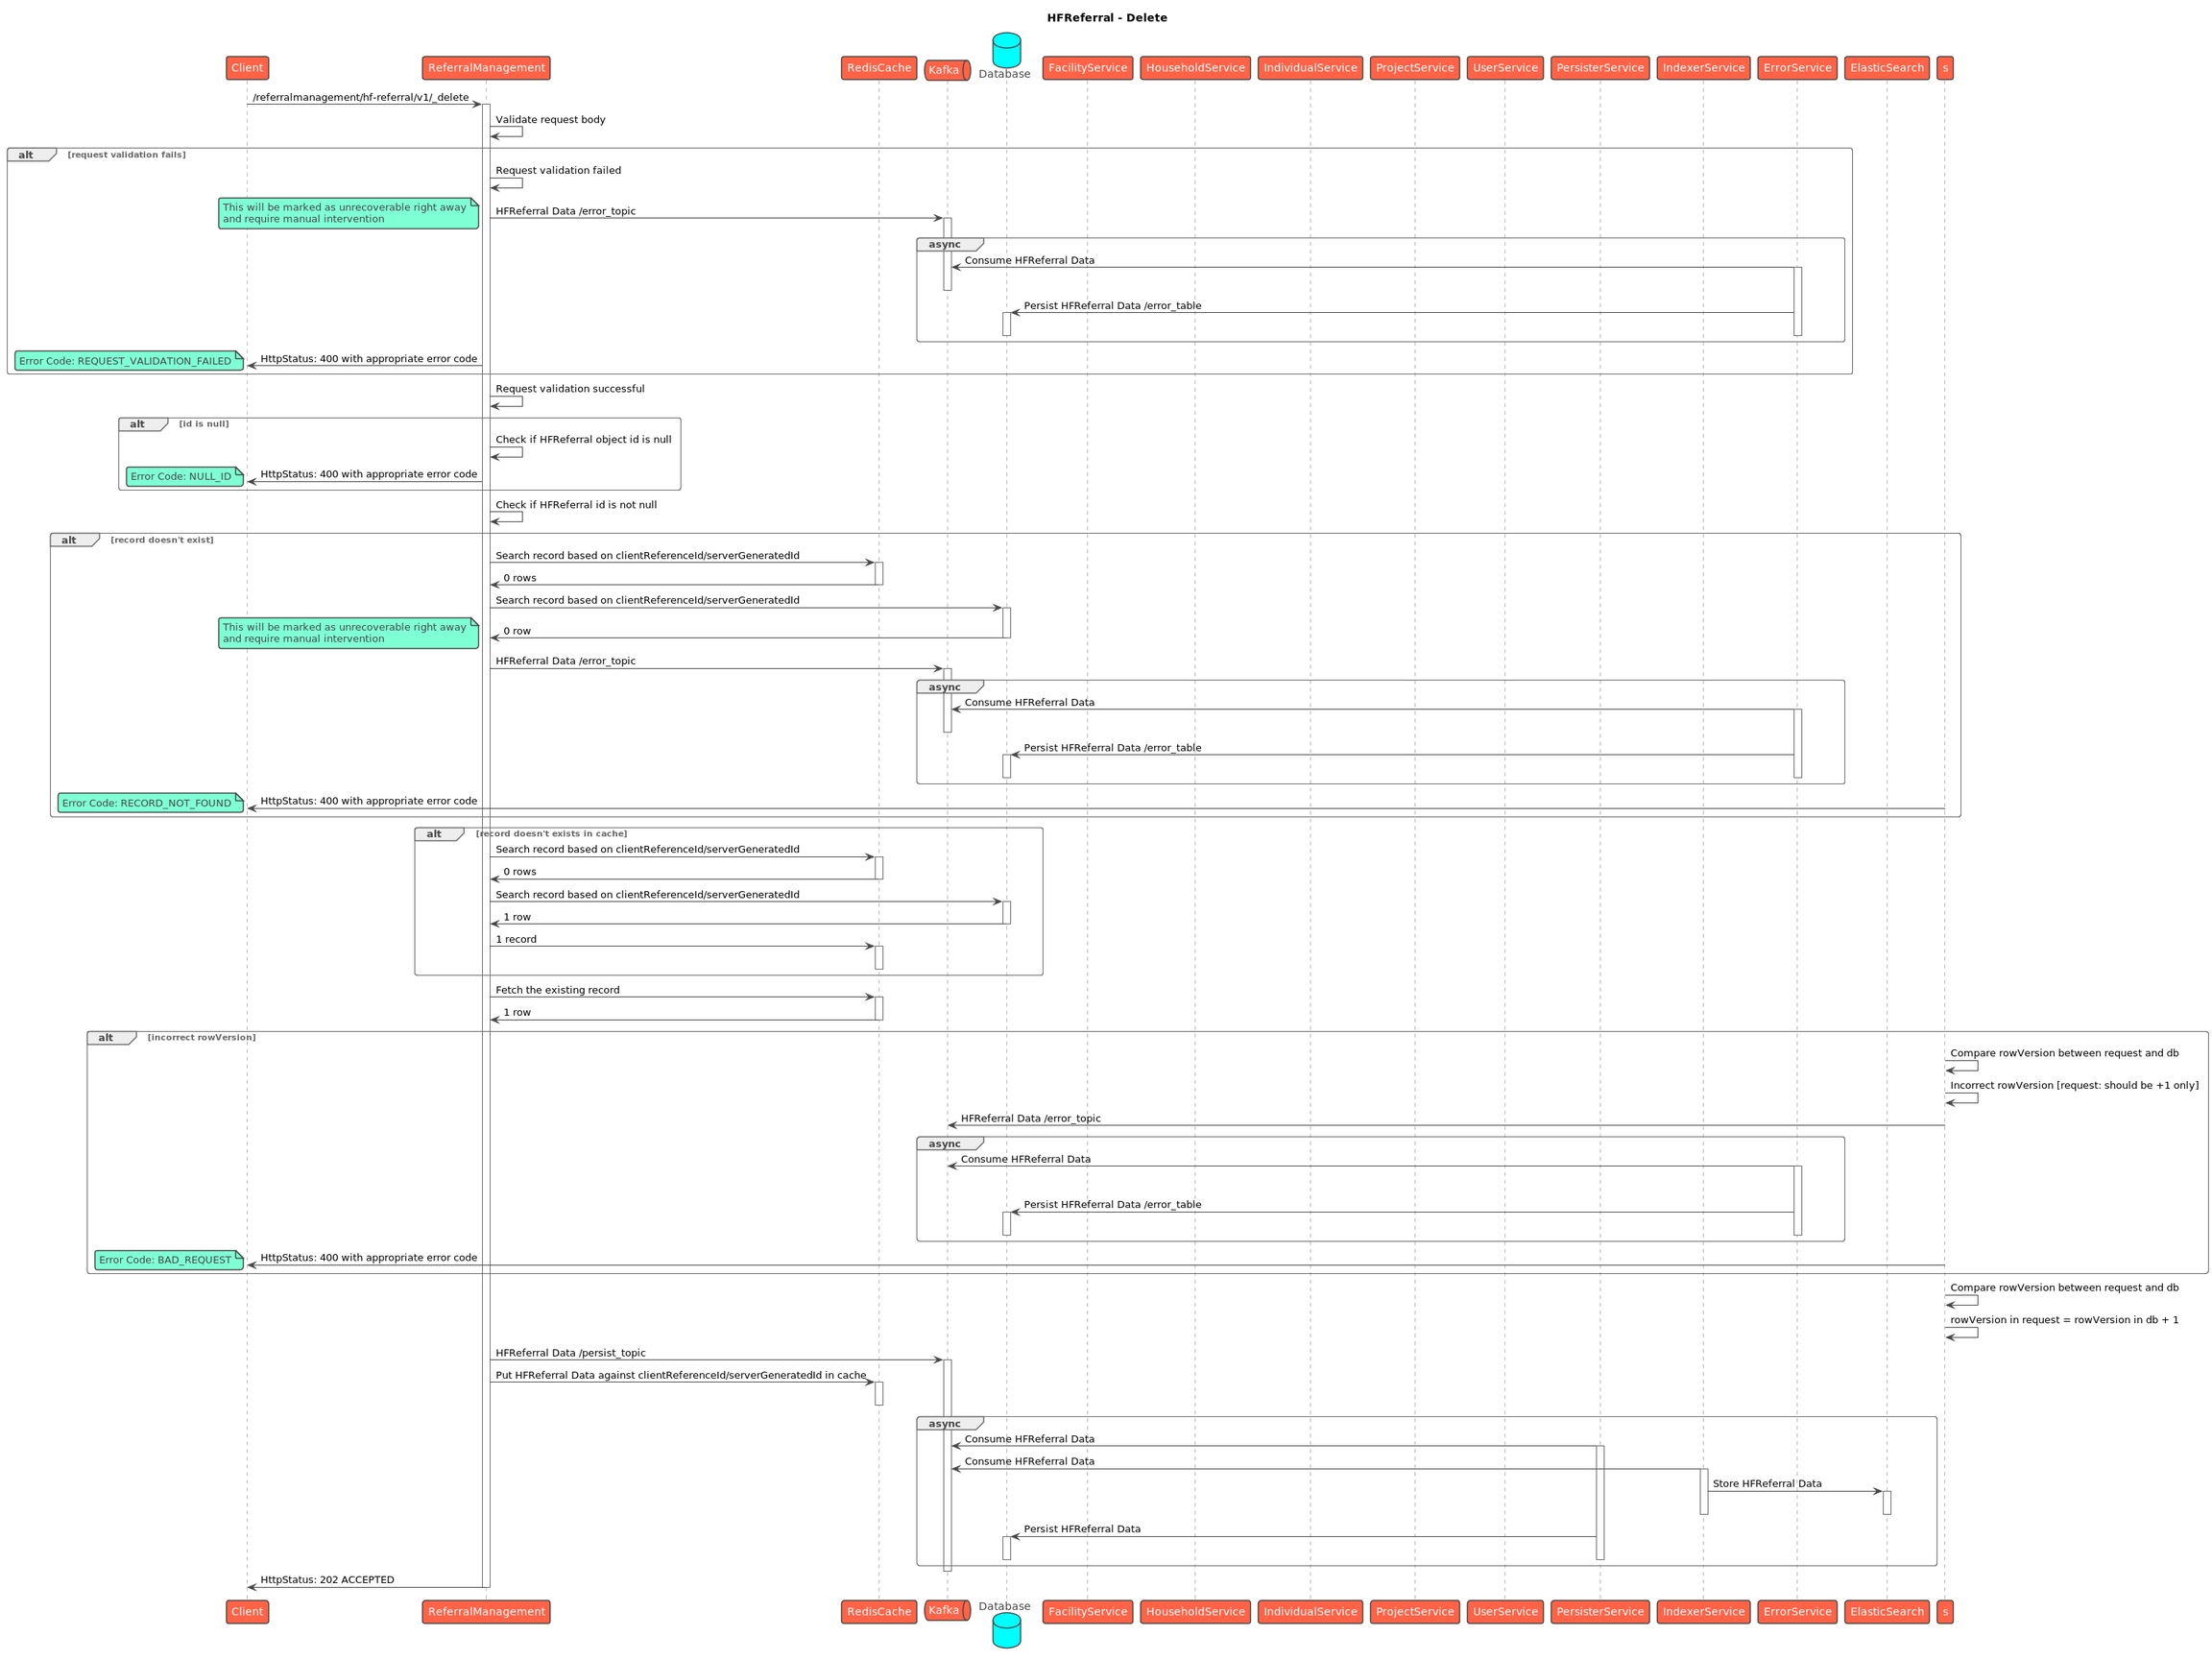
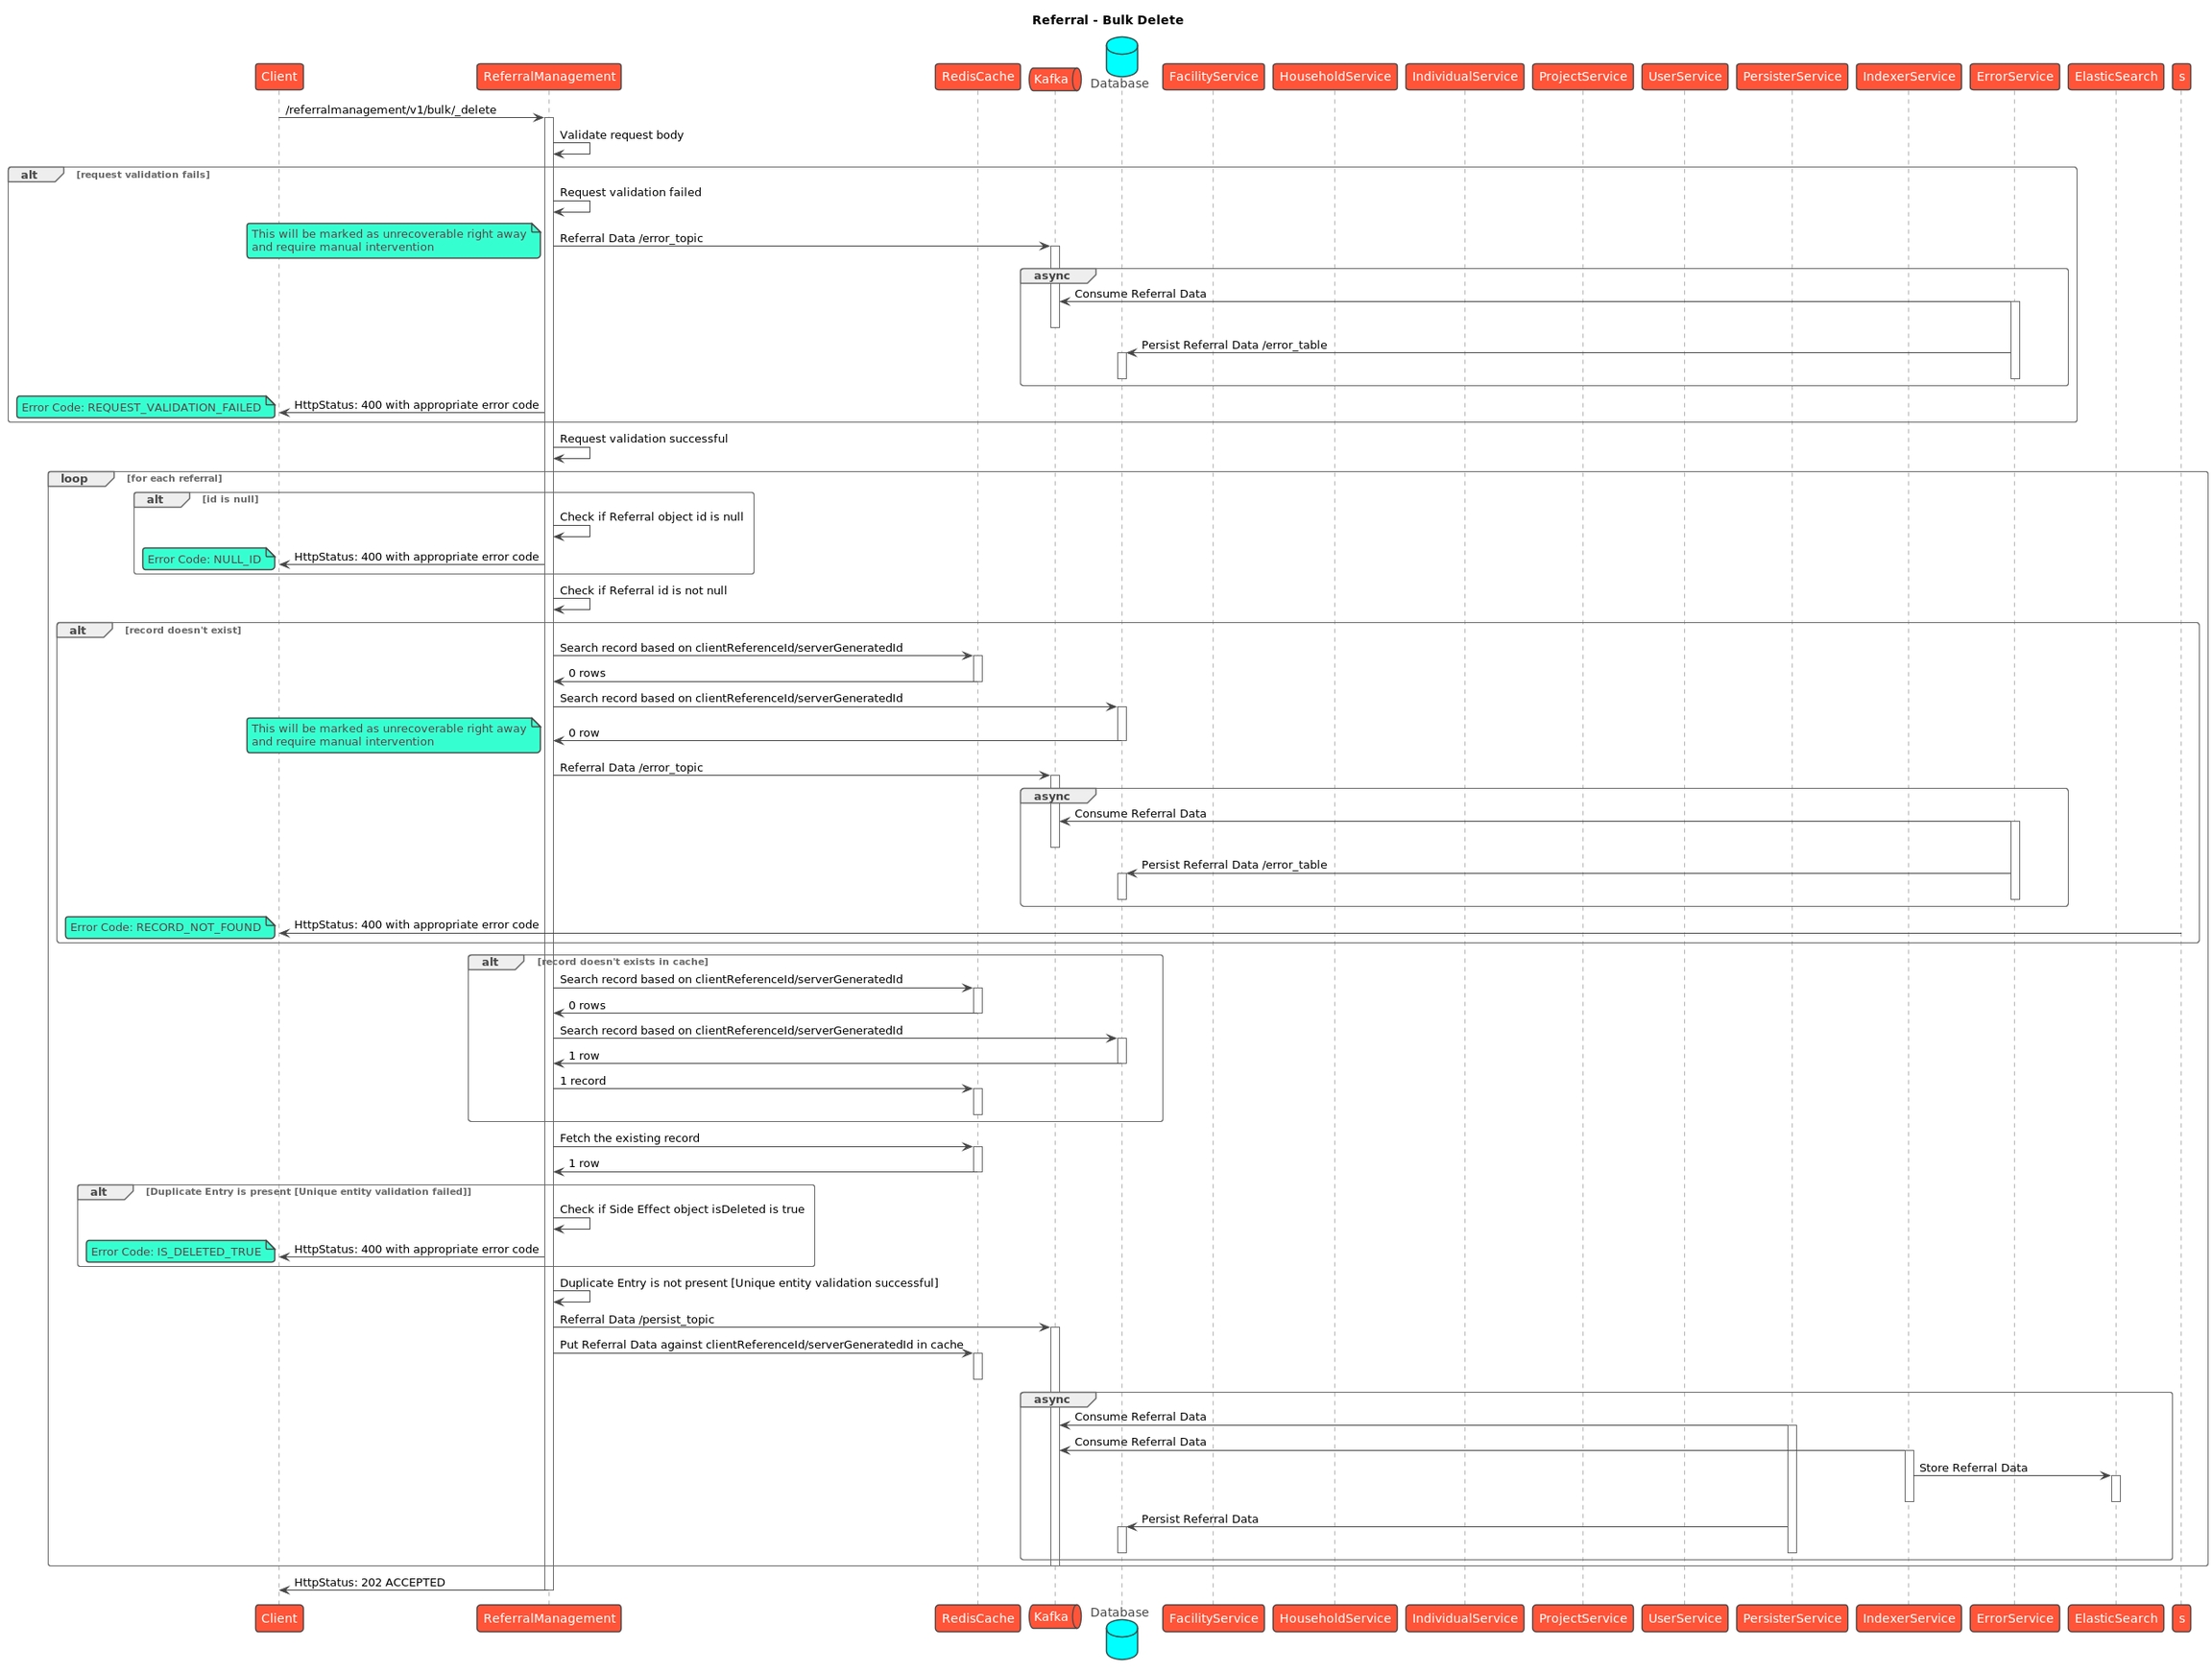
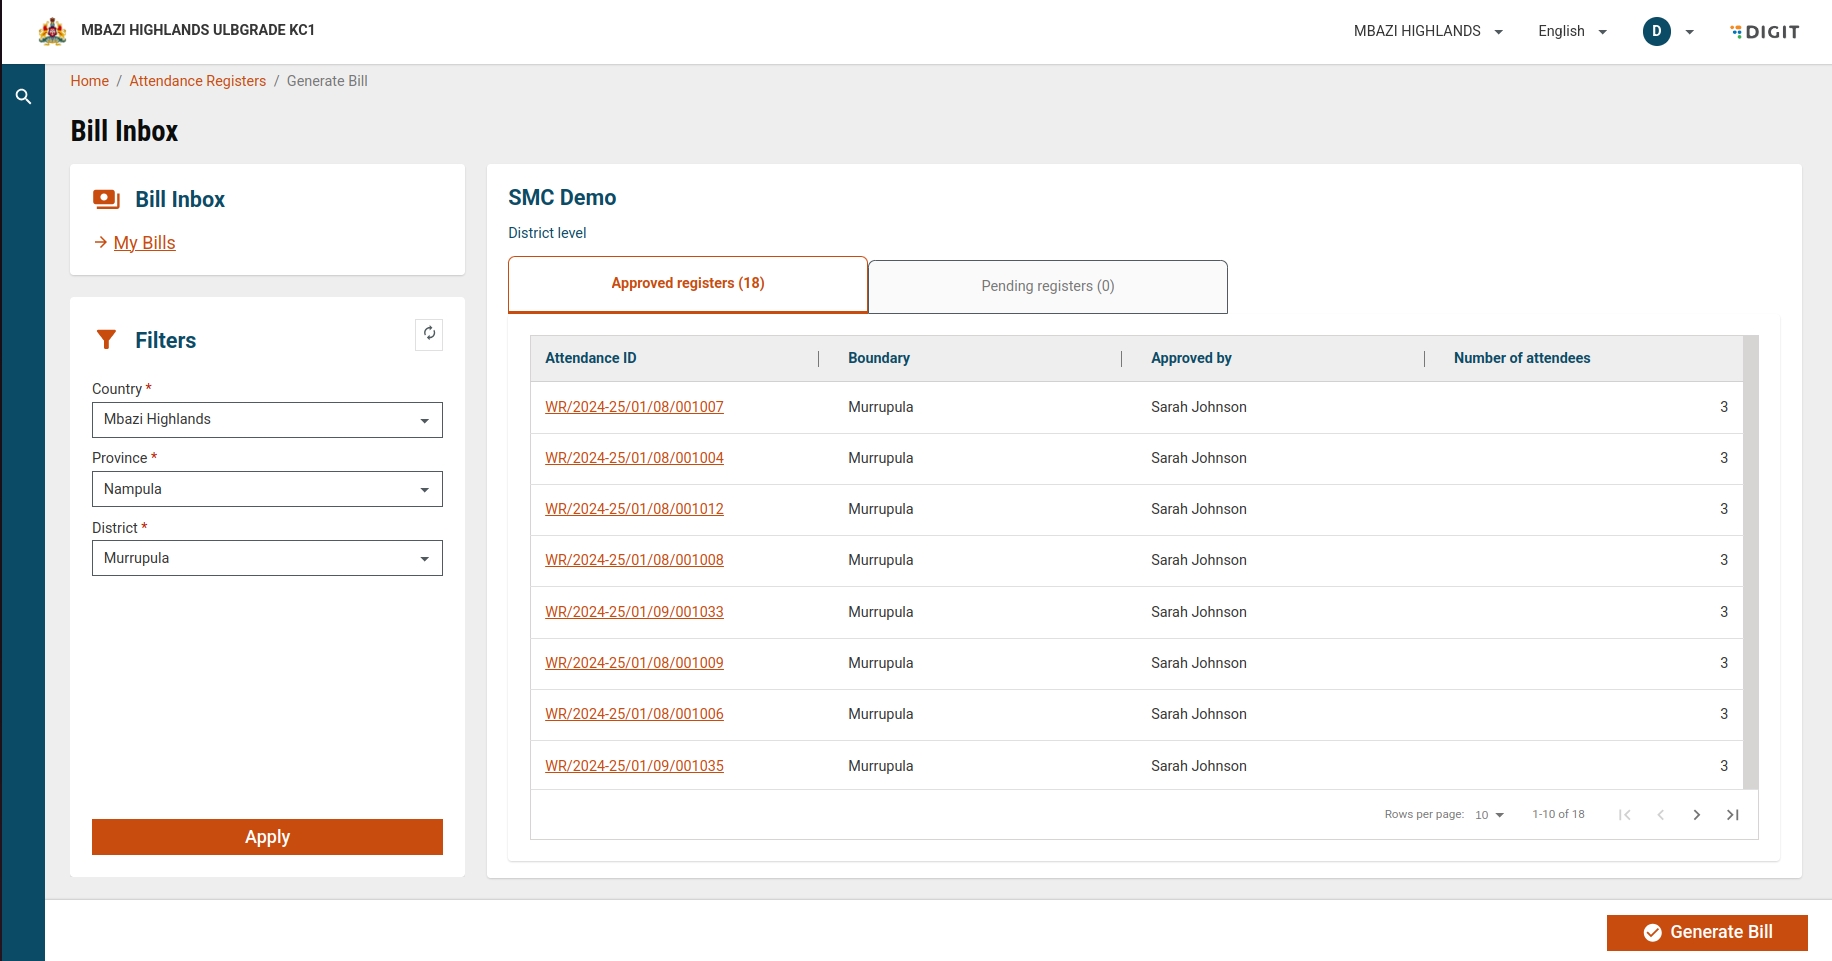
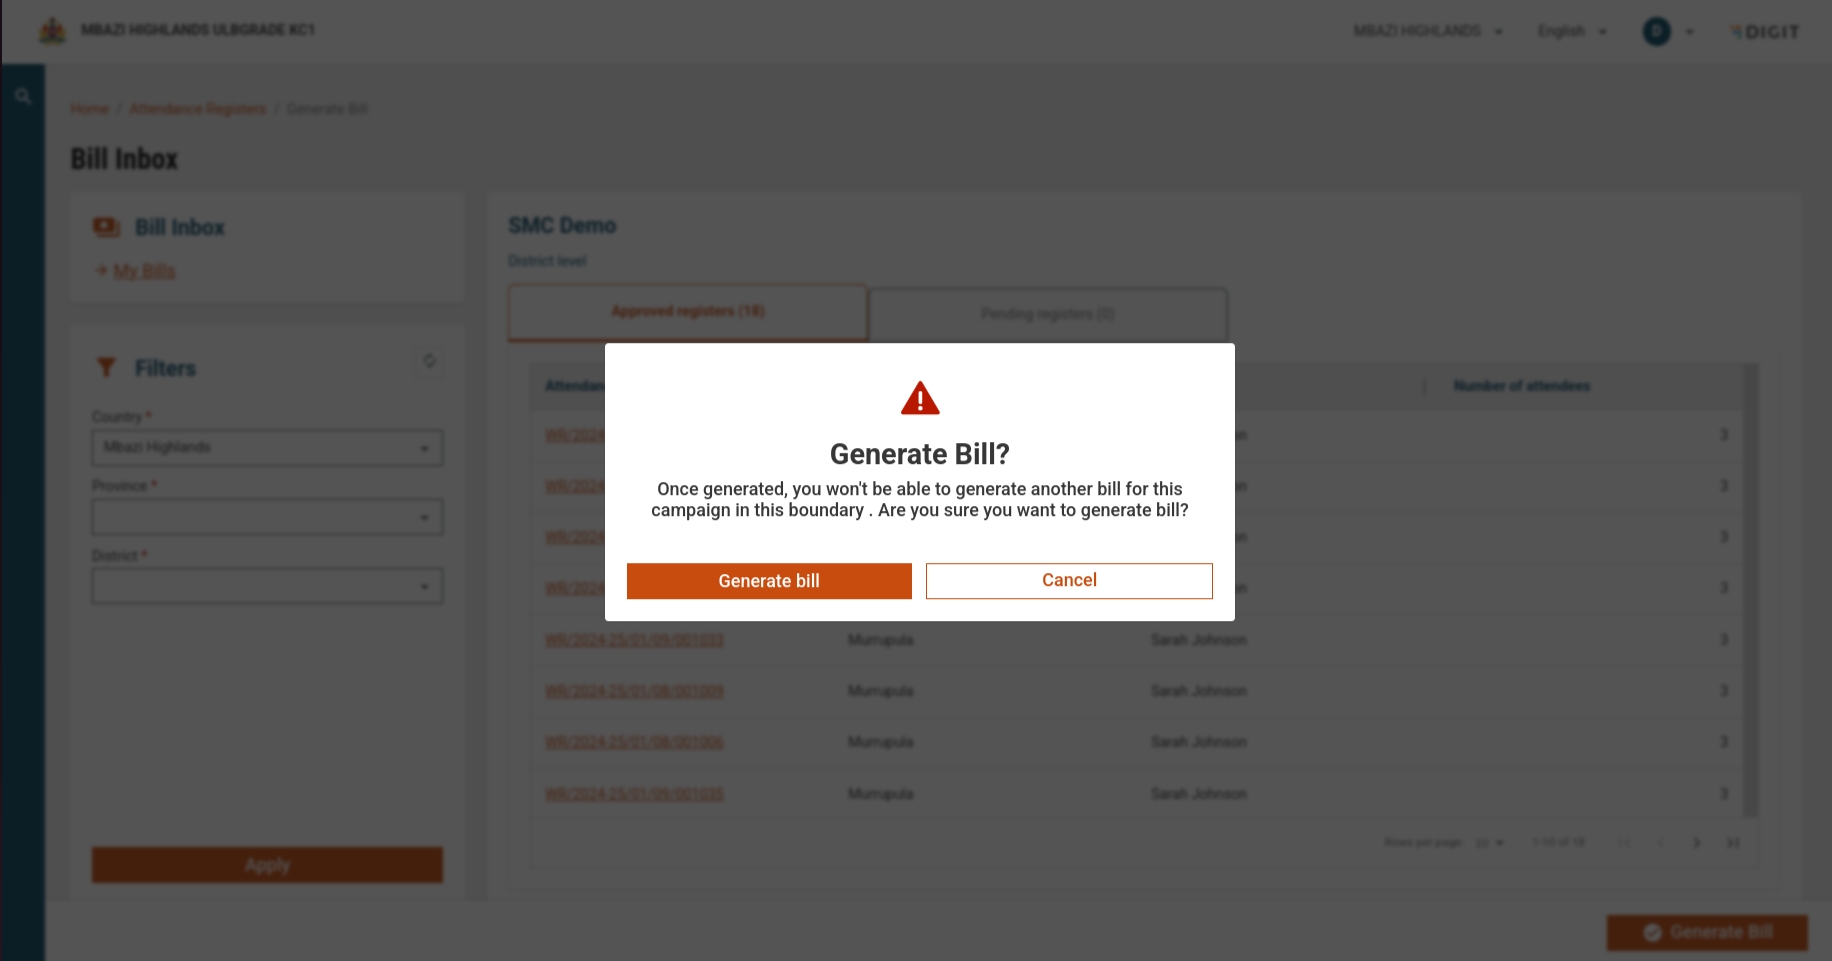
User: The individual interacting with the checklist management UI to view, create, and modify checklists.
Checklist View UI (CurrentScreen): This is the user interface for viewing existing checklists and initiating the creation of new ones.
Checklist Create UI (CurrentScreen): The user interface for creating and configuring checklists.
Service Request Service (ServiceRequestService): Manages service requests and updates related to checklists.
MDMS Service (MDMSAPI): Provides master data management services for roles, checklist types, and other configurations.
Localisation Service (LOCAPI): Manages the localisation of checklist questions.
Access Checklist View UI
The user accesses the Checklist View UI after a campaign has been created.
Fetching Configured Service Requests
CurrentScreen sends a request to ServiceRequestService to fetch configured service requests.
ServiceRequestService filters and returns checklists using the campaign name, role, and type, or just the campaign name (if the service is enhanced).
ServiceRequestService returns the relevant checklists to CurrentScreen.
Display Checklists
CurrentScreen displays the checklists received from ServiceRequestService to the User.
Creating a New Checklist
The user clicks on "Create Checklist" in the Checklist View UI.
CurrentScreen sends a request to MDMSAPI to fetch role and checklist type master data relevant to the campaign type.
MDMSAPI returns the master data to CurrentScreen
Enable/Disable Checklist
The user clicks on the enable/disable option for any checklist.
CurrentScreen sends an update call to ServiceRequestService to toggle the active/inactive status of the checklist.
ServiceRequestService returns the updated response.
Access Checklist Create UI
The user accesses the Checklist Create UI.
CurrentScreen parses URL query parameters to determine the campaign name, role, and checklist type.
Fetching Draft Service Requests
CurrentScreen sends a request to MDMSAPI to fetch draft service requests based on the role and type.
MDMSAPI returns the configured draft service requests.
Loading Default Checklist Questions
CurrentScreen checks if there is a template available for the checklist and loads default checklist questions.
User Interaction for Checklist Questions
Users can add, delete, or modify any checklist questions in the UI.
The user clicks on "Create" to finalise the checklist.
Generating Unique Codes and Creating Service Requests
CurrentScreen generates a unique code for every checklist question.
CurrentScreen sends a create service request with the list of all questions to ServiceRequestService.
ServiceRequestService returns a successful response indicating that the checklist has been created.
Localisation of Checklist Questions
CurrentScreen sends a request to LOCAPI to create localisation for all checklist questions.
Each question is assigned a generated code, a user-entered message, and is associated with the hcm-checklist module.
Completion and Feedback
CurrentScreen displays a toast notification to the User indicating the successful creation of the checklist.
User is redirected back to the Checklist View screen, where they can see the newly created checklist.
Service Request Failures: If a service request fails at any point, the CurrentScreen will display an error message to the User. Users must resolve the issues and retry the operation.
Validation Errors: During checklist creation, if validation errors are detected, the CurrentScreen will notify the User with specific details, and the user must correct the issues before proceeding.
This documentation provides a comprehensive overview of the checklist management process within a campaign. The structured sequence ensures that all checklist-related activities are handled correctly, from viewing existing checklists to creating and localising new ones. By adhering to this flow, users can manage checklists efficiently, ensuring consistency and accuracy in their campaign management activities.
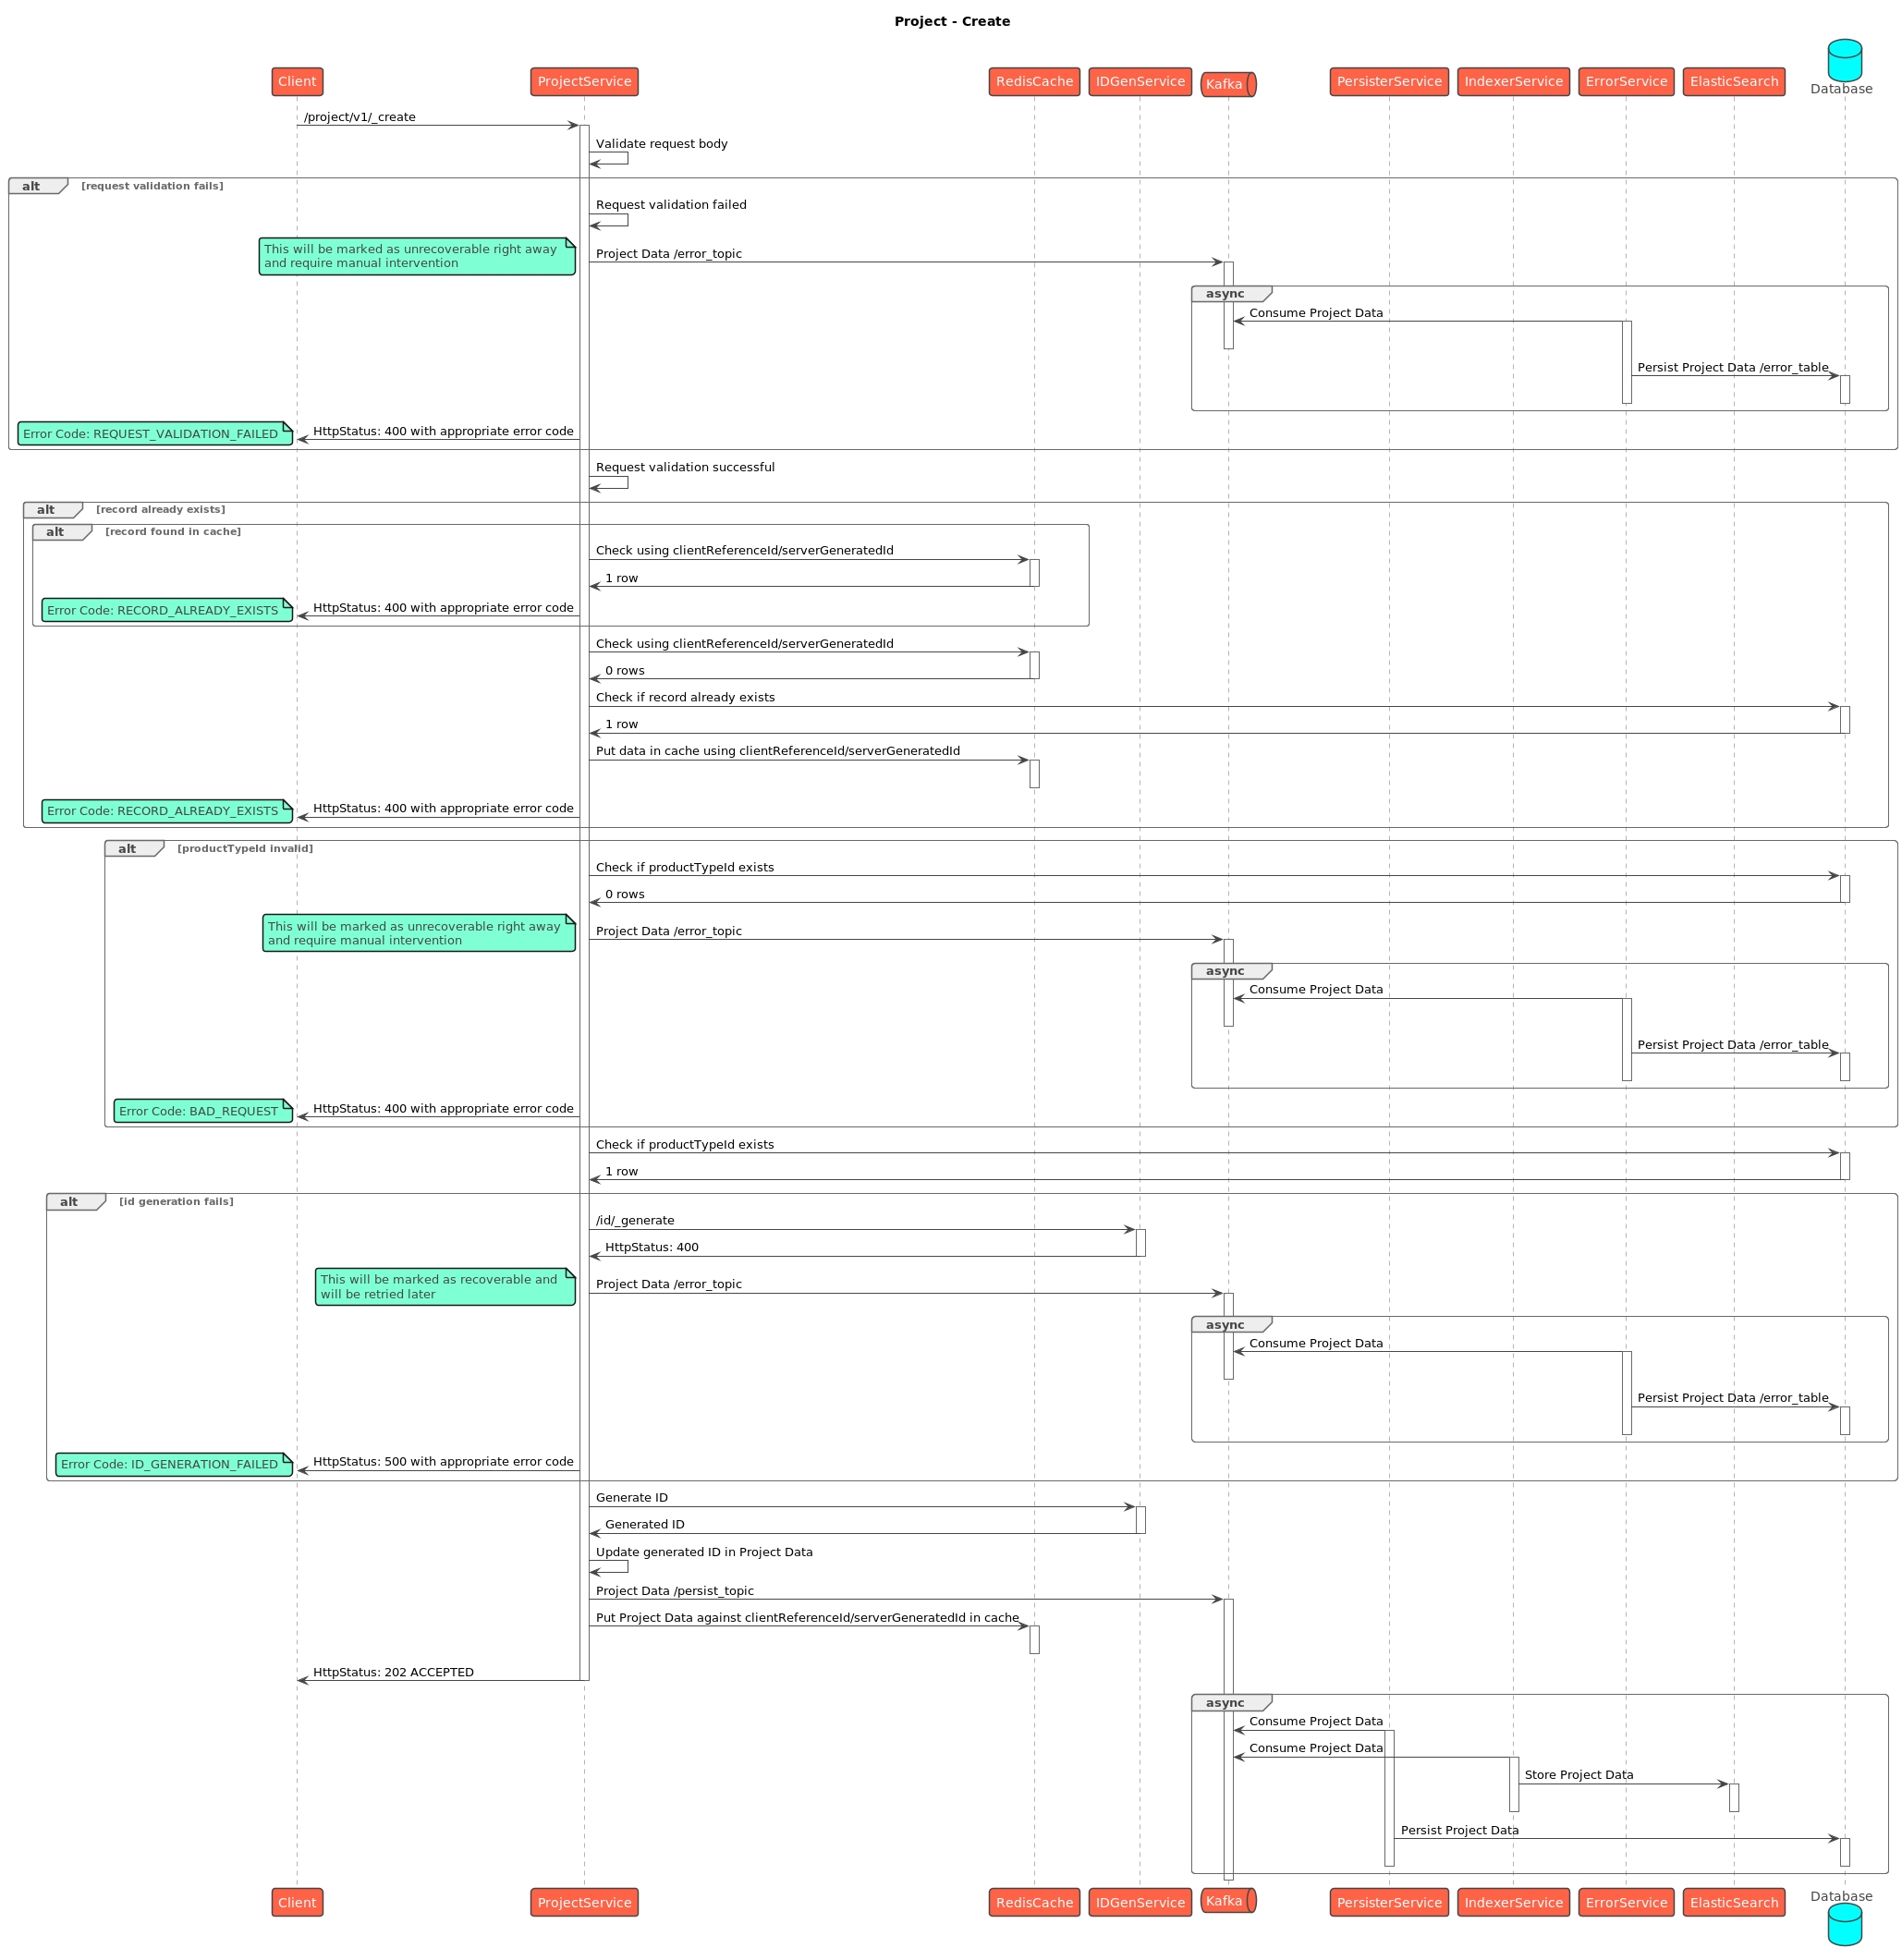
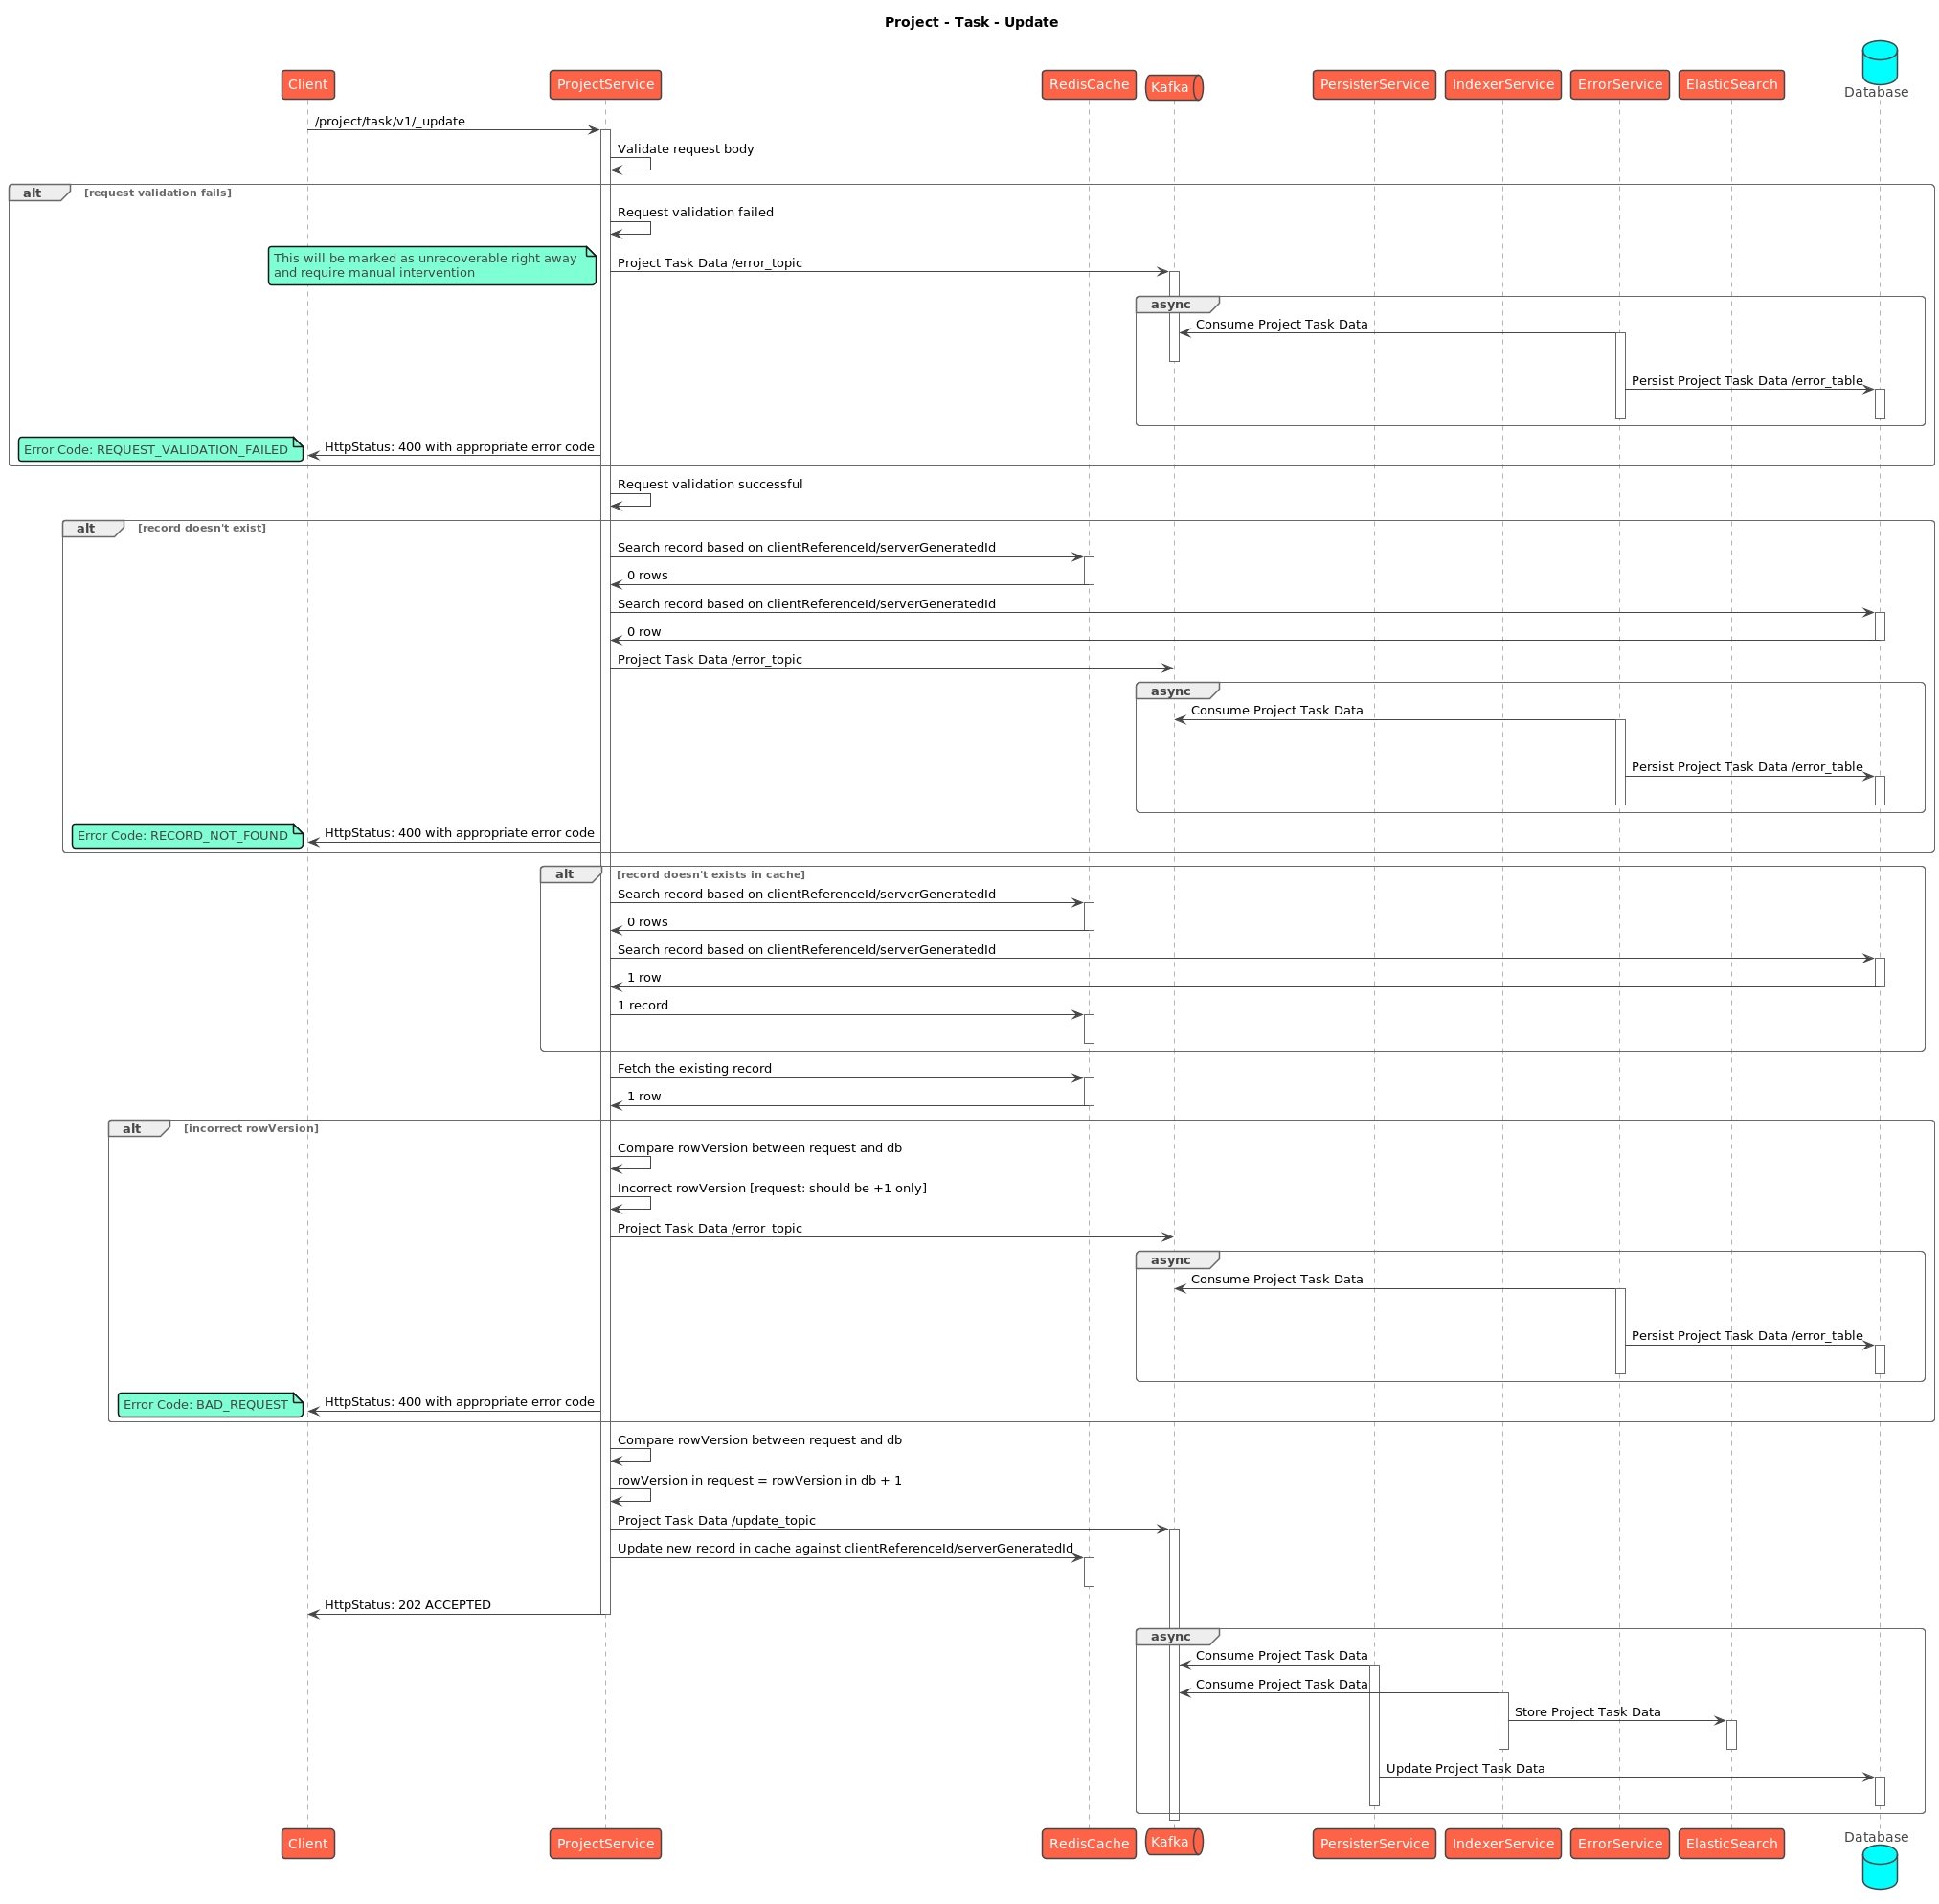
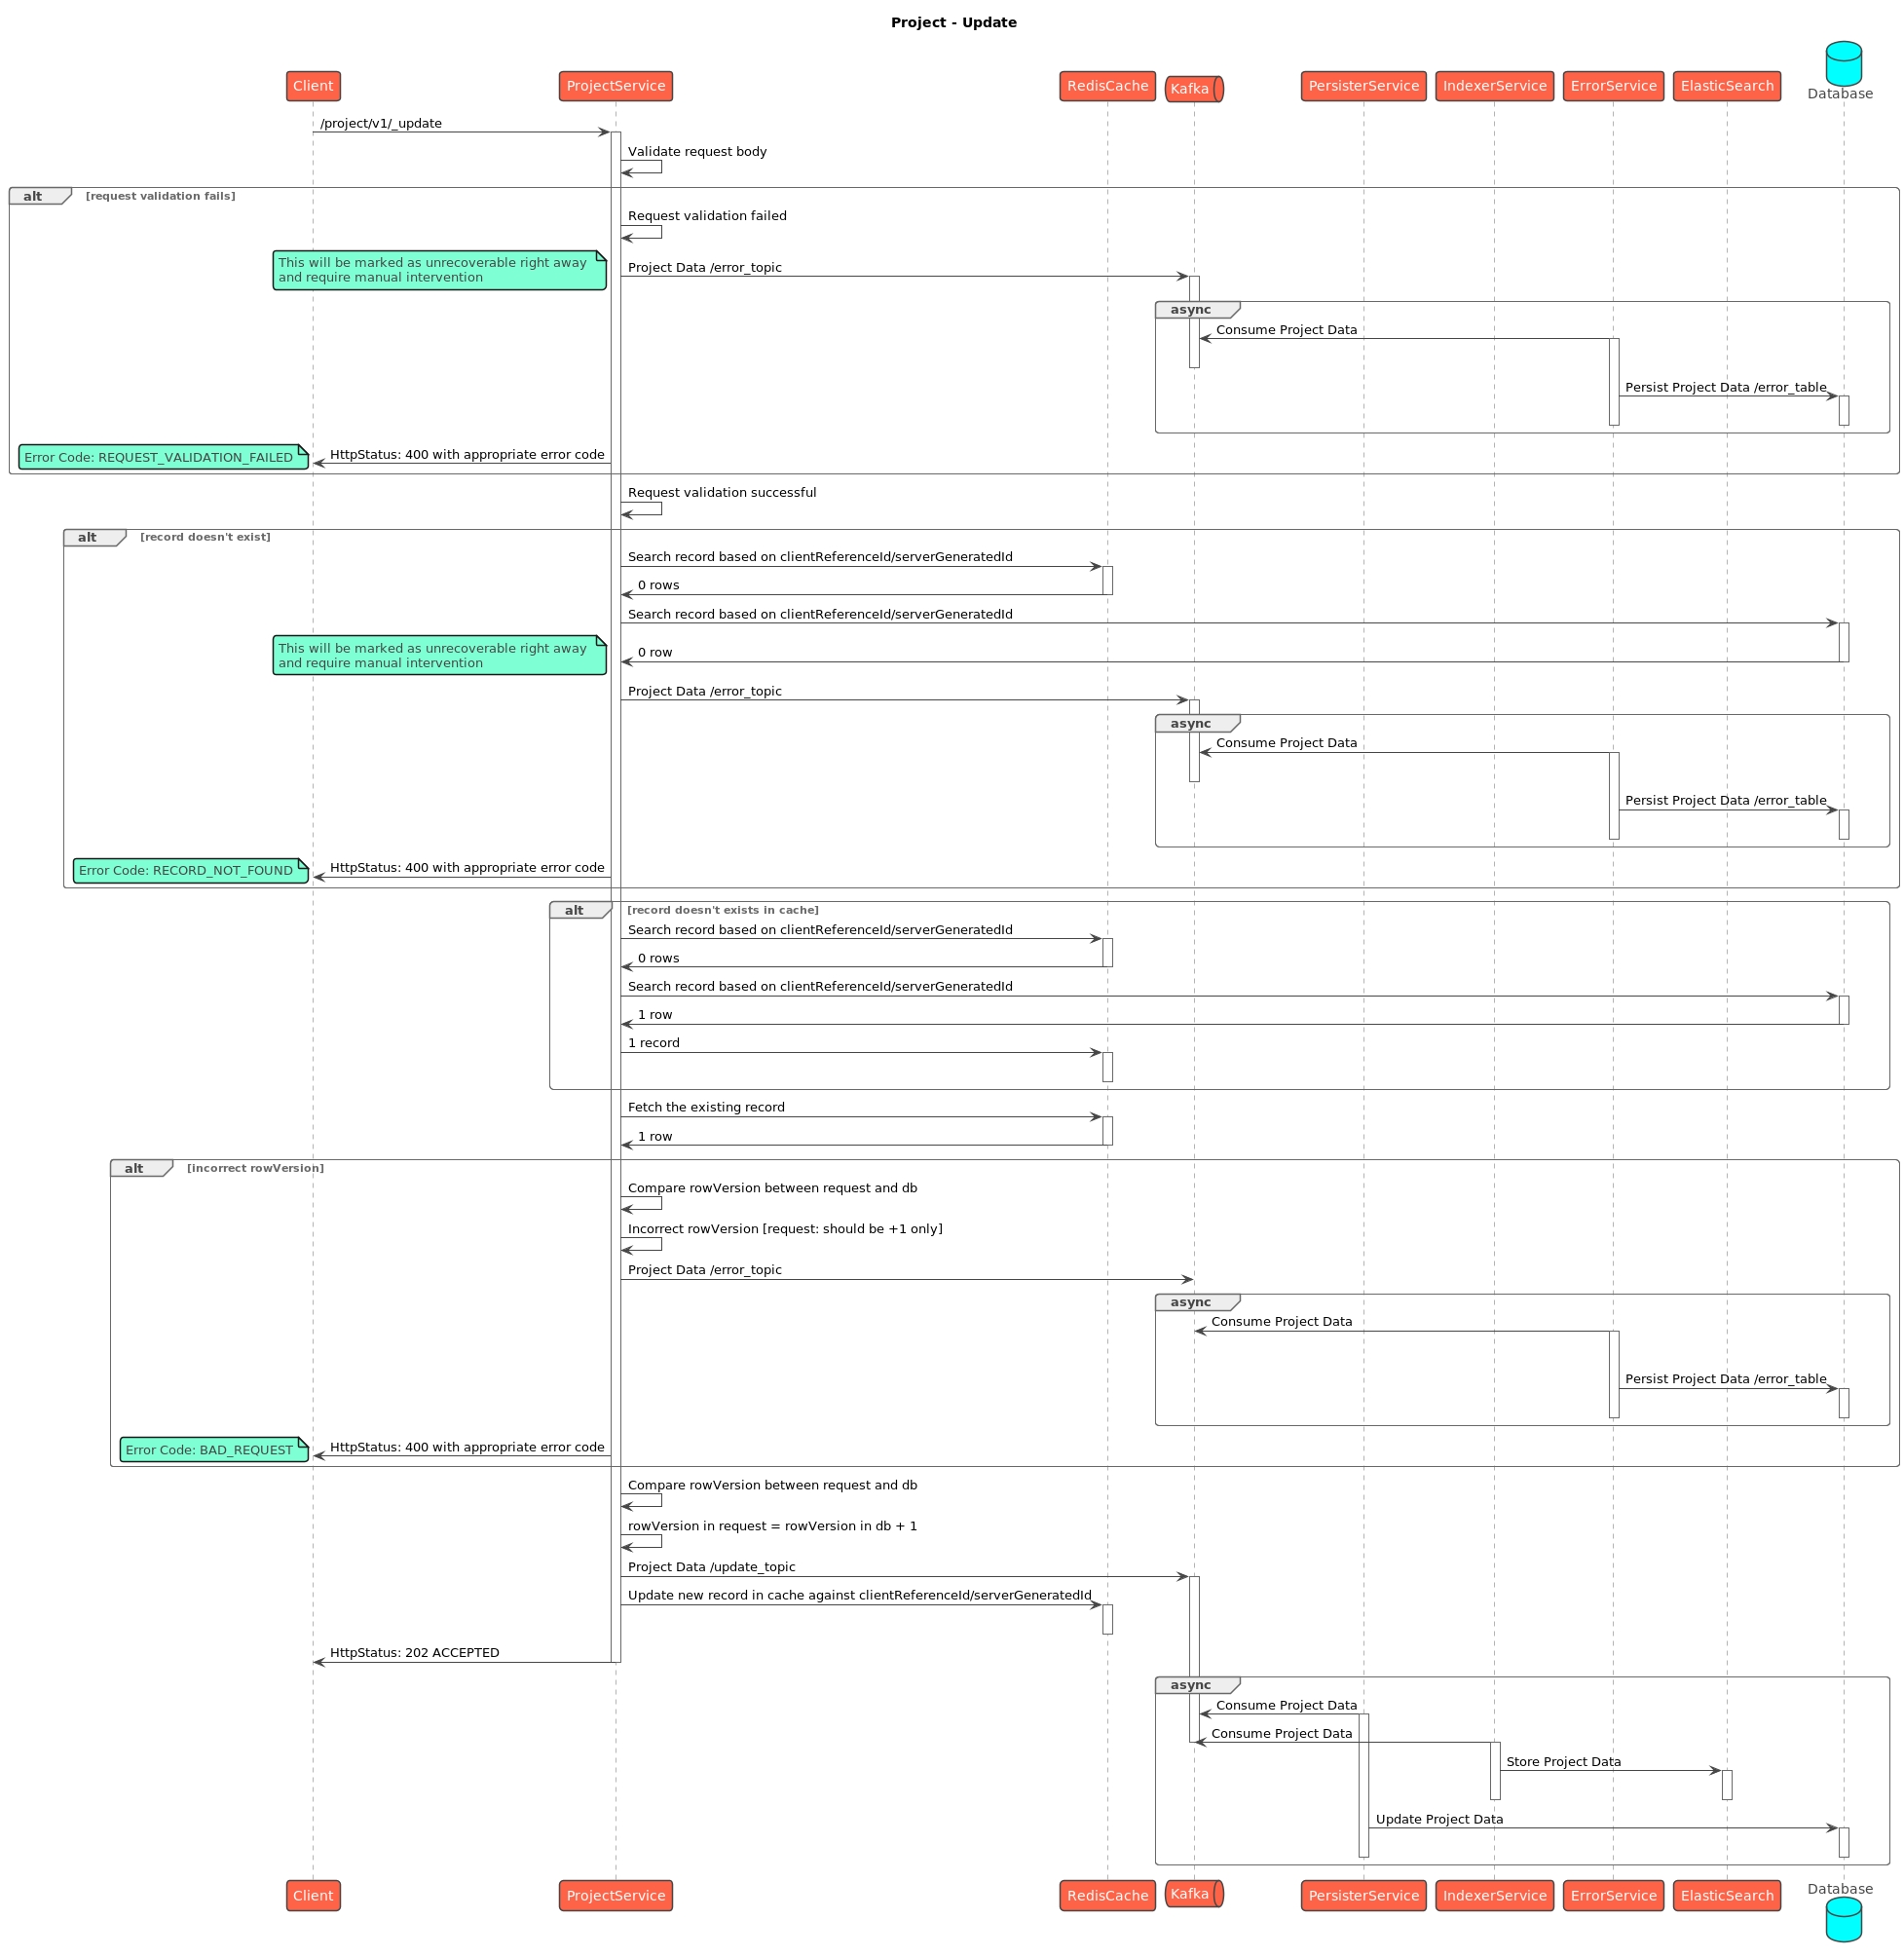
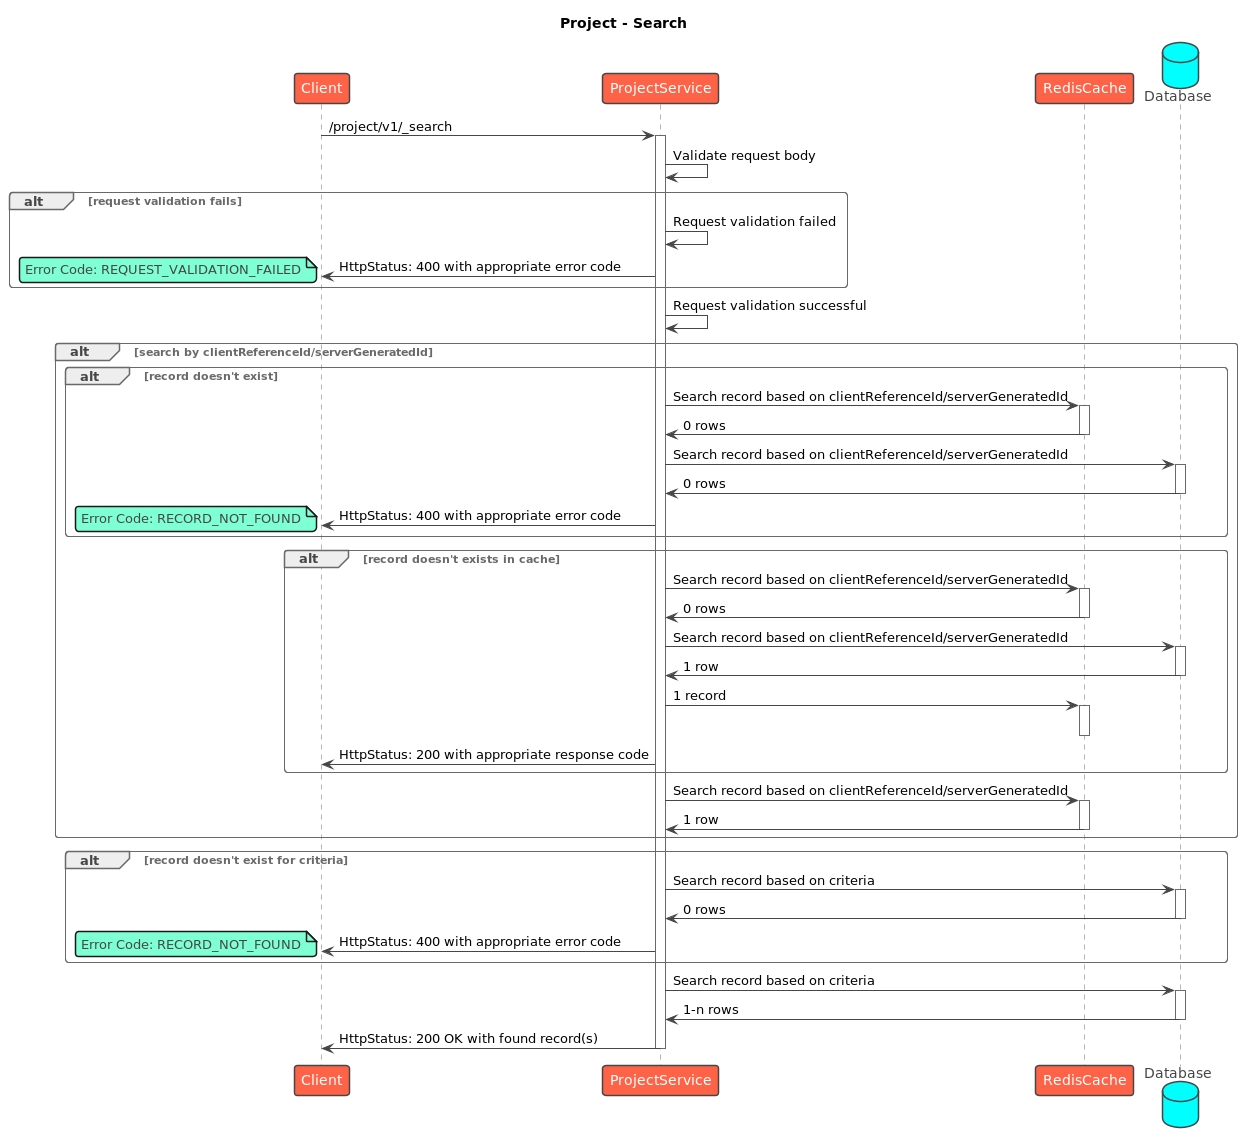
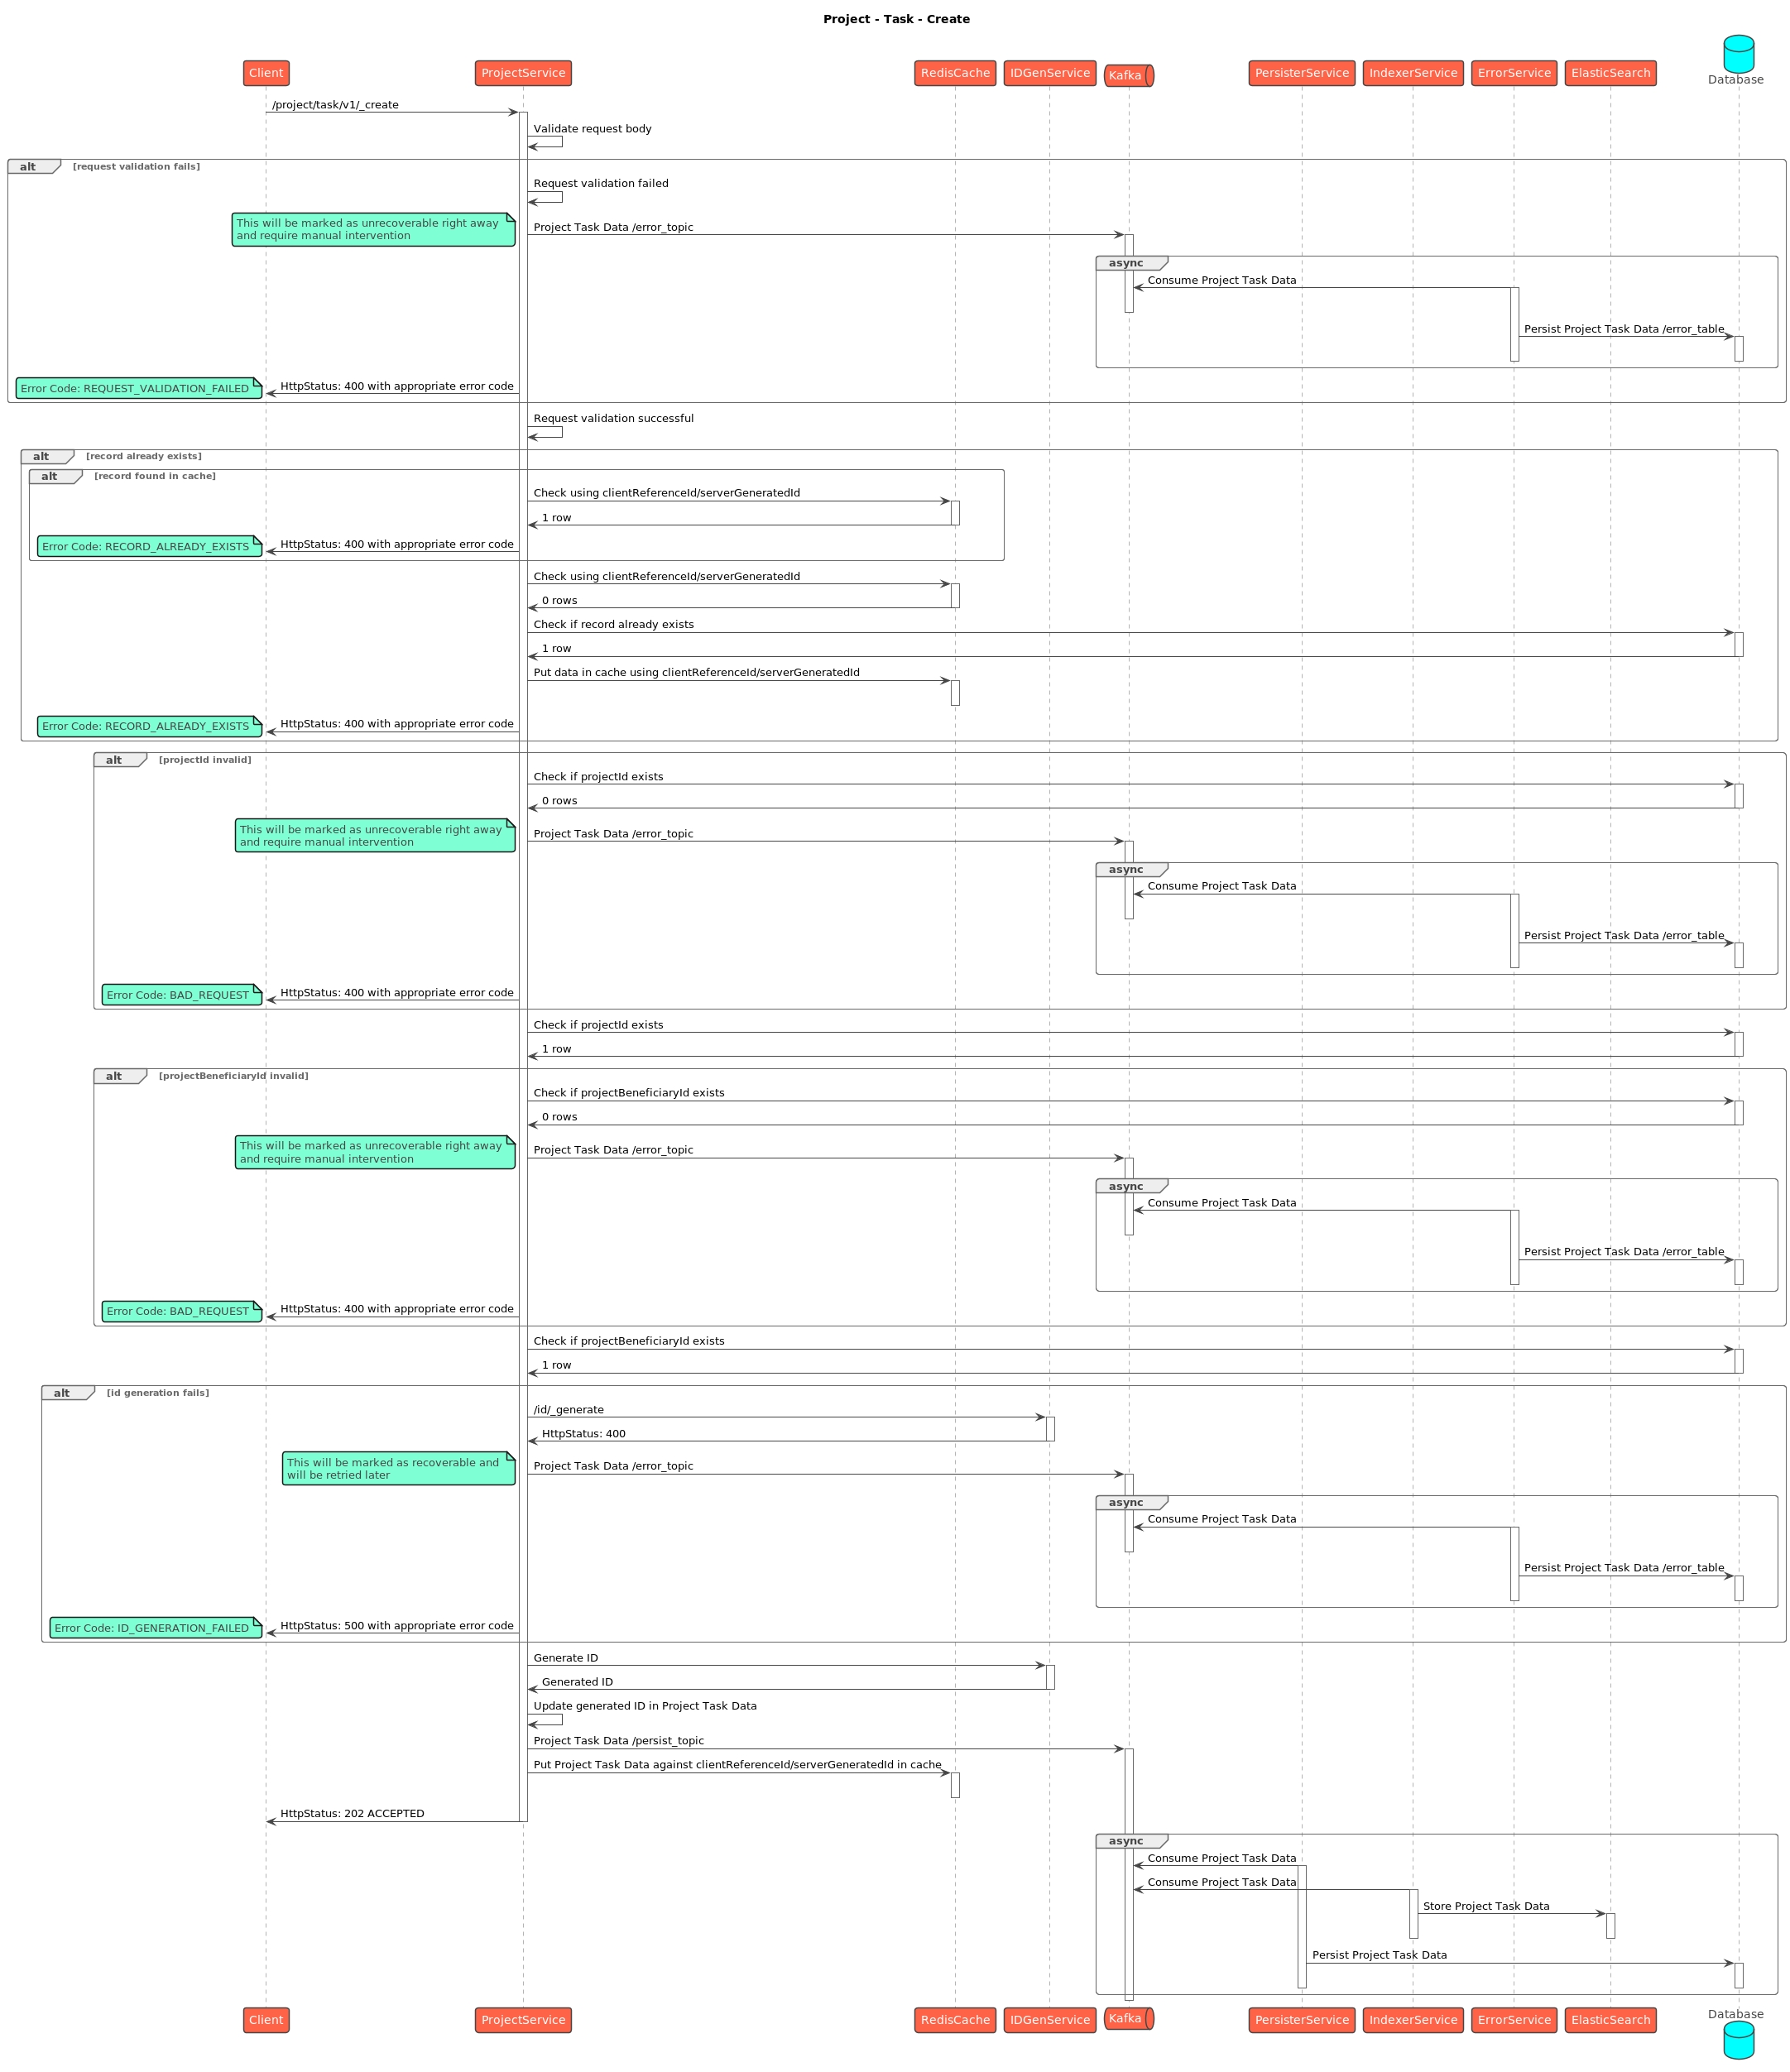


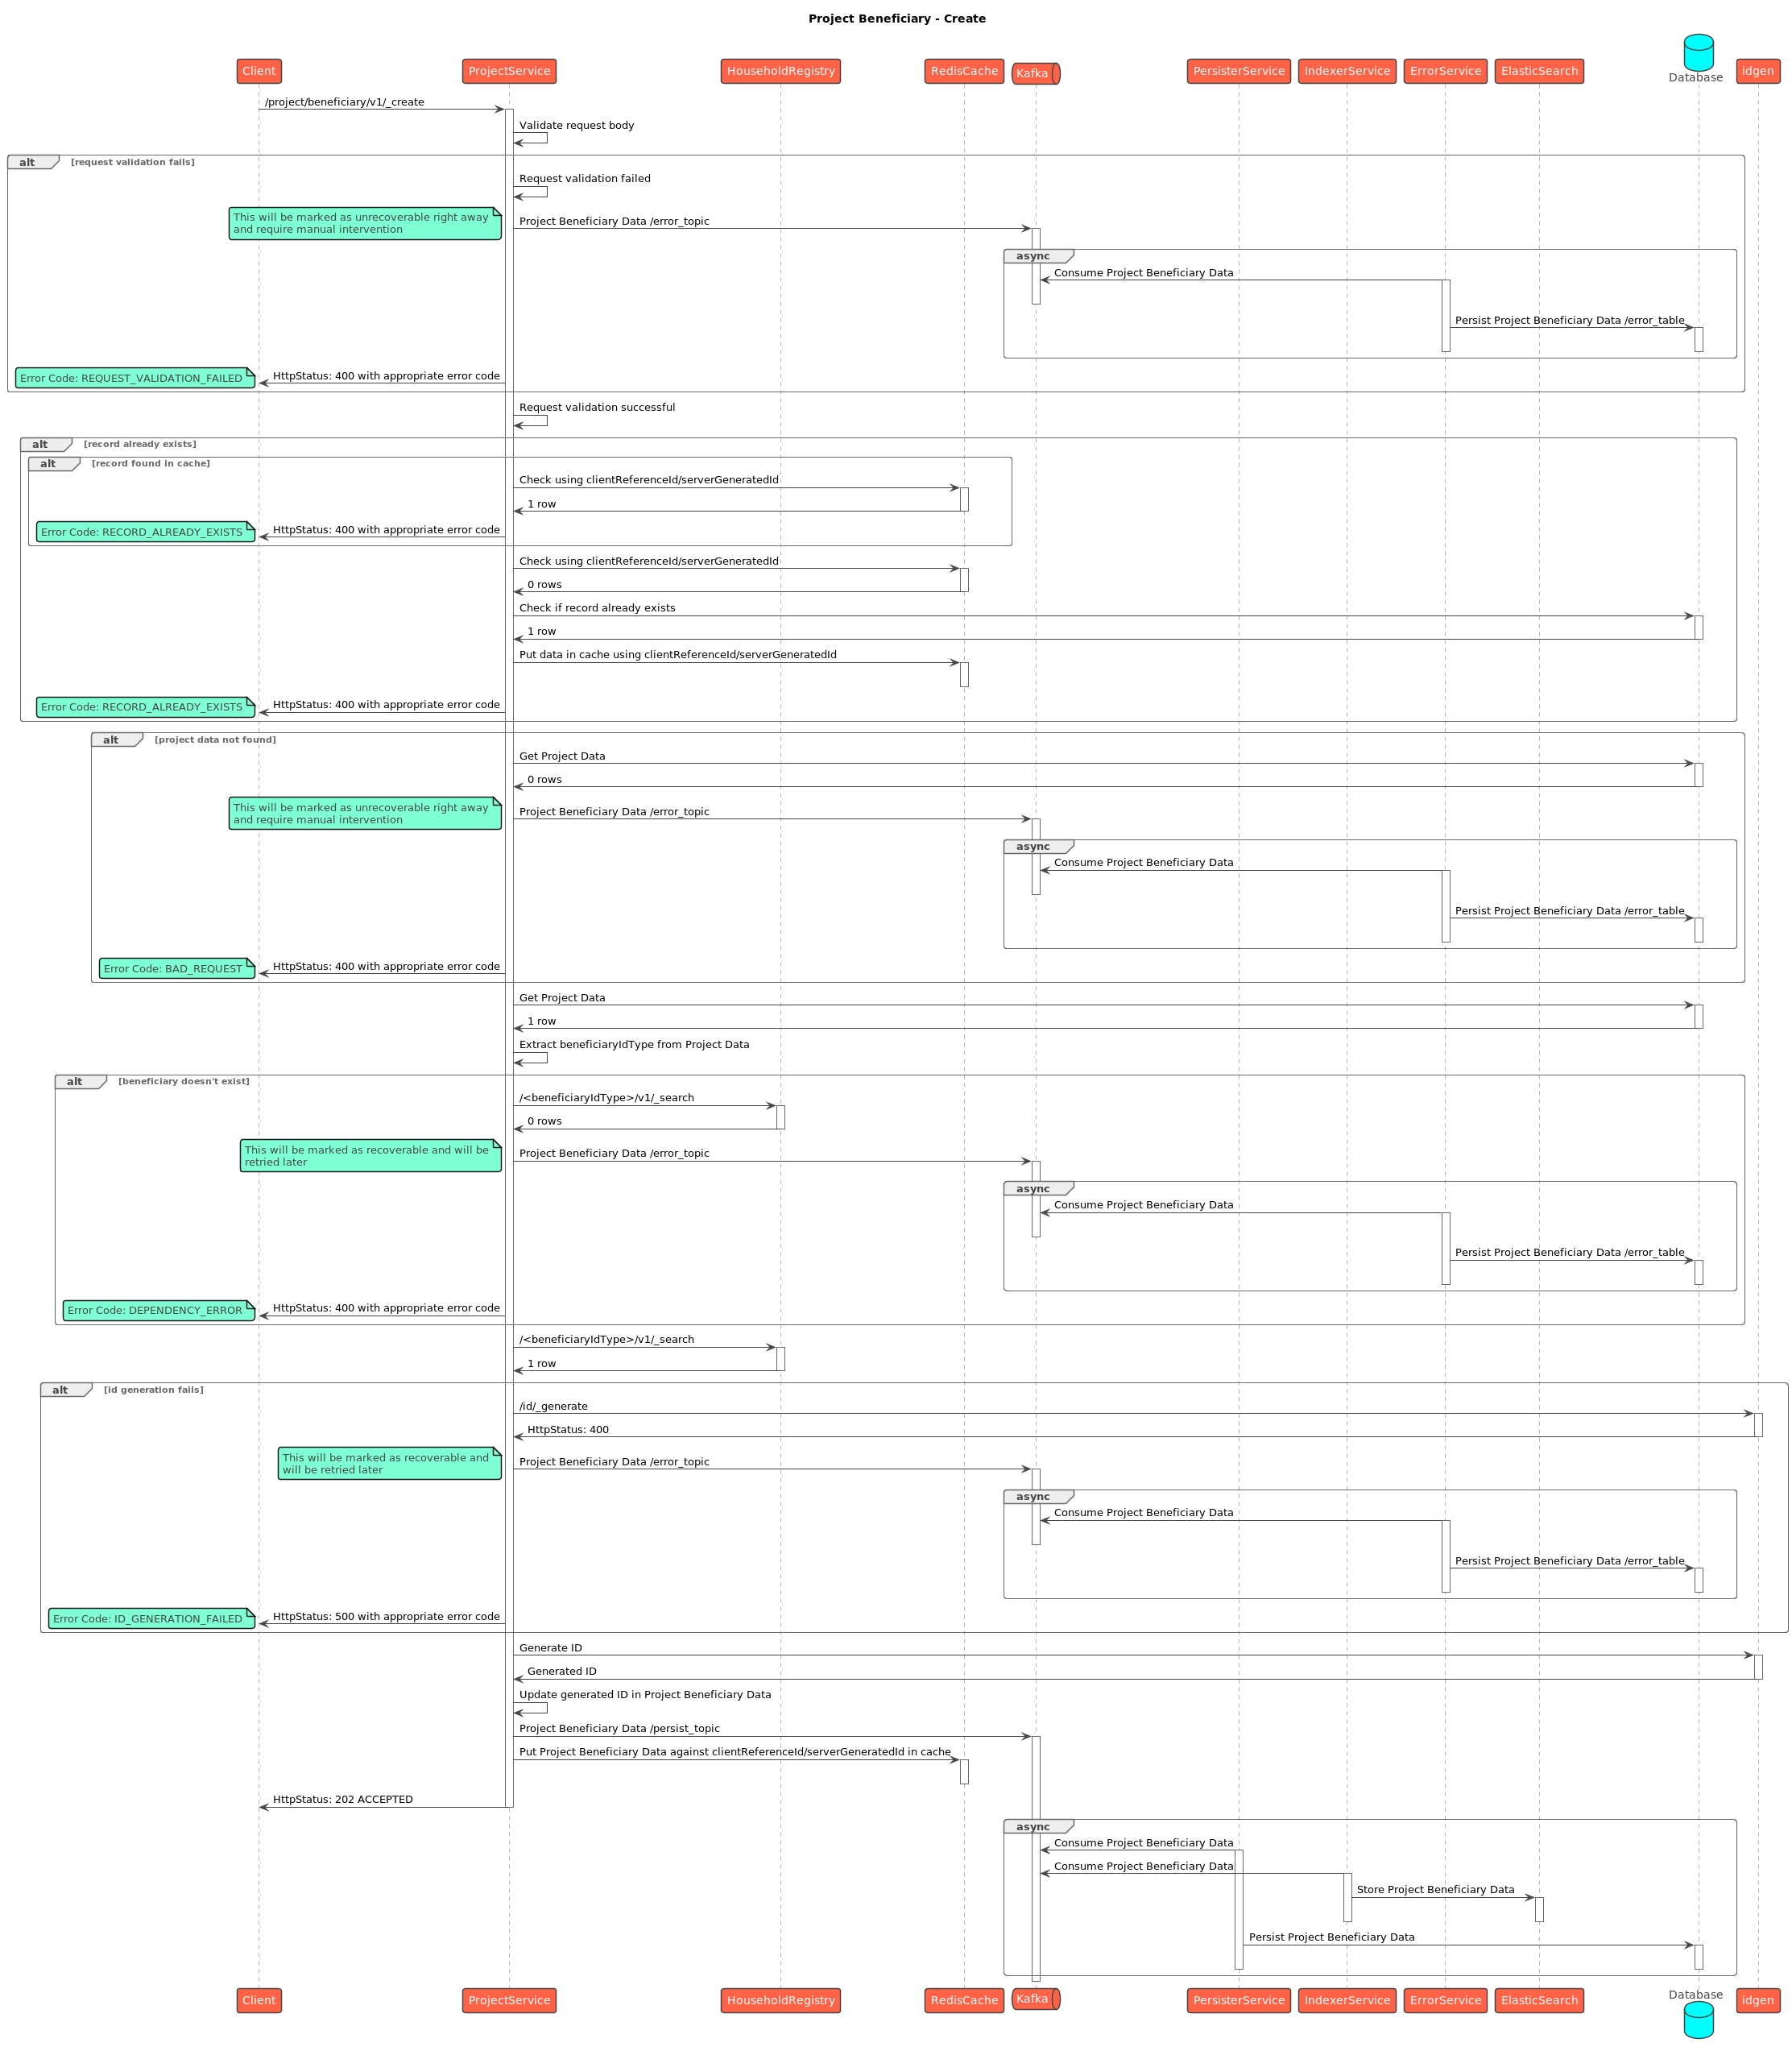


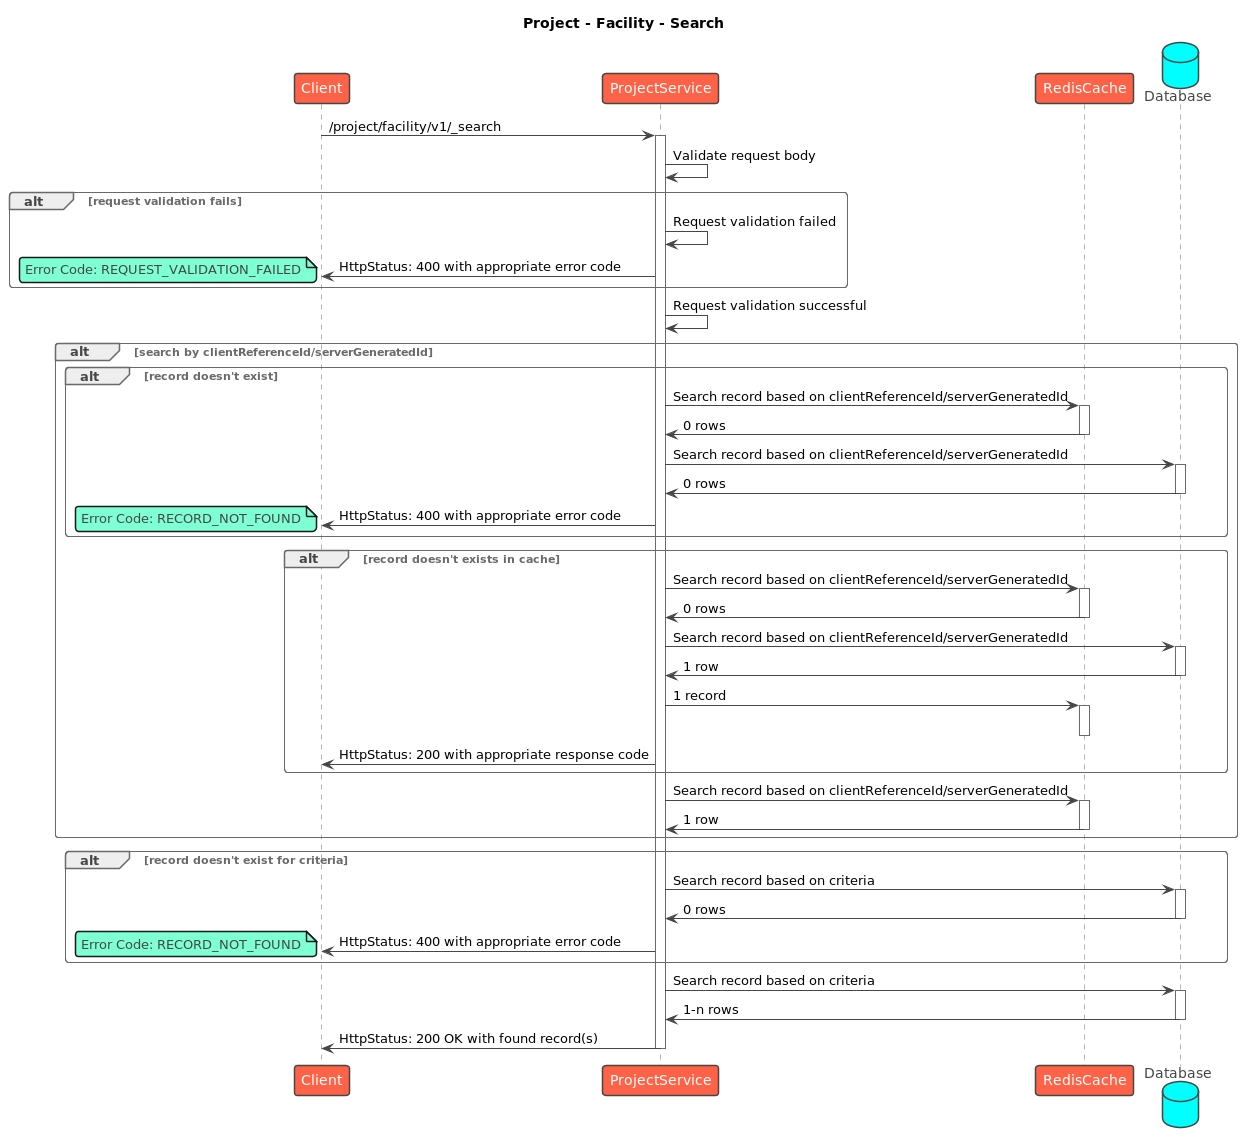

This documentation outlines the process and components of bulk uploading boundaries for a campaign. It covers the proper format of the Excel sheet, unique code generation, functions for boundary entity creation, boundary relationship creation, localisation, and API details.
The Excel sheet should be formatted as follows:
Unique codes are auto-generated for each boundary level as follows:
If there are two districts (boundaries at the same level) with the same name (for example, BLR) under different parent-level boundaries, the names will be updated to BLR, BLR-01, and so on.
Purpose:
Generate auto-generated boundary codes based on boundary list, child-parent mapping, element codes map, count map, and request information.
Parameters:
boundaryList: List of boundary data.
childParentMap: Map of child-parent relationships.
elementCodesMap: Map of boundaries to its corresponding auto-generated unique codes.
Returns:
Updated element codes map.
Steps:
Initialise Column Data:
Initialise an array to store column data.
Extract Unique Elements:
Iterate through each row of the boundary list.
Boundary entities are created chunk-wise, with each chunk consisting of 200 codes.
Purpose:
To create new boundary entities in the system from the provided boundary codes.
Steps:
Convert Boundary Map:
Change the boundary map to a list of objects with key and value.
Prepare Request:
Create Boundary RelationshipPurpose:
To create boundary relationships in the system from the provided boundary codes and their parent-child mappings.
Steps:
Convert Boundary Map:
Transform the boundary map into a list of {key, value} objects.
Initialise Request:
Boundary codes are localised to their corresponding names as specified in the uploaded Excel sheet.
To add more boundaries after the initial upload, use an Excel sheet that includes existing boundary codes. New boundaries without codes will be created in the same way as the first upload.
API request for boundary bulk upload:
The user selects the desired role and checklist type.
CurrentScreen redirects to the checklist creation screen based on the selected campaign name, role, and type.
CurrentScreen updates the checklist status based on the response.

INDIA
KARNATAKA
BLR
INDIA
KARNATAKA
BLR
KORAMANGALA
INDIA
KARNATAKA
BLR
KORAMANGALA
3RD BLOCK
INDIA
KARNATAKA
BLR
KORAMANGALA
3RD BLOCK
EGOV
INDIA
BIHAR
INDIA
BIHAR
PATNA
countMap: Map of counts for each boundary.request: HTTP request object.
Extract unique elements from each column.
Generate Boundary Codes:
Iterate over columns to generate boundary codes.
Check if the element code exists in the element codes map.
If not, generate a new code based on parent-child mapping and sequence.
Store the code of the element in the element codes map.
Default Code Generation:
Generate default code if parent code is not found.
Updated Element Codes Map
Return Updated Boundary Data - Auto-Generated Code Map.
Set up the request details and initialise lists for boundaries and existing codes.
Chunk Boundary Codes:
Divide the boundary codes into smaller groups.
Fetch Existing Boundaries:
Check the system for existing boundary codes and collect them.
Identify New Boundaries:
Determine which boundary codes are new and add them to the list of boundaries to create.
Create New Boundaries:
If there are new boundaries, send them to the system in groups and log the results.
Handle Existing Boundaries:
Log a message if all boundaries already exist.
Error Handling:
Manage any errors that occur and provide a relevant error message.
Fetch Existing Relationships:
Retrieve existing boundary relationships and extract their codes.
Identify and Create Relationships:
For each boundary code, check if it exists. If not:
Prepare the boundary relationship data.
Confirm the parent boundary creation.
Create the boundary relationship.
Handle Existing Relationships:
If all relationships already exist, log a validation error.
Attach Activity Messages:
Add activity messages to the request body.
Error Handling:
Catch, log, and handle errors appropriately.
INDIA
INDIA
KARNATAKA
INDIA
ADMIN_IN
KARNATAKA
ADMIN_IN_01_KARNATAKA
BLR
ADMIN_IN_01_01_BLR
KORAMANGALA
ADMIN_IN_01_01_01_KORMANGALA
BIHAR
ADMIN_IN_02_BIHAR
PATNA
ADMIN_IN_02_01_PATNA

curl --location 'http://localhost:8080/project-factory/v1/data/_create' \
--header 'authority: unified-dev.digit.org' \
--header 'accept: application/json, text/plain, */*' \
--header 'accept-language: en-GB,en-US;q=0.9,en;q=0.8' \
--header 'content-type: application/json' \
--header 'cookie: _ga_XBQP06FR8V=GS1.1.1691570094.3.1.1691570094.60.0.0; _ga=GA1.1.2124364284.1689669598; _ga_P1TZCPKF6S=GS1.1.1691648339.2.0.1691648339.60.0.0; __cuid=fe28d9c8c84c4d2487b9cb6c9e4cdec1; amp_fef1e8=f4a3f3ed-50f2-409b-be4f-a1ce1dbb59f2R...1hgs4r9gr.1hgs4robc.nu.1r.pp; _ga_H9YC8FEN6F=GS1.1.1701751656.77.1.1701751677.39.0.0' \
--header 'origin: https://unified-dev.digit.org' \
--header 'referer: https://unified-dev.digit.org/works-ui/employee/measurement/update?tenantId=pg.citya&workOrderNumber=WO/2023-24/000894&mbNumber=MB/2023-24/001252' \
--header 'sec-ch-ua: "Chromium";v="116", "Not)A;Brand";v="24", "Google Chrome";v="116"' \
--header 'sec-ch-ua-mobile: ?0' \
--header 'sec-ch-ua-platform: "Linux"' \
--header 'sec-fetch-dest: empty' \
--header 'sec-fetch-mode: cors' \
--header 'sec-fetch-site: same-origin' \
--header 'user-agent: Mozilla/5.0 (X11; Linux x86_64) AppleWebKit/537.36 (KHTML, like Gecko) Chrome/116.0.0.0 Safari/537.36' \
--data-raw '{
"RequestInfo": {
"apiId": "Rainmaker",
"authToken": "e45445a1-6891-4a76-a4e6-528e1dd24946",
"userInfo": {
"id": 1284,
"uuid": "867ba408-1b82-4746-8274-eb916e625fea",
"userName": "EMP57",
"name": "Jagan",
"mobileNumber": "6667776662",
"emailId": "[email protected]",
"locale": "string",
"type": "EMPLOYEE",
"roles": [
{
"name": "System Administrator",
"code": "SYSTEM_ADMINISTRATOR",
"tenantId": "mz"
},
{
"name": "Campaign Manager",
"code": "CAMPAIGN_MANAGER",
"tenantId": "mz"
},
{
"name": "Localisation admin",
"code": "LOC_ADMIN",
"tenantId": "mz"
},
{
"name": "MDMS Admin",
"code": "MDMS_ADMIN",
"tenantId": "mz"
}
],
"active": true,
"tenantId": "mz",
"permanentCity": "Amritsar"
},
"msgId": "1710912592752|en_IN",
"plainAccessRequest": {}
},
"ResourceDetails": {
"type": "boundary",
"tenantId": "mz",
"fileStoreId": "be52ce1a-bc25-4328-91bc-a682079abb59",
"action": "create",
"hierarchyType": "ADMIN",
"additionalDetails": {},
"campaignId": "5d721d03-bdf5-4021-86ff-107e61eb7abb"
}
}'User: Admin user interacting with the Admin Console to update campaigns.
CampaignManager (Admin Console): The web UI/controller handling orchestration of campaign updates.
ProjectFactory: Backend service that manages campaign object lifecycle, including updates and validation.
BoundaryService: Provides boundary hierarchy and relationship data for the campaign.
MDMSService: Supplies master data (project types, hierarchies, templates).
FileStoreService: Stores and retrieves campaign-related files.
User: Begins the update process by selecting an existing campaign from the "My Campaign" screen within the Admin Console.
CampaignManager: Receives the request to update a specific campaign and retrieves the campaign object using its unique ID.
CampaignManager sends a request to ProjectFactory to fetch the campaign object based on the provided campaign ID.
ProjectFactory responds with the campaign object containing the current campaign details.
CampaignManager requests BoundaryService to fetch boundary hierarchy definitions based on the campaign's hierarchy type.
BoundaryService responds with the boundary hierarchy definition.
CampaignManager requests BoundaryService to fetch boundary relationship data based on the hierarchy type.
BoundaryService responds with the boundary relationship data.
User: Updates the necessary fields, such as boundary delivery configuration and other campaign-specific details, using the Admin Console.
CampaignManager: Sends the updated information to ProjectFactory to create or update the campaign object, storing it with an action status of "draft".
ProjectFactory: Automatically triggers the generation of templates for different resources, including:
Target templates
Facility templates
User templates
User: Downloads the generated templates for each resource type via the Admin Console.
CampaignManager: Sends a request to FileStoreService to store the downloaded files.
FileStoreService responds with a filestoreid that uniquely identifies the stored file.
CampaignManager: Sends the data and the filestoreid to ProjectFactory for validation.
ProjectFactory responds with a unique validation ID, as the validation process may take some time.
CampaignManager: Periodically checks the validation status using the unique validation ID.
ProjectFactory:
If validation is successful:
Responds with a success message.
CampaignManager: Displays a success message to the user, indicating that they can proceed to the next step.
If validation fails:
Responds with an error message detailing the validation failure.
CampaignManager: Displays the error message to the user, prompting them to correct the errors and re-upload the files.
User: Once all required data is filled in and validated, the user reviews the summary of the campaign data and clicks on the "Update Campaign" button.
CampaignManager: Sends a request to ProjectFactory with the campaign update API, marking the action as "update".
ProjectFactory:
If the update is successful:
Responds with a success message, indicating that the campaign update has started.
CampaignManager: Displays a success message to the user, confirming that the campaign has been updated successfully.
If the update fails:
Responds with an error message detailing the failure.
CampaignManager: Displays the error message to the user, prompting them to correct any issues and try again.
Validation Failures: If validation fails at any stage (e.g., during file validation or input data checks), the CampaignManager will notify the user of the specific issues. The user must resolve these issues and re-upload the necessary data to proceed.
Service Errors: If any of the services (e.g., BoundaryService, ProjectFactory) encounter an error during processing, the CampaignManager will display an error message, detailing the problem and suggesting corrective actions.
This document outlines the flow for updating an existing campaign using the Admin Console. The structured sequence ensures that any changes to the campaign are thoroughly validated and processed, minimising errors and ensuring the integrity of the campaign data. By following this flow, users can confidently update campaigns, knowing that all necessary steps are taken to verify and finalise their changes.
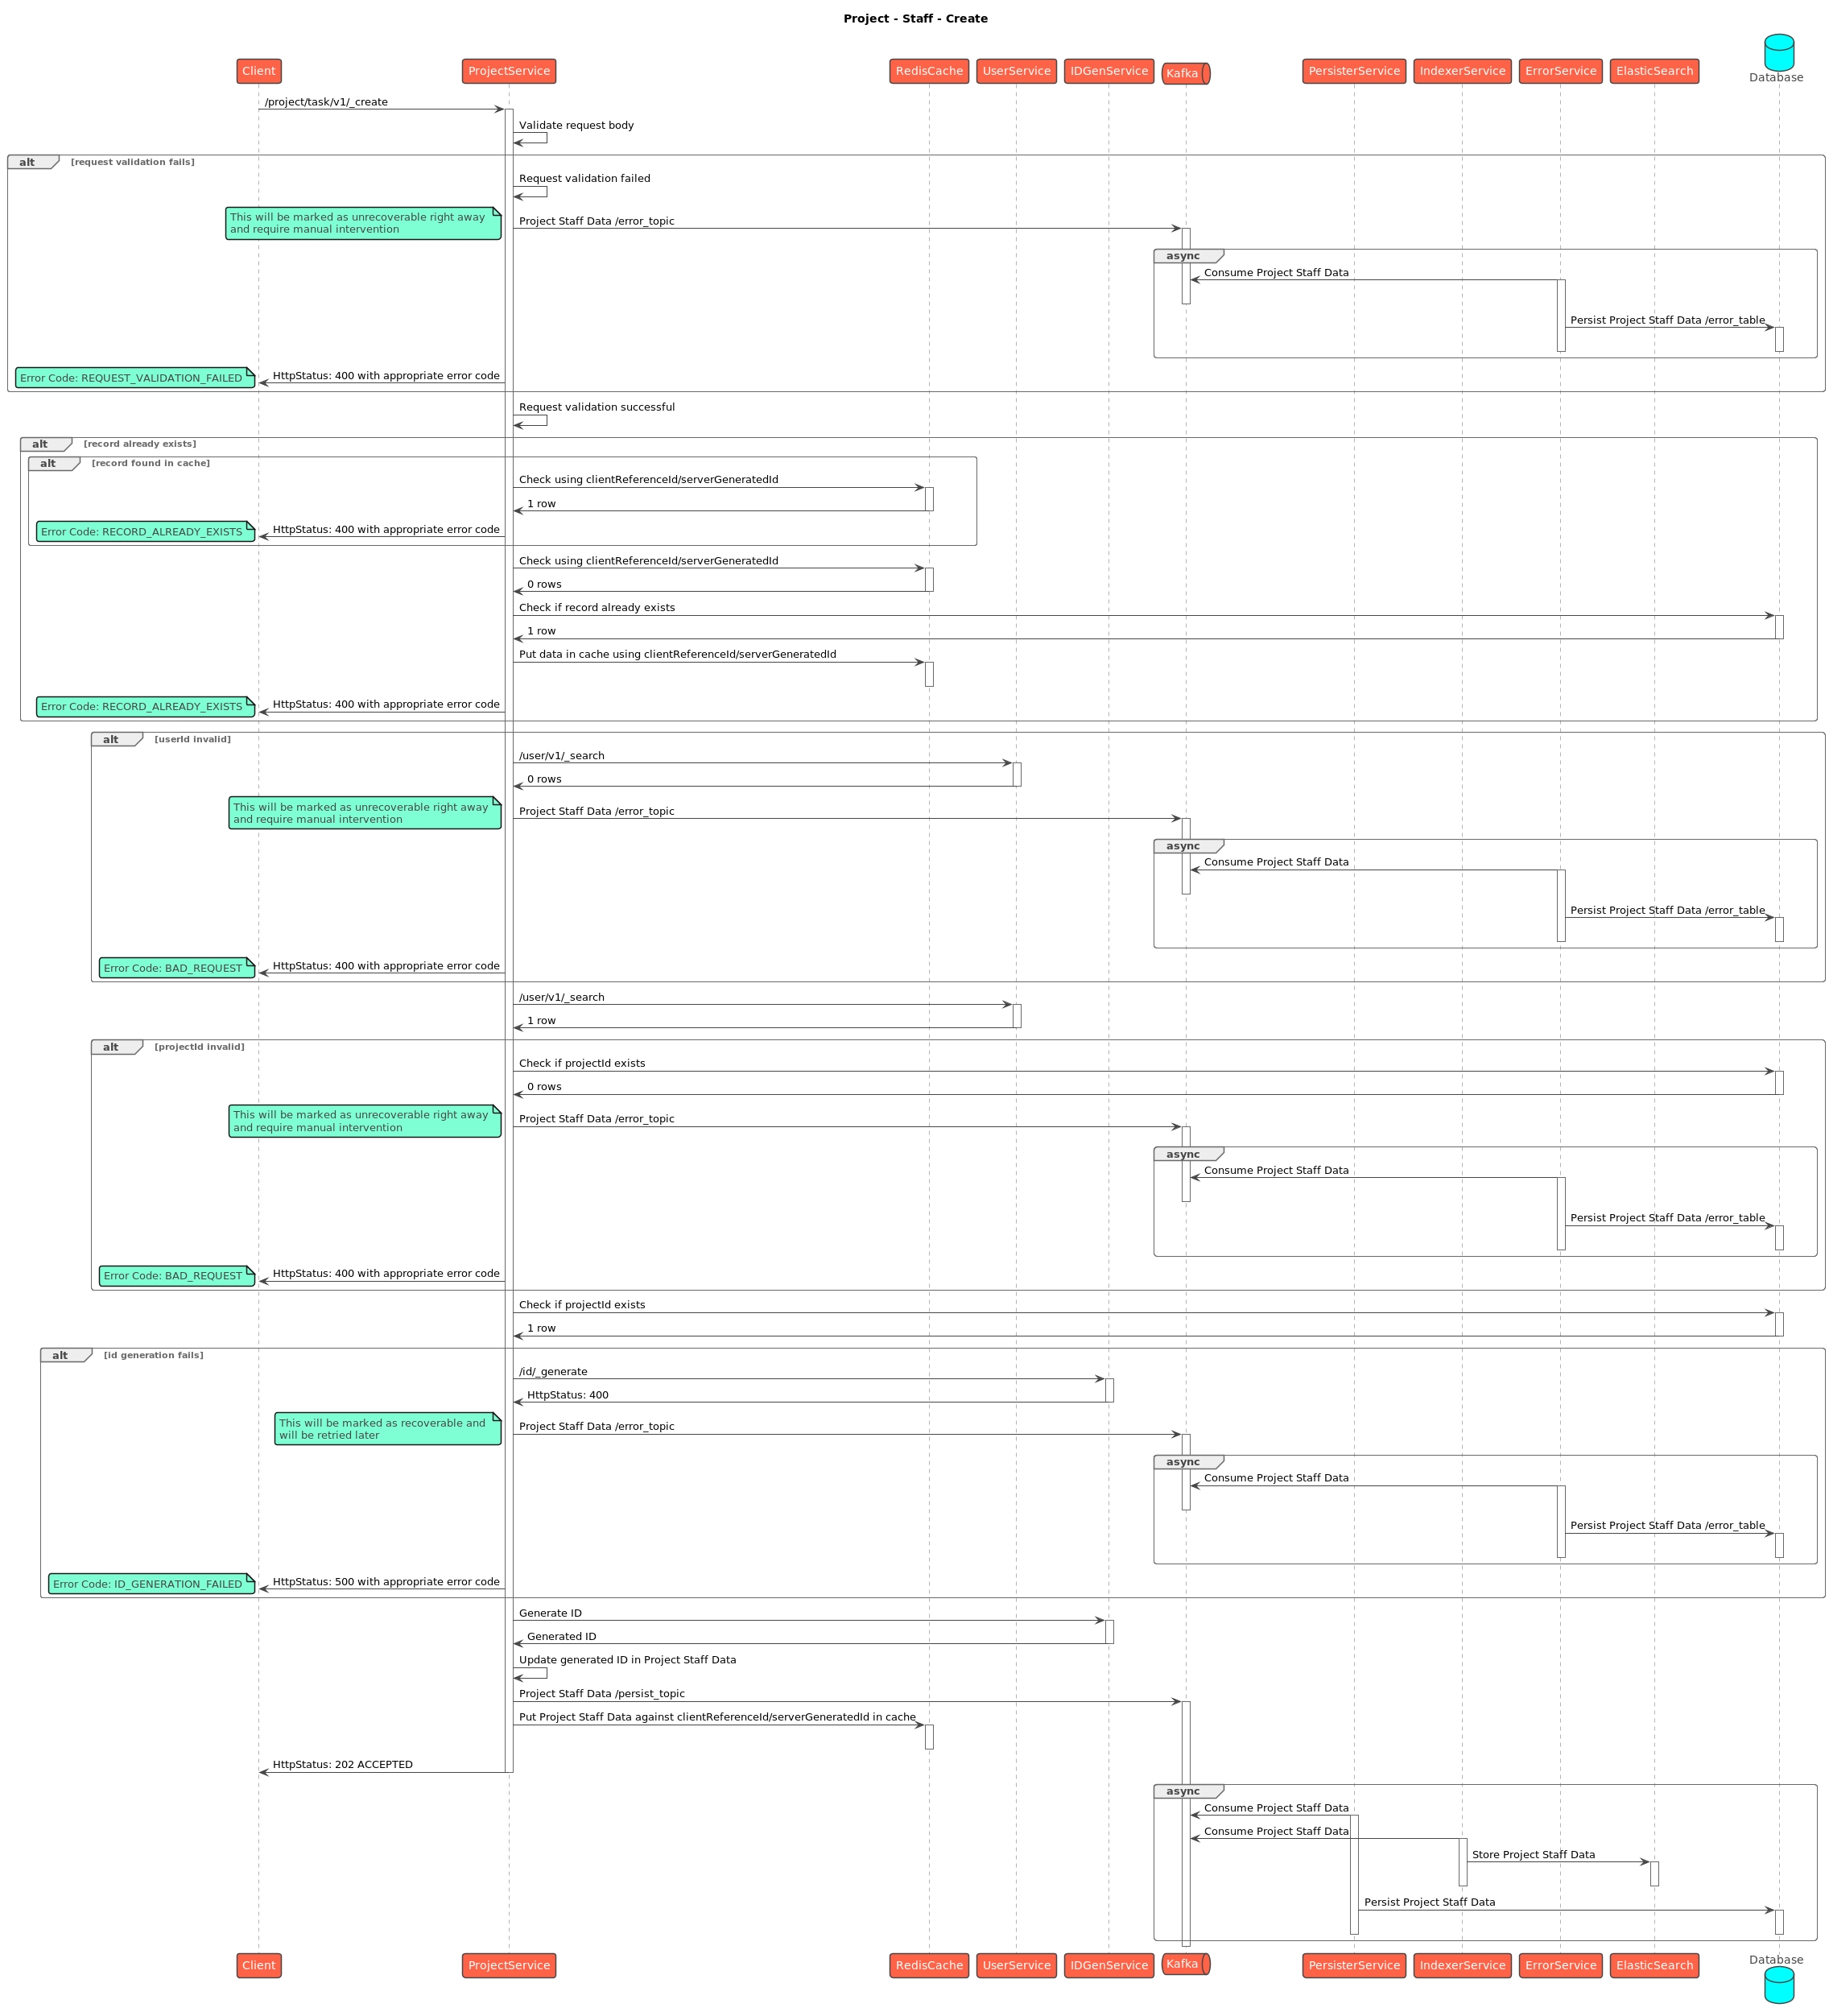


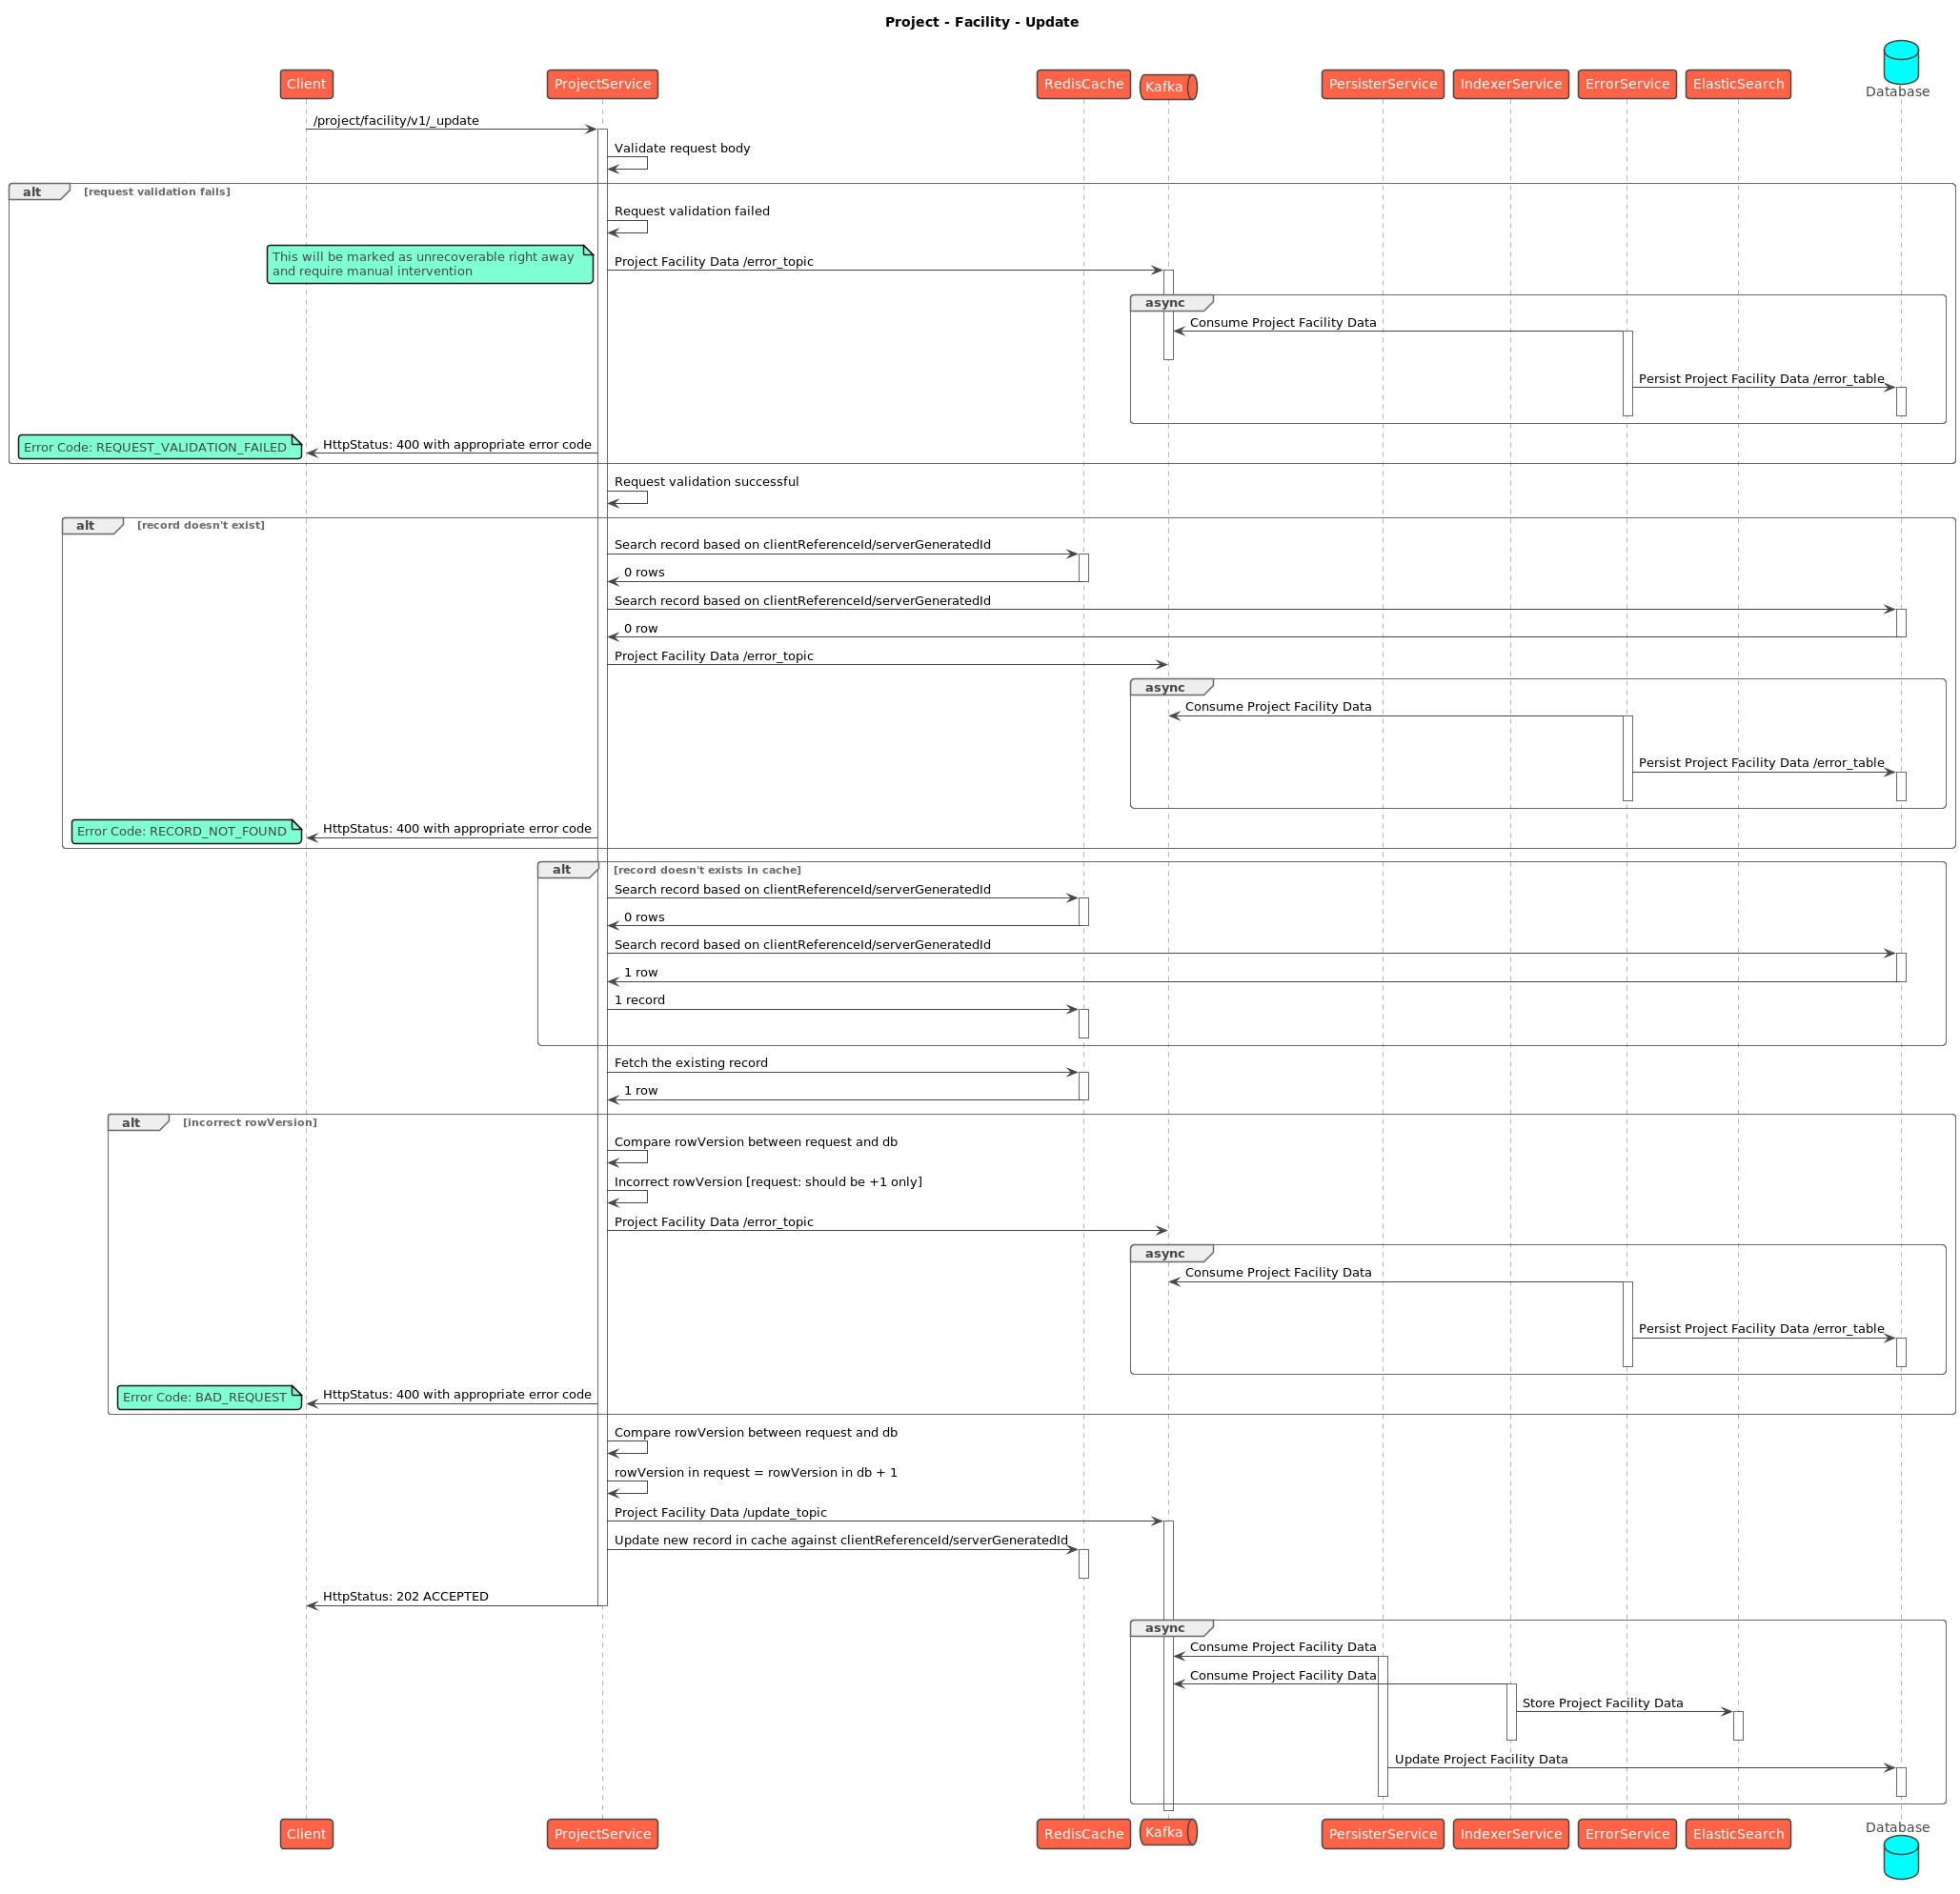
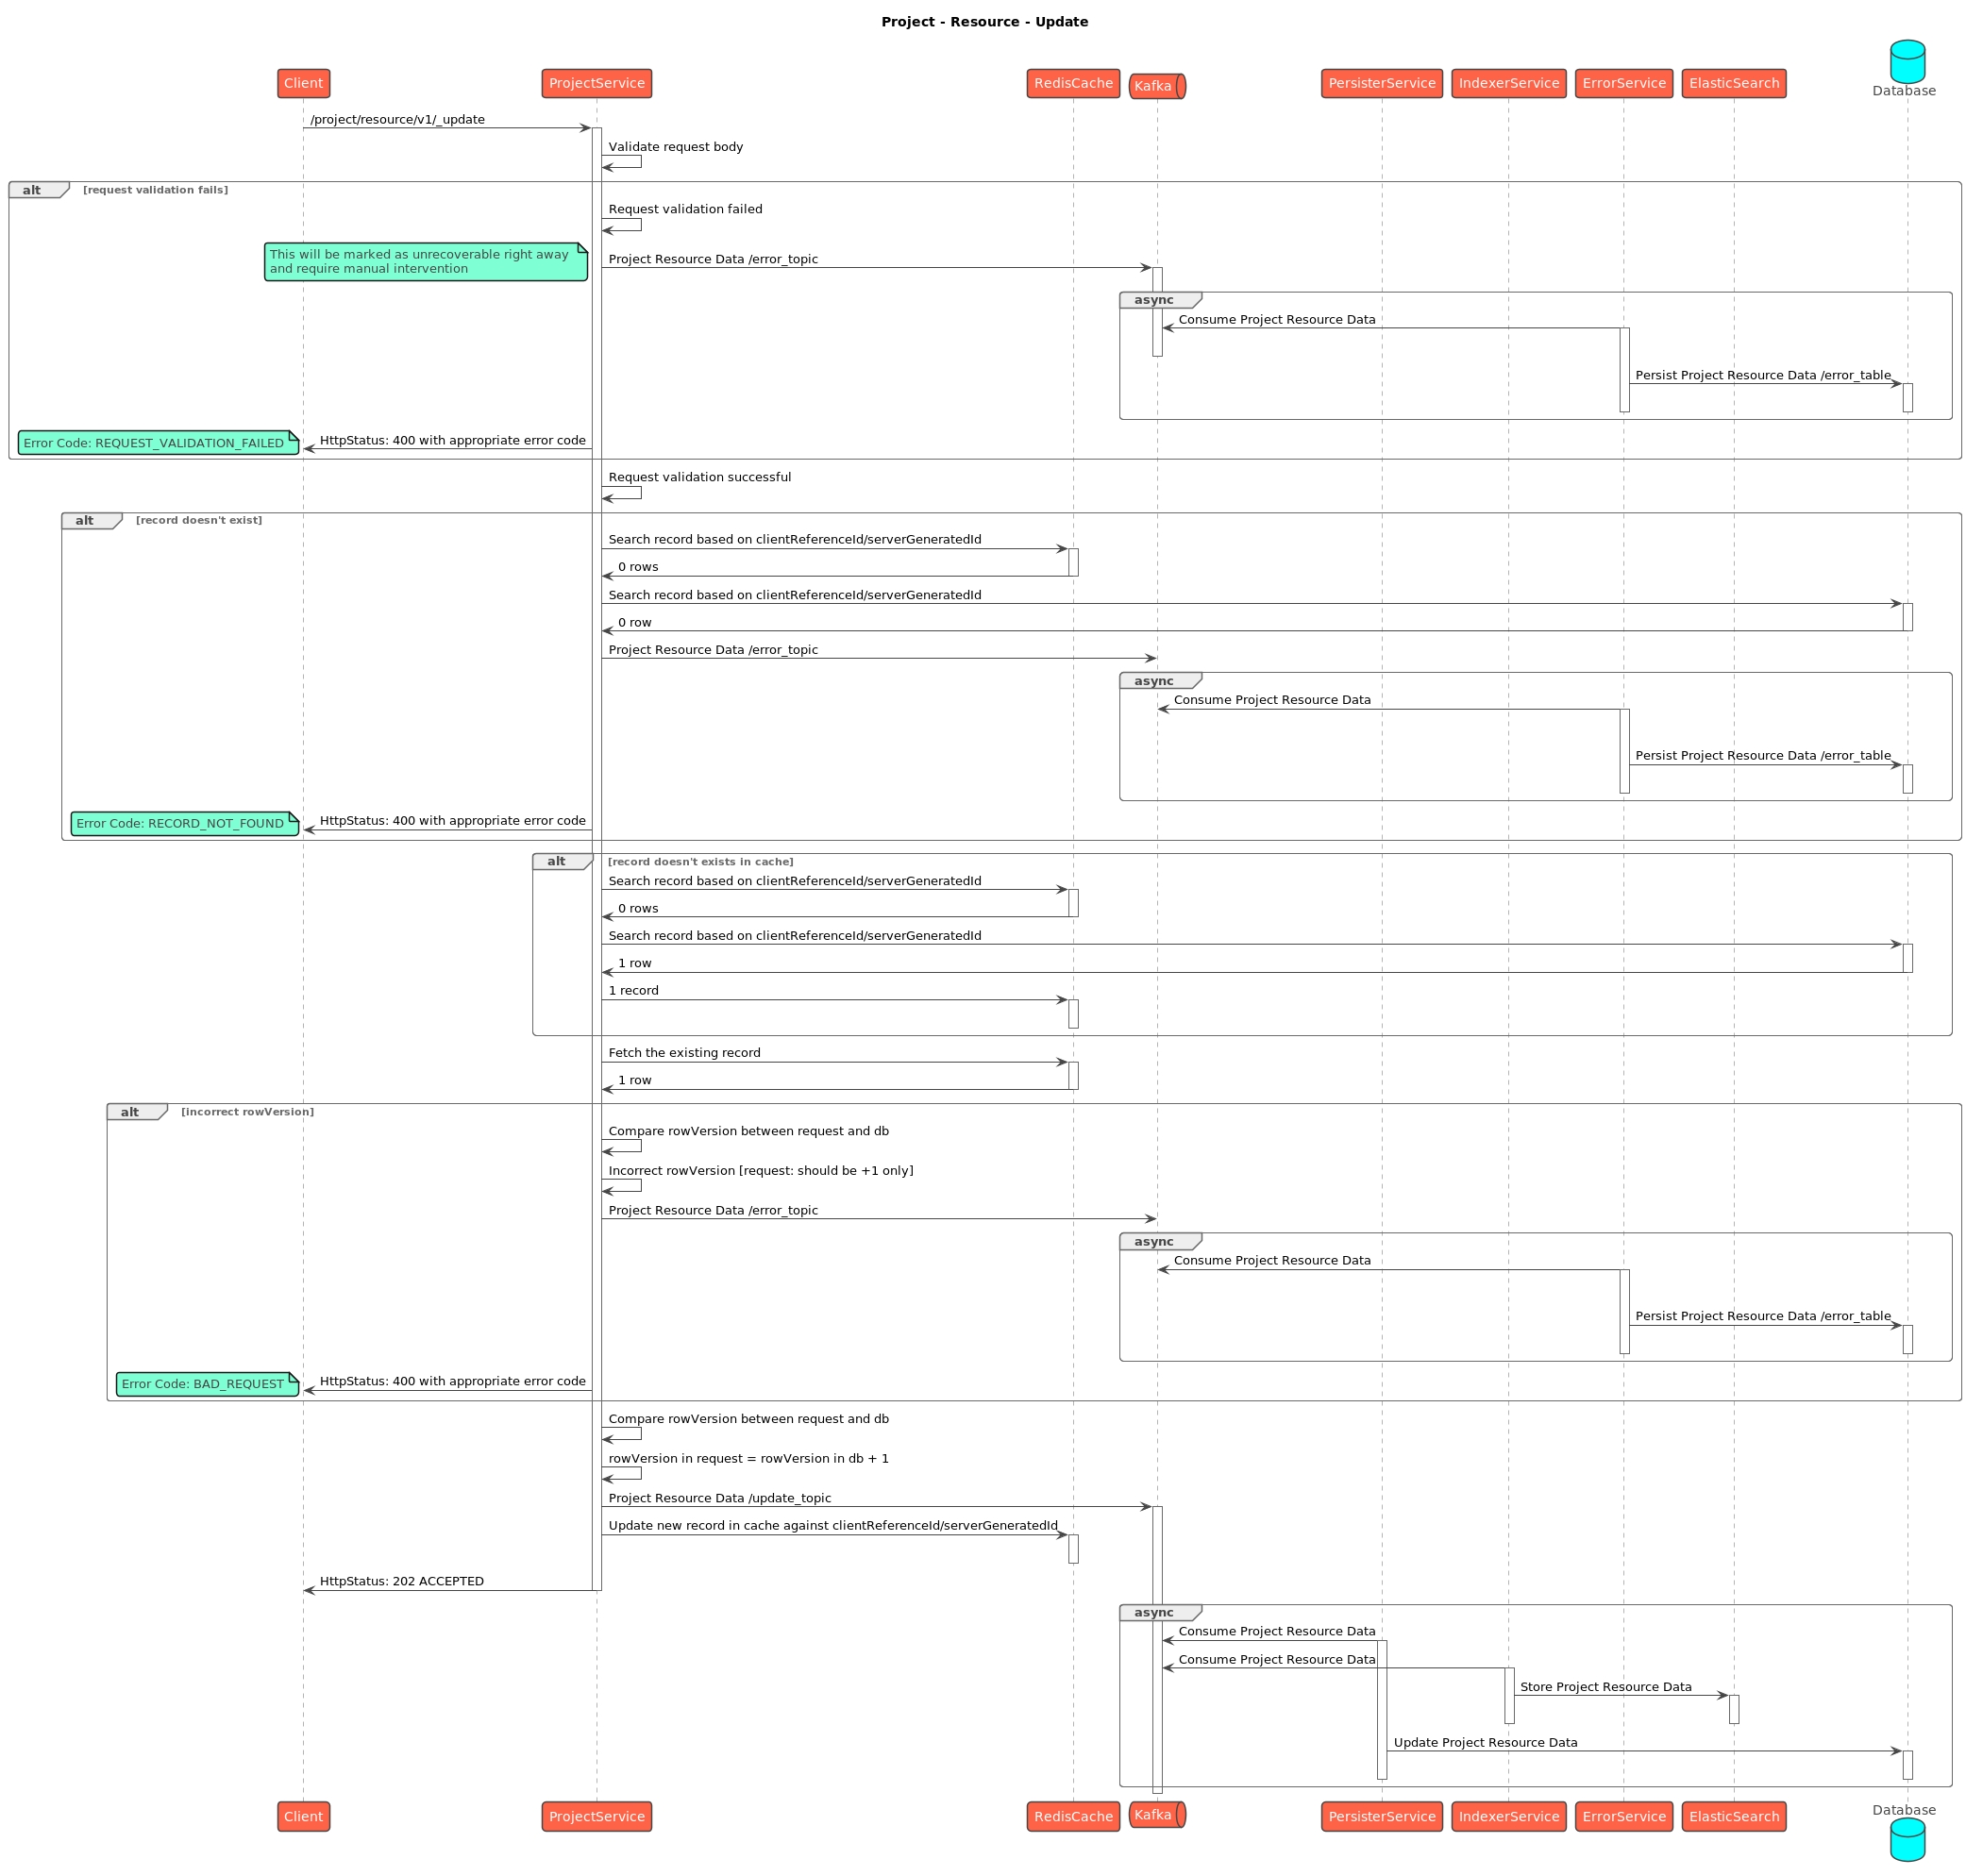
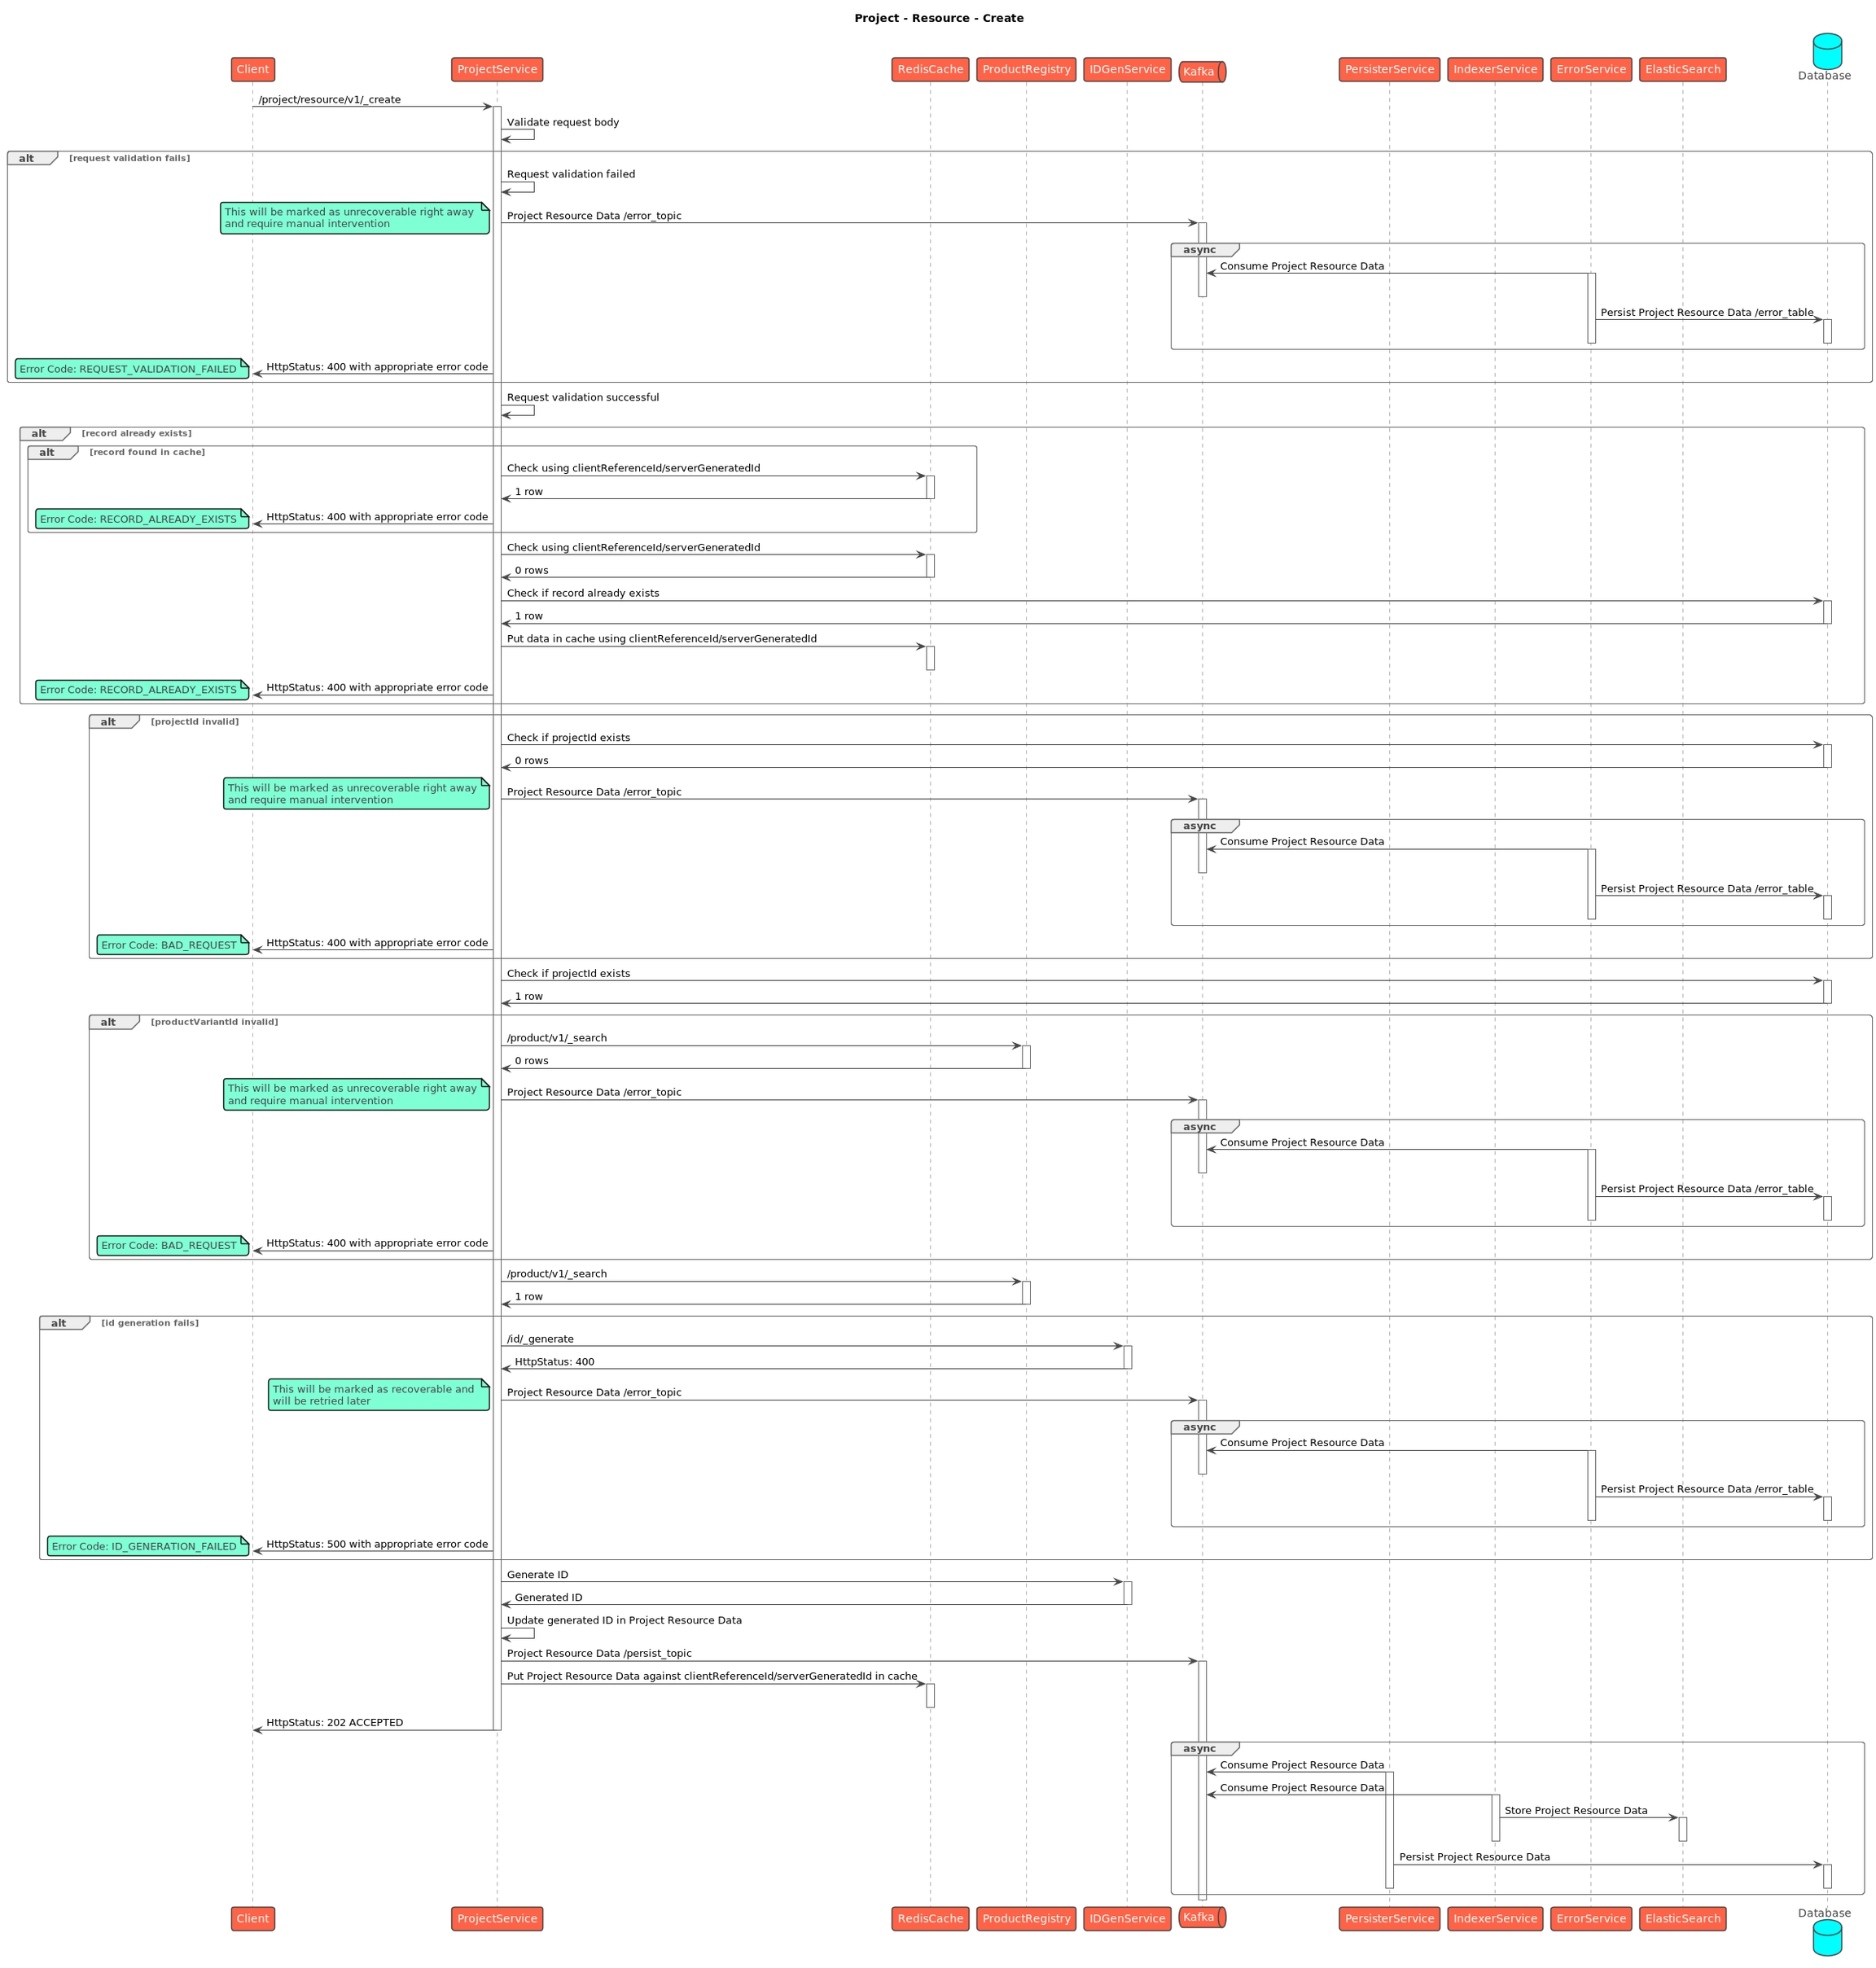


/project-factory/v1/project-type/fetch-from-microplan
This document describes the web flow for updating an existing campaign by integrating the existing microplan with the console. This process involves the integration of several backend services to update the data in the facility, target, and user sheet in the existing campaign object.
Core Services
Plan Service
Census Service
Initiate Request: The request body for the microplan integration will be:
Validations: This request validates whether the campaignId and planConfigurationId exist in the system or are invalid.
Update Facility Sheet: The process begins by searching for the facility associated with the planConfigurationId, which provides details about the facility code and the linked service boundaries. Next, a facility sheet is generated for the campaign. Once the facility sheet is obtained, the service boundaries are populated within the sheet where the specific facility code is present.
The sample data for filling the target sheet is:
Here, the type of the target sheet is constructed as Target-<projectType> of the campaign.
to: This specifies the key to be extracted from the census object.
from: These are the keys representing the headers that need to be enriched in the generated sheet.
This mapping ensures that the data from the census object is correctly aligned and populated into the appropriate headers in the target sheet. After populating the worksheet with data from the census objects, the file is uploaded to the filestore. Next, the sheet is validated using the Validate API with the type boundaryWithTarget. Once the validation is completed, the campaign object is updated with the newly generatedfilestoreId and resourceId. We get data from the census search as follows:
Update User Sheet: The process begins by fetching the plan associated with the planConfigurationId and retrieving the boundaries from the campaign details, specifically those of type LOCALITY. Next, for each locality, the count of all roles is obtained from the plan search response. This role count is then enriched in the corresponding sheet for that locality.
To map the roles and their requirements for determining the role count in the plan facility response, the predefined MDMS schema for the target is utilised. In this schema:
to: Represents the role to be mapped.
from: Specifies an array of keywords that must be present in the key to identify the role.
This ensures accurate and efficient mapping and population of role-related data in the sheet. Also used -
Added a field consolidateUsersAt in the schema to filter for boundaries based on a particular hierarchy; Example: LOCALITY Sample Data:
Sample MDMS data:
After populating the sheet with the appropriate information, the sheet is validated by calling the Validate API with the type userWithBoundary. Once the validation is successful, the campaign object is updated accordingly. We get the data to fill in this sheet from this API:
This document outlines the process for updating an existing campaign by integrating a microplan through the admin console. It involves validating the campaignId and planConfigurationId and updating the facility, target, and user sheets using data from backend services.
Facility Sheet: Generated using facility details from the planConfigurationId, enriched with service boundaries, validated, and updated in the campaign object.
Target Sheet: Created by mapping census data to boundary codes using the MDMS schema. The sheet is populated, validated, uploaded, and updated in the campaign object.
User Sheet: Locality boundaries are fetched, role counts are calculated and enriched using the MDMS schema, and the sheet is validated before updating the campaign object.
This integration ensures accurate, automated updates and efficient campaign management.
facilityId and resourceId. We get the data to fill in this sheet from plan-service/plan/facility/_search where data is like this and map the facilityId to the serviceBoundaries.Copy
Update Target Sheet: The process begins by performing a plan census search using the planConfigurationId, which retrieves details about the boundary code and its associated census data. After obtaining the mapping between the boundary code and the linked census, a target sheet of type boundary is generated for the campaign and hierarchy by invoking the Generate API.
A predefined MDMS schema ensures accurate mapping between the headers in the target sheet and the fields in the data. This schema acts as a blueprint, defining the correspondence between the data fields and their respective headers in the generated sheet. For this sheet, we get the data from the census search API, where the data looks like this:
{
"id": "baece49c-a7fa-49e7-bddd-d19ba71b2b89",
"tenantId": "mz",
"code": "HCM-ADMIN-CONSOLE.microplanIntegration",
"description": "HCM-ADMIN-CONSOLE.microplanIntegration",
"definition": {
"type": "object",
"title": "HCM-ADMIN-CONSOLE.microplanIntegration",
"$schema": "http://json-schema.org/draft-07/schema#",
"required": [
"type",
"mappings"
],
"x-unique": [
"type"
],
"properties": {
"type": {
"type": "string"
},
"mappings": {
"type": "array",
"minItems": 1,
"items": {
"type": "object",
"properties": {
"to": {
"type": "string"
},
"from": {
"type": "array",
"items": {
"type": "string"
}
},
"filter": {
"type": "string",
"enum": [
"includes",
"equal"
],
"default": "includes"
}
}
}
}
},
"isActive": true,
"auditDetails": {
"createdBy": null,
"lastModifiedBy": null,
"createdTime": 1697098069220,
"lastModifiedTime": 1697098069220
}
}
}
```{
"RequestInfo": {
"apiId": "Rainmaker",
"authToken": "{{auth}}",
"msgId": "1730962198879|en_MZ",
"plainAccessRequest": {}
},
"MicroplanDetails": {
"tenantId": "mz",
"campaignId": "58fb49a9-6772-4ecf-afc1-61f747e8c412",
"planConfigurationId": "e314a0b1-648c-4f7b-8551-f9441df00eb4"
}
}
Here campaignId will be the id of campaign for which the current plan is linked
and planConfigurationId is the id of the microplan.{
"type": "Target-MR-DN",
"mappings": [
{
"to": "HCM_ADMIN_CONSOLE_TARGET_SMC_AGE_3_TO_11",
"from": [
"CONFIRMED_HCM_ADMIN_CONSOLE_TARGET_POPULATION_AGE_3TO11"
],
"filter": "equal"
},
{
"to": "HCM_ADMIN_CONSOLE_TARGET_SMC_AGE_12_TO_59",
"from": [
"CONFIRMED_HCM_ADMIN_CONSOLE_TARGET_POPULATION_AGE_12TO59"
],
"filter": "equal"
}
]
} {
"id": "dc8521c0-102f-4879-bca2-97ad96883b7d",
"tenantId": "mz",
"hierarchyType": "MICROPLAN",
"boundaryCode": "MICROPLAN_MO_13_05_04_01_03_TOFFOI_TOWN",
"assignee": null,
"status": "VALIDATED",
"type": "people",
"totalPopulation": 987,
"populationByDemographics": null,
"additionalFields": [
{
"id": "8c66b784-212f-4771-9794-d554e0626466",
"key": "UPLOADED_HCM_ADMIN_CONSOLE_TARGET_POPULATION_AGE_3TO11",
"value": 432.00,
"showOnUi": true,
"editable": false,
"order": 3
},
{
"id": "bf0ba6b9-48e5-4545-b702-c6f97afdd604",
"key": "UPLOADED_HCM_ADMIN_CONSOLE_TOTAL_POPULATION",
"value": 987.00,
"showOnUi": true,
"editable": false,
"order": 1
},
{
"id": "5c16f657-f9b9-4100-b9a8-2a3898d2f89a",
"key": "CONFIRMED_HCM_ADMIN_CONSOLE_TOTAL_POPULATION",
"value": 987.00,
"showOnUi": true,
"editable": true,
"order": 2
},
{
"id": "8346d4a7-4e68-4481-a252-eb493fb08c42",
"key": "CONFIRMED_HCM_ADMIN_CONSOLE_TARGET_POPULATION_AGE_3TO11",
"value": 432.00,
"showOnUi": true,
"editable": true,
"order": 4
},
{
"id": "ca33c533-7abd-4325-a64a-52771a98857a",
"key": "UPLOADED_HCM_ADMIN_CONSOLE_TARGET_POPULATION_AGE_12TO59",
"value": 232.00,
"showOnUi": true,
"editable": false,
"order": 5
},
{
"id": "9e450a98-7229-4137-b93c-a6901e1561cc",
"key": "CONFIRMED_HCM_ADMIN_CONSOLE_TARGET_POPULATION_AGE_12TO59",
"value": 232.00,
"showOnUi": true,
"editable": true,
"order": 6
}
],
"effectiveFrom": 1732614985701,
"effectiveTo": 1732617841760,
"source": "f44bffa1-653a-455a-998d-e556ac097d3b",
"facilityAssigned": true,
"workflow": null,
"jurisdictionMapping": null,
"additionalDetails": {
"facilityId": "F-2024-11-26-104824",
"facilityName": "angelic being 3714",
"UPLOADED_HCM_ADMIN_CONSOLE_TOTAL_POPULATION": 987,
"CONFIRMED_HCM_ADMIN_CONSOLE_TOTAL_POPULATION": 987,
"UPLOADED_HCM_ADMIN_CONSOLE_TARGET_POPULATION_AGE_3TO11": 432,
"CONFIRMED_HCM_ADMIN_CONSOLE_TARGET_POPULATION_AGE_3TO11": 432,
"UPLOADED_HCM_ADMIN_CONSOLE_TARGET_POPULATION_AGE_12TO59": 232,
"CONFIRMED_HCM_ADMIN_CONSOLE_TARGET_POPULATION_AGE_12TO59": 232
},
"auditDetails": {
"createdBy": "29f73f64-2f5b-4699-b92c-4b093ac65749",
"lastModifiedBy": "d3fcb513-622c-4b68-a6fa-073267397da0",
"createdTime": 1732614985701,
"lastModifiedTime": 1732619464507
}
}HCM-ADMIN-CONSOLE.HierarchySchema{
"type": "console",
"group": [
"MALARIA",
"PERFORMANCE",
"ADMINISTRATIVEPOST",
"DISTRICT"
],
"hierarchy": "MICROPLAN",
"department": [],
"lowestHierarchy": "VILLAGE",
"splitBoundariesOn": "DISTRICT",
"consolidateUsersAt": "LOCALITY"
}{
"type": "user",
"mappings": [
{
"to": "Supervisor",
"from": [
"PER_BOUNDARY_FOR_THE_CAMPAIGN",
"PER_BOUNDARY",
"TEAM",
"SUPERVISORS"
],
"filter": "includes"
},
{
"to": "Registrar",
"from": [
"PER_BOUNDARY_FOR_THE_CAMPAIGN",
"PER_BOUNDARY",
"TEAM",
"REGISTRATION"
],
"filter": "includes"
},
{
"to": "Distributor",
"from": [
"PER_BOUNDARY_FOR_THE_CAMPAIGN",
"PER_BOUNDARY",
"TEAM",
"DISTRIBUTION"
],
"filter": "includes"
}
]
} {
"id": "eb33e406-a94a-4862-be9b-10e89f7759a3",
"tenantId": "mz",
"locality": "MICROPLAN_MO_13_05_04_01_11_GREBO_VILLAGE_2",
"campaignId": "fab0e988-c124-4b2b-9f28-adbbc0c0bbb4",
"planConfigurationId": "bc6e5fab-fd25-4b05-8286-7c567e88507a",
"status": "VALIDATED",
"assignee": null,
"additionalDetails": null,
"activities": [],
"resources": [
{
"id": "109745bf-e77e-42c6-ab33-32b5b2b591b9",
"resourceType": "NO_OF_BEDNETS_PER_BOUNDARY",
"estimatedNumber": 1.19,
"activityCode": null
},
{
"id": "07453754-16db-4884-bc88-f4e08d1a5e58",
"resourceType": "NO_OF_HOUSEHOLD_DISTRIBUTION_TEAMS_PER_BOUNDARY_FOR_THE_CAMPAIGN",
"estimatedNumber": 0.01,
"activityCode": null
},
{
"id": "2e803e3a-2735-426c-bdb0-b9556c20a8d3",
"resourceType": "NO_OF_BALES_PER_BOUNDARY",
"estimatedNumber": 0.01,
"activityCode": null
},
{
"id": "34007919-c5ed-4372-bcc5-2da8693d4972",
"resourceType": "NO_OF_MONITORS_FOR_HOUSEHOLD_DISTRIBUTION_TEAM_PER_BOUNDARY",
"estimatedNumber": 0.00,
"activityCode": null
},
{
"id": "95d1ed12-16d4-4c4f-94e9-e12289e6e634",
"resourceType": "NO_OF_HOUSEHOLD_DISTRIBUTION_TEAMS_PER_BOUNDARY_FOR_ONE_DAY",
"estimatedNumber": 1.23,
"activityCode": null
},
{
"id": "ef15c6d7-761a-494e-94d1-32dd1e5a2396",
"resourceType": "NO_OF_HOUSEHOLDS_PER_BOUNDARY",
"estimatedNumber": 1.28,
"activityCode": null
},
{
"id": "b8169c1f-eb9a-4329-97b5-8f2715af5832",
"resourceType": "NO_OF_FIXED_POST_REGISTRATION_TEAMS_PER_BOUNDARY_FOR_ONE_DAY",
"estimatedNumber": 0.88,
"activityCode": null
},
{
"id": "1e34c841-7f40-4fe2-9f44-e857ae1ee0df",
"resourceType": "NO_OF_FIXED_POST_REGISTRATION_TEAMS_PER_BOUNDARY_FOR_THE_CAMPAIGN",
"estimatedNumber": 0.01,
"activityCode": null
},
{
"id": "ce84ea0d-b670-4dad-b2b2-308da03af8fd",
"resourceType": "NO_OF_FIXED_POST_REGISTRATION_TEAM_SUPERVISORS_PER_BOUNDARY",
"estimatedNumber": 0.00,
"activityCode": null
},
{
"id": "96b60c74-6c0d-4f27-9192-51335d80fbce",
"resourceType": "NO_OF_STICKERS_ROLLS_PER_BOUNDARY",
"estimatedNumber": 0.01,
"activityCode": null
},
{
"id": "5c86bc8b-cd0f-41b3-bf4d-c30597559581",
"resourceType": "NO_OF_FIXED_POST_REGISTRATION_TEAM_MEMBERS_PER_BOUNDARY",
"estimatedNumber": 0.65,
"activityCode": null
},
{
"id": "29c5028d-2e78-433c-92bf-901d7d031677",
"resourceType": "NO_OF_HOUSEHOLD_DISTRIBUTION_TEAM_MEMBERS_PER_BOUNDARY",
"estimatedNumber": 0.32,
"activityCode": null
},
{
"id": "b0e007de-d437-4055-931c-181b0bf617bf",
"resourceType": "NO_OF_SUPERVISORS_FOR_HOUSEHOLD_DISTRIBUTION_TEAM_PER_BOUNDARY",
"estimatedNumber": 0.00,
"activityCode": null
}
],
"targets": [],
"auditDetails": {
"createdBy": "6c0fd096-60ec-45fd-b81c-526c3f1a3f0b",
"lastModifiedBy": "7c6714e9-72c8-46f7-a2c3-14edfe20cb1b",
"createdTime": 1732964373948,
"lastModifiedTime": 1732965150594
},
"jurisdictionMapping": null,
"workflow": null
}{
"id": "01a6cdc9-f777-4792-ad17-6dc7042fe1fd",
"tenantId": "mz",
"planConfigurationId": "f44bffa1-653a-455a-998d-e556ac097d3b",
"planConfigurationName": "Malaria-SMC Campaign-M1x3d-1-26 Nov 24",
"facilityId": "F-2024-11-26-104823",
"facilityName": "angelic being 3713",
"residingBoundary": "MICROPLAN_MO_13_05_02_02_07_ZAYBAY_TOWN",
"serviceBoundaries": [
"MICROPLAN_MO_13_05_01_03_04_GORBO_COMMUNITY",
"MICROPLAN_MO_13_05_01_03_03_FDA_COMMUNITY",
"MICROPLAN_MO_13_05_01_03_01_BARLAVILLE",
"MICROPLAN_MO_13_05_01_02_12_GARLOVILLE_COMMUNITY",
"MICROPLAN_MO_13_05_01_02_11_SUAH_COMMUNITY",
"MICROPLAN_MO_13_05_01_02_10_KANNAH_ROAD_COMMUNITY",
"MICROPLAN_MO_13_05_01_02_09_ZWEDRU_CENTRAL_MARKET",
"MICROPLAN_MO_13_05_01_02_08_ZOE_BUSH",
"MICROPLAN_MO_13_05_01_02_07_CITY_HALL_COMMUNITY",
"MICROPLAN_MO_13_05_01_02_06_WELBO_QUARTER",
"MICROPLAN_MO_13_05_01_02_05_TRIANGLE_COMMUNITY",
"MICROPLAN_MO_13_05_01_02_04_SPS_COMMUNITY",
"MICROPLAN_MO_13_05_01_02_03_BAPTIST_COMMUNITY",
"MICROPLAN_MO_13_05_01_02_02_TOWAH_COMMUNITY",
"MICROPLAN_MO_13_05_01_02_01_A_G__COMMUNITY",
"MICROPLAN_MO_13_05_01_01_09_NAO_COMMUNITY",
"MICROPLAN_MO_13_05_01_01_07_GBAGBAVILLE",
"MICROPLAN_MO_13_05_01_01_06_ELRZ_COMMUNITY",
"MICROPLAN_MO_13_05_01_01_05_MANDINGO_QUARTER",
"MICROPLAN_MO_13_05_01_01_04_ZANBO_QUARTER",
"MICROPLAN_MO_13_05_01_01_03_KYNE_QUARTER",
"MICROPLAN_MO_13_05_01_01_02_GBOE_QUARTER",
"MICROPLAN_MO_13_05_01_01_01_BOWEN_QUARTER"
],
"additionalDetails": {
"capacity": 1280,
"fixedPost": "No",
"facilityName": "angelic being 3713",
"facilityType": "Storing Resource",
"facilityStatus": "Temporary",
"assignedVillages": [],
"servingPopulation": 15272
},
"active": true,
"auditDetails": {
"createdBy": "29f73f64-2f5b-4699-b92c-4b093ac65749",
"lastModifiedBy": "bae97a73-8c70-4e09-92fd-d1ae97321cb5",
"createdTime": 1732615033646,
"lastModifiedTime": 1732619625034
}
}This section of the documentation details APIs for creating, searching, generating, and downloading data, including request/response structures, flows, and error handling. Campaign Creation V2 Flow – Documentation
The Campaign Creation V2 flow improves upon the earlier V1 implementation by introducing a type-aware, config-driven, and extensible architecture for handling Excel-based data uploads.
This change simplifies how Excel sheets are parsed, validated, transformed, and annotated, making the flow scalable and easier to maintain.
Processes uploaded Excel files for validation-type sheets. This API is exposed to the client UI through role-action mapping.
Sheet Parsing: Extracts data from each sheet using configured schema.
Data Transformation: Applies field-level or row-level transformations (e.g., date parsing, ID lookup).
Validation: Enforces rules defined in MDMS.
Error Annotation: Errors are annotated row-wise and can be returned in response or in the processed Excel file.
Processes any sheet type (both validation and data entry).
Internal Use Only – this API is not exposed via role-action mapping. It is used internally by services like project-factory-service.
🔹 Differences from /v2/data/_process
Same structure as /v2/data/_process, e.g.,
The V2 system uses a dynamic, type-based processing mechanism to ensure clean separation of concerns and better maintainability.
The system uses the type field in the request to determine the processing class:
const className = `${ResourceDetails?.type}-processClass`;
This maps to a file like
processFlowClasses/userValidation-processClass.ts
processFlowClasses/facility-processClass.ts
const { TemplateClass } = await import(classFilePath);
const sheetMap = await TemplateClass.process(ResourceDetails, wholeSheetData, localizationMap);
Each class implements a static process() method that:
Accepts the parsed sheet data
Performs transformation + validation
Returns a SheetMap object with data, errors, and annotations
Each class (e.g., userValidation-processClass) encapsulates all logic for that type:
Data cleanup or enrichment
Business rule validation
Conditional field logic
Return of structured, annotated sheet data
The Template Generation V2 flow is an upgrade over the earlier /v1/data/_generate implementation. It enables a loosely coupled, type-driven, and config-based Excel template generation system, ensuring better maintainability and extensibility.
The legacy endpoint:
http
POST /v1/data/_generate
has now been replaced with:
http
POST /v2/data/_generate
⚙️ Earlier most things were hardcoded. Now, ~80% is config-driven via MDMS or file-based config, and ~20% uses dynamic functions for specialized transformation logic.
Generates Excel templates for campaign resource types such as user, facility, boundary, etc., using MDMS-driven config and dynamic logic. UI integrates with this endpoint to export downloadable templates for upload flows.
const className = `${responseToSend?.type}-generateClass`;
let classFilePath = path.join(__dirname, '..', 'generateFlowClasses', `${className}.js`);
if (!fs.existsSync(classFilePath)) {
classFilePath = path.join(__dirname, '..', 'generateFlowClasses', `${className}.ts`);
}
Expected files (per type):
user-generateClass.ts
facility-generateClass.ts
boundary-generateClass.ts
const { TemplateClass } = await import(classFilePath);
const sheetMap = await TemplateClass.generate(ResourceDetails, localizationMap);
Returns an object with:
✅ Sheet Name(s)
✅ Header Row(s)
✅ Pre-filled Data (if any)
✅ Column metadata (dropdowns, styles, widths)
This configuration defines how API response data maps to Excel sheets and how sheet uploads map back to request payloads.
MDMS config
File-based transformConfigs
Optional dynamic transformation functions (transformBulkX, transformX)
The retry mechanism allows safe re-triggering of campaign creation only if the campaign is in a drafted or failed state. It uses the existing /v1/project-type/update API with action: "create" inside CampaignDetails. There is no dedicated retry API.
⚠️ Not fully idempotent 🔁 Re-uses creation API ✅ Works only for failed/drafted campaigns
If the campaign is already created and active, and a retry (action: "create") is attempted, it will throw an error.
Only campaigns in the following statuses are allowed to be re-processed:
["drafted", "failed"]
http
CopyEdit
POST /project-factory/v1/project-type/update
{
"RequestInfo": {
"apiId": "Rainmaker",
"authToken": "your-auth-token",
"userInfo": {
"uuid": "user-uuid",
"roles": [{ "code": "CAMPAIGN_MANAGER", "tenantId": "mz" }],
"tenantId": "dev"
}
},
"CampaignDetails": {
"campaignId": "5c845eb8-f8b2-43d0-a301-8e24692499f1",
"campaignNumber": "HCMP-CAM-00001",
"action": "create",
...
}
}
Tracks each data row uploaded from sheet.
export const dataRowStatuses = {
failed: "failed",
completed: "completed",
pending: "pending"
}
Stores mapping status per row and boundary.
export const mappingStatuses = {
toBeMapped: "toBeMapped",
mapped: "mapped",
toBeDeMapped: "toBeDeMapped",
deMapped: "deMapped"
}
Tracks which steps of campaign creation are done/pending/failed.
ts
CopyEdit
export const processStatuses = {
failed: "failed",
pending: "pending",
completed: "completed"
}
👇 Process Names
export const allProcesses = {
facilityCreation: "CAMPAIGN_FACILITY_CREATION_PROCESS",
userCreation: "CAMPAIGN_USER_CREATION_PROCESS",
projectCreation: "CAMPAIGN_PROJECT_CREATION_PROCESS",
facilityMapping: "CAMPAIGN_FACILITY_MAPPING_PROCESS",
userMapping: "CAMPAIGN_USER_MAPPING_PROCESS",
resourceMapping: "CAMPAIGN_RESOURCE_MAPPING_PROCESS",
userCredGeneration: "CAMPAIGN_USER_CRED_GENERATION_PROCESS"
}
This approach provides partial re-execution based on current statuses.
Helps in recovery from partial failure (e.g., during bulk upload).
Prevents overwriting already created resources.
Make sure to validate campaign status before retrying.
When a new campaign is created using the /project-factory/v1/project-type/create API, the backend asynchronously triggers:
Creation of campaign-specific MDMS module configs
Copying of base localisations to campaign-localised keys
This happens in the background and does not block the campaign creation response.
bash
CopyEdit
POST /project-factory/v1/project-type/create
ts
CopyEdit
createAppConfig(tenantId, campaignNumber, campaignType); // No await
createAppConfig(...) runs without await
The API returns immediately while config generation runs in parallel
From schema: HCM-ADMIN-CONSOLE.FormConfigTemplate
ts
CopyEdit
const templateModules = (templateResponse?.mdms || [])
.map(item => item?.data || [])
.flat()
.filter(module => !module?.disabled);
✔️ Only modules where disabled !== true are processed.
For each module:
Base Key: hcm-base-{moduleName}-{campaignType}
Target Key: hcm-{moduleName}-{campaignNumber}
For each locale:
Fetch localisation entries using the base key
Replace module with the new target key
Upload entries in chunks of 100
await localisation.createLocalisation(chunk, tenantId);
🧩 RequestInfo is not passed 💡 Failures are logged but do not interrupt other locale uploads
Target schema: HCM-ADMIN-CONSOLE.FormConfig
Each module:
Is enriched with:
project: campaignNumber
isSelected: true
Is posted to MDMS v2 API:
ts
CopyEdit
await httpRequest(mdms_create_or_update_url, requestBody);
🧱 Module configs are associated with the campaign being created.
Ensures every campaign has its own set of configuration modules and localised messages
Localisation is cloned and renamed from base templates for each campaign
This system supports high performance and reliability through async background execution
Limited
Easily extendable by adding type-specific logic
Client (UI)
Internal services
In chunks of 100, per locale
Error Handling
Errors logged per module or locale, but execution continues gracefully
Feature
V1 (/v1/data/_create)
V2 (/v2/data/_process)
API Endpoint
/v1/data/_create
/v2/data/_process
Sheet Type Support
Embedded in sheet
Explicit in API payload (type)
Validation Support
Manual/Inline
Automated via MDMS config
Flexibility
Rigid, fixed structure
Modular, type-based flow
Category
Types
Data Entry
user, facility, boundary
Validation
userValidation, facilityValidation, boundaryValidation
Feature
/v2/data/_process
/v2/data/_process-any
Scope
Validation-only
All types (data + validation)
Use Case
UI pre-submission checks
Backend ingestion, internal flows
Config Handling
Strict type filtering
Dynamic resolution based on type
Role Access
✅ Yes
❌ No (internal only)
Scenario
Recommended API
Validate uploaded sheet via UI
/v2/data/_process
Internal data ingestion (backend)
/v2/data/_process-any
API Endpoint
Role Mapping
Intended Caller
/v2/data/_process
✅ Yes
UI / client-facing
/v2/data/_process-any
❌ No
Internal service use
Feature
Benefit
🔌 Low Coupling
Each type is self-contained – changes don't affect others
🔧 Easily Extendable
Adding a new type is as simple as creating a new class
🧼 Clean Architecture
Sheet logic lives in its own file, not the main service
⚙️ Config-Driven
Sheet schema, headers, validation rules all come from MDMS
🧑💻 Developer Friendly
Developers only need to work on their type-specific class
Feature
V1 (/v1/data/_generate)
V2 (/v2/data/_generate)
API Endpoint
/v1/data/_generate
/v2/data/_generate
Sheet Type Support
Embedded logic
Passed via type query param
Logic Coupling
Tightly coupled
Type-based, dynamic classes
Extensibility
Hard to extend
Add new types via config + class
Parameter
Type
Description
tenantId
string
Tenant under which the campaign runs
type
string
Type of template to generate (user, facility, etc.)
hierarchyType
string
Hierarchy code associated with the campaign
campaignId
string
ID of the campaign
Property
Description
path
JSON path in request/response
source.header
Column name in Excel sheet
value
Static value or dynamic reference like ${metadata.tenantId}
splitBy
Delimiter for multi-valued fields
transform
Mapping to normalize values (e.g., from "Permanent" to boolean true)
Feature
Benefit
🔌 Low Coupling
Per-type logic and config separation
⚙️ Config-Driven
Most headers, styles, mappings are externalized
🔧 Easily Extendable
Drop in a class + config entry for new types
🧼 Clean Architecture
Controller remains generic; logic lives in type handlers
🧩 Reusable Logic
Same config powers both generation and upload parsing
Parameter
Type
Required
Description
tenantId
string
✅
Tenant ID
campaignId
string
✅
Campaign UUID (external)
Column
Description
campaignNumber
Campaign ref
type
Template type (user, facility)
uniqueIdentifier
Unique row key
data
Original sheet data (JSONB)
uniqueIdAfterProcess
Generated ID (after success)
status
✅ pending, completed, failed
Column
Description
type
Mapping type (userMapping, etc.)
uniqueIdentifierForData
FK to campaign data
boundaryCode
Boundary associated
mappingId
Generated ID post-mapping
status
✅ toBeMapped, mapped, toBeDeMapped, deMapped
Column
Description
processName
Each campaign step name
status
✅ pending, completed, failed
Step
Logic
✅ Allowed Status
Retry only works if campaign is in drafted or failed
❌ Disallowed
Retry fails if campaign is already active or completed
Sheet Rows
Retries only rows with status pending or failed
Mapping Rows
Retries only rows with status toBeMapped or toBeDeMapped
Process Steps
Retries only steps with status pending or failed
Completed Work
Skipped entirely
Step
Description
Trigger API
POST /project-factory/v1/project-type/create
Async Execution
createAppConfig(...) runs in background, no delay to API response
Template Schema
HCM-ADMIN-CONSOLE.FormConfigTemplate
Target Schema
HCM-ADMIN-CONSOLE.FormConfig
Localisation Source Key
hcm-base-{moduleName}-{campaignType}
Localisation Target Key
hcm-{moduleName}-{campaignNumber}
Extensibility
Intended Caller
Upload Method
{
"ResourceDetails": {
"tenantId": "dev",
"type": "userValidation",
"fileStoreId": "{{fileId}}",
"hierarchyType": "NEWTEST00222",
"additionalDetails": {},
"campaignId": "5c845eb8-f8b2-43d0-a301-8e24692499f1"
},
"RequestInfo": {
"apiId": "Rainmaker",
"authToken": "{{Auth}}",
"userInfo": {
"id": 1052,
"uuid": "8b110055-330f-4e7b-b4c0-f618f29b9d47"
}
}
}{
"ResourceDetails": {
"tenantId": "dev",
"type": "facility",
"fileStoreId": "{{fileId}}",
"hierarchyType": "NEWTEST00222",
"additionalDetails": {},
"campaignId": "5c845eb8-f8b2-43d0-a301-8e24692499f1"
},
"RequestInfo": {
"apiId": "Rainmaker",
"authToken": "{{Auth}}",
"userInfo": {
"id": 1052,
"uuid": "8b110055-330f-4e7b-b4c0-f618f29b9d47"
}
}
curl --location 'http://localhost:8080/project-factory/v2/data/_generate?tenantId=dev&type=user&hierarchyType=NEWTEST00222&campaignId=5c845eb8-f8b2-43d0-a301-8e24692499f1' \
--header 'Content-Type: application/json;charset=UTF-8' \
--data '{
"RequestInfo": {
"apiId": "Rainmaker",
"authToken": "your-auth-token",
"userInfo": {
"id": 1052,
"uuid": "8b110055-330f-4e7b-b4c0-f618f29b9d47",
"userName": "UATMZ",
"name": "UATMZ",
"mobileNumber": "8998988112",
"type": "EMPLOYEE",
"roles": [
{
"code": "CAMPAIGN_MANAGER",
"tenantId": "mz"
}
],
"active": true,
"tenantId": "dev"
}
}
}'
employeeHrms: {
metadata: { tenantId: "dev", hierarchy: "MICROPLAN" },
fields: [
{ path: "$.user.name", source: { header: "HCM_ADMIN_CONSOLE_USER_NAME" } },
{ path: "$.user.mobileNumber", source: { header: "HCM_ADMIN_CONSOLE_USER_PHONE_NUMBER" } },
{ path: "$.user.roles[*].name", source: { header: "HCM_ADMIN_CONSOLE_USER_ROLE", splitBy: "," } },
{ path: "$.user.roles[*].code", source: { header: "HCM_ADMIN_CONSOLE_USER_ROLE", splitBy: "," } },
{ path: "$.user.roles[*].tenantId", value: "${metadata.tenantId}" },
{ path: "$.user.userName", source: { header: "UserName" } },
{ path: "$.user.password", source: { header: "Password" } },
{ path: "$.user.tenantId", value: "${metadata.tenantId}" },
{ path: "$.user.dob", value: 0 },
{
path: "$.employeeType",
source: {
header: "HCM_ADMIN_CONSOLE_USER_EMPLOYMENT_TYPE",
transform: {
mapping: {
Permanent: "PERMANENT",
Temporary: "TEMPORARY",
"%default%": "TEMPORARY"
}
}
}
},
{
path: "$.jurisdictions[*].boundary",
source: { header: "HCM_ADMIN_CONSOLE_BOUNDARY_CODE_MANDATORY", splitBy: "," }
},
{ path: "$.jurisdictions[*].tenantId", value: "${metadata.tenantId}" },
{ path: "$.jurisdictions[*].hierarchy", value: "${metadata.hierarchy}" },
{ path: "$.jurisdictions[*].boundaryType", value: "${metadata.hierarchy}" },
{ path: "$.tenantId", value: "${metadata.tenantId}" },
{ path: "$.code", source: { header: "UserName" } }
],
transFormSingle: "transformEmployee",
transFormBulk: "transformBulkEmployee"
}Each Campaign Number (e.g., CMP-2025-05-22-005961) is unique and derived from the Campaign object.
This campaign number acts as a reference ID in the Project object once a user logs in.
Present in:
HCM-ADMIN-CONSOLE.TemplateBaseConfig
Maintains default configurations for each campaign type.
Serves as the source of truth to derive actual config data based on module/feature selection.
Module: hcm-registration-project
Maintains default localisation data per campaign type.
Used as a template to generate project-specific localisation.
When a user selects a specific:
Module(s)
Feature(s) ...then the system:
Reads template from TemplateBaseConfig.
Creates config entries in:
HCM-ADMIN-CONSOLE.SimpleAppConfiguration
App config keys are uniquely identified by:
campaign number
flow key (e.g., REGISTRATION, INVENTORY)
Example:
Localisation keys are generated using the flow name and campaign number.
Example:
When the user logs in and a Project is identified:
project.referenceId = CMP-2025-05-22-005961
Configuration version keys look like:
REGISTRATION_CMP-2025-05-22-005961
INVENTORY_CMP-2025-05-22-005961
OTHERFLOWS_CMP-2025-05-22-005961
Localisation entries:
hcm-registration-cmp-2025-05-22-005961
hcm-inventory-cmp-2025-05-22-005961
Key Points to Consider:
Schema Integration Based on Project Type
The UI design should incorporate schemas that vary depending on the selected project type.
Dynamic rendering of components and fields based on schema definitions.
Enable AddSection Functionality
Provide an option to dynamically add sections to the screen configuration.
Ensure sections can be personalised and managed efficiently.
Master Data Requirements The following master data sets are required to support the UI design and component configurations:
AppScreenConfigTemplate Predefined templates for application screen configurations based on project type.
AppScreenConfigPersonalized Personalised configurations for screens, tailored to specific user roles or preferences.
ComponentMetaDataMaster
The AppScreenConfigTemplate defines the configuration and structure of application screens. It supports dynamic field addition, sections, comments, and card-based layouts.
UPDATE
This provides the configuration and metadata for various input field types used in the application. Each field type is mapped to a specific appType and includes metadata such as data types, validation rules, and other properties.
The Drawer Master Data defines the configuration for the list of fields to be displayed in the drawer. Each field includes a label for identification and a fieldType that determines the type of input control to be rendered in the UI.
Fetching the App Configuration from MDMSv2:
Step Description: The app configuration master data is fetched from the MDMSv2 (Master Data Management System version 2). This data includes the settings, components, field types, and other configurations that dictate the structure and behaviour of the app’s screens and components.
Flow Detail:
The data is fetched asynchronously via an API call to the MDMSv2.
Once the data is fetched, it is stored in the application’s global state using React’s useContext. This ensures the data is accessible across various components throughout the app.
The data might look like:
Screen configurations (e.g., component layout, form field types).
Master data for field types, component metadata, drawer configurations, etc.
Considerations:
Ensure that proper error handling is in place if the API call fails (e.g., retry logic or fallback UI).
The context should be memoised or optimised for performance if the app grows large.
User Interactions (Editing, Adding, Deleting Components):
Step Description: Once the data is loaded and the UI is rendered based on the fetched configuration, users can interact with the UI by editing, adding, or deleting fields and components.
Flow Detail:
Editing: Users can modify the existing field values or configurations. For example, changing field labels, modifying validation rules, or adjusting layout properties.
Adding: Users can add new components, fields, or sections to the form. The UI should dynamically update to accommodate new fields or components.
Deleting: Users can delete specific components, fields, or entire sections, and the UI should reflect these changes instantly.
The updates made by the user are stored in the local state (managed by React’s useState or within the useContext).
Considerations:
The system must handle edge cases, such as removing fields that are required or have dependencies.
Ensure that updates are validated locally before sending them back to MDMSv2, to prevent inconsistencies.
Restructuring Data for Web or Mobile Outputs:
Step Description: After the user makes changes, the data must be restructured based on the target platform (e.g., web or mobile). This restructuring ensures that the configuration is correctly formatted to match the specifications required by the platform.
Flow Detail:
Once the data is updated, it is transformed according to the specific platform’s output format. For example:
For web applications, the configuration might need to be structured in a way that fits the web component framework (e.g., React).
For mobile applications, it may need to follow mobile-specific guidelines (e.g., using mobile UI components or formats).
The restructuring process may involve:
Converting configuration fields to fit the layout constraints of mobile screens (e.g., adjusting padding, margins).
Changing input types or validations for mobile responsiveness.
Adapting field types and labels based on the platform (e.g., dropdowns might be replaced with modals on mobile).
Considerations:
This step may require conditional logic to determine which platform the configuration is being prepared for.
No data must be lost during the restructuring process, so careful testing is needed.
Updating MDMSv2 (Client Master Data Structure):
Step Description: After the changes are made and the data has been restructured for the appropriate platform, the final updated configuration needs to be sent back to MDMSv2. This update is stored as the ClientMasterData structure.
Flow Detail:
Once the config is created, if it is directly for MDMS v2, we will enrich it with additional metadata and send it directly to MDMS v2.
If code generation is required based on the alternative approach, we will convert the config into code changes and push it to GitHub for app generation.

Key: REGISTRATION_CMP-2025-05-22-005961
Key: INVENTORY_CMP-2025-05-22-005961Localisation key: hcm-registration-cmp-2025-05-22-005961
Localisation key: hcm-inventory-cmp-2025-05-22-005961{
// Array of screens for the application
"screens": [
{
// Unique name for the screen
"name": "screen1",
// Parent category of the screen
"parent": "Registration",
// Screen headers and descriptions
"headers": [
{
// Header label
"label": "KJHSJKDHKJH",
// Type of the header (e.g., header, info, description)
"type": "header"
},
{
"label": "KJHSJKDHKJH",
"type": "info"
},
{
"label": "KJHSJKDHKJH",
"type": "description"
}
],
// Screen configuration settings
"config": {
// Allows adding fields dynamically to the screen
"enableFieldAddition": true,
// Allows adding sections dynamically to the screen
"enableSectionAddition": true,
// Enables commenting functionality on the screen
"enableComment": true,
// Specifies where fields can be added (e.g., body, header, footer)
"allowFieldsAdditionAt": [
"body"
],
// Specifies where comments can be added
"allowCommentsAdditionAt": [
"body"
]
},
// Cards within the screen (UI components grouped into cards)
"cards": [
{
// Card header text
"header": "Header",
// Card description text
"description": "Desc",
// Fields inside the card
"fields": [
{
// Path for binding data in the field
"jsonPath": "Screen heading",
// Type of the field (e.g., text, dropdown)
"type": "text",
// Label for the field
"label": "dzdzddadadad",
// Specifies if the field is mandatory
"required": true,
// Indicates if the field is active
"active": true,
// Additional metadata for the field
"metaData": {
// Field is read-only
"readOnly": true,
// Field supports comments
"isComment": true
}
},
{
"jsonPath": "Description",
"type": "text",
"label": "dzdzddadadad",
"required": true,
"active": true,
"metaData": {
"isComment": true
}
},
{
"jsonPath": "Description",
"type": "text",
"label": "Address Line 1",
"required": true,
"active": true,
"metaData": {}
},
{
// Unique ID for the field
"id": "field2",
// Field type is dropdown
"type": "dropdown",
// Label for the dropdown field
"label": "Beneficiary Status",
// Additional metadata for dropdown field
"metaData": {
// Field is mandatory
"required": true,
// Options available for the dropdown
"options": [
{
// Label for the dropdown option
"label": "Beneficiary Absent",
// Value associated with the dropdown option
"value": "absent"
},
{
"label": "Delivery Successful",
"value": "successful"
}
]
}
}
]
}
]
},
{
// Placeholder for additional screen configurations
}
]
}
```json
{
"screens": [
{
"name": "HOUSEHOLD_LOCATION",
"parent": "REGISTRATION",
"headers": [
{
"jsonPath": "SCREEN_HEADING",
"type": "header",
"label": "SCREEN_HEADING_LABEL",
"required": true,
"active": true,
"metaData": {
"fieldType": "text"
}
},
{
"jsonPath": "DESCRIPTION",
"type": "description",
"label": "DESCRIPTION_LABEL",
"required": true,
"active": true,
"metaData": {
"fieldType": "text"
}
}
],
"config": {
"enableFieldAddition": true,
"enableSectionAddition": true,
"enableComment": true,
"allowFieldsAdditionAt": [
"body"
],
"allowCommentsAdditionAt": [
"body"
]
},
"cards": [
{
"header": "HEADER_CODE",
"description": "DESCRIPTION_CODE",
"fields": [
{
"jsonPath": "ADDRESS_LINE_1",
"type": "text",
"label": "ADDRESS_LINE_1_LABEL",
"required": true,
"active": true,
"metaData": {}
},
{
"jsonPath": "ADDRESS_LINE_2",
"type": "text",
"label": "ADDRESS_LINE_2_LABEL",
"required": true,
"active": true,
"metaData": {}
}
]
}
]
}
]
}
```[
{
"name": "HouseholdLocation",
"type": "page",
"components": [
{
"title": "Household Location",
"description": "Make sure the village name matches the one where you are today.",
"order": 1,
"attributes": [
{
"name": "administrationArea",
"type": "field",
"isEnabled": true,
"attribute": "textField",
"readOnly": true,
"isRequired": false,
"order": 1,
"source": "DEFAULT"
},
{
"name": "accuracy",
"isEnabled": true,
"readOnly": true,
"attribute": "textField",
"isRequired": true,
"order": 2
},
{
"name": "addressLine1",
"isEnabled": true,
"readOnly": false,
"attribute": "textField",
"isRequired": false,
"validation": [
{
"pattern": "^\\d+$",
"key": "onlyDigits",
"errorMessage": "Digits only"
}
],
"order": 1
},
{
"name": "postalCode",
"isEnabled": true,
"readOnly": false,
"attribute": "textField",
"isRequired": false,
"order": 1
},
{
"name": "TextField",
"type": "additionalField",
"label": "TextField",
"attribute": "textField",
"formDataType": "String",
"isEnabled": true,
"readOnly": false,
"isRequired": false,
"keyboardType": "number",
"validation": [
{
"pattern": "^\\d+$",
"key": "onlyDigits",
"errorMessage": "Digits only"
}
],
"order": 1
},
{
"name": "SelectionBox",
"type": "additionalField",
"label": "SelectionBox",
"attribute": "selectionbox",
"formDataType": "List<String>",
"menuItems": [
"a",
"b",
"c",
"d"
],
"allowMultipleSelection": true,
"isEnabled": true,
"readOnly": false,
"isRequired": false,
"order": 2
},
{
"name": "dateForm",
"type": "additionalField",
"label": "dateForm",
"attribute": "dateFormPicker",
"formDataType": "DateTime",
"isEnabled": true,
"readOnly": false,
"isRequired": false,
"order": 5
},
{
"name": "DropDown",
"type": "additionalField",
"label": "DropDown",
"attribute": "dropdown",
"formDataType": "String",
"menuItems": [
"a",
"b"
],
"isEnabled": true,
"readOnly": false,
"isRequired": false,
"order": 3
},
{
"name": "dobPicker",
"type": "additionalField",
"label": "dobPicker",
"attribute": "dobPicker",
"formDataType": "DateTime",
"isEnabled": true,
"readOnly": false,
"isRequired": false,
"order": 4
},
{
"name": "integerFormPicker",
"type": "additionalField",
"label": "integerFormPicker",
"attribute": "integerFormPicker",
"formDataType": "int",
"initialValue": 0,
"minimum": 0,
"maximum": 10,
"isEnabled": true,
"readOnly": false,
"isRequired": false,
"order": 6
}
]
}
]
}
]{
"fieldType": [
{
"type": "textInput",
"appType": "textField",
"metadata": {
"formDataType": "String",
"validation": [
{
"pattern": "^\\d+$",
"key": "onlyDigits",
"errorMessage": "Digits only"
}
]
}
},
{
"type": "number",
"appType": "textField",
"metadata": {
"formDataType": "String",
"keyboardType": "number",
"validation": [
{
"pattern": "^\\d+$",
"key": "onlyDigits",
"errorMessage": "Digits only"
}
]
}
},
{
"type": "dropDown",
"appType": "dropdown",
"metadata": {
"formDataType": "String",
},
"attributeToRename": {
"from": "options",
"to": "menuItems" // Rename "options" to "menuItems" when restructuring
"optionalFunction": null
}
"attributeToDelete": [],
}
{
"type": "checkbox",
"appType": "selectionbox",
"metadata": {
"formDataType": "List<String>",
"allowMultipleSelection": true,
},
"fieldRenameMap": {
"options": "menuItems" // Rename "options" to "menuItems" when restructuring
}
},
{
"type": "counter",
"appType": "integerFormPicker",
"metadata": {
"formDataType": "int",
"initialValue": 0,
"minimum": 0,
"maximum": 10
}
},
{
"type": "datePicker",
"appType": "dobPicker",
"metadata": {
"formDataType": "DateTime"
}
},
{
"type": "dobPicker",
"appType": "dateFormPicker",
"metadata": {
"formDataType": "DateTime"
}
}
]
}{
"drawerData": [
{
"label": "componentType",
"fieldType": "dropdown",
"defaultValue": false,
"visibilityEnabledFor": []
},
{
"label": "Mandatory",
"fieldType": "toggle",
"defaultValue": false,
"visibilityEnabledFor": ["textField", "dropDown"]
},
{
"label": "label",
"fieldType": "toggle",
"defaultValue": false,
"visibilityEnabledFor": ["textField", "dropDown"]
},
{
"label": "helpText",
"fieldType": "toggle",
"defaultValue": false,
"visibilityEnabledFor":[]
},
{
"label": "innerLabel",
"fieldType": "toggle",
"defaultValue": false,
"visibilityEnabledFor": []
}
]
}{
"LocalisationData": {
"screen": "appScreenConfig"
"LocalisationModule":"configure-app",
"moduleVersion": "3",
"minModuleVersion": "1",
"fields": [
{
"fieldType": "dropdown",
"localisableProperties": ["label", "options", "placeholder"]
},
{
"fieldType": "toggle",
"applicableFieldTypes": ["textField", "dropDown"]
},
{
"fieldType": "toggle",
"applicableFieldTypes": ["textField", "dropDown"]
},
{
"fieldType": "toggle",
"applicableFieldTypes": []
}
]
}
}
FieldTypeMaster Master data for supported field types, including their attributes (e.g., input, dropdown, date picker).
An API call is made to send the updated data back to MDMSv2, where it is stored.
The ClientMasterData structure typically includes:
Updated configuration for screens, components, fields, and other UI elements.
Any changes to validation rules, field types, or component properties.
The system should notify the user once the update has been successfully pushed to MDMSv2, ideally with a confirmation message or toast notification.
Considerations:
Ensure data integrity is maintained during the update process.
The system should handle error scenarios (e.g., failed updates, validation errors) and provide appropriate feedback to users.
Implementing a versioning system for the configuration data could help manage updates and rollback scenarios, ensuring consistency over time.


