# OBPS-BPA/OC-BPA Architect

## Overview

To provide the facility for the user for creating New Building Permit Application by the citizen.&#x20;

<div align="left"><img src="/files/R5dKpWIchlbIvvWb7DUd" alt="BPA Home Card"></div>

## **Workflow Details**

Every application which is created is a part of the workflow.

### **Apply For New Building Permit Application (BPA)**

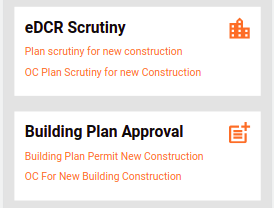
Users can apply for a new building permit application by clicking on the “Registered Architect Login”. This option can be used only by registered architects to log in.  Other users will not be able to proceed further.&#x20;

Architects will first need to generate an eDCR Scrutiny Number if it is not already available.  For this click on “Plan Scrutiny For New Construction”. If the eDCR Scrutiny Number is available, navigate directly to “Building Plan Permit For New Construction”. Add all required information while going through the workflow.&#x20;

The Create API is called in the middle of the workflow after owner details. And, at the end of the flow, a summary screen is visible for the review of the entered details. Click on the submit button calls the Update API that changes the status from Initiated to Applied and the Registration Application gets updated.

<div align="left"><img src="/files/ec5MEWHeIPEOzYHxapen" alt=""></div>

### eDCR Scrutiny Registration

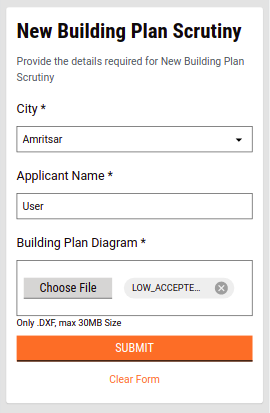
Users must provide the City, Applicant Name and upload the dxf file in order to generate eDCR number.

<div align="left"><img src="/files/tdWtBwyvZpPwnOzIeXiB" alt=""></div>

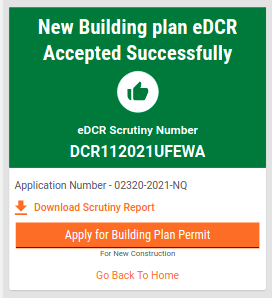
The Acknowledgement Page gets displayed. Users can apply for the building permit by clicking on the Apply for Building Plan Permit button. Or, they can go back and apply from the home page as mentioned in the previous section.

<div align="left"><img src="/files/VLFiXu3AFdB9NUb8uZJO" alt=""></div>

### New Building Plan Permit Registration

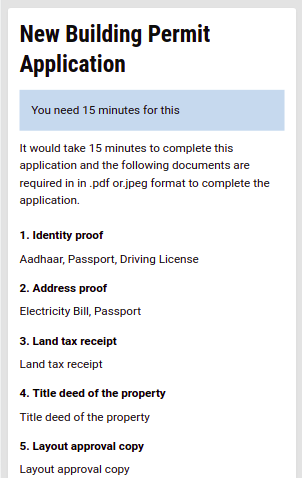
The New Building Permit Document Required screen is displayed after login, which helps the user to understand the necessary documents needed to complete the new registration for New Building Permit. A Citizen Info card is also shown at the bottom of the page for any additional information such as the maximum size of the file that can be uploaded.

<div align="left"><img src="/files/FBkkyae4sPOQcdD0c96L" alt=""></div>

### TimeLine Component

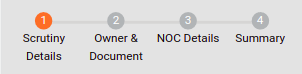
The TimeLine component is present on all pages of the application. It informs the user about each stepper in completing the registration application.

<div align="left"><img src="/files/6UdLW9Ebw2sLK038uGXI" alt=""></div>

### Scrutiny Details Step

In this step, the users need to provide and verify the details from the scrutiny API.

#### Basic Details

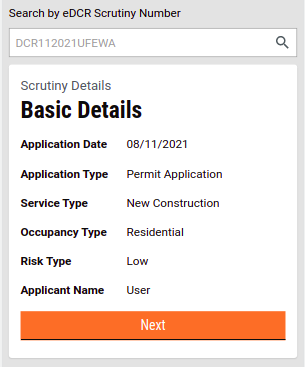
Users will need to verify the basic details received from the API, using the eDCR scrutiny number. In case the scrutiny number is not entered, users can enter the number and search for the result.

<div align="left"><img src="/files/y4lZfYr92HdBYMVqiqTD" alt=""></div>

#### Plot Details

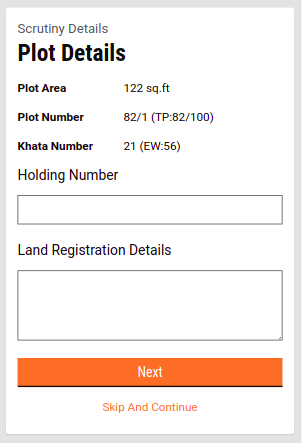
The data asked here is not compulsory - users can enter or skip it too.

<div align="left"><img src="/files/xmeiBmh64lP29yy9rKH2" alt=""></div>

#### Scrutiny Details

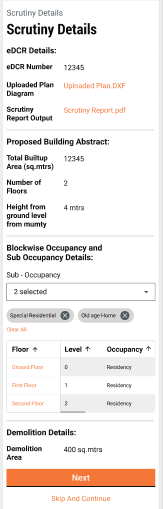
On this page, half of the details are received from the scrutiny details API and a drop-down for sub-occupancy which is multiple in nature. Users can select accordingly.

<div align="left"><img src="/files/QxxRqYPOHixIIWRc2q4e" alt=""></div>

#### Location Details

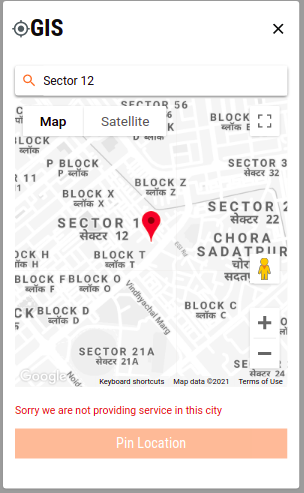
Users can click on the GIS icon and select and pinpoint the current address on the geolocation component.

<div align="left"><img src="/files/oxqBlbgyaBOWOMQDT7wN" alt=""></div>

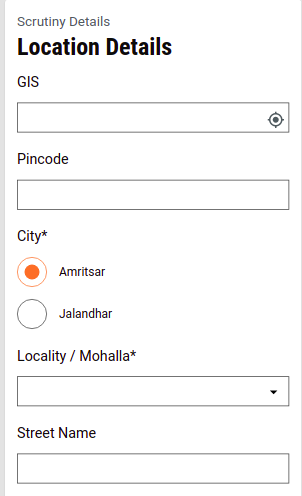
If the user does not want to select the location on the map, they can enter the Pincode. The city and locality get selected accordingly.

<div align="left"><img src="/files/5HkOV6X8bgw4Uy9gDyKg" alt=""></div>

### Owner & Document Step

In this step, users have to provide details about the owner. Owners could be single or multiple.

#### Owner Details

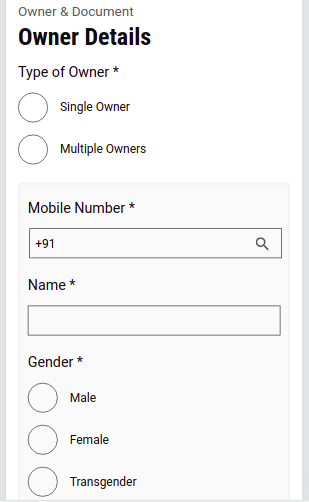
Select the type of owner and enter owner's details

<div align="left"><img src="/files/UzcaiVBdpgNEfApkcGqg" alt=""></div>

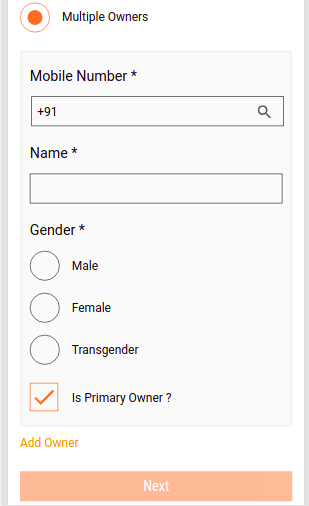
In case, the multiple owner option is selected, the Add Owner button is visible. The Primary Owner checkbox is also available. Click on the Add Owner button allows users to add multiple owners accordingly. Click on the Next button calls the Create API.

<div align="left"><img src="/files/CDPZt33aYEosSc4WUlOb" alt=""></div>

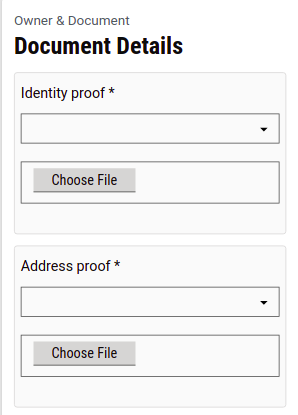
#### Document Details

Users have to select the document type. Upload multiple documents if needed using the document upload component. If the type is only one, then it came pre-selected for user convenience. Also, the documents which are mandatory are defined in MDMS from where it is fetched.

<div align="left"><img src="/files/g7jBRXzneBKeGi3EfELE" alt=""></div>

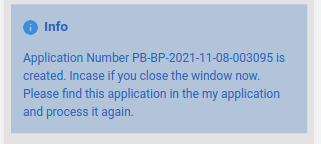
An info card is also visible which informs the user about the application number of the application created in the create API call.

<div align="left"><img src="/files/Z1u3X8oiQZAbdHYBUcme" alt=""></div>

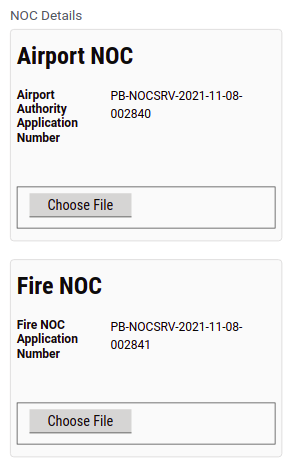
### NOC Details

Users need to verify and upload the documents, if required, for the NOC details. This information is also fetched from the MDMS.

<div align="left"><img src="/files/ReXZv6oNnvRJ5mI3mi5N" alt=""></div>

### Summary Page & Acknowledgement Screen

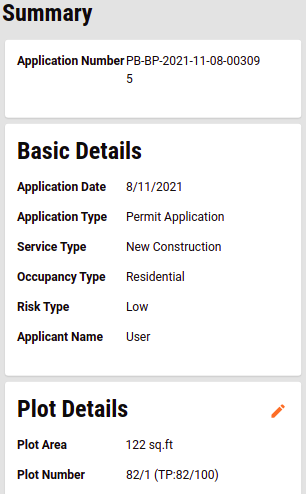
Users can cross-verify the data entered throughout the flow on the Summary page. In case any change or update is required, they can click on the edit icon available adjacent to the section headers. This redirects them to the relevant page and the entire flow is repeated again in order to submit the application.

Along with this Fee estimate for the corresponding application is also shown on the summary page.

<div align="left"><img src="/files/WgKj08MnsVOw7SDBKvJI" alt=""></div>

For BPA Application the Update API call is made. Below is the snippet of the Update API used:

```
update: "/bpa-services/v1/bpa/_update",
```

If the API response is successful, then the Acknowledgement Screen is displayed. Else, the Failed Acknowledgement Screen is displayed.

<div align="left"><img src="/files/hCb7SXWL1sMdRmg0vVWK" alt=""></div>

### **OC Apply For New Building Permit Application (BPA)**

The OCBPA flow is similar to the BPA flow detailed above with the exception of a few steps that are not necessary and therefore omitted in this flow.

### OC Plan Scrutiny For New Construction

Click on the OC Plan Scrutiny for New Construction button to generate an OC eDCR number. Users need the Permit Number and the Date that is generated upon the completion of the BPA application. &#x20;

### Documents Required

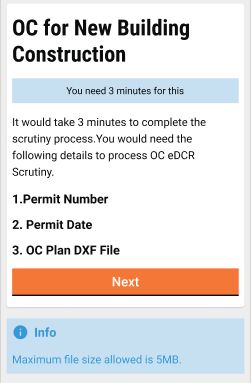
The Documents Required screen lists all the documents or data required to generate the OC eDCR number.

<div align="left"><img src="/files/Y4QzD16lUMmePea9GU3i" alt=""></div>

### OC eDCR scrutiny details

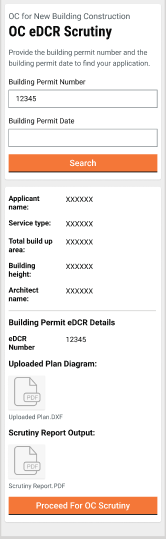
Once the user provides the Permit Number and Date, the application details are pre-populated.

<div align="left"><img src="/files/gDsWBEnmK2tXiz2UgTe1" alt=""></div>

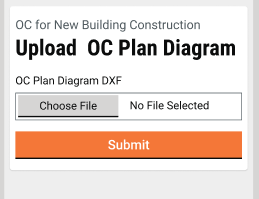
After verifying the details the user needs to upload the DXF file in order to generate the OC Scrutiny number.

<div align="left"><img src="/files/DANjR72bqd0B6VYaFxy1" alt=""></div>

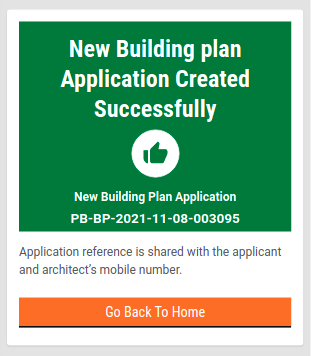
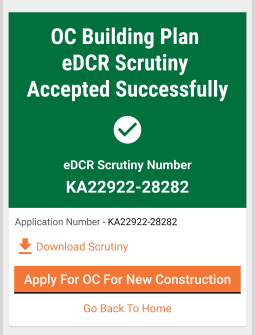
The success acknowledgement page is shown in case of no errors in the application.

<div align="left"><img src="/files/JzvjW14GCCO8UpAIHW2X" alt=""></div>

Clicking on Apply for OC New Construction redirects users to the Apply for new building permit form page. The Location & Owner Details will get auto-populated from the previous application details. The application triggers the Create API call from the scrutiny details page. The remaining flow is the same as for New Building Plan Permit.

## **Technical Implementation**

All the screens have been developed using the new-UI structure followed previously in FSM, PGR, PT and TL. Some new components have been introduced such as the TimeLine, Multi-Document Upload feature etc.

The links for the BPA & EDCR Main Index are given below. These help in understanding the starting point of the flow:

[<img src="https://github.githubassets.com/favicon.ico" alt="" data-size="line">https://github.com/egovernments/DIGIT-Dev/tree/develop/frontend/micro-ui/web/micro-ui-internals/packages/modules/obps/src/pages/citizen/EDCR - Connect to preview](https://github.com/egovernments/DIGIT-Dev/tree/develop/frontend/micro-ui/web/micro-ui-internals/packages/modules/obps/src/pages/citizen/EDCR)

[<img src="https://github.githubassets.com/favicon.ico" alt="" data-size="line">https://github.com/egovernments/DIGIT-Dev/tree/develop/frontend/micro-ui/web/micro-ui-internals/packages/modules/obps/src/pages/citizen/NewBuildingPermit - Connect to preview](https://github.com/egovernments/DIGIT-Dev/tree/develop/frontend/micro-ui/web/micro-ui-internals/packages/modules/obps/src/pages/citizen/NewBuildingPermit)

The links for the OCBPA & OCEDCR Main Index are given below. These help in understanding the starting point of the flow:

[<img src="https://github.githubassets.com/favicon.ico" alt="" data-size="line">https://github.com/egovernments/DIGIT-Dev/tree/develop/frontend/micro-ui/web/micro-ui-internals/packages/modules/obps/src/pages/citizen/OCEDCR - Connect to preview](https://github.com/egovernments/DIGIT-Dev/tree/develop/frontend/micro-ui/web/micro-ui-internals/packages/modules/obps/src/pages/citizen/OCEDCR)

[<img src="https://github.githubassets.com/favicon.ico" alt="" data-size="line">https://github.com/egovernments/DIGIT-Dev/tree/develop/frontend/micro-ui/web/micro-ui-internals/packages/modules/obps/src/pages/citizen/OCBuildingPermit - Connect to preview](https://github.com/egovernments/DIGIT-Dev/tree/develop/frontend/micro-ui/web/micro-ui-internals/packages/modules/obps/src/pages/citizen/OCBuildingPermit)

The OBPS Module is segregated into a specified structure. All the screen configurations are available inside the PageComponent Folder and the configuration for routing of the pages are available within the config folder which is common for both Citizen as well as Employees. New components like TimeLine are defined within the component folder. Below is the snippet for folder structure and routing configuration.

<div align="left"><img src="/files/8Z52xXIYXp2cTTmsJxoi" alt=""></div>

Config responsible for the routing of each flow

BPA (new building permit application):&#x20;

<https://github.com/egovernments/DIGIT-Dev/blob/develop/frontend/micro-ui/web/micro-ui-internals/packages/modules/obps/src/config/buildingPermitConfig.js>

EDCR (scrutiny number):&#x20;

<https://github.com/egovernments/DIGIT-Dev/blob/develop/frontend/micro-ui/web/micro-ui-internals/packages/modules/obps/src/config/edcrConfig.js>

OCBPA (OC new building permit application):&#x20;

<https://github.com/egovernments/DIGIT-Dev/blob/develop/frontend/micro-ui/web/micro-ui-internals/packages/modules/obps/src/config/ocbuildingPermitConfig.js>

OCEDCR (OC Scrutiny number):&#x20;

<https://github.com/egovernments/DIGIT-Dev/blob/develop/frontend/micro-ui/web/micro-ui-internals/packages/modules/obps/src/config/ocEdcrConfig.js>

The Pages Folder is where the high-level configuration for controlling the whole flow is defined, for citizens and employees. Citizen configuration details include Apply flows, send backflows, Application details etc. The folder contains the index (the main starting point of the whole flow).

The main difference in the BPA/OCBPA registration flow from other modules is in the apply flow. The create API is called in between the flow and the Update API is called at the end.

The code for Create API request object generation is available inside the Owner details or scrutiny details component for BPA & OCBPA respectively. This API call is triggered when the user clicks on the Next button on the Correspondence Address page.

The BPA/OBPS Create API call uses the `Digit.OBPSService.create` method to call the API. The code details are available within the gonext() method in the following files respectively.

Code reference:

<https://github.com/egovernments/DIGIT-Dev/blob/develop/frontend/micro-ui/web/micro-ui-internals/packages/modules/obps/src/pageComponents/OwnerDetails.js> / <https://github.com/egovernments/DIGIT-Dev/blob/develop/frontend/micro-ui/web/micro-ui-internals/packages/modules/obps/src/pageComponents/ScrutinyDetails.js>

The Utils Folder basically contains all the methods which are being used throughout the OBPS module, and if any common method needs to be declared here, it can be imported to other files.&#x20;

Throughout the flow, the Download button is mentioned according to the current state of the Application. These documents are generated from the server side and are dependent on the business service of the application. Refer to the code below to define the business service and the following keys.

```
if(data?.applicationData?.businessService === "BPA_LOW")
  {
    businessService = ["BPA.LOW_RISK_PERMIT_FEE"]
  }
  else if(data?.applicationData?.businessService === "BPA")
  {
    businessService = ["BPA.NC_APP_FEE","BPA.NC_SAN_FEE"];
  }
  else if(data?.applicationData?.businessService === "BPA_OC")
  {
    businessService = ["BPA.NC_OC_APP_FEE","BPA.NC_OC_SAN_FEE"];
  }
```

Following are the hooks used for the download PDF call:

```
let response = await Digit.PaymentService.generatePdf(tenantId, { Bpa: [requestData] }, order);
const fileStore = await Digit.PaymentService.printReciept(tenantId, { fileStoreIds: response.filestoreIds[0] });
window.open(fileStore[response?.filestoreIds[0]], "_blank");
```

For Occupancy Certificate use: `occupancy-certificate` and for Permit orders: `buildingpermit-low`

For updating an Application, the update API from BPA is called using the React hooks, which is declared under hooks/elements/obps as OBPSService.

The response object from the Create API is used for the request object of Update API, in addition to the document details that users have entered. This changes the status of the Application as Applied instead of initiated. Along with this NOC Update API is also called which updates the status of the NOC aligned with the particular application.&#x20;

Update API for NOC, BPA & OCBPA, the hook used for calling the API is:

`1Digit.Hooks.obps.useObpsAPI( 2 data?.address?.city ? data.address?.city?.code : tenantId, 3 true 4 );`

This API is called in the respective Acknowledgement Page:

<https://github.com/egovernments/DIGIT-Dev/blob/develop/frontend/micro-ui/web/micro-ui-internals/packages/modules/obps/src/pages/citizen/OCBuildingPermit/OBPSAcknowledgement.js> / <https://github.com/egovernments/DIGIT-Dev/blob/develop/frontend/micro-ui/web/micro-ui-internals/packages/modules/obps/src/pages/citizen/OCBuildingPermit/OBPSAcknowledgement.js>

## **MDMS Data**

Throughout the flow, a few of the page data is imported from the MDMS. Following is the list of pages that are using MDMS data. These pages .js files can be found under page components.

| EDCRForm     | City list                   | `tenant`                                                  | `citymodule`                                                        |
| ------------ | --------------------------- | --------------------------------------------------------- | ------------------------------------------------------------------- |
| DocsRequired | Documents required List     | <p><code>BPA</code></p><p><code>common-masters</code></p> | <p><code>DocTypeMapping</code></p><p><code>DocumentType</code></p>  |
| BasicDetails | Risk Type                   | `BPA`                                                     | `RiskTypeComputation`                                               |
| OwnerDetails | Gender & Ownership category | `common-masters`                                          | <p><code>OwnerShipCategory</code></p><p><code>GenderType</code></p> |

For calling MDMS data React Hooks has been used, so that it can be shared throughout the modules. Below is the little code snippet used for the MDMS call.

```
  const { data:homePageUrlLinks , isLoading: homePageUrlLinksLoading } = Digit.Hooks.obps.useMDMS(stateCode, "BPA", ["homePageUrlLinks"]);
```

## **Localization**

Localization keys are added in the ‘*rainmaker-bpa*’ locale module. In future, if any new labels are implemented in the OBPS - Architect (Citizen) they should also be pushed in the locale DB under *rainmaker-bpa* locale module. Below is an example of a few locale labels.

## &#x20;**API Call Role Action Mapping**

| S.No. | API                                   | Action ID | Roles     |
| ----- | ------------------------------------- | --------- | --------- |
| 1     | `/egov-mdms-service/v1/_search`       | `954`     | `CITIZEN` |
| 2     | `/edcr/rest/dcr/scrutinydetails`      |           | `CITIZEN` |
| 3     | `/filestore/v1/files/url`             | `1528`    | `CITIZEN` |
| 4     | `/billing-service/bill/v2/_fetchbill` | `1862`    | `CITIZEN` |
| 5     | `/bpa-services/v1/bpa/_create`        | `1684`    | `CITIZEN` |
| 6     | `/noc-services/v1/noc/_search`        |           | `CITIZEN` |
| 7     | `/localization/messages/v1/_search`   | `1531`    | `CITIZEN` |
| 8     | `/noc-services/v1/noc/_update`        |           | `CITIZEN` |
| 9     | `/bpa-services/v1/bpa/_update`        |           | `CITIZEN` |
| 10    | `/bpa-services/v1/bpa/_search`        |           | `CITIZEN` |

> [![Creative Commons License](https://i.creativecommons.org/l/by/4.0/80x15.png)*​*](http://creativecommons.org/licenses/by/4.0/)*All content on this page by* [*eGov Foundation*](https://egov.org.in/) *is licensed under a* [*Creative Commons Attribution 4.0 International License*](http://creativecommons.org/licenses/by/4.0/)*.*


---

# Agent Instructions: Querying This Documentation

If you need additional information that is not directly available in this page, you can query the documentation dynamically by asking a question.

Perform an HTTP GET request on the current page URL with the `ask` query parameter:

```
GET https://docs.digit.org/local-governance/access/local-governance-stack/online-building-plan-approval-system-obpas/obpas-service-configuration/obpas-digit-ui/obps-bpa-oc-bpa-architect.md?ask=<question>
```

The question should be specific, self-contained, and written in natural language.
The response will contain a direct answer to the question and relevant excerpts and sources from the documentation.

Use this mechanism when the answer is not explicitly present in the current page, you need clarification or additional context, or you want to retrieve related documentation sections.