
Loading...
Loading...
Loading...
Loading...
Loading...
Loading...
Loading...
Loading...
Loading...
Loading...
Loading...
Loading...
Loading...
Loading...
Loading...
Loading...
Loading...
Loading...
Loading...
Loading...
Loading...
Loading...
Loading...
Loading...
Loading...
Loading...
Loading...
Loading...
Loading...
Loading...
Loading...
Loading...
Loading...
Loading...
Loading...
Loading...
Loading...
Loading...
Loading...
Loading...
Loading...
Loading...
Loading...
Loading...
Loading...
Loading...
Loading...
Loading...
Loading...
Loading...
Loading...
Loading...
Loading...
Loading...
Loading...
Loading...
Loading...
Loading...
Loading...
Loading...
Loading...
Loading...
Loading...
Loading...
Loading...
Loading...
Loading...
Loading...
Loading...
Loading...
Loading...
Loading...
Loading...
Loading...
Loading...
Loading...
Loading...
Loading...
Loading...
Loading...
Loading...
Loading...
Loading...
Loading...
Loading...
Loading...
Loading...
Loading...
Loading...
Loading...
Loading...
Loading...
Loading...
Loading...
Loading...
Loading...
Loading...
Loading...
Loading...
Loading...
The Digital Urban Governance Platform
Building an urban governance platform to catalyze digital transformation across towns and cities - changing the way citizens interact with government bodies.
DIGIT Urban Stack is a set of Open APIs, services, and reference implementations, set up as a public good, to allow government entities, businesses, startups, and civil society to use a unique digital Infrastructure and build solutions for urban India at a large scale. It provides a set of open standards, specifications and documentation to create a level playing field and enable ecosystem players to innovate on the stack. As a public good, the platform is provided without profit or restriction to all members of society.
The urban mission offers digital governance solutions that encapsulate the core platform principles. The apps provide
Secure & reliable governance tools
Simple reusable modules for effective integration
Scalable & standardized solutions
Open APIs to promote interoperability
DIGIT-Urban focuses on inclusion and is designed on the principle of enhancing both platform openness and choice for citizens. The platform uses open APIs and standards, creating a powerful framework to drive convergence across the multiple systems currently in use and to lower the barrier to entry for locally-developed solutions.
Keeping in mind that most Indians use the internet through their phones, we follow and advocate a “mobile-first” approach, while supporting multi-channel access to accommodate diverse needs and preferences.
Open Source - DIGIT is Open Source and has been built using the best in class Open Source technology stacks powering the most advanced companies in the world. DIGIT is able to provide the lowest total cost of ownership and helps ensure that governments retain strategic control of their systems and data.
Mobile-Enabled - DIGIT has adopted a mobile-first approach, with robust mobile applications enabling citizens to easily access government services through their phones. Government officials and field workers are also empowered with mobile applications that enable them to deliver 24×7 governance with ease.
Real-time Dashboards - DIGIT’s real-time dashboards provide governments with actionable insights on demand. Administrators and department heads are empowered with verified data that enables them to manage their work and budgets better. Field-level employee reports enable effective performance management and ensure efficient usage of government resources.
All content on this page by is licensed under a .
Multiple channel support
Configurable building blocks that support customization at each stage
New release features, enhancements, and fixes
DIGIT 2.7 release has got new modules, a few functional changes, and non-functional changes.
Functional changes
National Dashboard for PT, TL, OBPS, PGR, W&S, mCollect, and Fire NOC;
State level DSS of OBPS, W&S, Fire NOC and mCollect;
PT UI/UX Audit Feedbacks, TL UI/UX Audit Feedbacks, PGR UI/UX Enhancements Audit Feedbacks;
PT common Search, PT lightweight create and integrate with TL;
Notification for different channels - W&S, PT, and TL;
Common UI/UX - Citizen Profile, Employee Profile;
Multi Tenancy Selection, Birth and Death module, State DSS and National Dashboard for Birth and Death
Non-functional changes
National Dashboard Ingest API and NUGP STQC Security fixes
All content on this page by is licensed under a .
National dashboard ingest API
NUGP STQC security fixes
Feature
Description
Common UI/UX - Citizen Profile, Employee Profile, and Multi Tenancy Selection
Edit User Profile - Citizen
Edit User Profile - Employee
Update Password - Employee
National Dashboard for PT, TL, OBPS, PGR, W&S, mCollect, and Fire NOC
Dashboard home screen shows module details
Dashboard overview screen shows revenue details and other common metric comparison for all modules
Individual dashboards offer comparative insights for multiple metrics for different states
Filter by date range, State , City
Table drilldowns for States→ City → Ward level information
State level DSS of OBPS, W&S, Fire NOC and mCollect
Updated dashboard home screen show module details
Updated dashboard overview screen show all module details
Individual dashboards created for W&S , OBPS , mCollect, and FireNoc
Birth and Death module, State DSS and National Dashboard for Birth and Death
Register birth & death records
View existing records
Search and download birth/ death certificates and receipts
PT common Search, PT lightweight create and integrate with TL
Search and link the existing property from other module applications
Create a limited information property to link and integrate with other applications
TL module integrated with property module
Updated Feature
Description
PGR UI/UX Enhancements
PGR workflow timeline enhancements
Upload PDF as attachments and other attachments related issues resolved
Notification for different channels - W&S, PT, and TL
For any specific user action, an SMS and email notifications are triggered as acknowledgment
SMS, event, and email notifications triggered to different channels
The application allows one to either send different messages across all channels based on their actions
PT UI/UX Audit Feedback
Search property by door number and owner name
Search application (employee)
My payments (citizen)
View payment history (from property details)
TL UI/UX Audit Feedback
Owner information card
Tag property while applying for trade license
Steppers in the citizen apply flow
UI/UX for revamp update Mobile number
Update mobile numbers in property in both citizen and employee portal
Non Functional
All content on this page by eGov Foundation is licensed under a Creative Commons Attribution 4.0 International License.
All content on this page by eGov Foundation is licensed under a Creative Commons Attribution 4.0 International License.
Learn how to setup DIGIT master data.
about , , , , , and .
This section contains documents and information required to configure the DIGIT platform
Learn how to configure the DIGIT Urban platform. Partner with us to enhance and integrate more into the platform.
Git ReposSetting up Master DataConfiguring ServicesConfiguring WorkflowsSetting Up eDCR ServiceConfiguration FAQsSetting up a LanguageDownload the file below to view the DIGIT Rollout Program Governance structure and process details.
All content on this page by is licensed under a .


DIGIT Infra and architecture details
DIGIT is India’s largest open-source platform for digital governance. It is built on OpenAPI (OAS 2.0) and provides API-based access to a variety of urban/municipal services enabling state governments and city administrators to provide citizen services with relevant new services and also integrating the existing system into the platform and run seamlessly on any commercial/on-prem cloud infrastructure with scale and speed.
DIGIT is a microservices-based platform that is built to scale. Microservices are small, autonomous and developer-friendly services that work together.
A big software or system can be broken down into multiple small components or services. These components can be designed, developed & deployed independently without compromising the integrity of the application.
Parallelism in development: Microservices architectures are mainly business-centric.
MicroServices have smart endpoints that process info and apply logic. They receive requests, process them, and generate a response accordingly.
MicroServices architecture allows its neighbouring services to function while it bows out of service. This architecture also scales to cater to its clients’ sudden spike in demand.
MicroService is ideal for evolutionary systems where it is difficult to anticipate the types of devices that may be accessing our application.
DIGIT follows Multilayer or n-tiered distributed architecture pattern. As seen in the illustration above there are different horizontal layers with some set of components eg. Data Access Layer, Infra Services, Business Services, different modules layers, client Apps and some vertical adapters. Every layer consists of a set of microservices. Each layer of the layered architecture pattern has a specific role and responsibility within the application.
Layered architecture increases flexibility, maintainability, and scalability
Multiple applications can reuse the components
Parallelism
Different components of the application can be independently deployed, maintained, and updated, on different time schedules
All content on this page by is licensed under a .
Human Resource Management System (HRMS) is a key module, a combination of systems and processes that connect human resource management and information technology through HR software. The HRMS module can be used for candidate recruiting, payroll management, leave approval, succession planning, attendance tracking, career progression, performance reviews, and the overall maintenance of employee information within an organization.
HRMS module enables users to -
Create User Roles
Create System Users
Employee Information Report
All content on this page by is licensed under a .
is an open-source system monitoring and alerting toolkit originally built at .
chart includes multiple components and is suitable for a variety of use-cases.
The default installation is intended to suit monitoring a kubernetes cluster the chart is deployed onto. It closely matches the kube-prometheus project.
service monitors to scrape internal kubernetes components
Layered architecture also makes it possible to configure different levels of security to different components
Layered architecture also helps users test the components independent of each other
kube-apiserver
kube-scheduler
kube-controller-manager
etcd
kube-dns/coredns
kube-proxy
With the installation, the chart also includes dashboards and alerts.
Deployment steps
Add environment variable to the respective env config file
Update the configs branch (like for qa.yaml added qa branch)
Add monitoring-dashboards folder to respective configs branch.
Enable the nginx-ingress monitoring and redeploy the nginx-ingress.
Add alertmanager secret in respective.secrets.yaml
If you want you can change the slack channel and other details like group_wait , group_interval and repeat_interval according to your values.
Deploy the prometheus-operator using go cmd or deploy using Jenkins.
To create a new panel in the existing dashboard
Login to dashboard and click on add panel
Set all required queries and apply the changes. Export the JSON file by clicking on t the save dashboard
Update the existing *-dashboard.json file from configs monitoring-dashboards folder with a newly exported JSON file.
All content on this page by eGov Foundation is licensed under a Creative Commons Attribution 4.0 International License.
State Data Centres with On-Premise Kubernetes Clusters
Running Kubernetes on-premise gives a cloud-native experience or SDC becomes cloud-agnostic when it comes to the experience of Deploying DIGIT.
Whether States have their own on-premise data centre, have decided to forego the various managed cloud solutions, there are few things one should know when getting started with on-premise K8s.
One should be familiar with Kubernetes and one should know that the control plane consists of the Kube-apiserver, Kube-scheduler, Kube-controller-manager and an ETCD datastore. For managed cloud solutions like Google’s Kubernetes Engine (GKE) or Azure’s Kubernetes Service (AKS) it also includes the cloud-controller-manager. This is the component that connects the cluster to the external cloud services to provide networking, storage, authentication, and other feature support.
To successfully deploy a bespoke Kubernetes cluster and achieve a cloud-like experience on SDC, one need to replicate all the same features you get with a managed solution. At a high-level this means that we probably want to:
Automate the deployment process
Choose a networking solution
Choose a storage solution
Handle security and authentication
Let us look at each of these challenges individually, and we’ll try to provide enough of an overview to aid you in getting started.
Using a tool like an ansible can make deploying Kubernetes clusters on-premise trivial.
When deciding to manage your own Kubernetes clusters, we need to set up a few proof-of-concept (PoC) clusters to learn how everything works, perform performance and conformance tests, and try out different configuration options.
After this phase, automating the deployment process is an important if not necessary step to ensure consistency across any clusters you build. For this, you have a few options, but the most popular are:
****: a low-level tool that helps you bootstrap a minimum viable Kubernetes cluster that conforms to best practices
: an ansible playbook that helps deploy production- ready clusters
If you already using ansible, kubespray is a great option otherwise we recommend writing automation around kubeadm using your preferred playbook tool after using it a few times. This will also increase your confidence and knowledge in the tooling surrounding Kubernetes.
When designing clusters, choosing the right container networking interface (CNI) plugin can be the hardest part. This is because choosing a CNI that will work well with an existing network topology can be tough. Do you need BGP peering capabilities? Do you want an overlay network using vxlan? How close to bare-metal performance are you trying to get?
There are a lot of articles that compare the various CNI provider solutions (calico, weave, flannel, kube-router, etc.) that are must-reads like the article. We usually recommend Project Calico for its maturity, continued support, and large feature set or flannel for its simplicity.
For ingress traffic, you’ll need to pick a load-balancer solution. For a simple configuration, you can use MetalLB, but if you’re lucky enough to have F5 hardware load-balancers available we recommend checking out the . The controller supports connecting your network plugin to the F5 either through either vxlan or BGP peering. This gives the controller full visibility into pod health and provides the best performance.
Kubernetes provides a number of . If you’re going on-premise you’ll probably want to use network-attached storage (NAS) option to avoid forcing pods to be pinned to specific nodes.
For a cloud-like experience, you’ll need to add a plugin to dynamically create persistent volume objects that match the user’s persistent volume claims. You can use dynamic provisioning to reclaim these volume objects after a resource has been deleted.
Pure Storage has a great example helm chart, the , that provides smart provisioning although it only works for Pure Storage products.
As anyone familiar with security knows, this is a rabbit-hole. You can always make your infrastructure more secure and should be investing in continual improvements.
Including different Kubernetes plugins can help build a secure, cloud-like experience for your users
When designing on-premise clusters you’ll have to decide where to draw the line. To really harden your cluster’s security you can add plugins like:
: provides the underlying secure communication channel, and manages authentication, authorization, and encryption of service communication at scale
: is a user-space kernel, written in Go, that implements a substantial portion of the Linux system surface
: secure, store and tightly control access to tokens, passwords, certificates, encryption keys for protecting secrets and other sensitive data
For user authentication, we recommend checking out which will integrate with an existing authentication provider. If you’re already using Github teams to then this could be a no-brainer.
Hope this has given you a good idea of deploying, networking, storage, and security for you to take the leap into deploying your own on-premise Kubernetes clusters. Like we mentioned above, the team will want to build proof-of-concept clusters, run conformance and performance tests, and really become experts on Kubernetes if you’re going to be using it to run DIGIT on production.
We’ll leave you with a few other things the team should be thinking of:
Externally backing up Kubernetes YAML, namespaces, and configuration files
Running applications across clusters in an active-active configuration to allow for zero-downtime updates
Running game days like deleting the CNI to measure and improve time-to-recovery
All content on this page by is licensed under a .
A good/meaningful logging system is a system that everyone can use and understand. How Digit Logging is configured.
The logging concern is one of the most complicated parts of our microservices. Microservices should stay as pure as possible. So, we shouldn’t use any library if we can (like logging, monitoring, resilience library dependencies). It means, every dependency can change any time and then usually, we must do that change for the other microservices. There is a lot of work here. Instead of that, we need to handle these dependencies with a more generic way. For logging, the way is the stdout logging. For most of the programming languages, logging to stdout is the default way and probably no additional change required at the beginning.
In MSA, services interact with each other through an HTTP endpoint. End users only know about API Contract (Request/Response), and don’t know how exactly do services work.
“A service” will call “B service” and “C service”. Once the request chain is complete, “X service” might be able to respond to the end-user who initiated the request. Let’s say you already have a logging system that captures error logs for each service. If you find an error in “X service”, it would be better if you know exactly whether the error was caused by “A service” or “C service”. If the error is informative enough for you. But if that isn’t the case, the correct way to reproduce that error is to know all requests and services that involved. Once you implement Correlation Id, you only need to look for that ID in the logging system. And you will get all logs from services that were part of the main request to the system.
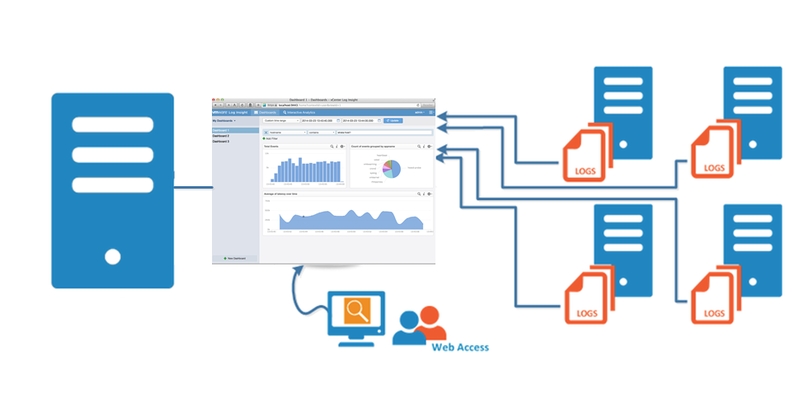
The application usually adds more features as time goes by. Go along with this, there are so many services will be created new (my project started with 12 services, and now we have 20). These services could be hosted on different servers. Let’s imagine, what will happen if you store logging on different servers? — you will have to access to each individual server to read logs, then trying to correlate problems. Instead, you have everything that you need in one dashboard by centralized logging data in one place. If would save your time so much.
Applying MSA allows you to use different technology stacks for each service. For example, you can use .Net Core for Buy service, Java for Shipping service and Python for Inventory service. However, it also impacts to log format of each service. It’s even more complicated as some logs need more fields than others.
Based on my experience, I’d like to suggest JSON as a standard format for logging data. JSON allows you to have multiple levels for your data so that, when necessary, you can get more semantic info in a single log event.
When we see the log one would want to know everything! What? When? Where?… even Who? — don’t think that we need to know exactly which person causes the problem to blame them :) Because, contacting the right person also helps you to resolve issues quicker. You can log all the data that you get. However, let us give some specific fields. This might help to figure out what really need to log.
When? — Time (with full date format): It doesn’t require using UTC format. But the timezone has to be the same for everyone that needs to look at the logs.
What? — Stack errors: All exception objects should be passed to the logging system.
Where? — Besides service name as we using MSA. We also need function name, class or file name where the error occurred. — Don’t guess anything, it might waste your time.
Bear in mind that, logging system is not only for developers. It’s also used by others (system admin, tester…) So, you should consider logging data that everyone can use and understand.
Sometimes, you log requests from end-users that contain PII. We need to be careful, it might violate .
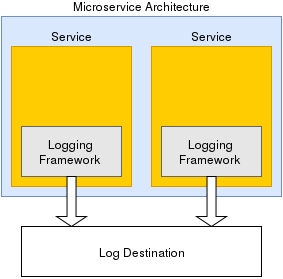
There are two techniques for logging in MSA. Each service will implement the logging mechanism by itself and using one logging service for all services. Both of them have Good and Not Good points. — I’m using both these approaches in my project.
Implement Logging in each service
With this approach, we can easily define the logging strategy/library for each service. For example, with service written by java we can use Log4j.
The problem with this approach is that it requires each service to implement its own logging methods. Not only is this redundant, but it also adds complexity and increases the difficulty of changing logging behaviour across multiple services.
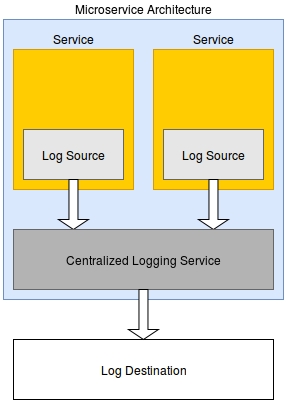
2. Implement central Logging service
If you don’t want to implement logging in each service separately. You can consider implementing a central service for logging. This service will help you with processing, formatting and storing log data.
This approach might help to reduce the complexity of your application. However, you might get lost your log data if that service is down.
All content on this page by is licensed under a .
At times in the different modules, there is a need to capture the address of the user’s place of residence or where the person is doing a trade, for which the user has to enter his/her full address which creates a task. In order to simplify the process, we can have google map geolocation service in place which would help us get the exact coordinates of the place on the map and help us identify the place.
This service is paid and the client has to purchase the below items:
Note:
Download the data template attached to this page.
Get a good understanding of all the headers in the template sheet, their data type, size, and definitions by referring to the ‘Data Definition’ section of this document.
In case of any doubt, please reach out to the person who has shared this template with you to discuss and clear your doubts.
Ask the clients to purchase the above-mentioned APIs in the Introduction section.
The checklist is a set of activities to be performed one the data is filled into a template to ensure data type, size, and format of data is as per the expectation. These activities have been divided into 2 groups as given below.
This checklist covers all the activities which are common across the entities.
Not Applicable
All content on this page by is licensed under a .
go run main.go deploy -e -c 'prometheus-operator,grafana,prometheues-kafka-exporter'
Alphanumeric
64
Yes
The key which the google would provide after the purchase for the API has been done
Get the details for the API URL and key from the client.
Verify the data once again by going through the checklist and making sure that each and every point mentioned in the checklist is covered.
1458-ASD785-987722
Google API URL
Alphanumeric
64
Yes
The URL of the API that is being purchased
2.
1
Make sure that each and every point in this reference list has been taken care of
API Key
Following is the table through which the information can be shared.
192.78.98.12
Since all state governments/clients prefer to host the websites on their servers, this activity is ideally done by them.
Domain Name
Alphanumeric
253
Yes
The name/address of the website being used to access the website/ module
Following are the steps which are to be followed:
Download the data template attached to this page.
Get a good understanding of all the headers in the template sheet, their data type, size, and definitions by referring to the ‘Data Definition’ section of this document.
In case of any doubt, please reach out to the person who has shared this template with you to discuss and clear your doubts.
If the state agrees to host the website on their server, provide them with the 2 columns mentioned in the attached template.
If the state disagrees to host on their server, then a domain name has to be purchased by any of the external vendors and the EXTERNAL-IP address has to be mapped with them.
Verify the data once again by going through the checklist and making sure that each and every point mentioned in the checklist is covered.
This checklist covers all the activities which are common across the entities.
1
Make sure that each and every point in this reference list has been taken care of.
This checklist covers the activities which are specific to the entity:
No mistake should be done in providing the EXTERNAL-IP address
-
2.
Only one domain name and its corresponding IP address have to be provided
-
All content on this page by eGov Foundation is licensed under a Creative Commons Attribution 4.0 International License.
A user role defines permissions for users to perform a group of tasks. In a default application installation, there are some predefined roles with a predefined set of permissions. Each role has a certain number set of tasks it is allowed to perform and these roles are Super Admin, Trade License Approver, Data Entry Admin and Trade License document verifier etc.
1
TL_APPROVER
TL Approver
Trade License Approver
2
GRO
Grievance Routing Officer
Grievance Routing Officer
3
1
Code
Alphanumeric
64
Yes
A unique code that identifies the user role name.
2
Download the data template attached to this page.
Have it open and go through all the headers and understand the meaning of them by referring 'Data Definition' section.
Make sure all the headers, its data type, field size and its definition/ description is understood properly. In case of any doubt, please reach out to the person who has shared this document with you to discuss the same and clear out the doubts.
Identify all different types of user roles on the basis of ULB’s functions.
Start filling the data starting from serial no. and complete a record at once. repeat this exercise until the entire data is filled into a template.
Verify the data once again by going through the checklist and taking care of each and every point mentioned in the checklist.
The checklist is a set of activities to be performed once the data is filled into a template to ensure data type, size, and format of data is as per the expectation. These activities have been divided into 2 groups as given below.
This checklist covers all the activities which are common across the entities.
1
Make sure that each and every point in this reference list has been taken care of
This checklist covers the activities which are specific to the entity.
1
The Code should be alphanumeric and unique
TL_APPROVER, GRO
2
The Name should not contain any special characters
TL Approver : [Allowed]
#TL Approver! : [Not allowed]
All content on this page by eGov Foundation is licensed under a Creative Commons Attribution 4.0 International License.
Knowledge of json and how to write a json is required.
Knowledge of MDMS is required.
User with permission to edit the git repository where MDMS data is configured.
For the login page city name selection is required. Tenant added in MDMS shows in city drop-down of the login page.
In reports or in the employee inbox page the details related to ULB is displayed from the fetched ULB data which is added in MDMS.
Modules i.e., TL, PT, MCS can be enabled based on the requirement for the tenant.
After adding the new tenant, the MDMS service needs to be restarted to read the newly added data.
Tenant is added in tenant.json. In MDMS, file tenant.json, under tenant folder holds the details of state and ULBs to be added in that state.
Localization should be pushed for ULB grade and ULB name. The format is given below.
Localization for ULB Grade
Localization for ULB Name
Format of localization code for tenant name <MDMS_State_Tenant_Folder_Name>_<Tenants_Fille_Name>_<Tenant_Code> (replace dot with underscore)
Boundary data should be added for the new tenant.
tenant json file
content
All content on this page by eGov Foundation is licensed under a Creative Commons Attribution 4.0 International License.
EXTERNAL-IP
Alphanumeric
32
Yes
It is the IP address that has to be mapped to the domain name

{
"tenantId": "uk", //<ReplaceWithDesiredTenantId>
"moduleName": "tenant",
"tenants": [ {
"code": "uk.citya", //<state.ulbname>
"name": "City A", //<name of the ulb>
"description": "City A", //<ulb description>
"logoId": "https://s3.ap-south-1.amazonaws.com/uk-egov-assets/uk.citya/logo.png", //<ulb logo path - To display ulb logo on login>
"imageId": null,
"domainUrl": "", //<ulb website url>
"type": "CITY",
"twitterUrl": null,
"facebookUrl": null,
"emailId": "[email protected]", //<ulb email id>
"OfficeTimings": {
"Mon - Sat": "10.00 AM - 5.00 PM"
},
"city": {
"name": "City A",
"localName": null,
"districtCode": "CITYA",
"districtName": null,
"regionName": null,
"ulbGrade": "Municipal Corporation",
"longitude": 78.0322,
"latitude": 30.3165,
"shapeFileLocation": null,
"captcha": null,
"code": "248430"
},
"address": "City A Municipal Cornoration Address",
"contactNumber": "91 (135) 2653572"
}]}{
"code": "ULBGRADE_MUNICIPAL_CORPORATION",
"message": "MUNICIPAL CORPORATION",
"module": "rainmaker-common",
"locale": "en_IN"
}{
"code": "TENANT_TENANTS_UK_HALDWANI",
"message": "Haldwani",
"module": "rainmaker-tl",
"locale": "en_IN"
}
CSR
Customer Support Representative
An employee who files and follows up complaints on behalf of the citizen
Name
Text
256
Yes
The Name indicates the User Role while creating an employee a role can be assigned to an individual employee
3
Description
Text
256
No
A short narration provided to the user role name


Key configurations at the state level include -
All content on this page by is licensed under a .
All content on this page by eGov Foundation is licensed under a Creative Commons Attribution 4.0 International License.
This page provides information on how to deploy DIGIT services on Kubernetes, prepare deployment manifests for various services along with its configurations, secrets. etc. It also discusses the maintenance of environment-specific changes.
All content on this page by is licensed under a .
This section addresses the key areas of concern and its potential remedial steps.
All content on this page by is licensed under a .
Summary of DIGIT OpenSource GitRepos and it's purpose. If you are a partner/contributor you may choose to fork or clone depending on need and capacity.
All content on this page by is licensed under a .


DIGIT environment setup is conducted at two levels.
FSM 1.1 is a release that has a few functional changes.
Functional: Pre-pay and post-pay service, multi-trip, capturing gender Information, desludging request flow enhancements, FSTPO vehicle log flow enhancements, DSO flow enhancements, and FSM generic enhancements.
A workflow process is a series of sequential tasks that are carried out based on user-defined rules or conditions, to execute a business process. It is a collection of data, rules, and tasks that need to be completed to achieve a certain business outcome.
In DIGIT, workflow for a business process is divided into three units out of which two are completely configurable while the remaining is fixed and lays the foundation of the other two.
This is the first unit which defines the actions and its nature which are basically executed during the workflow process by the workflow actors. It plays the foundation and configurable in nature as per the ground needs.
This is the second unit which defines the number of steps a workflow process may have and then trigger the creation role for each and every step with appropriate rights to perform a set of actions at each step. It is completely configurable.
This is the third unit which defines the workflow process including the steps, roles with actions and the present, next and previous state of a step/level of the workflow process. It is completely configurable.
All content on this page by is licensed under a .
The Decision Support System in DIGIT platform can be configured to provide customized insights and statistics on the dashboard. This section offers information on how to configure the DSS parameters for maximized efficiency.
All content on this page by eGov Foundation is licensed under a Creative Commons Attribution 4.0 International License.
DSO flow enhancements
DSO can edit pit and property usage details
Show validation message for DSO phone number on login
FSM generic enhancements
Add owner attribute for vehicle
Add ULB contact details in the FSM application flow
Citizen gives feedback on the number of trips - Configuration
Number of trips in FSM price calculation
N/A
Pre pay and Post pay service
Add citizen's choice for payment
Workflow changes (Desludging Application and Vehicle Trip)
Employee Flow Enhancements
Post Pay service: DSO creates trip
Multi-trip
Multi-trip facility
Add payment selection for DSO
FSTPO flow for multi-trip
Number of trips in FSM price calculation
Capturing gender information
Capture citizen gender on application
Capture DSO and FSTPO gender
Show citizen gender on FSM DSS
Desludging request flow enhancements
Select vehicle capacity instead of vehicle make.
Citizen Notifications | Payment Options | Timeline Enhancements
FSTPO vehicle log flow enhancements
FSTPO Vehicle Log Inbox Enhancements
FSTPO can decline the vehicle trip
FSTPO flow for Multi trip
National Informatica Cloud
Details coming soon...

All content on this page by eGov Foundation is licensed under a Creative Commons Attribution 4.0 International License.
An Urban Local Body (ULB) is defined as a tenant. The information which describes the various attributes of a ULB is known as tenant information. This detail is required to add the ULB into the system.
Download the data template attached to this page.
Have it open and go through all the headers and understand the meaning as given in this document under section 'Data Definition'.
Make sure all the headers, its data type, field size and its definition/ description are understood properly.
In case of any doubt, please reach out to the person who has shared this document with you and discuss the same to clear out the doubts.
The checklist is a set of activities to be performed once the data is filled into a template to ensure data type, size, and format of data is as per the expectation. These activities have been divided into 2 groups as given below.
This checklist covers all the activities which are common across the entities.
To see common checklist refer to the page consisting of all the activities which are to be followed to ensure completeness and quality of data.
This checklist covers the activities which are specific to the entity. There are no checklist activities exists which are specific to the entity.
All content on this page by is licensed under a .
Point of Sales (POS) machine is a machine that helps in handling transaction processing. This machine accepts and verifies the payments which are made by citizens for prevailing the services of DIGIT.
POS facilitates a middleware app developed in order to verify the payment process between the DIGIT module and the payment.
In this case, no data is required from the state team.
Not applicable.
Not applicable.
Not applicable.
Not applicable.
All content on this page by is licensed under a .
Master data templates allow users to configure the key parameters and details required for the effective functioning of the modules. This section offers comprehensive information on how to configure the master data templates for each module.
The individual master data templates for specific modules are availed in the Product & Modules section of our docs. Click on the links given below to navigate to view the specific module setup details.
Property Tax Master Data Templates
Trade License Master Data Templates
Water Charges Master Data Templates
Sewerage Charges Master Data Templates
mCollect Master Data Templates
All content on this page by is licensed under a .
This section contains a list of documents elaborating on the key concepts aiding the deployment of the DIGIT platform.
All content on this page by eGov Foundation is licensed under a Creative Commons Attribution 4.0 International License.
The Birth and Death module provides a digital interface, allowing citizens to search for and download the Birth and Death certificate. Also, the correctness of the certificate can be verified by scanning the QR code. The module enables the following:
Reduced physical touchpoints as citizens are not required to visit offices
All content on this page by is licensed under a .

Sonepur
Banka
BN47
Bihar
BBD47
24.8874° N
86.9198° E
Alphanumeric
64
Yes
It is a unique identifier which is assigned to each ULB. LGD (Local Government Directory) has already assigned a code urban local bodies and the same is used here
3
ULB Grade
Alphanumeric
64
Yes
Grade of ULB. e.g. Corporation, Municipality, Nagar Panchayat etc
4
City Name
Text
256
Yes
Name of city/ town which is covered by the ULB. E.g. Kannur/ Saptarishi
5
City Local Name
Text
256
No
Name of the city in the local language. e.g Telugu, Hindi etc
6
District Name
Text
256
Yes
Name of the District where the city is situated
7
District Code
Alphanumeric
64
Yes
It is a unique identifier which is assigned to each district. LGD (Local Government Directory) has already assigned code districts and the same is used here
8
Region Name
Text
256
No
Name of the region the listed district belongs to
9
Region Code
Alphanumeric
64
No
Unique code of the region to uniquely identify it
10
Contact Number
Alphanumeric
10
Yes
Contact person phone no. of ULB
11
Address
Text
256
Yes
Postal address of the ULB for the correspondence
12
ULB Website
Alphanumeric
256
Yes
URL address of the website for the ULB
13
Email Address
Alphanumeric
64
No
Email of the address of ULB where the email from the citizen can be received
14
Latitude
Alphanumeric
64
No
Latitude part of coordinates of the centroid of the city
15
Longitude
Alphanumeric
64
No
Longitude part of coordinates of the centroid of the city
16
GIS Location Link
Text
NA
No
GIS Location link of the ULB
17
Call Center No
Alphanumeric
10
No
Call centre contact number of ULB
18
Facebook Link
Text
NA
No
Face book page link of ULB
19
Twitter Link
Text
NA
No
Twitter page link of the ULB
20
Logo file Path
Document
NA
Yes
URL of logo file path to download the logo of ULB
Start filling the data starting from serial no. and complete a record at once. repeat this exercise until the entire data is filled into a template.
Verify the data once again by going through the checklist by taking care of each and every point mentioned in the checklist.
1
Sonepur Nagar Panchayat
47
Corp
98362532657
Main Hall, Sonepur
1
ULB Name
Text
256
Yes
Name of ULB. E.g. Kannur Municipal Corporation/ Saptarishi Municipal Council
2
Sonepur
ULB Code
Reduced time with the instantaneous download of certificates
Verification of the correctness of the certificate by scanning the QR Code
The Birth & Death module also enables ULB employees to create new registrations and also search for any previous applications through the employee side interface of the module.
In addition to the module, the DSS(Decision Support System) at the state level and national level instances enables administrators to view the records and have an aggregate view of the certificate downloads and other metrics for research and analysis purposes. The demographic data of the birth and death records also helps administrators to detect anomalies and make data-driven decisions.
In this release of the Birth & Death module, the following modules were developed
Birth & Death Module
Employee side interface
Citizen side interface
User access for
Birth record creator - Can only create new applications
Death record creator - Can only create new applications
Birth record viewer - Can only search and view applications
Death record viewer - Can only search and view applications
Birth & Death State DSS
Birth & Death National DSS
For an employee, the B&D module gives access to create birth records and death applications based on the registration details that they receive from the hospital, morgue, or from concerned authorities. They can also search the existing records of birth and death registrations based on date ranges, view them in tabular forms, and take printouts.
For a citizen, the Birth & Death module offers the convenience of downloading birth and death certificates using a simple search interface. They can also make payments if required for downloading the certificates, view past records and payments, and also download payment receipts.
The Birth & Death module shows the aggregated values for the certificate downloads and payment collections on the overview page of state DSS. Furthermore, in the individual module page, it shows
Distinct birth and death tabs that display metrics and charts for each segment
Number of certificate downloads and collection from payments
Certificate download trend across time
Chart showing certificate downloads by channel
Number of delayed registrations where the date of registration and date of birth/death differs by more than a year
Chart showing births and deaths by gender
Chart showing deaths by age category
The module also has the capability to show the ULB and ward-wise drill down for the delayed registrations and downloads by channel
The Birth & Death module shows the aggregated values of the certificate downloads and payment collections on the overview page of the National DSS. The application numbers and collection amounts are also aggregated and shown in the Total Collection and Total applications metrics on the Landing Page. Furthermore, in the individual module page, it shows
Distinct birth and death tabs that display metrics and charts for each segment
Number of certificate downloads and collection from payments
Certificate download trend across time
Chart showing certificate downloads by channel
Number of delayed registrations where the date of registration and date of birth/death differs by more than a year
Chart showing births and deaths by gender
Chart showing deaths by age category
The module also has the capability to show the ULB and ward-wise drill down for the delayed registrations and downloads by channel
None.
Birth & Death Report
User roles for - Birth Report viewer, Death Report Viewer
Doc Links
Description
This page is intended to help stakeholders as given below on data gathering activities.
State Team
eGov Onsite Team/ Implementation Team
ULB Team (Nodal and DEO)
Implementation Partners
The artefacts of this document are the data template of a configurable entity, a page with content defining the entity template and helping on how to fill the template with required data.
All content on this page by eGov Foundation is licensed under a Creative Commons Attribution 4.0 International License.
States and ULBs can configure their web portal to deploy the DIGIT portal effectively. State-level and ULB level web portal configuration details are covered in this section.
State PortalULB PortalAll content on this page by eGov Foundation is licensed under a Creative Commons Attribution 4.0 International License.
Looking at these requirements for a DevOps engineer, it is pretty clear that one should have a variety of skills to manage DIGIT DevOps.
Anyone involved in hiring DevOps engineers will realize that it is hard to find prospective candidates who have all the skills listed in this section.
Ultimately, the skill set needed for an incoming DevOps engineer would depend on the current and short-term focus of the operations team. A brand new team that is rolling out a new software service would require someone with good experience in infrastructure provisioning, deployment automation, and monitoring. A team that supports a stable product might require the service of an expert who could migrate home-grown automation projects to tools and processes around standard configuration management and continuous integration tools.
DevOps practice is a glue between engineering disciplines. An experienced DevOps engineer would end up working in a very broad swath of technology landscapes that overlaps with software development, system integration, and operations engineering.
SSL is Secure Sockets Layer is an encryption-based network security protocol developed for the assurance of privacy, authenticity and data integrity in internet communications.
Ideally, the domain name configuration and the SSL certification are obtained consecutively without fail from the state’s IT team.
No data is needed from the state team for this.
eGovernments Foundation transforms urban governance with the use of scalable and replicable technology solutions that enable efficient and effective municipal operations, better decision making, and contact-less urban service delivery.
Our comprehensive software products enable Governments to put their resources to efficient use by minimising overheads. We also help bring in transparency, accountability and citizen centricity in the delivery of Government services.
eGovernments Foundation has been in the forefront of implementing eGovernance solutions since 2003. Our products have been serving over 325 ULBs across the country. Our time tested products have impacted the ULBs in a large way. We have also been involved in several eGovernance initiatives in the country.
Our primary business motivator is to increase the footprint of eGovernance across the country and help adoption in as many ULBs as possible. Going opensource with our products is a measure in this direction. It also gives us the ability to tap into the immense talent pool in India for strengthening and improving our cities. Open source also blends well with our ethical fabric of being open and transparent in our business.
Birth record editor - Can edit existing applications
Death record editor - Can edit existing applications
DSS viewer - View DSS
An experienced DevOps engineer would be able to describe most of the technologies that is described in the following sections. This is a comprehensive list of DevOps skills for comparing one’s expertise and a reference template for acquiring new skills.
In theory, a template like this should be used only for assessing the current experience of a prospective hire. The needed skills can be picked up on the jobs that demand deep knowledge in certain areas. Therefore, the focus should be to hire smart engineers who have a track record of picking up new skills, rolling out innovative projects at work, and contributing to reputed open-source projects.
A DevOps engineer should have a good understanding of both classic (data centre-based) and cloud infrastructure components, even if the team has a dedicated infrastructure team.
This involves how real hardware (servers and storage devices) are racked, networked, and accessed from both the corporate network and the internet. It also involves the provisioning of shared storage to be used across multiple servers and the methods available for that, as well as infrastructure and methods for load balancing.
Hypervisors.
Virtual machines.
Object storage.
Running virtual machines on PC and Mac (Vagrant, VMWare, etc.).
Cloud infrastructure has to do with core cloud computing and storage components as they are implemented in one of the popular virtualization technologies (VMWare or OpenStack). It also involves the idea of elastic infrastructure and options available to implement it.
Network layers
Routers, domain controllers, etc.
Networks and subnets
IP address
VPN
DNS
Firewall
IP tables
Network access between applications (ACL)
Networking in the cloud (i.e., Amazon AWS)
Load balancing infrastructure and methods
Geographical load balancing
Understanding of CDN
Load balancing in the cloud
A DevOps engineer should have experience using specialized tools for implementing various DevOps processes. While Jenkins, Dockers, Kubernetes, Terraform, Ansible, and the like are known to most DevOps guys, other tools might be obscure or not very obvious (such as the importance of knowing one major monitoring tool in and out). Some tools like, source code control systems, are shared with development teams.
The list here has only examples of basic tools. An experienced DevOps engineer would have used some application or tool from all or most of these categories.
Expert-level knowledge of an SCM system such as Git or Subversion.
Knowledge of code branching best practices, such as Git-Flow.
Knowledge of the importance of checking in Ops code to the SCM system.
Experience using GitHub.
Experience using a major bug management system such as Bugzilla or Jira.
Ability to have a workflow related to the bug filing and resolution process.
Experience integrating SCM systems with the bug resolution process and using triggers or REST APIs.
Knowledge of Wiki basics.
Experience using MediaWiki, Confluence, etc.
Knowledge of why DevOps projects have to be documented.
Knowledge of how documents were organized on a Wiki-based system.
Experience building on Jenkins standalone, or dockerized.
Experience using Jenkins as a Continuous Integration (CI) platform.
CI/CD pipeline scripting using groovy
Experience with CI platform features such as:
Integration with SCM systems.
Secret management and SSH-based access management.
Scheduling and chaining of build jobs.
Source-code change based triggers.
Should know what artefacts are and why they have to be managed.
Experience using a standard artefacts management system such as Artifactory.
Experience caching third-party tools and dependencies in-house.
Should be able to explain configuration management.
Experience using any Configuration Management Database (CMDB) system.
Experience using open-source tools such as Cobbler for inventory management.
Ability to do both agent-less and agent-driven enforcement of configuration.
Experience using Ansible, Puppet, Chef, Cobbler, etc.
Knowledge of the workflow of released code getting into production.
Ability to push code to production with the use of SSH-based tools such as Ansible.
Ability to perform on-demand or Continuous Delivery (CD) of code from Jenkins.
Ability to perform agent-driven code pull to update the production environment.
Knowledge of deployment strategies, with or without an impact on the software service.
Knowledge of code deployment in the cloud (using auto-scaling groups, machine images, etc.).
Knowledge of all monitoring categories: system, platform, application, business, last-mile, log management, and meta-monitoring.
Status-based monitoring with Nagios.
Data-driven monitoring with Zabbix.
Experience with last-mile monitoring, as done by Pingdom or Catchpoint.
Experience doing log management with ELK.
Experience monitoring SaaS solutions (i.e., Datadog and Loggly).
To get an automation project up and running, a DevOps engineer builds new things such as configuration objects in an application and code snippets of full-blown programs. However, a major part of the work is glueing many things together at the system level on the given infrastructure. Such efforts are not different from traditional system integration work and, in my opinion, the ingenuity of an engineer at this level determines his or her real value on the team. It is easy to find cookbooks, recipes, and best practices for vendor-supported tools, but it would take experience working on diverse projects to gain the necessary skill set to implement robust integrations that have to work reliably in production.
Important system-level tools and techniques are listed here. The engineer should have knowledge about the following.
Users and groups on Linux.
Use of service accounts for automation.
Sudo commands, /etc/sudoers files, and passwordless access.
Using LDAP and AD for access management.
Remote access using SSH.
SSH keys and related topics.
SCP, SFTP, and related tools.
SSH key formats.
Managing access using configuration management tools.
Use of GPG for password encryption.
Tools for password management such as KeePass.
MD5, KMS for encryption/decryption.
Remote access with authentication from automation scripts.
Managing API keys.
Jenkins plugins for password management.
Basics of compilers such as node.js and Javac.
Make and Makefile, npm, Maven, Gradle, etc.
Code libraries in Node, Java, Python, React etc.
Build artefacts such as JAR, WAR and node modules.
Running builds from Jenkins.
Packaging files: ZIP, TAR, GZIP, etc.
Packaging for deployment: RPM, Debian, DNF, Zypper, etc.
Packaging for the cloud: AWS AMI, VMWare template, etc.
Use of Packer.
Docker and containers for microservices.
Use of artefacts repository: Distribution and release of builds; meeting build and deployment dependencies
Serving artefacts from a shared storage volume
Mounting locations from cloud storage services such as AWS S3
Artifactory as artefacts server
SCP, Rsync, FTP, and SSL counterparts
Via shared storage
File transfer with cloud storage services such as AWS S3
Code pushing using system-level file transfer tools.
Scripting using SSH libraries such as Paramiko.
Orchestrating code pushes using configuration management tools.
Use of crontab.
Running jobs in the background; use of Nohup.
Use of screen to launch long-running jobs.
Jenkins as a process manager.
Typical uses of the find, DF, DU, etc.
A comparison of popular distributions.
Checking OS release and system info.
Package management differences.
OS Internals and Commands
Typical uses of SED, AWK, GREP, TR, etc.
Scripting using Perl, Python.
Regular expressions.
Support for regular expressions in Perl and Python.
Sample usages and steps to install these tools:
NC
Netstat
Traceroute
VMStat
LSOF
Top
NSLookup
Ping
TCPDump
Dig
Sar
Uptime
IFConfig
Route
One of the attributes that helps differentiate a DevOps engineer from other members in the operations team, like sysadmins, DBAs, and operations support staff, is his or her ability to write code. The coding and scripting skill is just one of the tools in the DevOps toolbox, but it's a powerful one that a DevOps engineer would maintain as part of practising his or her trade.
Coding is the last resort when things cannot be integrated by configuring and tweaking the applications and tools that are used in an automation project.
Many times, a few lines of bash script could be the best glue code integrating two components in the whole software system. DevOps engineer should have basic shell scripting skills and Bash is the most popular right now.
If a script has to deal with external systems and components or it's more than just a few lines of command-lines and dealing with fairly complex logic, it might be better to write that script in an advanced scripting language like Python, Perl, or Ruby.
Knowledge of Python would make your life easier when dealing with DevOps applications such as Ansible, which uses Python syntax to define data structures and implement conditionals for defining configurations.
One of the categories of projects a DevOps engineer would end up doing is building dashboards. Though dashboarding features are found with most of the DevOps tools, those are specific to the application, and there will be a time when you may require to have a general-purpose dashboard with more dynamic content than just static links and text.
Another requirement is to build web UI for provisioning tools to present those as self-service tools to user groups.
In both these cases, deep web programming skills are not required. Knowledge of a web programming friendly language such as PHP and a JavaScript/CSS/HTML library like Composer would be enough to get things started. It is also important for the DevOps engineer to know the full-stack, in this case, LAMP, for building and running the web apps.
Almost every application and tool that is used for building, deploying, and maintaining software systems use configuration files. While manual reading of these files might not require any expertise, a DevOps engineer should know how config files in such formats are created and parsed programmatically.
A DevOps engineer should have a good understanding of these formats:
INI.
XML.
JSON.
YAML.
The engineer should also know how these formats are parsed in his/her favourite scripting language.
The wide acceptance of REST API as a standard to expose features that other applications can use for system integration made it a feature requirement for any application that wants to be taken seriously. The knowledge of using REST API has become an important skill for DevOps engineer.
HTTP/HTTPS: REST APIs are based on HTTP/HTTPS protocol and a solid understanding of its working is required. Knowledge of HTTP headers, status codes, and main verbs GET, POST, and PUT.
REST API basics: Normal layout of APIs defined for an application.
Curl and Wget: Command-line tools to access REST API and HTTP URLs. Some knowledge of the support available for HTTP protocol in scripting languages will be useful and that would be an indication of working with REST APIs.
Authentication methods: Cookie-based and OAuth authentication; API keys; use of If-Match and If-None-Match set of HTTP headers for updates.
API management tools: If the application you support provides an API for the users, most probably, its usage will be managed by some API Gateway tool. Though not an essential skill, experience in this area would be good if one works on the API provider side.
There was a time when mere knowledge of programming with RDBMS was enough for an application developer and system integrator to manage application data. Now with the wide adoption of Big Data platform like Hadoop and NOSQL systems to process and store data, a DevOps engineer needs varied requirements, from one project to another. Core skills are the following:
RDBMS: MySQL, Postgres, etc. knowledge of one or more is important.
Setting up and configuring PostGres: As an open-source database used with many other tools in the DevOps toolchain, consider this as a basic requirement for a DevOps engineer. If one hasn’t done this, he or she might not have done enough yet.
Running queries from a Bash script: How to run a database query via a database client from a Bash script and use the output. MySQL is a good example.
Database access from Perl/PHP/Python: All the major scripting languages provide modules to access databases and that can be used to write robust automation scripts. Examples are Perl DBI and Python’s MySQLdb module.
DB Backups: Migration, Logging, monitoring and cleanup.
Those who have built cloud infrastructure with a focus on automation and versioning should know some of these (or similar) tools:
cloud-init: Cloud-init can be used to configure a virtual machine when it is spun up. This is very useful when a node is spun up from a machine image with baseline or even application software already baked in.
AWS/Azure/GCloud CLI: If the application runs on Commercial cloud, knowledge of CLI is needed, which would be handy to put together simple automation scripts.
Terraform: HashiCorp’s Terraform is an important tool if the focus would be to provision infrastructure as code (IaaS). Using this, infrastructure can be configured independently of the target cloud or virtualization platform.
Ansible: It can be used to build machine images for a variety of virtualization technologies and cloud platforms, it is useful if the infrastructure is provisioned in a mixed or hybrid cloud environment.
In a rush to get things rolled out, one of the things left half-done is adding enough error handling in scripts. Automation scripts that are not robust can cause major production issues, which could impact the credibility of DevOps efforts itself. A DevOps engineer should be aware of the following best practices in error handling and logging:
The importance of error handling in automated scripts.
Error handling in Bash.
Error handling in Python.
Logging errors in application and system logs.
All content on this page by eGov Foundation is licensed under a Creative Commons Attribution 4.0 International License.
Gateway (Zuul, nginx-ingress-controller)
Understanding of VM Instances, LoadBalancers, SecurityGroups/Firewalls, nginx, DB Instance, Data Volumes.
Experience of Kubernetes, Docker, Jenkins, helm, golang, Infra-as-code.
Deploy configuration and deployment backbone services:
Clone the git repo https://github.com/egovernments/eGov-infraOps . Copy existing dev.yaml and dev-secrets.yaml with new environment name (eg..yaml and-secrets.yaml)
Modify the global domain and set namespaces create to true
Modify the below-mentioned changes for each backbone services:
Eg. For Kafka-v2 If you are using AWS as cloud provider, change the respective volume id’s and zone’s
(You will get the volume id’s and zone details from either remote state bucket or from AWS portal)
Eg. Kafka-v2 If you are using Azure cloud provider, change the diskName and diskUri
(You will get the volume id’s and zone details from either remote state bucket or from Azure portal)
Eg. Kafka-v2 If you are using ISCSI , change the targetPortal and iqn.
Deploy the backbone services using go command
Modify the “dev” environment name with your respective environment name.
Flags:
e --- Environment name
p --- Print the manifest
c --- Enable Cluster Configs
Check the Status of pods
All content on this page by eGov Foundation is licensed under a Creative Commons Attribution 4.0 International License.
Before you proceed with the configuration, make sure the following pre-requisites are met -
Prior Knowledge of Java/J2EE.
Prior Knowledge of Spring Boot.
Prior Knowledge of REST APIs and related concepts like path parameters, headers, JSON, etc.
Prior knowledge of Git.
Advanced knowledge of how to operate JSON data would be an added advantage to understand the service.
State Level Masters are maintained in a common folder.
ULB Level Masters are maintained in separate folders named after the ULB.
Module Specific State Level Masters are maintained by a folder named after the specific module that is placed outside the common folder.
For deploying the changes(adding new data, updating existing data or deletion) in MDMS, the MDMS service needs to be restarted.
The common master data across all ULBs and modules like department, designation, etc are placed under the common-masters folder which is under the tenant folder of the MDMS repository.
ex: egov-mdms-data/data/pb/common-masters/ Here “pb” is the tenant folder name.
The common master data across all ULBs and are module-specific are placed in a folder named after each module. These folders are placed directly under the tenant folder.
ex: egov-mdms-data/data/pb/TradeLicense/ Here “pb” is the tenant folder name and “TradeLicense“ is the module name.
Module data that are specific to each ULB like boundary data, interest, penalty, etc are configured at the ULB level. There will be a folder per ULB under the tenant folder and all the ULB’s module-specific data are placed under this folder.
ex: egov-mdms-data/data/pb/amritsar/TradeLicense/ Here “amritsar“ is the ULB name and “TradeLicense“ is the module name. All the data specific to this module for the ULB are configured inside this folder.
State Level Common-Master Data
State Level Module Specific Common-Master Data
ULB Specific Data
API Contract Reference
All content on this page by eGov Foundation is licensed under a Creative Commons Attribution 4.0 International License.
Feature
Description
Citizen Profile
Citizens can now edit name, email, passwords etc using their profile details section
Employee Profile
Employees can now edit names, email, passwords etc using their profile details section
Employee City Switch
Employees will be able to switch between multiple tenants that are mapped to his/her profile.
Common UI/UX: Common UI/UX
Document Title
Document Link
Citizen Profile
Employee Profile
Employee City Change
Not Applicable
Not Applicable
Not Applicable
Not Applicable
Not Applicable
Not Applicable
All content on this page by eGov Foundation is licensed under a Creative Commons Attribution 4.0 International License.
Generate bills
Search bills
Update bills
ULB Level
None
All content on this page by eGov Foundation is licensed under a Creative Commons Attribution 4.0 International License.
Report issues via the eGov Opensource JIRA.
The eGov suit is released under version 3.0 of the GPL.
All content on this page by eGov Foundation is licensed under a Creative Commons Attribution 4.0 International License.
Kubernetes has changed the way organizations deploy and run their applications, and it has created a significant shift in mindsets. While it has already gained a lot of popularity and more and more organizations are embracing the change, running Kubernetes in production requires care.
Although Kubernetes is open source and does it have its share of vulnerabilities, making the right architectural decision can prevent a disaster from happening.
You need to have a deep level of understanding of how Kubernetes works and how to enforce the best practices so that you can run a secure, highly available, production-ready Kubernetes cluster.
Although Kubernetes is a robust container orchestration platform, the sheer level of complexity with multiple moving parts overwhelms all administrators.
That is the reason why Kubernetes has a large attack surface, and, therefore, hardening of the cluster is an absolute must if you are to run Kubernetes in production.
There are a massive number of configurations in K8s, and while you can configure a few things correctly, the chances are that you might misconfigure a few things.
I will describe a few best practices that you can adopt if you are running Kubernetes in production. Let’s find out.
If you are running your Kubernetes cluster in the cloud, consider using a managed Kubernetes cluster such as or .
A managed cluster comes with some level of hardening already in place, and, therefore, there are fewer chances to misconfigure things. A managed cluster also makes upgrades easy, and sometimes automatic. It helps you manage your cluster with ease and provides monitoring and alerting out of the box.
Since Kubernetes is open source, vulnerabilities appear quickly and security patches are released regularly. You need to ensure that your cluster is up to date with the latest security patches and for that, add an upgrade schedule in your standard operating procedure.
Having a CI/CD pipeline that runs periodically for executing rolling updates for your cluster is a plus. You would not need to check for upgrades manually, and rolling updates would cause minimal disruption and downtime; also, there would be fewer chances to make mistakes.
That would make upgrades less of a pain. If you are using a managed Kubernetes cluster, your cloud provider can cover this aspect for you.
It goes without saying that you should patch and harden the operating system of your Kubernetes nodes. This would ensure that an attacker would have the least attack surface possible.
You should upgrade your OS regularly and ensure that it is up to date.
Kubernetes post version 1.6 has role-based access control (RBAC) enabled by default. Ensure that your cluster has this enabled.
You also need to ensure that legacy attribute-based access control (ABAC) is disabled. Enforcing RBAC gives you several advantages as you can now control who can access your cluster and ensure that the right people have the right set of permissions.
RBAC does not end with securing access to the cluster by Kubectl clients but also by pods running within the cluster, nodes, proxies, scheduler, and volume plugins.
Only provide the required access to service accounts and ensure that the API server authenticates and authorizes them every time they make a request.
Running your API server on plain HTTP in production is a terrible idea. It opens your cluster to a man in the middle attack and would open up multiple security holes.
Always use transport layer security (TLS) to ensure that communication between Kubectl clients and the API server is secure and encrypted.
Be aware of any non-TLS ports you expose for managing your cluster. Also ensure that internal clients such as pods running within the cluster, nodes, proxies, scheduler, and volume plugins use TLS to interact with the API server.
While it might be tempting to create all resources within your default namespace, it would give you tons of advantages if you use namespaces. Not only will it be able to segregate your resources in logical groups but it will also enable you to define security boundaries to resources in namespaces.
Namespaces logically behave as a separate cluster within Kubernetes. You might want to create namespaces based on teams, or based on the type of resources, projects, or customers depending on your use case.
After that, you can do clever stuff like defining resource quotas, limit ranges, user permissions, and RBAC on the namespace layer.
Avoid binding ClusterRoles to users and service accounts, instead provide them namespace roles so that users have access only to their namespace and do not unintentionally misconfigure someone else’s resources.
Cluster Role and Namespace Role Bindings
You can use Kubernetes network policies that work as firewalls within your cluster. That would ensure that an attacker who gained access to a pod (especially the ones exposed externally) would not be able to access other pods from it.
You can create Ingress and Egress rules to allow traffic from the desired source to the desired target and deny everything else.
Kubernetes Network Policy
By default, when you boot your cluster through , you get access to the kubernetes-admin config file which is the superuser for performing all activities within your cluster.
Do not share this file within your team, instead, create a separate user account for every user and only provide the right accesses to them. Bear in mind that Kubernetes does not maintain an internal user directory, and therefore, you need to ensure that you have the right solution in place to create and manage your users.
Once you create the user, you can generate a private key and a certificate signing request for the user, and Kubernetes would sign and generate a CA cert for the user.
You can then securely share the CA certificate with the user. The user can then use the certificate within kubectl to authenticate with the API server securely.
Configuring User Accounts
You can provide granular access to user and service accounts with RBAC. Let us consider a typical organization where you can have multiple roles, such as:
Application developers — These need access only to a namespace and not the entire cluster. Ensure that you provide them with access only to deploy their applications and troubleshoot them only within their namespace. You might want application developers with access to spin only ClusterIP services and might wish to grant permissions only to network administrators to define ingresses for them.
Network administrators — You can provide network admins access to networking features such as ingresses, and privileges to spin up external services.
Cluster administrators — These are sysadmins whose main job is to administer the entire cluster. These are the only people that should have cluster-admin access and only the amount that is necessary for them to do their roles.
The above is not etched in stone, and you can have a different organization policy and different roles, but the only thing to keep in mind here is that you need to enforce the principle of least privilege.
That means that individuals and teams should have only the right amount of access they need to perform their job, nothing less and nothing more.
It does not stop with just issuing separate user accounts and using TLS to authenticate with the API server. It is an absolute must that you frequently rotate and issue credentials to your users.
Set up an automated system that periodically revokes the old TLS certificates and issues new ones to your user. That helps as you don’t want attackers to get hold of a TLS cert or a token and then make use of it indefinitely.
A bootstrap token, for example, needs to be revoked as soon as you finish with your activity. You can also make use of a credential management system such as which can issue you with credentials when you need them and revoke them when you finish with your work.
Imagine a scenario where an externally exposed web application is compromised, and someone has gained access to the pod. In that scenario, they would be able to access the secrets (such as private keys) and target the entire system.
The way to protect from this kind of attack is to have a sidecar container that stores the private key and responds to signing requests from the main container.
In case someone gets access to your login microservice, they would not be able to gain access to your private key, and therefore, it would not be a straightforward attack, giving you valuable time to protect yourself.
Partitioned Approach
The last thing you would want as a cluster-admin is a situation where a poorly written microservice code that has a memory leak can take over a cluster node causing the Kubernetes cluster to crash. That is an extremely important and generally ignored area.
You can add a resource limit and requests on the pod level as a developer or the namespace as an administrator. You can use resource quotas to limit the amount of CPU, memory, or persistent disk a namespace can allocate.
It can also allow you to limit the number of pods, volumes, or services you can spin within a namespace. You can also make use of limit ranges that provide you with a minimum and maximum size of resources every unit of the cluster within the namespace can request.
That will limit users from seeking an unusually large amount of resources such as memory and CPU.
Specifying a default resource limit and request on a namespace level is generally a good idea as developers aren’t perfect. If they forget to specify a limit, then the default limit and requests would protect you from resource overrun.
The ETCD datastore is the primary source of data for your Kubernetes cluster. That is where all cluster information and the expected configuration is stored.
If someone gains access to your ETCD database, all security measures will go down the drain. They will have full control of your cluster, and they can do what they want by modifying state in your ETCD datastore.
You should always ensure that only the API server can communicate with the ETCD datastore and only through TLS using a secure mutual auth. You can put your ETCD nodes behind a firewall and block all traffic except the ones originating from the API server.
Do not use the master ETCD for any other purpose but for managing your Kubernetes cluster and do not provide any other component access to the ETCD cluster.
Enable encryption of your secret data at rest. That is extremely important so that if someone gets access to your ETCD cluster, they should not be able to view your secrets by just doing a hex dump of your secrets.
Containers run on nodes and therefore have some level of access to the host file system, however, the best way to reduce the attack surface is to architect your application in such a way that containers do not need to run as root.
Use pod security policies to restrict the pod to access HostPath volumes as that might result in getting access to the host filesystem. Administrators can use a restrictive pod policy so that anyone who gained access to one pod should not be able to access another pod from there.
Audit loggers are now a beta feature in Kubernetes, and I recommend you make use of it. That would help you troubleshoot and investigate what happened in case of an attack.
As a cluster-admin dealing with a security incident, the last thing you would want is that you are unaware of what exactly happened with your cluster and who has done what.
Remember that the above are just some general best practices and they are not exhaustive. You are free to adjust and make changes based on your use case and ways of working for your team.
All content on this page by is licensed under a .
Category
Services
GIT TAGS
Docker Artifact ID
Remarks
FSM
FSM
fsm:v1.1.0-2c66d3550a-45
This section contains steps that are involved in the build and deploy the application.
Checking out code from github
Maven Build process (includes the Junit tests):
> Apache Maven: to manage dependencies for projects. Maven can be installed as a command**-**line tool.
Creating Artifacts (EAR) on successful build process:
> An artefact is an assembly of any project assets that you put together to test, deploy or distribute your software solution or its part. > Examples are a collection of compiled Java classes or a Java application packaged in a Java archive, a Web application as a directory structure or a Web application archive, etc. > An artefact can be an archive file or a directory structure that includes the following structural elements:
Compilation output for one or more of your modules
Libraries included in module dependencies
Collections of resources (web pages, images, descriptor files, etc.)
Other artefacts
> maven deploy to nexus - Nexus is the option for hosting third-party artefacts, as well as for reusing internal artefacts across development streams. > Nexus (sonatype) is a repository manager - It allows you to proxy, collect, and manage your dependencies so that you are not constantly juggling a collection of JARs. It makes it easy to distribute your software. Internally, you configure your build to publish artefacts to Nexus and they then become available to other developers.
Inside ERP Stack: Fig.1.0: Graphical Representation of ERP Architecture
1.1 Load Balancer - A load balancer is a device that distributes network or application traffic across a cluster of servers. Load balancing improves responsiveness and increases the availability of applications. 1.2 Apache HTTP server - is a cross-platform web server. A web server is the software application that receives your request to access a web page. It runs a few security checks on your HTTP request and takes you to the web page.
2.1 Application Server - An application server is a software framework that provides both facilities to create web applications and a server environment to run them 2.1 WildFly - is a Java EE 8 certified application server. It provides a list of services as,
JDBC connection pool
ArtemisMQ - messaging broker
Resource adapter
EJB container - where you can deploy remote services
Our ERP application architecture follows the 3-tier architecture for web applications*.
This section is to be referred to only if you want the application to run using any IP address or domain name.
Domains should be registered with hosts
Sub-domains must be created and should point to the Load Balancer IP (elasticIP)
> Sub-domains are like: multi-tenant based, environment(DEV/QA/UAT) based, and others like issues.jira, etc., > create name-based virtual hosts for the sub-domains, which helps in picking up the right application servers, and schemas likewise. tenant.env.domain = name name → hosts, schemas, etc., which helps to access the application at right hosts pointing to.
To access the application using IP address:
Have an entry in the table (eg_city) in the database with an IP address of the machine where the application server is running (for ex: domainurl="172.16.2.164") to access the application using the IP address. > Access the application using the URL where 172.16.2.164 is the IP and 8080 is the port of the machine where the application server is running.
To access the application using a domain name:
>Have an entry in the table (eg_city) in the database with a domain name (for ex: domainurl= "www.egoverpphoenix.org") to access the application using a domain name. > Add the entry in the hosts file of your system with details as 172.16.2.164 www.egoverpphoenix.org (This needs to be done both in server machine as well as the machines in which the application needs to be accessed since this is not a public domain). > Access the application using the URL where www.egoverpphoenix.org is the domain name and 8080 is the port of the machine where the application server is running. Always start the wildfly server with the below command to access the application using the IP address or domain name. nohup ./standalone.sh -b 0.0.0.0 &
Two ways of Deployments
Manual Deployment - Copy the EAR files on the deployment folder and start the server.
Hot Deployment - using WildFly management console(it always listens at 9990), and using curl upload and publish the EAR.
Release Process Fig.2.0: Release Process Diagram *References: 3-Tier Architecture in ERP:
A typical enterprise application consists of at least three different types of components:
Presentation layer – Components that handle HTTP requests and implement either a (REST) API or an HTML‑based web UI. In an application that has a sophisticated user interface, the presentation tier is often a substantial body of code.
Business logic layer – Components that are the core of the application and implement the business rules.
Data‑access layer – Components that access infrastructure components such as databases and message brokers.
A three-tier architecture is a client-server architecture in which the functional process logic, data access, computer data storage and user interface are developed and maintained as independent modules on separate platforms. Three-tier architecture is a software design pattern and a well-established software architecture.
Fig.3.0: AWS 3-Tier Architecture Diagram
All content on this page by is licensed under a .
The SMS service is a way of communicating necessary information/updates to the users on their various transactions on DIGIT applications.
In order to update the users, there are certain notification parameters that are system configured for various steps in the application process. These configurations can be changed/reconfigured based upon the ULB requirements.
We have the below-mentioned parameters which we use for configuration:
For the SMS service to be integrated there are various things for which the vendor more or less guides us for the steps to be followed but below mentioned are a few basic steps and the generic data definitions which could be followed.
Below mentioned are the descriptions of the parameters which are needed for configuration:
Since the SMS service is a vendor delivered service for which the below steps would have to be followed:
Download the data template attached to this page.
Get a good understanding of all the headers in the template sheet, their data type, size, and definitions by referring to the ‘Data Definition’ section of this document.
In case of any doubt, please reach out to the person who has shared this template with you to discuss and clear your doubts.
The SMS vendor has to provide the data in the data template attached.
The checklist is a set of activities to be performed one the data is filled into a template to ensure data type, size, and format of data is as per the expectation. These activities have been divided into 2 groups as given below.
This checklist covers all the activities which are common across the entities.
This checklist covers the activities which are specific to the entity.
All content on this page by is licensed under a .
This page discusses the provisioning of the Kubernetes cluster which is an abstracted infrastructure requirement for DIGIT to be deployed. Learn how to provision infra-as-code on AWS using terraform.
All content on this page by eGov Foundation is licensed under a Creative Commons Attribution 4.0 International License.
Configuring Master Data for a new module requires creating a new module in the master config file and adding master data. For better organizing, create all the master data files belonging to the module in the same folder. Organizing in the same folder is not mandatory it is based on the moduleName in the Master data file.
Before you proceed with the configuration, make sure the following pre-requisites are met -
User with permission to edit the git repository where MDMS data is configured.
These data can be used to validate the incoming data.
After adding the new module data, the MDMS service needs to be restarted to read the newly added data.
The Master config file is structured as below. Each key in the Master config is a module and each key in the module is a master.
The new module can be added below the existing modules in the master config file.
Please check the link to create new master
All content on this page by is licensed under a .
ULB level setup involves the configuration of ULB specific data parameters such as ULB boundaries, ULB bank accounts, and hierarchy details.
All content on this page by is licensed under a .
This section discusses the supported cloud environment for DIGIT services. It provides information on where and how DIGIT is deployed. Further, it offers guidelines on estimating the infrastructural requirements for cloud support.
Supported Cloud List
All content on this page by is licensed under a .
An email account of the client/state team has to be set up in order to receive/send the email notifications.
In order to achieve the functionality, an email account has to be set up at there server since most of the states would defer from creating an account with the Gmail/public server. Further, this email account has to be integrated with the various DIGIT modules.
A ULB is divided into certain categories of boundaries by ULB administrative authorities in order to carry out ULB’s functions better. A ULB/City could be divided by a different set of delimitation of boundaries based on functions as given below.
Revenue - Delimitation of ULB into boundaries to perform the target setting and collection of revenue.
“Resource Request” and a “Resource Limit” when defining how many resources a container within a pod should receive.
Containerising applications and running them on Kubernetes doesn’t mean we can forget all about resource utilization. Our thought process may have changed because we can much more easily scale-out our application as demand increases, but many times we need to consider how our containers might fight with each other for resources. Resource Requests and Limits can be used to help stop the “noisy neighbour” problem in a Kubernetes Cluster.
To put things simply, a resource request specifies the minimum amount of resources a container needs to successfully run. Thought of in another way, this is a guarantee from Kubernetes that you’ll always have this amount of either CPU or Memory allocated to the container.
Why would you worry about the minimum amount of resources guaranteed to a pod? Well, its to help prevent one container from using up all the node’s resources and starving the other containers from CPU or memory. For instance, if I had two containers on a node, one container could request 100% of that nodes processor. Meanwhile, the other container would likely not be working very well because the processor is being monopolized by its “noisy neighbour”.
In Kubernetes, an Ingress is an object that allows access to your Kubernetes services from outside the Kubernetes cluster. You configure access by creating a collection of rules that define which inbound connections reach which services.
This lets you consolidate your routing rules into a single resource. For example, you might want to send requests to example.com/api/v1/ to an api-v1 service, and requests to example.com/api/v2/ to the api-v2 service. With an Ingress, you can easily set this up without creating a bunch of LoadBalancers or exposing each service on the Node.
An API object that manages external access to the services in a cluster, typically HTTP.
cd /eGov-infraOps/egov-deployergo run main.go deploy -e dev -p -c 'kafka-v2,redis,zookeeper-v2,elasticsearch-data-v1,elasticsearch-master-v1,playground,cert-manager,kafka-connect,kafka-connect-restart-tasks,kibana-v1,nginx-ingress'kubectl get pods --all-namespaces{
"Version": "2012-10-17",
"Statement": [
{
"Effect": "Allow",
"Action": [
"iam:GetInstanceProfile",
"iam:ListInstanceProfiles"
],
"Resource": "arn:aws:iam::YOUR_ACCOUNT_ID:instance-profile/*"
},
{
"Effect": "Allow",
"Action": [
"iam:CreateRole",
"iam:DeleteRole",
"iam:DeleteRolePolicy",
"iam:GetRole",
"iam:ListAttachedRolePolicies",
"iam:ListRolePolicies",
"iam:PassRole",
"iam:PutRolePolicy"
],
"Resource": "arn:aws:iam::YOUR_ACCOUNT_ID:role/kubernetes-*"
},
{
"Effect": "Allow",
"Action": [
"iam:AddRoleToInstanceProfile",
"iam:CreateInstanceProfile",
"iam:DeleteInstanceProfile",
"iam:GetInstanceProfile",
"iam:RemoveRoleFromInstanceProfile"
],
"Resource": "arn:aws:iam::YOUR_ACCOUNT_ID:instance-profile/kubernetes-*"
},
{
"Effect": "Allow",
"Action": [
"ec2:*",
"elasticloadbalancing:CreateListener",
"elasticloadbalancing:CreateRule",
"elasticloadbalancing:CreateTargetGroup",
"elasticloadbalancing:CreateLoadBalancer",
"elasticloadbalancing:ConfigureHealthCheck",
"elasticloadbalancing:DeleteListener",
"elasticloadbalancing:DeleteRule",
"elasticloadbalancing:DeleteTargetGroup",
"elasticloadbalancing:DeleteLoadBalancer",
"elasticloadbalancing:DeregisterTargets",
"elasticloadbalancing:DescribeListeners",
"elasticloadbalancing:DescribeRules",
"elasticloadbalancing:DescribeTargetGroupAttributes",
"elasticloadbalancing:DescribeTargetGroups",
"elasticloadbalancing:DescribeTargetHealth",
"elasticloadbalancing:DescribeLoadBalancers",
"elasticloadbalancing:DescribeLoadBalancerAttributes",
"elasticloadbalancing:ModifyListener",
"elasticloadbalancing:ModifyRule",
"elasticloadbalancing:ModifyTargetGroup",
"elasticloadbalancing:ModifyTargetGroupAttributes",
"elasticloadbalancing:ModifyLoadBalancerAttributes",
"elasticloadbalancing:RegisterTargets",
"elasticloadbalancing:RegisterInstancesWithLoadBalancer",
"elasticloadbalancing:RemoveListenerCertificates",
"elasticloadbalancing:SetIpAddressType",
"elasticloadbalancing:SetRulePriorities",
"elasticloadbalancing:SetSecurityGroups",
"elasticloadbalancing:SetSubnets",
"elasticloadbalancing:SetWebAcl",
"sts:GetFederationToken"
],
"Resource": "*"
}
]
}FSM Calculator
fsm-calculator:v1.1.0-2c66d3550a-2
Vehicle
vehicle:v1.1.0-2c66d3550a-31
Vendor
vendor:v1.1.0-2c66d3550a-9
Inbox
inbox:v1.1.1-3d4c447770-60
Shared service in DIGIT
Digit-UI fsm_v1.1
DIGIT UI
digit-ui:v1.5.0-758445286d-321
Shared service in DIGIT
DIGIT Dependency Builds
The FSM release is bundled with the DIGIT 2.7 release hence the release builds for the DIGIT 2.7 release is available here.
Configs v1.1
MDMS v1.1
Localization v1.1


Worker and slave nodes.
REST API support and Notification management.
Individual files, directories and archives.
Deploy the same to the respective environments:
Undertow - lightweight and performant web server
Batch job scheduler to execute tasks and jobs
Redis cache for (Tokens, auth, sessions, etc.,)
Elastic Search
Postgres as DB
Alphanumeric
64
Yes
The corresponding value of the parameter
Verify the data once again by going through the checklist and making sure that each and every point mentioned in the checklist is covered.
1
sms.provider.url
www.xyz.com
2
sms.username.parameter
mnsbihar@001
3
sms.username.value
***
1
Parameter
Alphanumeric
64
Yes
The parameter required to be configured
2
1
Make sure that each and every point in this reference list has been taken care of.
1
Make sure that the vendor should support multiple language functionality and especially the local language of the state.
-
Value
In order to achieve the above functionality, we require the below-mentioned details
1
1
Email ID
Alphanumeric
N/A
Yes
Email id which is being configured
2
Below steps could be followed in order to fill the template:
Download the data template attached to this page.
Get a good understanding of all the headers in the template sheet, their data type, size, and definitions by referring to the ‘Data Definition’ section of this document.
In case of any doubt, please reach out to the person who has shared this template with you to discuss and clear your doubts.
Ask the state to gather all the data related to the technical configuration from the email server settings.
Get the attached template filled from the state and a sample data is provided in the data table section for reference.
The data would be available in the POP and IMAP account settings at the server level.
Verify the data once again by going through the checklist and taking care of each and every point mentioned in the checklist.
The checklist is a set of activities to be performed one the data is filled into a template to ensure data type, size, and format of data is as per the expectation. These activities have been divided into 2 groups as given below.
This checklist covers all the activities which are common across the entities.
1
Make sure that each and every point in this reference list has been taken care of
Not Applicable
All content on this page by eGov Foundation is licensed under a Creative Commons Attribution 4.0 International License.
Below listed are the technical skillsets that are required to work on eDCR service. It is expected that the team planning on attending training is well versed with the mentioned technologies before they attend eGov training sessions.
Java and REST APIS
Postgres
Maven
Spring framework
Basics of 2D CAD Drawings
Git
Postman
YAML/JSON
Strong working knowledge of Linux, command, VM Instances, networking, storage
The session, cache, and tokens handling (Redis-server)
Understanding of VM types, Linux OS types, LoadBalancer, VPC, Subnets, Security Groups, Firewall, Routing, DNS
Experience setting up CI like Jenkins and creating pipelines
Artifactory - Nexus, verdaccio, DockerHub, etc
Experience in setting up SSL certificates and renewal
Gitops, Git branching, PR review process. Rules, Hooks, etc.
JBoss Wildfly, Apache, Nginx, Redis and Postgres
Trainees are expected to have laptops/ desktops configured as mentioned below with all the software required to run the eDCR service application
Laptop for hands-on training with 16GB RAM and OS preferably Ubuntu
All developers need to have Git ids
Install VSCode/IntelliJ/Eclipse
Install Git
Install
Install
Install 6
Postman
Install LibreCAD
Application Server
There are knowledge assets available on the Net for general items and eGov assets for DIGIT services. Here you can find references to each of the topics of importance. It is mandated the trainees do a self-study of all the software mentioned in the prerequisites using the reference materials shared.
Git
Do you have a Git account?
Do you know how to clone a repository, pull updates, push updates?
Do you know how to give a pull request and merge the pull request?
Postgres
How to create database and set up privileges?
How to add index on table?
How to use aggregation functions in psql?
Postman
Call a REST API from Postman with proper payload and show the response
Setup any service locally(MDMS or user service has least dependencies) and check the API’s using postman
All content on this page by eGov Foundation is licensed under a Creative Commons Attribution 4.0 International License.
Administration - Delimitation of ULB into boundaries for the better administration of ULB.
Locality/ Location - Delimitation of ULB into boundaries based on the places known to citizen with names and easily identifiable by the common person.
All these authorities have designated certain levels of boundary classification for a certain ULB.
The below mention table is used to collect data for the types of hierarchy being followed:
1
ADM
Administration
Administration level boundary classified on the basis of administrative functions such as scrutinize certain rules and regulations
2
REV
Revenue
Revenue-based classification of a ULB is done on the basis of revenue collection
3
1
Code
Alphabet
64
Yes
Code is used to identify a certain classification of the type of boundary hierarchy
2
Download the data template attached to this page.
Get a good understanding of all the headers in the template sheet, their data type, size, and definitions by referring to the ‘Data Definition’ section of this document.
In case of any doubt, please reach out to the person who has shared this template with you to discuss and clear your doubts.
Identify all the types of boundaries which are being used in the state in order to carry out various administrative/revenue functions.
Start filling the data starting from serial no. and complete a record at once. repeat this exercise until the entire data is filled into a template.
Then fill up the hierarchy types and the codes in the respective columns in the template.
Code should be created for the type of boundary being classified.
A brief description of the boundary hierarchy type would be helpful.
Verify the data once again by going through the checklist and taking care of each and every point mentioned in the checklist.
The checklist is a set of activities to be performed one the data is filled into a template to ensure data type, size, and format of data is as per the expectation. These activities have been divided into 2 groups as given below.
This checklist covers all the activities which are common across the entities.
1
Make sure that each and every point in this reference list has been taken care of
This checklist covers the activities which are specific to the entity.
1
Make sure that the hierarchies types should be uniform across all the ULB’s /cities in the state
-
2
Only 3 types of boundary hierarchies are allowed
-
All content on this page by eGov Foundation is licensed under a Creative Commons Attribution 4.0 International License.
What a resource request can do, is ensure that at least a small part of that processor’s time is reserved for both containers. This way if there is resource contention, each pod will have a guaranteed, minimum amount of resources in which to still function.
As you might guess, a resource limit is the maximum amount of CPU or memory that can be used by a container. The limit represents the upper bounds of how much CPU or memory that a container within a pod can consume in a Kubernetes cluster, regardless of whether or not the cluster is under resource contention.
Limits prevent containers from taking up more resources on the cluster than you’re willing to let them.
As a general rule, all containers should have a request for memory and CPU before deploying to a cluster. This will ensure that if resources are running low, your container can still do the minimum amount of work to stay in a healthy state until those resources free up again (hopefully).
Limits are often used in conjunction with requests to create a “guaranteed pod”. This is where the request and limit are set to the same value. In that situation, the container will always have the same amount of CPU available to it, no more or less.
At this point, you may be thinking about adding a high “request” value to make sure you have plenty of resources available for your container. This might sound like a good idea, but have dramatic consequences for scheduling on the Kubernetes cluster. If you set a high CPU request, for example, 2 CPUs, then your pod will ONLY be able to be scheduled on Kubernetes nodes that have 2 full CPUs available that aren’t reserved by other pods’ requests. In the example below, the 2 vCPU pods couldn’t be scheduled on the cluster. However, if you were to lower the “request” amount to say 1 vCPU, it could.
Let us try out using a CPU limit on a pod and see what happens when we try to request more CPU than we’re allowed to have. Before we set the limit though, let us look at a pod with a single container under normal conditions. I’ve deployed a resource consumer container in my cluster and by default, you can see that I am using 1m CPU(cores) and 6 Mi(bytes) of memory.
NOTE: CPU is measured in millicores so 1000m = 1 CPU core. Memory is measured in Megabytes.
Ok, now that we have seen the “no-load” state, let us add some CPU load by making a request to the pod. Here, I’ve increased the CPU usage on the container to 400 millicores.
After the metrics start coming in, you can see that I’ve got roughly 400m used on the container as you’d expect to see.
Now I’ve deleted the container and we’ll edit the deployment manifest so that it has a limit on CPU.
After redeploying the container and again increasing my CPU load to 400m, we can see that the container is throttled to 300m instead. I’ve effectively “limited” the resources the container could consume from the cluster.
OK, next, I’ve deployed two pods into my Kubernetes cluster and those pods are on the same worker node for a simple example of contention. I’ve got a guaranteed pod that has 1000m CPU set as a limit but also as a request. The other pod is unbounded, meaning there is no limit on how much CPU it can utilize.
After the deployment, each pod is really not using any resources as you can see here.
We make a request to increase the load on my non-guaranteed pod.
And if we look at the container's resources you can see that even though my container wants to use a 2000m CPU, it’s only actually using a 1000m CPU. The reason for this is that the guaranteed pod is guaranteed a 1000m CPU, whether it is actively using that CPU or not.
Kubernetes uses Resource Requests to set a minimum amount of resources for a given container so that it can be used if it needs it. You can also set a Resource Limit to set the maximum amount of resources a pod can utilize.
Taking these two concepts and using them together can ensure that your critical pods always have the resources that they need to stay healthy. They can also be configured to take advantage of shared resources within the cluster.
Be careful setting resource requests too high so your Kubernetes scheduler can still scheduler these pods. Good luck!
Property Registration
Property Update
Search Property
Search Application
My Payments
Search and Pay
View Property
View Mutation Application
Pay Mutation Fee
View Payment History
Search Property
Search Application
Assess Property
View Mutation Application
Collect Mutation Fee
Update Property
Key Feature
Description
CITIZEN
Property Registration
The change in information flow, ADD UNIT.
Property Update
The same changes which are applied for property registration.
Search Property
Search by Door no. and Owner’s Name.
Search Application
It was missing, added in this release.
None.
Reports revamp
Output Documents PDF revamp
Doc Links
Description
In order to start the configuration for the google play store following would be required:
1.
*******
1
Email Id
Alphanumeric
NA
Yes
Gmail account id through which the app would be published on the google play store
2
Download the data template attached to this page.
Get a good understanding of all the headers in the template sheet, their data type, size, and definitions by referring to the ‘Data Definition’ section of this document.
In case of any doubt, please reach out to the person who has shared this template with you to discuss and clear your doubts.
Ask the state team/client to create an email account on Gmail.
Ask the client to log in to the google play console and make the required payment so that further tasks could be processed.
Ask the client to share the email id and password in the template.
Verify the data once again by going through the checklist and making sure that each and every point mentioned in the checklist is covered.
The checklist is a set of activities to be performed one the data is filled into a template to ensure data type, size, and format of data is as per the expectation. These activities have been divided into 2 groups as given below.
This checklist covers all the activities which are common across the entities.
1
Make sure that each and every point in this reference list has been taken care of
This checklist covers the activities which are specific to the entity.
1
Make sure that the email account is created on Gmail since the play store works on Google accounts only
-
2
Email Id and Password is required in order to login to the google play store for configuration
-
All content on this page by eGov Foundation is licensed under a Creative Commons Attribution 4.0 International License.
For clarity, this guide defines the following terms:
Node: A worker machine in Kubernetes, part of a cluster.
Cluster: A set of Nodes that run containerized applications managed by Kubernetes. For this example, and in most common Kubernetes deployments, nodes in the cluster are not part of the public internet.
Edge router: A router that enforces the firewall policy for your cluster. This could be a gateway managed by a cloud provider or a physical piece of hardware.
Cluster network: A set of links, logical or physical, that facilitate communication within a cluster according to the Kubernetes .
Service: A Kubernetes that identifies a set of Pods using selectors. Unless mentioned otherwise, Services are assumed to have virtual IPs only routable within the cluster network.
Ingress exposes HTTP and HTTPS routes from outside the cluster to services within the cluster. Traffic routing is controlled by rules defined on the Ingress resource.
An Ingress may be configured to give Services externally-reachable URLs, load balance traffic, terminate SSL / TLS, and offer name based virtual hosting. An Ingress controller is responsible for fulfilling the Ingress, usually with a load balancer, though it may also configure your edge router or additional frontends to help handle the traffic.
An Ingress does not expose arbitrary ports or protocols. Exposing services other than HTTP and HTTPS to the internet typically uses a service of type Service.Type=NodePort or Service.Type=LoadBalancer.
You must have an ingress controller to satisfy an Ingress. Only creating an Ingress resource has no effect.
You may need to deploy an Ingress controller such as ingress-nginx. You can choose from a number of Ingress controllers.
Ideally, all Ingress controllers should fit the reference specification. In reality, the various Ingress controllers operate slightly differently.
An Ingress resource example:
As with all other Kubernetes resources, an Ingress needs apiVersion, kind, and metadata fields. The name of an Ingress object must be a valid DNS subdomain name. For general information about working with config files, see deploying applications, configuring containers, managing resources. Ingress frequently uses annotations to configure some options depending on the Ingress controller, an example of which is the rewrite-target annotation. Different Ingress controller support different annotations. Review the documentation for your choice of Ingress controller to learn which annotations are supported.
The Ingress spec has all the information needed to configure a load balancer or proxy server. Most importantly, it contains a list of rules matched against all incoming requests. Ingress resource only supports rules for directing HTTP(S) traffic.
Each HTTP rule contains the following information:
An optional host. In this example, no host is specified, so the rule applies to all inbound HTTP traffic through the IP address specified. If a host is provided (for example, foo.bar.com), the rules apply to that host.
A list of paths (for example, /testpath), each of which has an associated backend defined with a service.name and a service.port.name or service.port.number. Both the host and path must match the content of an incoming request before the load balancer directs traffic to the referenced Service.
A backend is a combination of Service and port names as described in the Service doc or a custom resource backend by way of a CRD. HTTP (and HTTPS) requests to the Ingress that matches the host and path of the rule are sent to the listed backend.
A defaultBackend is often configured in an Ingress controller to service any requests that do not match a path in the spec.
Learn about the Ingress API
Learn about Cert-manager
All content on this page by eGov Foundation is licensed under a Creative Commons Attribution 4.0 International License.
1
ACT
Accountant
अकाउंटेंट
2
AO
Accounts Officer
लेखा अधिकारी
1
Designation Code
Alphanumeric
64
Yes
Unique Identifier for designation which is used as a reference for child configuration mapping
2
Download the data template attached to this page.
Have it open and go through all the headers and understand the meaning given in this document under section 'Data Definition'.
Make sure all the headers, its data type, field size and its definition/ description are understood properly.
In case of any doubt, please reach out to the person who has shared this document with you to discuss the same and clear out the doubts.
Identify all the designations exists in the ULB, refer to governments gazette to define the designations in ULBs.
Start filling the data starting from serial no. and complete a record at once. repeat this exercise until the entire data is filled into a template.
Verify the data once again by going through the checklist and taking care of each and every point mentioned in the checklist.
The checklist is a set of activities to be performed after the data is filled into a template to ensure data type, size, and format of data is as per the expectation. These activities have been divided into 2 groups as given below.
This checklist covers all the activities which are common across the entities.
To see the common checklist refer to the Checklist page consisting of all the activities which are to be followed to ensure complete and quality data.
This checklist covers the activities which are specific to the entity. There is no entity-specific checklist is applicable for this entity.
All content on this page by eGov Foundation is licensed under a Creative Commons Attribution 4.0 International License.
Compute Admin: roles/compute.admin
Service Account User: roles/iam.serviceAccountUser
Viewer: roles/viewer
If the gcloud CLI is installed, a service account can be created like follow:
A Google Service Account for the platform has to be created, see Creating and managing service accounts. The result is a JSON file containing the fields
type
project_id
private_key_id
private_key
client_email
client_id
auth_uri
token_uri
auth_provider_x509_cert_url
client_x509_cert_url
The private key is BASE64 containing the newlines as non-escaped strings "\n”. So to avoid the resulting troubles the machine controller expects the whole service account encoded in BASE64.
The base64 encoded secret of the service account will be passed in the field serviceAccount of the cloudProviderSpec of the machine deployment. The encoded secret can be entered in the UI field Service Account
All content on this page by eGov Foundation is licensed under a Creative Commons Attribution 4.0 International License.
Payment preference
Multiple trips per service request
Key Feature
Description
FSM PostPay and Multitrip
Citizen payment preference
Postpay DSO flow
Postpay ULB Employee flow
Multitrip request per application at ULB application in postpay
Multitrip entry per application at DSO application in postpay
Feature
Description
FSM PostPay and Multitrip
Vehicle trip status in employee inbox and application
Vehicle capacity selection during assignment instead of vehicle make
Citizen gives feedback on number of trips
Record citizen gender on application
FSTPO inbox sort
Better UX/UI for citizen application flow
Dashboard with insights on Payment Preference, Gender, Request Status and Customer Rating
Doc Links
Description
User Manual
Sample Master config file
Sample Module folder

MDMS stands for Master Data Management Service. MDMS is One of the applications in the eGov DIGIT core group of services. This service aims to reduce the time spent by developers on writing codes to store and fetch master data ( primary data needed for module functionality ) which doesn’t have any business logic associated with them.
Before you proceed with the configuration, make sure the following pre-requisites are met -
Prior Knowledge of Java/J2EE.
Prior Knowledge of Spring Boot.
Prior Knowledge of REST APIs and related concepts like path parameters, headers, JSON, etc.
Prior knowledge of Git.
The MDMS service reads the data from a set of JSON files from a pre-specified location.
It can either be an online location (readable JSON files from online) or offline (JSON files stored in local memory).
The JSON files will be in a prescribed format and store the data on a map. The tenantID of the file serves as a key and a map of master data details as values.
For deploying the changes in MDMS data, the service needs to be restarted.
The changes in MDMS data could be adding new data, updating existing data, or deletion.
The config JSON files to be written should follow the listed rules
The config files should have JSON extension
The file should mention the tenantId, module name, and the master name first before defining the data
Example Config JSON for “Billing Service”
All content on this page by is licensed under a .
DIGIT being a containers based platform and orchestrated on kubernetes, let's discuss about some key security practices to protect the infrastructure.
Security is always a difficult subject to approach either by the lack of experience; either by the fact you should know when the level of security is right for what you have to secure.
Security is a major concern when it comes to government systems and infra. As an architect, we can consider that working with technically educated people (engineers, experts) and tools (systems, frameworks, IDE) should prevent key VAPT issues.
However, it’s quite difficult to avoid, a certain infatuation from different categories of people to try to hack the systems.
There aren’t only bug fixes in each release but also new security measures to require advantage of them, we recommend working with the newest stable version.
Updates and support could also be harder than the new features offered in releases, so plan your updates a minimum of once a quarter. Significantly simplify updates can utilize the providers of managed Kubernetes-solutions.
Use RBAC (Role-Based Access Control) to regulate who can access and what rights they need. Usually, RBAC is enabled by default in version 1.6 and later (or later for a few providers), but if you’ve got been updated since then and didn’t change the configuration, you ought to double-check your settings.
However, enabling RBAC isn’t enough — it still must be used effectively. within the general case, the rights to the whole cluster (cluster-wide) should be avoided, giving preference to rights in certain namespaces. Avoid giving someone cluster administrator privileges even for debugging — it’s much safer to grant rights only necessary and from time to time.
If the appliance requires access to the Kubernetes API, create separate service accounts. and provides them with the minimum set of rights required for every use case. This approach is far better than giving an excessive amount of privilege to the default account within the namespace.
Creating separate namespaces is vital because of the first level of component isolation. it’s much easier to regulate security settings — for instance, network policies — when different types of workloads are deployed in separate namespaces.
To get in-depth knowledge on Kubernetes, enrol a love demo on
A good practice to limit the potential consequences of compromise is to run workloads with sensitive data on a fanatical set of machines. This approach reduces the risk of a less secure application accessing the application with sensitive data running in the same container executable environment or on the same host.
For example, a kubelet of a compromised node usually has access to the contents of secrets only if they are mounted on pods that are scheduled to be executed on the same node. If important secrets are often found on multiple cluster nodes, the attacker will have more opportunities to urge them.
Separation can be done using node pools (in the cloud or for on-premises), as well as Kubernetes controlling mechanisms, such as namespaces, taints, tolerations, and others.
Sensitive metadata — for instance, kubelet administrative credentials, are often stolen or used with malicious intent to escalate privileges during a cluster. For example, a recent find within Shopify’s bug bounty showed in detail how a user could exceed authority by receiving metadata from a cloud provider using specially generated data for one of the microservices.
The GKE metadata concealment function changes the mechanism for deploying the cluster in such how that avoids such a drag. And we recommend using it until a permanent solution is implemented.
Network Policies — allow you to control access to the network in and out of containerized applications. To use them, you must have a network provider with support for such a resource. For managed Kubernetes solution providers such as Google Kubernetes Engine (GKE), support will need to be enabled.
Once everything is ready, start with simple default network policies — for example, blocking (by default) traffic from other namespaces.
Pod Security Policy sets the default values used to start workloads in the cluster. Consider defining a policy and enabling the Pod Security Policy admission controller: the instructions for these steps vary depending on the cloud provider or deployment model used.
In the beginning, you might want to disable the NET_RAW capability in containers to protect yourself from certain types of spoofing attacks.
To improve host security, you can follow these steps:
Ensure that the host is securely and correctly configured. One way is CIS Benchmarks; Many products have an auto checker that automatically checks the system for compliance with these standards.
Monitor the network availability of important ports. Ensure that the network is blocking access to the ports used by kubelet, including 10250 and 10255. Consider restricting access to the Kubernetes API server — with the exception of trusted networks. In clusters that did not require authentication and authorization in the kubelet API, attackers used to access to such ports to launch cryptocurrency miners.
Minimize administrative access to Kubernetes hosts Access to cluster nodes should in principle be limited: for debugging and solving other problems, as a rule, you can do without direct access to the node.
Make sure that audit logs are enabled and that you are monitoring for the occurrence of unusual or unwanted API calls in them, especially in the context of any authorization failures — such entries will have a message with the “Forbidden” status. Authorization failures can mean that an attacker is trying to take advantage of the credentials obtained.
Managed solution providers (including GKE) provide access to this data in their interfaces and can help you set up notifications in case of authorization failures.
Follow these guidelines for a more secure . Remember that even after the cluster is configured securely, you need to ensure security in other aspects of the configuration and operation of containers. To improve the security of the technology stack, study the tools that provide a central system for managing deployed containers, constantly monitoring and protecting containers and cloud-native applications.
All content on this page by is licensed under a .
Bill format can be configured on a module level. Few components on the DIGIT sample bill can be configured on a state level and few at ULB level. Components that can be changed on a module level can be categorized as mentioned:
Important messages: Values can be configured on a module level - state level
Download the data template attached to this page.
Get a good understanding of all the headers in the template sheet, their data type, size, and definitions by referring to the ‘Data Definition’ section of this document.
In case of any doubt, please reach out to the person who has shared this template with you to discuss and clear your doubts.
Get information about the bill format followed by state
The checklist is a set of activities to be performed one the data is filled into a template to ensure data type, size, and format of data is as per the expectation. These activities have been divided into 2 groups as given below.
This checklist covers all the activities which are common across the entities.
Entity Specific Checklist is not required separately.
All content on this page by is licensed under a .
This section contains architectural details about DIGIT deployment. It discusses the various activities in a sequence of steps to provision required infra and deploy DIGIT.
Every code commit is well-reviewed and squash merge to branches through Pull Requests.
Trigger the CI Pipeline that ensures code quality, vulnerability assessments, CI tests before building the artefacts.
Artefact is version controlled based on Semantic versioning based on the nature of the change.
After successful CI, Jenkins bakes the Docker Images with the versioned artefacts and pushes the baked docker image to Docker Registry.
As all the DIGIT services that are containerized and deployed on Kubernetes, we need to prepare deployment manifests. The same can be found .
DIGIT has built helm charts to using the standard helm approach to ease managing the service-specific configs, customisations, switch/toggle, secrets, etc.
Golang base Deployment script that reads the values from the helm charts template and deploys into the cluster.
All content on this page by is licensed under a .
This section contains docs and information resources that guide you through the key DevOps concepts and its role in managing the DIGIT platform.
All content on this page by is licensed under a .
apiVersion: apps/v1
kind: Deployment
metadata:
labels:
run: resource-consumer
name: resource-consumer
namespace: default
spec:
progressDeadlineSeconds: 600
replicas: 1
revisionHistoryLimit: 10
selector:
matchLabels:
run: resource-consumer
strategy:
rollingUpdate:
maxSurge: 25%
maxUnavailable: 25%
type: RollingUpdate
template:
metadata:
labels:
run: resource-consumer
spec:
containers:
- image: theithollow/resource-consumer:v1
imagePullPolicy: IfNotPresent
name: resource-consumer
terminationMessagePath: /dev/termination-log
terminationMessagePolicy: File
resources:
requests:
memory: "100Mi"
cpu: "100m"
limits:
memory: "300Mi"
cpu: "300m"
dnsPolicy: ClusterFirst
restartPolicy: Always
schedulerName: default-scheduler
securityContext: {}
terminationGracePeriodSeconds: 30 internet | [ Ingress ] --|-----|-- [ Services ]apiVersion: extensions/v1beta1kind: Ingressmetadata: annotations: kubernetes.io/ingress.class: nginx name: service1 namespace: egovspec: rules: - host: foo.bar.com http: paths: - backend: serviceName: service1 servicePort: 8080 path: /foo tls: - hosts: - foo.bar.com secretName: foo.bar.com-tls-certs# create new service account
gcloud iam service-accounts create k8c-cluster-provisioner
# get your service account id
gcloud iam service-accounts list
# get your project id
gcloud projects list
# create policy binding
gcloud projects add-iam-policy-binding YOUR_PROJECT_ID --member 'serviceAccount:YOUR_SERVICE_ACCOUNT_ID' --role='roles/compute.admin'
gcloud projects add-iam-policy-binding YOUR_PROJECT_ID --member 'serviceAccount:YOUR_SERVICE_ACCOUNT_ID' --role='roles/iam.serviceAccountUser'
gcloud projects add-iam-policy-binding YOUR_PROJECT_ID --member 'serviceAccount:YOUR_SERVICE_ACCOUNT_ID' --role='roles/viewer'# create a new json key for your service account
gcloud iam service-accounts keys create --iam-account YOUR_SERVICE_ACCOUNT k8c-cluster-provisioner-sa-key.json
# create base64 encoded secret
base64 -w 0 ./k8c-cluster-provisioner-sa-key.json{
"<module1>":{
"<master1>":{},
"<master2>":{},
...
},
"<module2>":{
<master3>:{},
<master4>:{},
...
},
...
}My Payments
It was missing, added in this release.
Search and Pay
Bill Details and Payer’s Details are added to payment flow.
View Property
View property screen to display the information.
View Mutation Application
Display of information changes.
Pay Mutation Fee
Collect mutation fee is changed to view missing details.
Update Mobile No.
Revamp of UI.
EMPLOYEE
View Payment History
Payment history is added to view property details.
Search Property
Search by Door No. and Owner’s Name is added.
Search Application
It was missing and added in this release.
Assess Property
Assess property is changes to display missing details.
View Mutation Application
Mutation application view is changed to display missing details.
Collect Mutation Fee
Collect mutation fee is changed to view missing details.
Update Property
Update property is changed to view missing details.


Advanced knowledge of how to operate JSON data would be an added advantage to understand the service.
Title
Description
tenantId
Serves as a Key
moduleName
Name of the module to which the master data belongs
MasterName
The Master Name will be substituted by the actual name of the master data. The array succeeding it will contain the actual data.
Reference Doc Link 1
Reference Doc Link 2
MDMS-Rewritten
API Contract Reference
Alphanumeric
256
Yes
Each category can have multiple entries under it, ie particulars
3
Business
Text
64
Yes
The business for which the Bill format is to be configured
Classify the components on the bill and place it under any category
Map the particulars under each category with DIGIT sample bill
Verify the data once again by going through the checklist and making sure that each and every point mentioned in the checklist is covered.
1
Water Charges
Important messages
5% rebate to be given on advance payment on the bills
1
Category
Text
64
Yes
To list out the components on the bill, every particular can be grouped into a category
2
1
Make sure that each and every point in this reference list has been taken care of
Particulars
Deployment Pipeline pulls the built Image and pushes to the corresponding Env.
Capture DSO and FSTPO gender
Updated dashboards and reports
SMS notifications to ULB employees when FSTP rejects vehicle entry
Technical Documentation
Create VehicleOwner.json for create and update vehicle api validation
RoleStatusMapping
RoleStatusMapping
Update RoleStatusMapping.json for updating DSO workflow status
master-config
master-config
Update master-config.json for adding payment preference functionalit
PreFieldsConfig
PreFieldsConfig.json
Update PreFieldsConfig.json for adding paymentpreference
Roleactions
roleactions
Update roleactions.json for timeline changes on adding waiting for disposal and disposed status
PaymentType
PaymentType
Create PaymentType.json for adding pre pay and post pay workflow
FSTPORejectionReason
FSTPORejectionReason
Create FSTPORejectionReason.json for decline functionality from FSTPO
Config
Config
Updated for override functionality for EDitor and DSO for no of trips
Feature
Service Name
Changes
Description
Feature
Service Name
Changes
Description
FSM Payment preference and vehicle capacity
fsm-persister
FSM Payment preference and vehicle capacity
Vehicle trip changes
vehicle-persister.
Vehicle trip changes
ChartApiConfig.json
Feature
Changes
Description
Added new key/value pair for FSM_POST_SERVICE in service-map property
Feature
Service Name
Changes
Description
VehicleOwner
VehicleOwner
1
PT_UNIT_PENALTY
PT
Penalty
PT Penalty
1.
Code
Alphanumeric
64
Yes
The code for the tax that is being levied
2.
Download the data template attached to this page.
Get a good understanding of all the headers in the template sheet, their data type, size, and definitions by referring to the ‘Data Definition’ section of this document.
In case of any doubt, please reach out to the person who has shared this template with you to discuss and clear your doubts.
Get all the tax heads for a particular module and then proceed to the next module.
Verify the data once again by going through the checklist and making sure that each and every point mentioned in the checklist is covered.
The checklist is a set of activities to be performed on the data is filled into a template to ensure data type, size, and format of data is as per the expectation. These activities have been divided into 2 groups as given below.
This checklist covers all the activities which are common across the entities.
1
Make sure that each and every point in this reference list has been taken care of
Not Applicable
All content on this page by eGov Foundation is licensed under a Creative Commons Attribution 4.0 International License.
Filters for the date range, States, ULBs
Denominations to change the revenue metrics view
Drill down feature in the service report where state wise, ULB wise, and ward wise reports are available by clicking on the boundary name
Definitions for all the metrics and chart elements are viewable by hovering over the desired element/metric
The search feature in the filter boxes and service tabular reports
Download, share (WhatsApp, email) for individual cards and overall dashboard
Each module dashboard presents the aggregated urban data from the ward, ULB, and state levels in concise charts, graphs, and also in raw numbers as per the KPIs defined. Except for Landing Page, all the other modules are similar for both national and state-level instances.
Module
Level
Landing Page
State DSS
National DSS
Overview Page
National DSS
Property Tax
National DSS
Trade License
National DSS
Public Grievances & Redressal
National DSS
Click on the file link below to find the detailed definitions of each KPI in the dashboard.
The individual dashboard features are listed in the table below:
Key Feature
Description
Landing Page
Provides a comprehensive aggregated view of the service and revenue metrics across all the states(Total collection, Total Applications, Target Achievement, SLA compliance etc.), status of the program across states (live, under implementation, onboarded etc.), and also links to detailed dashboards of various urban modules(Property Tax, Trade Licences etc.) In the national Instance it also has a geographical map of India depicting the status of program across different states and also the status of onboarded vs live ULBs across the time period.
Overview Page
This dashboard gives a detailed view of all the metrics related to revenue and service across all the modules. Some of the metrics include top 3 / bottom 3 performing states, SLA achievement, visualisations to view total applications across time and split module wise etc.
Property Tax
Includes separate tabs for revenue and service metrics. Revenue tab includes metrics such as Total collection, target collection etc, collection by usage type graph, tabular reports of split of tax heads. Service tab includes metrics such as Total properties, total assessments, completion rate etc.
Trade License
Has separate revenue and service tabs for KPIs. Revenue tab includes metrics such as total collection, target collection, Cumulative collection across time graph, collection by trade type graph,tax head breakup etc. Service tab includes metrics such as Total applications, total licences etc, Licence by application status pie chart
Public Grievances & Redressal
Since this is a service module, there are no separate tabs and has only service metrics such as total complaints, SLA compliance, pie charts depicting complaints by channel,department, status etc. Also has a service report which is a tabular chart complaint status for each state.
None.
Sidebar navigation
About, Purpose pages
Doc Links
Description
Bihar
POP3
SMTP
SMTP
****
192.172.82.12
192.172.82.12
Auto
14
Your Name
Text
256
Yes
The name on behalf of which the email would be sent in order to receive the updates
3
Account Type
Alphanumeric
64
Yes
The type of email account type protocol which will be used to download messages
4
Incoming Mail Server
Numeric
(12,2)
Yes
The IP address of the email server through which messages would be received
5
Outgoing Mail Server(SMTP)
Numeric
(12,2)
Yes
The IP address of the email server through which messages would be sent
6
Password
Alphanumeric
64
Yes
The password of the email server
7
Incoming Server POP3 Port
Numeric
(12,2)
Yes
The port number through which the emails are received
8
Outgoing server SMTP Port
Numeric
(12,2)
Yes
The port number through which the emails are to be sent
9
Encrypted Connection Type
Alphanumeric
64
Yes
The encryption type which is used for the connection
10
Days after which the email should be removed from the server
Numeric
(12,2)
Yes
The number of days after which the email should be deleted from the server (not from the local device)
REST APIs
What are the principles to be followed when making a REST API?
When to use POST and GET?
How to define the request and response parameters?
JSON
How to write filters to extract specific data using jsonPaths?
YAML
How to read an API contract using swagger?
Maven
What is POM?
What is the purpose of maven clean install and how to do it?
What is the difference between version and SNAPSHOT?
eDCR Approach Guide
How to configuring and customizing the eDCR engine as per the state/city rules and regulations.
eDCR Service setup
Overall Flow of eDCr service, design and setup process
LOC
Locality
Location-based classification could be done in order to identify a certain place. For example, Locality of a house of a citizen could follow the below hierarchy:
House no.
Mohalla
Area
Ward
City
Boundary Hierarchy Type
Alphanumeric
256
Yes
The meaningful name to define one group of boundaries defined to perform one function
3
Description
Alphanumeric
256
Yes
A brief description of the boundary hierarchy
Password
Alphanumeric
NA
Yes
Password for the Gmail account
3
AC
Additional Commissioner
अपर आयुक्त
Designation Name (In English)
Text
256
Yes
Designation name in English
3
Designation Name (In Local Language)
Text
256
Yes
Designation Name in the local language. e.g. Hindi, Telugu etc. whichever is applicable


DIGIT has modules which require the user to pay for the service that he/ she is availing for example property tax, trade license etc. . In order to achieve the functionality, we have a common payment gateway developed which acts a liaison between DIGIT apps and external payment gateways (which depends on the client requirements).
This module facilitates payments and lookup of transaction status.
Following are the details required from the payment gateway vendor in order to configure the payment gateway:
The payment gateway is a vendor oriented service that is integrated with different modules in order to facilitate the transactions. Below mentioned are the steps which are followed:
The client has to finalize a payment gateway vendor (for example PAYU, Paytm, HDFC, AXIS atc.) depending upon the requirements.
Get a good understanding of all the headers in the template sheet, their data type, size, and definitions by referring to the ‘Data Definition’ section of this document.
In case of any doubt, please reach out to the person who has shared this template with you to discuss and clear your doubts.
The checklist is a set of activities to be performed one the data is filled into a template to ensure data type, size, and format of data is as per the expectation. These activities have been divided into 2 groups as given below.
This checklist covers all the activities which are common across the entities.
This checklist covers the activities which are specific to the entity.
All content on this page by is licensed under a .
This is the 3rd step that comes after the boundary data collection. Cross hierarchy mapping happens in case a child has a relationship with more than 2 parents. This double relationship between the child and parents could happen between different hierarchies as well.
For example: In Admin level boundary hierarchy a mohalla M1(child) could be a part of 2 Wards(parent) W1 and W2. In such a case a single Mohalla(child) has to be mapped to 2 Wards(parent).
Below is the data table for the Boundary:
Download the data template attached to this page.
Get a good understanding of all the headers in the template sheet, their data type, size, and definitions by referring to the ‘Data Definition’ section of this document.
In case of any doubt, please reach out to the person who has shared this template with you to discuss and clear your doubts.
Firstly Identify all the child levels which have a relation with more than 2 parent boundary types and their hierarchy types as well.
The checklist is a set of activities to be performed one the data is filled into a template to ensure data type, size, and format of data is as per the expectation. These activities have been divided into 2 groups as given below.
This checklist covers all the activities which are common across the entities.
This checklist covers the activities which are specific to the entity. There is no entity-specific checklist activity applicable here.
All content on this page by is licensed under a .
The departments are defined as different sections within the ULB based on which the functions performed by ULBs and employees in ULB are grouped. The budgets details of the ULBs are also defined by the department. It is suggested that the ULB across the state adopt the same department naming terminology. This document will help you in filling the department detail in the template provided.
Download the data template attached to this page.
Have it open and go through all the headers and understand the meaning given in this document under section 'Data Definition'.
Make sure all the headers, its data type, field size and its definition/ description are understood properly.
In case of any doubt, please reach out to the person who has shared this document with you to discuss the same and clear out the doubts.
The checklist is a set of activities to be performed after the data is filled into a template to ensure data type, size, and format of data is as per the expectation. These activities have been divided into 2 groups as given below.
This checklist covers all the activities which are common across the entities.
To see the common checklist refer to the page consisting of all the activities which are to be followed to ensure complete and quality data.
This checklist covers the activities which are specific to the entity. There is no entity-specific checklist is applicable for this entity.
All content on this page by is licensed under a .
For creating a new master in MDMS, create the JSON file with the master data and configure the newly created master in the master config file.
Before proceeding with the configuration, make sure the following pre-requisites are met -
User with permission to edit the git repository where MDMS data is configured.
After adding the new master, the MDMS service needs to be restarted to read the newly added data.
The new JSON file needs to contain 3 keys as shown in the below code snippet. The new master can be created either State-wise or ULB-wise. Tenant id and config in the master config file determine this.
The Master config file is structured as below. Each key in the Master config is a module and each key in the module is a master.
Each master contains the following data and the keys are self-explanatory
All content on this page by is licensed under a .
For provisioning Kubernetes clusters with the Azure cloud provider Kubermatic needs a service account with (at least) the Azure role Contributor. Please follow the following steps to create a matching service account.
Login to Azure with az.
This command will open in your default browser a window where you can authenticate. After you succefully logged in get your subscription ID.
Get your Tenant ID
create a new app with
Enter provider credentials using the values from step “Prepare Azure Environment” into Kubermatic Dashboard:
Client ID: Take the value of appId
Client Secret: Take the value of password
Tenant ID
All content on this page by is licensed under a .
{
"tenantId": "uk",
"moduleName": "BillingService",
"{$MasterName}":[ ]
}{
"tenantId": "pb",
"moduleName": "BillingService",
"BusinessService":
[
{
"businessService": "PropertyTax",
"code": "PT",
"collectionModesNotAllowed": [ "DD" ],
"partPaymentAllowed": true,
"isAdvanceAllowed": true,
"isVoucherCreationEnabled": true
}
]
}
Document
NA
Yes
This is a separate document which is sent by the vendor in order to help ideally helps us to retrieve the transaction status
3
Redirect Working Key
Alphanumeric
64
Yes
The working key is provided by the vendor for the generation of the redirection URL
4
Merchant Id
Alphanumeric
64
Yes
Merchant id provided by the vendor
5
Test credential of Debit Card/ Net Banking
Document
NA
Yes
These are the details of the debit/credit card or net banking credentials which would help us test the gateway
This contains the card number/Code/Account number etc.
These details are to be received separately for both prods as well as UAT.
Get the IP address for UAT and Production environments whitelisted from the vendor.
Verify the data once again by going through the checklist and making sure that each and every point mentioned in the checklist is covered.
1.
File Name
File Name
XYZ#123
UDDUK
File Name
1
Integration Kit
Document
NA
Yes
This is a document that is sent by the vendor which contains information on how to integrate the service
2
1
Make sure that each and every point in this reference list has been taken care of
1
While finalizing a payment gateway vendor make sure that the vendor should support transactions into multiple bank accounts based on the key( which would be tenantid)
-
2
Do get the details for both the environments separately i.e UAT and Production
-
API Documentation
M1
Ward
W2
Mohalla
M1
2
Ward
W3
Mohalla
M2
Ward
W4
Mohalla
M2
Text
256
Yes
The type of hierarchy 2 the boundary belongs to which is to be mapped with other boundaries in hierarchy 1. Refer
3
Boundary Type
Text
64
Yes
This is the type of boundary from hierarchy 1. Refer
4
Boundary Code
Alphanumeric
64
Yes
This is the code of the boundary for the boundary from hierarchy 1. Refer
5
Boundary Type
Text
64
Yes
This is the type of boundary from hierarchy 2. Refer
6
Boundary Code
Alphanumeric
64
Yes
This is the code of the boundary for the boundary from hierarchy 2. Refer
Fill up the boundary hierarchy (names/ codes) types in place of boundary type 1/2.
Then along with the codes start filling in one by one with the proper mapping between every child and parent.
The Sr. No should be in an incremental order for every new child level.
Prepare a new table for every different parent-child relation.
Verify the data once again by going through the checklist and taking care of each and every point mentioned in the checklist.
Sr.No
Boundary Type*
Boundary Code*
Boundary Type*
Boundary Code*
1
Ward
W1
1
Hierarchy Type 1
Text
256
Yes
The type of hierarchy 1 the boundary belongs to which is to be mapped with other boundaries in hierarchy 2. Refer Boundary Hierarchies
2
1
Make sure that each and every point in this reference list has been taken care of
Mohalla
Hierarchy Type 2
REV
Revenue
राजस्व
4
TP
Town Planning
नगर नियोजन
Text
256
Yes
The name of the department in the ULB in English
3
Department Name (In Local Language)*
Text
256
Yes
The name of the department working in the ULB in local language e.g. Telugu, Hindi etc. whichever is applicable
Identify all the departments in ULB well before start filling then into the template.
Start filling the data starting from serial no. and complete a record at once. repeat this exercise until the entire data is filled into a template.
Verify the data once again by going through the checklist and taking care of each and every point mentioned in the checklist.
1
ACC
Accounts
लेखा
2
PHS
Public Health And Sanitation
सार्वजनिक स्वास्थ्य और स्वच्छता
1
Department Code*
Alphanumeric
64
Yes
Unique code for the department to identify a department
2
3
Department Name ( In English)*
Subscription ID: your subscription ID
1
PT_UNIT_PENALTY
PT
Penalty
PT Penalty
1.
Code
Alphanumeric
64
Yes
The code for the tax that is being levied
2.
Download the data template attached to this page.
Get a good understanding of all the headers in the template sheet, their data type, size, and definitions by referring to the ‘Data Definition’ section of this document.
In case of any doubt, please reach out to the person who has shared this template with you to discuss and clear your doubts.
Get all the tax heads for a particular module and then proceed to the next module.
Verify the data once again by going through the checklist and making sure that each and every point mentioned in the checklist is covered.
The checklist is a set of activities to be performed on the data is filled into a template to ensure data type, size, and format of data is as per the expectation. These activities have been divided into 2 groups as given below.
This checklist covers all the activities which are common across the entities.
1
Make sure that each and every point in this reference list has been taken care of
Not Applicable
All content on this page by eGov Foundation is licensed under a Creative Commons Attribution 4.0 International License.
Dashboard changes
Dashboard changes
MasterDashboardConfig.json
Dashboard changes
Dashboard changes
FALSE
FALSE
1
2
PT_UNIT_EXEMPTION
PT
Exemption
PT Exemption
TRUE
TRUE
2
Service
Text
256
Yes
This is the module or the name of the service for which the tax head is being mentioned
3.
Category
Text
256
Yes
The category to which the tax head belongs such as Penalty or exemption or cess
4.
Name
Text
256
Yes
This is the name/description of the tax head
5.
Is Debit
Text
NA
Yes
In case the tax head is an amount that needs to be added up to the property tax, then this needs to be TRUE else FALSE
6.
Is Actual Demand
Text
NA
Yes
In case the tax head is an amount that needs to be subtracted from the property tax, then this needs to be TRUE else FALSE
7
Order
Integer
5
Yes
The order in which the mentioned tax head should appear on the screen
Online Building Plan Approval System
State DSS & National DSS
Fire NOC
State DSS & National DSS
mCollect
State DSS & National DSS
Water & Sewerage
State DSS & National DSS
mCollect
Includes metrics such as total challans, total receipts, number of categories, charts of challan count by status, receipt count by status, top categories collection, state wise collection tabular report, monthly collections etc.
Online Building Plan Approval System
Includes metrics such as total plans scrutinised, total OC issues, Average days to issue permit, SLA compliance, Total permits issued vs total OC issued vs Total OC submitted graph, permits issued by occupancy type pie chart, permits issued by risk type pie chart, tabular service report etc.
FireNOC
Includes metrics such as total collection, total applications, Provisional NOCs issued, New NOCs issued, Pie charts for collection by payment mode, Total NOCs by type, top3/bottom 3 performing states, service tabular report etc.
Water & Sewerage
Has separate revenue and service tabs. Revenue tab has metrics such as total collection, target achievement collection by usage type graph, collection by channel graph, tax head breakup tabular chart etc. Service tab has Total application, water metered connection, non metered connections, sewerage connections, Connections by usage type graph, connections by channel type graph, connection ageing tabular chart etc.
Sample Master file
Sample Master configuration
An overview of the prerequisites to setup DIGIT and some of the key capabilities to understand before provisioning the infra and deploy DIGIT.
DIGIT is the largest urban governance platform built for billions and billions of transactions between citizens and the state govt through various municipal services/integration. The platform is built with key capabilities like scale, speed, integration, configurable, customizable, extendable, multi-tenanted, security, etc. Here, we shall discuss the key requirements and capabilities.
Before proceeding to set up DIGIT, it is essential to know some of the key technical details about DIGIT, like architecture, tech stack and how it is packaged and deployed on various infrastructures. Some of these details are explained in the previous sections. Below are some of the key capabilities to know about DIGIT as a platform.
DIGIT is a collection of various services built as RESTFul APIs with OpenAPI standard
DIGIT is built as MSA (Microservices Architecture)
DIGIT services are packaged as containers and deployed as docker Images.
DIGIT is deployed on Kubernetes which abstracts any Cloud/Infra suitable and standardised for DIGIT deployment.
The OpenAPI Specification (OAS) defines a standard, programming language-agnostic interface description for REST APIs, which allows both humans and computers to discover and understand the capabilities of a service without requiring access to source code, additional documentation, or inspection of network traffic. When properly defined via OpenAPI, a consumer can understand and interact with the remote service with a minimal amount of implementation logic. Similar to what interface descriptions have done for lower-level programming, the OpenAPI Specification removes the guesswork in calling a service.
Microservices are nothing but breaking big beasts into smaller units that can independently be developed, enhanced and scaled as a categorized and layered stack that gives better control over each component of an application that exists in its own container, independently managed and updated. This means that developers can build applications from multiple components and program each component in the language best suited to its function, rather than having to choose a single less-than-ideal language to use for everything. Optimizing software all the way down to the components of the application helps you increase the quality of your products. No time and resources are wasted managing the effects of updating one application on another.
Comparatively the best infra choice for running a microservices application architecture is application containers. Containers encapsulate a lightweight runtime environment for the application, presenting a consistent environment that can follow the application from the developer's desktop to testing to final production deployment, and you can run containers on cloud infra with physical or virtual machines.
As most modern software developers can attest, containers have provided us with dramatically more flexibility for running cloud-native applications on physical and virtual infrastructure. Kubernetes allows you to deploy cloud-native applications anywhere and manage them exactly as you like everywhere. For more details refer to the above link that explains various advantages of Kubernetes.
Kubernetes, the popular container orchestration system, is used extensively. However, it can become complex: you have to handle all of the objects (ConfigMaps, pods, etc.), and would also have to manage the releases. Both can be accomplished with . It is a Kubernetes package manager designed to easily package, configure, and deploy applications and services onto Kubernetes clusters in a standard way, this helps the ecosystem to adopt the standard way of deployment and customization.
For being successful in the DIGIT Setup, below are certain requirements that need to be ascertained:
On-premise/private cloud accounts
Interface to access and provision required infra
In the case of SDC, NIC or private DC, it'll be VPN to an allocated VLAN
in any of the
or
(SDC) or
All content on this page by is licensed under a .
We will discuss distributed tracing system Jaeger and how it helps in troubleshooting DIGIT.
Distributed tracing is a method used to profile and monitor applications, especially those built using a microservices architecture. Distributed tracing helps pinpoint where failures occur and what causes poor performance.
OpenTracing has been a key capability when it comes to microservices-based distributed systems like DIGIT. We’ll start with the introduction of OpenTracing, explaining what it is and why it is important We shall also set up Jaeger and learn to use it for monitoring and troubleshooting.
Architecture has now become the obvious choice for application developers. In the Microservice Architecture, a monolithic application is broken down into a group of independently deployed services. In simple words, an application is more like a collection of microservices. When we have millions of such intertwined microservices working together, it’s almost impossible to map the inter-dependencies of these services and understand the execution of a request.
In case of a failure in a monolithic application, it is much easier to understand the path of a transaction and do the root cause analysis with the help of logging frameworks. But in a microservice architecture, logging alone fails to deliver the complete picture.
Is this service the first one in the call chain? How do I span all these services to get insight into the application? With questions like these, it becomes a significantly larger problem to debug a set of interdependent distributed services in comparison to a single monolithic application, making OpenTracing more and more popular.
The OpenTracing API provides a standard, vendor-neutral framework for instrumentation. This means that if a developer wants to try out a different distributed tracing system, then instead of repeating the whole instrumentation process for the new distributed tracing system, the developer can simply change the configuration of the Tracer.
Here are some basic terminologies of Opentracing:
Span — It represents a logical unit of work that has an operation name, the start time of the operation, and the duration.
Trace — A Trace tells the story of a transaction or workflow as it propagates through a distributed system. It is simply a set of spans sharing a TraceID. Each component in a distributed system contributes its own span.
OpenTracing is a way for services to “describe and propagate distributed traces without knowledge of the underlying OpenTracing implementation.”
Let us take the example of a service like egov-property service (or any other DIGIT service). A service like this requires many other microservices to check that the location is available, proper payment credentials are received, and enough details exist for the ULB to process the property tac. If either one of those microservice fails, then the entire transaction fails. In such a case, having logs just for the main property service wouldn’t be very useful for debugging. However, if you were able to analyze each service you wouldn’t have to scratch your head to troubleshoot which microservice failed and what made it fail.
In real life, applications are even more complex and with the increasing complexity of applications, monitoring the applications has been a tedious task. Opentracing helps us to easily monitor:
Spans of services
Time taken by each service
Latency between the services
Hierarchy of services
Jaeger is used for monitoring and troubleshooting microservices-based distributed systems, including:
Distributed transaction monitoring
Performance and latency optimization
Root cause analysis
Service dependency analysis
Jaeger Client Libraries — Jaeger clients are language-specific implementations of the .
Agent — The Jaeger agent is a network daemon that listens for spans sent over UDP, which it batches and sends to the collector. It is designed to be deployed to all hosts as an infrastructure component. The agent abstracts the routing and discovery of the collectors away from the client.
Collector — The Jaeger collector receives traces from Jaeger agents and runs them through a processing pipeline. Currently, the pipeline validates traces, indexes them, performs transformations, and finally, stores them. Jaeger’s storage is a pluggable component which currently supports , , and .
Query — Query is a service that retrieves traces from storage and hosts a UI to display them.
Ingester — Ingester is a service that reads from Kafka topic and writes to another storage backend (Cassandra, Elasticsearch).
First, install Jaeger Client on your machine:
Now, let’s run Jaeger backend as an all-in-one Docker image. The image launches the Jaeger UI, collector, query, and agent:
TIP: To check if the docker container is running, use: Docker ps.
Once the container starts, open to access the Jaeger UI. The container runs the Jaeger backend with an in-memory store, which is initially empty, so there is not much we can do with the UI right now since the store has no traces.
1. Create a Python program to create Traces
Let’s generate some traces using a simple python program. You can clone the Jaeger-Opentracing repository given below for a sample program that is used in this blog_._
The Python program takes a movie name as an argument and calls three functions that get the cinema details, movie showtime details, and finally, book a movie ticket.
It creates some random delays in all the functions to make it more interesting, as, in reality, the functions would take a certain time to get the details. Also, the function throws random errors to give us a feel of how the traces of a real-life application may look like in case of failures.
Here is a brief description of how OpenTracing has been used in the program:
Initializing a tracer:
Using the tracer instance:
Starting new child spans using start_span:
Using Tags:
2. Run the python program
Now, check your Jaeger UI, you can see a new service “booking” added. Select the service and click on “Find Traces” to see the traces of your service. Every time you run the program a new trace will be created.
You can now compare the duration of traces through the graph shown above. You can also filter traces using “Tags” section under “Find Traces”. For example, Setting “error=true” tag will filter out all the jobs that have errors.
To view the detailed trace, you can select a specific trace instance and check details like the time taken by each service, errors during execution and logs.
In this blog, we’ve described the importance and benefits of OpenTracing, one of the core pillars of modern applications. We also explored how distributed tracer Jaeger collect and store traces while revealing inefficient portions of our applications. It is fully compatible with OpenTracing API and has a number of clients for different programming languages including Java, Go, Node.js, Python, PHP, and more.
All content on this page by is licensed under a .
Overview of various probes that we can setup to ensure the service deployment and the availability of the service is ensured automatically.
Determining the state of a service based on readiness, liveness, and startup to detect and deal with unhealthy situations. It may happen that if the application needs to initialize some state, make database connections, or load data before handling application logic. This gap in time between when the application is actually ready versus when Kubernetes thinks is ready becomes an issue when the deployment begins to scale and unready applications receive traffic and send back 500 errors.
Many developers assume that when basic pod setup is adequate, especially when the application inside the pod is configured with daemon process managers (e.g. PM2 for Node.js). However, since Kubernetes deems a pod as healthy and ready for requests as soon as all the containers start, the application may receive traffic before it is actually ready.
Kubernetes supports readiness and liveness probes for versions ≤ 1.15. Startup probes were added in 1.16 as an alpha feature and graduated to beta in 1.18 (WARNING: 1.16 deprecated several Kubernetes APIs. Use this to check for compatibility).
All the probe have the following parameters:
initialDelaySeconds : number of seconds to wait before initiating liveness or readiness probes
periodSeconds: how often to check the probe
timeoutSeconds: number of seconds before marking the probe as timing out (failing the health check)
Readiness probes are used to let kubelet know when the application is ready to accept new traffic. If the application needs some time to initialize state after the process has started, configure the readiness probe to tell Kubernetes to wait before sending new traffic. A primary use case for readiness probes is directing traffic to deployments behind a service.
One important thing to note with readiness probes is that it runs during the pod’s entire lifecycle. This means that readiness probes will run not only at startup but repeatedly throughout as long as the pod is running. This is to deal with situations where the application is temporarily unavailable (i.e. loading large data, waiting on external connections). In this case, we don’t want to necessarily kill the application but wait for it to recover. Readiness probes are used to detect this scenario and not send traffic to these pods until it passes the readiness check again.
On the other hand, liveness probes are used to restart unhealthy containers. The kubelet periodically pings the liveness probe, determines the health, and kills the pod if it fails the liveness check. Liveness checks can help the application recover from a deadlock situation. Without liveness checks, Kubernetes deems a deadlocked pod healthy since the underlying process continues to run from Kubernetes’s perspective. By configuring the liveness probe, the kubelet can detect that the application is in a bad state and restarts the pod to restore availability.
Startup probes are similar to readiness probes but only executed at startup. They are optimized for slow starting containers or applications with unpredictable initialization processes. With readiness probes, we can configure the initialDelaySeconds to determine how long to wait before probing for readiness. Now consider an application where it occasionally needs to download large amounts of data or do an expensive operation at the start of the process. Since initialDelaySeconds is a static number, we are forced to always take the worst-case scenario (or extend the failureThresholdthat may affect long-running behaviour) and wait for a long time even when that application does not need to carry out long-running initialization steps. With startup probes, we can instead configure failureThreshold and periodSeconds to model this uncertainty better. For example, setting failureThreshold to 15 and periodSeconds to 5 means the application will get 10 x 5 = 75s to startup before it fails.
Now that we understand the different types of probes, we can examine the three different ways to configure each probe.
The kubelet sends an HTTP GET request to an endpoint and checks for a 2xx or 3xx response. You can reuse an existing HTTP endpoint or set up a lightweight HTTP server for probing purposes (e.g. an Express server with /healthz endpoint).
HTTP probes take in additional parameters:
host : hostname to connect to (default: pod’s IP)
scheme : HTTP (default) or HTTPS
path : path on the HTTP/S server
If you just need to check whether or not a TCP connection can be made, you can specify a TCP probe. The pod is marked healthy if can establish a TCP connection. Using a TCP probe may be useful for a gRPC or FTP server where HTTP calls may not be suitable.
Finally, a probe can be configured to run a shell command. The check passes if the command returns with exit code 0; otherwise, the pod is marked as unhealthy. This type of probe may be useful if it is not desirable to expose an HTTP server/port or if it is easier to check initialization steps via command (e.g. check if a configuration file has been created, run a CLI command).
The exact parameters for the probes depend on your application, but here are some general best practices to get started:
For older (≤ 1.15) Kubernetes clusters, use a readiness probe with an initial delay to deal with the container startup phase (use p99 times for this). But make this check lightweight, since the readiness probe will execute throughout the entire lifecycle of the pod. We don’t want the probe to timeout because the readiness check takes a long time to compute.
For newer (≥ 1.16) Kubernetes clusters, use a startup probe for applications with unpredictable or variable startup times. The startup probe may share the same endpoint (e.g. /healthz ) as the readiness and liveness probes, but set the failureThreshold higher than the other probes to account for longer start times, but more reasonable time to failure for liveness and readiness checks.
In short, well-defined probes generally lead to better resilience and availability. Be sure to observe the startup times and system behaviour to tweak the probe settings as the applications change.
Finally, given the importance of Kubernetes probes, you can use a Kubernetes resource analysis tool to detect missing probes. These tools can be run against existing clusters or be baked into the CI/CD process to automatically reject workloads without properly configured resources.
: a resource analysis tool with a nice dashboard that can also be used as a validating webhook or CLI tool.
: a static code analysis tool that works with Helm, Kustomize, and standard YAML files.
: read-only utility tool that scans Kubernetes clusters and reports potential issues with configurations.
All content on this page by is licensed under a .

Workflow action defined as an activity which is performed by a workflow user on a service request/ application during the workflow. All the workflow actions are predefined and performed a well-defined job once performed.
In its nature actions are not configurable, only the localization of actions is permissible as a configuration.
Since there are many DIGIT services and the development code is part of various git repos, you need to understand the concept of cicd-as-service which is open sourced. This page also guides you through the process of creating a CI/CD pipeline.
As a developer - To integrate any new service/app to the CI/CD below is the starting point:
Once the desired service is ready for the integration: decide the service name, type of service, whether DB migration is required or not. While you commit the source code of the service to the git repository, the following file should be added with the relevant details which are mentioned as below:
az account show --query id -o json
********-****-****-****-************az account show --query tenantId -o json
********-****-****-****-************az ad sp create-for-rbac --role="Contributor" --scopes="/subscriptions/********-****-****-****-************"
Retrying role assignment creation: 1/36
Retrying role assignment creation: 2/36
Retrying role assignment creation: 3/36
{
"appId": "********-****-****-****-************",
"displayName": "azure-cli-2018-11-25-08-01-39",
"name": "http://azure-cli-2018-11-25-08-01-39",
"password": "********-****-****-****-************",
"tenant": "********-****-****-****-************"
}{
"tenantId": "< TENANT ID >",
"moduleName": "< MODULE NAME >",
"< MASTER NAME >": []
}{
"<module1>":{
"<master1>":{},
"<master2>":{},
...
},
"<module2>":{
<master3>:{},
<master4>:{},
...
},
...
}"master":{
"masterName": "<>",
"isStateLevel": true,
"uniqueKeys": []
}DIGIT deployment, configuration and customization are done through Helm Charts.
Kubernetes cluster setup is done through code like terraform/ansible suitably.
CI / CD
Virtualization
Hardware & Storage
OS & Networking
SSL Configuration
Infra-as-code
Dockers
DNS Configuration
GitOps
SecOps
Infra Skills
Public cloud
Managed Kubernetes services like AKS or EKS or GKE on Azure, AWS and GCP respectively
Private Clouds (SDC, NIC)
Clouds like VMware, OpenStack, Nutanix and more, may or may not have Kubernetes as a managed service. If yes we may have to estimate only the worker nodes depending on the number of ULBs and DIGIT's municipal services that you opt.
In the absence of the above, you have to provision the Kubernetes cluster from the plain VMs as per the general Kubernetes setup instruction and add worker nodes.
Operations Skills
Understanding of Linux, containers, VM Instances, Load Balancers, Security Groups/Firewalls, Nginx, DB Instance, Data Volumes
Experience with Kubernetes, Docker, Jenkins, Helm, Infra-as-code, Terraform
Experience in DevOps/SRE practice on microservices and modern infrastructure
Setting up the persistent disk volumes to attach to DIGIT backbone stateful containers like
ZooKeeper
Kafka
Elastic Search
Setting up the Postgres DB
On a public cloud, provision a Postgres RDS instance.
Private cloud, provision a Postgres DB on a VM with the backup, HA/DRS
Preparing deployment configuration for required DIGIT services using Helm templates from the InfraOps like the following
Preparing DIGIT service helm templates to deploy on the Kubernetes cluster
K8s Secrets
K8s ConfigMaps
Environment variables of each microservices
Deploy the stable released version of DIGIT and the required services
Setting up Jenkins job to build, bake images and deploy the components for the rolling updates
Scheduled Job Handling
API Gateway
Container Management
Resource and Storage Handling
Fault Tolerance
Load Balancing
Distributed Metrics
Application Runtime and Packaging
App Deployment
Configuration Management
Service Discovery
Errors or exceptions during execution of each service.
Distributed context propagation
Using Logs:
successThreshold : minimum number of consecutive successful checks for the probe to pass
failureThreshold : number of retries before marking the probe as failed. For liveness probes, this will lead to the pod restarting. For readiness probes, this will mark the pod as unready.
httpHeaders : custom headers if you need header values for authentication, CORS settings, etc
port : name or number of the port to access the server
Readiness checks can be used in various ways to signal system degradation. For example, if the application loses connection to the database, readiness probes may be used to temporarily block new requests and allow the system to reconnect. It can also be used to load balance work to other pods by marking busy pods as not ready.
1
Initiate
The action will start the application for citizen and CEMP
Trade Licenses, Property Tax, Building Plan Approval
2
Edit
Using this action the application can be opened in editable form and any changes can be performed
Trade Licenses, Property Tax, Building Plan Approval
3
Actions are standard and are not configurable, hence the template, data definition and standard procedure to fill the template are not needed. This page is created to provide the information and helping the defined workflow process.
Not applicable
Not applicable
Not applicable
Not applicable
All content on this page by eGov Foundation is licensed under a Creative Commons Attribution 4.0 International License.
This file contains the below details which are used for creating the automated Jenkins pipeline job for your newly created service.
While integrating a new service/app, the above content needs to be added in the build-config.yml file of that app repository. For example: If we are on-boarding a new service called egov-test, then the build-config.yml should be added as mentioned below.
If a job requires multiple images to be created (DB Migration) then it should be added as below,
Note - If a new repository is created then the build-config.yml should be created under the build folder and then the config values are added to it.
The git repository URL is then added to the Job Builder parameters
When the Jenkins Job => job builder is executed the CI Pipeline gets created automatically based on the above details in build-config.yml. Eg: egov-test job will be created under core-services folder in Jenkins because the “build-config was edited under core-services” And it should be the “master” branch only. Once the pipeline job is created, it can be executed for any feature branch with build parameters (Specifying which branch to be built – master or any feature branch).
As a result of the pipeline execution, the respective app/service docker image will be built and pushed to the Docker repository.
The Jenkins CI pipeline is configured and managed 'as code'.
New Service Integration - Example URL - https://builds.digit.org/
Job Builder – Job Builder is a Generic Jenkins job which creates the Jenkins pipeline automatically which are then used to build the application, create the docker image of it and push the image to docker repository. The Job Builder job requires the git repository URL as a parameter. It clones the respective git repository and reads the build/build-config.yml file for each git repository and uses it to create the service build job.
If git repository URL is available build the Job-Builder Job
If git repository URL is not available ask the devops team to add.
The services deployed and managed on a Kubernetes cluster in cloud platforms like AWS, Azure, GCP, OpenStack, etc. Here, we use helm charts to manage and generate the Kubernetes manifest files and use them for further deployment to respective Kubernetes cluster. Each service is created as charts which will have the below-mentioned files in it.
To deploy a new service, we need to create the helm chart for it. The chart should be created under the charts/helm directory in DIGIT-DevOps repository.
We have an automatic helm chart generator utility which needs to be installed on the local machine, the utility will prompt for user inputs about the newly developed service( app specifications) for creating the helm chart. The requested chart with the configuration values (created based on the inputs provided) will be created for the user.
_Name of the service? test-service Application Type? NA Kubernetes health checks to be enabled? Yes Flyway DB migration container necessary? No Expose service to the internet? Yes Route through API gateway [zuul] No Context path? hello_
The generated chart will have the following files.
This chart can also be modified further based on user requirements.
The Deployment of manifests to the Kubernetes cluster is made very simple and easy. We have Jenkins Jobs for each state and environment-specific. We need to provide the image name or the service name in the respective Jenkins deployment job.
Enter a caption for this image (optional)
Enter a caption for this image (optional)
The deployment Jenkins job internally performs the following operations,
Reads the image name or the service name given and finds the chart that is specific to it.
Generates the Kubernetes manifests files from the chart using helm template engine.
Execute the deployment manifest with the specified docker image(s) to the Kubernetes cluster.
All content on this page by eGov Foundation is licensed under a Creative Commons Attribution 4.0 International License.
FALSE
FALSE
1
2
PT_UNIT_EXEMPTION
PT
Exemption
PT Exemption
TRUE
TRUE
2
Service
Text
256
Yes
This is the module or the name of the service for which the tax head is being mentioned
3.
Category
Text
256
Yes
The category to which the tax head belongs such as Penalty or exemption or cess
4.
Name
Text
256
Yes
This is the name/description of the tax head
5.
Is Debit
Text
NA
Yes
In case the tax head is an amount that needs to be added up to the property tax, then this needs to be TRUE else FALSE
6.
Is Actual Demand
Text
NA
Yes
In case the tax head is an amount that needs to be subtracted from the property tax, then this needs to be TRUE else FALSE
7
Order
Integer
5
Yes
The order in which the mentioned tax head should appear on the screen


This article provides DIGIT Infra overview, Guidelines for Operational Excellence while DIGIT is deployed on SDC, NIC or any commercial clouds along with the recommendations and segregation of duties (SoD). It helps to plan the procurement and build the necessary capabilities to deploy and implement DIGIT.
In a shared control, the state program team/partners can consider these guidelines and must provide their own control implementation to the state’s cloud infrastructure and partners for a standard and smooth operational excellence.
DIGIT strongly recommends (SRE) principles as a key means to bridge between development and operations by applying a software engineering mindset to system and IT administration topics. In general, an SRE team is responsible for availability, latency, performance, efficiency, change management, monitoring, emergency response, and capacity planning.
Monitoring Tools Recommendations: Commercial clouds like , and GCP offer sophisticated monitoring solutions across various infra levels like CloudWatch and StackDriver, in the absence of such managed services to monitor we can look at various best practices and tools listed below which helps efficiently.
, , , ****
Segregation of duties and responsibilities.
SME and SPOCs for support along with the SLAs defined.
to manage incidents, converge and collaborate on various operational issues.
Monitoring dashboards at various levels like Infrastructure, Network and applications.
While DIGIT is deployed at state cloud infrastructure, it is essential to identify and distinguish the responsibilities between Infrastructure, Operations and Implementation partners. Identify these teams and assign SPOC, define responsibilities and Incident management is followed to visualize, track issues and manage dependencies between teams. Essentially these are monitored through dashboards and alerts are sent to the stakeholders proactively. eGov team can provide consultation and training on the need basis depending any of the below categories.
State program team - Refers to the owner for the whole DIGIT implementation, application rollouts, capacity building. Responsible for identifying and synchronizing the operating mechanism between the below teams.
Implementation partner - Refers to the DIGIT Implementation, application performance monitoring for errors, logs scrutiny, TPS on peak load, distributed tracing, DB queries analisis, etc.
Operations team - this team could be an extension of the implementation team who is responsible for DIGIT deployments, configurations, CI/CD, change management, traffic monitoring and alerting, log monitoring and dashboard, application security, DB Backups, application uptime, etc.
All content on this page by is licensed under a .


This section contains steps that are involved in the build and deploy the application. FAQ related to various deployment and development issues are discussed
Clone the eGov repository (development is done on the develop branch).
1$ mkdir -p ${HOME}/egovgithub && cd egovgithub 2$ git clone -b develop --single-branch <https://github.com/egovernments/egov-smartcity-suite.git>
This is the next step after collating all the boundary hierarchies which are being used in the state. In a hierarchy, there are certain types of boundary classification and in all the levels there will be a mapping which we could define as a parent-child mapping in order to link certain levels of the classification.
For example, a hierarchy could be:
Administration Hierarchy: City/ULB → Zone → Ward → Locality
In the above-mentioned hierarchy, a City/ULB is being divided into different into zones followed by zones into wards and at the end wards into the locality.
Key Performance Indicators(KPI) are a way of showing certain insights from the data available which would help the key management authorities to take important business decisions in order to improve the business, enhance the business process and help the people improve the way of functioning. This exercise largely becomes dependent on the data.
The insight could be shown in various available forms such as line graph, bar graph or a tabular format.
livenessProbe:
httpGet:
path: /healthz
port: 8080readinessProbe:
tcpSocket:
port: 21readinessProbe:
exec:
command: ["/bin/sh", "-ec", "vault status -tls-skip-verify"]https://github.com/egovernments/core-services/blob/master/build/build-config.yml# config:
# - name: < Name of the job, foo/bar would create job named bar inside folder foo >
# build:
# - work-dir: < Working directory of the app to be built >
# dockerfile: < Path to the dockerfile, optional, assumes dockerfile in working directory if not provided>
# image-name: < Docker image name >config:
- name: core-services/egov-test
build:
- work-dir: egov-test
dockerfile: build/maven/Dockerfile
image-name: egov-testconfig:
- name: core-services/egov-test
build:
- work-dir: egov-test
dockerfile: build/maven/Dockerfile
image-name: egov-test
- work-dir: egov-test/src/main/resources/db
dockerfile: build/maven/Dockerfile
image-name: egov-test-dbbilling-service/ # Directory – name of the service/app
Chart.yaml # A YAML file containing information about the chart
LICENSE # OPTIONAL: A plain text file containing the license for the chart
README.md # OPTIONAL: A human-readable README file
values.yaml # The default configuration values for this chart
templates/ # A directory of templates that, when combined with values, will generate valid Kubernetes manifest files.Github repository
https://github.com/egovernments/DIGIT-DevOps/deploy-as-code/helm/chartscreate Chart.yaml
create values.yaml
create templates/deployment.yaml
create templates/service.yaml
create templates/ingress.yaml

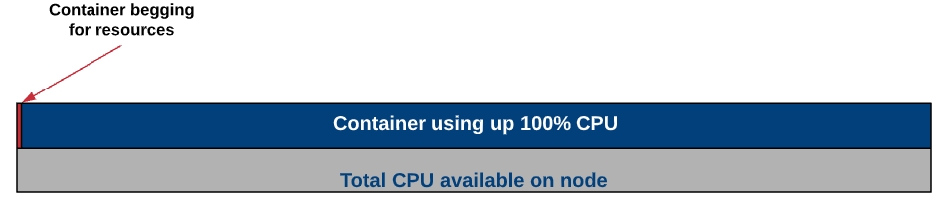

Transparency of monitoring data and collaboration between teams.
Periodic remote sync up meetings, acceptance and attendance to the meeting.
Ability to see stakeholders availability of calendar time to schedule meetings.
Periodic (weekly, monthly) summary reports of the various infra, operations incident categories.
Communication channels and synchronization on a regular basis and also upon critical issues, changes, upgrades, releases etc.
**State IT/Cloud team -**Refers to state infra team for the Infra, network architecture, LAN network speed, internet speed, OS Licensing and upgrade, patch, compute, memory, disk, firewall, IOPS, security, access, SSL, DNS, data backups/recovery, snapshots, capacity monitoring dashboard.
3
Database Administration
Setup PostGres DB, Set up read replicas, Backup, Log, DB RBAC setup, SQL Queries
3
Docker Registry
Setup docker registry and manage
2
SCM/Git
Source Code management, branches, forking, tagging, Pull Requests, etc.
4
CI Setup
Jenkins Setup, Master-slave configuration, plugins, jenkinsfile, groovy scripting, Jenkins CI Jobs for Maven, Node application, deployment jobs, etc.
4
Artifact management
Code artifact management, versioning
1
Apache Tomcat
Web server setup, configuration, load balancing, sticky sessions, etc
2
WildFly JBoss
Application server setup, configuration, etc.
3
Spring Boot
Build and deploy spring boot applications
2
NodeJS
NPM Setup and build node applications
2
Scripting
Shell scripting, python scripting.
4
Log Management
Aggregating system, container logs, troubleshooting. Monitoring Dashboard for logs using prometheus, fluentd, Kibana, Grafana, etc.
3
WordPress
Multi-tenant portal setup and maintain
2
Tools/Skills
Specification
Weightage (1-5)
Yes/No
System Administration
Linux Administration, troubleshooting, OS Installation, Package Management, Security Updates, Firewall configuration, Performance tuning, Recovery, Networking, Routing tables, etc
4
Containers/Dockers
Build/Push docker containers, tune and maintain containers, Startup scripts, Troubleshooting dockers containers.
2
Kubernetes
Setup kubernetes cluster on bare-metal and VMs using kubeadm/kubespary, terraform, etc. Strong understanding of various kubernetes components, configurations, kubectl commands, RBAC. Creating and attaching persistent volumes, log aggregation, deployments, networking, service discovery, Rolling updates. Scaling pods, deployments, worker nodes, node affinity, secrets, configMaps, etc..
One of the fundamental design decisions which have been taken by this impeccable cluster manager is its ability to deploy existing applications that run on VMs without any changes to the application code. On a high level, any application that runs on VMs can be deployed on Kubernetes by simply containerizing its components. This is achieved by its core features; container grouping, container orchestration, overlay networking, container-to-container routing with layer 4 virtual IP-based routing system, service discovery, support for running daemons, deploying stateful application components, and most importantly the ability to extend the container orchestrator for supporting complex orchestration requirements.
On a very high-level Kubernetes provides a set of dynamically scalable hosts for running workloads using containers and uses a set of management hosts called masters for providing an API for managing the entire container infrastructure.
That's just a glimpse of what Kubernetes provides out of the box. The next few sections will go through its core features and explain how it can help applications to be deployed on it in no time.
The above figure illustrates the high-level application deployment model on Kubernetes. It uses a resource called ReplicaSet for orchestrating containers. A ReplicaSet can be considered as a YAML or a JSON-based metadata file which defines the container images, ports, the number of replicas, activation health checks, liveness health checks, environment variables, volume mounts, security rules, etc required for creating and managing the containers. Containers are always created on Kubernetes as groups called Pods which is again a Kubernetes metadata definition or a resource. Each pod allows sharing of the file system, network interfaces, operating system users, etc among the containers using Linux namespaces, cgroups, and other kernel features. The ReplicaSets can be managed by another high-level resource called Deployments for providing features for rolling out updates and handling their rollbacks.
A containerized application can be deployed on Kubernetes using a deployment definition by executing a simple CLI command as follows:
One of the key features of Kubernetes is its service discovery and internal routing model provided using SkyDNS and layer 4 virtual IP-based routing system. These features provide internal routing for application requests using services. A set of pods created via a replica set can be load balanced using a service within the cluster network. The services get connected to pods using selector labels. Each service will get assigned a unique IP address, a hostname derived from its name and route requests among the pods in a round-robin manner. The services will even provide IP-hash-based routing mechanism for applications which may require session affinity. A service can define a collection of ports and the properties defined for the given service will apply to all the ports in the same way. Therefore, in a scenario where session affinity is only needed for a given port and where all the other ports are required to use round-robin-based routing, multiple services may need to be used.
Kubernetes services have been implemented using a component called kube-proxy. A kube-proxy instance runs in each node and provides three proxy modes: Userspace, iptables and IPVS. The current default is iptables.
In the first proxy mode: userspace, kube-proxy itself will act as a proxy server and delegate requests accepted by an iptable rule to the backend pods. In this mode, kube-proxy will operate in the userspace and will add an additional hop to the message flow.
In the second proxy mode: iptables, the kube-proxy will create a collection of iptable rules for forwarding incoming requests from the clients directly to the ports of backend pods on the network layer without adding an additional hop in the middle. This proxy mode is much faster than the first mode because of operating in the kernel space and not adding an additional proxy server in the middle.
The third proxy mode was added in Kubernetes v1.8 which is much similar to the second proxy mode and it makes use of an IPVS-based virtual server for routing requests without using iptable rules. IPVS is a transport layer load-balancing feature which is available in the Linux kernel based on Netfilter and provides a collection of load-balancing algorithms. The main reason for using IPVS over iptables is the performance overhead of syncing proxy rules when using iptables. When thousands of services are created, updating iptable rules takes a considerable amount of time compared to a few milliseconds with IPVS. Moreover, IPVS uses a hash table for looking up the proxy rules over sequential scans with iptables.
Kubernetes services can be exposed to external networks in two main ways. The first is using node ports by exposing dynamic ports on the nodes that forward traffic to the service ports. The second is using a load balancer configured via an ingress controller which can delegate requests to the services by connecting to the same overlay network. An ingress controller is a background process which may run in a container which listens to the Kubernetes API, and dynamically configure and reloads a given load balancer according to a given set of ingresses. An ingress defines the routing rules based on hostnames and context paths using services.
Once an application is deployed on Kubernetes using kubectl run command, it can be exposed to the external network via a load balancer as follows:
The above command will create a service of load balancer type and map it to the pods using the same selector label created when the pods were created. As a result, depending on how the Kubernetes cluster has been configured a load balancer service on the underlying infrastructure will get created for routing requests for the given pods either via the service or directly.
Applications that require persisting data on the filesystem may use volumes for mounting storage devices to ephemeral containers similar to how volumes are used with VMs. Kubernetes has properly designed this concept by loosely coupling physical storage devices with containers by introducing an intermediate resource called persistent volume claims (PVCs). A PVC defines the disk size, and disk type (ReadWriteOnce, ReadOnlyMany, ReadWriteMany) and dynamically links a storage device to a volume defined against a pod. The binding process can either be done in a static way using PVs or dynamically by using a persistent storage provider. In both approaches, a volume will get linked to a PV one-to-one and depending on the configuration given data will be preserved even if the pods get terminated. According to the disk type used multiple pods will be able to connect to the same disk and read/write.
Disks that support ReadWriteOnce will only be able to connect to a single pod and will not be able to share among multiple pods at the same time. However, disks that support ReadOnlyMany will be able to share among multiple pods at the same time in read-only mode. In contrast, as the name implies disks with ReadWriteMany support can be connected to multiple pods for sharing data in read-and-write mode. Kubernetes provides a collection of volume plugins for supporting storage services available on public cloud platforms such as AWS EBS, GCE Persistent Disk, Azure File, Azure Disk and many other well-known storage systems such as NFS, Glusterfs, iSCSI, Cinder, etc.
Kubernetes provides a resource called DaemonSets for running a copy of a pod in each Kubernetes node as a daemon. Some of the use cases of DaemonSets are as follows:
A cluster storage daemon such as glusterd , ceph to be deployed on each node for providing persistence storage.
A node monitoring daemon such as Prometheus Node Exporter to be run on every node for monitoring the container hosts.
A log collection daemon such as fluentd or logstash to be run on every node for collecting container and Kubernetes component logs.
An ingress controller pod to be run on a collection of nodes for providing external routing.
One of the most difficult tasks of containerizing applications is the process of designing the deployment architecture of stateful distributed components. Stateless components can be easily containerized as they may not have a predefined startup sequence, clustering requirements, point-to-point TCP connections, unique network identifiers, graceful startup and termination requirements, etc. Systems such as databases, big data analysis systems, distributed key/value stores, and message brokers, may have complex distributed architectures that may require the above features. Kubernetes introduced StatefulSets resource for supporting such complex requirements.
On high-level StatefulSets are similar to ReplicaSets except that it provides the ability to handle the startup sequence of pods, and uniquely identify each pod for preserving its state while providing the following characteristics:
Stable, unique network identifiers.
Stable, persistent storage.
Ordered, graceful deployment and scaling.
Ordered, graceful deletion and termination.
Ordered, automated rolling updates
In the above, stable refers to preserving the network identifiers and persistent storage across pod rescheduling. Unique network identifiers are provided by using headless services as shown in the above figure. Kubernetes has provided examples of StatefulSets for deploying Cassandra, and Zookeeper in a distributed manner.
In addition to ReplicaSets and StatefulSets Kubernetes provides two additional controllers for running workloads in the background called Jobs and CronJobs. The difference between Jobs and CronJobs is that Jobs executes once and terminates whereas CronJobs get executed periodically by a given time interval similar to standard Linux cron jobs.
Deploying databases on container platforms for production usage would be a slightly more difficult task than deploying applications due to their requirements for clustering, point-to-point connections, replication, shading, managing backups, etc. As mentioned previously StatefulSets has been designed specifically for supporting such complex requirements and there are a couple of options for running PostgreSQL, and MongoDB clusters on Kubernetes today. YouTube’s database clustering system Vitess which is now a CNCF project would be a great option for running MySQL at scale on Kubernetes with shading. By saying that it would be better to note that those options are still in very early stages and if an existing production-grade database system is available on the given infrastructure such as RDS on AWS, Cloud SQL on GCP, or on-premise database cluster it might be better to choose one of those options considering the installation complexity and maintenance overhead.
Containers generally use environment variables for parameterizing their runtime configurations. However, typical enterprise applications use a considerable amount of configuration files for providing static configurations required for a given deployment. Kubernetes provides a fabulous way of managing such configuration files using a simple resource called ConfigMaps without bundling them into container images. ConfigMaps can be created using directories, files or literal values using the following CLI command:
Once a ConfigMap is created, it can be mounted to a pod using a volume mount. With this loosely coupled architecture, configurations of an already running system can be updated seamlessly just by updating the relevant ConfigMap and executing a rolling update process which I will explain in one of the next sections. I might be important to note that currently ConfigMaps does not support nested folders, therefore if there are configuration files available in a nested directory structure of the application, a ConfigMap would need to be created for each directory level.
Similar to ConfigMaps Kubernetes provides another valuable resource called Secrets for managing sensitive information such as passwords, OAuth tokens, and ssh keys. Otherwise updating that information on an already running system might require rebuilding the container images.
A secret can be created for managing basic auth credentials using the following way:
Once a secret is created, it can be read by a pod either using environment variables or volume mounts. Similarly, any other type of sensitive information can be injected into pods using the same approach.
The above-animated image illustrates how application updates can be rolled out for an already running application using the blue/green deployment method without having to take a system downtime. This is another invaluable feature of Kubernetes which allows applications to seamlessly roll out security updates and backwards compatible changes without much effort. If the changes are not backwards compatible, a manual blue/green deployment might need to be executed using a separate deployment definition.
This approach allows a rollout to be executed for updating a container image using a simple CLI command:
Once a rollout is executed, the status of the rollout process can be checked as follows:
Using the same CLI command kubectl set image deployment an update can be rolled back to a previous state.
Figure 10: Kubernetes Pod Autoscaling Model
Kubernetes allows pods to be manually scaled either using ReplicaSets or Deployments. The following CLI command can be used for this purpose:
As shown in the above figure this functionality can be extended by adding another resource called Horizontal Pod Autoscaler (HPA) against a deployment for dynamically scaling the pods based on their actual resource usage. The HPA will monitor the resource usage of each pod via the resource metrics API and inform the deployment to change the replica count of the ReplicaSet accordingly. Kubernetes uses an upscale delay and a downscale delay for avoiding thrashing which could occur due to frequent resource usage fluctuations in some situations. Currently, HPA only provides support for scaling based on CPU usage. If needed custom metrics can also be plugged in via the Custom Metrics API depending on the nature of the application.
Figure 11: Helm and Kubeapps Hub
The Kubernetes community initiated a separate project for implementing a package manager for Kubernetes called Helm. This allows Kubernetes resources such as deployments, services, config maps, ingresses, etc to be templated and packaged using a resource called chart and allows them to be configured at the installation time using input parameters. More importantly, it allows existing charts to be reused when implementing installation packages using dependencies. Helm repositories can be hosted in public and private cloud environments for managing application charts. Helm provides a CLI for installing applications from a given Helm repository into a selected Kubernetes environment.
A wide range of stable Helm charts for well-known software applications can be found in it’s Github repository and also in the central Helm server: Kubeapps Hub.
Kubernetes has been designed with over a decade of experience in running containerized applications at scale at Google. It has been already adopted by the largest public cloud vendors, and technology providers and is currently being embraced by most of the software vendors and enterprises as this article is written. It has even led to the inception of the Cloud Native Computing Foundation (CNCF) in the year 2015, was the first project to graduate under CNCF, and started streamlining the container ecosystem together with other container-related projects such as CNI, Containers, Envoy, Fluentd, gRPC, Jagger, Linkerd, Prometheus, RKT and Vitess. The key reasons for its popularity and to be endorsed at such a level might be its flawless design, collaborations with industry leaders, making it open-source, and always being open to ideas and contributions.
[1] What is Kubernetes: https://kubernetes.io/docs/concepts/overview/what-is-kubernetes/
[2] Borg, Omega and Kubernetes: https://ai.google/research/pubs/pub44843
[3] Kubernetes Components: https://kubernetes.io/docs/concepts/overview/components/
[4] Kubernetes Services: https://kubernetes.io/docs/concepts/services-networking/service/
[5] IPVS (IP Virtual Server) http://www.linuxvirtualserver.org/software/ipvs.html
[6] Introduction of IPVS Proxy Mode: https://github.com/kubernetes/kubernetes/issues/44063
[7] Kubernetes Persistent Volumes: https://kubernetes.io/docs/concepts/storage/persistent-volumes/
[8] Kubernetes Configuration Best Practices: https://kubernetes.io/docs/concepts/configuration/overview/
[9] Customer Resources & Custom Controllers: https://kubernetes.io/docs/concepts/api-extension/custom-resources/
[10] Understanding Vitess: https://vitess.io/overview/
[11] Skaffold, CI/CD for Kubernetes: https://github.com/GoogleContainerTools/skaffold
[12] Kaniko, Build Container Images in Kubernetes: https://github.com/GoogleContainerTools/kaniko
[13] Apache Spark 2.3 with Native Kubernetes Support https://kubernetes.io/blog/2018/03/apache-spark-23-with-native-kubernetes/
[14] Deploying Apache Kafka using StatefulSets: https://github.com/kubernetes/contrib/tree/master/statefulsets/kafka
[15] Deploying Apache Zookeeper using StatefulSets: https://github.com/kubernetes/contrib/tree/master/statefulsets/zookeeper
All content on this page by eGov Foundation is licensed under a Creative Commons Attribution 4.0 International License.
First time setup which will install the stacks, build the source code, and deploys the artefact to Wildfly
1$ cd ${HOME}/egovgithub/egov-smartcity-suite && make all
To install the prerequisites Phoenix stacks
1$ cd ${HOME}/egovgithub/egov-smartcity-suite && make install
To build the source code base
1$ cd ${HOME}/egovgithub/egov-smartcity-suite && make build
To deploy the artefact to WILDFLY
1$ cd ${HOME}/egovgithub/egov-smartcity-suite && make deploy
Prerequisites
Install maven v3.2.x
Install PostgreSQL v9.4
Install Elastic Search v2.4.x
Install Jboss Wildfly v10.x
Install
Install
Database Setup
Create a database and user in postgres
Create a schema called generic
Execute ALTER ROLE <your_login_role> SET search_path TO generic,public;
Elastic Search Setup
Elastic search server properties need to be configured in elasticsearch.yml under <ELASTICSEARCH_INSTALL_DIR>/config1## Your local elasticsearch clustername, DO NOT use default clustername 2cluster.name: elasticsearch-<username> 3## This is the default port 4transport.tcp.port: 9300 5
NB: <username> user name of the logged-in system, enter the below command in terminal to find the username.1$ id -un
Building Source
Clone the eGov repository (development is done on the develop branch.
1$ mkdir egovgithub 2$ cd egovgithub 3$ git clone <https://github.com/egovernments/egov-smartcity-suite.git> 4$ git checkout develop
Change directory to <CLONED_REPO_DIR>/egov/egov-config/src/main/resources/config/ and create a file called egov-erp-<username>.properties and enter the following values based on your environment config.
1##comma separated list of host names 2elasticsearch.hosts=localhost 3elasticsearch.port=9300 4elasticsearch.cluster.name=elasticsearch-<username> 5
If required, you can override any default settings available in /egov/egov-egi/src/main/resources/config/application-config.properties by overriding the value in egov-erp-<username>.properties.
Change directory back to <CLONED_REPO_DIR>/egov
Run the following commands. This will clean, compile, test, migrate the database and generate ear artefact along with jars and wars appropriately.
1mvn clean package -s settings.xml -Ddb.user=<db_username> -Ddb.password=<db_password> -Ddb.driver=org.postgresql.Driver -Ddb.url=<jdbc_url>
Redis Server Setup
By default eGov suit uses an embedded redis server (work only in Linux & OSx), to make the eGov suit work in Windows OS or if you want to run redis server as a standalone then follow the installation steps below.
Installing redis server on Linux
1sudo apt-get install redis-server
Installing redis server on Windows:- There is no official installable available for Windows OS. To install redis on Windows OS, follow the instruction given in https://chocolatey.org/packages/redis-64
Once installed, set the below property in egov-erp-override.properties or egov-erp-<username>.properties.
1## true by default 2redis.enable.embedded=false
to control the redis server host and port use the following property values (only required if installed with non-default).1## Replace <your_redis_server_host> with your redis host, localhost by default 2redis.host.name=<your_redis_server_host> 3## Replace <your_redis_server_port> with your redis port, 6379 by default 4redis.host.port=<your_redis_server_port>
Deploying Application
Configuring JBoss Wildfly
Download and unzip the customized JBoss Wildfly Server from here. This server contains some additional jars that are required for the ERP.
In case, properties needs to be overridden, edit the below file (This is only required if egov-erp-<username>.properties is not present)
1<JBOSS_HOME>/modules/system/layers/base/ 2 3org 4└── egov 5 └── settings 6 └── main 7 ├── config 8 │ └── egov-erp-override.properties 9 └── module.xml
Update settings in standalone.xml under <JBOSS_HOME>/standalone/configuration
Check Datasource setting is in sync with your database details.
1<connection-url>jdbc:postgresql://localhost:5432/<YOUR_DB_NAME></connection-url> 2<security> 3 <user-name><YOUR_DB_USER_NAME></user-name> 4 <password><YOUR_DB_USER_PASSWORD></password 5</security>
Check HTTP port configuration is correct in
1<socket-binding name="http" port="${jboss.http.port:8080}"/>
Change directory back to <CLONED_REPO_DIR>/egov/dev-utils/deployment/ and run the below command
1$ chmod +x deploy.sh 2$ ./deploy.sh
Alternatively, this can be done manually by following the below steps.
Copy the generated exploded ear <CLONED_REPO_DIR>/egov/egov-ear/target/egov-ear-<VERSION>.ear in to your JBoss deployment folder <JBOSS_HOME>/standalone/deployments
Create or touch a file named egov-ear-<VERSION>.ear.dodeploy to make sure JBoss picks it up for auto-deployment
Start the wildfly server by executing the below command
1 $ cd <JBOSS_HOME>/bin/ 2 $ nohup ./standalone.sh -b 0.0.0.0 & 3
In Mac OSx, it may also required to specify -Djboss.modules.system.pkgs=org.jboss.byteman
-b 0.0.0.0 only required if the application accessed using an IP address or domain name.
Monitor the logs and in case of successful deployment, just hit <http://localhost:<YOUR_HTTP_PORT>/egi> in your favourite browser.
Log in using the username as egovernments and password demo
Accessing the application using IP address and domain name
This section is to be referred to only if you want the application to run using any IP address or domain name.
1. To access the application using an IP address:
Have an entry in eg_city table in the database with an IP address of the machine where the application server is running (for ex: domainurl="172.16.2.164") to access the application using the IP address.
Access the application using the URL http://172.16.2.164:8080/egi/ where 172.16.2.164 is the IP and 8080 is the port of the machine where the application server is running.
2. To access the application using the domain name:
Have an entry in eg_city table in the database with the domain name (for ex: domainurl= "www.egoverpphoenix.org") to access the application using the domain name.
Add the entry in the host file of your system with details as 172.16.2.164 www.egoverpphoenix.org (This needs to be done both in server machine as well as the machines in which the application needs to be accessed since this is not a public domain).
Access the application using an URL http://www.egoverpphoenix.org:8080/egi/ where www.egoverpphoenix.org is the domain name and 8080 is the port of the machine where the application server is running.
Always start the wildfly server with the below command to access the application using IP address or domain name.1 nohup ./standalone.sh -b 0.0.0.0 &
This section gives more details regarding developing and contributing to the eGov suit.
Repository Structure
egov - folder contains all the source code of eGov opensource projects
Check out sources
git clone [email protected]:egovernments/egov-smartcity-suite.git or git clone <https://github.com/egovernments/egov-smartcity-suite.git>
Prerequisites
Install your favourite IDE for the Java project. Recommended Eclipse or IntelliJ IDEA
Install maven >= v3.2.x
Install PostgreSQL >= v9.4
Install Elastic Search >= v2.4.x
Install
Install
Install
Note: Please check-in [eGov Tools Repository] for any of the above software installables before downloading from the Internet.
1. Eclipse Deployment
Install Eclipse Mars Eclipse Mars
Import the cloned git repo using maven Import Existing Project.
Install Jboss Tools and configure Wildfly Server.
Since jasperreport related jar's are not available in maven central, we have to tell eclipse to find jar's in alternative place for that navigate to Windows -> Preference -> Maven -> User Settings -> Browse Global Settings and point settings.xml available under egov-erp/
Now add your EAR project into the configured Wildfly server.
Start Wildfly in debug mode, this will enable hot deployment.
2. Intellij Deployment
Install Intellij
Open project
In project settings set JDK to 1.8
Add a run configuration for JBoss and point the JBOSS home to the wildfly unzipped folder
Run
3. Database Migration Procedure
Any new sql files created should be added under directory <CLONED_REPO_DIR>/egov/egov-<javaproject>/src/main/resources/db/migration
Core product DDL and DML should be added under <CLONED_REPO_DIR>/egov/egov-<javaproject>/src/main/resources/db/migration/main
Core product sample data DML should be added under <CLONED_REPO_DIR>/egov/egov-<javaproject>/src/main/resources/db/migration/sample
All SQL scripts should be named in the following format.
Format V<timestamp-in-YYYYMMDDHHMMSS-format>__<module-name>_<description>.sql
DB migration will automatically happen when the application server starts, in case required while maven build to use the above-given maven command.
Migration file name sample
1V20150918161507__egi_initial_data.sql 2
For more details refer Flyway
Note: This system is supported
OS:-
Linux (Recommended)
Mac
Windows (If Redis server standalone installed).
Browser:-
Chrome (Recommended)
Firefox
Internet Explorer
All content on this page by eGov Foundation is licensed under a Creative Commons Attribution 4.0 International License.
Data has to be collected for every boundary hierarchy type and boundary type with a mapping between the boundary code and its parent boundary code. Following is the table which is to be used across all the hierarchy types.
1
W1
Ward no.1
वार्ड नंबर 1
Z1
Ward
Following is the definition of the data columns which are being used in the template:
1
Boundary Code
Alphanumeric
64
Yes
This is a code for the sub-classification for a particular boundary. Should be unique across all boundaries defined
2
Following are the steps which should be used to fill the template:
Download the data template attached to this page.
Get a good understanding of all the headers in the template sheet, their data type, size, and definitions by referring to the ‘Data Definition’ section of this document.
In case of any doubt, please reach out to the person who has shared this template with you to discuss and clear your doubts.
After Identifying all the boundary hierarchy, get the sub-classification of all the hierarchies.
Figure out the codes for all the sub-classification for a particular city/ULB.
Start filling the template from the top of the hierarchy in a drill-down approach.
A parent-child mapping code has to be created for every boundary level except for the top level.
Follow the steps until you reach the last sub-classification.
Verify the data once again by going through the checklist and taking care of each and every point mentioned in the checklist.
The checklist is a set of activities to be performed one the data is filled into a template to ensure data type, size, and format of data is as per the expectation. These activities have been divided into 2 groups as given below.
This checklist covers all the activities which are common across the entities.
1
Make sure that each and every point in this reference list has been taken care of
This checklist covers the activities which are specific to the entity.
1
Every boundary type of data should be filled separately
-
All content on this page by eGov Foundation is licensed under a Creative Commons Attribution 4.0 International License.
Sr. No
Module*
KPI Chart Type*
Description*
PGR
Line Chart
Showing the status of closed complaints over a year month-wise
Pie Chart
Showing the various type of complaints
1
Module Name
Text
256
Yes
The name of the module for which the KPI chart types have to be defined
2
Download the data template attached to this page.
Get a good understanding of all the headers in the template sheet, their data type, size, and definitions by referring to the ‘Data Definition’ section of this document.
In case of any doubt, please reach out to the person who has shared this template with you to discuss and clear your doubts.
Present the client with information about various available chart types.
Show the client how the various KPI’s will look on the web page by showing the reference page from the attachments.
After which the gather the information for various chart types and the information that the chart types have to display in the description column.
Verify the data once again by going through the checklist and making sure that each and every point mentioned in the checklist is covered.
This checklist covers all the activities which are common across the entities.
1
Make sure that each and every point in this reference list has been taken care of
This checklist covers the activities which are specific to the entity:
Make sure that the chart types are chosen from the list of available chart types from the attachment section
-
All content on this page by eGov Foundation is licensed under a Creative Commons Attribution 4.0 International License.
Submit
This action will freeze the application from citizen or CEMP and proceed further for workflow
Trade Licenses, Property Tax, Building Plan Approval
4
Verify and Forward
This action will proceed application to the next stage of the workflow process and also assigns tasks to the next user in the workflow (if needed)
Trade Licenses, Property Tax, Building Plan Approval
5
Pay
This action will help to pay application fees
Trade Licenses, Property Tax, Building Plan Approval
6
Approve
This action will be the last stage of application workflow which will grant permission for a specific application
Trade Licenses, Property Tax, Building Plan Approval
7
Activate connection
This action will create a consumer no. against the application and demand generation can start
Water and Sewerage Charges
8
Reject
This action will reject the application, the application rejected can’t be processed further or with the help of it, citizens can not re-apply. He has to start a new application next time.
Trade Licenses, Property Tax, Building Plan Approval
9
Send Back
An actor can assign back the application to the previous state if any edits/changes are required
Trade Licenses, Property Tax, Building Plan Approval
10
Send Back to Citizen
An actor can assign back the application to the citizen if any edits/changes are required
Trade Licenses, Property Tax, Building Plan Approval
11
View
Anyone in the workflow can view the application and task details
Trade Licenses, Property Tax, Building Plan Approval
12
Comment
Comments can be recorded before any action is taken which can change the state of the application
Trade Licenses, Property Tax, Building Plan Approval
13
Download/ Print
Download/Print of any artefacts can be configured as per the requirement for application processing
All Modules
14
Forward
This action will not create any bill but will be forwarded to the next level review and approve
Finance
15
Create and Approve
In this action, the user who initiates the action can create and approve the bill. (Here there should a threshold amount to be set up)
Finance
16
Save
In this action, the approver can Save the bill before it is approved or rejected
Finance
17
Verify and Approve
This action will help the approver to approve the bill if he/she feels all the information is updated correctly
Finance
18
Reject
This action will help the approver to reject the bill if he/she feels all the information is not correct and may need further clarification.
Finance
19
Send back to Assistant
This action will help to send back the notification on the bill is rejected from the approver
Finance
20
Cancel
This action will help the approver to cancel the bill if he/she feels that the bill need to be rejected
Finance
kubectl run --image= --port=kubectl expose deployment --type=LoadBalancer --name=kubectl create configmap # map-name: name of the config map
# data-source: directory, file or literal value# write credentials to two files
$ echo -n 'admin' > ./username.txt
$ echo -n '1f2d1e2e67df' > ./password.txt# create a secret
$ kubectl create secret generic app-credentials --from-file=./username.txt --from-file=./password.txt$ kubectl set image deployment/ =:$ kubectl rollout status deployment/
Waiting for rollout to finish: 2 out of 3 new replicas have been updated...
deployment "" successfully rolled outkubectl scale --replicas= deployment/


ADM
2
W2
Ward no.2
वार्ड नंबर 2
Z1
Ward
ADM
3
W3
Ward no.3
वार्ड नंबर 3
Z2
Ward
ADM
4
W4
Ward no.4
वार्ड नंबर 4
Z3
Ward
ADM
Boundary Name (In English)
Text
256
Yes
The name of the boundary that is being defined in the English language
3
Boundary Name (In Local Language)
Text
256
Yes
The name of the boundary that is being defined in the local language of the state e.g. Telugu, Hindi etc.
4
Parent Boundary Code
Alphanumeric
64
Yes
This is the boundary code of the parent which identifies to which parent the child belongs to
5
Boundary Type
Text
256
Yes
The name of the boundary type i.e. Ward, Zone etc.
6
Hierarchy Type Code
Alphanumeric
64
Yes
The code of the Boundary Hierarchies for which this particular boundary is defined
Metric
Showing the rate of different complaint status by percentage in a tabular format
2.
Property Tax
Horizontal Bar Graph
Showing the various information about property application status month-wise over a year
KPI Chart Type
Text
256
Yes
The type of chart which has to display information
3
Description
Text
256
Yes
A brief description of the information that the chart has to display. Steps to fill Data
This document aims to put together all the items which will enable us to come up with a proper training plan for a partner team that will be working on the DIGIT platform.
Below listed are the technical skill sets that are required to work on the DIGIT stack. It is expected the team planning on attending training is well versed with the mentioned technologies before they attend eGov training sessions.
Open API Contract - Swagger2.0
YAML/JSON
Postman
Postgres
Understanding of the microservice architecture.
Experience of AWS, Azure, GCP, NIC Cloud.
Strong working knowledge of Linux, command, VM Instances, networking, storage.
To create Kubernetes cluster on AWS, Azure, GCP on NIC Cloud.
Trainees are expected to have laptops/ desktops configured as mentioned below with all the software required to run the DIGIT application
Laptop for hands-on training with 16GB RAM and OS preferably Ubuntu
All developers need to have Git ids
Install VSCode/IntelliJ/Eclipse
Install
There are knowledge assets available in the Net for general items and eGov assets for DIGIT services. Here you can find references to each of the topics of importance. It is mandated the trainees do a self-study of all the software mentioned in the prerequisites using the reference materials shared.
The Kubernetes vSphere driver contains bugs related to detaching volumes from offline nodes. See the Volume detach bug section for more details.
When creating worker nodes for a user cluster, the user can specify an existing image. Defaults may be set in the .
Supported operating systems
Ubuntu 18.04
CoreOS
CentOS 7
Go into the VSphere WebUI, select your data centre, right-click onto it and choose “Deploy OVF Template”
Fill in the “URL” field with the appropriate URL
Click through the dialogue until “Select storage”
Select the same storage you want to use for your machines
Convert it to vmdk: qemu-img convert -f qcow2 -O vmdk CentOS-7-x86_64-GenericCloud.qcow2 CentOS-7-x86_64-GenericCloud.vmdk
Upload it to a Datastore of your vSphere installation
Create a new virtual machine that uses the uploaded vmdk as rootdisk.
Modifications like Network, disk size, etc. must be done in the ova template before creating a worker node from it. If user clusters have dedicated networks, all user clusters, therefore, need a custom template.
During the creation of a user cluster Kubermatic creates a dedicated VM folder in the root path on the Datastore (Defined in the ). That folder will contain all worker nodes of a user cluster.
Kubernetes needs to talk to the vSphere to enable Storage inside the cluster. For this, kubernetes needs a config called cloud-config. This config contains all details to connect to a vCenter installation, including credentials.
As this Config must also be deployed onto each worker node of a user cluster, its recommended to have individual credentials for each user cluster.
The VSphere user must have the following permissions on the correct resources
Role k8c-storage-vmfolder-propagate
Granted at VM Folder and Template Folder, propagated
Permissions
Role k8c-user-vcenter
Granted at vcentre level, not propagated
Needed to customize VM during provisioning
The described permissions have been tested with vSphere 6.7 and might be different for other vSphere versions.
After a node is powered-off, the Kubernetes vSphere driver doesn’t detach disks associated with PVCs mounted on that node. This makes it impossible to reschedule pods using these PVCs until the disks are manually detached in vCenter.
Upstream Kubernetes has been working on the issue for a long time now and tracking it under the following tickets:
All content on this page by is licensed under a .
DIGIT is an open-source platform licensed under the MIT license (https://opensource.org/licenses/MIT) compliant with the NUIS digital blueprint.
Detailed mapping of DIGIT’s capabilities with the core requirements mentioned in the NUIS digital blueprint has been done below:
Interoperability
DIGIT is designed as an API-first platform and with Open APIs & Open Standard interoperability is maintained.
Along with this, taxonomies are available for the key domain entities/registries on DIGIT.
Data privacy and security by design
Data privacy and security design are a very critical part of the design of DIGIT.
Core service layer of DIGIT includes a signing and encryption service that provides capabilities to sign/encrypt/mask sensitive data.
Appropriate access controls can be defined in the APIs to ensure authorised access to sensitive data
Transparency and Accountability through data
Data specifications/models are available for domain entities. DIGIT is designed as an API-first platform wherein data specs/models are created for all key entities thus ensuring interoperability through open APIs and open standards. Taxonomies are available for the key domain entities/registries. These can later be harmonised with standard taxonomies in the domain as and when they are made available.
DIGIT data models and APIs are published as Open APIs freely available to everyone in the ecosystem. In Punjab, the DIGIT module was easily integrated with 3rd party payment apps like Paytm, Airtel Money, BBPS, etc to increase citizen access and improve collections. At present, DIGIT provides at least 3 key distinct APIs for all domain entities - create, update and search.
Deactivation/Cancellation of key entities in DIGIT is achieved through updating their status to inactive as per their defined specification/API contracts. Given the API-first and micro-services-driven nature of DIGIT, current APIs and models can be quickly harmonised with national standards as and when they are made available. DIGIT strives to leverage established domain standards (national/international) wherever available.
Data privacy capabilities are available to mark and protect sensitive data. The core service layer of DIGIT includes signing and encryption service as one of the core services that provide capabilities to sign/encrypt/mask sensitive data. It is designed such that it can work against software key stores and can be extended to integrate with any kind of hardware key store to store and protect signing and encryption keys.
Encryption requirements can be defined and adhered to for the storage of sensitive data. DIGIT requires the User PII data to be stored in its User service which is by default enabled for encryption of sensitive data as User Data Vault. All other services in DIGIT are required to access PII data by explicitly calling the User service - which in turn audits all access to PII. In addition, individual services in DIGIT can leverage DIGIT’s signing and encryption service (which is what User Service leverages to create User Data Vault) to further protect additional sensitive data available with the services.
DIGIT provides the capability to define workflows for data modification that can be configured to have approval steps to get needed consent for any data modification activities. DIGIT currently provides RBAC (Role-Based Access Control) based access control for access (search) to data.
Appropriate access controls can be defined in the APIs to ensure authorised access to sensitive data. DIGIT is designed to handle authentication and authorisation as perimeter control at its API gateway layer to ensure unauthorised calls are not allowed to even contact the respective micro-services. DIGIT provides an RBAC (Role-Based Access Control) mechanism where users are explicitly provided access to relevant resources by assigning them appropriate roles. By default, DIGIT supports OAUTH-based authentication for individual users and APIs. However, the Authentication and Authorization filter on DIGIT is designed to be easily extendable to support any further Auth and Auth needs.
Perimeter security mechanism in DIGIT also helps developers in focusing on the functional developments in further services and offloading the access control requirements for new resources and their APIs to the API gateway using simple configurations.
DIGIT also ensures that risks like the following are taken care of:
Privilege escalation – form field manipulation
Failure to restrict URL access
Insecure direct object references (IDOR)
Malicious file upload leads to cross-site scripting
DIGIT has the capability to define key registries in OpenAPI 3.0 specs formats and easily achieve key APIs like create/update/search using its building blocks in core services mainly through configurations and using lightweight extensions on a needs basis.
DIGIT has the capability to protect person-specific sensitive data by encrypting them in the user data vault (User Registry) which allows configuration-based protection of sensitive PII. DIGIT requires additional registries to reference PII using this mechanism. In addition, registries in DIGIT can leverage its data protection (Signing and Encryption) core service to provide additional protection to registry-specific attributes.
Registry data in DIGIT can be signed for tamper-proofing using its signing and encryption core service. A proof of concept for this has already been done on the ePass module that was built on the DIGT platform. All key data modifications in DIGIT are access logged to provide an audit trail, which can be accessed through APIs. The upcoming version of DIGIT is planning to bring in the concept of immutable event logs to further strengthen this capability. DIGIT leverages open-source telemetry to provide the ability to gather telemetry data and extends it for the DIGIT-specific processing pipeline. This framework allows for additional event definitions and contextual extension of the telemetry processing pipeline thereby future-proofing this capability in DIGIT.
DIGIT platform is designed as a collection of more than 50+ atomic microservices which are bundled together in a given context to provide end solutions. Microservices in DIGIT can be mainly categorized in three categories: Data services (Registries, reference Master data management, etc.), Tech infrastructure services (Authentication, authorisation, notification engine etc.) and domain services (Assessment, NOC etc.). Citizen, employee and administrative interfaces in DIGIT use these microservices to achieve the needed functionality.
Data models and APIs in DIGIT are defined as OpenAPI 3.0 specifications and can be extended by using a combination of configuration and extension techniques. E.g. if the additional attributes are only needed to be stored with format validation, it can be a simple schema extension, while if the additional business checks/functionality need to be implemented using the extended attributes then it can be achieved using pre/post request filters or extending underlying microservices.
DIGIT allows extension of existing capabilities without needing architectural interventions. As described above extension of existing functionality on DIGIT can be achieved using additional configurations, additional extension services or request/response filters.
Several partners have extended DIGIT modules to cater to new use cases. For instance DIGIT mCollect module caters to collection of fees for more than 50 services on the counter, but it did not have a citizen interface for payment of these services online. Directorate General Defence Estates (DGDE) wanted to introduce this interface for the citizen’s of cantonment boards in India and were able to easily enhance the mCollect module to include this capability. Similarly Punjab has reused several DIGIT core services to develop new modules on the platform with minimum efforts.
DIGIT supports single-instance multi-tenancy to enable sharing of the underlying infrastructure, also all DIGIT data models and services are designed to be multi-tenanted.
DIGIT uses API first approach in its design and development to ensure loose coupling between its various components. These APIs are clearly defined using OpenAPI 3.0 specifications to ensure clear documentation.
As described above, extension of existing functionality on DIGIT can be achieved using additional configurations, additional extension services or request/response filters. Similarly new functionality can be added by rebundling existing building blocks in context of new use cases and implementing only additionally required services without requiring any architectural overhaul. Additionally due to its loosely coupled API driven design DIGIT allows for new components to be implemented in the technology that is most useful for that use case.
API driven, microservices based architecture of DIGIT enables its components to evolve separately. On DIGIT Individual components can evolve separately to enable heterogeneous evolution of the system.
DIGIT uses SemVer 2.0 for versioning of its microservices and interfaces. Semantic versioning is a formal convention for specifying compatibility using a three-part version number: major version; minor version; and patch. More details on this can be found on this link: https://semver.org/.
DIGIT is designed to be horizontally scalable. Microservices based architecture of DIGIT also enables it to scale only needed components/services, thereby providing resource efficiency. E.g. Billing and Collection services can be scaled separately during financial year closing if the load pattern indicates increasing volume of bill payments during that period.
DIGIT is designed to be hardware agnostic and can be run on any hardware. It has been tested on multiple commercial clouds and state sponsored bare metal infrastructure. Components of DIGIT that need to use underlying hardware have been carefully chosen (in case where DIGIT is using other open source components) or designed (DIGIT’s own components) to provide a layer of abstraction that can be extended for any types of hardware.
DIGIT is designed using API first approach, therefore enabling any user interface channel to leverage it. DIGIT’s own user interfaces (Web/mobile app, WhatsApp chatbot) are implemented using its APIs to ensure offered platform capabilities and data are accessible to any delivery channel based on configured policies. In states like Punjab and AP where DIGIT modules are being used, the citizens have been given multi-channel access - ULB counters, Web portals, Mobile App, WhatsApp Chatbot and 3rd party applications like Paytm, BBPS to avail local government services.
DIGIT’s access control mechanism can be configured to provide different levels of access based on channels and roles.
DIGIT platform and its user interfaces are completely open source. Also, all external components used in DIGIT are also Open Source. Due to its API based and event driven architecture DIGIT can be integrated with any existing stack. Wherever appropriate, DIGIT also provides out of box integrations with crucial stacks/platforms. The most common integrations are to payment gateways, SMS providers and SMTP email servers for a typical implementation.
More than 14 organizations have already partnered with us to implement DIGIT across multiple implementations in the country and have built more than 20 new solutions on top of the platform.
DIGIT also provides the capability to gather feedback from the ecosystem in a digital manner. Feedback capability in DIGIT can be looked at the following levels:
Service Delivery feedback on services offered through DIGIT - DIGIT provides a highly configurable and extensible Public Grievance module to enable this kind of feedback/redressal for functional users (Citizens, employees etc)
Service Usage feedback - DIGIT user interfaces include a telemetry SDK which is backed by telemetry infrastructure in DIGIT platform. Coupled with API access logs, this enables DIGIT to gather usage feedback through live action and can be used for fine tuning interfaces and APIs
Design/Feature feedback - As an open source project on github, DIGIT provides a mechanism to provide comments/feedback on its various components using github. This feedback can be leveraged to create a Point of View on the future roadmap for the platform.
All content on this page by is licensed under a .
Program Execution Teams
Team Size
Roles/Actors
Proposed Composition
Timelines
Location
Program Management
2
Program Leader Program Manager
State / Deputation (External Consultants can be onboarded here if required)
Full-time
Central
All content on this page by is licensed under a .
Localization is a practice to localize various UI visible data into the local wordings according to the client's requirements. This practice of localization is enforced on various clients so that it becomes easier for the people using the service to understand the common terminology and make the best use of the available system.
The following texts (but not limited to) on the web page can be localized:
Labels
Messages: Alert messages, success messages, validation messages and other notifications etc.
Help Texts
Download the data template attached to this page.
Get a good understanding of all the headers in the template sheet, their data type, size, and definitions by referring to the ‘Data Definition’ section of this document.
In case of any doubt, please reach out to the person who has shared this template with you to discuss and clear your doubts.
Present the client the full sheet of codes as well as the English language for which the localized texts are required.
This checklist covers all the activities which are common across the entities.
Not Applicable
All content on this page by is licensed under a .

A ULB portal is a specially designed website for a ULB that serves as the single point of access for information. It can also be considered a library of personalized and categorized content. A ULB web portal helps in search navigation, personalization, notification and information integration, and often provides features like task management, collaboration, and business intelligence and application integration.

Java and REST APIS
Basics of Elasticsearch
Maven
Springboot
Kafka
Zuul
NodeJS, ReactJS
WordPress
PHP
Kubectl installation & commands (apply, get, edit, describe k8s objects)
Terraform for infra-as-code for cluster or VM provisioning.
Understanding of VM types, Linux OS types, LoadBalancer, VPC, Subnets, Security Groups, Firewall, Routing, DNS)
Experience setting up CI like Jenkins and create pipelines.
Deployment strategies - Rolling updates, Canary, Blue/Green.
Scripting - Shell, Groovy, Python and GoLang.
Experience in Baking Containers and Dockers.
Artifactory - Nexus, Verdaccio, DockerHub, etc.
Experience on Kubernetes ingress, setting up SSL certificates and renewal
Understanding on Zuul gateway
Gitops, Git branching, PR review process. Rules, Hooks, etc.
Experience in Helm, packaging and deploying.
JBoss Wildfly, Apache, Nginx, Redis and Postgres.
Install JDK 8 update 112 or higher
Install maven v3.2.x
Install PostgreSQL v9.6
Install Elastic Search v2.4.x
Postman
How to create a database and set up privileges?
How to add an index on a table?
How to use aggregation functions in psql?
Postman
Call a REST API from Postman with proper payload and show the response
Setup any service locally(MDMS or user service has least dependencies) and check the API’s using postman
REST APIs
What are the principles to be followed when making a REST API?
When to use POST and GET?
How to define the request and response parameters?
Kafka
How to push messages on Kafka topic?
How does the consumer group work?
What are partitions?
Docker and Kubernetes
How to edit deployment configuration?
How to read logs?
How to go inside a Kubernetes pod?
How to create a docker file using a base image?
How to port-forward the pod to the local port?
JSON
How to write filters to extract specific data using jsonPaths?
YAML
How to read an API contract using swagger?
Zuul
s
What does Zuul do?
Maven
What is POM?
What is the purpose of maven clean install and how to do it?
What is the difference between the version and SNAPSHOT?
Springboot
How does Autowiring work in spring?
How to write a consumer/producer using spring Kafka?
How to make an API call to another service using restTemplate?
How to execute queries using JDBC Template?
Elastic search
How to write basic queries to fetch data from elastic search index?
Wordpress
DIGIT Architecture
What comes as part of core service, business service and municipal services?
How to calls APIs from one service in another service?
DIGIT Core Services
Which are the core services in the DIGIT framework?
DIGIT DevOps
DIGIT MDMS
How to read a master date from MDMS?
How to add new data in an existing Master?
Where is the MDMS data stored?
DIGIT UI Framework
How to add a new component to the framework?
How to use an existing component?
DSS
Git
Do you have a Git account?
Do you know how to clone a repository, pull updates, push updates?
Do you know how to give a pull request and merge the pull request?
Microservice Architecture
Do you know when to create a new service?
How to access other services?
ReactJS
How to create react app?
How to create a Stateful and Stateless Component?
How to use HOC as a wrapper?
Validations at form level using React.js and Redux
Postgres
Select the same network you want to use for your machines
Leave everything in the “Customize Template” and “Ready to complete” dialogue as it is
Wait until the VM got fully imported and the “Snapshots” => “Create Snapshot” button is not greyed out anymore.
The template VM must have the disk.enable UUID flag set to 1, this can be done using the govc tool with the following command:
Virtual machine
Change Configuration
Add existing disk
Add new disk
Add or remove the device
Remove disk
Folder
Create folder
Delete folder
Role k8c-storage-datastore-propagate
Granted at Datastore, propagated
Permissions
Datastore
Allocate space
Low-level file operations
Role Read-only (predefined)
Granted at …, not propagated
Datacenter
Permissions
VirtualMachine
Provisioning
Modify customization specification
Read customization specifications
Role k8c-user-datacenter
Granted at datacentre level, not propagated
Needed for cloning the template VM (obviously this is not done in a folder at this time)
Permissions
Datastore
Allocate space
Browse datastore
Low-level file operations
Role k8c-user-cluster-propagate
Granted at the cluster level, propagated
Needed for upload of cloud-init.iso (Ubuntu and CentOS) or defining the Ignition config into Guestinfo (CoreOS)
Permissions
Host
Configuration
System Management
Role k8s-network-attach
Granted for each network that should be used
Permissions
Network
Assign network
Role k8c-user-datastore-propagate
Granted at datastore/datastore cluster level, propagated
Permissions
Datastore
Allocate space
Browse datastore
Low-level file operations
Role k8c-user-folder-propagate
Granted at VM Folder and Template Folder level, propagated
Needed for managing the node VMs
Permissions
Folder
Create folder
Delete folder
Global
Improper authentication
Missing account lockout
Request throttling attack
Weak encoding mechanism
Sensitive information in URL
Lack of automatic session expiration
Insecure banner implementation
Concurrent session
Clickjacking
Improper error handling
DIGIT has
The capability to define registries, preferably through standard specifications like OpenAPI 3.0
The capability to configure registry attributes for security and protection as per the configuration.
Mechanisms to verify data and its provenance through audit logs (access and changelogs), preferably through APIs.
Reusability and Extensibility
The DIGIT platform is designed as a collection of more than 55+ atomic microservices which are bundled together in a given context to provide an end solution.
DIGIT allows the extension of existing capabilities without needing architectural interventions.
Components are designed to be independently reusable without any tight coupling.
Evolvability and Scale
On DIGIT:
Capabilities can be added without needing overall system re-architecture.
Individual components can evolve separately to enable heterogeneous evolution of the system.
Scaling can be done horizontally to handle changes in request volumes.
Individual components can be scaled independent of each other, to enable efficient resource utilisation
Multi-channel access
DIGIT allows multiple channels of solution delivery - ULB counters, Web portals, Mobile App, WhatsApp Chatbot and 3rd party applications like Paytm, tablets, etc.
DIGIT’s access control mechanism can be configured to provide different levels of access based on channels and roles.
Ecosystem-driven
DIGIT leverages open source technologies to reduce the cost of solutions.
Leverages or integrates with or extends existing platforms/stacks like IndiaStack, IUDX, ICTRA infrastructure etc.
Provides the capability to gather feedback from the ecosystem in a digital manner.
B.Tech / M.Tech / MCA
Required 5+ years IT experience with skills such as users stories and/use cases/requirements, execute all levels of testing (System, Integration, and Regression) JIRA - Incident management
Data Migration Specialist
Works with data collection teams to collect, clean and migrate legacy data into the platform
Candidate with strong exposure to data migration and postgreSQL with 5+ years of experience in migrating data between disparate systems. Hands-on experience with MS Excel and Macros.
DevOps Lead
In the case of the cloud: Owns all deployments and configurations needed for running the platform in the cloud
In the case of SDC: Works with SDC teams on deployments and configurations needed for running the platform in SDC
5+ years of overall experience Strong hands-on Linux experience (RHEL/CentOS, Debian/Ubuntu, Core OS) Strong hands-on Experience in managing AWS/Azure cloud instance Strong scripting skills (Bash, Python, Perl) with Automation. Strong hands-on in Git/Github, Maven, DSN/Networking Fundamentals. Strong knowledge of CI/CD Jenkins continuous integration tool Good knowledge of infrastructure automation tools (Ansible, Terraform) Good hands-on experience with Docker containers including container management platforms like Kubernetes Strong hands-on in Web Servers (Apache/NGINX) and Application Servers (JBoss/Tomcat/Spring boot)
Business Analyst
Works with domain experts to understand business and functional requirements and converts them into workable features
Tests feature developed for completeness and accuracy with respect to defined business requirements
BE / Masters / MBA
5+ years of experience in: Creating a detailed business analysis, outlining problems, opportunities and solutions for a business like Planning and monitoring, Variance Analysis, Reporting, Defining business requirements and reporting them back to stakeholders
Content / Documentation Expert
Works on documentation and preparation of project-specific artefacts
Good experience in creating and maintaining documentation (multi-lingual) for government programs. Ability to write clearly in a user-friendly manner. Proficiency in MS Office tools
Data Preparation and Coordination (MIS)
Works with ULB teams to gather data necessary for the deployment of the platform and guides them in operating the platform
BCom / MCom / Accounting Background
1+ year of experience along with a good understanding of MS Excel and Macros and good typing skills
Capacity Building / IEC Personnel
Works with ULB teams on-site on creating content and delivering training
BCom / MCom / Accounting Background
Required demonstrated experience in building the capacity of government personnel to influence change;
Proficiency with IEC content creation/delivery, theories, methods and technology in the capacity-building field, especially in supporting multi-stakeholder processes
Help Desk Support Team
The first line of support for ULB teams to answer all calls which arrive with respect to the platform
BCom / MCom / Accounting Background
Knowledge of managing helpdesk, fluent in the local language, good typing skills. Strong process and application knowledge
Domain Experts
1-2
Domain experts for mCollect and Trade License
Senior Resources from ULBs / State Govt Depts. who can help in
interpretation of rules
propose reforms as required
From initiation till requirement finalisation/rollout
Central
Coordination + Execution Team
1 per ULB
Nodal Officers per ULB
ULB Staff (Tax Inspectors / Tax Suprintendants / Revenue Officers etc)
Full-time
Local
Technology Implementation Team
6-8
1 Program Manager 1 Sr. Developer 1 Jr. Developer 1 Tester 1 Data Migration Specialist / DBA 1 DevOps Lead 1 Business Analyst 1 Content / Documentation Expert
Outsourced
From initiation to rollout
Central
Data Preparation and Coordination (MIS)
1-2
MIS / Data / Cross-functional
Outsourced / Contract
Full-time
Central
Capacity Building / IEC
2-4
Content developers and Trainers / Process Experts
Outsourced / Contract
For 6-12 months post rollout
Central
Monitoring
4-6
Nodal Officers one per 2/3 Districts
State / Deputation
For 3-6 months post rollout
Semi-local
Help Desk and Support
4-5
Help Desk Support Analyst
Outsourced
For 12 months post rollout / as per contract
Central
Title
Responsibilities
Qualifications
Program Manager
Day to day project ownership/management and coordination within the project team as well as with State PMU
MBA / Relevant
Required 10+ years of Project/Program management experience implementing Tally / ERP Systems in large government deployments with extensive understanding of finance and accounting systems
Tech Lead / Sr. Developer
Decides all technical aspects/solutioning for the project in coordination with project plan and aligns resources to achieve project milestones
B.Tech / M.Tech / MCA
Required 8+ years of technology/solutioning experience. Preferred experience in deploying and maintaining large integrated platforms/systems
Jr. Developer / Support Engineer
Takes leadership with respect to complex technical solutions
B.Tech / M.Tech / MCA
Required 5+ years IT experience with skills such as Java, Core Java, PostgreSQL, GIT, Linux, Kibana, Elasticsearch, JIRA - Incident management, ReactJS, SpringBoot, Microservices, NodeJS
Tester / QA
Tests feature developed for completeness and accuracy with respect to defined business requirements
ट्रेड लाइसेंस रिपोर्ट
3
CORE_COMMON_CITY
Property Tax
City
शहर
Alphanumeric
64
Yes
The module in which the code belongs to
3
Message(In English)
Text
256
Yes
The English language that is being displayed on the UI
4
Message(In Local Language)
Text
256
Yes
The text in the local language that the client wants to be displayed
Ask the client to fill the localized text in the last column which is the message(local language) column.
Verify the data once again by going through the checklist and making sure that each and every point mentioned in the checklist is covered.
1
ACTION_TEXT_APPLICATION
Trade License
Search Trade Licenses
व्यापार लाइसेंस खोजें
2
ACTION_TEST_TL_REPORTS
Trade License
1
Code
Alphanumeric
64
Yes
The code for which the localized language is to be provided
2
1
Make sure that each and every point in this reference list has been taken care of
Trade License Reports
Module
This section tells about the template and table given below represents the template. Full template to fill with the portal content is attached with this page at the last into attachments sections.
1
City Introduction
Kesariya Stupa is a Buddhist stupa in Kesariya, located at a distance of 110 kilometres (68 mi) from Patna, in the Champaran (east) district of Bihar, India. Kesaria Stupa has a circumference of almost 1,400 feet (430 m) and raises to a height of about 104 feet (32 m).
2
Mayor’s Message
It is with immense gratitude to the citizens of Kesaria for reposing their faith in me to serve them as Chairman of Kesaria Nagar Panchayat that I write this message. I shall endeavour to prove that they have made the right choice.
.
.
.
.
This section consists the information about the meaning of each and every section in the template and then how to fill the templates in a few easy steps.
Below table consist of a standard section of any portal. The additional section as required will have to capture as part of customization.
1
ULB Logo
Document
N/A
Yes
Logo of resolution: 80 * 80 pixels of the ULB to be shown on the top of the website.
2
Download the data template attached to this page.
Have it open and go through all the headers and understand the meaning given in this document under section 'Data Definition'.
Make sure all the headers, its data type, field size and its definition/ description are understood properly.
In case of any doubt, please reach out to the person who has shared this document with you to discuss the same and clear out the doubts.
Start filling the data starting from serial no. and complete a record at once. repeat this exercise until the entire data is filled into a template.
Verify the data once again by going through the checklist and taking care of each and every point mentioned in the checklist.
The checklist is a set of activities to be performed one the data is filled into a template to ensure data type, size, and format of data is as per the expectation. These activities have been divided into 2 groups as given below.
This checklist covers all the activities which are common across the entities.
1
Make sure that each and every point in this reference list has been taken care of.
This checklist covers all the activities which are specific to the entity.
1
All the sections with data type ‘Template’, data to be filled into the section-wise template provided as an attachment
NA
All content on this page by eGov Foundation is licensed under a Creative Commons Attribution 4.0 International License.
Kubernetes as such is a set of components that designated jobs of scheduling, controlling, monitoring
3 or more machines running one of:
Ubuntu 16.04+
Debian 9
CentOS 7
RHEL 7
Container Linux (tested with 1576.4.0)
4 GB or more of RAM per machine (any less will leave little room for your apps)
2 CPUs or more
3 or more machines running one of:
Ubuntu 16.04+
Debian 9
CentOS 7
RHEL 7
Container Linux (tested with 1576.4.0)
2 GB or more of RAM per machine (any less will leave little room for your apps)
2 CPUs or more
Full network connectivity between all machines in the cluster (public or private network is fine)
Unique hostname, MAC address, and product_uuid for every node. Click for more details.
Certain ports are open on your machines. See below for more details
Swap disabled. You MUST disable swap in order for the Kubelet to work properly
You can get the MAC address of the network interfaces using the command ip link or ifconfig -a
The product_uuid can be checked by using the command sudo cat /sys/class/dmi/id/product_uuid
It is very likely that hardware devices will have unique addresses, although some virtual machines may have identical values. Kubernetes uses these values to uniquely identify the nodes in the cluster. If these values are not unique to each node, the installation process may fail.
If you have more than one network adapter, and your Kubernetes components are not reachable on the default route, we recommend you add IP route(s) so Kubernetes cluster addresses go via the appropriate adapter.
TCP
Inbound
6443*
Kubernetes API server
TCP
Inbound
2379-2380
etcd server client API
TCP
TCP
Inbound
10250
kubelet API
TCP
Inbound
10255
Read-only kubelet API
TCP
** Default port range for NodePort Services.
Any port numbers marked with * are overridable, so you will need to ensure any custom ports you provide are also open.
Systems
Specification
Spec/Count
Comment
User Accounts/VPN
Dev, UAT and Prod Envs
3
User Roles
Admin, Deploy, ReadOnly
3
OS
All content on this page by eGov Foundation is licensed under a Creative Commons Attribution 4.0 International License.


It is a ULB bank account which is operative at least to receive or deposit the day to day revenue collection done by the ULB. It is used by online payment integrator to disburse the amount in ULBs accounts which have been collected through a payment gateway into a pool account managed by the payment gateway.
govc vm.change -e="disk.enableUUID=1" -vm='/PATH/TO/VM'
Remove file
vApp
vApp application configuration
vApp instance configuration
Virtual Machine
Change CPU count
Memory
Settings
Inventory
Create from existing
Local operations
Reconfigure virtual machine
Resource
Assign virtual machine to the resource pool
Migrate powered off the virtual machine
Migrate powered-on virtual machine
vApp
vApp application configuration
vApp instance configuration
Set custom attribute
Virtual machine
Change Configuration
Edit Inventory
Guest operations
Interaction
Provisioning
Snapshot management
, , , , , , , , , , , , , , , , , , , , , ,
Digit 2.7 release changes
BND Module
, , , , , , , , ,
Birth and Death Module specific changes
BND National and State DSS
, ,
Birth and Death State and National dashboard specific changes
Feature
Service Name
Changes
Description
, , , , , , , , , , , , , , , , , , , , , , , , , , ,
Digit 2.7 release changes
BND Module
, , , , , ,
Birth and Death Module specific changes
BND National and State DSS
Feature
Changes
Description
, , , , ,
Digit 2.7 release changes
BND Module
,
Birth and Death Module specific changes
BND National and State DSS
Birth and Death State and National dashboard specific changes
Category
Services
GIT TAGS
Docker Artifact ID
Remarks
Frontend (old UI)
Citizen
citizen:v1.8.0-b078fa041d-97
Employee
employee:v1.8.0-2ac8314b2f-116
All content on this page by eGov Foundation is licensed under a Creative Commons Attribution 4.0 International License.
Feature
Service Name
Changes
Description
Below given data table represents the excel template attached. Data given in the table is a sample data.
1
dehradun
Dehradun Municipal Corporation
SBI
Rajpur
1
Code
Alphanumeric
64
Yes
Unique code is given to the bank detail record e.g. dehradun
2
Download the data template attached to this page.
Have it open and go through all the headers and understand the meaning of them by referring 'Data Definition' section.
Make sure all the headers, its data type, field size and its definition/ description is understood properly. In case of any doubt, please reach out to the person who has shared this document with you to discuss the same and clear out the doubts.
Identify the bank account which is to be used to transfer the amount which is collected online for various services.
Start filling the data starting from serial no. and complete a record at once. repeat this exercise until the entire data is filled into a template.
Verify the data once again by going through the checklist and taking care of each and every checklist point/ activity mentioned in the checklist.
The checklist is a set of activities to be performed after the data is filled into a template to ensure data type, size, and format of data is as per the expectation. These activities have been divided into 2 groups as given below.
This checklist covers all the activities which are common across the entities.
To see the common checklist refer to the page Checklist consisting of all the activities which are to be followed to ensure complete and quality data.
This checklist covers the activities which are specific to the entity.
Sr. No.
Activity
Example
1
Code should not consist of any special characters
E.g. dehradun is allowed but dehradun@1 is not allowed
2
The account number should not consist of any special characters.
As issued by the bank
All content on this page by eGov Foundation is licensed under a Creative Commons Attribution 4.0 International License.
22
Contact Us
All details of the contact person should be added under this section.
Slider Images
Document
N/A
Yes
Slider images of resolution 1280 * 450 pixels to be shown on the website.
3
City Introduction
Text
N/A
Yes
This section talks about the city hence introducing the city to be filled here to display it to the final audience/traffic onto the portal
4
City Map
Document
N/A
Yes
This section will have a map for the city mainly the area which the municipality/ panchayat takes care of and which indicates ULB boundary
5
Public Utility Services
Template
N/A
Yes
This section should include the infrastructure services provided to the citizen. E.g. Public Toilet, Govt School, Temples managed by Municipal Corporations/ Nagar Palika/ Panchayat etc.
6
Tourist Locations
Template
N/A
Yes
All tourist places in the city should be captured under this section. Tourist locations with pictures and other relevant information should be captured here
7
Mayor’s Message
Template
N/A
Yes
Message from the ULB chairman needs to be updated under this section
8
Commissioner’s Message
Template
N/A
Yes
Message from the ULB’s EO/commissioner needs to be updated under this section
9
ULB News
Template
N/A
Yes
Under this section we have will add current news about the ULB
10
ULB Events
Template
N/A
Yes
Under this section, we will add the Ongoing and Upcoming Events by the ULB
11
Recruitment Listing
Template
N/A
Yes
Recruitment listing/vacancies within the ULB needs to be mentioned in this section
12
Projects Info
Template
N/A
Yes
The description of the govt. Projects which ULBs take care of needs to be updated here with all other relevant details
13
Recent Announcements
Template
N/A
Yes
Any kind of announcements with title and description which are in public interest needs to be uploaded under this section
14
Home screen flash Announcement
Template
N/A
Yes
Any kind of announcements with title and description and by highlighting link which are in public interests can bee added under this section
15
Public Notice
Template
N/A
Yes
The notices announced by the ULB for the citizens with description, Rule and Regulation and timelines
16
Government Resolutions
Template
N/A
Yes
Directions, resolutions, and other legal instruction and acts issued by the department should be captured here
17
RTI listing
Template
N/A
Yes
All the RTI received by the ULBs shall be listed under this section
18
Help Documents for Online Services
Template
N/A
Yes
Under this section, we will add the Document or link with the title of online services for citizens
19
Required documents list for Online Services
Template
N/A
Yes
This section tells us about the list of required documents and data like old receipts or old transaction no for each service
20
Forms for services
Template
N/A
Yes
This section tells us about the services are not online, offline forms can be uploaded for the users to download
21
Tender Listing
Template
N/A
NO
All the tender issued by the ULB needs to be added under this section
22
Contact Us
Template
N/A
Yes
All details of the contact person should be added under this section
Inbound
10250
kubelet API
TCP
Inbound
10251
kube-scheduler
TCP
Inbound
10252
kube-controller-manager
TCP
Inbound
10255
Read-only kubelet API
Inbound
30000-32767
NodePort Services**
Any Linux (preferably Ubuntu/RHEL)
All
Kubernetes as a managed service or VMs to provision Kubernetes
Managed Kubernetes service with HA/DRS
(Or) VMs with 2 vCore, 4 GB RAM, 20 GB Disk
If no managed k8s
3 VMs/env
Dev - 3 VMs
UAT - 3VMs
Prod - 3VMs
Kubernetes worker nodes or VMs to provision Kube worker nodes.
VMs with 4 vCore, 16 GB RAM, 20 GB Disk / per env
3-5 VMs/env
DEV - 3VMs
UAT - 4VMs
PROD - 5VMs
Storage (NFS/iSCSI)
Storage with backup, snapshot, dynamic inc/dec
1 TB/env
Dev - 1000 GB
UAT - 800 GB
PROD - 1.5 TB
VM Instance IOPS
Max throughput 1750 MB/s
1750 MS/s
Storage IOPS
Max throughput 1000 MB/s
1000 MB/s
Internet Speed
Min 100 MB - 1000MB/Sec (dedicated bandwidth)
Public IP/NAT or LB
Internet-facing 1 public ip per env
3
3 Ips
Availability Region
VMs from the different region is preferable for the DRS/HA
at least 2 Regions
Private vLan
Per env all VMs should within private vLan
3
Gateways
NAT Gateway, Internet Gateway, Payment and SMS gateway, etc
1 per env
Firewall
Ability to configure Inbound, Outbound ports/rules
Managed DataBase
(or) VM Instance
Postgres 12 above Managed DB with backup, snapshot, logging.
(Or) 1 VM with 4 vCore, 16 GB RAM, 100 GB Disk per env.
per env
DEV - 1VMs
UAT - 1VMs
PROD - 2VMs
CI/CD server self-hosted (or) Managed DevOps
Self Hosted Jenkins: Master, Slave (VM 4vCore, 8 GB each)
(Or) Managed CI/CD: NIC DevOps or AWS CodeDeploy or Azure DevOps
2 VMs (Master, Slave)
Nexus Repo
Self-hosted Artifactory Repo (Or) NIC Nexus Artifactory
1
DockerRegistry
DockerHub (Or) SelfHosted private docker reg
1
Git/SCM
GitHub (Or) Any Source Control tool
1
DNS
main domain & ability to add more sub-domain
1
SSL Certificate
NIC managed (Or) SDC managed SSL certificate per URL
2 URLs per env


Birth and Death State and National dashboard specific changes
DSS Dashboard
dss-dashboard:v1.8.0-0d70d60e63-53
Digit-UI v2.7
DIGIT UI
digit-ui:v1.5.0-dc44c10a7b-739
Core Services v2.7
Encryption
egov-enc-service:v1.1.2-72f8a8f87b-9
xState Chatbot
xstate-chatbot:v1.1.1-96b24b0d72-21
Searcher
egov-searcher:v1.1.5-72f8a8f87b-16
Payment Gateway
egov-pg-service:v1.2.3-c856353983-16
Filestore
egov-filestore:v1.2.4-72f8a8f87b-10
Zuul - API Gateway
zuul:v1.3.1-96b24b0d72-39
Mail Notification
egov-notification-mail:v1.1.2-72f8a8f87b-12
SMS Notification
egov-notification-sms:v1.1.3-48a03ad7bb-10
Localization
egov-localization:v1.1.3-72f8a8f87b-6
Persist
egov-persister:v1.1.4-72f8a8f87b-6
ID Gen
egov-idgen:v1.2.3-72f8a8f87b-7
User
egov-user:v1.2.7-cc363f0584-12
User Chatbot
egov-user-chatbot:v1.2.6-96b24b0d72-4
MDMS
egov-mdms-service:v1.3.2-72f8a8f87b-12
URL Shortening
egov-url-shortening:v1.1.2-1715164454-3
Indexer
egov-indexer:v1.1.7-f52184e6ba-25
Report
report:v1.3.4-96b24b0d72-16
Workflow
egov-workflow-v2:v1.2.1-df98ec3c35-2
PDF Generator
pdf-service:v1.1.6-96b24b0d72-22
Chatbot
chatbot:v1.1.6-72f8a8f87b-8
Deprecated.
Access Control
egov-accesscontrol:v1.1.3-72f8a8f87b-24
Location
egov-location:v1.1.4-72f8a8f87b-6
OTP
egov-otp:v1.2.2-72f8a8f87b-12
User OTP
user-otp:v1.1.5-1715164454-3
NLP Engine
nlp-engine:v1.0.0-fbea6fba-21
No changes in the current release.
Egov Document-Uploader
egov-document-uploader:v1.1.0-75d461a4d2-4
National Dashboard Ingest
national-dashboard-ingest:v0.0.1-762c61e743-16
New service
National Dashboard Kafka Pipeline
national-dashboard-kafka-pipeline:v0.0.1-762c61e743-3
New service
Business Services v2.7
Apportion
egov-apportion-service:v1.1.5-72f8a8f87b-5
Collection
collection-services:v1.1.6-c856353983-29
Billing
billing-service:v1.3.4-72f8a8f87b-39
HRMS
egov-hrms:v1.2.5-1715164454-6
Dashboard Analytics
dashboard-analytics:v1.1.7-1ffb5fa2fd-49
Dashboard Ingest
dashboard-ingest:v1.1.4-72f8a8f87b-10
EGF Instrument
egf-instrument:v1.1.4-72f8a8f87b-4
EGF Master
egf-master:v1.1.3-72f8a8f87b-15
Finance Collection Voucher Consumer
finance-collections-voucher-consumer:v1.1.6-96b24b0d72-18
Municipal Services v2.7
Trade License
tl-services:v1.1.7-1715164454-66
Trade License Calculator
tl-calculator:v1.1.5-5bc44eec8a-5
Fire NOC
firenoc-services:v1.3.2-12ed7e93c1-64
Fire NOC Calculator
firenoc-calculator:v1.2.1-96b24b0d72-20
Property Services
property-services:v1.1.8-50fadd72a1-37
Property Tax Calculator
pt-calculator-v2:v1.1.5-96b24b0d72-12
Property Tax
pt-services-v2:v1.0.0-48a03ad7bb-4
Deprecated. No changes in the current release.
Water Charges
ws-services:v1.4.3-9611caae31-23
Water Charges Calculator
ws-calculator:v1.3.3-1715164454-23
Sewerage Charges
sw-services:v1.4.3-9611caae31-20
Sewerage Charges Calculator
sw-calculator:v1.3.3-1715164454-13
BPA Calculator
bpa-calculator:v1.1.1-72f8a8f87b-8
BPA Services
bpa-services:v1.1.6-a19ec01ecf-9
User Event
egov-user-event:v1.2.0-c1e1e8ce24-21
PGR
rainmaker-pgr:v1.1.4-48a03ad7bb-4
v1 - Deprecated.
PGR Service
pgr-services:v1.1.4-c856353983-23
v2
Land Services
land-services:v1.0.4-96b24b0d72-14
NOC Services
noc-services:v1.0.5-1715164454-1
FSM
fsm:v1.1.0-2c66d3550a-45
FSM Calculator
fsm-calculator:v1.1.0-2c66d3550a-2
Vehicle
vehicle:v1.1.0-2c66d3550a-31
Vendor
vendor:v1.1.0-2c66d3550a-9
eChallan Services
echallan-services:v1.0.5-700b644c79-16
eChallan Calculator
echallan-calculator:v1.0.2-72f8a8f87b-14
Inbox
inbox:v1.1.1-a9e95f948f-75
Turn-IO
turn-io-adapter:v1.0.1-96b24b0d72-5
Birth and Death Services
birth-death-services:v1.0.0-f96bf4c8bc-110
New service
Utilities Services v2.7
Custom Consumer
egov-custom-consumer:v1.1.1-72f8a8f87b-3
egov-pdf:v1.1.2-344ffc814a-37
eDCR v2.7
eDCR
egov-edcr:v2.1.1-1815083c26-25
Finance v2.7
Finance
egov-finance:v3.0.2-0d0a8db8ff-28
Configs v2.7
MDMS v2.7
Localization v2.7
QA Automation v2.7
Service
XXXX0082XX01
Saving
SBIX0921
2
haridwar
Haridwar Municipal Corporation
PNB
Chauk
XXXX9820XX9
Saving
PNBX8320
ULB Name
Text
256
Yes
Name of Urban Local Body
3
Bank Name
Text
256
Yes
Name of the bank where the account exists
4
Branch Name
Text
256
Yes
Name of the bank branch where the account exists
5
Account Number
Alphanumeric
64
Yes
Bank account number to be used to transfer the amount
6
Account Type
Text
256
Yes
Account type. e.g. Saving, Current etc.
7
IFSC
Alphanumeric
64
Yes
IFS code of branch as per FBI guidelines


State Portal is a website for the state. Any content or information which is displayed on this site needs to be provided by the State.
This document is to define a template to collect the portal content and information. And to help in filling up the content into the template.
This section talks about the template and the table given below represents the template. Full template to fill with the portal content is attached with this page at the last into attachments sections.
This section consists of the information about the meaning of each and every section in the template and then how to fill the templates in a few easy steps.
Below table consist of a standard section of any portal. The additional section as required will have to capture as part of customization.
Download the data template attached to this page.
Have it open and go through all the headers and understand the meaning given in this document under section 'Data Definition'.
Make sure all the headers, its data type, field size and its definition/ description are understood properly.
In case of any doubt, please reach out to the person who has shared this document with you to discuss the same and clear out the doubts.
The checklist is a set of activities to be performed one the data is filled into a template to ensure data type, size, and format of data is as per the expectation. These activities have been divided into 2 groups as given below.
This checklist covers all the activities which are common across the entities.
All content on this page by is licensed under a .
.
.
20
About Website
N/A
Yes
Message from the governor of the state to the citizens needs to be updated under this section
3
Chief Minister Message
Template
N/A
Yes
Message from the chief minister needs to be updated under this section
4
State News
Template
N/A
Yes
Under this section we have will add current news about the state
5
State Events
Template
N/A
Yes
Under this section, we will add the Ongoing and Upcoming Events in the state
6
Recruitment Listing
Template
N/A
Yes
Recruitment listing/vacancies within the state need to be mentioned in this section
7
Tender Listing
Template
N/A
Yes
All the tender issued by the state government needs to be added under this section
8
Project Info
Template
N/A
Yes
All the Information of upcoming or ongoing project within the state should be added under this section
9
Recent Announcement
Template
N/A
Yes
Any kind of announcements by the state government with title and description which are in public interest needs to be uploaded under this section
10
Home Screen Flash Announcement
Template
N/A
Yes
Any kind of announcements by the state government with title and description and by highlighting link which are in public interests can bee added under this section
11
Public Notice
Template
N/A
Yes
The notices announced by the state government for the citizens with description, Rule and Regulation and timelines
12
Government Resolution
Template
N/A
Yes
Directions, resolutions, and other legal instruction and acts issued by the department should be captured here
13
RTI Listing
Template
N/A
Yes
All the RTI received by the state government shall be listed under this section
14
Help Document for Online services
Template
N/A
Yes
Under this section, we will add the Document or link with the title of online services for citizens
15
Required documents list for Online Services
Template
N/A
Yes
This section tells us about the list of required documents and data like old receipt or old transaction no for each service
16
Forms for services
Template
N/A
Yes
This section tells us about the services are not online, offline forms can be uploaded for the users to download
17
Contact Us
Template
N/A
Yes
All details of the contact person should be added under this section
18
List of ULBs (links to the ULB sites)
Template
N/A
Yes
All website Link of ULBs within the state should be added under this section
19
About Website
Template
N/A
Yes
This section talks about the all over details whatever is there on the state website
20
Tourist Places
Template
N/A
Yes
Under this section, we will add all the tourist place in the state with details and images
21
Slider Images
Document
N/A
Yes
Slider images of resolution 1280 * 450 pixels to be shown on the website
22
State Map
Document
N/A
Yes
This section will have a map for the State
Start filling the data starting from serial no. and complete a record at once. repeat this exercise until the entire data is filled into a template.
Verify the data once again by going through the checklist and taking care of each and every point mentioned in the checklist.
Sr. No
Section Name
Section Content
1
Government Logo
2
Chief Minister Message
.
.
Sr. No.
Section Name
Data Type
Data Size
Is Mandatory?
Description / Definition
1
Government Logo
Document
N/A
Yes
Resolution: 80 * 80 pixels
Logo of the state to be updated on the website
2
Governor’s Message
1
Make sure that each and every point in this reference list has been taken care of
1
All the sections with data type ‘Template’, data to be filled into the section-wise template provided as an attachment
NA
Template


A system user is a person who uses the application service. A user often has a user account and is identified to the system by a username. A user is a person who accesses a particular application to perform a set of actions.
Each user has a certain number of set tasks, the user would be allowed to perform a task by assigning particular roles which are Super Admin, Trade License Approver, Data Entry Admin and Trade License document verifier etc.

1
Name
Text
256
Yes
The Name of his/her to whom the access to the system is provided, so he/she can use the application to perform the role function assigned
2
Download the data template attached to this page.
Have it open and go through all the headers and understand the meaning of them by referring 'Data Definition' section.
Make sure all the headers, its data type, field size and its definition/ description is understood properly. In case of any doubt, please reach out to the person who has shared this document with you to discuss the same and clear out the doubts.
Start filling the data starting from serial no. and complete a record at once. repeat this exercise until the entire data is filled into a template.
Verify the data once again by going through the checklist and taking care of each and every point mentioned in the checklist.
The checklist is a set of activities to be performed once the data is filled into a template to ensure data type, size, and format of data is as per the expectation. These activities have been divided into 2 groups as given below.
This checklist covers all the activities which are common across the entities.
1
Make sure that each and every point in this reference list has been taken care of
This checklist covers the activities which are specific to the entity.
1
The Name should not have any special character
Pooja : [Allowed]
#Pooja! : [Not allowed]
2
The date should be in DD/MM/YYYY format
DD/MM/YYYY : [Allowed]
YYYY/DD/MM : [Not allowed]
3
The Email ID should be valid Id, email Id should contain the Company/Firm name or an individual personal name before the “@” and the “” after the “@”
All content on this page by eGov Foundation is licensed under a Creative Commons Attribution 4.0 International License.
Revenue
Tax Inspector
2
M.C. Joshi
9999999999
Late Jai Dutt Joshi
MALE
04/08/1965
Nagar Nigam Haldwani
Haridwar
TL Counter Employee
PERMANENT
Yes
EMPLOYED
REVENUE
City
Haldwani
1
Pooja
9999999999
Mr.Bala Chandra
FEMALE
22/01/1987
Nagar Nigam Haldwani-PIN CODE-263139
Haldwani
Super User
PERMANENT
Yes
EMPLOYED
REVENUE
City
Haldwani
Mobile Number
Alphanumeric
10
Yes
The Mobile number of his/her to whom the access to an application provided. The mobile number is relevant so in an emergency case the person can be contacted
3
Father/Husband's Name
Text
256
Yes
The Name of the Father/Husband of his/her to whom the access to an application provided. This information is for internal records
4
Gender
Text
64
Yes
The Gender of the individual person. This information is for internal records
5
Date of Birth
Date
10
Yes
The Date of birth of the individual person. This information is for internal records
6
Alphanumeric
256
No
The email id of his/her, this email id is linked to receiving all the official communication from the customers and other counterparts
7
Correspondence Address
Text
256
Yes
The address of his/her, this information is saved for internal records
8
ULB
Text
256
Yes
A ULB to be assigned against the individual employee, So that the assigned role can perform his/her duty within that assigned ULB
9
Role
Text
256
Yes
A Role is a permission for users to perform a group of tasks, a role is assigned to the user to perform a function within the application. A user can be assigned multiple roles. Click User Roles for the Role master Data
10
Employment Type
Text
256
Yes
The employment types indicate the type of contract which he/she hold with the organization. This indicates whether he/she is a permanent employee or a contract employee for short period. The employment type “Permanent”, “Temporary”, “DailyWages” and “Contract” either one should be selected
11
Current Assignment
Text
64
Yes
The current assignment type to indicate whether the employee is currently assigned to a particular department and designation. A user can be also be assigned multiple assignments to perform his/her function
12
Status
Text
256
Yes
The Status indicates the type of status which he/she hold, whether employed or not within the organization
13
Hierarchy
Text
256
Yes
The hierarchy indicates the hierarchy type for the Boundary to which he/she is assigned
14
Boundary Type
Text
256
Yes
The boundary type indicates assigning a city to his/her role within the organization. A user can be assigned multiple Boundary Type to perform in different function. (Example: City, Zone, Block and Locality)
15
Boundary
Text
256
Yes
The boundary indicates assigning a particular city to his/her role wherein they perform role function of the application for the particular city. A user can be assigned multiple Boundary to perform in a different location (Example: City Name and Tenant Zone)
16
Assigned from Date
Date
10
Yes
The assigned from date indicates the date from which his/her role is assigned to perform the role function assigned
17
Department
Text
256
Yes
The Department indicates the particular department to which his/her role is assigned
18
Designation
Text
256
Yes
The designation indicates a particular designation is assigned to his/her role
05/10/2019

30/10/2019
Revenue
Tax Collector
