# Quick Setup (AWS)

{% hint style="info" %}
**Before you begin with the installation:**

1. ap-south-1 is hardcoded in terraform script. It will be moved to input.yaml shortly.
2. Secrets should be encrypted using SOPS. Currently, a private repository is needed to restrict access to sensitive information.
   {% endhint %}

## Overview

This guide provides step-by-step instructions for installing DIGIT using GitHub Actions within an AWS environment.

Secrets should be encrypted using SOPS. Currently, the private repo will be required to restrict access to sensitive information

## Pre-requisites

* AWS account with administrative privilege
* Github account

### Create IAM User & Generate Access Key & Secret Key

* *Skip this step if you already have access and a secret key*

1. Create an IAM User with administrative privilege in your AWS account
2. Generate `ACCESS_KEY` and `SECRET_KEY` for the IAM user.

```
// Access Keys will look something like below

AWS_ACCESS_KEY_ID=A************FQ
AWS_SECRET_ACCESS_KEY=tqM************************+lfTt
AWS_REGION=ap-south-1
```

### Configure GitHub Repository

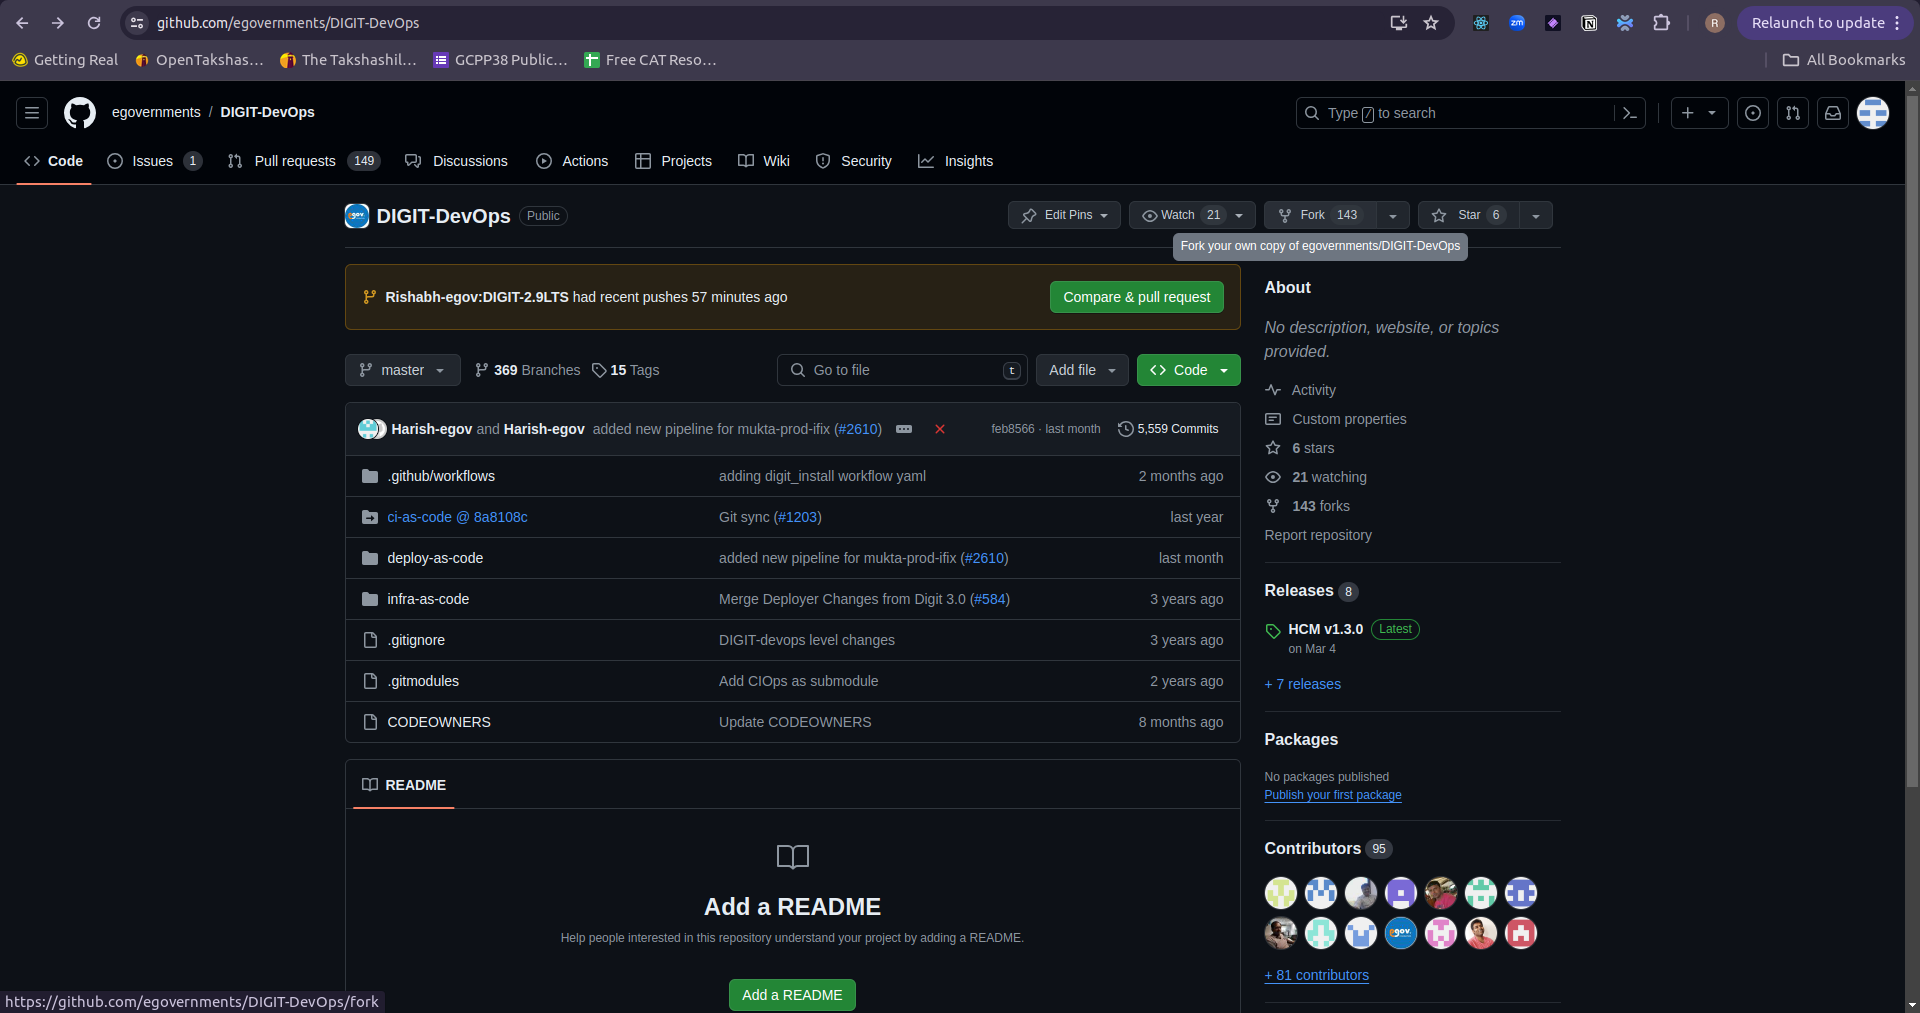
1. Fork the [DIGIT-DevOps](https://github.com/egovernments/DIGIT-DevOps) Repository into **your account** on GitHub (***Uncheck** Copy the master branch only* while forking). Refer to the image below to find a fork on GitHub.

<figure><img src="/files/35jWPnnX8k1UTf7x2wXd" alt=""><figcaption></figcaption></figure>

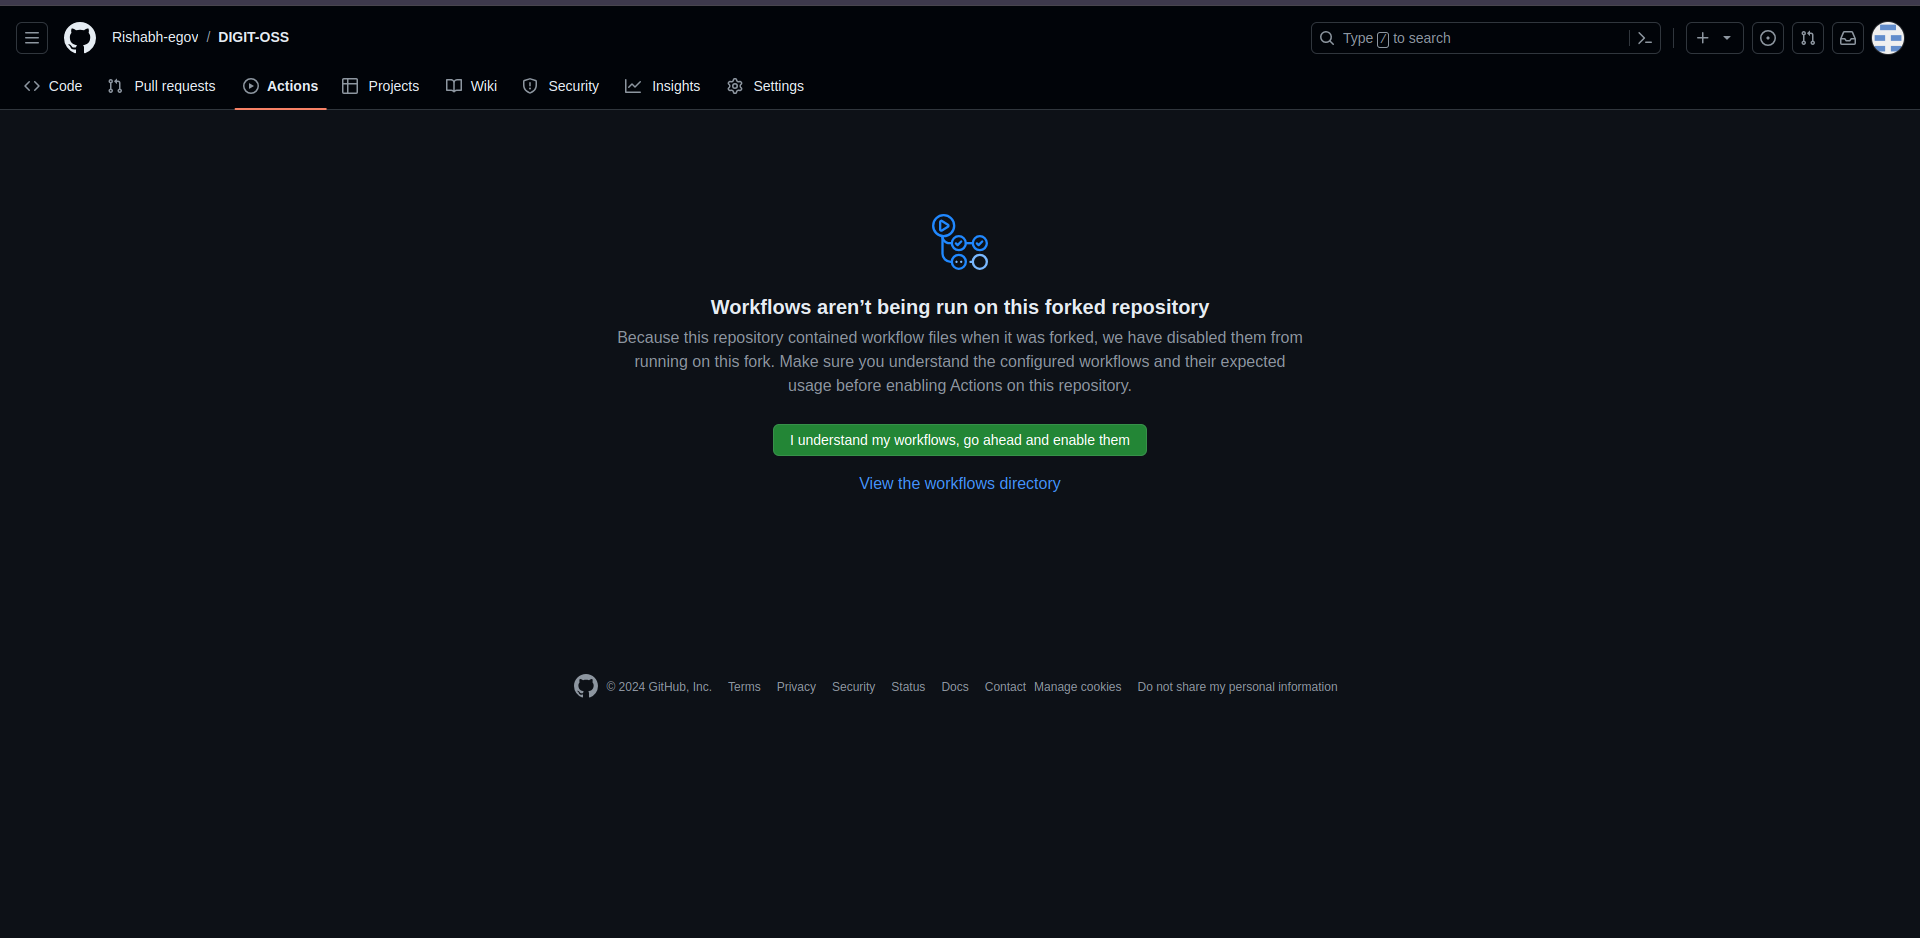
2. Enable GitHub workflow by clicking on *I understand my workflow, go ahead and enable them.*

<figure><img src="/files/C8pkBdN8fp3oUUWfGuls" alt=""><figcaption></figcaption></figure>

3. Navigate to the repository settings, under the *security* section, go to *Secrets and Variables*, click on actions and add the following repository secrets one by one by clicking on *New repository secret*:

<figure><img src="/files/Z6TJOUWL0hq3KQODIHjt" alt=""><figcaption></figcaption></figure>

The following secrets need to be added:

<table><thead><tr><th width="299">Name</th><th>Secret</th></tr></thead><tbody><tr><td><code>AWS_ACCESS_KEY_ID</code></td><td><code>&#x3C;GENERATED_ACCESS_KEY></code></td></tr><tr><td><code>AWS_SECRET_ACCESS_KEY</code></td><td><code>&#x3C;GENERATED_SECRET_KEY></code></td></tr><tr><td><code>AWS_DEFAULT_REGION</code></td><td><code>&#x3C;AWS_REGION></code></td></tr><tr><td><code>AWS_REGION</code></td><td><code>&#x3C;AWS_REGION></code></td></tr></tbody></table>

<figure><img src="/files/yOWaOdpvFyLpcOCdeIvt" alt=""><figcaption></figcaption></figure>

Once all four secrets are added, it will look like the below:

<figure><img src="/files/nuL83F0FMhFYd3GJGywi" alt=""><figcaption></figcaption></figure>

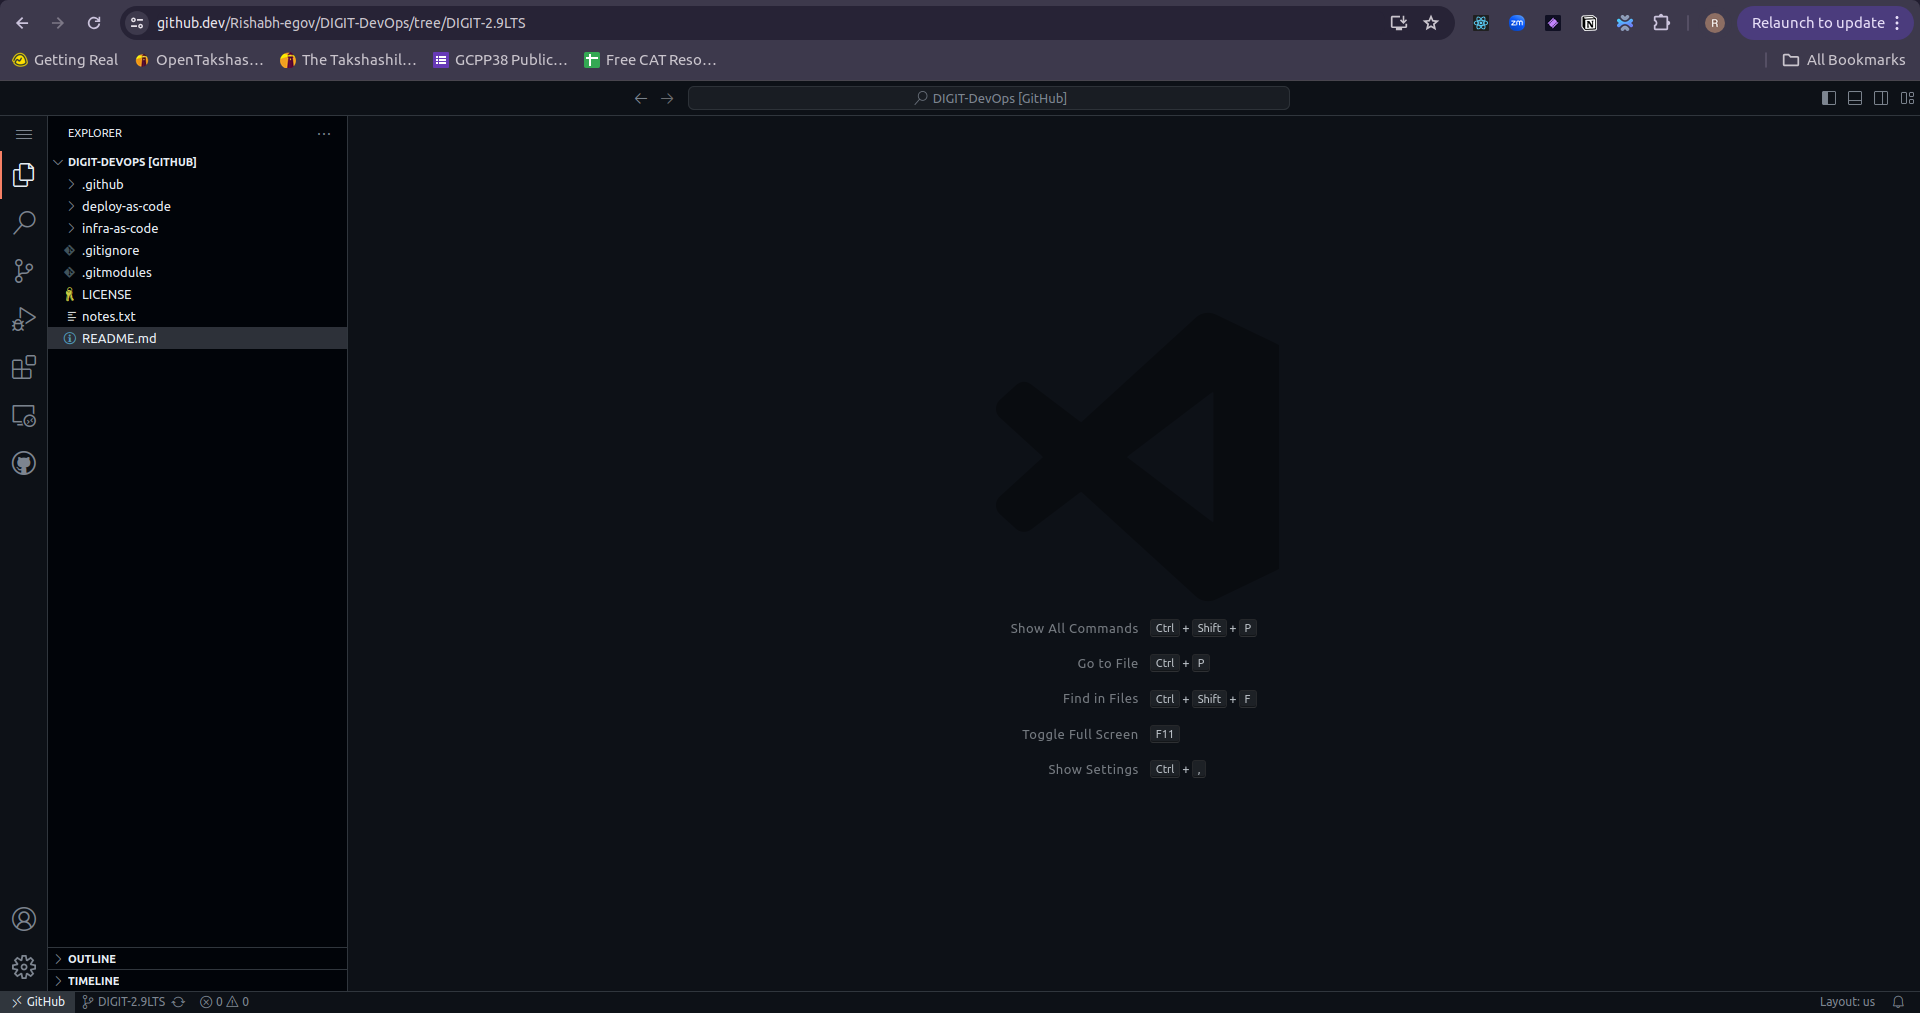
* Clone the forked DIGIT-DevOps repository (using `git clone` command) and open the repo in the code editor, or you can optionally use the GitHub[ web editor](https://docs.github.com/en/codespaces/the-githubdev-web-based-editor) by replicating github.com with github.dev.

<figure><img src="/files/kmx99QZUrkzpHqSwcD4w" alt=""><figcaption></figcaption></figure>

* Switch the branch from master to release-githubactions using the below command.

<pre><code><strong>git checkout release-githubactions
</strong></code></pre>

### Generate SSH Key Pair

Choose the following method to generate an SSH key pair:

* **Method a:** Use an online website (Note: This is not recommended for production setups, only for demo purposes): `https://8gwifi.org/sshfunctions.jsp`

Store the generated private and public keys in separate files on your local.

The *private key* will look like:

> \-----BEGIN RSA PRIVATE KEY-----\
> MIIEpAIBAAKCAQEAue4+1\*\*\*\*\*\*\*\*\*\*\*\*\*\*\*\*\*\*\*\*\*K7mGXRIv6enEP4lN/y9i287wsNBpg+IDGjIV\*\*\*\*\*\*\*\*\*\*\*\*\*\*\*\*\*\*\*\*\*\*\*\*\*\*\*\*\*\*\*\*\*\*\*\*\*\*\*\*\*\*\*\*\*\*\*\*\*\*\*\*\*\*\*\*\*\*\*\*\*\*\*\*\*\*\*\*\*\*\*\*\*\*\*\*\*\*\*\*\*\*\*\*\
> +zrt79wBgG5vlGMoT1hysRDpxNNlDdimE6G8OHaCj6e5cwhXrMt1swKFUwVsZaFx\
> UMv1xVFU/OsrJ8v8\*\*\*\*\*\*\*\*\*\*\*\*\*\*\*\*\*\*\*\*\*\*\*\*\*\*\*\*\*\*\*\*\*\*\*\*\*\*\*\*\*\*\*\*\*\*\*\*\*\*\*\*\*\*\*\*\*\*\*\*\*\*\*\*\* \*\*\*\*\*\*\*\*\*\*\*\*\*\*\*\*\*\*\*\*\*\*Sd74a4d2h28pIEHNbrlvAVn7Zt9IDC\
> kgske+VBY+X0D2en1l8bt3Vdnn5xgcDQsPmp6GdoRfE2luJ6lAe+mdkCgYEA0wUj\
> tUHRH9sI3X86wZVREt\*\*\*\*\*\*\*\*\*\*\*\*\*\*\*\*\*\*\*\*\*\*\*\*\*\*\*\*\*\*\*\*\*\*\*\*\*\*\*\*\*\*\*\*\*\*\*\*\*\*\*\*\*\*\*\*\*\*\*\*\*\*\* \*\*\*\*\*\*\*\*\*\*\*\*\*\*\*\*\*\*\*\*\*\*\*\*\*\*\*\*\*\*\*\*\*\*poTy6hNQr9IT2TsBckuN/qqockBR/j+iRap7lec3tJM\
> vdmMVP0Ed7GjBiSBVeHeHVg+Dt6+AqayWqU0hPkCgYB6o+bof7XnnsmBjvLVFO15\
> LlDiIZQFBtr7CriRDD2Nx\*\*\*\*\*\*\*\*\*\*\*\*\*\*\*\*\*\*\*\*\*\*\*\*\*\*\*\*\*\*\*\*\*\*\*\*\*\*\*\*\*\*\*\*\*\*\*\*\*\*\*\*\*\*\*\*\*\*\*\*\* \*\*\*\*\*\*\*\*\*\*\*\*\*\*\*\*\*\*\*\*\*\*\*\*\*\*\*\*\*\*\*\*\*\*\*\*TCaHk8CGmA+TXSKM9q7cTtMb6ythUQhZrpq 0EEY5TgQKBgQ\*\*\*\*\*\*\*\*\*\*\*\*\*\*\*\*\*\*\*\*\*\*\*\*\*\*\*\*\*\*\*\*\*\*\*\*\*\*\*\*\*\*\*\*\*\*\*\*\*\*\*\*\*\*\*\*\*\*\*\*\*8/PD+mT 5jFvon5Q==\
> \-----END RSA PRIVATE KEY-----

The *public key* will look like the below:

> ssh-rsa AAAAB3NzaC1yc2EAAAADAQA\*\*\*\*\*\*\*\*\*\*\*\*\*\*\*\*\*\*\*\*\*\*\*\*\*\*\*\*\*\*\*\*\*\*\*\*\*HBFUNjyMLpFltqwbsA\*\*\*\*\*\*\*\*\*\*\*\*\*\*\*\*\*\*\*\*\*\*\*\*\*\*\*\*\*\*\*\*\*\*\*\*\*MaMhX7Ou3\*\*\*\*\*\*\*\*\*\*\*\*\*\*\*\*\*\*\*\*\*\*\*\*\*\*\*\*\*\*\*\*\*\*\*\*\*PWHKx\*\*\*\*\*\*\*\*\*\*\*\*\*\*\*\*\*\*\*\*\*\*\*\*\*\*\*\*\*\*\*\*\*\*\*\*\*oVTBWxloXFQy/XFU\*\*\*\*\*\*\*\*\*\*\*\*\*\*\*\*\*\*\*\*\*\*\*\*\*\*\*\*\*\*\*\*\*\*\*\*\*W/QVdgs5xp+P5hhZgm9WpdN3Cz\*\*\*\*\*\*\*\*\*\*\*\*\*\*\*\*\*\*\*\*\*\*\*\*\*\*\*\*\*\*\*\*\*\*\*\*\*clYmUHoPCPwKIqElX2DZzYGJc\*\*\*\*\*\*\*\*\*\*\*\*\*\*\*\*\*\*\*\*\*\*\*\*\*\*\*\*\*\*\*\*\*\*\*\*\*y4gR

### Configure Infrastructure Parameters

1. In your editor, go to `DIGIT-DevOps/infra-as-code/terraform/sample-aws`.
2. Open `input.yaml` and enter details such as `domain_name`, `cluster_name`, `bucket_name`, `db_name` and add `public_ssh_key` generated in the above step. *(Fill in the inputs as per the regex mentioned in the comments).* The following variables need to be set in the input.yaml

<table><thead><tr><th width="234">Parameter</th><th>Description</th></tr></thead><tbody><tr><td>cluster_name</td><td>Name of the EKS cluster. The Cluster name can have only lowercase alphanumeric characters and hyphens</td></tr><tr><td>ssh_key_name</td><td>The name of the ssh key. Can contain any alphanumeric character</td></tr><tr><td>public_ssh_key</td><td>The public ssh key generated in section above (Generate SSH Key Pair)</td></tr><tr><td>db_name</td><td>Name of the database. The name that you enter should contain only alphanumeric characters</td></tr><tr><td>db_username</td><td>Username of the root user. DB user name must contain only alphanumeric characters</td></tr><tr><td>domain_name</td><td>The domain url for the UI</td></tr><tr><td>terraform_state_bucket_name</td><td>Name to be given to S3 bucket which will be created in terraform. This bucket will store the terraform state.</td></tr></tbody></table>

### Configure Application Secrets

1. Go to `deploy-as-code/charts/environments`.
2. Open `env-secrets.yaml`.
3. Enter `db_password` and `ssh_private_key (in git-sync section)`. *(Make sure that the indentation is the same as the sample value given for* `ssh_private_key`*)*
4. Add the public key to your [GitHub account](https://www.youtube.com/watch?v=9C7_jBn9XJ0).

### Trigger Installation

After entering all the details, push these changes to the remote GitHub repository (in the same DIGIT-2.9LTS branch). Open the `Actions` tab in your GitHub account to view the workflow. You should see that the workflow has started and the pipelines have been completed successfully.

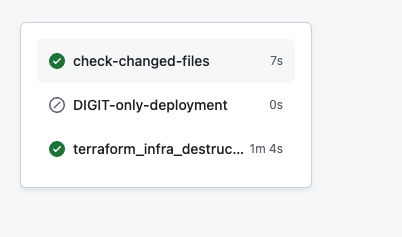
<figure><img src="/files/LPeN1QRrmmqrmAJvBSo9" alt=""><figcaption><p>Github actions workflow that gets created after committing the inputs</p></figcaption></figure>

This indicates that your setup is correctly configured and your application is ready to be deployed. Monitor the output of the workflow for any errors or success messages to ensure everything is functioning as expected.

### KubeConfig Setup

For guidance on setting up your AWS CLI, please follow the instructions provided in the [Installation Guide - Production Setup on AWS](https://core.digit.org/guides/installation-guide/production-setup/aws/3.-setup-aws-account). Additionally, ensure your AWS CLI is correctly configured by referring to the official AWS documentation on Configuring the AWS CLI - AWS Command Line Interface. Confirm your AWS credentials are correctly set by executing:

If not, create the profile using:

```
aws configure --profile <profile_name>
```

Run the below command to export AWS Credentials

```
export AWS_PROFILE=<profile_name>
```

Proceed only after verifying the correct configuration of your credentials. For any uncertainties on how to set up the credentials, consult the AWS documentation for detailed instructions. To check if credentials are properly set, run the command:

```
aws configure list --profile <profile_name>
```

<figure><img src="/files/zhFMBI1WdFNACtfI8dY9" alt=""><figcaption></figcaption></figure>

Run the following command to get the Kubernetes configuration:

```
# Run the below command and give the respective region-code and the cluster name
aws eks --region <aws-region> update-kubeconfig --name <cluster_name>
```

Verify that you can connect to the cluster by running the following command.

```
kubectl config use-context <cluster_name>

kubectl get nodes 

kubectl get pods -A
```

Once the deployment is done, get the CNAME of the *nginx-ingress-controller:*

```
kubectl get svc ingress-nginx-controller -n backbone -o jsonpath='{.status.loadBalancer.ingress[0].hostname}'
```

The output of this will be something like this:

[ae210873da6ff4c03bde2ad22e18fe04-233d3411.ap-south-1.elb.amazonaws.com](http://ae210873da6ff4c03bde2ad22e18fe04-233d3411.ap-south-1.elb.amazonaws.com/)

Add the CNAME to your domain provider against your domain name.

### Post Deployment

Login to the employee dashboard with the username and password provided in [env-secrets.yaml](https://github.com/egovernments/DIGIT-DevOps/blob/DIGIT-2.9LTS/deploy-as-code/charts/environments/env-secrets.yaml#L10) file using the domain name provided in the [input.yaml](https://github.com/egovernments/DIGIT-DevOps/blob/DIGIT-2.9LTS/infra-as-code/terraform/sample-aws/input.yaml#L21).

Login to <mark style="color:blue;">https\://\<domain\_name>/employee</mark>\
\
![](/files/q3gb5P4j9XqiNu1GIxUW)

## Cleanup & Uninstallation Of DIGIT Infrastructure

As you wrap up your work with DIGIT, ensuring a smooth and error-free cleanup of the resources is crucial. Regular monitoring of the GitHub Actions workflow's output is essential during the destruction process. Watch out for any error messages or signs of issues. A successful job completion will be confirmed by a success message in the GitHub Actions window, indicating that the infrastructure has been effectively destroyed.

When you're ready to remove DIGIT and clean up the resources it created, proceed with executing the `terraform_infra_destruction` job. This action is designed to dismantle all setup resources, clearing the environment neatly.

We hope your experience with DIGIT was positive and that this guide makes the uninstallation process straightforward.

### How to Run the Terraform Infrastructure Destruction Job

To initiate the destruction of a Terraform-managed infrastructure, follow these steps:

1. Navigate to **Actions**.
2. Click **DIGIT-Install workflow**.
3. Select **Run workflow**.
4. When prompted, type **"destroy"**. This action starts the `terraform_infra_destruction` job.

You can observe the progress of the destruction job in the actions window.

{% hint style="info" %}
**Note:** For DIGIT configurations created using the master branch.
{% endhint %}

<div align="left"><figure><img src="/files/MGy3hmrOqoWv3yqshfaY" alt=""><figcaption><p>Destroying the created DIGIT Infrastructure via Terraform</p></figcaption></figure></div>

If DIGIT is installed from a branch other than the main one, ensure that the branch name is correctly specified in the workflow file. For instance, if the installation is done from the **digit-install** branch, the following snippet should be updated to reflect that.

```github-actions-workflow
name: DIGIT-Install workflow
# Workflow branch creating cluster against the input.yaml file  
on:
  push:
    branches:
      - master
      - digit-install
  workflow_dispatch:
    inputs:
      destroyCommand:
        description: 'Type "destroy" to run the terraform_infra_destruction job.'
        required: true
        default: ''  
```


---

# Agent Instructions: Querying This Documentation

If you need additional information that is not directly available in this page, you can query the documentation dynamically by asking a question.

Perform an HTTP GET request on the current page URL with the `ask` query parameter:

```
GET https://docs.digit.org/platform/guides/installation-guide/quick-setup-aws.md?ask=<question>
```

The question should be specific, self-contained, and written in natural language.
The response will contain a direct answer to the question and relevant excerpts and sources from the documentation.

Use this mechanism when the answer is not explicitly present in the current page, you need clarification or additional context, or you want to retrieve related documentation sections.