iFIX Quickstart - this is not for a production
Quickstart installation helps you jump-start with the iFIX basic installation with limited functionalities.
iFIX is a distributed microservice-based platform that comprises many containerized services. Depending upon the required features, the specific services can be run on any container-supported orchestration platform like docker-compose, Kubernetes, etc.
The Quickstart guide covers the installation steps for basic services to get the platform up. Before setting up iFIX, create a lightweight Kubernetes cluster called k3d on a local machine with specified hardware requirements. The hardware requirements are listed below to ensure before we proceed further.
To provision a lightweight Kubernetes cluster, follow the instructions below in context to your OS and install the k3d on your machine.
min 4 vCPUs (recommended 8)
min 8GiB of RAM (recommended 16)
min 30GiB of HDD (recommended 30+)
Linux distribution running in a VM or bare metal
Ubuntu 18.04 or Debian 10 (VM or bare metal)
Install Docker
Install kubectl on Linux
Open the terminal and Install k3d on Linux using the below command
OSX or Mac
Docker Desktop local Kubernetes cluster enabled
Install kubectl on Mac
Install k3d on Mac, on terminal use Homebrew (Homebrew is available for MacOS) using the below command
Windows 10 or above
Docker Desktop for windows need to be installed
Install kubectl on Windows
Install Chocolatey package manager for windows
Install GitBash as an alternative command prompt that allows most of the Linux commands on Windows.
Open gitbash and Install k3d on Windows using the below command
Once the above prerequisites are met, run the following tasks depending on your OS.
login/ssh into the machine, go to terminal/command prompt and run the following commands as an admin user.
Create /Kube directory and change permission. To use this directory for persistent data mount. This means data from all container logs will be stored here.
Create a cluster with a single master node and 2 agents (Worker Nodes) and mount the pre-created directory (for data persistence).
When cluster creation is successful, get the kubeconfig file, that allows you to connect to the cluster at any time.
Verify the cluster creation by running the following commands from your local machine where the kubectl is installed. It gives you the sample output as below
You can verify the workers' nodes created by using the following command.
Once the above steps are completed successfully, your Cluster is now up and running ready to proceed with the DIGIT Deployment.
Now that we have the Infra setup to proceed with the DIGIT Deployment. Below are the tools (in the Pre-requisites section) that need to be installed on the machine before proceeding with the deployment of DIGIT Services.
What we'll deploy in Quickstart:
iFIX core platform services
kubectl is a CLI to connect to the Kubernetes cluster from your machine
Install CURL for making API calls
Install Visualstudio IDE Code for better code/configuration editing capabilities
The iFix services deployment configurations are in GitRepo which needs to install git and then git clone it to your local.
Install Postman to run some DIGIT bootstrap scripts.
After cloning the repo CD into the folder iFix-DevOps, type the "code ." This command will open the visual editor and all the files from the repo iFix-DevOps
Check the sample deployment config file that needs to be configured as per any specific values according to your needs. (For a quick start you can run as it is)
Add the following entries in your host file /etc/hosts depending on your OS, instructions can be found here.
Once the prerequisite setup is complete, go to the following repo, run the command and follow the instructions.
Test the DIGIT application status in the command prompt/terminal using the below command.
Choose your infra type and provision the necessary infra before you actually deploy the services
iFIX is a microservices-based distributed cloud-native application. Each of these context-specific microservices is dockerized and deployed on Kubernetes infrastructure.
It is essential to understand some of the key concepts, benefits and best practices of the Kubernetes platform before we understand the deployment of the iFIX.
Know the basics of Kubernetes: https://www.youtube.com/watch?v=PH-2FfFD2PU&t=3s
Know the basics of kubectl commands
Know Kubernetes manifests: https://www.youtube.com/watch?v=ohSUtEfDefc
Know how to manage environment values and secrets of any service deployed in Kubernetes https://www.youtube.com/watch?v=OW244LxB4oI
Know how to port forward to a pod running inside k8s cluster and work locally https://www.youtube.com/watch?v=TT3nd5n5Yus
Know sops to secure your keys/creds: https://www.youtube.com/watch?v=DWzJ87KbwxA
Choose the target infra type and follow the instructions to set up a Kubernetes cluster before moving on to the deployment.
Before we begin the deployment, it is important to understand the deployment architecture from the source code to the production-ready stage. Deploying and managing Kubernetes have emerged as a streamlined way to deploy containers in the cloud infrastructure. When running Kubernetes at scale, it can be challenging to manage, operate, and scale its infrastructure to maximize cluster utilization. There are too many parameters the development team needs to manage and configure. This includes selecting the best instance type and size, determining when to scale up or down, and making sure all of the containers are scheduled and running on the best instances — even before starting to think about cost resource optimization.
The simplest way to get started with the deployment process is to manage the deployment configuration as code. Each service deployment configuration is defined as Helm charts and deployed into the Kubernetes cluster. We can collocate the deployment-as-code as source code, leveraging all the benefits of source control including change tracking and branching and then packaging it. The source code repo below contains the deployment-as-code details for iFIX.
Use the command below to clean up the setup cluster. This deletes the entire cluster and other cloud resources that were provisioned for the iFIX Infra Setup.
All done, the infra on local, cloud, and deployment of iFIX into the Kubernetes cluster is completed successfully.
All iFIX services are packaged using helm charts Installing Helm
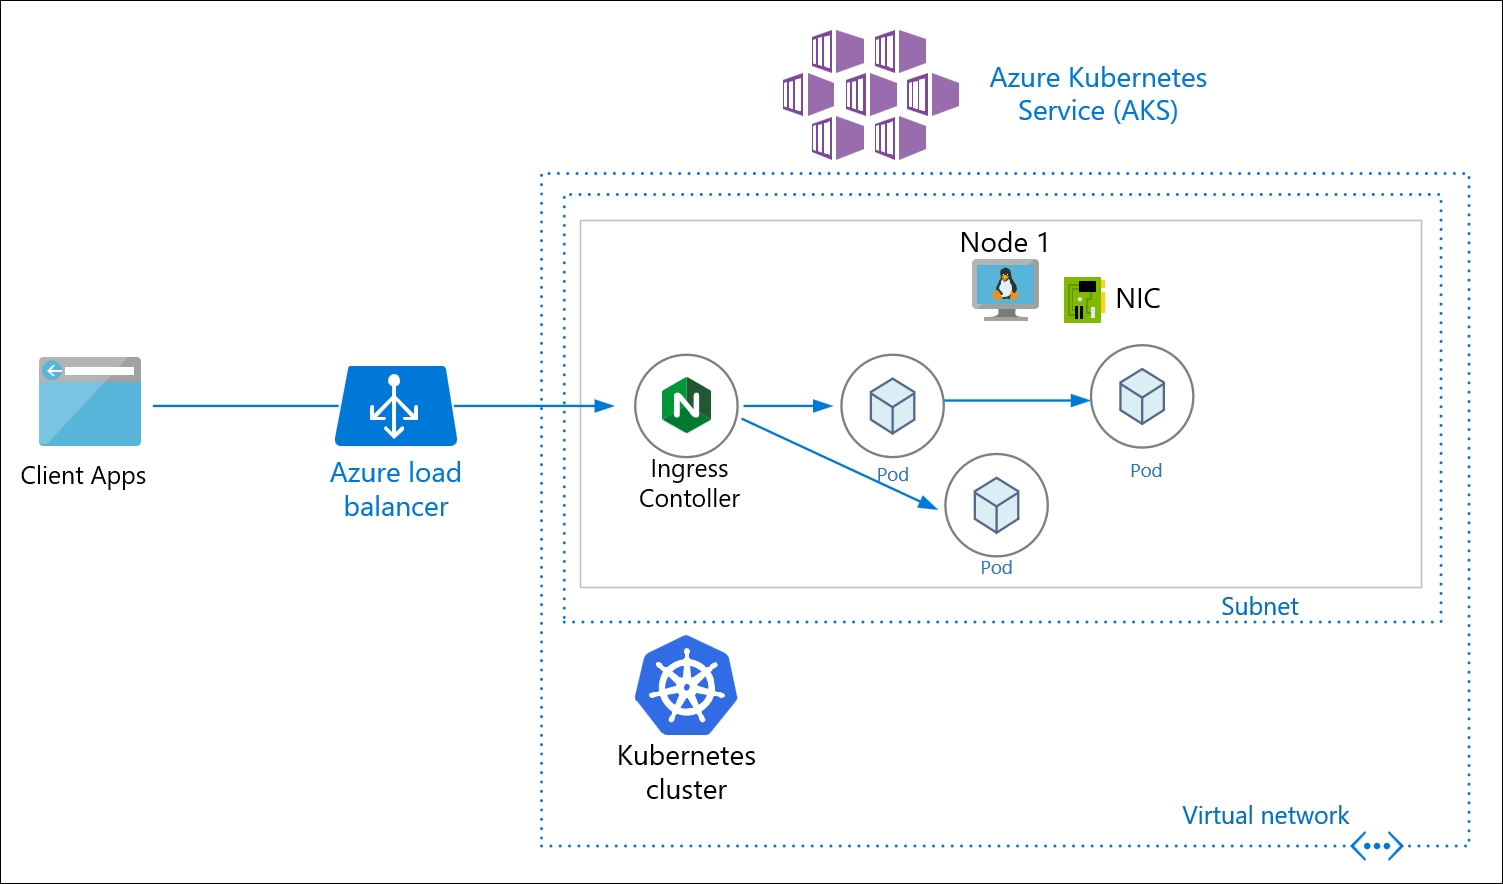
The Azure Kubernetes Service (AKS) is one of the Azure services used for deploying, managing, and scaling any distributed and containerized workloads. Here we can provision the AKS cluster on Azure from the ground up and using an automated way (infra-as-code) using terraform and then deploy the DIGIT-iFIX Services config-as-code using Helm.
This quickstart assumes a basic understanding of Kubernetes concepts. For more information, see Kubernetes core concepts for Azure Kubernetes Service (AKS).
If you don't have an Azure subscription, create a free account before you begin.
Use the Bash environment in Azure Cloud Shell.
If you prefer, install the Azure CLI to run CLI reference commands.
If you're using a local installation, sign in to the Azure CLI by using the az login command. To finish the authentication process, follow the steps displayed in your terminal. For additional sign-in options, see Sign in with the Azure CLI.
When you're prompted, install Azure CLI extensions on first use. For more information about extensions, see Use extensions with the Azure CLI.
Run az version to find the version and dependent libraries that are installed. To upgrade to the latest version, run az upgrade.
This article requires version 2.0.64 or greater of the Azure CLI. If using Azure Cloud Shell, the latest version is already installed.
The identity you are using to create your cluster has the appropriate minimum permissions. For more details on access and identity for AKS, see Access and identity options for Azure Kubernetes Service (AKS).
Install kubectl on your local machine that helps you interact with the kubernetes cluster
Install Helm that helps you package the services along with the configurations, envs, secrets, etc into a kubernetes manifests
Install terraform version (0.14.10) for the Infra-as-code (IaC) to provision cloud resources as code and with desired resource graph and also it helps to destroy the cluster at one go.
Note: Run the commands as administrator if you plan to run the commands in this quickstart locally instead of in Azure Cloud Shell.
Before we provision the cloud resources, we need to understand and be sure about what resources need to be provisioned by Terraform to deploy DIGIT. The following picture shows the various key components. (AKS, Worker Nodes, Postgres DB, Volumes, Load Balancer)
Considering the above deployment architecture, the following is the resource graph that we are going to provision using Terraform in a standard way so that every time and for every env, it'll have the same infra.
AKS Azure (Kubernetes Service Master)
Work node group (VMs with the estimated number of vCPUs, Memory
Volumes (persistent volumes)
PostgreSQL Database
Virtual Network
Users to access, deploy and read-only
Ideally, one would write the terraform script from scratch using this doc.
Here we have already written the terraform script that provisions the production-grade DIGIT Infra and can be customized with the specified configuration.
Let's clone the iFix-DevOps GitHub repo where the terraform script to provision the AKS cluster is available and below is the structure of the files.
The following main.tf contains the detailed resource definitions that need to be provisioned, please have a look at it.
Dir: iFix-DevOps/Infra-as-code/terraform/aks-ifix-dev
You can define your configurations in variables.tf and provide the environment-specific cloud requirements so that using the same terraform template you can customize the configurations.
Following are the values that you need to mention in the following files, the blank ones will be prompted for inputs while execution.
variables.tf
Now that we know what the terraform script does, the resources graph that it provisions and what custom values should be given with respect to your env.
Let's begin to run the terraform scripts to provision infra required to Deploy DIGIT on AZ.
First CD into the following directory, run the following command 1-by-1 and watch the output closely.
Upon Successful execution following resources get created which can be verified by the command "terraform output"
Network: Virtual Network.
AKS cluster: with nodepool(s), master(s) & worker node(s).
Storage(s): for es-master, es-data-v1, es-master-infra, es-data-infra-v1, zookeeper, kafka, kafka-infra.
To manage a Kubernetes cluster, use the Kubernetes command-line client, kubectl. kubectl is already installed if you use Azure Cloud Shell.
Install kubectl locally using the az aks install-cli command:
Configure kubectl to connect to your Kubernetes cluster using the az aks get-credentials command. The following command:
Downloads credentials and configures the Kubernetes CLI to use them.
Uses ~/.kube/config, the default location for the Kubernetes configuration file. Specify a different location for your Kubernetes configuration file using --file.
3. Finally, verify that you can connect to the cluster by running the following command
All set and now you can go with Deploy Product.
The Amazon Elastic Kubernetes Service (EKS) is one of the AWS services for deploying, managing, and scaling any distributed and containerized workloads, here we can provision the EKS cluster on AWS from the ground up and using an automated way (infra-as-code) using terraform and then deploy the DIGIT-iFIX Services config-as-code using Helm.
Know about EKS: https://www.youtube.com/watch?v=SsUnPWp5ilc
Know what is terraform: https://youtu.be/h970ZBgKINg
AWS account with admin access to provision EKS Service, you can always subscribe to a free AWS account to learn the basics and try, but there is a limit to what is offered as free, for this demo you need to have a commercial subscription to the EKS service.
Install kubectl on your local machine which helps you interact with the Kubernetes cluster
Install Helm that helps you package the services along with the configurations, environments, secrets, etc into a kubernetes manifests
Install terraform version (0.14.10) for the Infra-as-code (IaC) to provision cloud resources as code and with desired resource graph and also it helps to destroy the cluster in one go.
Install AWS CLI on your local machine so that you can use AWS CLI commands to provision and manage the cloud resources on your account.
Install AWS IAM Authenticator which helps you authenticate your connection from your local machine so that you should be able to deploy DIGIT services.
Use the AWS IAM User credentials provided for the Terraform (Infra-as-code) to connect with your AWS account and provision the cloud resources.
You'll get a Secret Access Key and Access Key ID. Save them safely.
Open the terminal and run the following command. The AWS CLI is already installed and the credentials are saved. (Provide the credentials and you can leave the region and output format blank).
The above will create the following file In your machine as /Users/.aws/credentials
Before we provision the cloud resources, we need to understand and be sure about what resources need to be provisioned by Terraform to deploy DIGIT. The below illustration shows the various key components - (EKS, Worker Nodes, Postgres DB, EBS Volumes, Load Balancer).
Considering the above deployment architecture, the following is the resource graph that we are going to provision using Terraform in a standard way so that every time and for every environment, it'll have the same infra.
EKS Control Plane (Kubernetes Master)
Work node group (VMs with the estimated number of vCPUs and memory)
Node-pool's (iFIX)
EBS Volumes (persistent volumes)
RDS (Postgresql)
VPCs (private network)
Users to access, deploy and read only
Ideally, one would write the terraform script from scratch using this doc.
Here we have already written the terraform script that provisions the production-grade DIGIT Infra and can be customized with the specified configuration.
Let's clone the iFix-DevOps GitHub repo where the terraform script to provision the EKS cluster is available and below is the structure of the files.
Example:
VPC Resources:
VPC
Subnets
Internet Gateway
Route Table
EKS Cluster Resources:
IAM Role to allow EKS service to manage other AWS services
EC2 Security Group to allow networking traffic with the EKS cluster
EKS Cluster
EKS Worker Nodes Resources:
IAM role allowing Kubernetes actions to access other AWS services
EC2 Security Group to allow networking traffic
Data source to fetch the latest EKS worker AMI
AutoScaling Launch Configuration to configure worker instances
AutoScaling Group to launch worker instances
Database
Configuration in this directory creates a set of RDS resources including DB instance, DB subnet group, and DB parameter group.
Storage Module
Configuration in this directory creates EBS volume and attaches it.
The following main.tf with create s3 bucket to store all the state of the execution to keep track.
iFix-DevOps/Infra-as-code/terraform/sample-eks/remote-state
2. The following main.tf contains the detailed resource definitions that need to be provisioned.
Dir: iFix-DevOps/Infra-as-code/terraform/sample-eks
Define your configurations in variables.tf. Provide the environment-specific cloud requirements and use the same terraform template to customize the configurations.
The values given below must be mentioned in the following files. The blank ones will be prompted for inputs while execution.
variables.tf
Important: Create your key base key before you run the terraform
Use the URL https://keybase.io/ to create your own PGP key. This creates both public and private keys on your machine. Upload the public key into the keybase account that you have just created, give a name to it and ensure that you mention that in your terraform. This allows the encryption of all sensitive information.
Example - the keybase user (in eGov case is "egovterraform") needs to be created and has to be uploaded the public key here - https://keybase.io/egovterraform/pgp_keys.asc
you can use this portal to decrypt your secret key. To decrypt PGP Message, upload the PGP Message, PGP Private Key and the Passphrase.
Now that we know what the terraform script does, the resources graph that it provisions and what custom values should be given with respect to your environment.
Let's begin to run the Terraform scripts to provision the infra required to Deploy DIGIT on AWS.
First CD into the following directory, run the following command 1-by-1 and watch the output closely.
Upon successful execution following resources get created which can be verified by the command "terraform output"
s3 bucket: to store terraform state.
Network: VPC, security groups.
IAM users auth: using the key base to create admin, deployer and the user. Use this URL https://keybase.io/ to create your own PGP key, this will create both public and private keys in your machine. Upload the public key into the keybase account that you have just created, give a name to it and ensure that you mention that in your terraform. This allows for encrypting all sensitive information.
Example: keybase user (in eGov case is "egovterraform") needs to be created and has to upload the public key here - https://keybase.io/egovterraform/pgp_keys.asc
you can use this portal to decrypt your secret key. To decrypt PGP Message, Upload the PGP Message, PGP Private Key and Passphrase.
EKS cluster: with master(s) & worker node(s).
Storage(s): for es-master, es-data-v1, es-master-infra, es-data-infra-v1, zookeeper, kafka, kafka-infra.
2. Use this link to get the kubeconfig from EKS to get the kubeconfig file and be able to connect to the cluster from your local machine so that you should be able to deploy DIGIT services to the cluster.
3. Verify that you can connect to the cluster by running the following command
All set and now you can go with Deploy Product.