Loading...
Loading...
Loading...
Loading...
Loading...
Loading...
Loading...
Loading...
Loading...
Loading...
Loading...
Loading...
Loading...
Loading...
Loading...
Loading...
Loading...
Loading...
Loading...
Follow the steps below to create the Adapter Master Data. Individual Adapter Service setup and configuration documents can be accessed here.
Enter valid details along with Tenant ID to create the Department. Once the tenant ID is created, the user receives a response with an ID and related details. This ID is the Department ID.
Enter valid details along with the Tenant ID to create the Expenditure. Once the tenant ID is created, the user receives a response with an ID and related details. This ID is the Expenditure ID.
Enter valid hierarchy details of the Master Department to create a Department Hierarchy.
Provide valid details to create a Department Entity.
On successful completion of steps 1 to 4, enter valid details to create a project.
Date/Time Filter
The date & time filter on the dashboard defaults to the current financial year since most of the calculations and visualizations make sense when viewed from a fiscal year perspective rather than an individual week/month view. However, users can change to respective dates and most charts will be filtered to the selected time range.
Department Hierarchy Filter
Currently, there are 6 levels of hierarchy as per administration set up by the Department of Water Supply and Sanitation Punjab. These are State, Zone, Circle, Division, Sub Division, Section, Gram Panchayat.
All these filters are independent and work on the dashboard irrespective of whether other filters in the hierarchy are selected or not.
Surplus/Deficit
This number shows whether the selected Administrative entity is financially surplus or not. It also compares with the previous year using the “trend” visualization in Metabase.
Pending Collections
For selected Administrative boundary what is the pending collections through water charges are represented in this card. If the pending amount is null. Then this card should display zero.
Outstanding Electricity Bills
Since electricity bills create a major component of the expenditure for all projects, it is important to show how much electricity bills are pending at each administrative entity. The total amount of pending bills filtered by electricity under COA gives us pending electricity bills
GPWSCs at Risk
Risky GPWSCs are divided into 3 types
High Risk: Demand is less than Bill. Medium Risk: Demand is more than bill but pending collections are less than pending bills.
Low Risk: Demand is more than bill and also pending collections are more than pending bills.
It is important to identify the risky GPWSCs and keep the officials of DWSS informed, so they to take the right actions before it’s too late.
Collections & Expenditure Time Series Graphs
These charts represent the Demand, Net Collections, Bills and Net Payments across time(month-on-month) so that officials get a fair idea of how the amount that is getting collected is being spent.
Any abnormalities in the graphs (Low collections or excessive spending) are something that needs to be paid attention to.
Expenditure by Chart of Accounts
Expenditure is currently divided into 4 broad categories - Electricity Bills, Salaries, Operations and Maintenance and Miscellaneous. How these 4 categories accumulate to total expenditure for the selected entity over time is presented on the chart. Usually, 75% of the expenditure should be on the type of electricity.
Department Hierarchy Table
Here, we represent Total Demand, Receipt, Bills and Payments by all levels of the hierarchy so that officials at any point, instead of just viewing the charts, and trends from the visualizations can also see the tables and compare best-performing entities.
Fiscal Event services flatten each fiscal event line item and post them into Druid via the Kafka Druid connector. The raw events are stored in the fiscal events dataset in Druid. Metabase is used for visualisations.
The flattened fiscal event consists of the following attributes
version
string example: 1.0.0
Version of the Data Model Definition
id
string example: 51c9c03c-1607-4dd5-9e0e-93bbf860f6f7
System generated UUID of Line Item
eventId
string example: fecbbf1d-d6e3-4f24-9935-02c33b9248e0
Fiscal Event Reference Id
tenantId
string nullable: false example: pb
Tenant Id
government.id
string example: pb
government.name
string example: Punjab
department.id
string example: 5d664a9f-9367-458a-aa5f-07fb18b90adc
Unique system generated UUID
department.code
string example: DWSS
Unique department code
department.name
string example: Department of Water Supply & Sanitation
Name of the department
expenditure.id
string example: d334d99a-b5c1-426c-942b-f11b5b5454fe
Unique system generated UUID
expenditure.code
string example: JJM
Unique Expenditure code
expenditure.name
string example: Jal Jeevan Mission
Name of the Expenditure
expenditure.type
string
Type of the Expenditure Enum: Array [ 2 ]
project.id
string example: 6ab1b1d2-e224-46fa-b53b-ac83b3c7ce95
Unique system generated UUID
project.code
string example: PWT
Unique Project code
project.name
string example: Peepli Water Tank
Name of the Project
eventType
string nullable: false example: Appropriation
Captures the event type e.g Demand, Receipt, Bill, Payment
eventTime
integer($int64) example: 1628177497000
when the event occurred at source system level
referenceId
string example: 013e9c56-8207-4dac-9f4d-f1e20bd824e7
reference unique id(transaction id) of the caller system
parentEventId
string nullable: true example: 7d476bb0-bc9f-48e2-8ad4-5a4a36220779
If this is a follow up event then it will refer to the parent event using this reference id.
parentReferenceId
string nullable: true example: 77f23efe-879d-407b-8f23-7b8dd5b2ecb1
If this is a follow up event then it will refer to the parent event in source system using this reference id.
amount
number example: 10234.5
Transaction Amount
coa.id
string example: e9f940d4-69aa-4bbb-aa82-111b8948a6b6
Unique system generated UUID
coa.coaCode
string example: 1234-123-123-12-12-12
Chart of account concatenated string
coa.majorHead
string example: 1234
Major head code
coa.majorHeadName
string
Major head name
coa.majorHeadType
string example: Revenue
Major head code type
coa.subMajorHead
string example: 123
Sub-Major head code
coa.subMajorHeadName
string
Sub-Major head name
coa.minorHead
string example: 123
Minor head code
coa.minorHeadName
string
Minor head name
coa.subHead
string example: 12
Sub-Head code
coa.subHeadName
string
Sub-Head name
coa.groupHead
string example: 12
Group head code
coa.groupHeadName
string
Group head name
coa.objectHead
string example: 12
Object head code
coa.objectHeadName
string
Object head name
fromBillingPeriod
integer($int64) example: 1622907239000
Start date of the billing period for which transaction is applicable
toBillingPeriod
integer($int64) example: 1628177643000
Start date of the billing period for which transaction is applicable
Post infra setup (Kubernetes Cluster), there starts the deployment process.
Pipeline as code is a practice of defining deployment pipelines through source code, such as Git. Pipeline as code is part of a larger “as code” movement that includes infrastructure as code. Teams can configure builds, tests, and deployment in code that is trackable and stored in a centralized source repository. Teams can use a declarative YAML approach or a vendor-specific programming language, such as Jenkins and Groovy, but the premise remains the same.
A pipeline as a code file specifies the stages, jobs, and actions for a pipeline to perform. Because the file is versioned, changes in pipeline code can be tested in branches with the corresponding application release.
The pipeline as a code model of creating continuous integration pipelines is an industry best practice, but deployment pipelines used to be created very differently.
The deployment process has got 2 stages and 2 modes. We can see the modes first and then the stages.
Essentially, iFix adapter deployment means that we need to generate Kubernetes manifests for each service. We use the tool called Helm, which is an easy, effective and customizable packaging and deployment solution. So depending on where and which env you initiate the deployment there are 2 modes that you can deploy.
From Local machine - whatever we are trying in this sample exercise so far.
Advanced: Setup CI/CD System like Jenkins - Depending on how you want to setup your CI/CD and the expertise the steps will vary, however here you can find how eGov has set up an exemplar CI/CD on Jenkins and the pipelines are created automatically without any manual intervention.
iFix Adapter
Essentially, 2 stages should allow you to use the full potential of DeploymentConfig and pipeline-as-code.
Stage 1: Clone the DevOps repo, choose your iFix product branch as iFix-adapter.
Prepare an <env.yaml> master config file, you can name this file as you wish which will have the following configurations, this env file needs to be in line with your cluster name.
each service global, local env variables
credentials, secrets (You need to encrypt using sops and create a <env>-secret.yaml separately)
Number of replicas/scale of individual services (Depending on whether dev or prod)
MDMS, config repos (Master Data, ULB, Tenant details, Users, etc)
sms g/w, email g/w, payment g/w
GMap key (In case you are using Google Map services in your PGR, PT, TL, etc)
S3 Bucket for Filestore
URL/DNS on which the DIGIT will be exposed
SSL Certificate for the above URL
End-points configs (Internal/external)
Stage 2: Run the iFix_Adapter_setup deployment script and simply answer the questions that it asks.
Post infra setup (Kubernetes Cluster), the deployment has got 2 stages and 2 modes. We can see the stages first and then the modes.
Essentially, iFix dashboard deployment means that we need to generate Kubernetes manifests for each service of the required OLAP components like a druid and metabase. We use the tool called Helm, which is an easy, effective and customizable packaging and deployment solution. So depending on where and which env you initiate the deployment there are 2 modes that you can deploy.
From Local machine - whatever we are trying in this sample exercise so far.
Advanced: Setup CI/CD System like Jenkins - Depending on how you want to set up your CI/CD and the expertise the steps will vary, however here you can find how we eGov has set up an exemplar CI/CD on Jenkins and the pipelines are created automatically without any manual intervention.
You can choose the infra type and the env to either a single fat server or a distributed setup on Docker Compose or Kubernetes.
iFix Dashboard
Essentially, 2 stages should allow you to use the full potential of DeploymentConfig and pipeline-as-code.
Stage 1: Clone the DevOps repo, choose your iFix product branch as iFix-adapter.
Prepare an <env.yaml> master config file, you can name this file as you wish which will have the following configurations, this env file need to be in line with your cluster name.
each service global, local env variables
credentials, secrets (You need to encrypt using sops and create a <env>-secret.yaml separately)
Number of replicas/scale of individual services (Depending on whether dev or prod)
mdms, config repos (Master Data, ULB, Tenant details, Users, etc)
sms g/w, email g/w, payment g/w
GMap key (In case you are using Google Map services in your PGR, PT, TL, etc)
S3 Bucket for Filestore
URL/DNS on which the DIGIT will be exposed
SSL Certificate for the above URL
End-points configs (Internal/external)
Stage 2: Run the iFix_Dashboard_setup deployment script and simply answer the questions that it asks.
This section contains details and information about the iFIX Reference Dashboard. Click on the links below to learn more.
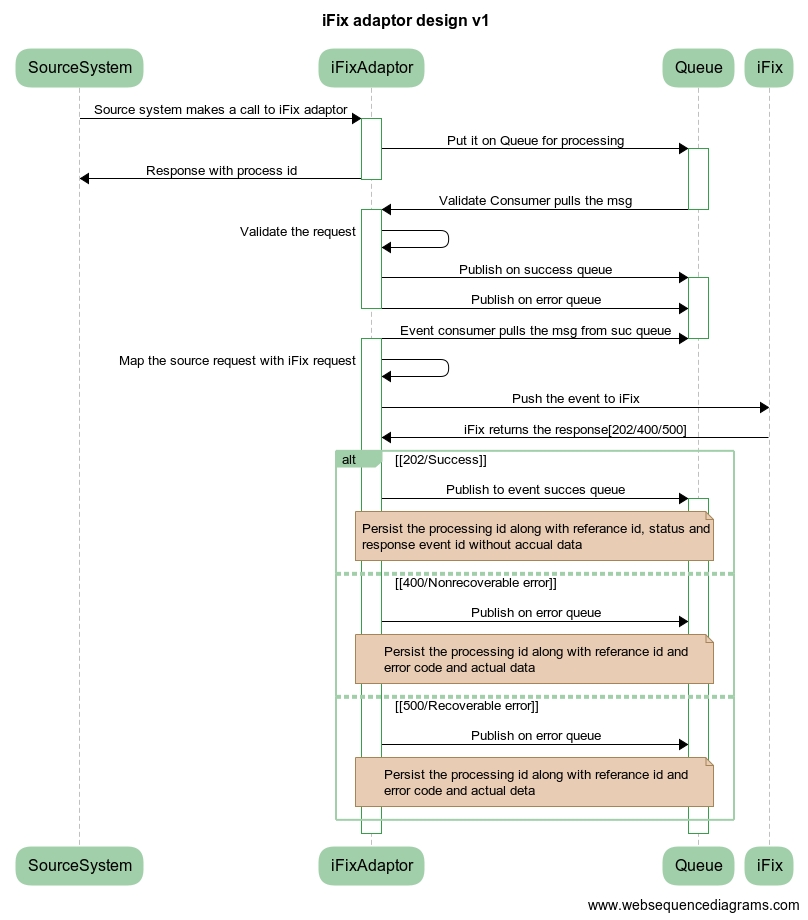
Ifix-Adapter is a system that works as a mediator between iFIX and its clients. This system will receive requests from the client system and convert the data in the iFIX required format This document contains the details on how to set up the iFIX-adapter service and describes the functionalities it supports. It supports multiple events (Event Array) in a single request.
Before you proceed with the configuration, make sure the following pre-requisites are met -
Java 8
The Kafka server is up and running
The PSQL server is running
Redis
The following services should be up and running:
Client Service Like mgramseva-ifix-adapter
Target service IFIX- fiscal-event-service
Target Service IFIX-keycloak
Adapter master data service
IFIX client requests are pushed to IFIX.
The authentication token is fetched from keycloak and cached. Token is re-fetched 5 minutes before expiry.
project_id from request data is getting treated as Department Entity Code to fetch Department Entity.
COA Code fetched from COA Mapping table by client code and cached it in Redis Server.
Every push to IFIX is recorded in the table with HTTP status
status series 200 considered success
status 400 are marked client error
It collects projectId form request data, treats it as department_entity_code and calls search API to Department Entity Service. It always expects it will receive only one Department Entity against a single department_entity_code, if it finds multiple raises an error message.
One project can have multiple department entities but vice-versa cannot be true. In case of multiple projects for one department entity - the system will raise an error message.
Deploy the latest version of the ifix-reference-adapter.
kafka.topics.ifix.adaptor.mapper
Topic in which client requests are put. From this further listen and posting happens
keycloak.host
Host name of the key cloak authentication token provider
keycloak.token.url
key cloak authentication token url
keycloak.credentials.clientid
userid of for authentication token
keycloak.credentials.clientsecret
password for authentication token
ifix.host
host name of IFIX server
ifix.event.url
IFIX post URL
spring.redis.host
Host name of the redis server
state.goverment.code
top level tenant id of the client
spring.jpa.properties.hibernate.dialect
dialect for JPA. you can change this to oracle or my sql etc
spring.jpa.properties.hibernate.jdbc.lob.non_contextual_creation
will generate the required tables in the respective database . This feature is used instead of flyway to get database in-dependency
Map clientcode, ifixcoacode, ifixid in ifix_adapter_coa_map table
“clientcode” is the tax head like “WATER_CHARGES” or ‘10011’ used in IFIX clients like mgramseva
“ifixcoacode” is the 16 digit glcode in IFIX. 16-digit code is mapped then this can be ported to any environment like dev to qa, or qa to uat or from uat to prod. Prefer mapping ifixcoacode
an example is INSERT INTO public.ifix_adapter_coa_map(id, clientcode, ifixcoacode, ifixid, tenantid) VALUES (1,'10101', '0215-01-102-00-00-01', '6cbcb4a1-2431-4f78-89d7-b4f0565aba37', 'pb');
state.goverment.code set this value to the client top level tenant_id
API Swagger document
Postman
events/v1/_push
API for receiving data from client (mgram). This is the only API present in the adapter
Ifix-Adapter is a system that works as a mediator between iFix and its clients. This system will receive requests from the client system and convert the data in the Ifix required format. This document contains details about how to set up ifix-adapter service and describes the functionalities it provides.
Before you proceed with the configuration, make sure the following pre-requisites are met -
Java 8
The Kafka server is up and running
The PSQL server is running
Redis
The following services should be up and running:
Client Service Like mgramseva-ifix-adapter
Target service IFIX- fiscal-event-service
Target Service IFIX-keycloak
IFIX master-data-service
IFIX client requests are pushed to IFIX
The authentication token is fetched from keycloak and cached. Token will be re-fetched 5 minutes before expiry
the project ID is fetched from IFIX and cached
COA ID fetched from IFIX and cached
Every push to IFIX is recorded in the table with HTTP status
status series 200 is considered a success
status 400 are marked client error and reported back to the client
status 500 resubmitted by the scheduler
Deploy the latest version of ifix-reference-adapter
kafka.topics.ifix.adaptor.mapper
Topic in which client requests are put . From this further listen and posting happens
keycloak.host
Host name of the key cloak authentication token provider
keycloak.token.url
key cloak authentication token url
keycloak.credentials.clientid
userid of for authentication token
keycloak.credentials.clientsecret
password for authentication token
ifix.host
host name of IFIX server
ifix.event.url
IFIX post URL
spring.redis.host
Host name of the redis server
state.goverment.code
top level tenant id of the client
ifix.coa.search.url
url for COA search in IFIX
ifix.project.search.url
Url for the project code search in IFIX
spring.jpa.properties.hibernate.dialect
dialect for JPA. you can change this to oracle or my sql etc
spring.jpa.properties.hibernate.jdbc.lob.non_contextual_creation
will generate the required tables in the respective database . This feature is used instead of flyway to get database in-dependency
Map clientcode, ifixcoacode, ifixid in ifix_adapter_coa_map table
“clientcode” is the tax head like “WATER_CHARGES” or ‘10011’ used in IFIX clients like mgramseva
“ifixcoacode” is the 16 digit glcode in IFIX. 16-digit code is mapped then this can be ported to any environment like dev to qa, or qa to uat or from uat to prod. Prefer mapping ifixcoacode
Another way is to map the IFIX COA ID itself. Since these are generated ids you can't port to other environments. ID mapping has to be done for every environment.
Preference is given to COA Code, if it is null ID will be used
example is INSERT INTO public.ifix_adapter_coa_map( id, clientcode, ifixcoacode, ifixid, tenantid) VALUES (1,'10101', '0215-01-102-00-00-01', '6cbcb4a1-2431-4f78-89d7-b4f0565aba37', 'pb');
If client “project code” and IFIX project code are the same then no need for mapping. If it is different then map clientprojectcode, ifixprojectid in ifix_adapter_project_map table. Ideally, you should keep both codes the same for getting meaningful data on the dashboard. This way you don't have to do any mapping for project code for any environment. But if for any reason you have different project codes in IFIX and its client or have multiple projects having the same project code then only go for this mapping. The adapter will first check in the IFIX for the supplied “projectCode”, If found it will be used and cached. If multiple projects or not found it will look into this table for mapping
an example is INSERT INTO public.ifix_adapter_project_map( id, clientprojectcode, ifixprojectid, tenantid) VALUES (1, '7374', 'e42db9bb-8427-40a6-9939-4f2189d032bf','pb');
state.goverment.code set this value to the client top level tenantid
Api Swagger document
Postman
events/v1/_push
API for receiving data from the client (mgram). This is the only API present in the adapter
iFIX Adapter enables existing or new source systems to integrate seamlessly with iFIX. iFIX Adapter has been developed as a reference implementation for developers of source systems who want to integrate their departmental system with iFIX.
iFix Adapter works as a mediator between iFIX and its clients. This system will receive requests from the client system and converts the data into the iFIX fiscal event or associated formats.
Before you proceed with the configuration, make sure the following pre-requisites are met -
Java 8
Kafka server is up and running
PSQL server is running
Redis
Following services should be up and running:
Client Service Like mgramseva-ifix-adapter
Target service IFIX- fiscal-event-service
Target Service IFIX-keycloak
iFIX client requests pushed to IFIX
Auth token is fetched from keycloak and cached. Token will be re-fetched 5 minutes before expiry
Every push to iFIX is recoded with http status
status series 200 series considered success
status 400 are marked client error and reported back to client
status 500 resubmitted by scheduler
Update the keycloak credentials client-id and secrets in the environment file
Map the coa in HeadCodeToCoaMapping.yml
Map project in ProjectMapping.yml
Deploy the latest version of ifix-reference-adapter
Update Key cloak credentials in dev.yaml, qa.yaml, prod.yaml according to environment
The adapter master data service maintains information on Departments, Expenditures and Projects. We can create these details and search for the same details based on the given parameters/request data.
Current version: 1.0.0
Before we proceed with the configuration, make sure the following pre-requisites are met
Java 8
MongoDB instance
Required service dependency - Department entity service
It creates secure endpoints for the master data service. The access token is required to create any master data. The subsequent sections on this page discuss the service details maintained by the master data service.
Maintains the creation and search department details. The following information is passed while creating the department - the Government ID, department code, department name, parent department if any. Searching the department details is on given parameters like IDs, Government IDs, department codes, and department names.
/department/v1/_create
/department/v1/_search
Maintains the expenditure details And provides create and search functionality. For creating the expenditure, the following details are required - the Government ID, the department ID, code, name, and type (can be "SCHEME", or "NON_SCHEME") details. While searching the expenditure details, pass the given parameters like IDs, Government IDs, names and codes.
/expenditure/v1/_create
/expenditure/v1/_search
Maintains the project details and provides create and search functionality. The following details are required to create the project - Government, name, code, expenditure ID, department entity ID(s) and location IDs. While searching, pass the IDs, Government ID, name, code, expenditure ID and location ID.
/project/v1/_create
/project/v1/_search
No environment-specific variables are required for the environment (migration).
Update the DB and URI configurations in the dev.yaml, qa.yaml, prod.yaml file.
Swagger Yaml
Postman collection
Project Create API creates the project when the Master data details (COA, Government, Expenditure, Department) and Department Entity have been created. COA And Government have to be created in iFIX core Master data service.
Project Create API takes the below attributes in request :
tenantId: This is the ID that will be defined while creating the Ifix core Master Government Service.
expenditureId: This is the ID that will be generated while creating the Adapter Master Expenditure Service.
code: This is the project code that needs to be created.
name: This is the project name that needs to be created.
departmentEntityIds: This is the Department Entity Ids. If we have to create a project at hierarchy level 1 then we need to pass the Department Entity Id of that corresponding level. It depends on the Department hierarchy level on which the project has to be created and hence the same level Department Entity Id. You can pass a list of departmentEntityIds and can create the same project.
Below is an example of a dummy project using create API.
Request :
Response:
iFix Adapter
Post infra setup (Kubernetes Cluster), We start with deploying the Jenkins and kaniko-cache-warmer.
Sub Domain to expose CI/CD URL
GitHub Oauth App
Docker hub account details (username and password)
SSL Certificate for the sub-domain
Prepare an <ci.yaml> master config file and <ci-secrets.yaml>, you can name this file as you wish which will have the following configurations.
credentials, secrets (You need to encrypt using sops and create a ci-secret.yaml separately)
Check and Update ci-secrets.yaml details (like github Oauth app clientId and clientSecret, GitHub user details gitReadSshPrivateKey and gitReadAccessToken etc..)
To create Jenkins namespace mark this flag true
Add your environment kubconfigs under kubConfigs like https://github.com/misdwss/iFix-DevOps/blob/mgramseva/deploy-as-code/helm/environments/ci-secrets.yaml#L19
KubeConfig env's name and deploymentJobs name from ci.yaml should be the same
Update the CIOps and DIGIT-DevOps repo name with your forked repo name and provide read-only access to github user to those repo's.
SSL Certificate for the sub-domain
You have launched the Jenkins. You can access the same through your sub-domain which you configured in ci.yaml.
The Jenkins CI pipeline is configured and managed 'as code'.
Example URL - https://<Jenkins_domain>
Since there are many services and the development code is part of various git repos, you need to understand the concept of cicd-as-service which is open-sourced. This page also guides you through the process of creating a CI/CD pipeline.
As a developer - To integrate any new service/app to the CI/CD below is the starting point:
Once the desired service is ready for the integration: decide the service name, type of service and whether DB migration is required or not. While you commit the source code of the service to the git repository, the following file should be added with the relevant details which are mentioned below:
Build-config.yml –It is present under the build directory in each repository
This file contains the below details which are used for creating the automated Jenkins pipeline job for your newly created service.
While integrating a new service/app, the above content needs to be added to the build-config.yml file of that app repository. For example: If we are onboarding a new service called egov-test, then the build-config.yml should be added as mentioned below.
If a job requires multiple images to be created (DB Migration) then it should be added as below,
Note - If a new repository is created then the build-config.yml should be created under the build folder and then the config values are added to it.
The git repository URL is then added to the Job Builder parameters
When the Jenkins Job => job builder is executed the CI Pipeline gets created automatically based on the above details in build-config.yml. Eg: egov-test job will be created under the core-services folder in Jenkins because the “build-config was edited under core-services” And it should be the “master” branch only. Once the pipeline job is created, it can be executed for any feature branch with build parameters (Specify which branch to build – master or any feature branch).
As a result of the pipeline execution, the respective app/service docker image will be built and pushed to the Docker repository.
Job Builder – Job Builder is a Generic Jenkins job that creates the Jenkins pipeline automatically which is then used to build the application, create the docker image of it and push the image to the docker repository. The Job Builder job requires the git repository URL as a parameter. It clones the respective git repository and reads the build/build-config.yml file for each git repository and uses it to create the service build job.
Check git repository URL is available in ci.yaml
If git repository URL is available build the Job-Builder Job
If the git repository URL is not available ask the Devops team to add it.
The services are deployed and managed on a Kubernetes cluster in cloud platforms like AWS, Azure, GCP, OpenStack, etc. Here, we use helm charts to manage and generate the Kubernetes manifest files and use them for further deployment to the respective Kubernetes cluster. Each service is created as charts which will have the below-mentioned files in them.
To deploy a new service, we need to create the helm chart for it. The chart should be created under the charts/helm directory in iFix-DevOps repository.
We have an automatic helm chart generator utility that needs to be installed on the local machine, the utility prompts for user inputs about the newly developed service (app specifications) for creating the helm chart. The requested chart with the configuration values (created based on the inputs provided) will be created for the user.
Name of the service? test-service Application Type? NA Kubernetes health checks to be enabled? Yes Flyway DB migration container necessary? No, Expose service to the internet? Yes, Route through API gateway [zuul] No Context path? hello
The generated chart will have the following files.
This chart can also be modified further based on user requirements.
The Deployment of manifests to the Kubernetes cluster is made very simple and easy. We have Jenkins Jobs for each state and are environment-specific. We need to provide the image name or the service name in the respective Jenkins deployment job.
Enter a caption for this image (optional)
Enter a caption for this image (optional)
The deployment Jenkins job internally performs the following operations,
Reads the image name or the service name given and finds the chart that is specific to it.
Generates the Kubernetes manifests files from the chart using the helm template engine.
Execute the deployment manifest with the specified docker image(s) to the Kubernetes cluster.
iFix Dashboard
Post infra setup (Kubernetes Cluster), We start with deploying the Jenkins and kaniko-cache-warmer.
Sub Domain to expose CI/CD URL
GitHub Oauth App
Docker hub account details (username and password)
SSL Certificate for the sub-domain
Prepare an <ci.yaml> master config file and <ci-secrets.yaml>, you can name this file as you wish which will have the following configurations.
credentials, secrets (You need to encrypt using sops and create a ci-secret.yaml separately)
Check and Update ci-secrets.yaml details (like github Oauth app clientId and clientSecret, GitHub user details gitReadSshPrivateKey and gitReadAccessToken etc..)
To create Jenkins namespace mark this flag true
Add your env's kubconfigs under kubConfigs like https://github.com/misdwss/iFix-DevOps/blob/mgramseva/deploy-as-code/helm/environments/ci-secrets.yaml#L19
KubeConfig env's name and deploymentJobs name from ci.yaml should be the same
Update the CIOps and DIGIT-DevOps repo name with your forked repo name and provide read-only access to github user to those repo's.
SSL Certificate for the sub-domain
You have launched the Jenkins. You can access the same through your sub-domain which you configured in ci.yaml.
The Jenkins CI pipeline is configured and managed 'as code'.
Example URL - https://<Jenkins_domain>
Since there are many services and the development code is part of various git repos, you need to understand the concept of cicd-as-service which is open-sourced. This page also guides you through the process of creating a CI/CD pipeline.
As a developer - To integrate any new service/app to the CI/CD below is the starting point:
Once the desired service is ready for the integration: decide the service name, type of service, whether DB migration is required or not. While you commit the source code of the service to the git repository, the following file should be added with the relevant details which are mentioned below:
Build-config.yml –It is present under the build directory in each repository
This file contains the below details which are used for creating the automated Jenkins pipeline job for your newly created service.
While integrating a new service/app, the above content needs to be added to the build-config.yml file of that app repository. For example: If we are onboarding a new service called egov-test, then the build-config.yml should be added as mentioned below.
If a job requires multiple images to be created (DB Migration) then it should be added as below,
Note - If a new repository is created then the build-config.yml should be created under the build folder and then the config values are added to it.
The git repository URL is then added to the Job Builder parameters
When the Jenkins Job => job builder is executed the CI Pipeline gets created automatically based on the above details in build-config.yml. Eg: egov-test job will be created under the core-services folder in Jenkins because the “build-config was edited under core-services” And it should be the “master” branch only. Once the pipeline job is created, it can be executed for any feature branch with build parameters (Specify which branch to build – master or any feature branch).
As a result of the pipeline execution, the respective app/service docker image will be built and pushed to the Docker repository.
Job Builder – Job Builder is a Generic Jenkins job that creates the Jenkins pipeline automatically which is then used to build the application, create the docker image of it and push the image to the docker repository. The Job Builder job requires the git repository URL as a parameter. It clones the respective git repository and reads the build/build-config.yml file for each git repository and uses it to create the service build job.
Check git repository URL is available in ci.yaml
If the git repository URL is available build the Job-Builder Job
If the git repository URL is not available ask the DevOps team to add it.
The services are deployed and managed on a Kubernetes cluster in cloud platforms like AWS, Azure, GCP, OpenStack, etc. Here, we use helm charts to manage and generate the Kubernetes manifest files and use them for further deployment to the respective Kubernetes cluster. Each service is created as charts which will have the below-mentioned files in them.
To deploy a new service, we need to create the helm chart for it. The chart should be created under the charts/helm directory in iFix-DevOps repository.
We have an automatic helm chart generator utility that needs to be installed on the local machine, the utility prompts for user inputs about the newly developed service (app specifications) for creating the helm chart. The requested chart with the configuration values (created based on the inputs provided) will be created for the user.
Name of the service? test-service Application Type? NA Kubernetes health checks to be enabled? Yes Flyway DB migration container necessary? No, Expose service to the internet? Yes, Route through API gateway [zuul] No Context path? hello
The generated chart will have the following files.
This chart can also be modified further based on user requirements.
The Deployment of manifests to the Kubernetes cluster is made very simple and easy. We have Jenkins Jobs for each state and are environment-specific. We need to provide the image name or the service name in the respective Jenkins deployment job.
Enter a caption for this image (optional)
Enter a caption for this image (optional)
The deployment Jenkins job internally performs the following operations,
Reads the image name or the service name given and finds the chart that is specific to it.
Generates the Kubernetes manifests files from the chart using the helm template engine.
Execute the deployment manifest with the specified docker image(s) to the Kubernetes cluster.
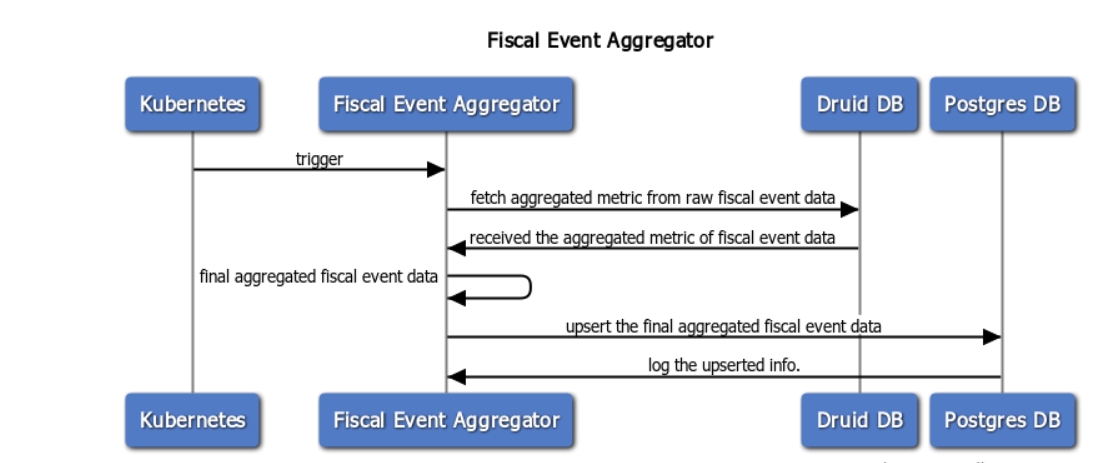
Fiscal Event Aggregator is a Java standalone application that runs as a Cron Job to aggregate fiscal event data from the Druid data store to Postgres DB.
Current Version: 2.0.0
Before you proceed with the configuration, make sure the following pre-requisites are met
Java 8
Druid DB & Postgres DB should be up and running
Fiscal-Event-Aggregator computes the aggregate of data over a selected time period. Aggregator will apply the time range filter according to the following approach :
Fiscal periods will be picked up as per the current system time. The current year will be the current fiscal period starting from the 1st of April of the current year to the 31st March of (current year+1). And it will also aggregate the data of one previous fiscal year starting from the 1st of April of (current year -1) to the 31st of March of the current year.
Follow the steps below to aggregate the final fiscal event data as per the fiscal time periods.
Group the sum of the amount based on department entity ancestry[6] id (attributes.departmentEntity.ancestry[6].id) that is GP (Gram Panchayat), COA (chart of account) id, and event type.
Difference of the sum of the amount of "DEMAND" and "RECEIPT" event type with respect to distinct department entity ancestry[6] id (attributes.departmentEntity.ancestry[6].id) that is GP (Gram Panchayat).
Difference of the sum of the amount of "BILL" and "PAYMENT" event type with respect to distinct department entity ancestry[6] id (attributes.departmentEntity.ancestry[6].id) that is GP(Gram Panchayat).
Upsert the final aggregated fiscal event data into the Postgres DB.
Note: Below environment variables need to be configured with respect to the environment
DRUID_CONNECT_PROTOCOL
HTTP
This is a hardcoded value And won’t change w.r.t environment. And It depends upon the druid broker’s protocol that is getting used to connect.
DRUID_CONNECT_PORT
8082
This is a hardcoded value And won’t change w.r.t environment. It depends upon the druid broker protocol that we are using and the corresponding port of that druid broker.
DRUID_HOST
druid-broker.olap
this is kept under configmaps.
FISCAL_EVENT_DATASOURCE
fiscal-event
This is the data Source present in Druid DB. It is the same as defined in Druid DB.
Update the configurations in the dev.yaml, qa.yml, prod.yaml file.
iFIX Dashboard is built on Metabase and can be easily configured to develop various dashboards.
The below dashboard provides information about the fiscal position of various projects. The dashboard can be filtered for various date ranges and departmental hierarchies.
Reference Dashboard
Tools used to create the OLAP system for the iFix
iFix dashboard is developed using opensource tools that include the complete OLAP system that streams the data from various sources, transforms and processes data and visualizes the data using dashboards
v0.40.4
v0.40.2
Metabase is an open-source business intelligence tool. It lets you ask questions about your data, and displays answers in formats that make sense, whether that's a bar graph or a detailed table.
0.21.1
0.21.1
Apache Druid is a real-time analytics database designed for fast slice-and-dice analytics ("" queries) on large data sets. Druid is most often used as a database for powering use cases where real-time ingest, fast query performance, and high uptime is important. As such, Druid is commonly used for powering GUIs of analytical applications, or as a backend for highly concurrent APIs that need fast aggregations. Druid works best with event-oriented data.
6.2.0
5.4.1
Apache Kafka is an open-sourced and community distributed event streaming platform capable of handling trillions of events a day.
13.4
9.6 and 10.6
PostgreSQL is a powerful, open-source object-relational database system with over 30 years of active development that has earned it a strong reputation for reliability, feature robustness, and performance