A new 'Actions' column has been added to the "My Campaign" screen, allowing users to perform some tasks skillfully.
Users can click on 'Actions' to choose from the available action options in the menu.
We've added config for column actions in myCampaignConfig.js
In UICustomization.js, we have added a component that needs to be rendered for the action column under additionalCustomizations.
We have added an onActionSelect function which acts based on the selected option.
Actions are different according to the different campaign status
Here user will get all the actions such as:
For the case of ongoing campaigns user is able to update the campaign , configure checklist and to view user credentials , all the 4 options will be visible.
For the case of completed campaings user will not be able to update the campaign. Only view the user credentials:
Here user will get all the actions such as: For the case of upcoming campaigns user is able to update the campaign , configure checklist and to view user credentials ,all the 4 options will be visible.
Draft state will have no action button.
Failed state will have no action button.
File Path:
Config:
UICustomisation:
This flow allows the user to update campaign boundary, facility, user, and target details once the campaign is created.
Users can go to update campaign flow from the action button present in my campaigns screen.
Updating the campaign is possible only for ongoing and upcoming campaigns.
Screens coming for this update campaign are-
Selecting Boundary
Update Facility details
Update User details
Update Target
Summary
This is the first screen that is displayed to the user when they try to update the campaign from the My Campaigns screen. This screen is already pre-filled with the boundary data which is selected during the campaign creation.
It is impossible to delete the already selected boundaries, user can always add new boundaries if they want to update.
This screen allows the user to update the facility details:
When the user downloads the current facility template, then that template is already filled with the facility details that the user has entered during the time of campaign creation.
In this user can add the new facilities.
This screen allows the user to update the facility details:
When the user downloads the current user template, then that template is already filled with the user details that the user has entered during the time of campaign creation.
In this user can add a new user.
This screen allows the user to update targets:
When the user downloads the current target template then that template is already filled with the target details that the user has entered during the time of campaign creation.
In this user can add the new targets or change the existing ones.
The file path of all the upload screens:
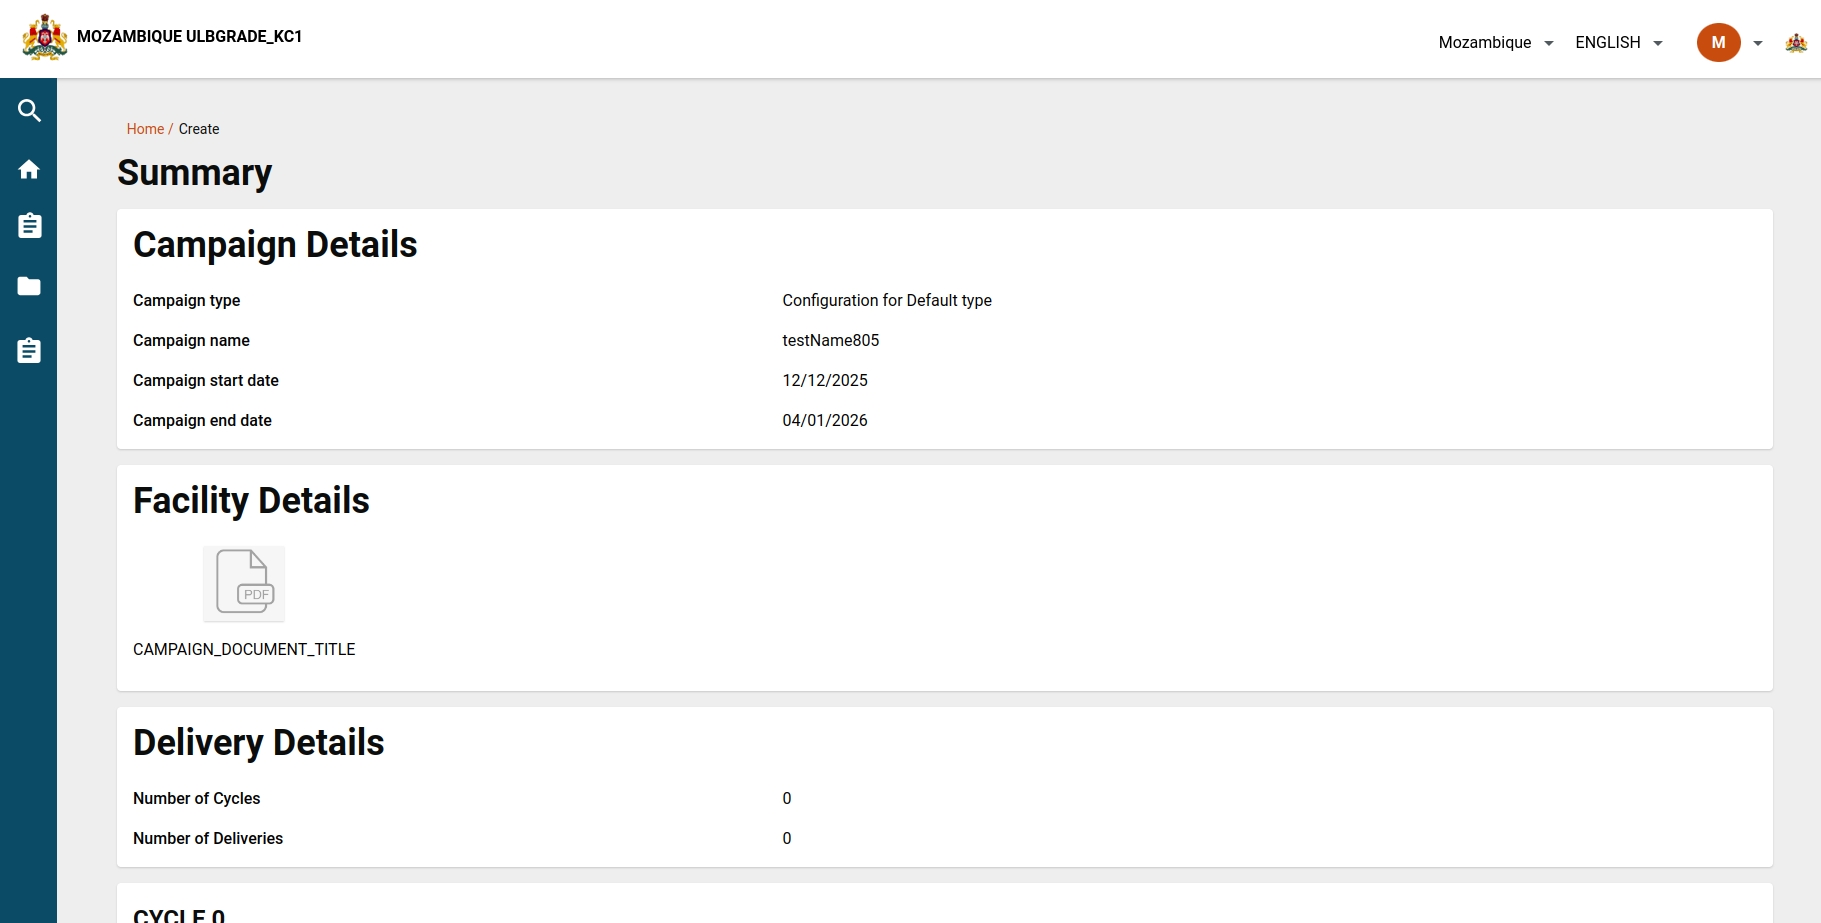
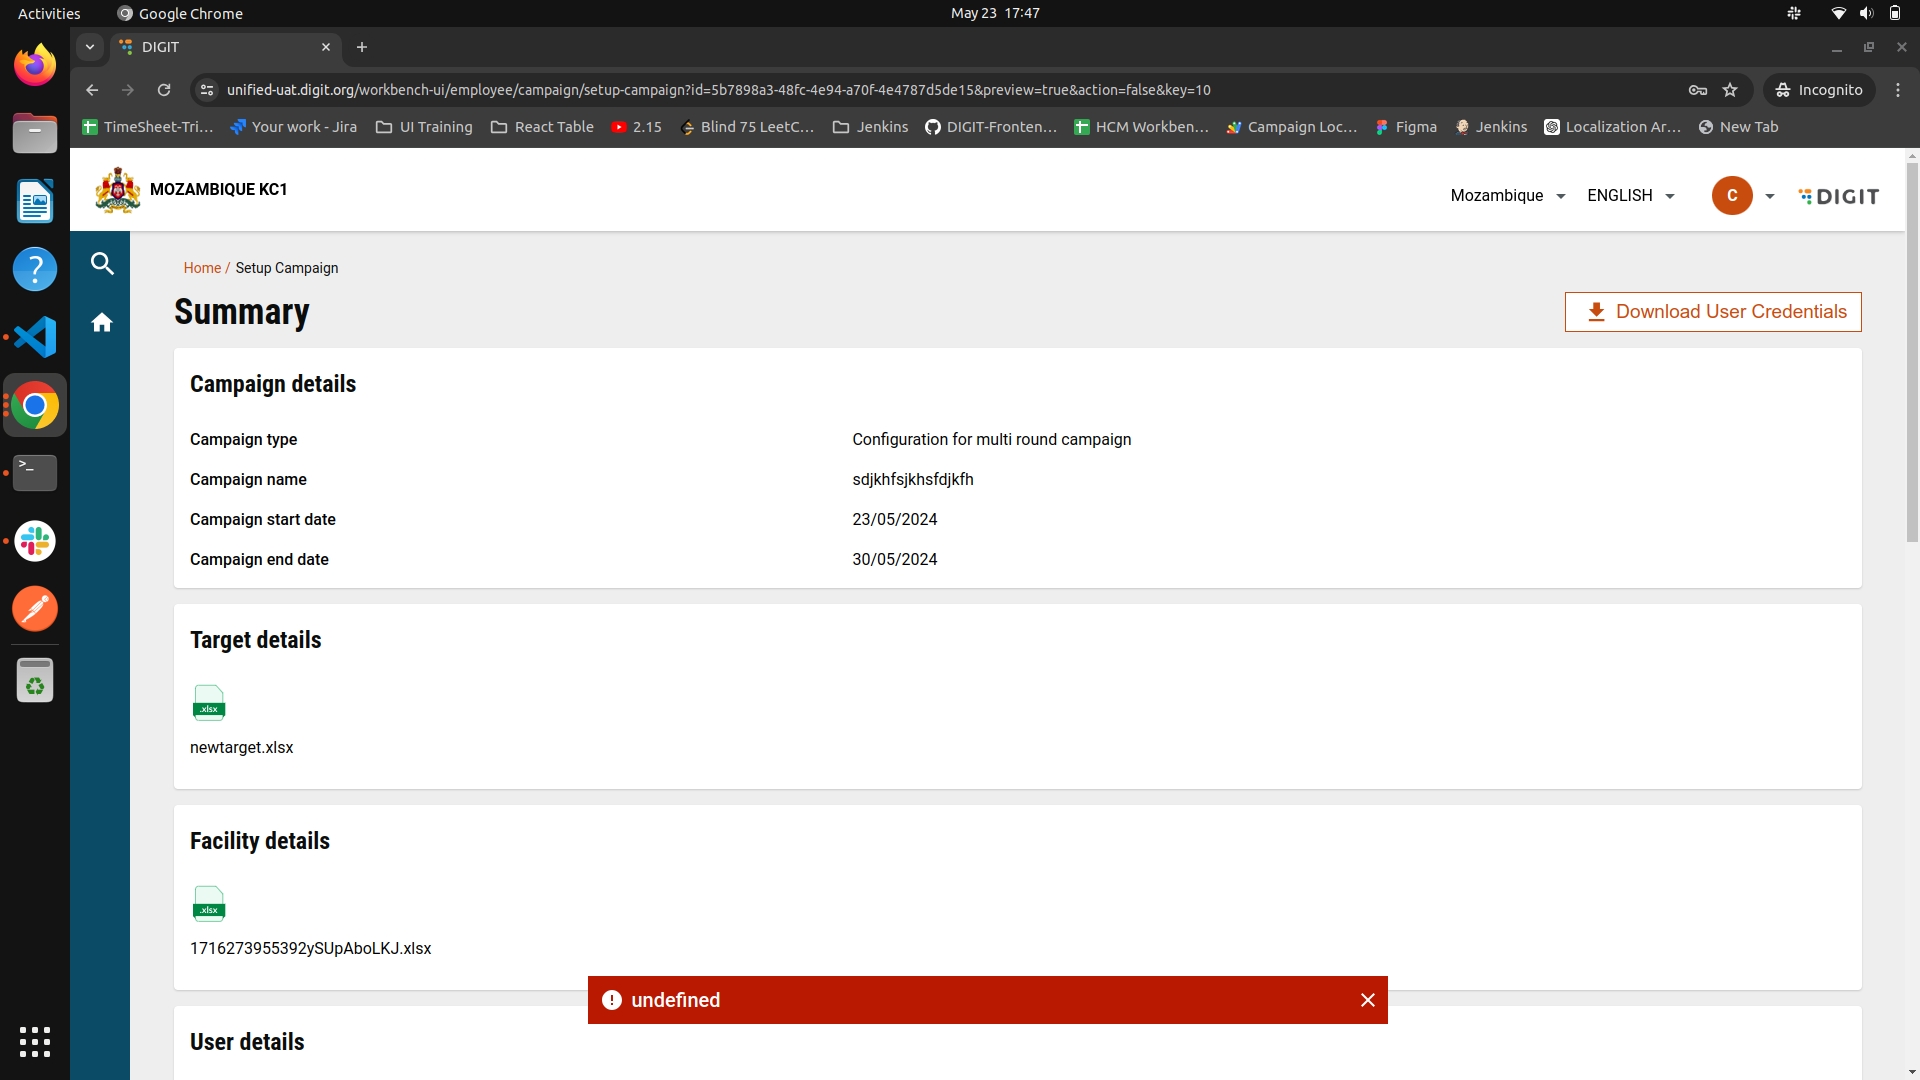
This helps the user to view the summary of all the entered details in the previous screens:
The update campaign flow works similarly to the setup campaign. But the difference is that here we send the parentId in the URL and fetch it from there.
When the user clicks on next after the boundary details screen, the create API is called with parentID in the params and with action = draft. Then for the subsequent steps update API is called. In the summary screen again create API is called again but with action = 'create'. This action updates the campaign.
If no new boundary selected - If the user has not selected any new boundary then, to update the campaign at least one data upload is necessary.
New Boundaries Added - If the user has selected new boundaries then all the 3 data uploads are necessary for the user.
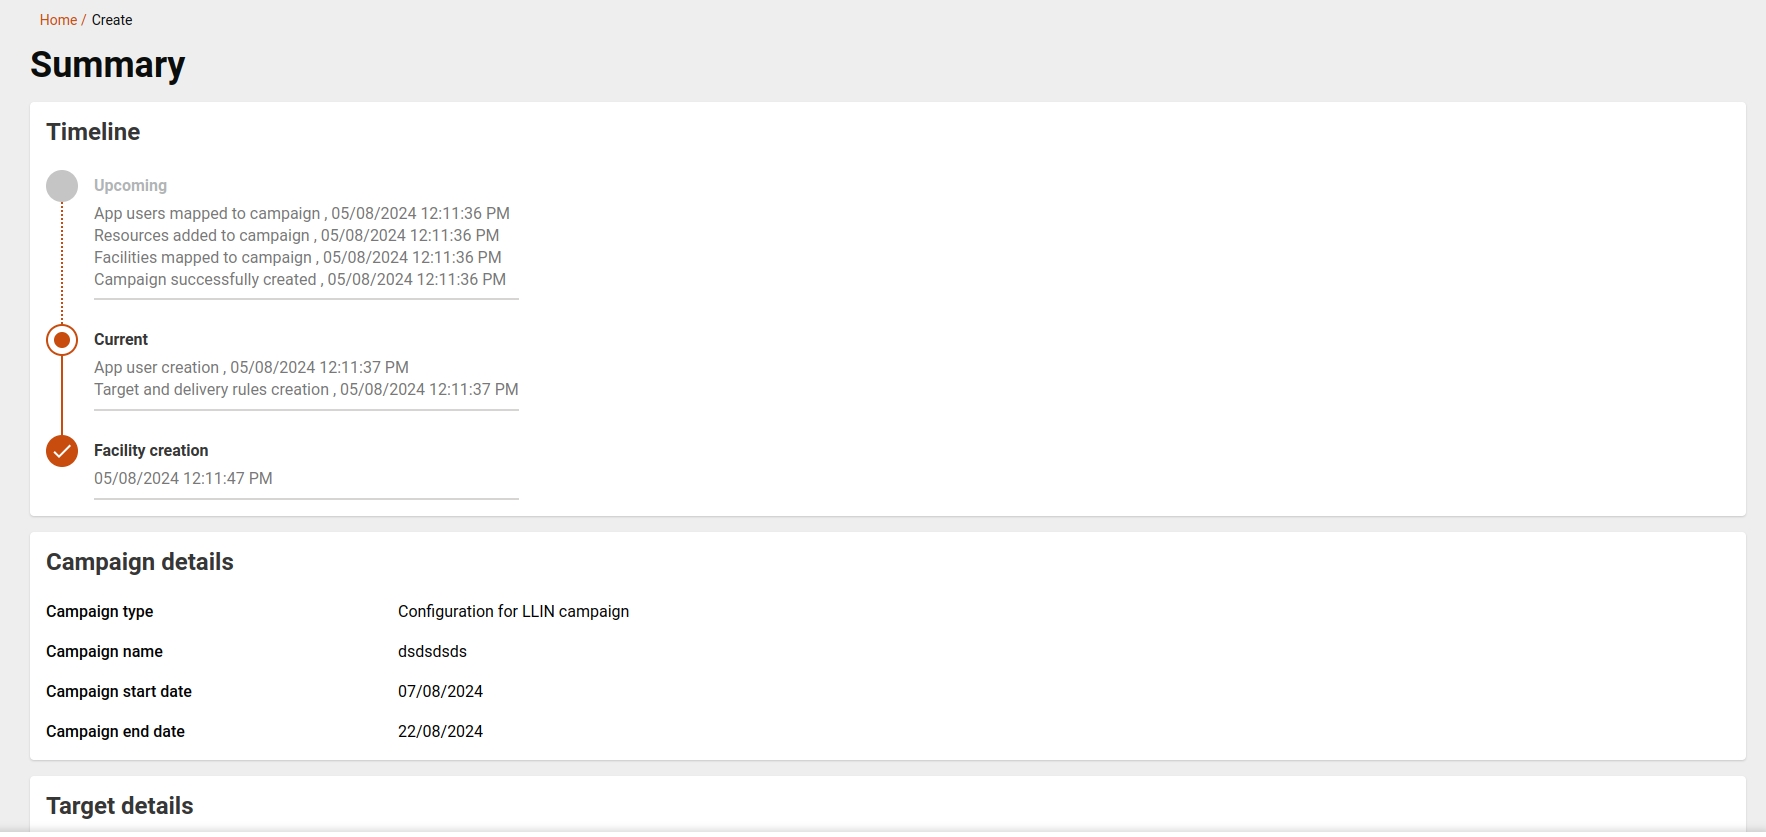
The timeline provides a visual representation of the campaign creation process. It can be accessed from the summary or through the action button on the "My Campaign" screen. The timeline will be shown for ongoing, upcoming, completed, and failed campaigns.
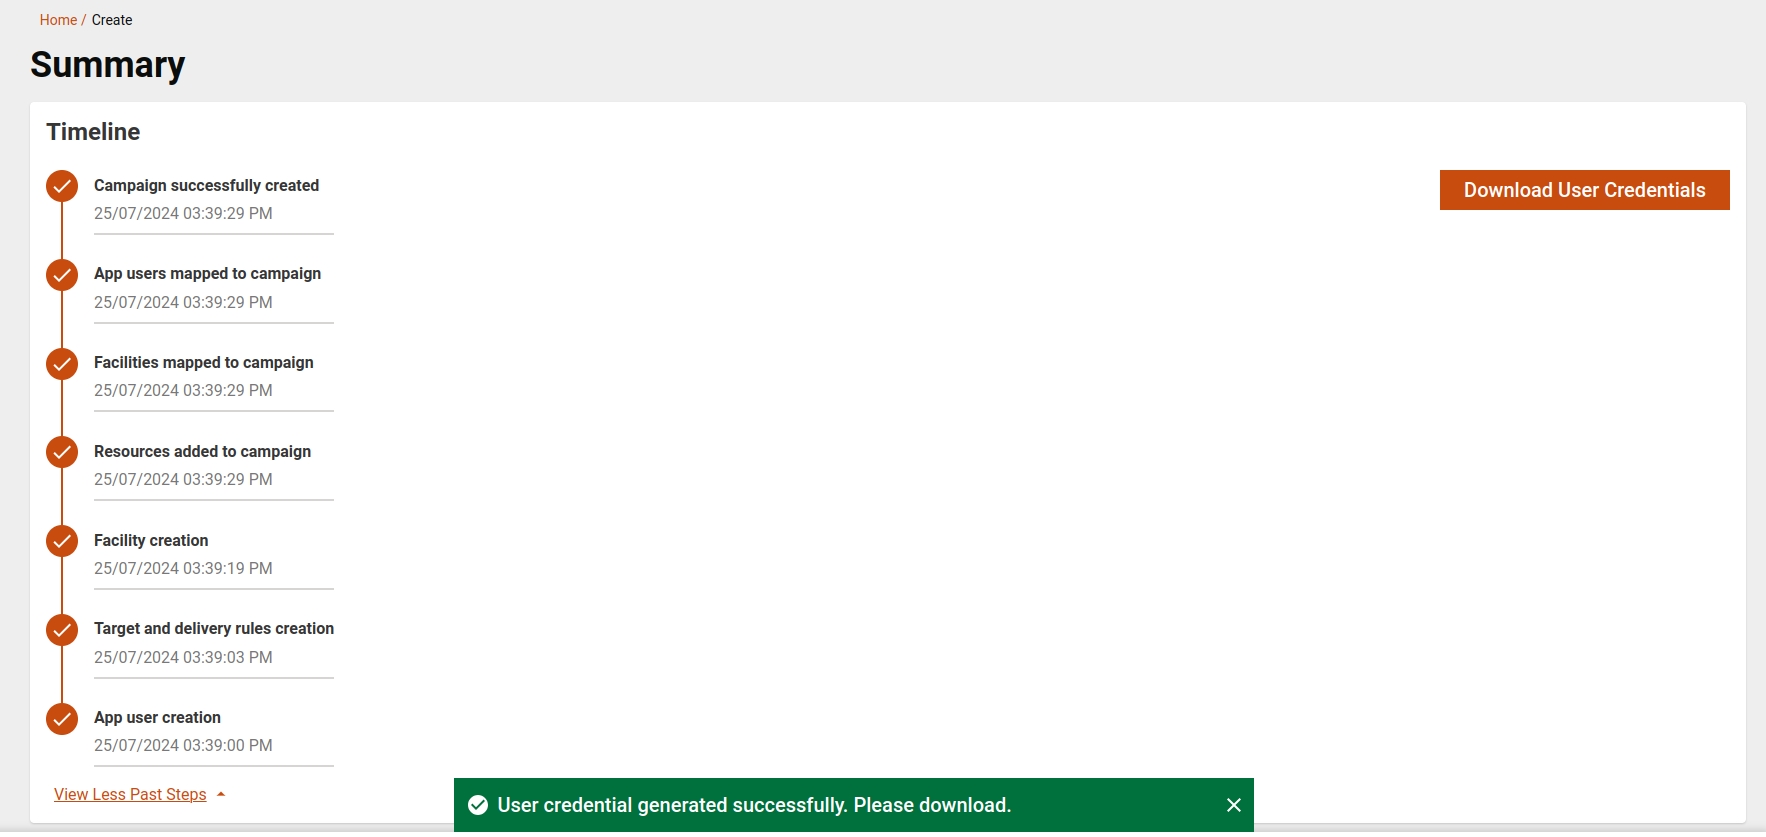
This timeline shows all the stages of the campaign that are successfully created. A user can download the user credentials as soon as the campaign is created successfully.
The above images show all three timeline steps: upcoming, current, and completed.
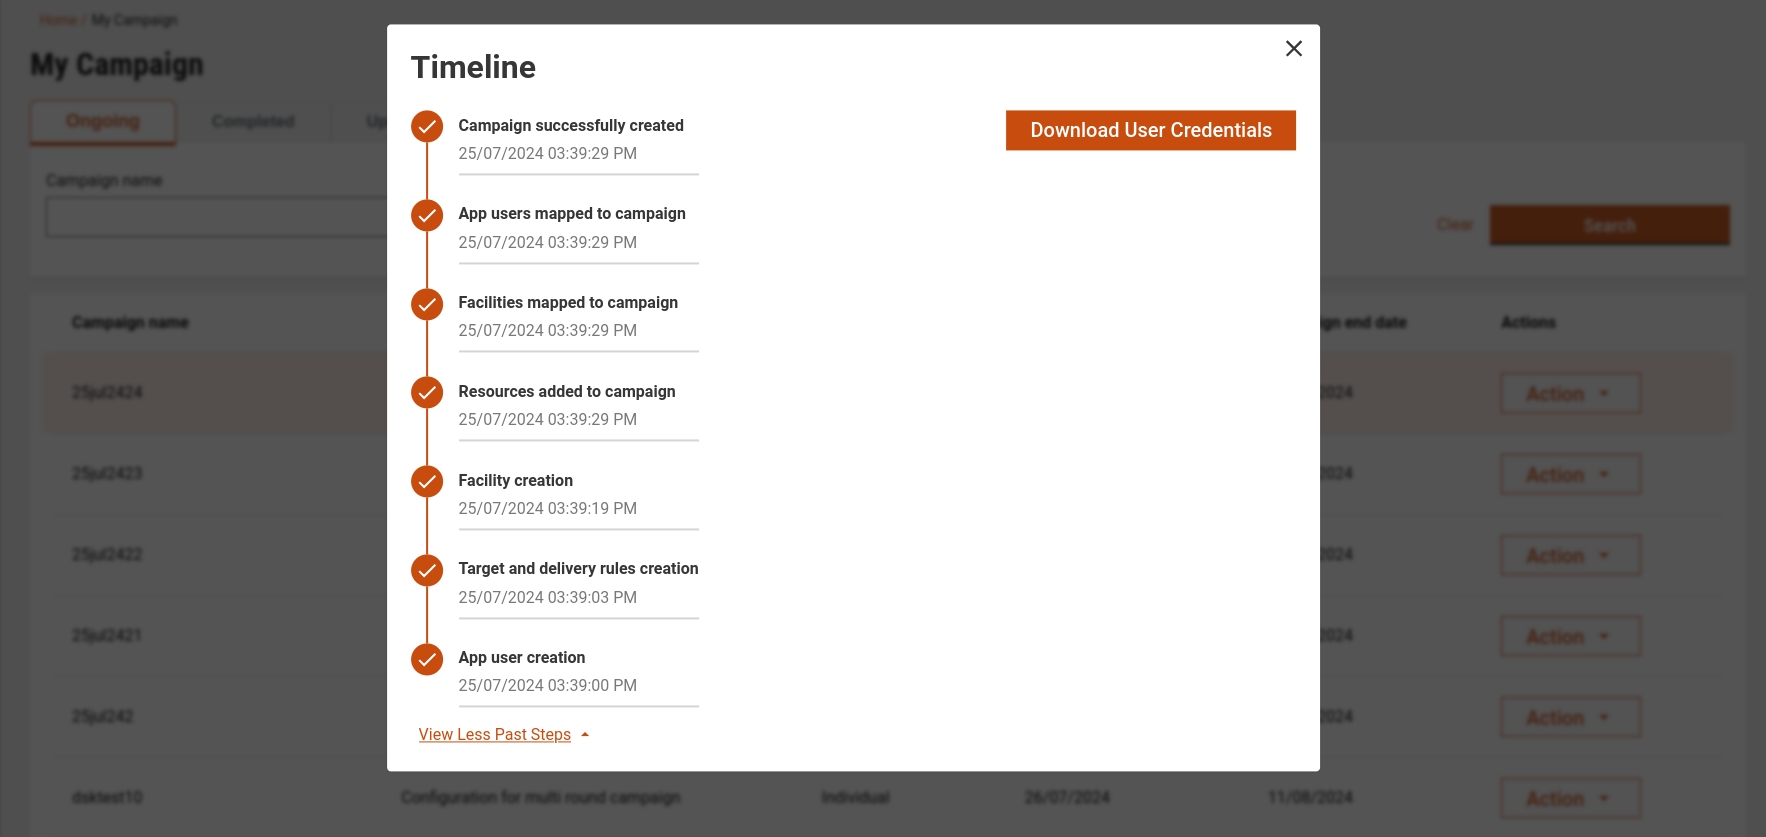
A user can also access the timeline from the "My Campaign" screen by clicking on the action button present in the search result.
The timeline will be shown as a pop-up from the "My Campaign" screen. Similar to the summary, while the campaign creation is in progress, it will display all the steps such as upcoming, current, and completed. User credentials will be downloaded once the campaign is successfully created.
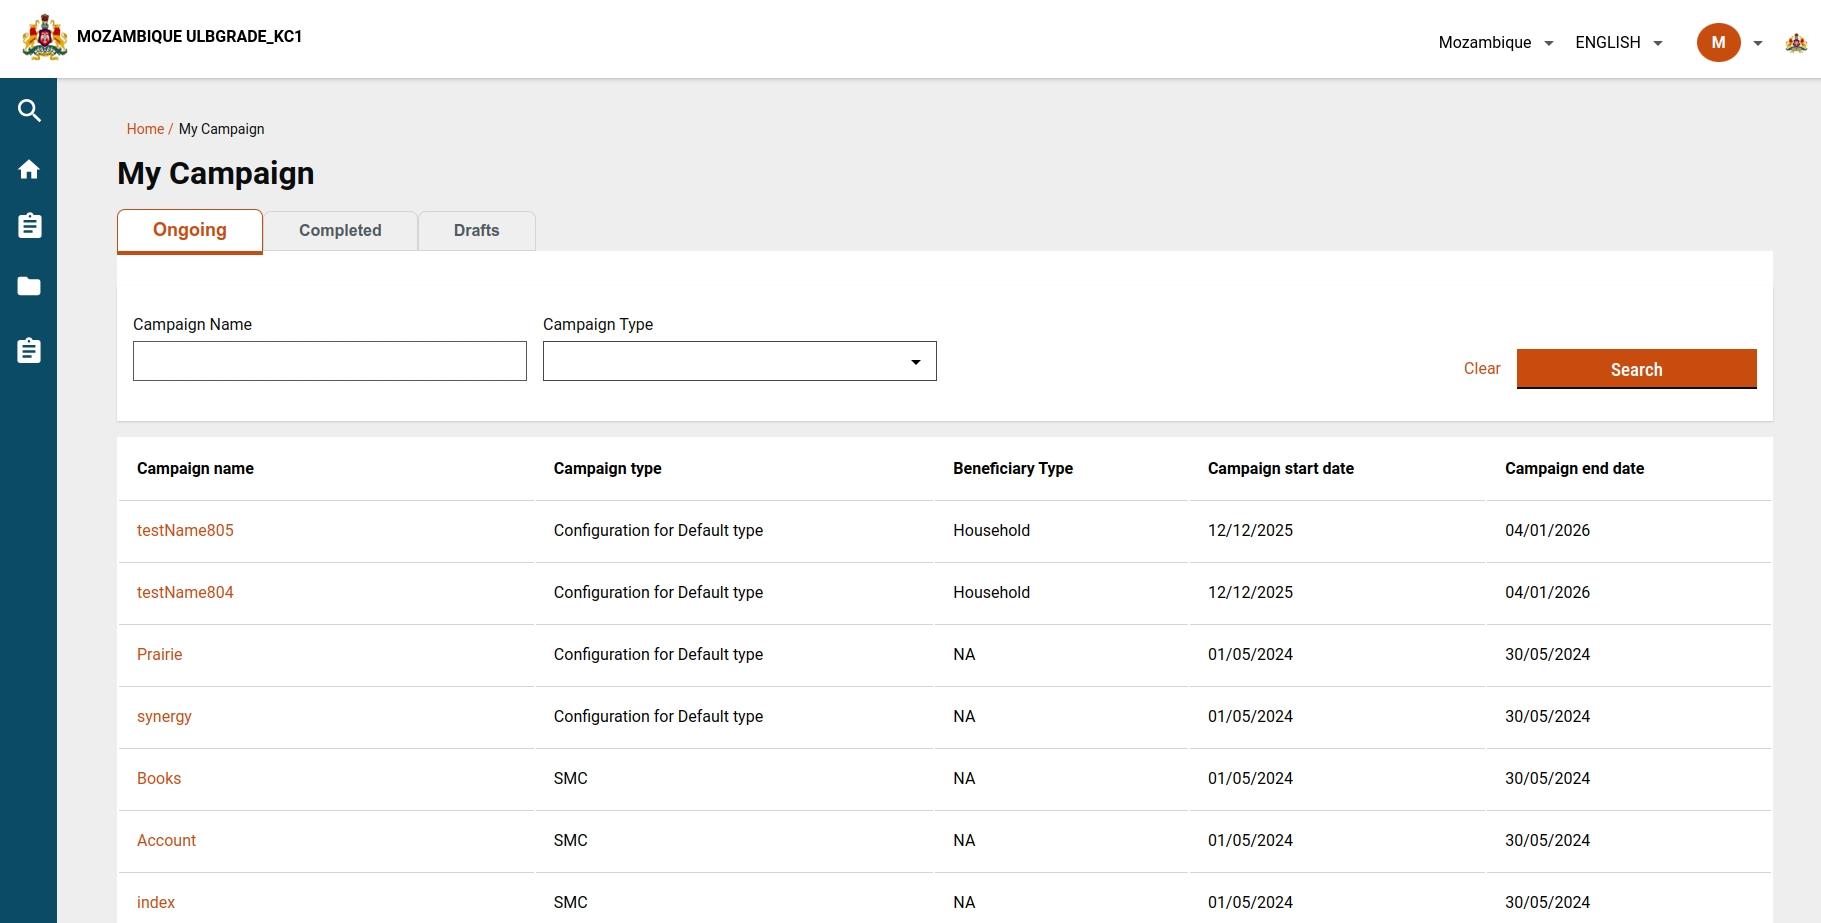
My campaign screen allows users to see the list of campaigns that are in Ongoing, Completed, or Draft status. Users can search campaign by using the campaign name or campaign type. Users can also see a summary of the campaign and complete the campaign creation if it is draft status.
The list of statuses showing in the "My Campaign" screen are:
Ongoing
Completed
Drafts
Failed
Upcoming
After clicking on the My Campaign link from the HCM Campaign module card, the user lands on the My Campaign screen where the user can see all the lists of campaigns of each action in the tab.
On my campaign screen, we are sending the payload:
Campaigns with an end date that has passed the current date are marked as 'Completed'.
Campaigns with a status of 'Started' and no end date, or with an end date in the future, are labeled as 'Ongoing'."
The logic is written in UICustomizations.js
Clicking on campaigns other than draft status will redirect to the summary page of the campaign where the user can see the complete details of the respective campaign.
For the ongoing campaign filtering functionality, we are utilizing the campaignsIncludeDates parameter set to true. The startDate and endDate parameters are both set to the current date. This configuration ensures that the API will return any campaign where the specified startDate or endDate falls within the campaign's defined start and end dates. Additionally, the campaign status is filtered to include campaigns with statuses of created or creating.
campaignsIncludeDates: This boolean parameter is set to true to enable date range filtering.
startDate: The start date for the filter, is set to today's date.
endDate: The end date for the filter, is also set to today's date.
status: The campaign status filter, including the statuses created and creating.
To filter the ongoing campaigns based on the criteria mentioned above, ensure that your request payload includes the following parameters:
campaignsIncludeDates = true: This activates the date range filtering feature.
startDate and endDate = today: By setting both the start and end dates to today's date, the filter will capture any campaigns that are active today.
status = ["created", "creating"]: Filters the campaigns to only include those that are currently in the created or creating status.
For filtering completed campaigns, we use a similar approach with a slight modification to the date parameters and status. Specifically, we will set the endDate parameter to yesterday's date. This configuration ensures that the API returns campaigns that have ended as of yesterday. The statuses to filter will remain creating and created.
endDate: The end date for the filter, is set to yesterday's date.
status: The campaign status filter, including the statuses creating and created.
To filter the ongoing campaigns based on the criteria mentioned above, ensure that your request payload includes the following parameters:
endDate = yesterday: By setting the end date to yesterday's date, the filter will capture any campaigns that have ended by the end of the previous day.
status = ["created", "creating"]: Filters the campaigns to include only those that were in the created or creating status when they ended.
When a user clicks on the completed campaign, they will be redirected to the summary page displaying the campaign details. The success toast message will appear If the user credential sheet is generated successfully. Users can view or download the sheet from the user credential card or download button which appears at the top.
For filtering upcoming campaigns, we use a different approach by setting the campaignsIncludeDates parameter to false and specifying the startDate parameter to tomorrow's date in epoch format. This configuration ensures that the API returns campaigns scheduled to start tomorrow. The statuses to filter will remain creating and created.
campaignsIncludeDates: This boolean parameter is set to false as we are not filtering based on a date range but rather a specific start date.
startDate: The start date for the filter, is set to tomorrow's date in epoch format.
status: The campaign status filter, including the statuses creating and created.
To filter the upcoming campaigns based on the criteria mentioned above, ensure that your request payload includes the following parameters:
campaignsIncludeDates = false: This deactivates the date range filtering feature, focusing the filter on a specific start date.
startDate = tomorrow (epoch date): By setting the start date to tomorrow's date in epoch format, the filter will capture any campaigns scheduled to start tomorrow.
status = ["created", "creating"]: Filters the campaigns to include only those that are in the created or creating status and scheduled to start tomorrow.
When a user clicks on an upcoming campaign, they will be redirected to the summary page displaying the campaign details.
For the drafts campaign, we are passing the status as drafted. It will return all the drafts that are in drafted status
For failed campaigns, we are passing the status as failed. It will return all the drafts that are in failed status
When a user clicks on a failed campaign, they will be redirected to the summary page displaying the campaign details. Additionally, a toast message will appear, showing the error that caused the campaign to fail.
This screen enables users to update the start date, end date, and cycle dates for both ongoing and upcoming campaigns. Additionally, an 'Actions' column has been added to the "My Campaign" screen, providing more options for managing the campaigns.
When a user clicks on 'Actions', they will see the "Update Dates" option. Selecting "Update Dates" redirects the user to the update date screen.
We have added an MDMS configuration flag to determine whether the dates can be updated with or without boundaries. Depending on the MDMS flag, the appropriate screen will be rendered.
If the MDMS flag for updating dates with a boundary is set to true, the corresponding screen for updating dates will be rendered.
If the MDMS flag for updating with a boundary is set to true, the corresponding screen will be rendered. On this screen, the user first selects the hierarchy level and boundary they wish to update. After making their selection, the user clicks the 'Confirm' button.
Based on the selected boundaries, the corresponding dates are displayed. The user can then change the dates and cycle dates as needed. Fields with dates that have already passed (relative to today) are made non-editable.
After making the desired changes, the user clicks the 'Confirm' button to update the dates. Once the update is successful, a success response screen is shown, and the user is redirected back to the "My Campaign" screen.
If the MDMS flag is set to false, the corresponding screen is rendered to update the dates without considering boundaries, at the root level.
When the user clicks on "Update Date" for the respective campaign, the update date screen is shown with all the prefilled start and end dates. The user can then make the necessary changes.
The user can change the editable dates. Any date fields that have passed the current date are non-editable. Once the user confirms the date change, the data is updated. After a successful update, the user is redirected to a success screen.
MDMS Link:
File Path: -
File path -
File Path: -
File Path:
File path:
File Path:
Path:
File Path:
MDMS configuration to check whether the update date is at the root level or boundary level:
/project-factory/v1/project-type/create
CAMPAIGN_MANAGER
"action": "draft", "action": "create", to update the campaign
/project-factory/v1/project-type/search
CAMPAIGN_MANAGER
only id is required in params
/project-factory/v1/project-type/update
CAMPAIGN_MANAGER
/project-factory/v1/data/_download
CAMPAIGN_MANAGER
Params will be different for different types- 1) boundary tenantId:mz
type:boundary
hierarchyType:ADMIN
id:987eadc3-55a0-4553-925d-bf8087f57e5a 2) facilityWithBoundary tenantId:mz
type:facilityWithBoundary
hierarchyType:ADMIN
id:052f59fc-18a7-4e07-816a-f5d8062b56b5 3) userWithBoundary tenantId:mz
type:userWithBoundary
hierarchyType:ADMIN
id:fbfbd393-d053-4f51-9e12-1068b97da292
/project-factory/v1/project-type/getProcessTrack
POST
params: { campaignId: campaignId, },
/project-factory/v1/project-type/search
{ "RequestInfo": { }, "CampaignDetails": { "tenantId": "mz", "status": [ "failed" ], "createdBy": "ff98f9f6-192b-4e12-8e90-7b73dcd0ad4d", "pagination": { "sortBy": "createdTime", "sortOrder": "desc", "limit": 10, "offset": 0 } } }
/health-project/v1/_search?tenantId=mz&limit=10&offset=0
CAMPAIGN_MANAGER
/health-project/v1/_update
CAMPAIGN_MANAGER
/health-project/v1/_search?tenantId=mz&limit=10&offset=0
CAMPAIGN_MANAGER
/health-project/v1/_update
CAMPAIGN_MANAGER
boundary-service/boundary-hierarchy-definition/_search
CAMPAIGN_MANAGER


