The DIGIT-Faecal Sludge Management (FSM) allows citizens to raise service requests for desludging and pay the fees for the service delivery online. For governing bodies and vendors, it makes service delivery easier and captures information end-to-end, ensuring waste pick up and its disposal at the correct treatment plant. Real-time tracking of service delivery, along with the availability of rich transactional data allow decision makers to ensure a better citizen service experience and promote a cleaner/healthier environment.
Apply for desludging services
Make payment for services
Register desludging operators
Update vehicle logs
Manage vendors, vehicles and drivers
Refer to the table below to understand the different user roles and the scope of action linked to each role. The manual provides a detailed description of how to use the system for each role.
Citizen
Apply for desludging services
Make payment for services
Individuals and society groups/communities
Desludging Operators (DSO)
Take action on assigned service requests
Private or government entities
Septage Treatment Plant Operator (SeTPO)
Update vehicle log
Private or government entities
Employees
Apply for desludging services on behalf of citizens
Receive payment from citizens over the counter
Send back applications
Reject applications
Assign DSOs to service requests and update the status of the service requests
ULB employees
This section guides you through the details of using the FSM module for each role. Click on the relevant role below to learn more about how to use the FSM system.
Employees
The Septage Treatment Plant Operator (SeTPO) receives multiple vehicles servicing various desludging requests in the urban local body (ULB) and adjacent gram panchayats (GPs) through the day, each day. Some of these trips made by some vehicles may be associated with the applications raised and serviced through the platform. Additionally, incoming vehicles may come in independently, without corresponding applications.
SeTPO can:
Update the status of applications and trips in “Waiting for Disposal” stage at the FSTP/STP as disposed
Log vehicle(s) requests that are not in the system
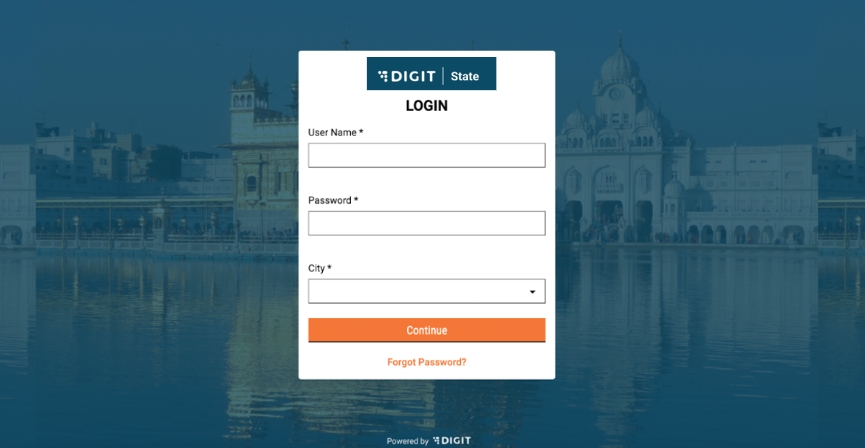
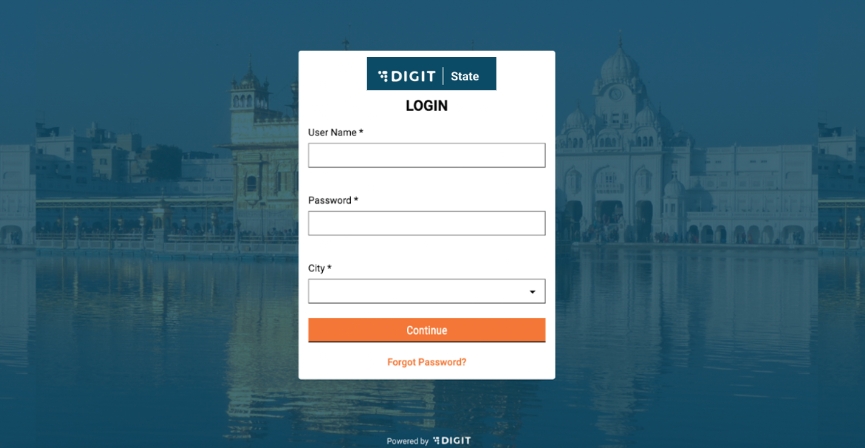
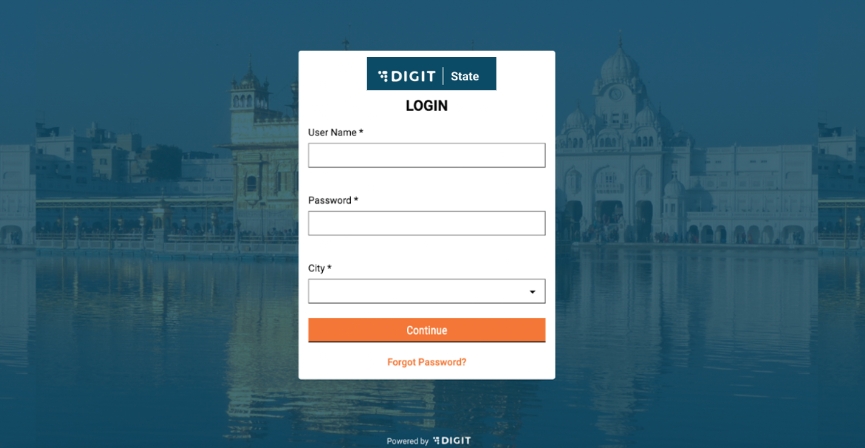
FSTP operators are provided credentials to login to the system.
On this page, the following actions can be performed:
Enter username and password
Select the city for login
Reset password by clicking on the “Forgot Password” link
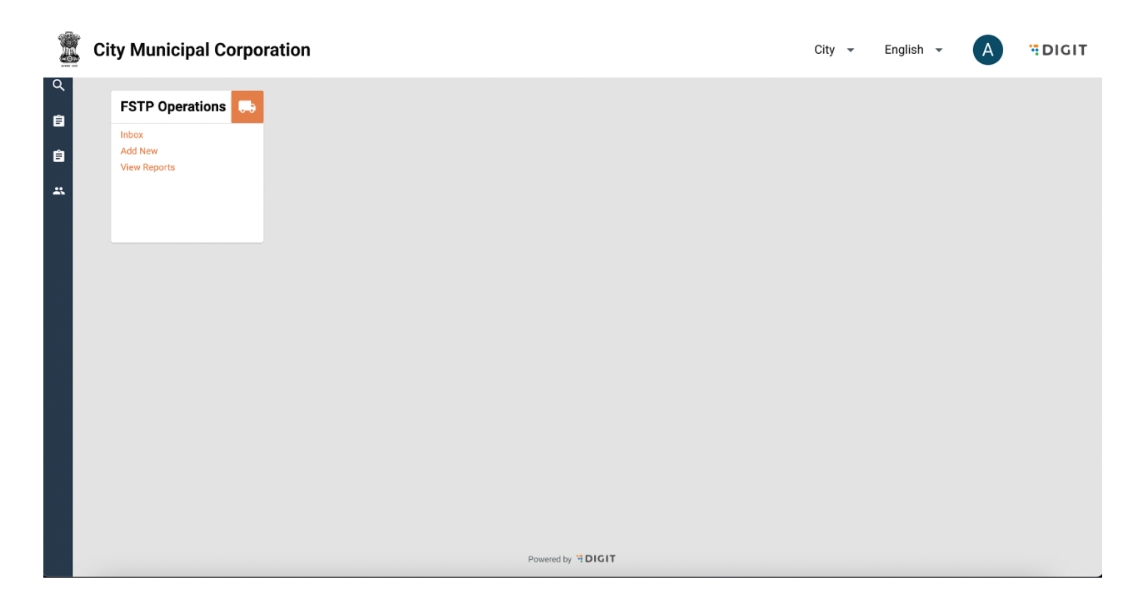
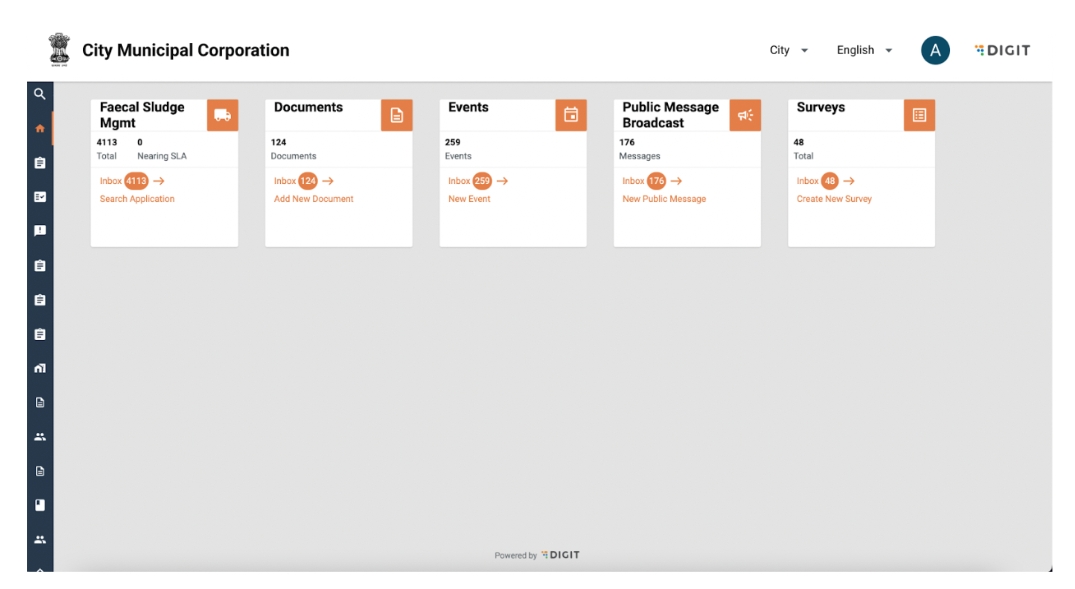
On clicking continue, FSTP operators are redirected to the FSM homepage.
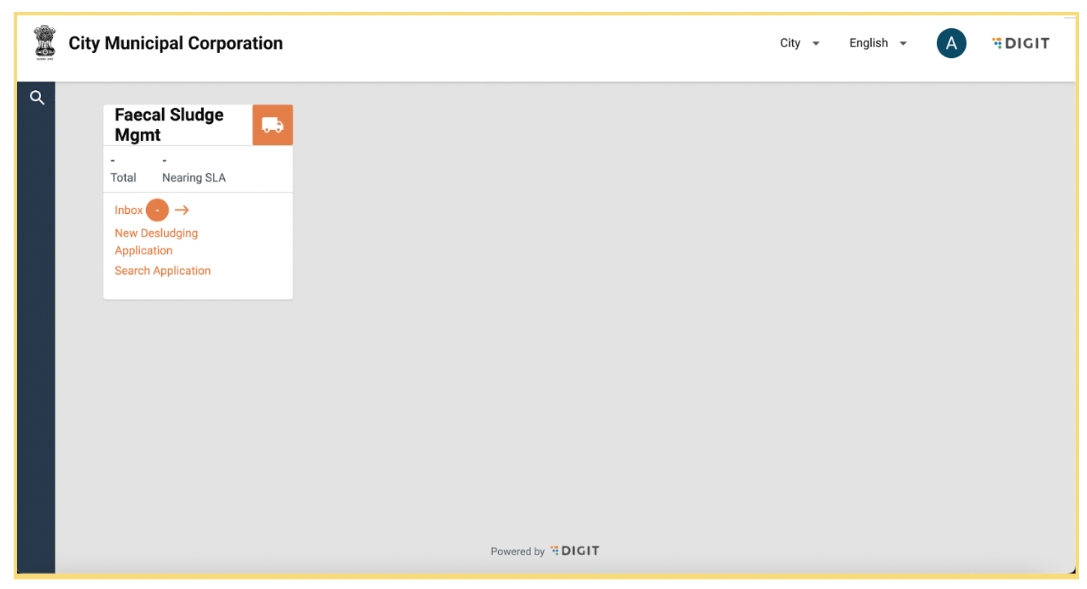
Click on Inbox to view incoming vehicles for disposal against applications and perform actions
Record incoming vehicle that has not come in via an application
View reports
Change language
Edit profile details by clicking on the user icon on the top right hand corner
Logout by clicking on the user icon on top right hand corner
On this page, the following actions can be performed:
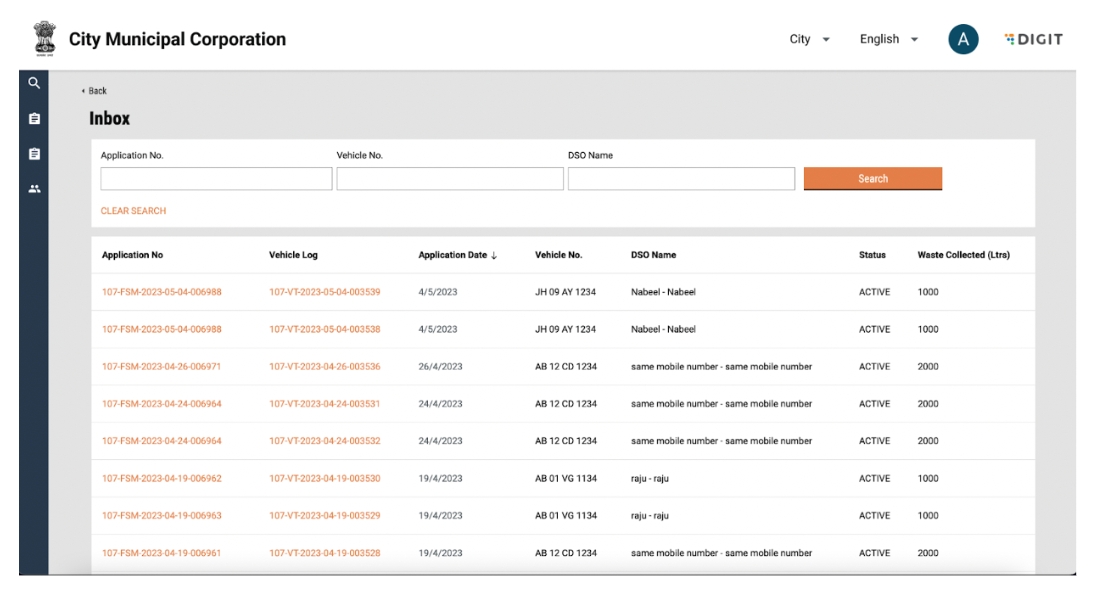
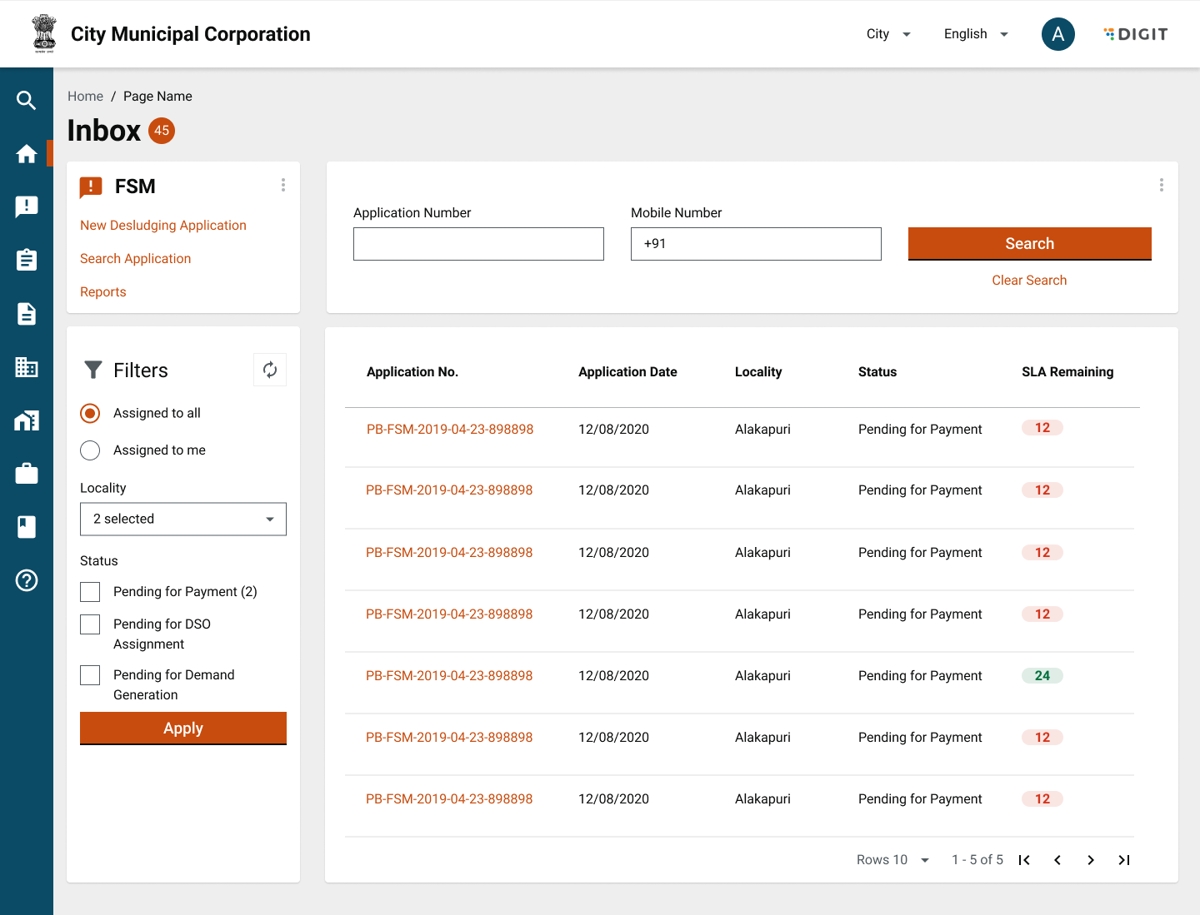
To view incoming vehicles for disposal against applications, the user can navigate to the inbox. The inbox displays a list of trips along with the vehicle number that is pending to be disposed off at a specific plant.
The following actions can be performed:
Search for an active trip using the “Application No.”, Vehicle no. and DSO name.
Clear search by clicking on “Clear Search”
View and update trip details by clicking on a trip ID or vehicle log
Sort applications and trips by the application date
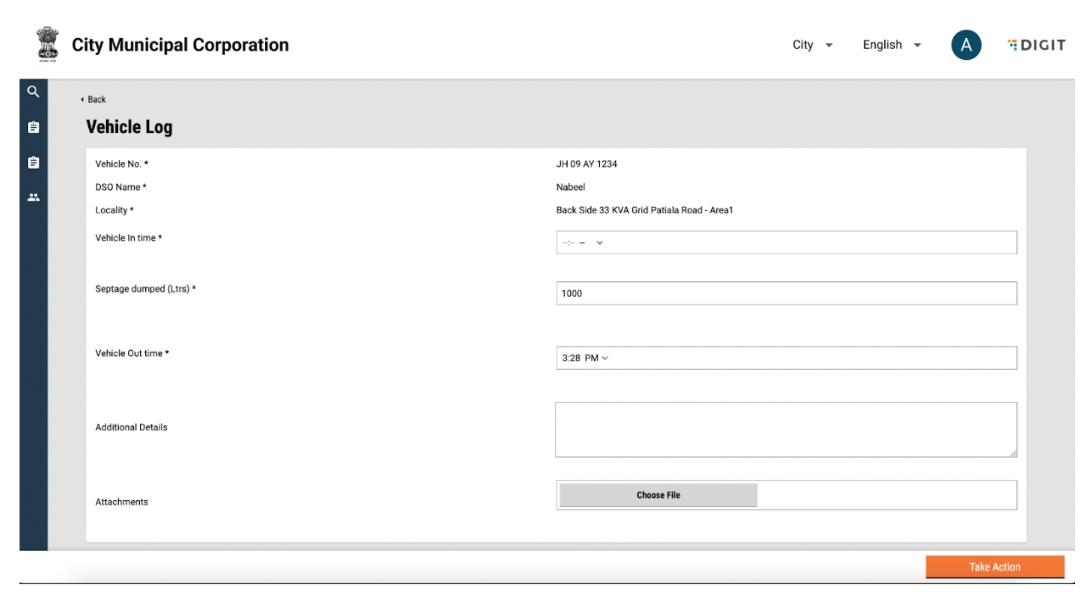
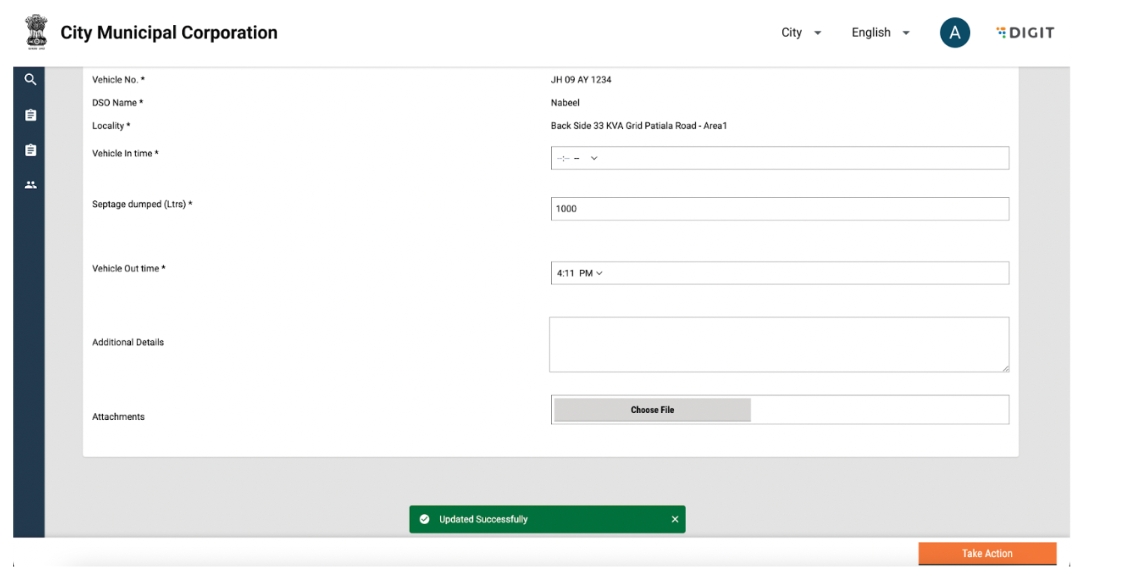
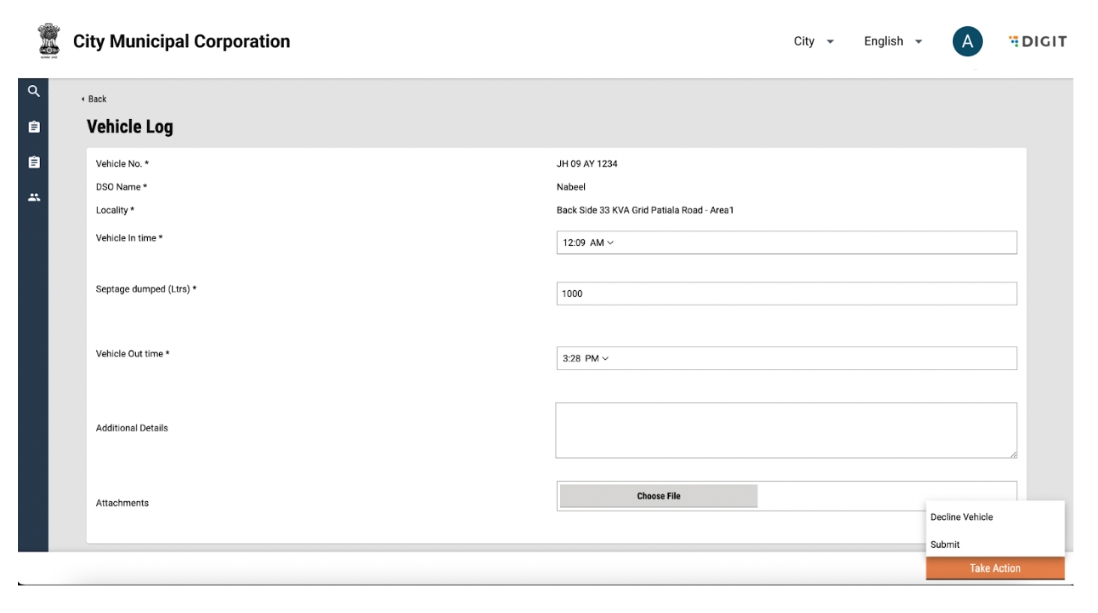
On clicking on an application number or vehicle log ID, the user is redirected to the update trip page.
View trip details such as Vehicle no., DSO Name, and Locality.
Update vehicle in time and out time.
Update septage dumped (in litres)
Add additional details and attachments.
Submit form or decline vehicle by clicking on the “Take Action” button
The following actions can be performed:
The take action button has the following options:
Decline Vehicle
Submit
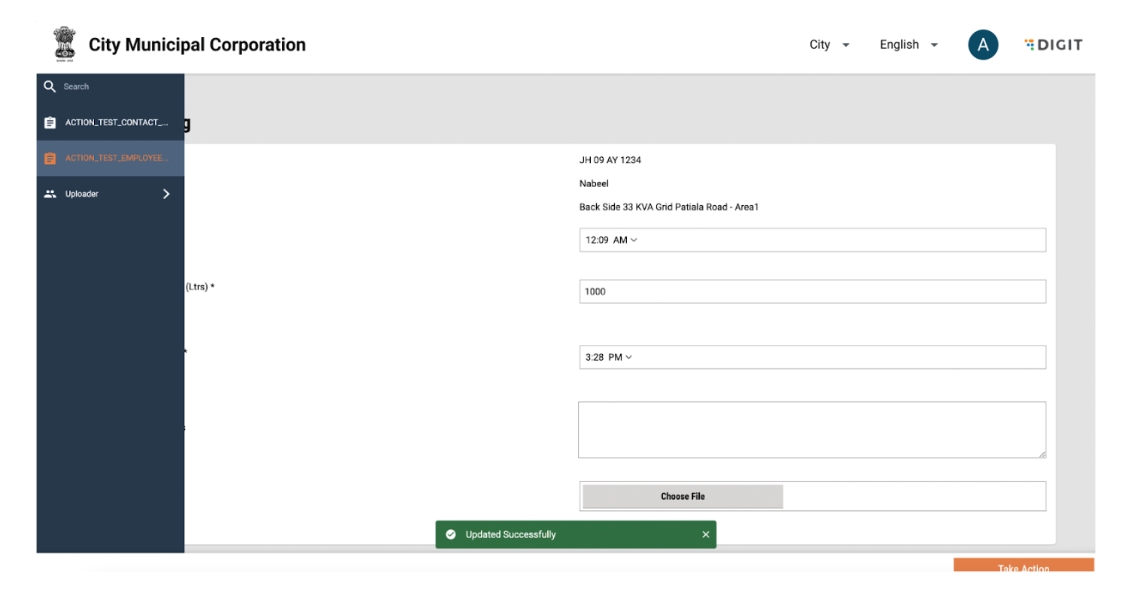
On clicking the Submit button, the application is updated successfully and a snack bar will appear for confirmation. The application will also be removed from the Inbox.
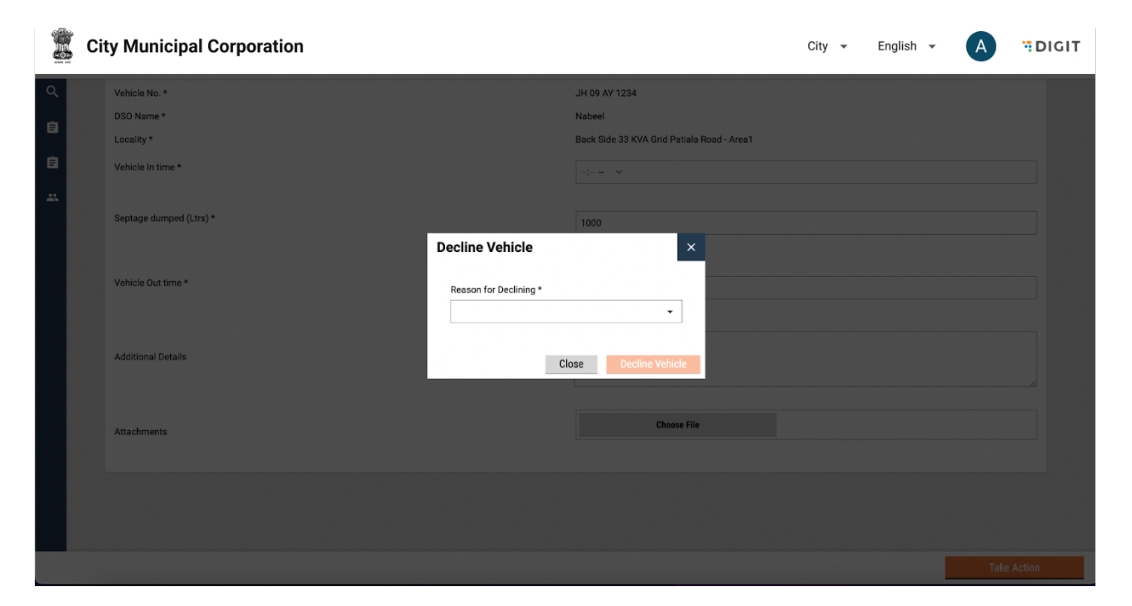
There are multiple reasons why a vehicle may be declined at the treatment plant, such as due to the quality of waste or if the plant is under maintenance. In such cases, the treatment plant operator may decline the incoming vehicle. This can be done from the application details page where the “Take Action” button has the option for Decline. On clicking on this, the following pop-up will appear.
The following actions can be performed:
Select the reason for declining
Close pop-up by clicking on the Close button on the pop up.
Close pop-up by clicking on the cross icon on the top right of the pop up.
Confirm decline by clicking on Decline Vehicle.
On clicking on Decline Vehicle, there will be a snack bar confirming the action and the user will be redirected to the home screen.
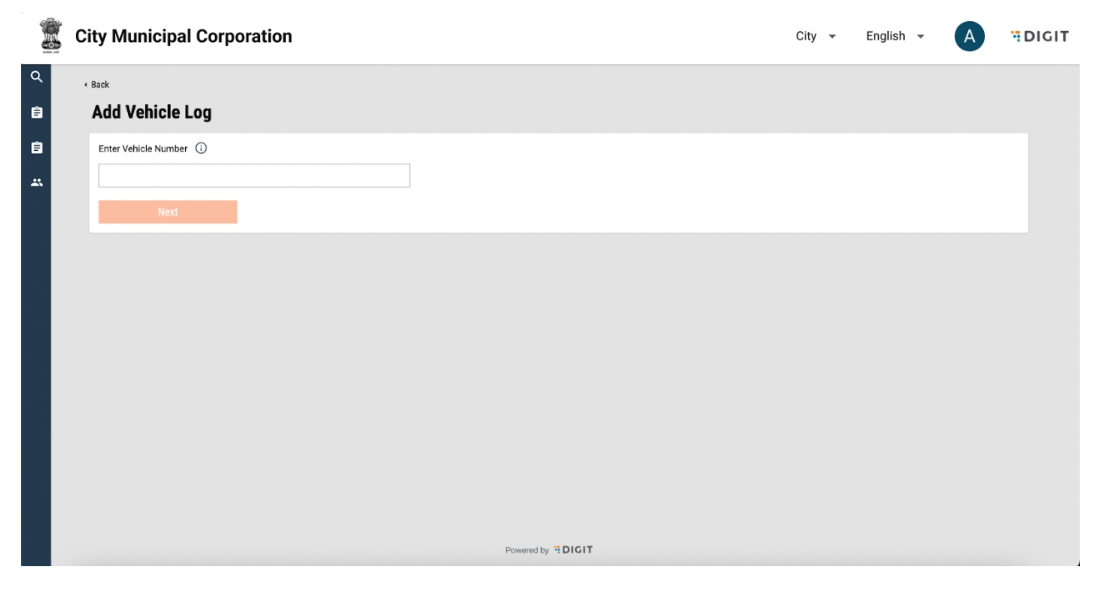
Incoming vehicles that have not come in via an application can be recorded by the user using the add ‘New’ button on the FSM home screen. On clicking on the New button, the user will be redirected to the following screen:
The following actions can be performed:
Enter Vehicle Number
Click on Next
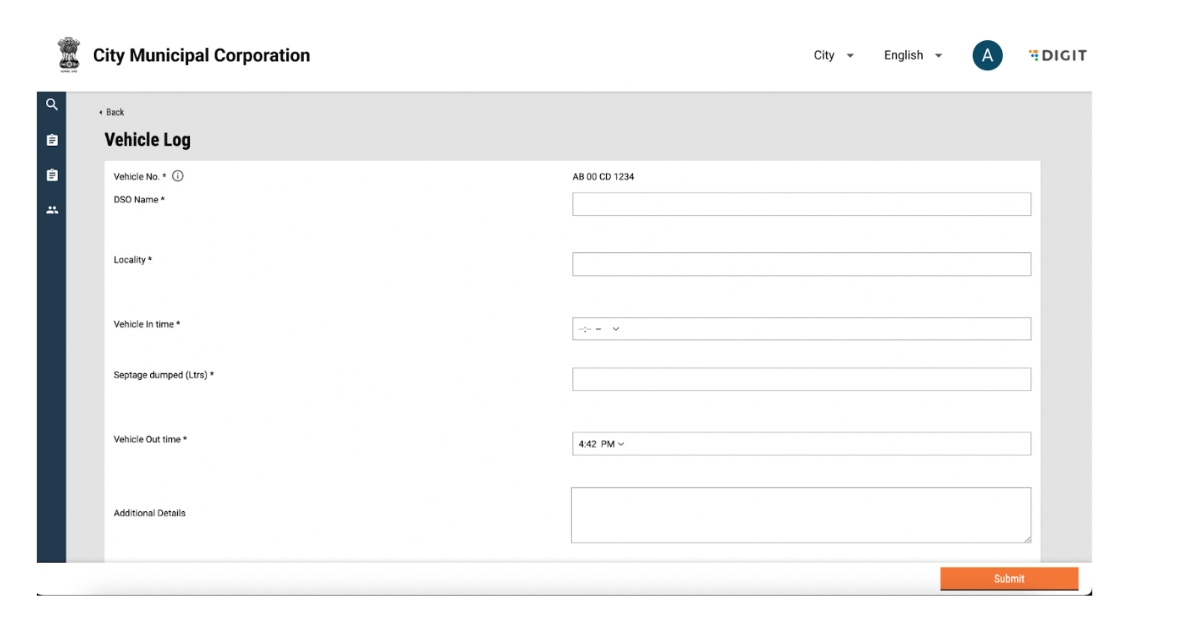
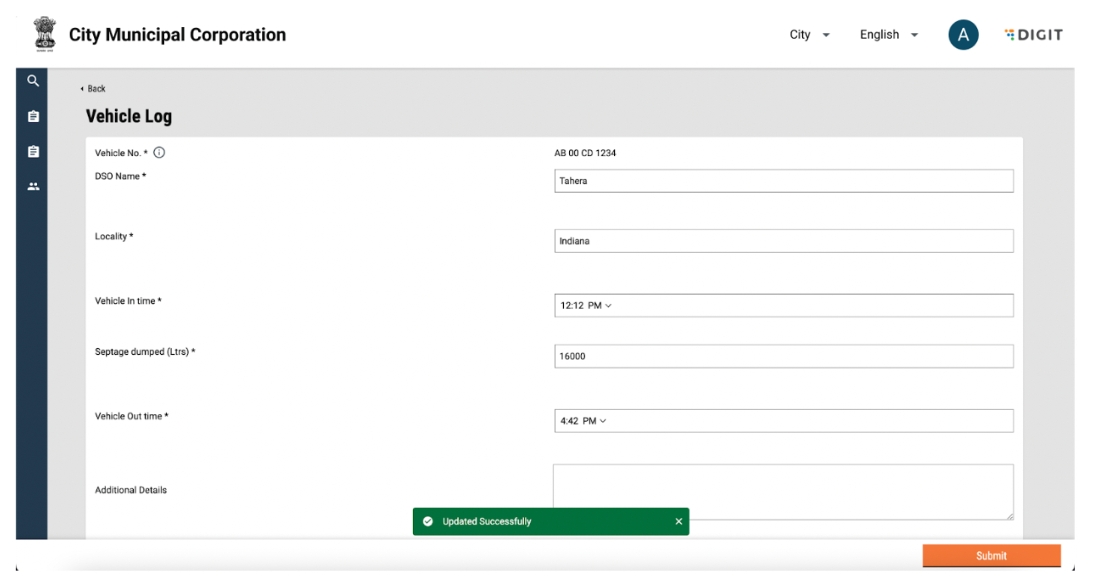
Once vehicle number is entered, the ‘Next’ button will be highlighted and the user will be redirected to the Vehicle Log screen.
The following actions can be performed:
Update DSO Name and Locality
Update Vehicle In time and Out time.
Update volume of waste.
Update Additional Details and Attachments.
Submit the form by clicking on Submit.
A snack bar will confirm submission and the user will be redirected to the FSM homepage.
The Desludging Operators or DSOs are responsible for initiating and completing action on citizen requests for desludging services. The requests are routed to the respective DSOs by the urban local body (ULB) officials. The DSOs update the application status once the services are delivered and the payments are collected.
DSOs can do the following:
Assign vehicles for desludging services
Decline service requests
Complete service requests
DSOs operators are provided with credentials to log in to the system.
On this page, the following actions can be performed:
Enter username and password
Select city for login
Reset password by clicking on the “Forgot Password” link
On clicking continue, DSOs are redirected to the FSM homepage.
On this page, the following actions can be performed in the FSM card:
Click on Inbox to view assigned requests
Search for historical requests serviced
Change language
Edit profile details by clicking on the user icon on top right hand corner
Logout by clicking on the user icon on the top right hand corner
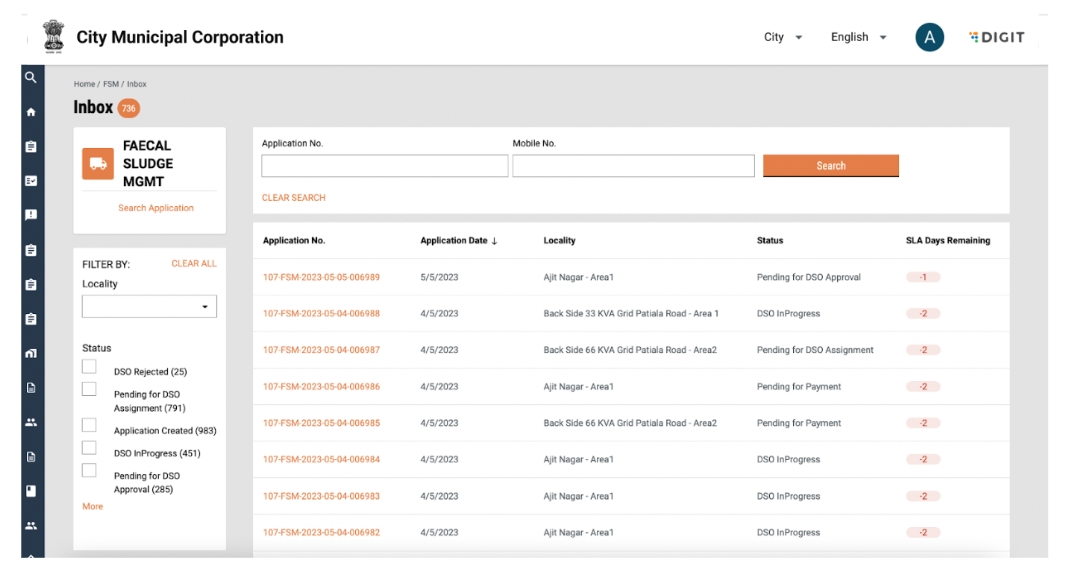
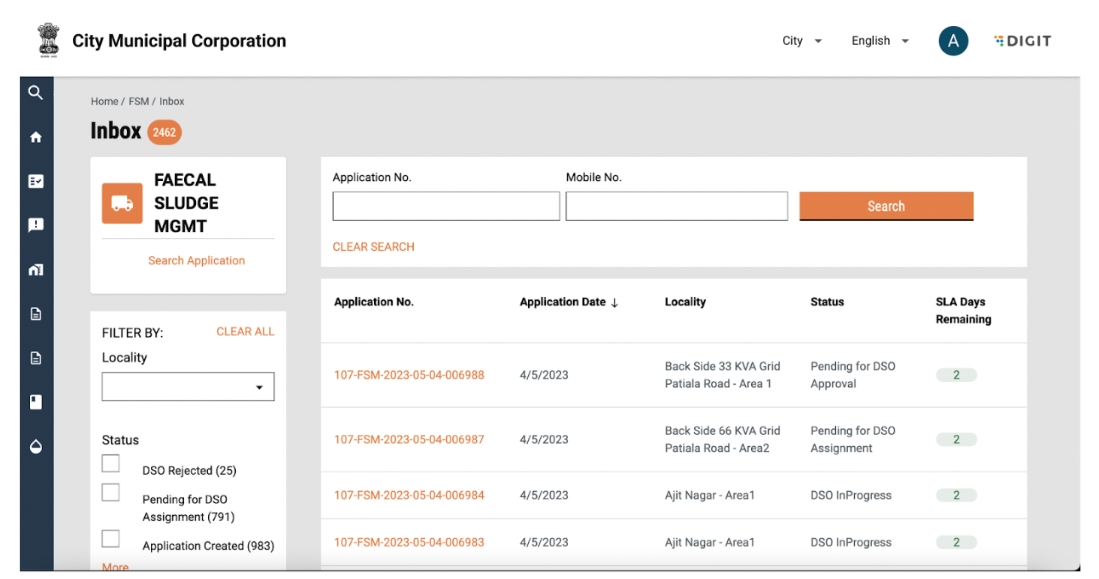
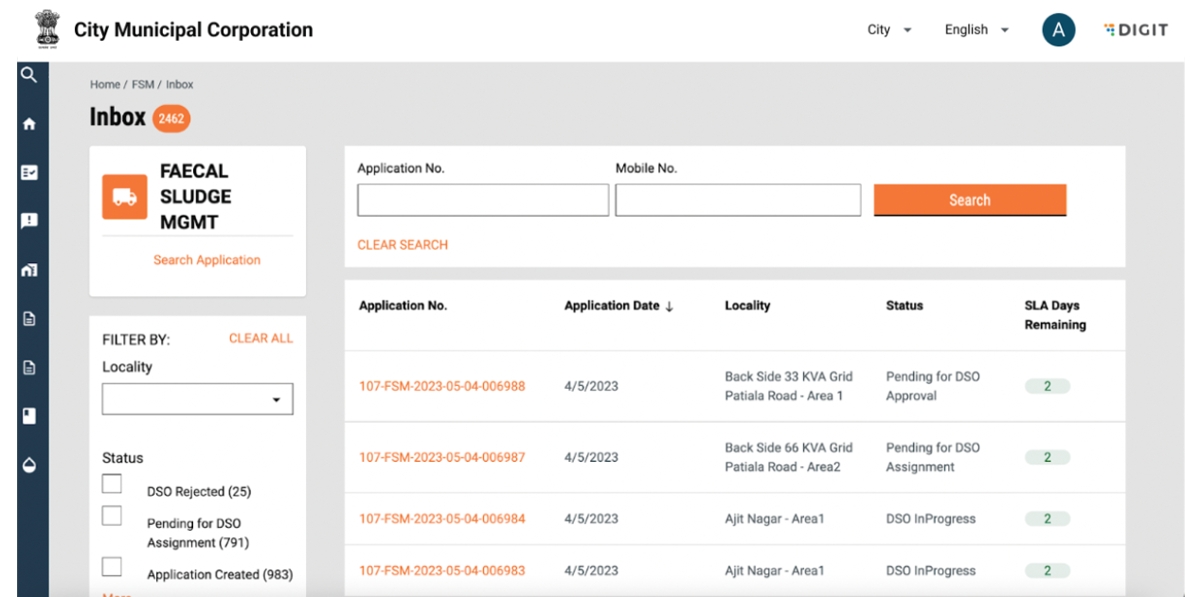
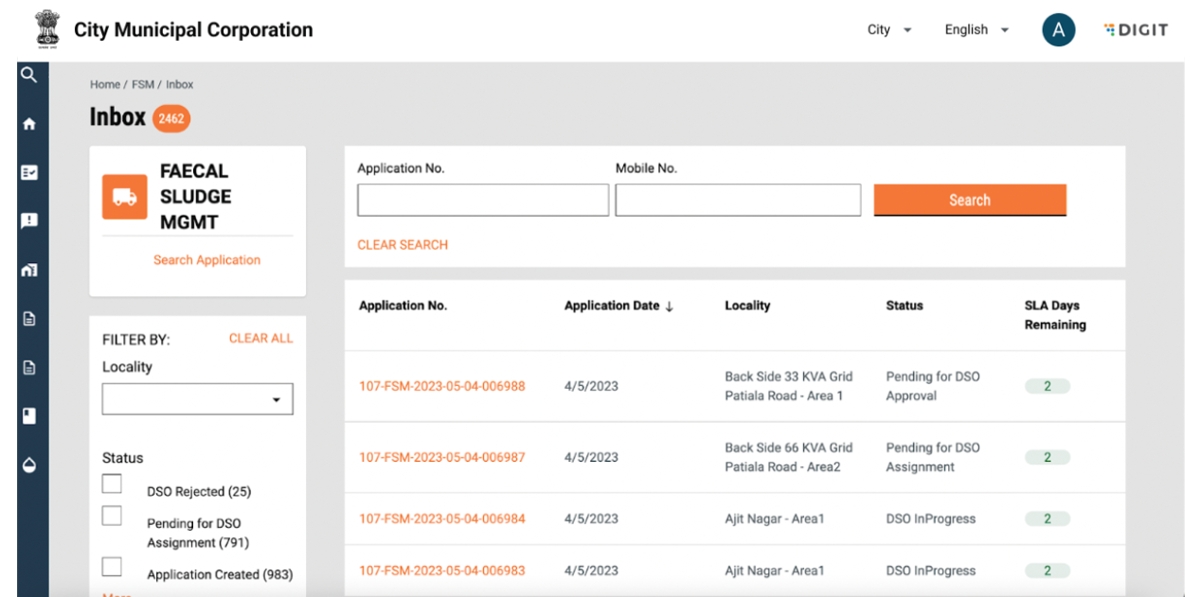
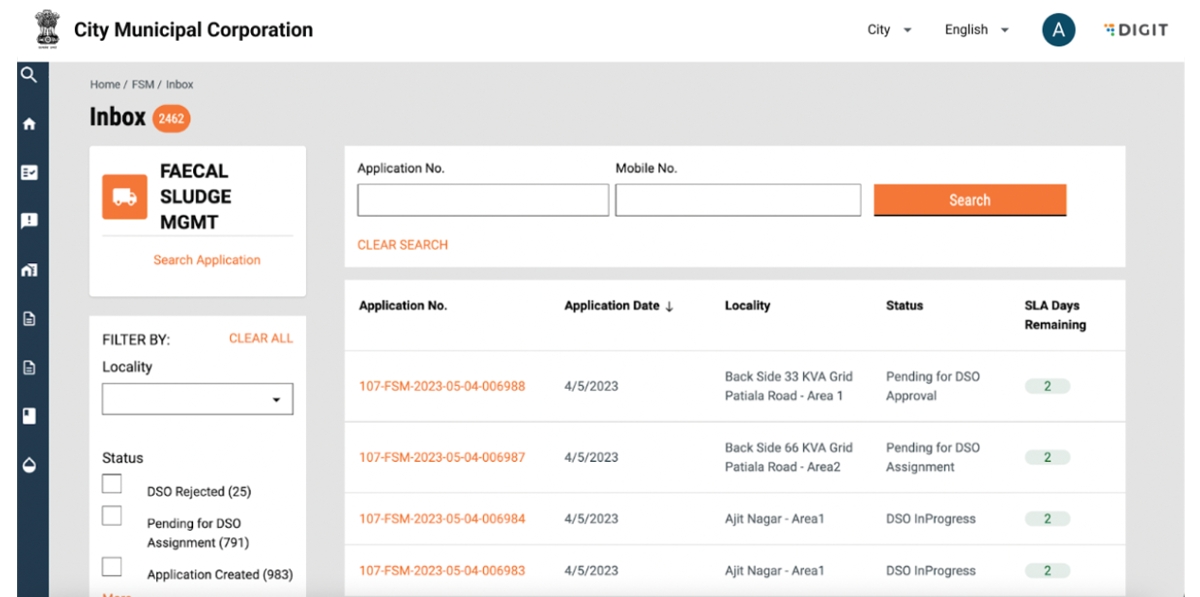
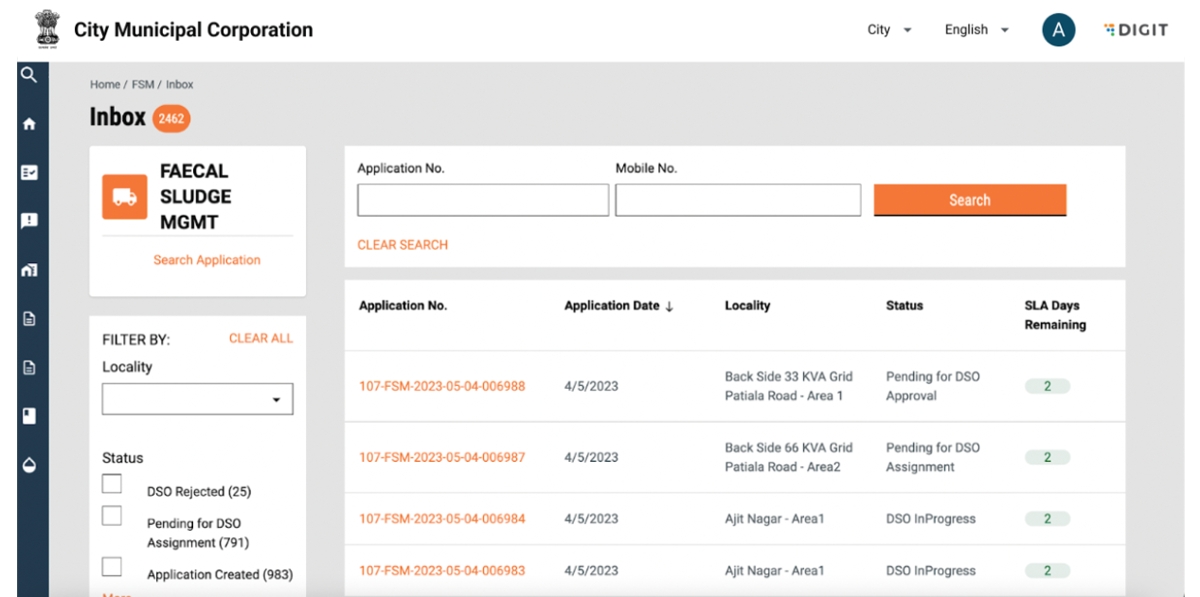
Requests assigned to the DSO can be viewed by clicking on the Inbox link in the FSM homepage.
Requests pending for acceptance will be viewable in the status: Pending for DSO Approval.
The following actions can be performed:
Search for an active application using “Application No.” and “Mobile No.”
Clear search by clicking on “Clear Search’”
View and update applications by clicking on an application number
Filter applications by locacilty using the ‘Locality’ dropdown
Filter applications by ‘Status’
Search for past applications by using “Search Application”
Sort applications by Application date.
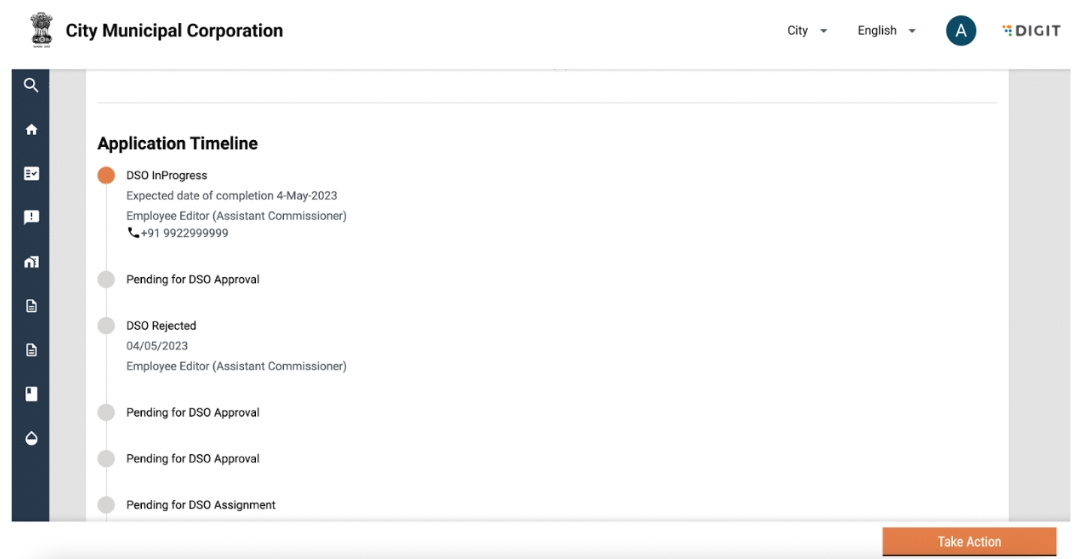
On clicking on an application number, application details are displayed.
The following actions can be performed:
View application details
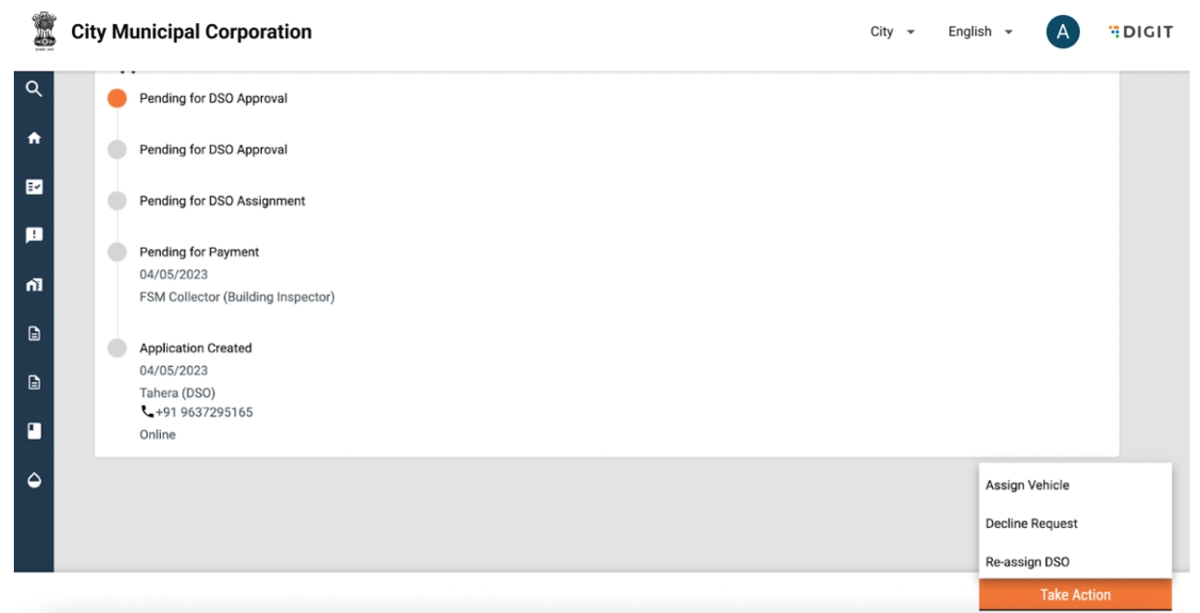
Click on the “Take Action” button
The take action button has the following options:
Assign Vehicle
Decline Request
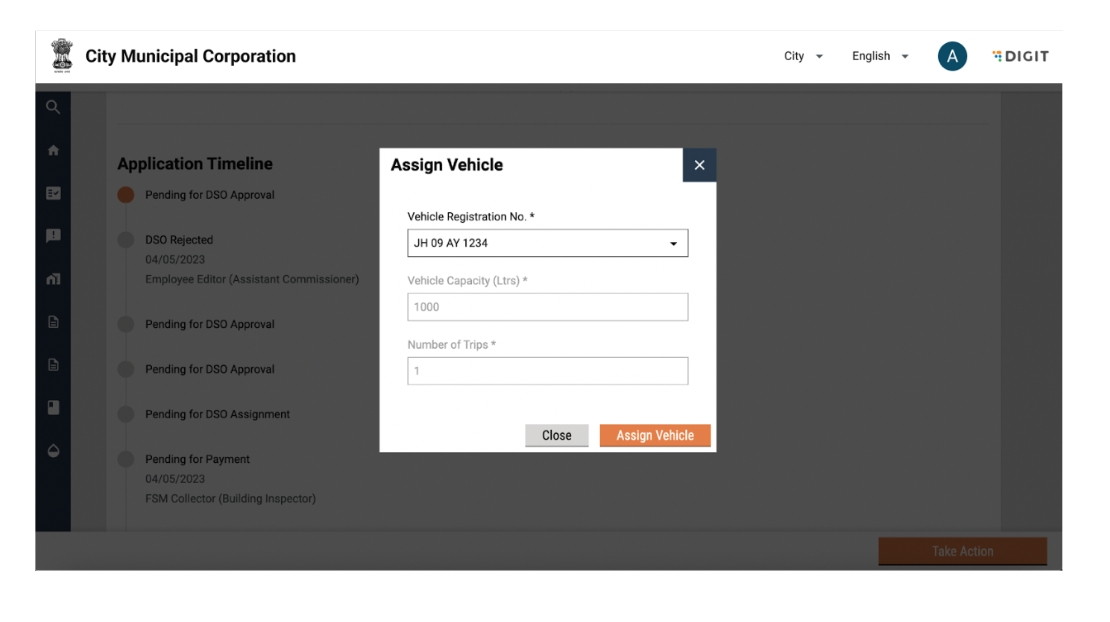
A request can be approved by assigning a vehicle. Clicking on “Assign Vehicle’’ will display the following pop-up:
The following actions can be performed:
Update Vehicle Registration No.
Close pop-up by clicking on the Close button on the pop-up.
Close pop-up by clicking on the cross icon on the top right of the pop-up
Confirm decline request by clicking on the “Assign Vehicle” button
A snack bar will confirm assignment of vehicle and the application timeline will be updated to DSO in Progress.
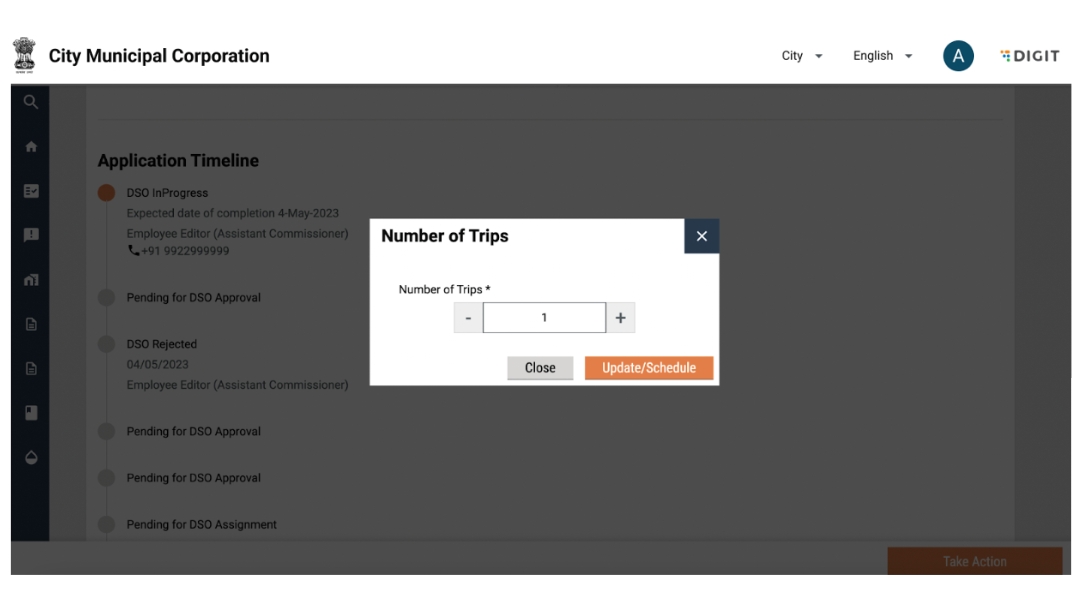
Once DSO is in progress, the number of trips can be updated.
The following actions can be performed:
Search for an active application using “Application No.” and “Mobile No.”
Clear search by clicking on “Clear Search”
View and update applications by clicking on an application number
Filter applications by ‘Locacilty’ using the locality dropdown
Filter applications by ‘Status’
Search for past applications by using “Search Application”
On clicking on an application number, application details are displayed.
The following actions can be performed:
View application details
Click on the ‘Take Action’ button
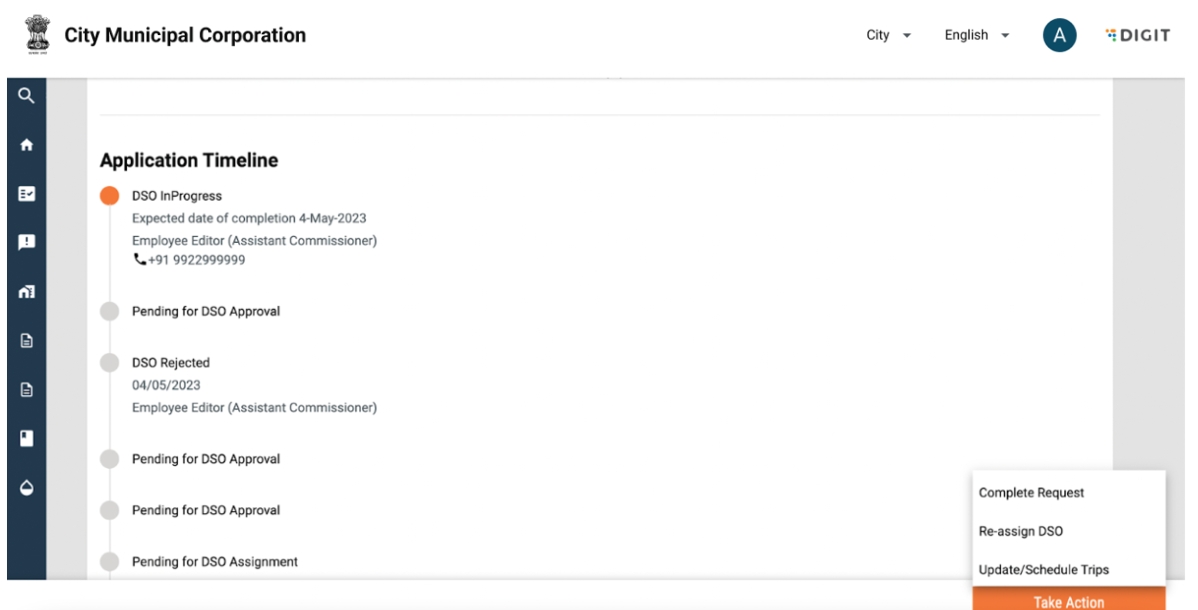
The take action button has the following options:
Complete Request
Update/Schedule Trips
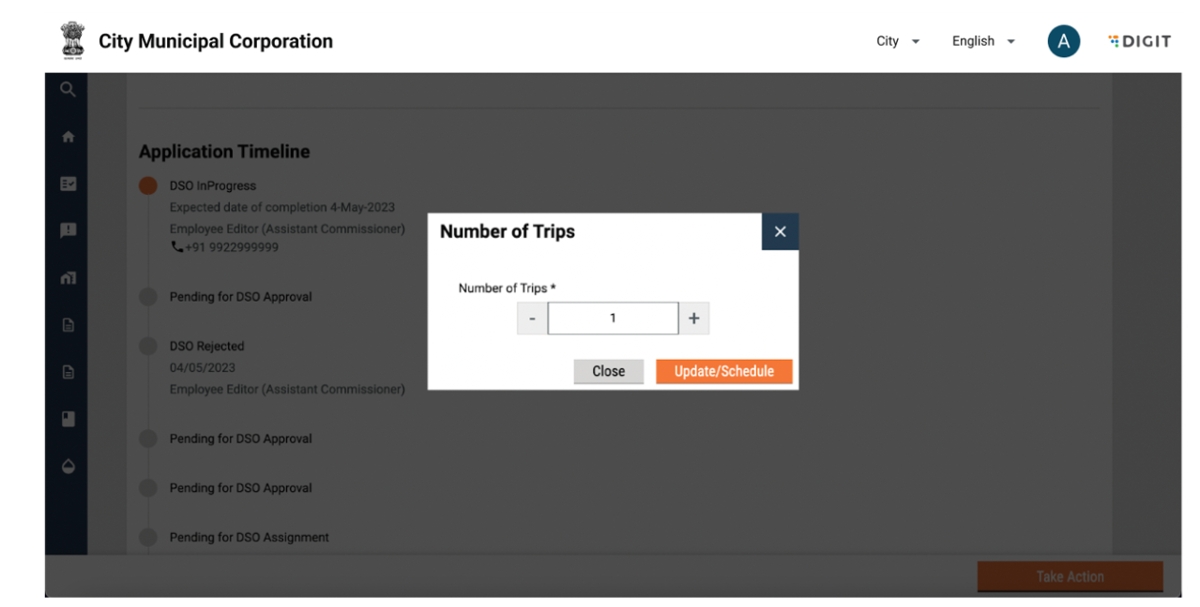
On clicking on Update/Schedule trips, the following pop up is displayed:
The following actions can be performed:
Increase the number of trips by clicking on the + button
Decrease the number of trips by clicking on the - button
Close pop-up by clicking on the Close button on the pop-up.
Close pop-up by clicking on the cross icon on the top right of the pop-up
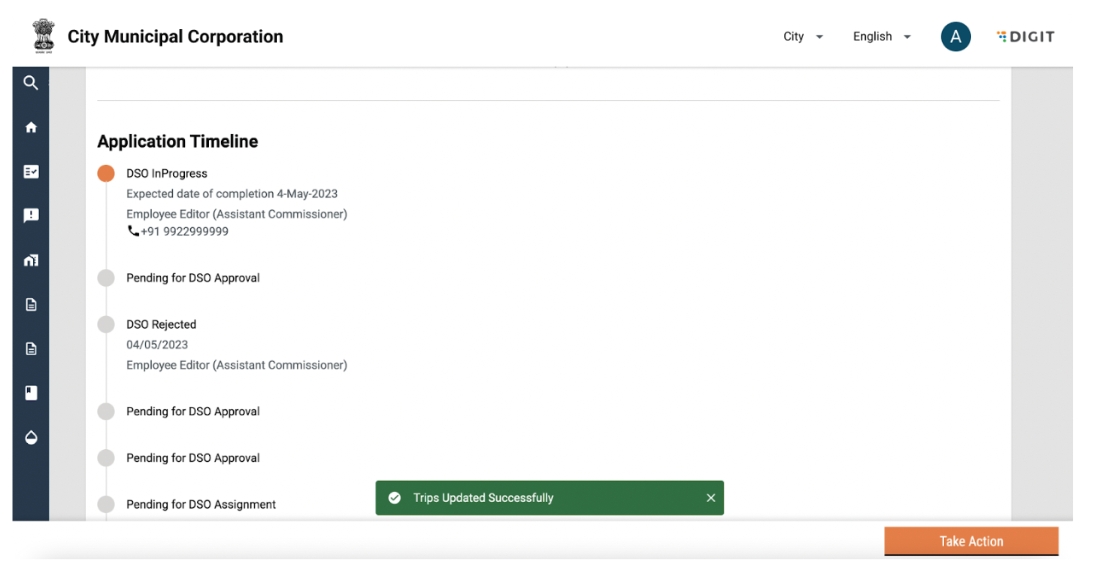
Confirm update/schedule trips by clicking on the “Update/schedule” button
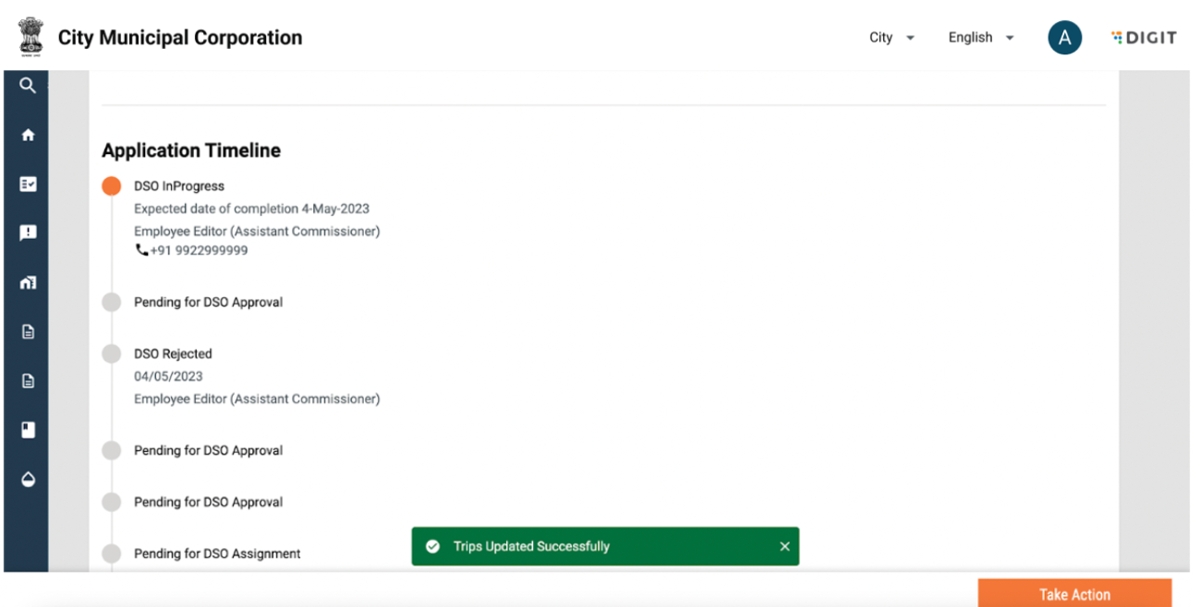
A snack bar will confirm that the number of trips have been updated
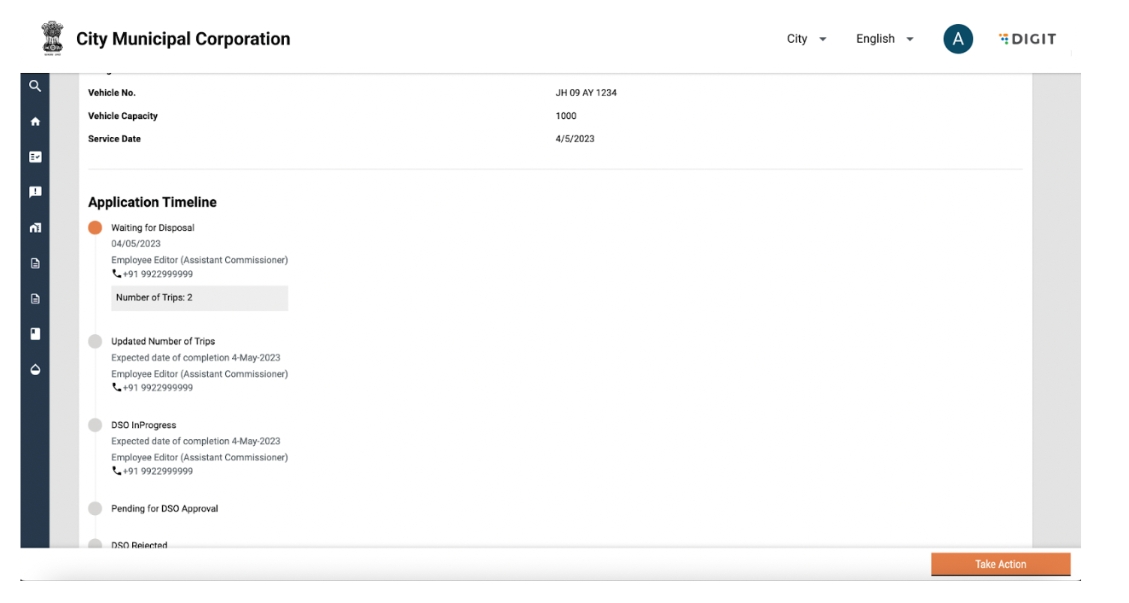
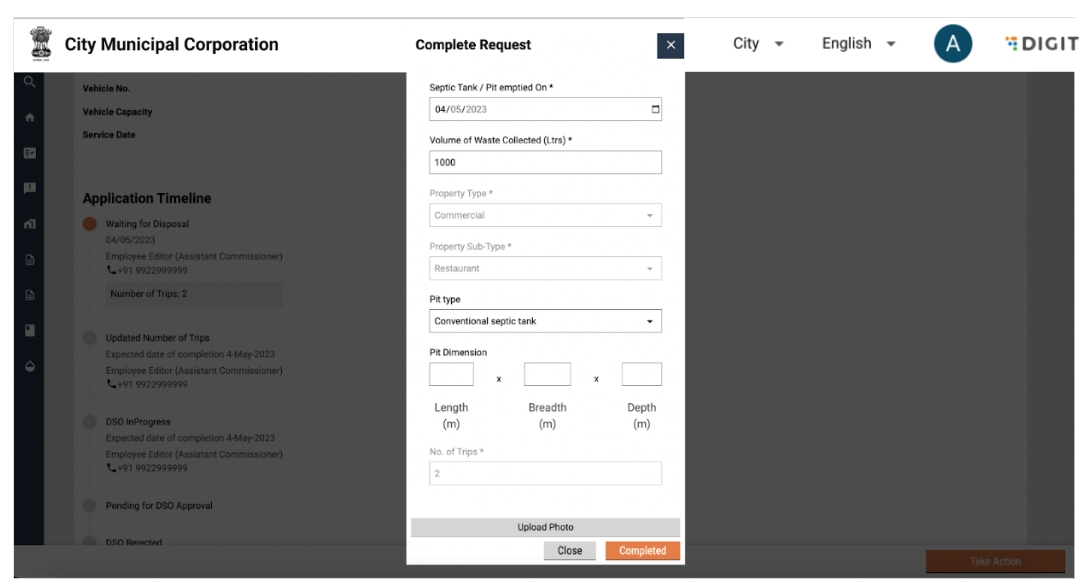
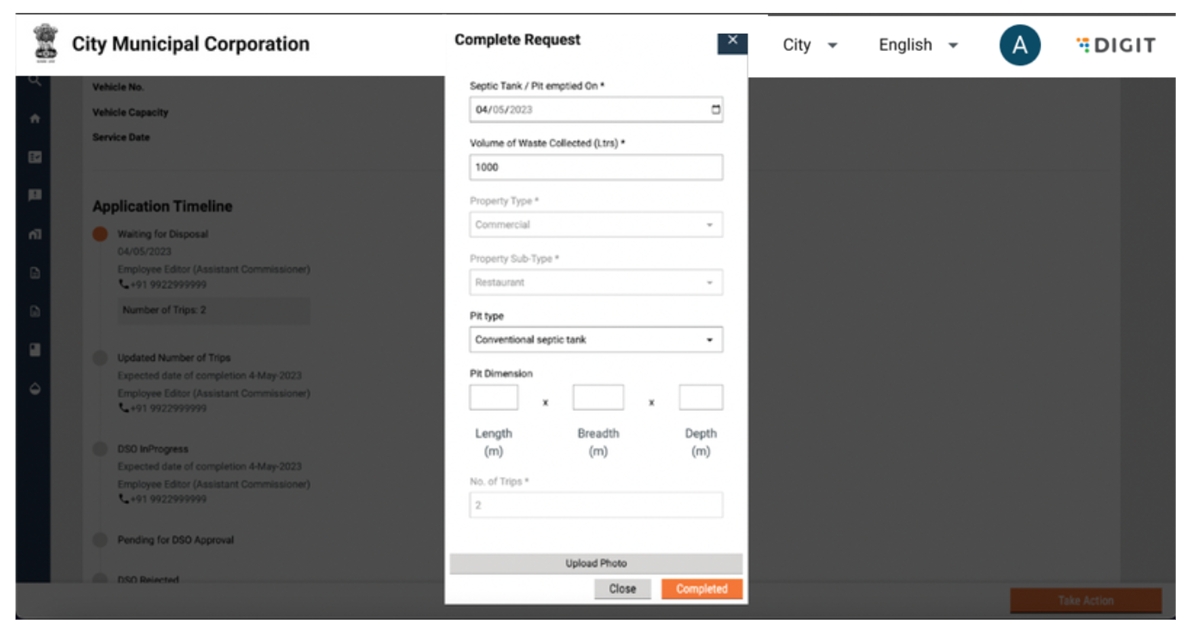
Once the service request has been completed and all pending payments have been collected, the same has to be confirmed in the system. This can be done by selecting the “Complete Request” button in the “Take Action” button. On clicking on Complete Request, the following pop up is displayed:
The following actions can be performed:
Confirm/Update service date
Confirm/Update Volume of waste collected
Confirm/Update pit details
Upload pit photo
Close pop-up by clicking on the Close button on the pop-up.
Close pop-up by clicking on the cross icon on the top right of the pop-up
Confirm details by clicking on the ‘Completed’’ button
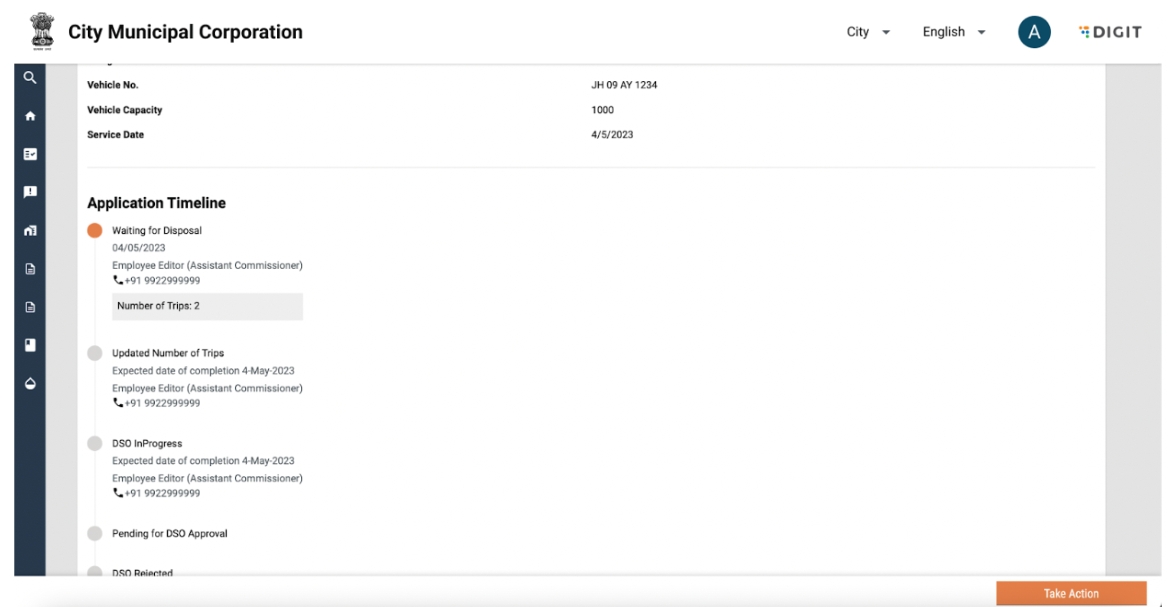
A snack bar will confirm that request has been completed and the status will be updated to “Waiting for Disposal”.
DSOs can choose to decline unserviceable service requests. Applications can be rejected by a DSO in the “Pending for DSO Approval” stage.
The following actions can be performed:
Search for an active application using “Application No.” and “Mobile No.”
Clear search by clicking on “Clear Search”
View and update applications by clicking on an application number
Filter applications by ‘Locacilty’ using the locality dropdown
Filter applications by ‘Status’
Search for past applications by using “Search Application”
On clicking on an application number, application details are displayed.
The following actions can be performed:
View application details
Click on the “Take Action” button
The take action button has the following options:
Assign Vehicle
Decline Request
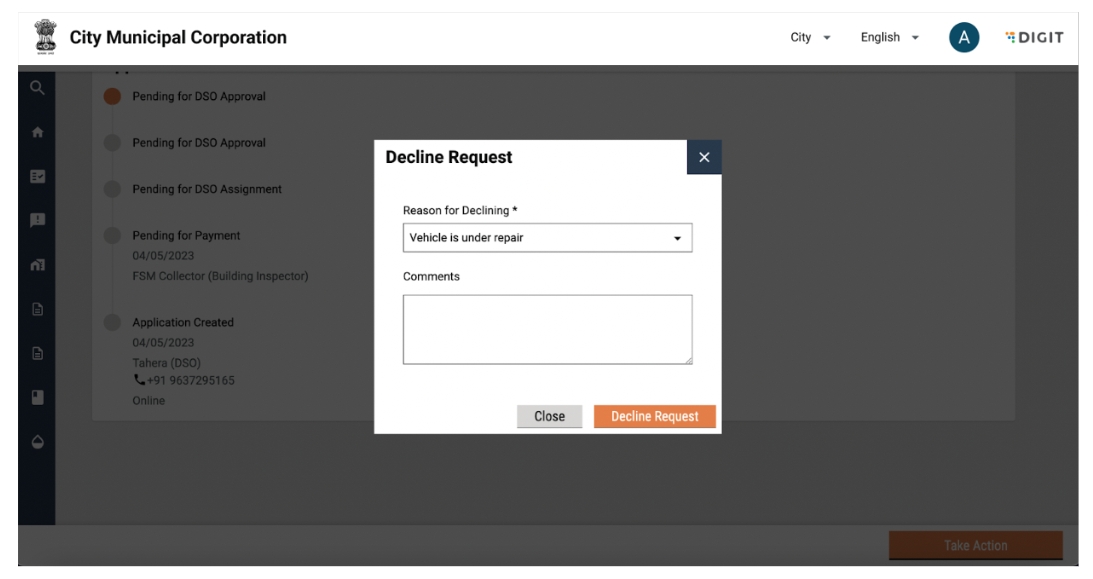
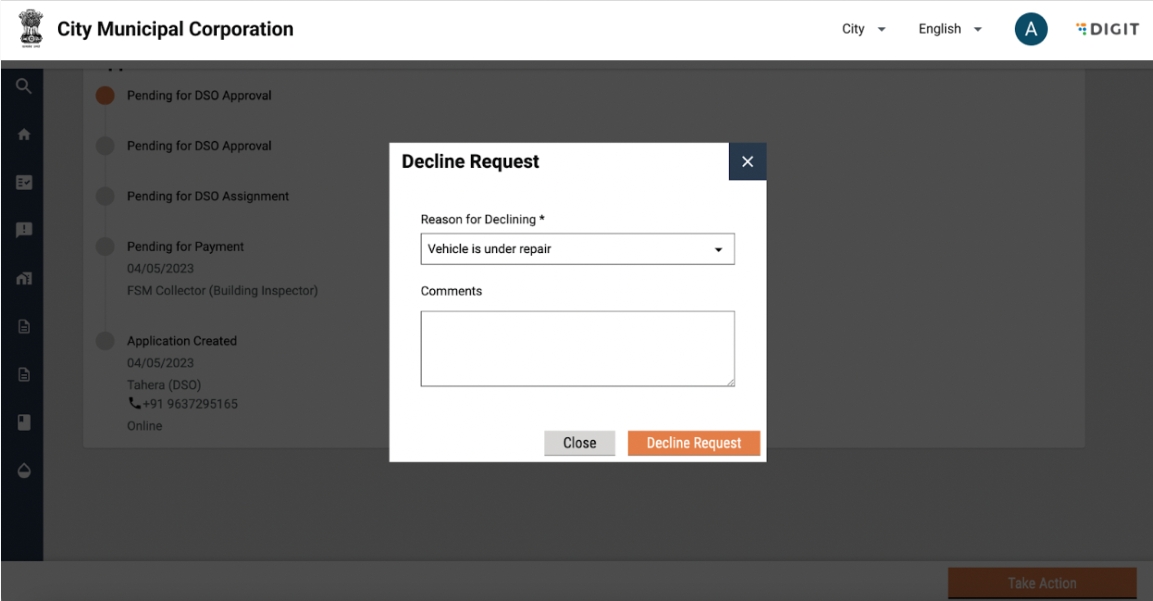
Clicking on “Decline Request’’ will display the following pop-up:
The following actions can be performed:
Reason for declining
Enter comments
Close pop-up by clicking on the Close button on the pop up.
Close pop-up by clicking on the cross icon on the top right of the pop-up
Confirm decline Request by clicking on the “Decline Request” button
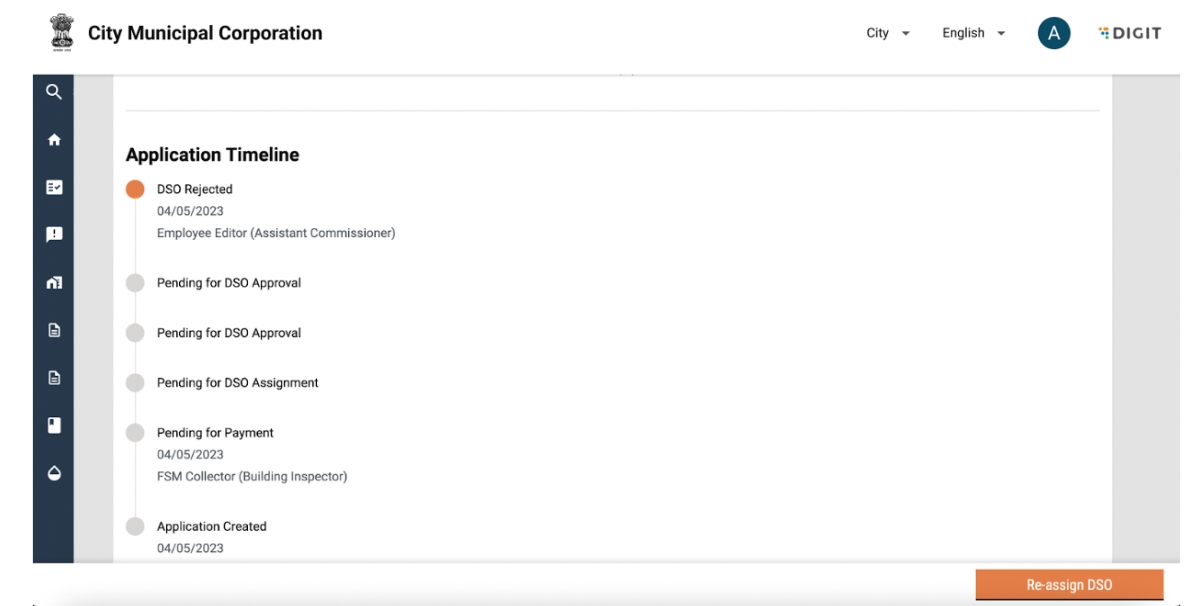
A snack bar will confirm decline and the application timeline will be updated to DSO Rejected.
The FSM Registry allows for the following actions from the frontend for a particular urban local body (ULB):
Add a new sanitation worker, vehicle, vendor.
Edit sanitation worker, vehicle, vendor details.
Enable and disable sanitation workers, vehicles and vendors.
Tag a sanitation worker and vehicle to vendors.
Login as a ULB admin and navigate to the FSM registry by clicking on it.
The following actions can be performed:
View a list of all vendors in the system along with the details of tagged vehicles and sanitation workers.
Search for a vendor using the search box.
Clear search by using the "Clear Search" button.
Enable/disable a vendor by using the toggle.
Sort vendors by creation date.
View total vehicles tagged to the vendor by clicking on the value to “Total Vehicles”.
View active vehicles tagged to the vendor by clicking on the value to “Total Vehicles”.
View total sanitation workers tagged to the vendor by clicking on the value to “Total sanitation workers”.
View active sanitation workers tagged to the vendor by clicking on the value to “Total sanitation workers”.
Add a new vendor, sanitation worker or vehicle by clicking on the ‘Add’ button.
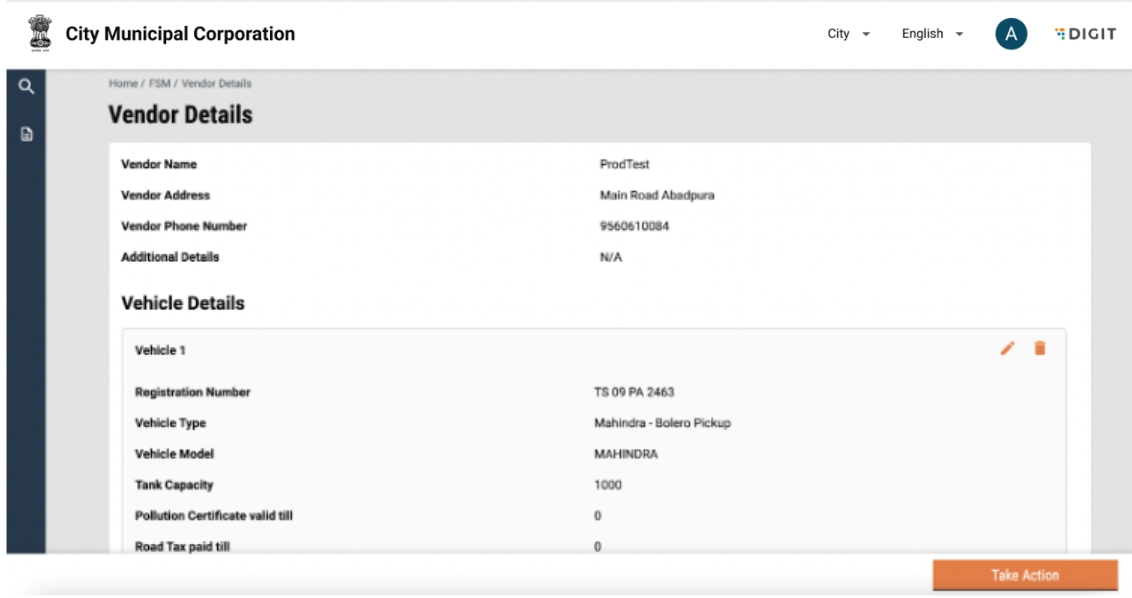
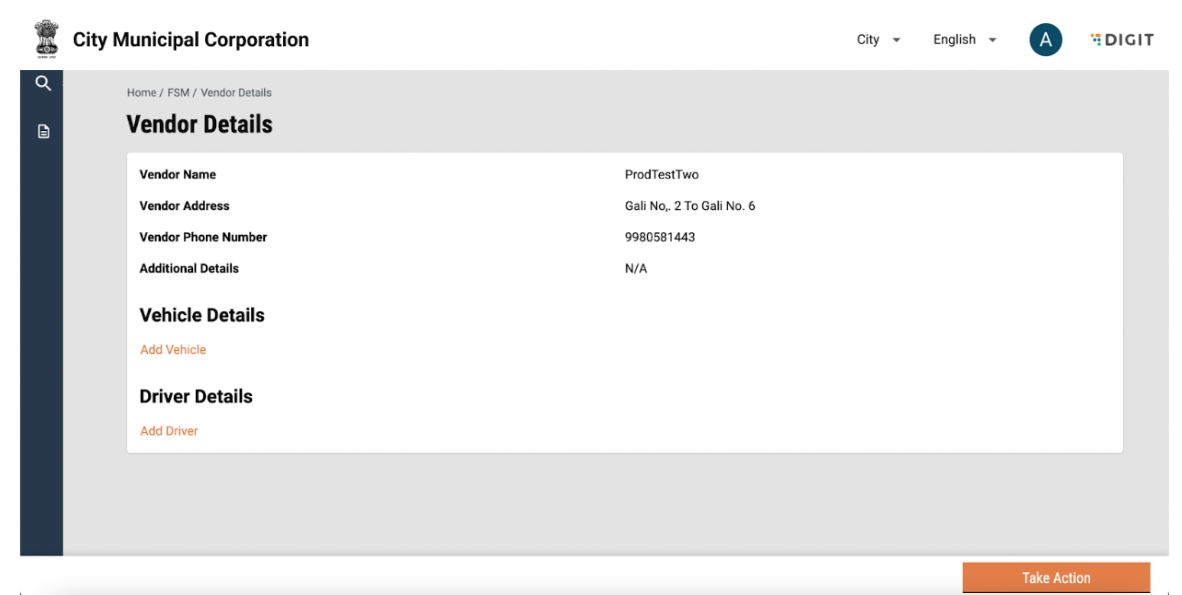
Vendor details can be viewed by clicking on the vendor name in the FSM Registry homepage.
The following actions can be performed:
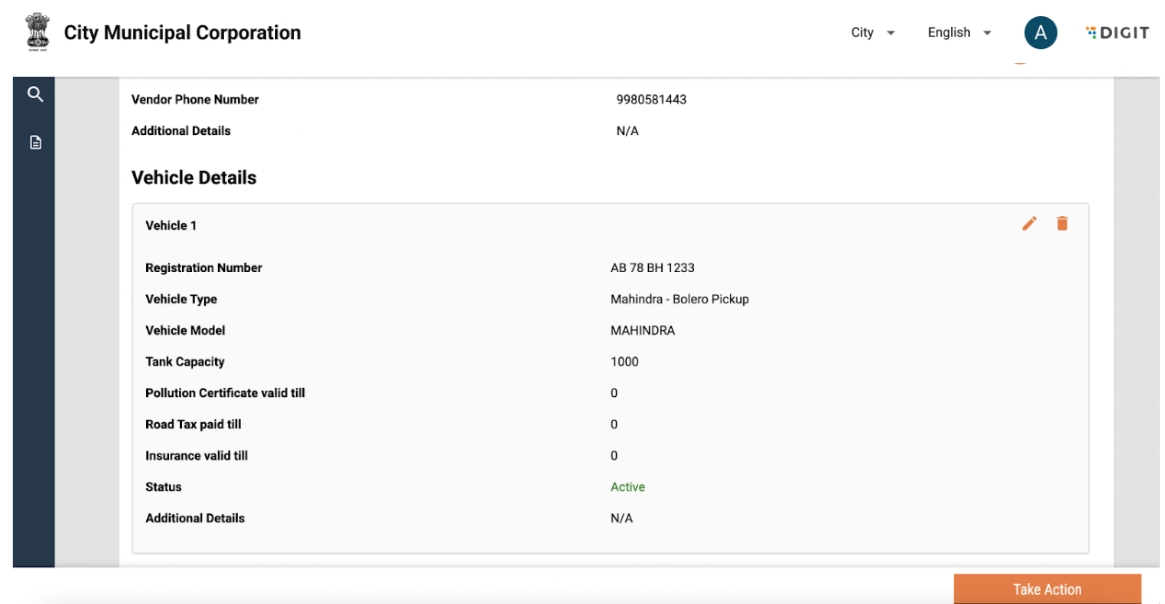
View vendor details along with tagged vehicles and sanitation workers.
Tag a new vehicle to the vendor by clicking on the “Add Vehicle” button.
Remove a tagged vehicle by clicking on ‘Delete’ on the top right of the vehicle card.
Edit vehicle details by clicking on the ‘Edit’ symbol on the top right of the vehicle card.
Tag a new sanitation worker to the Vendor by clicking on the “Add Sanitation Worker” button.
Remove a tagged sanitation worker by clicking on the ‘Delete’ symbol on the top right of vehicle card.
Edit sanitation worker details by clicking on the ‘Edit’ symbol on the top right of the vehicle card.
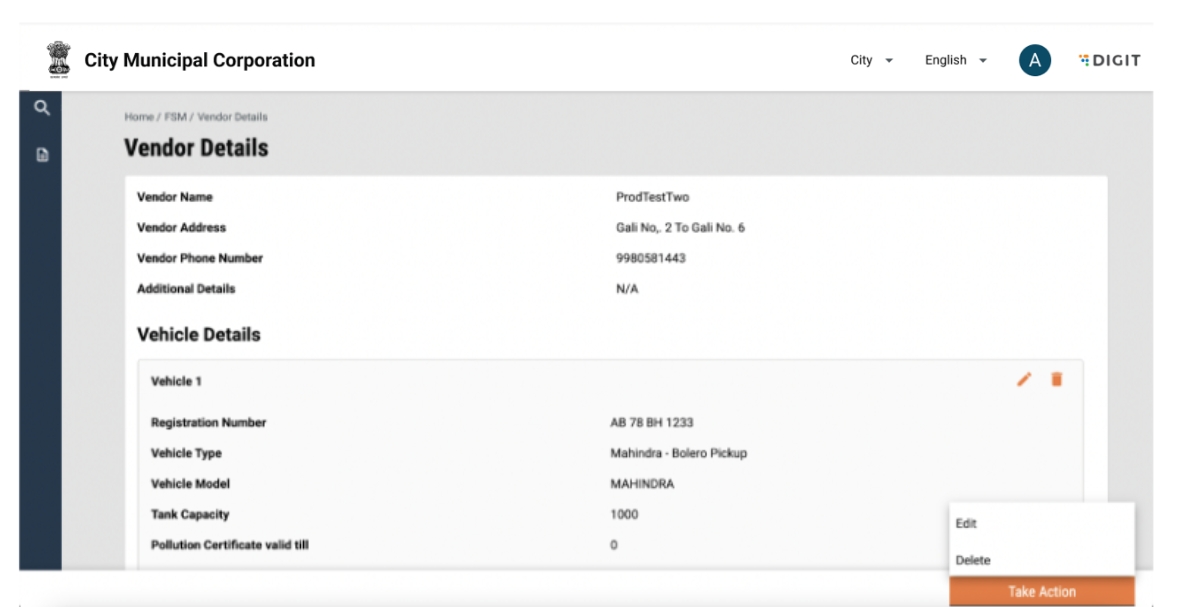
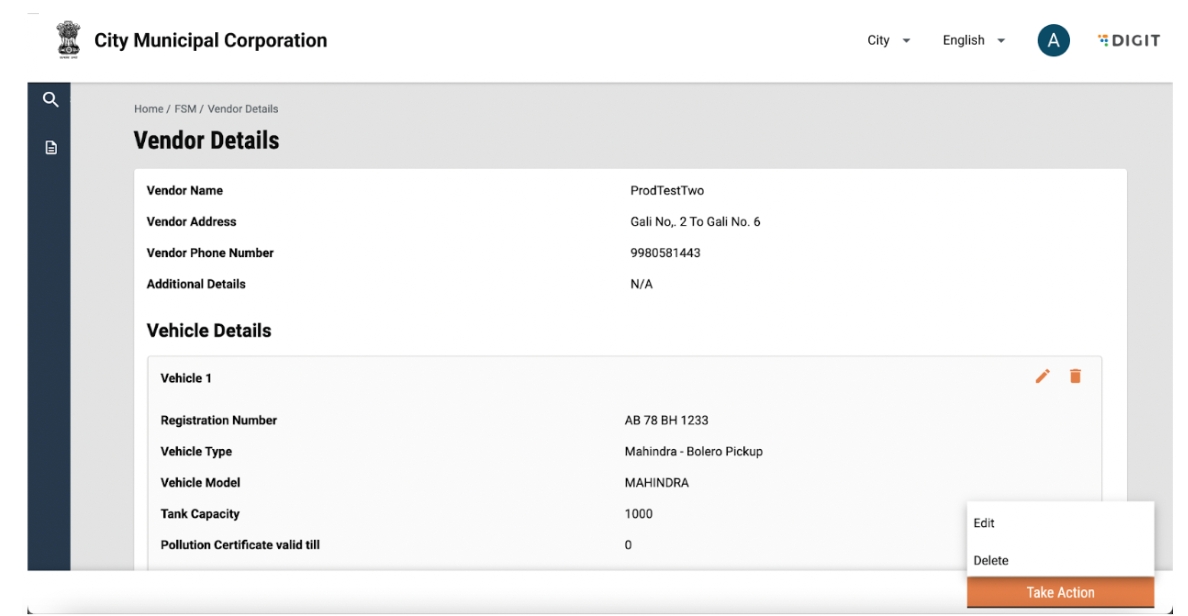
The details of a vendor can be edited or a vendor deleted by clicking on the “Take Action” button.
Clicking on the ‘Edit’ button as part of the “Take Action” button will redirect the user to the “Edit Vendor” details page.
The following actions can be performed:
Edit vendor details.
Submit application.
The user will be redirected to the list of vendors, and a snack bar will confirm edit.
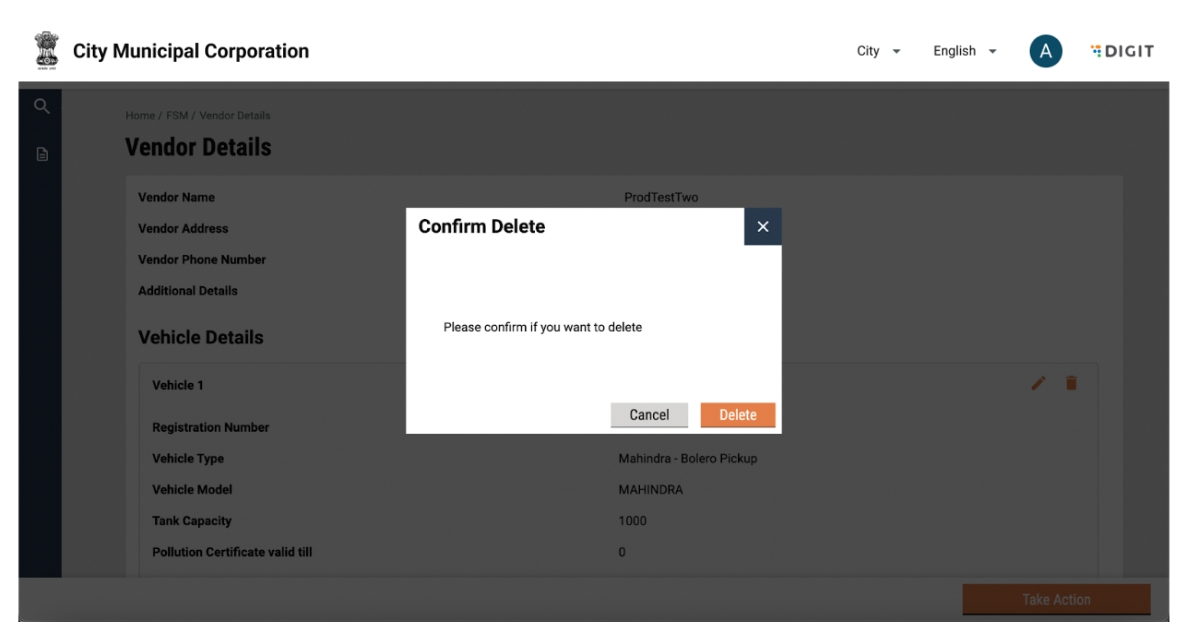
A vendor can be deleted by clicking on the “Take Action” button and selecting delete. A pop-up will appear on the screen.
The following actions can be performed:
Confirm delete.
Close pop-up by clicking on the 'Close' button on the pop-up.
Close pop-up by clicking on the cross icon on the top right of the pop-up
The user will be redirected to the list of vendors, and a snack bar will confirm delete.
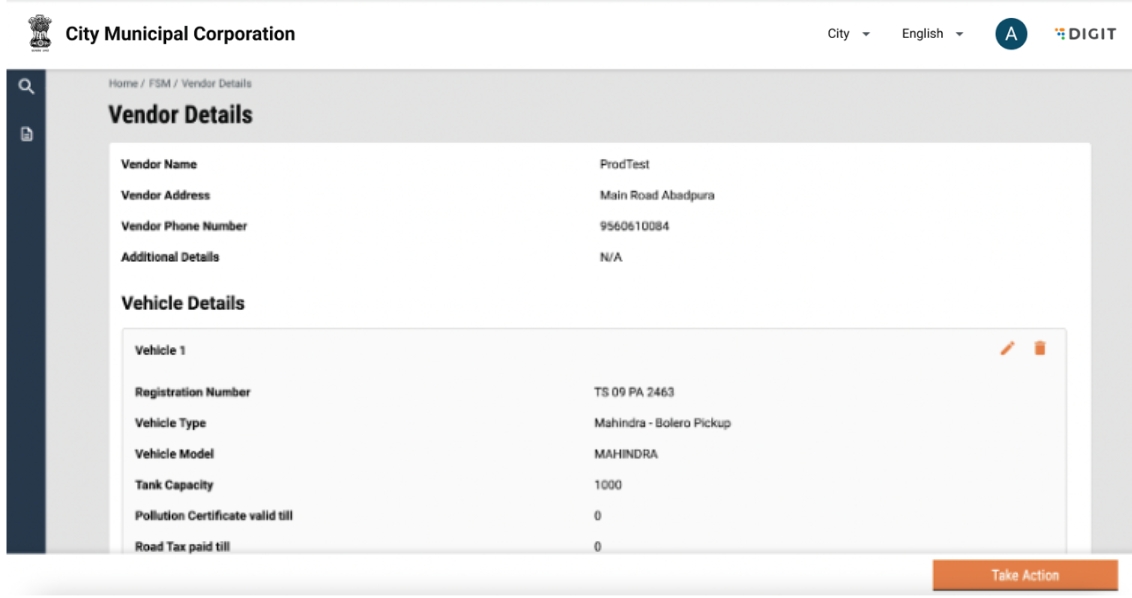
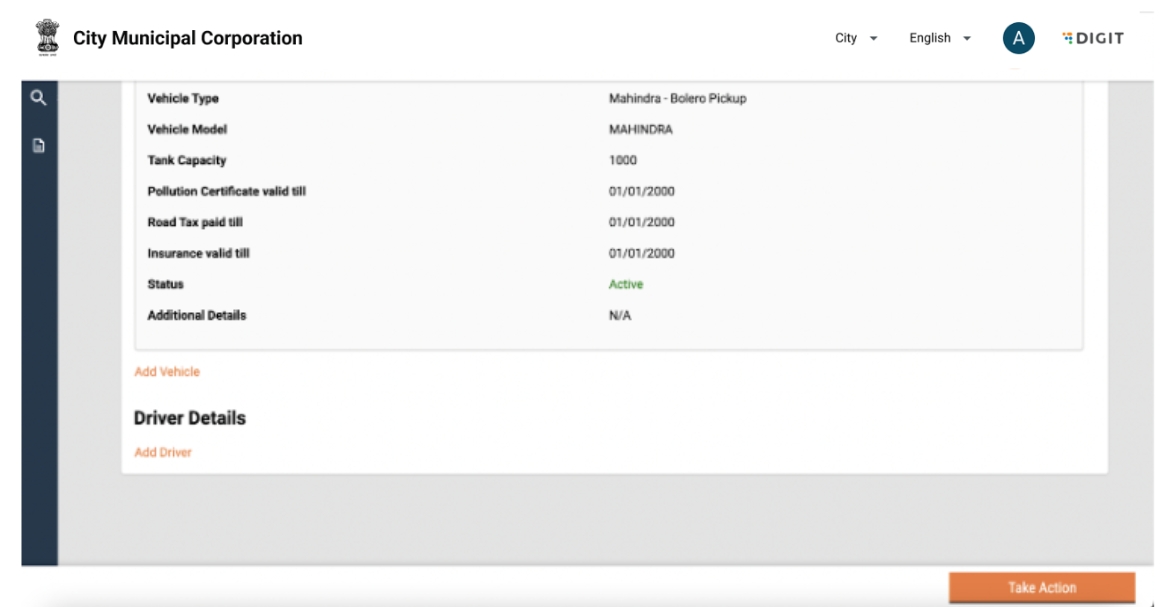
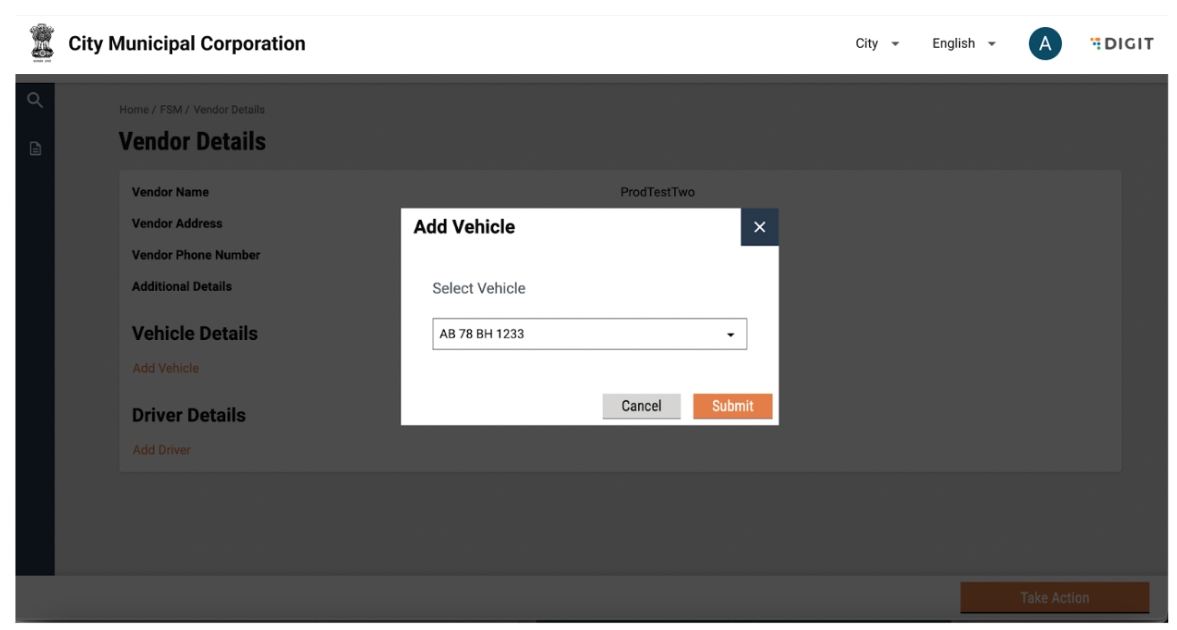
Multiple vehicles can be tagged to a vendor. It is necessary that a vehicle exists in the system before it can be tagged. A vehicle can be tagged to a vendor by clicking on the “Add Vehicle” button in the vendor details page.
The following actions can be performed:
View vendor details along with tagged vehicles and sanitation workers.
Tag a new vehicle to the vendor by clicking on the “Add Vehicle” button.
Remove a tagged vehicle by clicking on the ‘Delete’ symbol on the top right of vehicle card.
Edit vehicle details by clicking on the ‘Edit’ symbol on the top right of the vehicle card.
Tag a new sanitation worker to the vendor by clicking on the “Add sanitation worker” button.
Remove a tagged sanitation worker by clicking on the ‘Delete’ symbol on the top right of vehicle card.
Edit sanitation worker details by clicking on the ‘Edit’ symbol on the top right of the vehicle card.
The details of a vendor can be edited or a vendor deleted by clicking on the “Take Action” button.
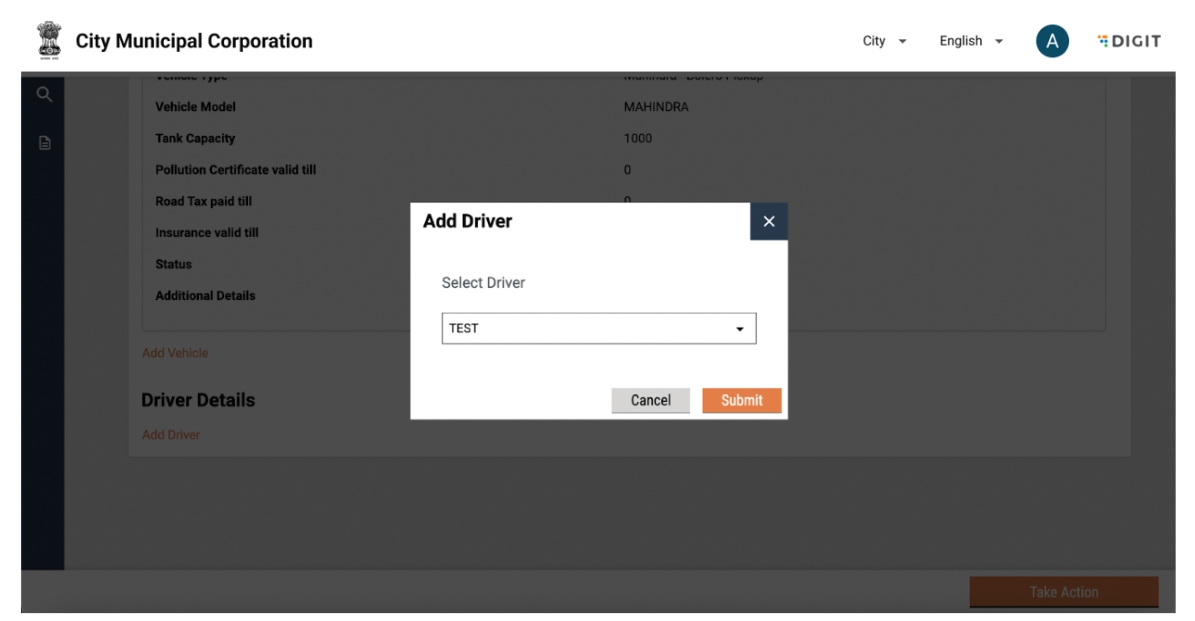
Clicking on “Add Vehicle” will display a pop-up.
Only vehicles that are not tagged to any vendor will be displayed.
The following actions can be performed:
Select vehicle from the dropdown.
Click on 'Submit' to confirm.
Close pop-up by clicking on the Close button on the pop-up.
Close pop-up by clicking on the cross icon on the top right of the pop-up.
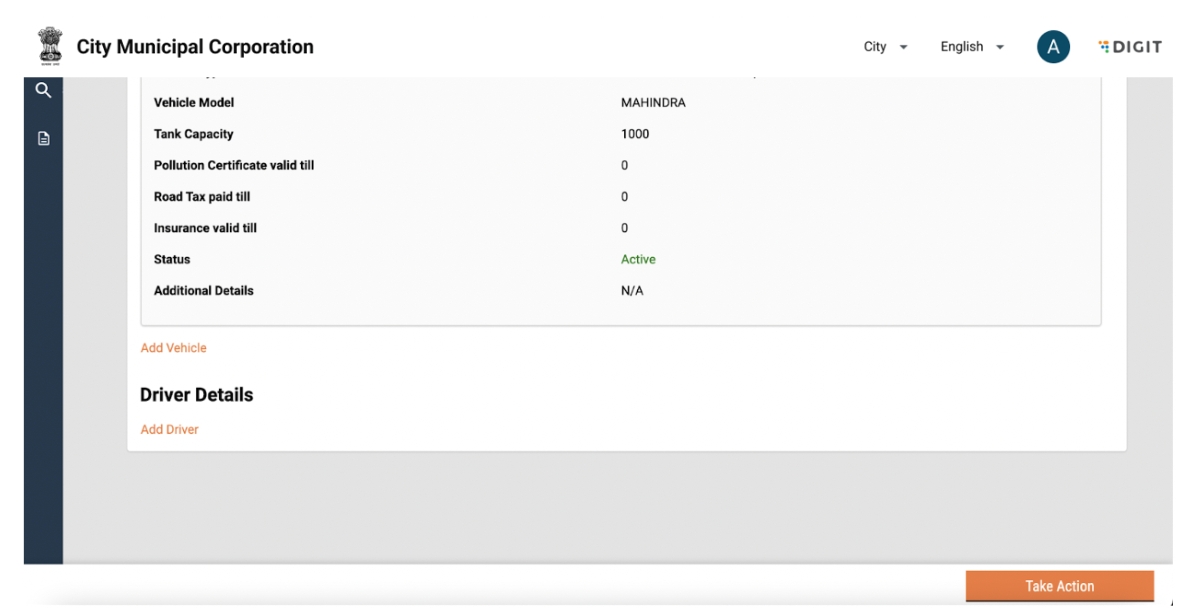
The user will be able to see the tagged vehicle in the vehicle details section. The vehicle can be untagged from the vendor by clicking on the delete button against the vehicle details.
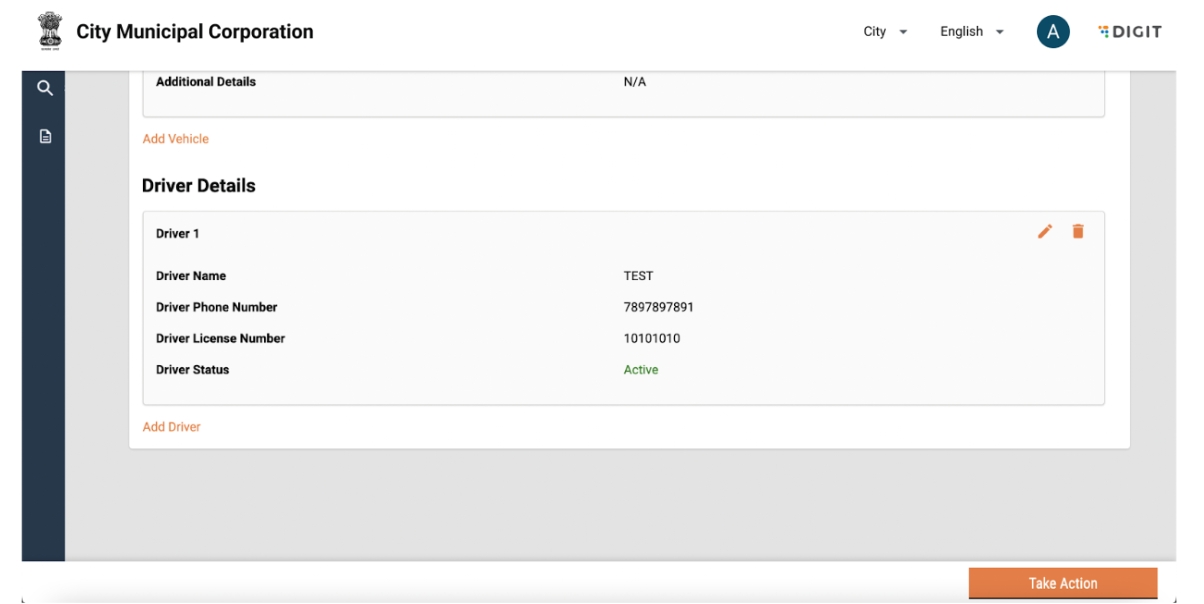
Multiple sanitation workers can be tagged to a vendor. It is necessary that a sanitation worker exists in the system before he/she can be tagged. A sanitation worker can be tagged to a vendor by clicking on the “Add sanitation worker” button in the vendor details page.
A pop-up will be displayed with a dropdown to select a sanitation worker. Only sanitation workers that are not tagged to any vendor will be displayed.
The following actions can be performed:
Select sanitation worker from the dropdown.
Click on 'Submit' to confirm.
Close pop-up by clicking on the 'Close' button on the pop-up.
Close pop-up by clicking on the cross icon on the top right of the pop-up
The added sanitation worker details will be displayed. The sanitation worker can be untagged from the vendor by clicking on the delete button against the sanitation worker details.
A new vendor can be added by clicking on the ‘Add’ button on the FSM Registry landing page.
The following actions can be performed:
Add a new vendor by clicking on vendor.
Add a new vehicle by clicking on vehicle.
Add a new sanitation worker by clicking on sanitation worker.
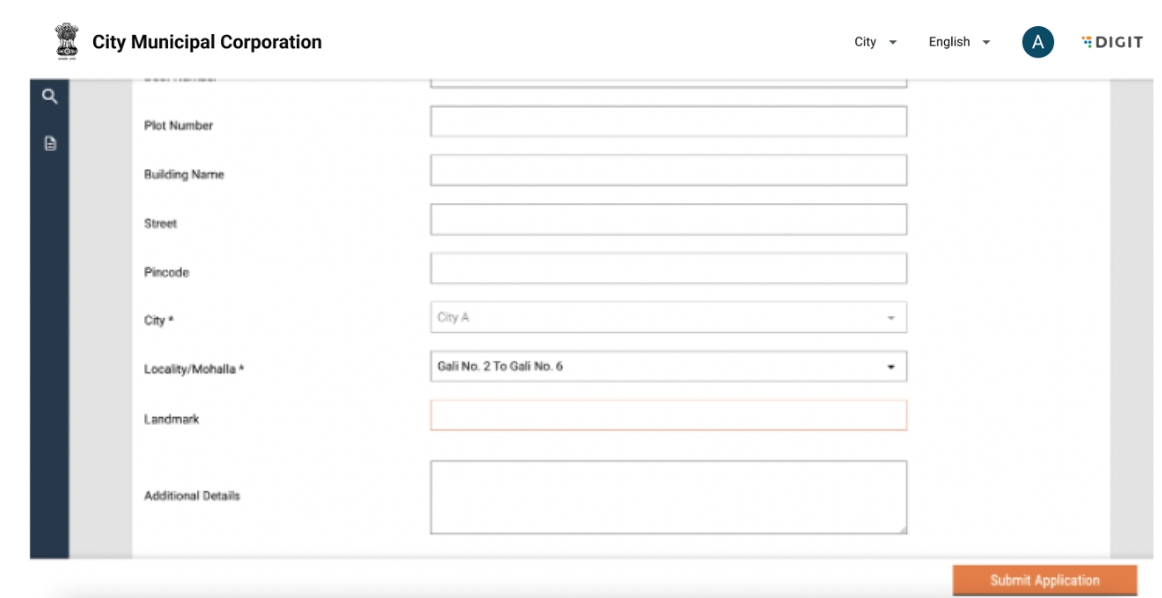
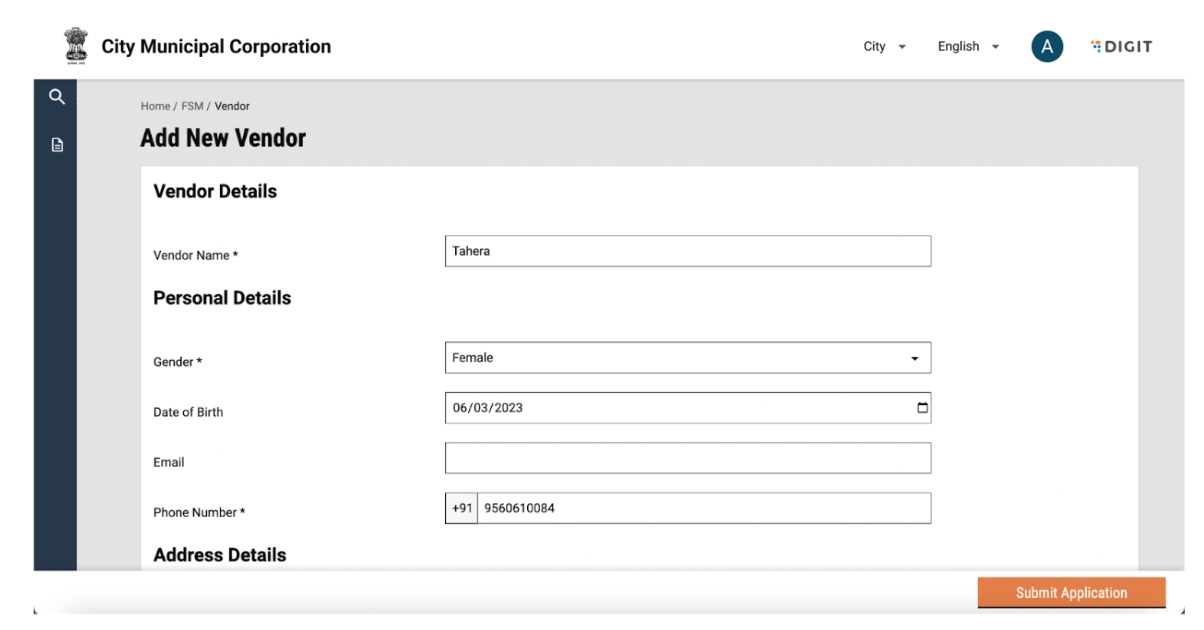
On clicking on vendor, the user will be redirected to the add vendor page.
The following actions can be performed:
Enter vendor name.
Select vendor owner details such as Gender, Date of Birth, Email and Phone number. Each vendor is created with a unique mobile number and hence, an error message will be displayed if the mobile number has been used to create other vendors.
Enter address details.
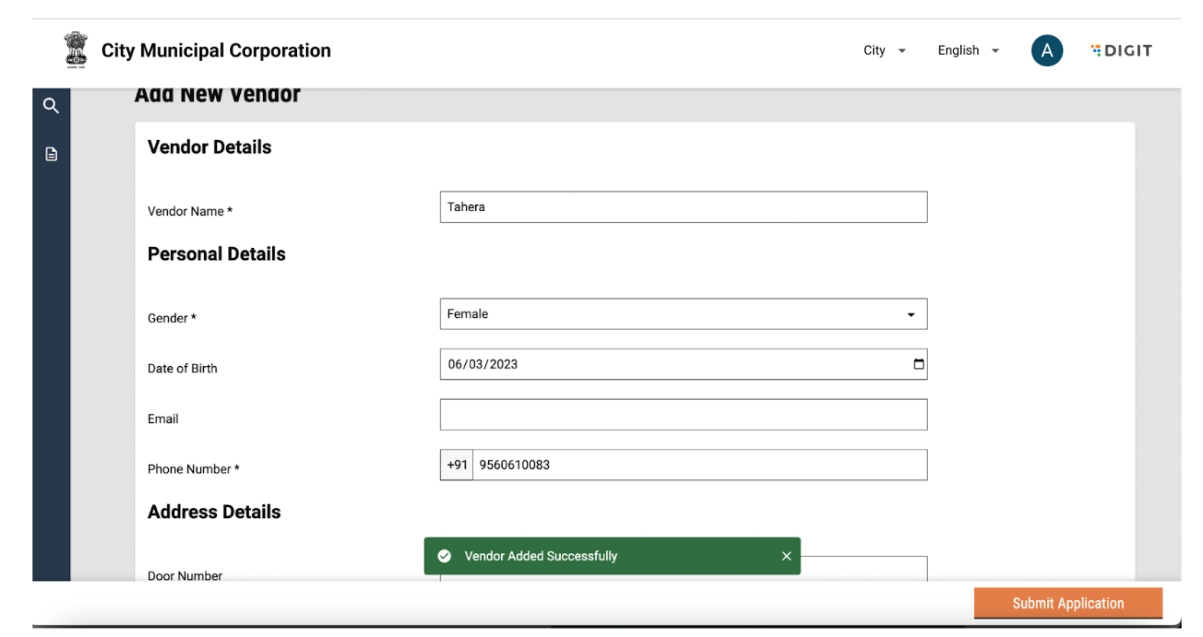
Submit the application.
Once the user submits an application, a snack bar will confirm the successful addition of a vendor.
Details of the added vendor will be displayed in the vendor list.
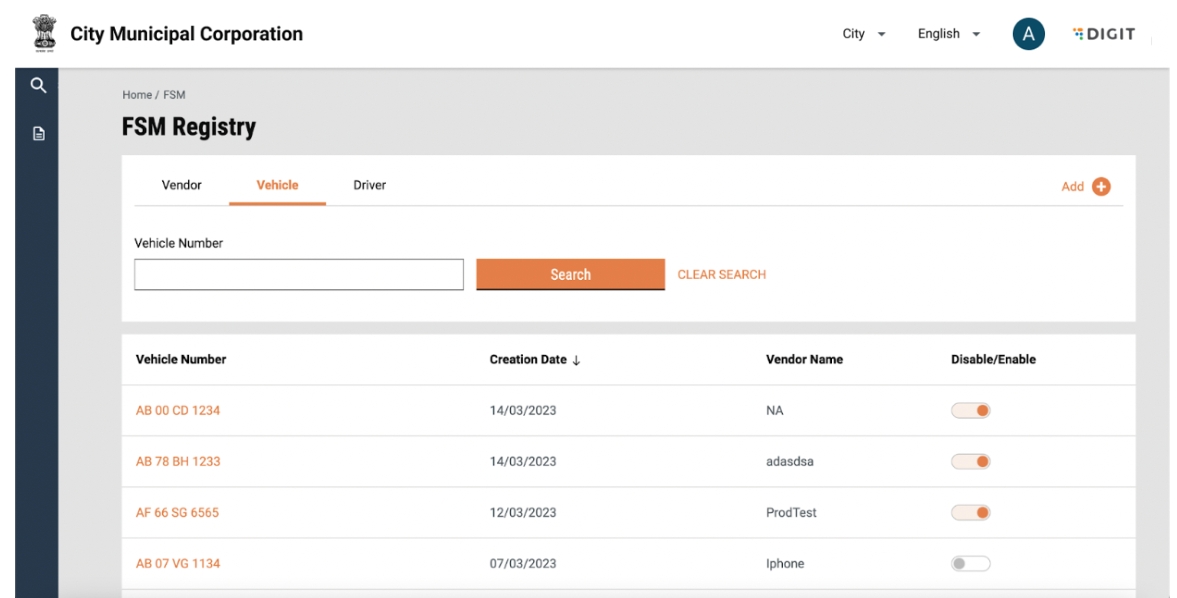
The vehicle list can be viewed by clicking on the vehicle tab in the DSM registry.
A list of all vehicles in the system are visible along with the details of the vendor they are tagged to.
User Actions
The following actions can be performed:
View list of all vehicles in the system along with the details of tagged vendor.
Search for a vehicle using the search box.
Clear search by using the “Clear Search” button.
Enable/disable a vehicle by using the toggle.
Sort vehicles by creation date.
Add a new vendor, sanitation worker or vehicle by clicking on the ‘Add’ button.
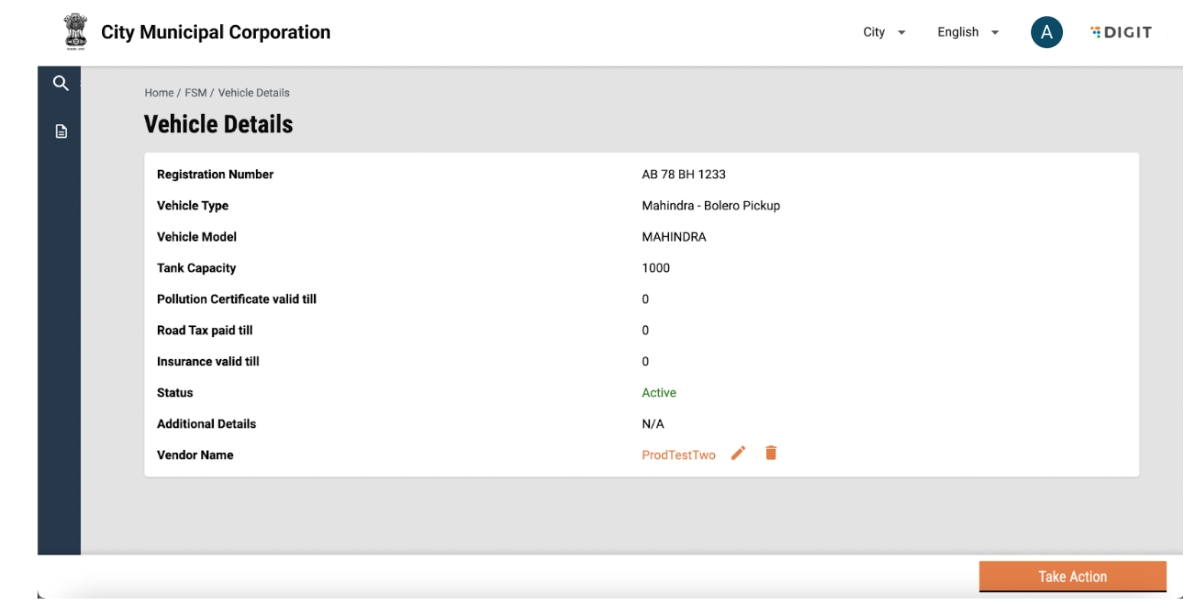
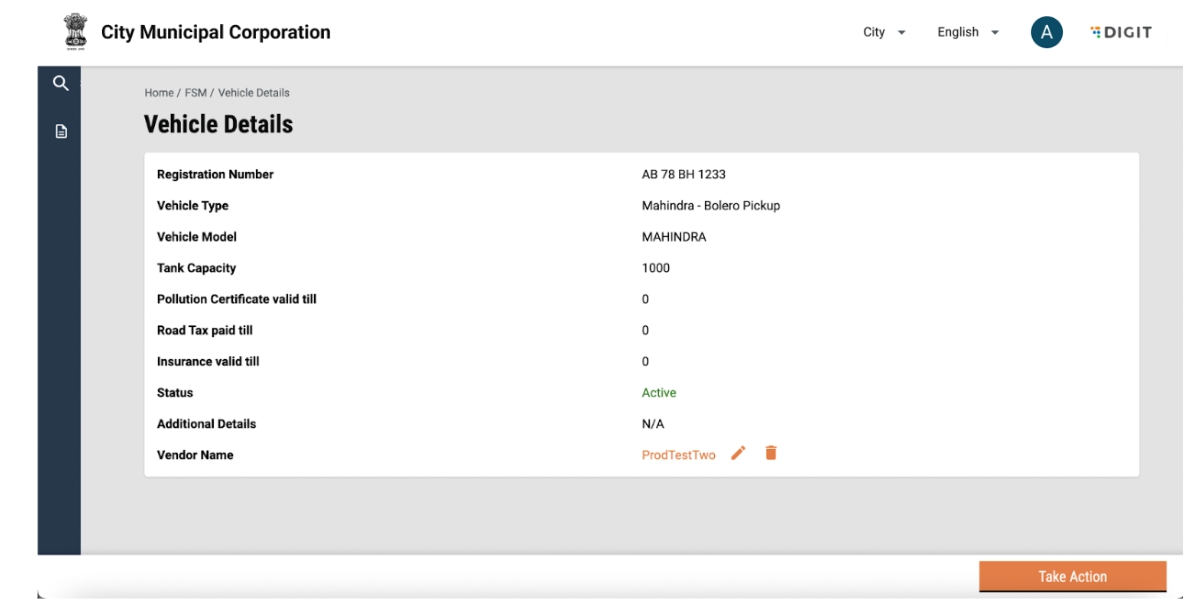
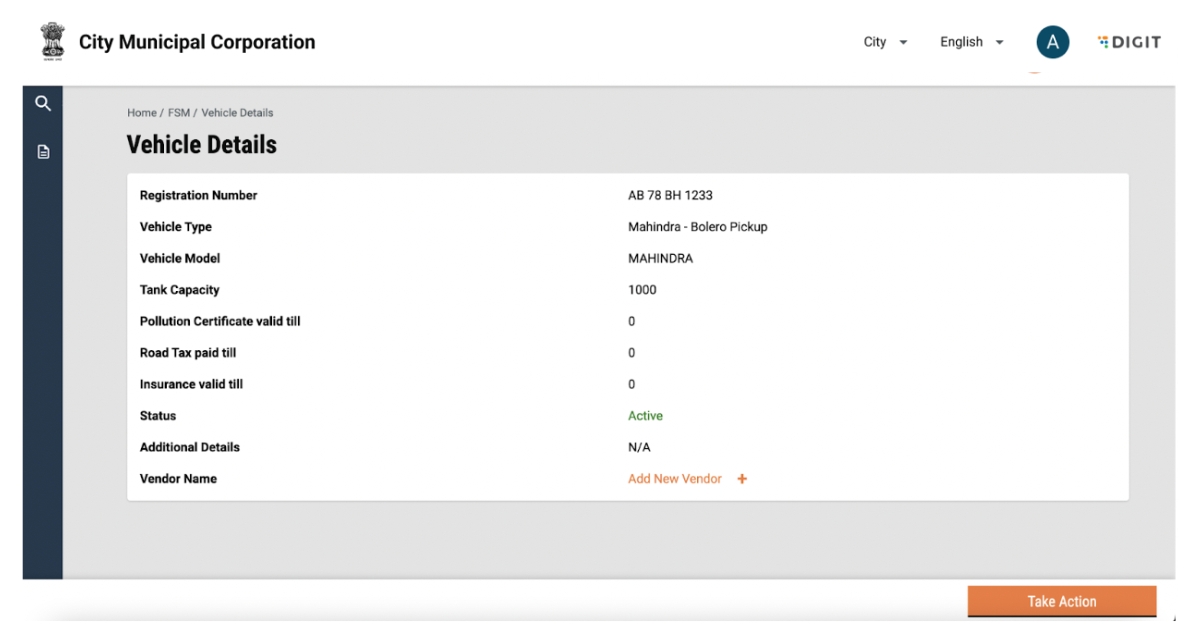
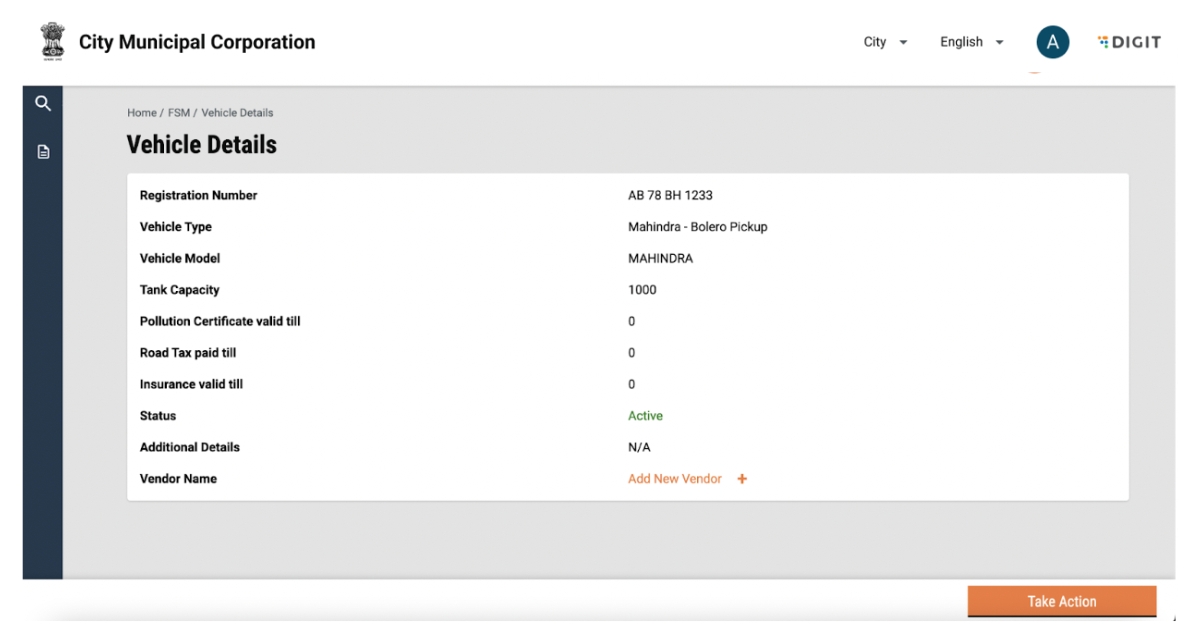
Vehicle details can be viewed by clicking on the vehicle name.
The following actions can be performed:
View details of the vehicle.
Edit vendor tagging by clicking on the edit icon besides the vendor name.
Remove vendor tagging by clicking on the 'Delete' icon besides the vendor name.
Click on the “Take Action” button to edit or delete a vehicle.
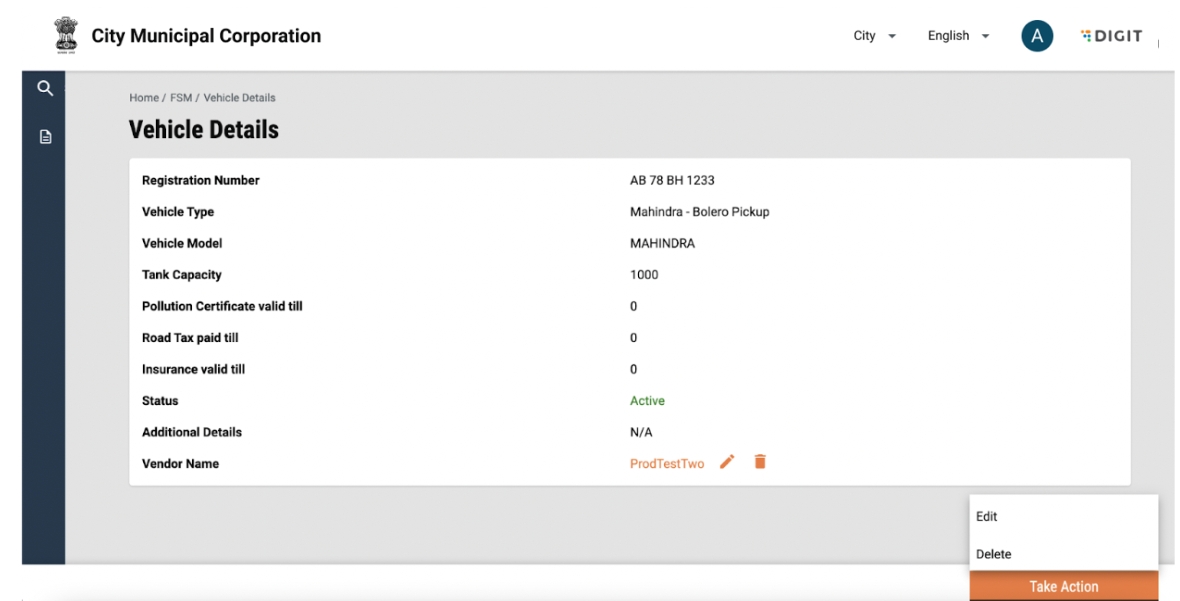
On clicking on the “Take Action” button, the following will be displayed.
The following actions can be performed:
Click on edit to edit the vehicle.
Click on delete to delete the vehicle.
Click anywhere else on the screen to go back to vehicle details.
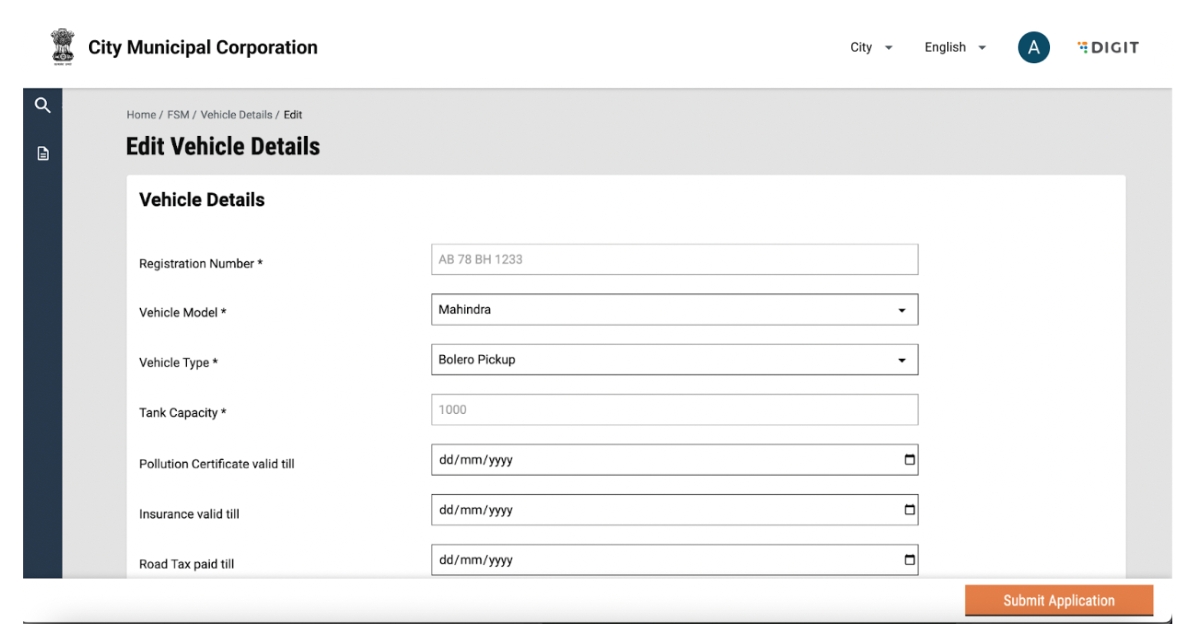
On clicking on the edit button, the user will be redirected to the “Edit Vehicle” page.
The following actions can be performed:
Edit vehicle details.
Submit edited details.
The user will be redirected to the vehicle details page and the edits will be reflected.
A vehicle can be deleted by clicking on the “Take Action” button and selecting delete.
The following actions can be performed:
Click on edit to edit the vehicle.
Click on delete to delete the vehicle.
Click anywhere else on the screen to go back to vehicle details.
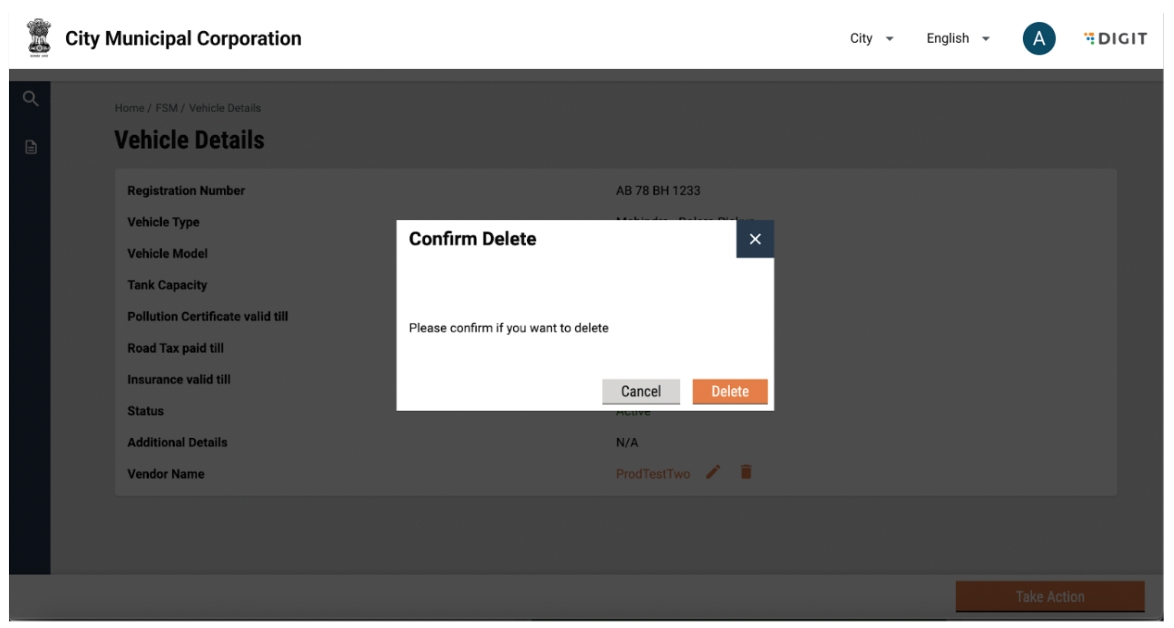
On clicking the delete button, a pop-up will be displayed for confirmation.
The following actions can be performed:
Close pop-up by clicking on the 'Close' button on the pop-up.
Close pop-up by clicking on the cross icon on the top right of the pop-u
Confirm deletion by clicking on the delete button.
On clicking on ‘Delete', the user will be directed to a list of vehicles and a snack bar will be displayed as confirmation.
Apart from tagging a vehicle to a vendor from the vendor details page, tagging can also be done from the vehicle details page by clicking on the add vendor button.
The following actions can be performed:
View details of the vehicle.
Tagging vehicle to a Vendor by clicking on the ‘+’ icon besides “Add New Vendor”.
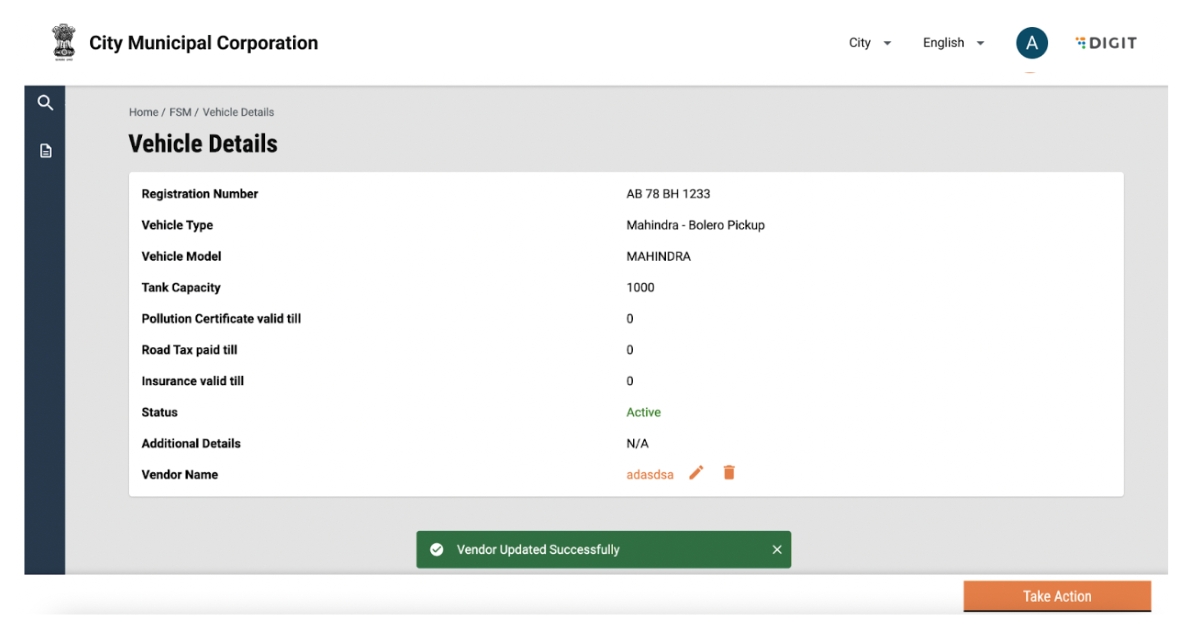
A pop-up will be displayed with a dropdown to select a vendor.
The following actions can be performed:
Selection of a vendor from the dropdown.
Close pop-up by clicking on the cross icon on the top right of the pop-up.
Close pop-up by clicking on 'Cancel'.
Confirm vendor selection by clicking on 'Submit'.
On clicking submit, the added vendor details will be displayed in the vehicle details page and a snack bar will be displayed for confirmation.
Add a new vehicle by clicking on the Add button on the FSM Registry landing page and select vehicle.
The following actions can be performed:
Add a new vendor by clicking on vendor.
Add a new vehicle by clicking on vehicle.
Add a new sanitation worker by clicking on sanitation worker.
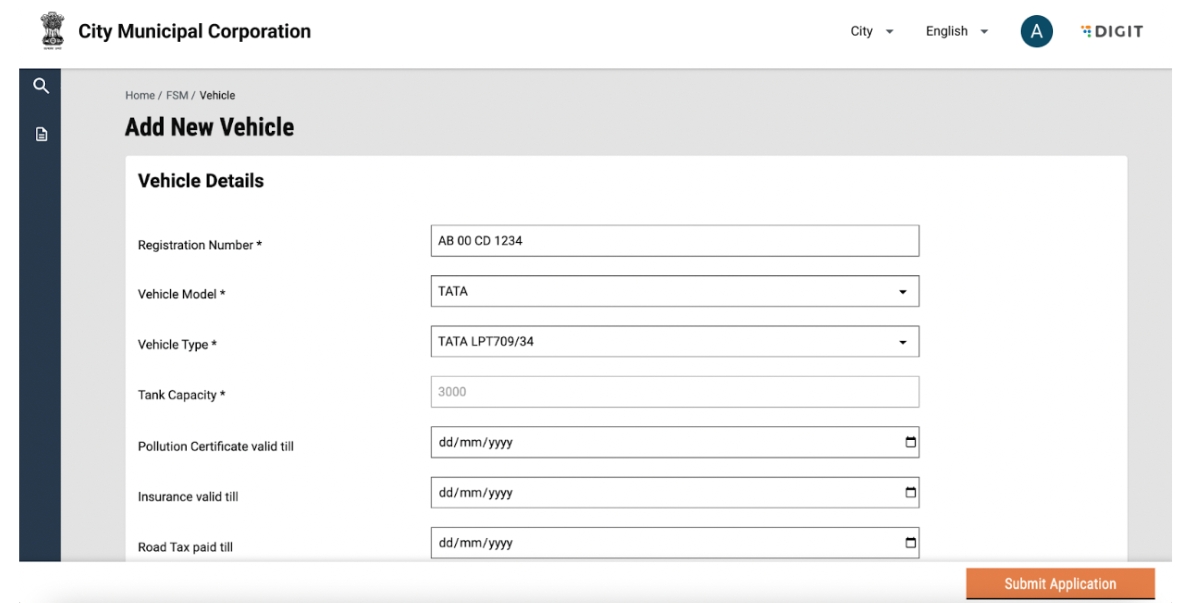
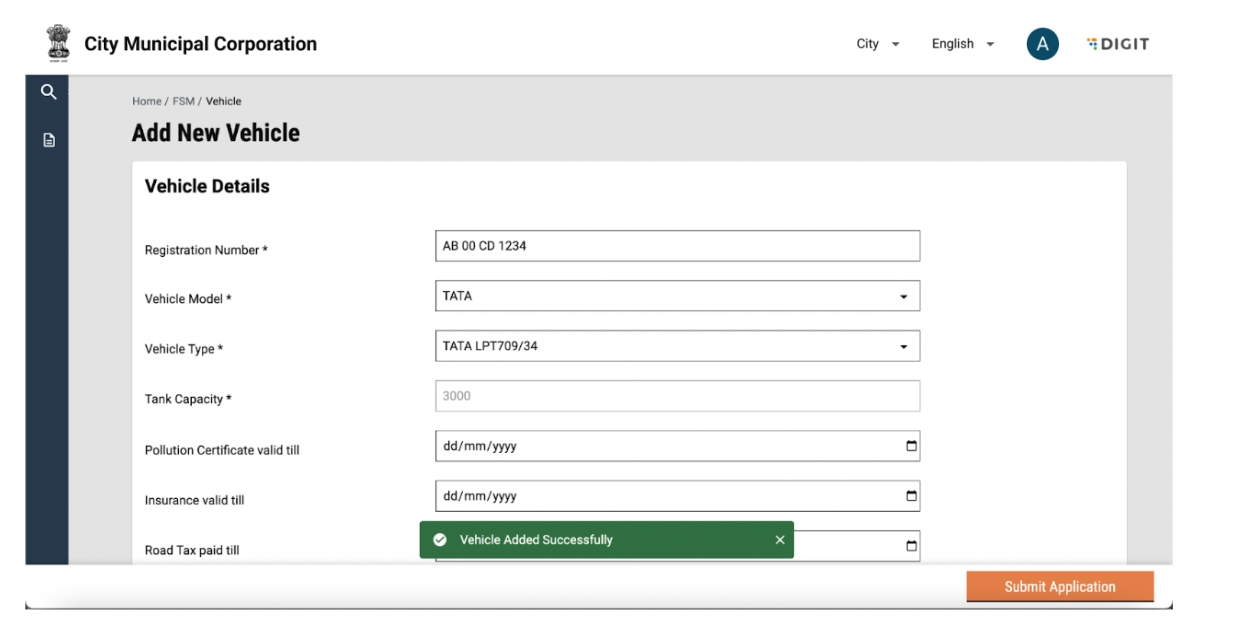
On clicking on ‘Vehicle’, the user will be redirected to the add vehicle page.
The following actions can be performed:
Enter the vehicle registration number. Each vehicle is created with a unique registration number and hence, an error message will be displayed if the registration number has been used to create other vehicles.
Select vehicle details such as model, type, capacity, details of pollution certificate, insurance and road tax.
Submit the application.
Once the user submits an application, a snack bar will confirm the successful addition of a vendor.
Details of the added vehicle will be displayed in the vehicle list.
Login as a ULB admin and navigate to the FSM Registry by clicking on it. Click on the sanitation worker tab. A list of all sanitation workers in the system is visible along with the details of the vendor they are tagged to.
The following actions can be performed:
View the list of all sanitation workers in the system along with the details of tagged vendor.
Search for a sanitation worker using the search box.
Clear search by using the “Clear Search” button.
Enable/disable a sanitation worker by using the toggle.
Sort sanitation workers by creation date.
Add a new vendor, sanitation worker or vehicle by clicking on the ‘Add’ button.
Sanitation worker details can be viewed by clicking on the sanitation worker’s ID.
The following actions can be performed:
View details of the sanitation worker.
Edit vendor tagging by clicking on the edit icon besides the vendor name.
Remove vendor tagging by clicking on the 'Delete' icon beside the vendor name.
Click on the “Take Action” button to edit or delete a sanitation worker.
sanitation worker details can be edited by clicking on the “Take Action" button and selecting edit.
The following actions can be performed:
Click on 'Edit' to edit the sanitation worker.
Click on 'Delete' to delete the sanitation worker.
Click anywhere else on the screen to go back to sanitation worker details.
On clicking the Edit button, the user will be redirected to the “Edit Sanitation Worker” page.
The following actions can be performed:
Submit edited details like professional, role details.
The user will be redirected to the sanitation worker details page and the edits will be reflected.
A sanitation worker can be deleted by clicking on the “Take Action” button and selecting 'Delete'.
The following actions can be performed:
Click on 'Edit' to edit the sanitation worker.
Click on 'Delete' to delete the sanitation worker.
Click anywhere else on the screen to go back to sanitation worker details.
On clicking the 'Delete' button, a pop-up will be displayed for confirmation.
The following actions can be performed:
Close pop-up by clicking on the 'Close' button on the pop-up.
Close pop-up by clicking on the cross icon on the top right of the pop-up.
Confirm deletion by clicking on the 'Delete' button.
On clicking on ‘Delete’, the user will be directed to a list of vehicles and a snack bar will be displayed as confirmation.
Method 1: Apart from tagging a sanitation worker to a vendor from the vendor details page, tagging can also be done from the sanitation worker details page by clicking on the add new vendor button.
The following actions can be performed:
View details of the vehicle.
Tag sanitation worker to a vendor by clicking on the + icon besides the “Add New Vendor”.
A pop-up will be displayed with a dropdown to select a vendor.
The following actions can be performed:
Selection of a vendor from the dropdown.
Close pop-up by clicking on the cross icon on the top right of the pop-up.
Close pop-up by clicking on 'Cancel'.
Confirm vendor selection by clicking on 'Submit'.
On clicking on submit, the added vendor details will be displayed in the sanitation worker details page and a snack bar is displayed for confirmation.
Method 2: A sanitation worker can also be tagged to a vendor from the sanitation worker list page. Select a vendor from the dropdown. The sanitation worker will be tagged to the selected vendor.
Add a new sanitation worker by clicking on the 'Add' button on the FSM Registry landing page and select the sanitation worker.
The following actions can be performed:
Add a new vendor by clicking on vendor.
Add a new vehicle by clicking on vehicle.
Add a new sanitation worker by clicking on sanitation worker.
On clicking on sanitation worker, the user will be redirected to the add sanitation worker page.
The following actions can be performed:
Enter sanitation worker personal details such as Gender, Mobile number, DOB.
Enter the professional details like skills of the sanitation worker.
Click on "Add Role" to define the role for the sanitation worker if the worker is a driver or a helper or a plant operator.
Submit the application.
Once the user submits an application, a snack bar will confirm the successful addition of a vendor. Details of the added sanitation worker will be displayed in the sanitation worker list.
Citizens represent individuals or communities who are the system end-users. The FSM module provides citizens with the scope to apply for desludging services and make the payment for the applied services.
Citizens can do the following:
Language selection
Login
Apply for desludging services
Check application status and vehicle status
Download application acknowledgement
Choose to pay an amount above the minimum advance required and pay the remaining balance post service
Rate the services provided by the urban local bodies (ULBs)
Overview
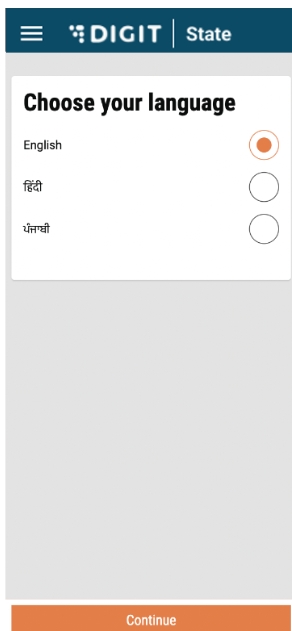
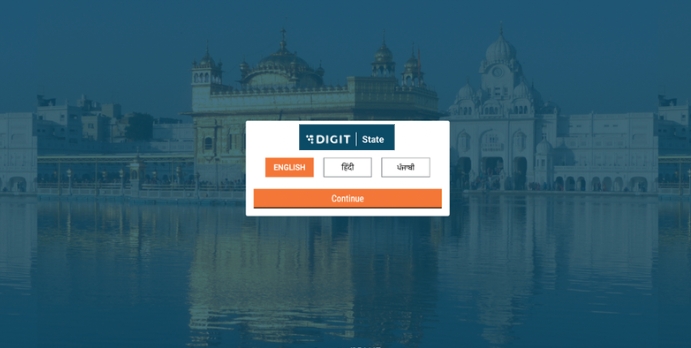
When the user opens the application, it asks them to first select the language. The selected language is highlighted in orange colour.
On this page, the following actions can be performed:
A user can switch the language.
A user can click on 'Continue' to navigate to the login screen.
Overview
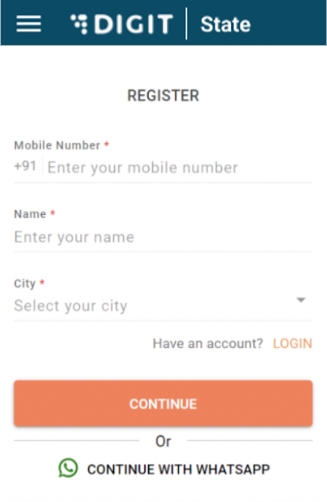
Users are redirected to this screen once they select the preferred language in the previous screen. Users can choose to either register as a new user or login as an existing user.
Register a new user
User Actions
On this page, the following actions can be performed:
A person can register as a new user by entering the mobile number, name and the city.
A person can login as an existing user by clicking on the login button.
A user can choose to continue with Whatsapp to raise a service request.
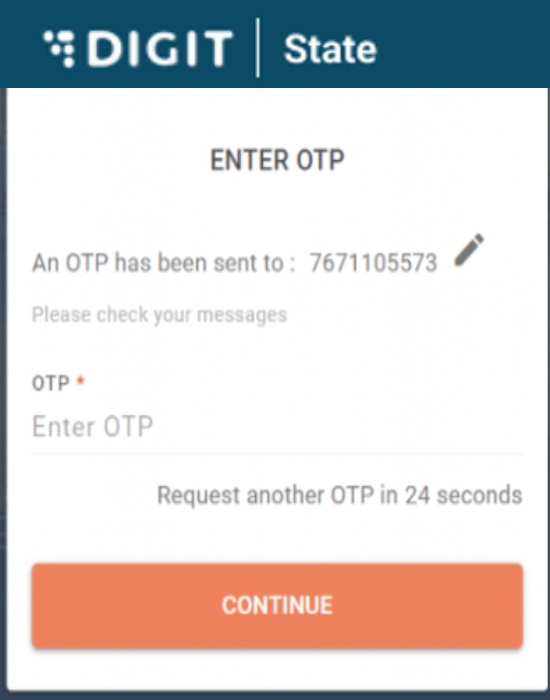
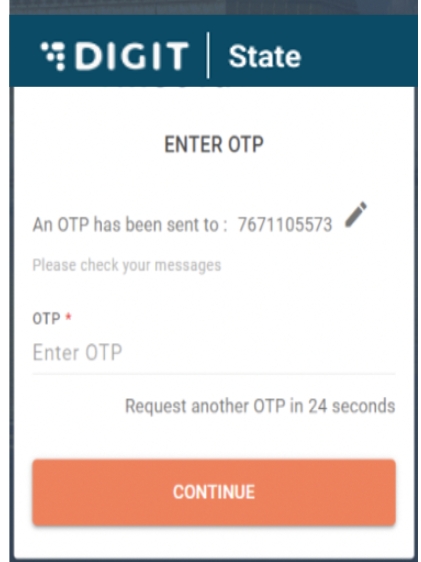
After the user clicks on "Continue", the page navigates to the "Enter OTP" page.
User actions
On this page, the following actions can be performed:
Enter the OTP received on the given mobile number to login.
The system will prompt for the selection from a list of available cities. Select the city to complete login.
Login as an Existing User
Overview
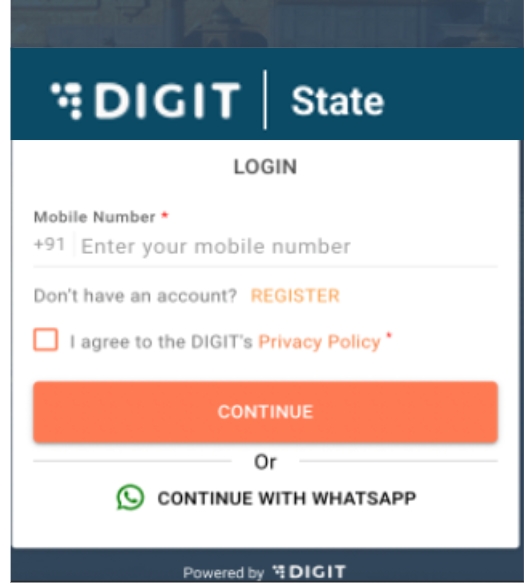
This is the page one is redirected to when the user clicks on ‘Login’ to login as an existing user.
User Actions
On this page, the following actions can be performed:
Enter mobile number to login as an existing user.
Navigate to register as a new user.
A user can choose to continue with Whatsapp to raise a service request.
After the user clicks on ‘Continue’, the page navigates to the “Enter OTP” page.
User Actions
On this page, the following actions can be performed:
Enter the OTP received on the given mobile number to login.
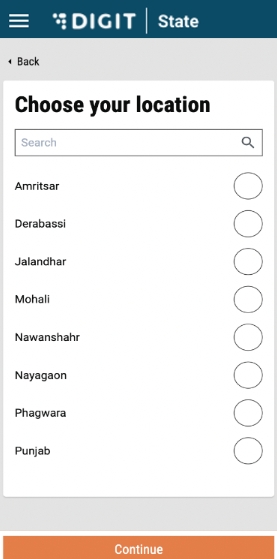
Once the OTP is entered, users are prompted to choose a location. Using this screen, they can select the location for which they would like to request for services.
User Actions
On this page, the following actions can be performed:
A user can switch the location.
A user can click on 'Continue' to navigate to the login screen.
Overview
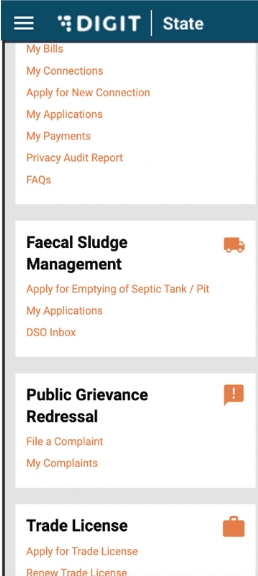
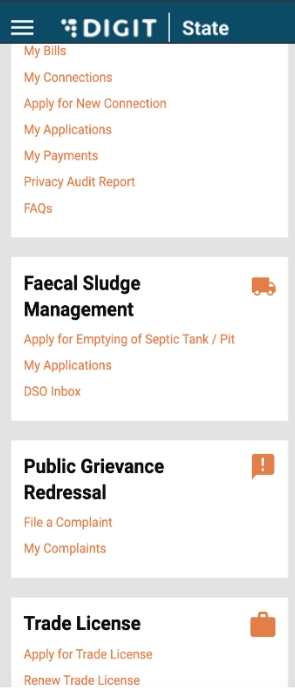
After they login, users are redirected to this screen where multiple actions can be performed related to Faecal Sludge Management services.
User Actions
On this page, the following actions can be performed:
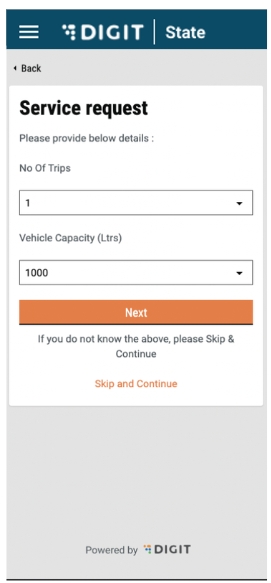
Desludging services can be requested by clicking on “Apply for Emptying of Septic Tank/Pit” option on the homepage.
User is redirected to the Service Request Page.
On this page, the following actions can be performed:
Enter “No of Trips” required
Enter “Vehicle Capacity” required.
Skip and Continue if the above information is not available.
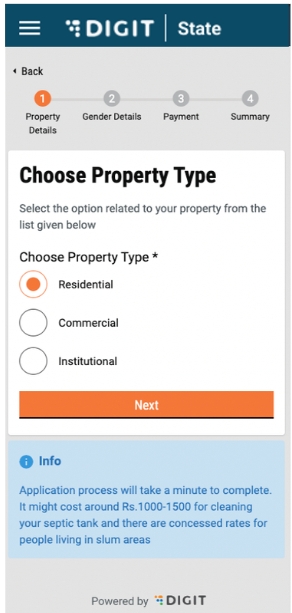
On clicking on “Next”, the user is redirected to the Choose Property Type page.
On this page, the following actions can be performed:
Selection of Property Type
Basis Property Type selected, information regarding tentative cost of desludging service is provided.
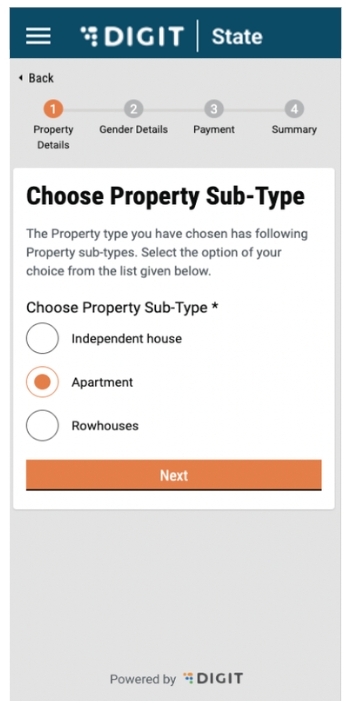
On clicking on “Next”, the user is redirected to the Choose Property Subtype page.
On this page, the following actions can be performed:
Selection of Property Subtype
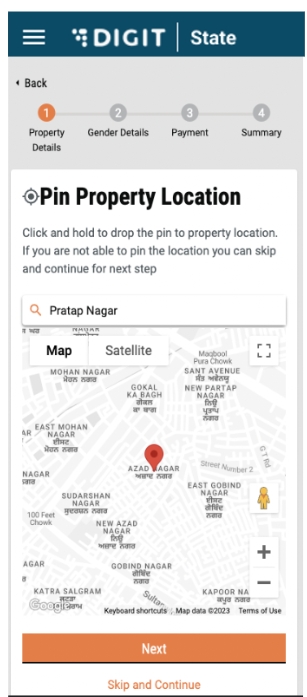
On clicking on “Next”, the user is redirected to the Pin Property Location page.
On this page, the following actions can be performed:
Enable the Location finder to allow GPS to track the current location, or, move the pin to the location manually.
Search for location using the search bar.
Skip and Continue if the above information is not available.
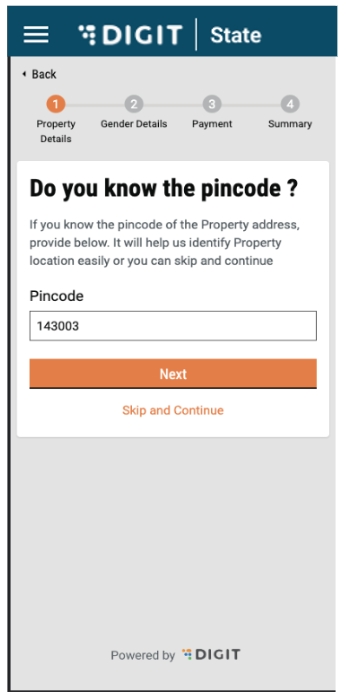
If pin location is not selected, the user is redirected to enter Pincode.
On this page, the following actions can be performed:
Entering Pincode.
Skip and Continue if the above information is not available.
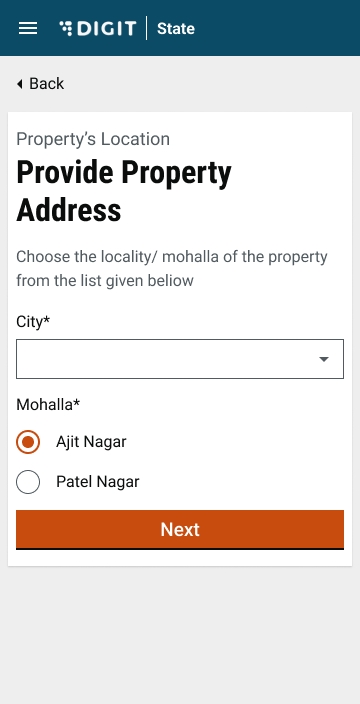
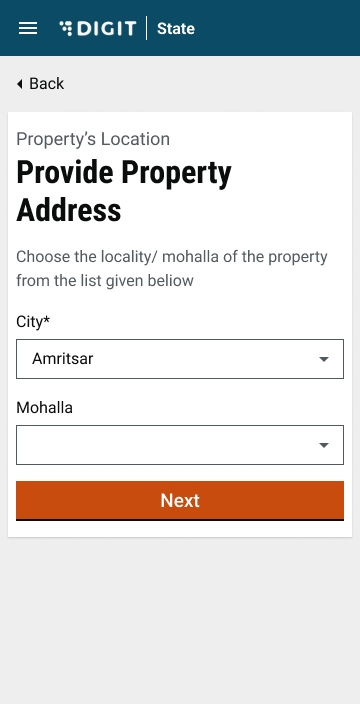
On clicking on “Next”, the user is redirected to the Provide Property Address page.
On this page, the following actions can be performed:
Selection of City
Selection of Locality/Mohalla
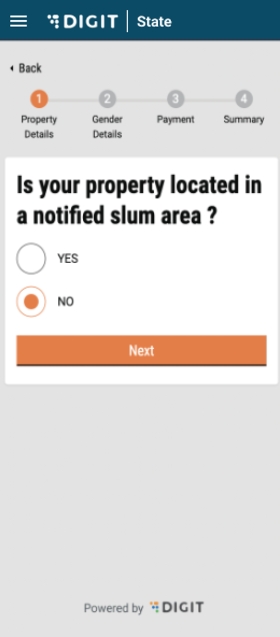
On clicking on “Next”, the user is redirected to mention whether the property is located in a Slum.
On this page, the following actions can be performed:
Selection of whether property is located in Slum
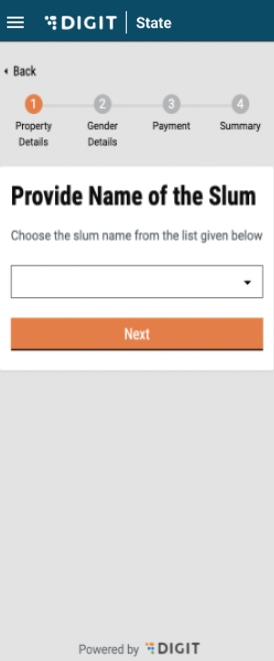
On clicking on “Next”, the user is redirected to the Provide Name of Slum page. If no is selected, then this page is skipped.
On this page, the following actions can be performed:
Selection of Slum name from dropdown
On clicking on “Next”, the user is redirected to the Provide property address page.
On this page, the following actions can be performed:
Enter Street Name
Enter Door No.
Skip and Continue if above information is not available
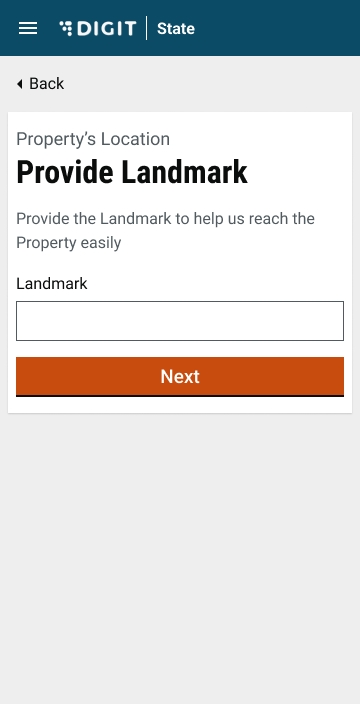
On clicking on “Next”, the user is redirected to the Provide Landmark page.
On this page, the following actions can be performed:
Enter Landmark
Skip and Continue if above information is not available.
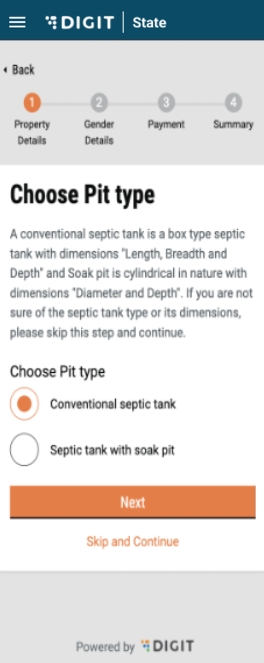
On clicking on “Next”, the user is redirected to the Pit/Septic Tank Details page.
On this page, the following actions can be performed:
Enter Length of Septic Tank
Enter Breadth of Septic Tank
Enter Depth of Septic Tank
Skip and Continue if the above information is not available.
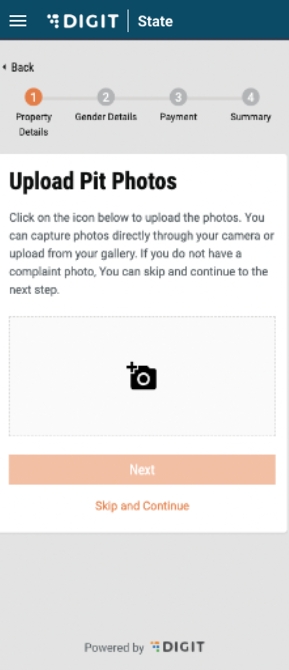
On clicking on “Next”, the user is redirected to the Upload Pit photo page.
On this page, the following actions can be performed:
Upload Pit Photo
Skip and Continue if the above information is not available.
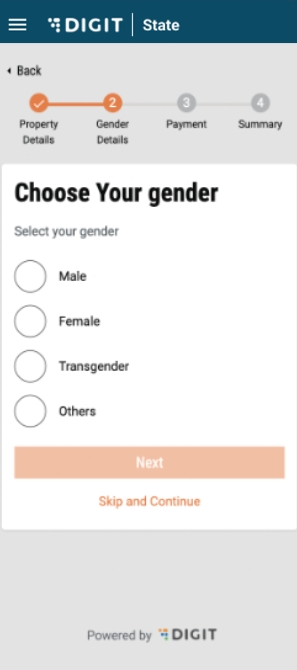
On clicking on “Next”, the user is redirected to the Select Gender page.
On this page, the following actions can be performed:
Select Gender
Skip and Continue if the above information is not available.
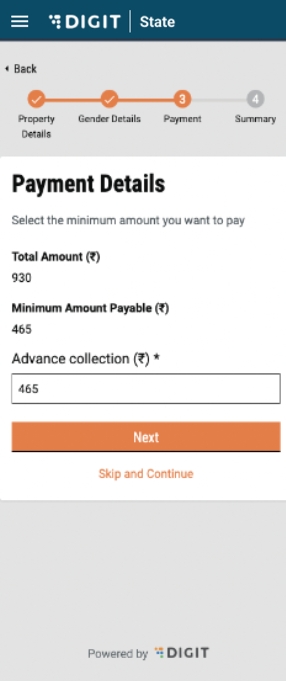
On clicking on “Next”, the user is redirected to the Payment Details page. The page displays Total amount and Minimum amount payable. The advance amount payable field displays the minimum amount payable.
On this page, the following actions can be performed:
Enter advance amount greater than minimum amount payable and lower than total amount
Skip and Continue if the above information is not available
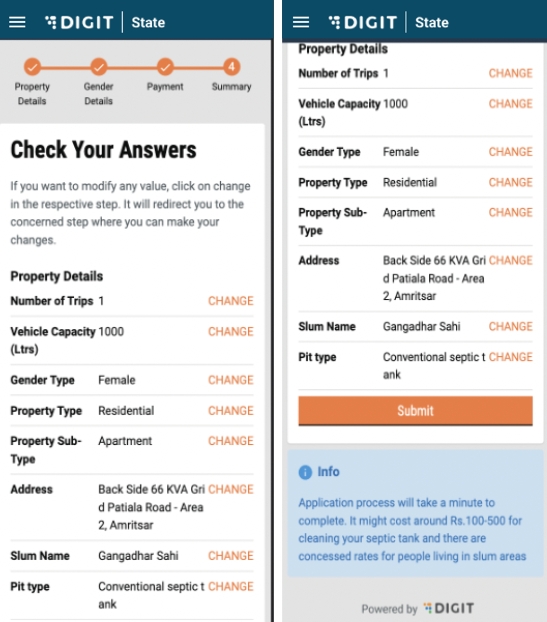
On clicking on “Next”, the user is redirected to the Summary page. The page displays a summary of all the details filled by the user.
On this page, the following actions can be performed:
Click on Change to change any filled details
Click on Submit once the review is complete and the details are satisfactory
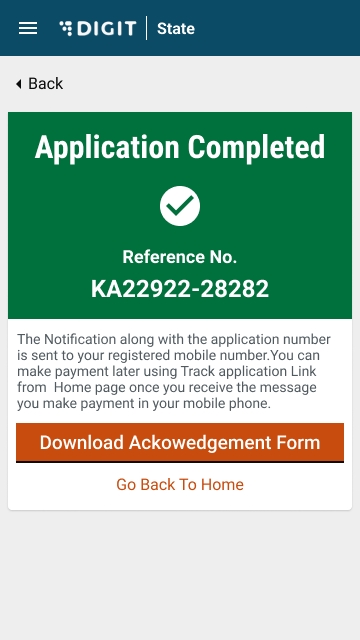
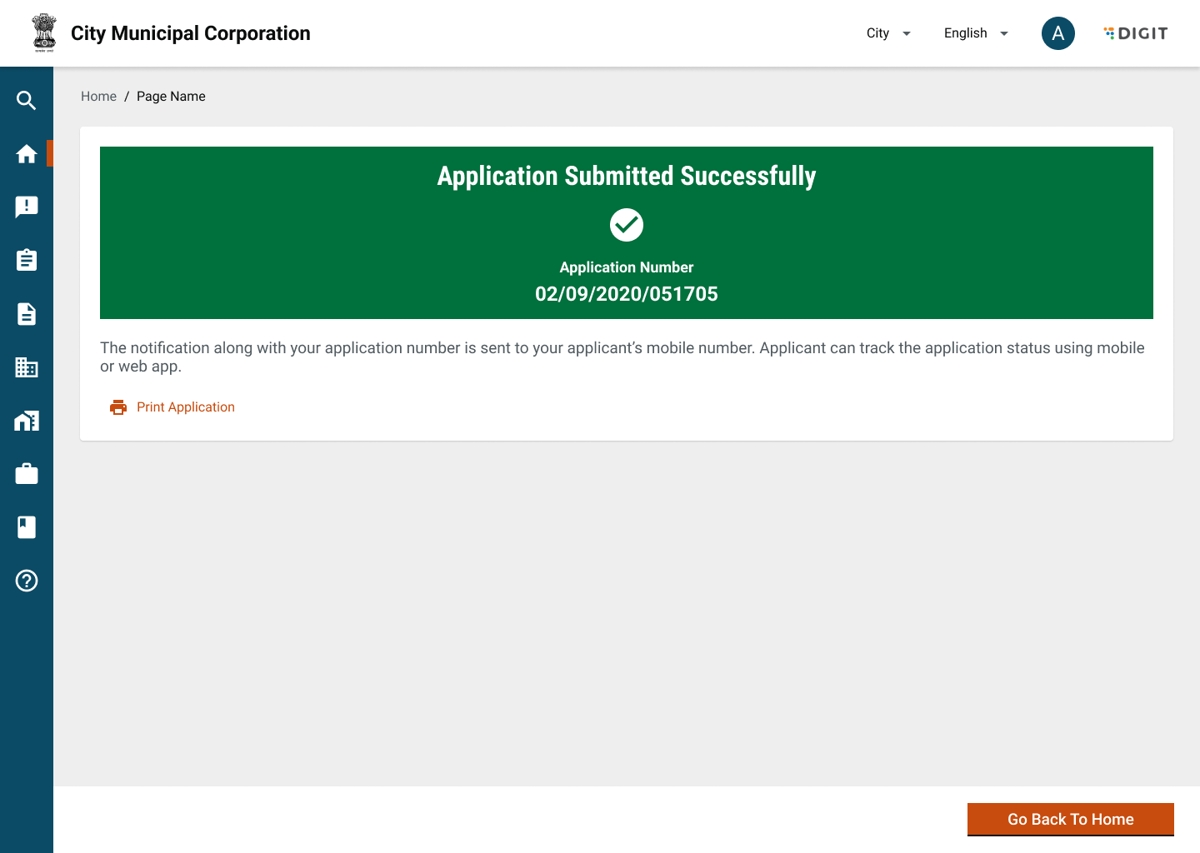
On clicking on “Submit”, the user is redirected to the Application Submitted page.
On this page, the following actions can be performed:
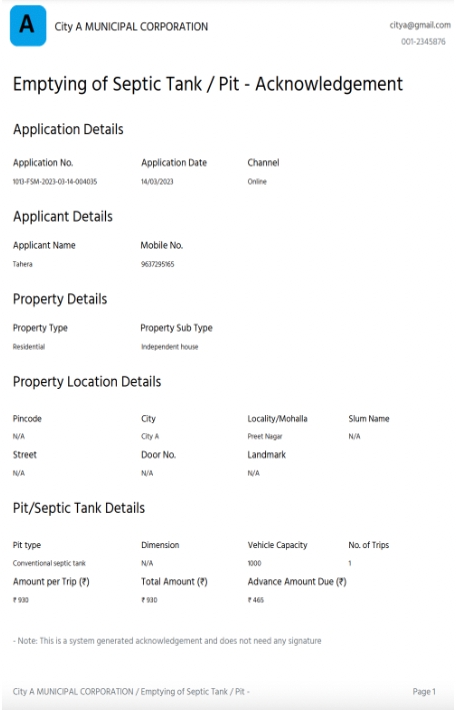
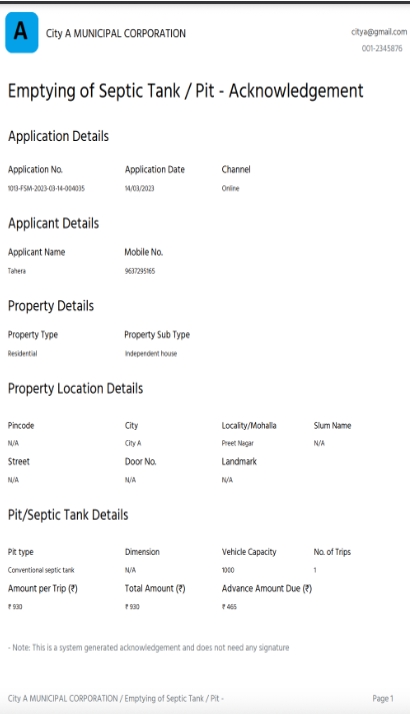
Download application receipt by clicking on download button
Go back to the home page.
The system triggers a notification along with the Application No. and details to the registered mobile number. Any subsequent updates and actions on the application also trigger a notification to the applicant.
The system triggers a notification along with the Application No. and details to the registered mobile number. Any subsequent updates and actions on the application also trigger a notification to the applicant.
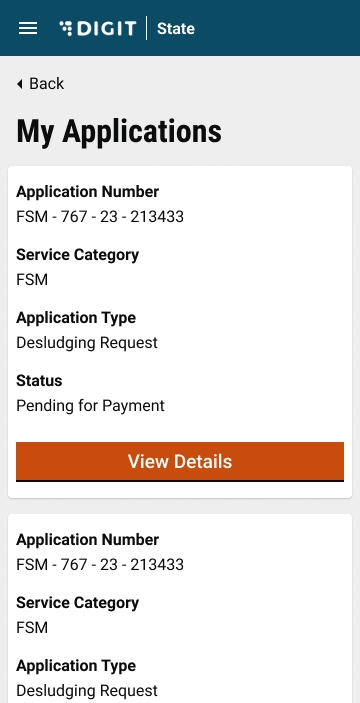
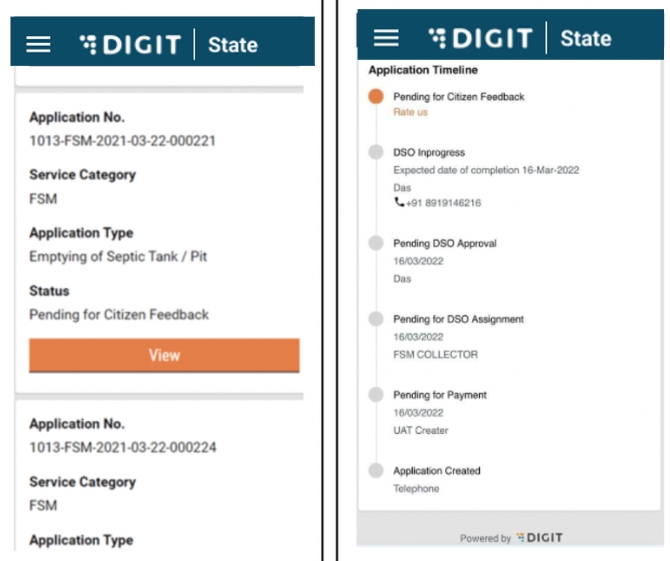
From the home page, users can access past application history by clicking on the “My Applications” page.
On this page, the following actions can be performed:
Click on ‘My applications’ to view a list of past applications.
On this page, the following actions can be performed:
View details of Applications
Clicking on View redirects the user to Application Details
View details of applications
View current Status of application
On this page, the following actions can be performed:
If the application is on the Payment Pending stage, the user will have the option to make a payment from the View Applications page.
On this page, the following actions can be performed:
Download Acknowledge receipt of application
Make a payment by clicking on the Make Payment button.
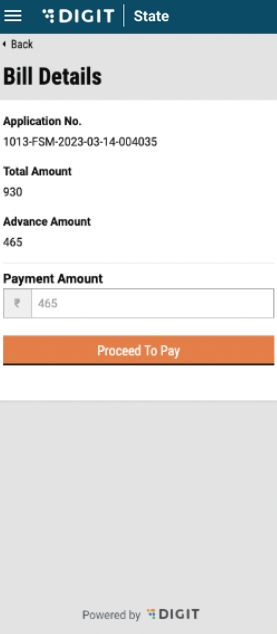
The user is redirected to the bill details page which displays the total, advance and due amount.
On this page, the following actions can be performed:
Confirm details and Proceed to pay.
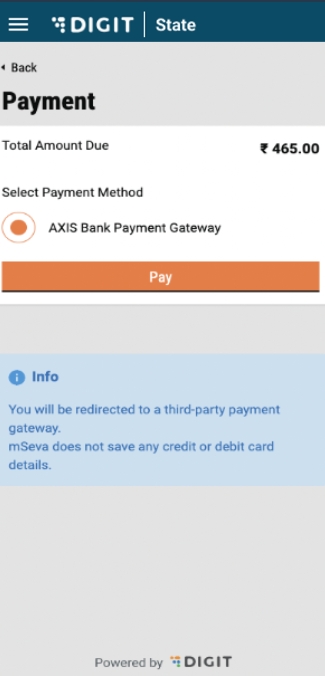
The user is redirected to Select Payment preference.
The system intimates the user that clicking on Pay will redirect them to a third party payment gateway.
On this page, the following actions can be performed:
Select Payment Method.
Click on pay to proceed.
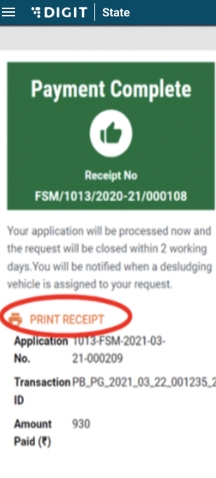
The system displays a payment acknowledgement message along with the Payment Receipt No.
On this page, the following actions can be performed:
Print Payment receipt
If the application is on the Payment Pending stage, the user will have the option to make a payment from the View Applications page.
On this page, the following actions can be performed:
Provide the rating for service by clicking on Rate us.
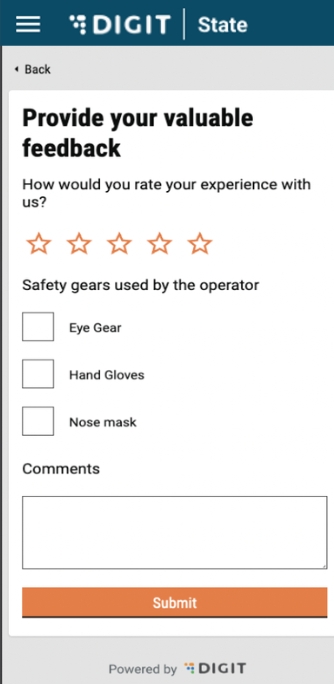
The user will be redirected to the Provide Feedback page.
On this page, the following actions can be performed:
Selection of overall rating between 1-5 stars
Confirmation on Safety gears used by the operator
Providing additional inputs, if any, using the comments box.
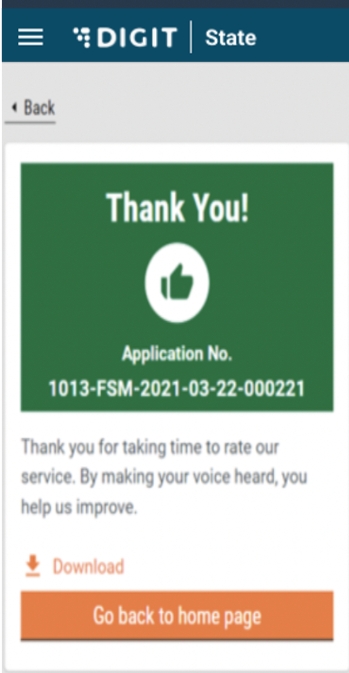
Clicking on submit redirects the user to the confirmation page.
On this page, the following actions can be performed:
Download final payment receipt
Go back to the home page.
Urban local body (ULB) officials or employees receive the service requests, and are responsible for managing and routing these requests to specific DSOs.
Employees can:
Create desludging application on behalf of citizens.
Collect payments.
Update application/generate demand.
Assign DSO to an application.
Assign sanitation worker to an application.
Re-assign DSO to an application.
Complete or decline request.
Multiple request assignment to a single vehicle.
Manage vendor, driver, and vehicle details.
After landing on the employee URL, the user is prompted to select the language with which they would like to access the system.
On this page, the following actions can be performed:
Selection of language
After the user clicks on ‘Continue’, the page navigates to the ‘Login’ page.
ULB employees are provided with credentials to login to the system. There are role-based access for various steps in the workflow, that is, different individuals can be assigned to create an application, modify applications or manage vendor, driver and vehicle details.
On this page, the following actions can be performed:
Enter username and password.
Select city for login.
Reset password by clicking on the “Forgot Password” link.
On clicking continue, employees are redirected to the FSM home page.
The FSM home page has 3 options:
To create a new application on behalf of the citizen.
View existing pending applications.
Search for historical applications.
On this page, the following actions can be performed:
Navigate to the inbox to view pending actions.
Create a new desludging application.
Search for old applications.
Change language.
Edit profile details by clicking on the user icon on top right hand corner.
Logout by clicking on the user icon on top right hand corner.
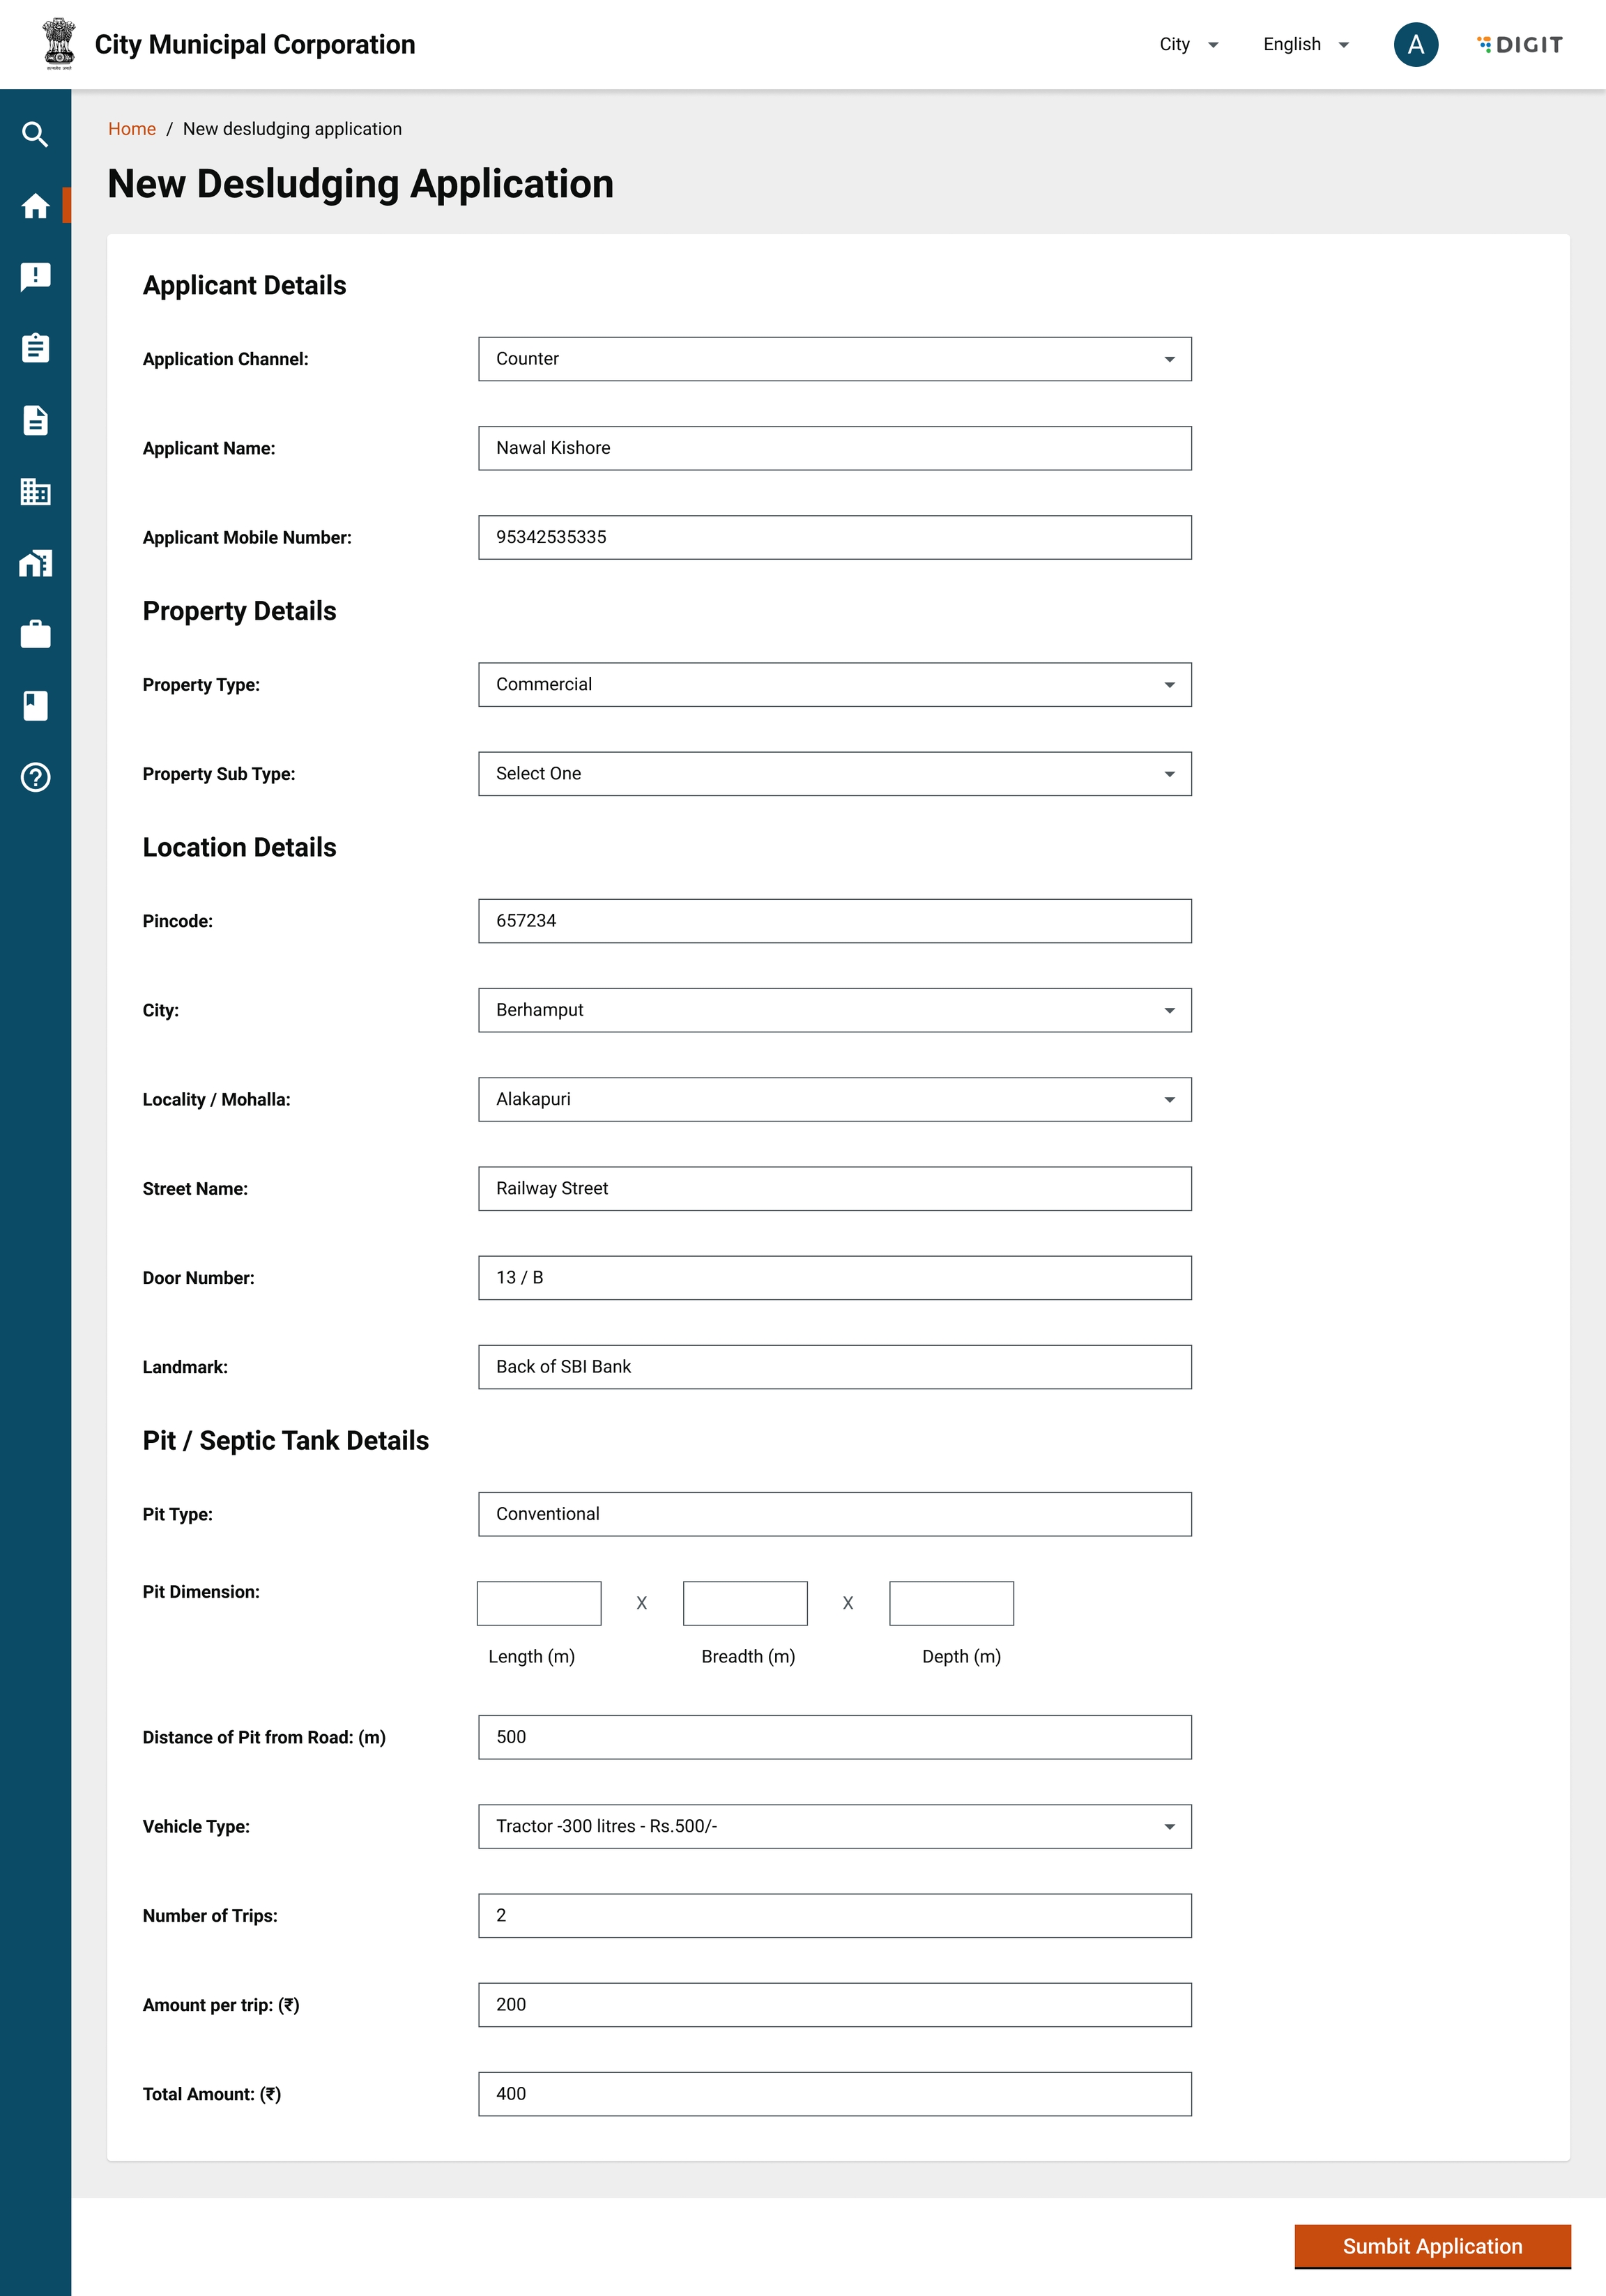
Click on "New Desludging Application" to create a new application.
On this page, the following actions can be performed:
Enter application details (Application Channel, Applicant Name, Applicant Mobile Number and Gender).
Enter property details (Property Type and Property Subtype).
Enter location details (Pincode, City, Locality, Whether Slum and slum name, Street Name, Door/House No., Landmark).
Enter pit/septic tank details (Pit Type, Dimensions).
Enter trip details (No. of trips required and vehicle capacity).
On filling the above details, the "Amount per Trip" and "Total Amount" are calculated automatically.
The following actions can be performed:
The advance amount may be edited (above minimum advance amount and below total advance amount).
Click on "Submit Application" to submit the application, and it redirects to a confirmation page.
The following actions can be performed:
Download application acknowledgement receipt.
Go back to the homepage.
An SMS will be triggered to the citizen with an acknowledgement and payment link, if payment is due.
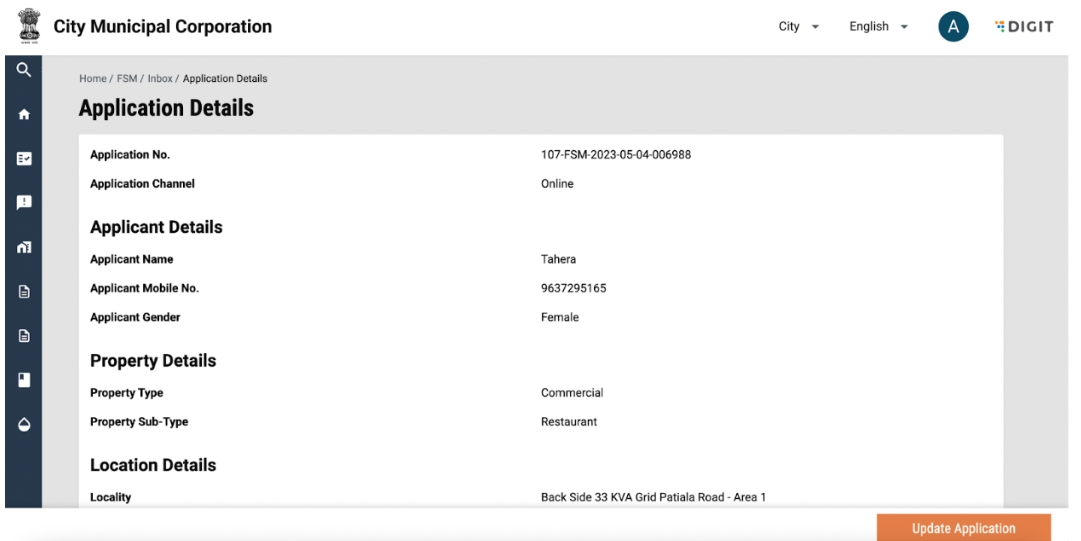
An application created by a citizen through the online channel has to be updated by an employee before confirmation. This application will show with the status “Application Created”.
The following actions can be performed:
Search for an active application using “Application No.” and “Mobile No.”.
Clear search by clicking on “Clear Search”.
View and update applications by clicking on an application number.
Filter applications by ‘Locality’ using the Locality dropdown.
Filter applications by ‘Status’.
Search for past applications by using “Search Application”.
On clicking on an application number, application details are displayed.
The following actions can be performed:
View application details.
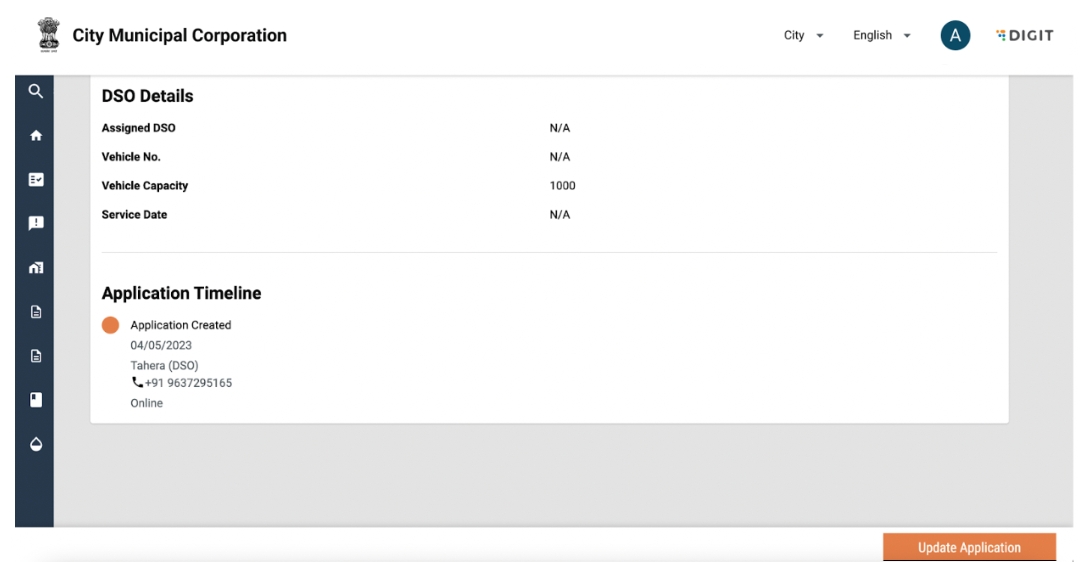
On clicking on the update application, application details will be viewed. Details such as locality, number of trips and capacity will be displayed.
Clicking on “Update application” will update the status of the application as “Pending for Payment”.
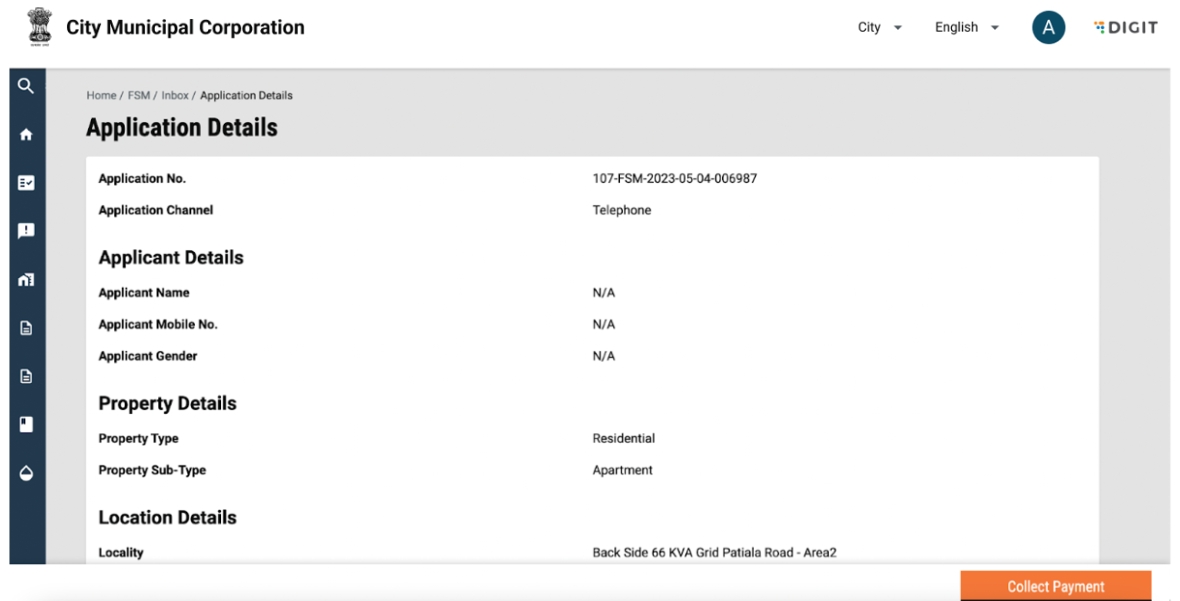
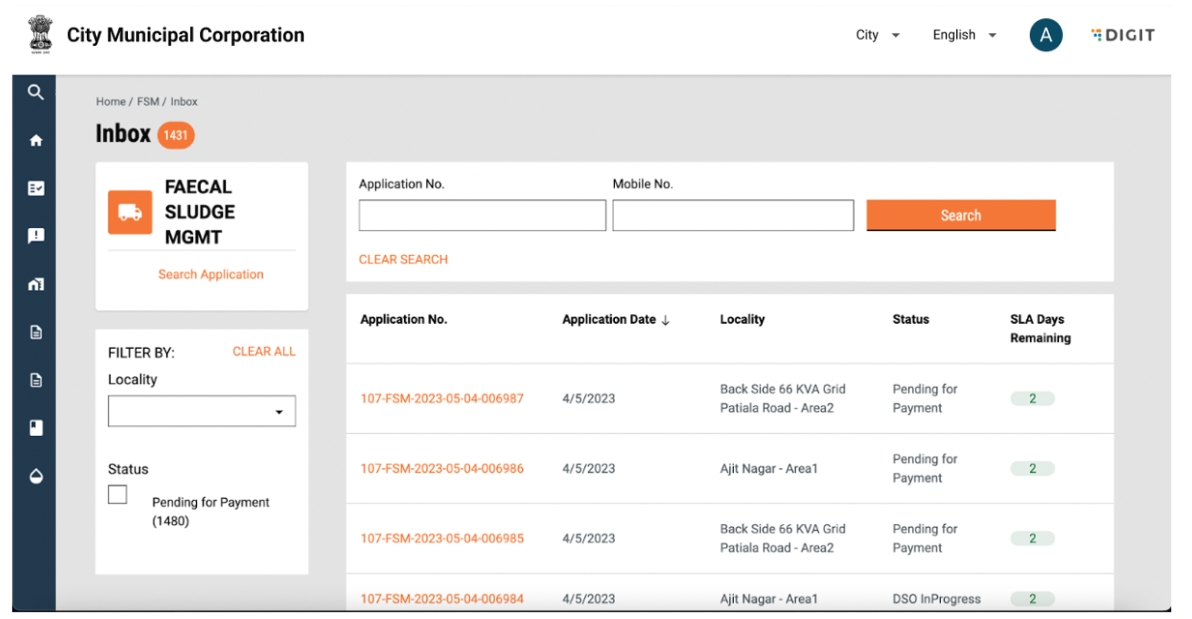
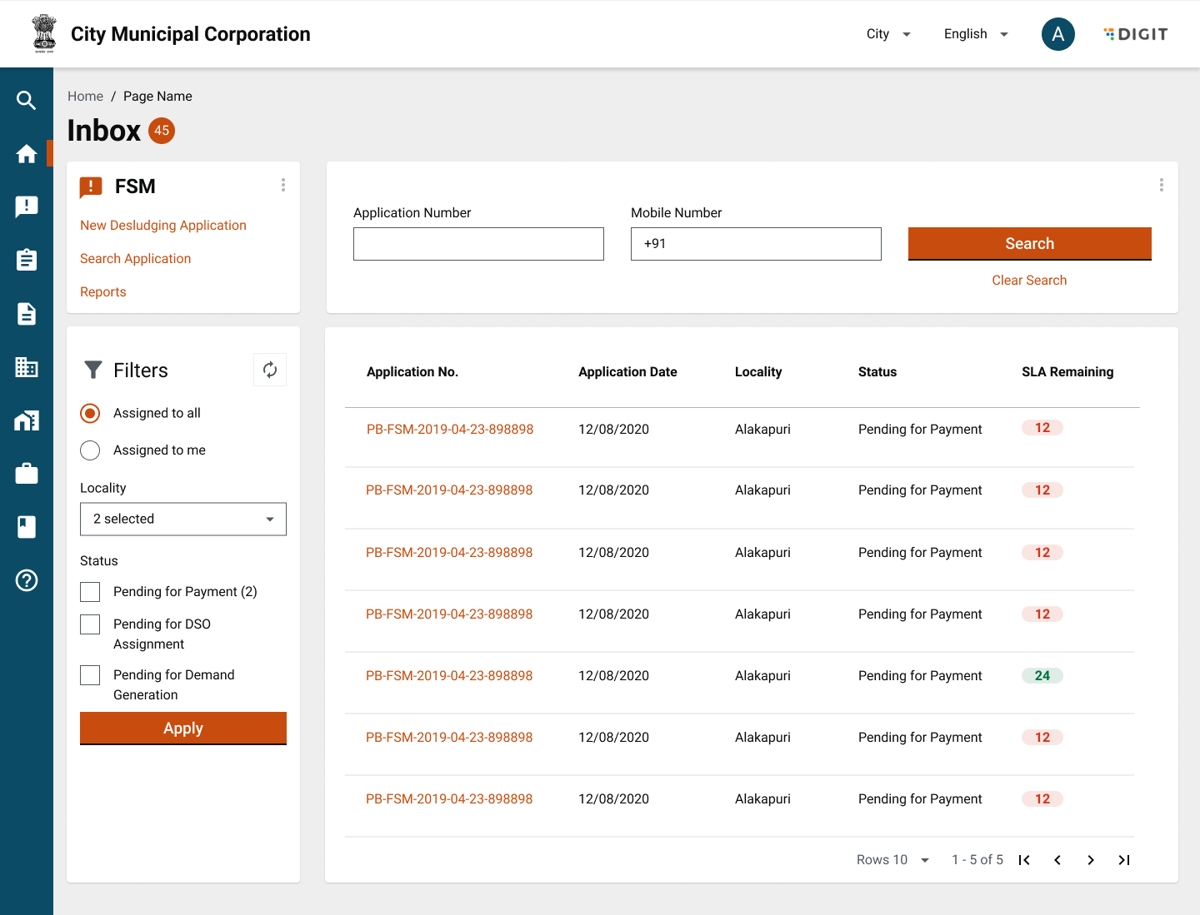
Desludging applications pending for payment are accessible in the inbox of the user assigned the collector role. The status of the application is reflected in the status column.
The following actions can be performed:
Search for an active application using “Application No.” and “Mobile No.”.
Clear Search by clicking on “Clear Search”.
View and update applications by clicking on an application number.
Filter applications by ‘Lolacilty’ using the locality dropdown.
Filter applications by ‘Status’.
Search for past applications by using “Search Application”.
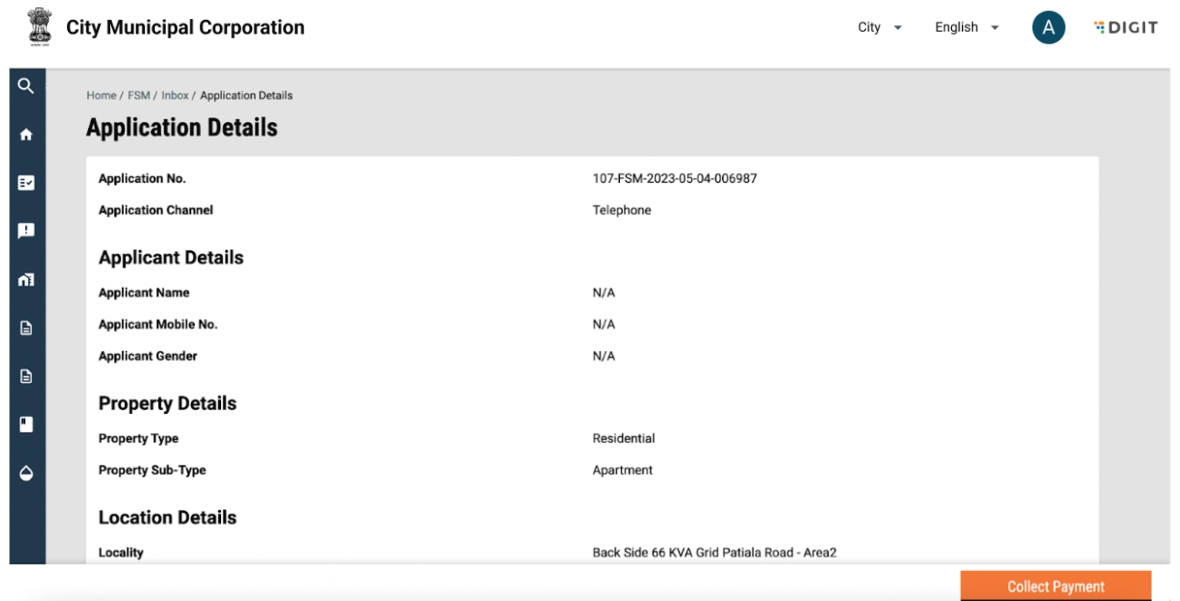
On clicking on an application number, application details are displayed.
The following actions can be performed:
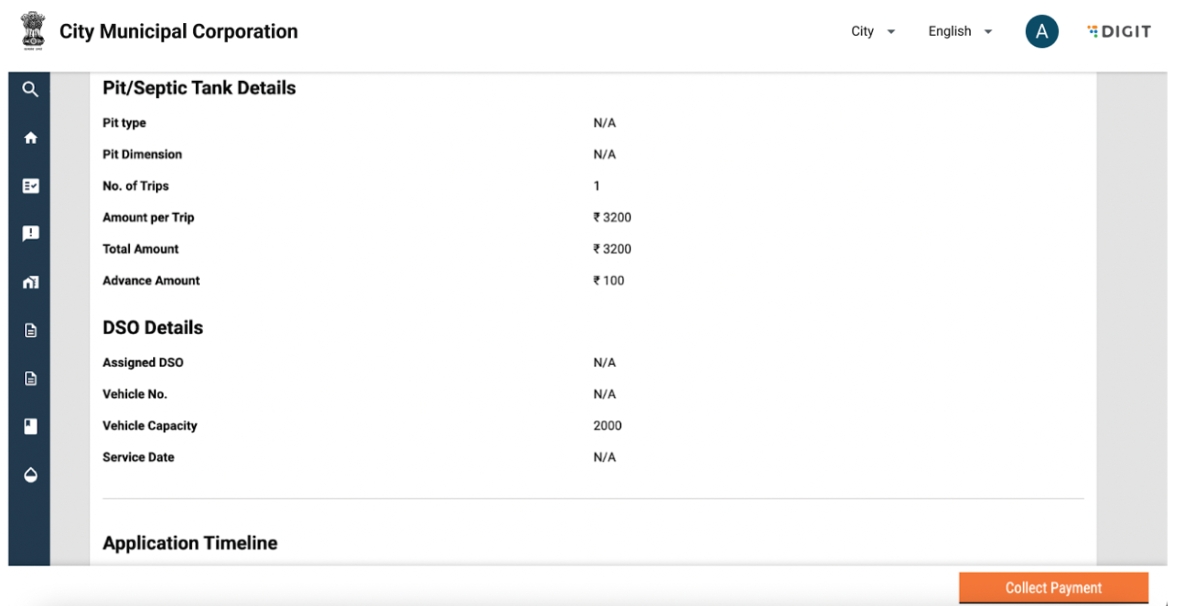
View application details, including applicant, property and trip details
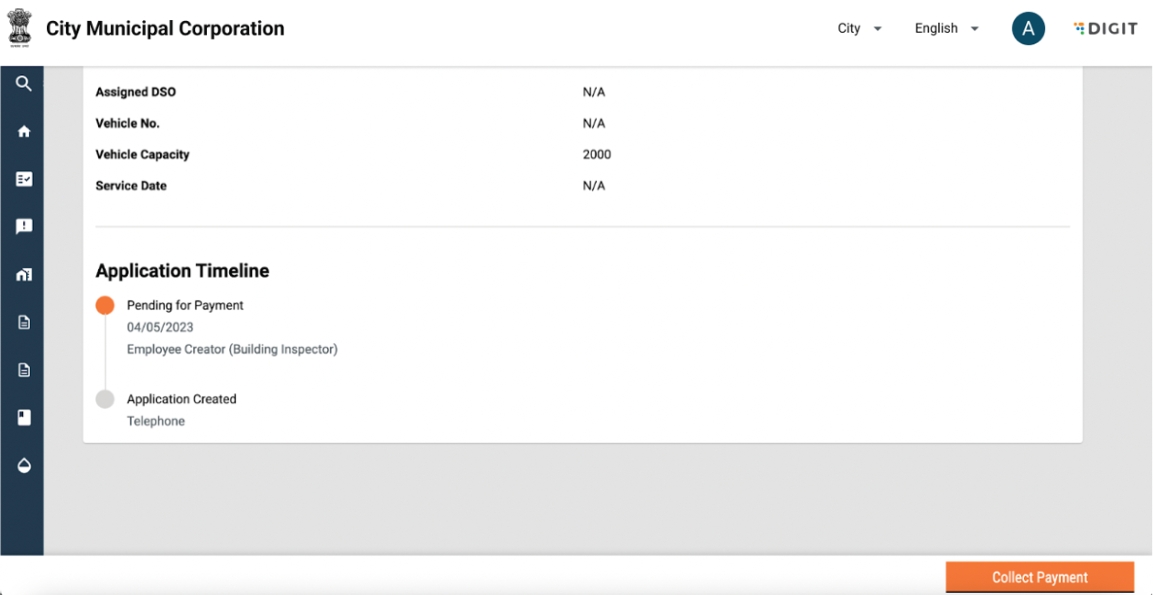
View application timeline.
Proceed to collect by clicking on the “Collect Payment” button.
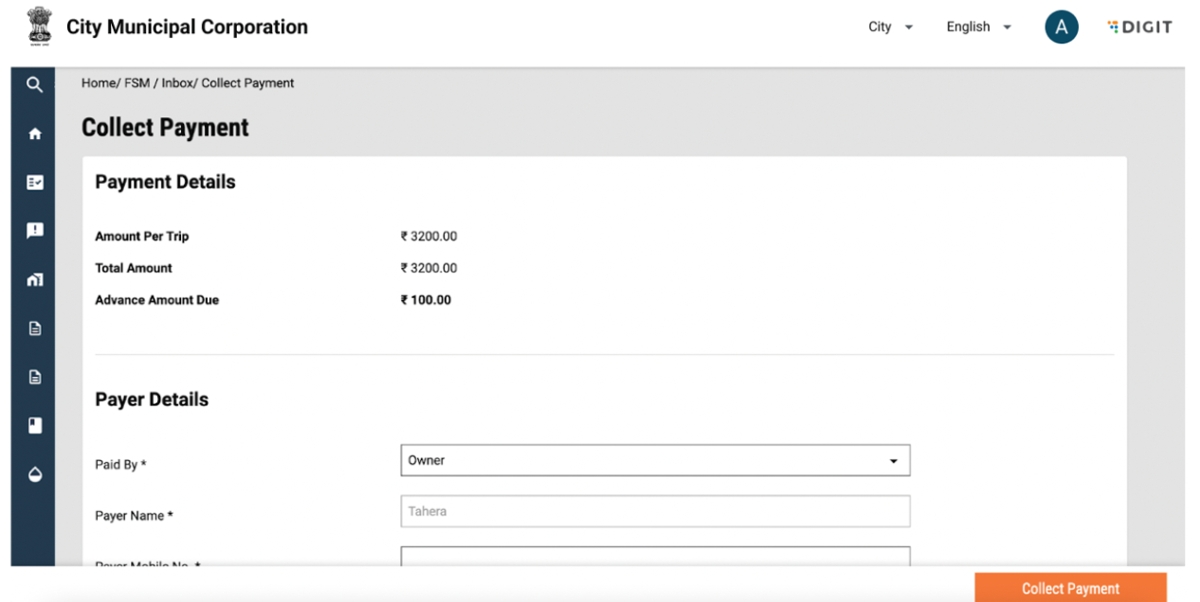
A user is redirected to the following screen on clicking on "Collect Payment".
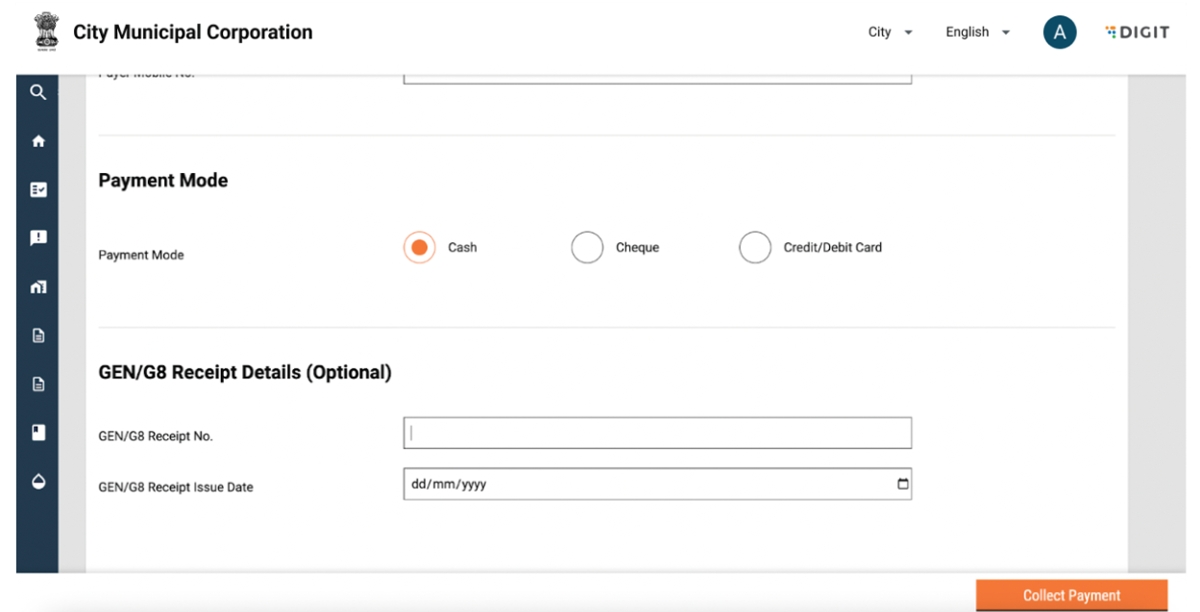
The following actions can be performed:
View collection amount, including total amount and amount per trip.
Enter/update payee details.
Select payment mode.
Gen/G8 receipt details by entering receipt no. and issue date.
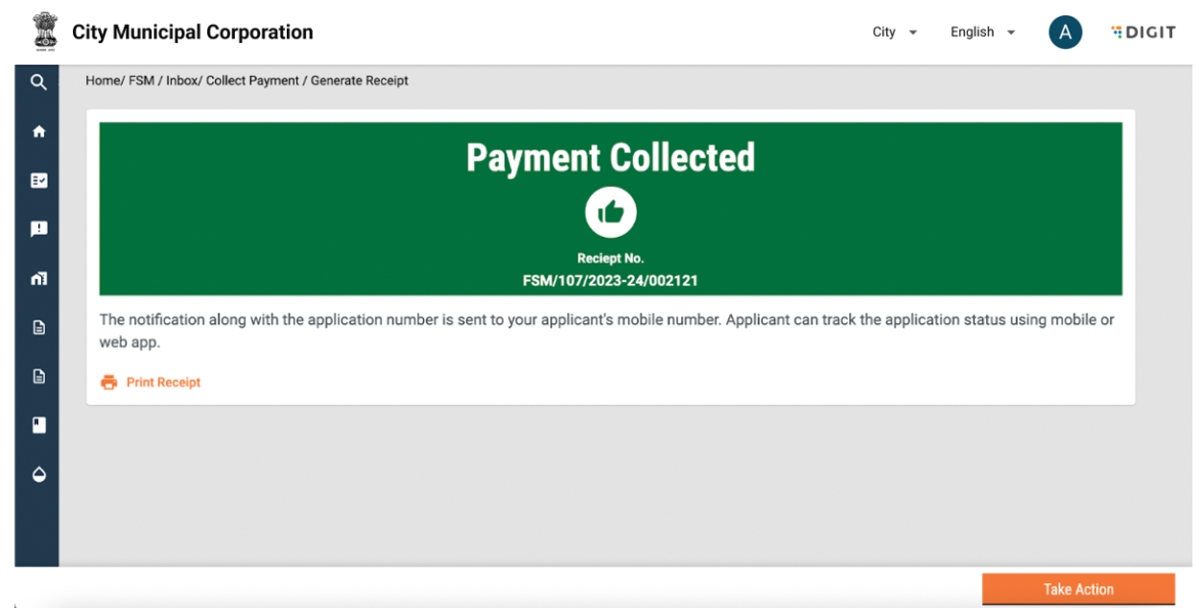
Upon clicking on collect, a user is redirected to a confirmation page.
User Actions
The following actions can be performed:
Print payment receipt.
Go back to home by clicking on the “Take Action” button.
The following is the view of the payment receipt.
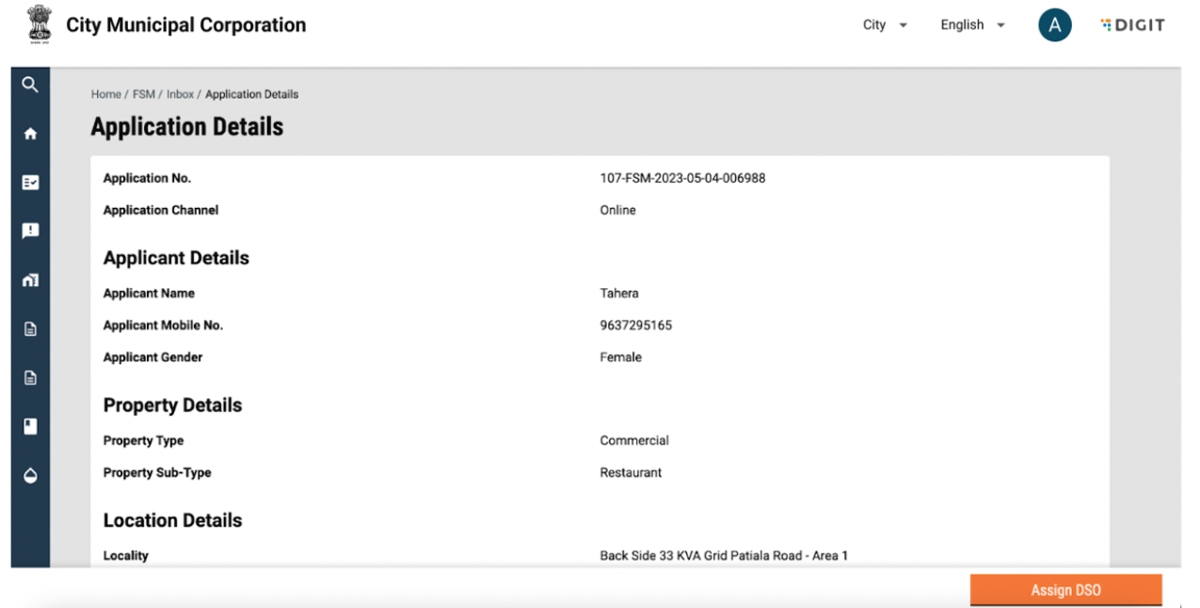
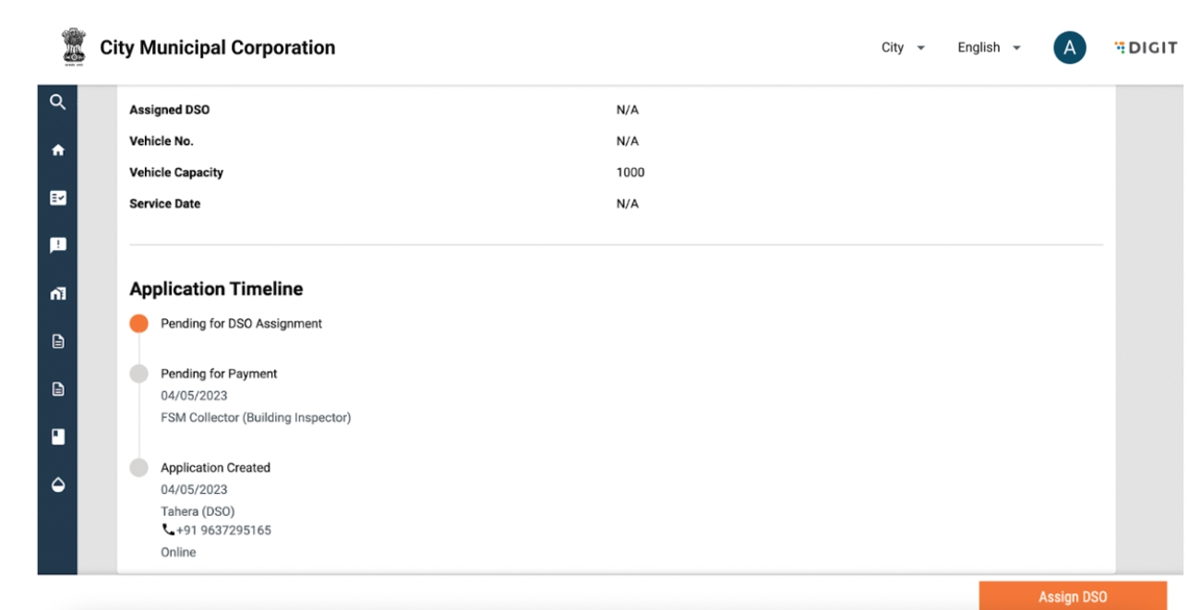
Open desludging applications are accessible by navigating to the inbox via the FSM homepage. Applications where DSO needs to be assigned will be shown as "Pending for DSO Assignment".
The following actions can be performed:
Search for an active application using “Application No." and “Mobile No.”.
Clear Search by clicking on “Clear Search”.
View and update applications by clicking on an application number.
Filter applications by ‘Locality’ using the locality dropdown.
Filter applications by ‘Status’.
Search for past applications by using “Search Application”.
On clicking on an application number, application details are displayed.
The following actions can be performed:
View application detail.
Assign DSO.
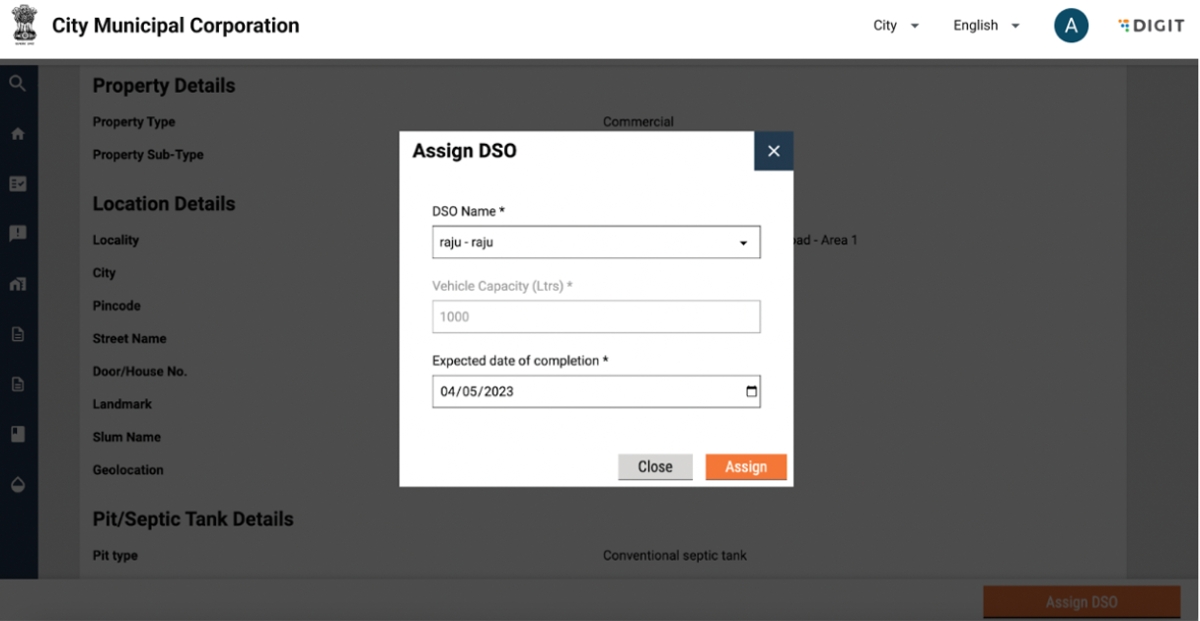
On clicking the "Assign DSO" button, a pop-up will occur.
The following actions can be performed:
Select DSO name via dropdown.
Select expected date of completion.
Close pop-up by clicking on the 'Close' button.
Close pop-up by clicking on the cross icon on the top right of the pop-up.
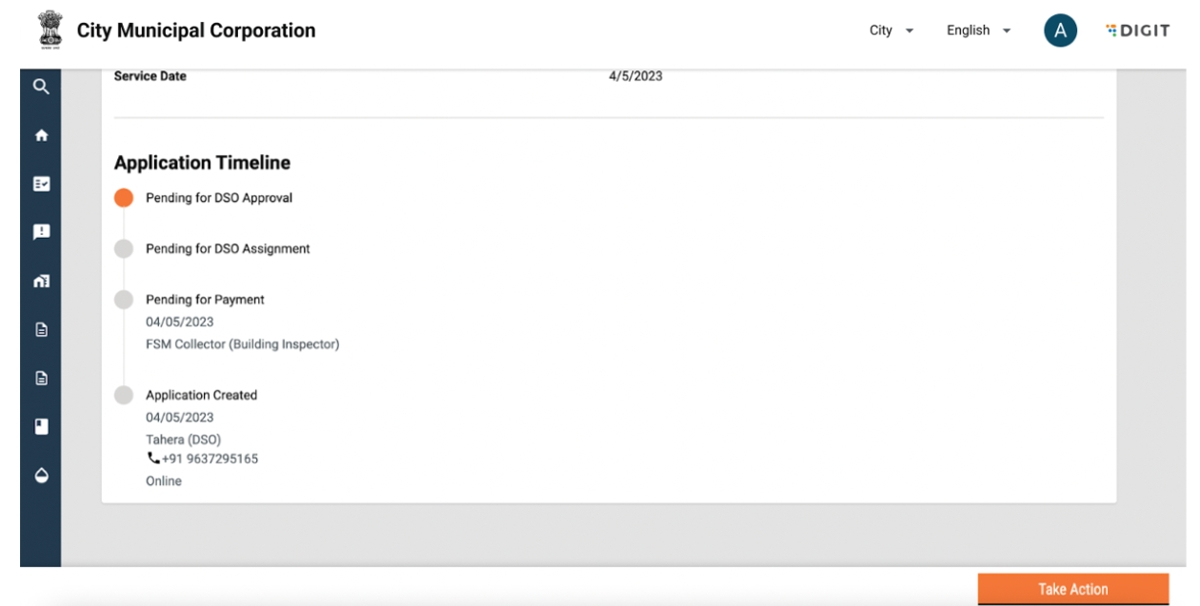
Clicking on 'Assign' will redirect the user to the application details page and display a snack bar as confirmation. The status of the application will be updated to “Pending for DSO Approval”.
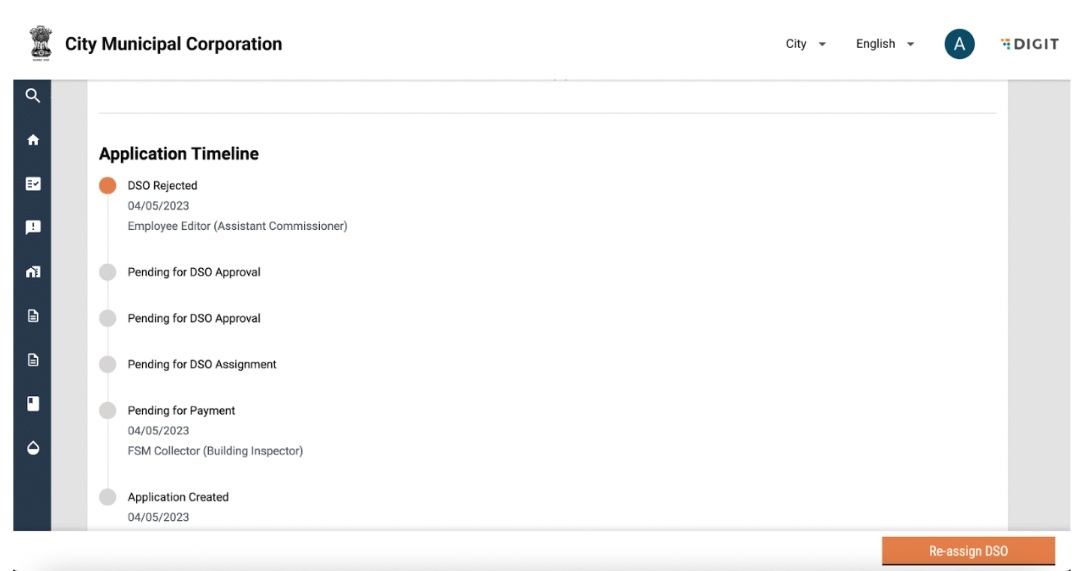
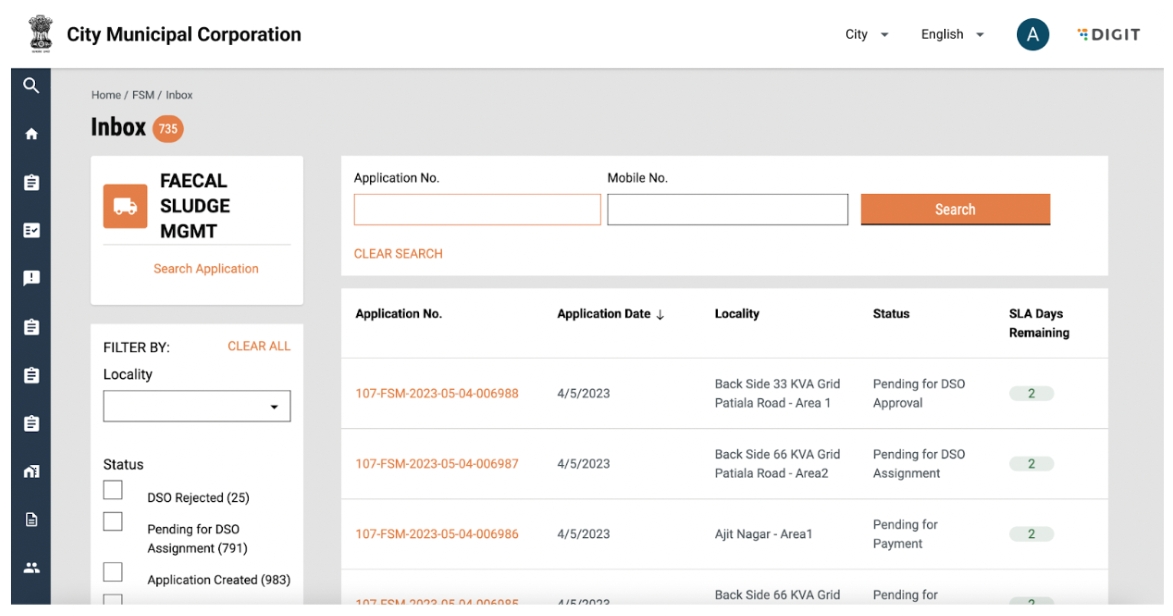
Employees can reassign to other DSOs in case the request has been rejected or declined by the DSO for some reason. Search for applications "Pending for DSO Approval" status.
The following actions can be performed:
Search for an active application using “Application No." and “Mobile No.”.
Clear search by clicking on “Clear Search”.
View and update applications by clicking on an application number.
Filter applications by ‘Localilty’ using the locality dropdown.
Filter applications by ‘Status’.
Search for past applications by using “Search Application”.
On clicking on an application number, application details are displayed.
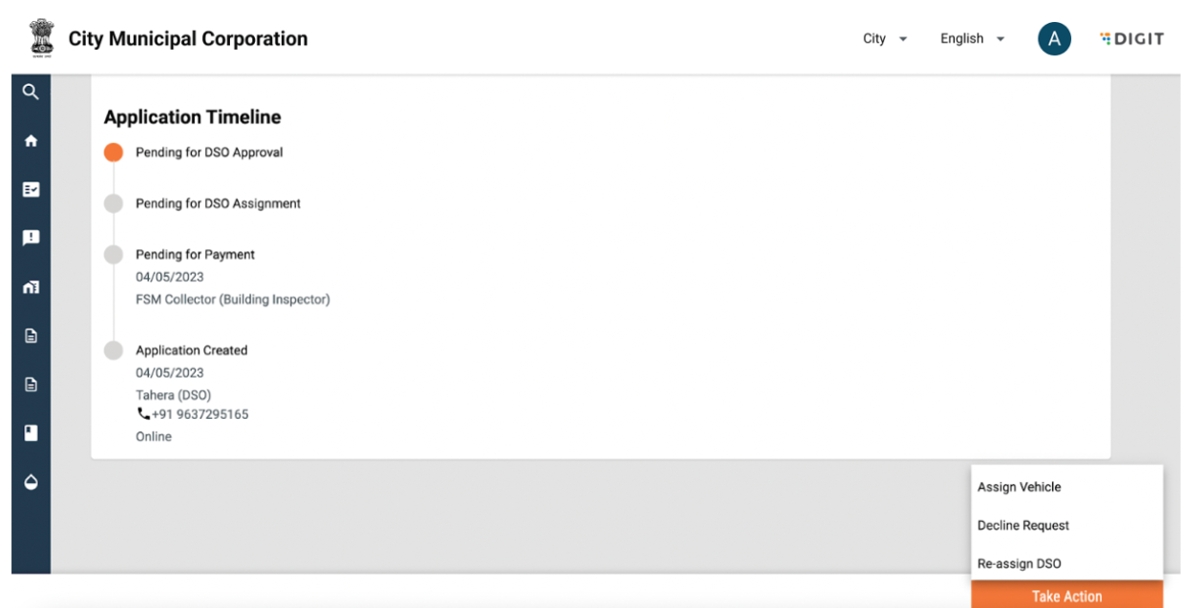
The following actions can be performed:
View application details.
Click on “Take Action” button.
The take action button has the following options:
Assign vehicle (on behalf of DSO).
Decline request (on behalf of DSO).
Re-assign DSO.
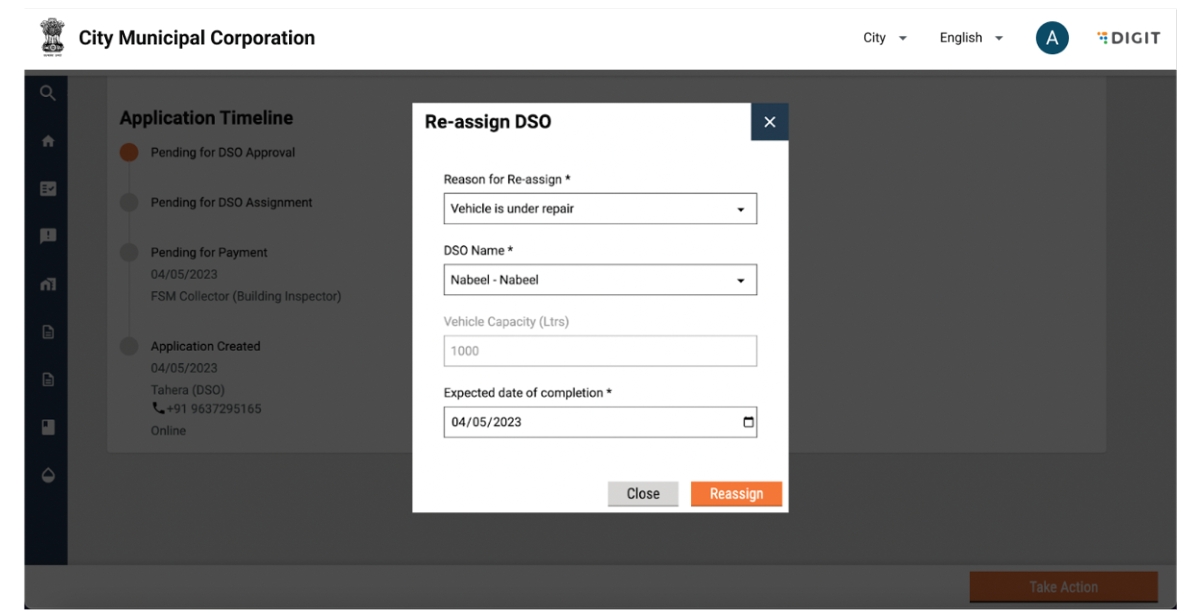
Clicking on “Re-assign DSO” will display the following pop-up.
The following actions can be performed:
Select “Reason for Re-assign”.
Select “DSO Name”.
Update “Expected date of completion”.
Close pop-up by clicking on the 'Close' button on the pop up.
Close pop-up by clicking on the cross icon on the top right of the pop up.
Confirm re-assignment by clicking on the ‘Reassign’ button.
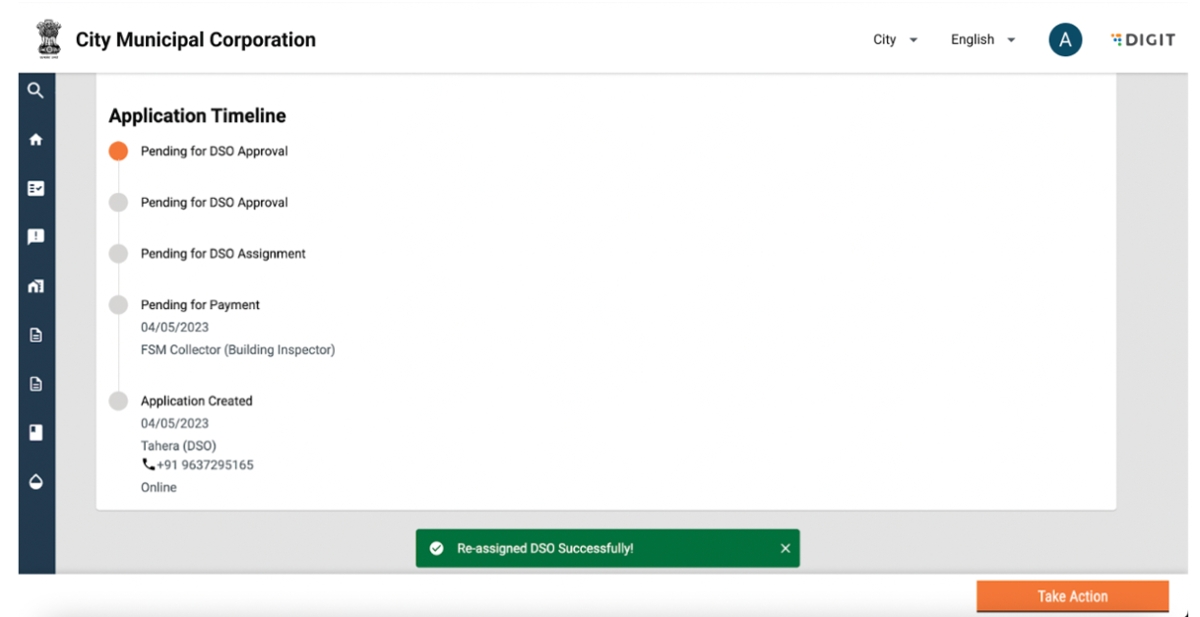
Clicking on 'Assign' will redirect the user to the application details page and display a snack bar as confirmation. The status of the application will remain as “Pending for DSO Approval".
Employees can be assigned the role of the DSO, and can decline a request on behalf of the DSO. Applications can be rejected by an employee when in “Pending for DSO Approval” stage.
User Actions
The following actions can be performed:
Search for an active application using “Application No." and “Mobile No.”.
Clear search by clicking on “Clear Search”.
View and update applications by clicking on an application number.
Filter applications by ‘Localilty’ using the locality dropdown.
Filter applications by ‘Status’.
Search for past applications by using “Search Application”.
On clicking on an application number, application details are displayed.
The following actions can be performed:
View application details.
Click on the “Take Action” button.
The take action button has the following options:
Assign vehicle (on behalf of DSO).
Decline request (on behalf of DSO).
Re-assign DSO.
Clicking on “Decline Request’” will display the following pop-up.
User Actions
The following actions can be performed:
Reason for declining.
Enter comments.
Close pop-up by clicking on the 'Close' button on the pop-up.
Close pop-up by clicking on the cross icon on the top right of the pop-up.
Confirm decline request by clicking on the “Decline Request” button.
A snack bar will confirm decline and the application timeline will be updated to "DSO Rejected".
Employees can be assigned the role of the DSO, and can assign a vehicle and a sanitation worker on behalf of the DSO. A vehicle and a sanitation worker can be assigned when the application is in the “Pending for DSO Approval" stage.
The following actions can be performed:
Search for an active application using “Application No.” and “Mobile No.”
Clear search by clicking on “Clear Search”.
View and update applications by clicking on an application number.
Filter applications by ‘Locality’ using the locality dropdown.
Filter applications by ‘Status’.
Search for past applications by using “Search Application”.
On clicking on an application number, application details are displayed.
The following actions can be performed:
View application details.
Click on the “Take Action” button.
The take action button has the following options:
Assign vehicle (on behalf of DSO).
Assign sanitation worker (on behalf of DSO).
Decline request (on behalf of DSO).
Re-assign DSO.
Clicking on “Assign Vehicle and Sanitation Worker’’ will display the following pop-up.
The following actions can be performed:
Update vehicle registration number.
Update the driver and the sanitation worker.
Choosing a driver is mandatory.
Close pop-up by clicking on the 'Close' button on the pop up.
Close pop-up by clicking on the cross icon on the top right of the pop up.
Confirm decline request by clicking on the 'Assign' button
A snack bar will confirm assignment of vehicle and driver, and the application timeline will be updated to "DSO in Progress".
Once DSO is in progress, the number of trips can be updated. This can be done by both the ULB and the DSO.
The following actions can be performed:
Search for an active application using “Application No.” and “Mobile No.”.
Clear search by clicking on “Clear Search”.
View and update applications by clicking on an application number.
Filter applications by ‘Locality’ using the locality dropdown.
Filter applications by ‘Status’.
Search for past applications by using “Search Application”.
On clicking on an application number, application details are displayed.
The following actions can be performed:
View application details.
Click on the “Take Action” button.
The take action button has the following options:
Complete request.
Update/schedule trips.
Re-assign DSO.
On clicking on Update/Schedule trips, the following pop up is displayed:
The following actions can be performed:
Increase the number of trips by clicking on the + button.
Decrease number of trips by clicking on the - button.
Close pop-up by clicking on the Close button on the pop up.
Close pop-up by clicking on the cross icon on the top right of the pop up.
Confirm update/schedule trips by clicking on the “Update/schedule” button.
A snack bar will confirm the updated number of trips.
Once the service request has been completed and all pending payment has been collected, the same has to be confirmed in the system. This can be done by selecting the “Complete Request” button in the “Take Action” button. On clicking on "Complete Request", the following pop-up is displayed:
The following actions can be performed:
Confirm/update service date.
Confirm/update the volume of waste collected.
Confirm/update pit details.
Upload pit photo
Close pop-up by clicking on the 'Close' button on the pop up.
Close pop-up by clicking on the cross icon on the top right of the pop up
Confirm details by clicking on the ‘Completed' button.
A snack bar will confirm that request has been completed and the status will be updated to “Waiting for Disposal”.
