Loading...
Loading...
Loading...
Loading...
Loading...
Loading...
Loading...
Loading...
Loading...
Loading...
Loading...
Loading...
Loading...
Loading...
Loading...
Loading...
Loading...
Loading...
Loading...
Loading...
Loading...
Loading...
Loading...
Loading...
Loading...
Loading...
Loading...
Loading...
Loading...
Loading...
Loading...
Loading...
Loading...
On this page:
Track attendance service allows the CBO user to capture the daily attendance of the wage seekers at work. During the weekend, it generates a muster roll and submits it for verification and approval to the ULB employees.
There are two types of requests raised by the CBOs. One is the request to close the project, second is to request to extend the completion period or time extension. Once these requests raised by CBOs are sent for approval, the same can be viewed and tracked from the My Requests option.
On this page:
Muster roll service lists all the muster rolls generated all across the Works/ Projects assigned to the logged-in CBO user. The CBO user can view the muster roll details along with its status and edit it in case the muster roll is sent back to CBO for correction by the ULB employee.
Manage estimates
Manage work orders
Manage measurement books
Manage attendance and muster rolls
Manage billing
Manage payments
Manage the schedule of rates
Manage organization
Manage wage seekers
Download artefacts such as BOQs, work orders, muster rolls, bills, project completion certificates
View and set up dashboards
Refer to the table below to understand the different user roles and the actions linked to each role.
Project Creator
Create
Search
View
Modify
Project
Project Viewer
Search
View
Project
Estimate Creator
Inbox
Create
Search
View
Estimate
Estimate Verifier
Inbox
Search
View
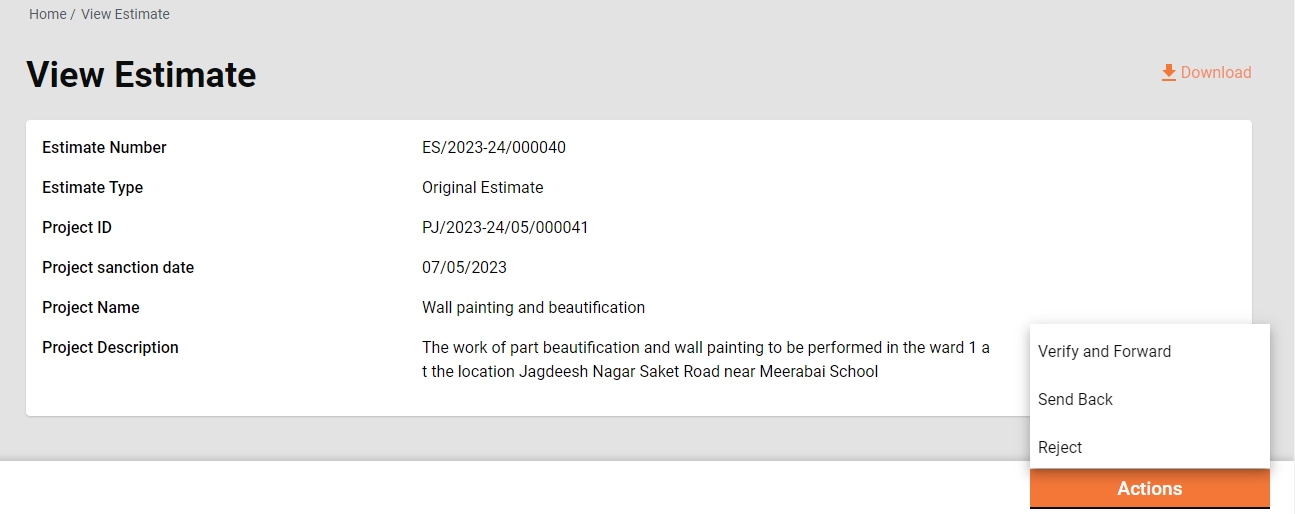
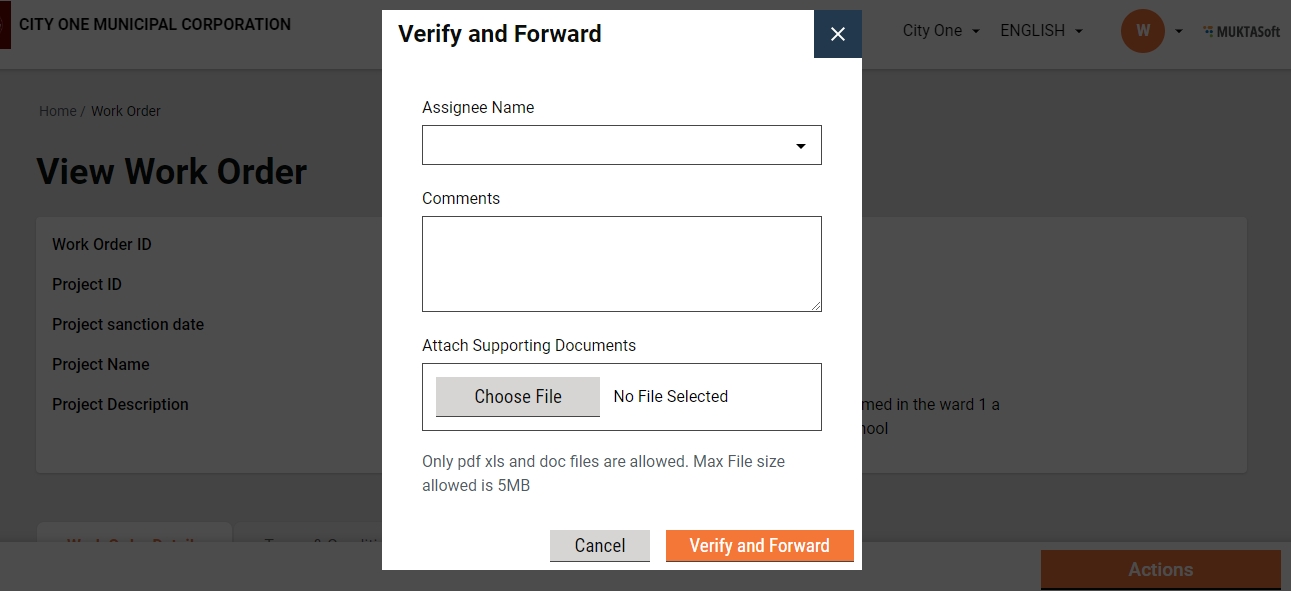
Verify and Forward
Estimate
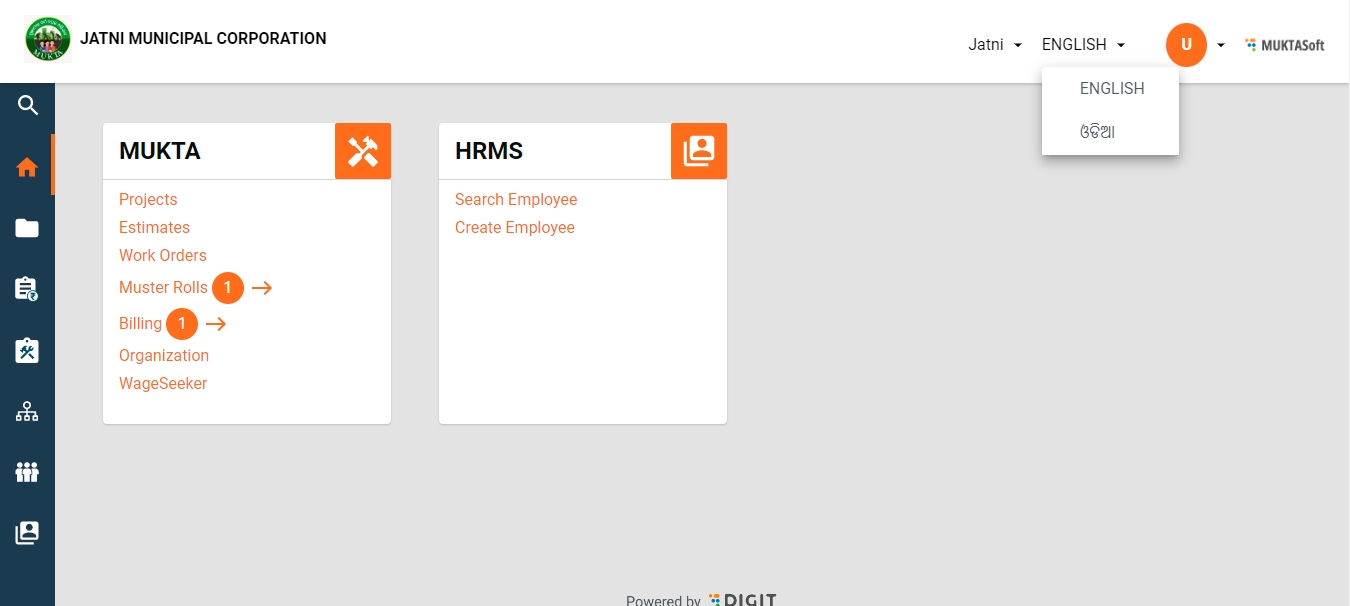
This section guides you through the details of using the MUKTASoft application for specific roles. Click on the relevant application below to learn how to use MUKTASoft.
To view all raised requests -
Step 1: Click on the My Service Requests option.
The list of service requests along with status and details will be available on screen.
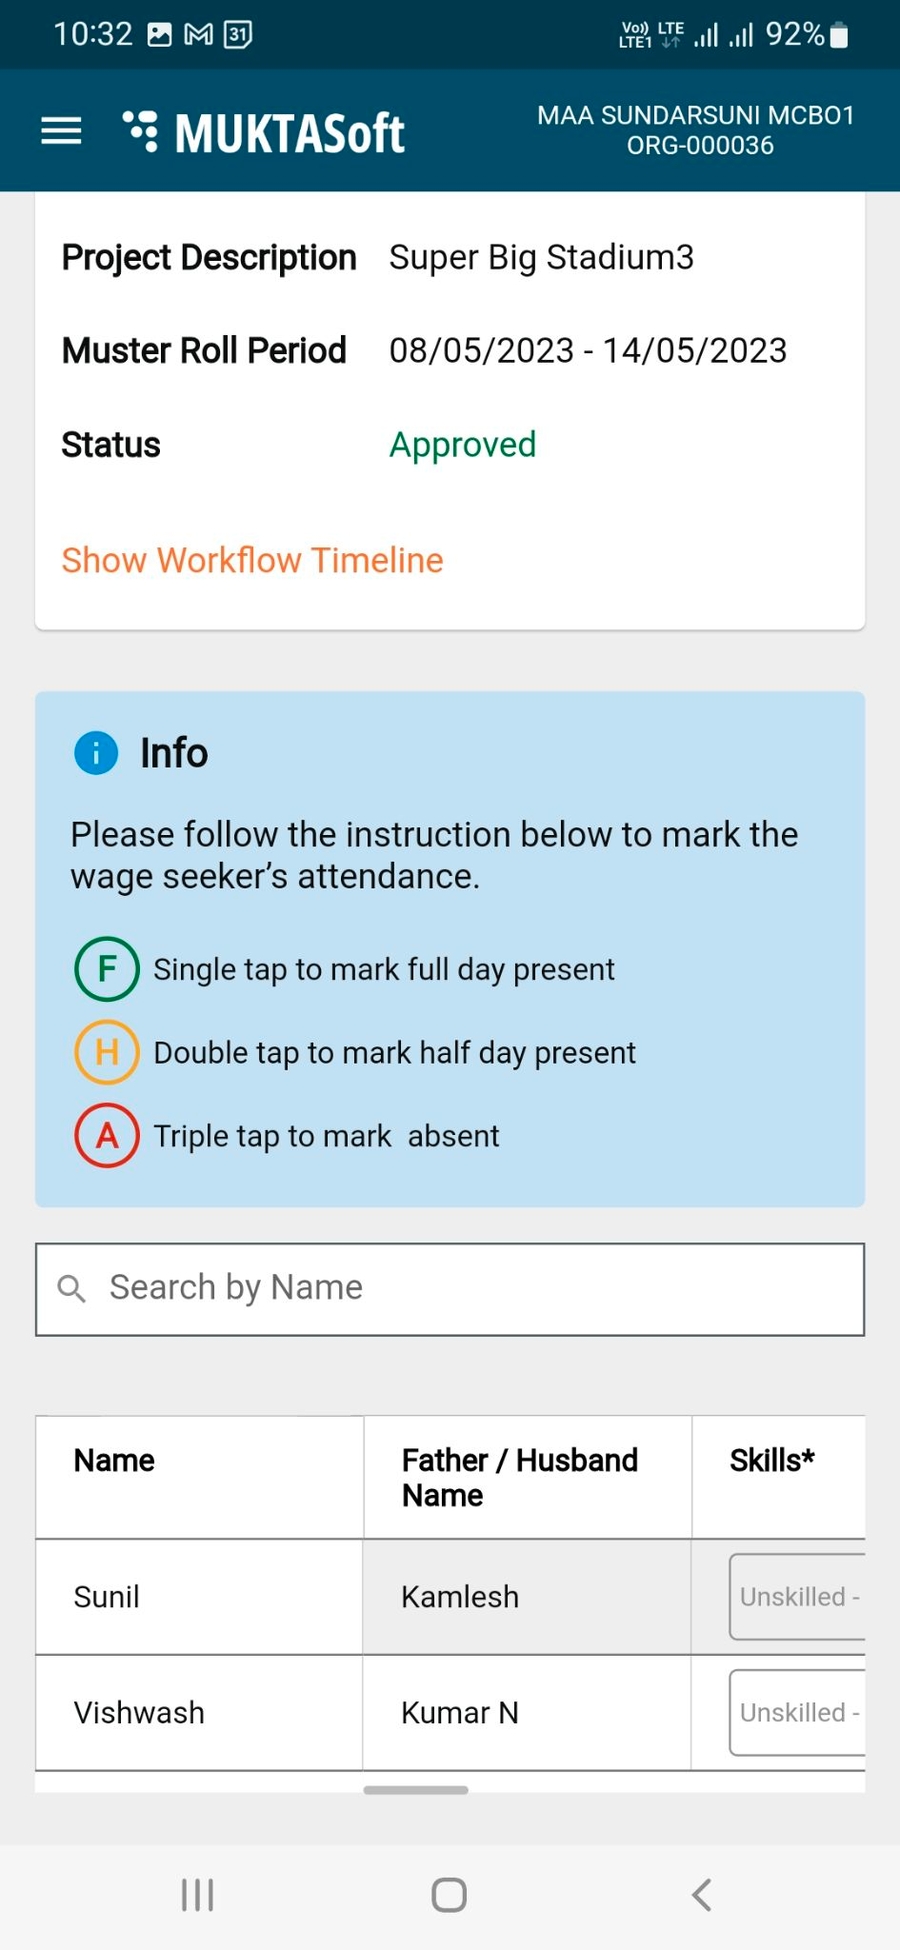
To view and track attendance:
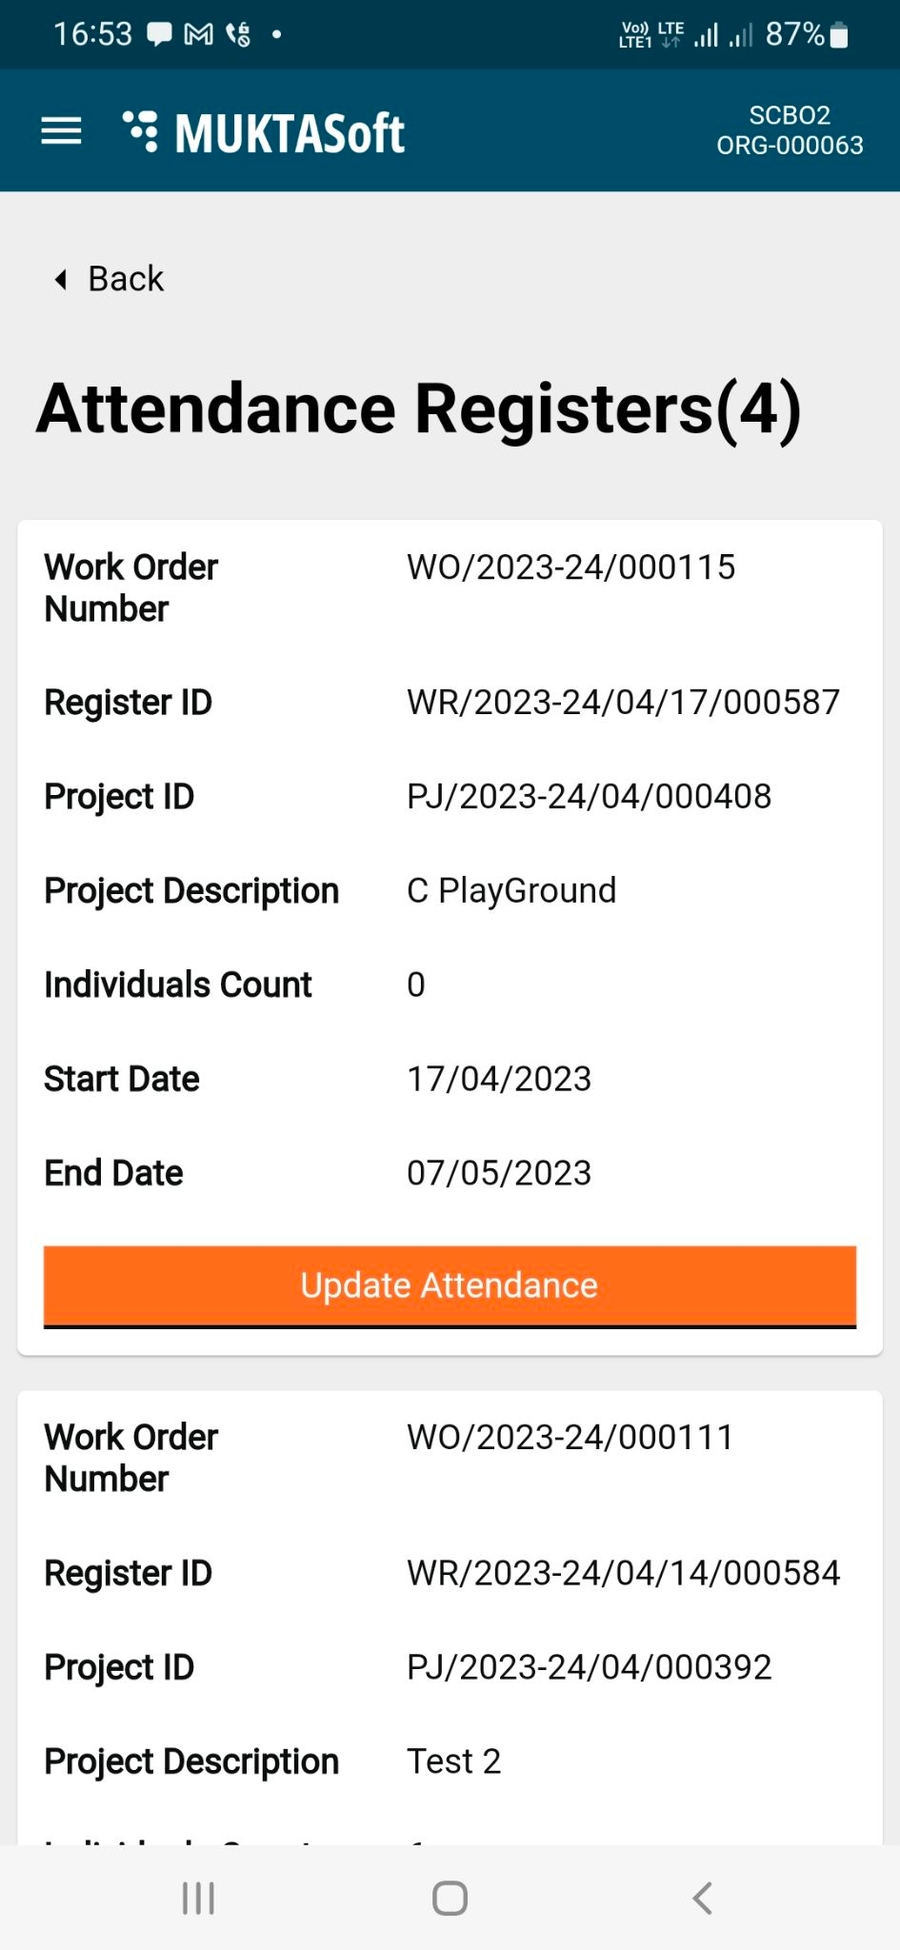
Step 1: Click on the Track Attendance option on the homepage. The page displays the different attendance registers.
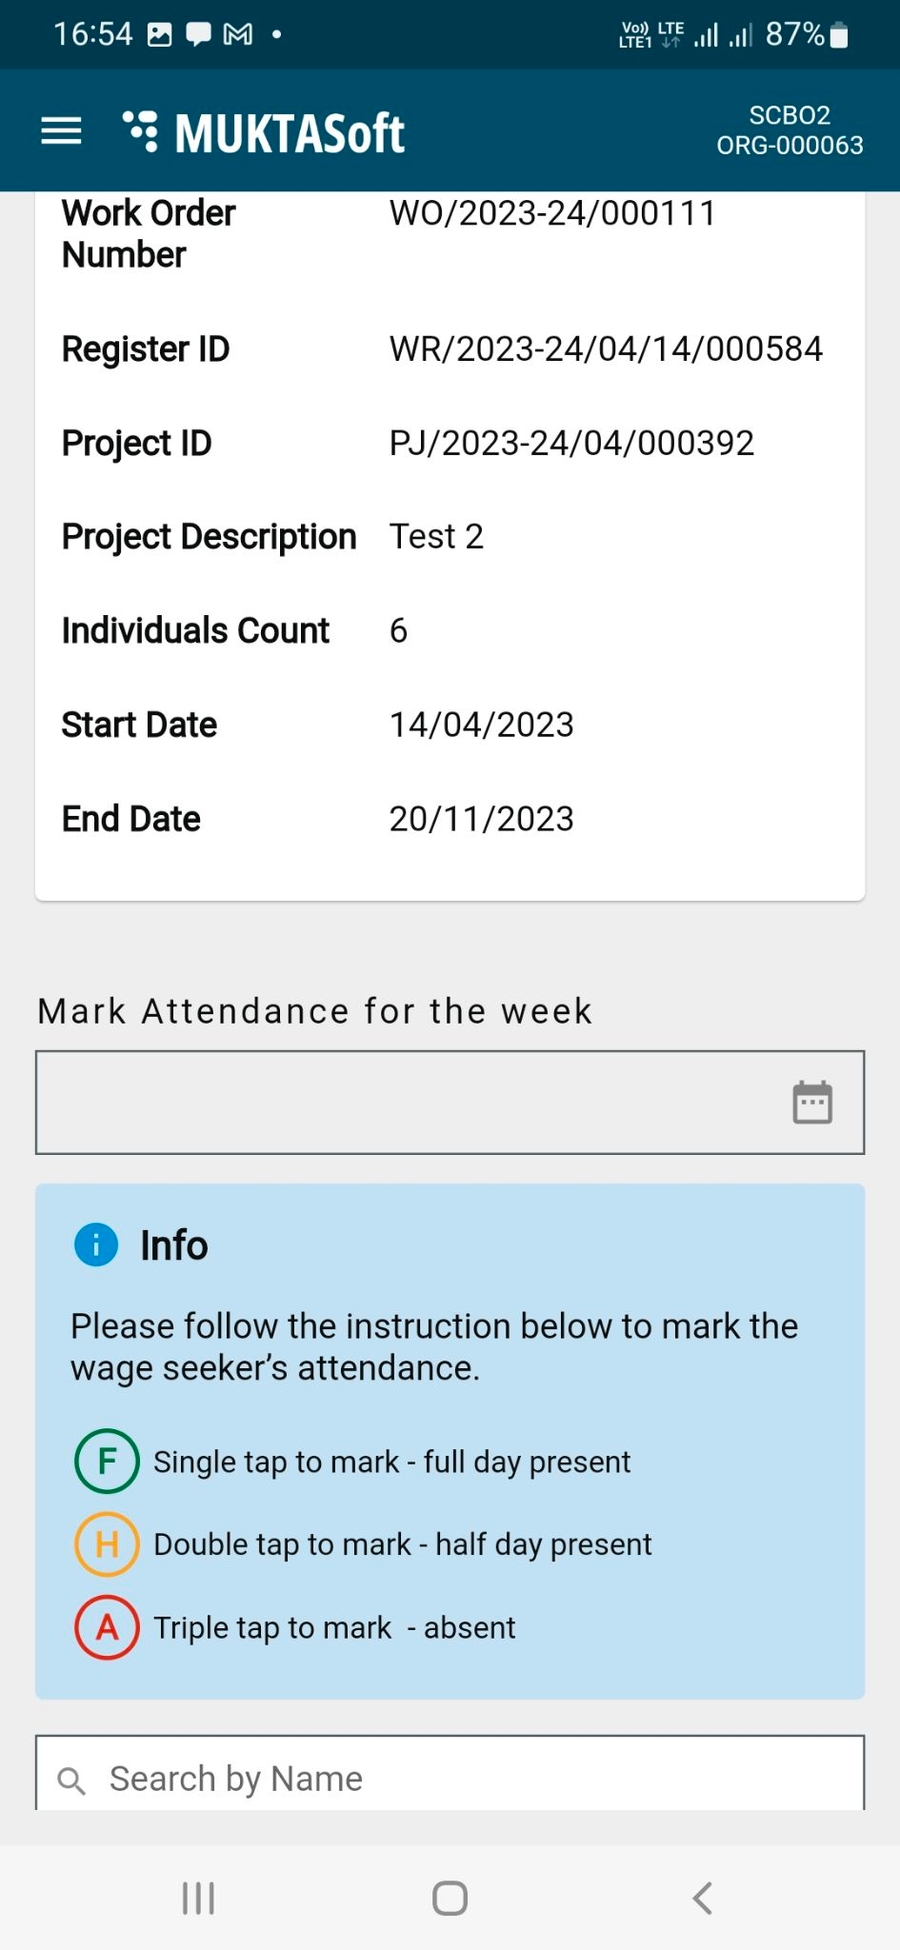
Step 2: Click on Update Attendance to view the individual attendance and mark attendance for the week.
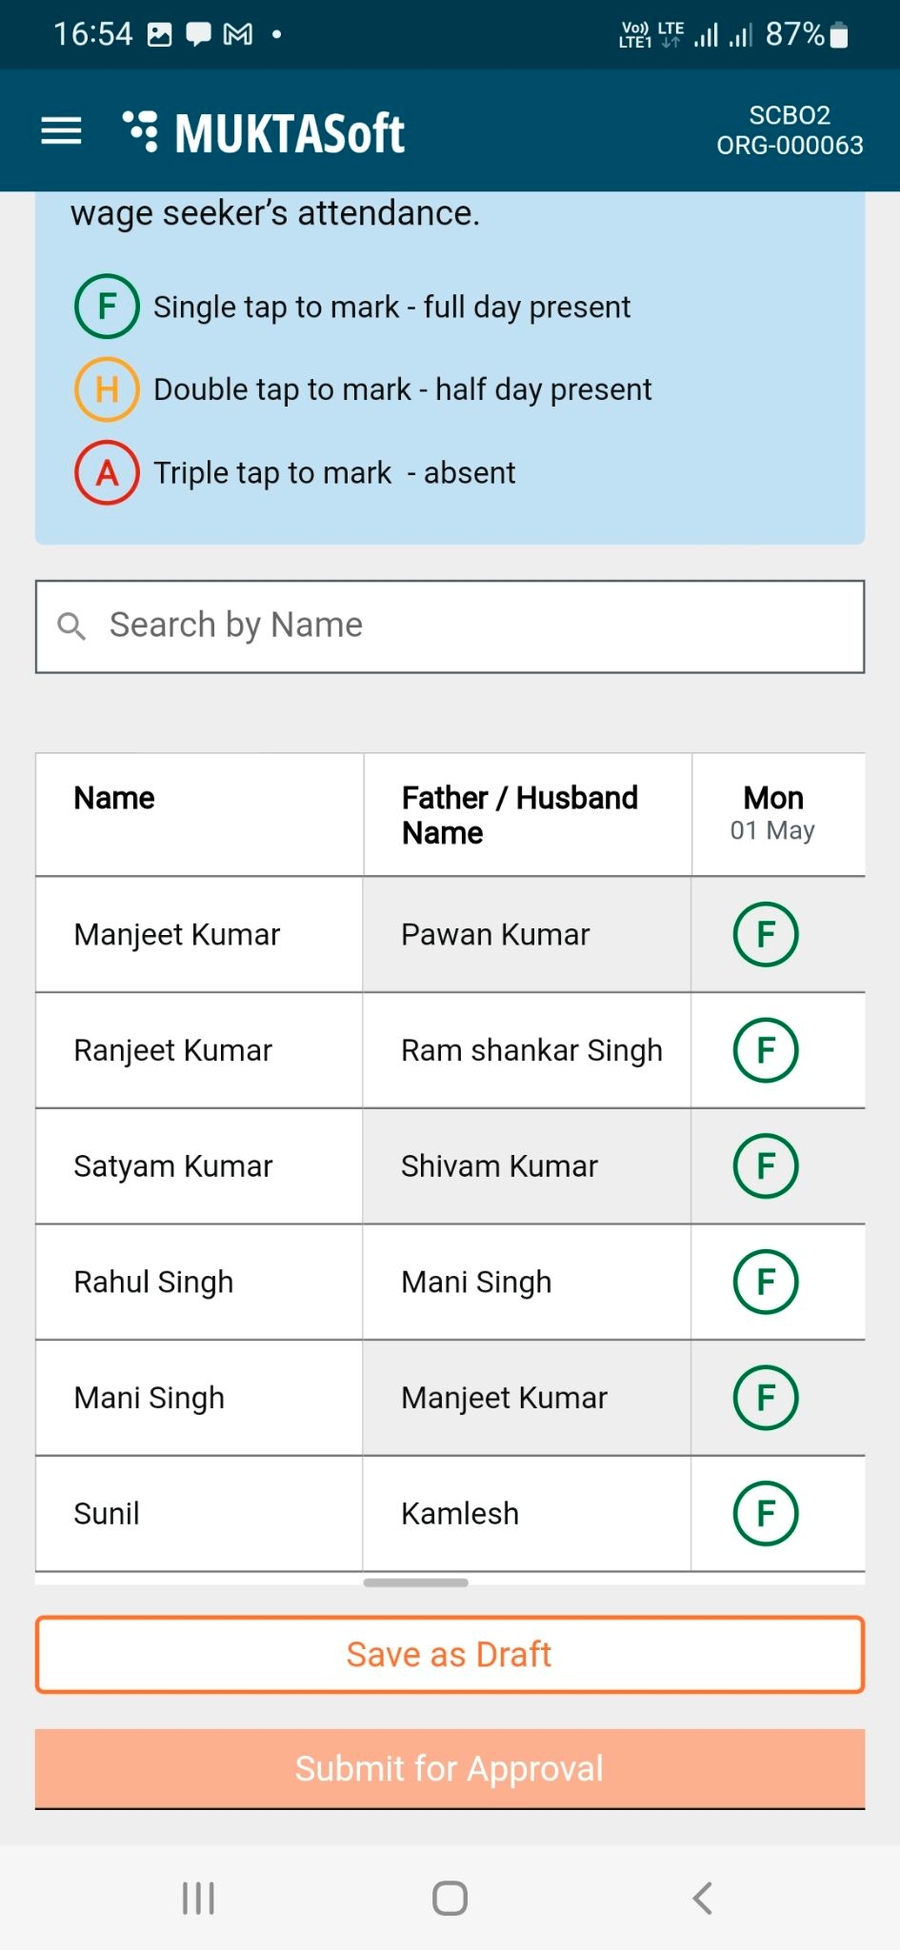
Step 3: In the Mark Attendance for the Week field - select the week for which attendance is to be marked. This shows the list of wage seekers engaged for the selected week with the option to mark attendance.
Step 4: Mark the attendance and click on Save as Draft to save details.
Step 5: Once the attendance is marked for the week, click on Submit for Approval. This generates the muster roll and sends it for verification and approval.
This section of the user manual guides you through the employee login process. Employees are using the MUKTASoft application online to capture the work completed measurement from the ground.
To log in to the system
Step 1: Enter the URL []/ Install MUKTASoft mobile application
Step 2: Open the application on your mobile device and select a language from the available options
You are logged in to the app and landed on the Home Page.
On the home page, menus are displayed, allowing users to navigate and perform various activities.
Users can change the application language from English to Odia or vice-versa for ease and convenience.
There are three main registries: wage seekers, organizations, and schedule of rates. Organizations are further divided into two categories: community-based organizations and vendors. The schedule of rates is divided into SOR definition, SOR rate, and rate analysis.
View Analysis Statements
View Analysis Statements
Technical Sanctioner
Inbox
Search
View
Technically Sanction
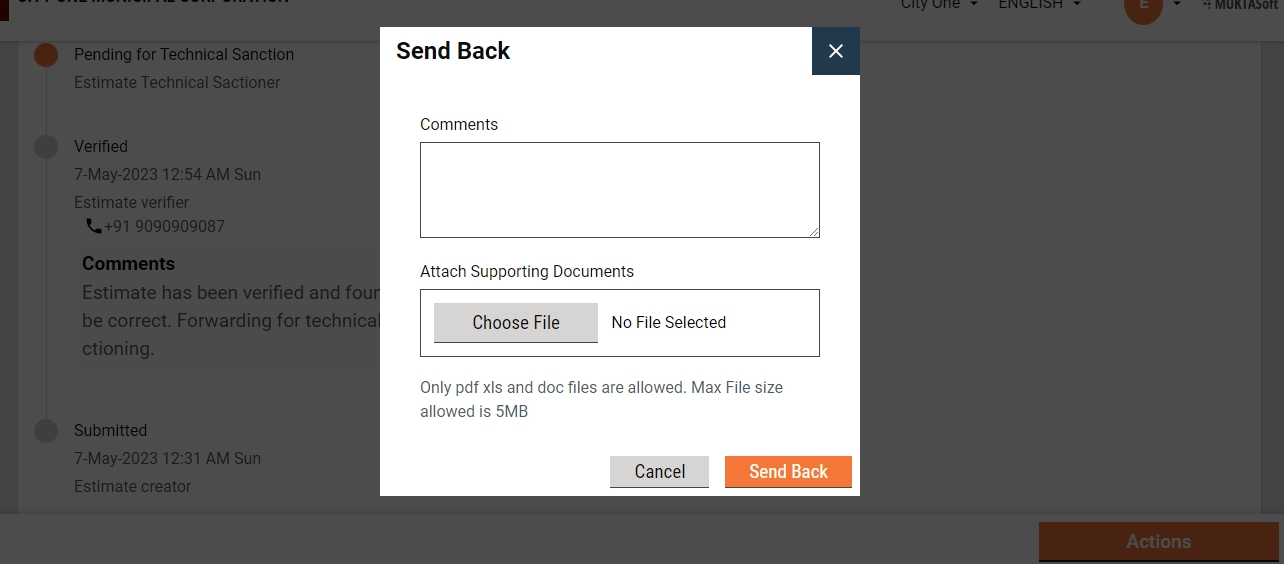
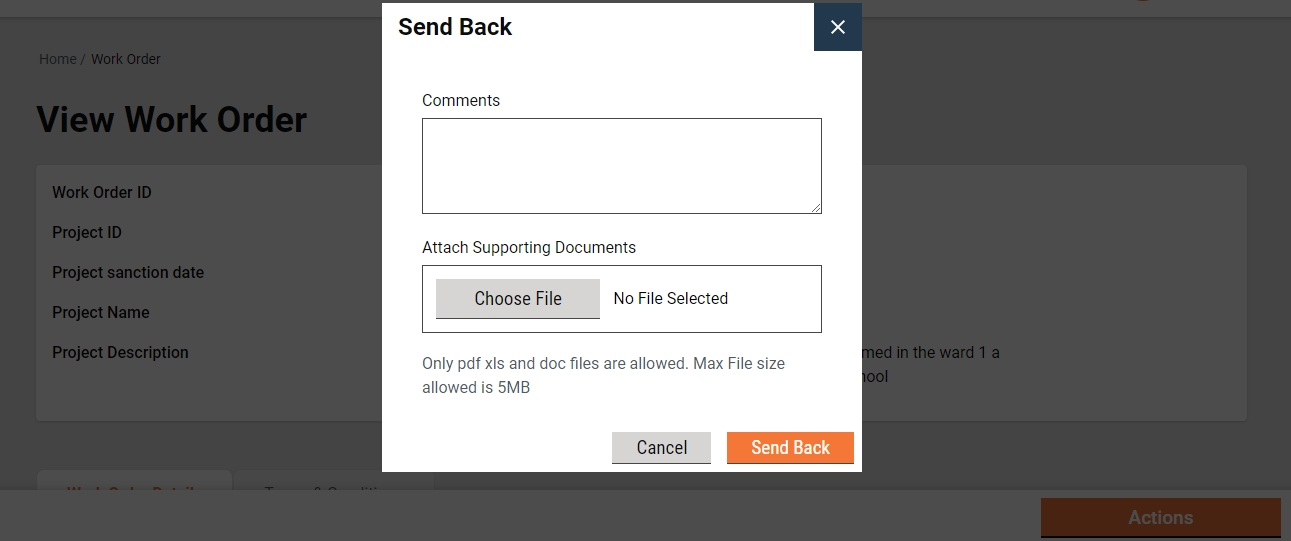
Send Back
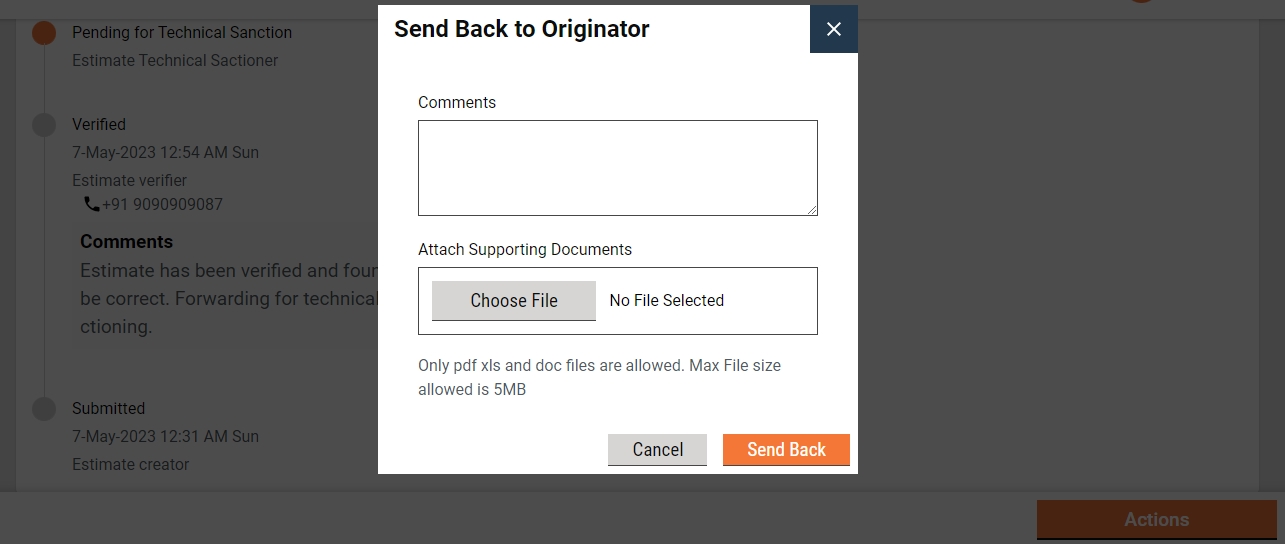
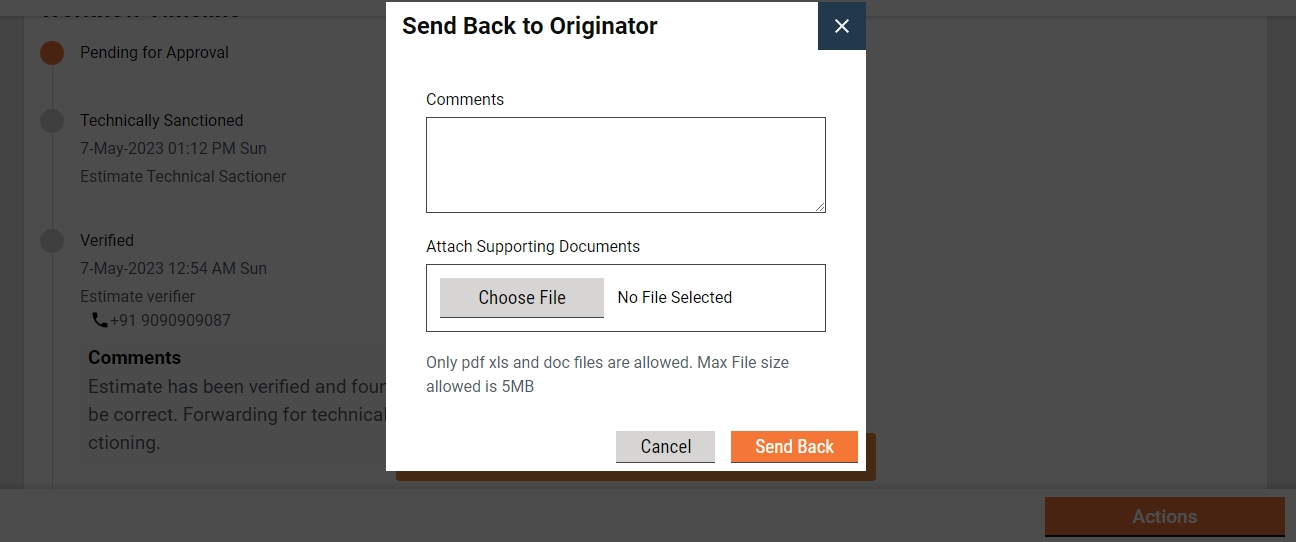
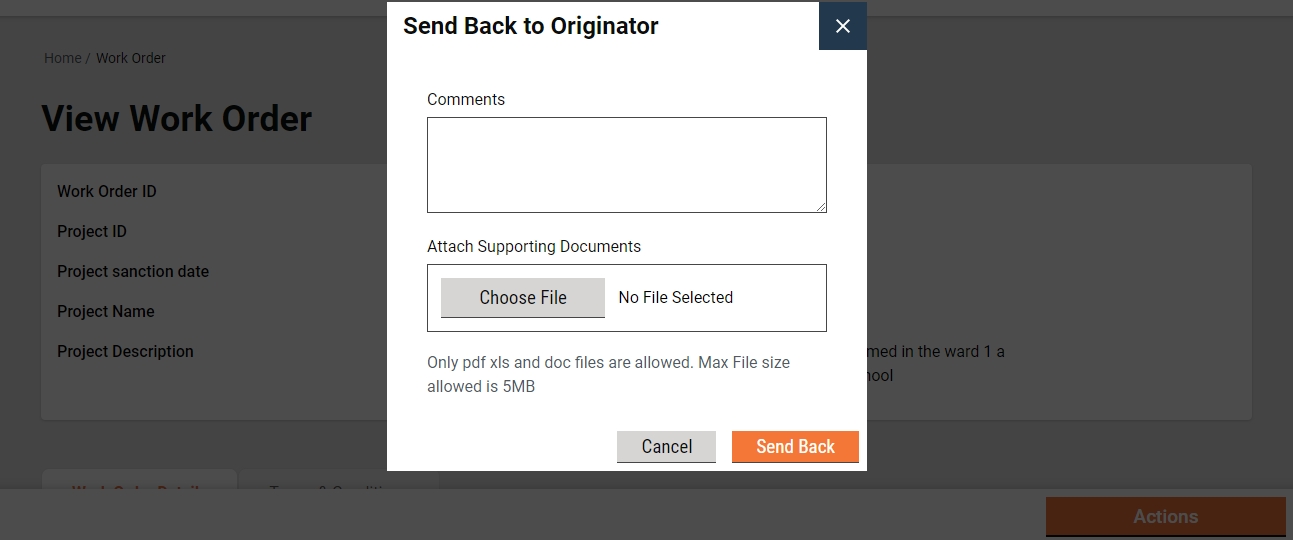
Send Back To Originator
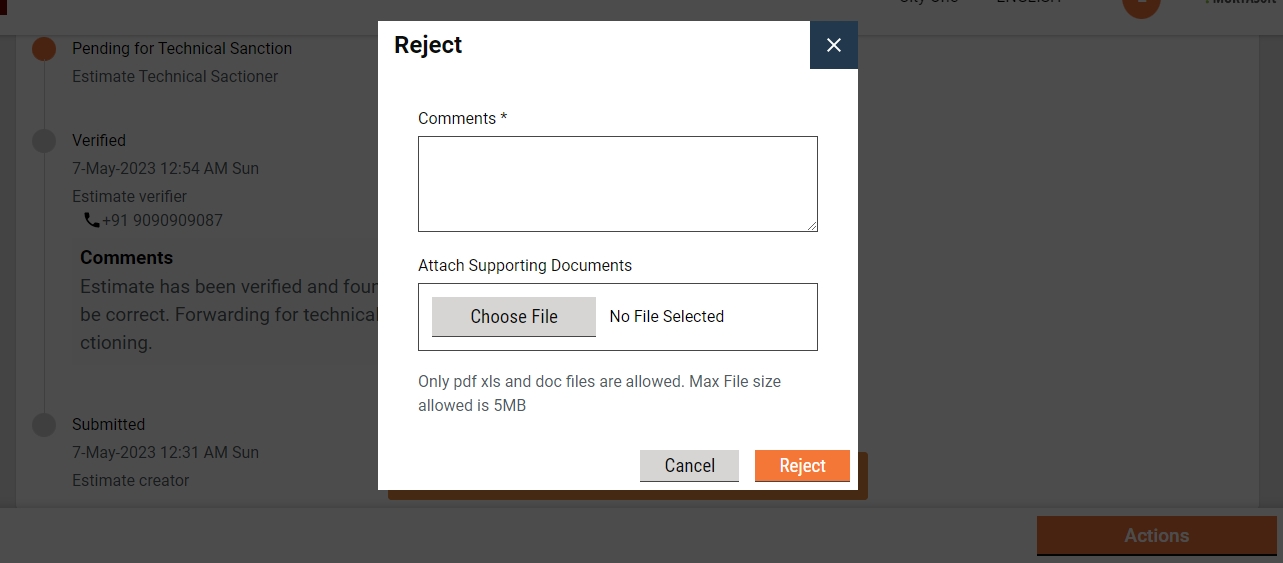
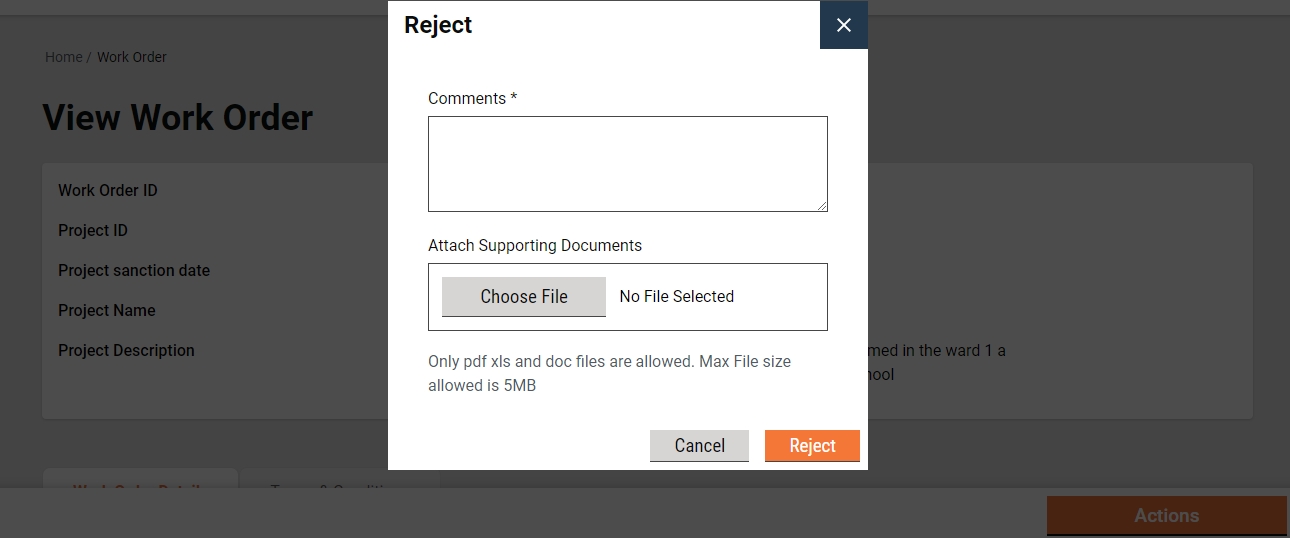
Reject
View Analysis Statements
Estimate
Estimate Approver
Inbox
Search
View
Approve
Send Back
Send Back To Originator
Reject
View Analysis Statements
Estimate
Estimate Viewer
Search
View
View Analysis Statements
Estimate
Work Order Creator
Inbox
Create
Search
View
Edit
Contract
Work Order Verifier
Inbox
Search
View
Verify and Forward
Send Back
Contract
Work Order Approver
Inbox
Search
View
Approve
Send Back
Send Back To Originator
Reject
Contract
Measurement Book Creator
Inbox
Create
Search
View
Edit
View Utilization Statements
Measurement Book
Measurement Book Verifier
Inbox
Search
View
Verify and Forward
Send Back
View Utilization Statements
Measurement Book
Measurement Book Approver
Inbox
Search
View
Approve
Send Back
Send Back To Originator
Reject
View Utilization Statements
Measurement Book
Muster Roll Verifier
Inbox
Search
View
Edit
Verify and Forward
Send Back
Muster Roll
Muster Roll Approver
Inbox
Search
View
Approve
Send Back
Muster Roll
Bill Creator
Inbox
Search
View
Create
Edit
Billing
Bill Viewer
Inbox
Search
View
Verify and Forward
Send Back
Billing
Bill Approver
Inbox
Search
View
Approve
Send Back
Reject
Billing
Bill Accountant
Search Payment Instruction
Create Payment Instruction
Create Revised Payment Instruction
Payment Instruction
MUKTA Admin
Create Organization
Search Organization
View Organization
Modify Organization
Search Wage Seeker
View Wage Seeker
Modify Wage Seeker
Registries
MDMS Admin
Search and View Schedule of Rates
Search and View SOR Rates
Add/ View/ Edit SOR Rates (ULBs)
Search Rate Analysis
View Rate Analysis
Edit Rate Analysis (ULBs)
Schedule of Rates
Schedule of rates - definition
Schedule of rates - rates
Schedule of rates - rate analysis
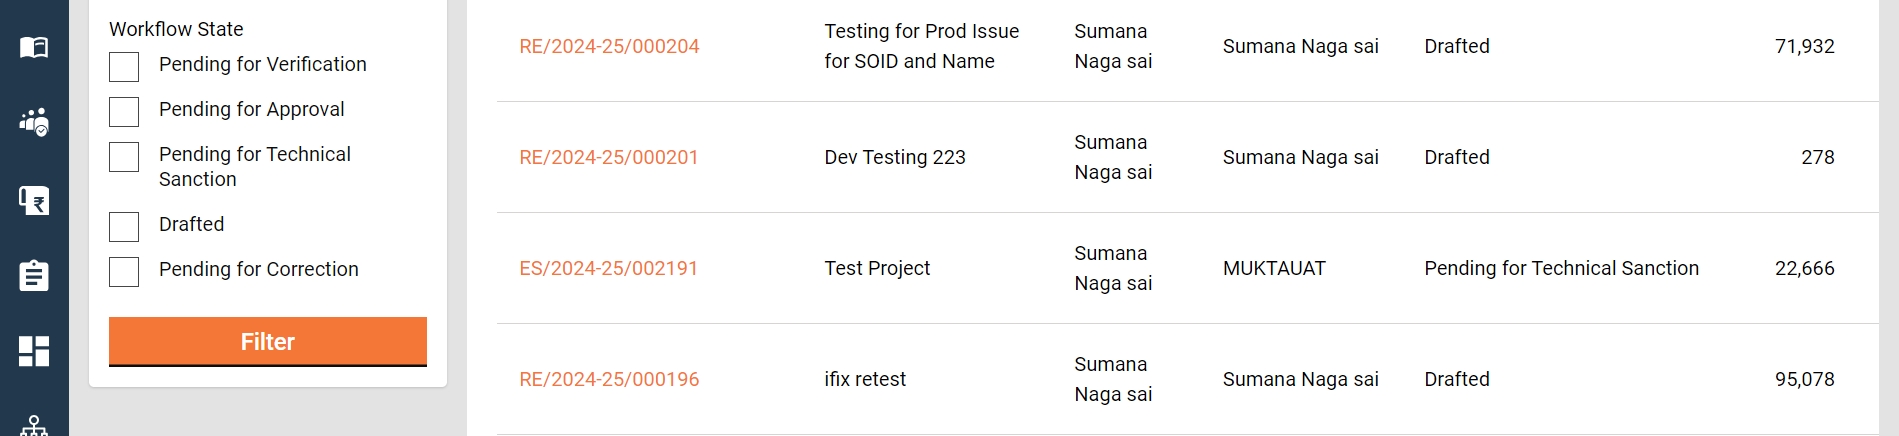
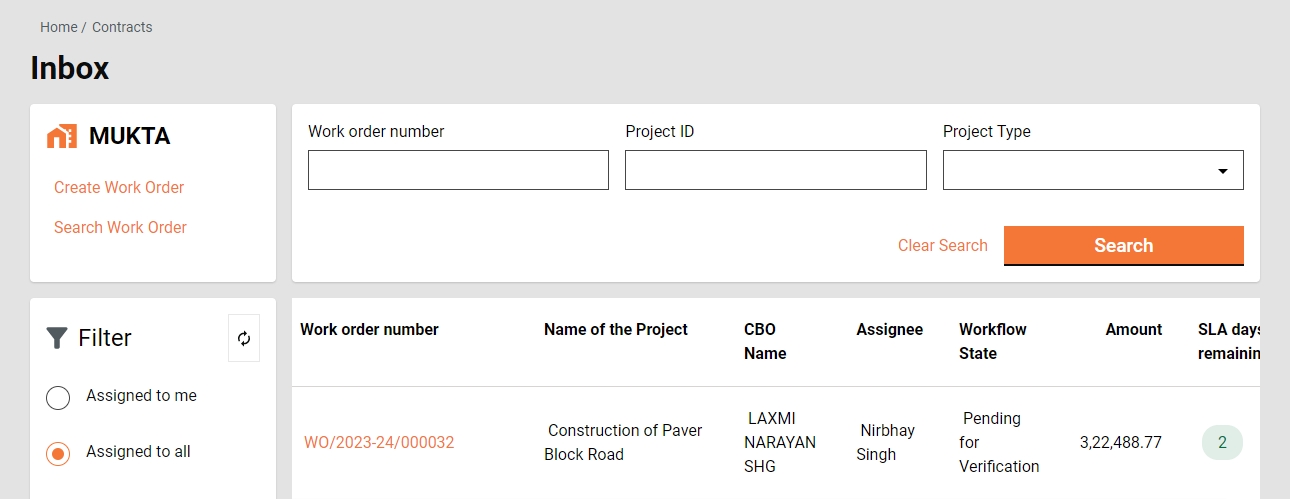
The work orders page, by default, displays all accepted and not completed work orders.
Enter the below filters to view specific results:
Work order number
CBO Name
Ward
The work orders can be sorted on the below parameters:
End Date
Start Date
Issue Date
Amount – Low to high
Select the relevant parameter to sort the view results.
It enables the user to view the complete work order details and then take action to create a measurement book (MB).
It enables the user to create a measurement book and navigate to the measurement book create page.
Step 1: On the Home Page, click on Work Orders
The work orders list is displayed.
Additionally from the Home Page, select the menu Revision of Rates.
The Search SOR page displays the works SORs listing. Select the applicable SOR to revise the rate.
Schedule the rate vision for selected or for all the SORs without selecting SORs.
A JOB will get scheduled and the same can be seen from “Show JOB”.
This feature enables the user to see all the jobs scheduled for revising the rate with the details given below.
JOB ID - It is a system-generated ID to identify the job uniquely
Scheduled on date - It is the date on which the job is scheduled
Effective from - It is the effective date of rates from which new rates will become effective and the existing rates will get closed on the previous day of this date
Number of SORs scheduled - It is the number of SORs scheduled to revise the rate
Successful - It is the count of SORs for which the rate is revised successfully
Failed - It is the count of SORs for which rate revision failed
Status - Status of job
Step 3: Select the user type, either CBO or Employee to log in.
Step 4: Enter the mobile number and click on Continue.
Step 5: For Employee users enter the User Name, Password and City.
Step 6: Click on the Forgot Password option in case you do not remember your password.
To change language -
Step 1: On the home page, tap on the menu icon () in the top left corner.
Step 2: Select the preferred language from the available list of languages.
The system menu and prompts are now displayed in the selected language.
To logout from the app -
Step 1: On the home page, tap on the menu icon () in the top left corner.
Step 2: Click on Logout.
You are logged out of the system.
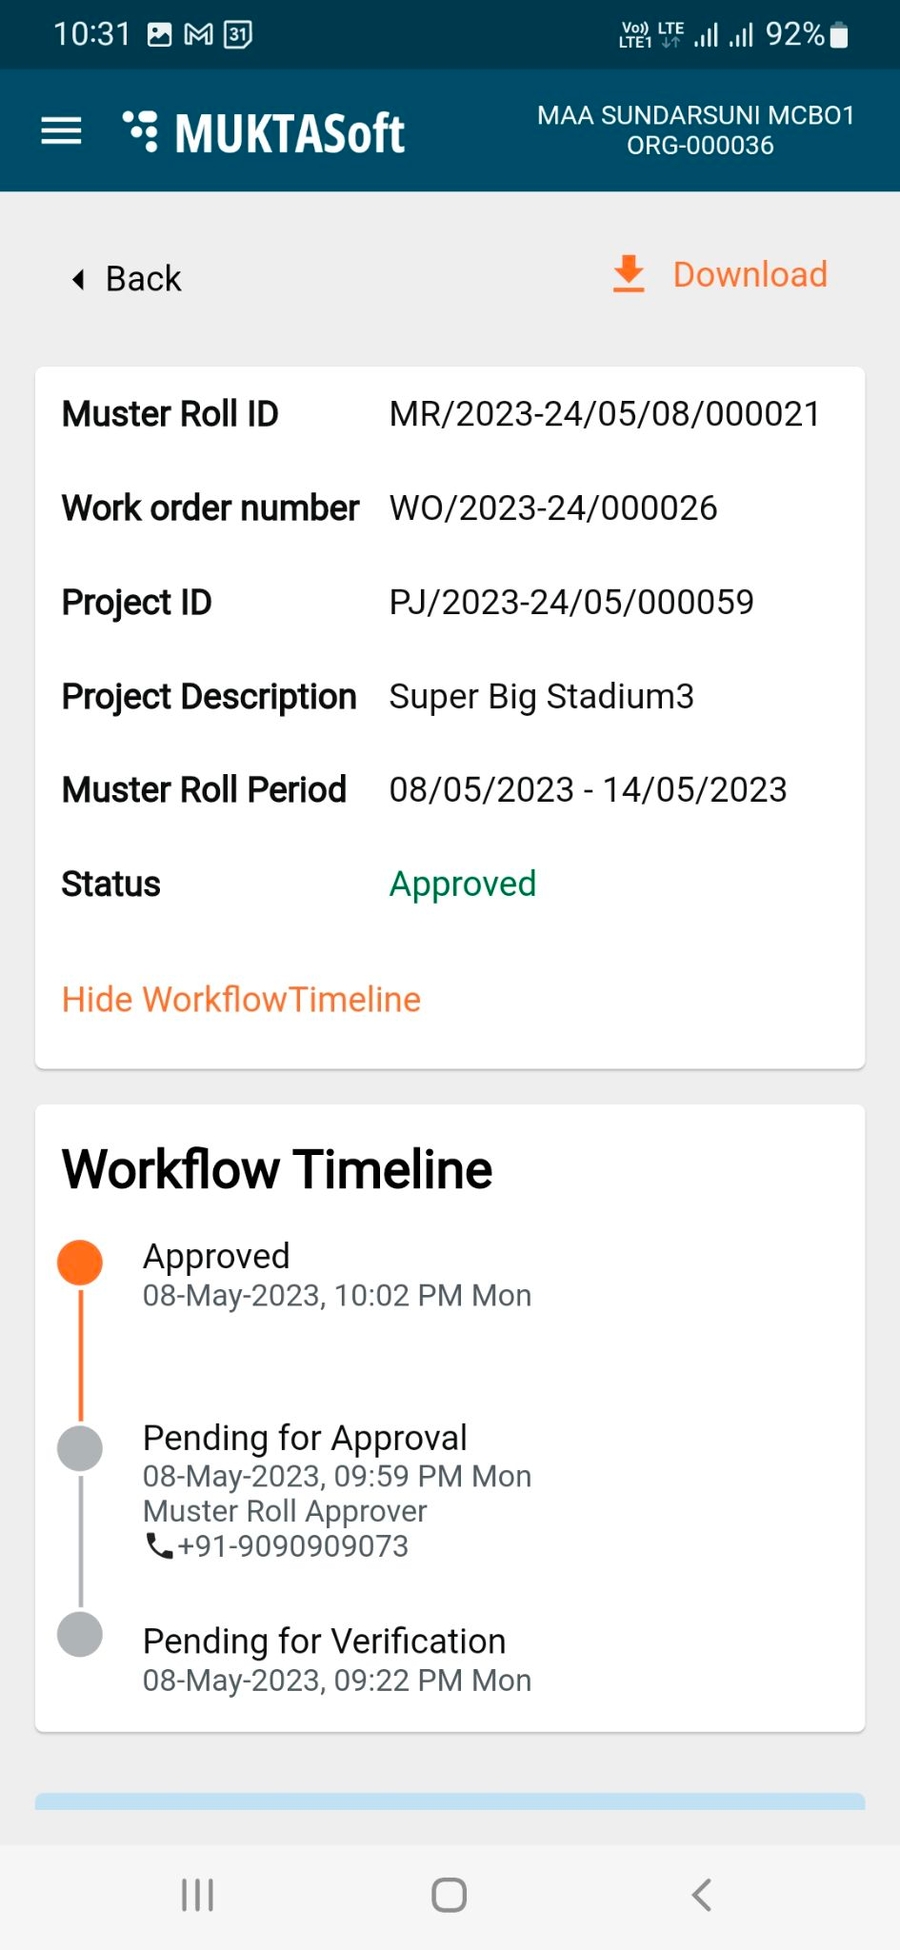
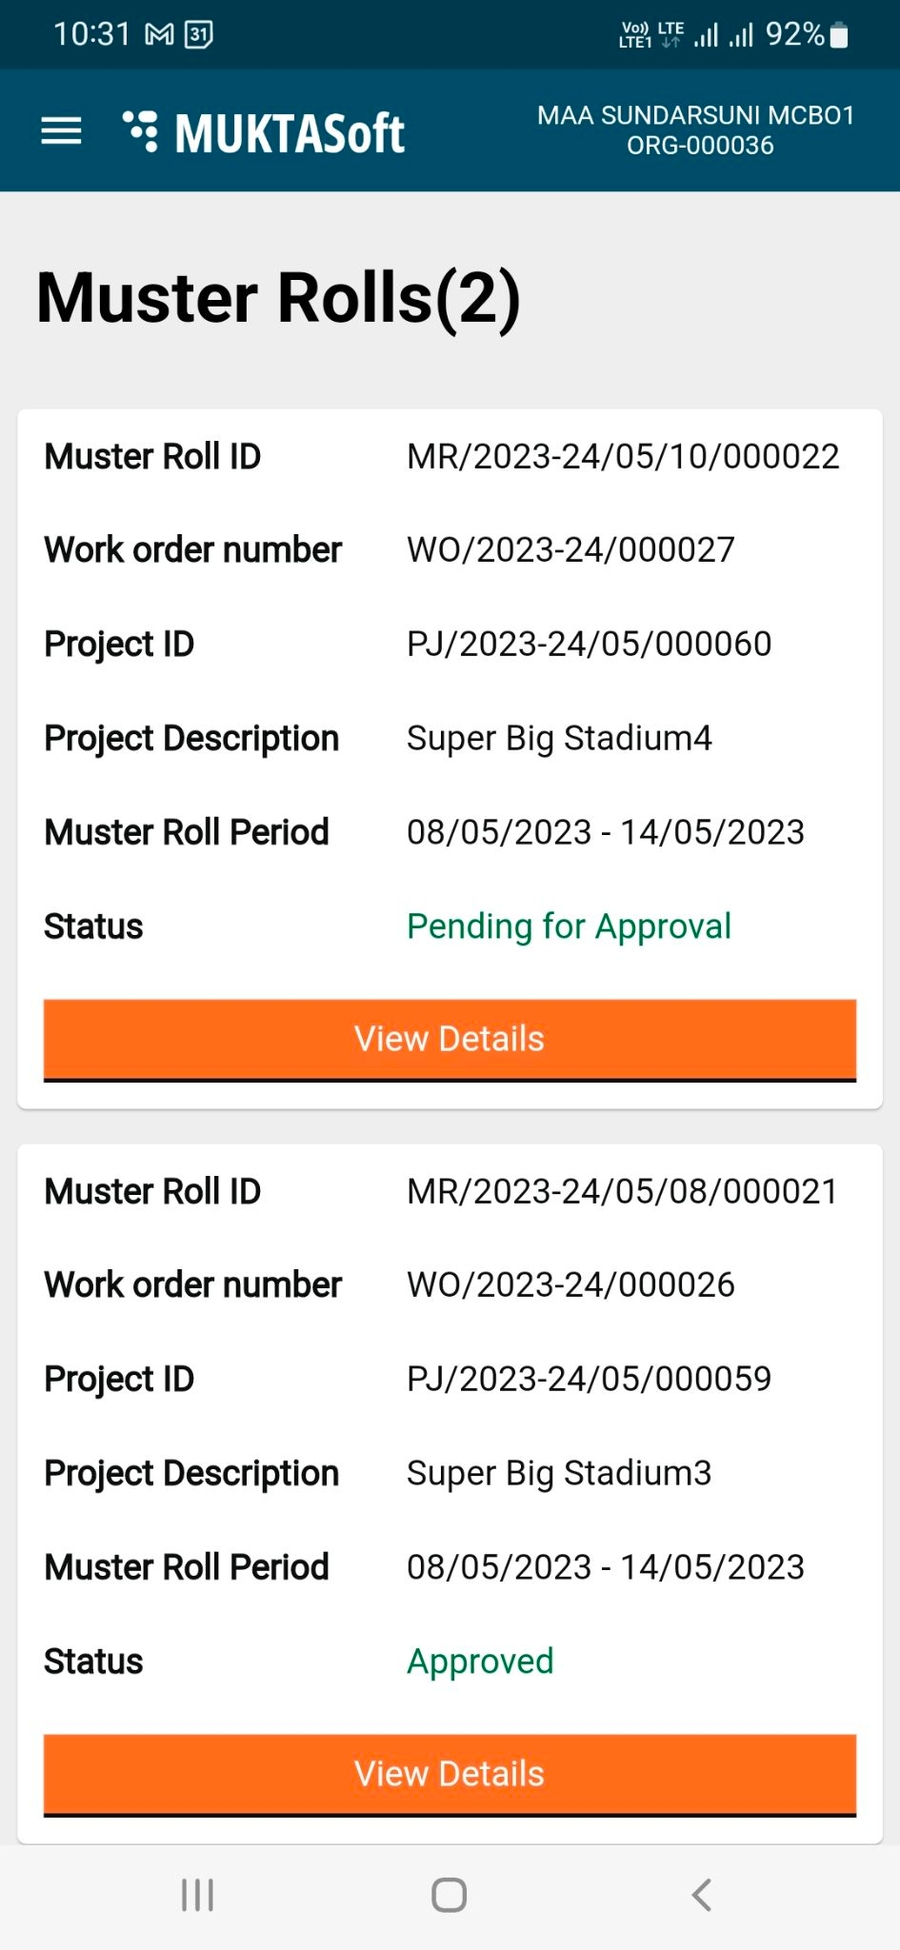
To view muster rolls -
Step 1: Click on Muster Rolls on the homepage.
Step 2: Click on View Details to access the muster roll details.
In case the muster roll is sent back to CBO for correction - the CBO gets the option to edit the muster roll and re-submit it.
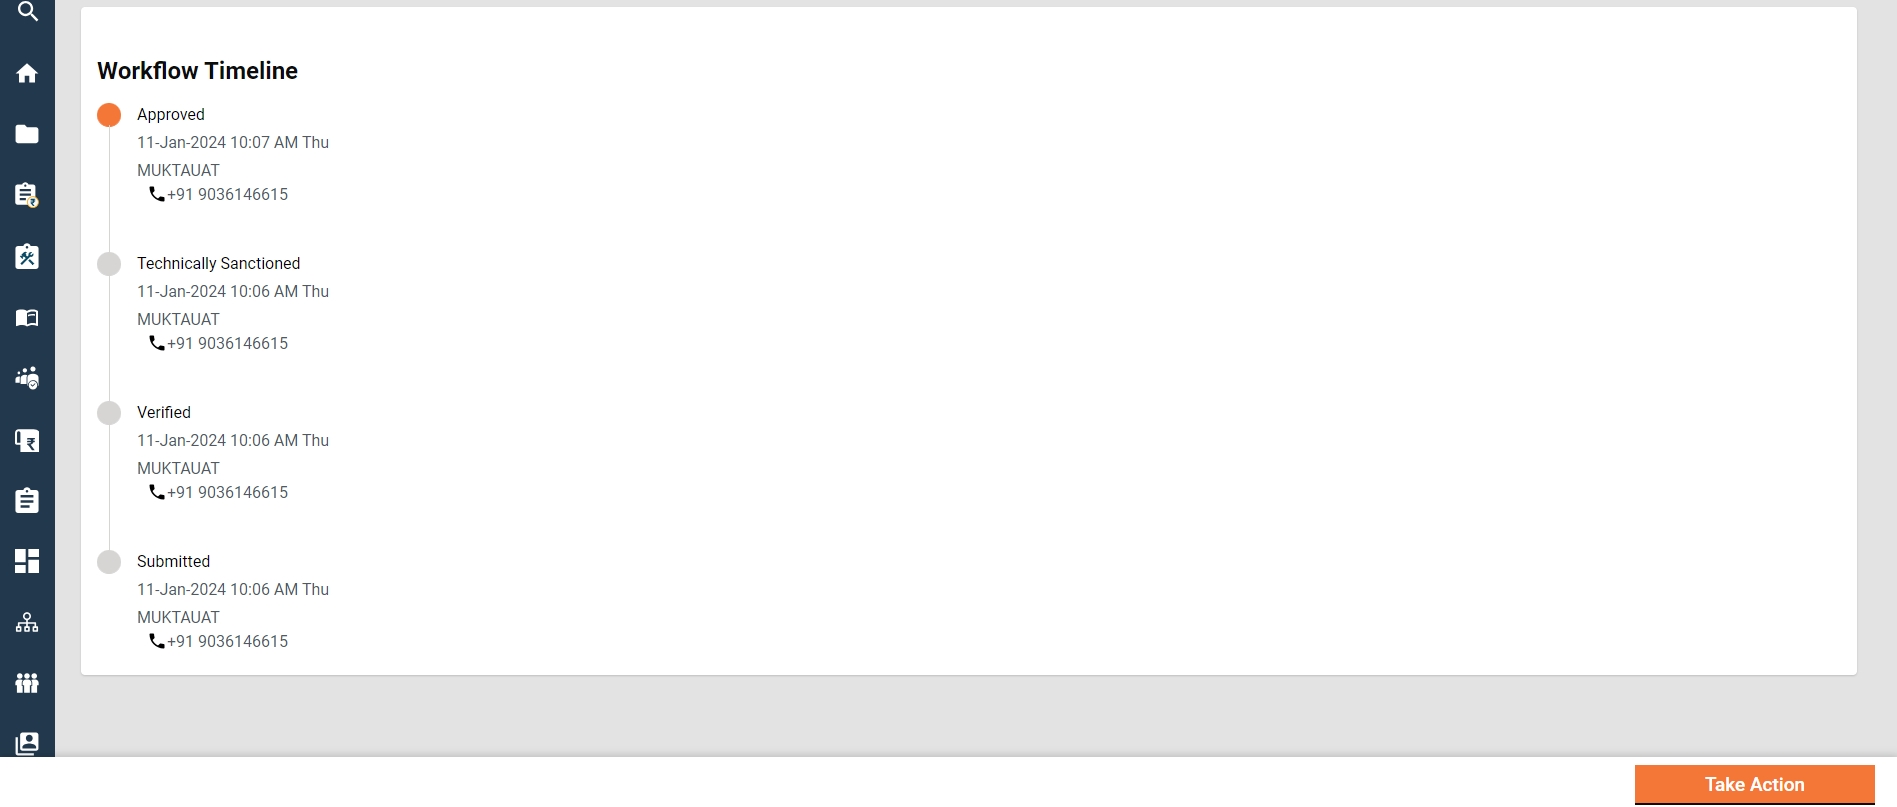
Step 3: Click on Show Workflow Timeline to view the timeline details for the specific muster roll.
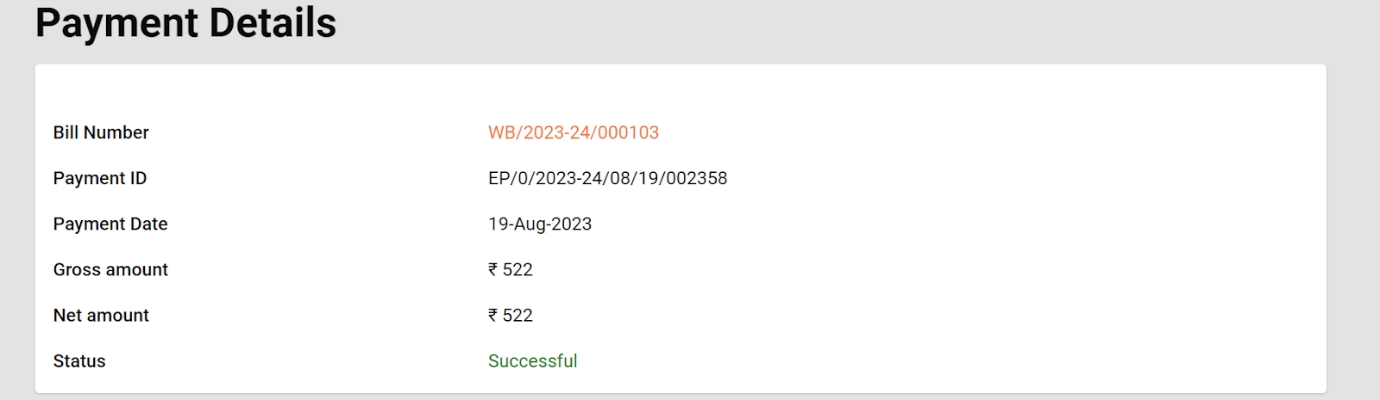
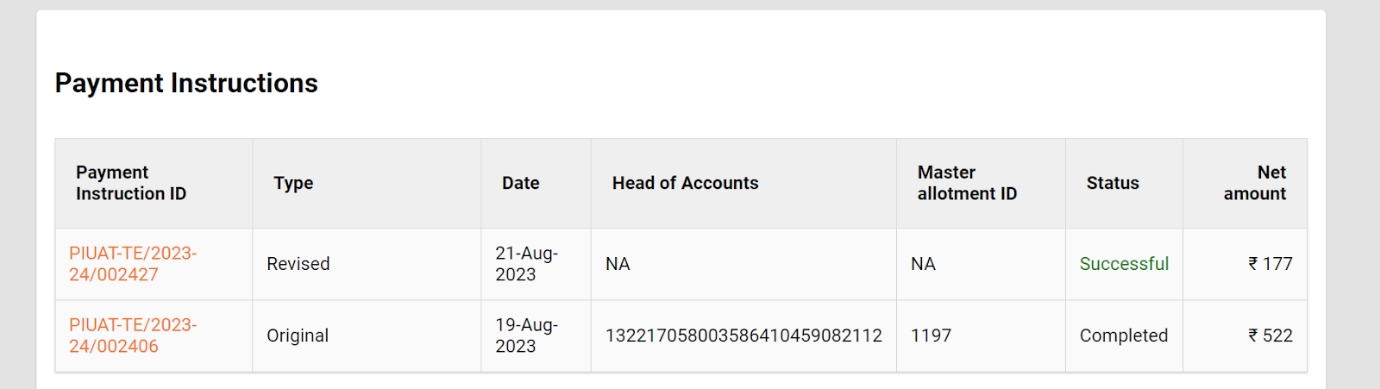
The Payments feature offers the following options to users:
All the payments are processed by the JIT-FS system which is a state treasury system integrated with MUKTASoft. These payments are processed from MUKTA funds and designated HOAs.
On approval of bills, a payment instruction is created automatically and sent to the JIT-FS system.
Home > Payment Instruction
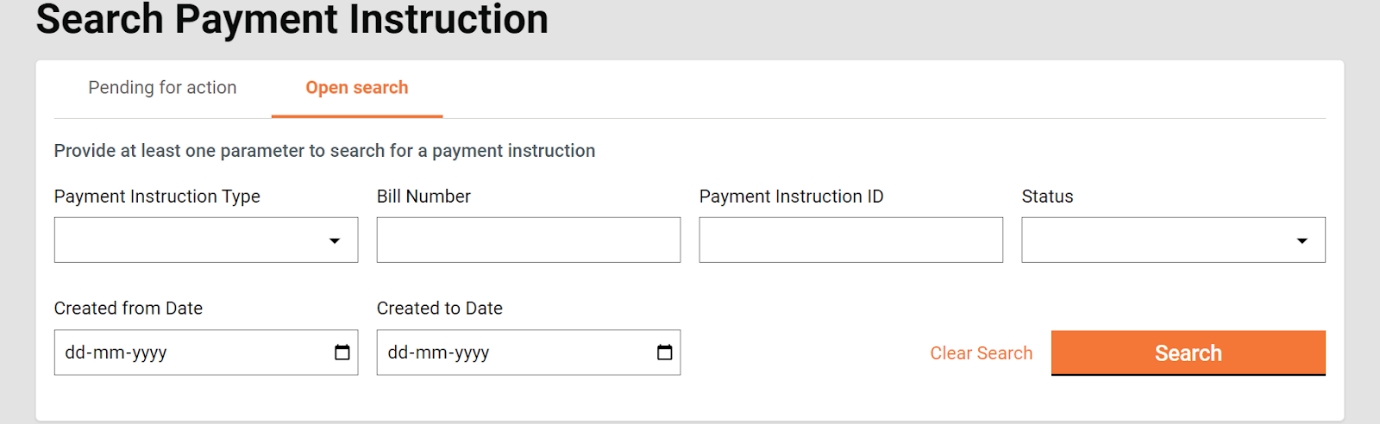
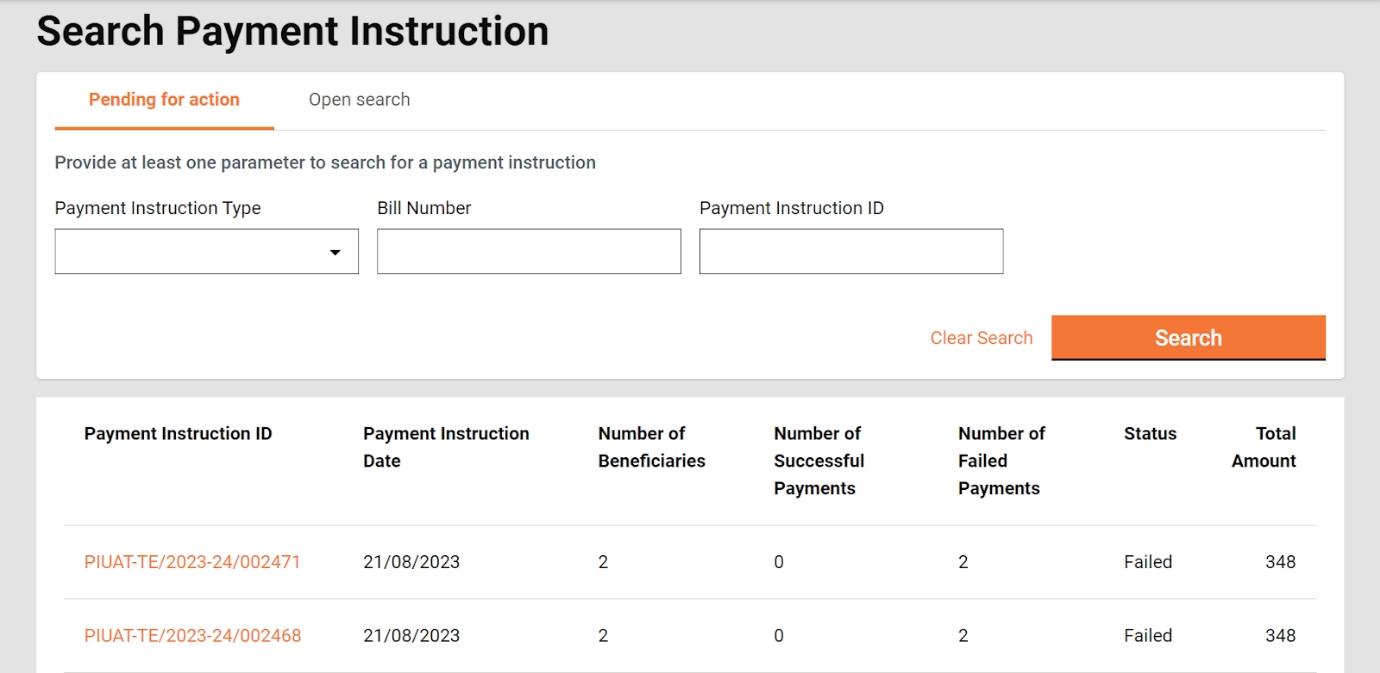
The payment instruction feature lists all the payment instructions by default which are pending action. It also enables users to search for payment instructions and view the details.
To search for payment instructions
Click on Open Search.
Enter at least one parameter to perform the search.
Click on the Search button. This will display the search results.
Click on the payment instruction ID to view the details.
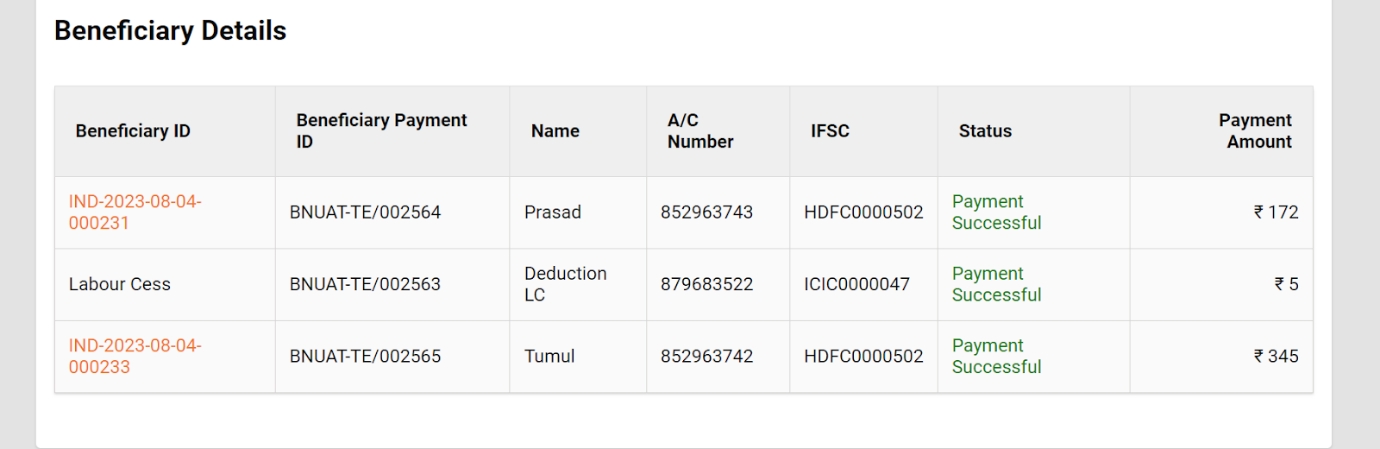
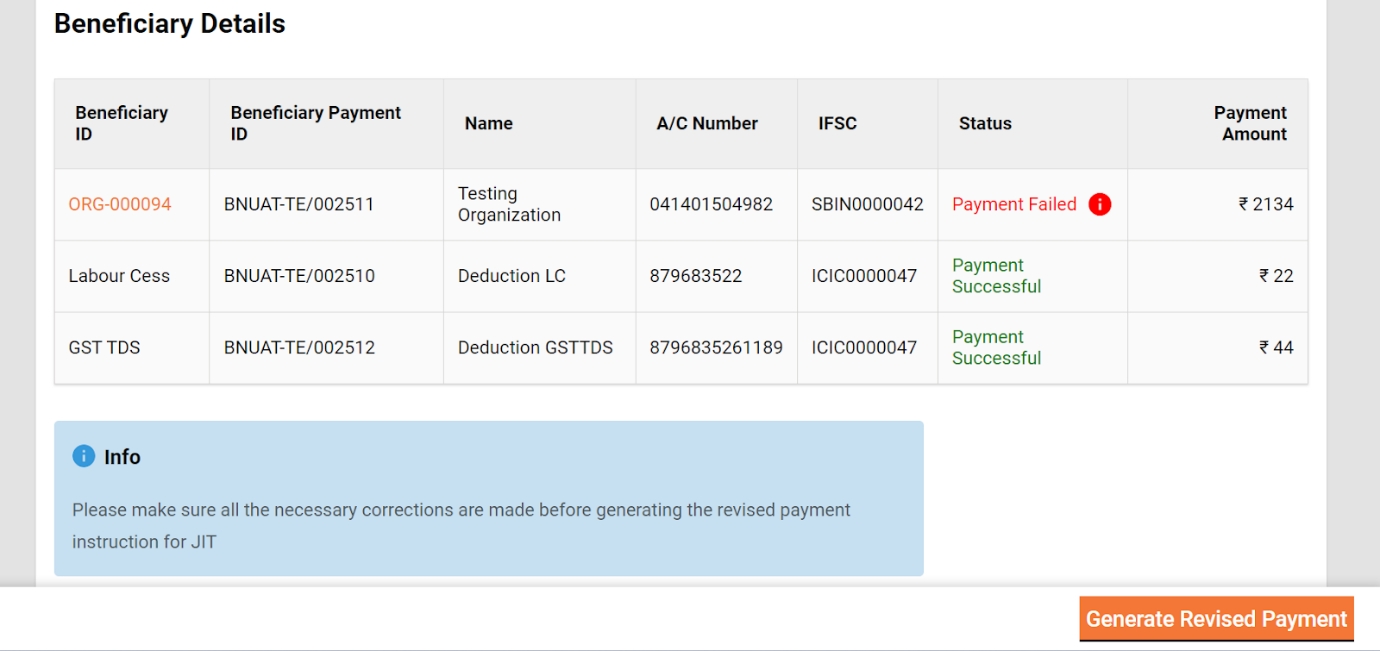
In case payment to a beneficiary fails due to some reason, the status of the beneficiary’s payment is displayed as failed with the error message displayed at the tool tip. All such payment instructions are displayed under “pending for action” by default and the user has to generate the revised payment instruction.
In case a payment instruction is declined by JIT due to some error the status of payment instruction is updated as failed. All such payment instructions are displayed under “pending for action” by default and the user has to take the action to retry after making necessary corrections.
The fundamental rates for materials, labour, and machinery are determined by the State Public Works Department, establishing uniformity for a group of Urban Local Bodies (ULBs). However, the ultimate cost of Schedule of Rates (SORs) may vary from one ULB to another, contingent on the specific Conveyance and Royalty Charges applicable to each ULB.
The entire schedule of rates is divided into three interconnected registries for easy management and usage: SOR definition, SOR rate, and rate analysis.
A Measurement Book (MB) is a document used in construction and engineering projects to record measurements, quantities, and descriptions of work performed by contractors. It serves as a detailed record of work completed, often used for billing, verification, and project monitoring purposes.
Home Page > Measurement Books
The Measurement Book (MB) inbox, dedicated to managing MB, is also utilized for tracking and processing the workflow related to Measurement Books.
Home Page → Schedule of Rates
(Select the Module Name as SOR and Master Name as SOR)
The Search SOR functionality enables users to search for a particular Schedule of Rates (SOR) and subsequently open it to access and view detailed information. This feature streamlines the process of locating and reviewing specific SORs within the system.
Amount - High to low
CBO Name
Step 1: On the home page, click on the Measurement Books card to view the MB Inbox page.
Step 2: Click on Open Measurement Book to view the details for the specified MB.
The inbox page displays all MBs in the workflow awaiting action from the logged-in user by default.
Step 1: Click on the Filter option to refine search results.
Step 2: Select and enter the relevant filter details.
Click on the Filter button.
The work orders can be sorted using different parameters.
Step 1: Click on the Sort option on the top of the page.
Step 2: Select the applicable sort option from the Sort By list.
Workflow
The Measurement Book (MB) workflow comprises three key roles: the creator, verifier, and approver. Each role is associated with specific actions that contribute to the overall processing and approval of the MB. The workflow typically involves a sequence of actions performed by these roles to ensure accurate documentation, verification, and approval of measurements within the MB.
The MB Creator is responsible for creating and forwarding the measurement book along with worksite photos on the work in progress uploaded.
MB Creator can -
Save as Draft
Submit
Edit MB
The Save as Draft feature provides users with the capability to create a Measurement Book (MB) and retain it in the creator's inbox for subsequent updates. This functionality allows users to initiate the MB creation process, save the work in progress as a draft, and revisit it later for additional edits or finalization before submission.
When a Measurement Book is created, it is submitted to the next user in the workflow for verification. Upon selecting the 'submit' action, the system provides the user with the option to either choose a specific user as the verifier or submit it without selecting a verifier.
If a Measurement Book is sent back to the creator for correction, the MB is placed into the creator's inbox, allowing them to make edits and subsequently re-submit it for verification.
The MB Verifier is responsible for verifying the measurement book.
MB Verifier can -
Verify and forward MB
Send MB back to the originator for correction
The 'Verify and Forward' action enables the verifier to forward MB to the approver after completing the verification process and adding the comments if required.
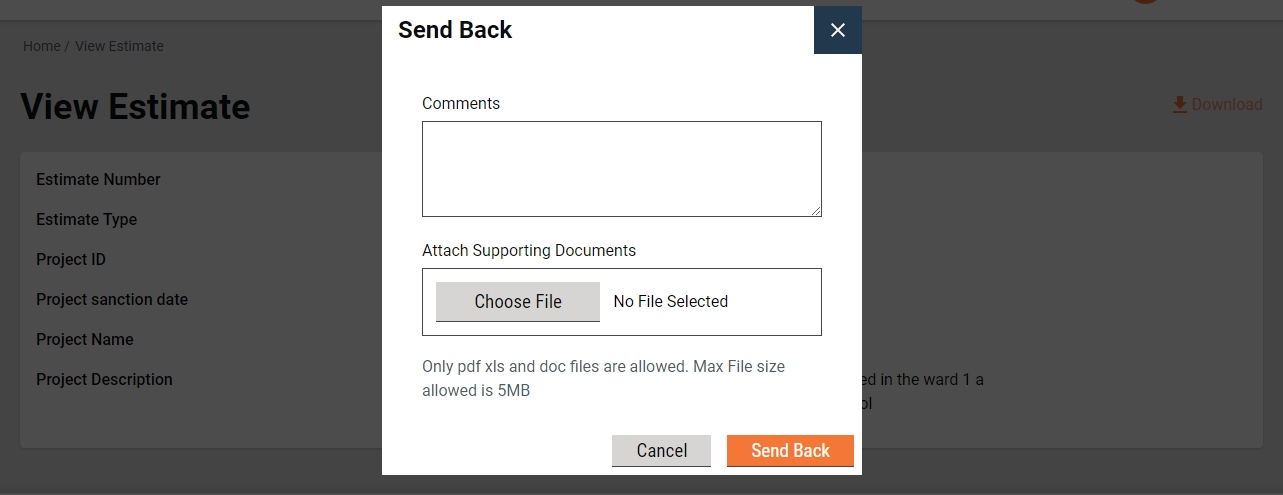
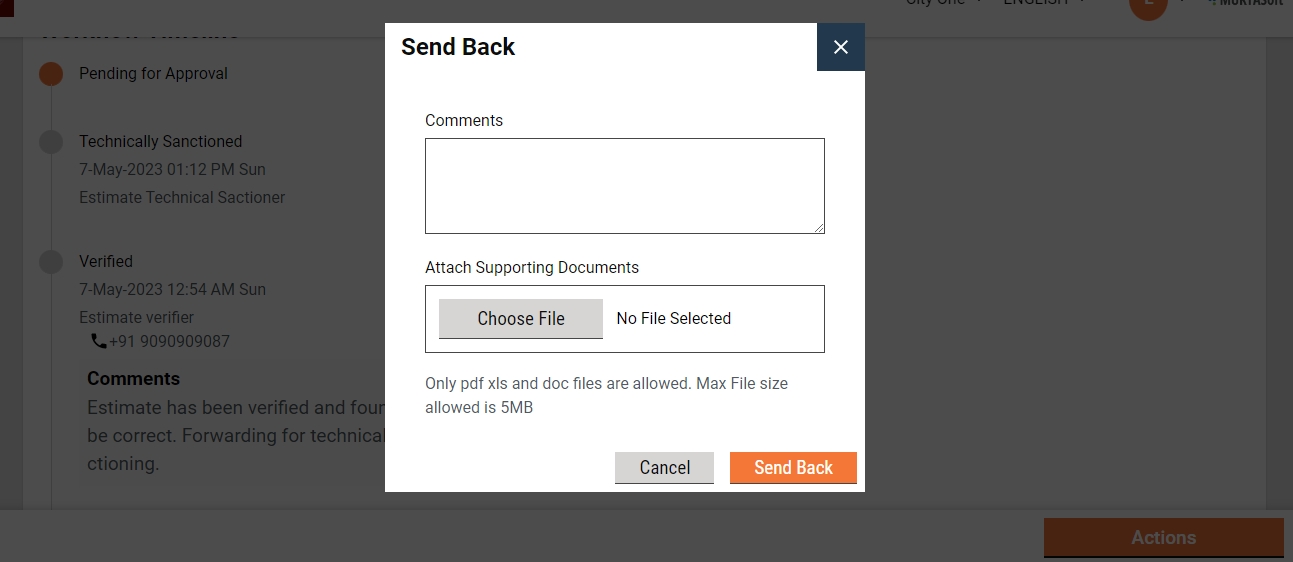
The 'Send Back' action provides the verifier with the capability to send the MB back to the creator for necessary corrections.
The Approver verifies the measurement book and ensures the provided measurements are satisfactory and complete according to the work completed.
The Approver can:
Approve the MB
Send the MB back to the verifier
Send the MB back to the originator
Reject the MB
The Approve action bestows upon the approver the authority to approve the Measurement Book (MB). Upon approval, the MB attains an immutable status, meaning that it becomes unalterable or resistant to further changes. This step typically signifies the finalization and confirmation of the recorded measurements and associated details within the MB.
The Send Back action permits the approver to send the MB back to the previous user in the workflow for necessary corrections, MB is placed into the verifier's inbox, allowing them to take necessary action.
The Send Back To Originator action enables the approver to return the MB to the creator for necessary corrections. The request is placed into the creator's inbox, allowing them to make edits and subsequently re-submit it for verification.
The Reject action empowers the approver to decline the MB. Once rejected, no further action can be taken on the MB, necessitating the creation of a new MB.
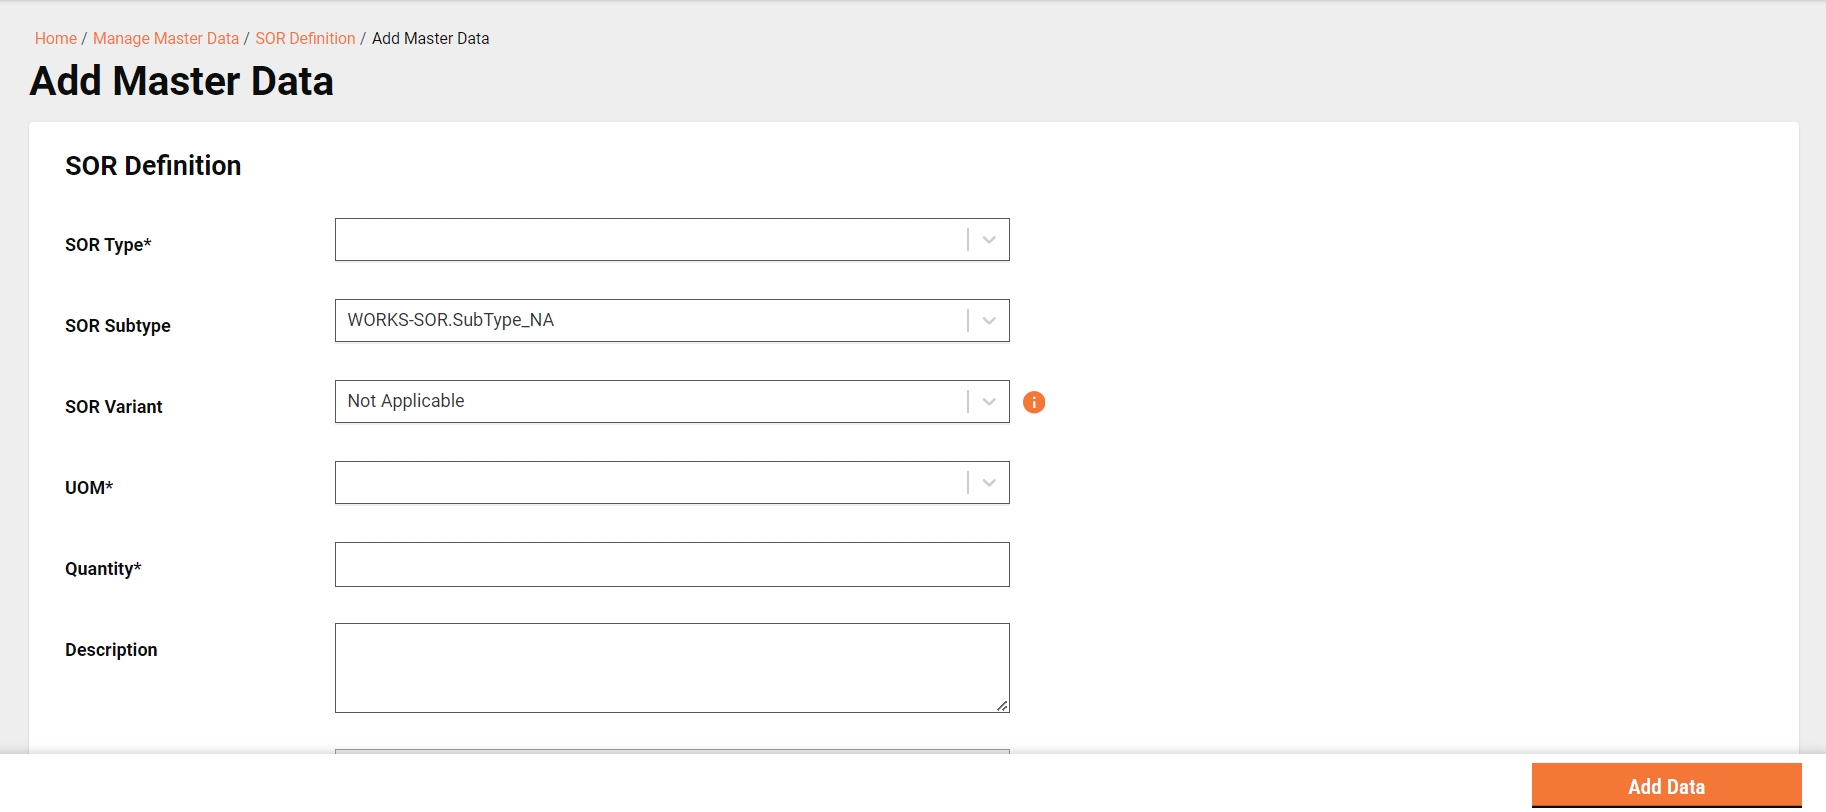
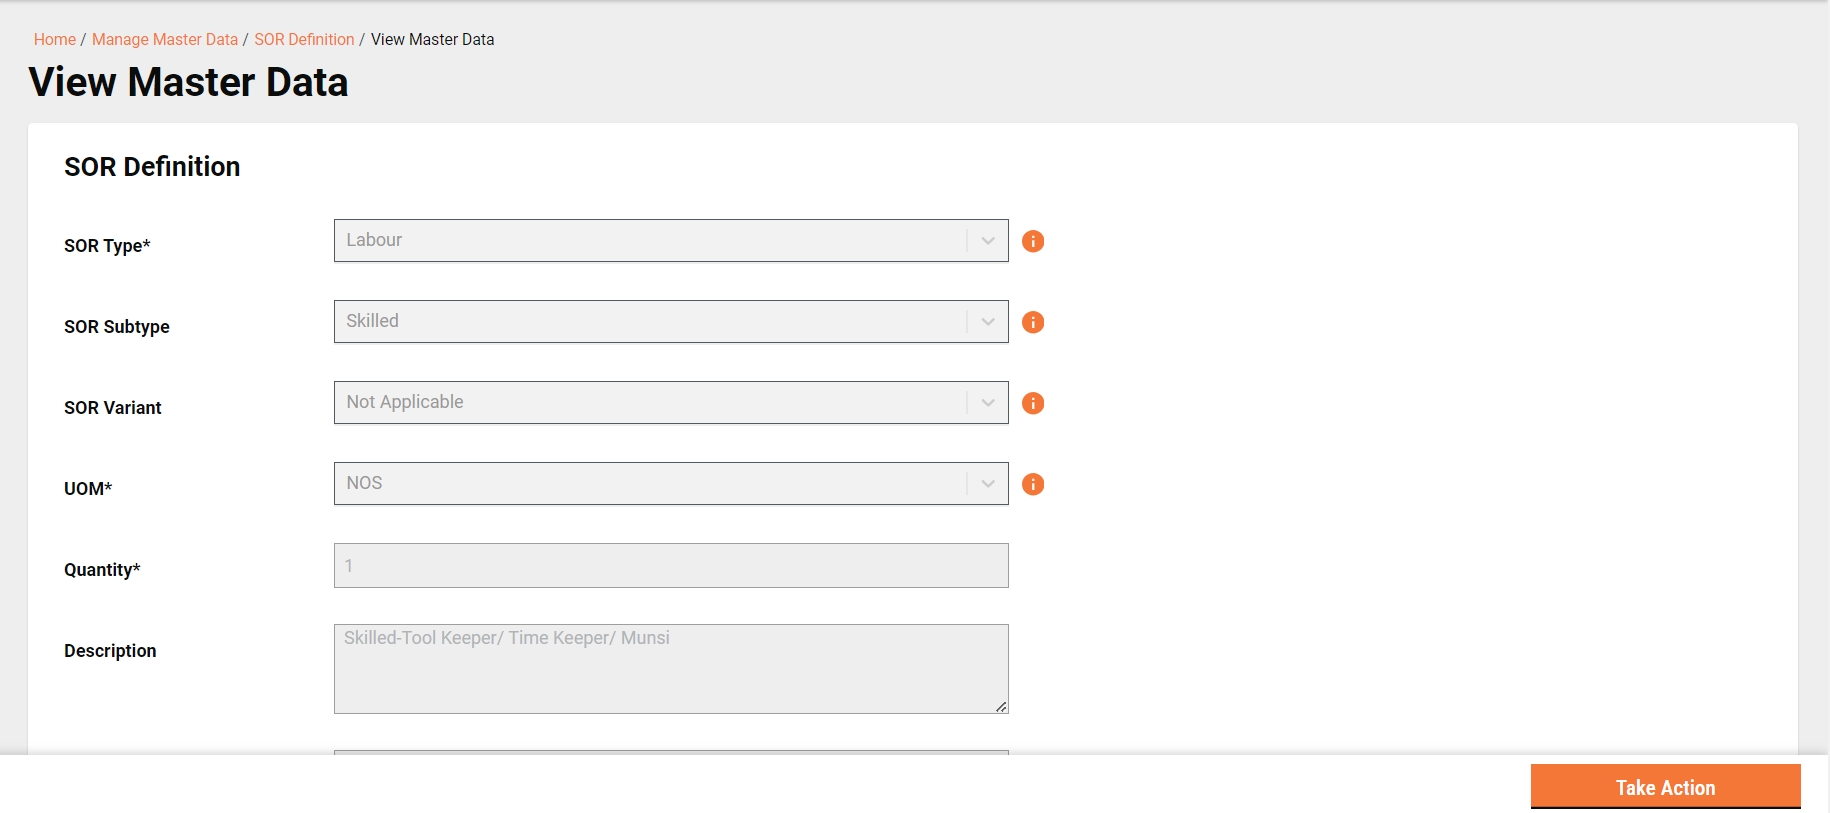
Search SOR Definition > Add Master Data
The "Add SOR" functionality enables users to create a new SOR.
The "View SOR" feature empowers users to access and review the details of a specific Schedule of Rates (SOR). This functionality provides a comprehensive view, allowing users to examine and understand the specifics of the rate structure and associated information within the SOR.
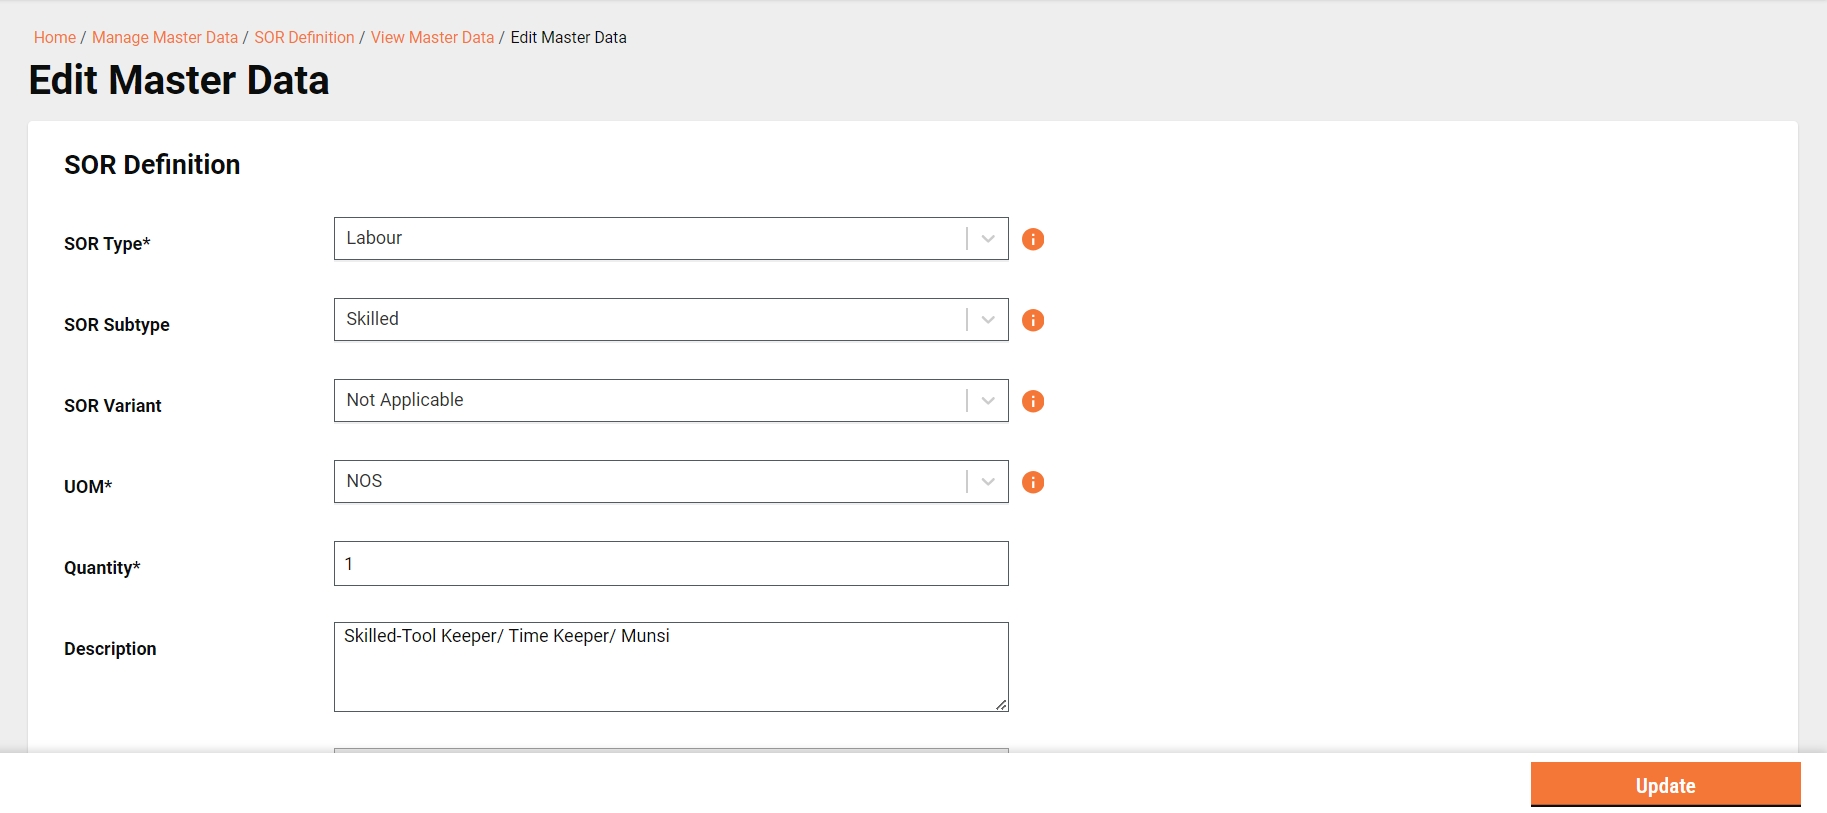
Search SOR Definition > View SOR Definition > Take Action > Edit Master
The "Edit SOR Definition" functionality enables users to modify an existing SOR details.

On this page:
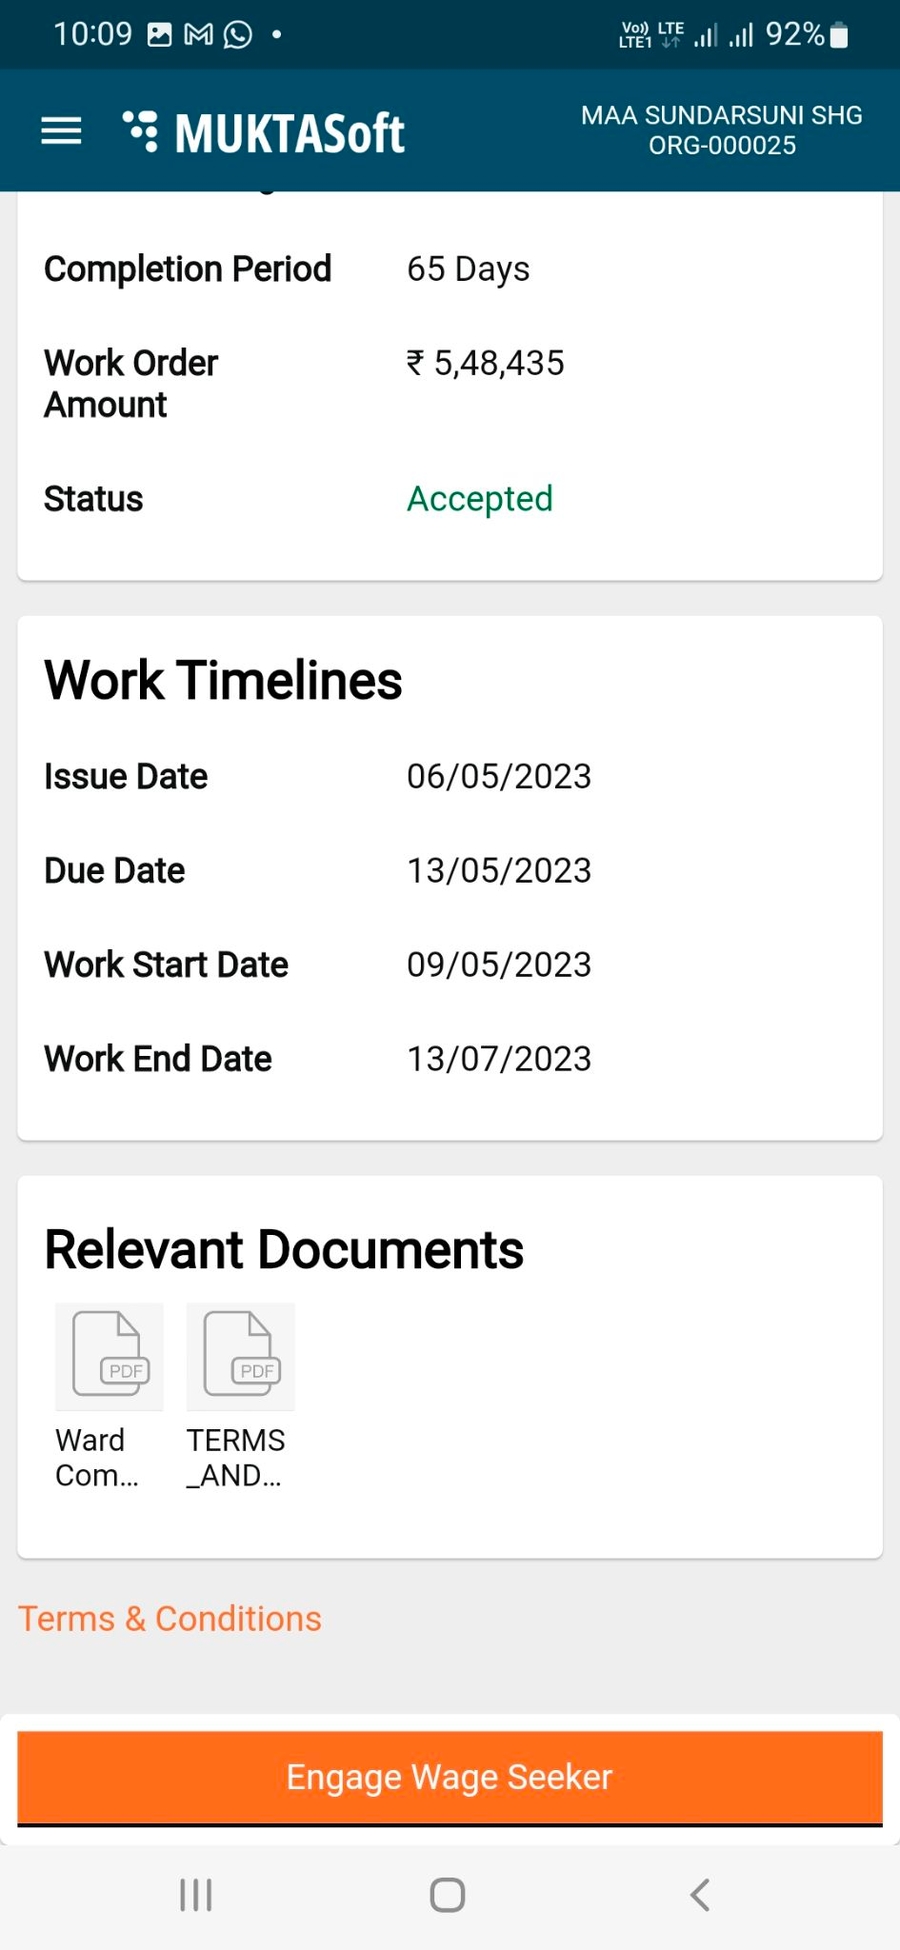
CBOs can view their work orders through the portal or the mobile app.
A CBO user can engage or disengage the wage seekers for all its running works.
The View Work Order screen contains the option to request for time extension for completing the specific work project.
Illustrative MuktaSoft guide for community based organisations
This section of the user manual guides you through the CBO login process. CBO represents community-based organizations that are using the MUKTASoft application online to manage their MUKTA works-related activities effectively.
On this page:
On this page:
The bills related to works assigned to a CBO are listed under My Bills.
Register wage seeker service allows the CBO user to enter the wage seeker details into MUKTASoft who are working for them.
MuktaSoft - how to get started
This section of the user manual guides you through the user login process and the details of using the MUKTASoft application for each role.
On this page:
Click on English in the top right corner to view other language options. Select the preferred language from the list.
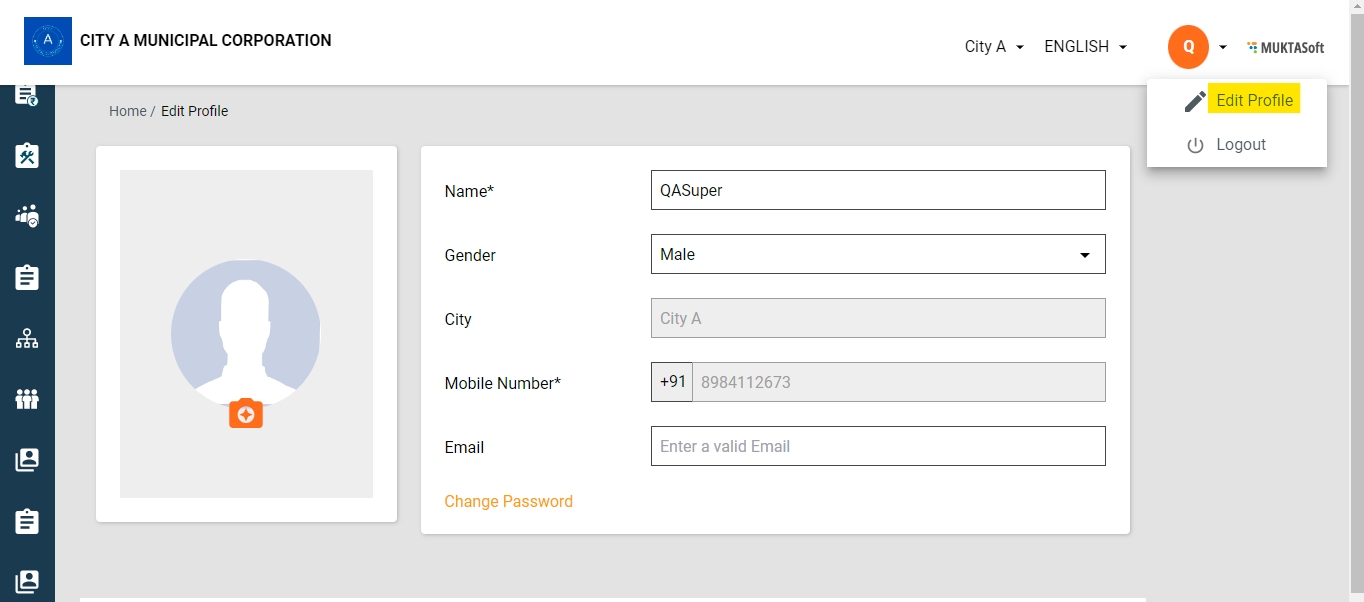
Profile icon> Edit Profile > Change Password
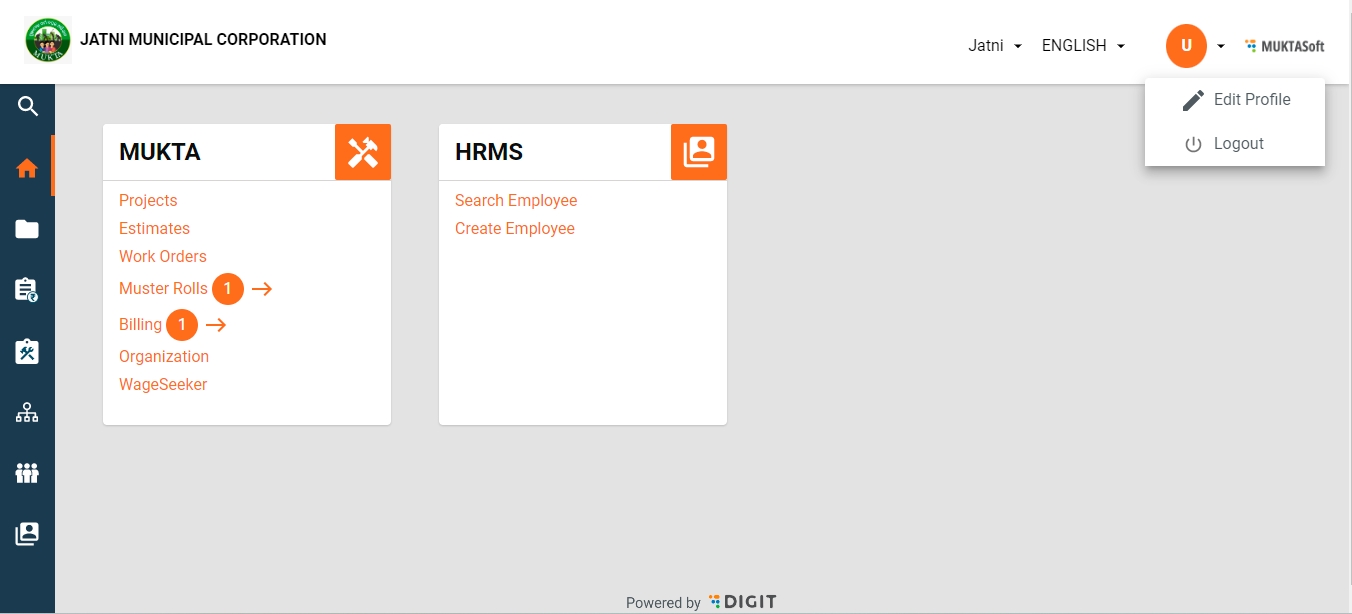
Click on the Profile icon on the homepage.
Two options are displayed - Edit Profile and Logout.
Click on Edit Profile.
This opens the Edit Profile page with the employee picture on the left and the details on the right.
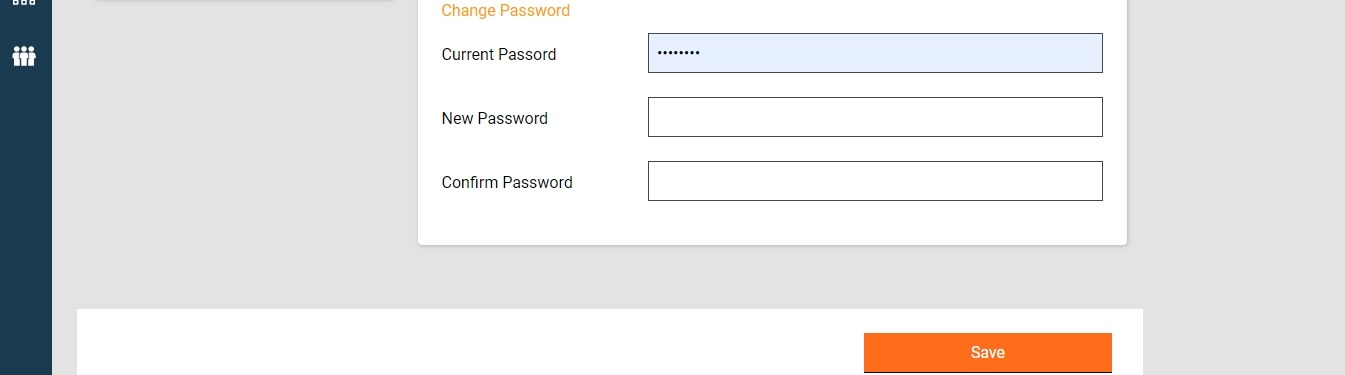
Click on the Change Password option at the bottom.
Enter the current password and new password and confirm the new password.
Click on the Save button to reset the password.
Login Page > Forgot Password
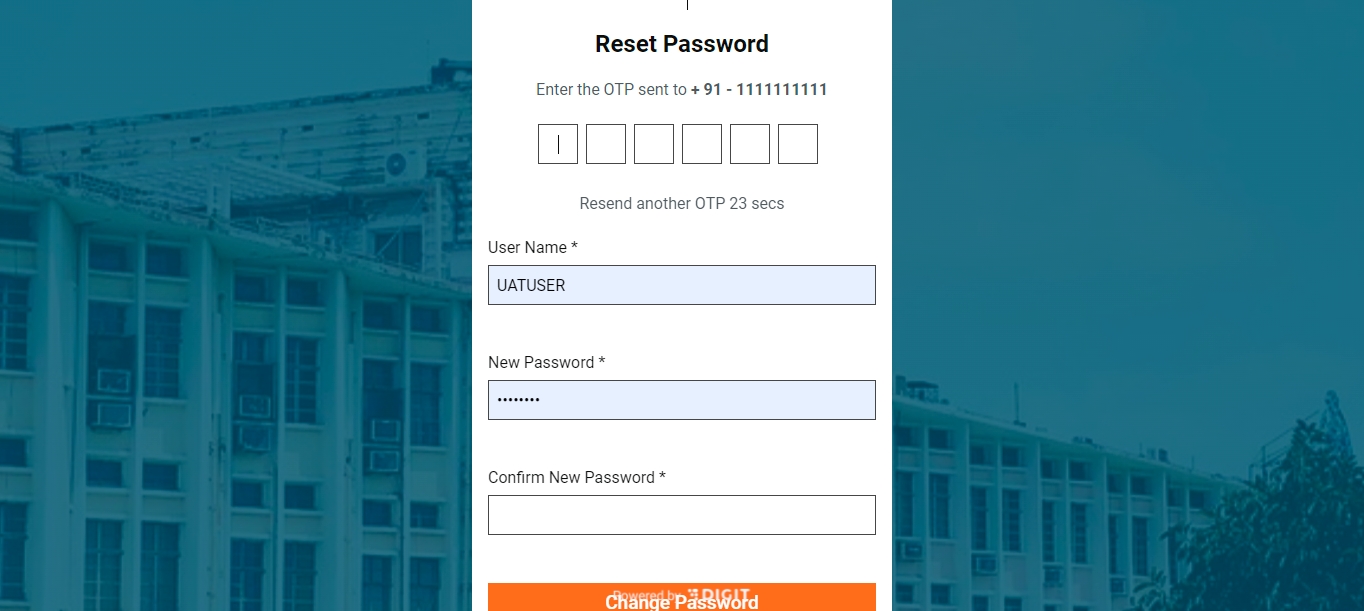
Click the Forgot Password option on the login screen to reset the password.
Enter the registered Mobile Number and City. Click on Continue.
Enter the OTP sent on the registered mobile number.
Enter the new passwords and type in the new password again to confirm.
Click on the Change Password button to reset it.
Home > Profile > Logout
Click on the profile icon on the top right side of the screen. There are two options - Edit Profile and Logout.
Click on the Logout option. The user is logged out.
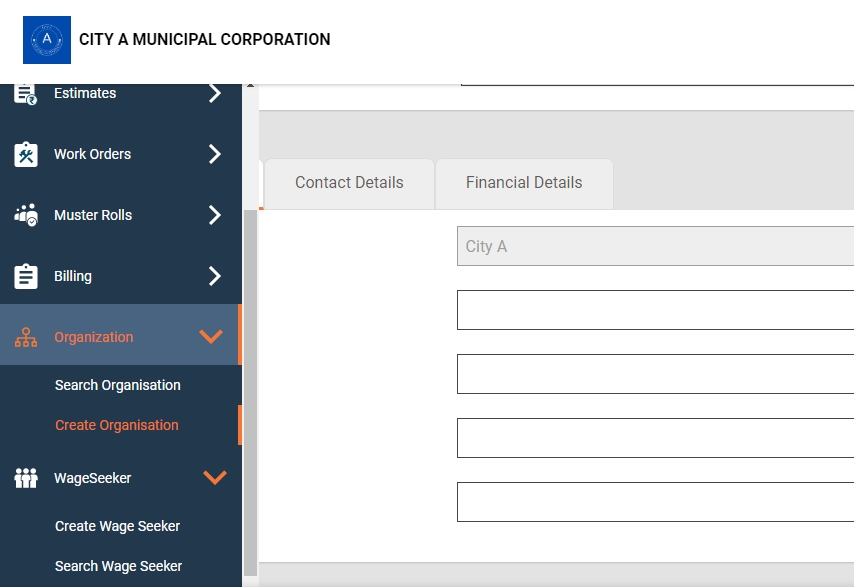
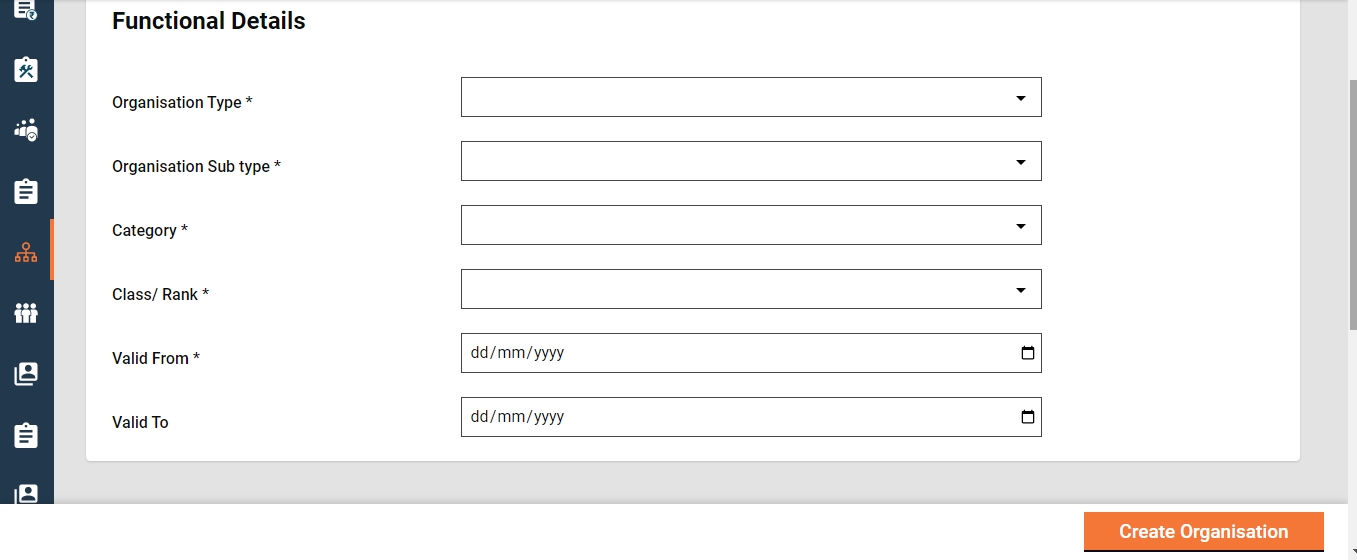
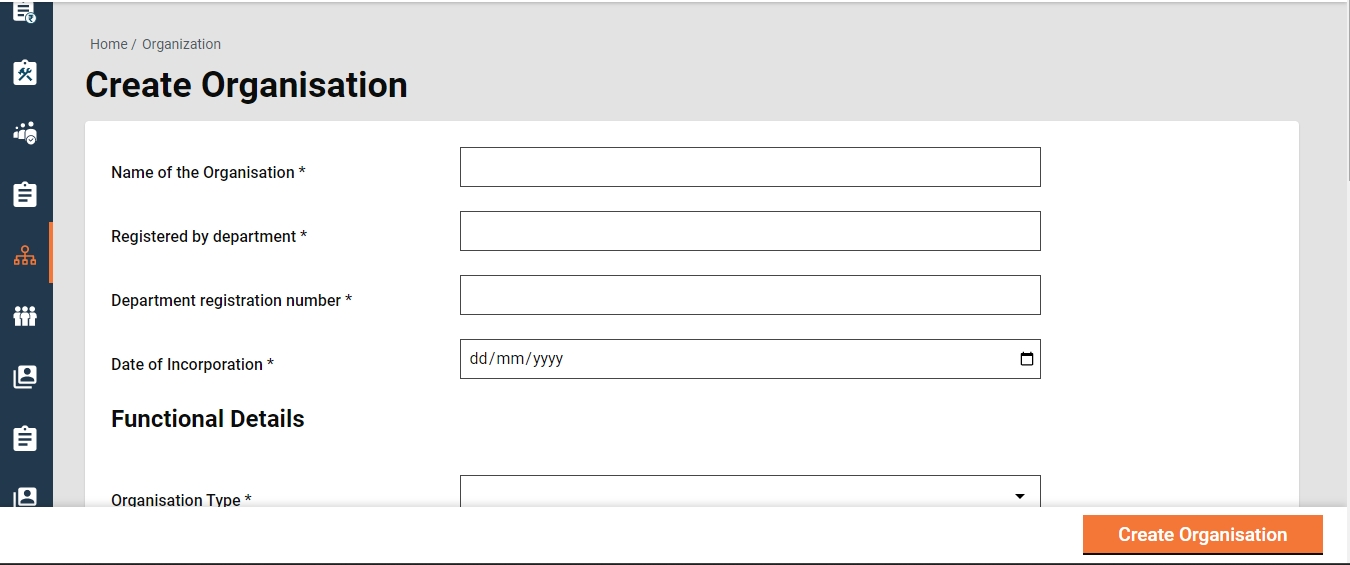
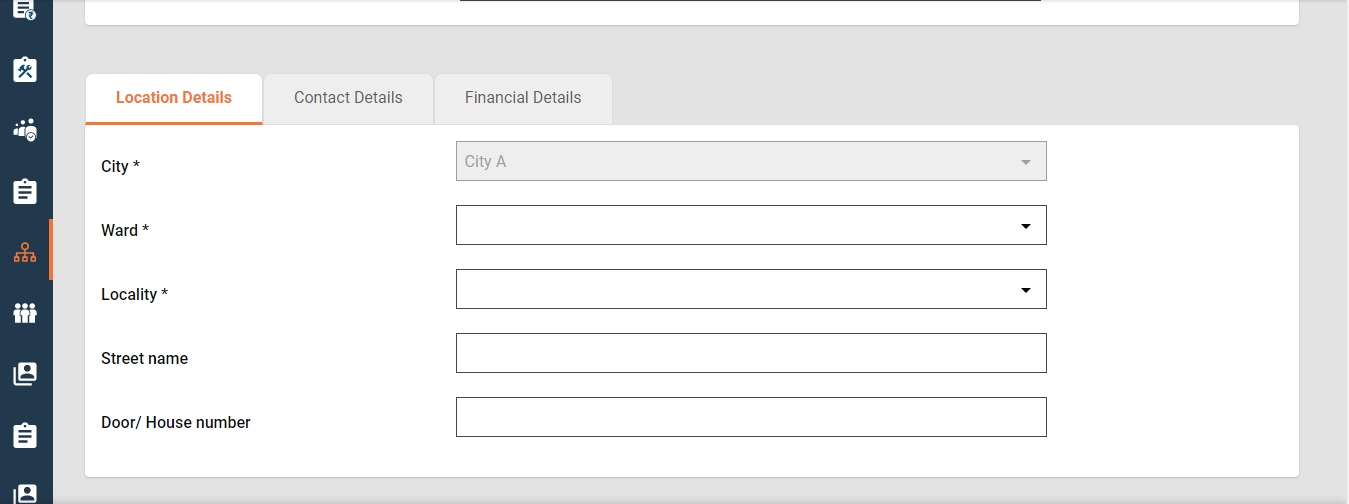
Home > Sidebar Menu/ Homepage > Organization > Search Organization > Create Organization
To create an Organization for a Project -
Click on Organization in the sidebar menu from the homepage and select Create Organization. Alternatively, one can click on Organization from the homepage to view Search Organization and click on Add New Organization.
This displays the Create Organization page with various details such as the name of the organization, functional details, contact, financial and location details to be filled.
Click on Create Organization after filling in the details.
Home >Sidebar Menu/ Homepage > Organisation > Search Organisation
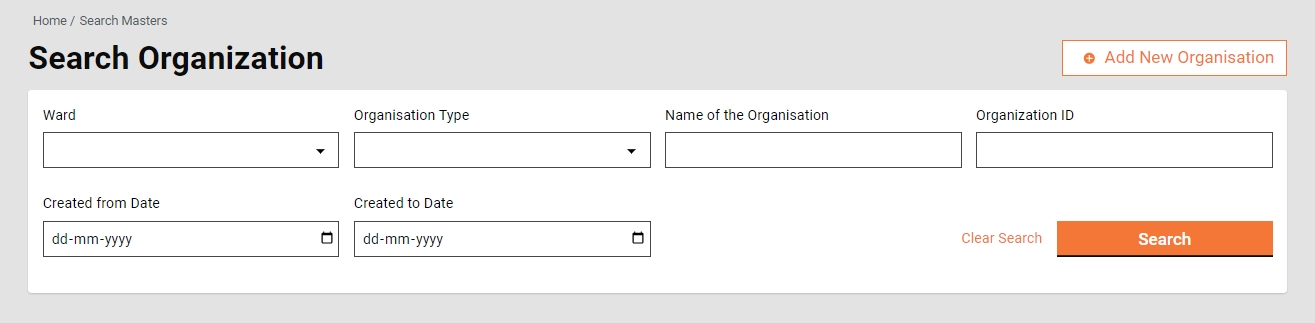
To Search for an Organisation for a project -
Click on Organisation in the sidebar menu from the homepage and select Search Organisation.
This will display the Search Organisation page where details such as Ward, Organisation Type, Name of the Organisation, and Organisation ID need to be filled.
This will view the Search Result; Organisation ID, Name of the Organisation, Organisation Type, Organisation Sub type, Address and Status.
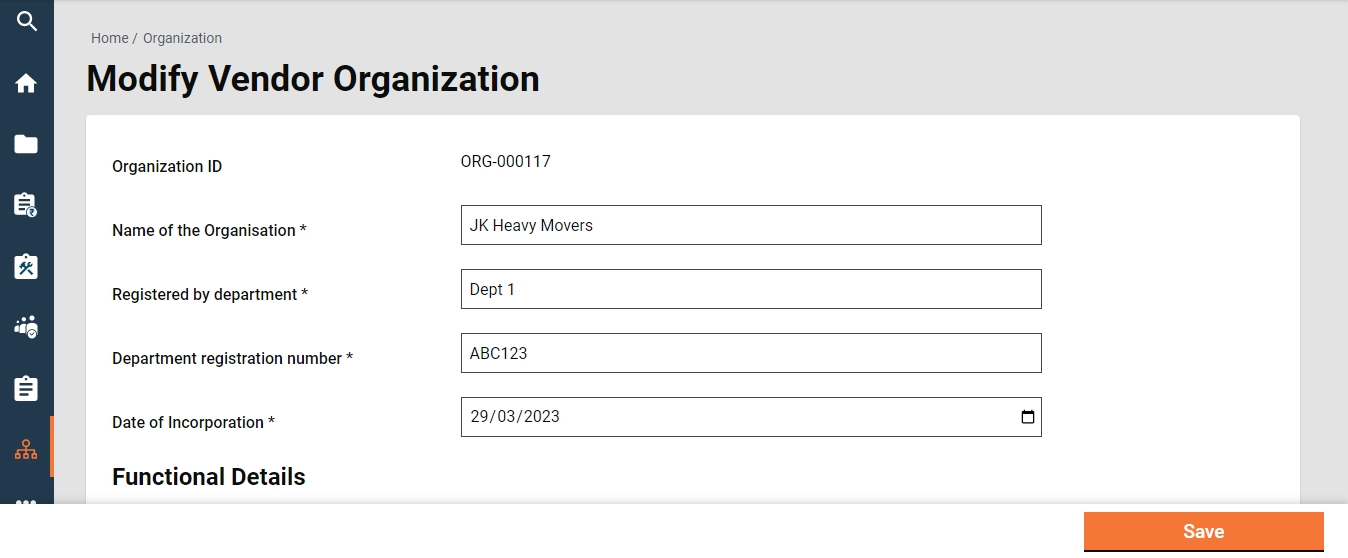
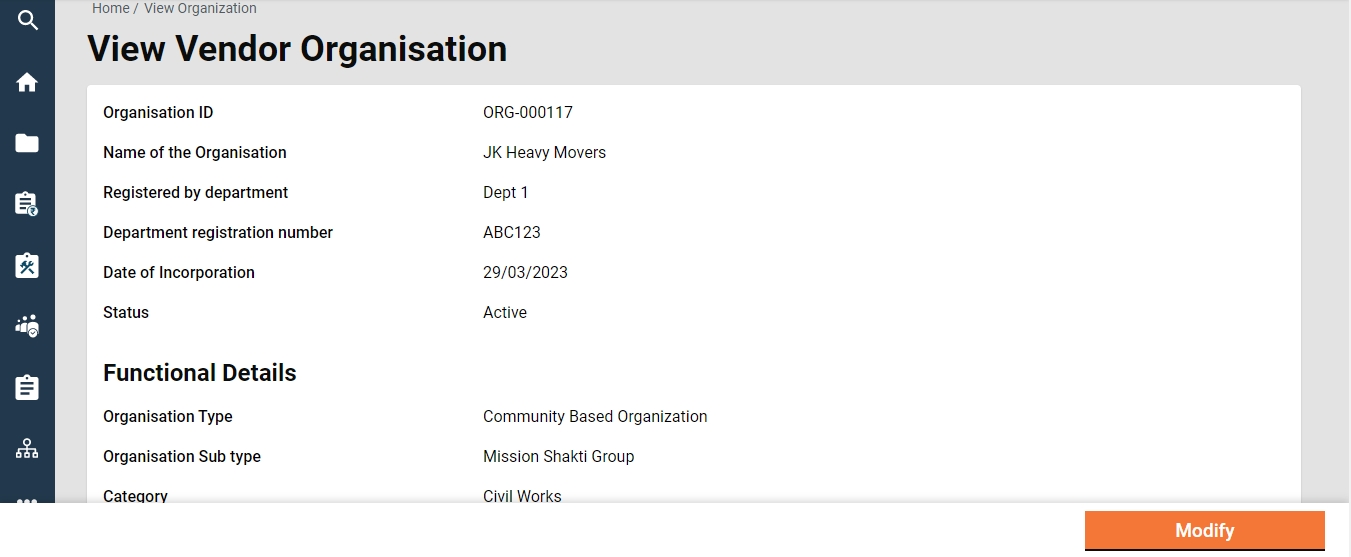
Home >Sidebar Menu/ Homepage > Organisation > Search Organisation > Organisation ID > View Vendor Organisation
Click on Organisation in the sidebar menu from the homepage and select to Search Organisation.
This will display the Search Organisation page where details such as Ward, Organisation Type, Name of the Organisation, Organisation ID needs to be filled.
This will view the Search Result; Organisation ID, Name of the Organisation, Organisation Type, Organisation Sub type, Address and the Status.
Home > Sidebar Menu/ Homepage > Organisation > Search Organisation > Organisation ID > View Vendor Organisation
To modify any details regarding Organizations, one must view the Organizations and then click on Modify at the bottom of the page. This will display all the details of the Organization. Make necessary changes and click on Save at the bottom.
Home Page → Schedule of Rates
(Select the Module Name "Schedule of Rates" and Master Name "Rates")
The "Search Rate" functionality enables users to search for the rate of a particular Schedule of Rates (SOR) and subsequently open it to access and view detailed information. This feature streamlines the process of locating and reviewing specific SORs rate within the system.
The "View Rate" feature empowers users to access and review the details of a specific Schedule of Rates (SOR) rate. This functionality provides a comprehensive view, allowing users to examine and understand the specifics of the rate structure.
The "Add Rate" feature empowers users to add a rate to an SOR with a future effective-from date and closes the existing rate by updating its effective-to date to one day before the newly added rate effective-from date.
From the search rate page, click on 'Add Master Data'.
Enter an SOR Code to which a rate needs to be added.
Add the head wise rate using “add Amount Details”
Enter the consolidated amount into the rate field and click 'Add Data'.
Rate is added and the success page is displayed.
The "Edit Rate" feature enables users to edit the existing rate with the same effective-from date. This helps users correct any rate they entered incorrectly.
To edit the rate, select 'Edit Rate' from the view rate page.
It opens the rate in edible mode, the user can make the changes in the existing rates, add/remove a head and then save. System makes the existing rate inactive and adds a new one with the same “effective from” date.
It allows users to search all templates using various parameters, such as Template ID, Template Name, and Active Status.
It allows users to create an estimate template applicable to all ULBs. The estimate template is created at the state level.
To create an estimate template, click of Add Master Data from search estimate template screen.
Enter the template name.
Enter the template description
Select project type.
Add SOR using the search SOR feature.
b. Click on the view more to search for SORs with more details.
Select an SOR to add into the estimate template.
Add the Non-SORs. Enter the Non-SOR description.
Click on “Add Data” to create the template. Template ID is created automatically by the system.
It allows the user to view the estimate template details. The “i” icon against a field displays the complete information of the value of that field.
It allows the user to edit the details of the estimate template, change the name and description, add/remove the SORs and Non-SORs.

Click on the drop-down to search for a SOR.
Fill all the details inquired and click on Search.
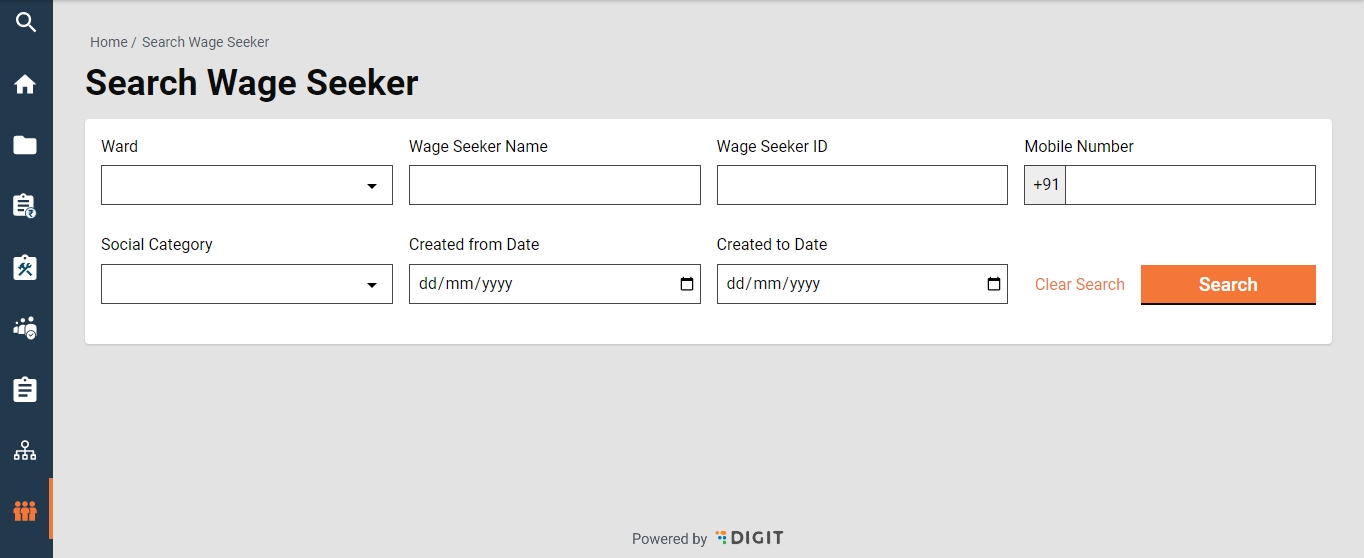
Search Criteria
Ward
Wage Seeker Name
Wage Seeker ID
Mobile Number
Social Category
Created from Date
Created to Date
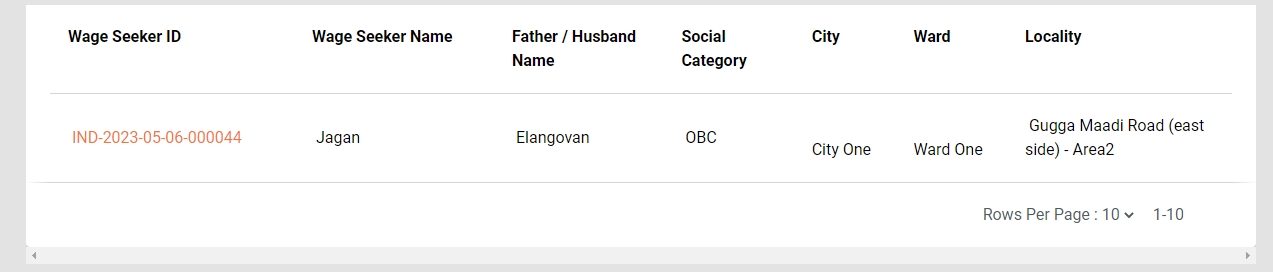
Search Result
Once you have filled in all details and clicked on Search, it displays the following details:
Wage Seeker ID
Wage Seeker Name
Father/ Husband Name
Social Category
City
Ward
Locality
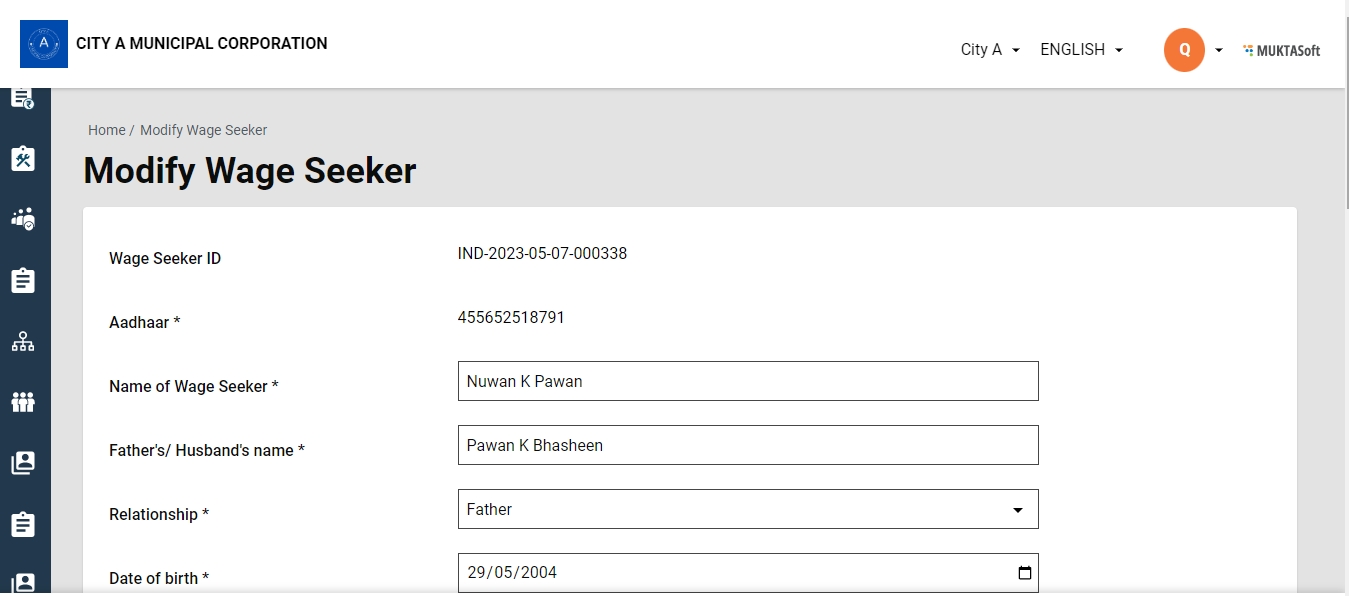
Sidebar Menu / Homepage > Wage Seeker > Search Wage Seeker > Wage Seeker Result > Wage Seeker ID > View Wage Seeker
To View the Wage Seeker, one must Search Wage Seeker.
Once you have filled in all the details click on the Search button. This will display the search results.
Click on the Wage Seeker ID in orange. This displays the View Wage Seeker option.
Sidebar Menu/ Homepage > Wage Seeker > Search Wage Seeker > Wage Seeker Result > Wage Seeker ID > View Wage Seeker > Modify Wage Seeker
To modify any details regarding Wage Seekers, one must view the Wage Seeker and then click on Modify at the bottom of the page. This will display all the details of the Wage Seeker. Make necessary changes and click on Save at the bottom.
Step 1: Enter the Extension required (In Days) and the Reason for Extension.
Step 2: Click on the Submit button to submit the request for processing.
On successful submission, the success page is displayed with the Request ID and the request is available for tracking in the My Request section.
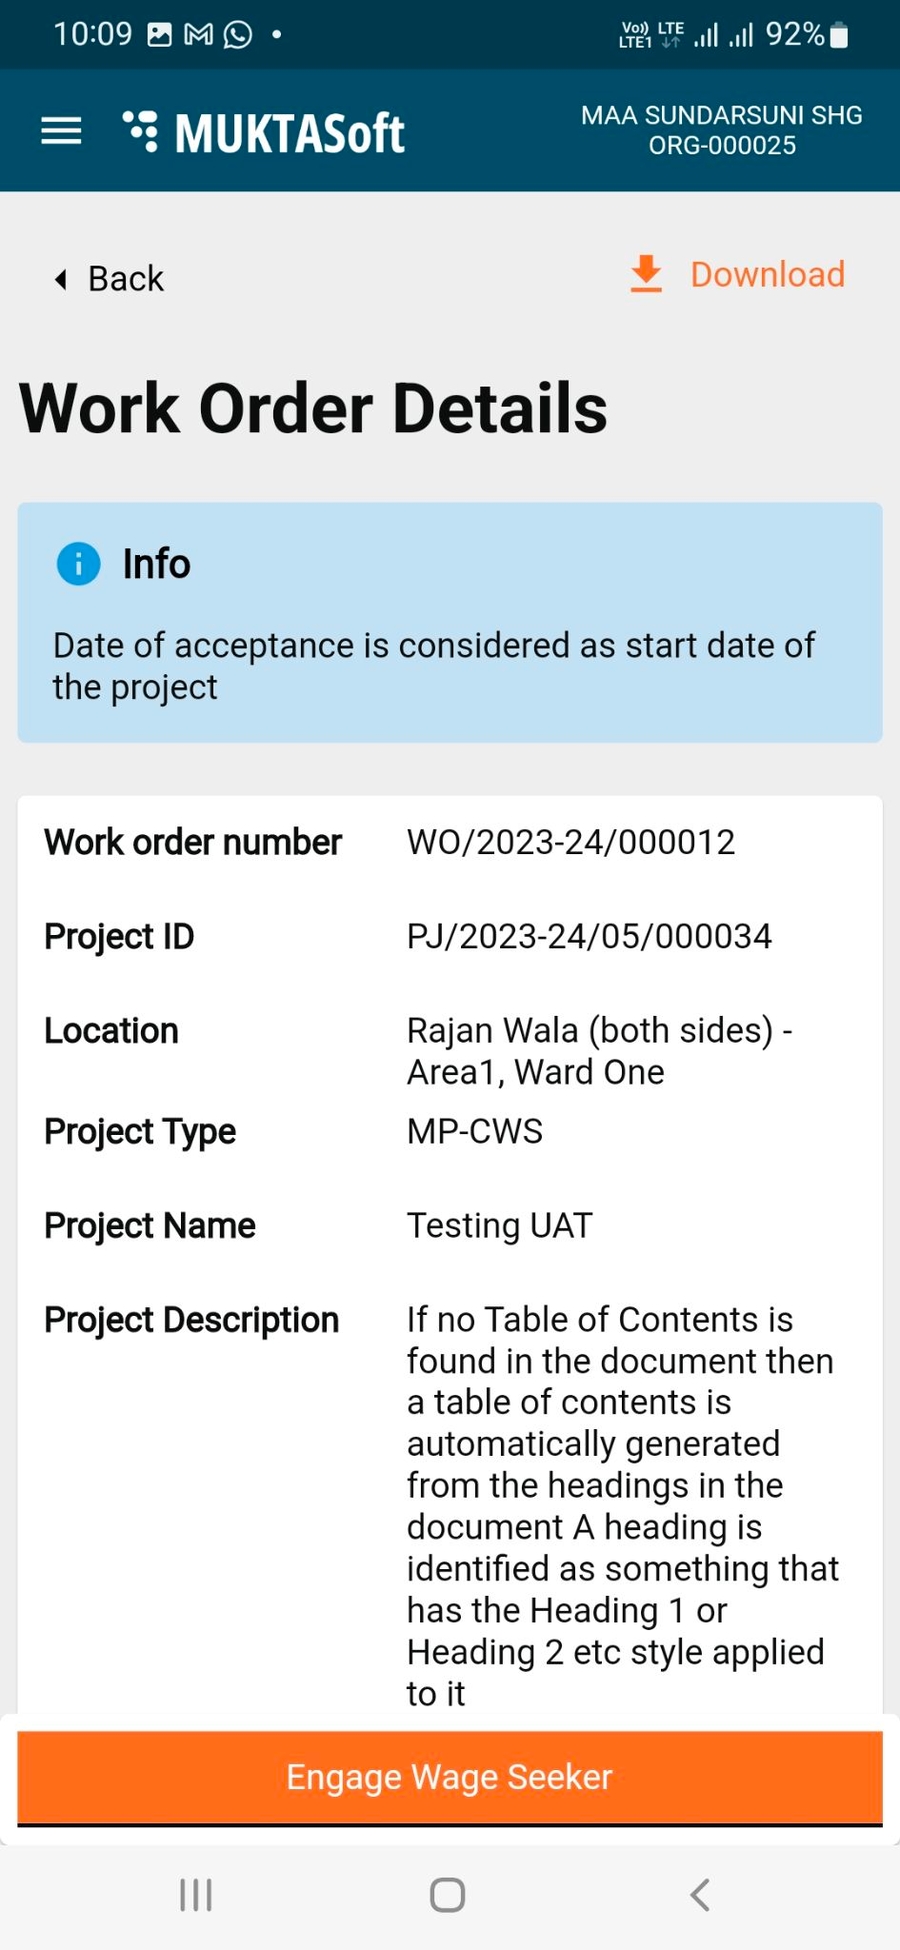
To view work order details -
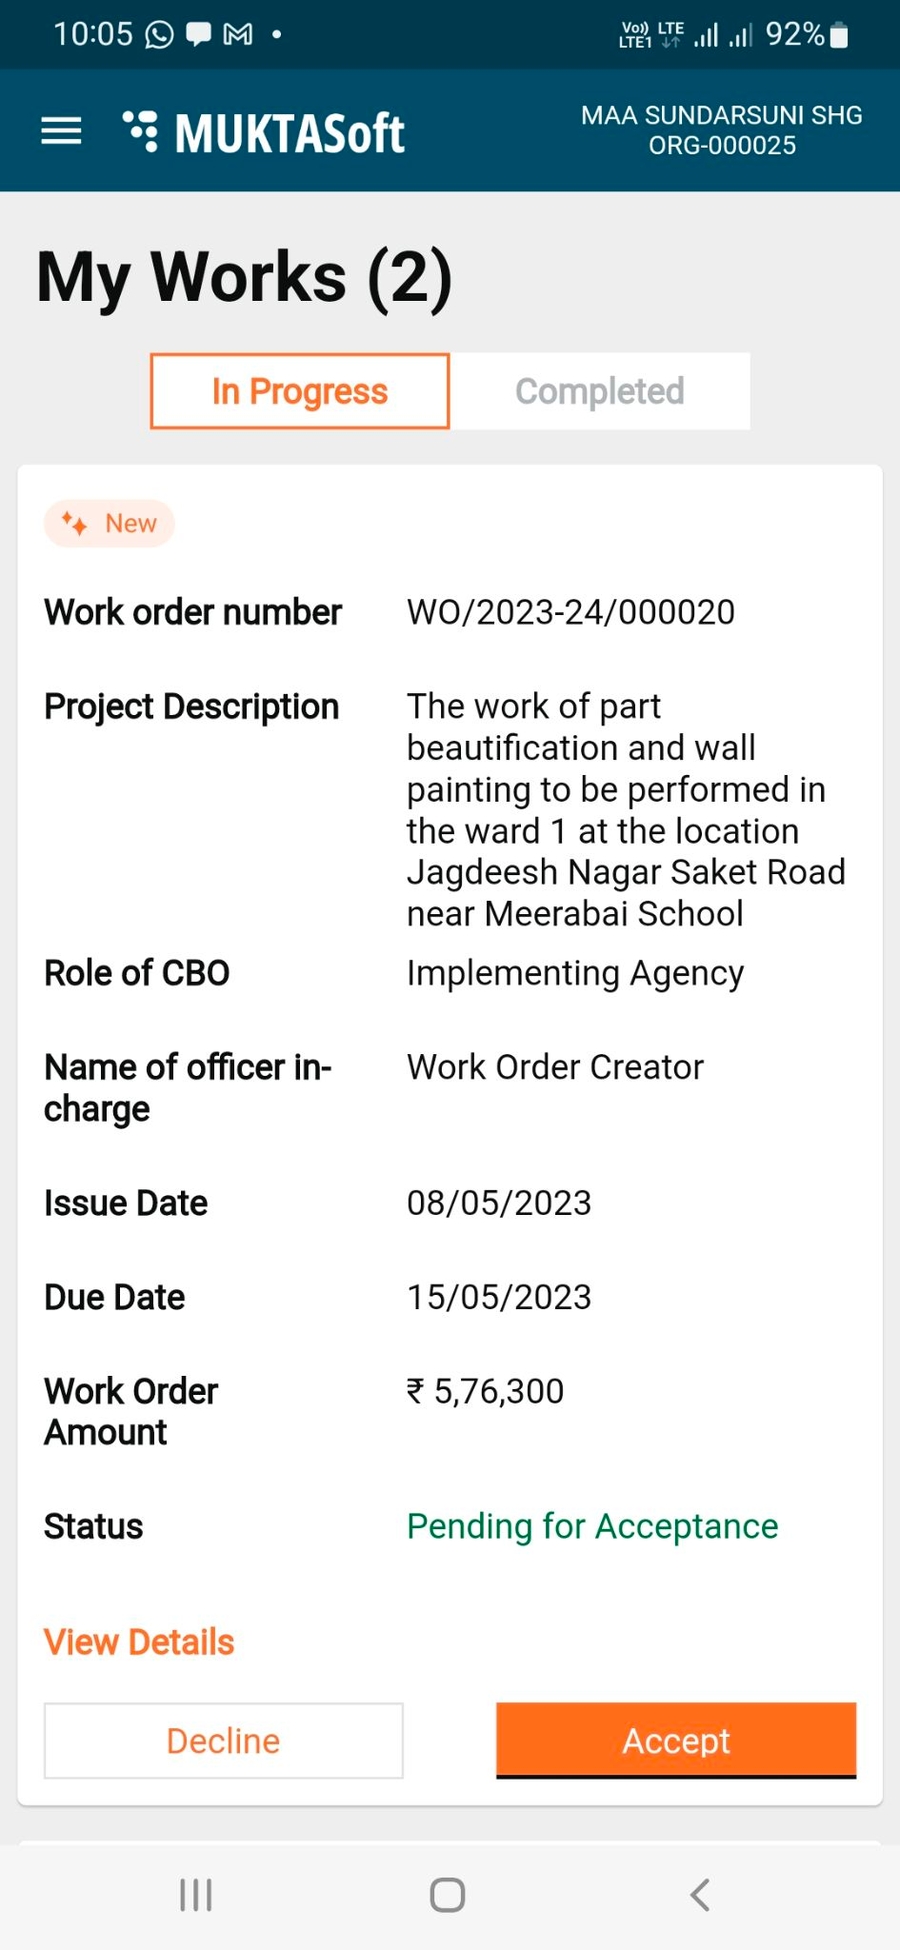
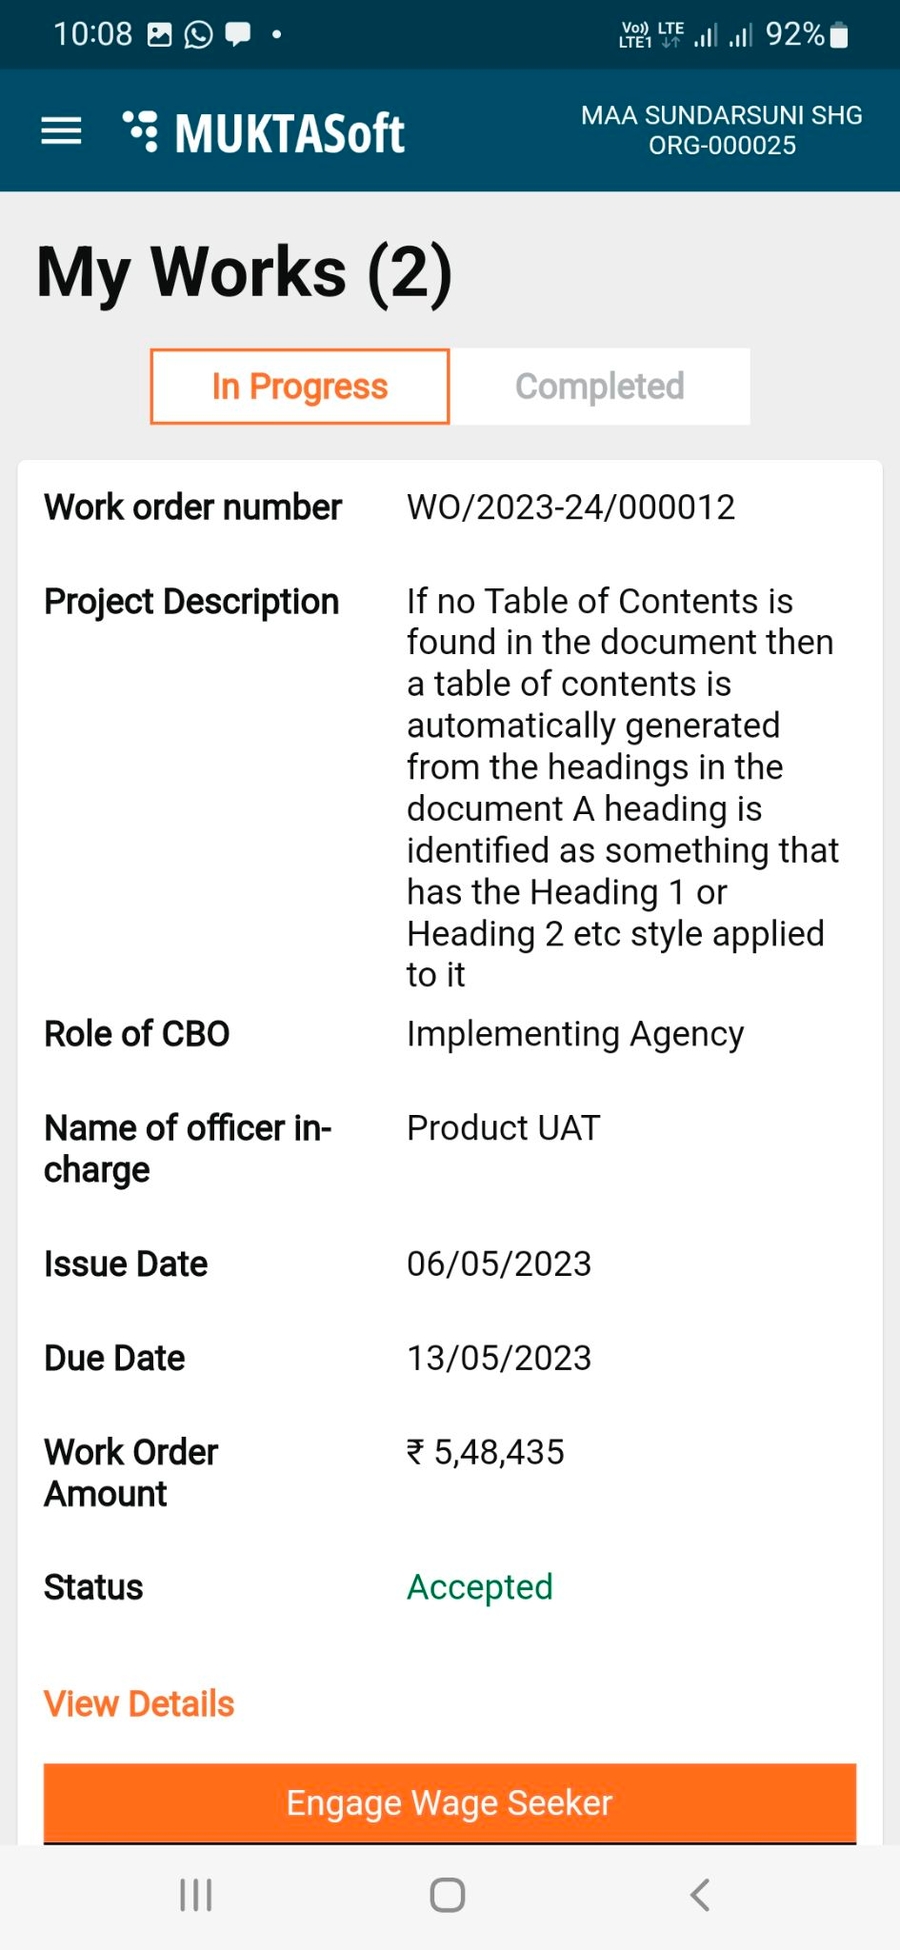
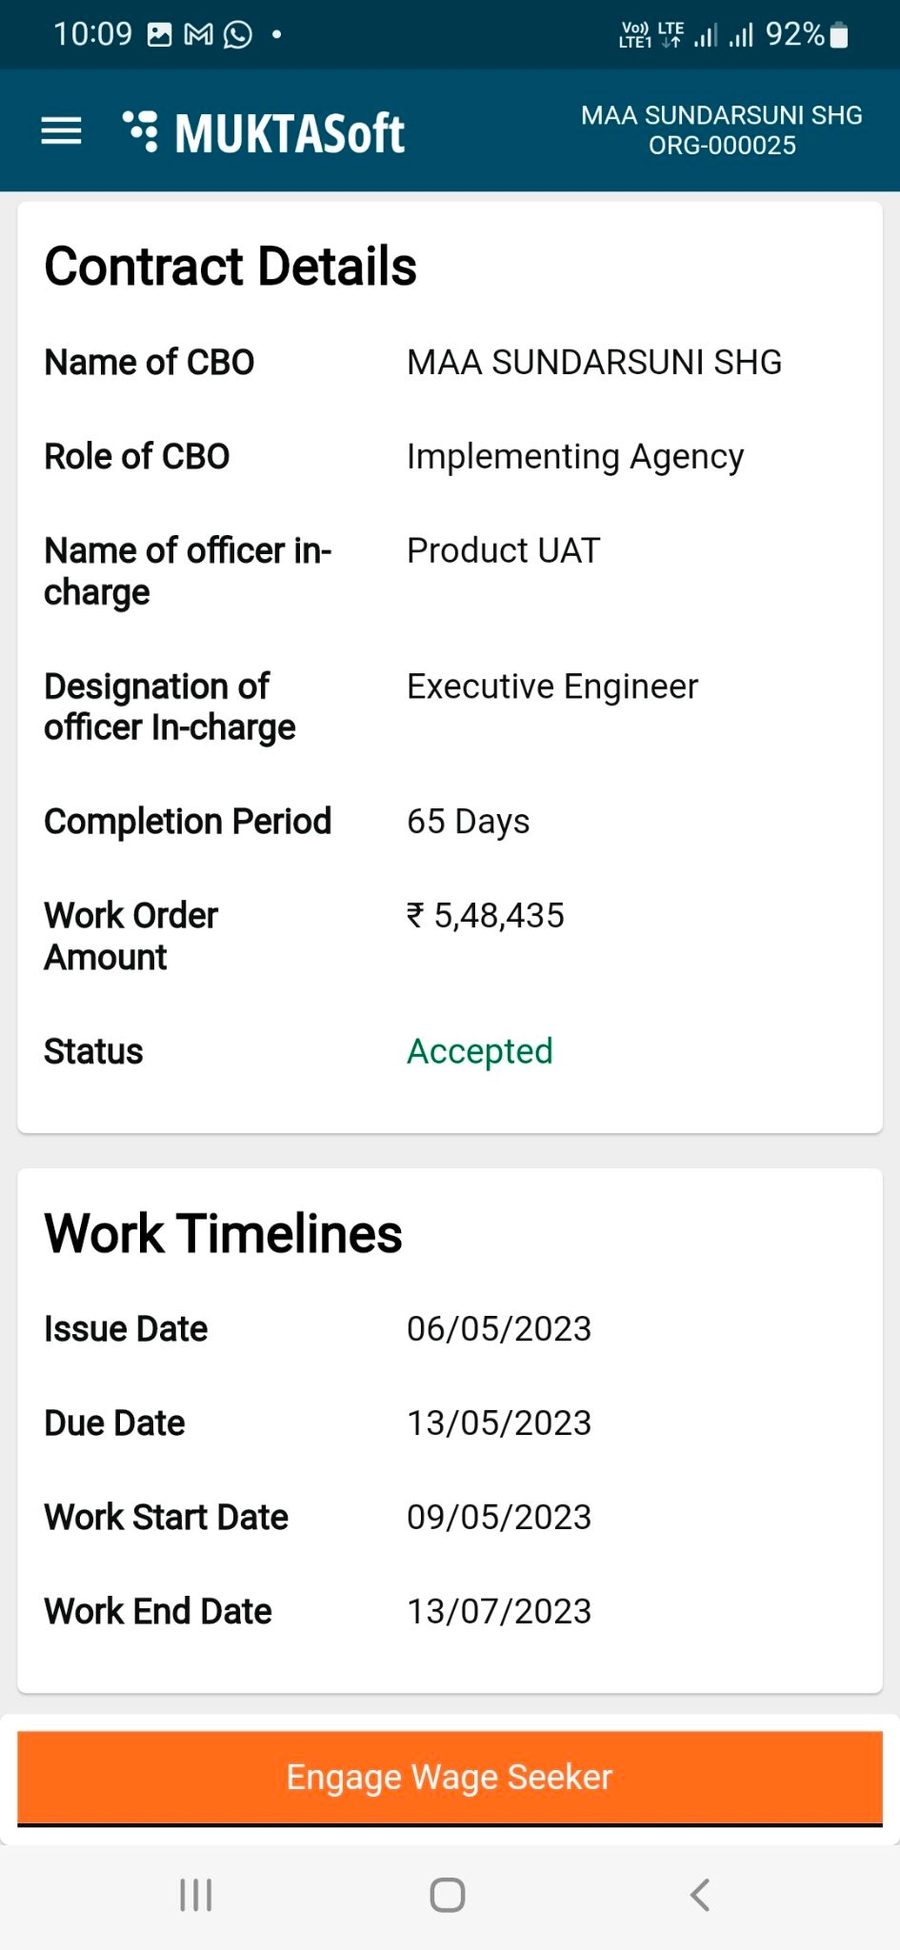
Step 1: Click on the My Works option on the home page.
This displays all the work orders assigned to the logged-in user.
Step 2: Scroll down to see if the logged-in user has more than one work assigned.
Step 3: Click on View Details to view the complete details of a work order.
Step 4: The Work Order details page displays the Contract Details, Work Timelines, Terms and Conditions, and the option to download Work Order PDF.
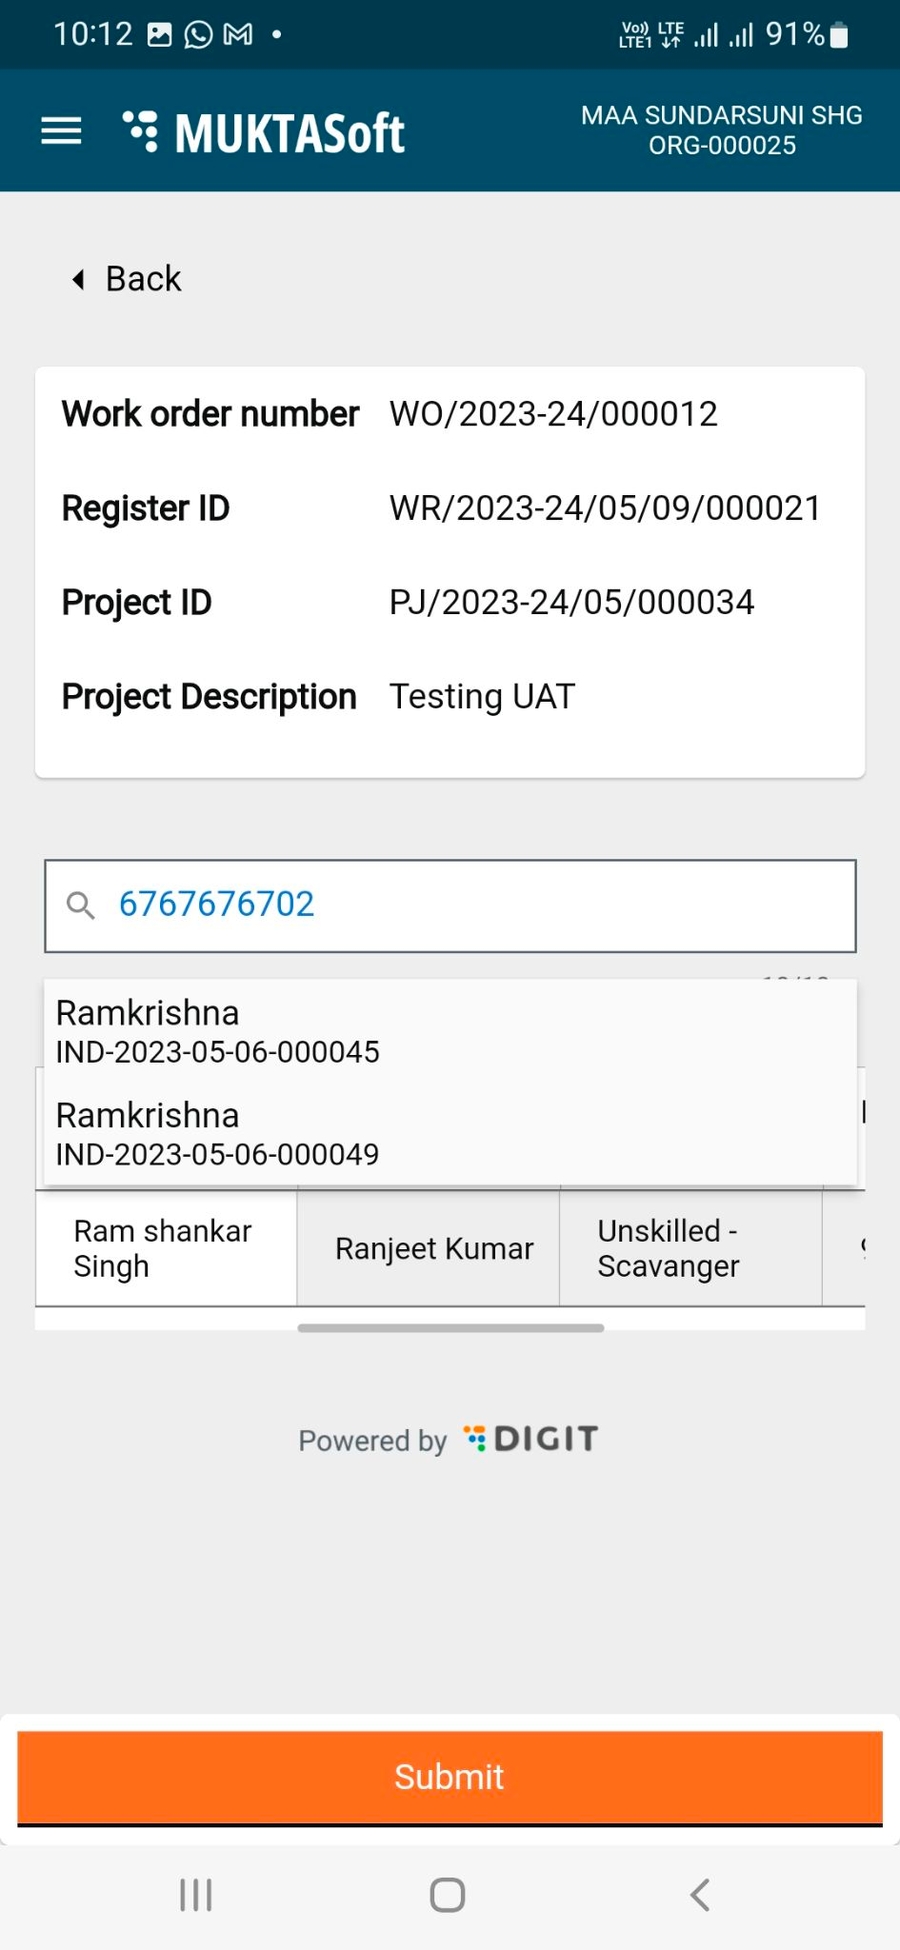
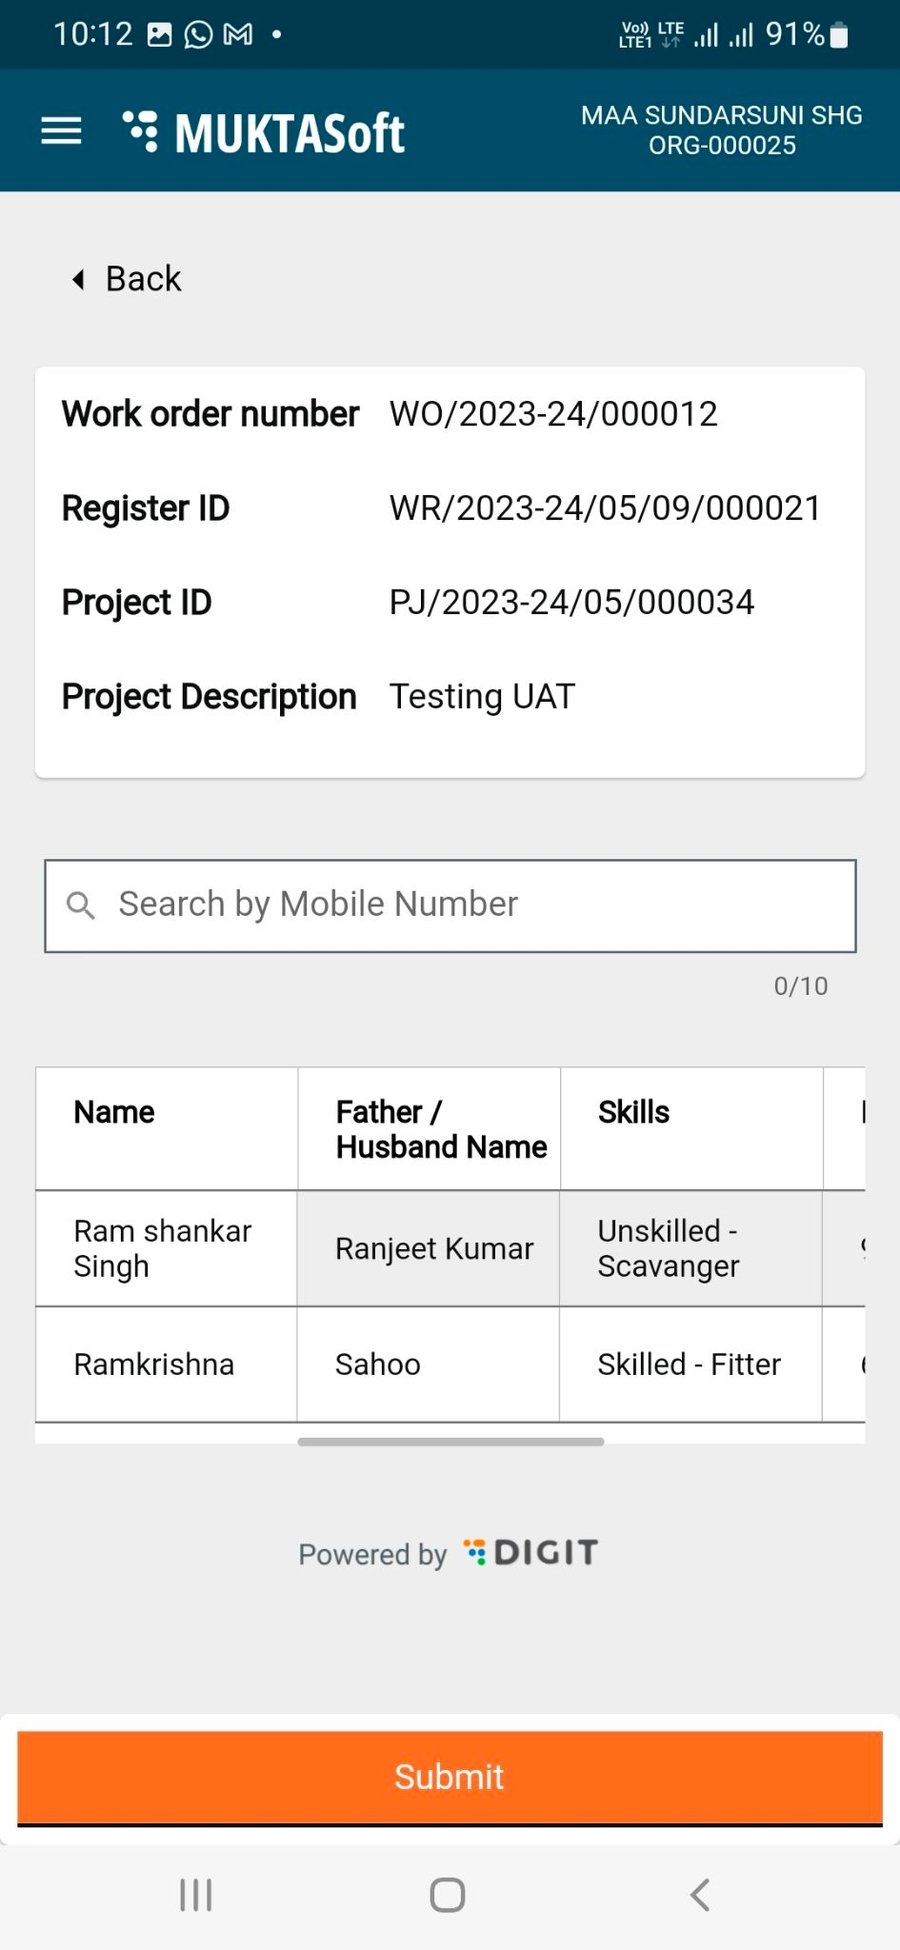
To engage wage seekers -
Step 1: Click on My Works to list all the running works.
Step 2: Click on the Engage Wage Seekers button available on the Work Order card.
Step 3: Search wage seekers by the registered Mobile Numbers and map to specific works.
Step 4: Click on Add a new wage seeker option to add wage seekers.
Step 5: Click on Submit once all the wage seekers are added. This saves the wage seeker record.
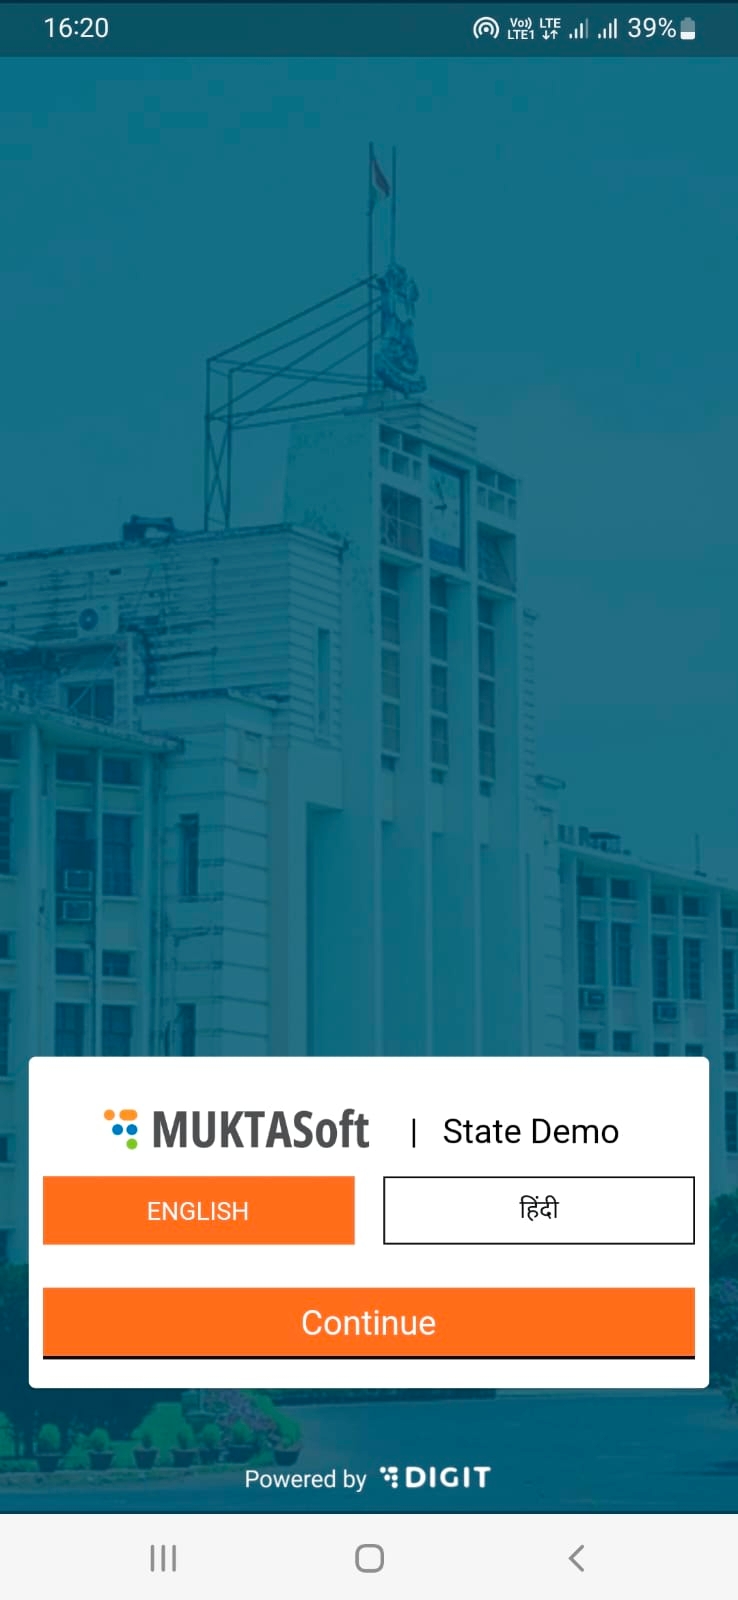
Enter the URL [Application URL] or Install the MUKTASoft CBO application.
Select the preferred language option. Click on Continue.
Click on Login.
Enter the registered Mobile Number.
Click on Continue.
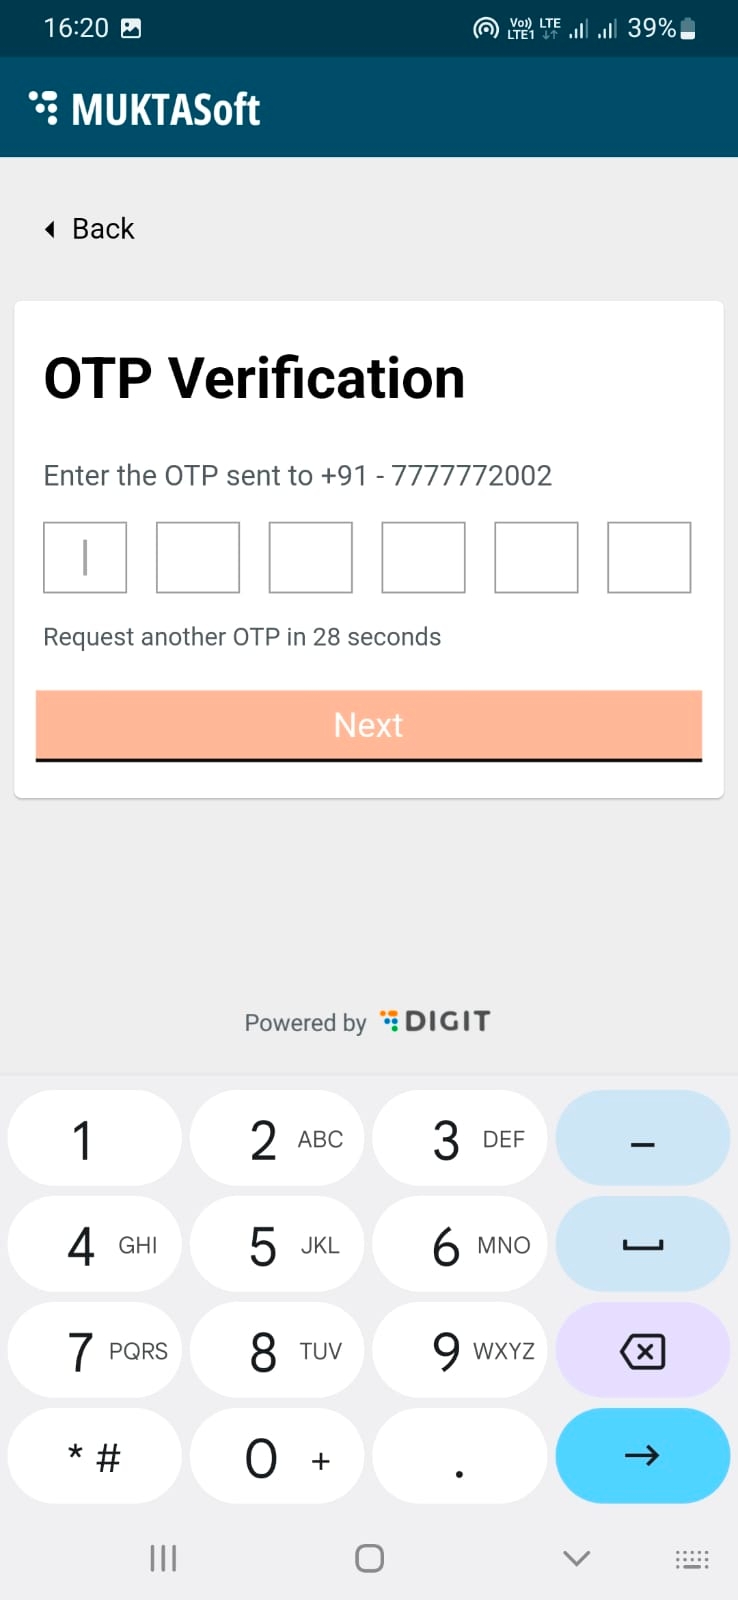
Enter the OTP sent to the registered mobile number.
Click on the Continue button.
You are logged in.
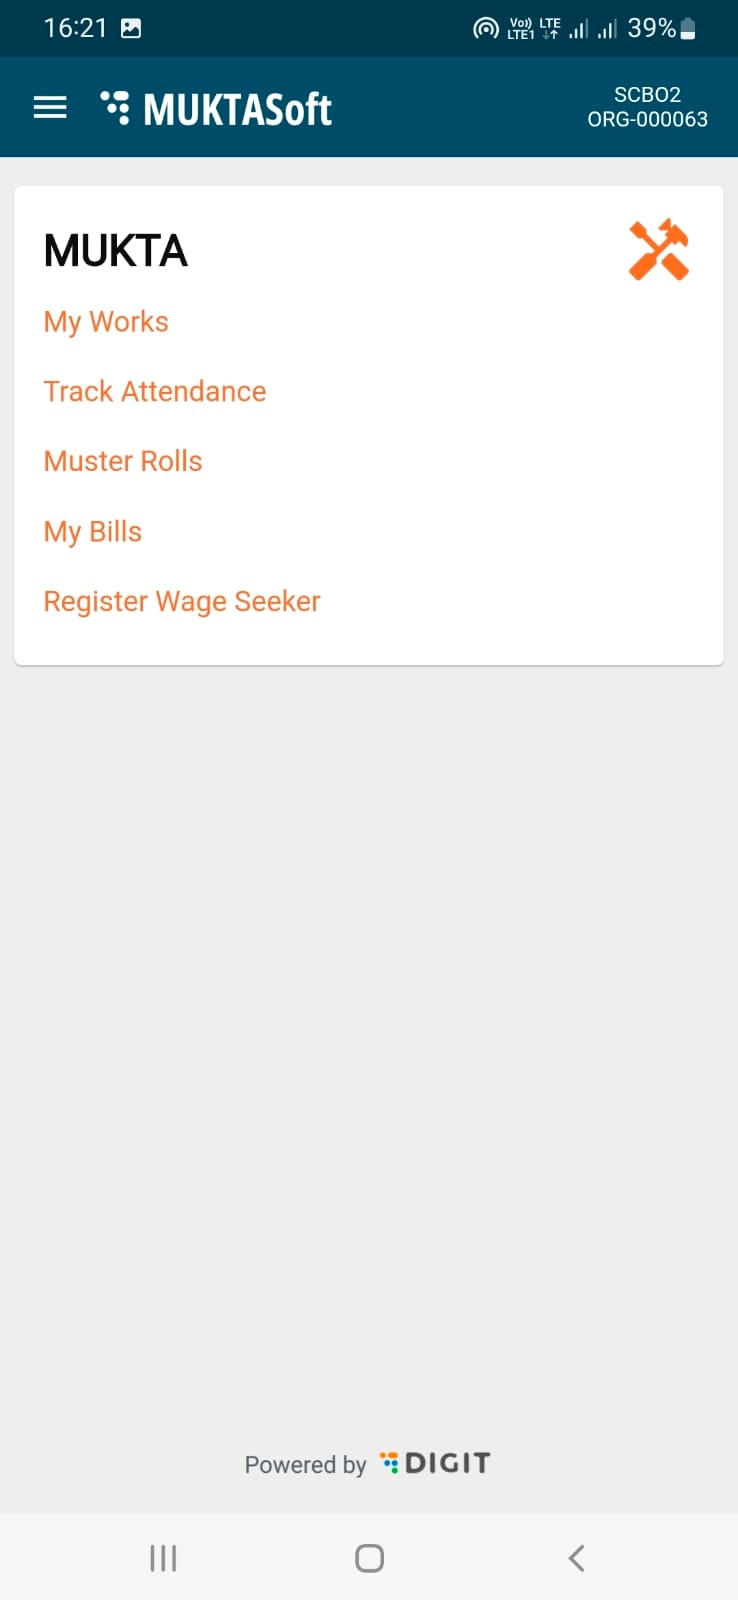
The home page displays the action menu available for the logged-in user profile.
Navigate through the options to initiate an activity.
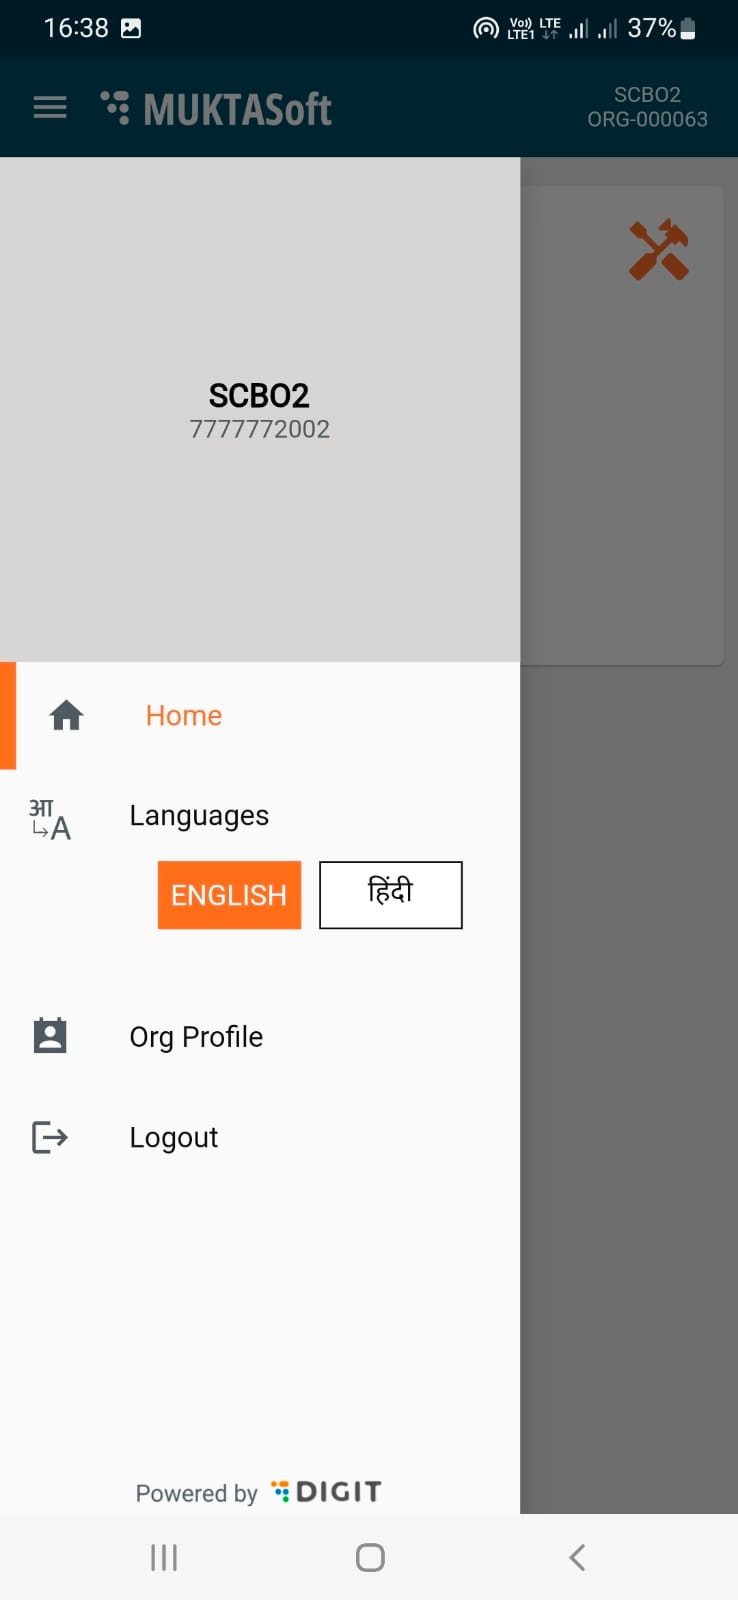
Users can change the language of the application from English to Odiya or vice-versa for ease and convenience.
To change language -
Tap on the menu icon () in the top left corner of the home page,
Select the preferred language from the list of available languages.
The system menu and prompts will now be displayed in the selected language.
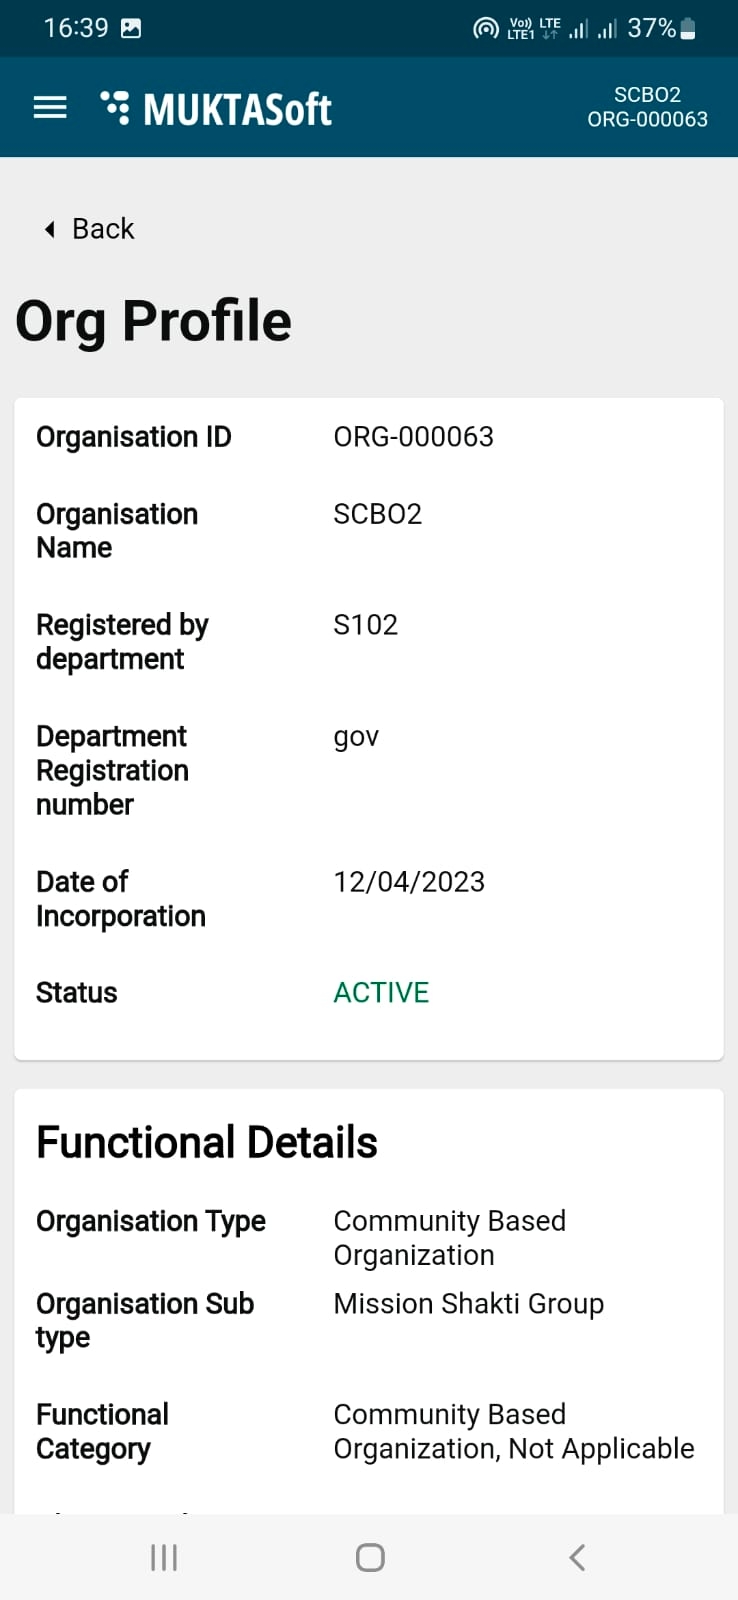
To view the organisation profile
Tap on the menu icon () on the top left corner of the home page.
Tap on Org Profile to view the organisation details.
Organisation profile details view
Organisation profile details view
To log out from the app -
Tap on the menu icon () on the top left corner of the home page.
Click on Logout.
You are now logged out of MuktaSoft.
To view different types of bills -
Step 1: Click on the My Bills option. The screen will list all types of bills along with their status.
There are two types of requests raised by CBOs.
Request to close the project
Request for more time to finish the work which is known as time extension.
Once these requests raised by CBOs are forwarded for approval, the same can be viewed and tracked under My Requests.
To view and track the requests raised -
Step 1: Click on the My Requests option.
To add a register a wage seeker -
Step 1: Tap on the Register Wage Seeker option on the home page.
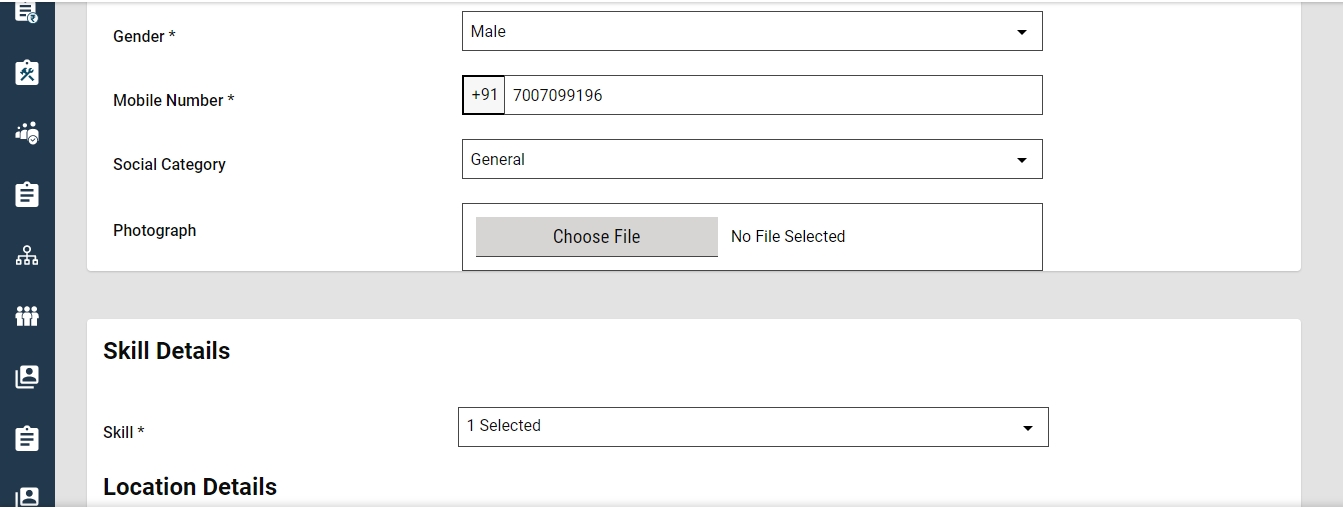
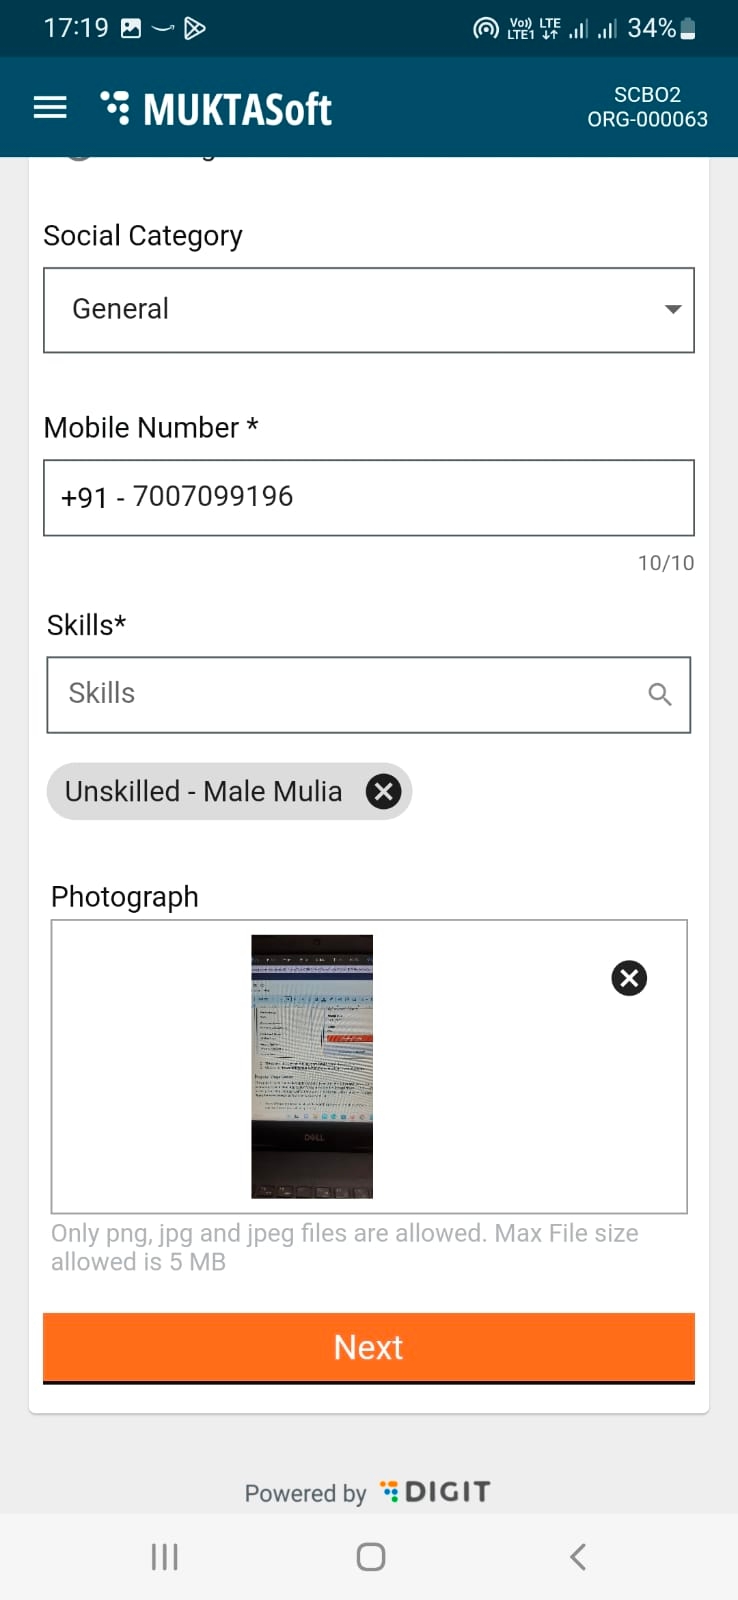
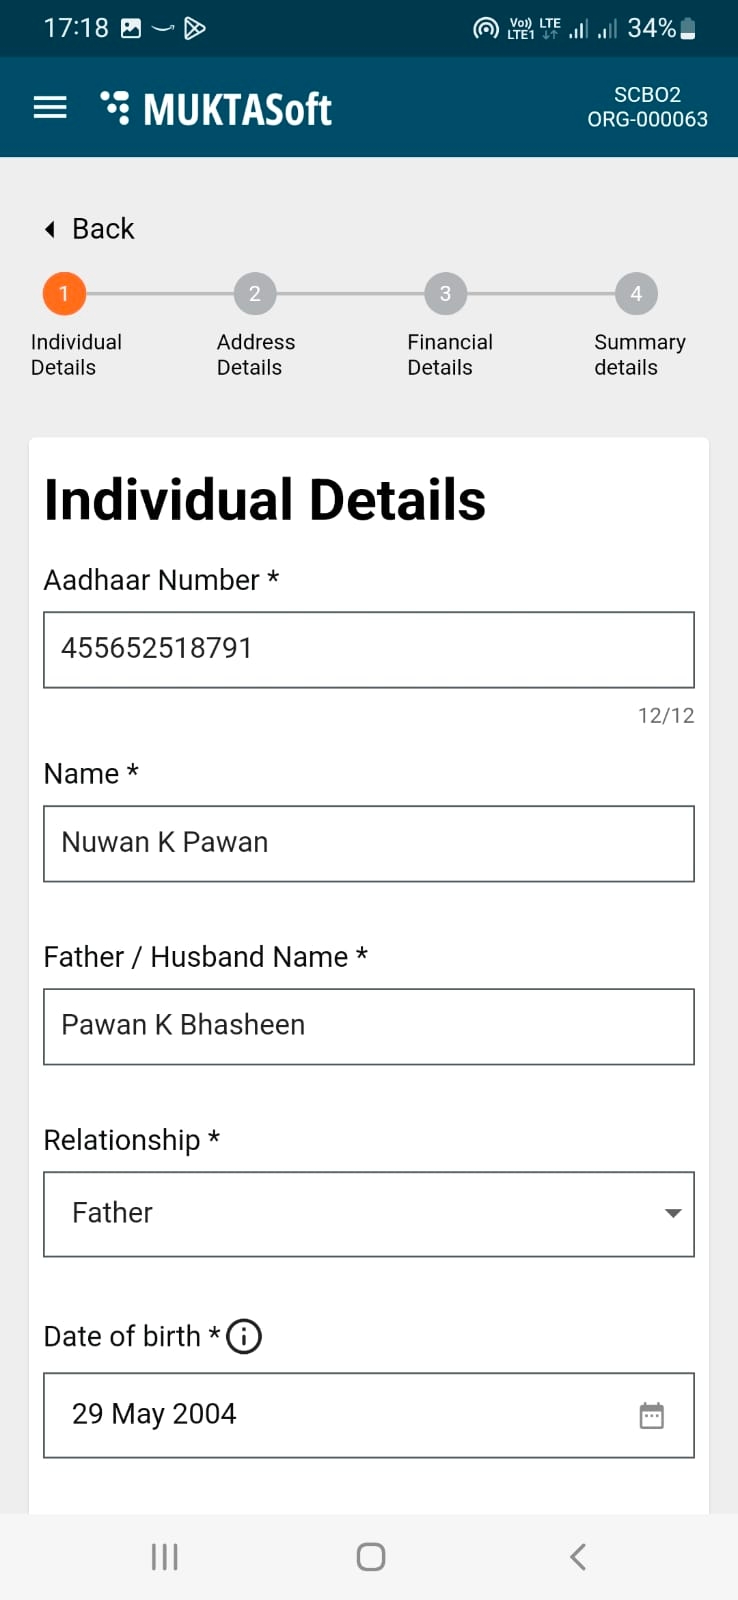
Step 2: Fill in the individual details. The fields marked with an asterisk is mandatory and cannot be left blank.
Step 3: Enter the details on the form as indicated.
Upload a photograph. The supported file formats are png, jpg, and jpeg. The max file size should not exceed 5MB.
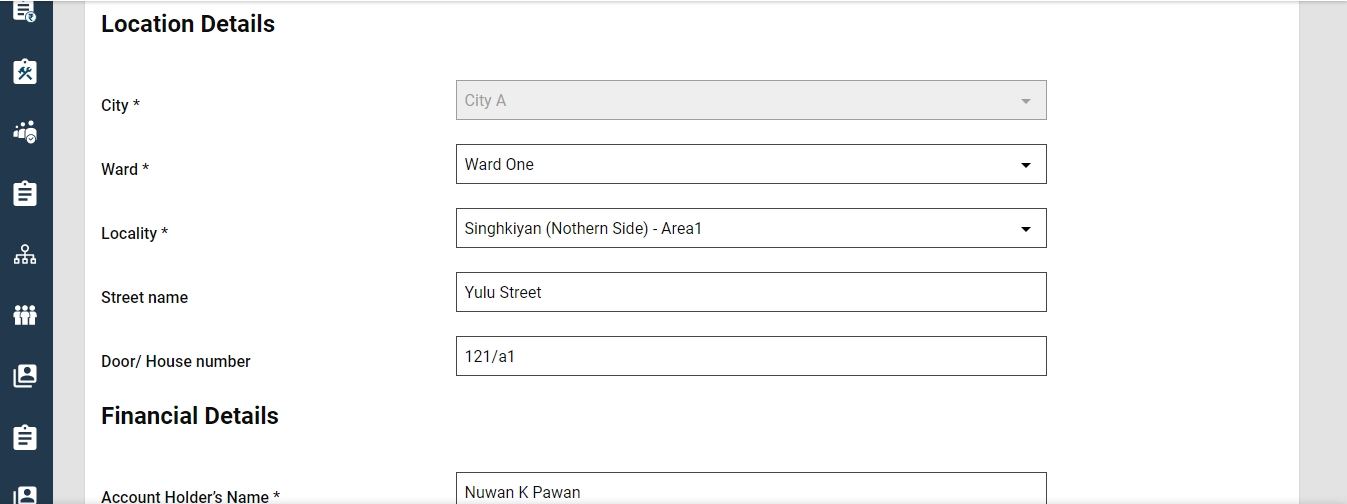
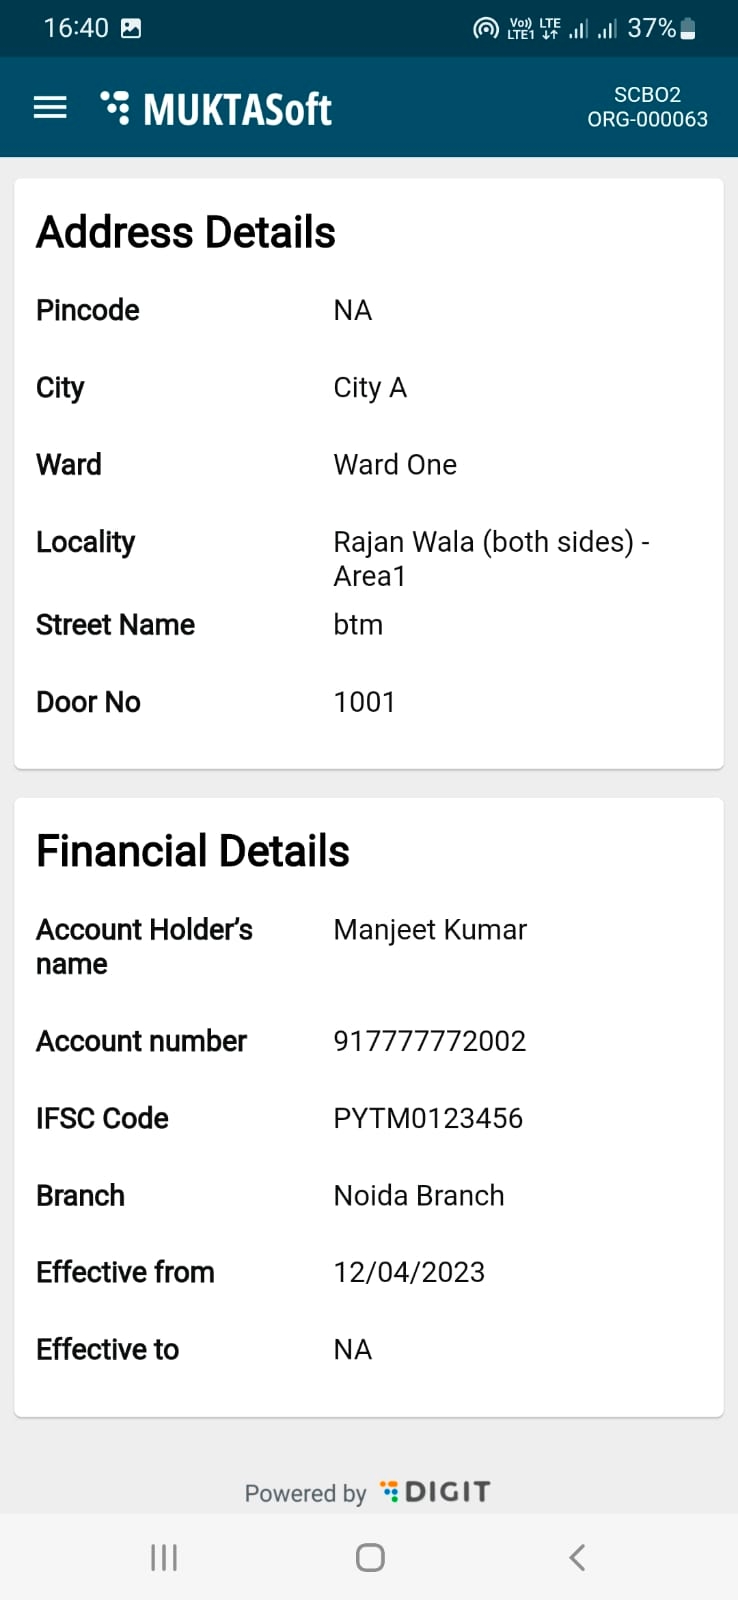
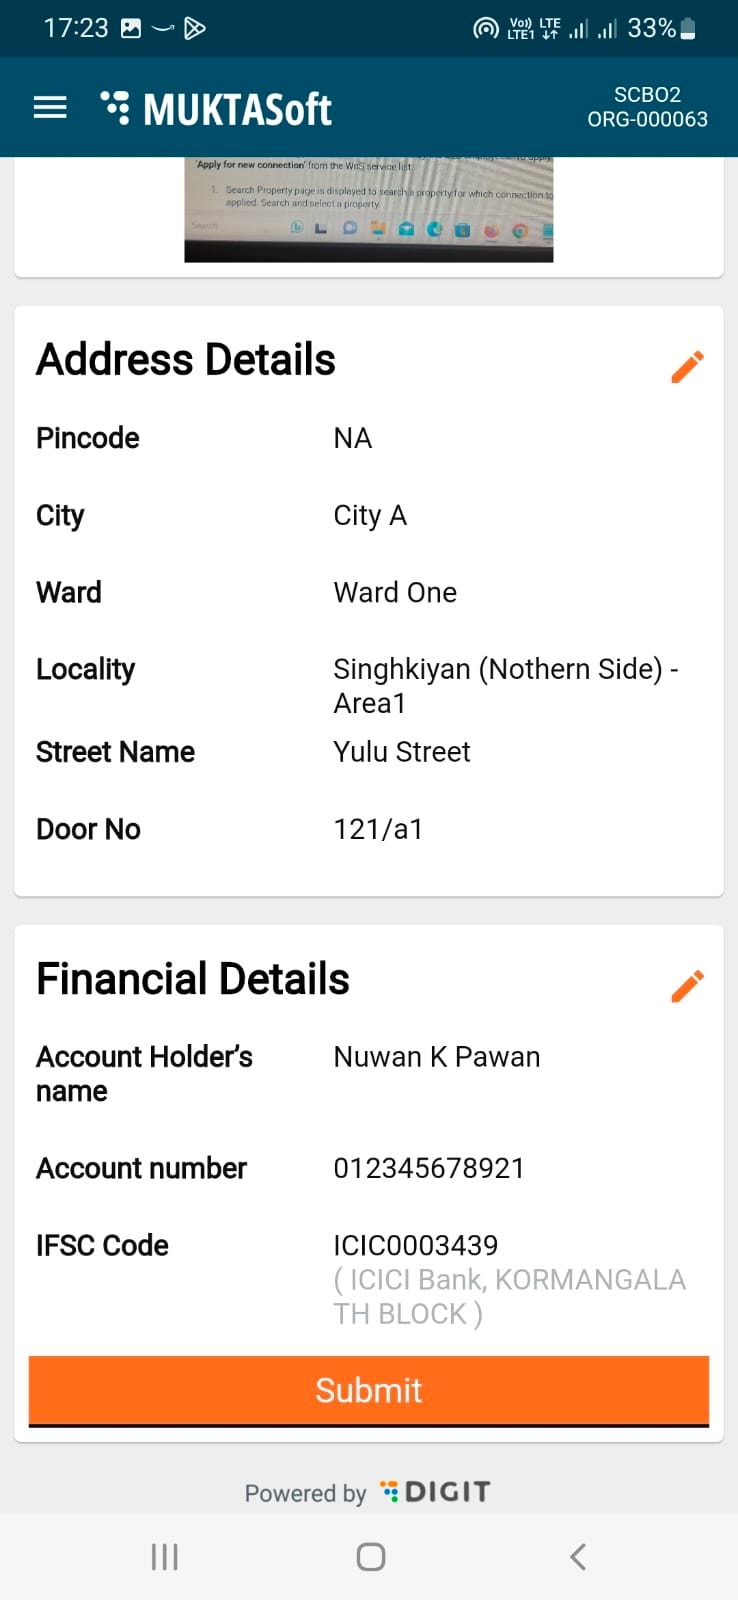
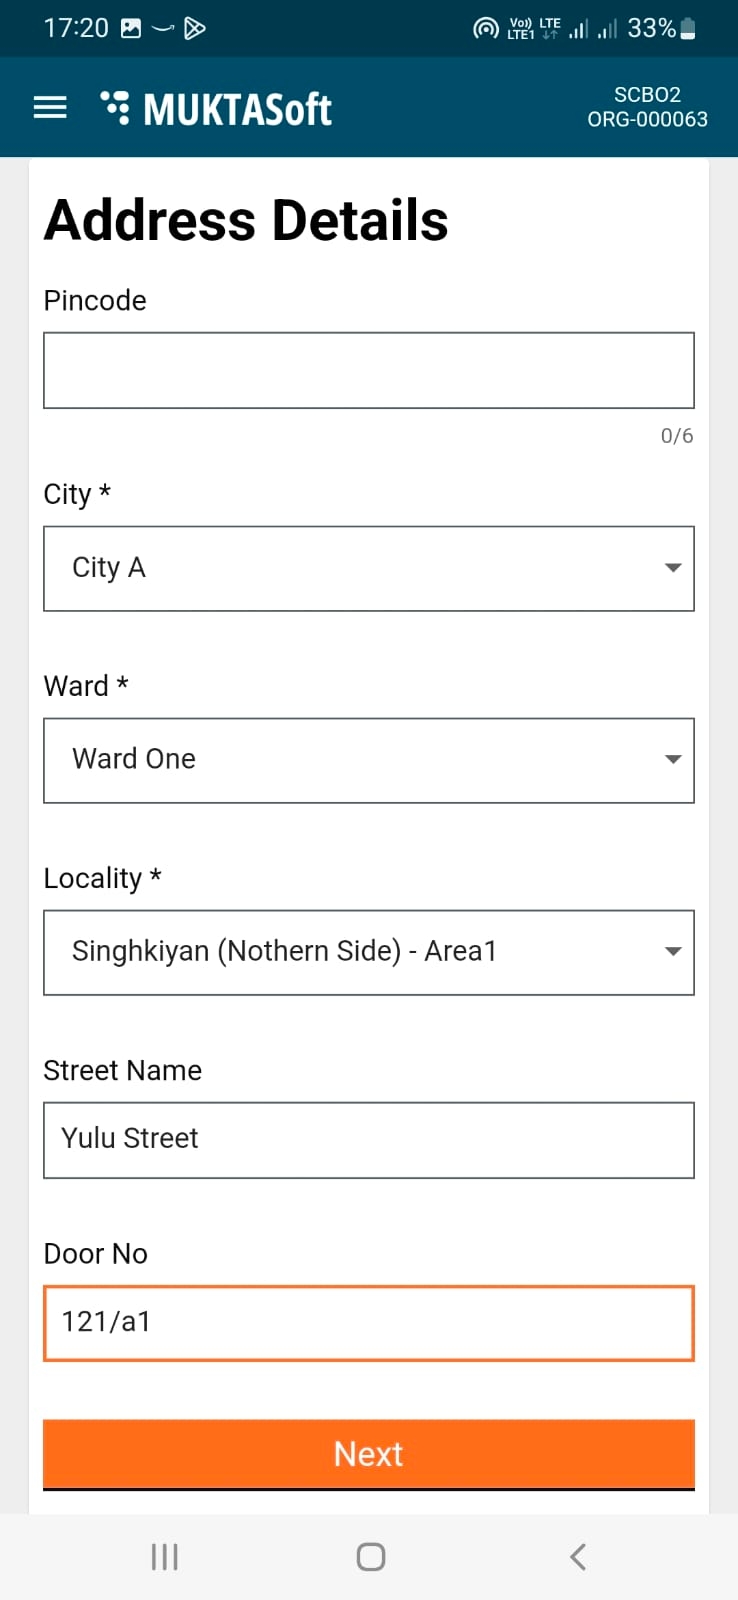
Step 4: Enter the Address Details. Click on Next.
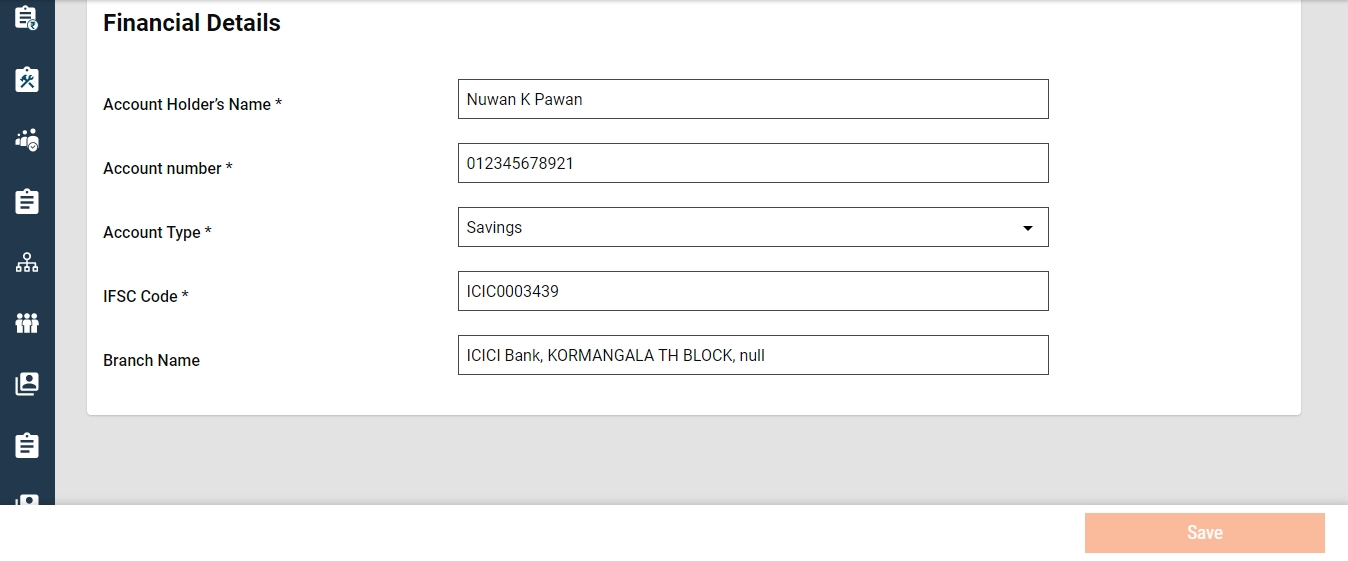
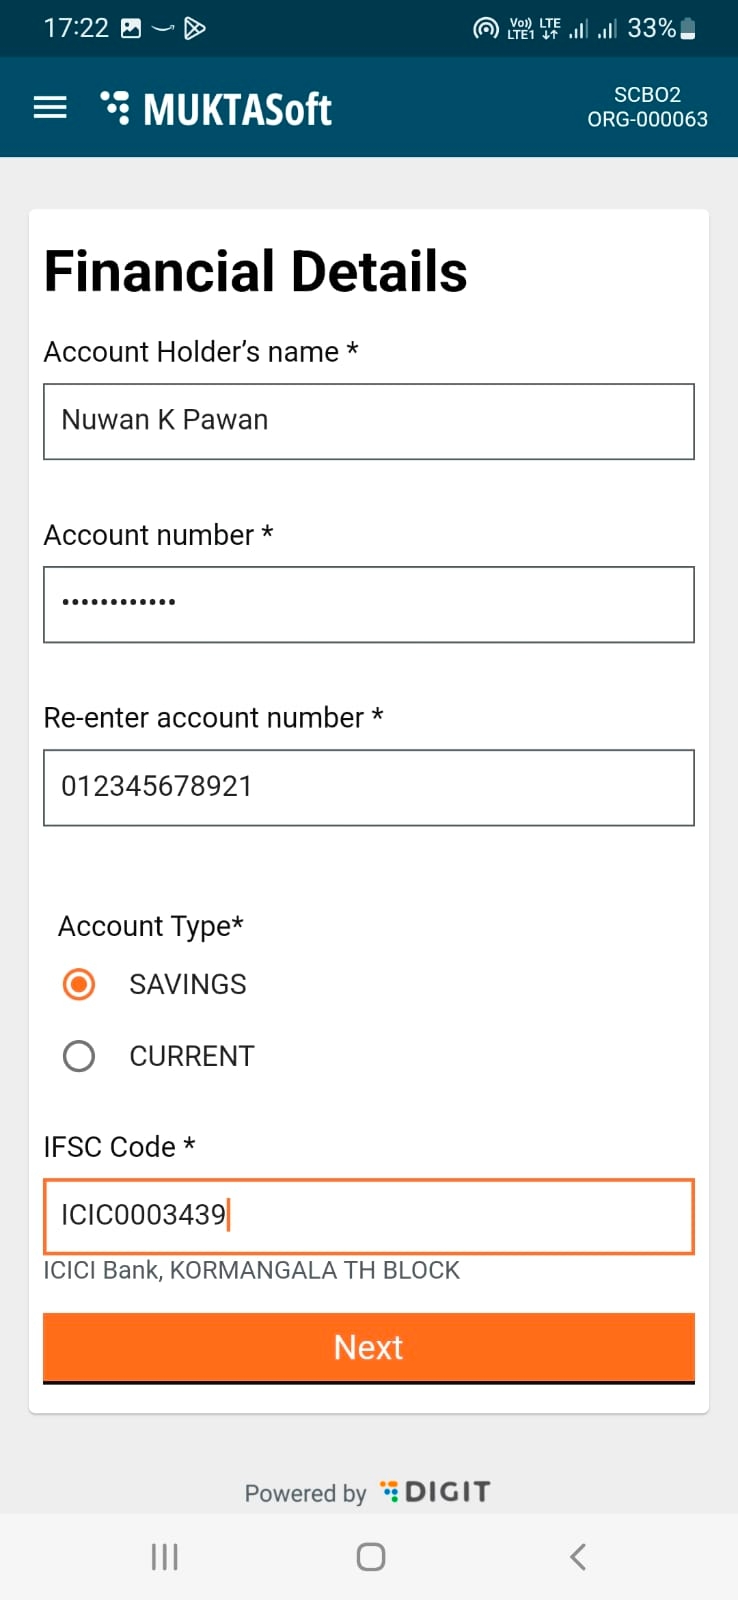
Step 5: Enter the bank account-related information on the Financial Details page.
Make sure to check and confirm the details before clicking on the Next button.
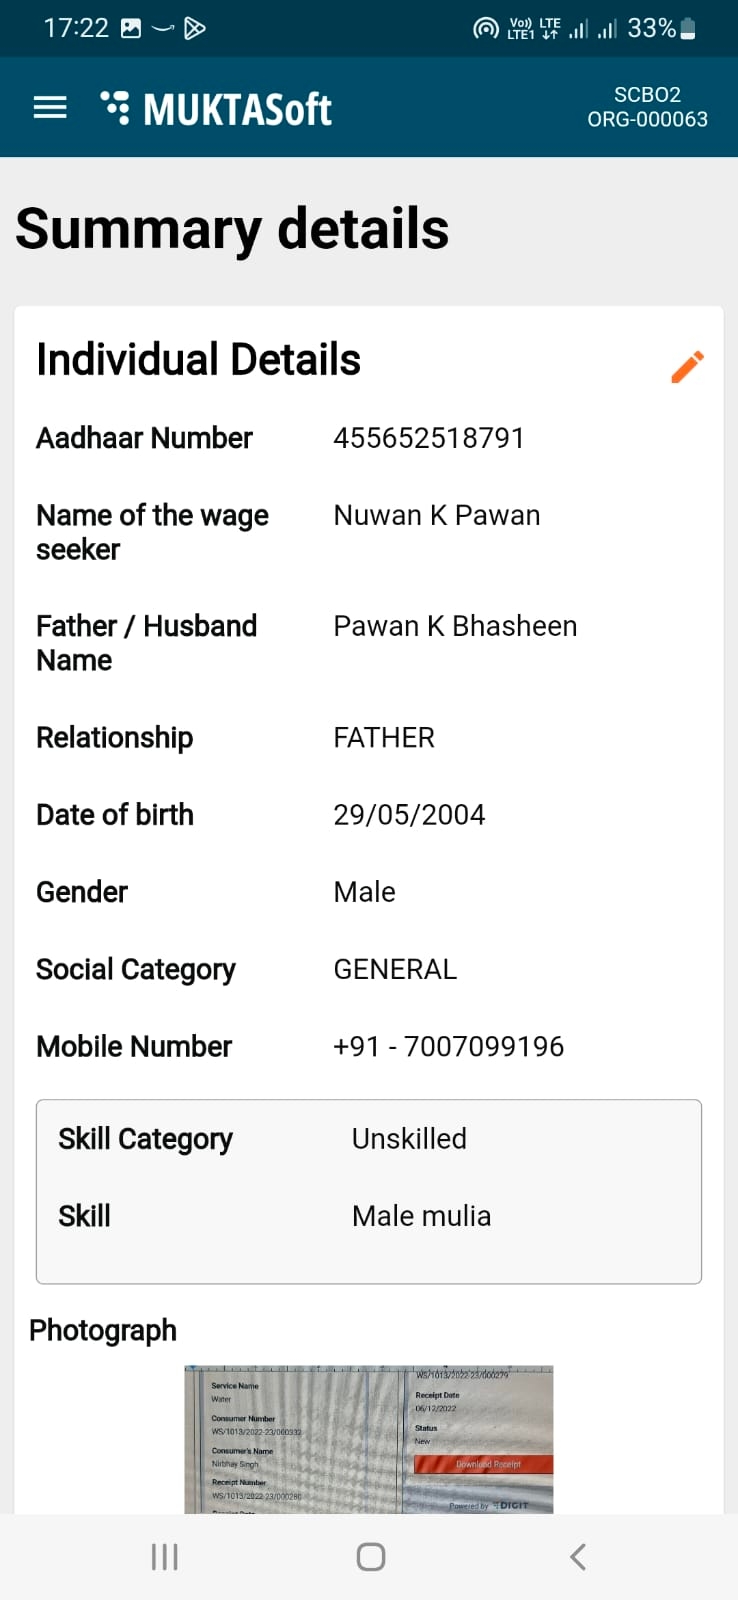
Step 6: Re-check all details displayed on the Summary Details page.
Step 7: Click on the Edit icon in the corresponding section where you want to make the changes.
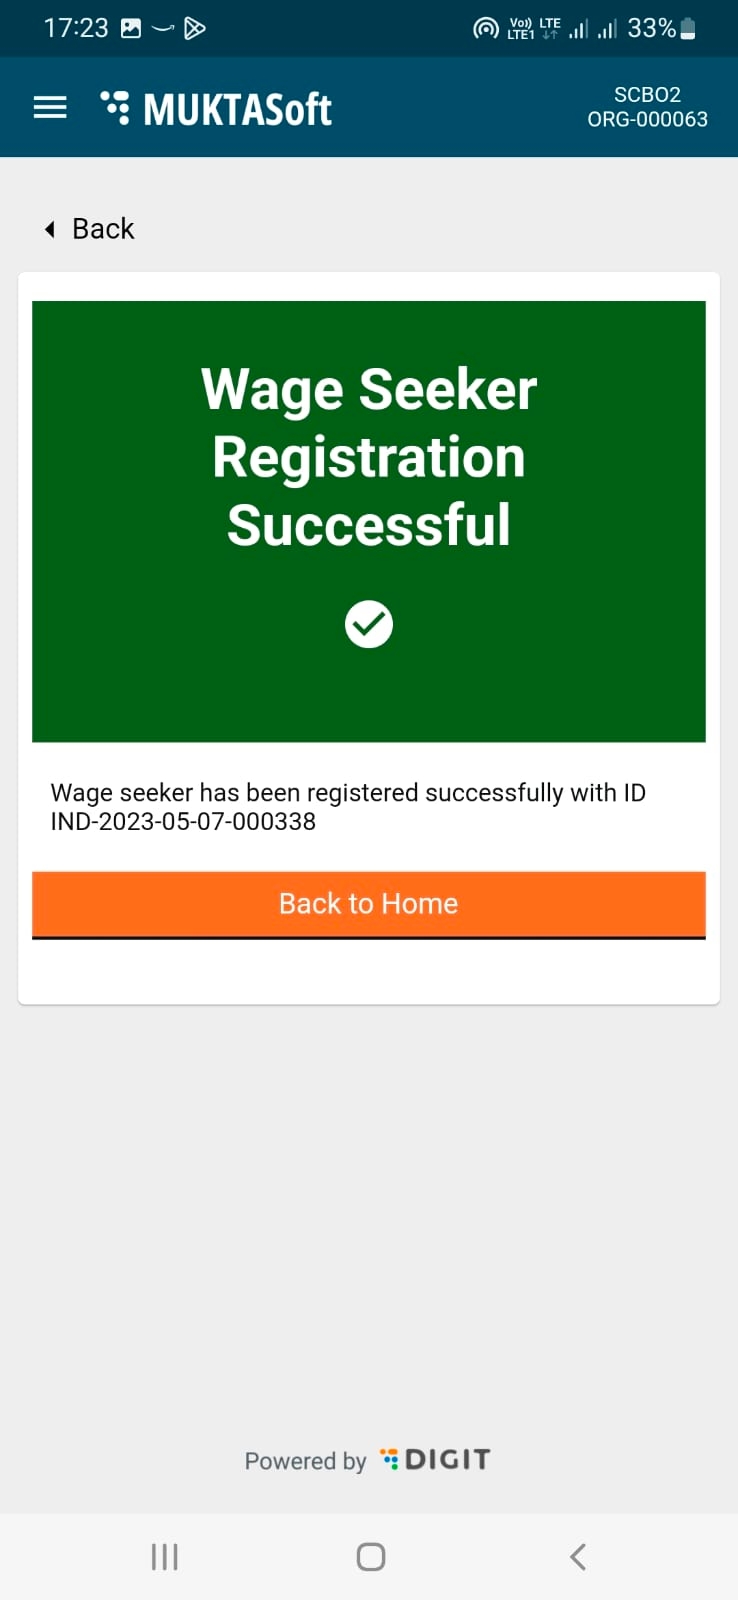
Step 8: Click on the Submit button to save the wage seeker details.
The Wage Seeker registration is successful acknowledgement is displayed on the screen. The Wage Seeker ID is also displayed on the page.
Click on the Back to Home button to navigate to the home page.
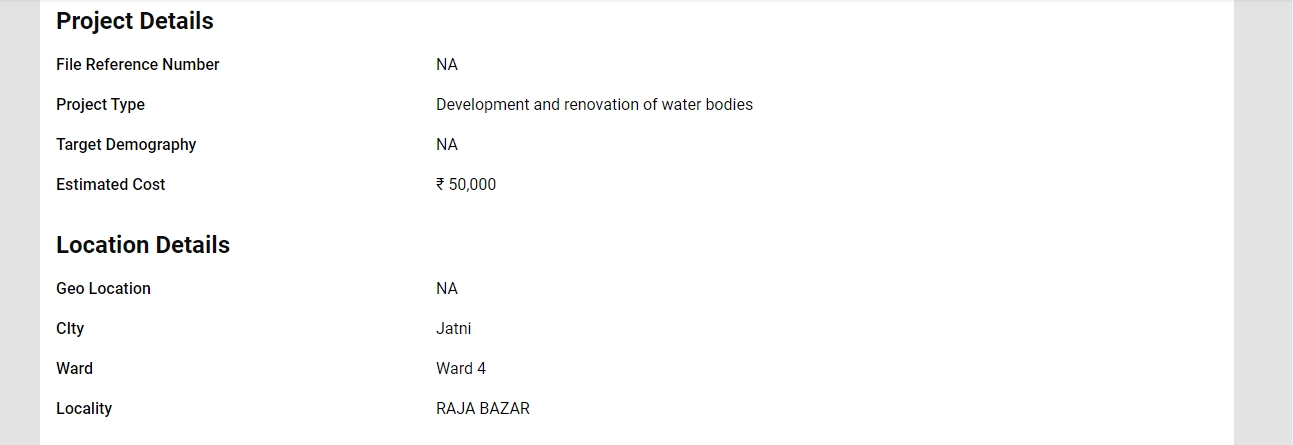
The work in the finalized work list is called a project. The project option enables employees to -
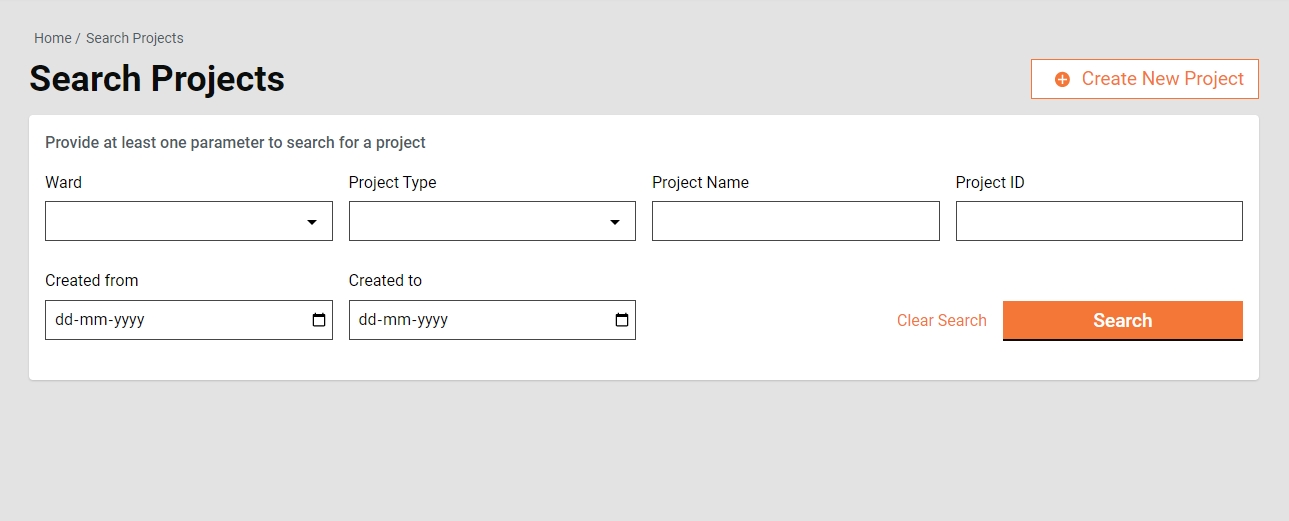
Home Page > Projects > Search Project
The search project option enables ULB employees to find specific projects using multiple filters.
Search Filters
Ward
Project Type
Project Name
Project ID
At least one parameter is mandatory. Enter any one or more to search for a Project.
The system fetches the estimates created between the specified period by entering the date range in created from and created to. The Created From and Created To are considered one parameter.
Click on the Search button to view the search results.
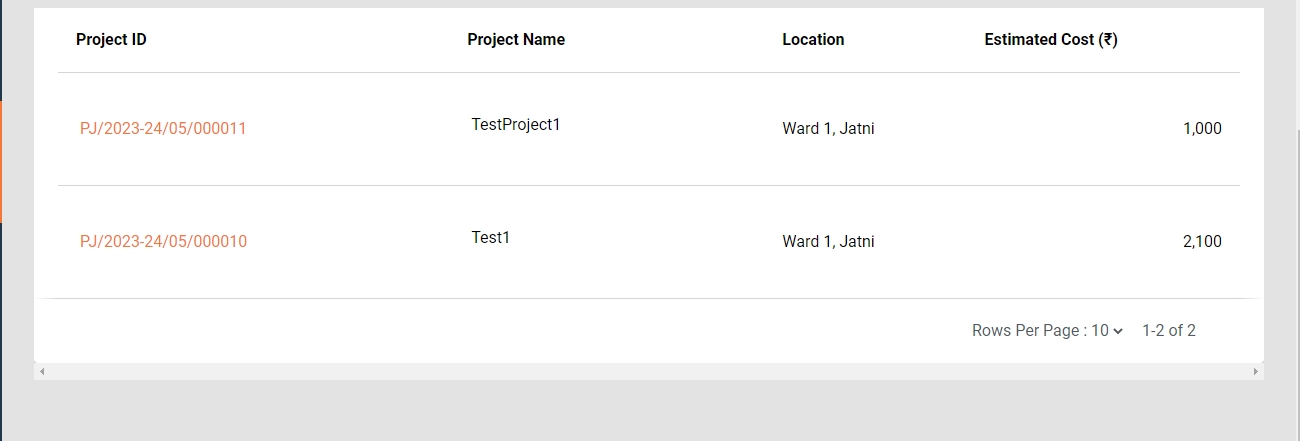
Search Result
Project ID
Project Name
Location
Project Cost
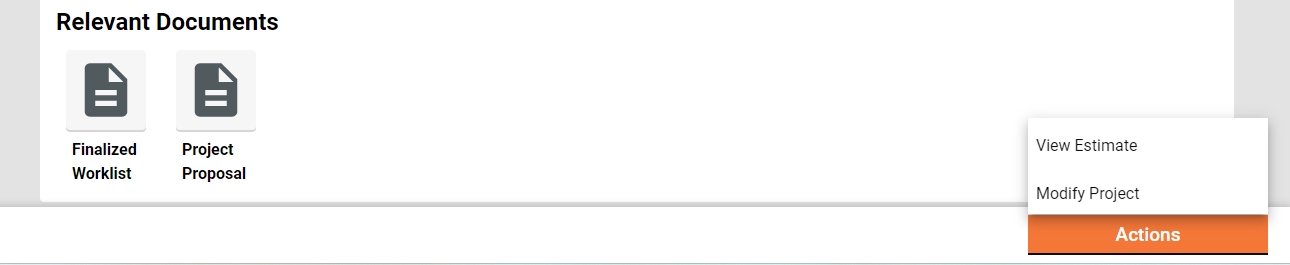
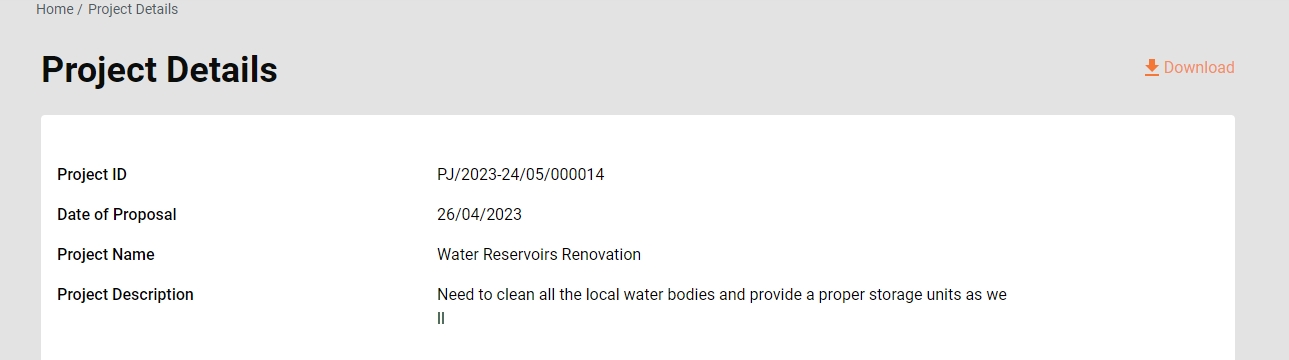
Home Page > Projects > Search Project > View Project Details
Search for the project to view details. Click on the Project ID to open and view the project page.
Home Page > Projects > Search Project > Create Project
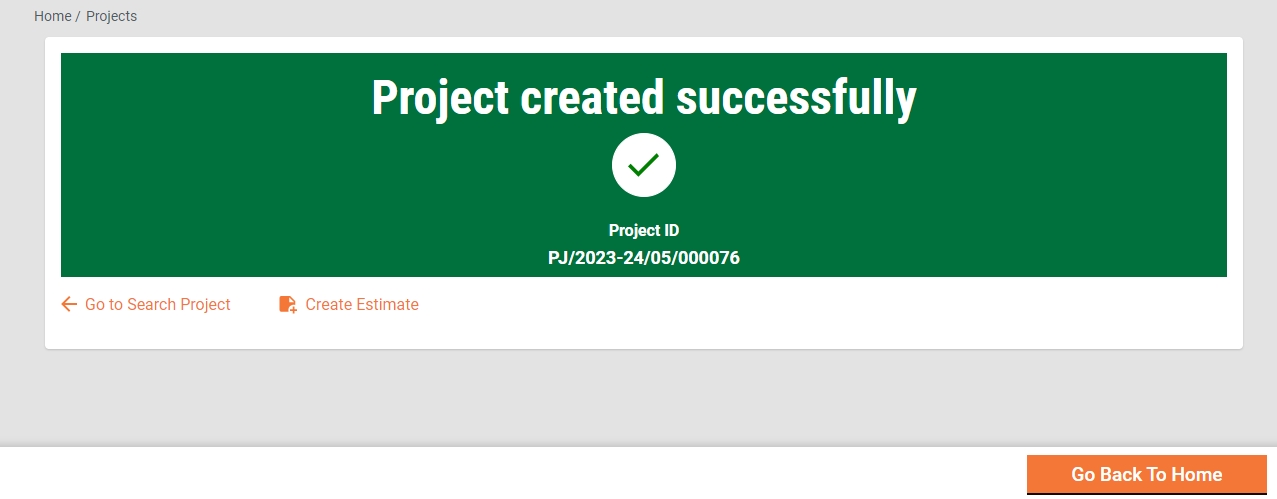
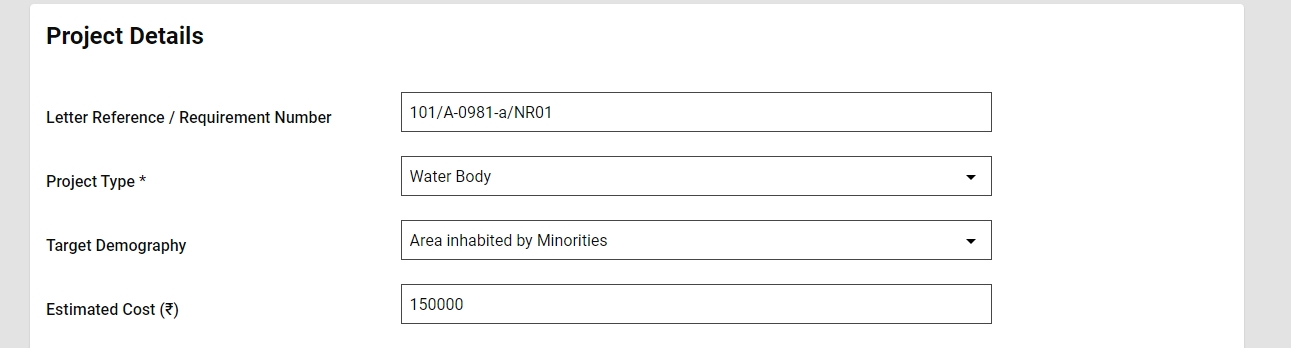
To create a project click on the Create New Project button. It takes the user to create a project form.
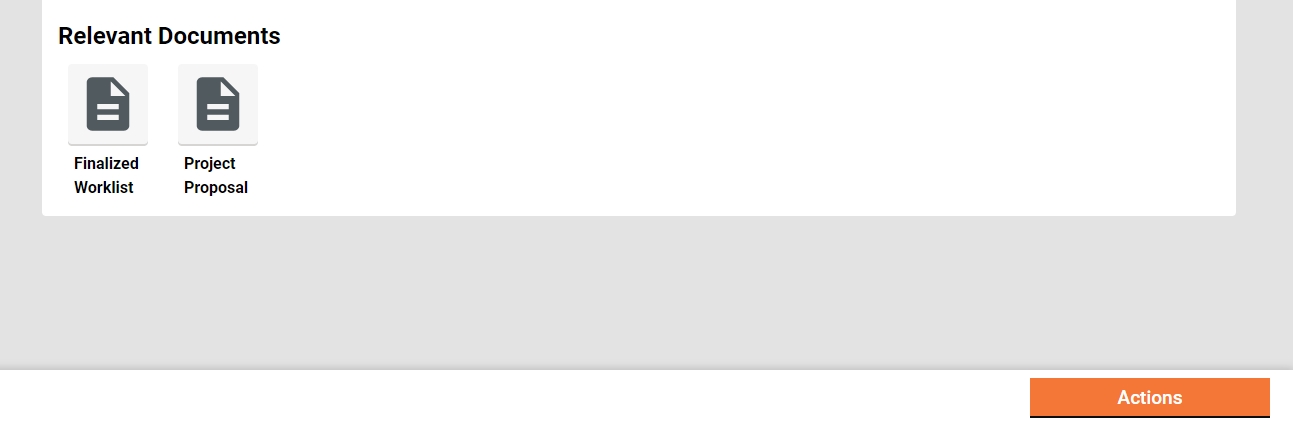
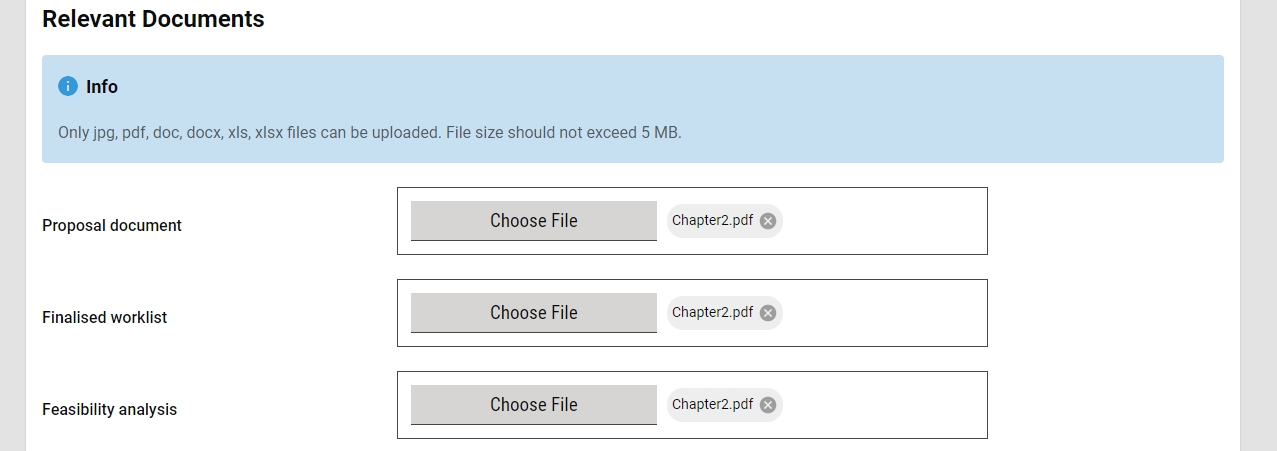
Fill in all the required details and attach the relevant documents.
Click on the Create Project. On successful creation of the project, the success page is displayed along with Project ID and options to go back to the Search Project, go back to the home page, or create an estimate for the project.
Home Page > Projects > Search Project > View Project > Modify Project
The project details can be modified to correct the fields that were wrongly entered at the time of creating the project. Search for the specific project and open it to view the details. Navigate to the Actions button and click on Modify Project.
The project details are in the edit mode. Make the required changes.
The "Add Rate Analysis" feature empowers users to add a rate analysis to an SOR with a future effective-from date and closes the existing rate analysis by updating its effective-to date to one day before the newly added rate analysis effective-from date.
It opens the create rate analysis screen, allowing the creation of a rate analysis with a 'future effective from date'.
The "View Rate Analysis" feature enables users to access and review the details of a specific Schedule of Rate (SOR)’s rate analysis. This functionality provides a comprehensive view, allowing users to compare the existing rate, the rate as per the rate analysis, and the latest rates of the basic SORs included in the rate analysis.
Search SOR and open to view the details.
For the Take Action menu, select View Rate Analysis. The rate analysis effective as on date is displayed.
The "Edit Rate Analysis" feature enables users to edit the existing rate analysis with the same effective-from date. This helps users correct any rate they entered incorrectly.
To edit the rate, select 'Edit Rate Analysis' from the View Rate Analysis page.
It opens the rate analysis in editable mode, allowing modifications from the same 'effective from date'.


Created From
Created To


The Time Extension feature offers the following options to users:
The same inbox used for managing work orders is also utilized to track and process time extension requests.
Home Page > Work Orders
From the Home Page on click of the Work Orders, the Inbox Page is displayed.
On the left side on the top feature menus are displayed.
On the left side, the bottom Filters Panel is displayed with the filters.
Assigned to Me - The only work orders assigned to the logged-in user are displayed on the right side window.
Assigned to All - It is default selected and hence the work orders assigned to anyone are displayed on the right side window.
The search screen for work orders is also utilized to search for time extension requests.
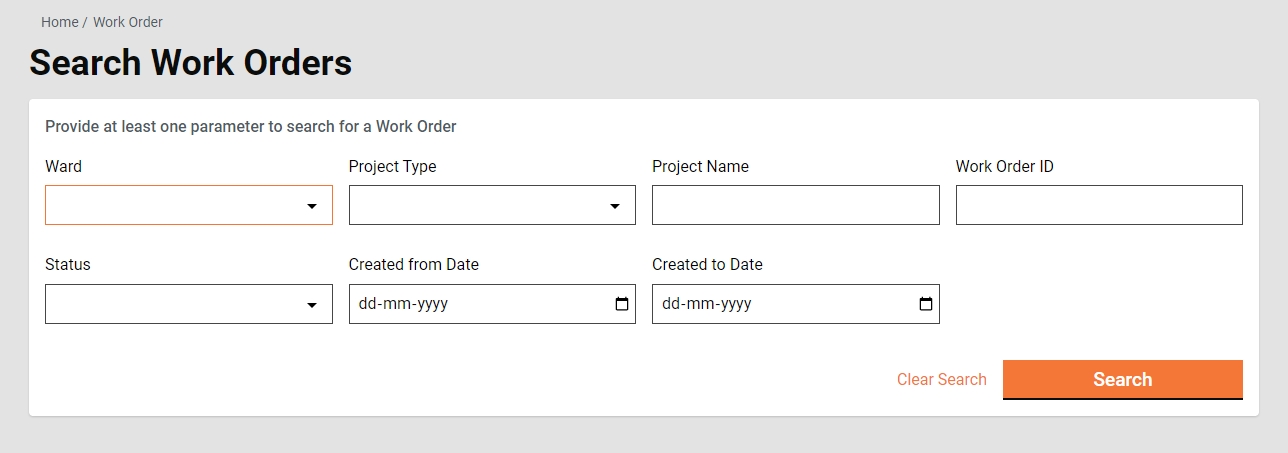
Home Page > Work Orders> Inbox > Search Work Order
The search work order enables ULB employees to search for a specific work order using different search parameters.
Search Criteria
Ward
Project Type
Project Name
Work Order Number/ Time Extension Number
At Least one parameter is mandatory. Enter anyone for more to search for a work order.
The system fetches the work order created between the specified period by entering the date range in created from and created to. From Date and To Date considered as one parameter.
Click on the Search button to view the search results.
Click on the Reset button to renew the search using different parameters.
Search Result
Work Order Number/ Time Extension Number
Project Name
Name of CBO
Role of CBO
To view the details of a time extension request, users can search for the request using the work order search screen and then open it by clicking on the corresponding time extension request ID.
Time Extension Header
Time Extension Details
Time Extension Workflow
To initiate a time extension request, users can search for the original work order, view its details, and then, from the actions menu, select 'Create Time Extension.' This action opens the time extension page for users to fill in and submit the request.
Work Order Details
Create TE Header
Create TE Details
Submit
When a time extension request is created, it is submitted to the next user in the workflow for verification. Upon selecting the 'submit' action, the system provides the user with the option to either choose a specific user as the verifier or submit the request without selecting a verifier.
Edit
If a time extension request is sent back to the CBO for correction, the request is placed into the creator's inbox, allowing them to make edits. Simultaneously, the CBO has the ability to edit the request and subsequently re-submit it for verification.
Verify and Forward
The 'Verify and Forward' action enables the verifier to forward the time extension request to the approver after completing the verification process and adding the comments if required.
Send Back To CBO
The 'Send Back To CBO' action provides the verifier with the capability to send the time extension request back to the CBO for necessary corrections. CBO has the ability to edit the request and subsequently re-submit it for verification.
Approve
The 'Approve' action grants the approver the authority to approve the time extension request. Upon approval, the changes in the project completion period become effective.
Reject
The 'Reject' action empowers the approver to decline the time extension request. Once rejected, no further action can be taken on the request, necessitating the creation of a new request if a time extension is indeed required.
Send Back
The 'Send Back To CBO' action permits the approver to send the time extension request back to the previous user in the workflow, typically the CBO, for necessary corrections, the request is placed into the creator's inbox, allowing them to make edits. Simultaneously, the CBO can edit the request and subsequently re-submit it for verification.
Send Back To CBO
The 'Send Back To CBO' action enables the approver to return the time extension request to the CBO for necessary corrections. The request is placed into the creator's inbox, allowing them to make edits. Simultaneously, the CBO has the ability to edit the request and subsequently re-submit it for verification.
The Measurement Book feature offers the following options to users:
The Muster Roll feature offers the following options to users:


Ward- It filters the application based on the ward selected and then displays the result on the right side window.
Workflow States - It appears only when the application type filter is selected and filters the application based on the application status selected and then displays the result on the right side window.
On the right side of the top, search parameters are displayed, which allow you to search the work order by Work Order Number, Project ID, and Project Type.
On the right side on the bottom, a window is provided to list the work orders based on default settings and applied filters and search parameters.
Created From Date
Created To Date
Status
Amount
The Measurement Book (MB) inbox, dedicated to managing MB, is also utilized for tracking and processing the workflow related to Measurement Books.
Home Page > Measurement Books
To access the measurement book inbox, follow these steps:
Step 1: Navigate to the home page.
Step 2: Look for and click on the Measurement Books option. This redirects you to the measurement books inbox, where you can manage and view the measurement books.
Step 3: Select and apply the filters and search parameters as applicable.
The feature menus are displayed on the top left side.
The bottom panel displays the filters on the left.
Assigned to Me - The panel on the right side displays the estimates assigned to the logged-in user.
Assigned to All - This option is selected by default and displays all the estimates along with the assignee names.
Ward- This filters and displays the applications based on the selected ward on the right side window.
Workflow State - This option is displayed only when the application type filter is selected. It filters and displays the applications based on the selected application status on the right side window.
The search parameters are displayed on the top right. Search the measurement book by Measurement Book Number, Project ID, and Project Type.
Step 4: The window on the bottom right lists the measurement books based on the default settings, applied filters and search parameters.
The system enables users to capture measurements of completed work items, whether they are part of the Schedule of Rates (SOR) or Non-SOR items. This recorded information is crucial and becomes the foundation for payment processes involving wage seekers, suppliers, and supervisors (CBOs).
Home Page > Measurement Books > Create MB
Step 1: Follow the navigation link given above. This will open the Search Work Order screen to search for a Work Order to create a Measurement Book.
Step 2: Enter at least one of the search parameters to search for a work order.
Step 3: Click on the relevant Work Order number to open the work order and view the details. Click on the Action button and select the option Create MB.
Step 4: Scroll down the details in the Create MB screen (screenshots below).
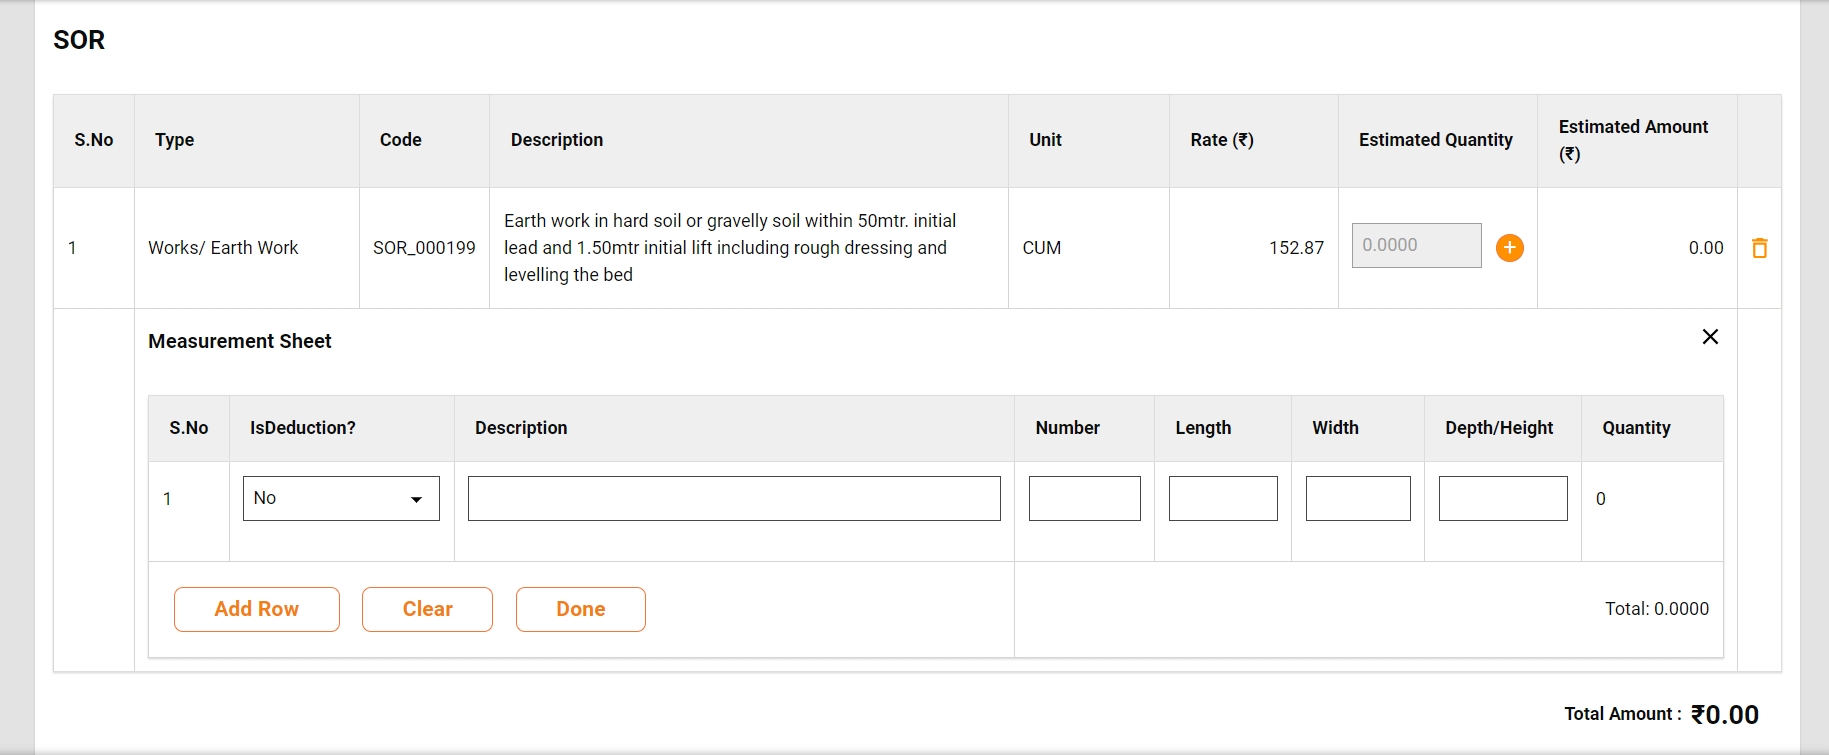
Step 5: Enter the Current MB Entry detail as applicable. Click on the + icon to increment the value as required.
Step 6: Enter the Number, Length, Width, Depth/Height details as applicable. Click on the Clear button to reset and enter fresh details. Click on the Done button to proceed with the existing details.
Step 7: Click on the View Utilisation Statement button to fetch the details.
Step 8: Click on the Choose File button to upload worksite photos. Ensure only .jpg, .png, and .jpeg files are allowed and the file size should not exceed 5MB.
Step 9: Click on the Take Action button and select Submit option to save and submit the details. Click on the Save As Draft to save the inputs and submit the Measurement Book details later.
Measurement books cannot be created if the estimate's revision status is in the workflow for a given project.
The Search MB functionality allows users to search for a specific Measurement Book (MB) created for a particular period. Upon locating the relevant MB, users can open it to view comprehensive details and take the necessary actions based on the information contained within the record.
Step 1: Enter the applicable search parameter (at least one) and click on the Search button to fetch a specific measurement book. Click on the Clear Search button to clear the existing search parameters and initiate a fresh search.
Step 2: Click on the specified MB Number hyperlink to view the measurement book details.
The View MB feature empowers users to access and review the details as well as the workflow status of a Measurement Book (MB).
Step 1: Search for the required Measurement Book and click on the MB Number hyperlink to view the details.
Step 2: The measurement book details are available on the screen. Click on the MB History button to fetch the past transaction details for the MB. Click on the Hide MB History button to hide these details.
The Measurement Book (MB) workflow involves three key roles: the Creator, Verifier, and Approver. Each role is mapped to specific actions that contribute to the overall processing and approval of the MB. The workflow typically involves a sequence of actions performed by these roles to ensure accurate documentation, verification, and approval of measurements within the MB.
Save as Draft
The Save as Draft feature provides users with the capability to create a Measurement Book (MB) and retain it in the creator's inbox for subsequent updates. This functionality allows users to initiate the MB creation process, save the work in progress as a draft, and revisit it later for additional edits or finalization before submission.
Submit
When a Measurement Book is created, it is submitted to the next user in the workflow for verification. Upon selecting the Submit action, the system provides the user with the option to either choose a specific user as the verifier or submit it without selecting a verifier.
Edit
If the Measurement Book is sent back to the Creator for correction, it is placed into the creator's inbox, allowing them to make edits and subsequently re-submit it for verification.
Verify and Forward
The Verify and Forward action enables the verifier to forward MB to the approver after completing the verification process and adding the comments if required.
Send Back
The Send Back action provides the verifier with the capability to send the MB back to the creator for necessary corrections.
Approve
The Approve action bestows upon the approver the authority to approve the Measurement Book (MB). Upon approval, the MB attains an immutable status, meaning that it becomes unalterable or resistant to further changes. This step typically signifies the finalization and confirmation of the recorded measurements and associated details within the MB.
Reject
The 'Reject' action empowers the approver to decline the MB. Once rejected, no further action can be taken on the MB, necessitating the creation of a new MB.
Send Back
The 'Send Back' action permits the approver to send the MB back to the previous user in the workflow for necessary corrections, MB is placed into the verifier's inbox, allowing them to take necessary action.
Send Back To Originator
The 'Send Back To Originator' action enables the approver to return the MB to the creator for necessary corrections. The request is placed into the creator's inbox, allowing them to make edits and subsequently re-submit it for verification.
The amounts in the Muster Roll and Purchase Bill are validated against the corresponding utilization amount in the Measurement Book (MB).
The approval of the muster roll is restricted if a Measurement Book (MB) for the same period is either missing or pending approval. Additionally, if the labour utilization amount does not match the muster roll wage amount, the approver of the muster roll is presented with an alert message.
The creation of the purchase bill is restricted if no Measurement Book (MB) has been created and approved. Furthermore, if the material/machinery utilization amount does not match the muster roll wage amount, the creator is alerted with an alert message.
The system facilitates the download of an abstract measurement in PDF format from the view details page through the available download option.
Home Page > Muster Rolls
From the Home Page on click of the Muster Roll, the Inbox Page is displayed.
On the left side on the top feature menus are displayed.
On the left side, the bottom Filters Panel displays the filters.
Assigned to Me - The only muster rolls assigned to the logged-in user are displayed on the right side window.
Assigned to All - It is default selected and hence the muster rolls assigned to anyone are displayed on the right side window.
Ward- It filters the application based on the ward selected and then displays the result on the right side window.
Workflow States - It appears only when the application type filter is selected and filters the application based on the application status selected and then displays the result on the right side window.
On the right side of the top, search parameters are displayed, which allow you to search the muster roll by Muster Roll ID, Project Name, and Organization Name.
On the right side on the bottom, a window is provided to list the muster rolls based on default setting and applied filters and search parameters.
Home Page > Work Orders> Inbox > Search Muster Roll
The search Muster Roll enables ULB employees to search for a specific Muster Roll using different search parameters, as given below.
Search Criteria
Ward
Project Type
Project Name
Muster Roll ID
Status
Created From Date
Created To Date
Search Result
Muster Roll ID
Project Name
Location
Name of CBO
Status
Home Page > Muster Roll > Inbox > Search Muster Roll> Search Results
The Muster Roll is searched using the Search Muster Roll and then click on the Muster Roll ID of the Muster Roll from the search result for which details are displayed.
Click on the Muster Roll ID to view the Muster Roll details.
Complete Muster Roll details are displayed along with attached documents and the option to download the Muster Roll in PDF.
The creation of muster rolls is done by CBOs only. The muster roll is forwarded to ULB employees for verification on creation.
The Approver verifies the Muster Roll and if the documents and information provided in the Muster Roll are found satisfactory, complete, and as per the guideline, the Muster Roll is approved.
Approver can -
Approve the Muster Roll
Send the work order back to CBO
Approve
The Muster Roll “Pending for Approval” is available in the Inbox. Otherwise, search for the Muster Roll using the search Muster Roll.
Click on the Muster Roll ID to open the Muster Roll and view the details.
Select the Approve from the Take Action.
In case MB for the same muster roll period is not yet approved, a validation message is displayed and the user is allowed to approve the muster roll.
In case MB is approved but the labour utilization amount is less than the total muster roll amount, an alert message is displayed and upon confirmation, the user is allowed to approve the message.
In case MB is approved and the labour utilization amount is more or equal to the total muster roll amount, a pop-up window is opened and the user is allowed to approve the muster roll.
Provide any additional information in the Comments section.
Click on the Approve Files button to upload any supporting documents.
Click on the Approve button. The Muster Roll is approved.
Send back to CBO
To send the Muster Roll back to the CBO
The Muster Roll pending approval is available in the Inbox. Otherwise, search for the Muster Roll using the search Muster Roll.
Click on the Muster Roll number to open the Muster Roll and view the details.
Select the Send Back from the Take Action. A pop-up window is opened.
State the reasons for sending the Muster Roll back to the CBO in the comments section.
Click on the Choose Files button to upload any supporting documents.
Click on the Send Back button. The Muster Roll is placed to CBO and the Muster Roll is enabled for editing.


The work order feature offers the below options to the users:


Home Page > Work Orders
Click on the Work Orders card on the home page. This displays the Inbox page.
The feature menus are displayed on the top left side.
The filter panel is available on the bottom left side with the following filters:
Assigned to Me - The work orders assigned to the logged-in user are displayed on the right window.
Assigned to All - This is selected by default and hence, all work orders irrespective of who is assigned, are displayed on the right window.
Ward- It filters and displays the work orders based on the selected ward.
Workflow States - It appears only when the application type filter is selected. It filters the work orders based on the selected status and displays the results on the right window.
On the top right, the search parameters are displayed. These allow you to search the work order by Work Order Number, Project ID, and Project Type.
On the bottom right, a window is provided to list the work orders based on default settings, applied filters and search parameters.
Home Page > Work Orders> Inbox > Search Work Order
The search work order enables ULB employees to search for a specific work order using different search parameters.
Search Criteria
Ward
Project Type
Project Name
Work Order Number
Status
Created From Date
Created To Date
At Least one parameter is mandatory. Enter anyone for more to search for a work order.
The system fetches the work order created between the specified period by entering the date range in created from and created to. From Date and To Date are considered as one parameter.
Click on the Search button to view the search results.
Click on the Reset button to renew the search using different parameters.
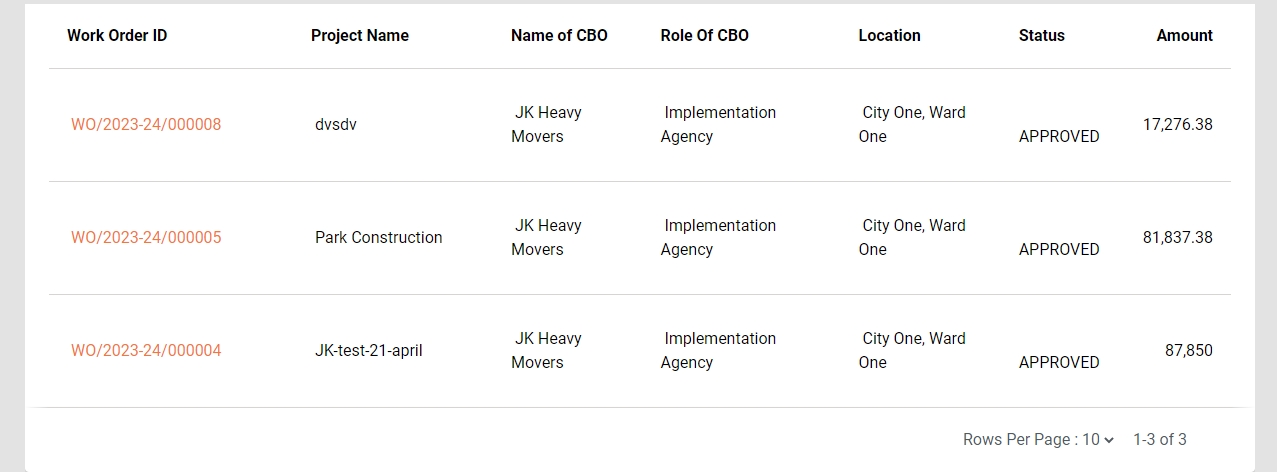
Search Result
Work Order Number
Project Name
Name of CBO
Role of CBO
Location
Status
Amount
Home Page > Work Orders > Inbox > Search Work Orders> Search Results
The work order is searched using the search work order and then click on the work order number to see the detail.
Click on the work order number to view the work order details.
Complete work order details are displayed along with attached documents and the option to download the work order in PDF.
Home Page > Work Orders > Inbox > Create Work Order
To create work order -
Search for the estimate using the Search Estimate option.
Click on the Estimate Number to view the estimate details.
Click on Create Work Order to open the form.
Fill in the details and then click on the Create Work Order button. Make sure the fields marked with asterisk are mandatory and must be filled in.
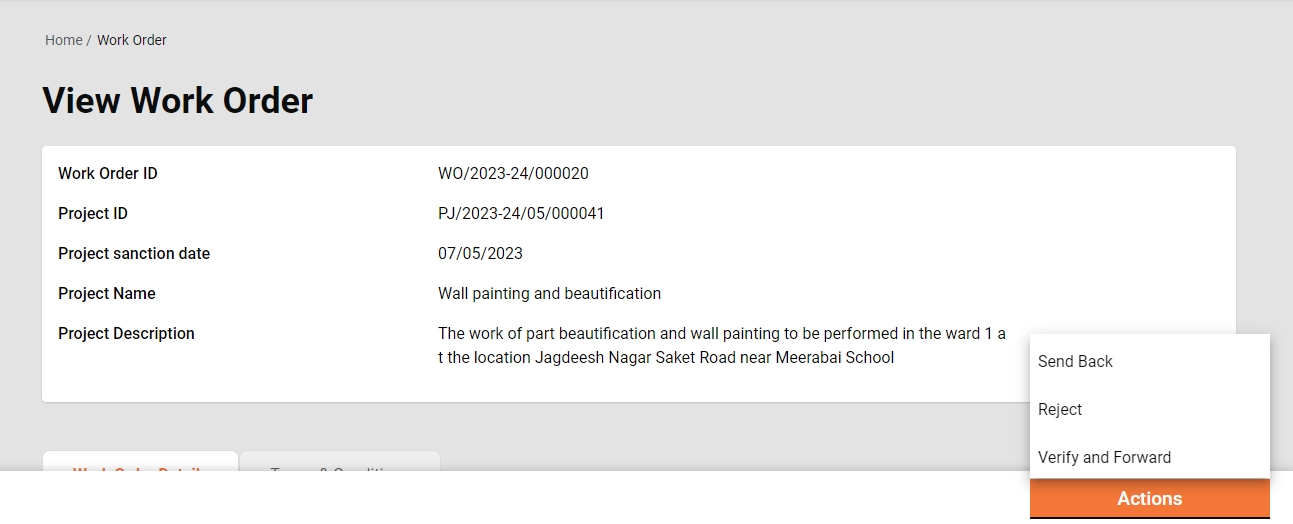
The Work Order Creator (WC) is responsible for creating and forwarding the work Order along with relevant documents uploaded.
WC can
Create and forward work order
Edit work order
Create and Forward
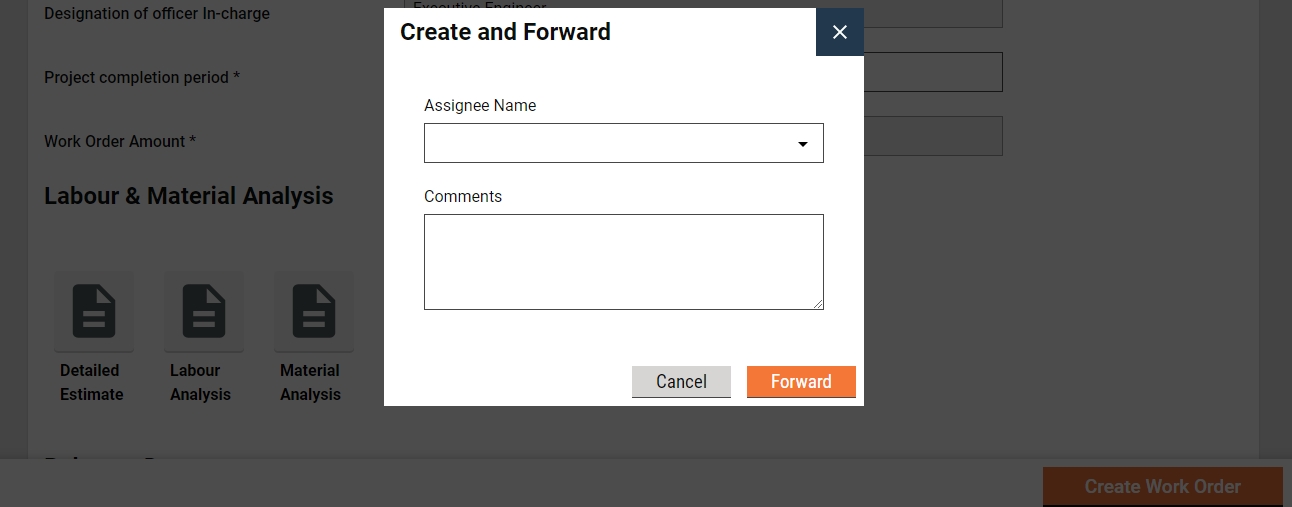
The work order creator (WC) has the right to create a work order for a project and then forward it to the verifier. On creation, the WC gets the forward dialogue box from which the user optionally selects the verifier’s name as the assignee name, adds the comments if any, and then forwards the work order.
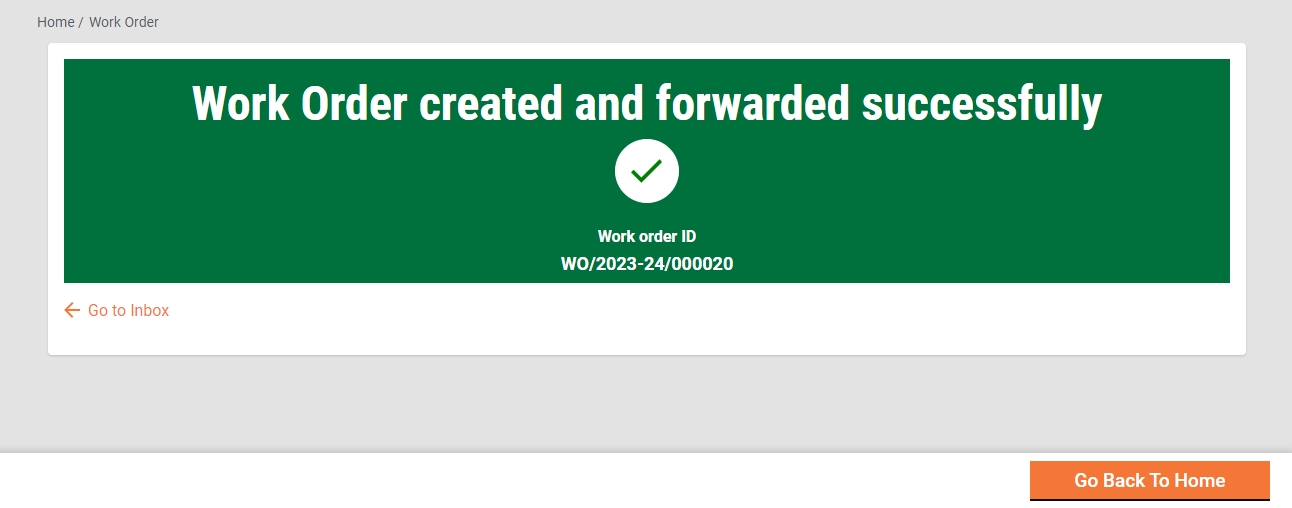
On Forward, the work order is forwarded to the verifier and the success page is displayed with the success message and work order number.
Edit
The Work order creator (WC) has the right to edit the work order in the case the work order is sent back for any correction.
The work order pending correction is available in the Inbox. Else, search for the work order using the search work order.
Click on the work order number to open the work order and view the details.
Select the Edit from the Take Action. The work order is opened into editable mode.
Verifier
The Work Order Verifier (WV) is responsible for verifying the work order and supporting documents uploaded.
WV can -
Verify and forward the work order
Send work order back to WC
Verify and forward
The WC verifies and forwards the application if the documents and information provided in the work order are found satisfactory and complete.
To verify and forward the work order -
The work order pending verification is available in the Inbox. Else, search for the work order using the search work order.
Click on the work order number to open the work order and view the details.
Select the Verify and Forward from the Take Action. A pop-up window is opened.
Select the approver’s name as Assignee Name.
Provide any additional information for the assignee in the comments section.
Click on the Choose Files button to upload any supporting documents.
Click on the Verify and Forward button. The work order is forwarded to the approver.
Send back
WV can send the work order back to the WC for any corrections or if any vital document has not been uploaded.
To send the work order back to the WE
The work order pending verification is available in the Inbox. Else, search for the work order using the search work order.
Click on the work order number to open the work order and view the details.
Select the Send Back from the Take Action. A pop-up window is opened.
State the reasons for sending the work order back to WE in the comments section.
Click on the Choose Files button to upload any supporting documents.
Click on the Send Back button. The work order is placed into WE’s inbox and the work order is enabled for editing.
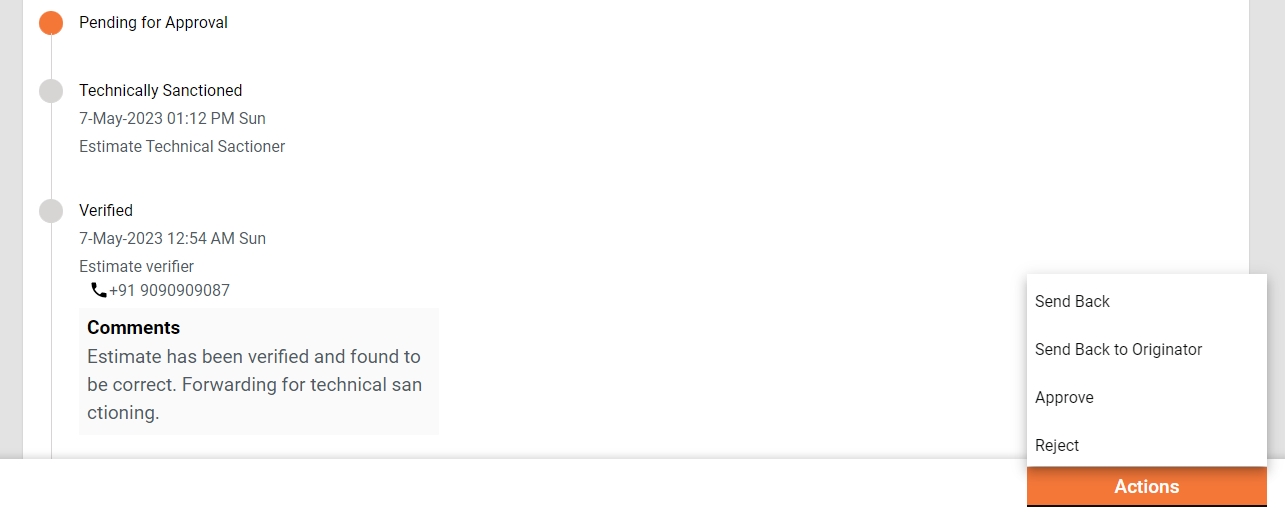
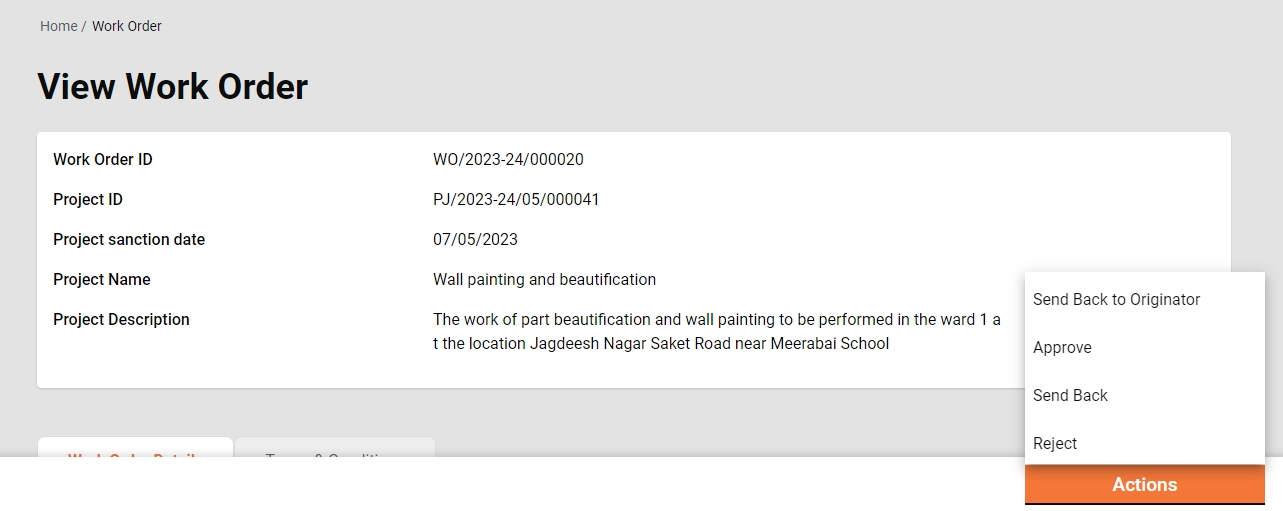
The Approver verifies the work order and if the documents and information provided in the work order are found satisfactory, complete and as per the guideline, the work order is approved.
Approver can
Approve the work order
Send the work order back to WV
Send the work order back to WC
Reject the work order
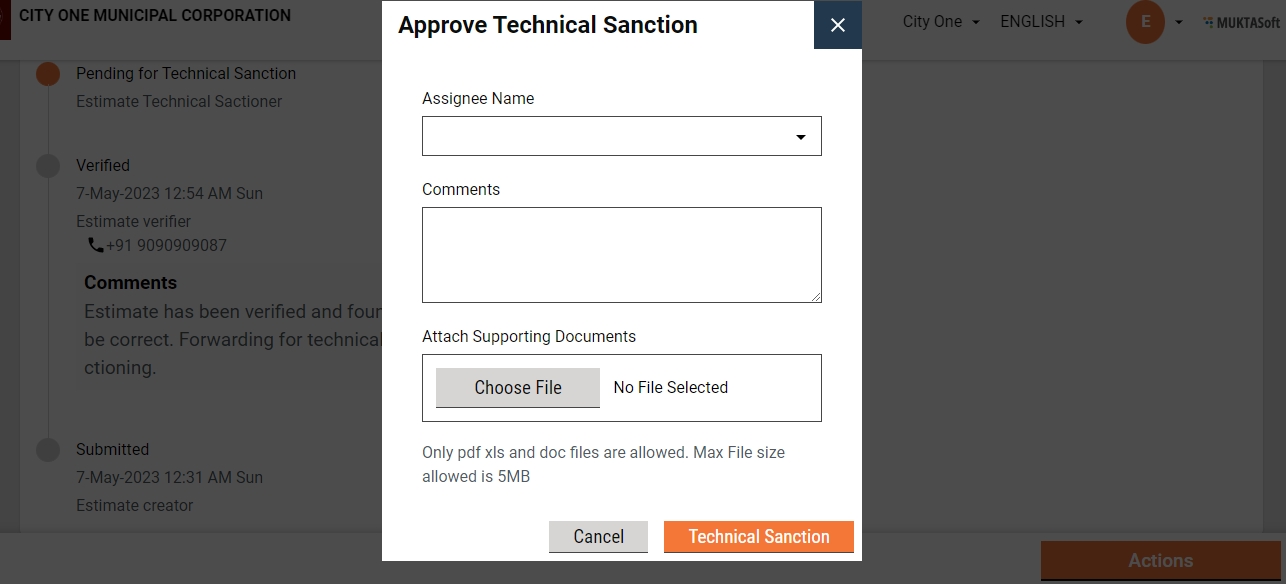
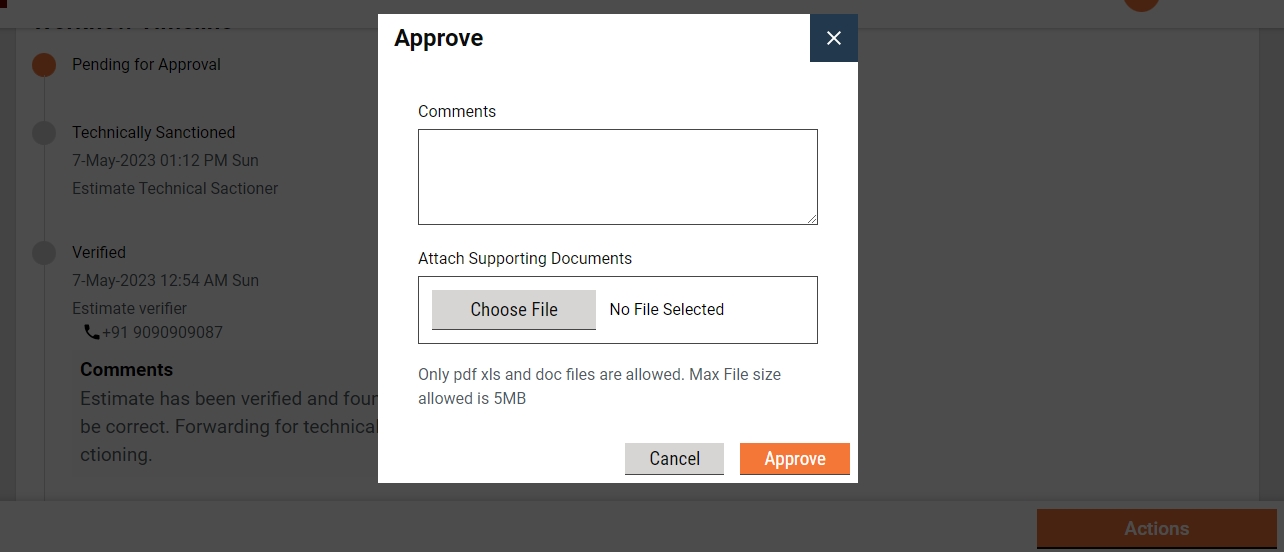
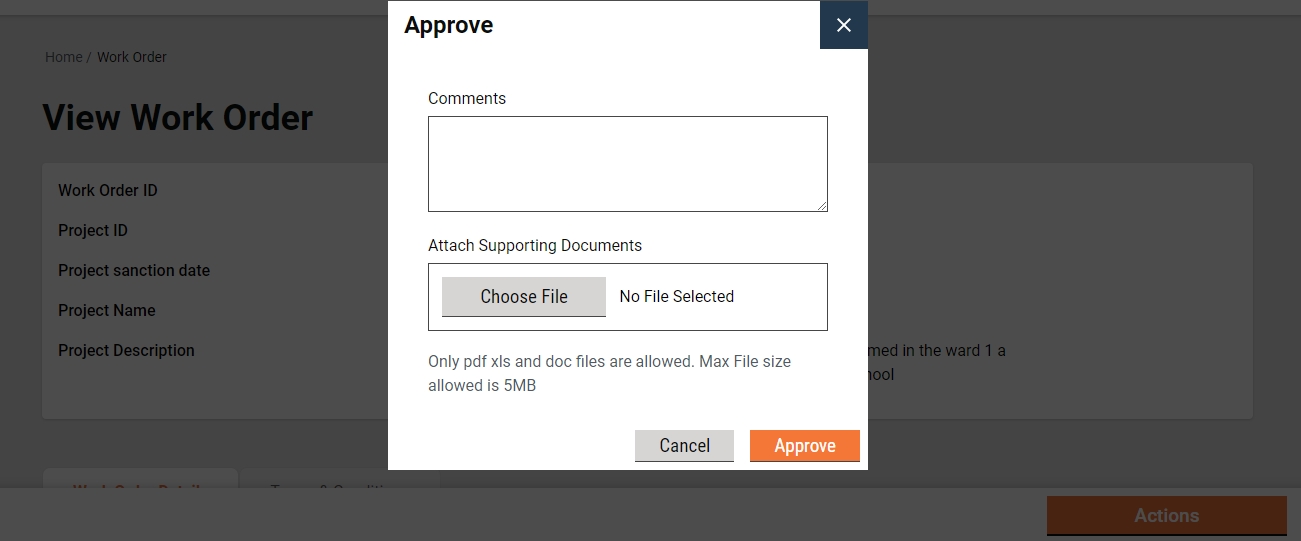
Approve
The work order Pending Approval is available in the Inbox. Else, search for the work order using the search work order.
Click on the work order number to open the work order and view the details.
Select the Approve from the Take Action. A pop-up window is opened.
Provide any additional information in the Comments section.
Click on the Approve Files button to upload any supporting documents.
Click on the Approve button. The estimate is approved.
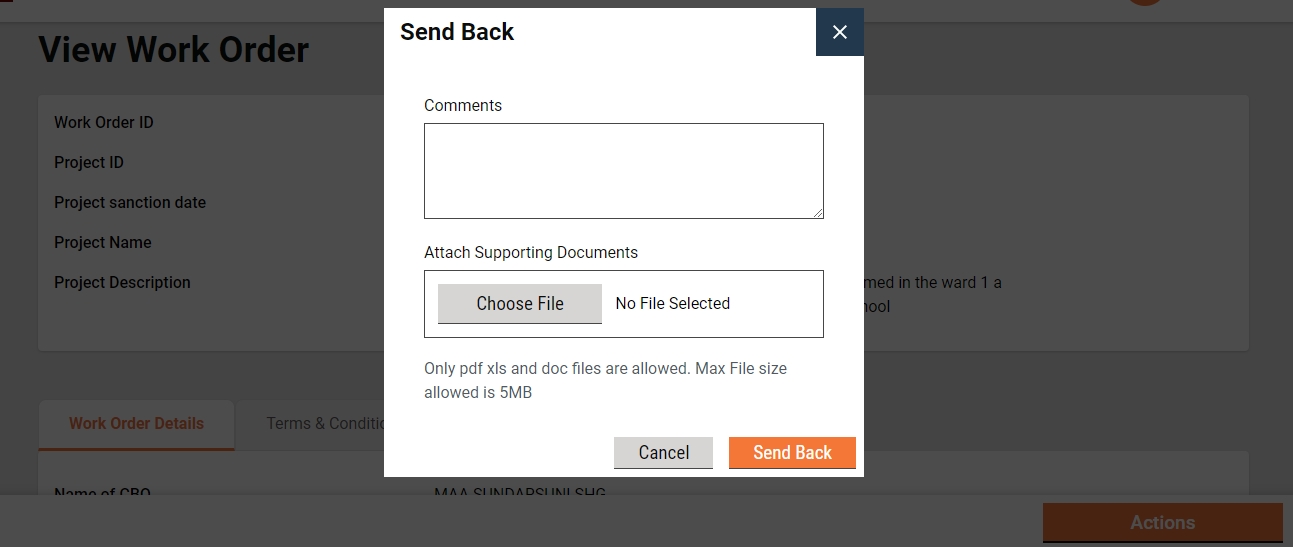
Send Back
To send the work order back to the WV
The work order pending approval is available in the Inbox. Else, search for the work order using the search work order.
Click on the work order number to open the work order and view the details.
Select the Send Back from the Take Action. A pop-up window is opened.
State the reasons for sending the work order back to the WV in the comments section.
Click on the Choose Files button to upload any supporting documents.
Click on the Send Back button. The work order is placed into WV’s inbox.
Send back to originator
To send the work order back to the WE
The work order pending approval is available in the Inbox. Else, search for the work order using the search work order.
Click on the work order number to open the work order and view the details.
Select the Send Back from the Take Action. A pop-up window is opened.
State the reasons for sending the work order back to WE in the comments section.
Click on the Choose Files button to upload any supporting documents.
Click on the Send Back button. The work order is placed into WE’s inbox and the work order is enabled for editing.
Reject
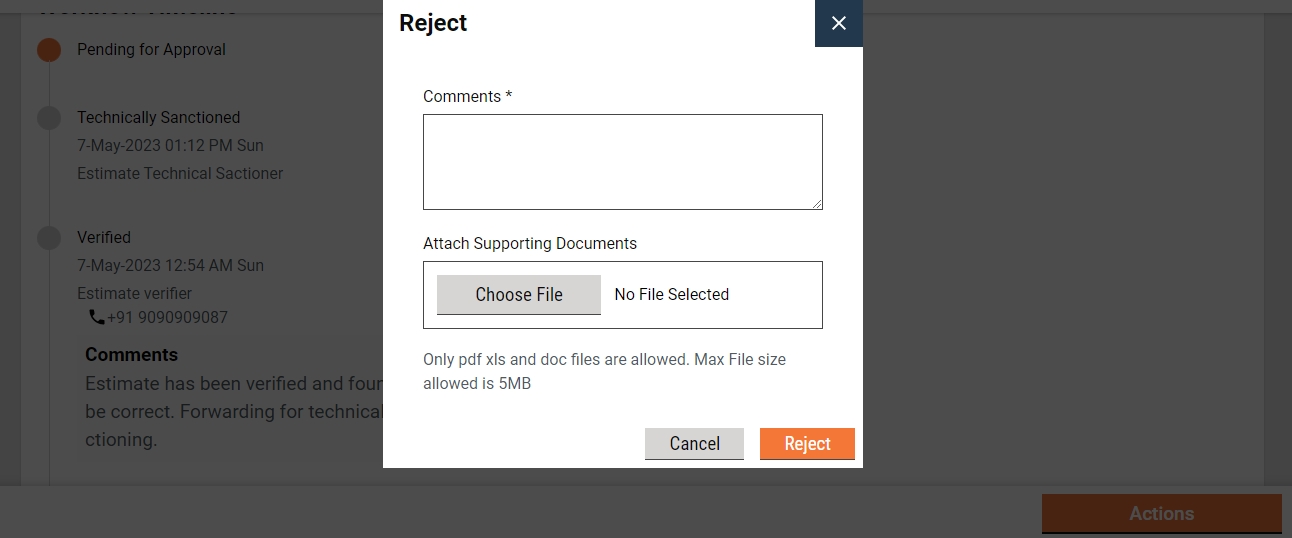
The Approver can reject the work order if the documents and information furnished by the WC do not meet the prescribed guidelines.
To reject the work order
The work order Pending Approval is available in the Inbox. Else, search for the work order using the search work order.
Click on the work order number to open the work order and view the details.
Select the Edit from the Take Action. A pop-up window is opened.
State the reasons for rejecting the work order in the Comments section.
Click on the Choose Files button to upload any supporting documents.
Click on the Reject button. The work order is rejected, and a notification is sent to the WC informing the same.


MUKTASoft v2.1 Dashboard
Welcome to the Dashboard User Manual. This manual provides an overview of the features and functionalities of the dashboard interface to help you navigate effectively.
To access the dashboard, open your web browser and enter the URL provided. Once on the homepage, navigate to the dashboard section and select the specific dashboard you wish to view.
The dashboard is organized into several sections:
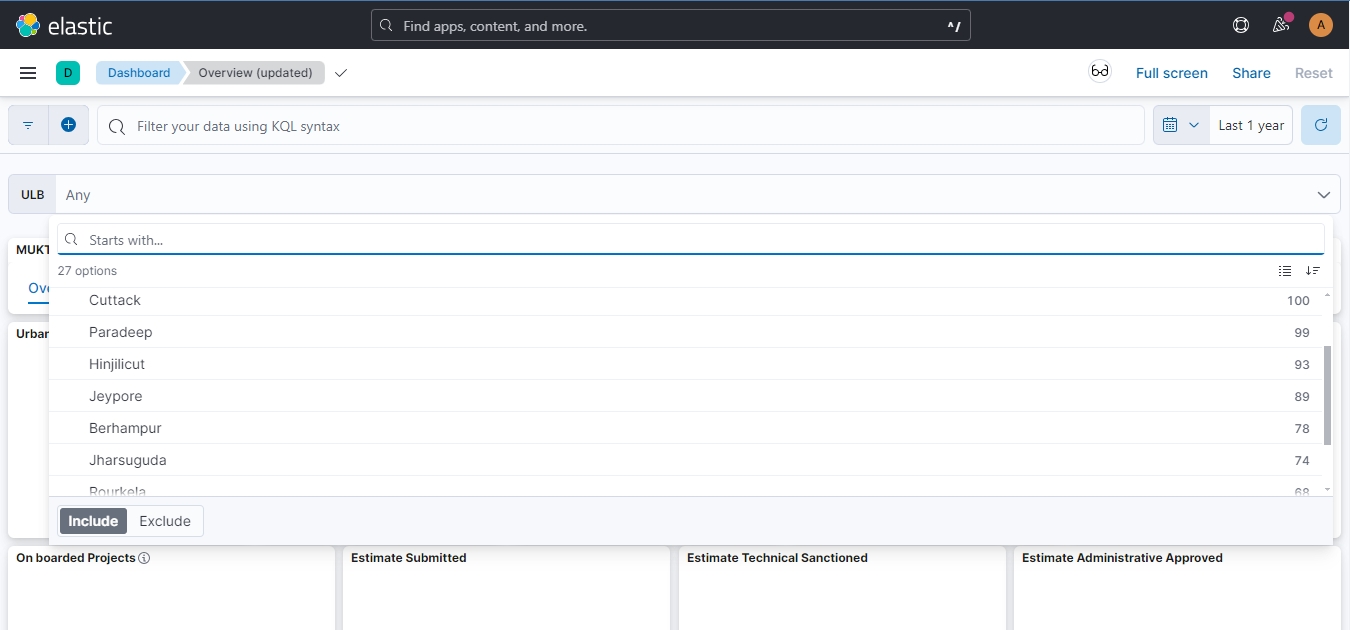
Positioned below the header, the filter bar allows you to apply the ULB filters to the data displayed on the dashboard. Filters help you narrow down the data according to specific ULBs.
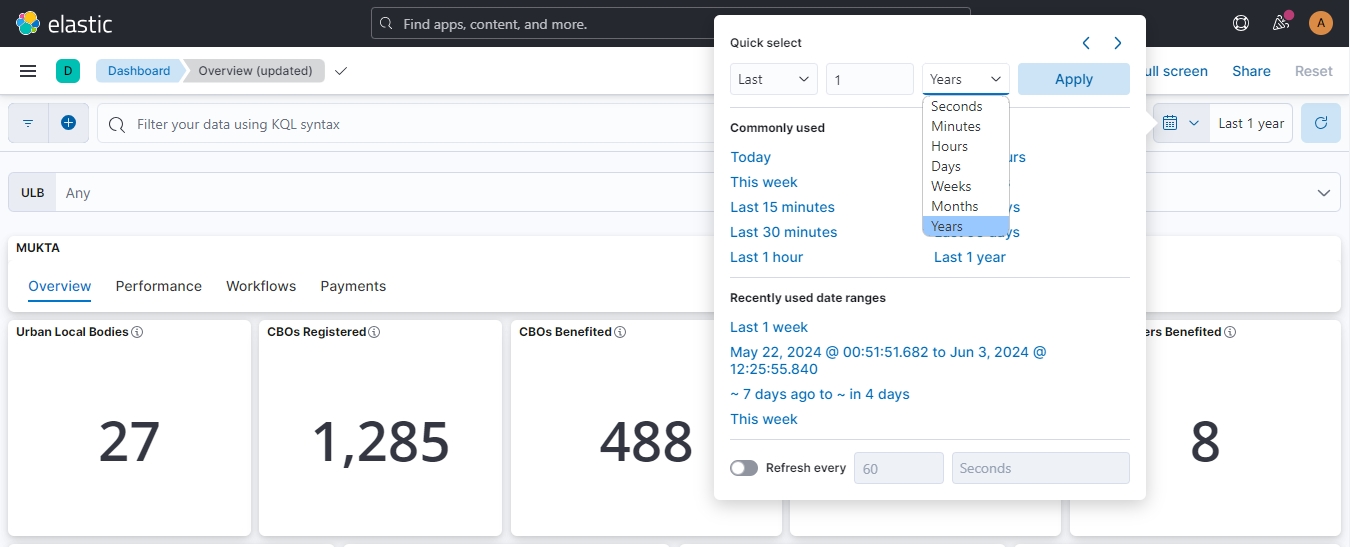
The date filter bar allows you to apply the date filters to the data displayed on the dashboard. Filters help you narrow down the data according to a specific time based on seconds, minutes, hours, days, weeks, months, and years.
In the Overview tab, you can find numeric figures representing various metrics or data points. These figures provide a quick summary of key information without the need to delve into detailed charts or graphs. They offer a snapshot of the most important aspects of the data at a glance, allowing users to quickly assess the current status or performance of the system, project, or process being monitored.
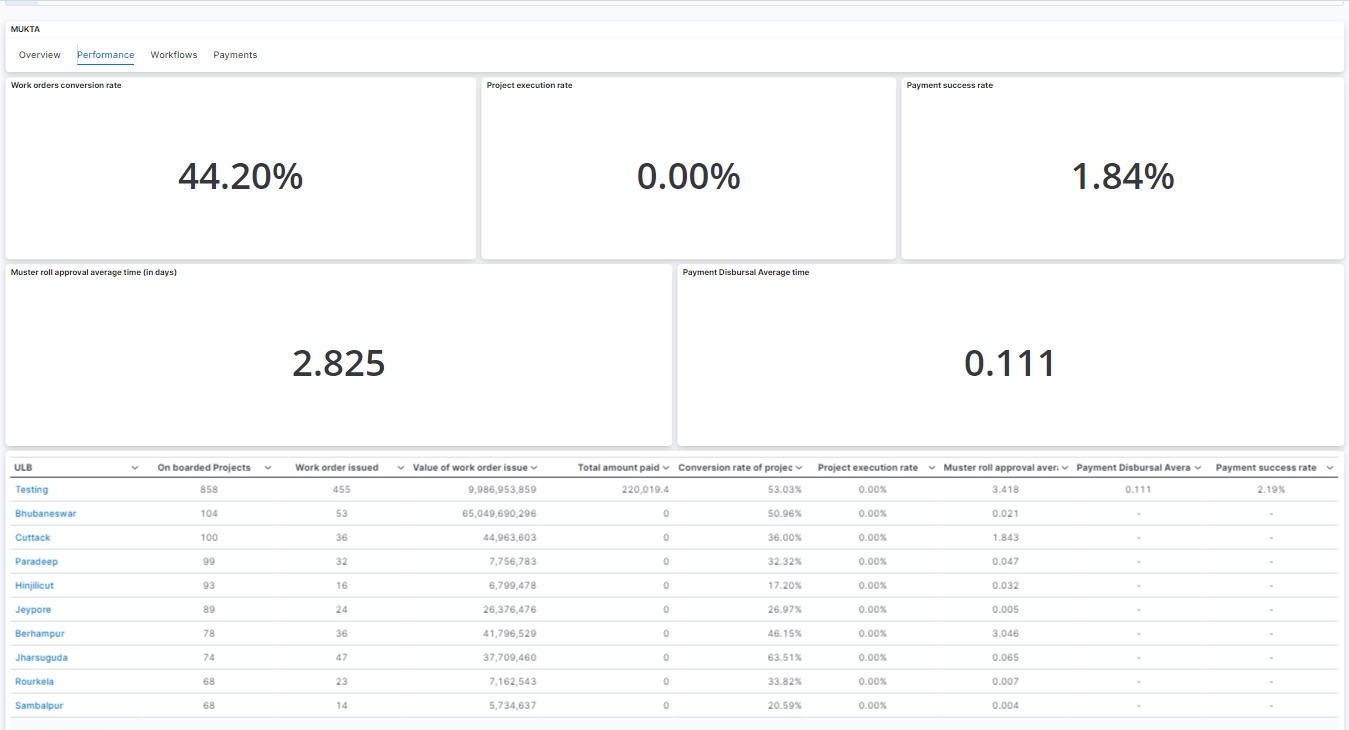
The Performance tab offers several Key Performance Indicators (KPIs) designed to gauge the performance of Urban Local Bodies (ULBs). These KPIs serve as benchmarks to assess various aspects of ULB operations and effectiveness. Additionally, it enables users to rank ULBs based on specific parameters, allowing for comparisons and the identification of top performers. This feature enables stakeholders to evaluate the performance of ULBs and identify areas for improvement or recognition.
In the Performance tab, users can rank Urban Local Bodies (ULBs) based on specific parameters. These parameters facilitate comparisons among ULBs and help identify top performers. The parameters include:
Number of onboarded Projects
Number of work orders issued
Value of work orders issued
Total amount paid
By analyzing ULBs based on these parameters, stakeholders can gain insights into their performance and efficiency across various operational dimensions.
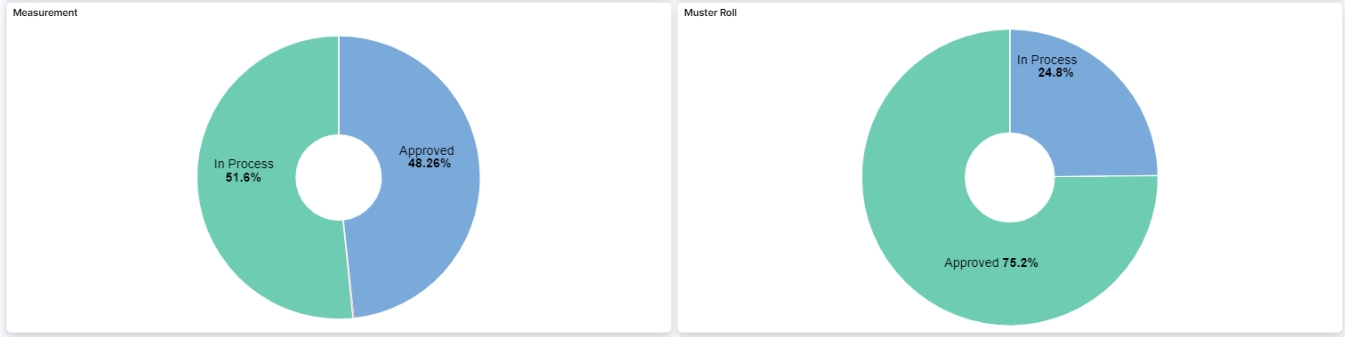
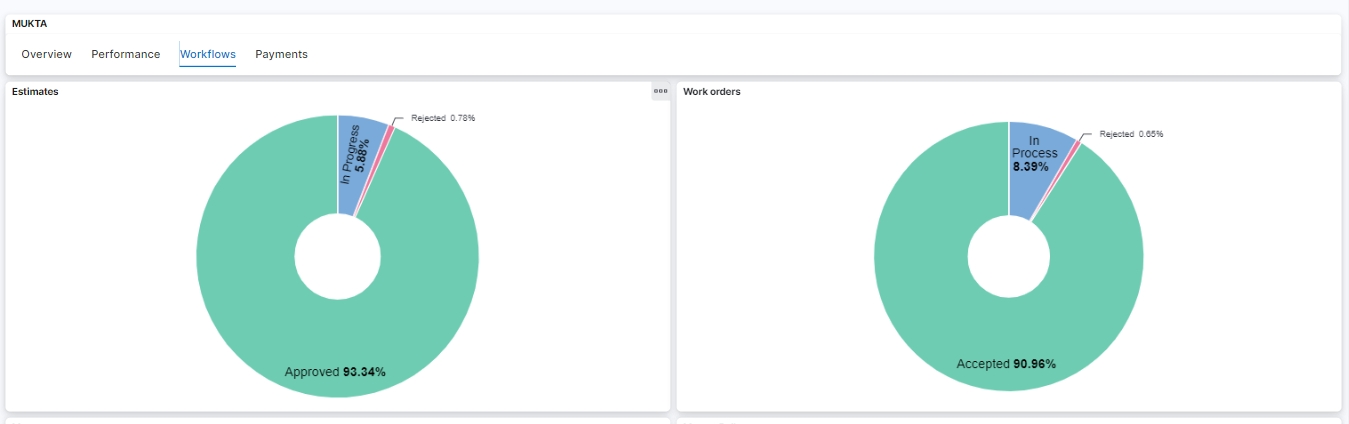
This tab provides a comprehensive overview of the current status of various elements involved in the project cycle. By leveraging pie charts, users can quickly grasp the proportion of work items in different statuses (e.g., Pending, In Progress, Completed).
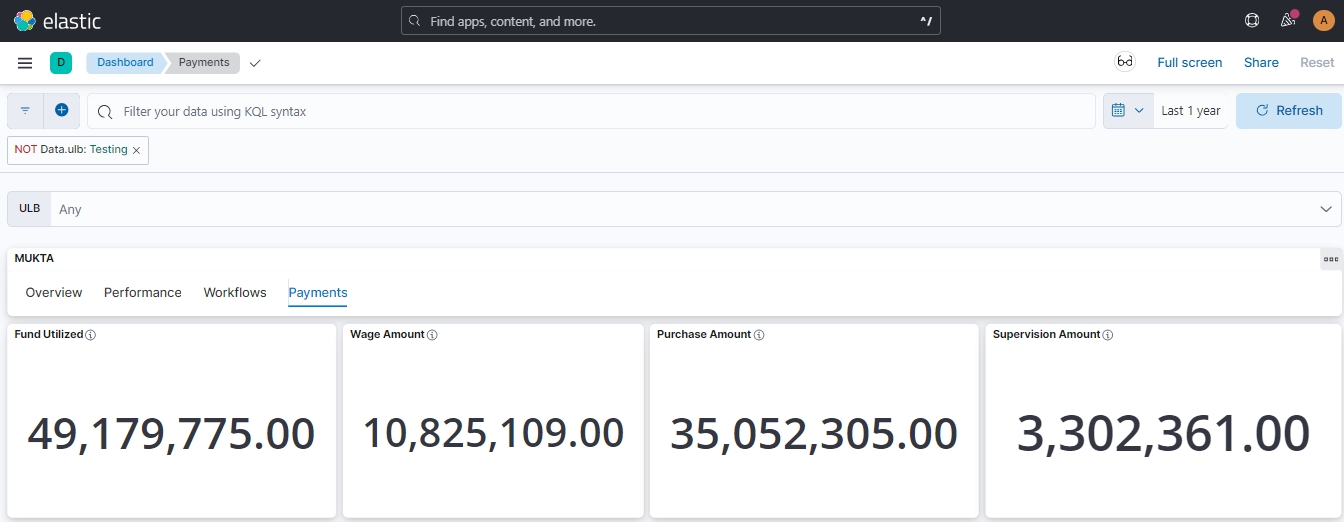
The Payments tab on the dashboard is designed to provide detailed insights into fund utilization and payment distribution. This explains the various components and visualizations available on this tab.
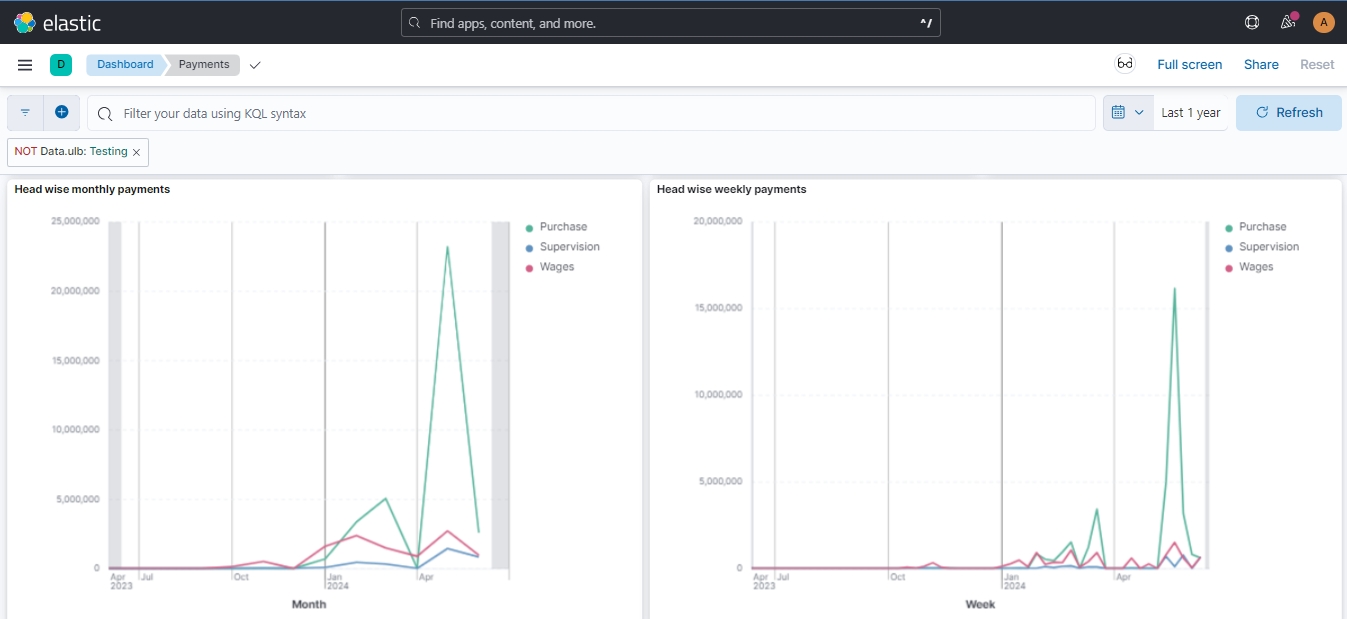
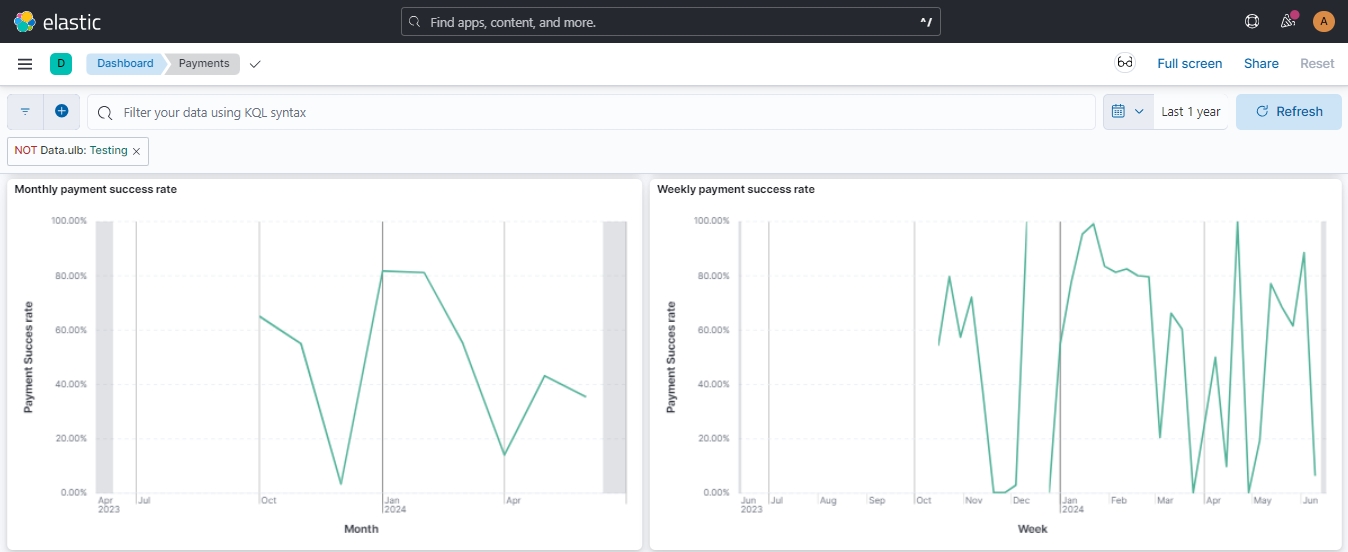
Head-wise Payments and Payment Success Rate
Description: These line charts display the payments made and the success rate of payments over time.
Frequency:
Monthly Basis
Weekly Basis
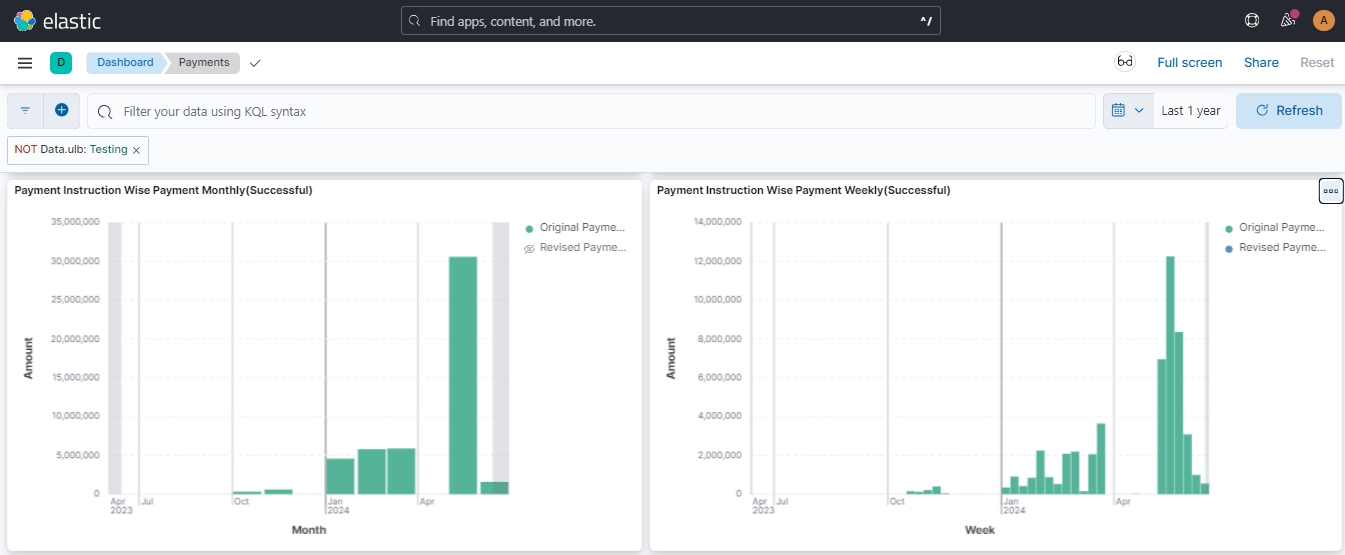
Payment Instruction-wise Payments
Description: This bar chart shows the payments made according to the type of Payment Instruction.
Types:
Original Payment Instruction
Revised Payment Instruction
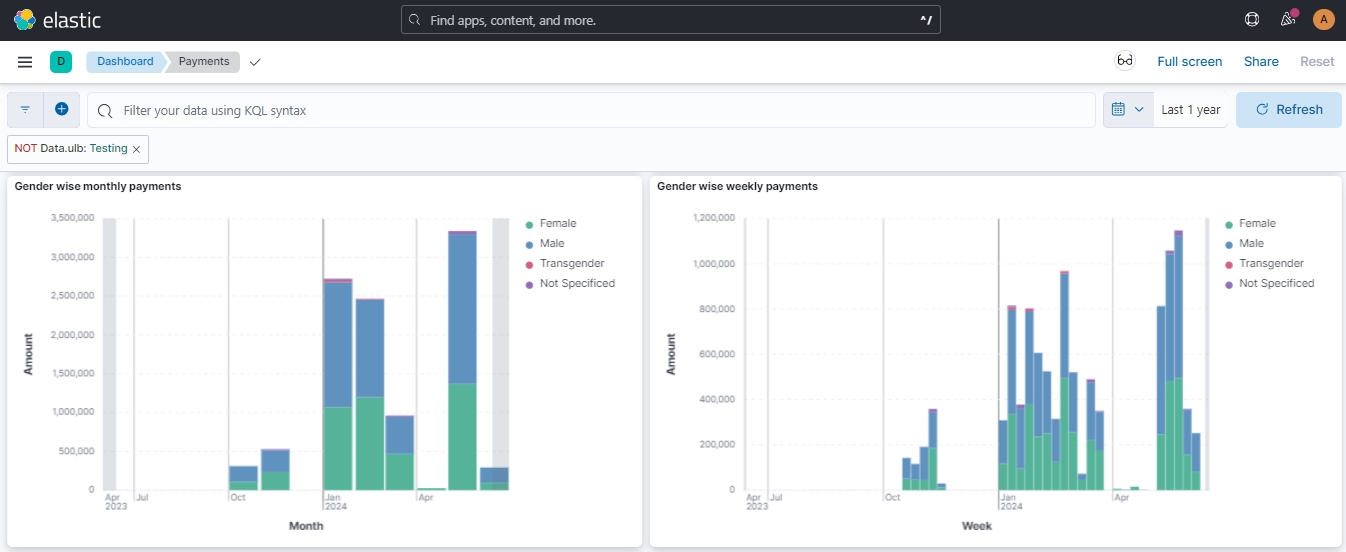
Gender-wise Monthly Payments
Description: This stacked bar chart displays the payments made to different gender categories.
Categories:
Male
Female
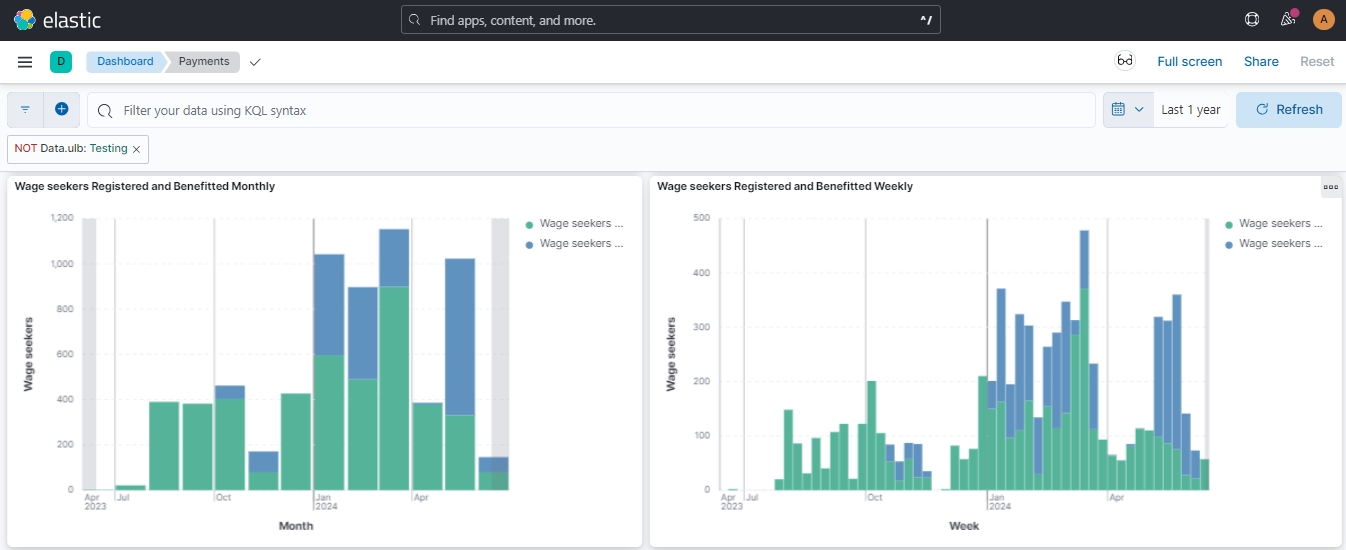
Wage Seekers Registered and Benefited
Description: This stacked bar chart shows the number of wage seekers registered in the system and those who have received payments.
Categories:
Wage Seekers Registered
Wage Seekers Benefited
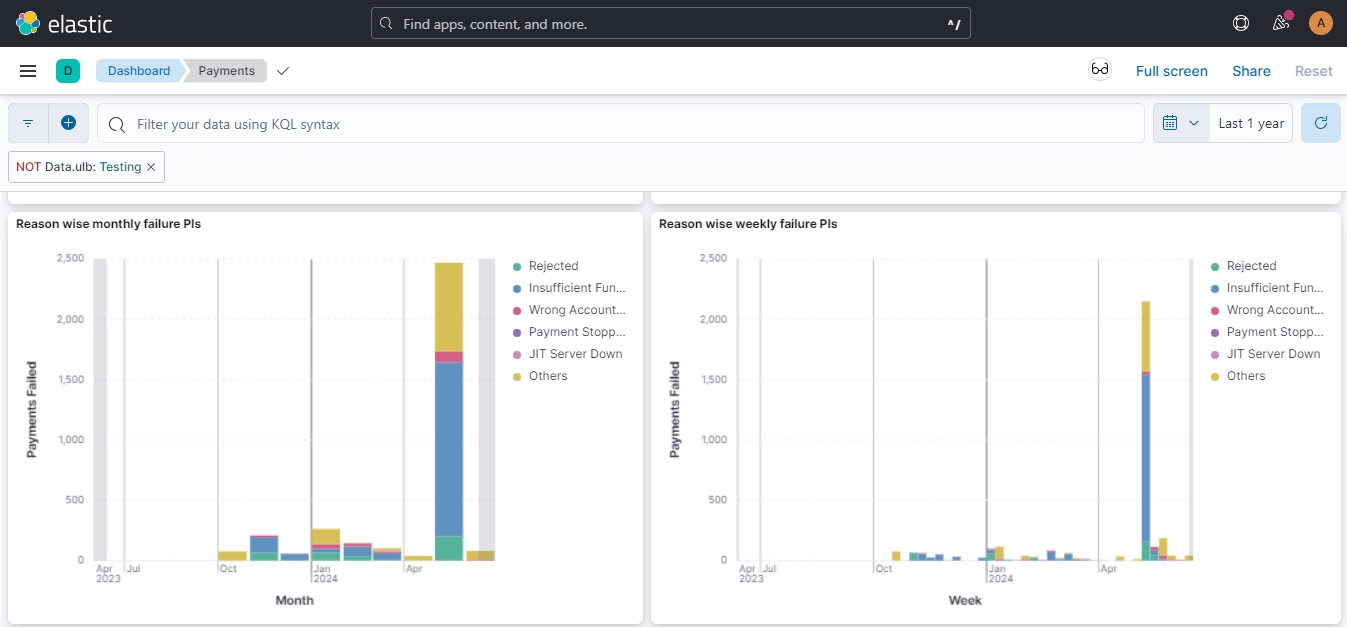
Payment Instruction (PI) Failure Reasons
Description: This stacked bar chart categorizes the reasons for payment instruction failures.
Frequency:
Monthly Basis
Weekly Basis
The billing feature offers the following options to users:


Estimate Submitted
Total number of project estimates submitted for approval under the MUKTASoft
Estimate Technical Sanctioned
Number of project estimates that have received technical sanction under the MUKTASoft
Estimate Administrative Approved
Number of project estimates that have received administrative approval under MUKTASoft
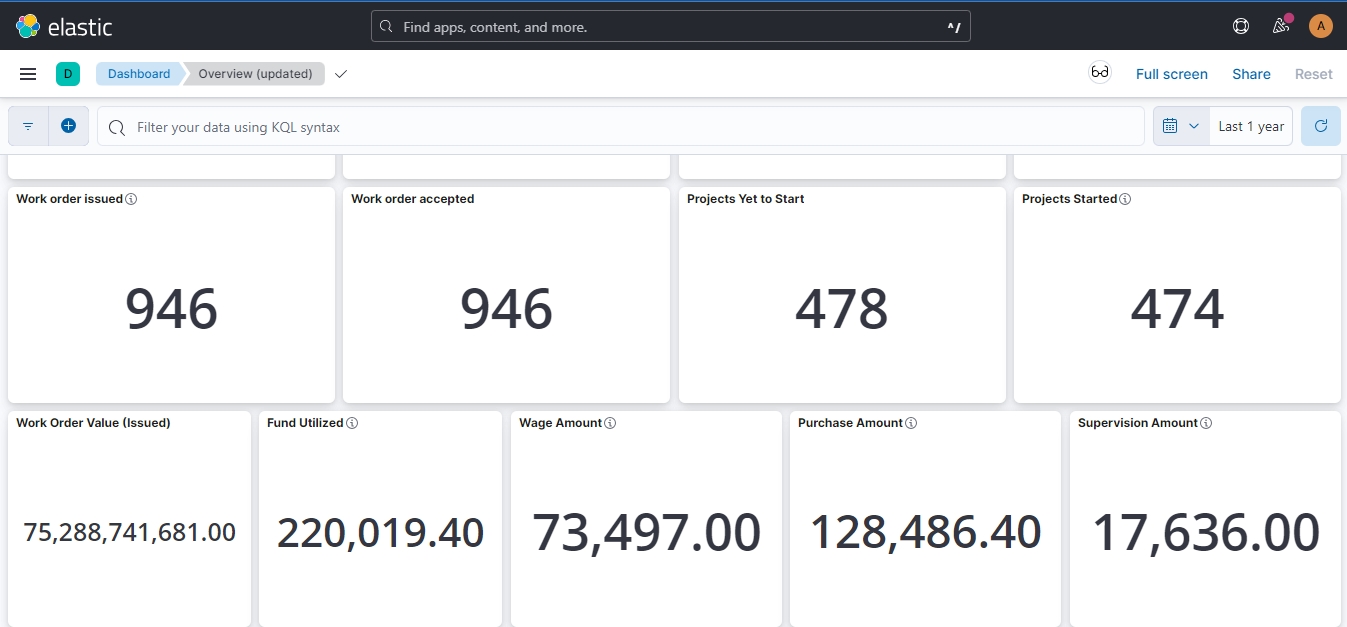
Work Order Issued
Total number of work orders issued under the MUKTASoft
Work Order Accepted
Number of work orders that have been accepted by CBOs into the MUKTASoft
Projects Yet to Start
Number of projects that have been approved but not yet started under the MUKTASoft
Projects Started
Number of projects where the first muster roll got created
Work Order Value (Issued)
The total monetary value of the work orders issued under the MUKTASoft
Fund Utilized
Total amount of funds utilized
Wage Amount
Total wage amount paid
Purchase Amount
Total amount paid on purchasing materials and equipment
Supervision Amount
Total supervision amount paid
Project execution rate
Muster roll approval, average time
Payment success rate
Frequency:
Monthly Basis
Weekly Basis
Transgender
Not Specified
Frequency:
Monthly Basis
Weekly Basis
Frequency:
Monthly Basis
Weekly Basis
Urban Local Bodies
Numbers of ULBs boarded into MUKTASoft
CBOs Registered
Numbers of CBOs on boarded into MUKTASoft
CBOs Benefited
Number of Community-Based Organizations that have received at least one work order
Wage Seekers Registered
Total numbers of wage seekers registered
Wage Seekers Benefited
Number of registered wage seekers who have benefited from the MUKTASoft
Onboarded Projects
Total number of projects got created into the MUKTASoft
Work order conversion rate
Percentage of onboarded projects with approved work orders (Projects work order approved/ Onboarded Projects*100)
Project execution rate
Percentage of approved work order value paid to beneficiaries (Total amount paid/ Value of work orders approved * 100)
Payment success rate
Percentage of successful payments out of the total payments processed (Number of successful payments/Total number of payments * 100)
Muster roll approval average time (in days)
Average time in days taken to approve a muster roll (Total time taken to approve the muster rolls / Total muster rolls approved)
Payment Disbursal Average time
Average time taken to disburse payments to beneficiaries from bill approval (Total time taken for all disbursals / Total number of disbursals)
In Process
This represents the percentage of estimates that are in process (i.e., to be verified, technically sanctioned, and to be approved) and yet to be approved.
Approved
Indicates the estimates that have been reviewed and approved.
Rejected
This shows the estimates that have been rejected.
In Process
Work orders currently that are in process (i.e., to be verified or approved)
Accepted
Work orders that have been accepted by the respective CBO
Rejected
Work orders that have been rejected by the approving authority
In Process
Measurement books are waiting for verification or approval.
Approved
Measurement books that have been reviewed and approved.
In Process
Muster rolls that are yet to be verified and approved.
Approved
Muster rolls that have been approved by the concerned JE.
In Process
Bills that have been submitted for verification and approval.
Approved
Bills that have received approval and are pushed to JIT for payment.
In Process
Payments that are awaiting processing in JIT-FS.
Successful
Payments that have been processed successfully.
Failed
Payments that encountered errors (technical errors, errors related to the wrong account & IFSC number, insufficient funds, blocked bank accounts, etc.) during processing.
Fund Utilized
Shows the total fund utilized.
Wage Amount
Displays the total amount spent on wages bills.
Purchase Amount
Displays the total amount spent on purchases.
Supervision Amount
Displays the total amount spent on supervision charges.
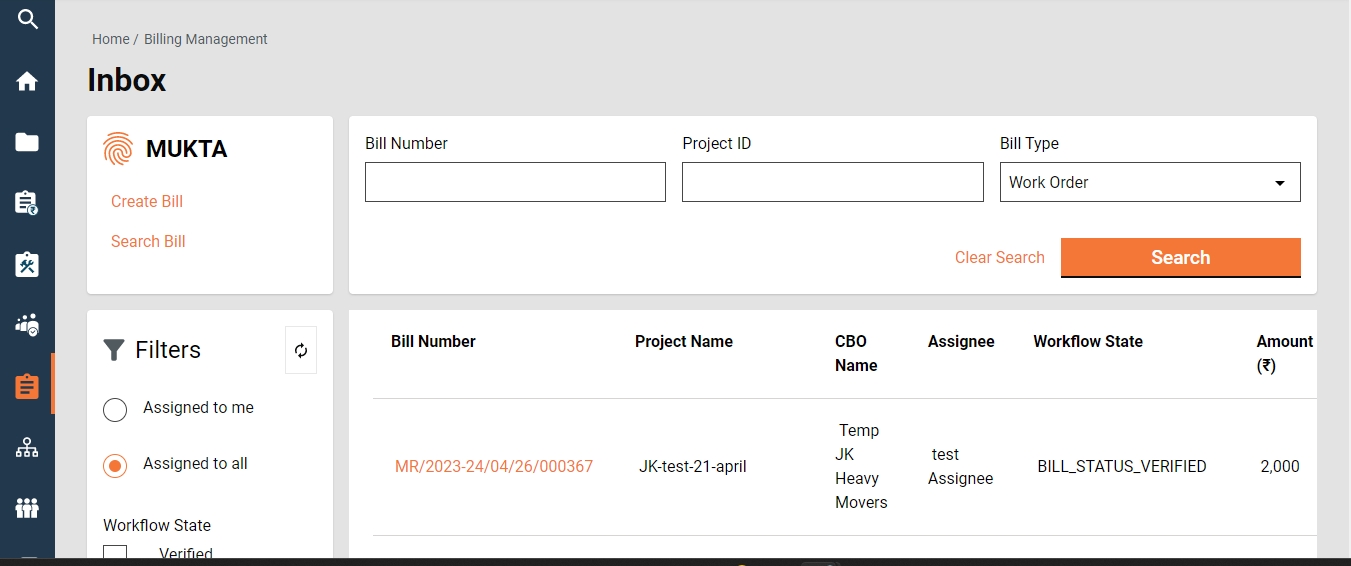
Home Page > Bills
From the Home Page on click of the Bills, the Inbox Page is displayed.
On the left side on the top feature menus are displayed.
On the bottom left side, the Filters Panel is displayed with the below filters.
Assigned to Me - The only bills assigned to the logged-in user are displayed on the right side window.
Assigned to All - It is default selected and hence the bills assigned to anyone are displayed on the right side window.
Ward- It filters the application based on the ward selected and then displays the result on the right side window.
Workflow States - It appears only when the application type filter is selected and filters the application based on the application status selected and then displays the result on the right side window.
On the right side of the top, search parameters are displayed, which allow you to search the bill by Bill Number, Project ID, and Bill Type.
On the bottom right side, a window is provided to list the bills based on default settings and applied filters and search parameters.
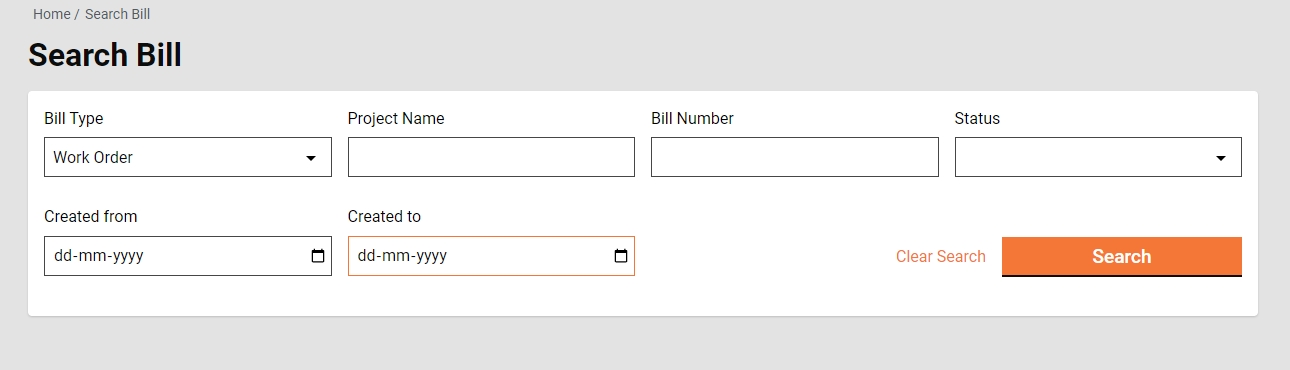
Home Page > Bills > Inbox > Search Bill
The search Bill enables ULB employees to search for a specific Bill using different search parameters.
Search Criteria
Ward
Bill Type
Project Name
Bill Number
Status
Created From Date
Created To Date
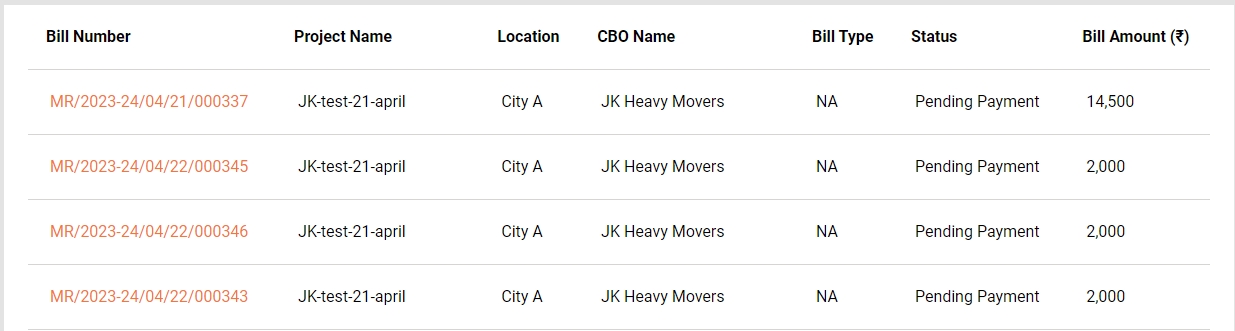
Search Result
Bill Number
Project Name
Location
CBO Name
Bill Type
Status
Bill Amount
Home Page > Bills > Inbox > Search Bill > Search Results
Click on the Bill Number to view the Bill details.
Complete bill details are displayed along with attached documents and the option to download the bill in PDF.
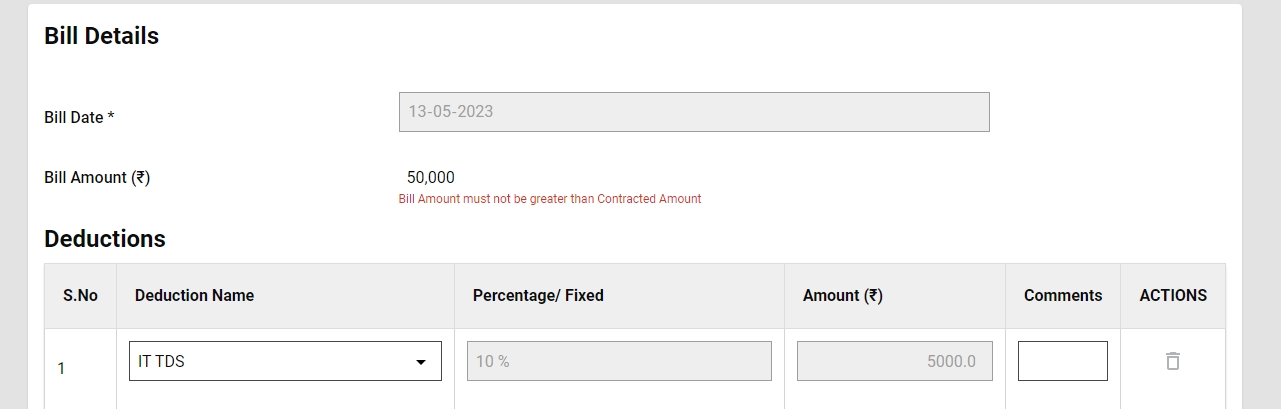
Wage Bill Details
Purchase Bill Details
Supervision Bill Details
Home Page > Bills > Inbox > Create Bill
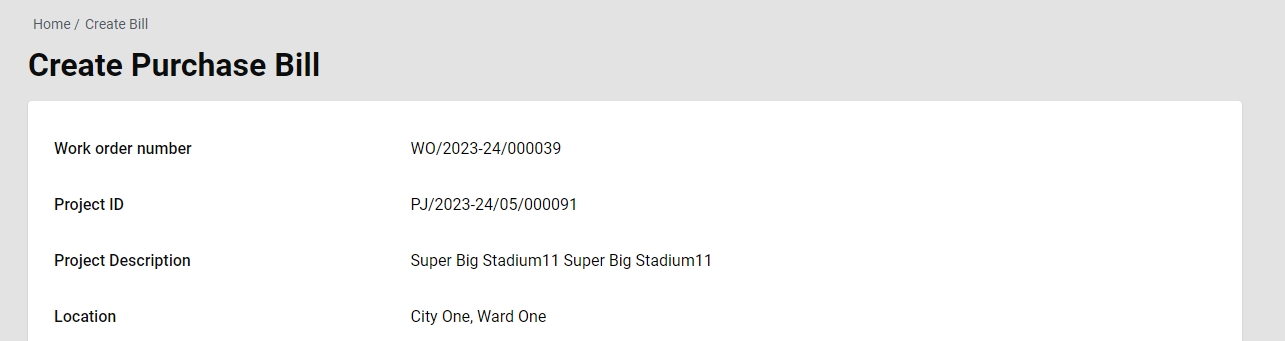
To create a bill for a project, the work order for the project is searched using the search work order and opened to view the details. Then from the view work order page, the action Create Purchase Bill is clicked. Other bills, wages and supervision are created automatically.
A work order is searched using the Search Work Order and the search result is displayed.
Click on the Work Order Number to view the work order details.
Click on the Create Purchase Bill from the action.
Create Purchase Bill page is opened.
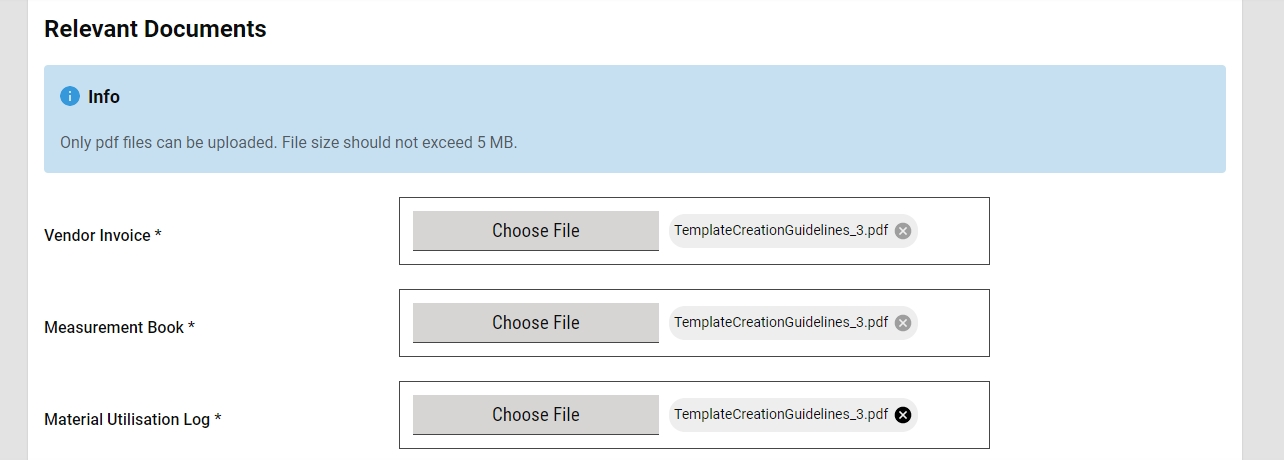
Fill in all the relevant details properly and then forward the application.
On successful completion, the success page is displayed along with the bill number.
The Bill Creator (BC) is responsible for creating and forwarding the Purchase Bill along with the relevant documents uploaded.
BC can -
Create and forward purchase bill
Edit purchase bill
The Bill creator (BC) has the right to create a bill for a project and then forward it to the verifier. On creation, the BC gets the forward dialogue box from which the user optionally selects the verifier’s name as the assignee name, adds the comments if any, and then forwards the bill.
On forward, the bill is forwarded to the verifier and the success page is displayed with the success message and bill number.
The bill creator (BC) has the right to edit the bill in case the bill is sent back for any correction.
The bill pending correction is available in the Inbox. Else, search for the bill using the search bill.
Click on the bill number to open the bill and view the details.
Select the Edit from the Take Action. Bill is opened into editable mode.
The Bill Verifier (BV) is responsible for verifying the bill and supporting documents uploaded.
BV can
Verify and forward Bill
Send Bill back to BC
The BV verifies and forwards the Bill if the documents and information provided in the Bill is found satisfactory and complete. To verify and forward the Bill
The bill pending verification is available in the Inbox. Else, search for the bill using the search bill.
Click on the bill number to open the bill and view the details.
Select the Verify and Forward from the Take Action. A pop-up window is opened.
Select the approver’s name as Assignee Name.
Provide any additional information for the assignee in the comments section.
Click on the Choose Files button to upload any supporting documents.
Click on the Verify and Forward button. The bill is forwarded to the approver.
Send back
BV can send the Bill back to the BC for any corrections or if any vital document has not been uploaded. To send the Bill back to the BC.
The bill pending verification is available in the Inbox. Else, search for the bill using the search bill.
Click on the bill number to open the bill and view the details.
Select the Send Back from the Take Action. A pop-up window is opened.
State the reasons for sending the bill to BC in the comments section.
Click on the Choose Files button to upload any supporting documents.
Click on the Send Back button. The bill is placed into BC’s inbox and the bill is enabled for editing.
The Approver verifies the bill and if the documents and information provided in the bill are found satisfactory, complete, and as per the guideline, the bill is approved.
Approver can -
Approve the bill
Send the bill back to BV
Send the bill back to BC
Approve
The bill Pending Approval is available in the Inbox. Else, search for the bill using the search bill.
Click on the bill number to open the bill and view the details.
Select the Approve from the Take Action. A pop-up window is opened.
Provide any additional information in the Comments section.
Click on the Approve Files button to upload any supporting documents.
Click on the Approve button. The bill is approved.
Send Back
To send the bill back to the BV
The bill pending for approval is available in the Inbox. Else, search for the bill using the search bill.
Click on the bill number to open the bill and view the details.
Select the Send Back from the Take Action. A pop-up window is opened.
State the reasons for sending the bill back to the BV in the comments section.
Click on the Choose Files button to upload any supporting documents.
Click on the Send Back button. The bill is placed into BV’s inbox.
Send back to the originator
To send the bill back to the BC
The bill pending approval is available in the Inbox. Else, search for the bill using the search bill.
Click on the bill number to open the bill and view the details.
Select the Send Back from the Take Action. A pop-up window is opened.
State the reasons for sending the bill back to the BC in the comments section.
Click on the Choose Files button to upload any supporting documents.
Click on the Send Back button. The bill is placed into BC’s inbox and the bill is enabled for editing.


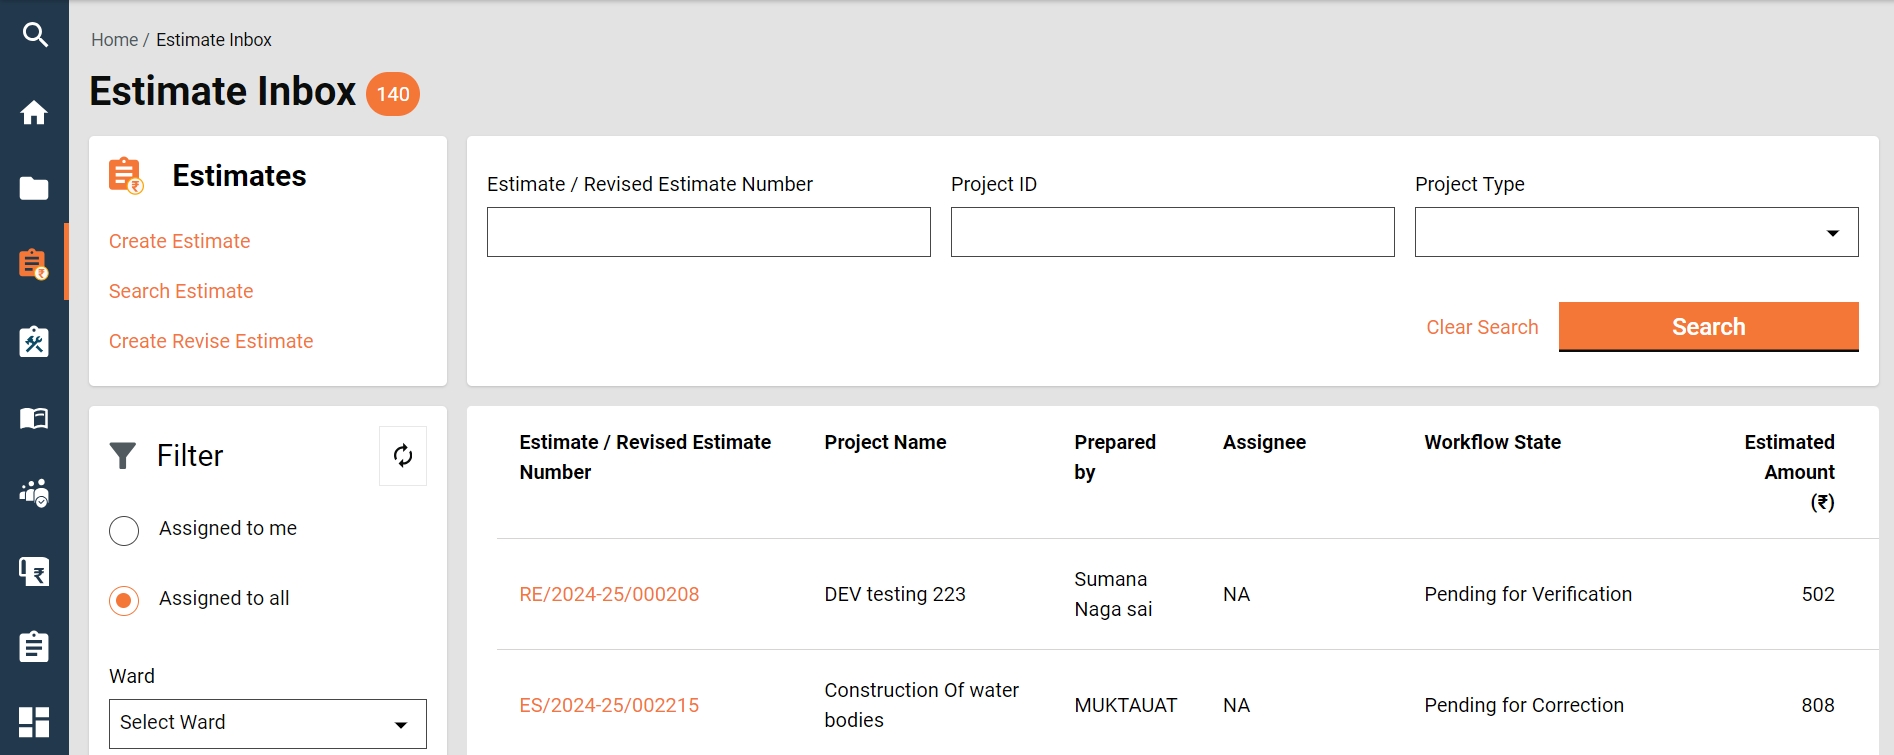
The estimate feature offers the below options to users:
Home Page > Estimates
Click on the Estimate Inbox on the home page.
The feature menus are displayed on the top left side.
The bottom panel on the left side displays the following filters:
Assigned to Me - The only estimates assigned to the logged-in user are displayed on the right window.
Home Page > Estimates> Search Estimate
The search estimate enables ULB employees to find specific estimates using multiple filters.
Search Criteria
Ward
Project Type
Project Name
Estimate Number/ Revised Estimate Number
At least one parameter is mandatory. Enter any one filter or more to search for an estimate.
The system fetches the estimates created between the specified periods by entering the date ranges created from and created to. The From Date and To Date fields are considered one parameter.
Click on the Search button to view the search results.
Search Result
Estimate Number/ Revised Estimate Number
Project Name
Location
Prepared by
Home Page > Estimates> Inbox > Search Estimate > Search Results
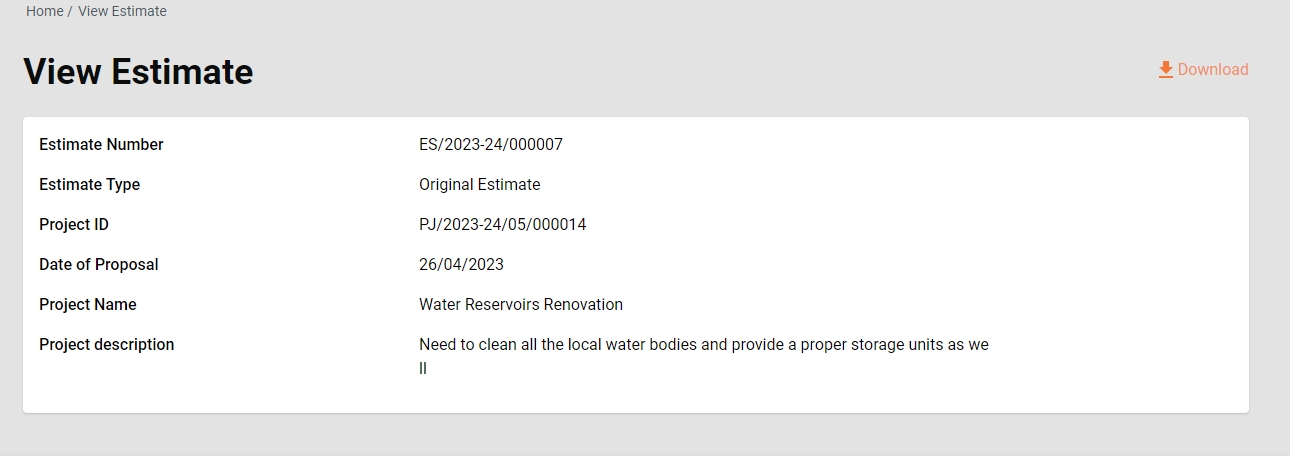
Click on the applicable Estimate Number from the search results to view the estimate details.
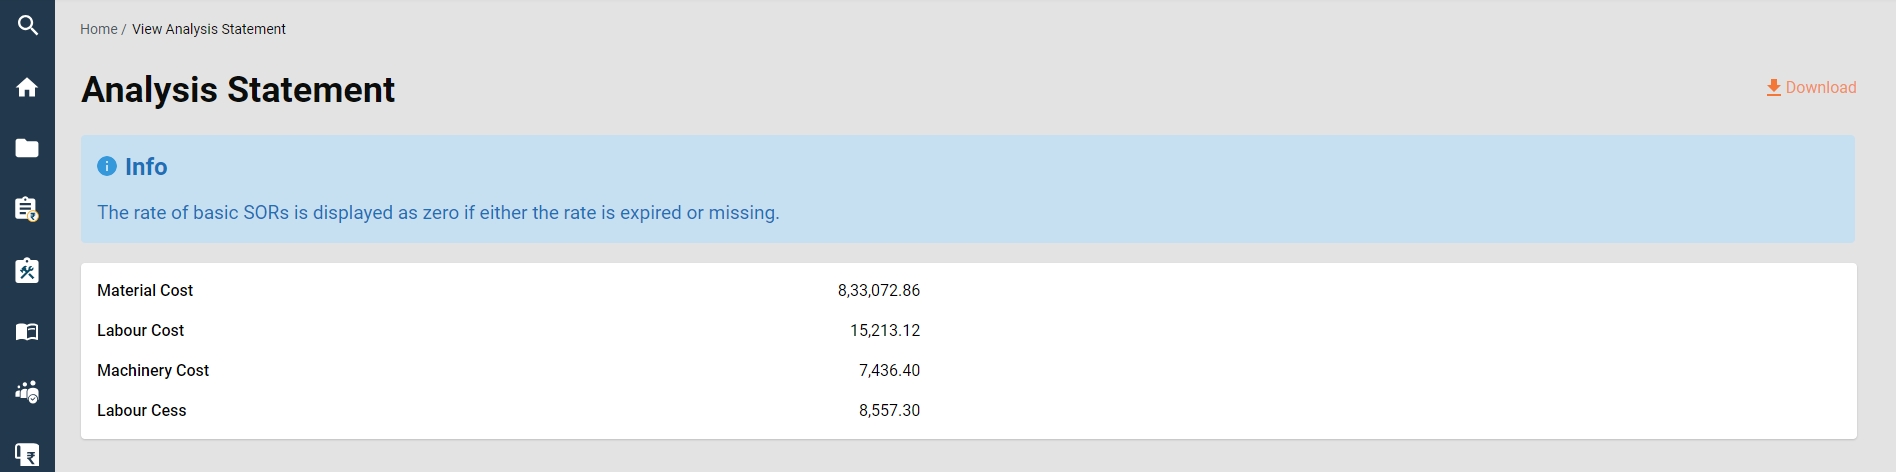
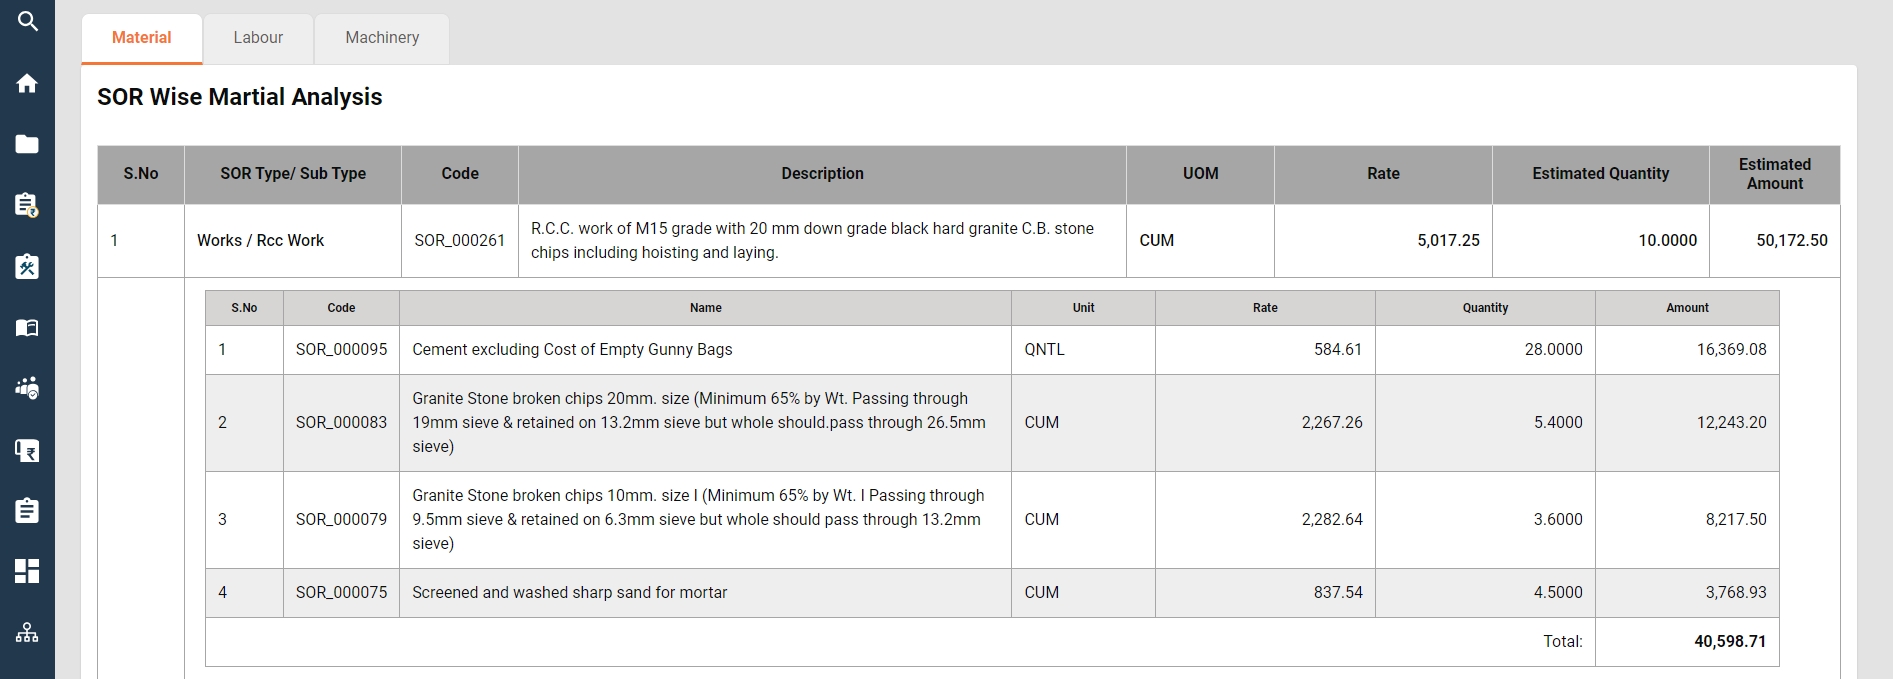
On the view estimate details page, click on View Analysis Statements.
The screen displays the breakup of SORs total into labour, material, machinery and labour cess.
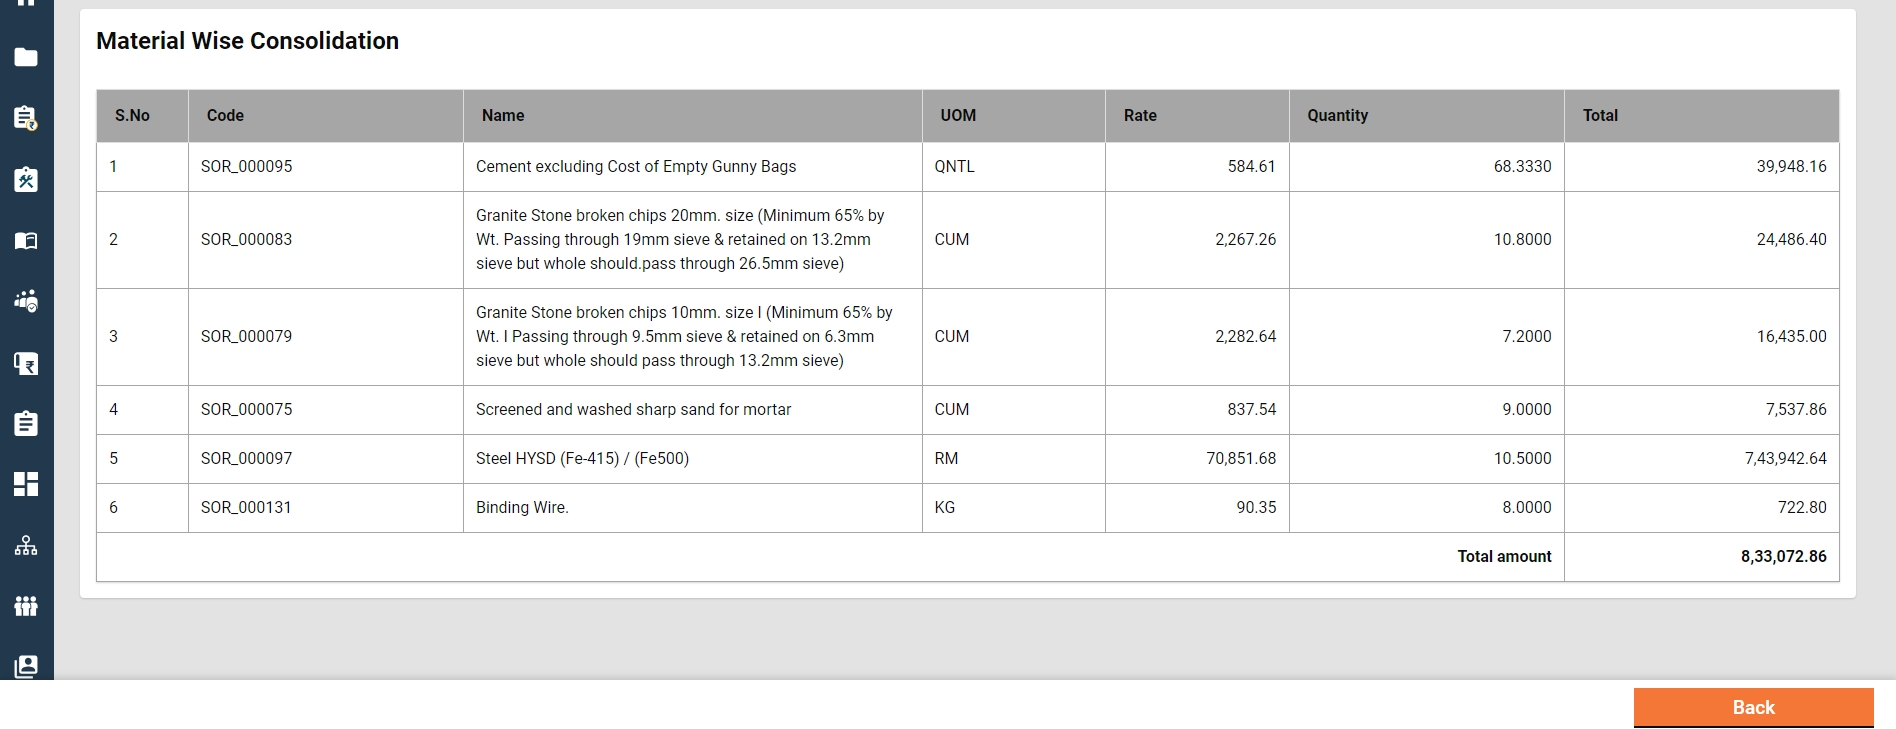
It also displays the SOR-wise analysis of labour, material, and machinery.
Additionally, it displays the consolidation of analysis into labour, material and machinery.
The option to download the analysis statement in PDF is provided.
Home Page > Estimates > Inbox > Create Estimate
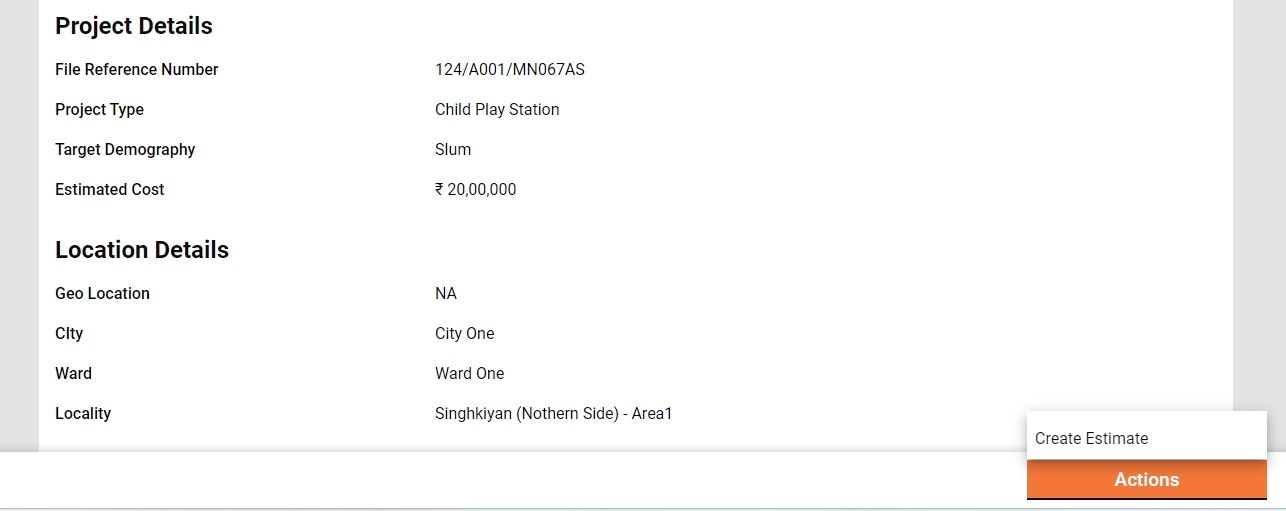
To create an estimate for a project, search for the project using the search project feature. Open the project to view the details. Navigate to the Actions button on the bottom right corner and click on the Create Estimate option.
Search for the project using the Search Project option.
Click on the applicable Project ID from the search results list to view the project details.
The complete project detail is displayed along with the attached documents and the Actions menu.
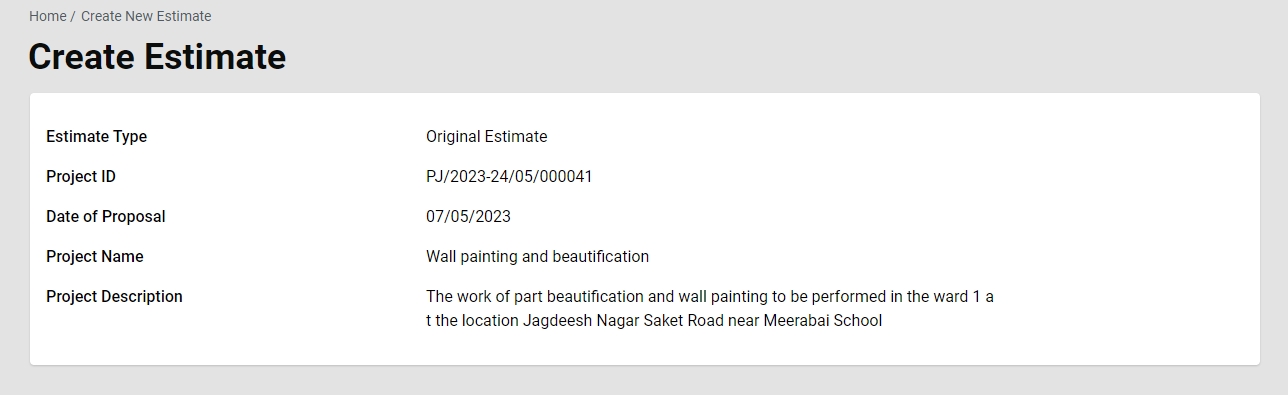
Click on the Create Estimate option. This opens the Create Estimate page.
The basic project details are displayed at the top of the page.
The project details tab displays the full project details.
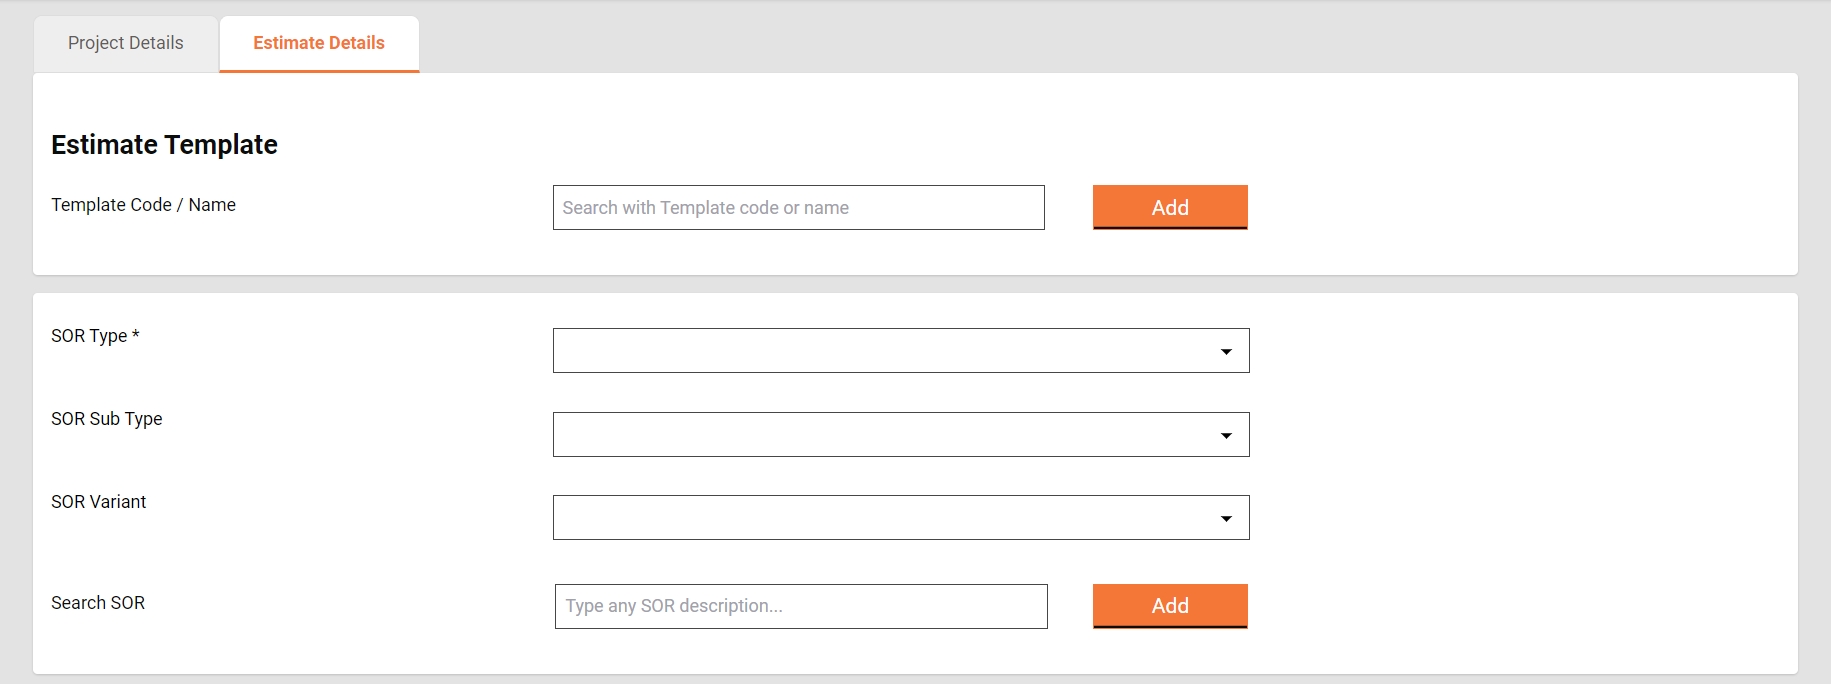
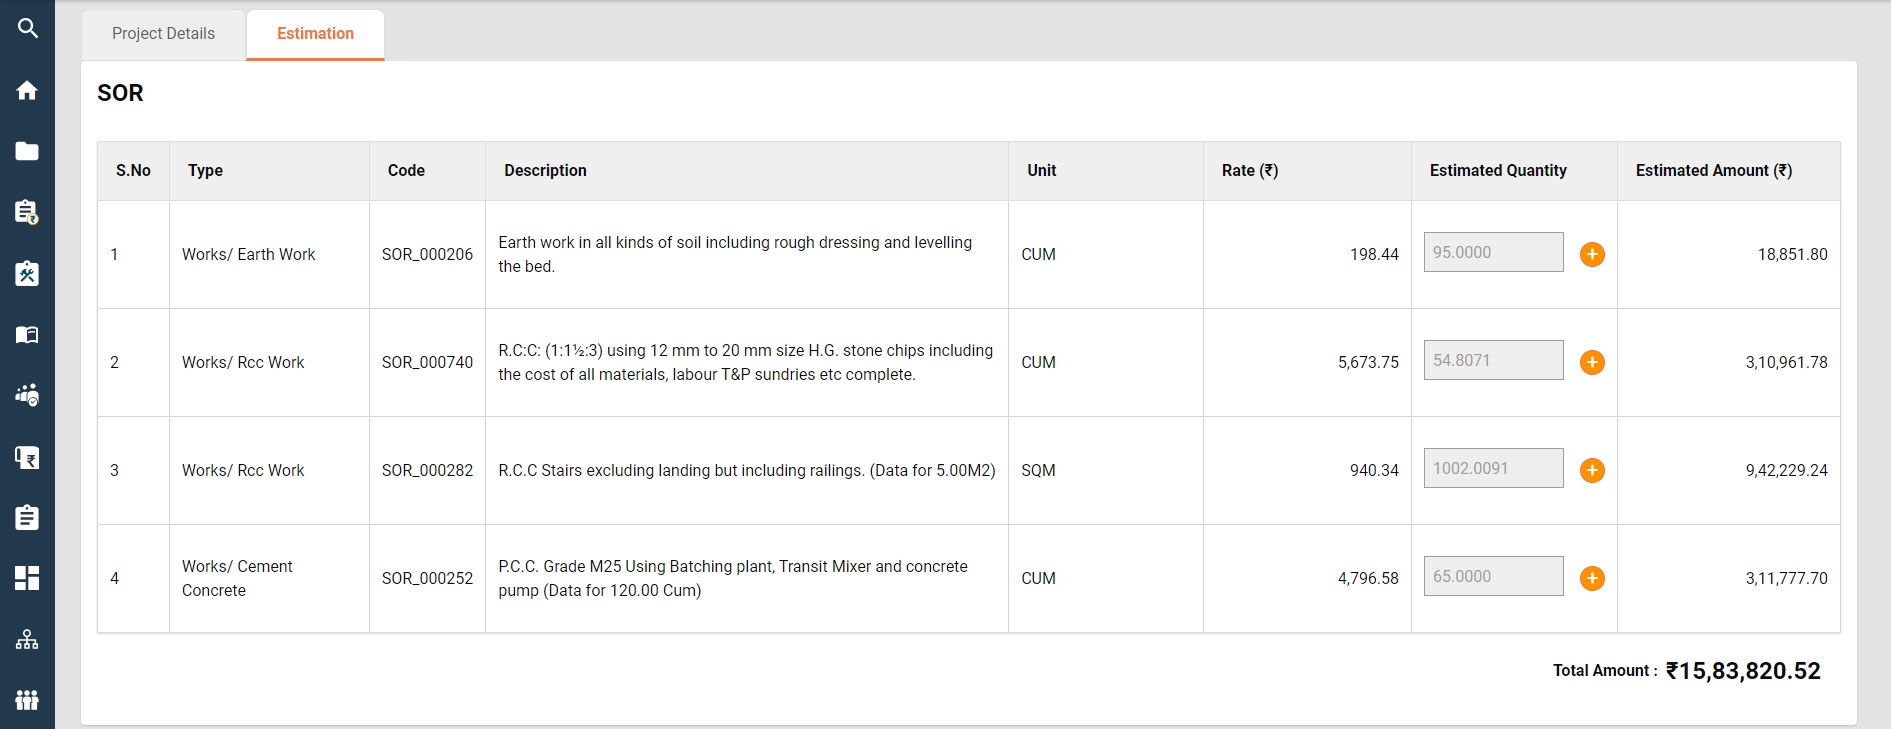
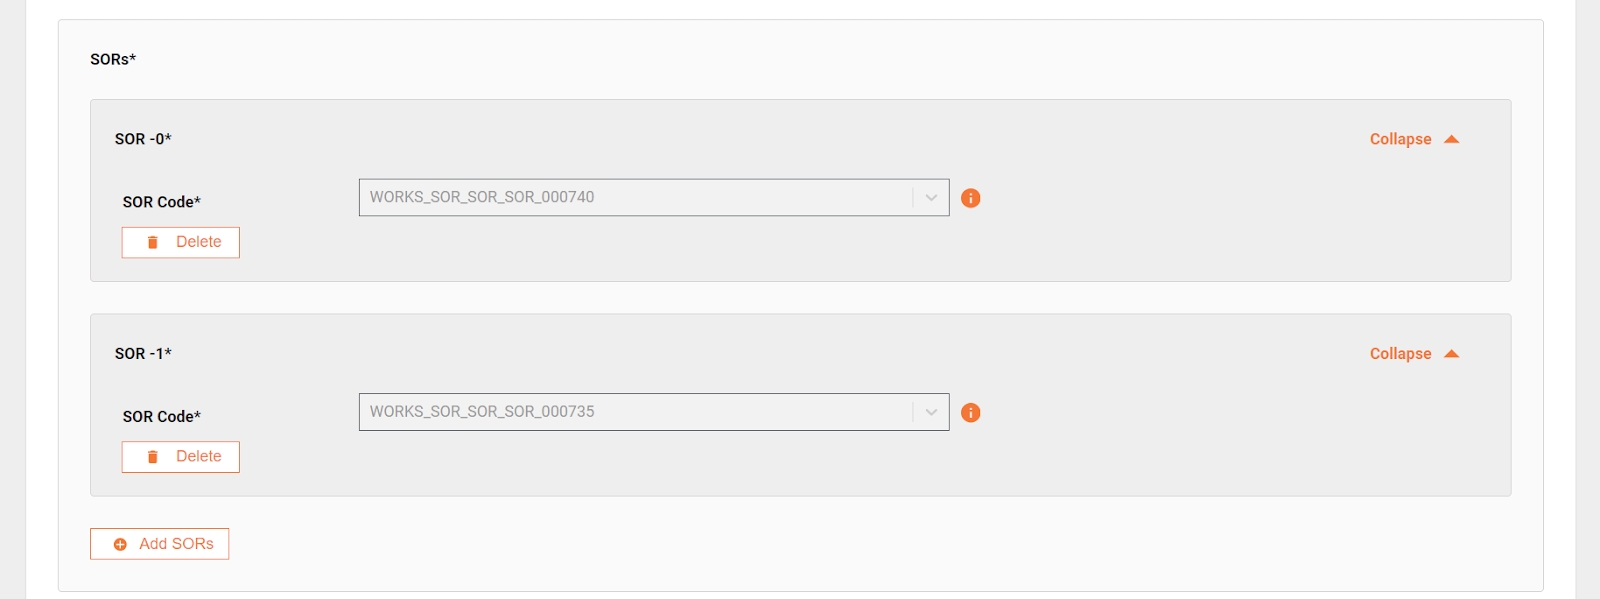
Estimate details are captured under 3 sections: SOR, Non-SOR and Other Charges.
SORs can be added in bulk by adding an estimate template. To add an estimate template, search it using the template name or code and then click on the add button to add it to the estimate.
Once a SOR is added to the estimate, its measurement is captured into the measurement sheet. To open the measurement sheet click on the plus icon beside the estimated quantity.
The measurement captured calculates the quantity and the same is displayed as the estimated quantity.
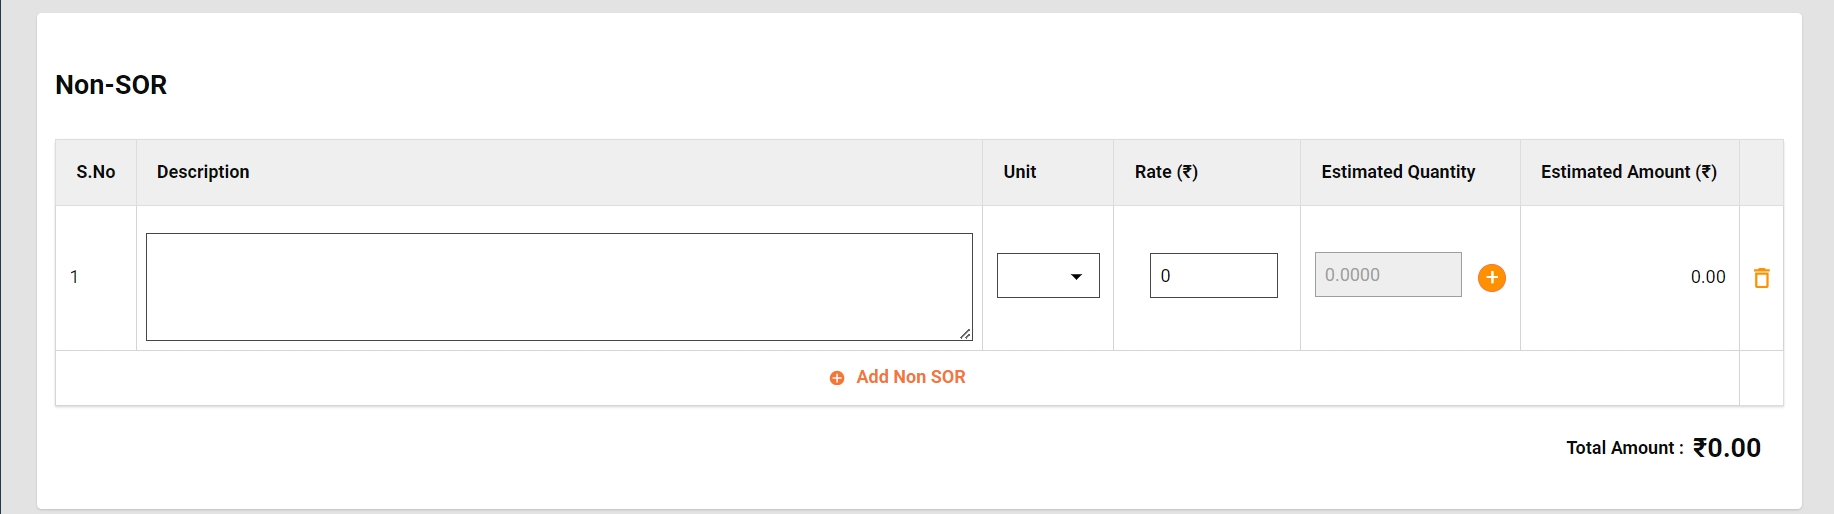
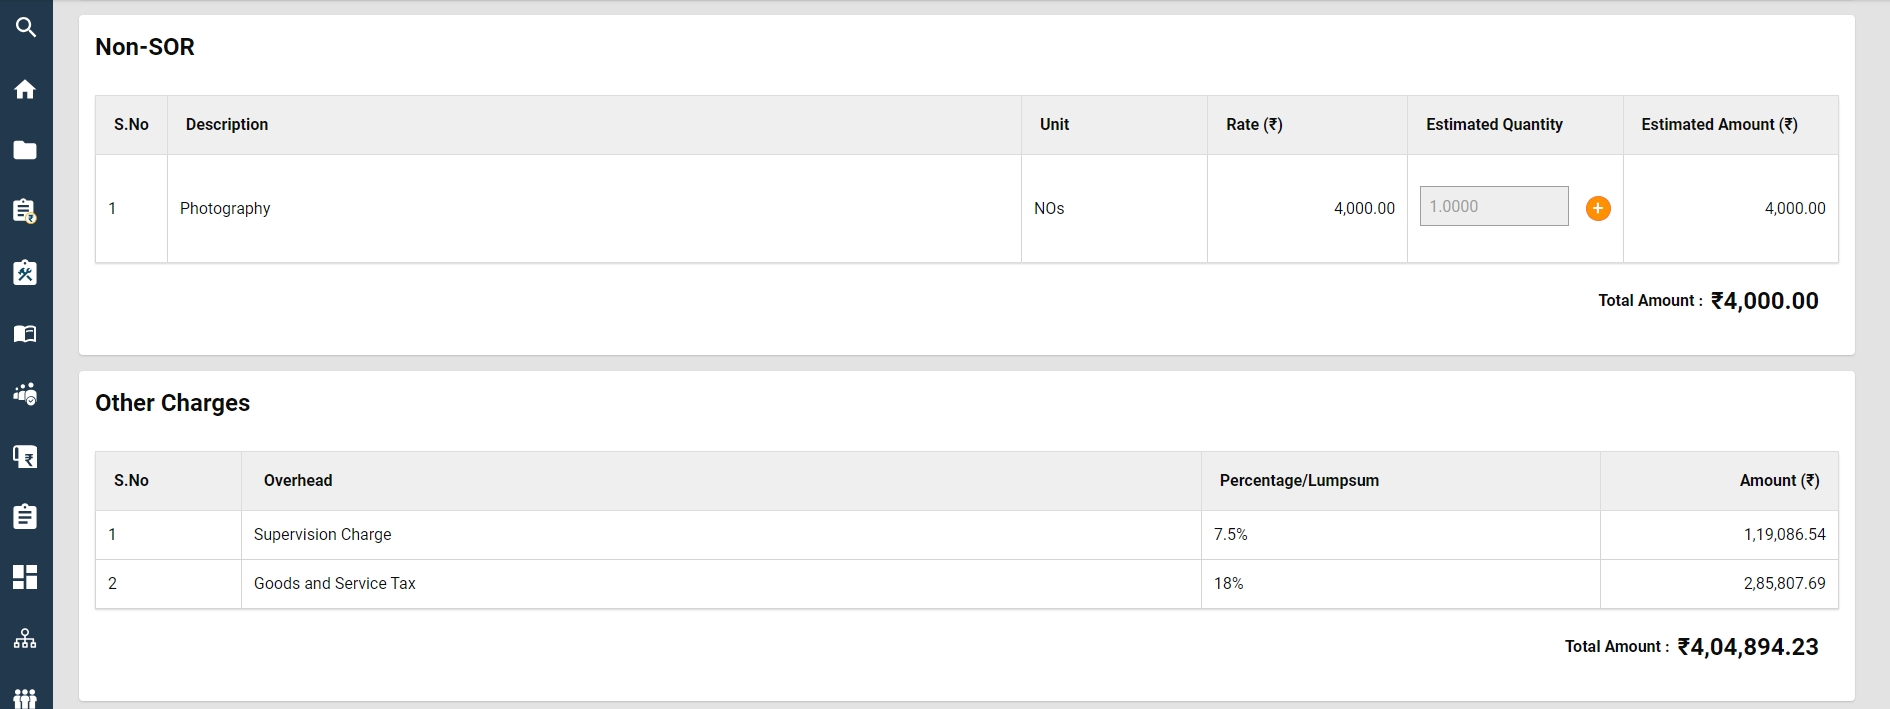
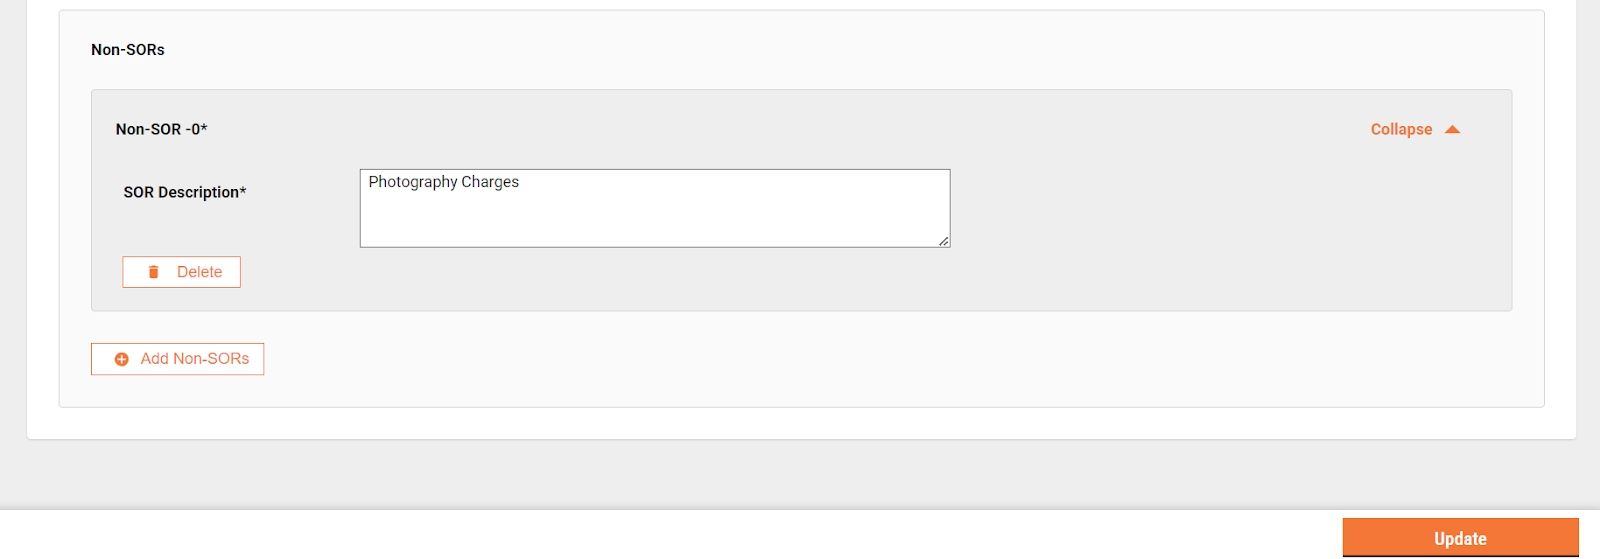
The non-SOR section allows the user to capture the non-schedule items into the estimate.
Enter the Item Description, Unit, and Rate and capture the measurement as shown for SOR to calculate the estimated quantity.
Click on the Add Non-SOR icon to append add items.
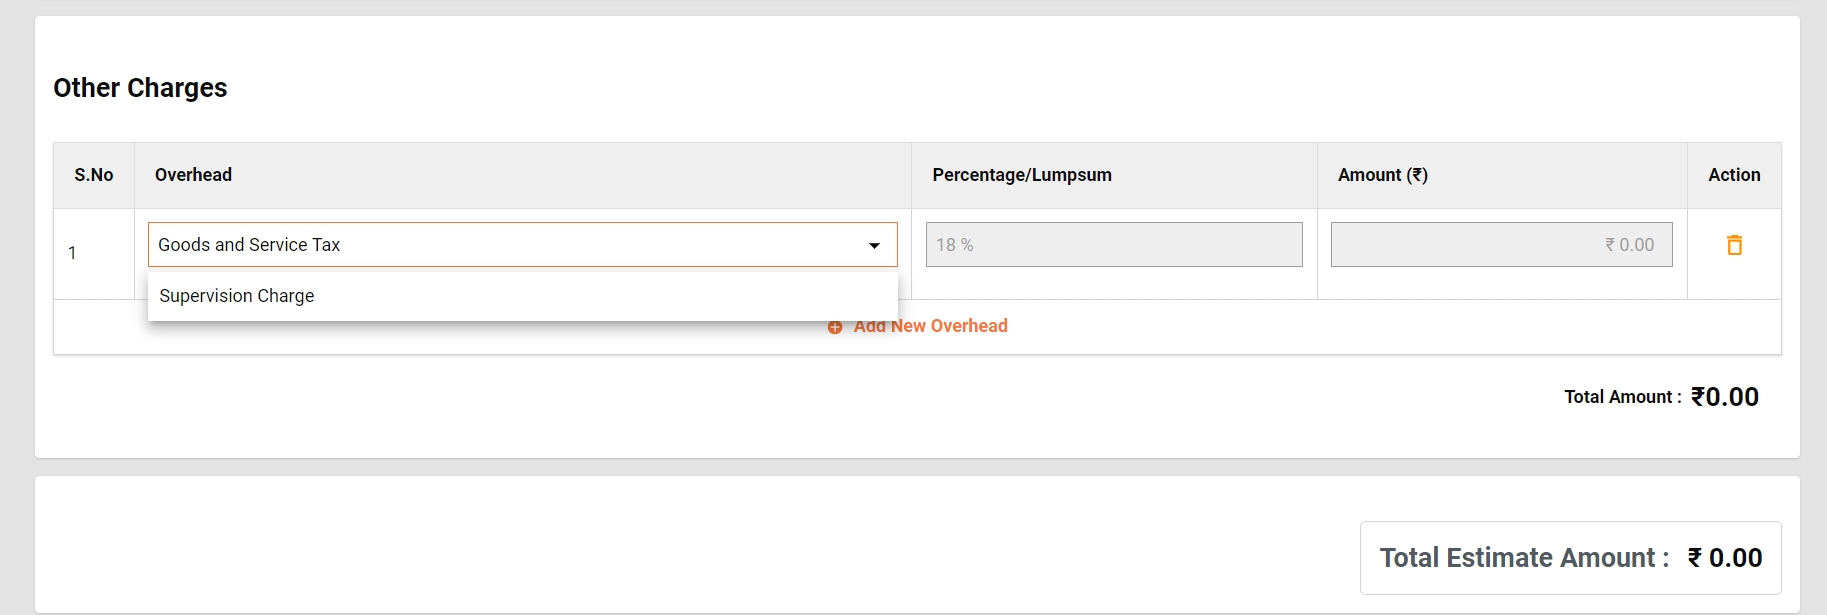
Other charges section is provided to capture the GST and Supervision Charges.
The total of SOR/ Non-SOR and other charges are displayed as Total Estimate Amount.
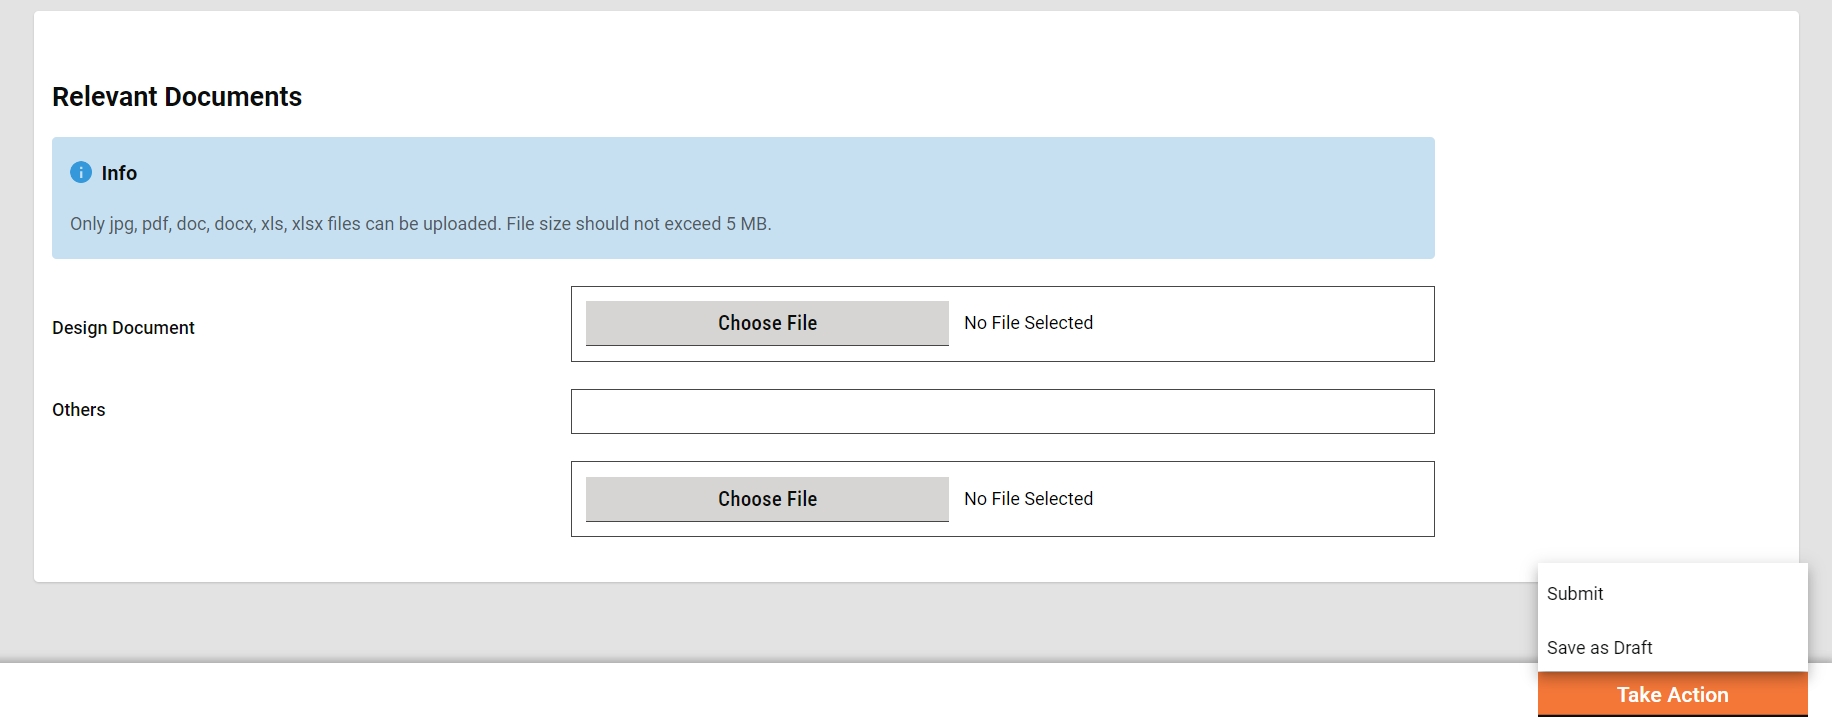
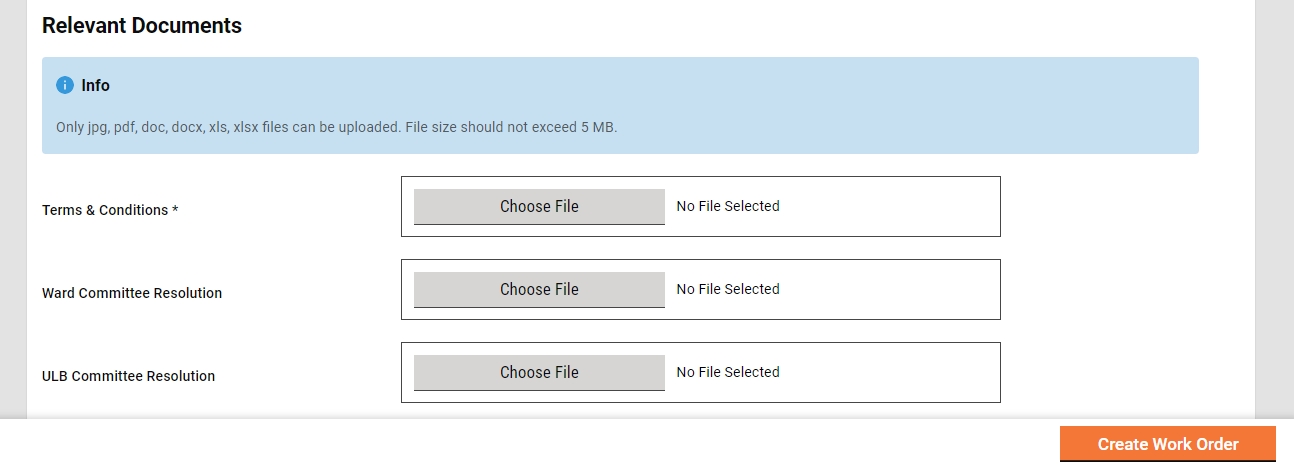
Upload the documents in the Relevant Documents section which are required to verify and approve the estimate.
Click on Save as Draft to save the estimate for further modification and see the analysis statements.
Click on Submit to send the estimate for verification.
The Estimate Creator (EC) is responsible for creating and forwarding the estimation along with relevant documents uploaded.
EV can
Save the estimate as a draft.
Forward estimate
Edit estimate
Save as Draft
The "Save as Draft" feature provides users with the capability to create an estimate and retain it in the creator's inbox for subsequent updates. This functionality allows users to initiate the estimate creation process, save the work in progress as a draft, and revisit it later for additional edits or finalization before submission.
Submit
The estimate creator (EC) has the right to create an estimate for a project and then forward it to the verifier. On creation, the EC gets the forward dialogue box from which the user optionally selects the verifier’s name as the assignee name, adds the comments if any, and then forwards the estimate.
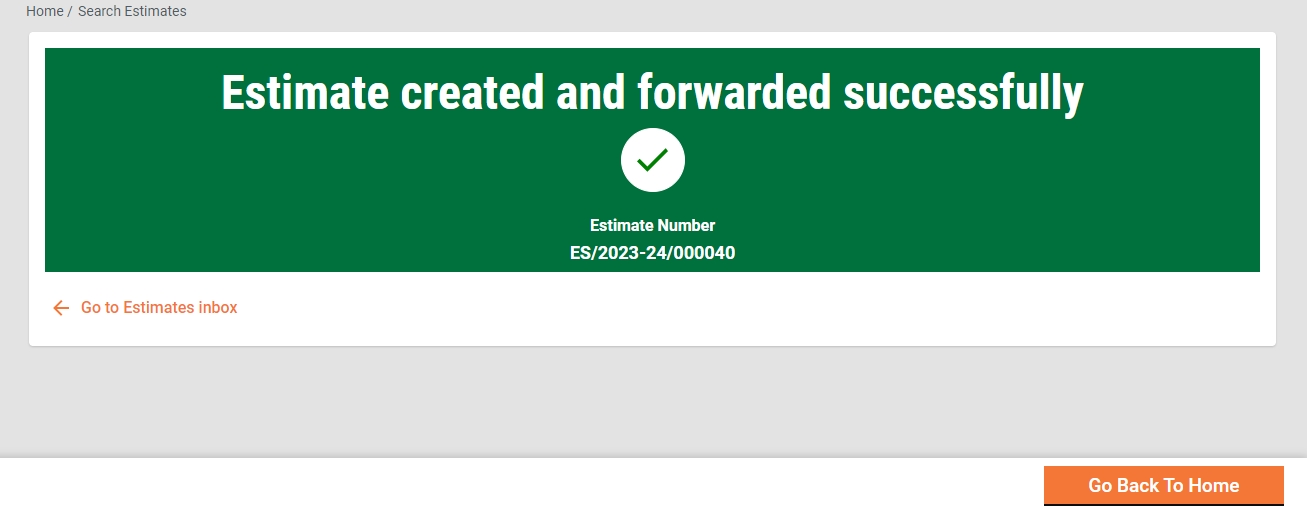
On Forward, the estimate is forwarded to the verifier and the success page is displayed with the success message and estimate number.
Edit
The estimate creator (EC) has the right to edit the estimate in case the estimate is sent back for any correction.
The estimate pending correction is available in the Inbox. Otherwise, search for the estimate using the search estimate.
Click on the estimate number to open the estimate and view the details.
Select the Edit from the Take Action. The estimate is opened into editable mode.
After editing, the submitted estimate is again sent to the verifier for verification.
Verifier
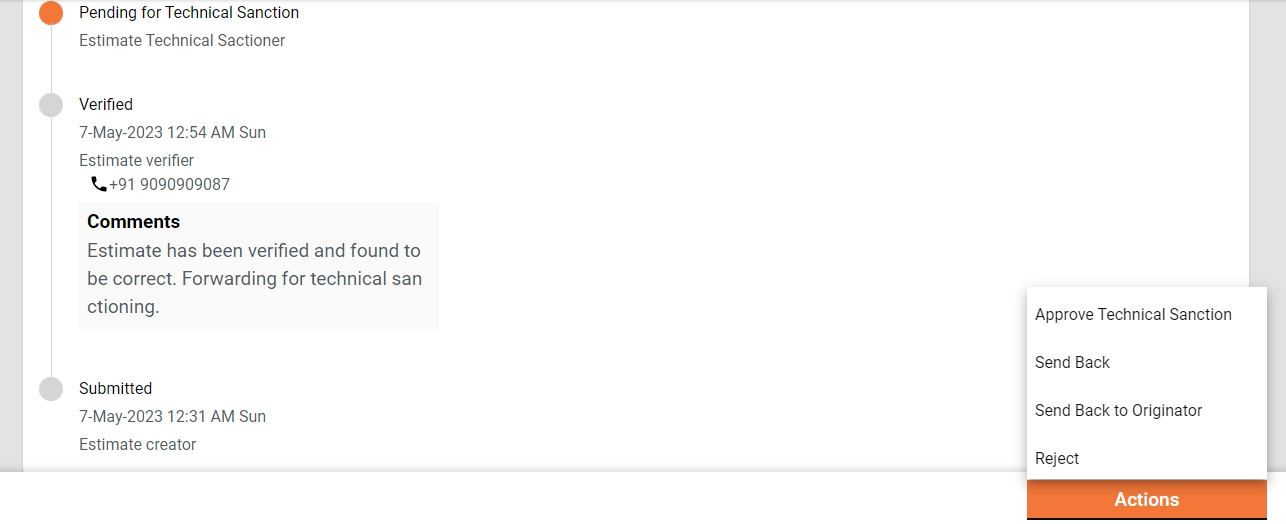
The Estimate Verifier (EV) is responsible for verifying the estimation and supporting documents uploaded.
EV can
Verify and forward estimate
Send estimate back to EC
Verify and forward
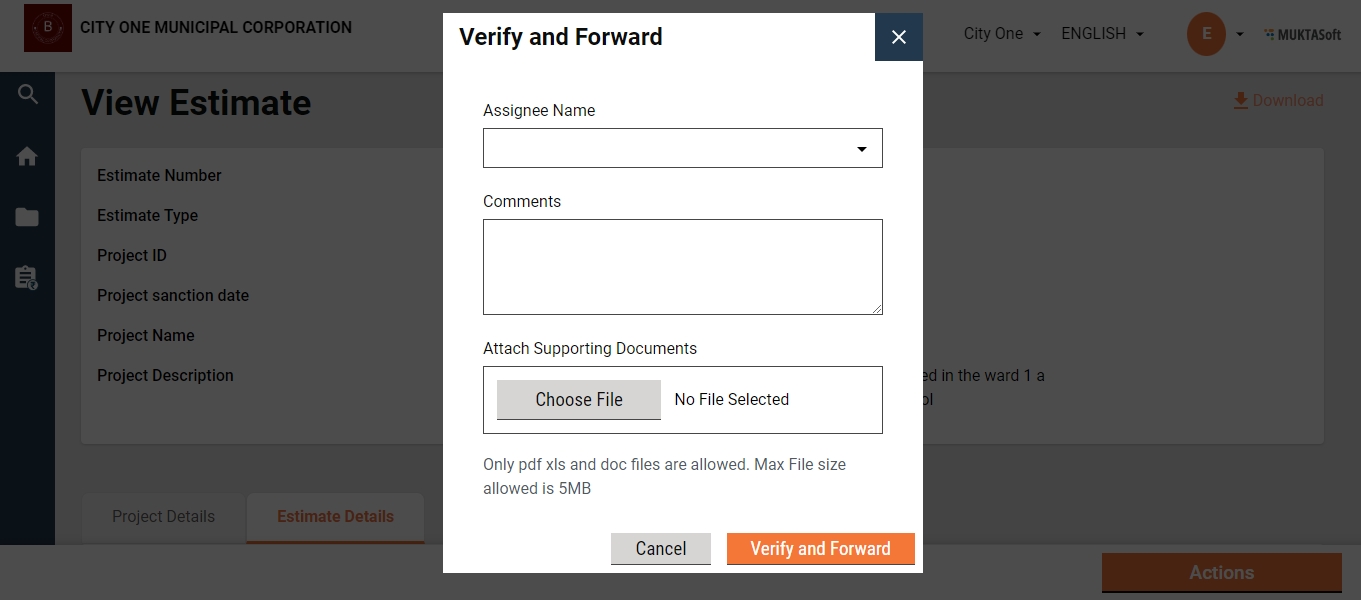
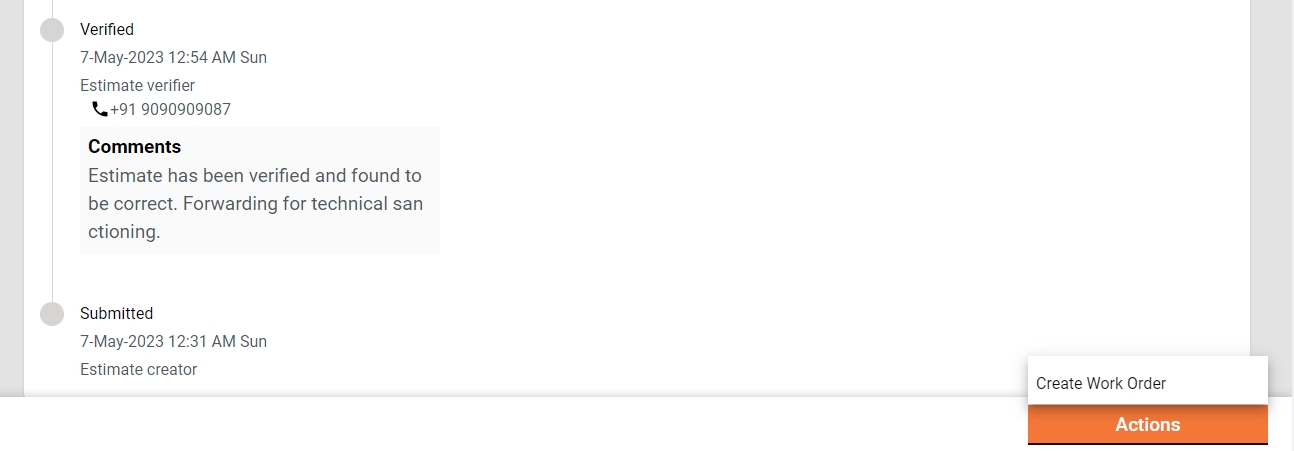
The EV verifies and forwards the application if the documents and estimation provided in the estimate are found satisfactory and complete.
To verify and forward the estimate
The estimate pending verification is available in the Inbox. Otherwise, search for the estimate using the search estimate.
Click on the estimate number to open the estimate and view the details.
Select the Verify and Forward from the Take Action. A pop-up window is opened.
Select the estimate’s technical sanctioner’s name as Assignee Name.
Provide any additional information for the assignee in the comments section.
Click on the Choose Files button to upload any supporting documents.
Click on the Verify and Forward button. The application is forwarded to the technical sanctioner.
Send back
EV can send the estimate back to the EC for any corrections or if any vital document has not been uploaded.
To send the estimate back to the CE
The estimate pending verification is available in the Inbox. Otherwise, search for the estimate using the search estimate.
Click on the estimate number to open the estimate and view the details.
Select the Send Back from the Take Action. A pop-up window is opened.
State the reasons for sending the estimate back to the CE in the comments section.
Click on the Choose Files button to upload any supporting documents.
Click on the Send Back button. The estimate is placed into CE’s inbox and enabled for editing.
The Technical Sanctioner (TS) is responsible for technically sanctioning the estimate.
TS can
Technical sanction estimate
Send the estimate back to EV
Send the estimate back to EC
Reject the estimate
Technical Sanction
The TS technically approves the estimate if the estimate is found technically correct.
To technically sanction the estimate
The estimate pending verification is available in the Inbox. Otherwise, search for the estimate using the search estimate option.
Click on the estimate number to open the estimate and view the details.
Select the Send Back from the Take Action. A pop-up window is opened.
Select the estimate’s approver’s name as Assignee Name.
Provide any additional information for the assignee in the comments section.
Click on the Choose Files button to upload any supporting documents.
Click on the Technically Sanction button. The application is forwarded to the estimate approver.
Send Back
TS can send the estimate back to the EV for any clarification which is needed by TS to proceed further.
To send the estimate back to the EV
The estimate pending for technical sanction is available in the Inbox. Otherwise, search for the estimate using the search estimate.
Click on the estimate number to open the estimate and view the details.
Select the Send Back from the Take Action. A pop-up window is opened.
State the reasons for sending the estimate back to the EV in the comments section.
Click on the Choose Files button to upload any supporting documents.
Click on the Send Back button. The estimate is placed into EV’s inbox.
Send back to the originator
TS can send the estimate back to the EC for any corrections or if any vital document has not been uploaded.
To send the estimate back to the CE
The estimate pending for technical sanction is available in the Inbox. Otherwise, search for the estimate using the search estimate.
Click on the estimate number to open the estimate and view the details.
Select the Send Back from the Take Action. A pop-up window is opened.
State the reasons for sending the estimate back to the CE in the comments section.
Click on the Choose Files button to upload any supporting documents.
Click on the Send Back button. The estimate is placed into CE’s inbox and the estimate is enabled for editing.
Reject
The TS can reject the estimate if the documents and information furnished by the EC do not meet the prescribed guidelines.
To reject the estimate
The estimate Pending for Technical Sanction is available on the Inbox. Otherwise, search for the estimate using the search estimate.
Click on the estimate number to open the estimate and view the details.
Select the Reject from the Take Action. A pop-up window is opened.
State the reasons for rejecting the estimate in the Comments section.
Click on the Choose Files button to upload any supporting documents.
Click on the Reject button. The estimate is rejected, and a notification is sent to the EC informing the same.
The Approver verifies the estimate and if the documents and estimation provided in the application are found satisfactory and complete and the estimation amount is as per the guideline, the estimate is approved.
Approver can
Approve the estimate
Send the estimate back to TS
Send the estimate back to EC
Reject the estimate
Approve
The estimate Pending Approval is available in the Inbox. Otherwise, search for the estimate using the search estimate.
Click on the estimate number to open the estimate and view the details.
Select the Approve from the Take Action. A pop-up window is opened.
Provide any additional information for the applicant in the Comments section.
Click on the Approve Files button to upload any supporting documents.
Click on the Approve button. The estimate is approved.
Send Back
To send the estimate back to the TS
The estimate pending approval is available in the Inbox. Otherwise, search for the estimate using the search estimate.
Click on the estimate number to open the estimate and view the details.
Select the Send Back from the Take Action. This opens a pop-up window.
State the reasons for sending the estimate back to the TS in the comments section.
Click on the Choose Files button to upload any supporting documents.
Click on the Send Back button. The estimate is placed into TS’s inbox.
Send back to originator
To send the estimate back to the CE
The estimate pending for technical sanction is available in the Inbox. Otherwise, search for the estimate using the search estimate.
Click on the estimate number to open the estimate and view the details.
Select the Send Back from the Take Action. A pop-up window is opened.
State the reasons for sending the estimate back to the CE in the comments section.
Click on the Choose Files button to upload any supporting documents.
Click on the Send Back button. The estimate is placed into CE’s inbox and the estimate is enabled for editing.
Reject
The Approver can reject the estimate if the documents and information furnished by the EC do not meet the prescribed guidelines.
To reject the application
The estimate Pending Approval is available in the Inbox. Otherwise, search for the estimate using the search estimate.
Click on the estimate number to open the estimate and view the details.
Select the Edit from the Take Action. A pop-up window is opened.
State the reasons for rejecting the estimate in the Comments section.
Click on the Choose Files button to upload any supporting documents.
Click on the Reject button. The estimate is rejected and a notification is sent to the EC informing the same.
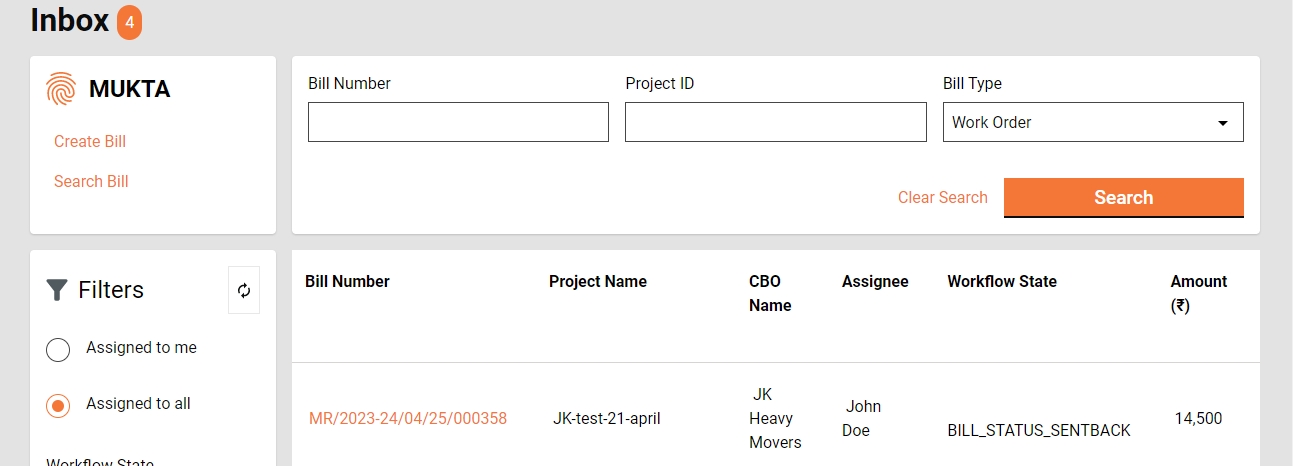
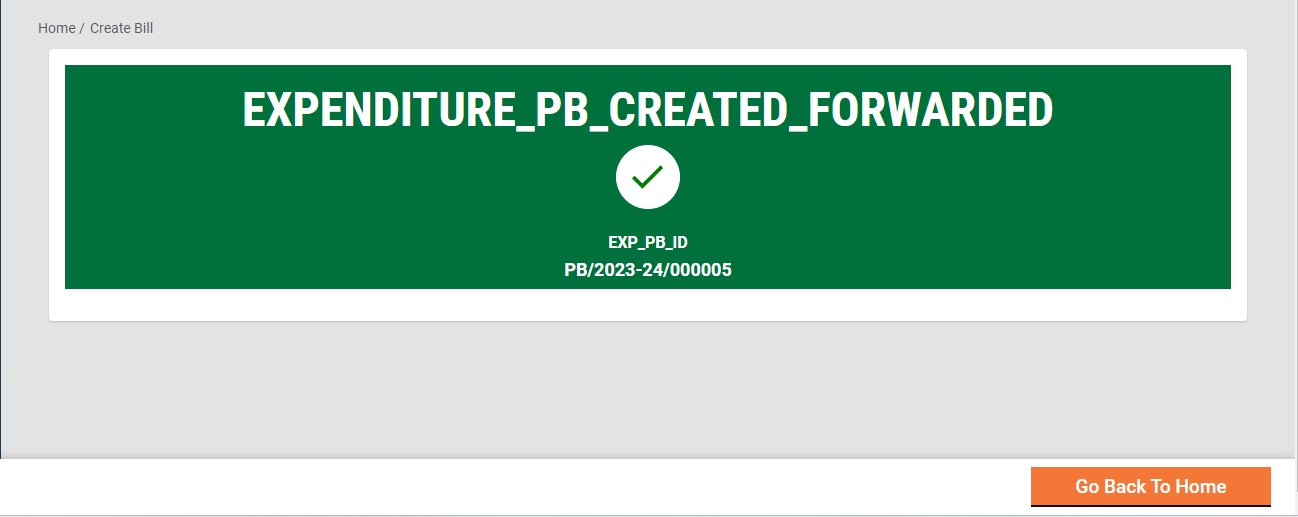
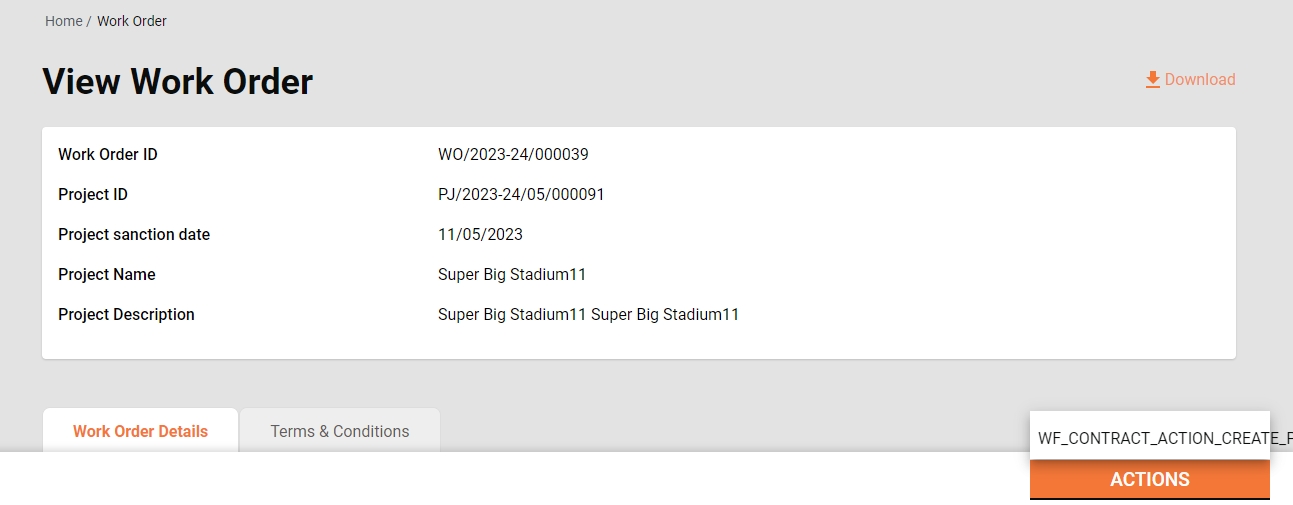
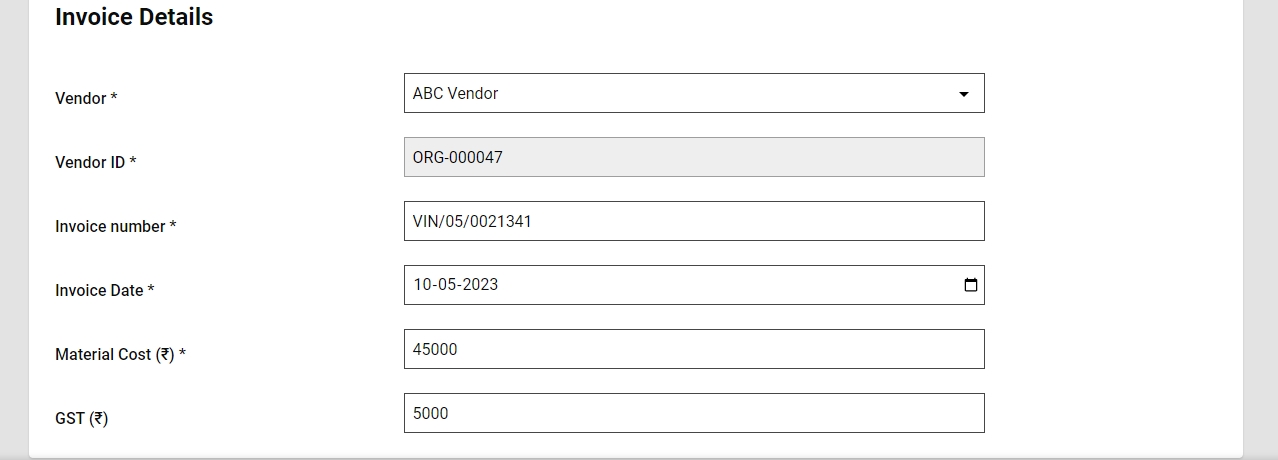
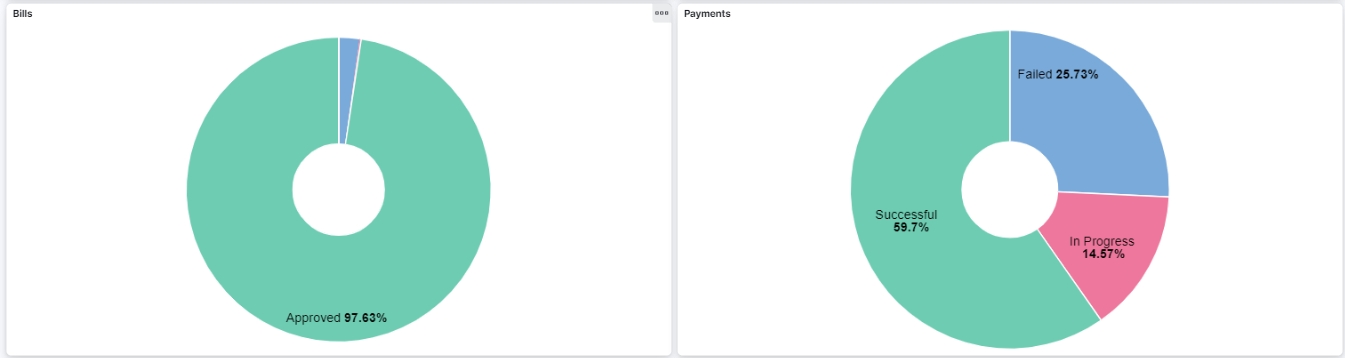
Ward- It filters and displays the applications based on the selected ward.
Workflow States - It appears only when the application type filter is selected. It filters the applications based on the selected status and displays the results on the right window.
The top right side displays the search parameters. This enables users to search for estimates by Estimate Number, Project ID, and Project Type.
The bottom right side provides a window to list the estimates based on the default settings, applied filters and search parameters.
Status
From Date
To Date
Status
Estimated Amount (₹)
SORs can also be added by searching them one by one and then adding them to the estimate.
A SOR not having an effective rate in the system is not allowed to be added.