
Loading...
Loading...
Loading...
Loading...
Loading...
Loading...
Loading...
Loading...
Loading...
Loading...
Loading...
Loading...
Loading...
Loading...
Loading...
Loading...
Loading...
Loading...
Loading...
Loading...
Loading...
Loading...
Loading...
Loading...
Loading...
Loading...
Loading...
Loading...
Loading...
Loading...
Loading...
Loading...
Loading...
Loading...
Loading...
Loading...
Loading...
Loading...
Loading...
Loading...
Loading...
Loading...
Loading...
Loading...
Loading...
Loading...
Loading...
Loading...
Loading...
Loading...
Loading...
Loading...
Loading...
Loading...
Loading...
Loading...
Loading...
Loading...
Loading...
Loading...
Loading...
Loading...
Loading...
Loading...
Loading...
Loading...
Loading...
Loading...
Loading...
Loading...
Loading...
Loading...
Loading...
Loading...
Loading...
Loading...
Loading...
Loading...
Loading...
Loading...
Loading...
Loading...
Loading...
Loading...
Loading...
Loading...
Loading...
Loading...
Loading...
Loading...
Loading...
Loading...
Loading...
Loading...
Loading...
Loading...
Loading...
This section provides a structured and comprehensive technical overview of DIGIT HCM. It is divided into three main segments:
Functional Specifications – Detailed documentation of core modules, including campaign type setup, inventory management, beneficiary data handling, boundary hierarchies, system user roles, and more
Role Action Mapping – Defines the permissions and actions available to each system role—from system administrators to registrars, supervisors, warehouse managers, and programme managers—ensuring clarity, security, and accountability
Building Blocks & Services – Highlights the modular architecture of HCM, emphasising reusable, configurable building blocks—such as registries and service modules—that support adaptability, scalability, and seamless interoperability across campaigns and systems
The DIGIT Public Health platform is an open-source, modular, and configurable digital public infrastructure that enables governments and partners to enhance health service delivery, campaign execution, and data-driven governance.
It enables governments and partners to efficiently plan, manage, and monitor health campaigns such as immunisation, Neglected Tropical Diseases (NTD) control, and nutrition drives.
With household-level planning and equitable coverage tracking, it ensures no population is left behind. Program managers can quickly configure and launch customised campaigns using the Console, while real-time dashboards offer live insights into campaign coverage, stock availability, and workforce performance, supporting timely, data-driven decisions. The platform allows multiple campaigns to be run simultaneously on a single infrastructure, reducing duplication, lowering costs, and simplifying training.
Vision Statement - Helping countries achieve Health SDGs by building digital public goods that strengthen public health
To access the dashboard, open your browser and enter the URL [ ]. Log in with your credentials and click on submit.
After logging in, you will land on a page listing all campaign dashboards. This page also includes About and FAQ sections, and a link for downloading custom Excel reports.
To view a specific campaign's dashboard, click on the campaign name.
The ICCD (Integrated Cross Campaign Dashboard) system serves as a pivotal technology infrastructure that facilitates real-time data visualisation and command operations. It integrates various data sources to provide a holistic view of ongoing projects, enhancing decision-making and operational efficiency. The system is particularly beneficial for managing complex projects across different jurisdictions, enabling seamless information sharing and collaboration among stakeholders. Its dashboard rendering capability allows users to access specific project details aligned with their roles, thereby streamlining access control and reducing information overload.
These are standard features that can be used as-is across any campaign, depending on the requirement, with minimal configurations, and can be shared with other products/services as well.
Click on the links below to learn more:
Multi-round campaigns for health initiatives entail registering beneficiaries once, followed by interventions delivered in successive rounds at predefined intervals. Click on the link below to learn more:
Browse the Public Health Roadmap below:
The dashboard is divided into several tabs based on campaign modules: Registration & Delivery, Inventory, Complaints, and Supervision.
Registration & Delivery module: Displays indicators related to registration, including coverage metrics and charts for households, population, and service delivery.
Complaints module: Shows the status of various complaints, types, resolution times, and details of each complaint.
Inventory module: Provides insights into stock status across all warehouses and predicts stock-out scenarios.
External Systems Integration: Enable integration with external health information systems such as DHIS2, OpenSRP, etc, to seamlessly import and visualise external health data within DIGIT dashboards.
Predictive Analytics and Dashboard Insights: Incorporate predictive models into dashboards to generate predictive insights on campaign performance, stock usage, and coverage trends.
Anomaly Detection and Alerts: Introduce automated anomaly detection and alerting to flag irregular patterns and improve data quality.
Supervision module: Evaluates supervisors' performance in monitoring campaigns using checklists.
Here are the articles in this section:
The DIGIT HCM provides a ready-to-use Dashboard that enables campaign supervisors to view real-time indicators, such as coverage, empowering them to make informed, data-driven decisions.
Download charts in PDF or JPG format.
Share charts via WhatsApp or email.
A diverse range of charts and graphs for visualising key metrics.
Drill-down functionality for detailed data examination.
Multi-language support.
Geographic boundary-based heat maps.
View data across multiple campaigns via a single dashboard.
Geo-coordinate map to view delivery data at the household level.
Restrict data access based on user hierarchy.
Tab navigation across modules.
Predictive charts to forecast campaign extensions and stock availability.
Custom Excel reports for in-depth analysis.
Filter and sort tables.
View data for custom date ranges or specific campaign cycles.
The dashboard data is tailored according to the user's hierarchical boundary, ensuring access is aligned with their operational scope. For instance, a national supervisor can oversee campaign operations nationwide, while a district supervisor can solely access data within their designated district, without visibility into other districts.
Health Campaign Management App
The DIGIT Health Campaign Management (HCM) app is designed to support registrars, frontline workers, and supervisors in delivering health campaigns efficiently. It’s simple, offline-ready, and packed with features that guide users, reduce errors, and provide real-time support.
📋 Registration & Data Management
Add new households and individuals
Search and update existing records
Reuse beneficiary data for future campaigns
💉 Service Delivery
Record healthcare services delivered during single-round campaigns
Auto-calculate required resources based on pre-set rules
📦 Stock Management
Record stock received, issued, returned, damaged, or lost
Auto-reconcile available stock in the warehouse
View all stock transactions and counts offline
🛠️ Complaint Management
Log complaints directly in the app (even offline)
Search, sort, and filter complaints using defined parameters
🧾 Supervision & Monitoring
Use custom checklists for supervision activities
Track campaign progress using a daily work progress bar
Record GPS locations with offline support
🌐 Additional Capabilities
Multi-language interface
In-app notifications to remind users of pending tasks
Web portal for user and access management
🗓️ Attendance tracking
Record attendance once or twice for campaign-related staff or training events
Operates offline and preserves data integrity
💰Payments workflow
Review and approve attendance registers
Musters are generated and collated by boundary/event
Payment reports are exportable in Excel or PDF formats
Select the preferred language from the options on the landing page of the app.
Click on the Continue button to navigate to the login screen.
Enter the User ID and the password on the login screen.
Click on the Forgot Password button in case the user forgets the password or wants to reset it. This will send a password reset request to the administrator.
Click on the relevant project option on the screen to view the project details.
The system downloads the data for the selected project only.
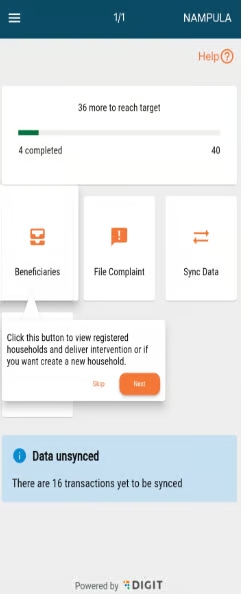
Click on the Help button on the app screen to access a walkthrough of the app.
Click on the Skip button to skip the walkthrough at any point.
Click on the Next button to proceed to the next aligned action.
Click on the hamburger menu to view the user profile and details.
Click on the Edit Profile option on the hamburger menu.
Edit the User Name, Phone Number, and Gender as required.
Click on the Save button to save the edited information.
Users can file a complaint using the HCM app. There are a few assumptions:
Not all complaints will be logged using the complaints module. Users may prefer raising complaints on WhatsApp groups/calls, and may not be registered in the system.
Complaints are most likely to be logged by users on behalf of other users (Most common use case: Supervisors raising complaints on behalf of users).
10-04-2025
Community Living Facilities
Eligibility based delivery
Payment advisory reports
Enhancements to microplanning
Smarter eligibility checks, extending campaign reach into communal facilities, generating payments advisory reports, and enhancements to the console and microplanning modules
19-12-2024
Microplanning
Console
Enhancements to HCM app & dashboards
The Campaign Types categorise the two principal approaches to running health campaigns:
Single Round Campaigns
Multi-Round Campaigns
This categorisation highlights the structure and workflow of the campaigns, which can be a one-off activity or a structured, multi-phased operation with repeated delivery cycles. The user manual helps administrators configure processes, resource schedules, beneficiary management, and app behaviours accordingly.
An illustrative guide to using the Complaints feature (Mobile and Web)
The Supervisor and Helpdesk user can:
View and track complaints
File a new complaint
Resolve a complaint
Reject a complaint
Assign to other roles
Click on the Take Action button. This opens a pop-up displaying all possible actions that the user can take that include:
Assign Complaint
Reject Complaint
Resolve Complaint
Re-route the complaint to the assigned role or department if further handling is needed.
Select the employee to Assign to. Enter any Comments for clarity on the required action for the assigned employee. Click on the Assign button.
Close the complaint with a reason if invalid.
Click Resolve.
Provide brief resolution notes explaining how the issue was addressed.
Submit the form.
The complaint status updates to RESOLVED and is moved out of the general queue.
The support features enhance user satisfaction, promote ease of use, and contribute to the app's overall effectiveness in facilitating seamless interactions and data management
Click on the links below to learn more:
Click on the Transit Post option to proceed with the flow.
Select the type of transit post from the given drop-down list. This list is configured in the system and contains multiple transit options like parks, bus stops, etc.
Enter the name of the post.
The screen displays the total number of deliveries and the number of deliveries completed by the user on that day.
Click on the Scan Resource button to scan the resources. Scanning the product QR code saves the details of the product in the system.
Click on the Submit button to add the resource details. Proceed to scan a new QR code to enter new resource details. In case you are not able to scan the resource, enter the details manually.
This screen contains all the details related to the vaccine, resources to be delivered and resources in hand. Click on the Record Delivery button to save the delivery details.
Click on the Close Delivery button to record the delivery of all resources linked to the transit post as completed.
The Delivery Successful acknowledgement message appears on the screen.
Scan the resource code to track the resources delivered:
Package utilised to parse the barcode: https://pub.dev/packages/gs1_barcode_parser.
Package utilised to QR code scanner:
GS1 - standards :
Package utilised for barcode scanning-
The Sync action allows users to sync the data that is recorded in the system so that it reaches the server and the data is secured.
Click on the Sync Data button on the home screen to initiate a manual sync process.
The data synced pop-up appears once the sync is complete. Click on the Close button to navigate to the home screen.
In case of any sync error, a pop-up stating Sync Failed is displayed on the screen.
Click on the Retry button to retry syncing the data.
Click on the Close button to navigate back to the home screen.
The Seasonal Malaria Chemoprevention (SMC) Dashboard is a digital tool designed to provide real-time visibility into the planning, execution, and monitoring of SMC campaigns. It consolidates data from the field, such as drug distribution progress, household coverage, and campaign timelines, into interactive visualisations that allow supervisors and decision-makers to track performance at various administrative levels. By offering access to coverage statistics, geographic distribution maps, and operational indicators, the dashboard helps identify gaps, address bottlenecks, and ensure that high-risk populations, particularly children under five, are reached effectively.
Download charts in PDF or JPG format.
Share charts via WhatsApp or email.
A diverse range of charts and graphs for visualising key metrics.
Drill-down functionality for detailed data examination.
Side-by-side bar chart visualisation for more than 2 variables
Venn diagram for inter-cycle analysis
Filter data by cycles
The dashboard data is customised based on the user's hierarchical level, ensuring access is aligned with their specific operational scope. For example, a national supervisor has oversight of the entire campaign at the national level, while a provincial supervisor has access to data within their assigned province, and a district supervisor has access to data within their assigned district, with no visibility into other districts.
A checklist is a tool that enables supervisors to monitor certain activities and record observations according to a defined set of questions.
Allows users to observe the tasks and fill out checklists.
View all the submitted responses for the checklists.
Click on the My Checklists option to view and perform random or scheduled inspections and record observations of the inspection activity.
Click on the Fill Checklist button to fill in the checklist against the date and the administrative area.
Click on the View Submitted Checklists to see the checklists submitted by the supervisor.
The Transit Post mode enables front-line workers to record vaccination or intervention data in dynamic, high-footfall locations (e.g., bus stops, railway stations, parks) where individuals are not pre-enumerated. Instead of individual records, the system captures aggregate counts linked with location details, ensuring data traceability without adding complexity to the delivery flow.
Introduction of Temporary Outreach Posts: Create temporary immunisation posts at strategic public locations (e.g., bus stops, railway stations, parks) to efficiently reach unvaccinated individuals.
Geolocation Capture: Record the name, type, and nearby landmarks of the transit post, with the option to add precise geolocation data.
Quick Data Capture: Enable swift recording of beneficiary counts with minimal inputs.
The Campaign Management Dashboard (HCM Dashboard) is a comprehensive tool designed to help supervisors monitor, evaluate, and optimise health campaigns in real time. It provides intuitive visualisations, customisable metrics, and actionable insights to track campaign progress, team productivity, and individual performance. With features such as predictive line graphs, heat maps, and multi-campaign views, the dashboard enables supervisors to make data-driven decisions and ensure smooth campaign execution. Its user-friendly interface requires minimal training, making it easy to track milestones, identify obstacles, and manage campaigns effectively.
Difficulty in monitoring campaign progress and team performance in real time.
Challenges in identifying bottlenecks or areas requiring additional support.
Limited visibility into individual and team productivity metrics.
Inadequate tools for analysing trends, comparing planned versus actual progress, and optimising strategies.
Provide supervisors with a unified, real-time view of campaign performance and progress.
Enable data-driven decision-making to optimise campaign strategies.
Facilitate quick identification and resolution of obstacles at all levels, from macro to micro.
Improve tracking of KPIs such as coverage, engagement, and inventory movement.
Enhanced Performance Monitoring: Track team and individual productivity, identify top performers, and address gaps proactively.
Data-Driven Insights: Leverage real-time, historical, and predictive data to optimise campaign outcomes.
Operational Efficiency: Quickly identify bottlenecks and resolve issues to maintain smooth campaign execution.
Customisable Visualisations:
*** Not applicable ***
*** Not applicable ***
*** Not applicable ***
Level config Master - Based on the user’s jurisdiction and hierarchy, we’ll load either the Level 1 or the Level 2 Dashboard
Filter config Master - Dynamic global filters on UI (eg, cycle selection)
An illustrative guide to using the Proximity Search feature
At the time of registration and drug delivery, the product captures the latitudinal and longitudinal data, and the distributor can search for the registered beneficiaries based on the distance from their current location. All the registered beneficiaries are populated based on the distance in ascending order. The search populates all the beneficiaries registered in a 3-km radius of the current location of the distributor.
Enables distributors to search for beneficiaries within a 3-km radius (configurable) from their current location based on the latitudinal and longitudinal data recorded by the product at the time of registration.
The latitudinal and longitudinal data will be recorded by the product for both registration and drug delivery.
Flip the toggle switch on the Search Individual details page to populate the registered beneficiaries, by distance, in ascending order and available within a 3-km radius.
Dual Timeline View for Campaign Creation
The campaign creation process is structured with a dual timeline to manage different steps more effectively. The Horizontal Timeline at the top handles major campaign setup steps, while the Vertical Timeline on the left handles sub-steps within each major step.
Click on Campaign Details.
Define campaign Type, Campaign Name, and Campaign Dates.
Review a summary of the campaign details.
Enter the Boundary Details. This step does not have a Vertical Timeline.
Enter the Delivery Details, such as the number of cycles and deliveries, including the cycle dates.
Set up rules for the delivery of resources.
Review a summary of the delivery details.
Upload Data for targets, facilities, and the creation of HCM app users sections.
Click on the Beneficiary IDs card.
The system displays the current count of Beneficiary IDs. Click on the Download Beneficiary IDs button to generate the IDs from the server.
The ID meter will display the number of Beneficiary IDs left. These IDs can be used to register a new household or individual.
The count is available at the top of the screen while registering households or individual details.
Once the user submits the details, a success screen appears with a unique beneficiary ID assigned to the individual.
Enter the last 6 digits of the beneficiary ID in the Search Households screen to fetch the beneficiary details.
The Beneficiary ID feature enables the reuse of beneficiary registries across campaigns by assigning a unique, reusable ID to each household or individual.
It helps CDDs easily identify beneficiaries during follow-up visits, reducing duplicate records, lowering operational overhead, and ensuring consistency in the database, especially in contexts without a universal national ID system.
Unique ID Assignment: Pre-generated Beneficiary IDs are created on the server and synced to the app during login, and these IDs are unique across the campaign.
Offline Access: IDs remain accessible in the app even without internet after login.
Registry Reuse: The same IDs can be used across multiple campaigns and acts as a permanent ID for the beneficiary.
Click on the View Reports button on the home screen. The reports page enables users to view the following reports:
Stock Received
Stock Issued
Stock Returned
Stock Reconciliation
Click on the arrow button placed next to every transaction to open the respective report. The back button will navigate users back to the home screen.
Click on the Stock Received button to fetch the report for stock received. The report is available in tabular data format.
Click on the Stock Reconciliation button to fetch the details. The report is in tabular format.
A step-by-step guide for creating and managing enumeration checklist
The Enumeration Checklist feature enables flexible and adaptable data collection for community health enumeration.
It is designed for contexts where standard formats may not exist, allowing capture of both household- and individual-level details, condition-based questions, and structured relationships (e.g., parent-child) for accurate and reusable registries.
Configurable Checklist Framework: Create and customise household- and individual-level checklists to match program needs.
Dynamic Question Triggers: Show relevant questions based on attributes like age and gender
Linked Data Structure: Maintain clear relationships between parent and child for accurate reporting and follow-up.
A step-by-step guide for device tracking
The device tracking feature in the app enables the user to store the location(coordinates) of the device.
It can be used to:
Track the device path.
Display data in dashboards to visualise the user’s movement.
Identify areas where the user spends more time (multiple coordinates captured for the same location indicate ongoing activity)
Verify whether a distributor has stayed within the assigned area or deviated from it.
This helps in understanding user behaviour and activity patterns in specific areas.
Coordinates will be captured automatically after a specific time interval as soon as the user selects the project.
Users will receive notifications about the location captured.
Then it will be shown as the unsynced records in the app, which can be synced to the server by clicking on the sync data button or by auto-syncing.
A step-by-step guide for cross campaign dashboard
The HCM DSS is designed to provide partners and programs with an easy-to-use, real-time dashboarding solution. Initially, dashboards required extensive customisation and development for each new campaign type, which made the process time-consuming and resource-heavy. With Kibana integration, partners now have greater flexibility to configure charts and tailor dashboards to their needs. As the platform evolves to support multiple disease areas and cross-delivery campaigns, the DSS is expanding beyond descriptive analytics to deliver actionable intelligence - offering insights into campaign outcomes, public health indicators, usage metrics, and user engagement
Rapid Dashboard Deployment – Ability to quickly create and launch dashboards for new campaign types or disease areas without extensive customisation or starting from scratch
Resource & Time Efficiency – Reduces overhead by eliminating repetitive problem discovery and development efforts.
Consolidated Real-Time View – Provides a unified view of progress and status across multiple campaigns and disease areas.
Log in as a National Supervisor.
The landing page lists all the campaign dashboards.
Click on the Dashboard.
If you log in as a National Supervisor, the landing page displays the campaign inbox. The inbox lists all individual-based campaigns currently running in your country.
Health campaigns, critical for disease control in the global south, face challenges such as limited resources, outdated tools, and a lack of real-time data. In Mozambique, where malaria is endemic, 95% of the population is affected, with 617,000 malaria-related deaths reported in 2021 underscoring the urgency to revolutionize the existing health campaign framework. Hence, we felt the need for a product to address these issues and our first exemplar was in Mozambique.
The Ministério da Saúde ((MISAU) or the Ministry of Health Mozambique in partnership with eGov recognised the need to use infrastructure-first thinking to reimagine how health campaigns were managed, run, and could be sustained over years, not just for malaria, but for many other diseases.
Mozambique reimagined health campaigns using a platform approach, with DIGIT Health Campaign Management (HCM). DIGIT HCM worked closely with various departments within NMCP, as well as other partners to build state capacity, provide technical assistance, and contribute to digital transformation.
DIGIT HCM, customised and branded as Salama for Mozambique, was rolled out as part of the Long Lasting Insecticidal Nets (LLIN) campaign. In 2023, Mozambique used DIGIT HCM to manage the distribution of malaria bednets across Tete and Gaza provinces. Click on the links below to learn more:
Mozambique
1. Tete 2. Gaza 3. Nampula 4. Cabo Delgabo 5. Inhambane 6. Maputo 7. Niassa 8. Maputo Cidade
Malaria: Bednet, SMC, IRS
NMEP, MC, Goodbye Malaria, ADDP, World Vision, AWS
Liberia
National Rollout
Malaria: Bednet
CRS, NMCP Liberia, Plan International
Senegal
An illustrative guide to using the Inventory Management feature
The Inventory Management module in the DIGIT Health Campaign Management (HCM) platform is designed to ensure accurate, transparent, and traceable stock movement from central warehouses to last-mile health workers during public health campaigns.
Enables distributors and warehouse managers to track stock till the last mile, including receipts, issues, returns, damages, and losses.
Health Campaign Management (HCM) is a digital, scalable, and sustainable solution for public health campaign execution that enables healthcare decision-makers, program managers, and frontline workers to plan, execute, monitor, and adapt time-bound health interventions across all disease types. It supports real-time data, seamless integration, and features tailored workflows for different roles in the field and at headquarters.
Core features include:
A mobile app for frontline workers with guided flows, offline capability, and built-in checks to reduce errors.
Building blocks are individual, independent blocks of solutions that are assembled to solve large, complex problems. With building blocks, any solution could be evolved to fit the evolving problem, as against building a new system from the ground up.
DIGIT HCM is built using modular building blocks that are highly configurable, allowing countries to tailor the product to their specific needs easily. These building blocks are reusable, allowing for the creation of new solutions. They facilitate reusable assets for all campaigns and have the following benefits:
Easy to adapt to local needs (Highly configurable - easy to rework)
One asset for all campaigns (Multiple campaign types, diseases)
If you are a national-level supervisor, the initial page you see is a national-level view. Here, you can monitor the campaign's progress across various sub-national boundaries, including aggregates of households, population, and service deliveries.
To navigate to a sub-national level dashboard, click on the ‘View Dashboard’ button next to the sub-national boundary name.
This feature enables distributors to download all boundary data along with beneficiary information that will be covered by the distributor on a specific day of a campaign. For this process, the distributor must select all levels of boundary data up to the lowest level of the boundary hierarchy, so they only need to download limited data at one time, which helps address device memory and data bandwidth constraints.
Distributors must select the boundary hierarchy down to the lowest level and then download the latest beneficiary data from the server to commence their drug delivery.
Multi-language support.
Geographic boundary-based heat maps.
Geo-coordinate map to view delivery data at the household level.
Restrict data access based on user hierarchy.
Tab navigation across modules.
Predictive charts to forecast campaign extensions.
Filter and sort tables.
View data for custom date ranges or specific campaign cycles.
Complexity in sharing campaign data and performance insights across teams and stakeholders.
Offer flexible visualisations and reporting options to enhance analysis and communication.
Ease of Use: Intuitive interface with minimal training required.
Reporting & Sharing: Export and share charts and dashboards in PDF/JPG formats via email or WhatsApp.
Future Readiness: Track trends and predict campaign outcomes to refine strategies for upcoming campaigns.
Fraud Detection: Detect potential fraud by monitoring unusual or inconsistent movement patterns
Captures transaction-level details to prevent mismanagement and fraud, ensuring safe and accurate stock movement
Warehouse Manager
Warehouse Managers record stock across different geo- boundaries respectively
Warehouse Managers can record stock received, issued, returned, lost, or damaged, and perform end-of-day stock reconciliation
Distributor
Distributor records the stock received for the day
Distributors record the stock received from warehouse managers for a specific distribution day
Click on the links below to learn more:
Facilitate accurate, timely payments for healthcare workers based on attendance.
Proximity Supervisor
View attendance: Filter, search, and view attendance data.
Edit attendance: Modify attendance entries for accuracy.
Approve attendance: Validate and approve attendance registers for payment processing.
Proximity Supervisors can manage attendance records within a specific boundary assigned
Campaign Supervisor
View registers: Access to view registers to generate bills.
Download reports: Export reports in Excel/PDF formats for stakeholder communication.
Generate bills: Create bills based on three boundary levels: Country, Province, and District.
Campaign Supervisors can generate campaign-wide bills. If the boundary is set to a district, all the registers within that district will be consolidated into a single bill.
Aggregate Counts: Capture beneficiary numbers without linking to households or facilities.
Reduced Field Friction: Simplify tasks for front-line workers operating in mobile or fluid environments.
Support for Large Campaigns: Optimised for high-volume interventions such as polio campaigns and outreach drives.
Coverage Insights: Gather data from otherwise hard-to-track delivery points, improving visibility of outreach efforts.
Distributor
Distributor sets up transit posts in high foot fall areas.
Distributors identify areas to set up transit posts and deliver interventions to eligible beneficiaries.
Distributor
Distributor generates the required beneficiaries IDs for distribution.
While the Distributor registers a household , a unique beneficiary ID is assigned and this ID can be used to search the household at later point of time as well
Distributor
The distributor can add child information associated with a parent, and can capture information using enumeration checklist questions.
Distributors can add the child information associated with the parent. It helps to maintain the parent-child relationship using the enumeration checklist questionnaire.
Filter the campaigns to view data for both past and live campaigns.
National Supervisor
The supervisor can monitor the dashboard
Supervisor can monitor the dashboards for multiple individual campaigns that is running across the country
1. Diourbel
Malaria: SMC
CRS
Nigeria
1. Kano 2. Kebbi 3. Kaduna 4. Bauchi
NTDs: LF, Schisto, AZM Malaria: SMC
MC, CRS, CHAI, AWS
Burundi
National Rollout: 18 Provinces
Malaria: Bednet
UNDP, BlueSquare, AWS
Complaints
Single Round Campaigns
Multi-Round Campaigns
Added microplanning for resource optimisation and admin console to streamline campaign setup
03-09-2024
Configurable Project Dashboard
Search Query Enhancement
Managing a new campaign such as IRS
Support for IRS campaigns: Enhances Health Campaign Management to handle Indoor Residual Spraying (IRS) campaigns
Review the summary and the success screen before proceeding to app configuration.
App Configuration - Manage checklists and other configurations for the HCM mobile app.


Ability to leverage the staff registry and attendance tracking to request and release digital payments to campaign staff


Registrar
Create and view complaints.
Registrars can raise technical complaints on the application
Field Supervisor
Create and view complaints.
Assist the frontline teams and raise the issues communicated by them on the application
Supervisor
a. Create and view complaints.
b. Resolve complaints, re-assign complaints back to the helpdesk, and reject complaints.
Monitor the overall campaign and provide assistance for the issues raised by the field teams
Helpdesk user
a. Create and view complaints.
b. Resolve complaints, assign complaints, and reject complaints.
Helpdesk users are the support team established to provide assistance throughout the campaign.
Click on the File Complaint button.
Select the applicable Complaint Type.
Select the Administrative Area.
Select the option Myself or Another User in case you are registering a complaint on behalf of someone else. Enter the Complainant's Contact Number.
Enter the Supervisor's Name, Contact Number and Complaint Description.
Click on the Submit button to file the complaint.
Enter the Location Details.
The complaint is submitted. Note down the Complaint No. for future reference.
Tools for managers and supervisors to track registration, service delivery, campaign progress, staff, stock, complaints, etc.
A centralised system for national/regional agencies: dashboards, configuration of multiple campaigns, complaint management, integration with other systems (like DHIS2), etc.
Health campaign management faces several challenges, which include the inability to fetch accurate population targets or monitor the campaigns in real-time and tune the campaign to the defined population needs. Lack of timely and actionable data is often the primary cause of operational inefficiency. Additional concerns relate to siloed, redundant datasets, adding to the implementation costs.
There is a need for a campaign management product that offers:
DIGIT HCM goals include:
Increased campaign effectiveness (coverage)
Reduced time to respond to outbreaks
Improved efficiency (lower costs)
Increased transparency and accountability
Set up campaigns in 3 days
Run hundreds of campaigns simultaneously
Record bednet delivery in 1 minute
Real-time campaign data dashboards
Interoperability with any system
Reusable campaign setup
Data privacy is maintained through control over data from day one
Click on the links below to learn more about the different features of the app:
Maximise leverage (Additive blocks - Create new solutions)
With these building blocks, one campaign could easily be pivoted to set up another health campaign. For example, a malaria campaign could be pivoted from a cholera campaign to an NTD campaign with minimal effort and time. Beyond campaigns, the same blocks could create solutions for routine health delivery and other health needs.
Data resides in shared open registries, enabling the reuse of data and establishing a single source of truth. Interoperability is baked into the design of DIGIT HCM, allowing the free flow of data across different systems. DIGIT HCM enables countries to set up their digital public infrastructure for health.
From setting up campaigns quickly to planning, inventory management, registrations, service delivery, and real-time data dashboards, DIGIT HCM covers all elements required to run effective campaigns. The same product can be used for all campaign types across multiple diseases.
The Complaints Inbox lists all complaints with current status and details. Use the filters to fetch relevant complaint details.
A summary screen is displayed when the user clicks on the Open button on the complaints card.
Once the data is found, the data can be downloaded, and the distributor can choose to download data for other boundaries if they plan to use it.
This feature can only be done in areas where a stable internet connection is available.
Distributor and Registrar
Select the assigned boundary till the lowest level
Download the beneficiary data
Repeat the process to download for multiple boundaries
The user downloads the village-level data from the server which can be used for both registration and drug delivery.
Steps to download beneficiary data for longitudinal tracking.
Navigate to the Boundary Selection screen once the micro-planning data is synced. Select all hierarchies of boundary and click on the Submit button, and download any data onto your devices.
The app checks with the server if the selected boundary has any new data associated with it which needs to be downloaded onto the device. If new data is found, the following screen is displayed. Click on the Download button, or click on Proceed without downloading the data.
If you click on Download, the download starts.
Once the download is completed, a success screen with two buttons will be shown. Click on the Go To Home Screen button to navigate back to the app home screen.
If you click on the Download More Data button, the app navigates you to the Hierarchy Selection screen.
Allow a distributor to refer a beneficiary to the correct health facility and mark the correct health facility for the referral.
Referrals can be done both before and after drug administration.
Distributor
Refer beneficiaries to the health facilities
The user goes from house-to-house for drug administration and refers beneficiaries, who require treatment, to the health facilities.
On the Household Details screen, you can see the list of beneficiaries who are supposed to receive the drug in that cycle. If the beneficiary is experiencing significant discomfort/sickness, due to which you could not administer the drug.
Click on the Unable To Deliver? button for that specific beneficiary.
Click on Refer Beneficiary.
Input the following details:
Date For Referral: This will be a non-editable field and will capture the date of referral, which is picked directly from the system.
Administrative Unit: This will be a non-editable field and will be captured based on your user login, which will define the "Administrative Unit".
Referred By: This field will contain the unique ID for the distributor who has referred the beneficiary and is an editable field.
Referred To: This field will have a search ability, which can be used by clicking on the search lens icon on the field. The following screen will load, where you can search for the ID of the facility where the beneficiary is being referred to.
Reason for Referral: This is a mandatory field which will have all the reasons for referral based on the configuration set for the specific household.
Referral Comment: This is a non-mandatory field that allows you some custom comments regarding the referral being made for the beneficiary.
After you populate all the required fields, click on the Submit button. The system displays the Data Successfully Recorded screen.
Once the beneficiary is referred successfully, they are marked as Beneficiary Referred in the household details screen.
Click on Add New Checklist to begin creating a checklist.
Select Role and Checklist Type.
Click Create Checklist to proceed. In case of any information gaps, an error message appears.
Add a Checklist Name and then proceed to add questions. Click on Add New Question to start adding questions.
Select the Answer Type choice from the options in the dropdown menu. Click on Add New Option to add more choices. Each option can be edited, and up to 10 options can be added.
Add Comments or Linked Questions. For Multiple Choice and Dropdown types, you can enable the "Add Comment" option, allowing users to provide additional text when selecting certain answers.
Alternatively, you can create linked (nested) questions that will appear based on the user's answer. This can be nested up to 5 levels.
To delete a question or answer, click the delete icon next to it. Be sure to review all entries before proceeding.
Review Questions and Answers. Once all questions and answers are added, review them to ensure accuracy. Click on the Preview button in the top-right corner to see how the checklist will appear in the HCM Mobile App.
If everything is correct, click the Create Checklist button to finalise the checklist.
Save Checklists as Draft. If you navigate away or close the screen without creating the checklist, it will be saved as a draft (assuming a unique name was provided).
Activate or Inactivate Checklists. Use the "Active/Inactive" toggle on the Checklist home screen to control whether a checklist is available to users in the HCM mobile app.
Fill in the details of the house structure and number of rooms.
Enter the required details in the Household Details screen.
On the success acknowledgement screen, click on the View Household Details button to fetch information.
Click on the Add Child button to append child details.
Enter the child details in the Individual Details screen as prompted.
Provide the relevant responses to the questions on the screen related to the child's health.
Click on the Submit button once the child details are entered. You can add multiple child records in the same way.
Supervisors
Fill the checklists
View submitted checklists
Supervisors are responsible to oversee the campaign operations and monitor the activities, and ensure the targets are achieved effectively.
Distributor and Registrar
Search registered households using the proximity feature
The user goes from house-to-house and searches for beneficiaries by using proximity scanning.


The goal of Public Health is to drive public health initiatives through thought leadership, strategic partnerships with a shared narrative, and a DPI-driven technology approach to strengthen preventive, promotive and primary healthcare service delivery.
Health programs across countries often operate in silos, running multiple vertical campaigns such as NTDs, malaria, immunisation, and bed net distribution. These efforts face common challenges:
Fragmented data and a lack of integration
Delayed or incomplete reporting
Stock-outs and poor visibility during campaign rollout
Time-consuming and manual microplanning processes
DIGIT brings a transformative approach to public health by offering an integrated, scalable platform that simplifies campaign design, execution, and monitoring — all in one place.
The current approach has two main focus areas. First, it promotes the quick adoption of a health campaign tool for managing key health initiatives. Second, it takes a broader, citizen-focused path to improve preventive and promotive health services. This includes strengthening local health governance, increasing community health awareness, and enhancing the responsiveness of health systems.
DIGIT-Health is currently supporting public health interventions across several high-priority areas:
Neglected Tropical Diseases (NTDs): Streamlining planning and monitoring for mass drug administration
Malaria Prevention: Supporting Seasonal Malaria Chemoprevention (SMC), Insecticide-Treated Net campaign (ITN), and Indoor Residual Spraying (IRS) - streamlining household-level tracking and delivery workflows
Immunisation Campaigns: Launch of polio, malaria and measles vaccination in Nigeria, ensuring accurate coverage and reducing missed populations through digital microplanning
Nutrition-based Campaigns & Mass Drug Administration: Supporting Vitamin A Supplementation Programs to address nutrition gaps
The DIGIT Health platform offers a comprehensive suite of tools designed to improve efficiency, coordination, and data use:
Health Campaign Management (HCM):
Enables tailored planning at the household level
Ensures equitable coverage, reducing missed populations
Console:
The platform enhances the overall quality of health campaigns by enabling detailed microplanning and incorporating real-time data feedback loops. This allows teams to identify gaps, adjust field operations on the fly, and improve coverage accuracy, ultimately making campaigns more effective and efficient.
Campaigns that once took weeks or months to prepare can now be launched in a matter of days. With ready-to-use digital tools for planning, configuration, and rollout, the platform significantly shortens the time from campaign design to field implementation.
Program managers have access to real-time dashboards and analytics that provide actionable insights. These tools help identify delays, coverage issues, or stock shortages early, enabling timely interventions to avoid campaign failures and maximise impact.
The platform is designed to support multiple types of campaigns, such as immunisation, malaria, and nutrition drives, through modular and configurable components. This flexibility allows it to be adapted for diverse geographies, health needs, and organisational workflows.
By enabling household-level planning and disaggregated data analysis, the platform ensures that campaigns are inclusive and reach marginalised or hard-to-access populations. This focus on equitable delivery helps close gaps in health access and improves community outcomes.
Current and upcoming areas of intervention include -
Malaria - ITN, Seasonal Malaria Chemoprevention (SMC) and Indoor Residual Spraying (IRS);
NTDs - Schistosomiasis, Lymphatic filariasis (LF) and Soil-Transmitted Helminthiases (STH)
Mass Drug Administration (MDA) campaigns- Azithromycin
Nutrition-based campaigns - Vitamin A Supplementation (VAS)
v1.8 - Attendance feature functional and technical release details
QR Code Proof of Work for Attendance
Every employee now gets a unique QR code.
Supervisors use the mobile app to scan the QR code and mark attendance.
This works even without internet; data syncs when a connection is available.
Stops “proxy” (fake) attendance and manual tampering.
Makes attendance more trustworthy and easy to verify.
Keeps things simple for supervisors.
Prepares for future features like location and time stamping.
Tagging Employees for Better Grouping and Search
You can now add a “tag” (like “SHIFT”, “PROJECT”, or “SKILL”) to each attendee.
Tags help you organise and filter attendance records easily.
Bulk Tag Update API
Enable users to access dashboards based on their assigned jurisdiction or project assignment, eliminating the need to maintain multiple dashboard roles.
Upon login, the system should -
Determine the user’s jurisdiction via the project service.
Restrict access to data and dashboard views to that jurisdiction.
Inbox, where users can see live and past campaigns and check their respective dashboards
Jurisdiction and role-based access to dashboards
Eliminates the need to manage multiple roles or dashboards for each hierarchy level or user group.
Users immediately see the information that matters most to them, improving usability and decision-making.
Support dynamic filter rendering on dashboards using a configuration-driven approach. This avoids hardcoded filters and allows dashboard views to be easily adapted across campaigns and Key Performance Indicators (KPIs).
Define and allow rendering of dynamic filters from a centralised JSON configuration file.
Dashboard API response times must remain below 200 milliseconds.
All dashboard aggregation queries to be optimised with:
Pre-aggregated views using Elasticsearch Transforms.
Proper indexing and mapping strategies.
The analytics and dashboard system should handle millions of records across indexes like household-index-v1, household-member-index-v1, project-task-index-v1, etc.
Sensitive personal information (e.g., exact address, phone number, health conditions, or any combination of fields that can uniquely identify an individual) must be excluded during ingestion into analytical indexes.
All API access must be authenticated and transmitted over HTTPS.
The system must be highly available to ensure uninterrupted access to dashboards during campaign operations.
Key practices to meet this requirement include:
Managed ElasticSearch cluster with multi-node configuration and shard replication.
Load-balanced dashboard pods with auto-scaling support and caching.
Standardise KPIs across campaigns for population-based campaigns to bring down the required engineering effort.
Allow dashboard extensibility for campaign-specific customisations.
Unify the approach for setting up boundary hierarchies and associated map layers (GeoJSON) within Kibana, ensuring consistency and reusability across implementations.
Maintain a centralised KPI catalogue organised by campaign type to simplify the selection, setup, and validation of metrics during dashboard rollout.
Steps to track side effects for beneficiaries
A distributor can record the side effects experienced by a beneficiary after consuming the drug. The list of side effects can be configured based on the specific campaign being conducted.
Allows administrators to record side effects for drugs delivered to the beneficiaries after every dose consumed by the beneficiary.
The distributor can record the side-effects for both direct delivery, where all the doses of the drug is administered directly to the beneficiary, as well as for indirect deliver,y where the beneficiary is provided with all the remaining doses by the distributor at the same time and is asked to administer the drug on their own.
If you replied 'No' (Recording side-effects when the distributor does direct delivery for all rounds):
After completing the delivery of the first dose, the list of beneficiaries who are eligible for the next round of drug delivery is displayed. If the beneficiary experienced any side effects, click on the Unable to Deliver? button. This displays 3 options. Click on Record Side Effects.
Record the side effects experienced by the beneficiary. Once you have selected the relevant side effects, click on Next.
The data is recorded successfully.
If you replied 'Yes' (Recording side-effects when the distributor does indirect delivery for subsequent deliveries):
If you replied Yes, the next time you visit the beneficiary and click on Record Delivery against that beneficiary in the household details page.
Once you submit the answers, you can record the side effects for the beneficiary. If no side effects were reported, select No to move on to the beneficiary details screen, and the delivery status for all cycles reflects as Completed.
If you select Yes, record the side effect. Click on Next.
In case of no observed side effects, the system displays the Data recorded successfully screen.
Date Filters: Each page has filters to view data for a specific date range, today's data, or cumulative data since the campaign's start.
Campaign Progress: A progression line at the top displays the number of days since the campaign began.
Data Completeness: The sync rate chart indicates how many users have synced data so far.
Drill-Down Charts: Double-click on any bar to drill down to sub-boundaries, continuing until the lowest level (e.g., a village). To return to the previous view, click the 'x' button.
Toggle Chart Views: Switch between percentage and absolute values by clicking toggle buttons.
Prediction Line Chart: Estimates how many more days are needed to reach target coverage based on current service delivery rates.
Sortable Tables: Summary tables can be sorted by column in ascending/descending order or alphabetically.
Download Options: Each chart can be downloaded as a PDF or JPG by clicking the kebab button. Charts can also be shared via WhatsApp or email. Tabular charts can be downloaded as Excel files.
Brush Component: Use the brush component below bar charts to expand or contract the view to see all represented boundaries.
Heat Maps: Monitor campaign progression by boundary through interactive, drill-down heat maps.
Geocoordinate maps: To view each household-level service delivery data.
The HCM Console is a new tool within the Health Campaign Management (HCM) ecosystem that enables users to create and manage campaigns with ease. It’s designed for field-level health campaign managers who understand campaign structures but may not have technical expertise. The tool provides core campaign setup capabilities, with future releases planned for advanced customisation and automation.
High developer dependency – Campaign setup in the HCM app currently requires significant technical support.
Complex technical processes – Users often need to understand JSON, APIs, or database schemas to make changes.
Time-consuming setup – Configuring campaigns takes longer than necessary, slowing down implementation.
Limited user autonomy – Field managers can’t easily make changes themselves during campaign planning or execution.
Empower non-technical users – Provide an intuitive, guided interface for campaign setup and management.
Reduce setup time – Allow quick creation of core campaign structures such as timelines, boundaries, targets, facilities, and users.
Enhance flexibility – Enable real-time updates to campaigns during planning and execution.
Support gradual feature expansion – Introduce advanced functions like form customisation and detailed data capture in future versions.
Dual Timeline View – Create and manage campaign timelines
Boundary Data Management – Add or update boundaries
User Management – Add/edit users for ongoing and upcoming campaigns
Target Management – Add/edit targets for ongoing and upcoming campaigns
With these tools, users can set up the core structure of their campaigns.
This enables a user to verify whether the physical count and calculated stock values are the same or not.
Click on the Stock Reconciliation card on the home screen.
Input the Warehouse and select the product from the dropdown. The following details are available:
Date of Reconciliation
Received Stock
Issued Stock
An illustrative guide to using the Multi-Round Campaign feature
Once the distributor is on the household details page, he/she can see which beneficiary is eligible for drug delivery in the current cycle. The Registration & Delivery feature enables distributors to deliver multiple doses for multiple cycles and record the deliveries for the drugs prescribed for that specific cycle.
Allows a distributor to see the eligible household members for the current cycle under the selected household.
This section defines which actions each system role is authorised to perform, ensuring clear, secure, and role-appropriate access within the Console and mobile application. Initial mappings are available for System Administrator, Registrar, and Distributor, with additional roles in progress.
A step-by-step guide to transfer downsyced data offline
google_mlkit_barcode_scanningEnables program managers to create and configure APKs for new campaigns in a single day
Campaigns can be easily customised and replicated, saving time and effort
Supports customisation for campaign type, geography, and workflow
Real-Time Dashboards:
Monitors campaign coverage, field staff performance, and stock availability in real time
Supports data-driven decision-making and rapid corrective action
Integrated Platform for Multiple Campaigns:
Countries can use a single system to run and manage multiple health campaigns together on the same instance/infrastructure
Reduces duplication, increases efficiency, cost savings, and simplifies training and scale-up
Immunisation campaigns - Polio and measles
Monitoring and alerting for failures.
Increase efficiency and scalability – Free up the technical team to focus on optimisation and expansion of the HCM platform.
Facility Management – Add/edit facilities for ongoing and upcoming campaigns
Campaign Enablement – Set up ITN or similar health intervention campaigns directly from the console
Checklist Module – Manage campaign checklists
System Admin
National Level/Provincial Level
The user will have all the data required for setting up a campaign and will be responsible for campaign setup on the DIGIT HCM app using the campaign data.
Features
Specifications
User Manual


The overall attendance process doesn’t change, but now you must scan a QR code for proof.
New API: POST /attendee/v1/_updateTag
Lets you update tags for many attendees at once.
Validates input to make sure tags and attendees are correct.
Tag Search
You can now search for attendees using tags in /attendee/v1/_search.
Supports searching with one or more tags.
Database Updates
A new “tag” column was added to the attendance table for fast searching.
Database and config updated to handle tags in all attendance actions.
Code Improvements
Added error messages for invalid tags and mismatches.
Cleaned up unused code.
Updated version to 1.3.0 to include these features.
Database/Code Clean
Support for tags, better error handling
More reliable and efficient
QR Proof of Work
Scan QR to mark attendance
Stops fake/manual entries
Tagging
Add tags to group/filter attendees
Easier data analysis
Bulk Tag Update
Update tags for many attendees at once
Saves time
Tag-based Search
Search by one or more tags
Find the right records faster
Returned Stock
Damaged Stock
Stock Lost
Stock on Hand- The stock on hand is calculated as incoming stock minus outgoing stock. There is a hint icon for how the stock on hand is calculated. The received and returned stocks will be considered incoming stocks. The issued, damaged, and lost stocks will be considered outgoing stocks.
The DIGIT HCM Dashboard uses the same core services as the DIGIT HCM Platform.
Refer to this document for the list of core services. Make sure they’re deployed.
The following image of the Dashboard analytics service is required for the DIGIT HCM dashboard:
Dashboard analytics service
dashboard-analytics:dashboard-v1.1.0-2ad7482dbd-32
The core dashboard analytics service with specific enhancements has been added for the DIGIT HCM Dashboard.
Deploy the following artefacts in your target environment:
Dashboard chart configurations
Dashboard analytics service
MDMS
DIGIT UI
Refer to this document to promote the backend services and configurations.
DIGIT UI
digit-ui:health_v1.1.0-91a6f61fc1-375
DIGIT micro UI with enhancements specific for the health Dashboard.
The DIGIT HCM Dashboard features UI improvements described earlier. The stylesheet and the global configuration used by the UI are as follows:
Deploying the above image to the target environment will include the DIGIT HCM dashboard for eligible users.
This screen consists of the following types of transactions that take place for the inventory:
Stock receipt
Stock issued
Stock returned
Stock damaged
Stock loss
When a user clicks on record stock receipt, the warehouse details screen will appear.
The latitude/longitude captures the geo-location of the warehouse, which can be fetched with the help of the location icon within the field.
Clicking on the next button will navigate the user to the Received Stock Details screen.
The "Receipt Stock Details" form has some mandatory fields: product, received from the warehouse, and quantity received.
The optional fields include waybill number, quantity indicated on the waybill, transport type, vehicle number, and comments.
Clicking on the submit button will take the user to the success page.
This screen captures the mandatory fields: Product, Issued to warehouse, and the quantity.
The optional fields include waybill number, quantity indicated on waybill, transport type, vehicle number and comments.
Clicking on the submit button will go to the success page.
This screen captures the mandatory fields: Product, returned to warehouse, and quantity returned.
The optional fields are waybill number, quantity indicated on the waybill, transport type, vehicle number, and comments.
Clicking on the submit button will take the user to the success page.
This screen captures the mandatory fields: Product, damaged during, received from, and quantity damaged.
The optional fields include waybill number, quantity indicated on the waybill, transport type, vehicle number, and comments.
Clicking on the submit button will take he user to the success page.
This screen captures the mandatory fields: Product, lost during, received from, and quantity lost.
The optional fields are Waybill Number, quantity indicated on the waybill, transport type, vehicle number, and comments.
Clicking on the submit button will take the user to the success page.
Click here to learn more about stock reconciliation.
For each eligible household member, the distributor has two options: Record Delivery and Unable To Deliver.
A distributor can record the exact quantity delivered for each drug with a delivery comment.
A distributor can also record if the drugs for the next set of doses in the current cycle are already provided to the beneficiary or not. If the doses for the next rounds are already provided, the distributor can mark the next doses as 'Delivered' for the next rounds.
Distributor
Register households
Add members
Deliver intervention
The user goes from house-to-house in the specified boundary and delivers the drug assigned for that round of delivery.
Click on Record Delivery or Unable to Deliver? button
The Record Cycle (X) Dose (Y) screen displays the status of drug delivery for all doses for the current and previous cycles (if available). Click on the Record Cycle (X) Dose (Y) button at the bottom of the screen to record the drug delivery.
On the Record Delivery Details screen, select the Quantity Distributed for each drug to the beneficiary.
Add any new drug if distributed using the + Add Resource button, and mark its quantity similar to the drugs added before.
Add a comment if required, and click on the Submit button.
The Data recorded successfully message appears on the screen.
The subsequent screen asks if the upcoming set of doses was provided to the beneficiary or not. Click on Yes or No to respond.
The screen displays the Data recorded successfully message. Click on the View Household Details button to access the linked household details.
Click on the Back to Search button to search for beneficiaries from other families.
The screens are displayed based on the response provided by you to the question Did you provide Drugs for the next Doses?
If the response is Yes: If you replied 'Yes', the next time you visit the beneficiary and click on Record Delivery against that beneficiary in the household details page, you will see the following screen:
Click Yes or No to record if Dose 2 was administered within 24 hours after Dose 1. Repeat the same for Dose 3.
Click on Yes or No to indicate if any side effects were observed after administering the dose. If no side effects were reported, the user is redirected to the Beneficiary Details screen, and the delivery status for all cycles reflects as Completed.
If you replied No: The user is redirected to the Household Details page. Click on the Record Delivery button and follow the same flow as for the first round of drug delivery.
Log in to the HCM Console.
Navigate to the Boundary Management. Click on the Create New Boundary Data button.
Click on Get Boundary Data from GeoPoDe. The system fetches the available boundary hierarchy and data for your country.
If only partial boundary data is available from GeoPoDe, the missing levels will need to be created manually. Click on the Add Boundary Hierarchy Level button to add the missing boundary hierarchy levels.
For missing boundary levels, you can upload data via ShapeFiles or Excel. Download the Excel template if needed, fill in the missing boundary data, and upload it back into the system.
Preview and confirm the Boundary Data details. Use the filters to view different boundary levels or base maps (e.g., Satellite, Street Map). Click on the Confirm Boundary Data button to finalise the boundary data. A success screen will appear for 5 seconds before redirecting you to the Boundary Management home screen.
If GeoPoDe data is not being used, click on Create My Own Boundary Data.
Add new boundary hierarchy levels using the Add New Boundary Hierarchy button. Name each level, and add up to 10 levels as needed.
Upload boundary data using either ShapeFiles or Excel. If using ShapeFiles for some levels and Excel for others, download the Excel template to ensure consistency. Fill in the boundary data for the levels not covered by ShapeFiles and upload the completed Excel file.
Preview the boundary data on a map or in Excel format. Use the filters to view different boundary levels or base maps. Click on Confirm Boundary Data to finalise the boundary data.
In the Boundary Management home screen, click on View Existing Boundary Data.
A table displays all existing boundaries with details such as Disease Type, Last Campaign Usage, and Creation Date.
To edit boundary data at the lowest level of the hierarchy, download the relevant ShapeFile or Excel.
Modify the data as needed.
Save and upload the modified ShapeFile or Excel back into the system. Preview the updated boundary data and confirm the changes.
Offline Data Sharing: Transfer data between devices without internet using Wi-Fi Direct.
Downsync Sharing: One device downloads data from the server and shares it with other nearby devices.
Multi-device Support: One sender can share data with multiple receivers at once.
Distributor
Distributor shares data from their device to another device
During the second round of the campaign, the user goes on-ground, downsyncs the data, and shares it with nearby users reducing reliance on internet connectivity
After selecting the boundaries app will show an option to download the data.
Data is getting downloaded, do not close or refresh the app while downloading the data.
Data downloaded successfully, a success screen will appear in front of the user. Now the user can go to the home screen to transfer the data.
To share the data between the sender and user, both the sender and receiver need to click on the share data card in the home screen.
Both sender and receiver will see this screen, sender needs to click on the send data card and receiver will click on the receive data card.
Sender
This screen will come before the sender in which app is searching for the nearby receivers device.
List of receivers will come before them and the sender can select the receiver and share the data with them.
A pop-up asking the sender if they want to share the data, the sender can proceed by clicking on the send data button.
Data is shared successfully, the sender will view this screen.
Receiver
The receiver views this screen when they click on receive data. The app searches for the nearby device to receive the data.
A pop-up that has the sender’s info will appear on the screen of the receiver, and the receiver can access the data after clicking on the receive data button.
Data received successfully, the message will appear on the receiver's screen after successful transfer of data.
System administrator
Create, search, update, and deactivate user accounts.
Create, search, update, and deactivate other system administrator accounts.
Create, assign, update, and delete role assignments.
Create, assign, update, and delete campaign assignments.
A system administrator is a super user, who has complete access to all the features that the product includes.
Supervisors
Create, search, update, and deactivate user accounts (except system admin).
Assign/update/delete role assignments.
Assign/update/delete campaign assignments
Supervisors are responsible to monitor and guide the teams during the campaign and ensure that the targets are met effectively.
Helpdesk user
Create, search, update, and deactivate user accounts (except system admin).
Assign/update/delete role assignments.
Assign/update/delete campaign assignments.
Helpdesk users are the support team established to provide assistance throughout the campaign.
Click on the User Management card on the home page to access.
Enter the Employee Name, Mobile Number or Username to search for specific users.
The Search User option allows you to filter the search for users.
By Campaign
By Role
Employment Status - Active or Inactive
Click on the Create Employee option on the search user screen to add a user.
Fill in the employee details in the form. Click on the Submit button to add the employee to the database.
Click on the Proceed For Campaign button to assign a campaign to the employee user.
Select the applicable campaign from the drop-down list and add the dates for assignment.
The view and edit user option enables users to reset the password and edit employee details.
Click on the Edit Employee option to update or change details.
Click on the Deactivate Employee option to remove or disable any employee.
Serial number
The sequence number for the list.
Distributor
Administer drug to the beneficiaries and observe the effect of drug
Record side effects observed due to administration
The user goes from house-to-house for drug administration and records any side-effects observed in the beneficiary for previous doses of drugs for indirect delivery as well as for current dose during direct delivery.


An illustrative guide to using the voucher based registration & distribution feature
With the help of Voucher-Based Registration and Distribution, the registrar can use a QR code-based voucher provided by the program to link beneficiaries to the QR code voucher at the time of registration. This will enable distributors to search for beneficiaries at the time of delivery by scanning the QR code vouchers linked to a specific beneficiary.
Allows a registrar to link a QR code voucher provided by the program to the beneficiary by scanning the QR code at the time of registration.
Allows a distributor to search for a beneficiary in the system by scanning the QR code voucher shown by the beneficiary when the Distributor has to deliver the drug.
Add the mandatory details for an individual on the Individual Details screen
Click on the Link Voucher To Individual button.
The QR code scanner is launched.
Scan the unique QR code linked to the beneficiary. The 1 Resource Scanned message appears below the QR scanning panel.
If the QR code voucher scanning shows an error, click on the Enter Beneficiary Code option to link the voucher manually.
Add the voucher code. Click on the Submit button to link the code successfully to the beneficiary.
The voucher appears on the Individual Details page. Click on the Edit button next to the voucher code. Redo step 2 and link the correct QR code voucher to the beneficiary.
Click on Submit after adding the correct voucher code for the beneficiary to link the Voucher to the Beneficiary in the database.
Distributors at the time of delivering the drug can search for beneficiaries using the QR code voucher associated with that beneficiary.
Click on the Search Individual and the Scan QR Code button.
Use the QR Code scanner to scan the voucher shown by the beneficiary and click on Submit.
If there is a user linked to the voucher scanned by the distributor, the details of the beneficiaries will appear on the Individual Details page. If not, a message will be shown stating Match Not Found.
If the beneficiary is found after scanning, you can open the record of the beneficiary and add the drug administration as per the regular flow.
An illustrative guide to using the Adverse Events feature
While administering the dose to a beneficiary (usually children), there can be instances when the beneficiary shows some symptoms against the dose provided. These adverse events need to be recorded and monitored as they help to take precautionary measures for further doses as well as in future campaigns for that beneficiary. It is helpful for cases when a beneficiary's situation becomes critical and he/she need to be referred to a healthcare facility. This is also crucial for resource tracking because, in certain campaigns, the beneficiary can be re-administered the dose even after they vomit out the medicine.
Recording adverse events.
Enabling actors to record and track the adverse events observed in a beneficiary after administration of the dose.
Monitoring the data to plan and decide on upcoming doses during the campaign.
Navigate to the Deliver Intervention screen. This screen is configured based on the selected campaign type. The system automatically displays the list of resources and their quantities based on the intervention plan. These values are pre-filled in the form.
Update the resource delivery details if required. Click on the Next button to submit the form to save the intervention record for the beneficiary.
Click on the Next button - a pop-up appears with the question: “Did you observe any adverse events?”
If ‘No’ is Selected
The system skips the adverse events screen.
The user is directly navigated to the next screen in the workflow.
The challenge is around the ability of the user to use and understand technology. The user is not tech-savvy and is not expected to know concepts of JSON Files, Schemas, APIs, MDMS, Services, and any other such terms. The user is also not expected to be well-versed in high-fidelity UX/UI and needs every bit of hand-holding possible during the process of creating and running a campaign.
Reduce set-up time for new campaigns.
Reduce dependence on engineering resources for setting up a new campaign.
Provide the power to the end user for customising campaigns.
Boundary data: If the boundary data is updated regularly, then the analytics for the long-term will not have data sanity.
Users might have issues uploading multiple Excel sheets for targets, facility, and user data.
Public health initiatives are intended to address particular health-related concerns within a predetermined timeframe or scope, and in a single round.
This option enables frontline workers to register households and individuals using the HCM application.
Register households
Add/delete members to/from the households
Edit household/individual details
Delete household
Click on the Beneficiaries button on the home screen.
Enter the name of the household head in the search button to find the household details, if registered.
Click on the Register New Household button to register a household.
Enter the Household Location details on the page.
Click on the Next button to proceed to the Household Details screen.
Enter the Number of members living in the household.
Click on the Next button to navigate to the Individual details screen.
Fill in the required details to add the individual to the household.
Select ID Type as Default to mark the individual as the head of the household.
Click on the Submit button. The household is registered, and a confirmation screen is displayed.
Click on the Back to Search button to edit the household or register new household fields.
Click on the Open button adjacent to the household to view the household details.
Click on the Edit Household button to edit household details.
Click on the Add Member option to add new members to the household.
Click on the Deliver Intervention button at the bottom of the screen to update the delivery screen.
Campaign type
Specific campaign run by the system admin.
Mandatory
User
Yes
System admins can manage and update campaign data, such as Targets, Facilities, and Users, during an ongoing or upcoming campaign. This feature reduces the dependency on the Implementation Team and enables quicker adjustments.
Before editing campaign data, ensure that:
You have access to the HCM Console.
The campaign is either ongoing or in an ongoing state.
You have the latest uploaded files for Target, Facility, and User data.
To select new boundaries for any campaign, navigate to the My Campaigns section from the main dashboard. Locate and select the campaign you wish to update. This will take you to the campaign summary screen.
On the My Campaign screen, click the Actions button and then select Edit Campaign Boundary Data from the dropdown. Add existing boundaries from the dropdown.
Upload and update Target, Facility, and User Data details. These updates are mandatory to ensure consistency in campaign data.
To update target data -
On the Update Target Data Screen, click on the Download Existing Data button to download the last successfully uploaded file used for creating the Target Data. Open the downloaded file and review the existing Target data.
On the Target Upload Screen, note that the Download Template button is disabled. Instead, download the last successfully uploaded file that was used to create the Target Data for the campaign. Open the downloaded file and review the existing data.
Once the new boundaries are added, upload the updated data. Ensure that the upload is successful and the changes are reflected in the campaign summary.
To update Facility Data -
Go to My Campaigns in the HCM Console. Under My Campaigns, go to the campaign for which you want to edit Facility Data and under “Actions” click on “Edit Facility Data”.
On the Update Facility Data Screen, click on the "Download Existing Data" button to download the last successfully uploaded file used for creating the Facility Data. Open the downloaded file and review the existing facility data.
If new boundaries are added to the campaign, these will be appended to the “List of Campaign Boundary” sheet. Review and update the facility status, boundary mapping, and create any new facilities as needed.
After making the necessary edits, save the Excel file. Return to the Facility Data Upload Screen and upload the updated Excel file. Ensure that the upload is successful and that the changes are reflected in the campaign summary.
To update app user data -
Navigate to My Campaigns in the HCM Console. Select the Actions button for that specific campaign, and in the dropdown that opens, select Edit App User Data.
On the Update App User Data Screen, click on the Download Existing Data button to download the last successfully uploaded file used for creating the App User Data. Open the downloaded file and review the existing App User data.
If new boundaries are added to the campaign, these will be appended to the List of Campaign Boundary sheet. Review and update user roles, boundary mapping, and create any new users as needed.
After making the necessary edits, save the Excel file. Return to the User Data Upload Screen and upload the updated Excel file. Ensure that the upload is successful and that the changes are reflected in the campaign summary.
Access the data upload templates below:
The DIGIT HCM v1.8 release introduces a Central Instance Deployment Model—running services for multiple countries (Mozambique, Liberia, Nigeria) on a single Kubernetes cluster. Data for each country is securely isolated at both:
Namespace level (Kubernetes separation)
Database schema level (PostgreSQL schemas)
Goals:
Reduce ongoing maintenance
Standardise configurations across countries
Avoid duplication of services
Still allow country-specific customisations where required
What it is: A no-code, configurable console.
Purpose: Allows partners and field teams to independently design, localise, and deploy campaigns without engineering help.
What it is: Pre-generated Beneficiary IDs created on the server.
How it works: Synced to the app during login.
Benefit: Enables registry reuse across campaigns by giving each household/individual a unique ID.
What it is: A Tool for capturing household- and individual-level data.
Features: Supports conditional questions and structured relationships (e.g., parent-child).
Purpose: Flexible community health enumeration in areas without standard formats.
What it is: New "Transit Post" campaign mode.
Use case: For locations where pre-enumeration isn’t possible (e.g., bus stops, parks).
Purpose: Records aggregate counts with location details instead of individual records.
What it is: QR Code Scanning for employee attendance.
Benefit: Improves reliability and accountability in campaign deployments where supervisor-marked attendance lacked verification.
What it is: P2P downsync sharing between devices via Wi-Fi Direct.
Purpose: Enables offline data sharing to keep field work running in low/no-connectivity areas.
Single Kubernetes cluster for Mozambique, Liberia, and Nigeria.
Common namespace: Shared core services (e.g., egov-user, workflow, egov-otp, MDMS V2).
Dedicated tenant namespaces: Country-specific services (e.g., Liberia HRMS, Nigeria HRMS).
Single PostgreSQL instance with separate schemas (public, liberia, nigeria).
Automated Flyway migration using migrate.sh for all schemas.
Schema lists and enablement flags are configurable via Helm & environment YAML.
Separate apps per country (example: Mozambique - mz, Liberia - lb, Nigeria - ng).
Each app connects to tenant-specific URLs for correct routing.
Tenant-prefixed format prevents collisions.
Example: mz-save-household-topic, lb-save-household-topic, ng-save-household-topic.
Common values.yml for baseline DB/service settings.
App-specific values.yml overrides for schema/multi-schema flags.
Backwards-compatible for services without multi-schema needs.
Internal gateway configurations are stored centrally for easier updates.
MDMS v2 configs consolidated per tenant for consistent metadata.
Shared services: Household, Individual, Stock, Facility, Product, Service Request, Egov-HRMS, Project, Referral.
Tenant-specific services: Deployed only where needed (e.g., Liberia HRMS, Nigeria HRMS).
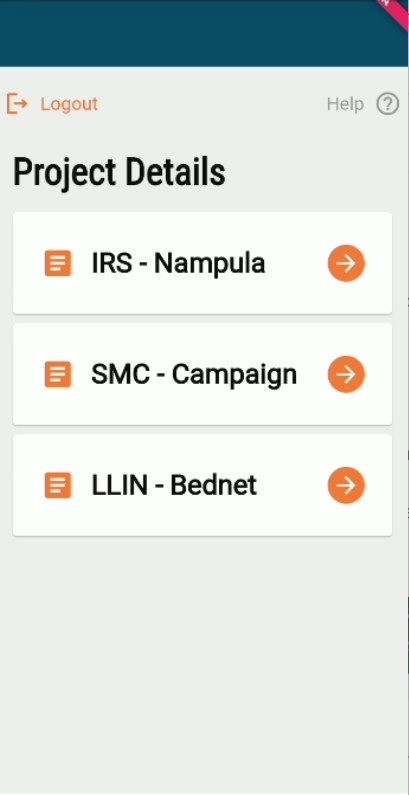
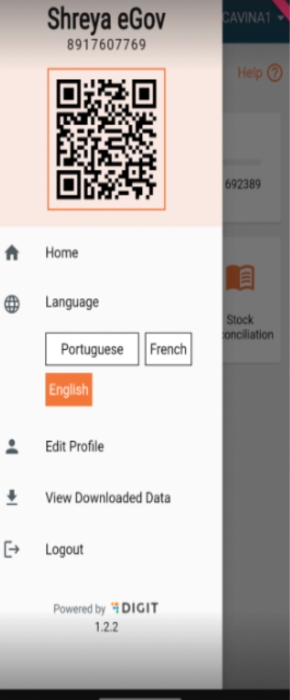
Boundary hierarchy type
The meaningful name to define a group of boundaries defined to perform one function.
Mandatory
MDMS
String
2
256
Yes
Code
A code is used to identify a certain classification of the type of boundary hierarchy.
Mandatory
MDMS
String
2
64
Yes
Description
Mandatory
MDMS
String
2
256
Yes
Campaign name
Name given to the campaign being created.
Mandatory
User
Yes
Beneficiary type
Specify the beneficiaries for the campaign. For example, household, individual, structure.
Mandatory
Auto Selected by the system
No
Start and end dates of the campaign
This will define when the campaign starts and ends.
Mandatory for moving to the next step.
User
Yes
Number of cycles in the campaign
This will set the number of cycles in the campaign.
Mandatory for moving to the next step
User
Yes
Number of deliveries in each cycle in the campaign
This will set the number of deliveries in each cycle of the campaign.
Mandatory for moving to the next step
User
Yes
Dates for each cycle
This will set the dates of cycles in each cycle of the campaign.
Mandatory for campaign creation, non mandatory to move to the next step
User
Yes
Selecting parameters for delivery rules
These are the parameters basis which a user can create the delivery rules.
Mandatory for moving to the next step
User
Yes
Selecting operators for delivery rules
These are the operators basis which a user can create the delivery rules.
Mandatory for moving to the next step
User
Yes
Configuring resources for delivery
These are the products/resources that are going to be delivered to the beneficiary during the campaign.
Mandatory for moving to the next step
User
Yes
Selection of the boundary information
The user will select boundaries where the user wants to select the boundary.
Mandatory for moving to the next step
User
Yes
Setting of targets
The user will enter boundary-wise targets in an Excel template.
Mandatory for campaign creation, non mandatory to move to the next step
User
Yes
Creating facility data
The user will enter the facility data in an Excel template.
Mandatory for campaign creation, non mandatory to move to the next step
User
Yes
Creating user data
The system admin will enter the user data in an Excel template.
Mandatory for campaign creation, non mandatory to move to the next step
User
System administrator
1. Define the campaign type (project type). 2. Create campaign(s) (projects). 3. Create products. 4. Create product variants. 5. Assign product variants as campaign resources. 6. Create, search, update, and deactivate user accounts. 7. CRUD other system administrator accounts. 8. Create, assign, update, and delete role assignments. 9. Create, assign, update, and delete campaign assignments. 10. Define MDMS configurations (including the project type). 11. Create localisation. 12. Create, search, edit, and delete checklists. 13. Assign checklists to projects. 14. Edit/delete filled checklists. 15. Boundary setup.
Registrar
A frontline worker (FLW) who is responsible for registering households. The registrar also shares awareness messages (SBCC).
1. Create a new household. 2. Create a new individual. 3. Map individuals to households. 4. Assign household/individual as the beneficiary of a campaign. 5. Read, update, and delete for all actions mentioned above. 6. View offline reports. 7. Create, and view complaints.
Distributor
Frontline worker (FLW) who is responsible for registering households and updating the service delivery details against the registered households. The registrar also shares awareness messages (SBCC).
1. Create a new household. 2. Create a new individual. 3. Map individuals to households. 4. Assign a household/individual as the beneficiary of a campaign. 5. Update service delivery against the beneficiary (household/ individual). 6. Read, update, and delete for all actions mentioned above. 7. View offline reports. 8. Create, and view complaints.
Field supervisor
Responsible for monitoring the field teams. This user is also responsible for training the FLW teams, monitoring the field team's progress during campaign execution, managing stocks at the community warehouse, and performing random inspections during the campaign execution.
1. View assigned checklists. 2. Fill assigned checklists.
National supervisor
Supervisors are responsible for overseeing the campaign operations, conducting random and scheduled inspections, filling supervision checklists, supporting field supervisors to tackle operational issues under their jurisdictions, and training users on campaign SOP and digital tools.
1. View assigned checklists. 2. Fill out assigned checklists. 3. View completed checklists. 4. Create, search, update and deactivate user accounts (except the system admin). 5. Assign, or update, or delete role assignments. 6. Assign, or update, or delete campaign assignments. 7. View the national-level dashboard page. 8. Select and view the dashboard for each province. 9. View indicators and visualisations district-wise for each province. 10. Drill-down charts to view the metrics upto the lowest boundary level (village). 11. Filter dashboard indicators by the date range. 12. Share dashboard pages/visualisations by email/WhatsApp. 13. Download dashboard pages/visualisations as PDF/JPG. 14. View the offline Excel reports at specified intervals. 15. View the checklists completion rate for the country across all levels of supervisors (national, province, district, and field).
Provincial supervisor
Supervisors are responsible for overseeing the campaign operations, conducting random and scheduled inspections, filling supervision checklists, supporting field supervisors to tackle operational issues under their jurisdictions, and training users on campaign SOP and digital tools.
1. View assigned checklists. 2. Fill out assigned checklists. 3. View completed checklists. 4. Create, search, update, and deactivate user accounts (except for the system admin). 5. Assign, or update, or delete role assignments. 6. Assign, or update, or delete campaign assignments. 7. View the province-level dashboard page. 8. View indicators and visualisations district-wise for the province. 9. Drill-down charts to view the metrics upto the lowest boundary level (village). 10. Filter dashboard indicators by the date range. 11. Share dashboard pages/visualisations by email/WhatsApp. 12. Download dashboard pages/visualisations as PDF/JPG. 13. View the offline excel reports at specified intervals. 14. View the checklists completion rate for the assigned province across all levels of supervisors (national, province, district, and field).
District Supervisor
Supervisors are responsible for overseeing the campaign operations, conducting random and scheduled inspections, filling supervision checklists, supporting field supervisors to tackle operational issues under their jurisdictions, and training users on campaign SOP and digital tools.
1. View assigned checklists. 2. Fill out assigned checklists. 3. View completed checklists. 3. Create, search, update, and deactivate user accounts (except for the system admin). 4. Assign/update/delete role assignments. 5. Assign/update/delete campaign assignments. 6. View the district-level dashboard page. 8. View indicators and visualisations, administrative post-wise, for the district. 9. Drill down charts to view the metrics upto the lowest boundary level (village). 10. Filter dashboard indicators by the date range. 11. Share dashboard pages/visualisations by email/WhatsApp. 12. Download dashboard pages/visualisations as PDF/JPG. 13. View offline excel reports at specified intervals. 14. View the checklists completion rate for the assigned district across all levels of supervisors (national, province, district, and field).
Warehouse manager
1. Record stock transactions: Create receipt, issues, and returns. 2. View stock reconciliation (system calculated). 3. Submit the reconciliation form. 4. View offline reports for inventory reconciliation.
Programme manager
This user consumes the data collected and shared by the FLW and takes decisions based on the data present. This user must have access to all dashboards with the default view of the data belonging to their jurisdiction and a level below. For example, a provincial manager must be able to view the aggregated data from the entire province as well as the data for individual districts after logging into the system.
Help desk user
Supports an executive to resolve, routes complaints raised during the campaign. This user also helps in user management requests.
1. Create, view complaints. 2. Resolve complaints, assign complaints, and reject complaints. 3. Create, search, update, and deactivate user accounts (except for the system admin). 4. Assign/update/delete role assignments. 5. Assign/update/delete campaign assignments.
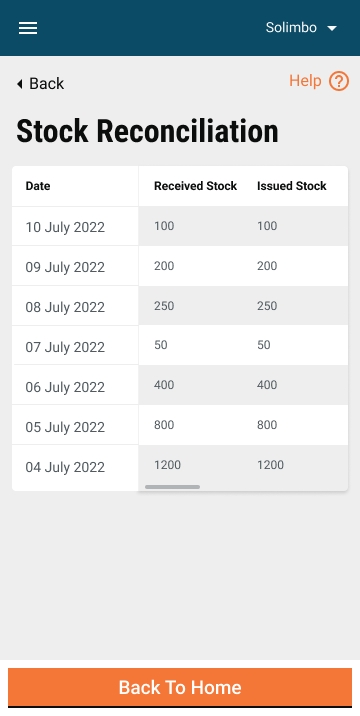
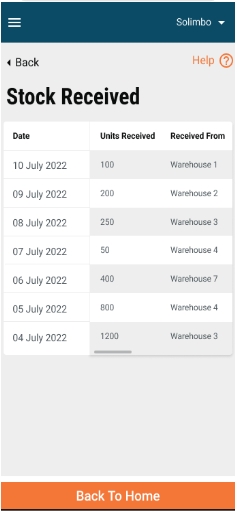
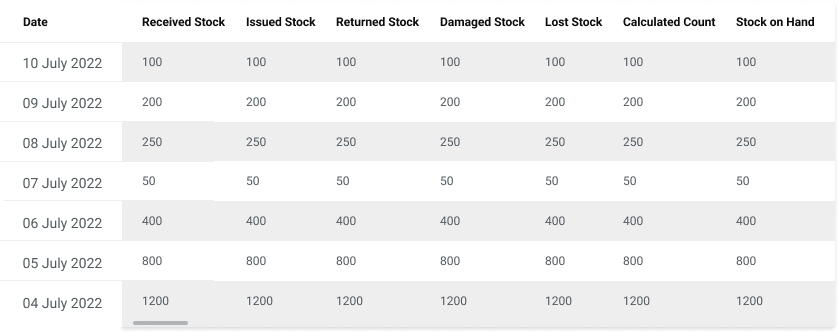
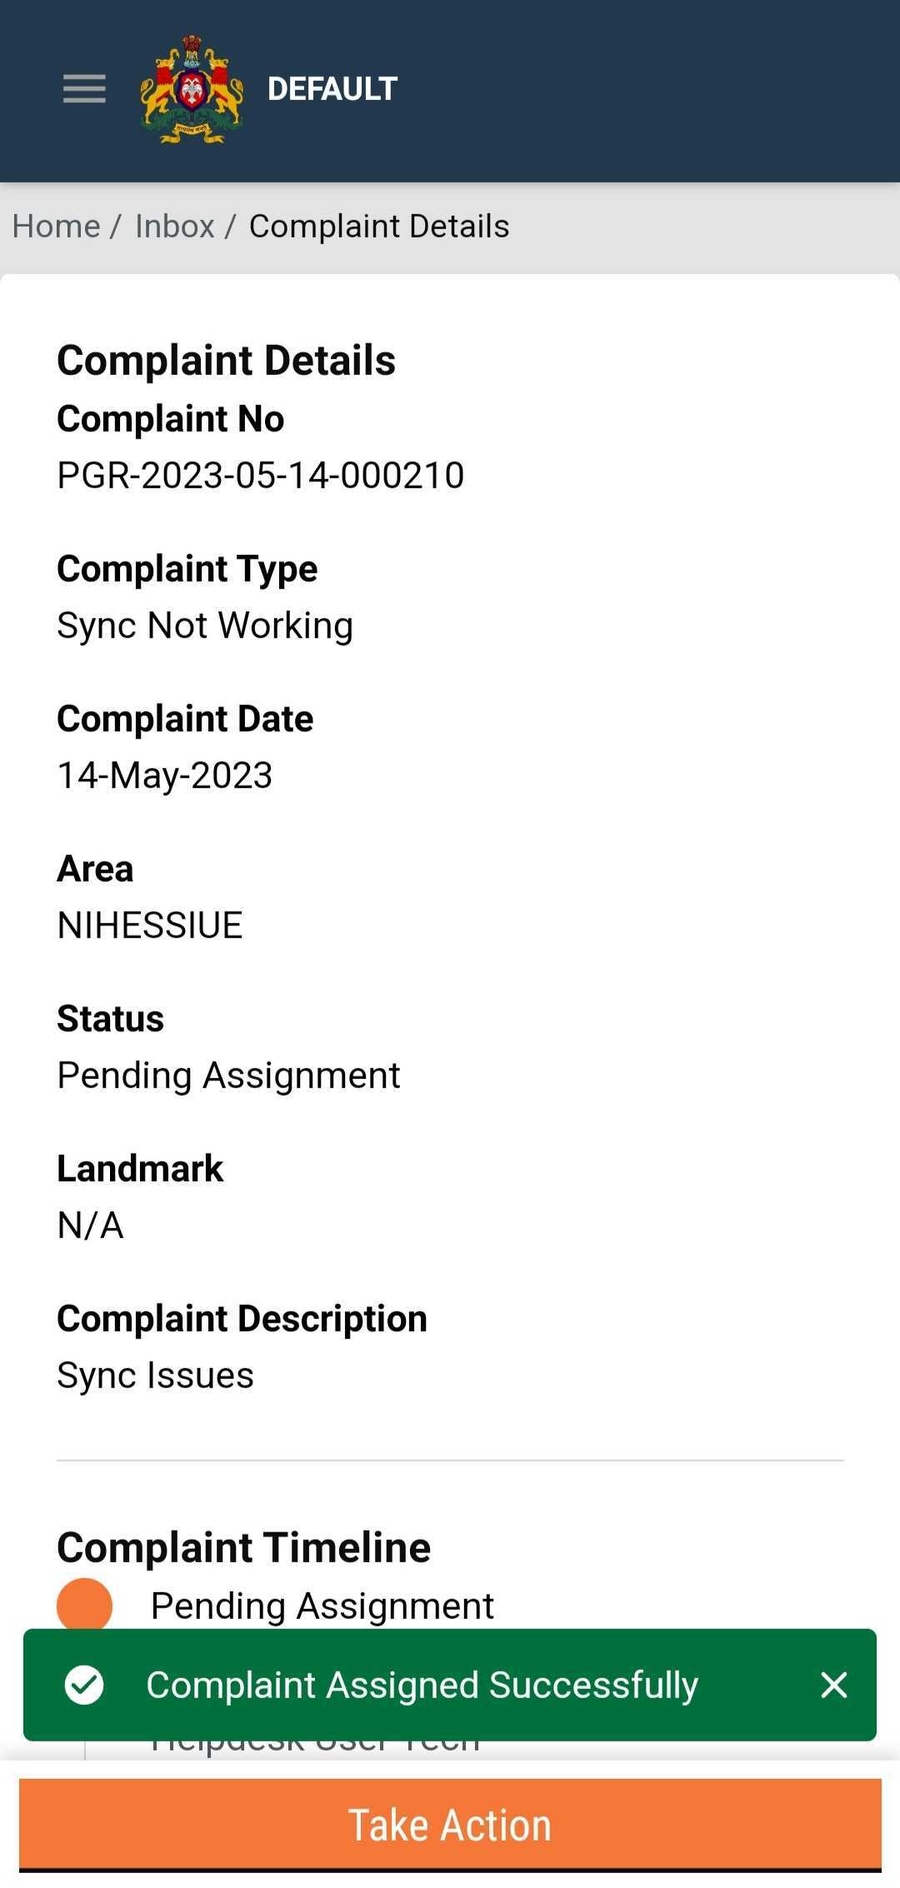
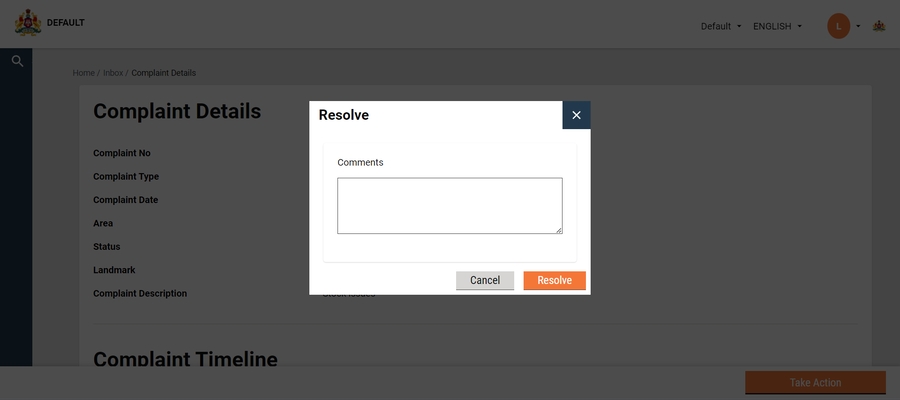
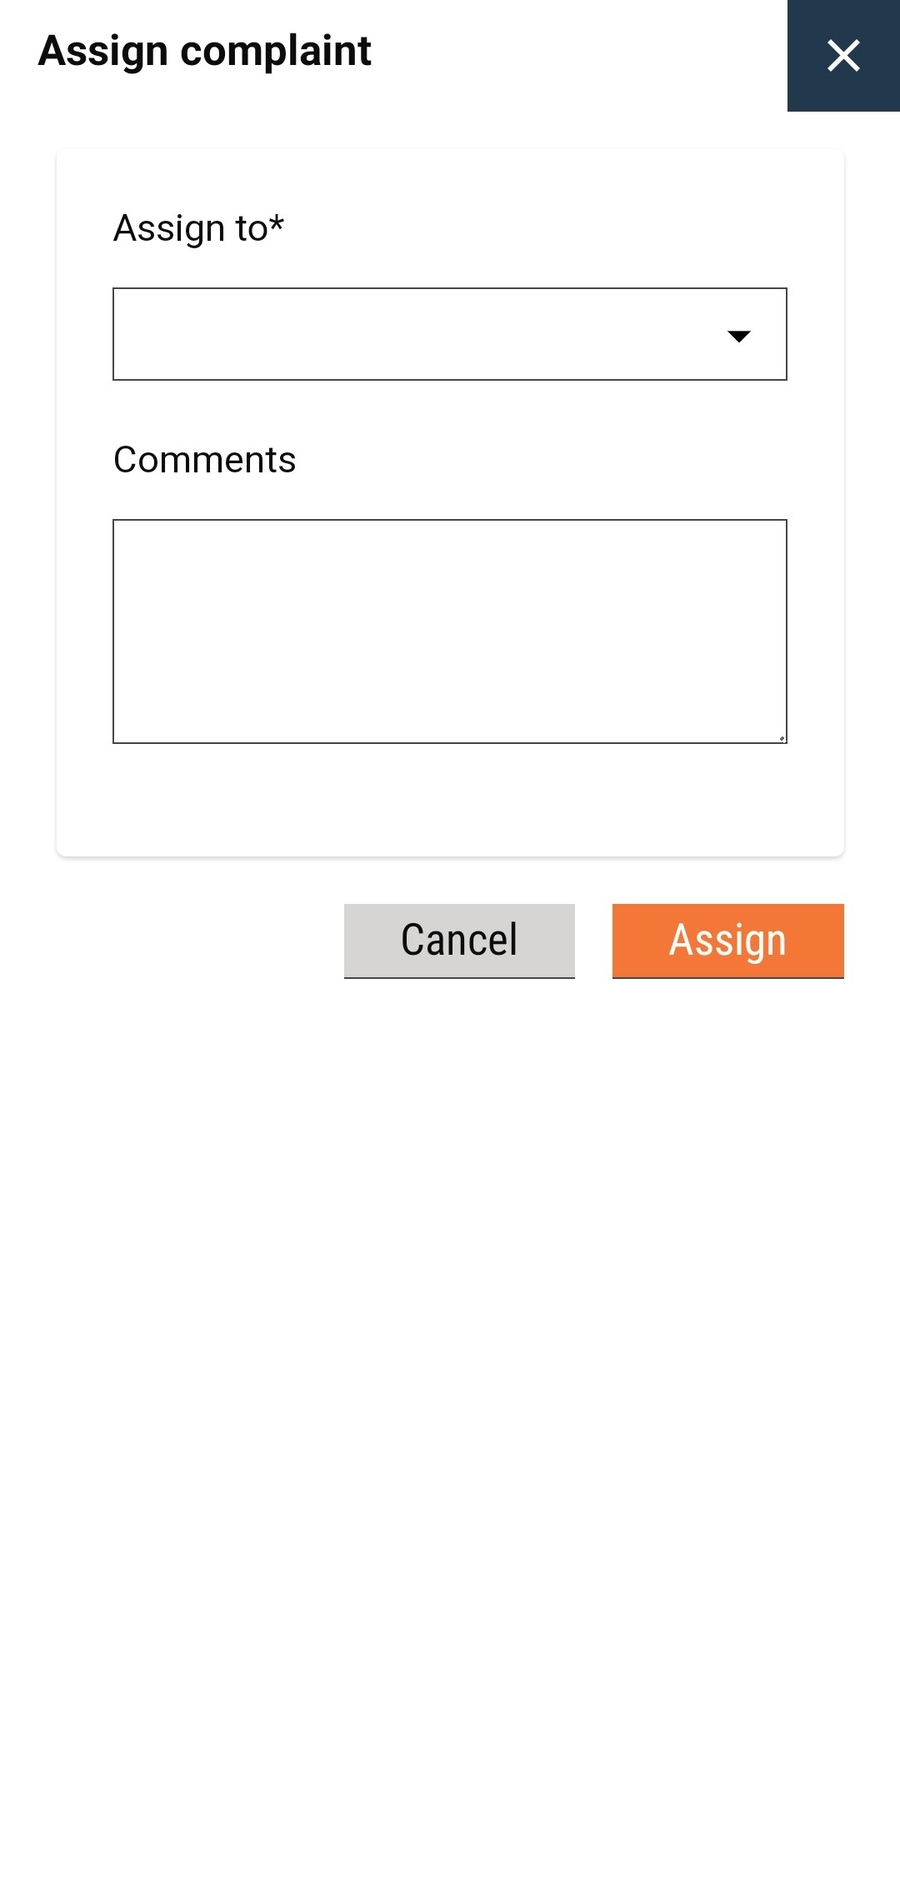
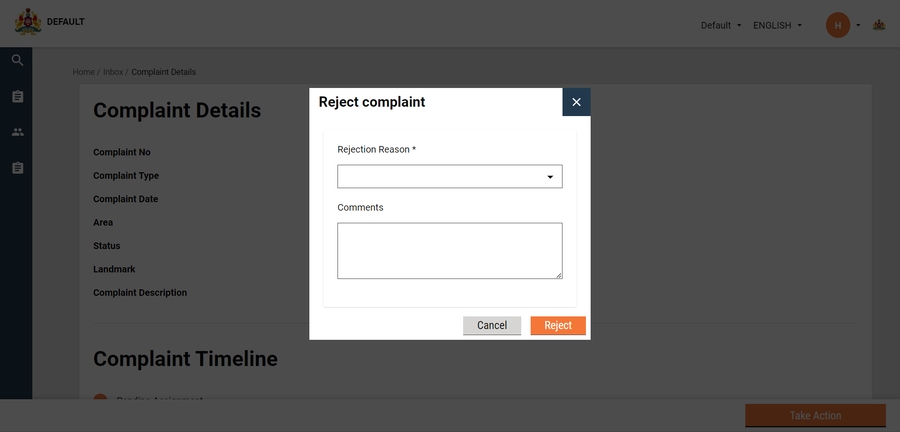
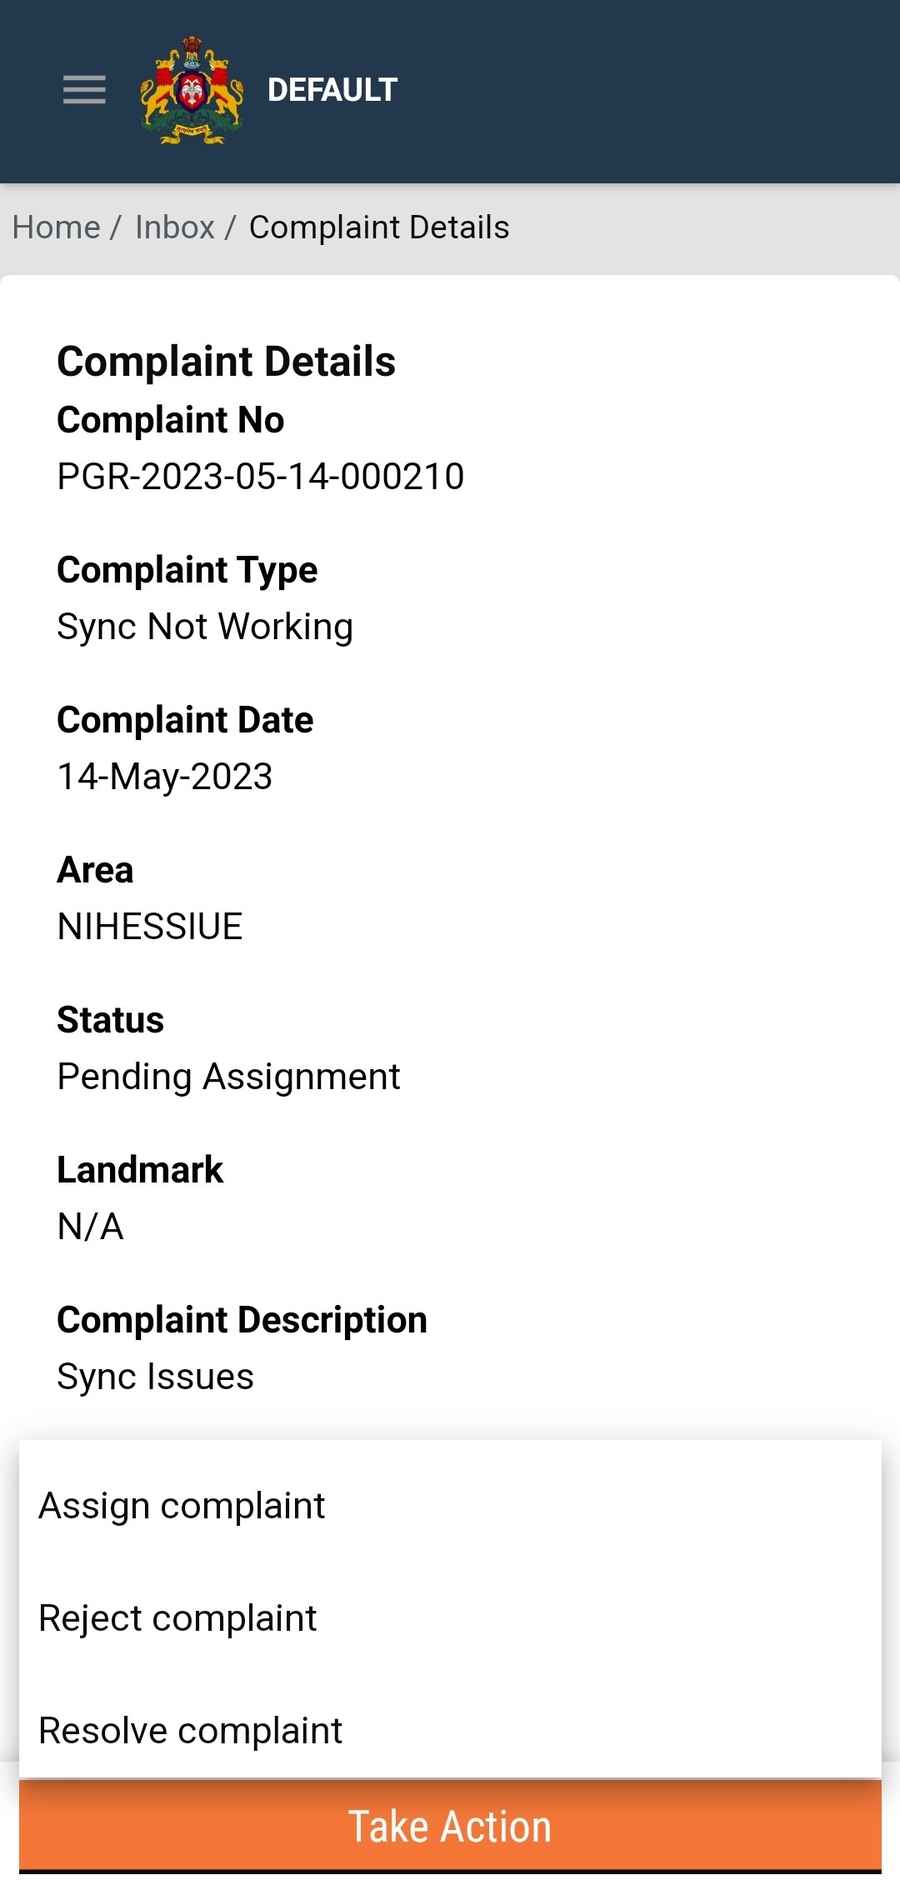


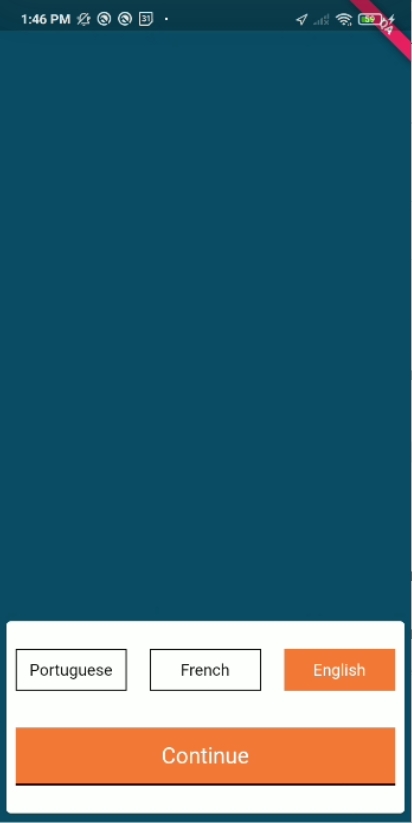
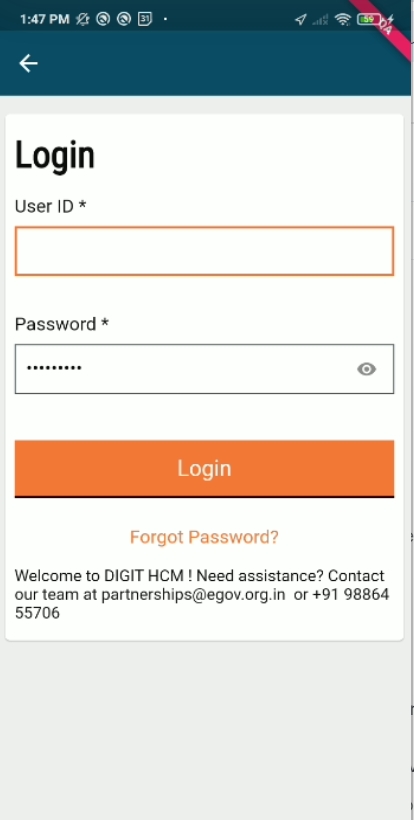
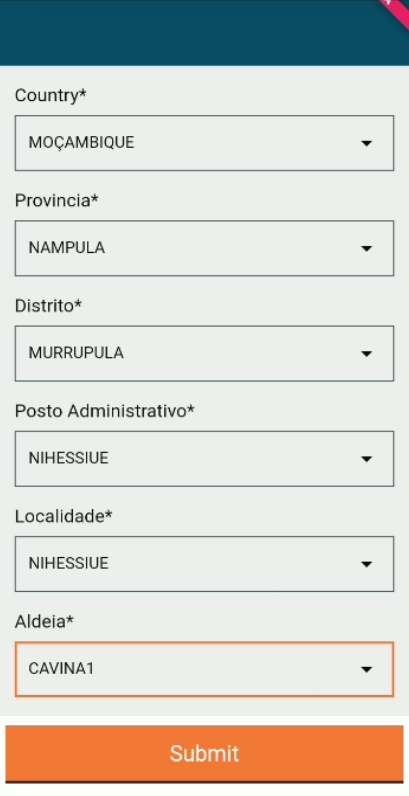
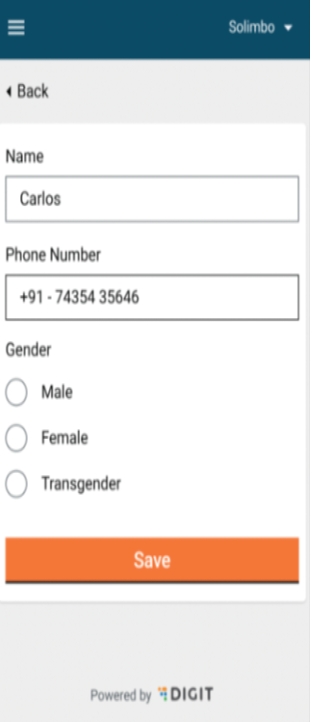
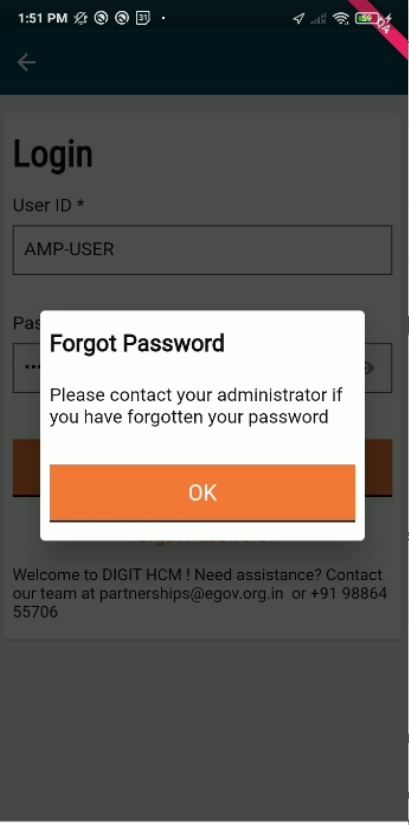
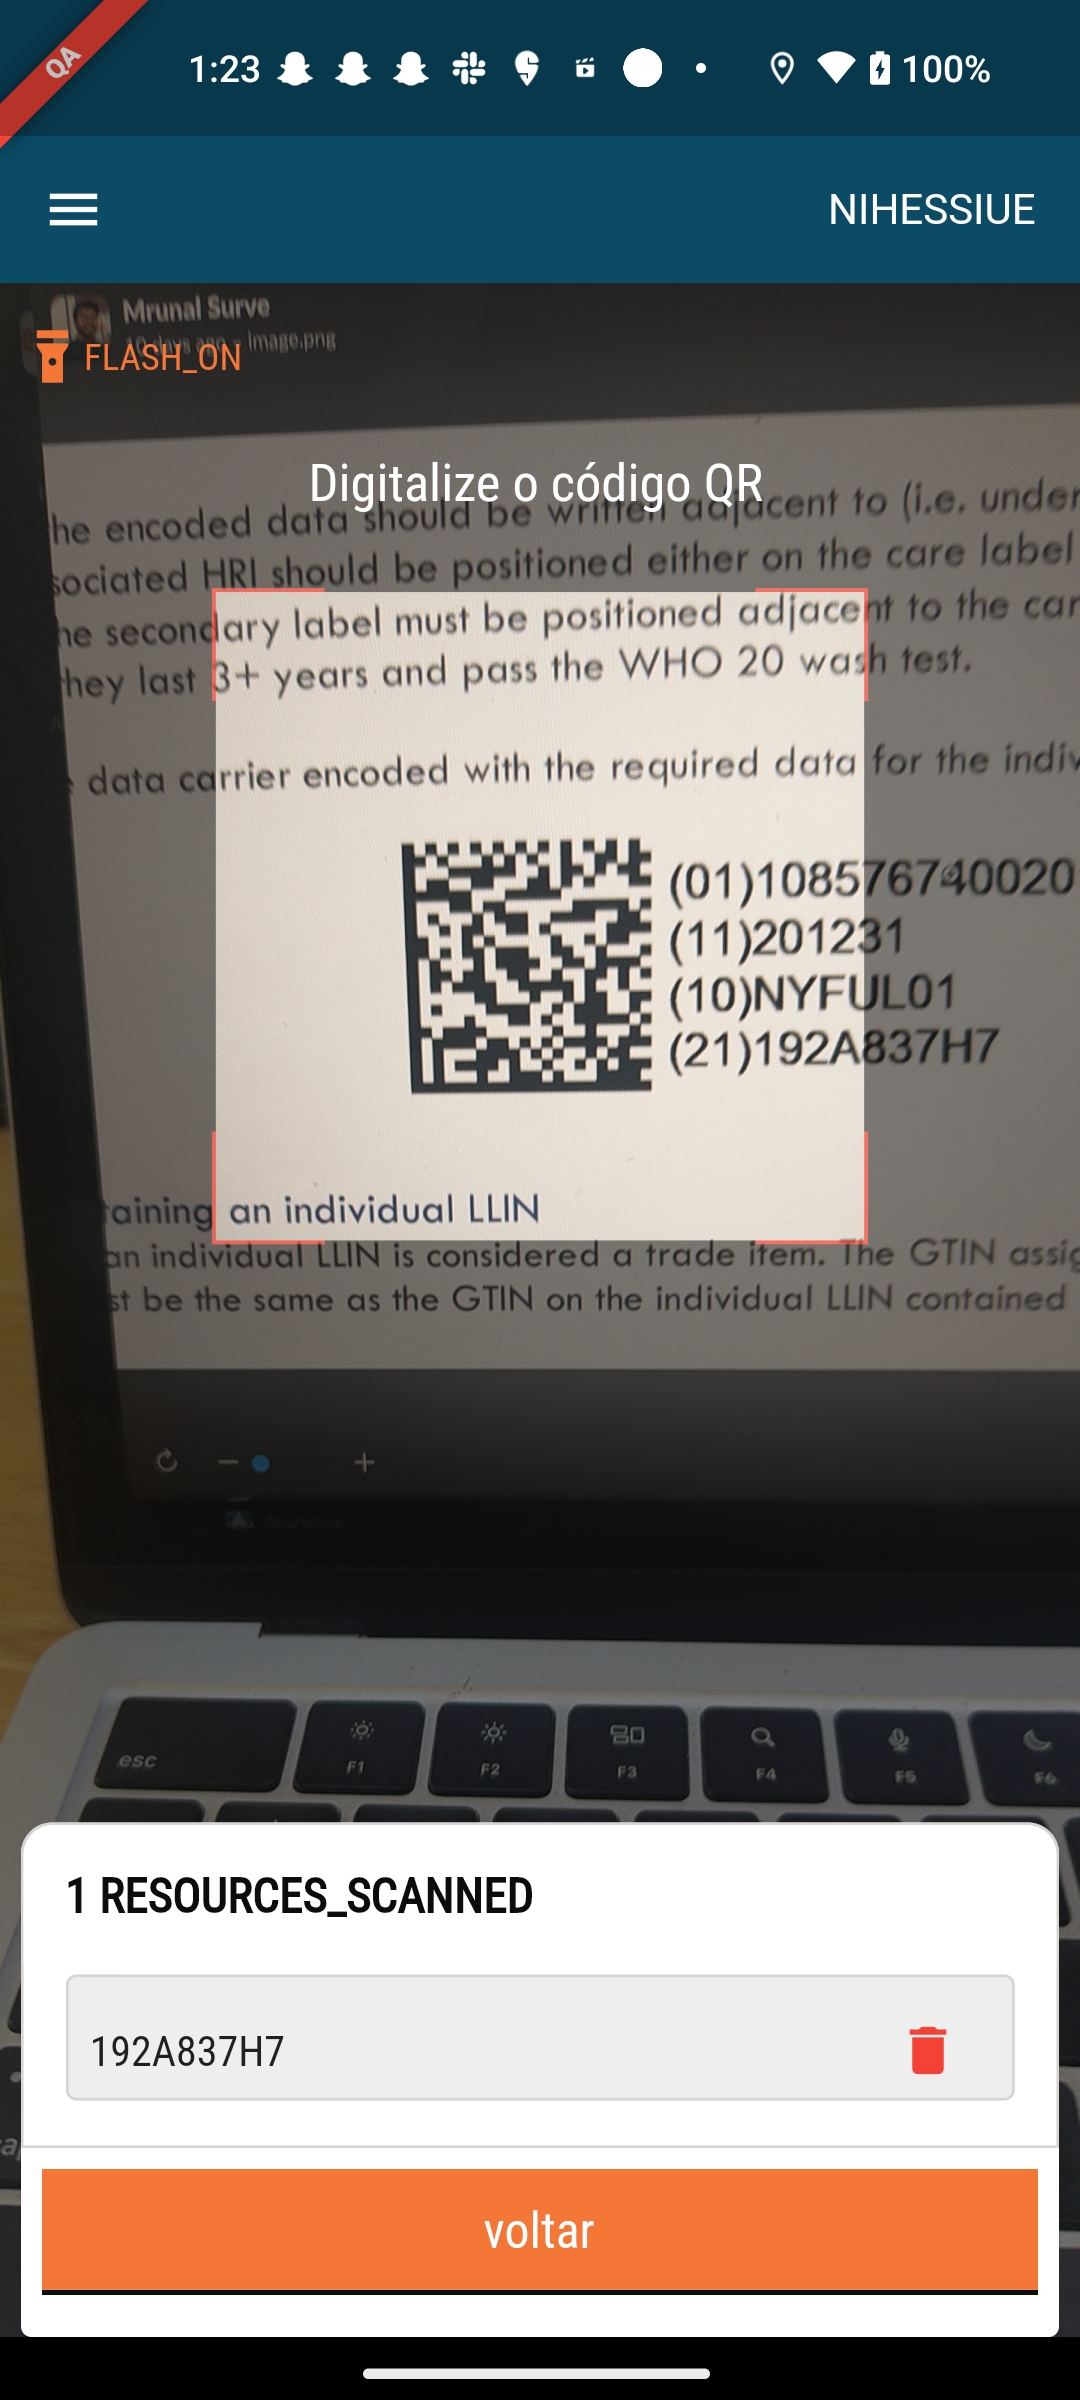
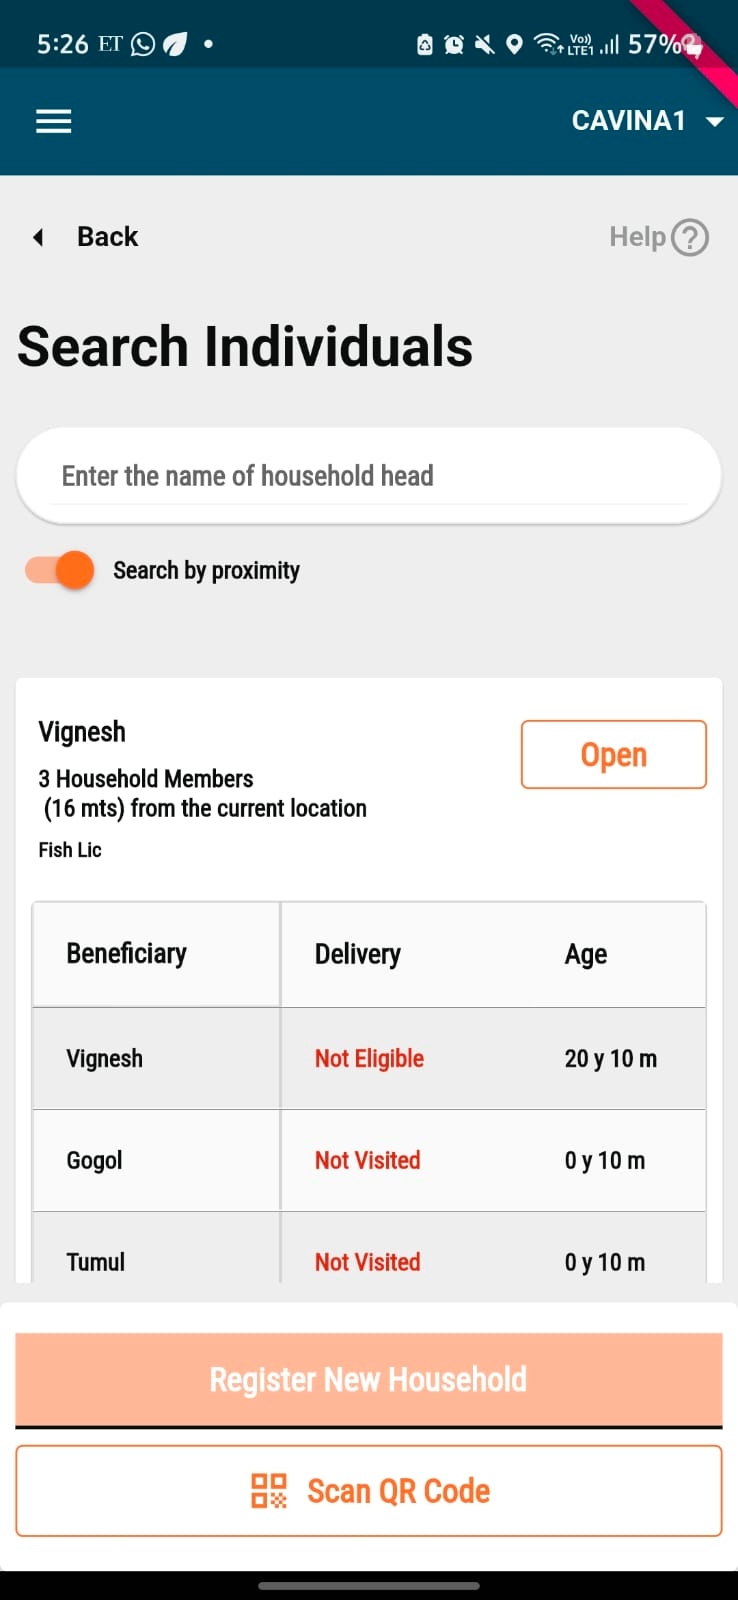
Sr. No.
Theme
Assumption
1
User persona
The user is well-versed with campaign terminologies and has some level of previous campaign management experience.
2
Device type
The product will be used as a web-based application with an internet connection.
1
Campaign Manager
Select Campaign Type
Assign Campaign Name
Set Campaign Dates
Configure Boundary Data
Configure Facilities
Configure Users
Set Rules for Delivery
Which campaign type do you want to run?
Dropdown single selection
Users can select only one campaign at a time. The entries in this drop-down will be pre loaded from the back end. Will provide the functionality of updating the list to the users from UI.
What is the name of your campaign?
Open text field
Limit of 50 characters.
Beneficiary type for the selected campaign is
Non-editable field
The answer to this question can only be household or individual based on the campaign name selected in the previous question.
Select the start and end dates of the campaign for the boundaries selected above. Note: This date range will be applicable to all boundaries selected in the previous question.
Calendar selection Icon with 2 inputs:
Start Date
End Date
The selection will ask for 2 inputs from the user:
Start and end dates. The user cannot select start or end dates from the past. only future date selections should be allowed. By default, when the selection opens, the date should be set to today's date.


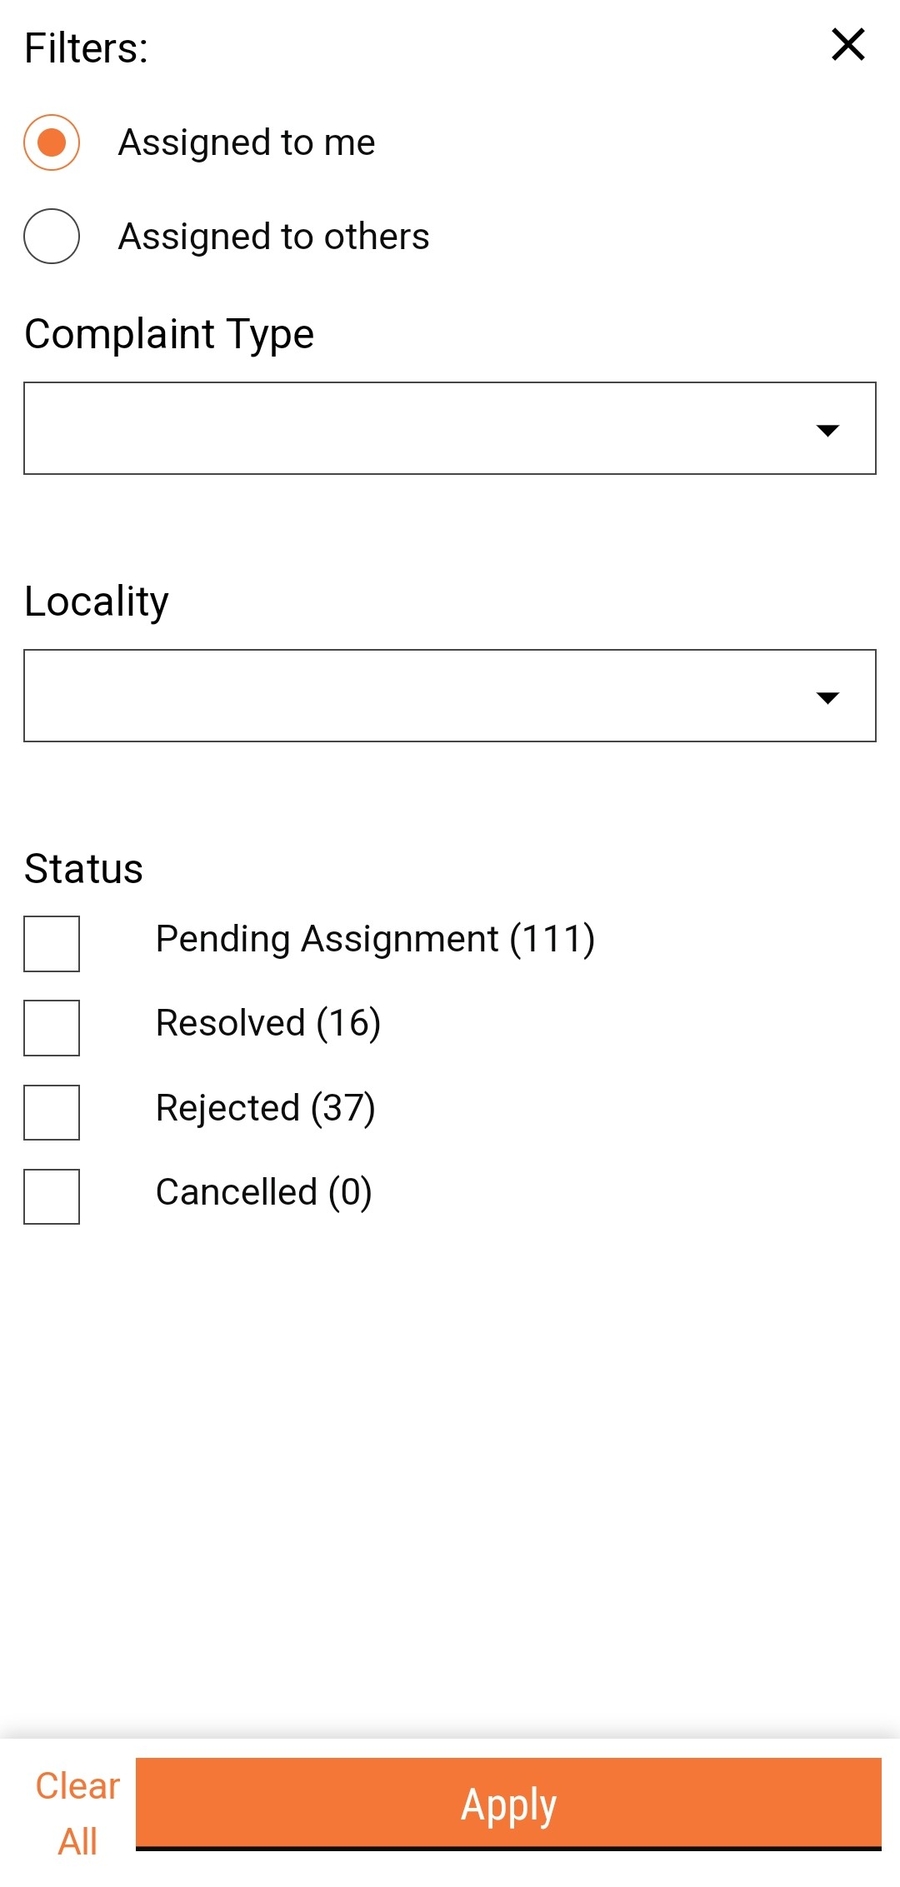


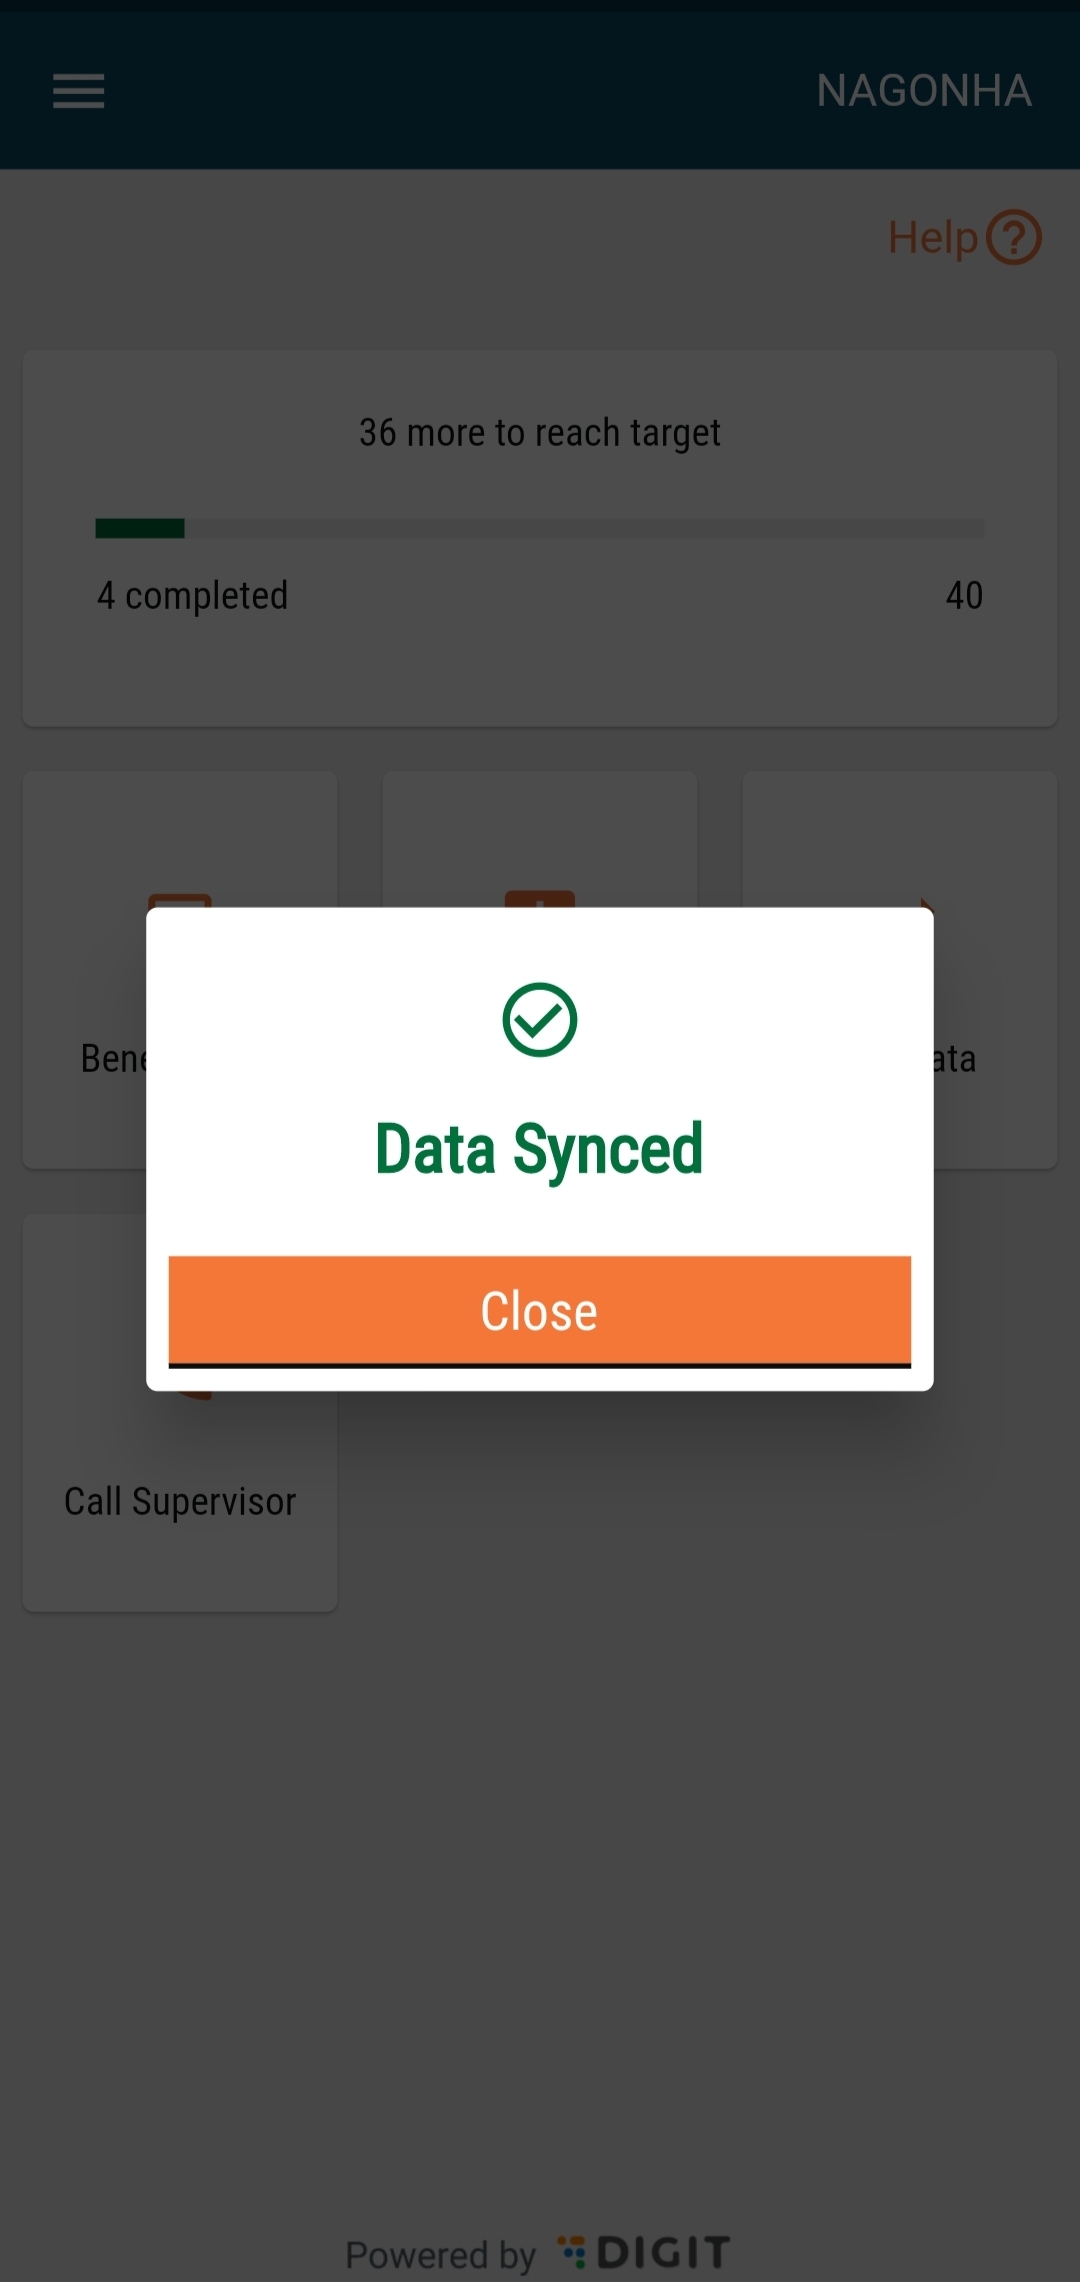
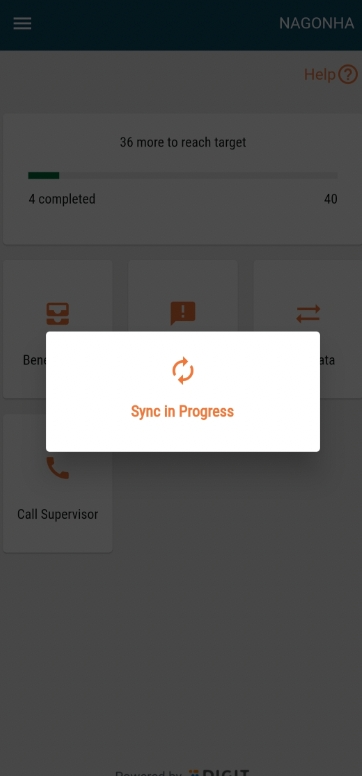
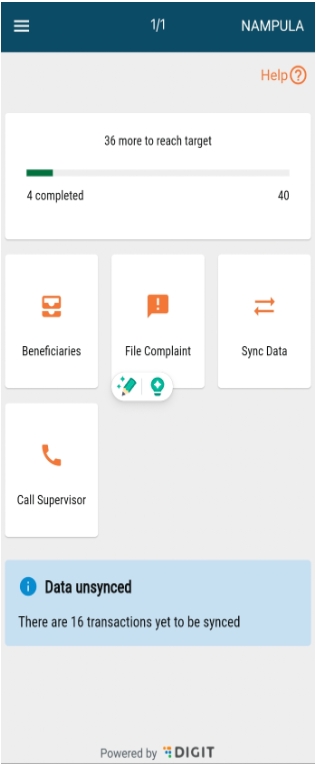
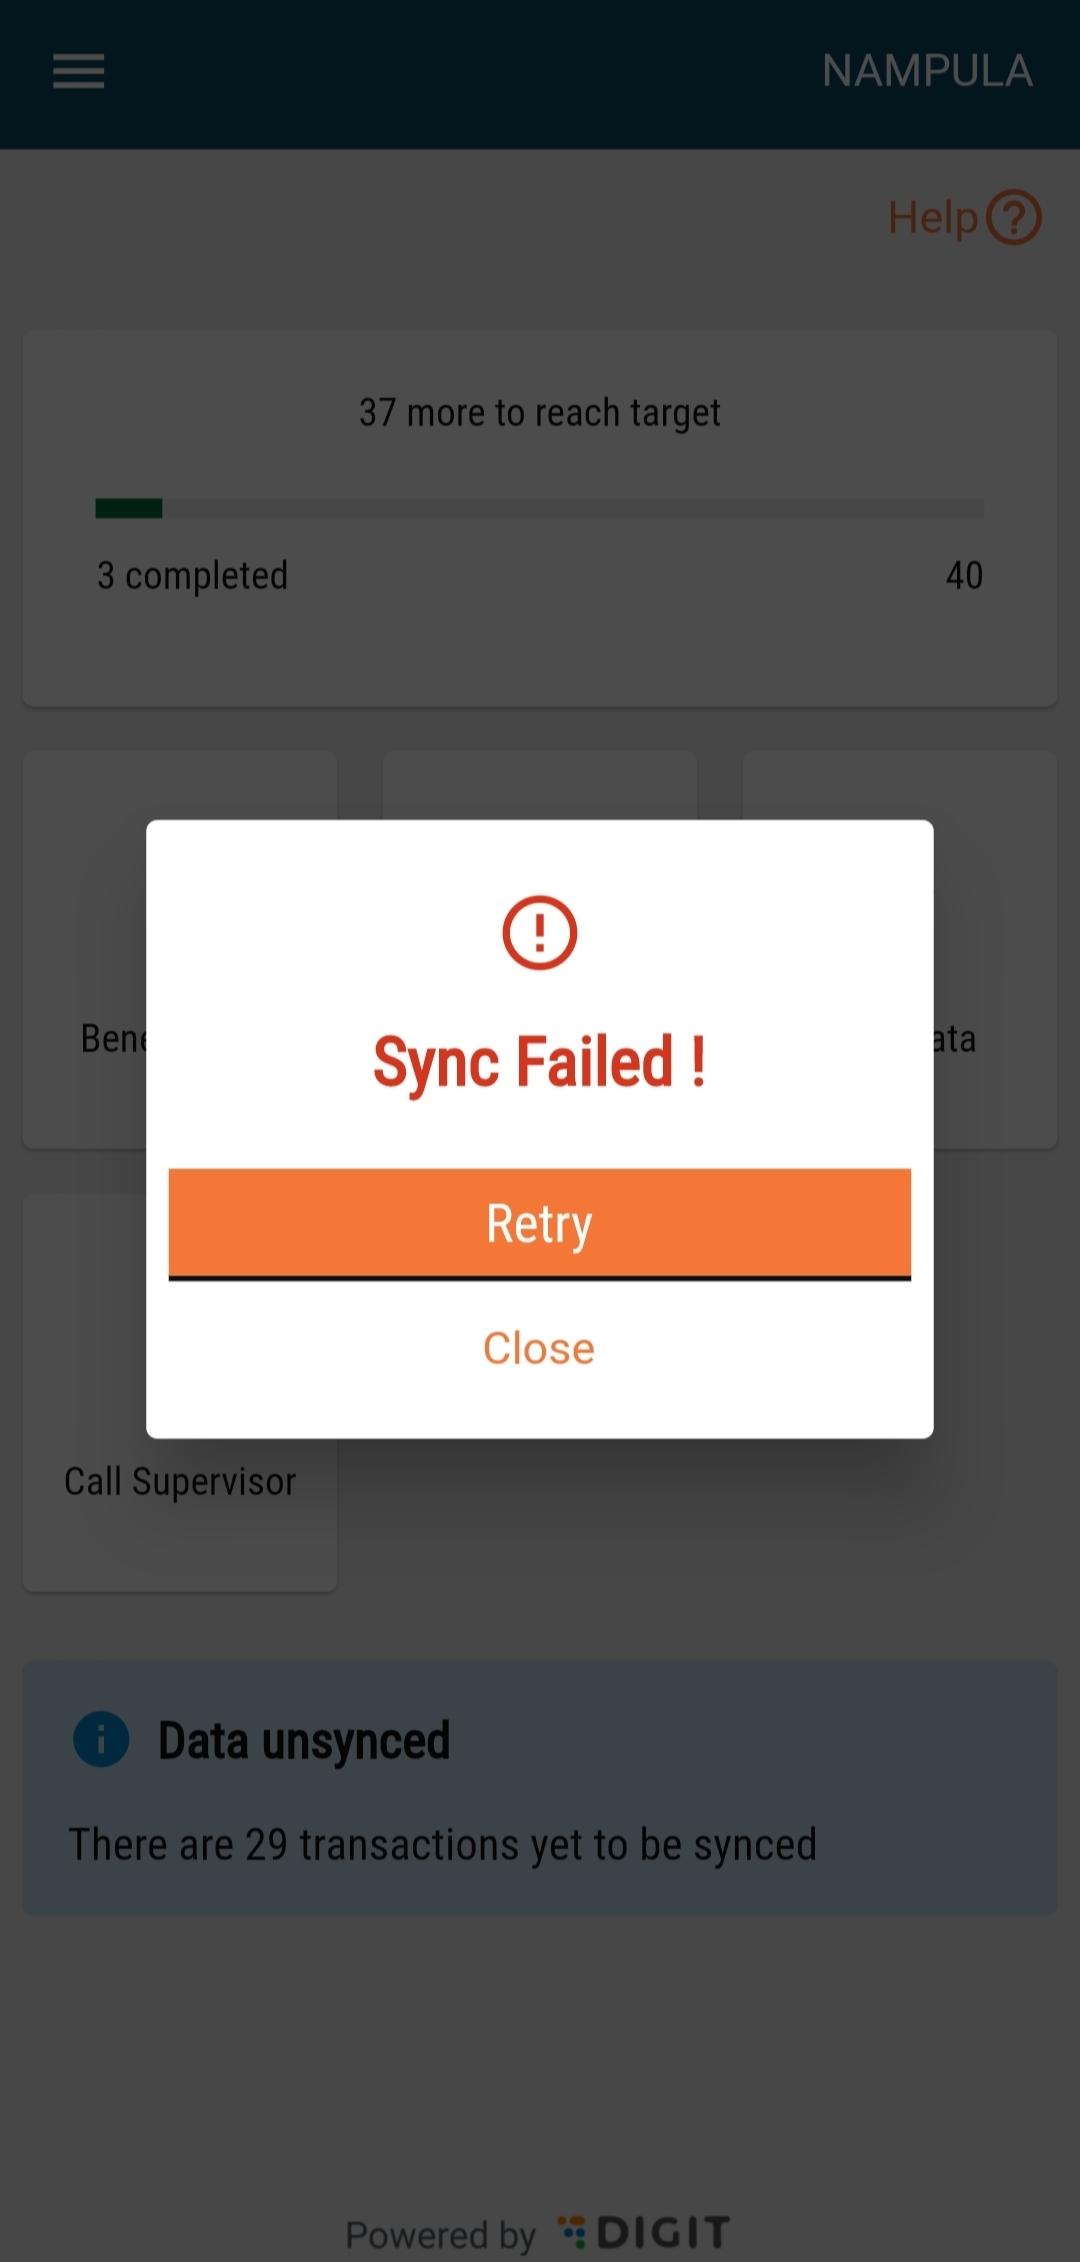

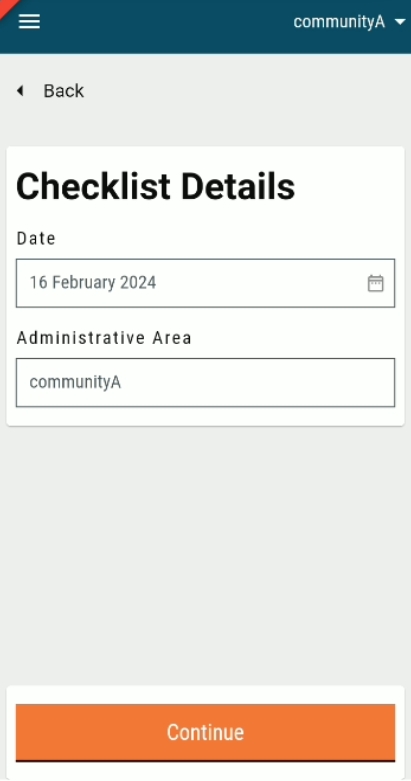
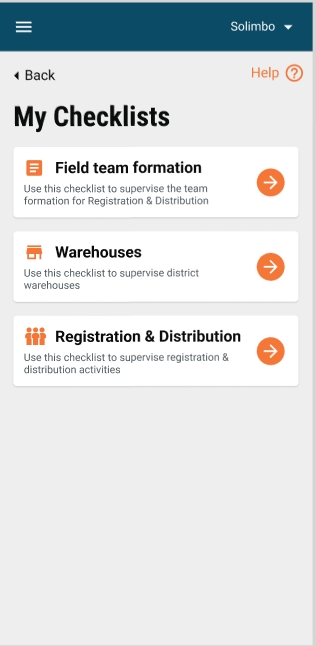
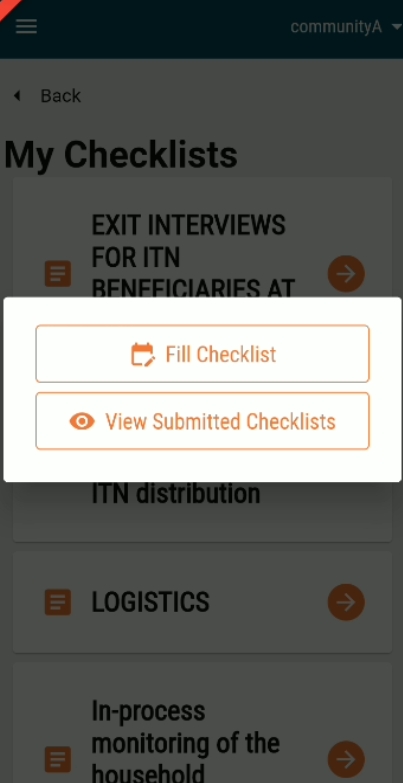
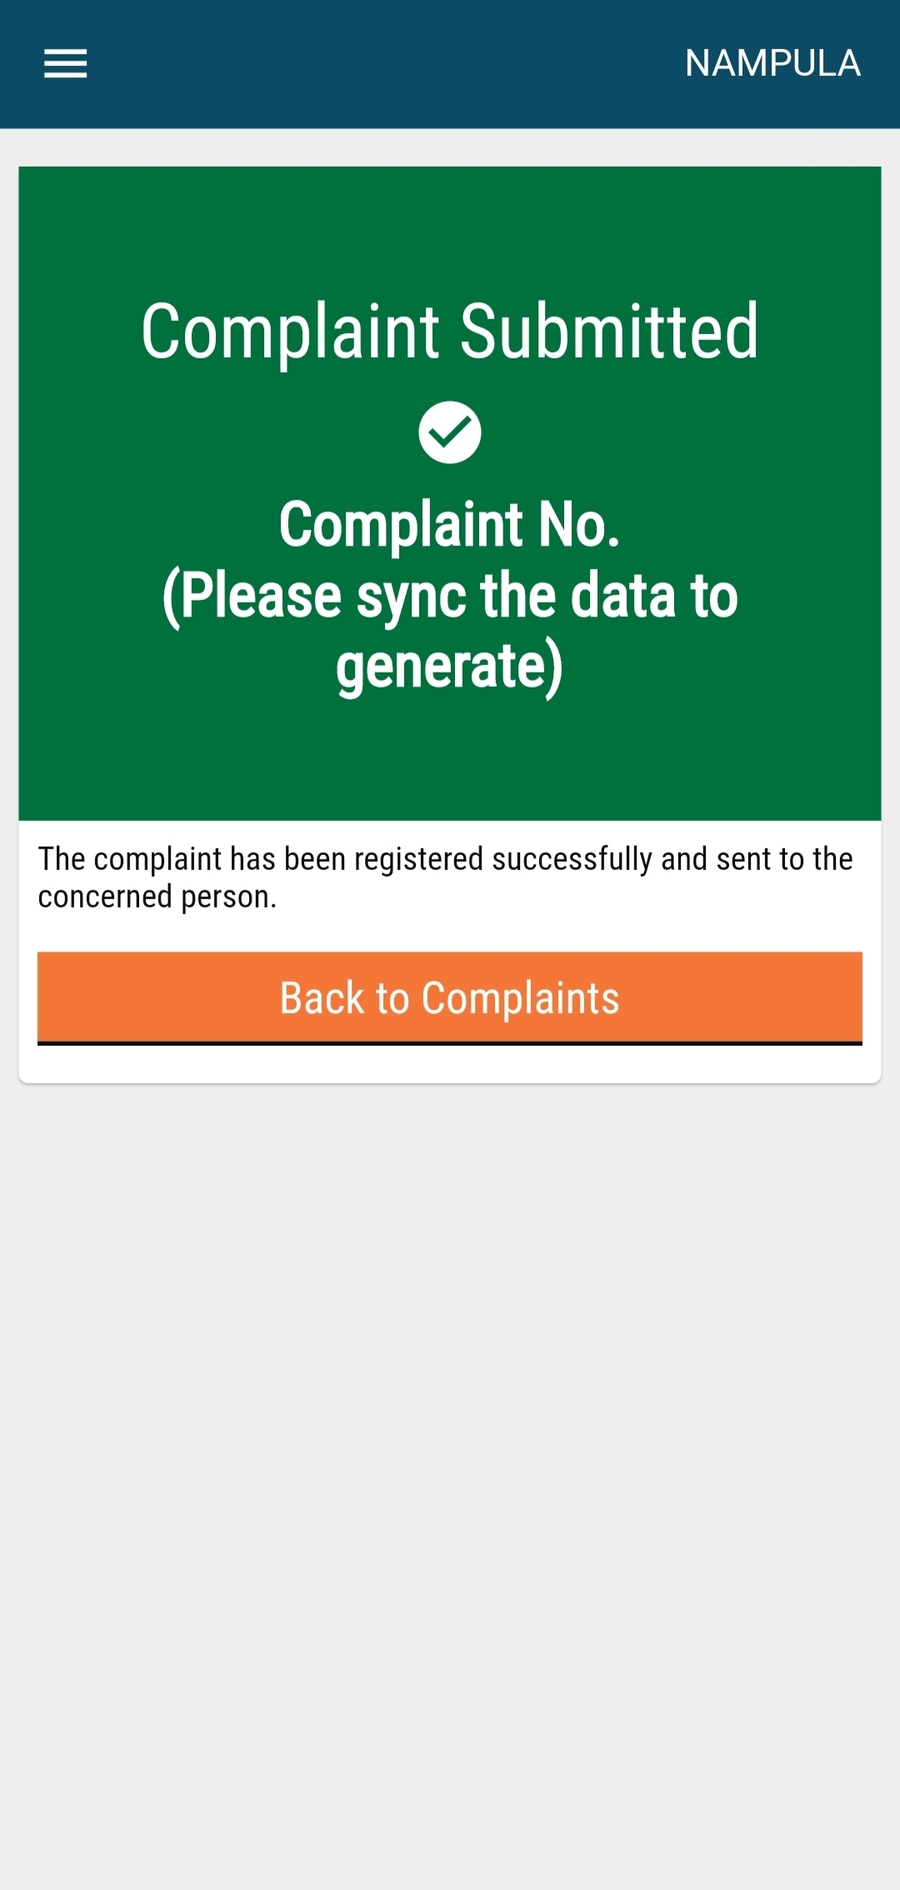
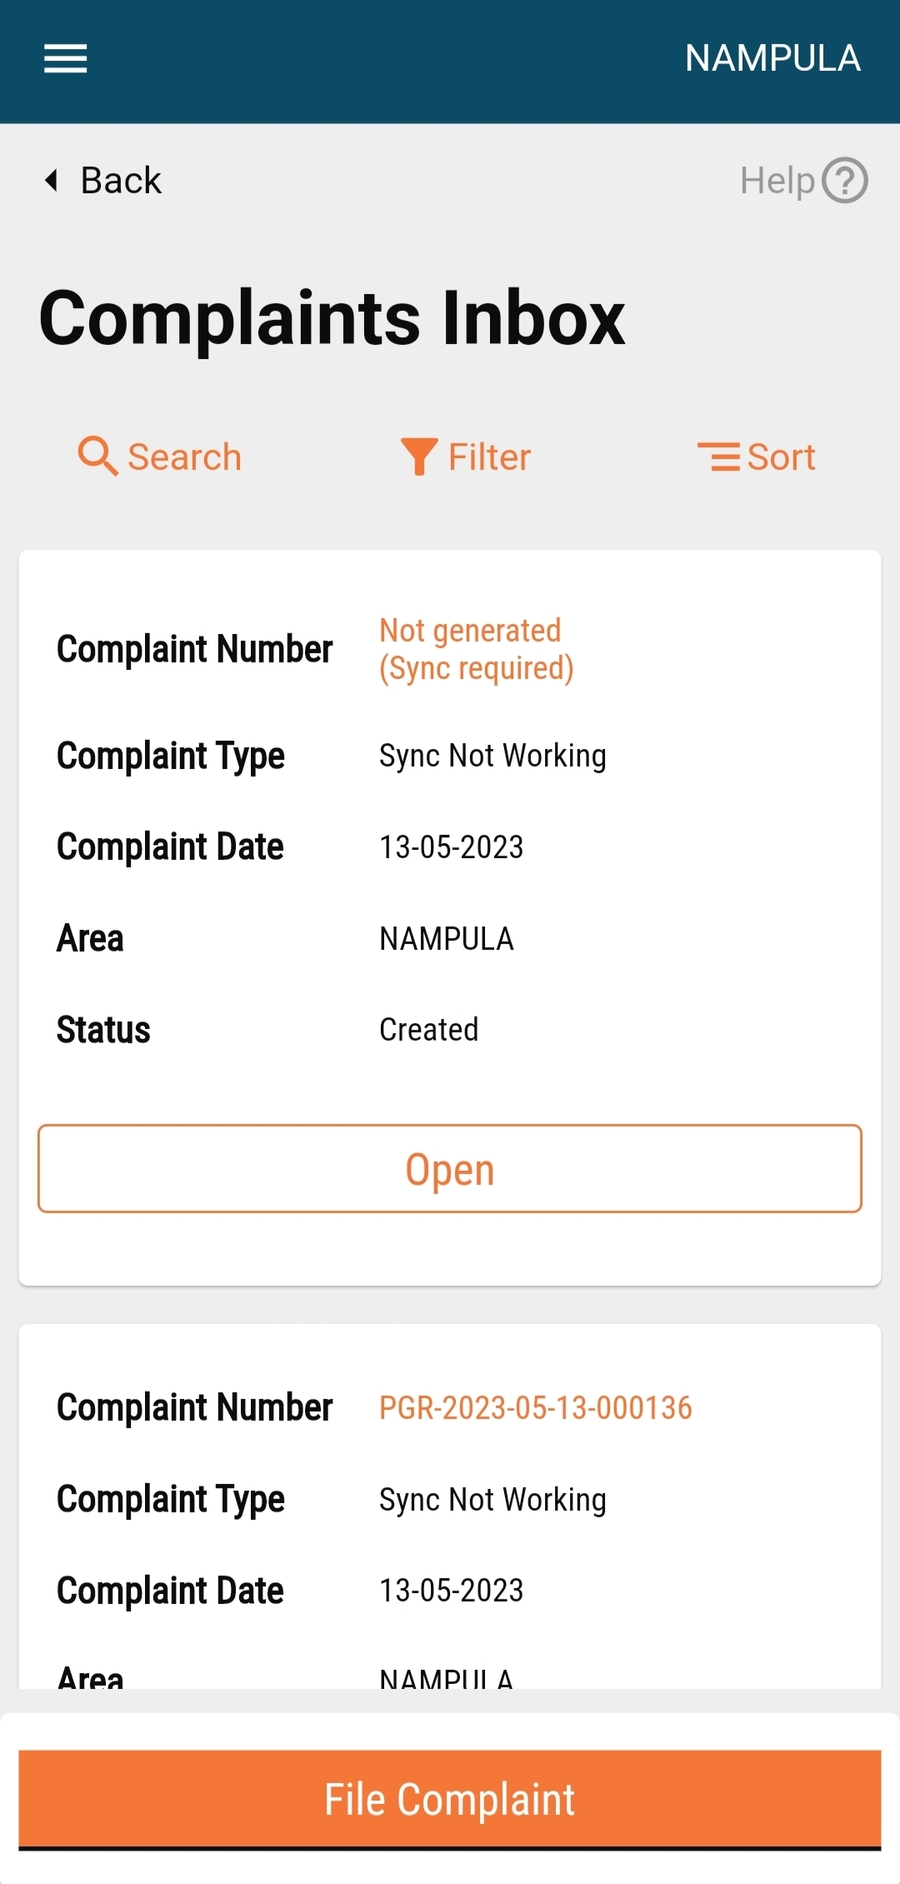

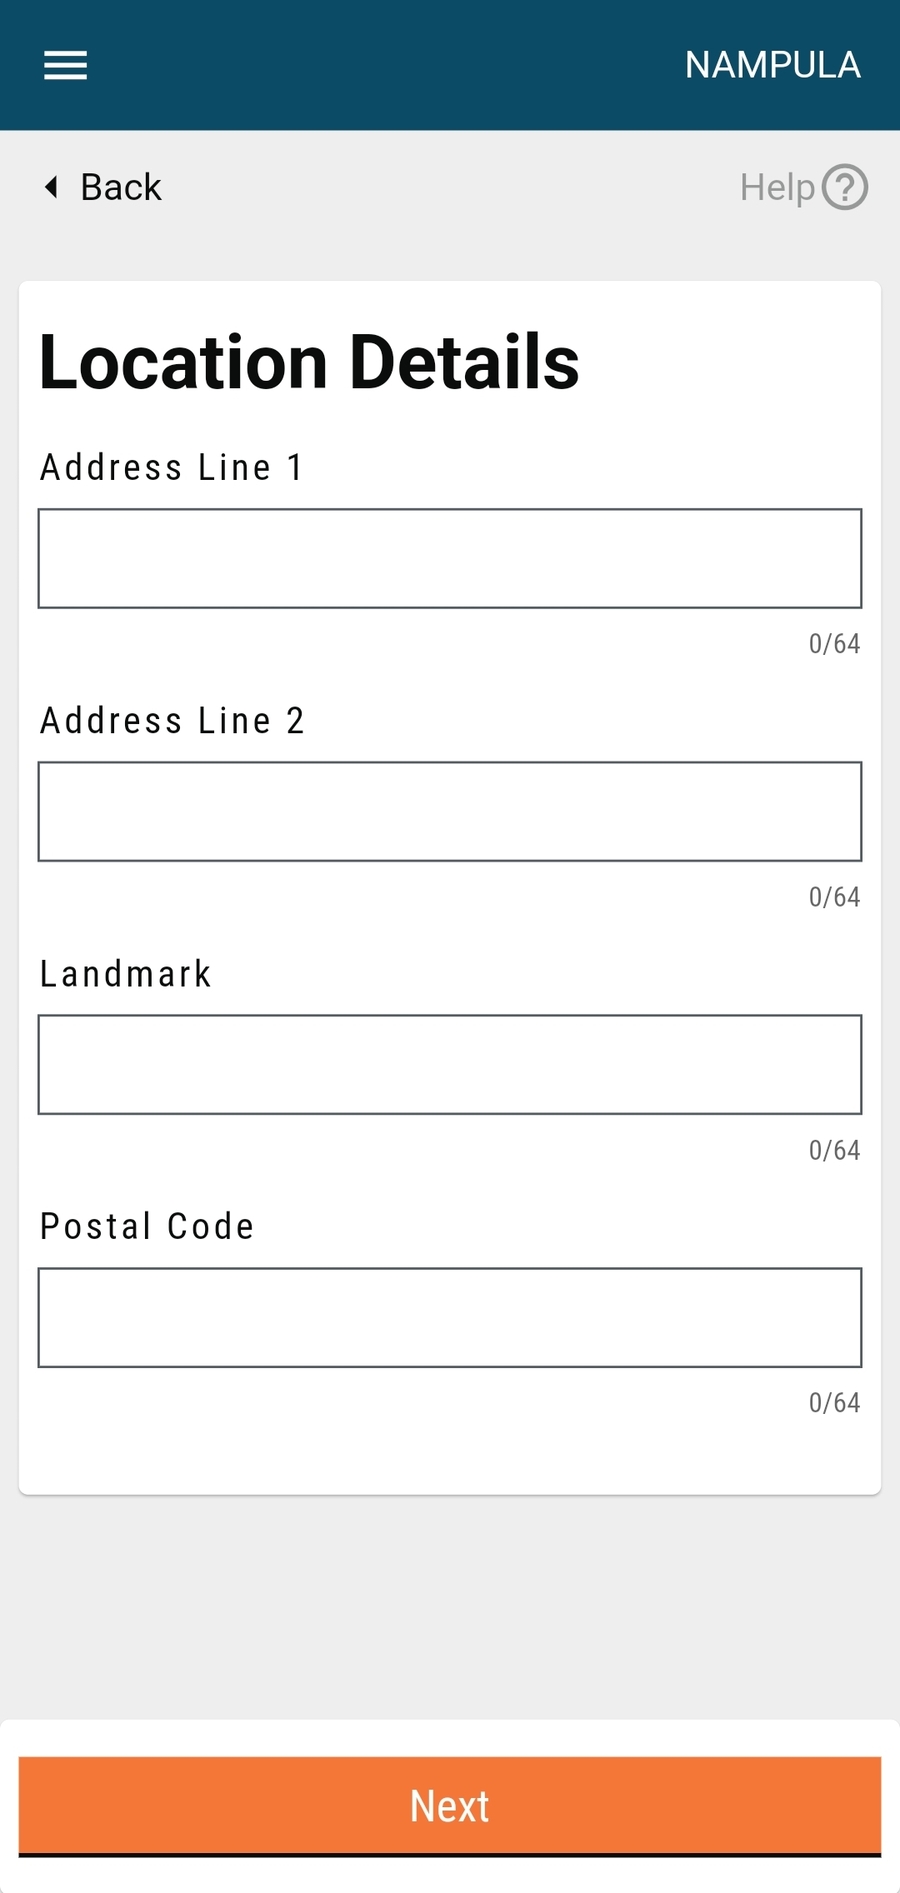
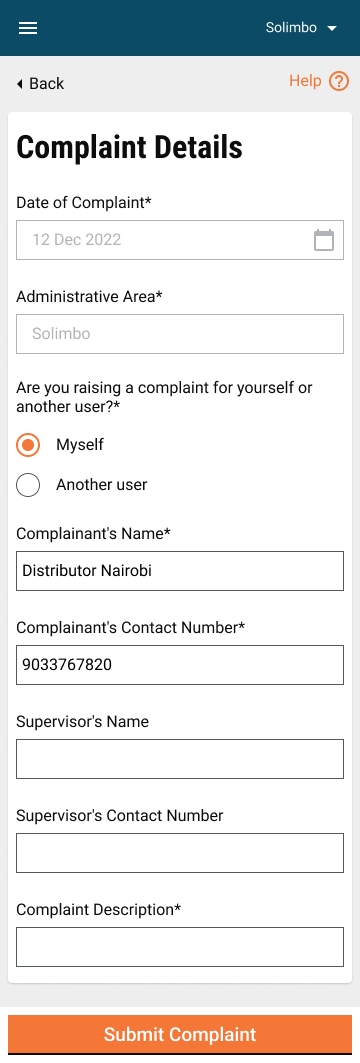
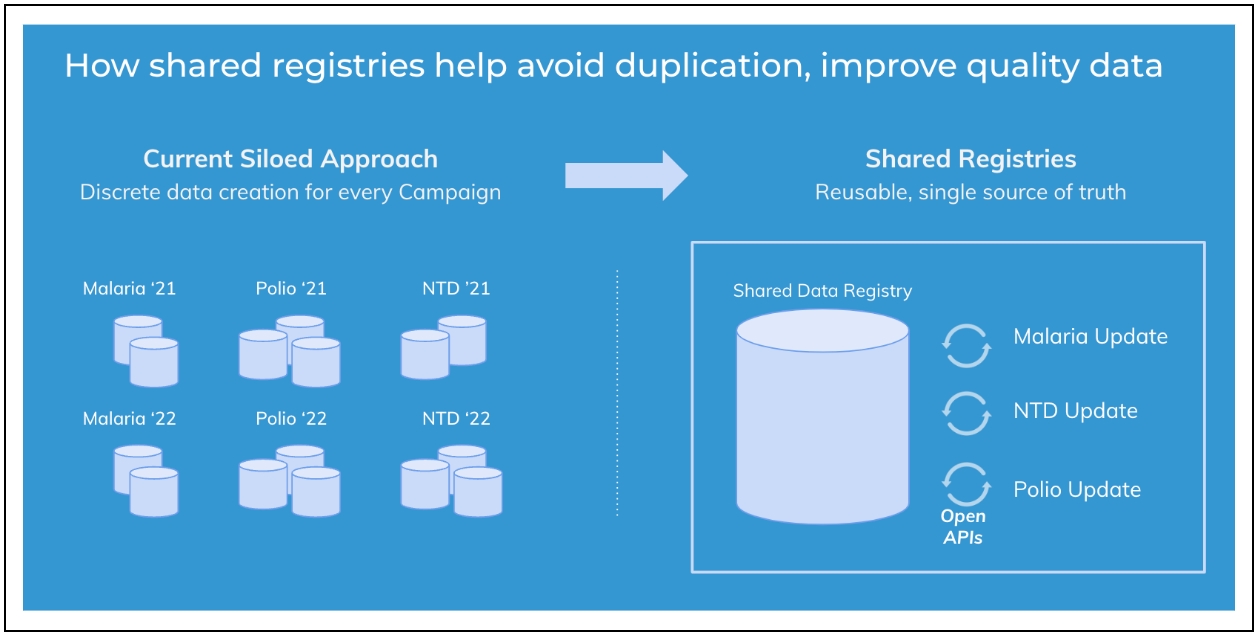
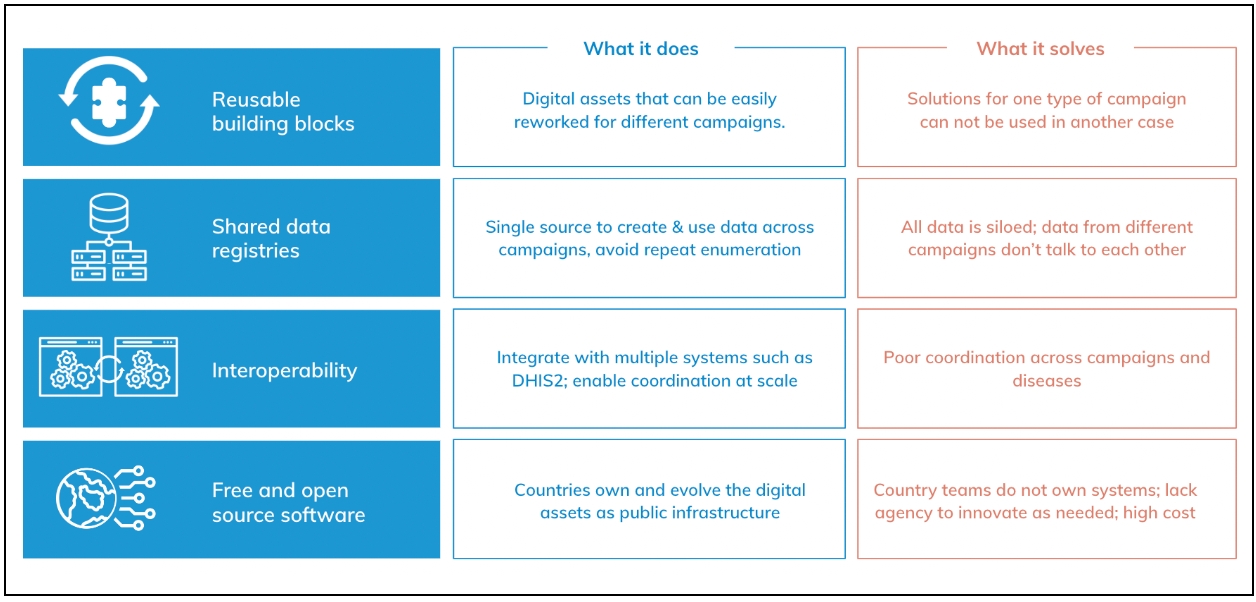
If ‘Yes’ is Selected
The Adverse Events Form opens.
A summary table of delivered resources is shown at the top.
Enter any details of the observed symptoms. The list of symptoms is configurable to allow new values as needed. The user can select multiple symptoms from the list to reflect the beneficiary’s condition.
If Dose Was Readministered
The user selects ‘Yes’ to indicate re-administration.
The user must also enter the number of times the dose was readministered.
Refer Beneficiary (If Required)
If the beneficiary is in critical condition, the user can click the “Refer Beneficiary” button.
This navigates to the refer beneficiary flow for further medical assistance.
Proceed to Next Step
After completing the form, clicking the ‘Next’ button will move the user to the next screen in the workflow.
Distributor
Record adverse events for beneficiaries
The user goes from house-to-house for drug administration and records the adverse events observed in the beneficiary before administration
Frontline workers
Register households
Add members
Deliver intervention
SBCC
Provide direct healthcare services, communicate SBCC information, and support to communities. Usually operate in teams and within a specified boundary.
Field Supervisors
Train and monitor the field teams
Provide on ground support
May have authority for registration and distribution to support the teams
Organise and direct the activity of frontline staff in health initiatives.
Offer direction, assistance, and coordination for effective service delivery, adherence to protocols, and high-quality results.
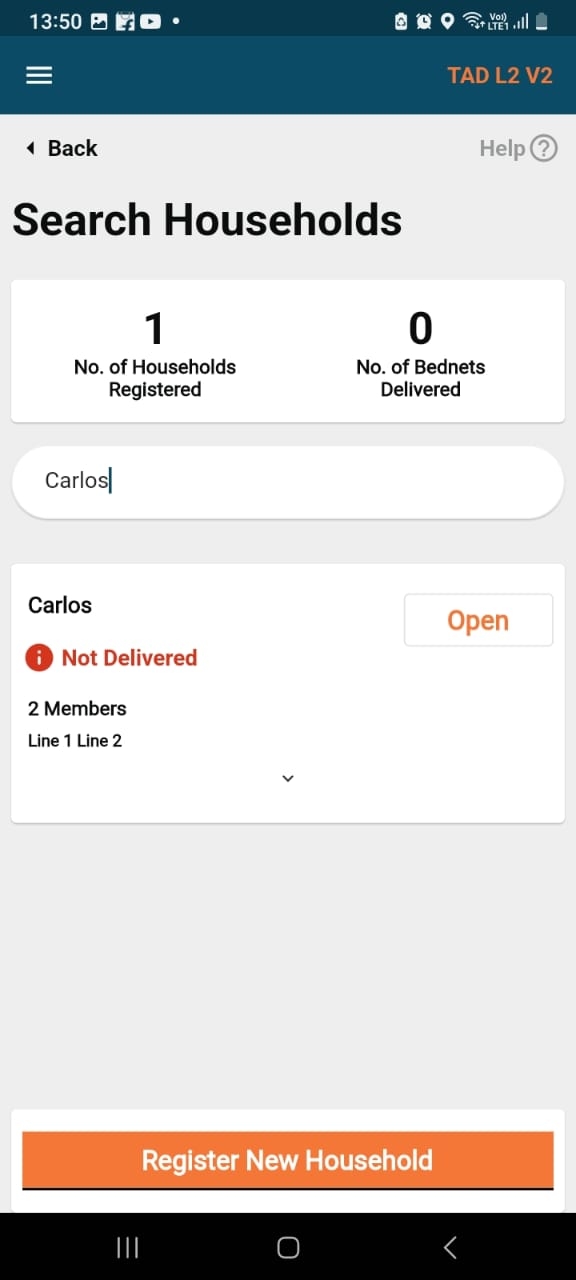
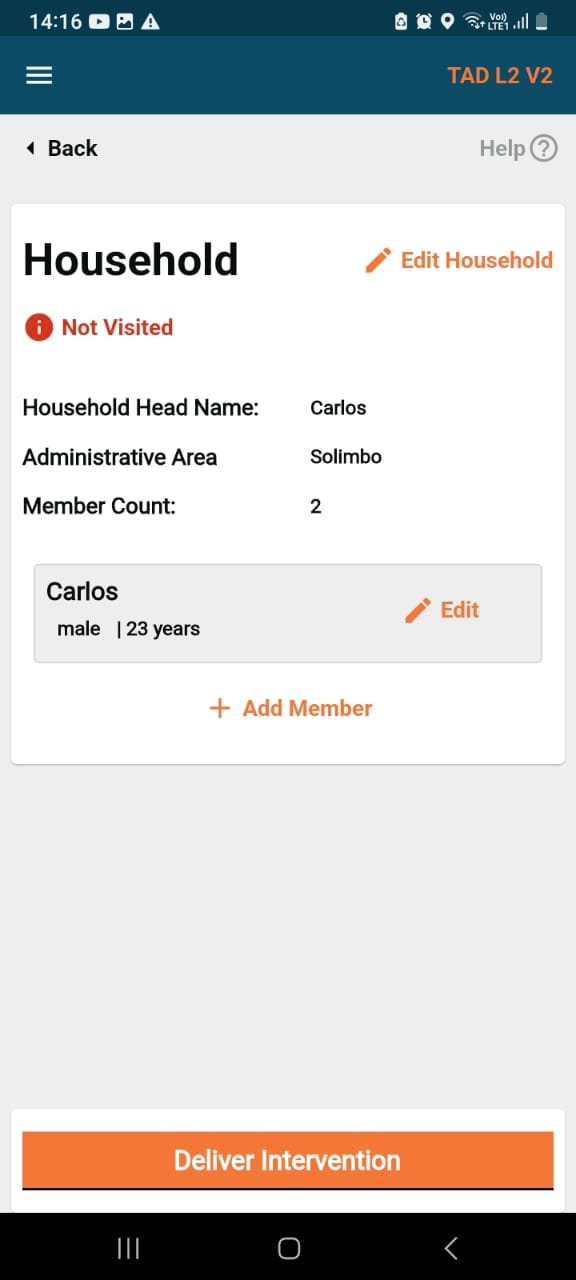
Beneficiaries referred
Referral details of the beneficiary
Reason for referrals and its diagnosis
Based on the diagnosis chosen, further details are provided if applicable
Health Facility Supervisor
Record referrals made by field workers
Record data of beneficiaries, reason for referral and diagnosis, and any further details.
Log in as a health facility worker. The Health Facility Referral feature enables workers at the given Health Facility (HF) to provide a diagnosis based on the type of symptoms they observe and prescribe the appropriate drugs.
Click on Beneficiary Referral.
Enter the beneficiary name in the Search Beneficiary screen to filter the view of the beneficiary.
Click on the Open button on the beneficiary card to view the specific details.
Click on the Create New Referral button to add a new entry in the Referral module, in case the beneficiary is available in the search.
Enter the details of the health facility the beneficiary is mapped to in the Facility Details screen. The details include:
Administrative Unit: This field will be auto-filled from the value available from the role-action mapping, and will be non-editable.
Date of Evaluation: This field will be auto-filled with a system value and will be non-editable.
Evaluation Facility: This will be a mandatory field for the health facility worker to search and add. It is the ID used for a given health facility.
Name of Health Facility Coordinator: This is a non-mandatory field that will capture the name of the health facility coordinator who is attending the referred beneficiary.
Referred By (CDD Team Code): This is a non-mandatory field that will capture the CDD team code of the field worker who referred the beneficiary.
Click on the Next button.
Enter the Referral Details. Referral details include:
Select Cycle: This will be a dropdown selector which will have the cycle numbers. This is a mandatory field and cannot be left empty.
Name of the child: The user needs to add the name of the referred beneficiary. This field is mandatory.
Beneficiary ID: This will be added by the user with the beneficiary ID of the referred Beneficiary. This is a mandatory field.
Select the applicable option to answer What is the reason for referral.
Click on Next to proceed. Select the relevant options based on the selected reason for referral.
If the selected option was Sick: Below are the options available if the user selects Sick as the reason for referral:
Child evaluated to determine cause of illness: This will be a mandatory question to be answered with 2 options in the form of a radio button: Yes or No.
Enter Comment for Diagnosis: The answer to this question should be entered by the user in a free-text form, which will be a mandatory field.
Was the Child Treated?: This question will be answered by the user using a radio button option of 'Yes' or 'No', and it will be a mandatory question
Name and Dose of the Drug: Provide an open text field that will be mandatory.
Was the child admitted/transferred to the hospital due to serious illness?: This question will have a Yes/No radio button selection for it. This is a mandatory field.
If the selected option was Fever: If the user selects 'Fever' as the reason for referral, the following options are available:
Was the child tested for malaria?: This question has a Yes/No radio button option. This is a mandatory field.
Result of Malaria Diagnostic Test?: This is a mandatory field, and based on the response to this question, the next set of questions opens up as a nested form.
If the user chooses “Negative” for “Result of Malaria Diagnostic Test?, following questions are displayed:
“Child with negative malaria test received SPAQ in this cycle“: Answer Yes/No.
If “Drug side effect in current/previous cycle” was chosen as a reason: If the user selects “Drug side effect in current/previous cycle” as the reason, the“Referral due to adverse drug reaction” screen appears with the following questions:
Child evaluated for adverse reaction for SP and AQ?: Answer Yes/No.
The National Pharmacovigilance has been filled out?: Answer Yes/No.
Was the child admitted/transferred to the hospital due to serious illness?: Answer Yes/No.
Once all the questions in one of these flows are answered, a pop-up frame asking for confirmation will be shown for submission as given below:
The message Data Recorded Successfully appears on clicking the Submit button.
Enables actors to execute the registration and delivery process efficiently through the use of scanners.
Code scanning capability provides a better user experience by auto-populating the data, thus reducing the time and effort.
Allows manual entry of codes to ensure maximum data collection, with defined validations.
Prevents duplication of records and monitors resources by linking beneficiaries to their respective codes and reusing them while registering a new beneficiary or distributing resources. One can also monitor the quantity of stock distributed by scanning the code available on the stock.
Allows multiple scanning of resources at once.
Registrars/Distributors
Scan and link vouchers to households during registration
Enter the voucher code manually
Scan and retrieve household details to deliver intervention
Scan the resource code during delivery
Provide direct healthcare services, communicate SBCC information, and support to communities. Usually operate in teams and within a specified boundary.
Warehouse Managers
Scan the stock resource cards while receiving (Can be used for other transactions but is not preferred)
Scan multiple resources at once.
Enter the code manually
A warehouse manager is responsible to manage the stock and record all the transactions that take place within the assigned warehouse/facility.
Click on the Scan QR code button on the Search Households screen.
Scan the Voucher Code provided to the beneficiary during registration. Alternatively, users can click on the Enter Beneficiary Code button to manually enter the voucher code.
This opens the beneficiary card with a set of actions for the scanned beneficiary.
Click on the close button to close the scanner if needed.
To link the beneficiary -
Click on the Link Voucher to Individual button to link the beneficiary to the voucher card provided during registration.
The voucher is linked successfully, and the voucher code is displayed on the screen.
While delivering any resource to the beneficiary, the user must scan the code provided on the resource package.
To track a delivery resource -
Scan the code available on the resource package.
The scanner screen has an expandable card that provides the list of resources scanned. The card displays the count of resources scanned along with the identification number for each scanned resource.
In case one is unable to scan, the user can enter the codes manually, but after every code, they have to click on the Enter Beneficiary Code again and repeat the process.
Click on the Delete button to remove any resource.
Click on the Submit button to navigate back to the Deliver Intervention screen.
The toast message for a successful scan is displayed on the screen.
Registrar
Scan and link voucher to the households during registration
The user goes from house-to-house and links the beneficiaries to the QR code voucher at the time of registration.
Distributor
Scan and retrieve household details for distribution
The user goes from house-to-house, and searches for beneficiaries by scanning the QR code voucher.
Steps to migrate from HCM v1.7 to v1.8
Below are the steps to upgrade from v1.7.0 → v0.2.0.
Enter the dashboard URL in the browser.
On the language selection screen, choose your preferred language and click Continue.
Enter your credentials on the Login page and click Continue to access the dashboard.
The home page lists the campaign dashboards.
Click on the Dashboard. If you are logged in as a National Supervisor, the landing page shows the national overview page.
To navigate to a sub-national level dashboard, click on the View Dashboard button next to the sub-national boundary name.
The dashboard is divided into several tabs based on campaign modules: Registration & Delivery, Inventory, Complaints, Supervision, Team Performance, Data Quality, and Referral and Side Effects.
Each page includes date filter options to view campaign data:
Specific Date Range – Select start and end dates.
Today’s Data – View data recorded for the current day.
Cumulative Data – View data accumulated since the start of the campaign.
At the top of each page, a progression line shows the number of days since the campaign started.
Use this to quickly track the campaign’s timeline and progress.
Use the Filter by Cycle option to view data for a specific treatment cycle in the Seasonal Malaria Chemoprevention (SMC) campaign.
Since children receive treatment across multiple cycles, this filter allows you to:
Focus on performance and coverage for a particular cycle
Click on any bar in the chart to drill down into sub-boundaries.
Continue drilling down until you reach the lowest level (e.g., a village).
To return to the previous view, click the '×' button.
Click on any boundary in the table to drill down into sub-boundaries.
Continue drilling down until you reach the lowest level (e.g., a village).
To return to the previous view, click the '×' button.
Click on any slice in the pie chart to drill down into sub-categories or data split across sub-boundaries.
To return to the previous view, click the '×' button.
The Prediction Line Chart estimates the number of additional days required to reach the target coverage.
This estimate is based on the current service delivery rates, helping to plan and adjust campaign efforts.
The system uses geographic coordinates from completed checklists to monitor:
Distributor coverage
Supervisor performance
On a zoomed-out map, coordinates are grouped into clusters
Purpose: These charts allow a clear comparison between two distinct variables, making it easier to identify differences and trends.
Use Cases:
Compare coverage by gender relative to population distribution.
Purpose: Display multiple relevant variables simultaneously in a single chart for comprehensive analysis.
Use Cases:
Compare age categories
Analyse referral summaries
Purpose: Stacked bar charts visualise the distribution of data across multiple variables, enabling easy comparison and analysis.
Use Cases:
Display the number of complaints filed within each operational boundary (e.g., district), grouped by type or status (pending, resolved, rejected).
Purpose: The Venn diagram visually represents the overlap and distribution of children treated across different campaign cycles.
Details Displayed:
Cycle 1: Children treated in the first cycle
The National Malaria Control Program (NMCP) transitioned to a digital system for their bed net distribution campaign in 2022/2023, moving away from their previous paper-based method. However, the team faced numerous issues with the new tool, such as synchronisation errors, data quality issues, inadequate visualization and analysis of geolocation data, and ineffective bednet tracking during the campaign.
To address these challenges, NMCP partnered with eGov to develop DIGIT HCM, a Digital public infrastructure. This collaborative effort resulted in the creation of an open-source digital public infrastructure (DPI) with interoperability and scalability. Customised as Salama (implying health in Swahili), the aim was to mitigate the above challenges and support multiple campaigns efficiently.
Salama was rolled out as part of the Long Lasting Insecticidal Nets (LLIN) campaign for the periodic distribution of bednets in the Tete and Gaza provinces.
The main players involved in the campaigns in Tete and Gaza are listed below:
National Malaria Control Program, Mozambique: Provided overall strategic direction for the campaign, part of the Ministry of Health (MISAU).
DIS (Information System Directorate): Provided support during the requirements discussion and the implementation of the campaigns, part of MISAU.
DTIC (Information Technology and Communication Directorate): Technical team that was trained and helped manage technical training and issues during the campaign, part of MISAU.
World Vision: Implementation Partner for the BedNet campaign in Tete and Gaza.
The other partners include PNCM, World Vision, the Foundation for Community Development (FDC), Food for The Hungry Association (FHA), Aid for Develop.
Besides the different players mentioned above, a core group called Nucleo Duro, consisting of members from all groups was formed to lead all decision-making aspects of campaign implementation and digitisation.
Lessons learned from the Tete implementation spurred enhancements in Gaza, and underscored the flexibility of Salama. NMCP successfully conducted campaigns with reduced eGov assistance and effectively addressed many campaign-related issues. During the campaign, NMCP noted that the platform was user-friendly for registrars, and the dashboard's clear presentation negated the need to work on different formats in M&E meetings. Notable improvements in the Gaza campaign encompassed enhanced real-time syncing efficiency, prompt access to team performance reports, and a significant decrease in incomplete records.
The NMCP highlighted the points listed below as things that went well while implementing DIGIT HCM (SALAMA):
Automatic synchronisation in areas with internet connectivity: The Salama application has enabled automatic synchronisation in intervals of 5 minutes, which resulted in near real-time data synchronisation in areas with internet connectivity. This was observed during the campaign in Gaza.
Ability to check teams' progress against daily targets: In the application, there is a progress bar that each team can use to verify their progress when compared to the target. This feature was appreciated by NMCP as it gave the local monitors the ability to check the targets and motivate the teams to achieve at least the daily target.
Automatic collection of GPS data on each Household registered: The collection of GPS coordinates for a household is done in the background of the application. Whenever a household is registered, the registrar does not have to click any button to initiate the capture of geo coordinates. This made the user experience for registrators better and was in turn well received by NMCP.
Throughout the campaign, numerous training sessions were conducted to enhance the capacity of NMCP in managing and utilising Salama, with additional capacity-building activities scheduled for post-campaign implementation. Key recommendations include linking credentials to performance, enhancing microplan estimates, improving warehouse manager training, addressing bed net scanning issues, and shifting the focus to monitoring and correcting supervision results.
In summary, the successful digitalization of Tete and Gaza using Salama facilitated accomplishing essential campaign objectives. While recognising areas for improvement, the standardised data format enabled thorough analysis across campaigns, ensuring ongoing enhancement in effectiveness and efficiency.

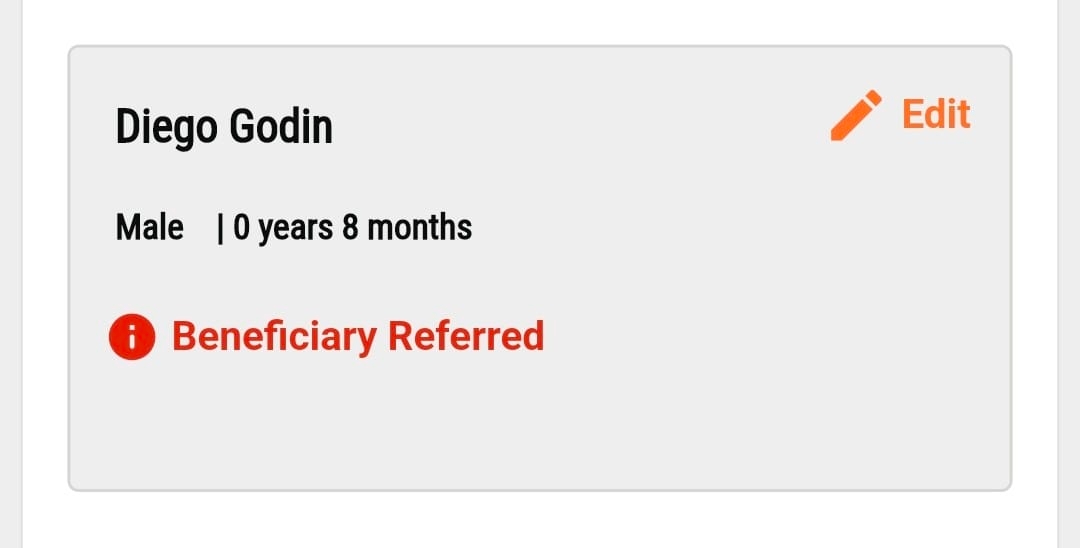
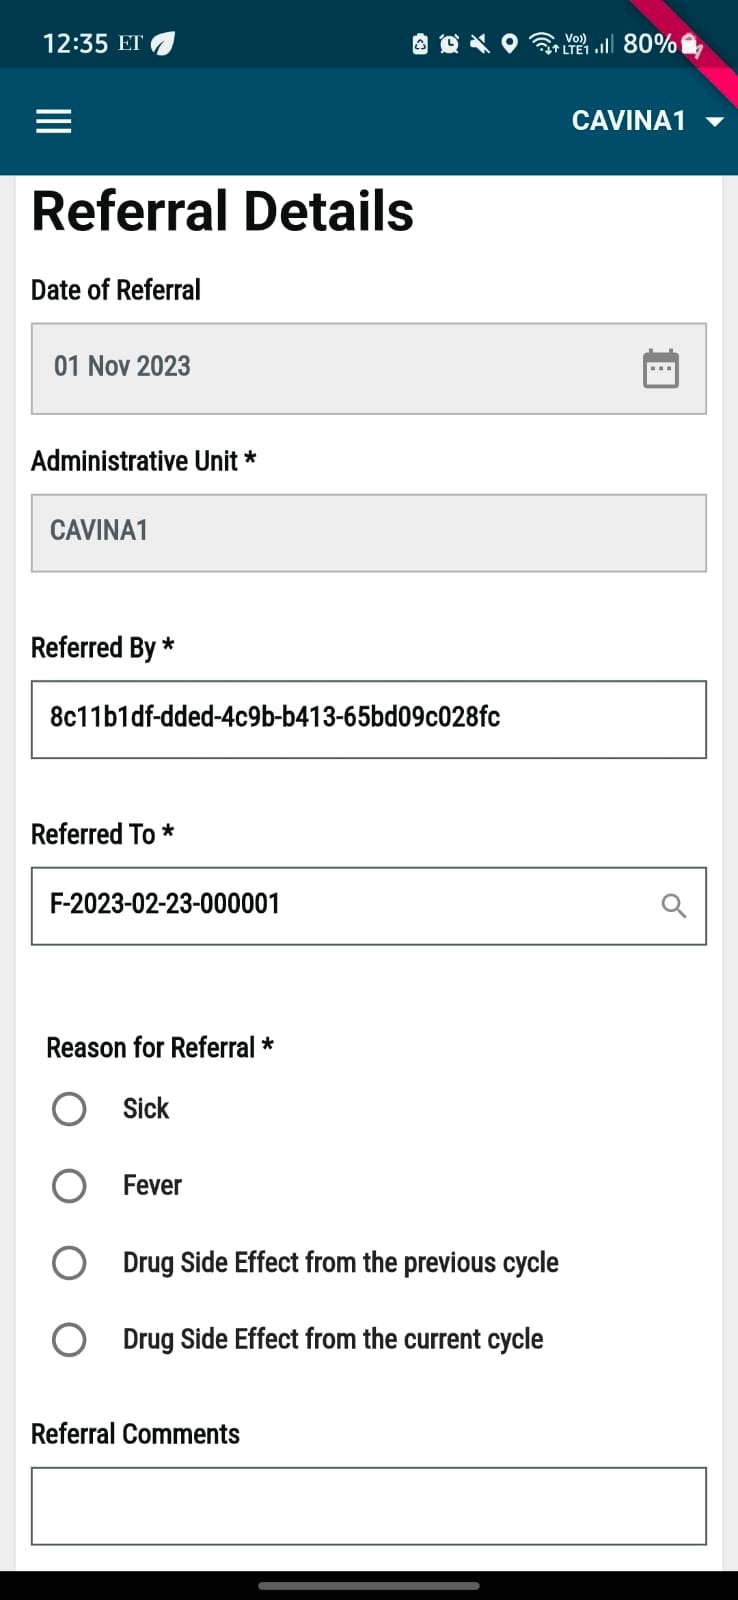
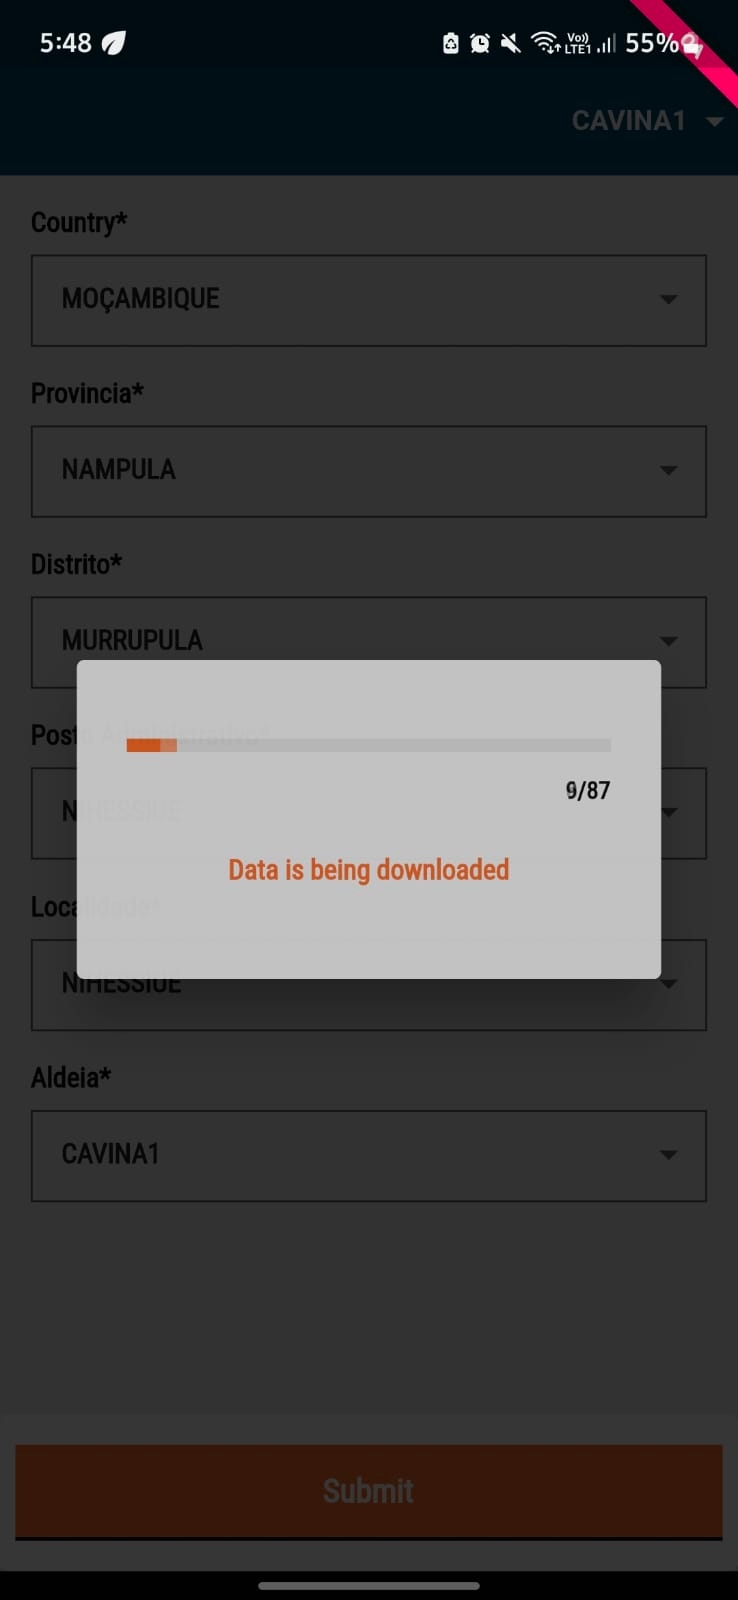
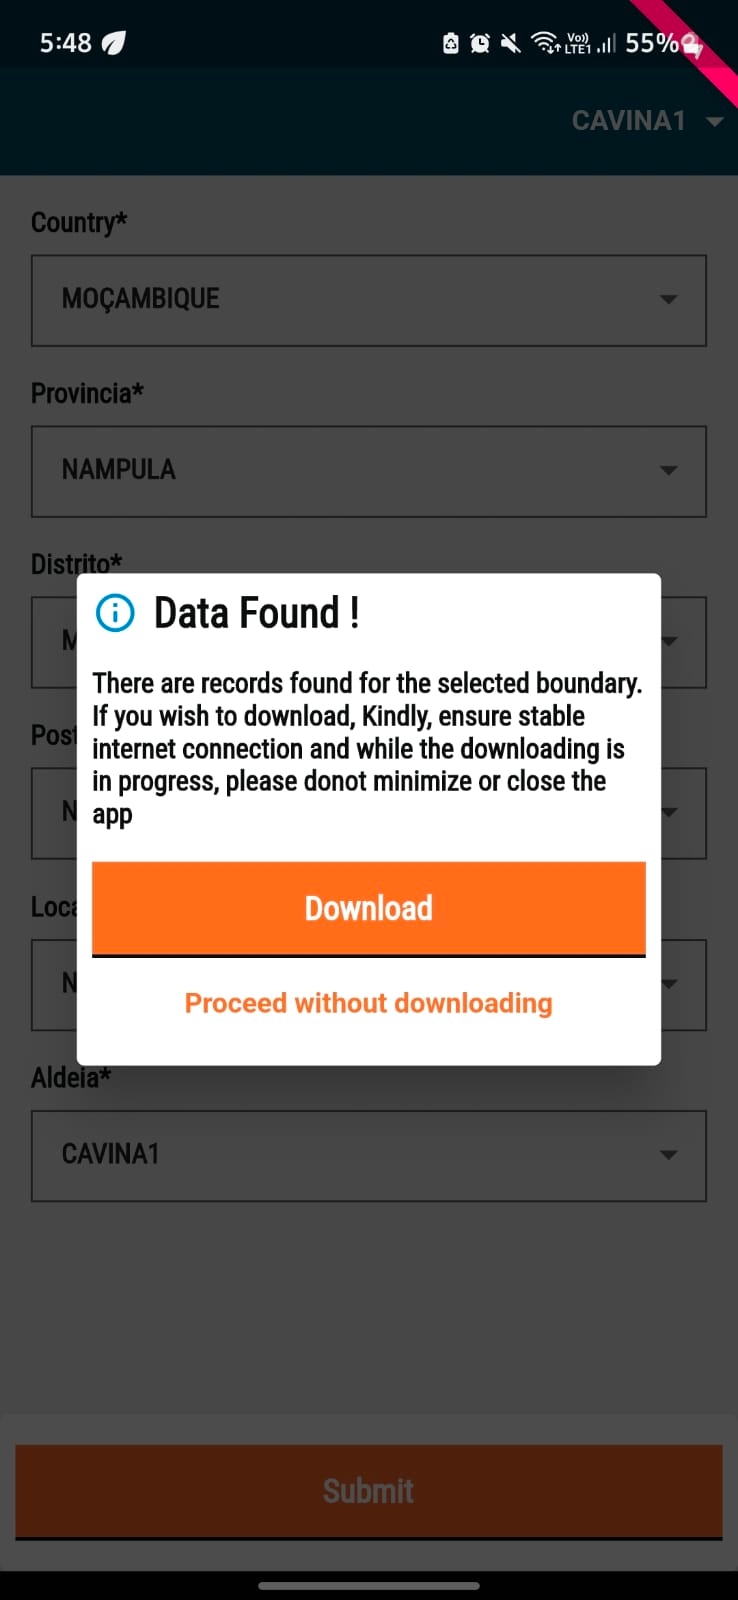
The Community Living Facilities feature in HCM is designed to support health campaigns in places where people live together for extended periods, such as schools, nursing homes, and refugee camps. It allows for both fixed-post and mobile delivery (transit post), making it easier to reach beneficiaries efficiently. This feature ensures that health interventions can be effectively delivered beyond traditional household-based approaches by enabling proper enumeration and adapting to different facility setups.
To learn more about the scope of Community Living facilities, click .
Bill and Melinda Gates Foundation: Funder of the DIGIT HCM platform.
The Global Fund: Funds campaign implementation across Africa.
Dashboard was flexible, interactive, and user-friendly: The dashboard was used in the daily review meetings as the main monitoring and evaluation tool and saved time as it was not necessary to develop a PowerPoint presentation for those meetings.
Automatic calculation of the bednets to be delivered: The application was able to recommend the number of bednets to be delivered to a household based on the number of members, which removed the cognitive effort of the registrar to calculate these numbers by themselves.
Indication of duplications at the end of the day: The custom reports generated at the end of the day indicated duplications of registration and delivery, It further provided details of duplicate households created by the same registrar and the ones duplicated by different registrars.
Application easy to learn: During the training, it was noticed that it took less time for the trainees to understand the application and flows. Thus, the training was more practical and focused on simulation-based learning rather than on training the users on how to use the applications.
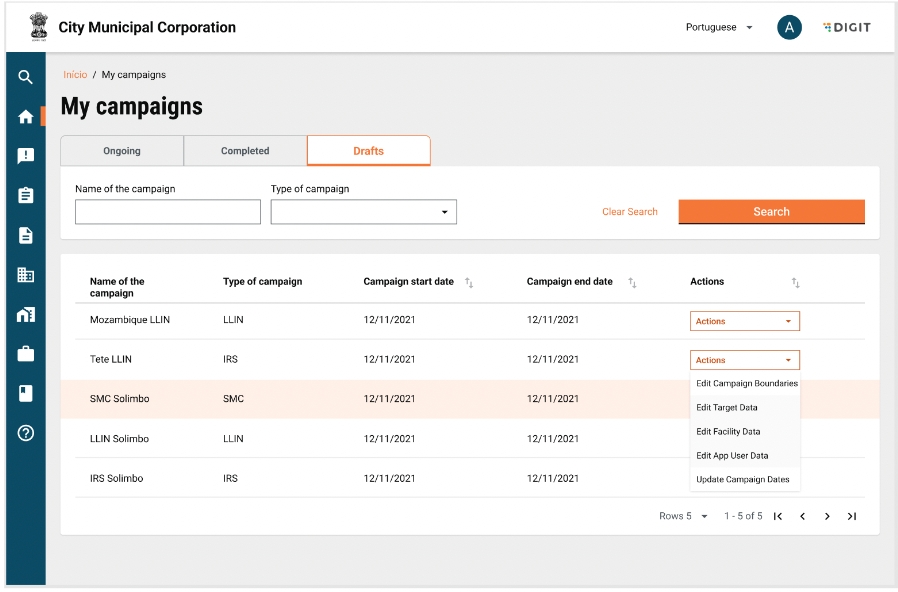
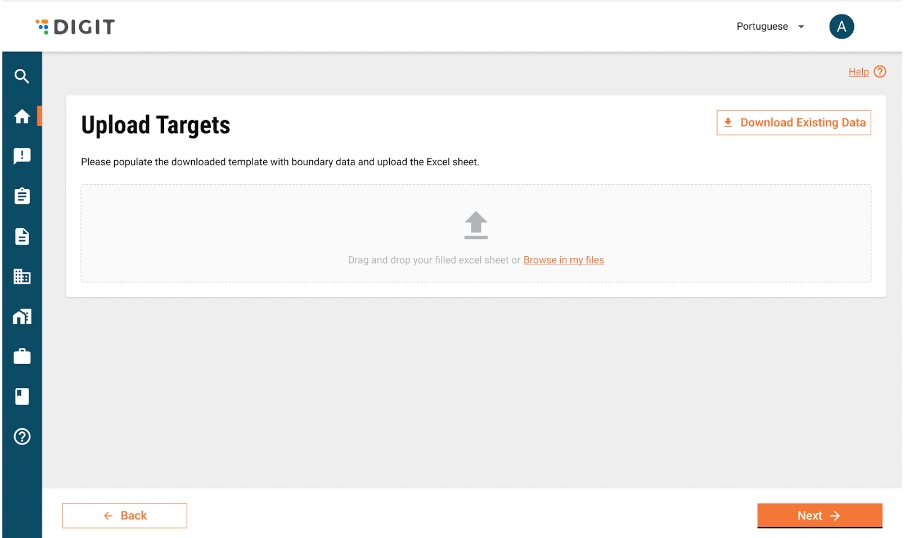
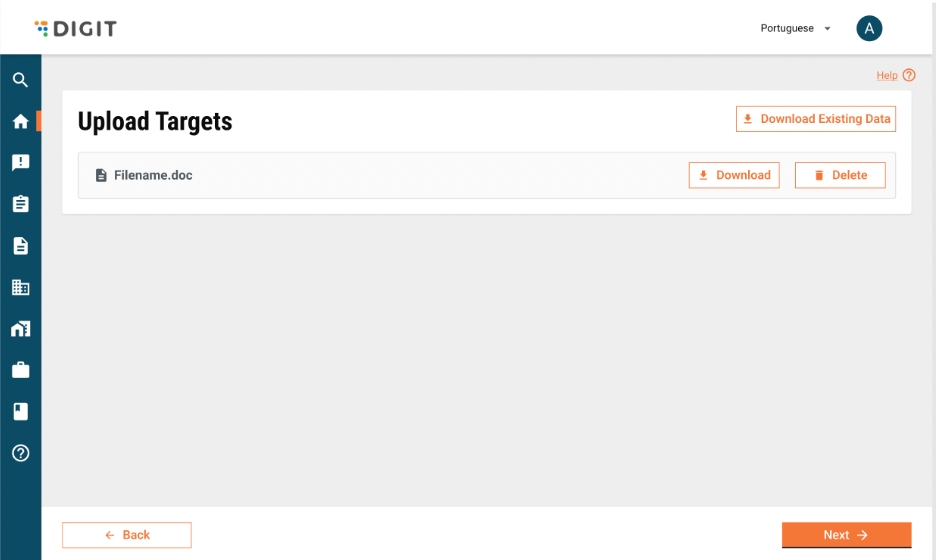
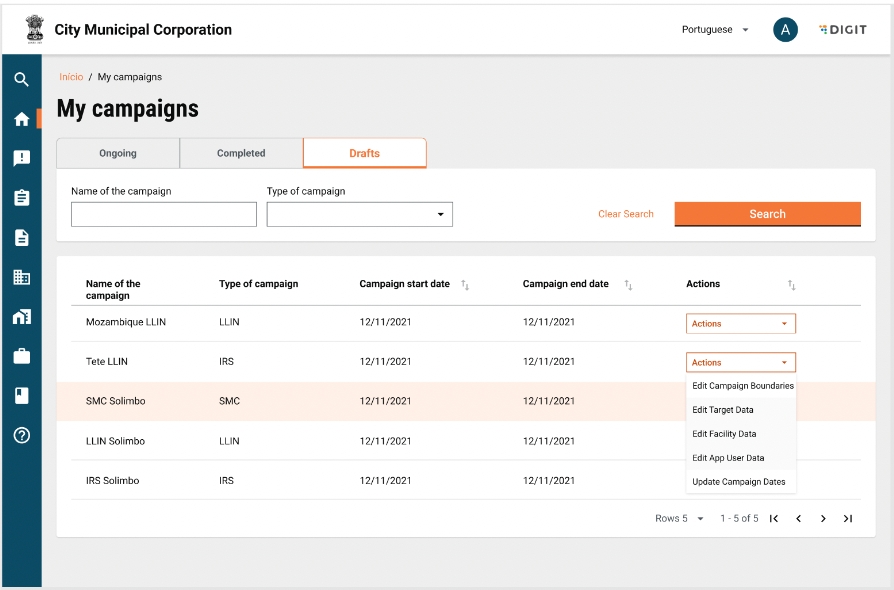
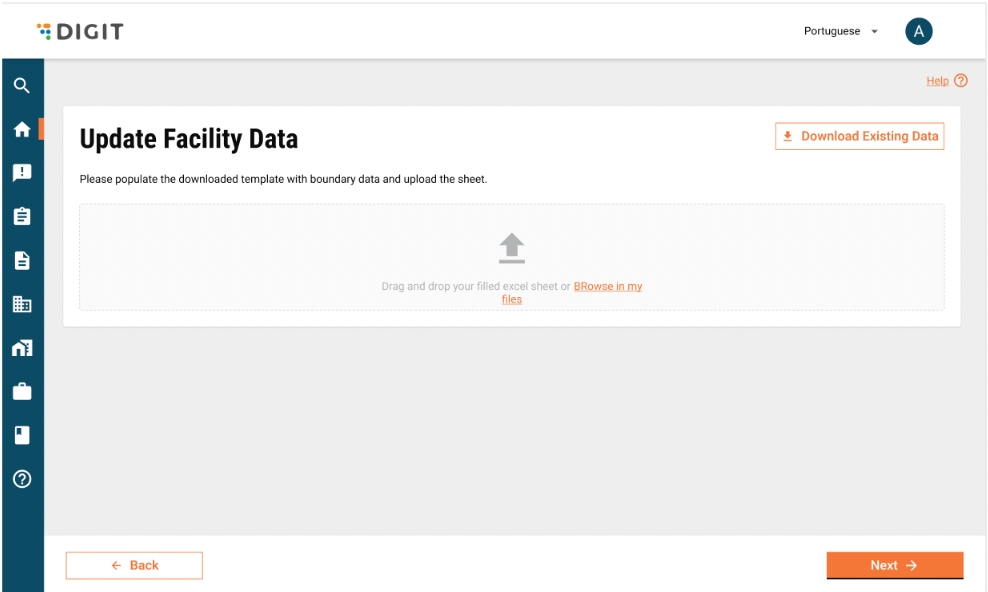
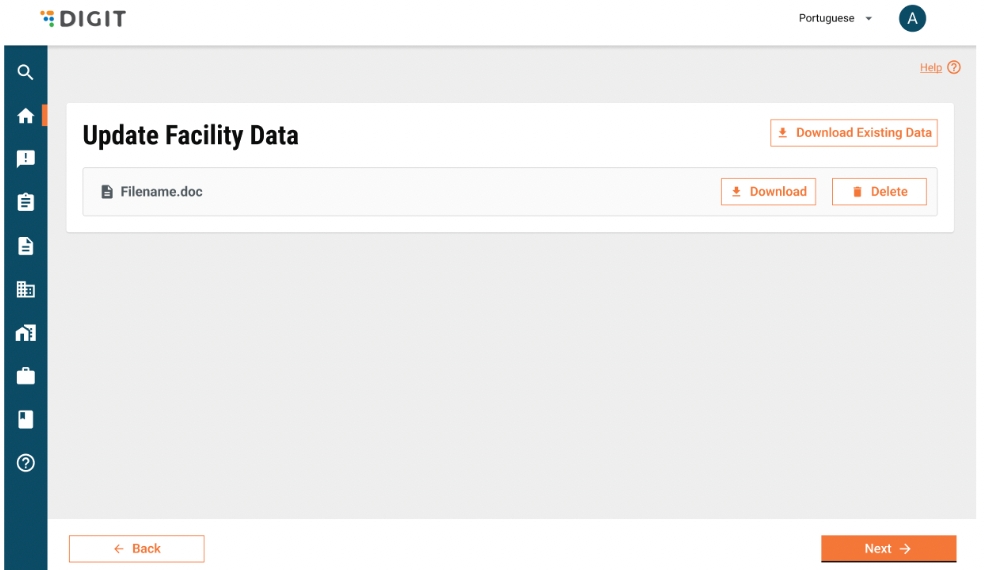

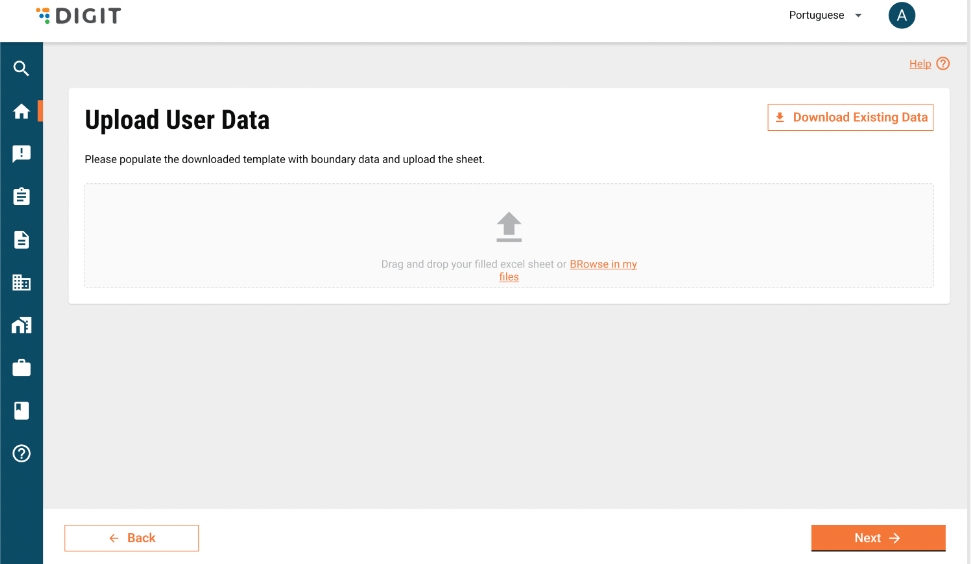
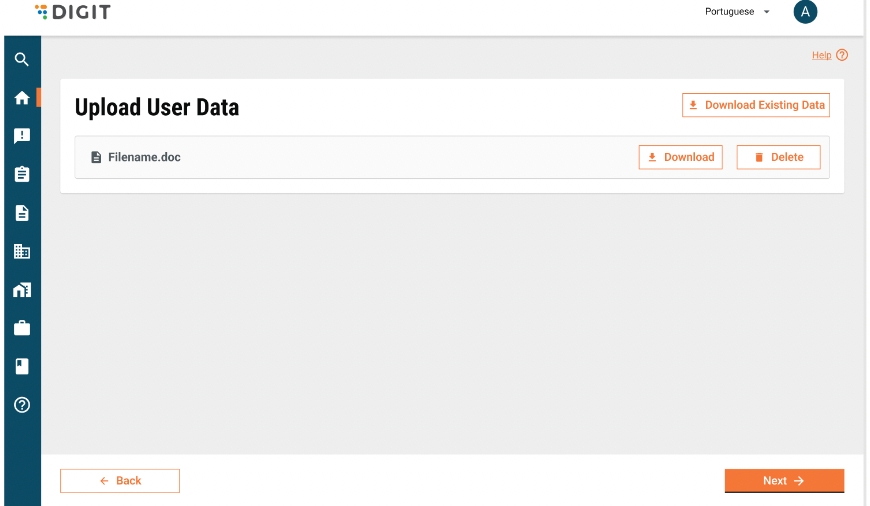
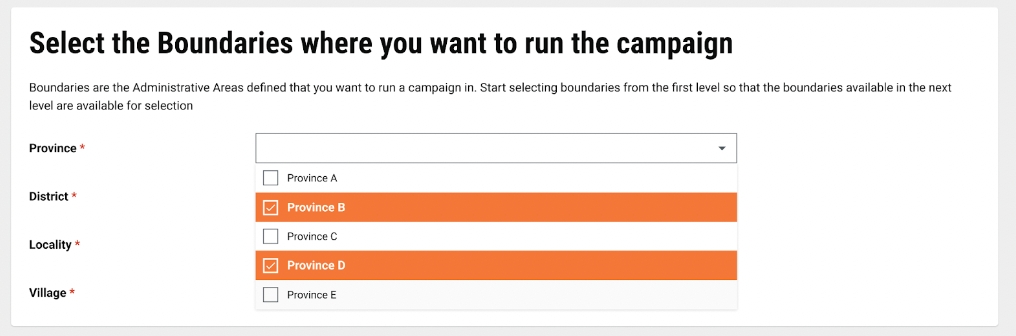
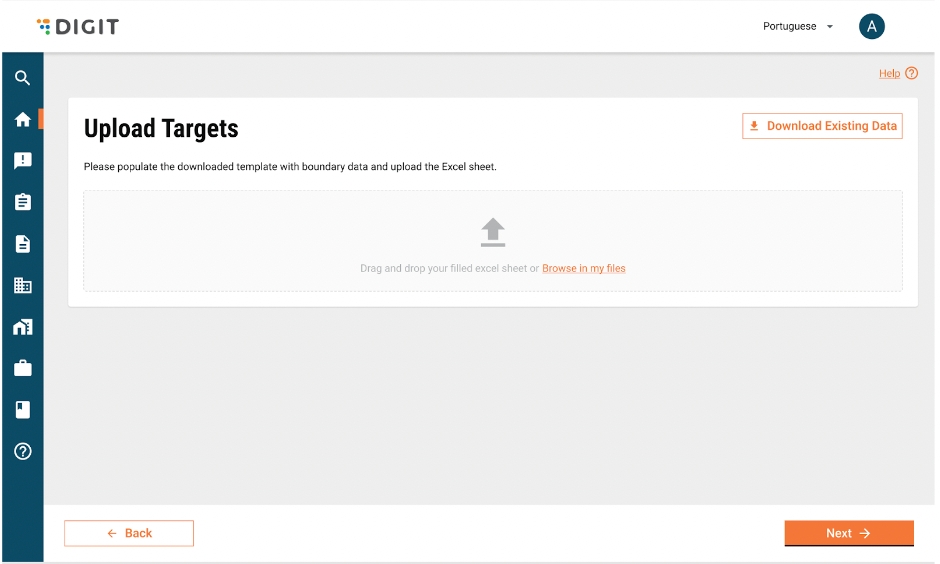
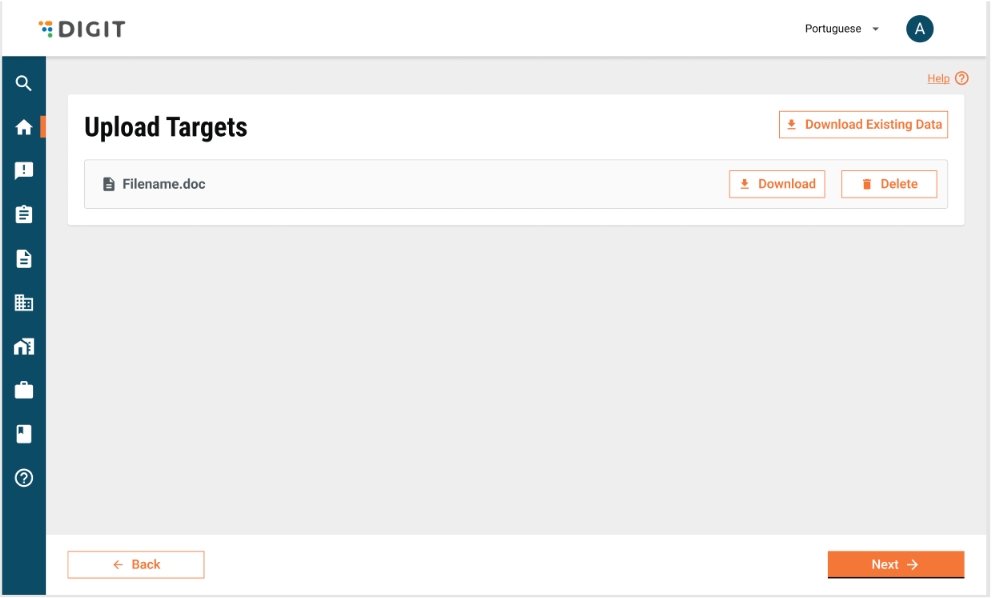
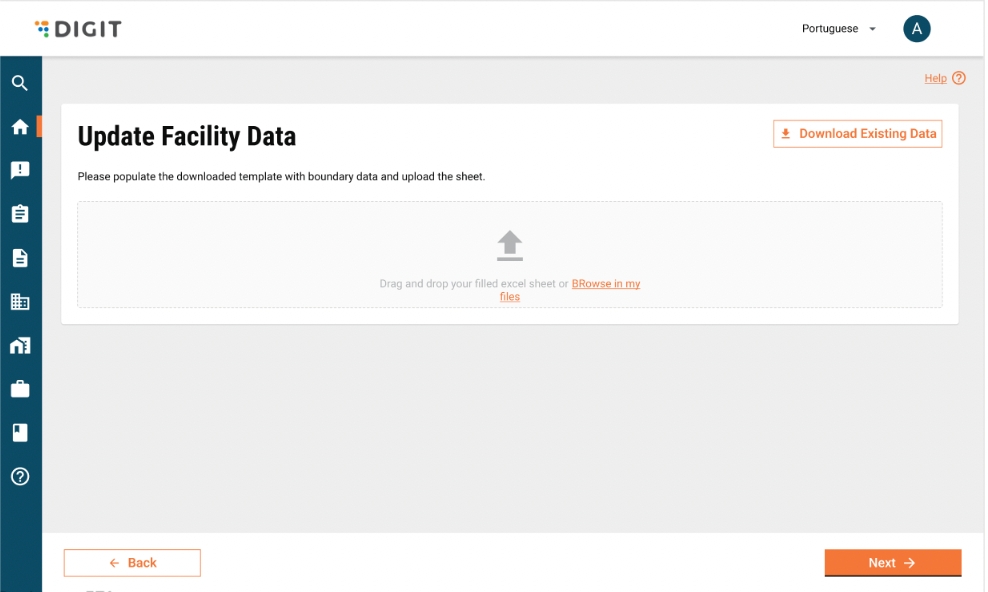
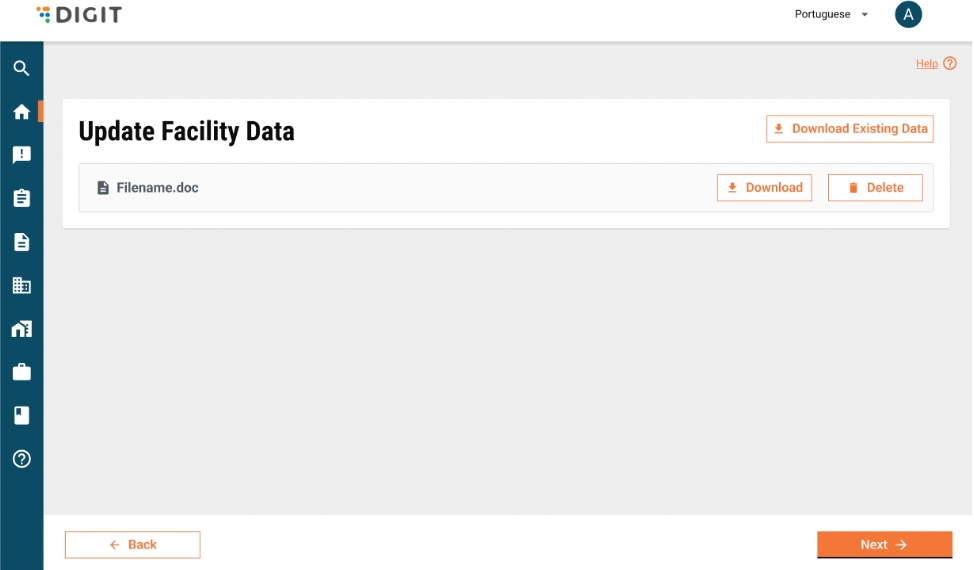
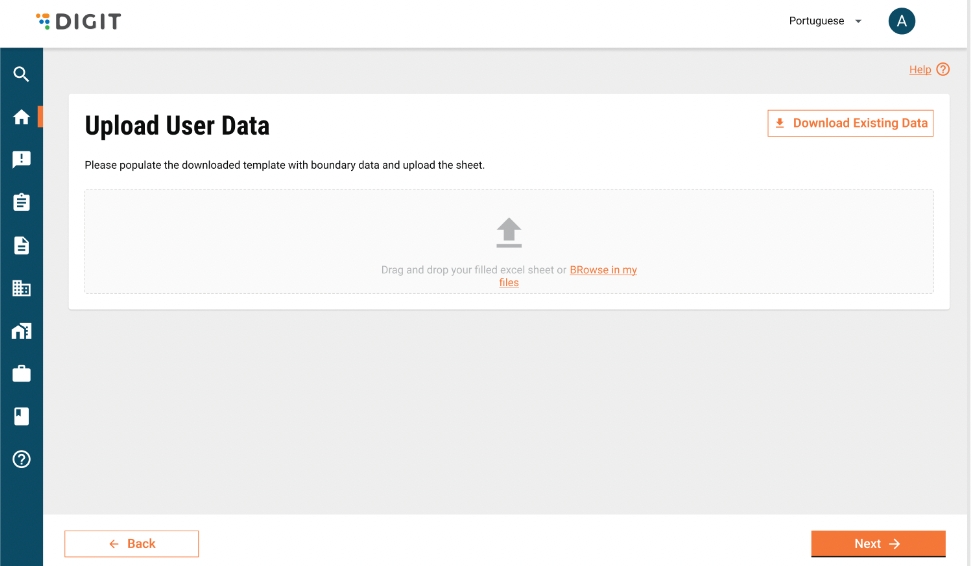
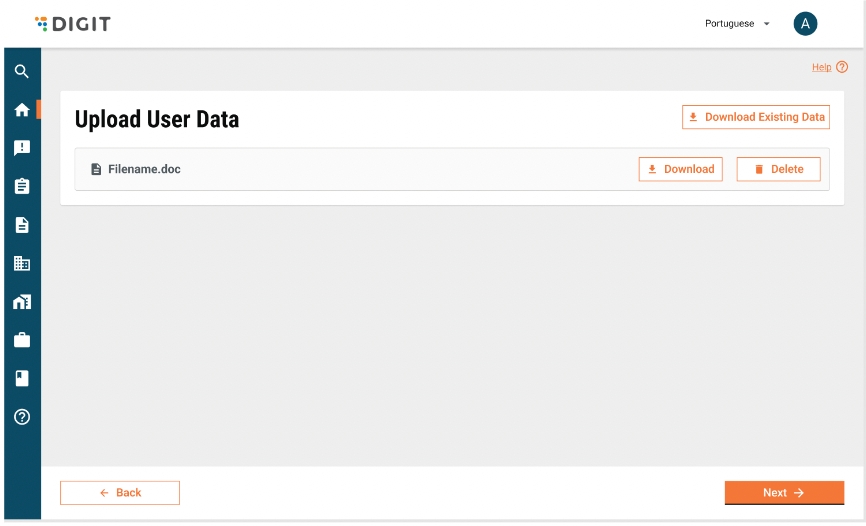
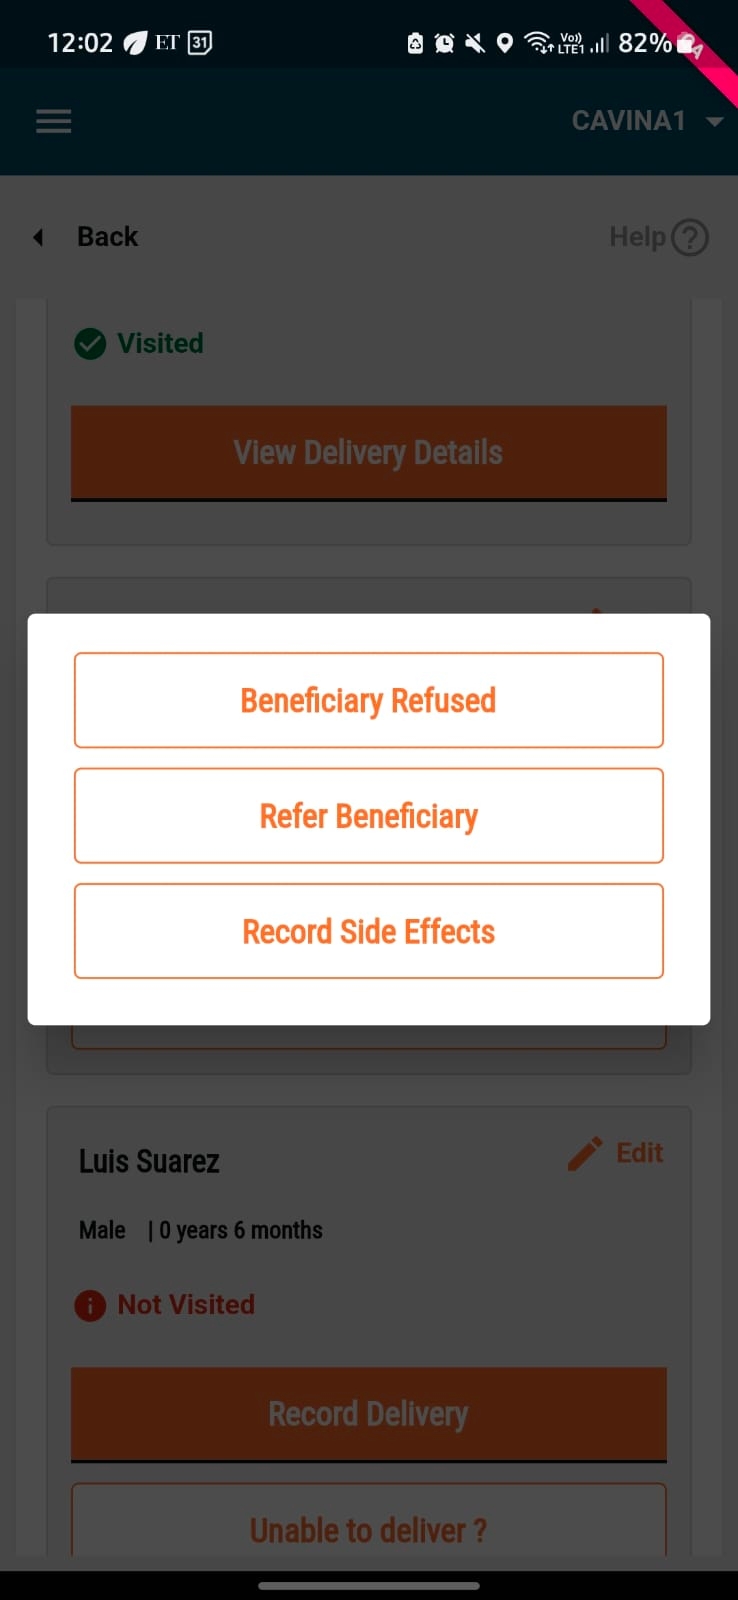
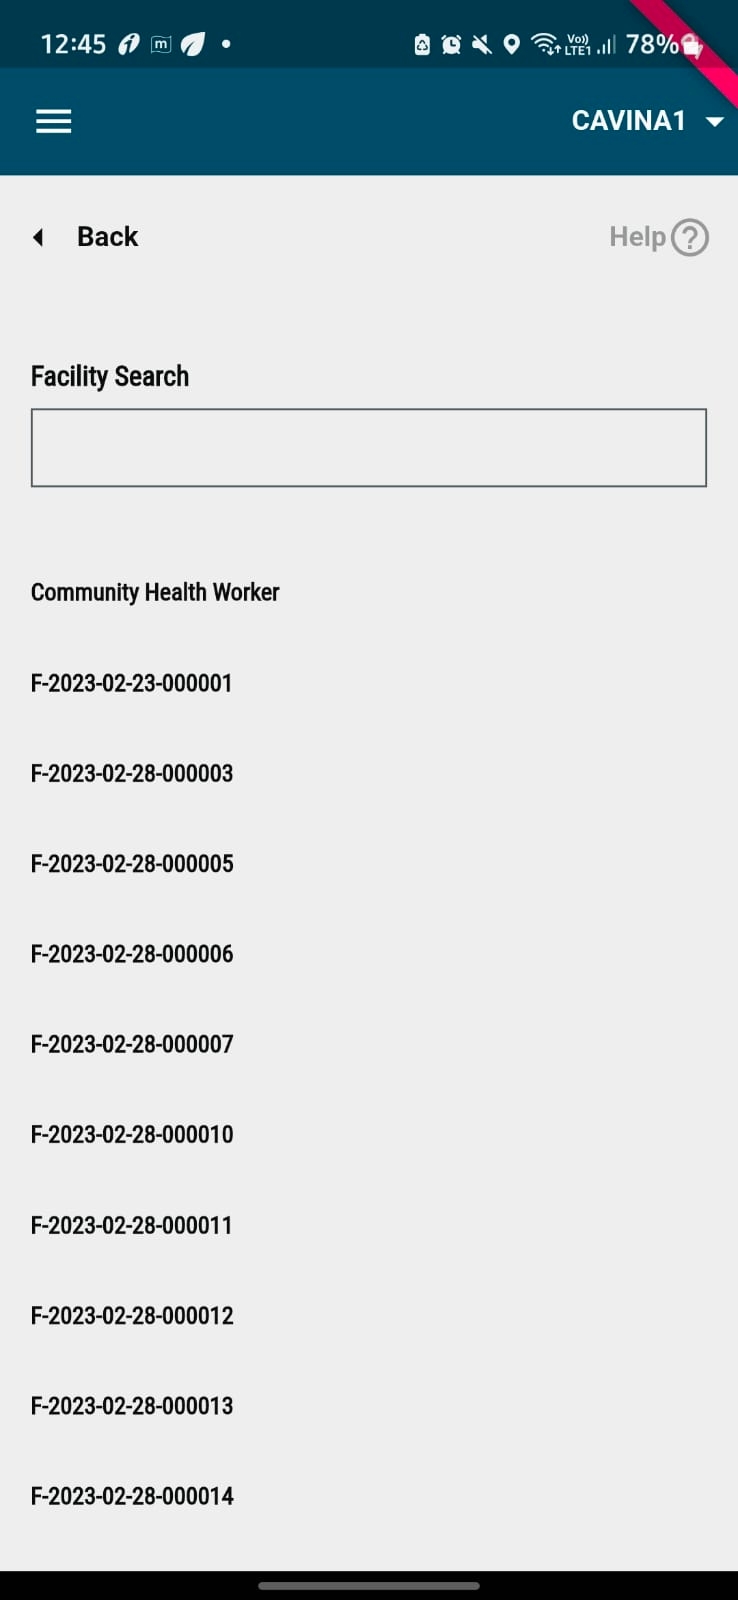
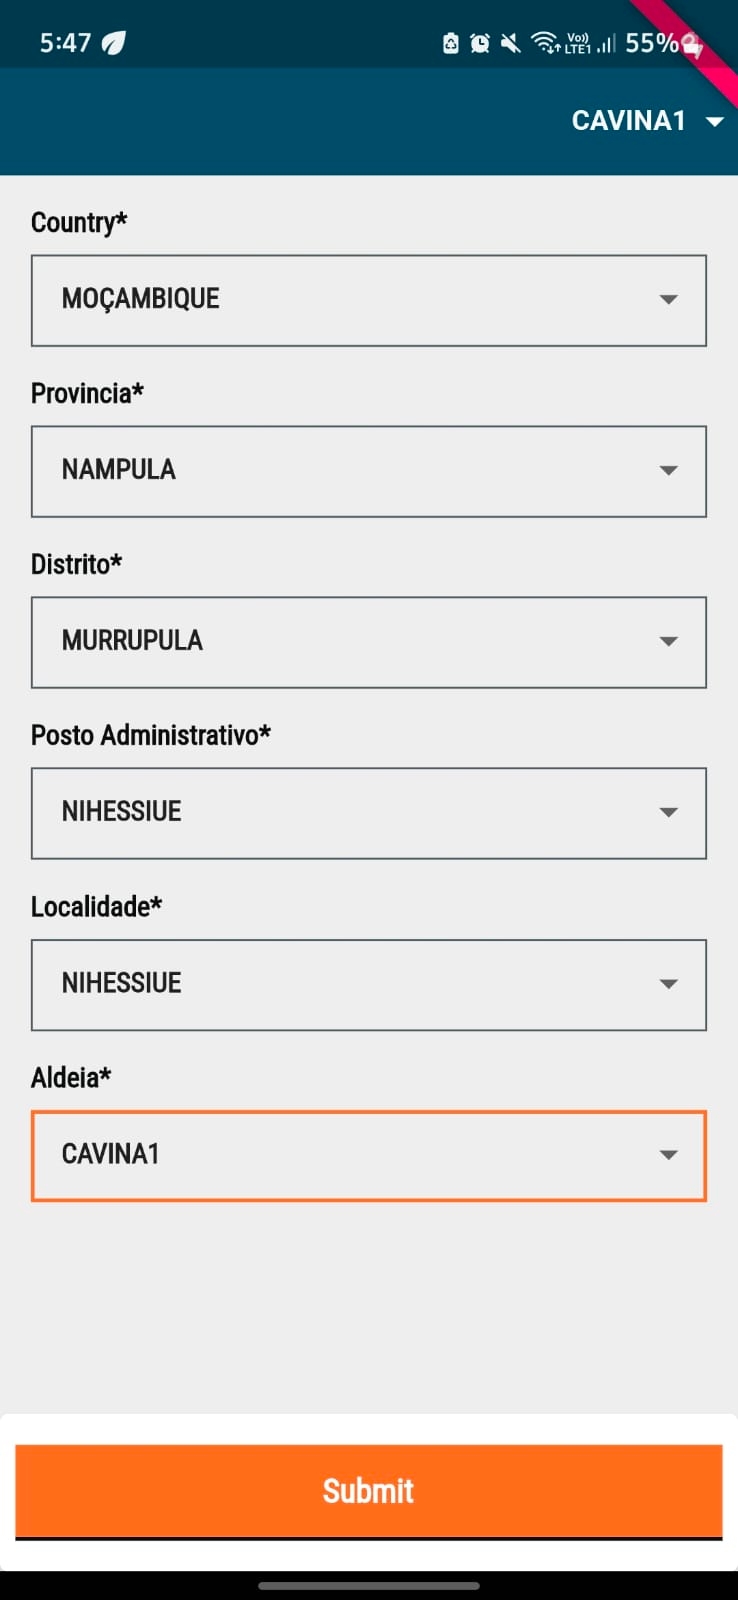
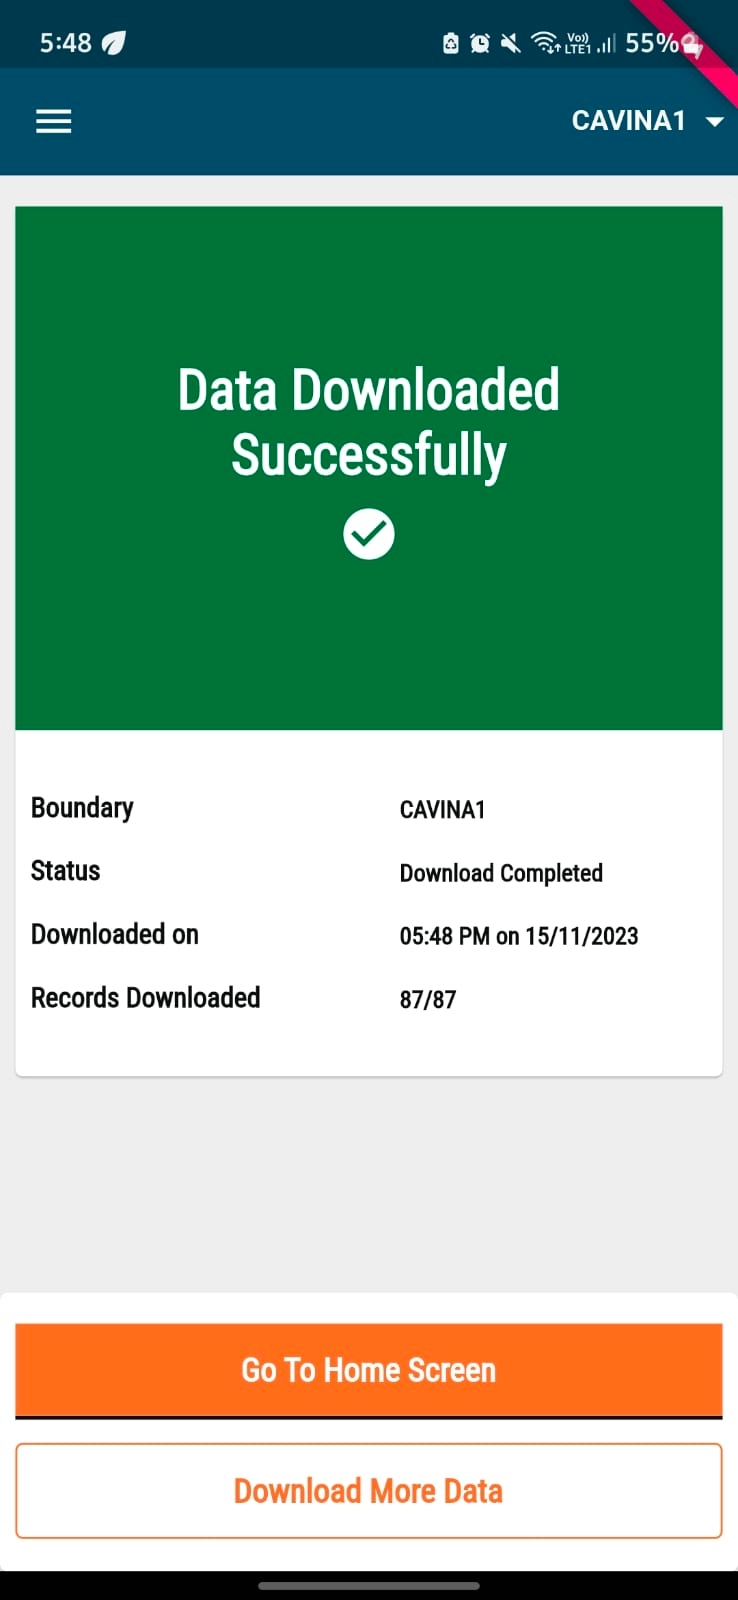
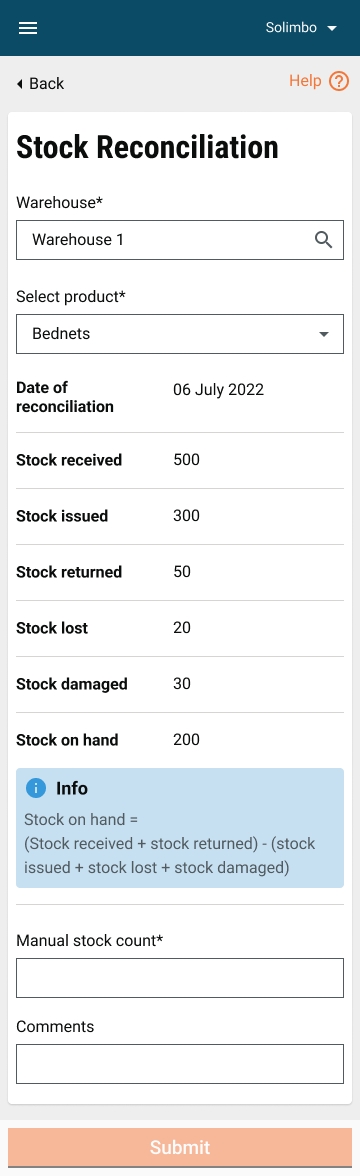


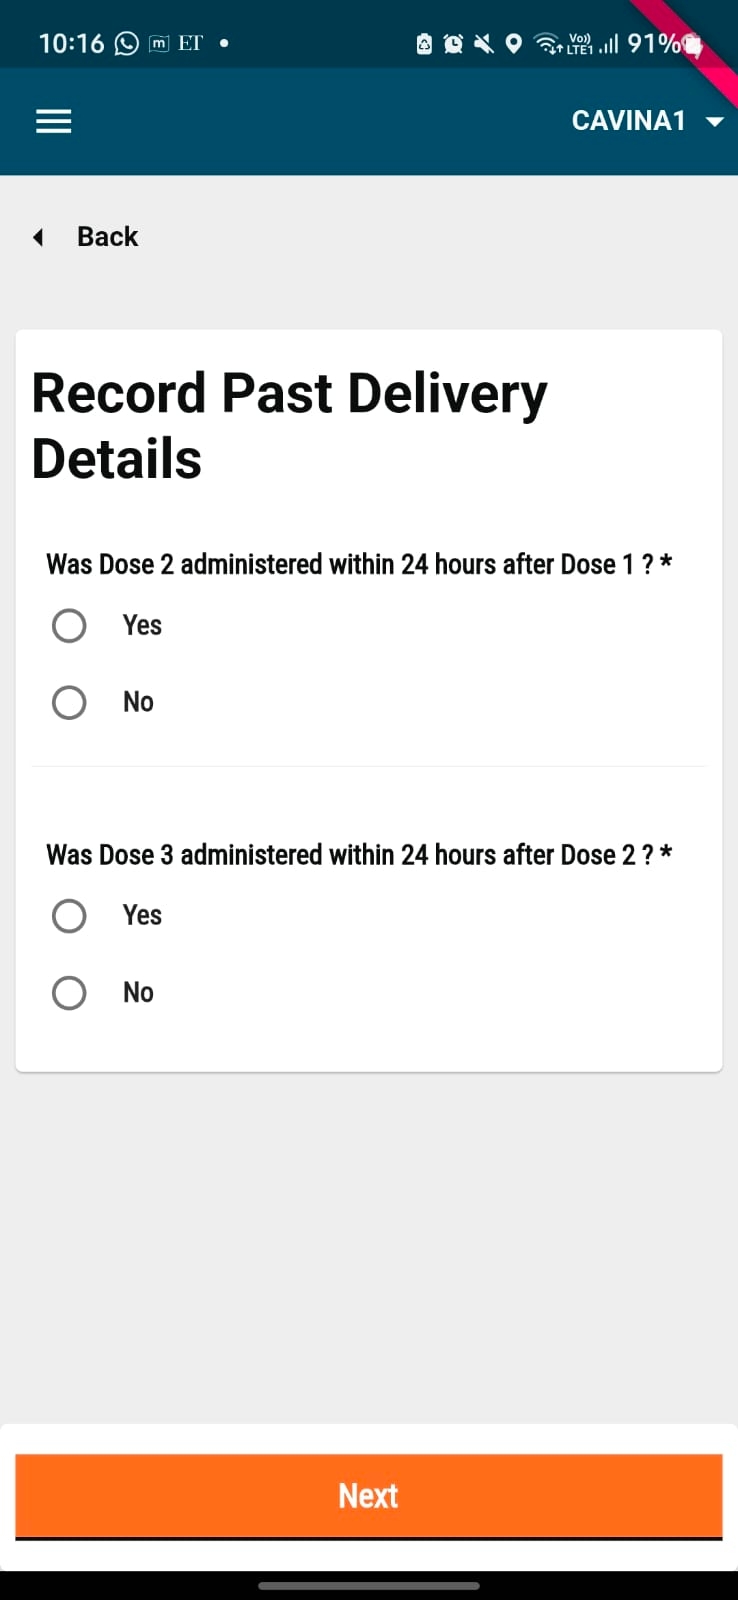


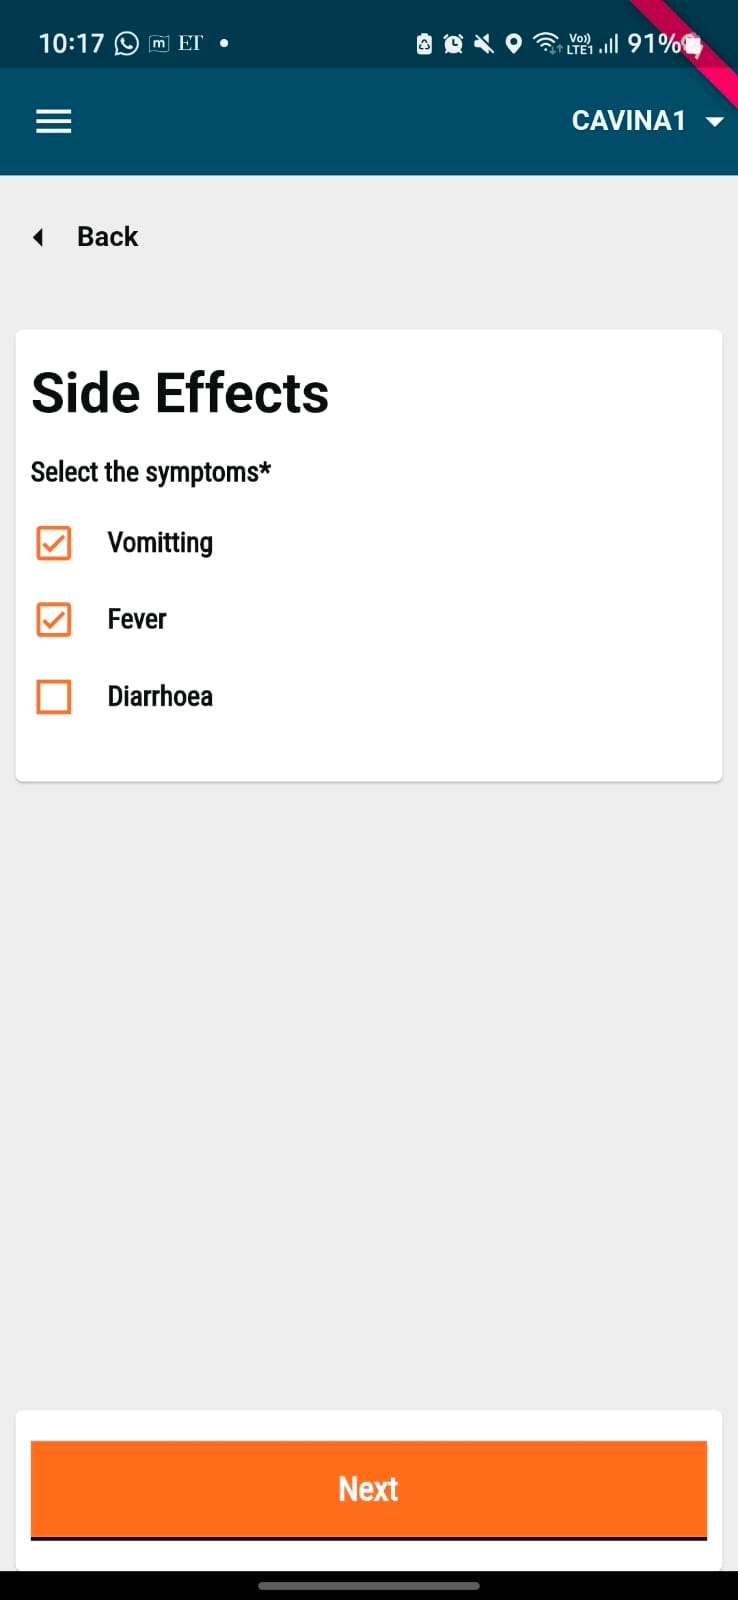
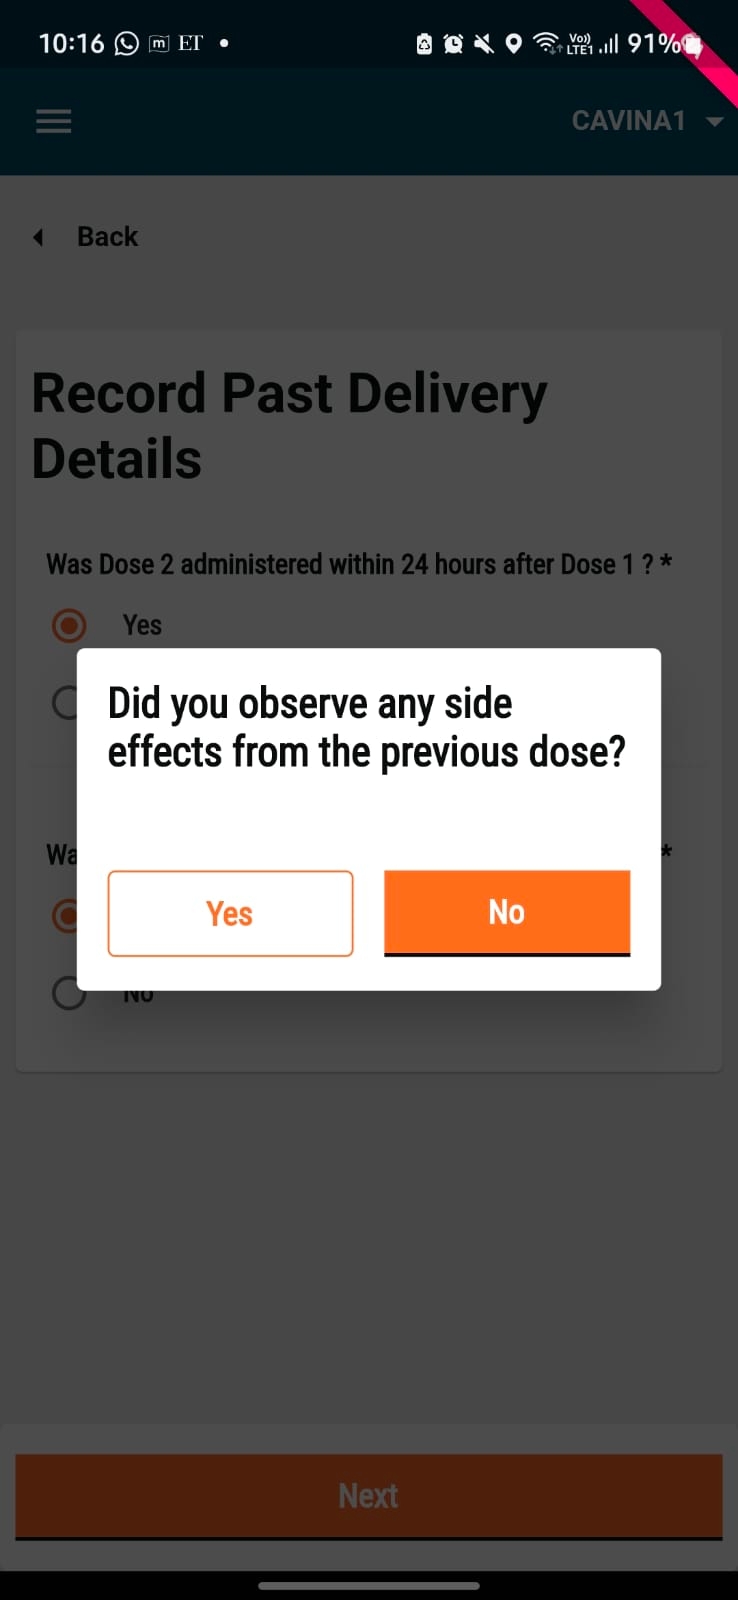
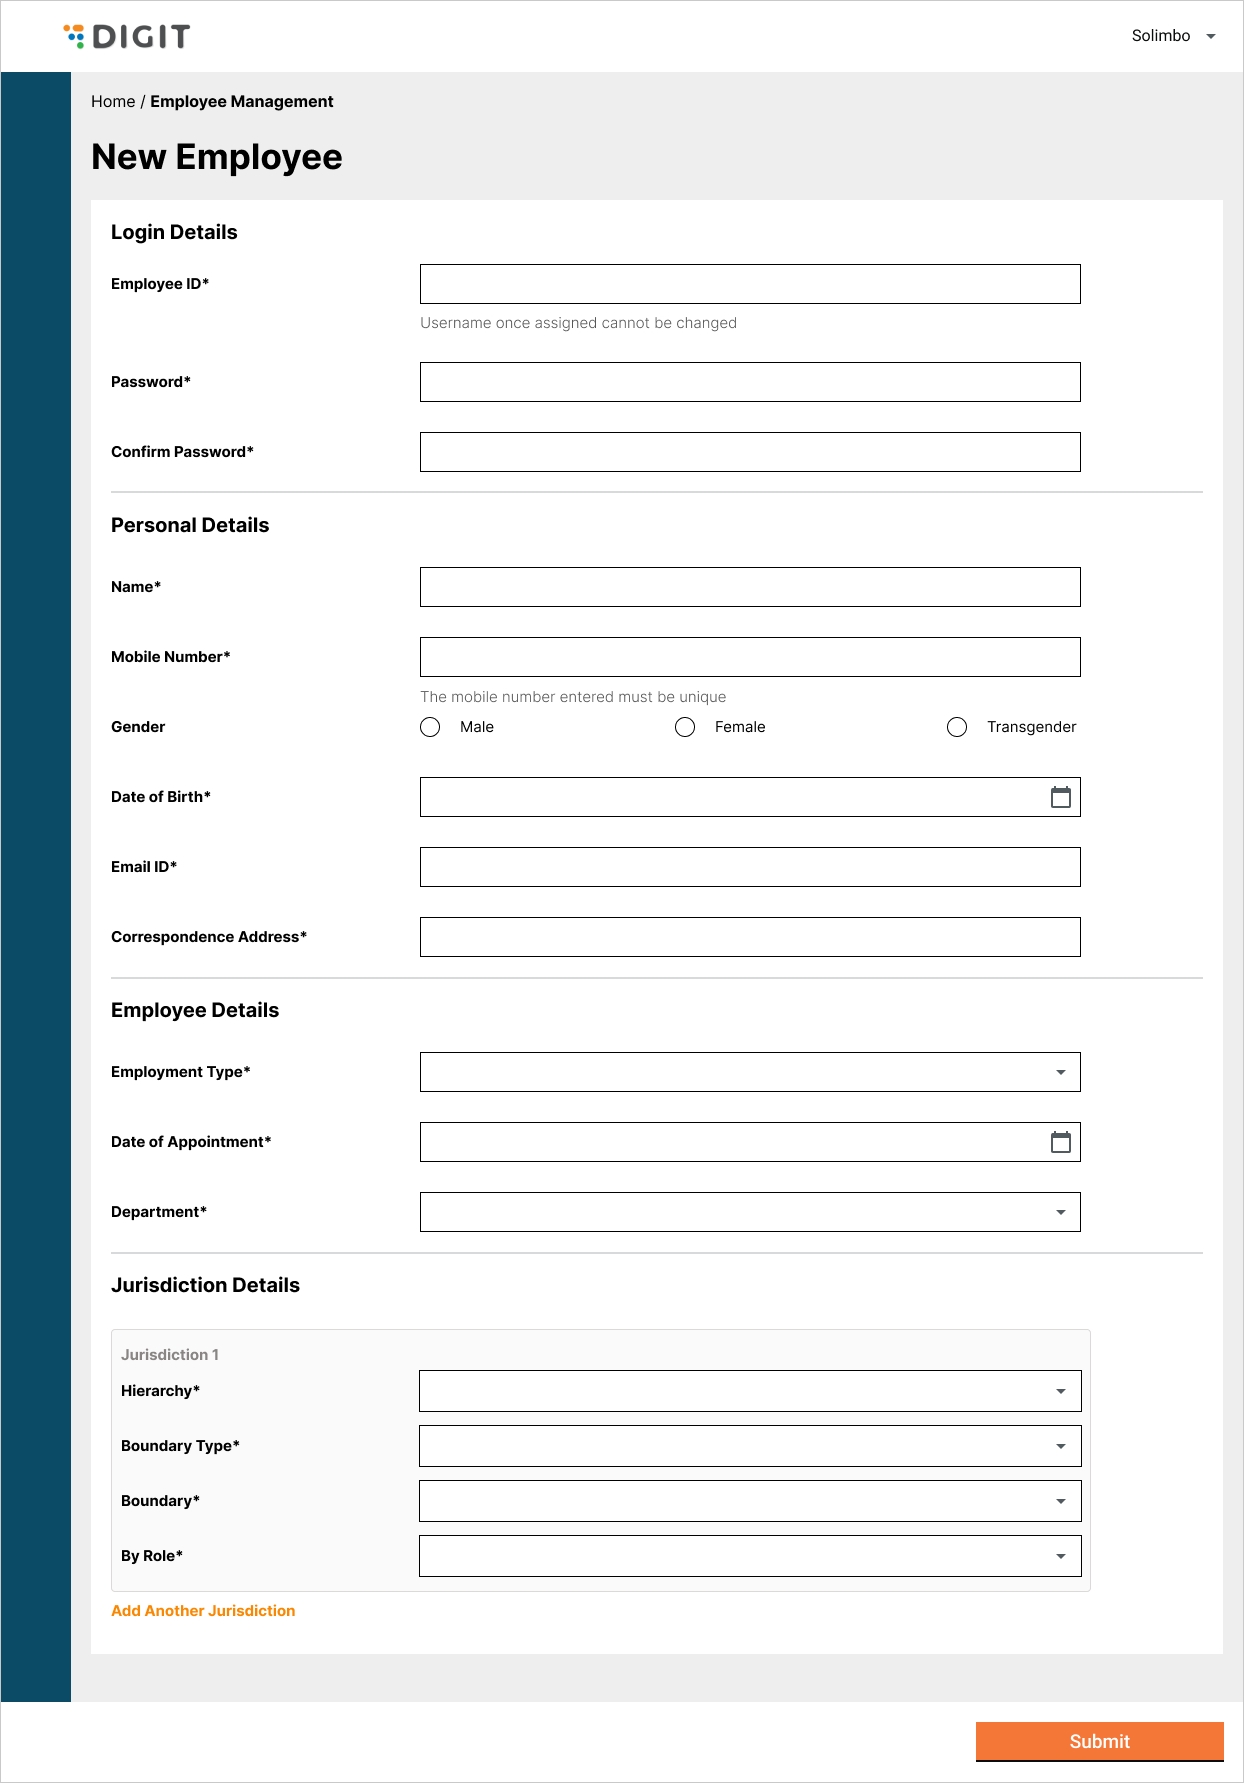
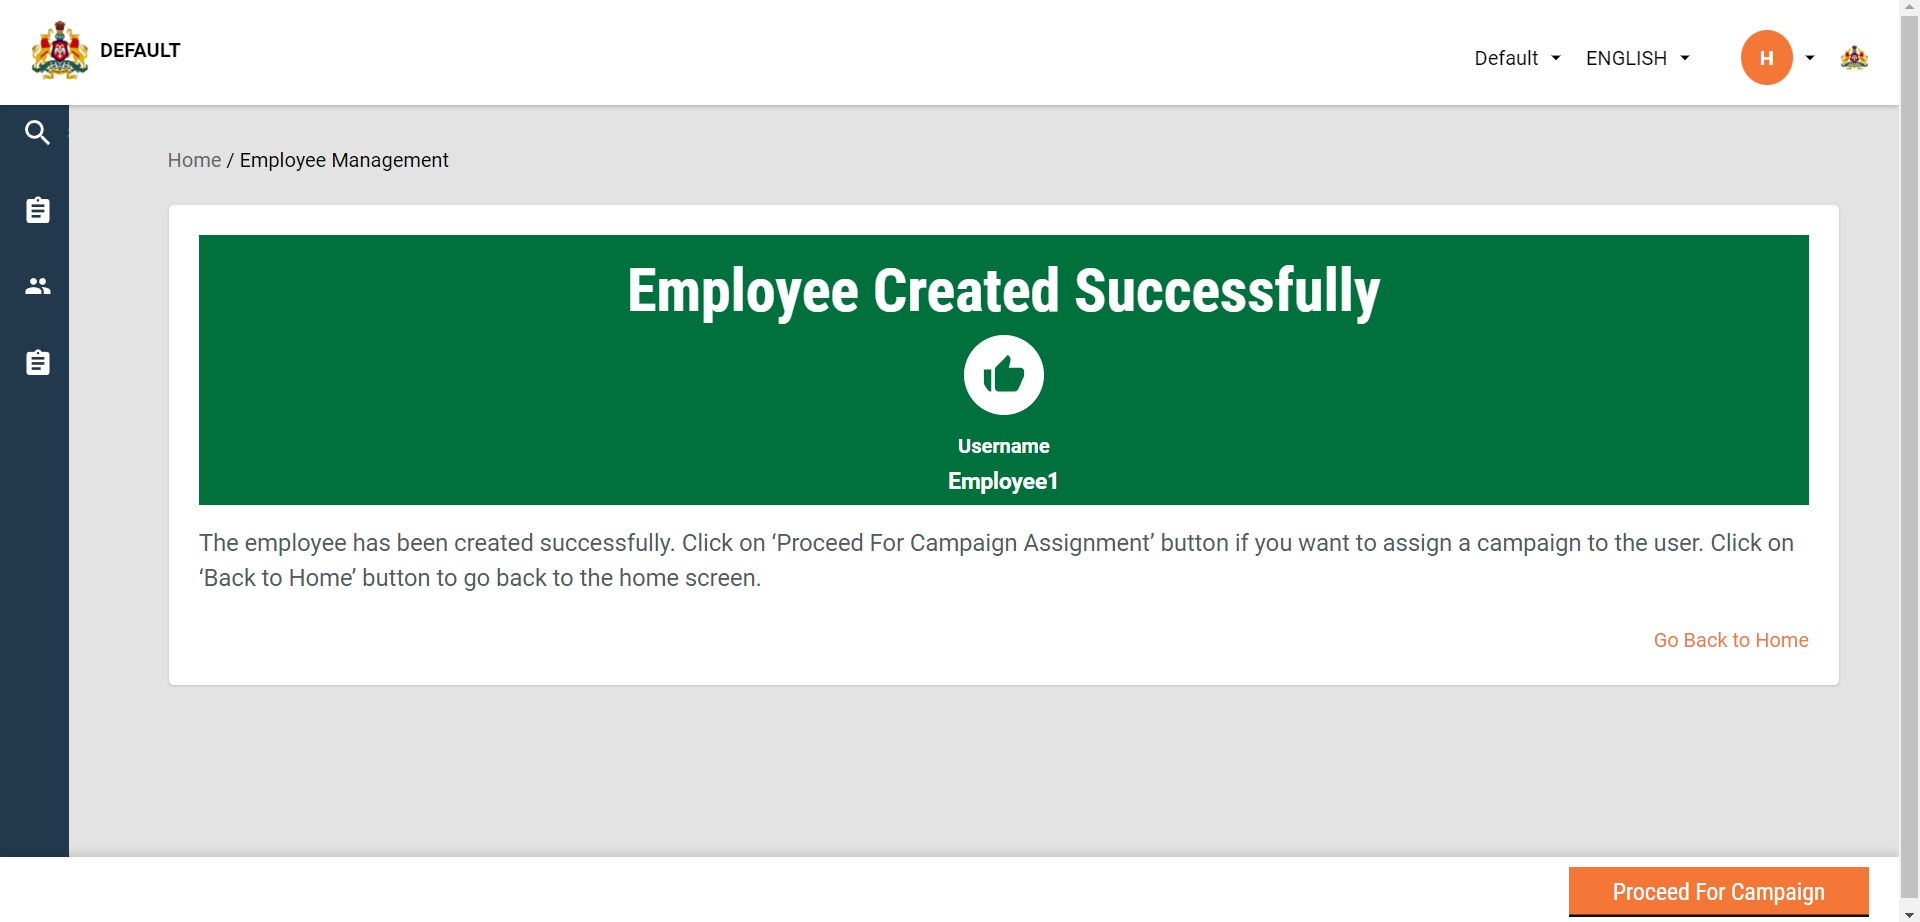
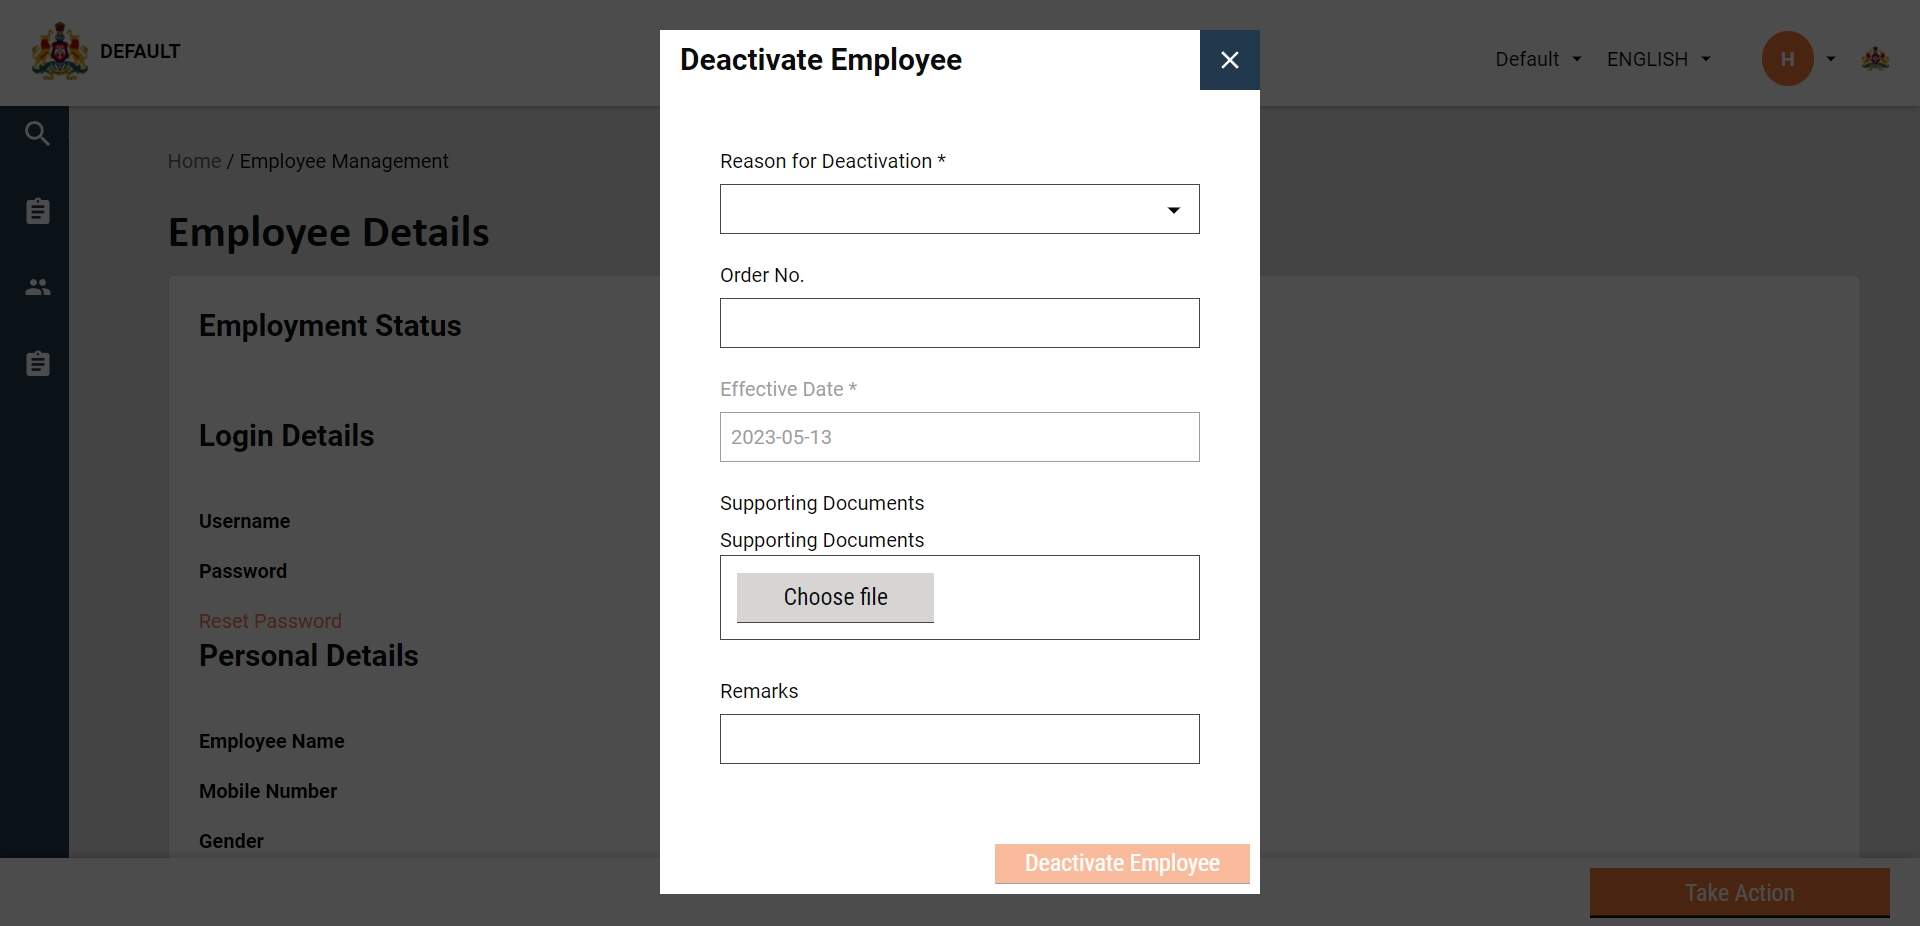

Age in Months: This will be a mandatory field that will capture the age of the beneficiary being referred in months.
Gender: This is a mandatory field with a dropdown having values: Male, Female, Other.
Was the child admitted/transferred to the hospital due to a serious illness?: Answer Yes/No. This is a mandatory field.
Child with positive malaria test treated with anti-malarial?: Answer Yes/No. This is a mandatory field.
Name and Dose of Anti-Malarial: Respond with the name and dose details.
Add DevOps updates on top of the branch that holds the HCM v1.7 DevOps changes.
Use the updated seed data dump provided here: 🔗 Seed Data File
Import this dump into the environment. This will replace/upgrade the existing seed data with the updated version needed for HCM v1.8.
No manual picking of changes from the document is required.
Localization Update
The reference document lists the updated translations/localization changes: 🔗 Reference Document
Use the finalized localization files (JSON/CSV) that are shared along with the migration package. These files should be applied directly to update the localization.
project-factory
v0.4.0-ac42230ae7-576
Test the environment for:
Functionality changes from v1.8 configs.
Project Factory V2 API functionality.
Seed data correctness.
UI rendering in the workbench.
If all tests pass, proceed to promote changes to the required environments.
Run:
Step 2 — Clean project (to avoid old cached versions)
Run:
workbench-ui
v0.4.0-51d99a279e-514
Click on a cluster to see details, including:
Total number of points in the cluster
Information about the supervisors who recorded the data
This allows users to track performance and coverage across different areas efficiently.
Benefits:
Provides a clear view of inventory management.
Helps supervisors identify discrepancies, such as potential shortages or overstocking, ensuring campaign needs are met.
Track stock movements
Benefits:
Enables supervisors to compare and analyse data across different dimensions quickly.
Facilitates faster identification of trends, patterns, or areas requiring attention.
Benefits:
Easily identify trends and compare performance across regions or cycles.
Pinpoint areas requiring further attention or intervention.
Provides a clear comparative view to support data-driven decisions and enhance campaign efficiency.
Overlap: Children who received treatment in both cycles
Benefits:
Identify the extent of coverage across cycles
Ensure children needing multiple rounds of treatment are accounted for
Highlight treatment gaps and overlaps to support efficient campaign management and decision-making
Boundary code
This is a code for the sub-classification of a particular boundary. It should be unique across all boundaries defined.
Mandatory
MDMS
Unique QR Code for Each Employee: Every employee is assigned a unique and dynamic QR code for attendance verification
Supervisor Scan Verification: Supervisors use the mobile app to scan the dynamic QR code and confirm presence.
Accounts All User Types: Works for both mobile and non-mobile employees.
Offline Functionality: Attendance can be recorded without internet and synced once connectivity is restored.
Team Supervisor
The supervisor can mark the attendance.
Supervisor can mark the attendance of every employee just by scanning the unique QR code which they have.
Click on the Manage Attendance card to mark employee attendance.
On the screen, view the list of all active campaigns.
Identify the campaign for which you want to mark attendance.
Click Open Register to begin marking attendance for that campaign.
When the Missed Attendance pop-up appears, review the list of all missed attendance entries.
To update past records, change the date and mark attendance for the selected day.
To proceed without updating past records, continue by marking attendance for the current date.
Go to the Mark Attendance screen.
View the list of attendees mapped to the supervisor.
Use the date scroller to navigate to the required date.
Select a session — Morning or Evening (both are available by default).
Mark the attendance for each attendee.
Use the Present/Absent filter to quickly view and update attendees by status.
The screen displays all the employees linked to the logged-in user.
By default, the status of each employee is shown as Attendance Unmarked.
To begin marking attendance, click on the Mark Attendance button.
A scanner will open with two options for marking attendance:
Scan QR Code
(other option to be specified if available)
When a QR code is scanned successfully, a pop-up appears showing attendee details such as:
Name
Age
QR creation time
The supervisor should verify the details and then continue scanning QR codes for the remaining attendees.
QR pop-up to scan the attendee
Attendee QR code Pop-up to confirm the attendee
After a QR code is successfully scanned, the attendee’s status automatically changes to Present.
For attendees whose QR codes are not scanned, two Call-to-Action (CTA) options are displayed:
Mark as Present
Mark as Absent
If the scanner does not work or attendance cannot be marked through QR code for any reason, the user can switch to Manual Attendance.
While marking attendance manually, the user must provide a reason for the manual entry.
When marking attendance manually, the user can set the status to either Present or Absent.
Once attendance is marked for all employees, click on the Submit button to submit the register.
While submitting, the user must add comments for each individual register.
To mark attendance for past dates, note that the scanner is not available. Attendance must be marked manually.
Select the required past date using either:
The date scroller, or
The calendar picker.
For the selected date, mark the attendance of the required employees manually as Present or Absent.
After marking attendance for the entire list of employees, click on the Submit button.
Before submission, enter comments for the respective register.
Once comments are added, proceed to submit the register.
After adding the required comments, click Submit.
The register will then be submitted successfully.
To mark attendance for non-mobile users, the distributor using DIGIT HCM generates and shows the QR code for those users.
The supervisor scans the QR code to mark their attendance.
This process tags non-mobile users to mobile users, ensuring that every individual involved in the campaign is properly accounted for.
Open the Hamburger menu and select the new option “Non Mobile Users”.
A list of all non-mobile users tagged to the mobile user will be displayed.
Each non-mobile user has a QR code containing their username and individual ID.
The supervisor can scan this QR code to mark the attendance of non-mobile users.
Changed
Household
household-db:v1.2.0-8900208f3e-74
Changed
Individual
health-individual-db:v1.2.0-a059ce1ffd-101
Changed
Project
health-project-db:v1.2.0-8900208f3e-108
Changed
Product
product-db:v1.2.0-8900208f3e-1
Changed
Referral Management
referralmanagement-db:v1.2.1-80c43fbe9a-100
Changed
Stock
stock-db:v1.2.0-8900208f3e-67
Changed
HRMS
health-hrms-db:v1.4.0-683e9da909-13
Changed
Pgr
health-pgr-services-db:v1.2.0-bf5fea17f1-7
Changed
Service-request
health-service-request-db:v1.2.0-01c2b65440-5
Changed
Attendance
health-attendance:v1.3.0-b38ace6dd-65
Changed
Muster-roll
health-muster-roll-db:v1.2.0-4f1ffc1b8-14
Changed
Expense
health-expense-db:v1.2.0-4f1ffc1b8-35
Changed
DIGIT-2.9-LTS
egov-otp
egov-otp-db:central-instance-a0fc793059-8
Changed
egov-user
egov-user-db:central-instance-70f75d2a82-77
Changed
mdms-v2
mdms-v2-db:central-instance-6fae5fdefc-96
Changed
egov-enc-service
egov-enc-service-db:central-instance-e346023dcb-26
Changed
egov-workflow
egov-workflow-v2-db:central-instance-1248cc50e5-38
Changed
Admin Console
workbench-ui
workbench-ui:v0.4.0-bcca6afadd-601
Changed
project-factory
project-factory:v0.4.0-500e69c6fa-587
Changed
HCM v1.8
Beneficiary-IdGen
beneficiary-idgen:v1.0.0-5933b8db0e-8
New Service
HCM v1.8
Referral Management
referralmanagement:v1.2.1-80c43fbe9a-100
changed
HCM v1.8
Individual
health-individual-db:v1.2.0-a059ce1ffd-101
HCM v1.8
Household
household-db:v1.2.0-8900208f3e-74
changed
HCM v1.8
Referral Management
referralmanagement:v1.2.1-80c43fbe9a-100
changed
HCM v1.8
Service-request
health-service-request-db:v1.2.0-01c2b65440-5
Attendance Revamp
attendance-service
health-attendance:v1.3.0-b38ace6dd-65
changed
Facility
facility-db:v1.2.0-b8e24ab705-33
There are 3 scenarios -
The user is assigned to work at a community living facility.
The user is assigned to work at both a community living facility and in a house-to-house setting.
The user is assigned to work from house to house.
Use the separate navigation options available for:
Community Living Facilities–based delivery
Transit Post–based delivery
Household–based delivery
Click on the respective card to navigate to its flow.
The Community Living Facilities and Transit Post cards will appear only if required by the campaign.
The progress bar tracks beneficiaries covered under Household and Community Living Facilities.
Transit Post coverage is monitored separately since it is not included in the microplan.
Enter the name of the required Community Living Facility (CLF) in the search bar.
The search result displays the following:
The name of the CLF
Its proximity (distance from the user)
Click the Open button on the card to open the selected CLF.
The Match Not Found message is displayed if the search result does not match the given criteria. Proceed with Register New Household to add the household details.
Use the filters provided to refine the search.
Enter the CLF Location details.
Click on the relevant card to select the Type of Structure. Select the Number of rooms depending on the requirement.
Enter the Individual Details as prompted on the screen.
Click on the scan voucher to open the camera and scan the QR code on the voucher.
Once the voucher is linked, click on the Submit button. This opens the Summary screen.
Click on the Submit button to record and save the data.
On the Beneficiaries screen, click on the Assess Eligibility button to evaluate if the individual is eligible for the selected campaign.
Answer the questions on the screen to evaluate the conditions.
On the Community Living Facility (CLF) screen, click Record Delivery.
This opens the Beneficiary Details screen.
Use this screen to record the administration of services for any individual-based campaign, such as:
Neglected Tropical Diseases (NTDs)
Seasonal Malaria Chemoprevention (SMC)
Polio
On the Household screen, click Record Delivery.
This opens the Beneficiary Details screen.
Use this screen to record the delivery of services for any household-based campaign, such as:
Bednet distribution
Click on the Delivery card.
Search for the required Community Living Facility (CLF) by name.
Since all CLF data is pre-loaded during down-sync, the necessary information for the selected CLF will be readily available.
If CLF data is not pre-loaded from the microplan, deliveries must be managed through on-the-spot registration. Once registered, the delivery screens and steps remain the same as with pre-loaded data.
- The KPI indicators show the deliveries completed for the current data and cumulative for that user. The following details are captured:
Type of transit post (master data)
Name of transit post (user input)
The resource is scanned using the scanner feature.
Enter the resource code if the scan does not work for any reason.
- The screen shows:
The number of deliveries for the transit post is selected
The transit post details
The resource to be delivered
Eligibility conditions
Resource details scanned
Click on Record Delivery to add a count toward the delivery of one beneficiary. The process is repeated until all beneficiaries are administered. Click on Close Delivery to complete the deliveries for the selected transit post.
Upon successful scan, the acknowledgement screen is displayed.
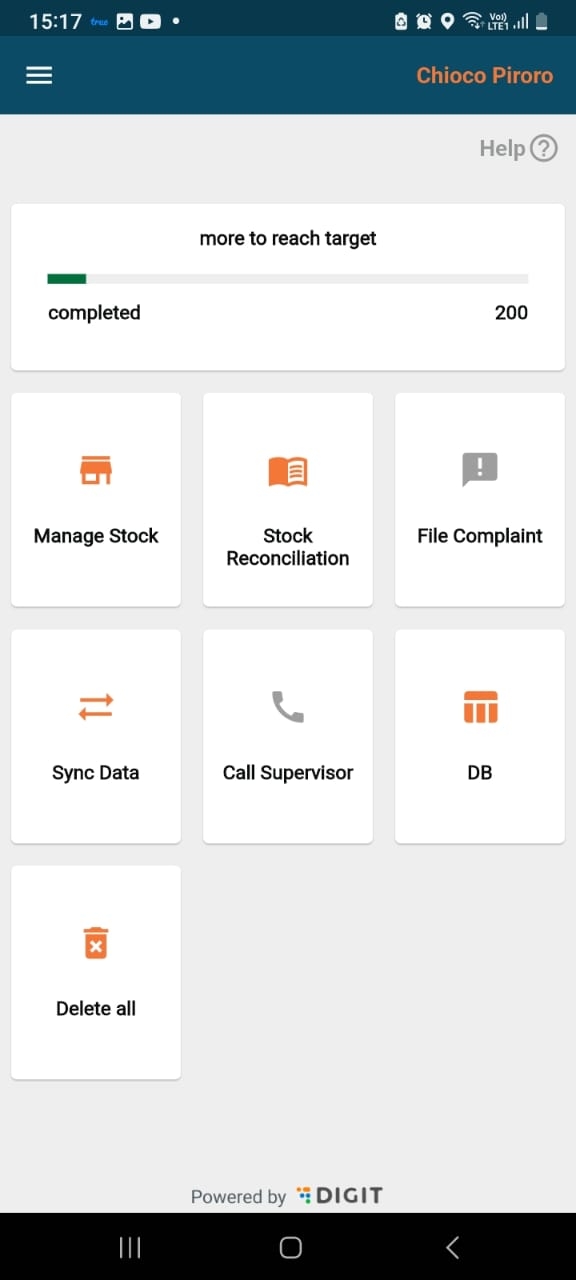
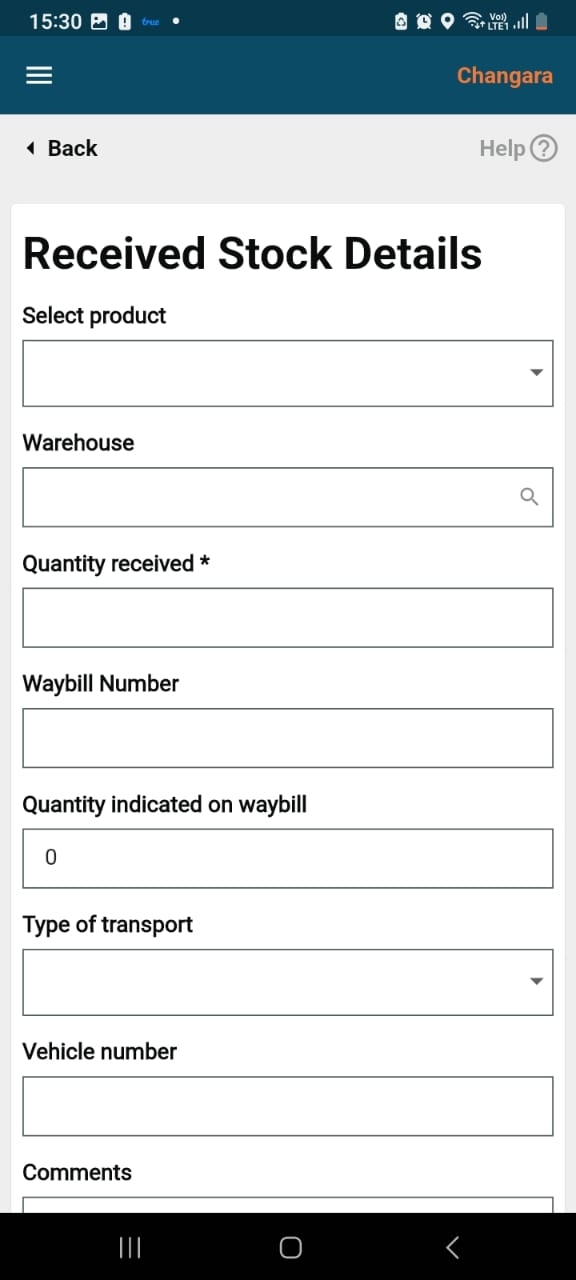

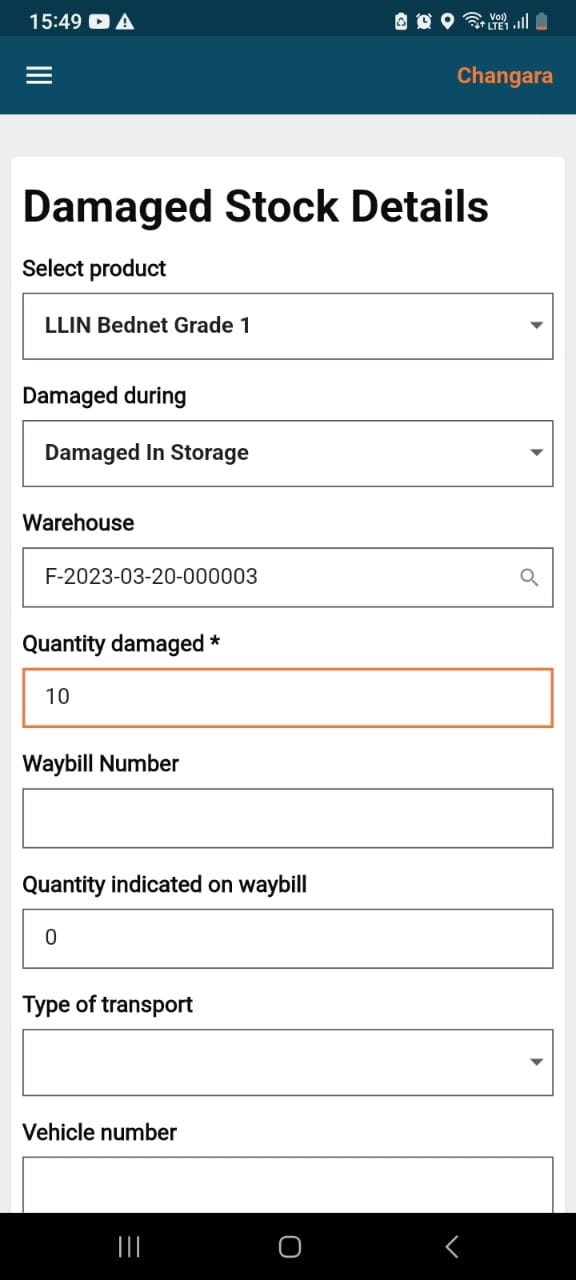
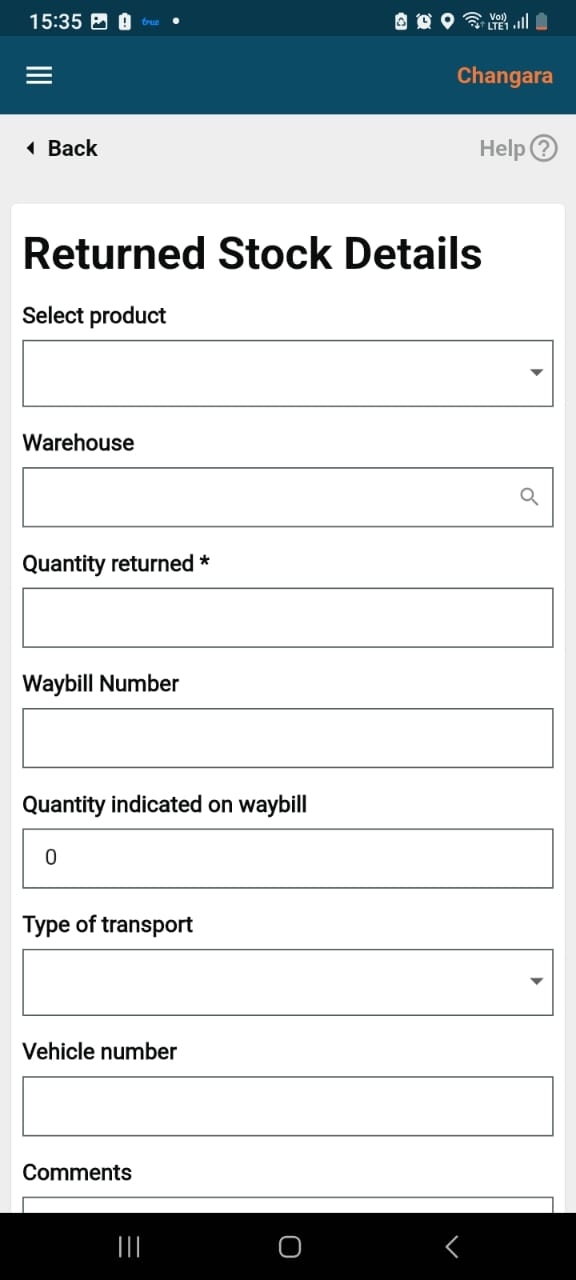
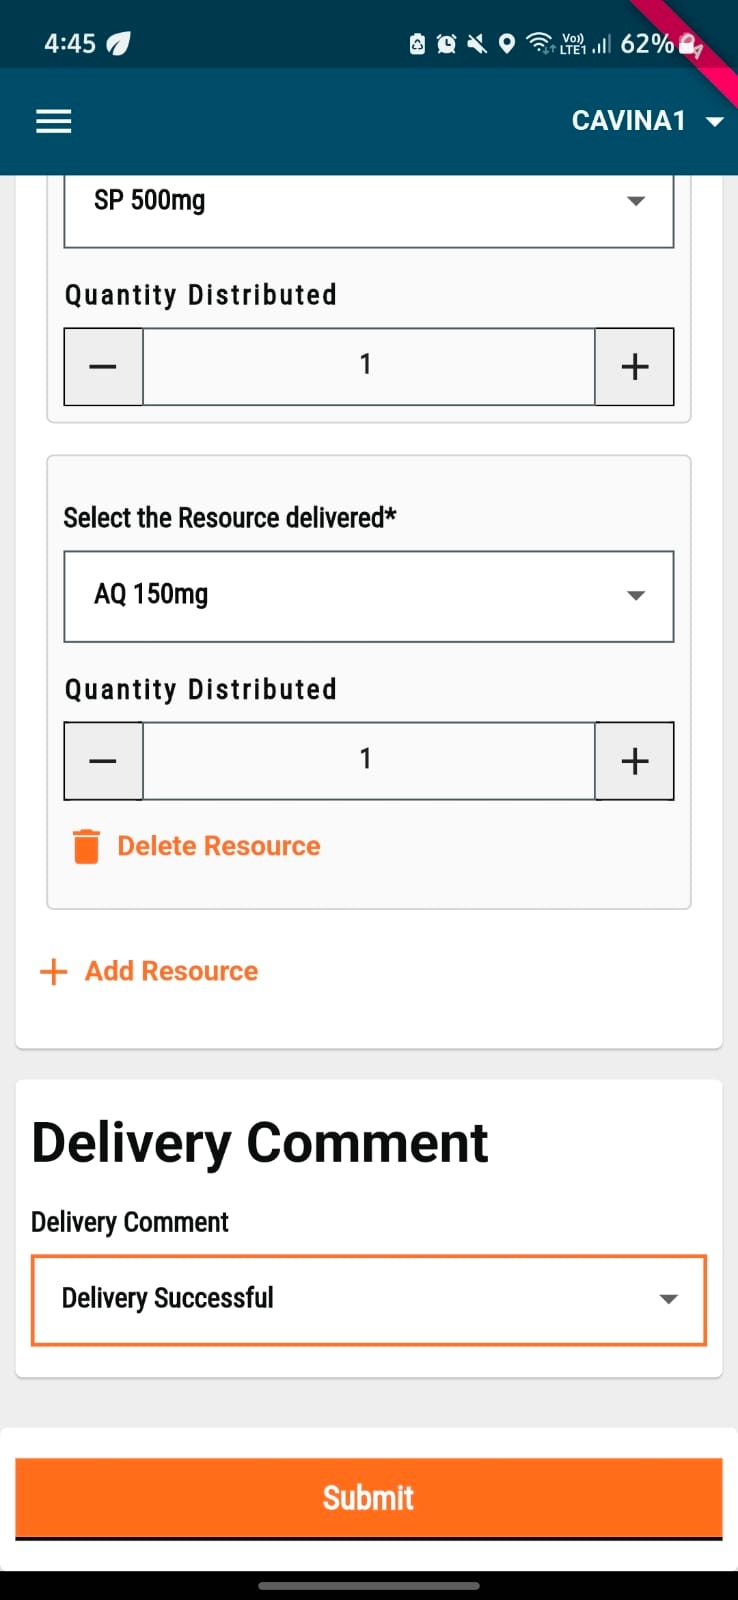
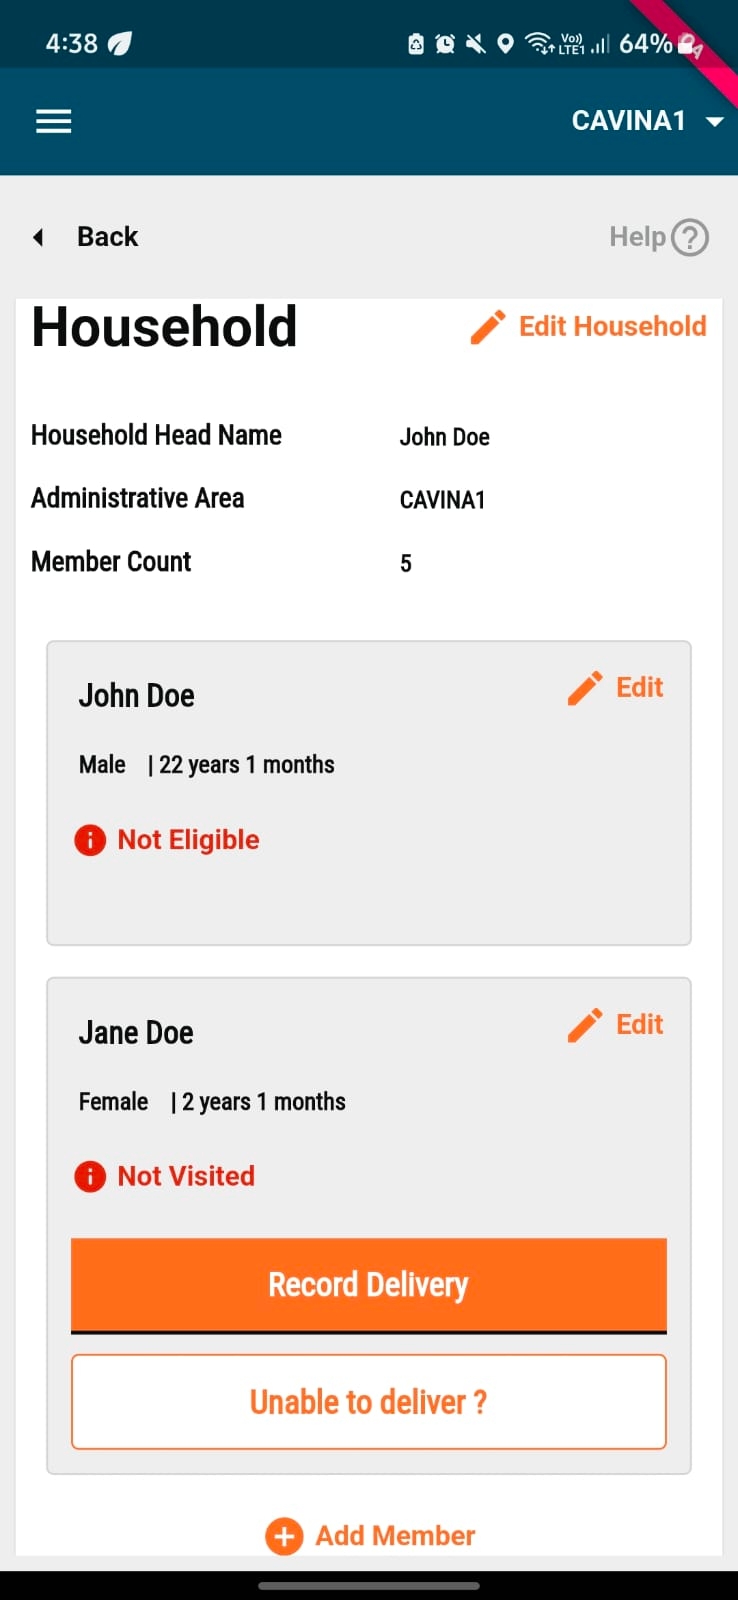

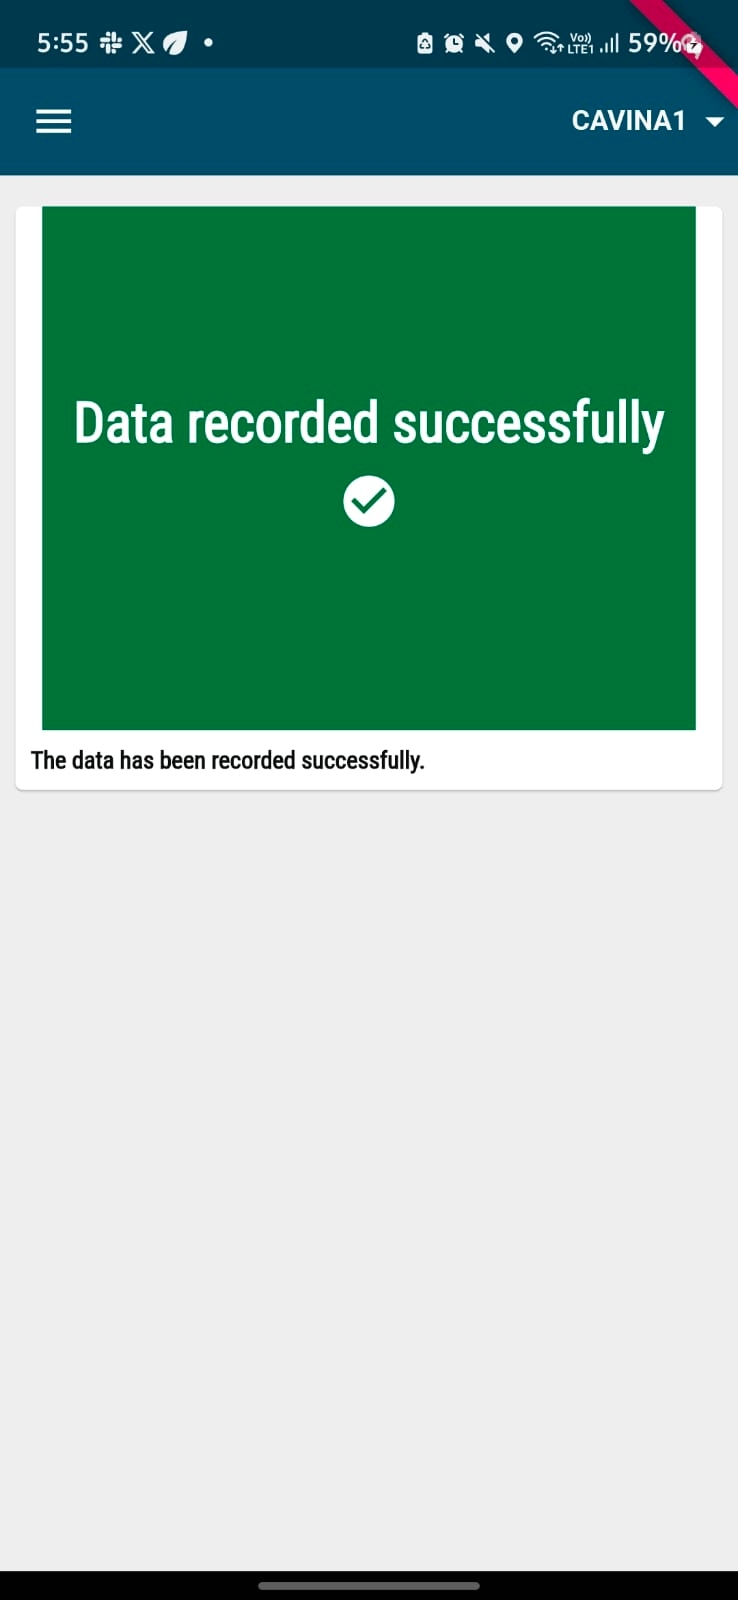

flutter pub upgrade
flutter clean
flutter pub get
flutter pub outdatedflutter pub upgradeflutter clean
flutter pub getflutter pub outdatedString
2
64
Yes
Boundary name* (In English)
The name of the boundary that is being defined in the English language.
Mandatory
MDMS
String
2
256
Yes
Boundary name* (In local language)
The name of the boundary that is being defined in the local language of the state. For example, Portuguese, Hindi, etc.
Mandatory
MDMS
String
2
256
Yes
Parent boundary code*
This is the boundary code of the parent which identifies to which parent the child belongs to.
Mandatory
MDMS
String
2
64
Yes
Boundary type*
The name of the boundary type, that is, ward, zone, etc.
Mandatory
MDMS
String
2
256
Yes
Hierarchy type code*
The code of the boundary hierarchies for which this particular boundary is defined.
Mandatory
MDMS
String
2
64
Yes
Campaign start date
The date when the campaign starts in the respective boundary.
Mandatory
MDMS
Date
Yes
Campaign end date
The date when the campaign is supposed to end in the respective boundary.
Mandatory
MDMS
Date
Yes
Total households
Total households present in the boundary (as per the micro-plan).
Mandatory
MDMS
Numeric
Yes
Targeted households
Total households targeted for the respective boundary (as per the micro-plan).
Mandatory
MDMS
Numeric
Yes
Total individuals
Total individuals present in the boundary (as per the micro-plan).
Mandatory
MDMS
Numeric
Yes
Targeted individuals
Total individuals targeted in the boundary (as per the micro-plan).
Mandatory
MDMS
Numeric
Yes
Bed nets estimated to be delivered
Total bed nets estimated to be delivered in the boundary (as per the micro-plan).
Mandatory
MDMS
Numeric
Yes
changed
changed

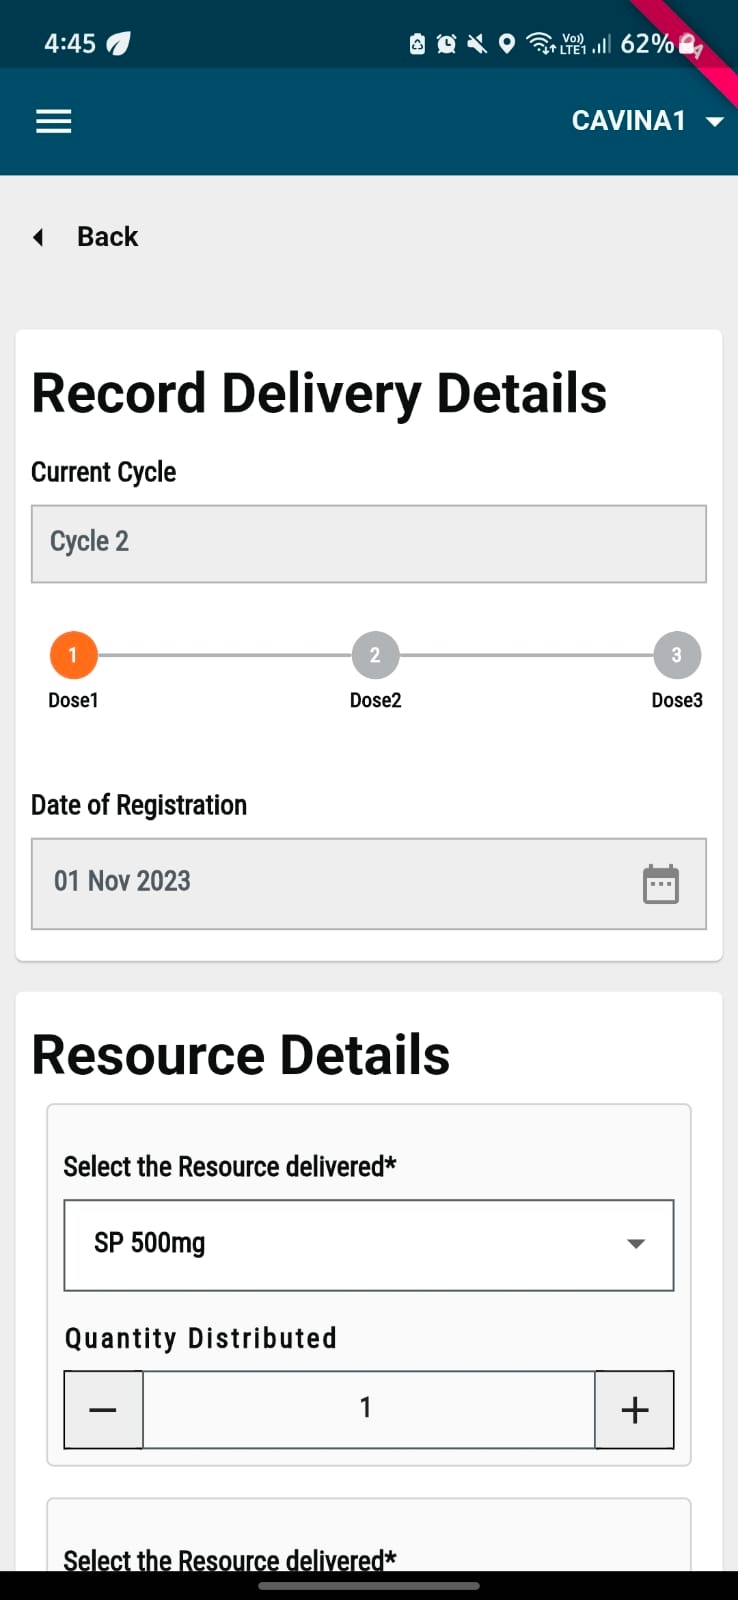
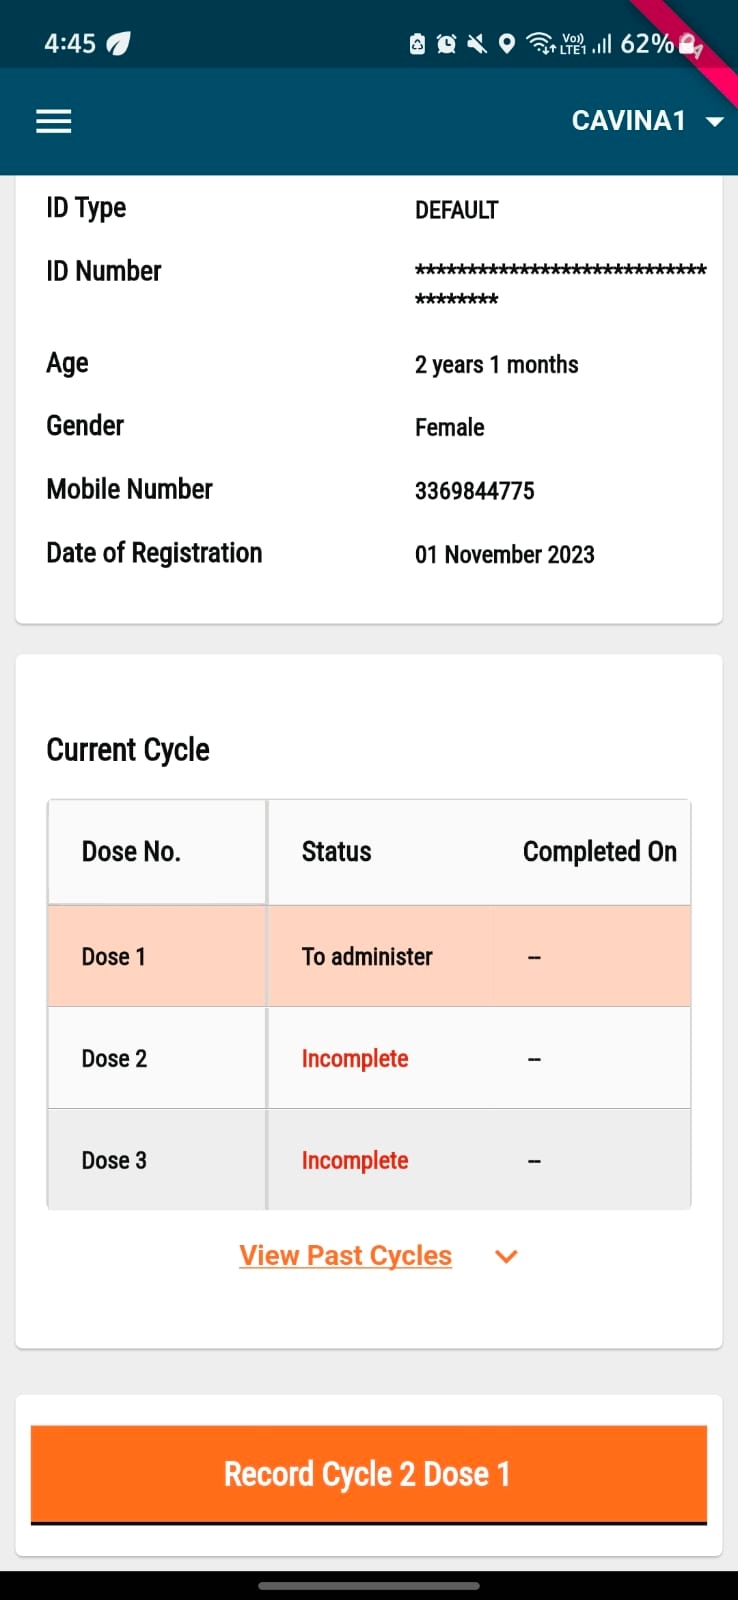
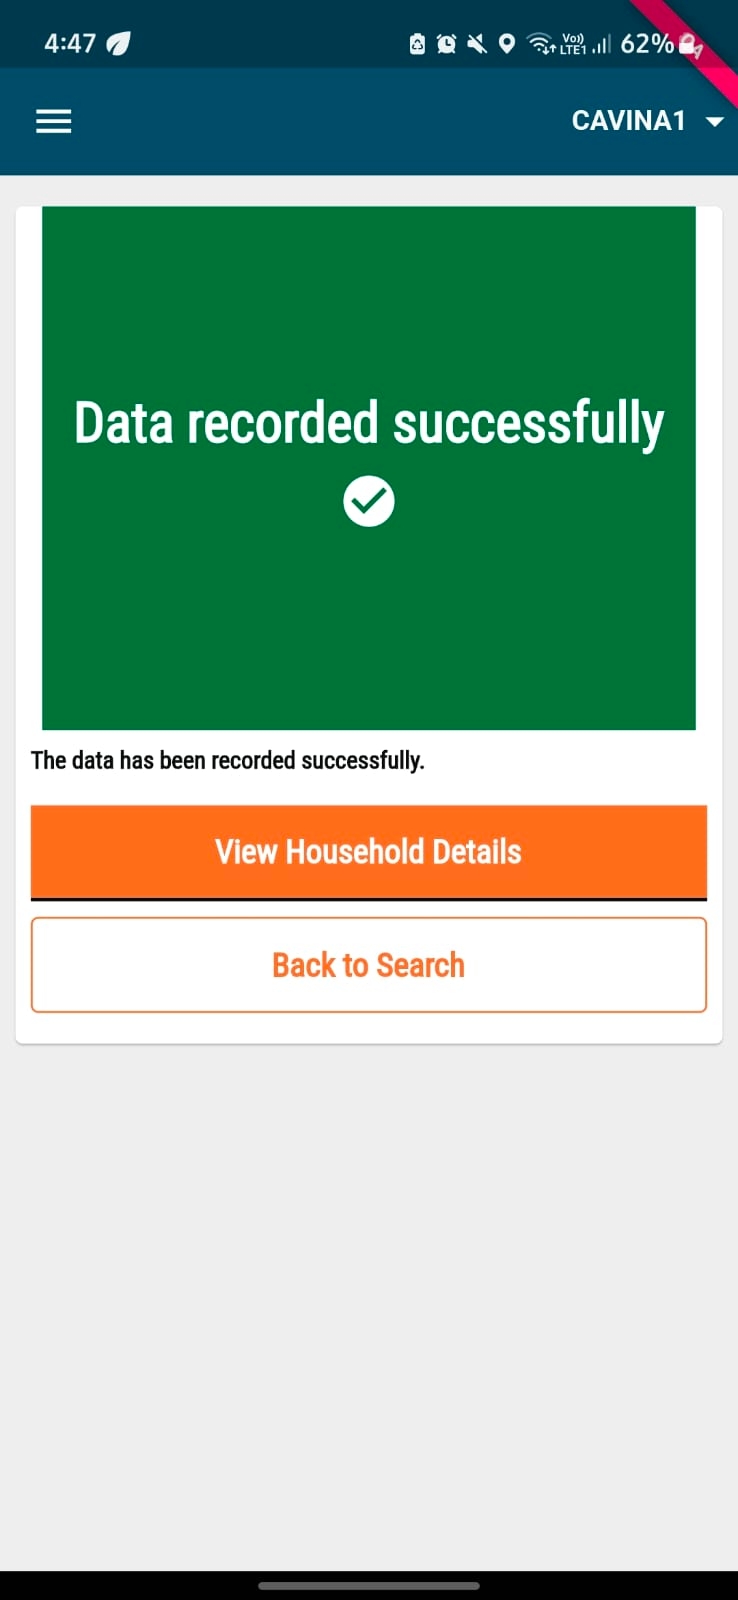
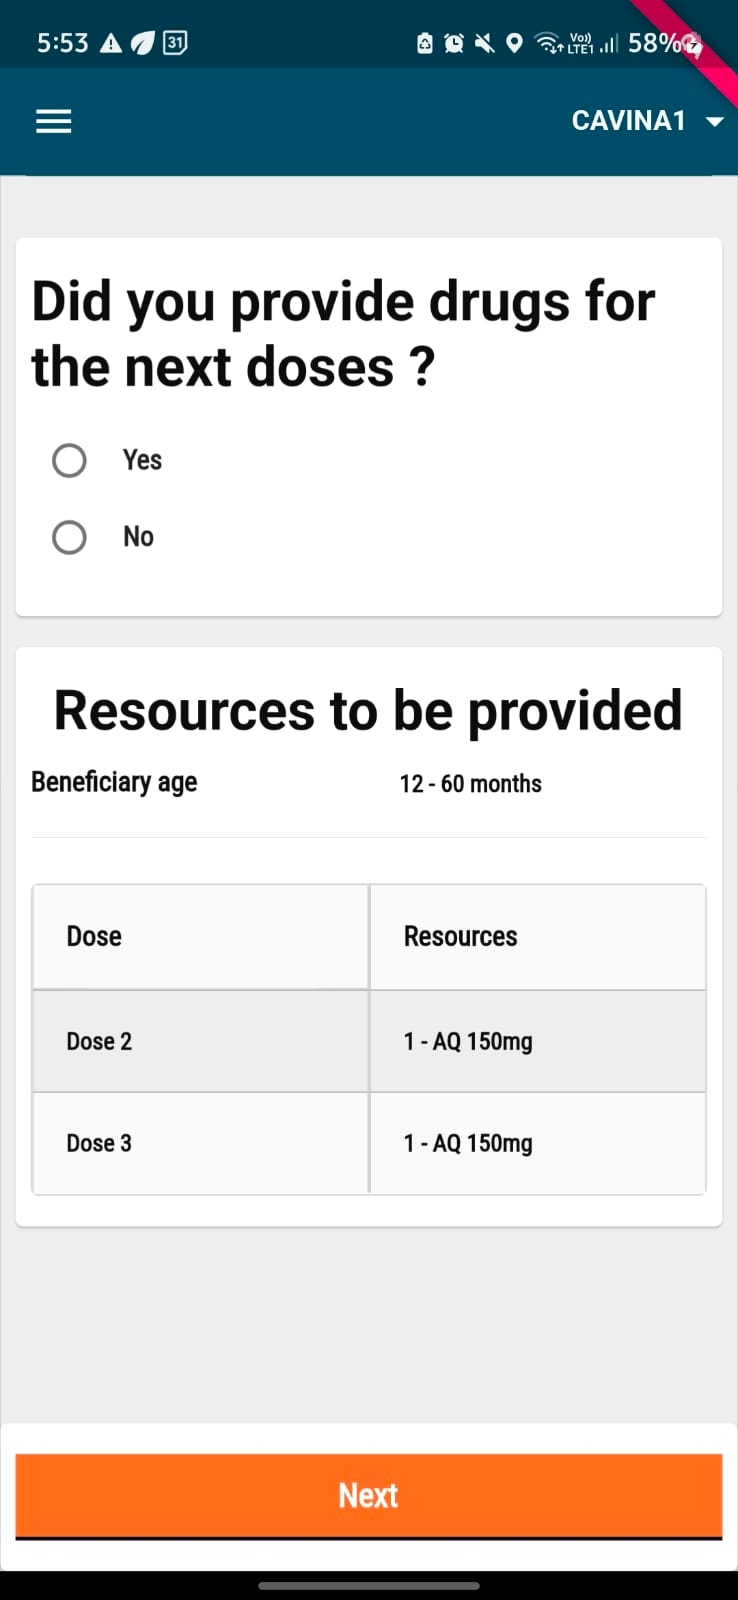
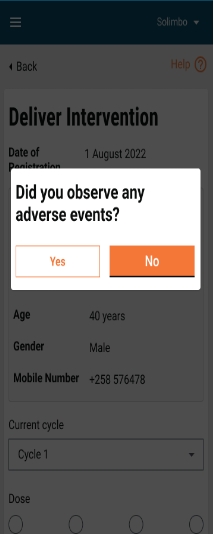
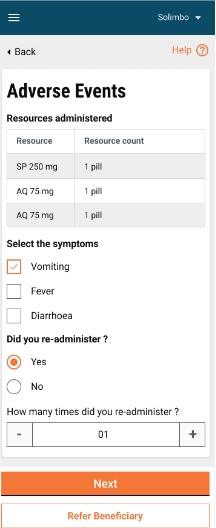
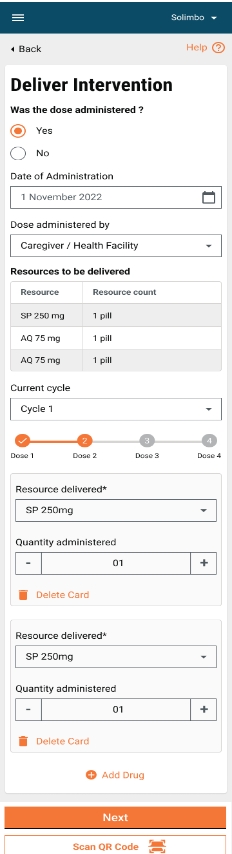
^1.0.6
digit_data_model
^1.0.6
^1.2.0-dev.1-console
registration_delivery
^1.0.6
^1.1.0-dev.5-console
digit_dss
^1.0.4
^1.0.4+2
closed_household
^1.0.5
^1.1.0-dev.1-console
survey_form
^1.0.1
^1.0.3
complaints
^1.0.2
^1.0.3
digit_ui_components
^0.0.2-dev.14
^0.2.2+4
sync_service
^1.0.0
^1.0.2
attendance_management
^1.0.4+1
^1.0.5+1
digit_scanner
^1.0.5
^1.0.6+1
inventory_management
^1.0.5
^1.0.6
referral_reconciliation
digit_crud_bloc
^0.0.2-dev
digit_data_converter
^0.0.2-dev
digit_forms_engine
^0.0.2-dev
^1.0.4
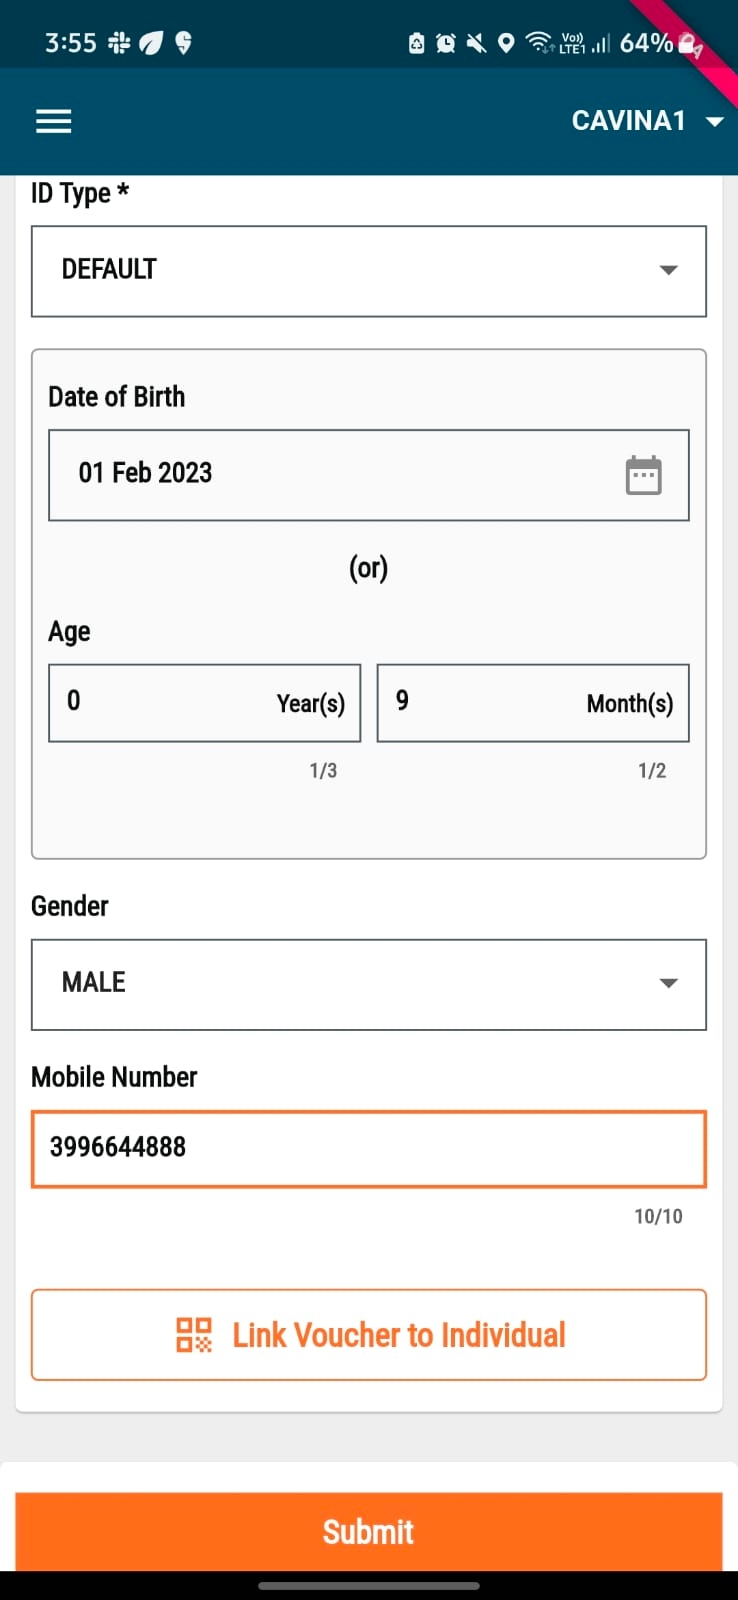

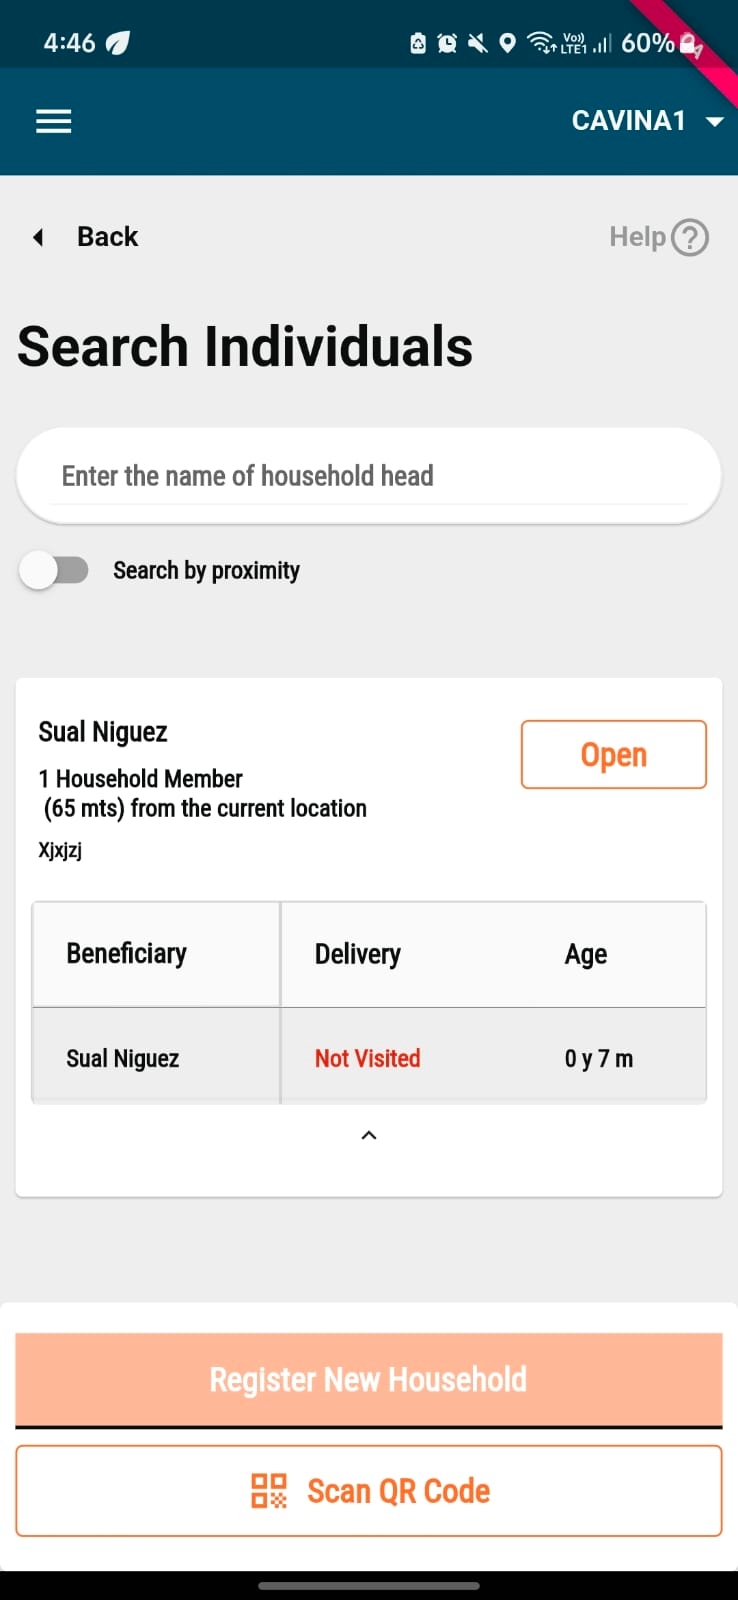
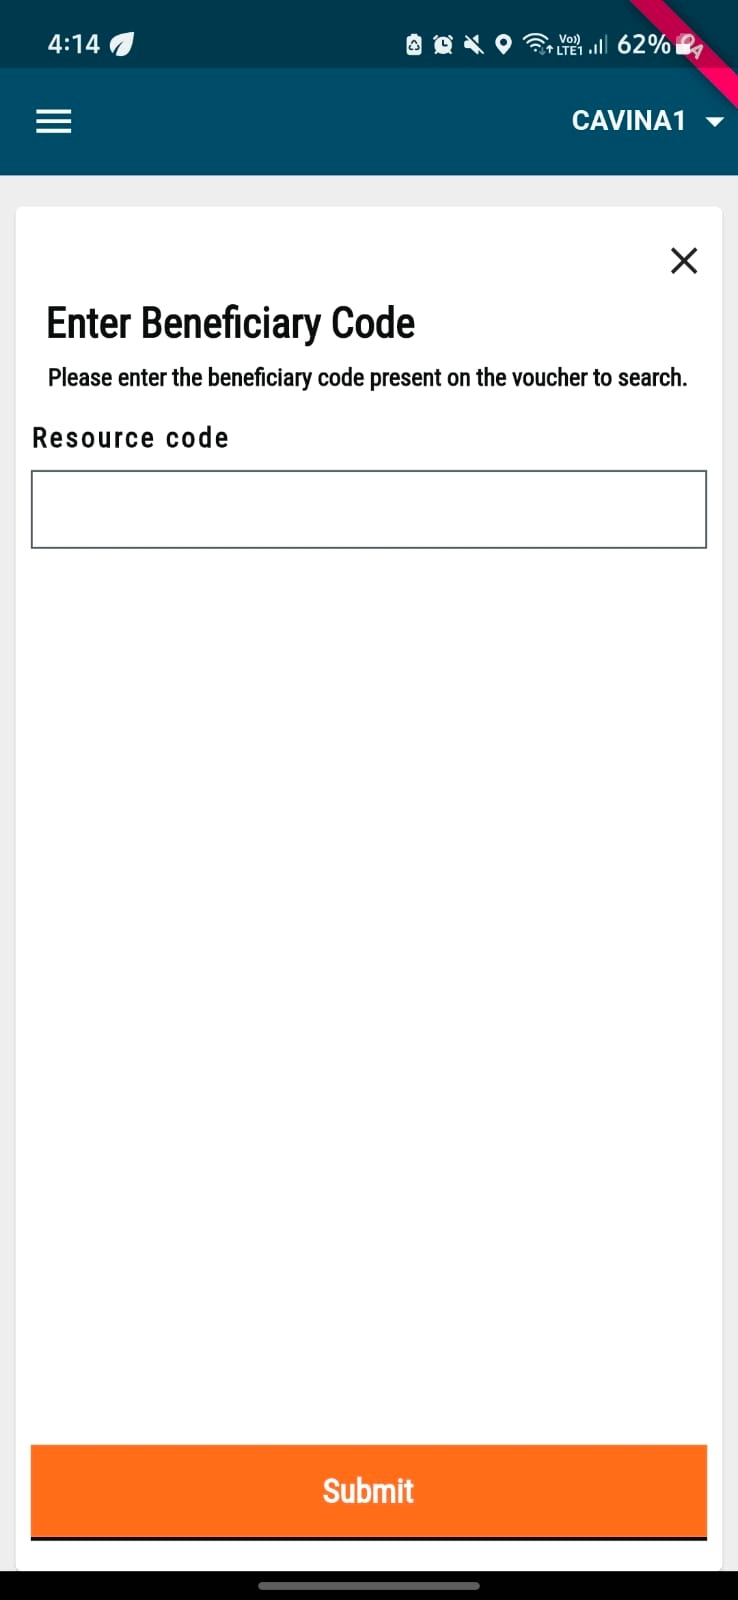
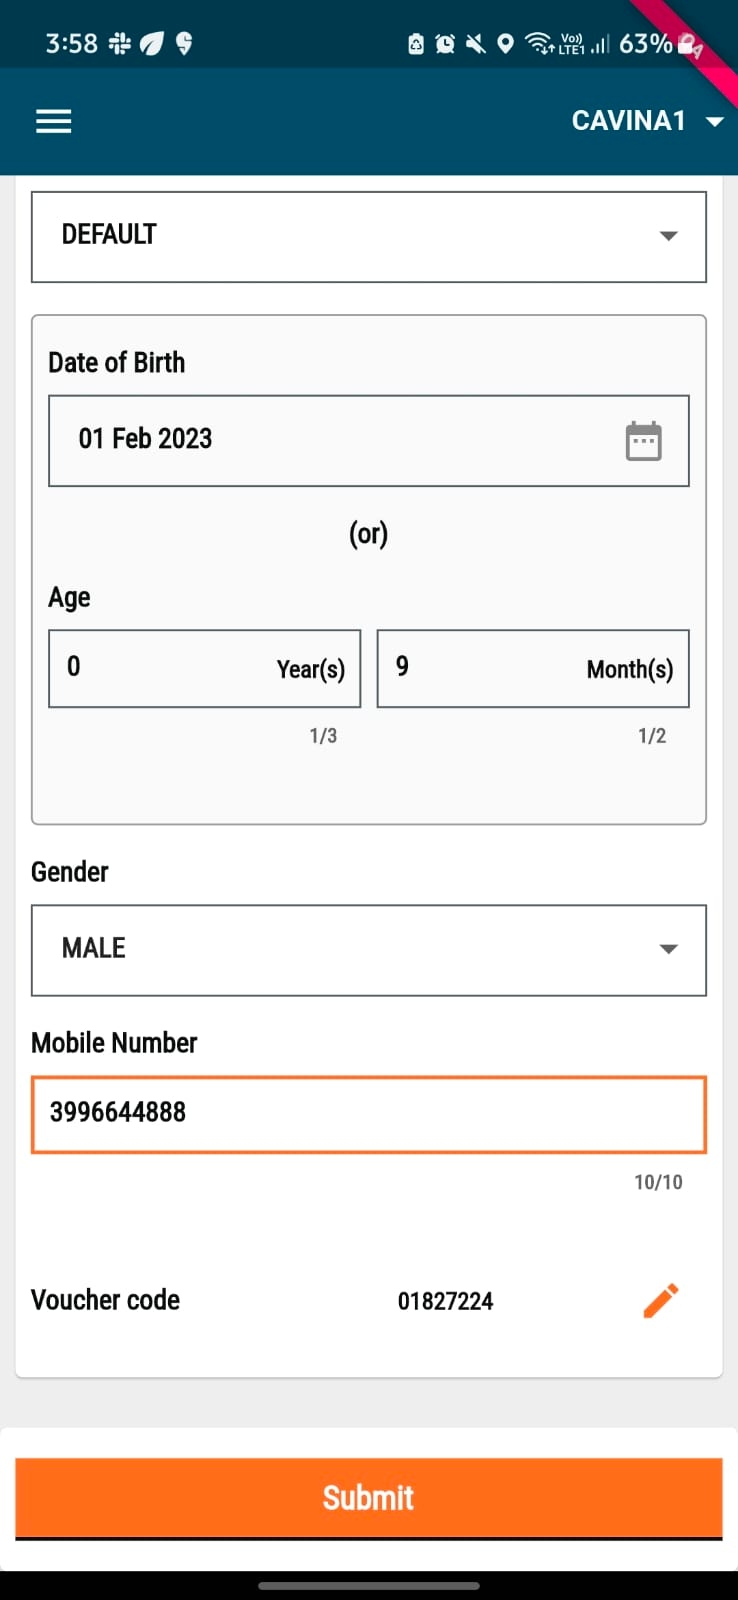
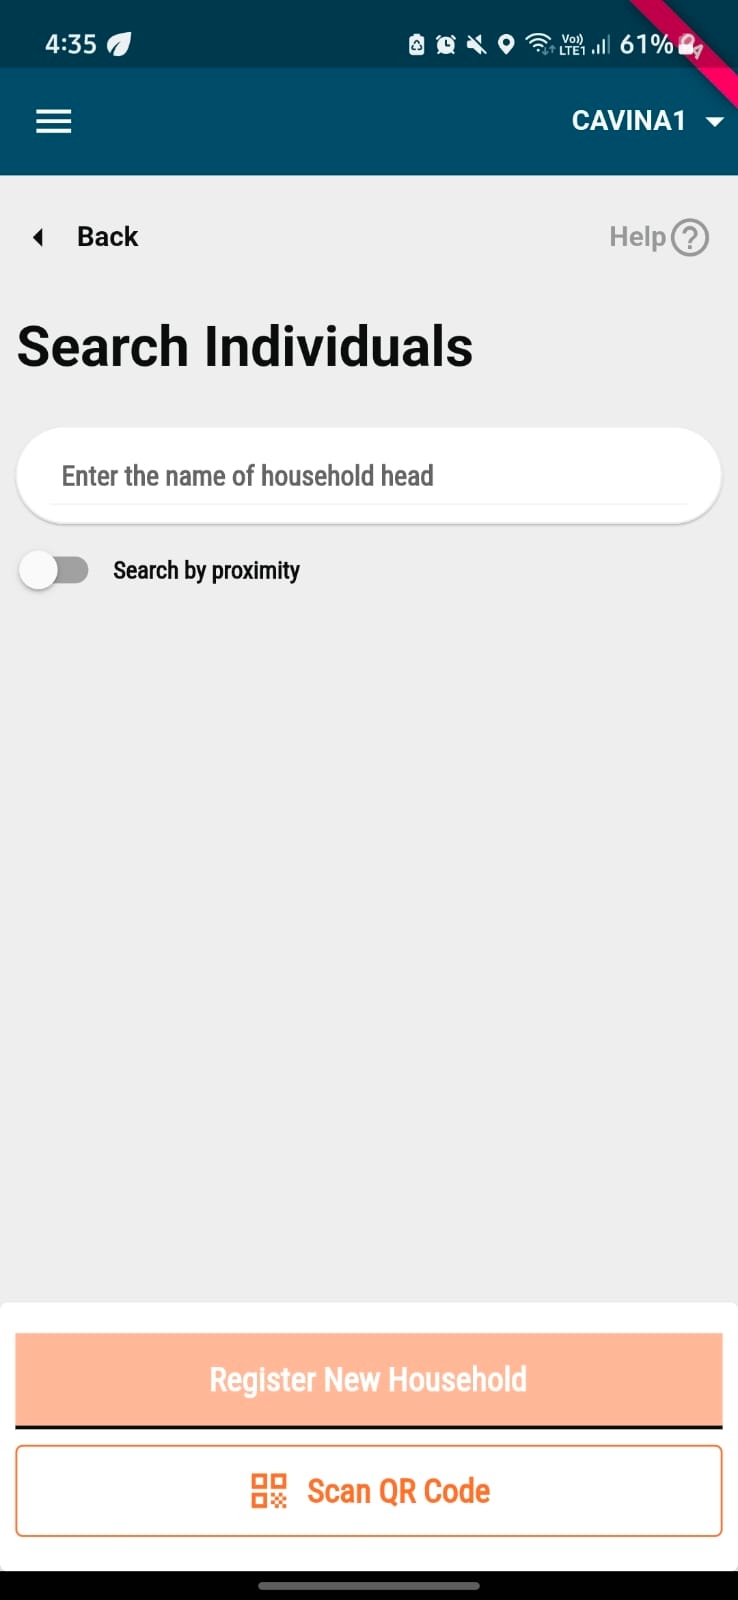
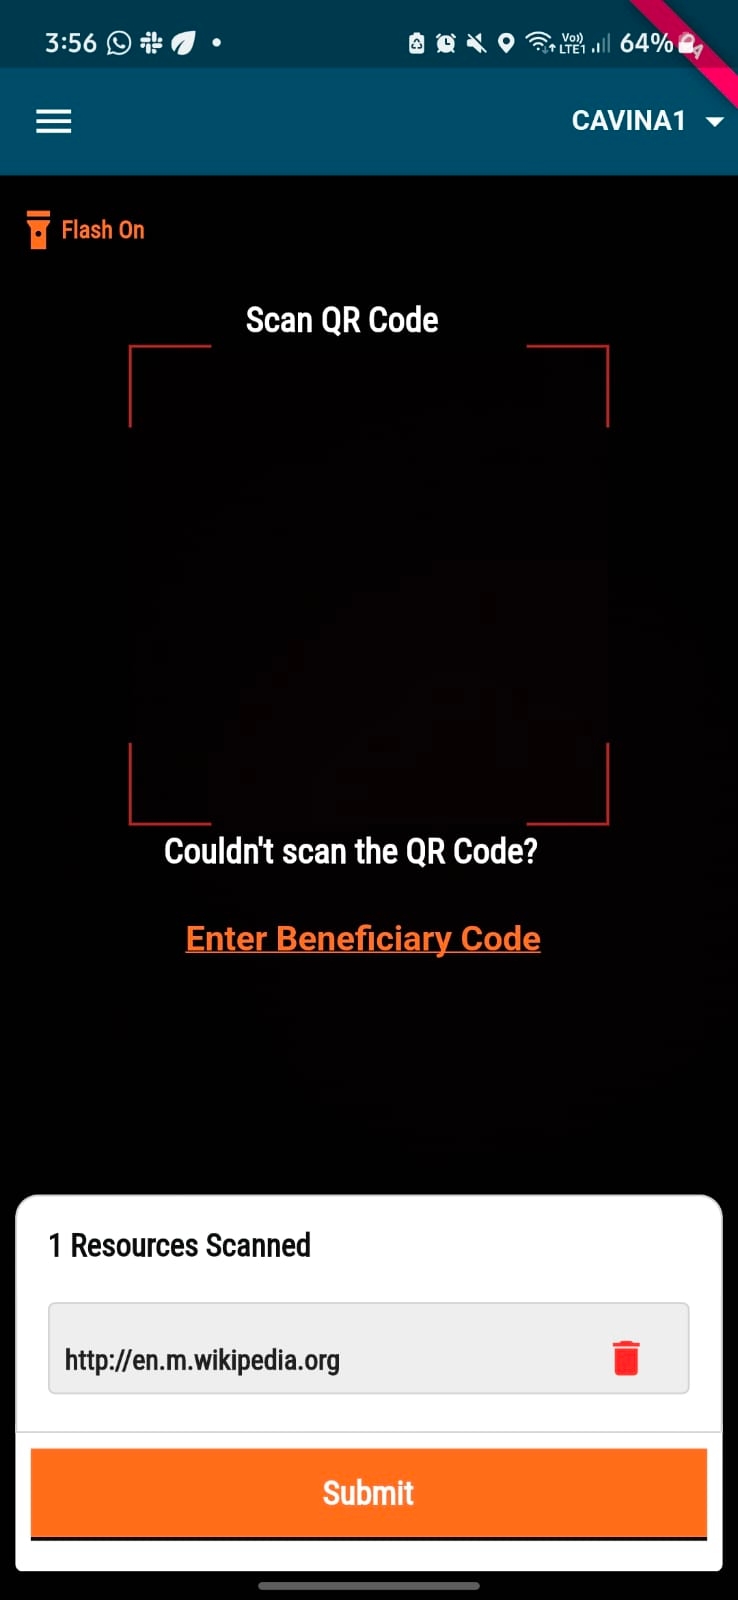
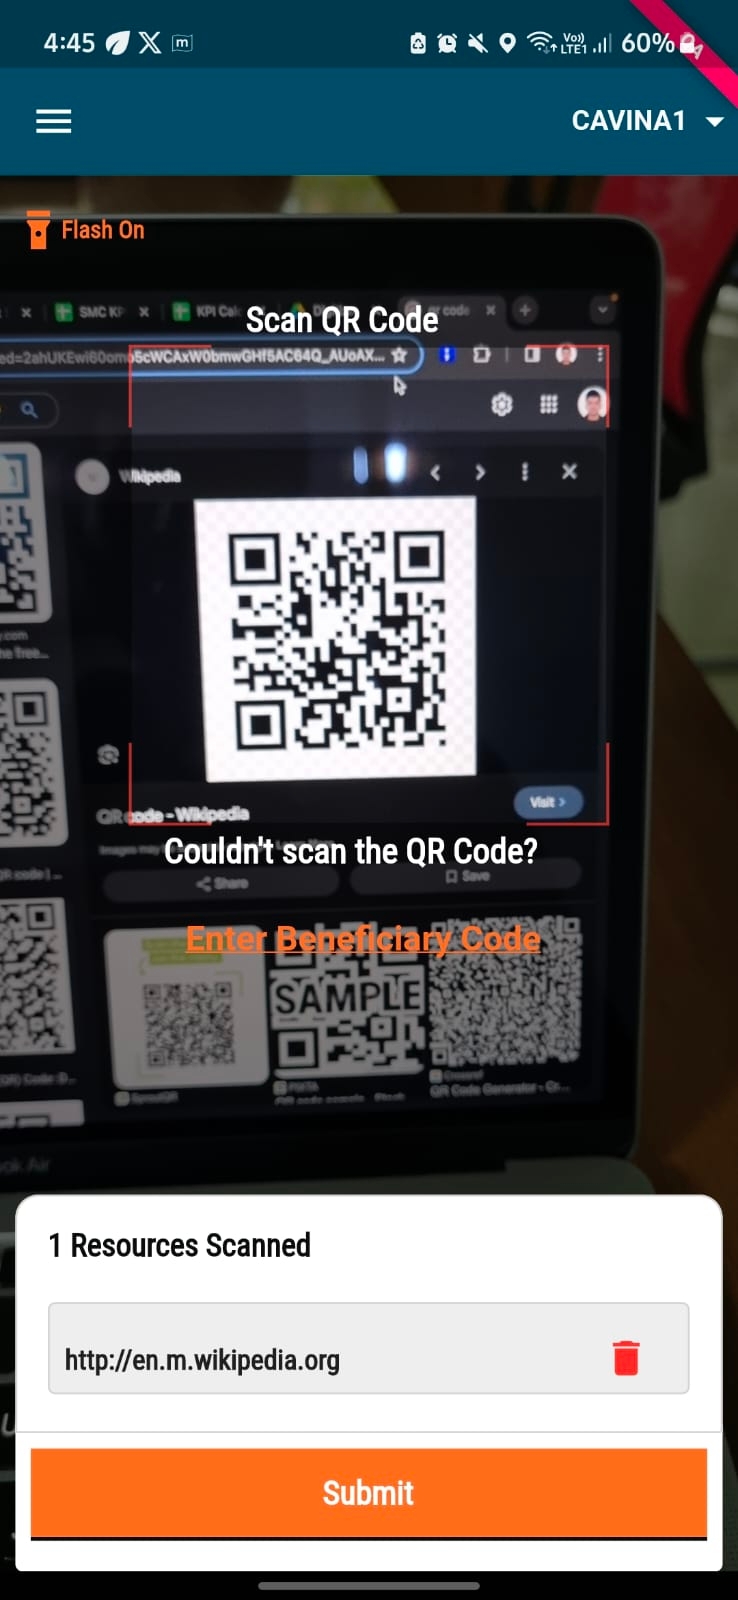


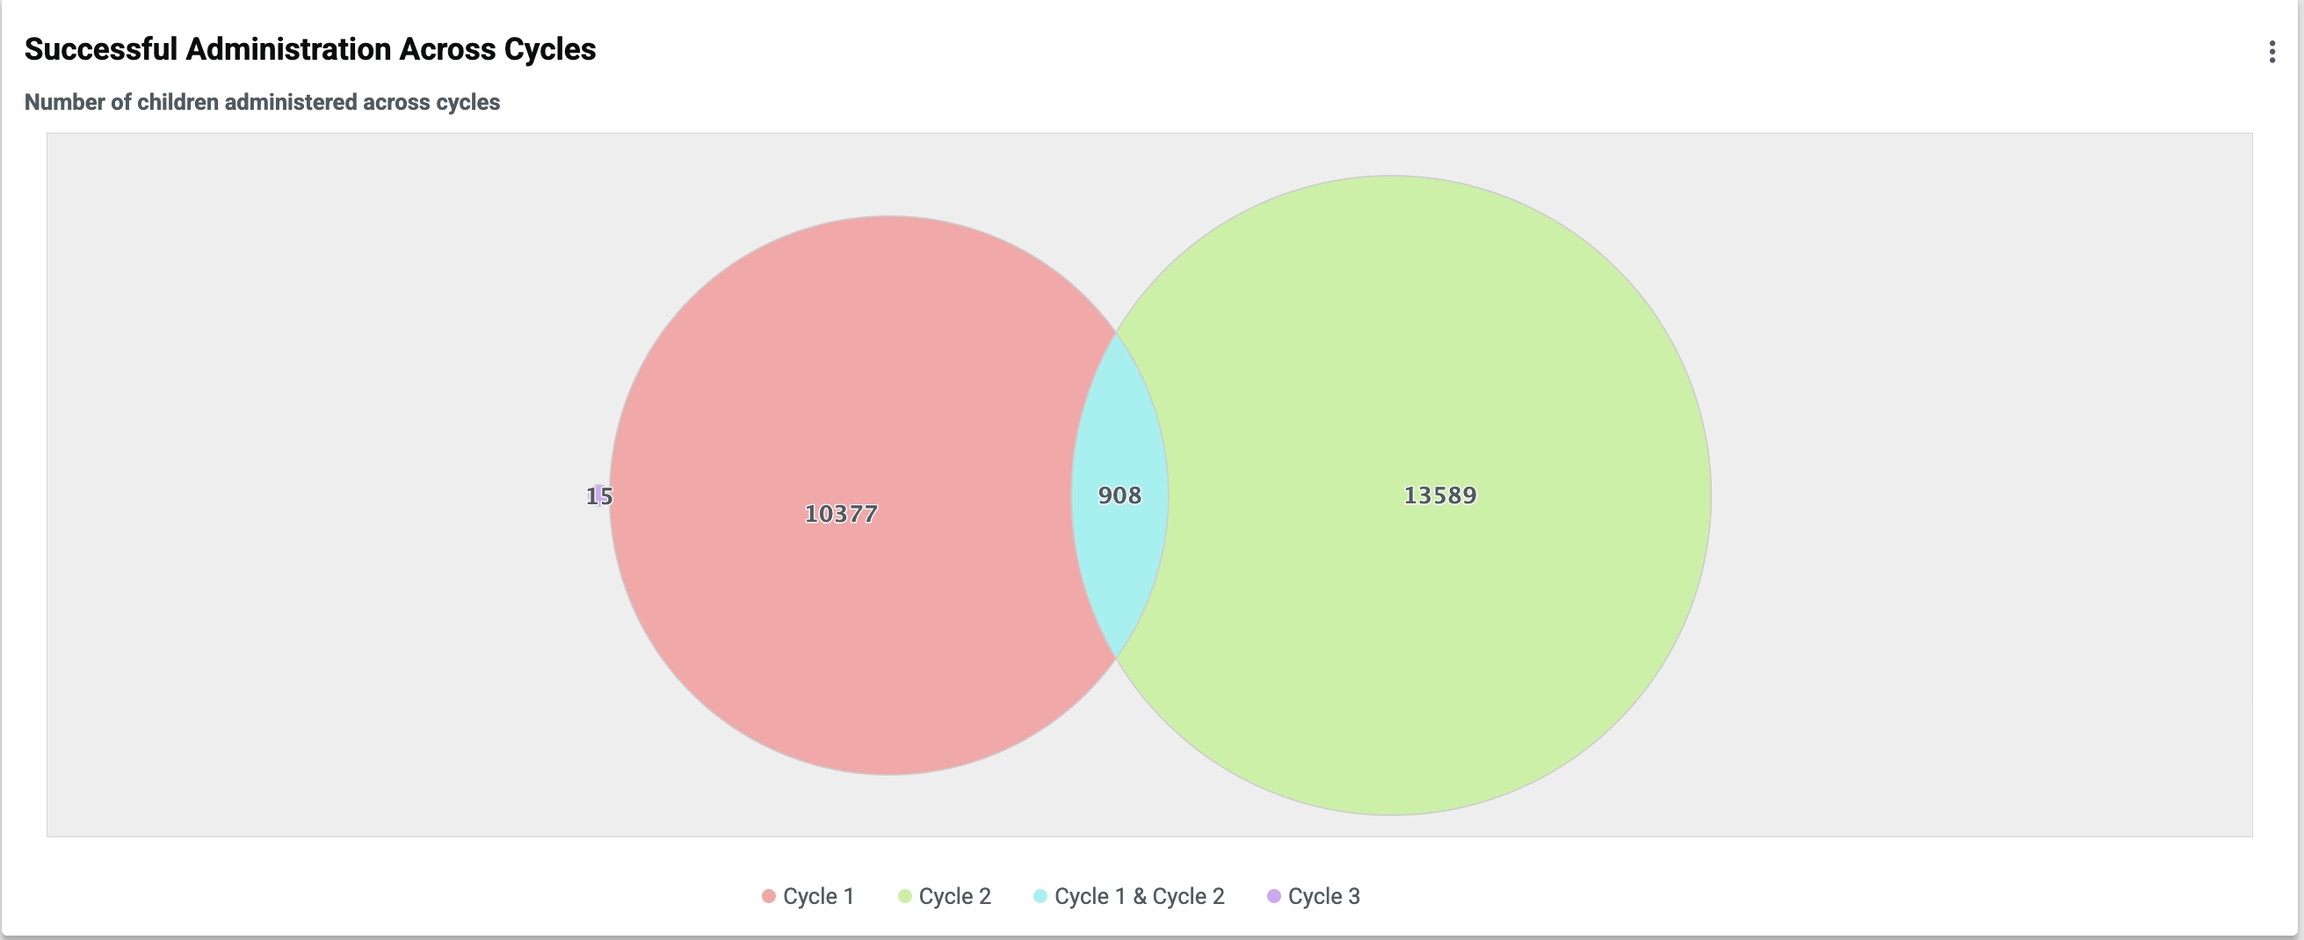
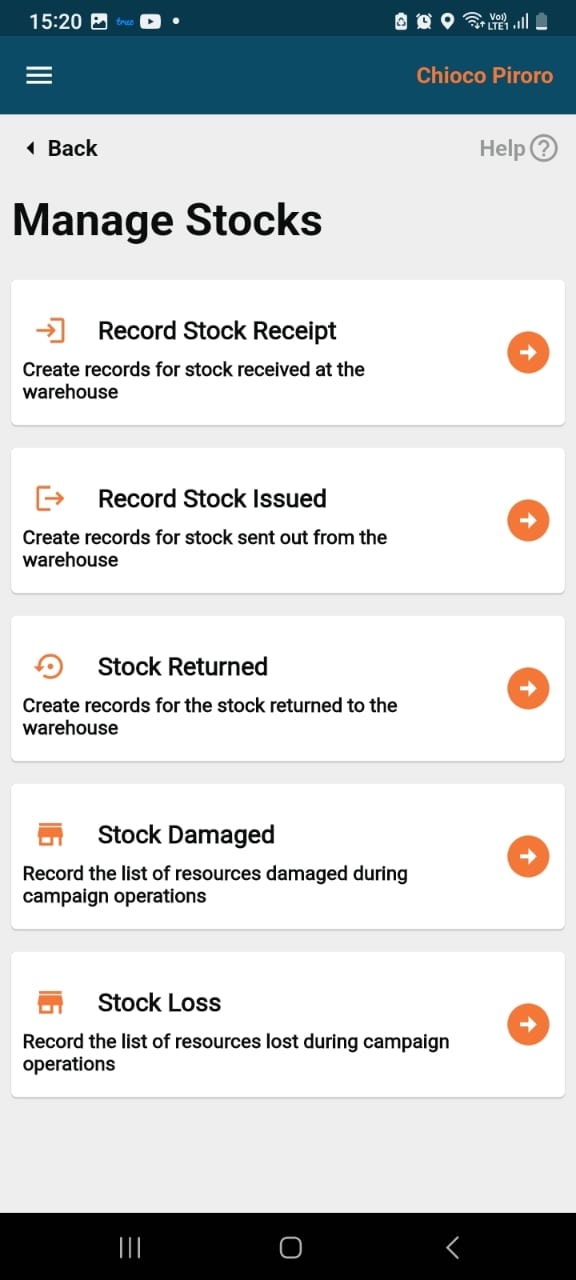
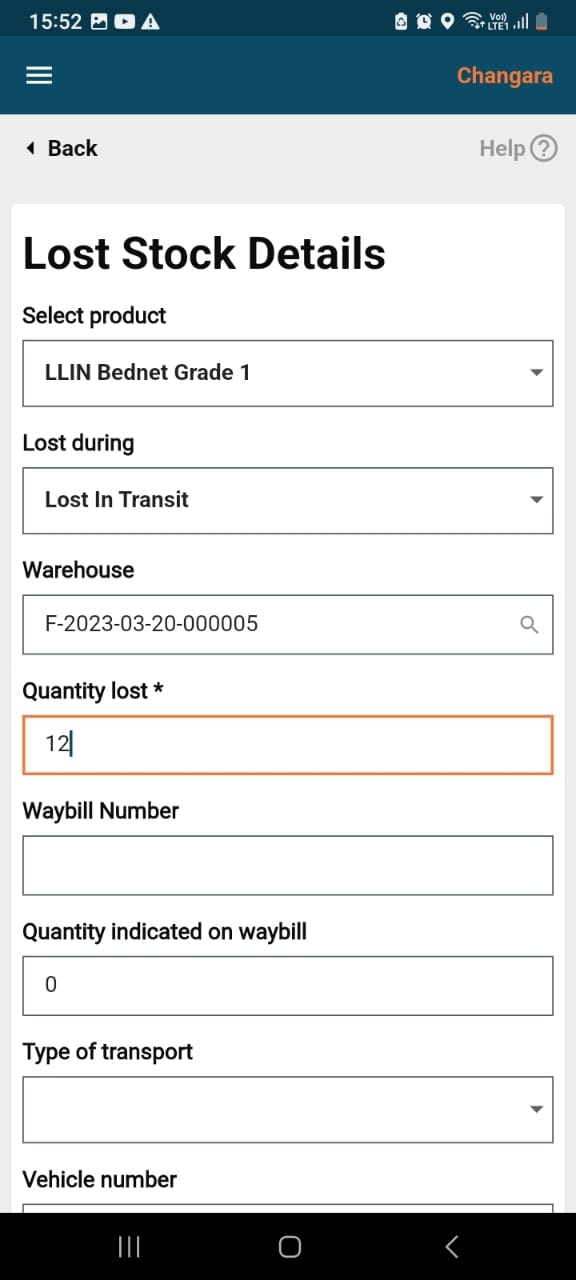
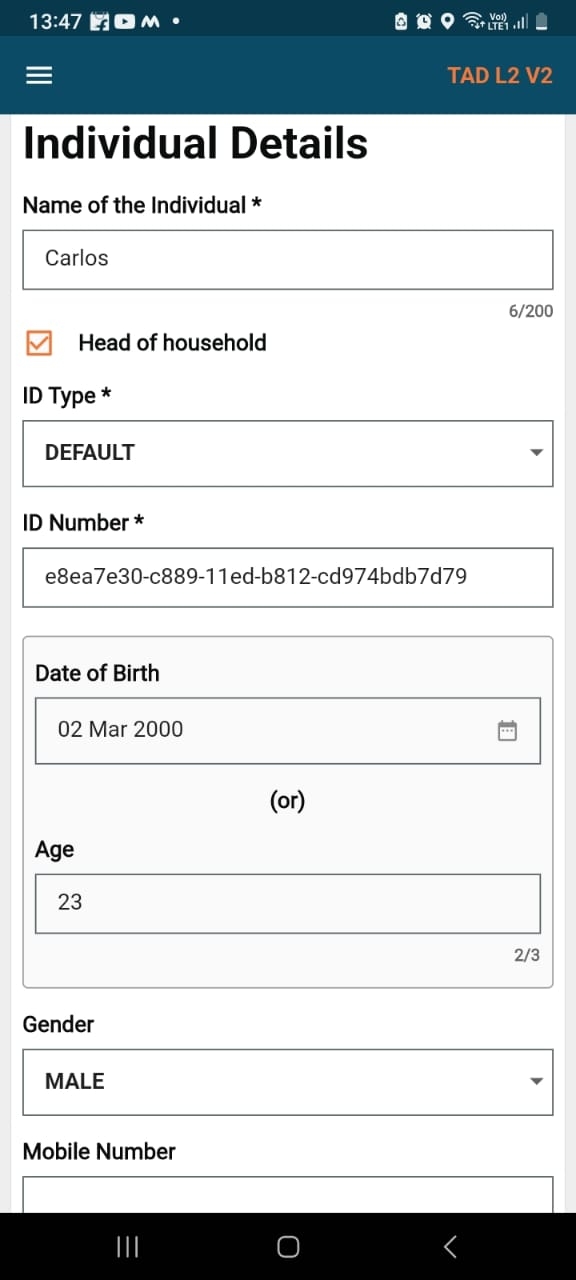
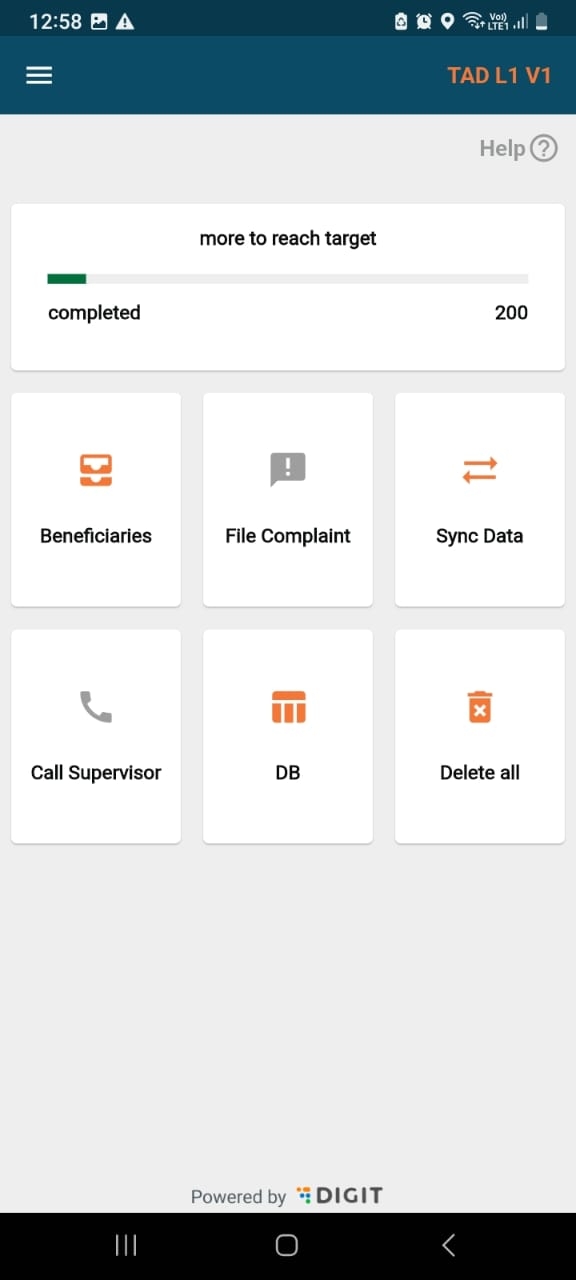
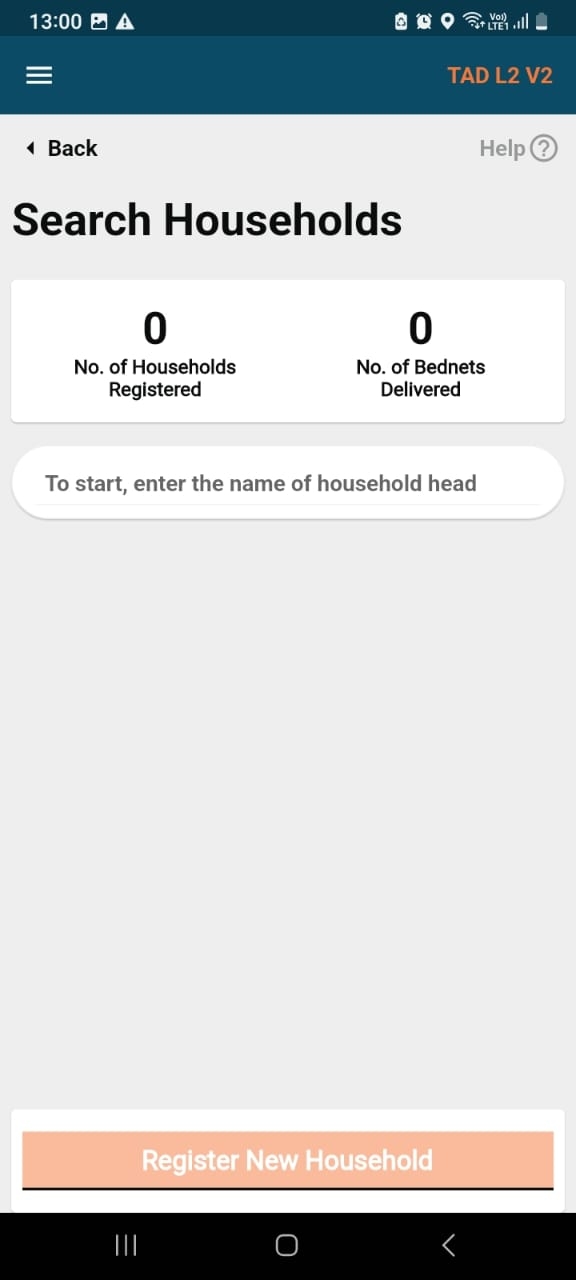
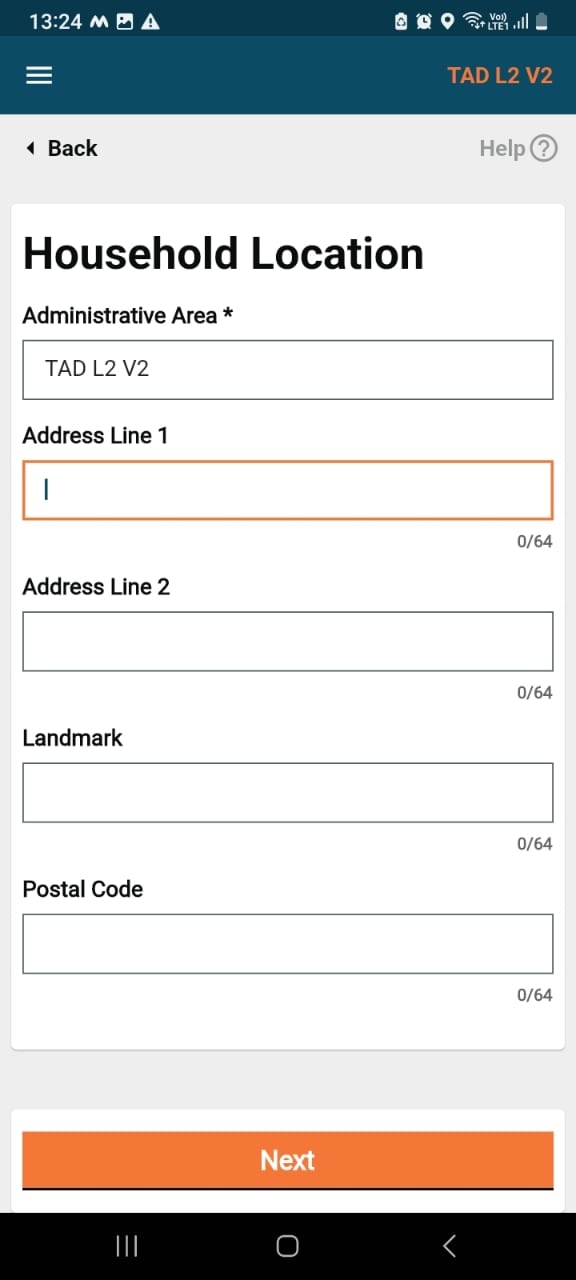
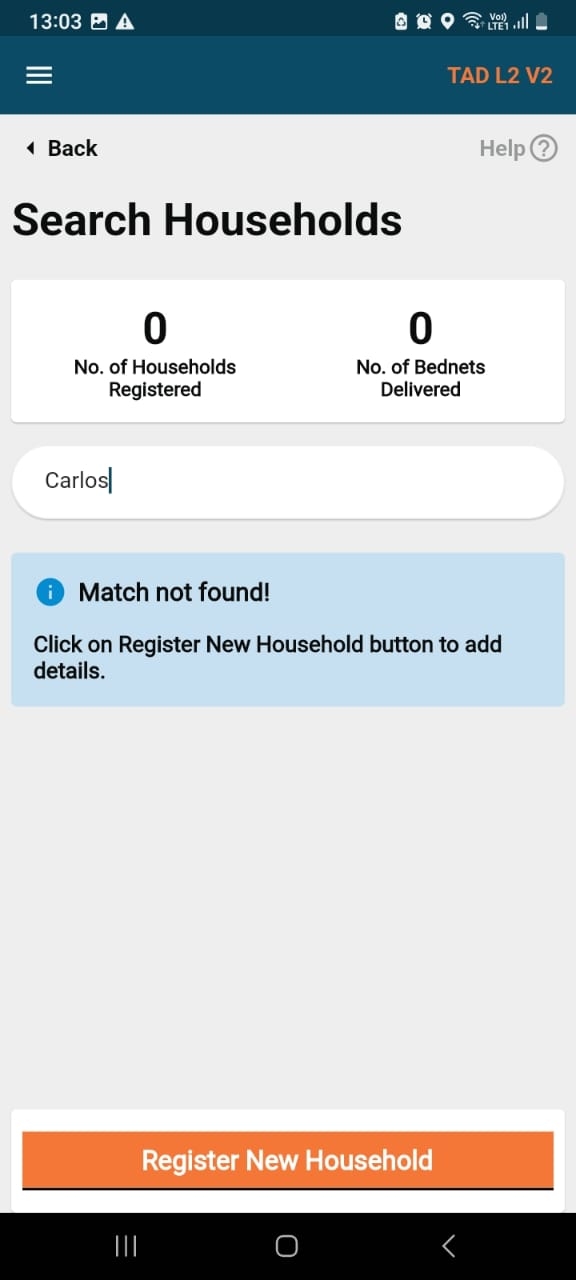
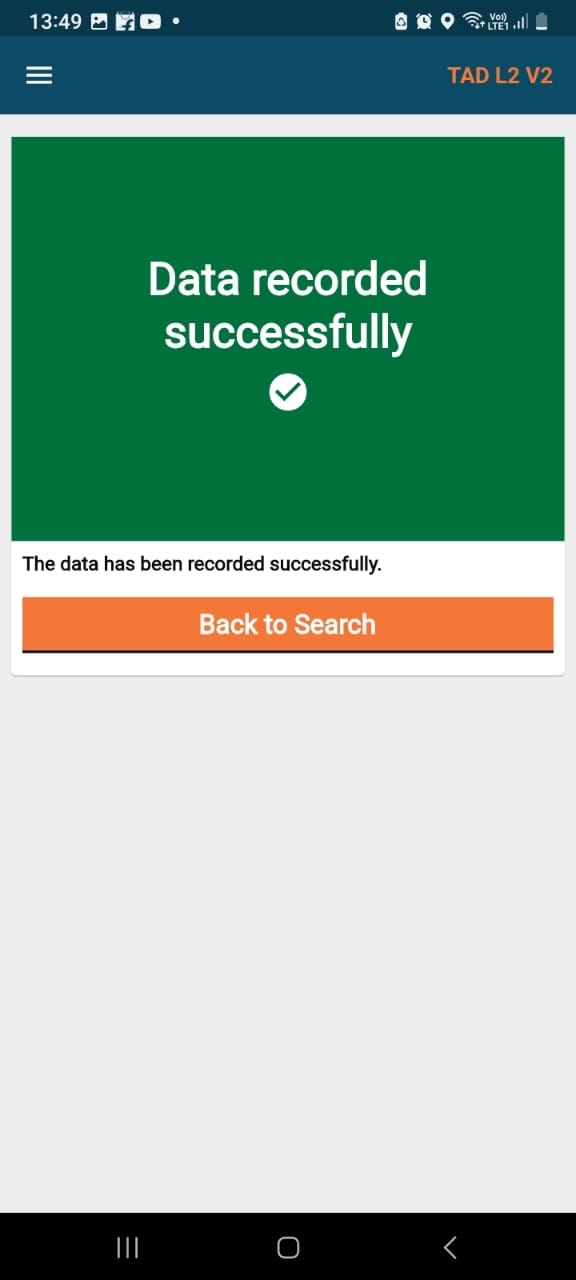
The Campaign Type Setup allows administrators to define and configure different types of health campaigns, enabling flexibility in planning and execution. Each campaign type defines the structure and flow of activities for a particular health intervention.
Define details about the product and its variant that will be used during the campaign
The beneficiary entities include households, individuals, and structures. The specifications here define how beneficiaries are configured, identified, and managed within HCM campaigns. This specification governs the core data model that underpins registration, delivery, monitoring, and reporting.
Scope of Community Living Facilities
In health campaigns, HCM has primarily supported house-to-house delivery, where the distribution was tied to a specific household or individual. For fixed post mode, HCM has done only household-based campaigns where enumeration was done house-to-house and distribution was done at a fixed post. Even in individual-based campaigns, the beneficiaries were usually part of a household with a limited number of members, with the largest households we’ve encountered being up to 30 members.
During the discussions for the polio campaign in Nigeria, there was a need to administer vaccines in fixed locations like schools, community centers, or in transit settings. In these scenarios, delivery agents are mobile, administering vaccines on the go, such as along roadsides or under trees.
There is now a growing demand for addressing similar alternative delivery modes in other health campaigns. For example, in Nigeria's Schistosomiasis campaign, medicines had to be delivered to children residing in Madrassas (residential schools), where they were permanent residents. Other similar use cases could include:
Nursing homes and long-term care facilities
Orphanages
Military camps
Police camps
As these use cases expand, it is essential for HCM to adapt to cater to these modes of delivery as well and also ensure the HCM Console enables the same.
As a campaign manager, I can configure different modes of delivery (fixed locations or transit points) in HCM, so that I can ensure efficient and adaptable health interventions across diverse settings like schools, refugee camps, or transit locations.
As a field worker, I can easily administer vaccines or medicines on the go using HCM, so that I can reach beneficiaries efficiently in non-household environments, such as roadsides, schools, or community centers.
Primary Goals:
Enable HCM to cater to all modes of service delivery.
Enable HCM to cater to Polio campaigns.
Increase coverage during campaigns by delivering to non-household entities and populations.
Key Metrics:
Number of implementations with non-household-based campaigns
Percentage of beneficiaries' coverage achieved through non-household-based campaigns.
The number of Polio campaigns.
Fixed Post: This is a collective term for a location where an intervention is delivered or where a campaign worker goes to deliver an intervention. The details of this place are normally available as part of the microplan. For example: For a bednet campaign, the households are enumerated door to door and provided QR code vouchers and later the beneficiaries come to a fixed post to collect the bed nets. This was the mode for the Liberia ITN campaign in 2024.
For example: For a bednet campaign, the households are enumerated door to door and provided QR code vouchers, and later the beneficiaries come to a fixed post to collect the bed nets. This was the mode for the Liberia ITN campaign in 2024.
Note: Any mention of a facility is analogous to community living facilities for the current context.
Community living facilities: A location with a permanent structure where there is a population residing such as jails/schools/refugee camps. The details of this place are normally available as part of the microplan. For example: A campaign worker goes to a school to vaccinate the children for an STH campaign.
House to House/ Door to Door: Mode of campaign delivery where a campaign worker goes from house to house enumerating and delivering interventions.
Transit Post: Mode of the campaign where the target population is not estimated prior and the beneficiaries are not enumerated. Only the aggregate count of the beneficiaries is captured along with the coordinates of the location. This can be a bus stop/railway station or even a health facility. The location of the transit post may be known prior or may not be known prior depending on different programs. The key point is only the count is captured and there is no residence of the population at this place.
The logic for the delivery of intervention for different categories of community living facilities will be different.
The modes of delivery for a user may or may change during different days of the campaigns.
The scope is formulated based on the discussion and validations with NMEP Burundi, Nigeria(Polio), field visit (Kano Nigeria), and Malaria Consortium. The scope discussed in this document is assumed to cover all requirements for any mode of campaign delivery.
The user assigned to a community living facility will select the cluster/division and downsync the data only for that particular cluster/division respectively to the selected community living facility.
Feature set:
Search within Community living facilities
Filter search results
Map between FP and D2D
Remove duplicates
Adding new Community living facilities on the field. Any new community living facilities will need to be added in the backend and will need to be down-synced. This will be considered.
The CDDs are responsible for household enumeration, beneficiary enumeration within both households and community living facilities, and delivering interventions even without prior enumeration. Users can add beneficiaries to households, administer interventions, record adverse events for SMC and NTDs, and refer beneficiaries as needed for the programmes.
For a frontline worker who needs to register a large number of individuals for entities that are not a house such as schools etc, it is difficult to find a registered individual as the number of individuals increases within a facility.
For certain campaigns such as Polio, the delivery of interventions also happens in transit such as at bus stops, railway stations, etc. Enumerating the beneficiaries is not the primary motivation here rather it is to administer doses to the maximum population.
The current household-based delivery UI cannot be modified for Community living facilities-based delivery because it is not designed to search for any Community living facilities, and adapting it would make the entire interface heavy and cluttered.
Able to identify duplicates based on a pre-defined algorithm.
Can merge/map the duplicates created at a household and a facility together.
Adding new community living facilities.
In this mode, there are 2 possibilities:
1. Individuals are registered (individual registry) and linked to other entities (like hospitals, or schools) - eg: Individual campaigns such as SMC, NTD
2. Individuals are not registered and only the count is maintained and linked to an entity (hospital, school), for example, household campaigns such as ITN.
I as a frontline worker should be able to add individuals to a structure/household and then be able to search for those individuals within an entity.
Able to navigate through search results through infinite scroll.
Need to mark the entity as a facility (not needed).
Individuals are not registered and the count is maintained but not linked to an entity (hospital, school). It is merely recorded with (perhaps) a geolocation.
Only the count needs to be captured at a location with the option of capturing the details of the location.
Non-functional Requirements
The application should consume minimal battery and data, comparable to existing HCM versions.
Data aggregation and synchronization between field devices and the main server should occur seamlessly, providing near real-time updates of intervention data with stable internet connectivity.
The app should work offline, capturing required data at regular intervals and synchronizing automatically when the internet is available.
The user interface should be intuitive, enabling ease of use for individuals with varying levels of digital literacy.
Design should avoid dropdowns with fewer than five options and limit open-text fields to reduce user input time.
Screen layout should avoid vertical scrolling, displaying no more than two data fields per screen.
Visual aids (e.g., icons or images) should be present on screens to guide users in understanding their tasks.
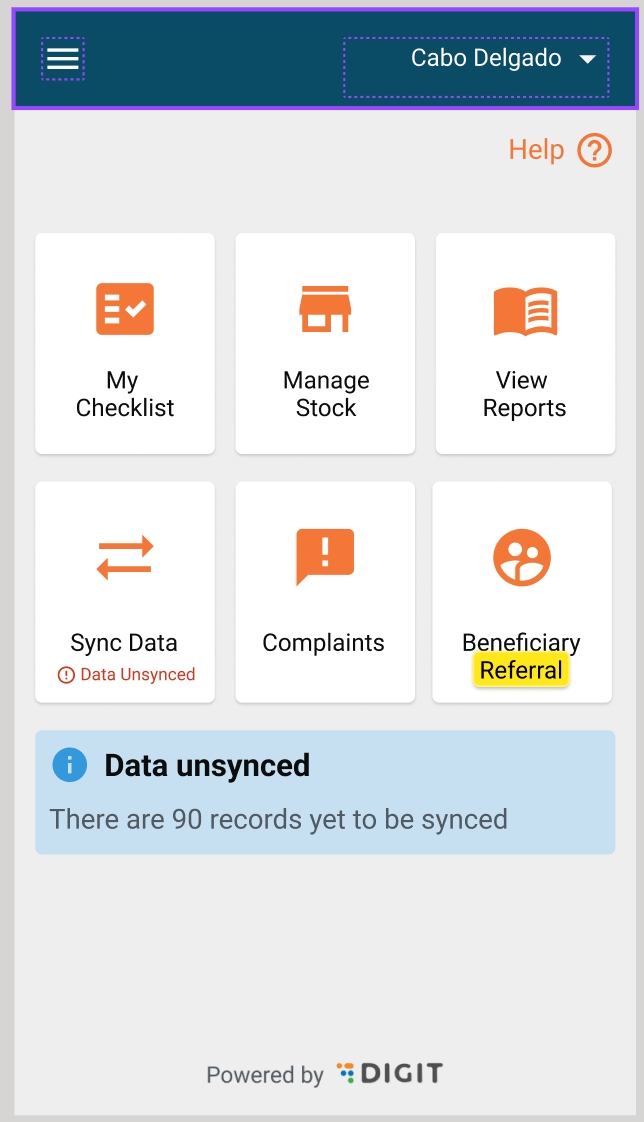
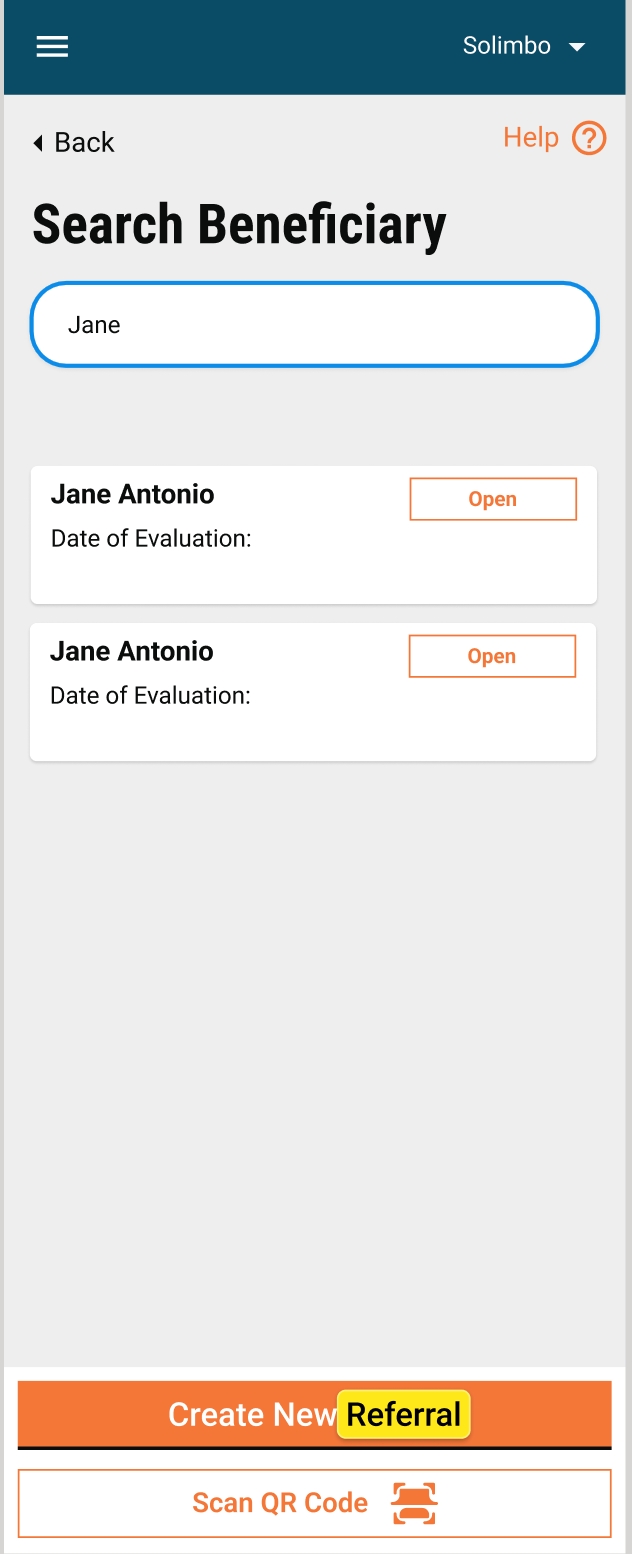
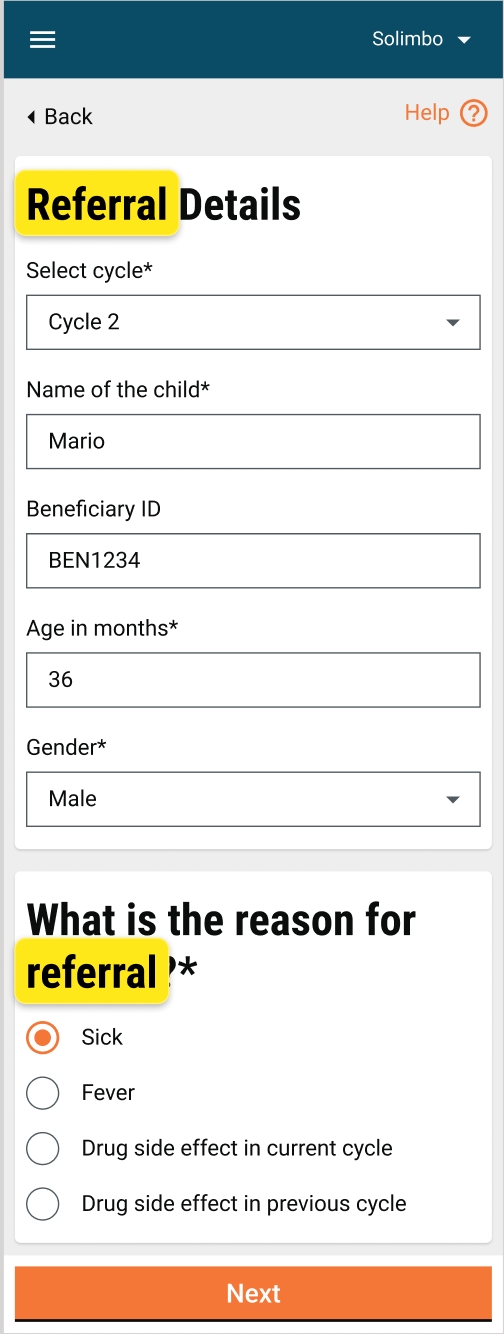
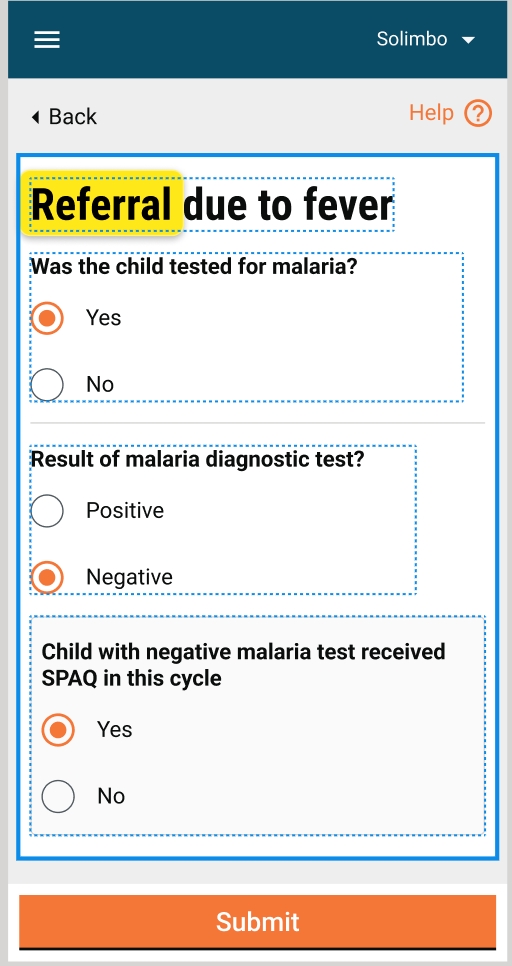
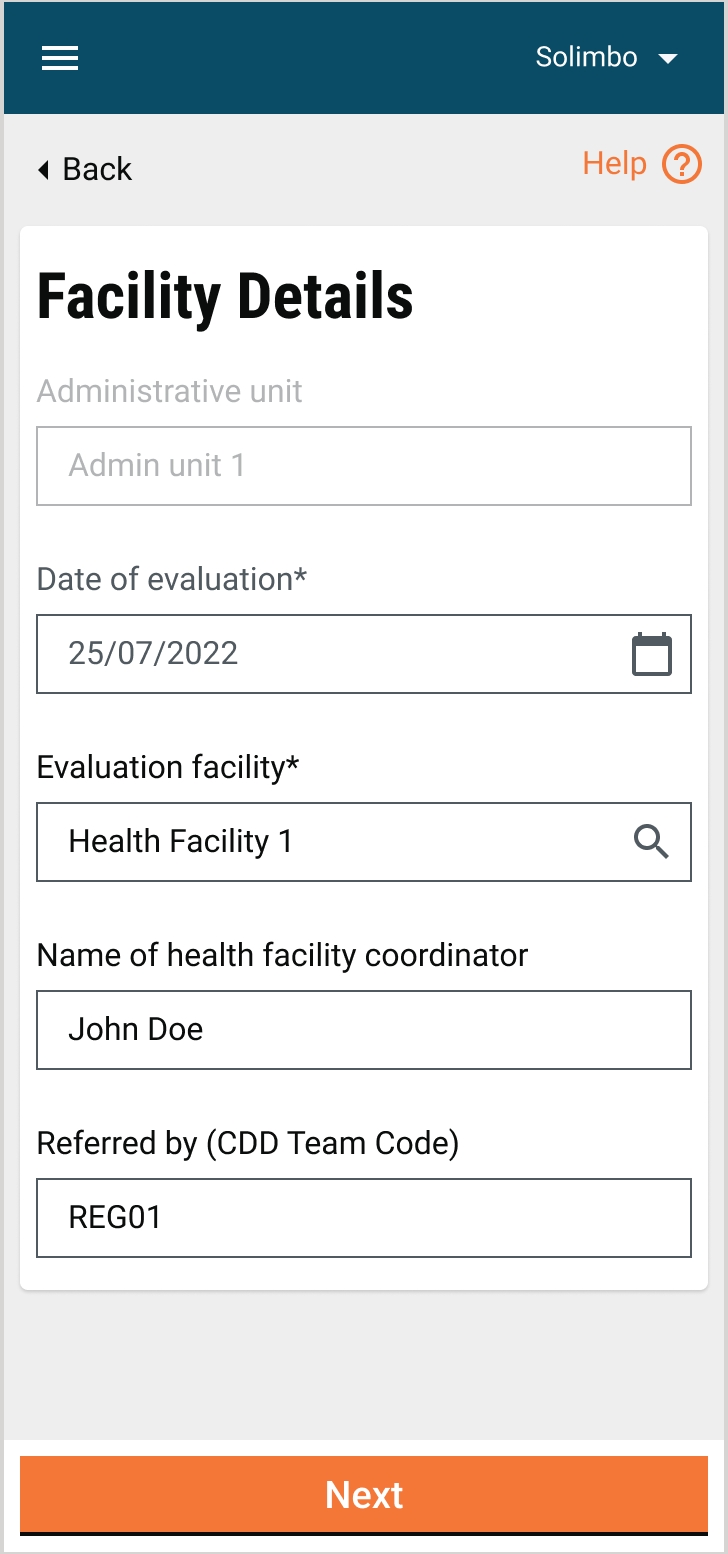
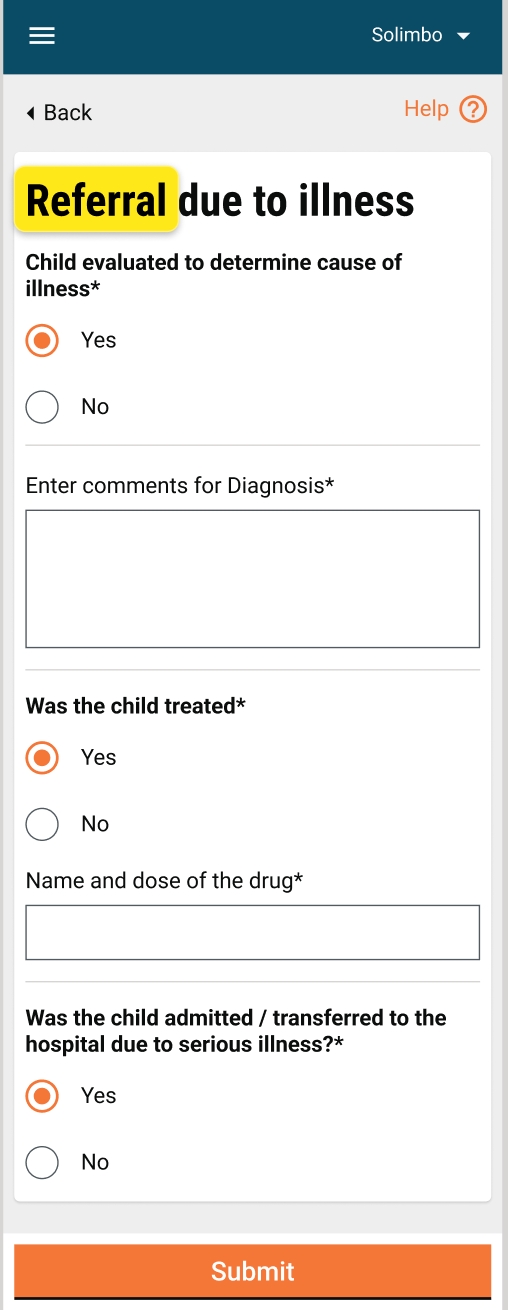

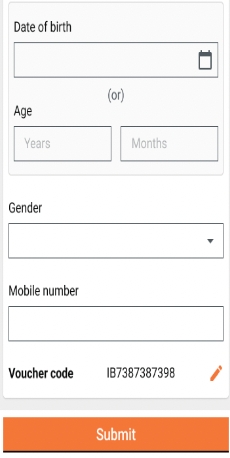
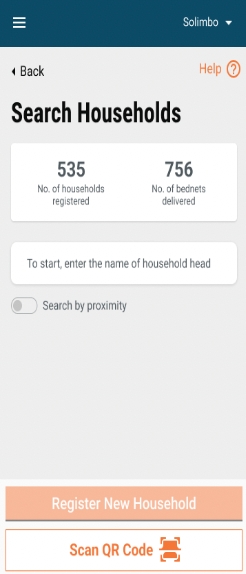
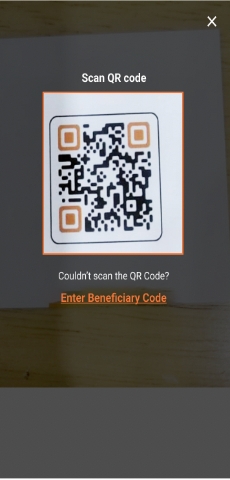
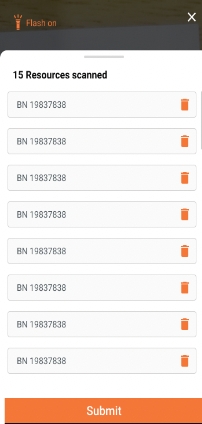
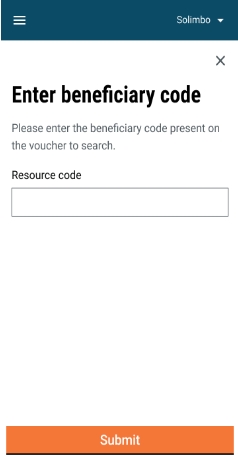
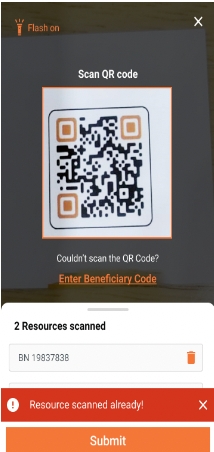
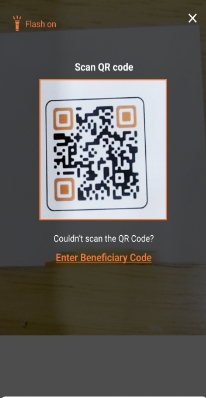
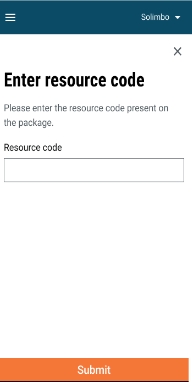
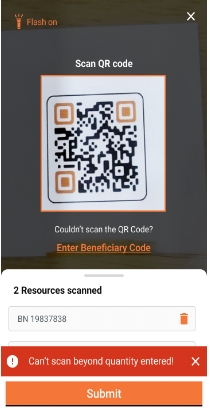
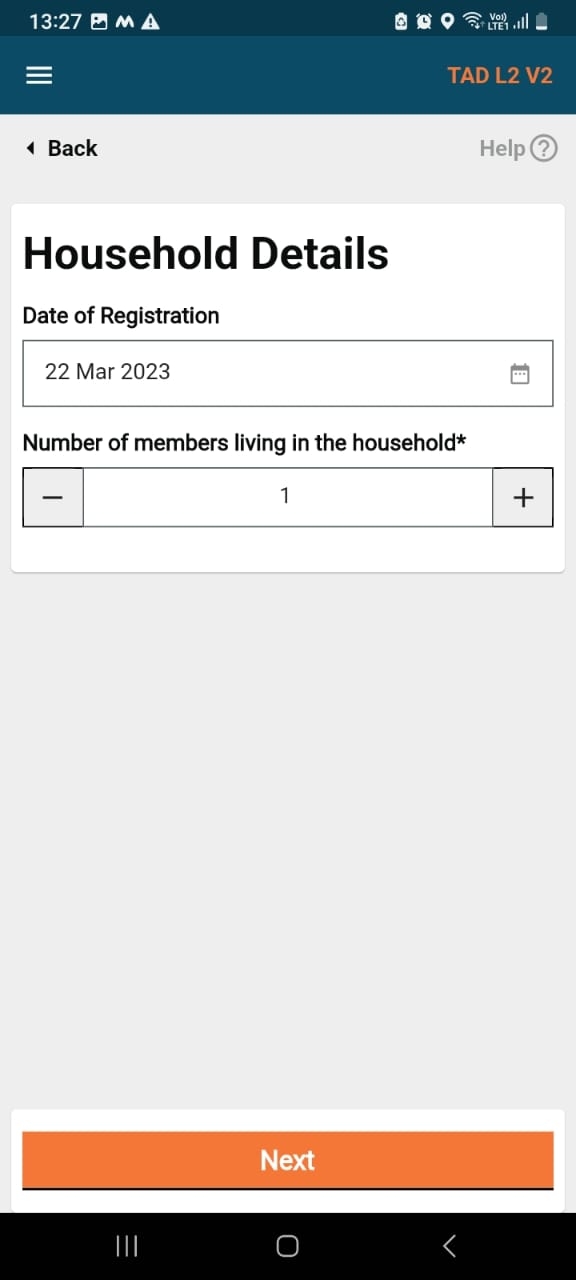
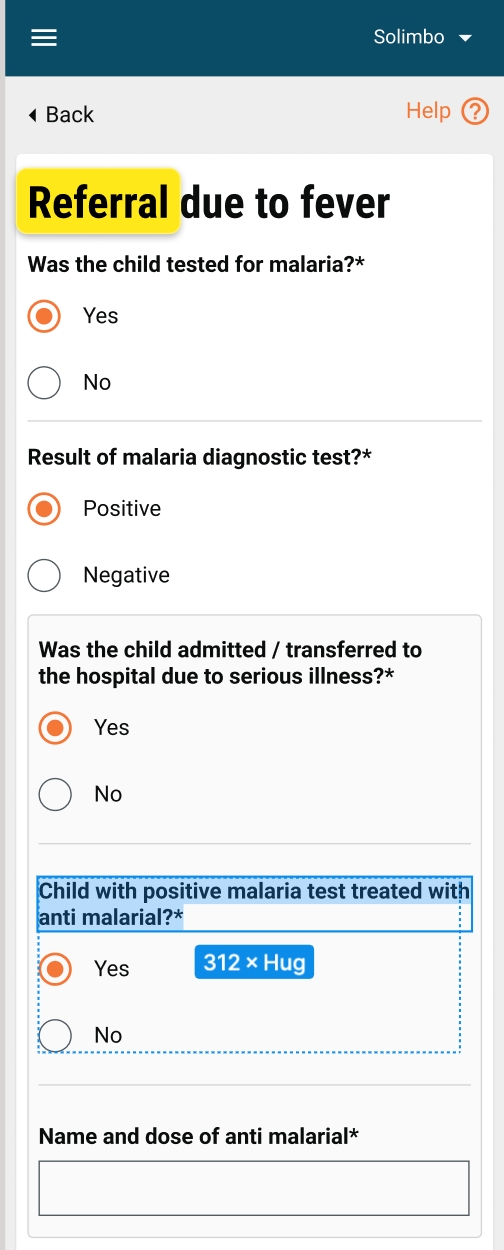
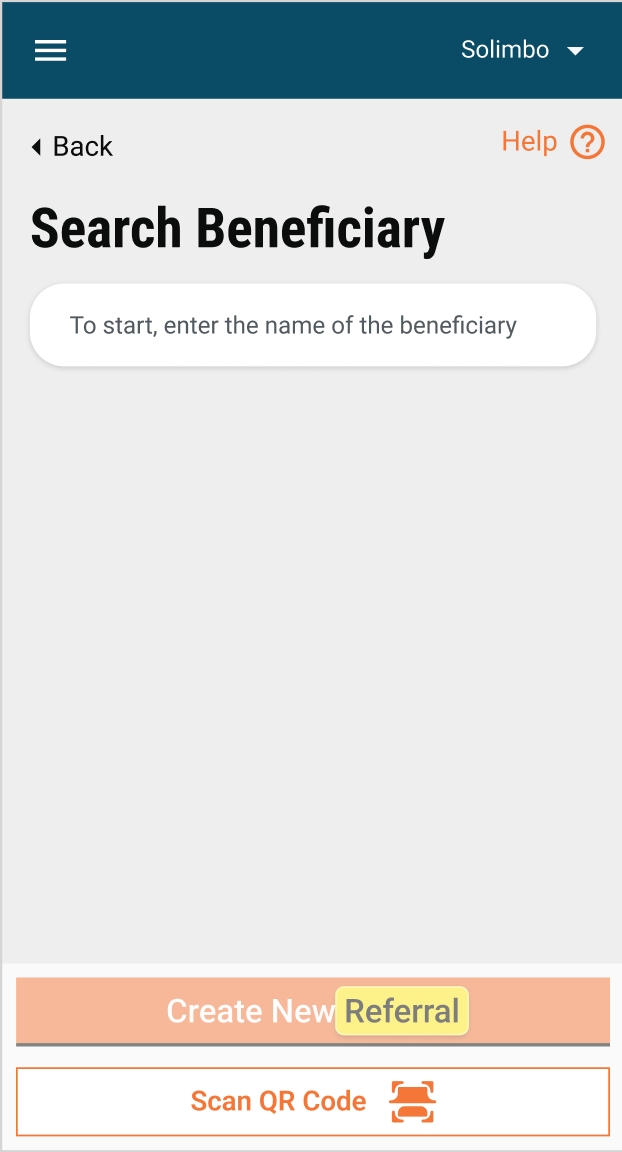
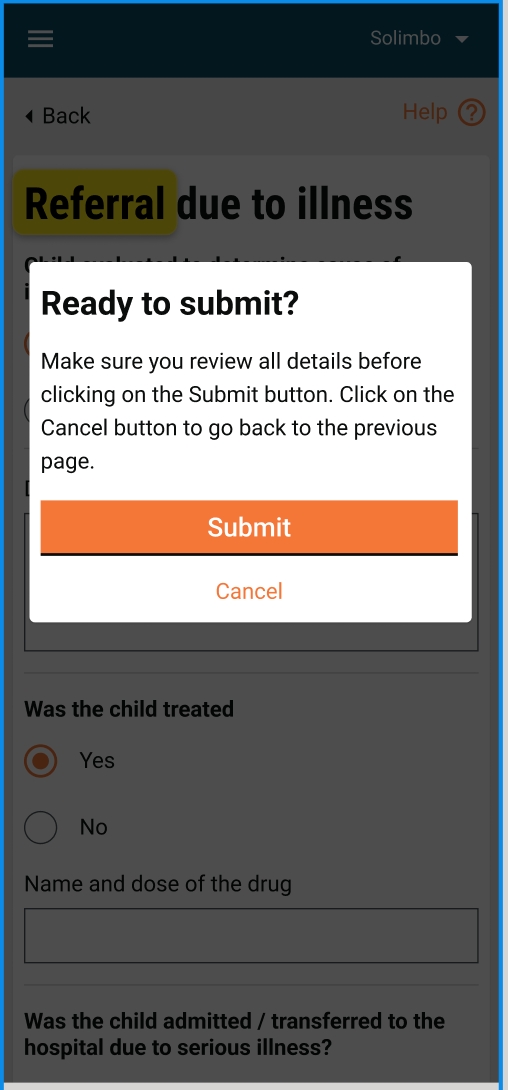
64
NA
No
Campaign Type Name
Name of the Campaign Type Eg. LLIN 2022, IRS 2023
Mandatory
User
String
2
64
Yes
Code
Unique code for campaign type
Mandatory
User
String
2
64
Yes
Disease group
Disease(s) targetted by the campaign Eg. Malaria, Polio
Mandatory
User
String
2
64
Yes
Beneficiary type
Specify beneficiaries for the campaign Eg. Household, Individual, Structure
Mandatory
User
String
Yes
Eligibility Criteria
Specify the criteria to determine if beneficiaries are eligible for the campaign Eg. Universal Campaign, Age based, gender based etc
Mandatory
User
Array
10
Yes
Task Procedure [ ]
Capture details regarding tasks to be carried out as a part of the campaign Eg. details regarding Drug administration/ Resource distribution i.e 1 bednet for 2 individuals, 1 tablet for individuals under age of 5 etc
Mandatory
User
Array
Yes
Delivery Mode
How will the campaign intervention be delivered Eg. Fixed, Mobile, Door-to-door
Mandatory
User
String
2
64
Yes
No
Product Type
Type of product being used Eg. Drug, Spray, Vaccine, Bednet, IEC Material
Mandatory
User
String
2
64
Yes
Product Name
Name of the product being used Eg. Ivermectic, Paracetamol etc
Mandatory
User
String
2
64
Yes
Product Manufacturer
Name of the manufacturer Eg. Merck, Johnson & Johnson etc
Mandatory
User
String
Yes
Product Variant
Capture details about the product variants and SKU's being used. Eg. Para-200 mg
Ensure Product is created before product variants and SKU's are defined i.e System must not allow creation of product variant without a parent product
Yes
Product Variant ID
Unique ID generated by the system
Mandatory
System
String
2
64
No
Product ID
Link Product variant with the parent product
Mandatory
System
String
2
64
No
SKU
Stock keeping unit code for the product Eg. Para 200 mg and Para 250 mg
Mandatory
User
String
2
64
There must be atleast one SKU assigned to a product i.e For a product with only 1 variant Eg, product "Bednet", with SKU "Bednet".
Yes
Variant
Capture variant of the products. Products can vary based on shape, size, color or other characteristics Eg. Para 200 mg- pack of 5 tables, Para 250 mg- pack of 10 tables
Mandatory
User
String
2
64
Yes
Base Unit Variant
Capture details if variant is the base unit used for record keeping of the product's inventory. Useful to filter variants applicable for tasks within a project. Eg. Base unit for Bednet is individual bednet or bale of 50 nets
Mandatory
User
String
Yes
Campaign ID
Unique ID generated by the system
Mandatory
System
String
Campaign Product [ ]
Resources that will be used by the campaign. Can add multiple- Linked to Products Eg. Bednets, Drugs
Mandatory
User
Array
Yes
Product ID
Unique ID generated by the system
Mandatory
System
String
2
2
64
ID
Unique system-generated GUID.
Mandatory
System
String
2
64
No
Client reference ID
Unique client-generated GUID.
Mandatory
Client generated
String
2
64
No
Household ID
The ID of the household.
Mandatory
User/system
String
2
64
No
Member count
The total number of individuals in a household.
Mandatory
User
Numeric
1
1000
A household can be created only when it has at least 1 individual assigned to the household.
Individual ID
The ID of the individual
Mandatory
User/system
String
2
64
Individual details
ID
Unique system-generated GUID.
Mandatory
System
String
2
64
No
Client reference ID
Unique client-generated GUID.
Mandatory
Client generated
String
2
64
No
Name of the individual
Name of the individual being registered as the given name, family name, and other names.
Mandatory
User
String
2
200
No
Head of the household
Capture if the registered individual is also the head of the household.
Mandatory
User
Boolean
No
Type of ID
Capture the type of ID.
Mandatory
User
Array
The list of IDs to be given by the programme/state during impel. If no forms of ID are allowed, then a system generated ID is to be selected for the ID type.
Identity number
Capture the ID number belonging to the beneficiary.
Mandatory
User
String
2
64
If the individual has no forms of ID, then a unique system generated ID must be assigned.
Validations for specific ID types to be built during impel depending on the list of acceptable IDs.
Date of birth
Date of birth in DD/MM/YYYY format.
Optional
User
String
The DoB cannot be in the future. Error Message: DoB cannot be in the future.
Age
The age of the individual.
Optional
User
Integer
If DoB is not known, allow the user to enter his/her age.
Contact number
The mobile number of the registered individual.
Optional
User
Integer
Any validations on mobile numbers to be built during impel as per country-specific requirements.
Gender
Gender of the registered individual.
Optional
User
String
A product allows three types of genders: male, female and other. Adding/deleting from this list to be done during impel in accordance with country-specific requirements.
Household details
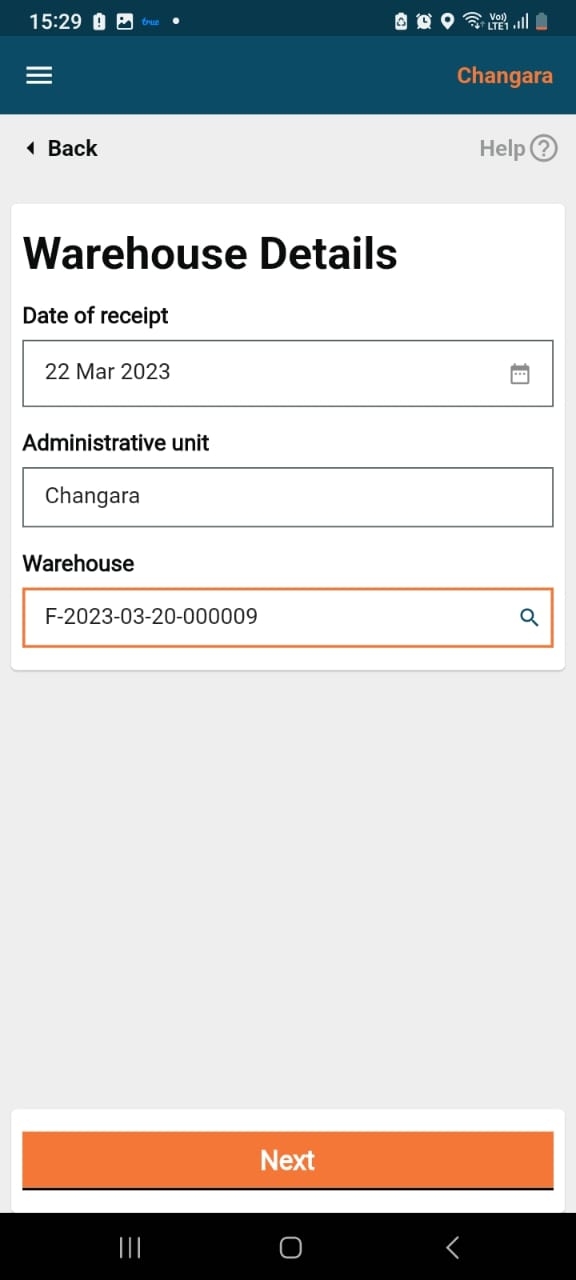
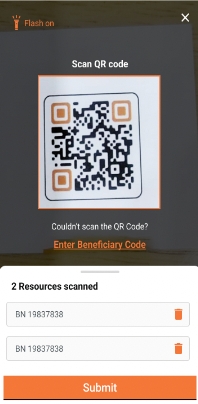
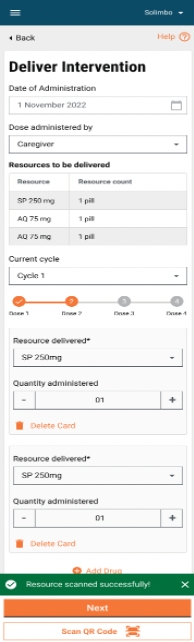
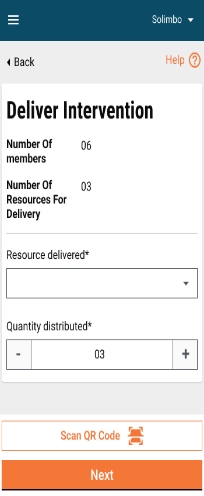
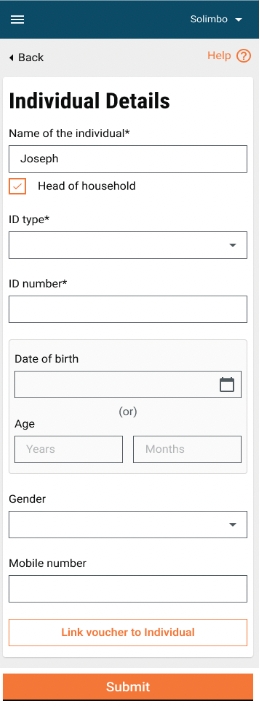
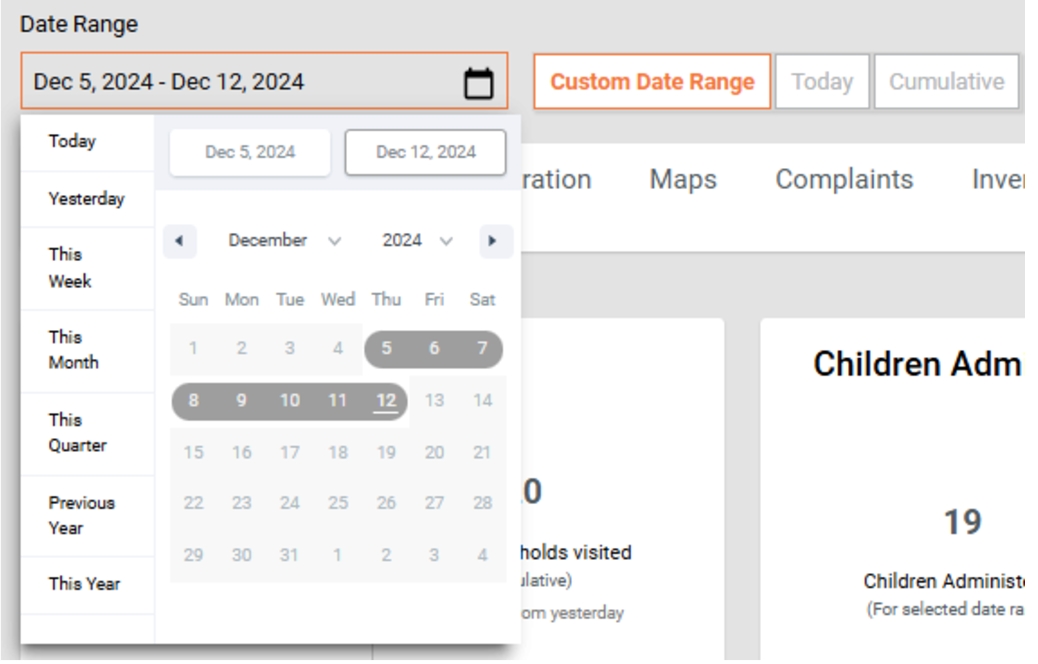

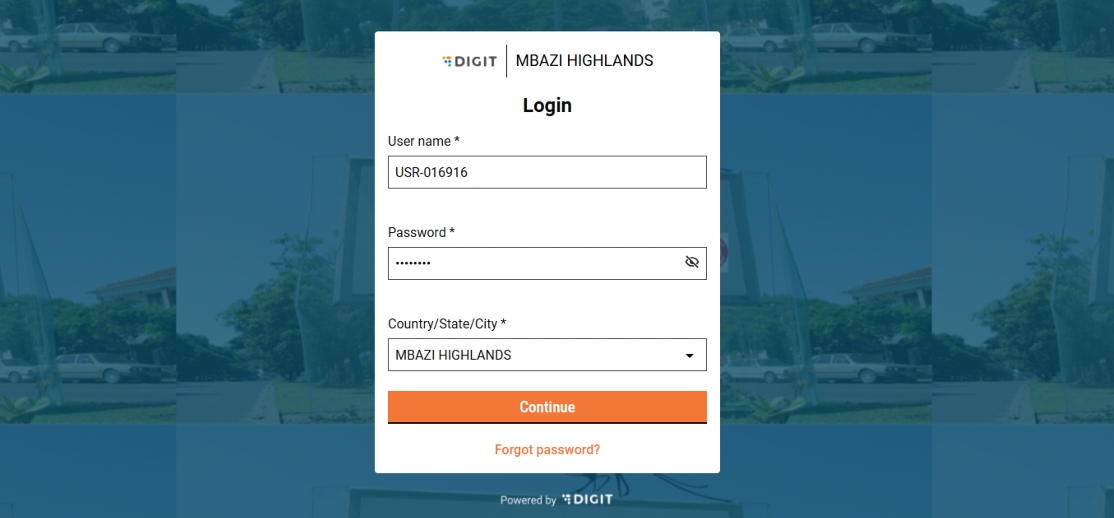
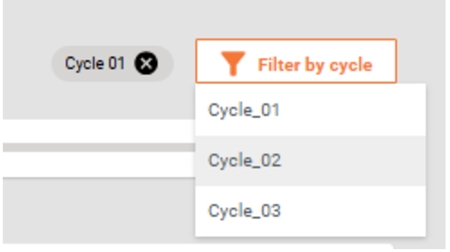
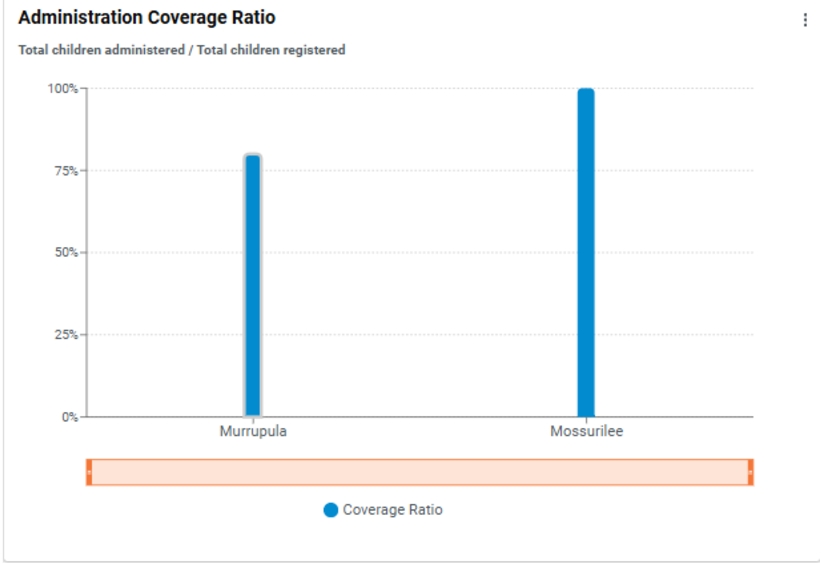
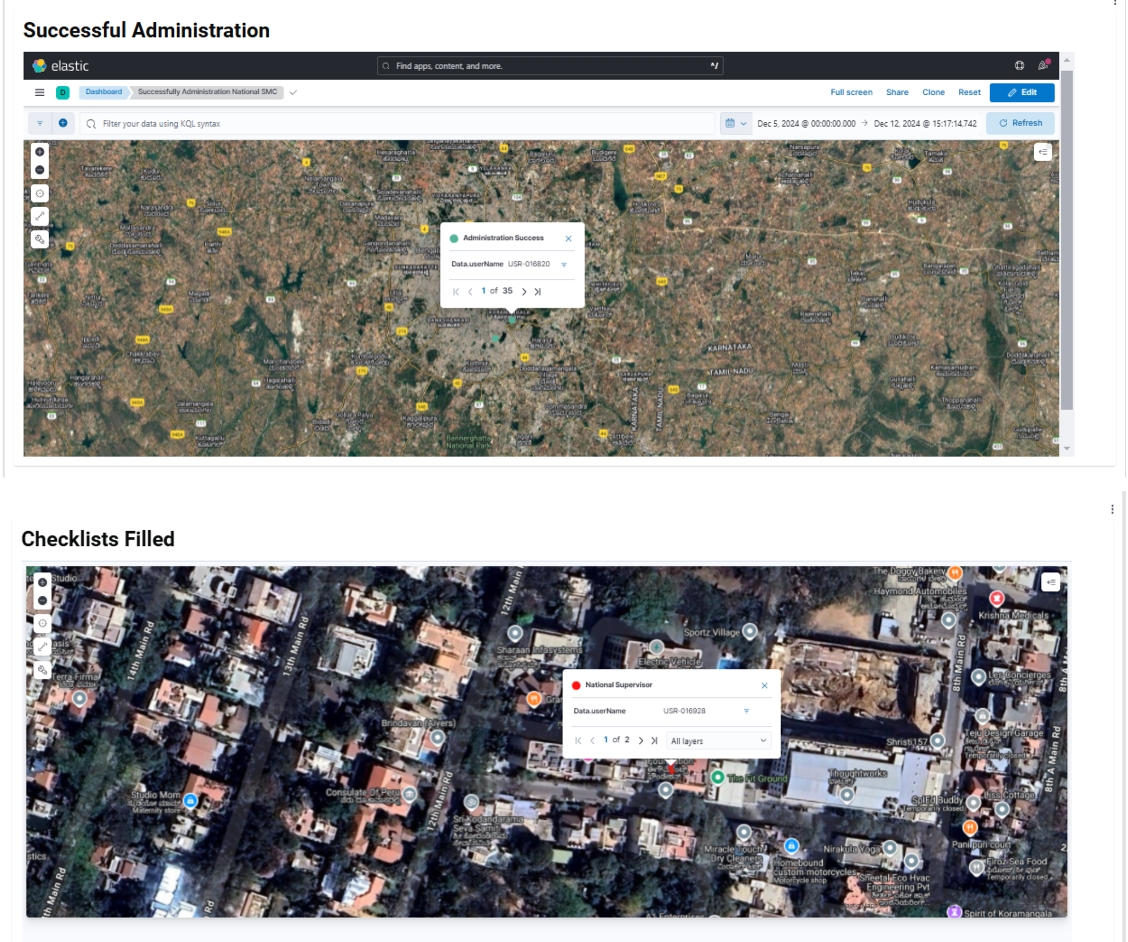
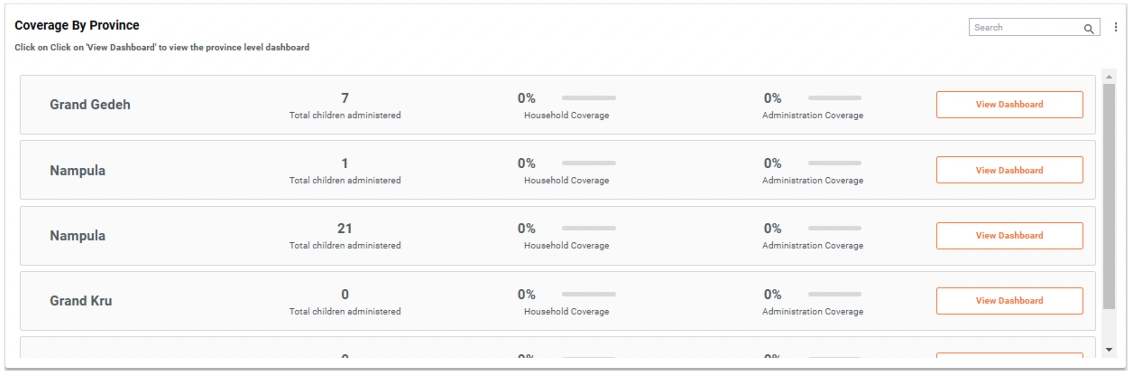
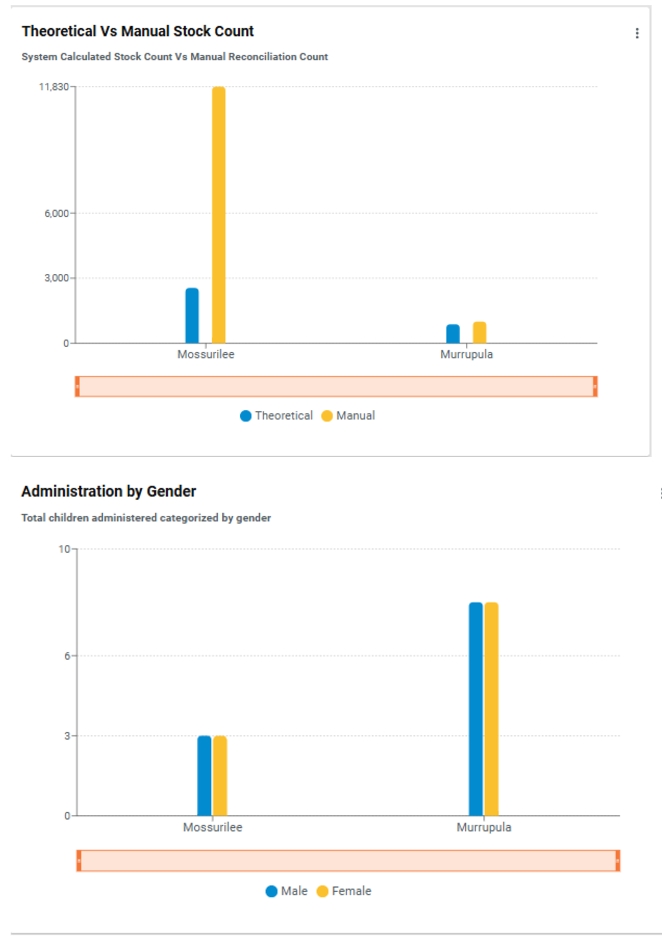
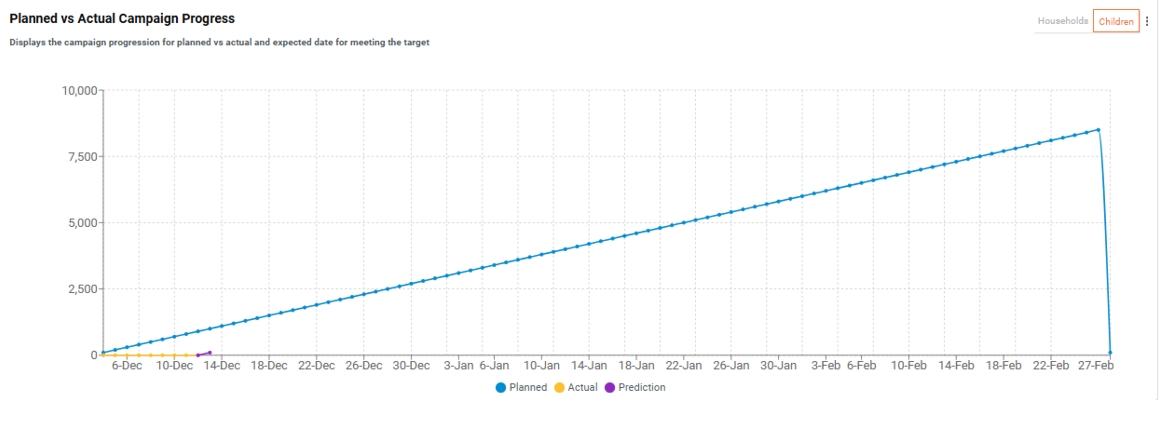
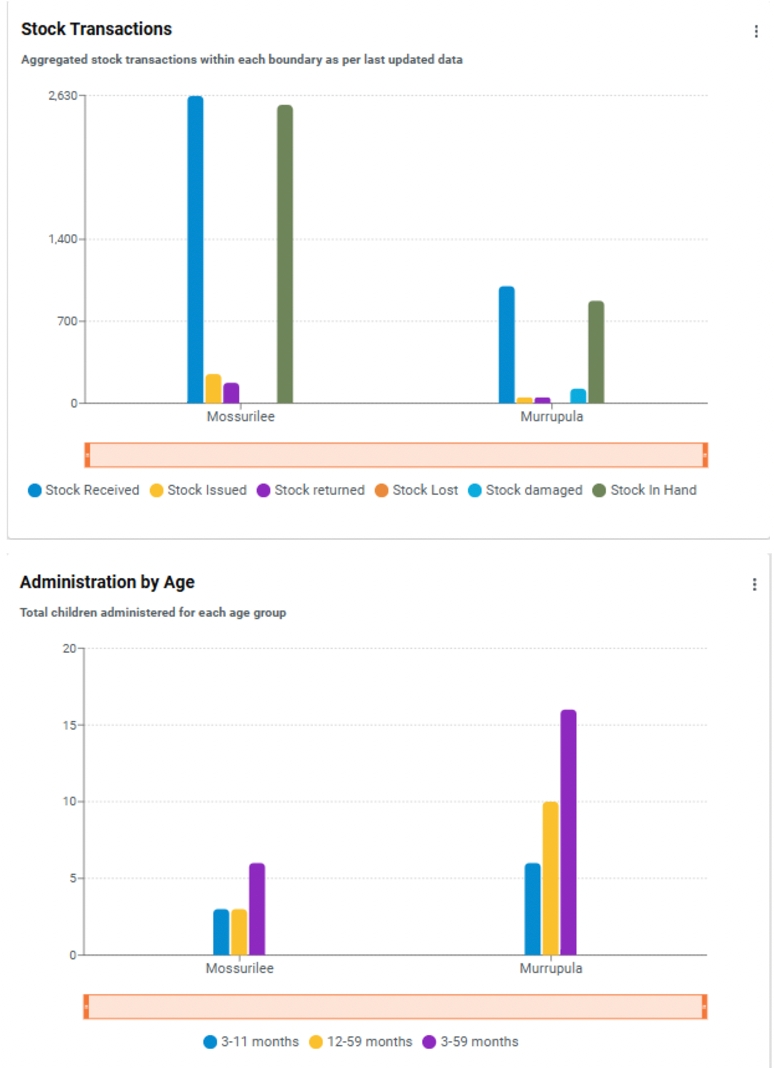
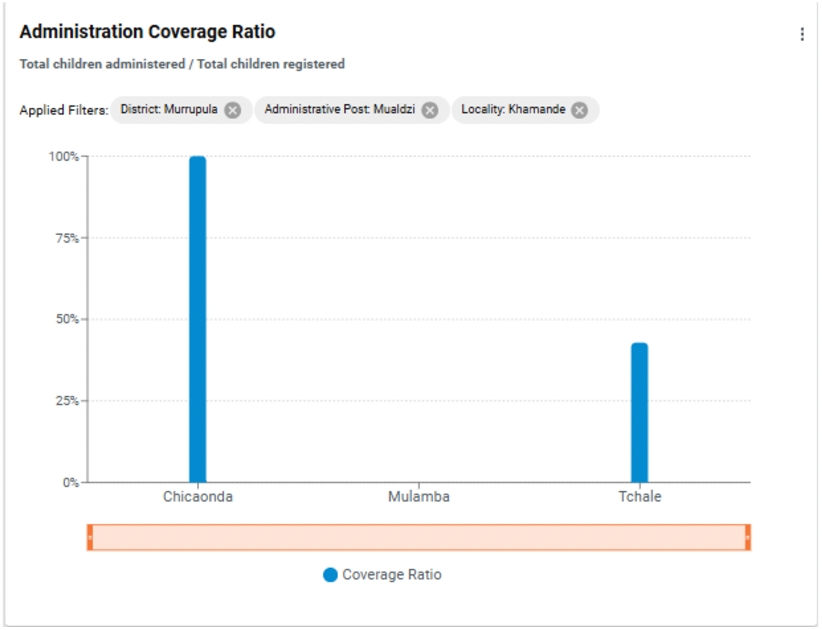
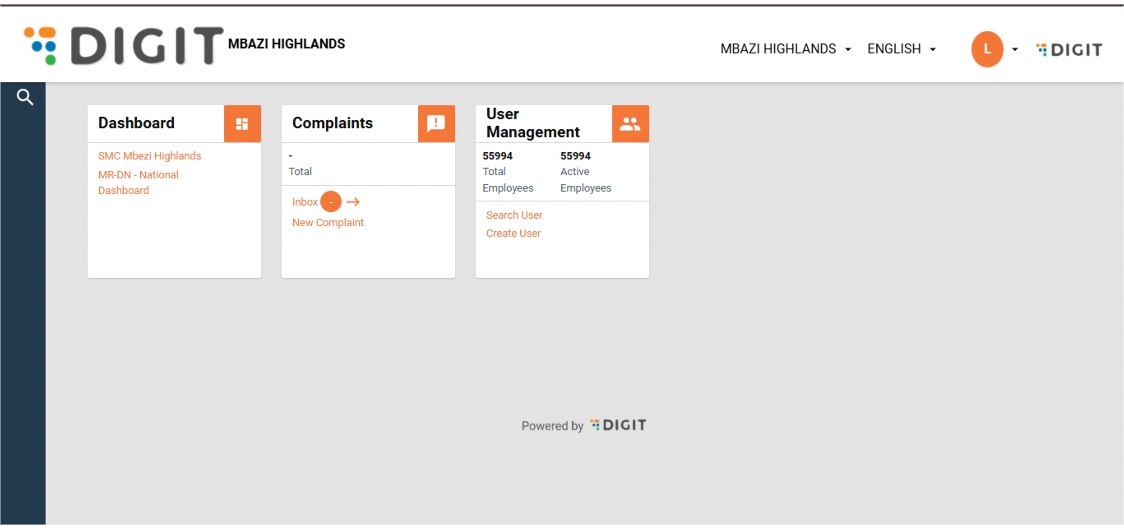
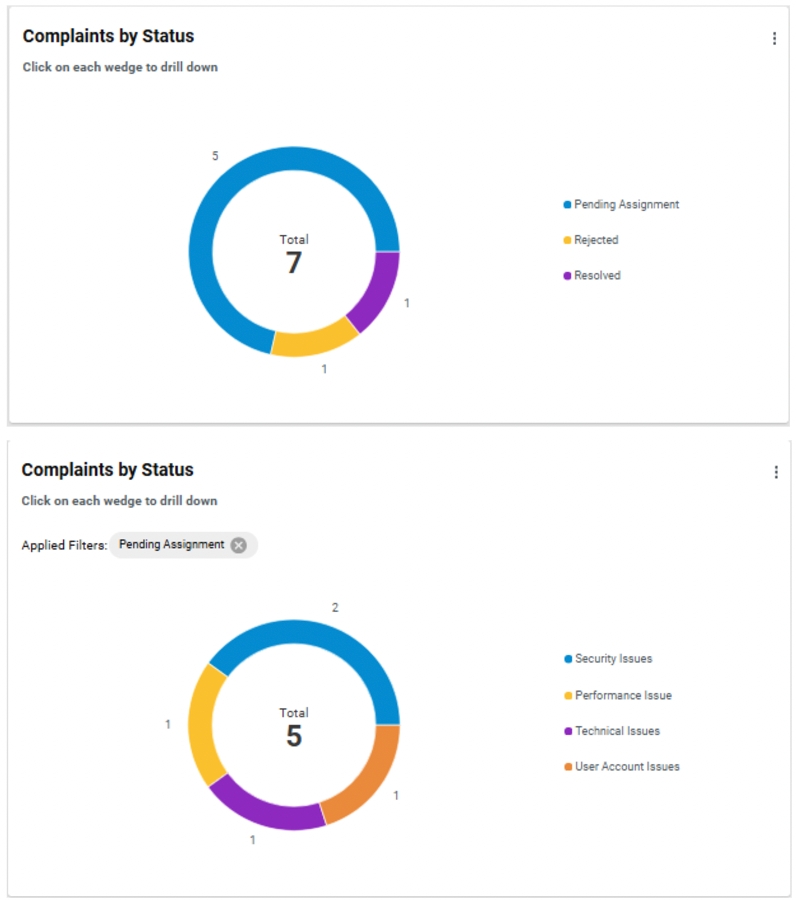
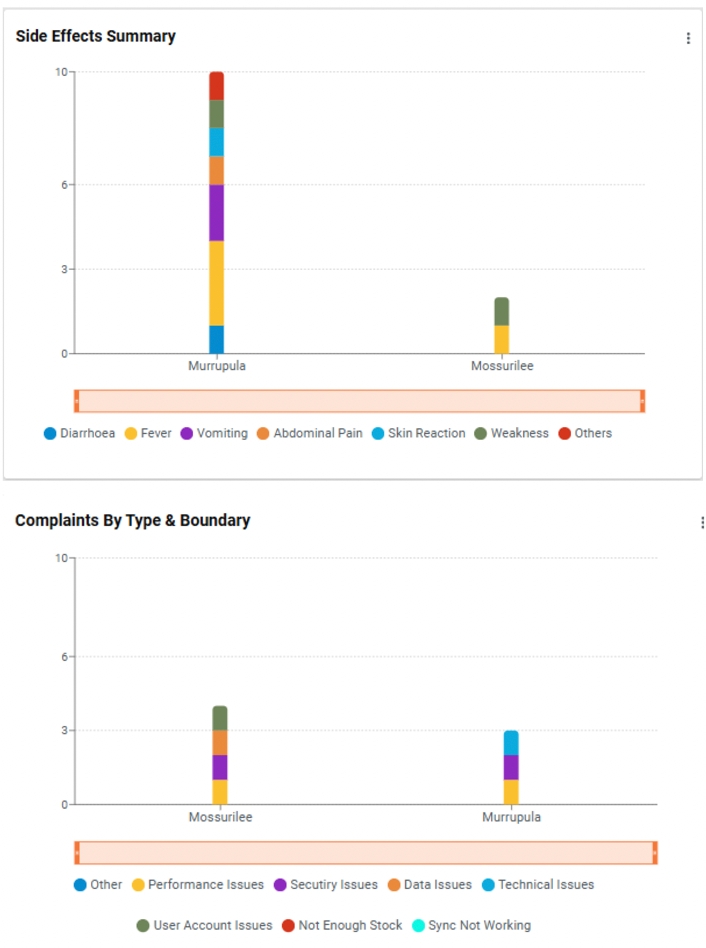
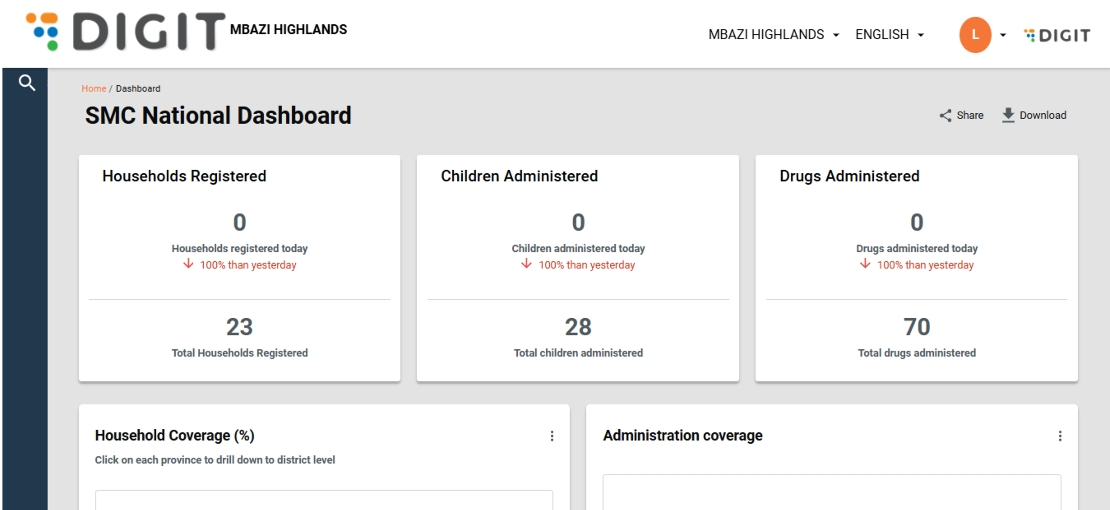

Religious community living facilities with permanent residents
Refugee camps
Jails
Schools (Residential and Non-residential)
Bus stands / railway stations
Logic for delivery based on type
Compliance for transit post
Show separate coverage cards for D2D and FP
Mobile Number
Numeric
This field must be configurable - configure the mobile number field to 10 digits
Only numeric input allowed.
Total number of beneficiaries in the Community living facilities
Numeric
Must be a positive integer.
Maximum value - to confirm
Name of the transit post
String
- Only alphabetic characters and spaces allowed.
Batch Number
String
Allow up to 20 alphanumeric characters.
No special characters allowed.
Voucher serial number
String
Allow up to 15 alphanumeric characters.
No spaces or special characters allowed.
Expiry Date
Date
Cannot be a past date.
Help text under each data input field should explain the purpose of the field.
Field
Data Type
Validation
Comments
Search bar
String
Allow the user to search by name or beneficiary id
Display results after 3 characters
Show results if the user enters full name (First name and last name)
Landmark
String
Allow up to 100(configurable) characters for the landmark description.
Only alphanumeric characters are allowed.
Name of Community living facilities head
String
Allow up to 50(configurable) characters.
Only alphabetic characters and spaces allowed.
Stock details
Name*
The name of the user who wants access to the system.
Mandatory
User
English
Portuguese
French
Select the desired language and click on Continue to access the Login page.
Enter the credentials for a proximity supervisor and select the assigned boundary.
Read the Privacy Policy statement, select the checkbox to accept the terms and conditions and then click on Continue to proceed to the landing page.
Click on the Attendance Registers option in the Payments card to access project-specific attendance registers.
Select the desired project name (event name) from the options in the dropdown and click Next to proceed.
After selecting the project name, the Inbox screen is shown, where no attendance registers are shown by default. To view attendance registers, a desired boundary must be selected through a boundary filter (in this case, District). Once the desired boundary is selected, click on Apply to proceed.
After selecting a boundary, the user is directed to a screen displaying attendance registers.
The screen shows two categories:
Pending for Approval (#) – displayed by default
Approved (#) – accessible by toggling
Depending on the selected status type, the registers are displayed in a tabular format with the following details:
Attendance ID
Attendance marked by
Boundary
Click on the Attendance ID. This opens the View Attendance screen, which will provide all the campaign-related details of the registrant and their attendance summary.
Click on the Action button to either Edit Attendance or Approve the submitted data.
Click Edit Attendance on the register.
A warning message appears, informing the proximity supervisor that:
Editing the attendance data will impact payments.
The data will be frozen for the entire event duration.
Any future attendance marked by the field supervisor will not be updated in the register.
Review the confirmation question in the warning message.
Choose one of the options:
Proceed → Confirm editing the attendance data.
Cancel → Return to the View Attendance page without making changes.
After confirmation, the Edit Attendance page is displayed.
On this page, the proximity supervisor can update the attendance for each field supervisor by:
Using the ‘+’ or ‘–’ buttons, or
Entering the count directly in the data entry field.
The Submit button remains disabled until attendance is updated for at least one field supervisor.
Once the new attendance data is entered, click on the Submit button to proceed.
Subsequently, a toast message is displayed indicating that attendance has been updated successfully. The attendance data can be modified as many times as required until it is approved.
Following the successful submission of the new data, the View Attendance page appears, reflecting the updated attendance data.
Click on the Action button for the selected register.
Choose the Approve option.
A dialogue box appears, prompting users to:
Enter mandatory comments to proceed.
Click Approve again to confirm and complete the approval process.
Or click Cancel to exit without approving.
After entering the mandatory comments and selecting Approve, a confirmation pop-up appears.
The pop-up message highlights that once approved, the data cannot be modified.
Review the message carefully before proceeding.
Click Approve on the confirmation pop-up.
A success screen will be displayed, confirming the approval.
The muster roll will be generated and shown on the screen.
From here, you can:
Click View Another Register to work on a different register, or
Click Go Back to Home to return to the main page.
Go to the Inbox page.
The status of the register will now be shown as Approved.
When you open an approved register, no further actions are available.
The only option provided is Go Back.
The payment approver is responsible for generating and downloading the final payment bill, which is further used to disburse the payments to all the campaign workers.
Before logging in, select the preferred language.
Currently, three languages are supported:
English
Portuguese
French
After selecting the desired language, click Continue to proceed to the Login page.
On the Login page, enter the credentials for the campaign supervisor.
Select the assigned boundary from the list.
Review the Privacy Policy statement carefully.
Tick the checkbox to indicate acceptance.
Click Continue to proceed.
On the landing page, a Payments card is displayed with two options:
Inbox → Generate bills
My Bills → View and download already generated bills
Click on Inbox to proceed.
On the Inbox page, select the Project Name (event type name) from the available options.
Choose the Aggregation Boundary Level for the bill:
National
Province/State
District
After selecting the required aggregation level, click Next to continue.
After selecting the aggregation boundary, the Bill Inbox page will open.
Use the filter to choose the specific boundary for which the bill needs to be generated.
The page will display all attendance registers (both Approved and Pending Approval).
These registers can only be viewed by the campaign supervisor.
To proceed, click on Generate Bill.
A bill can be generated only once per boundary, and only after all registers in that boundary are approved.
When you click Generate Bill, a confirmation pop-up will appear.
The message will indicate that the bill cannot be generated again for the selected boundary.
To continue, click Generate Bill on the pop-up.
If you do not wish to proceed, close the pop-up to cancel the action.
Click on Generate Bill to start the bill generation process.
A toast message appears, indicating the expected wait time for completion.
Once the process is initiated, click My Bills to view and manage generated bills.
Click on My Bills to open the Bill Inbox page.
Use the search options to find bills by:
Bill ID, or
Date range (based on generation date)
Bills that are still being generated can be identified in the Actions column.
After a bill has been successfully generated, locate it in the My Bills page.
Choose the desired format to download the bill. Available download formats:
Excel or
Find below an illustration of the PDF report. The report provides the following information: total amount to be processed, details of each individual, different cost heads that are applicable based on the assigned role, and the sum of the amount to be paid based on the number of days attended.
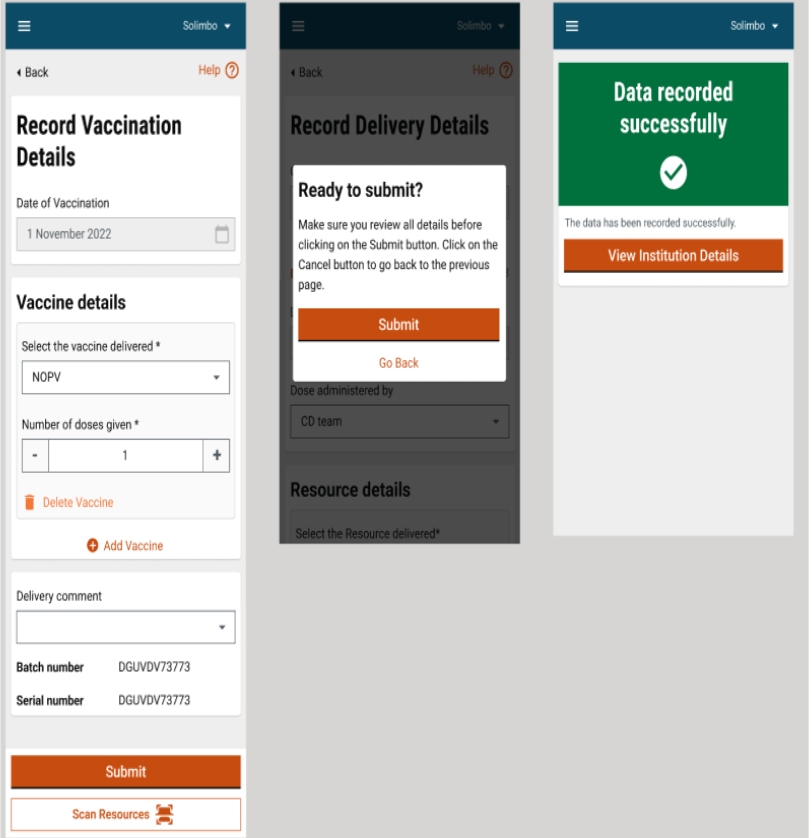
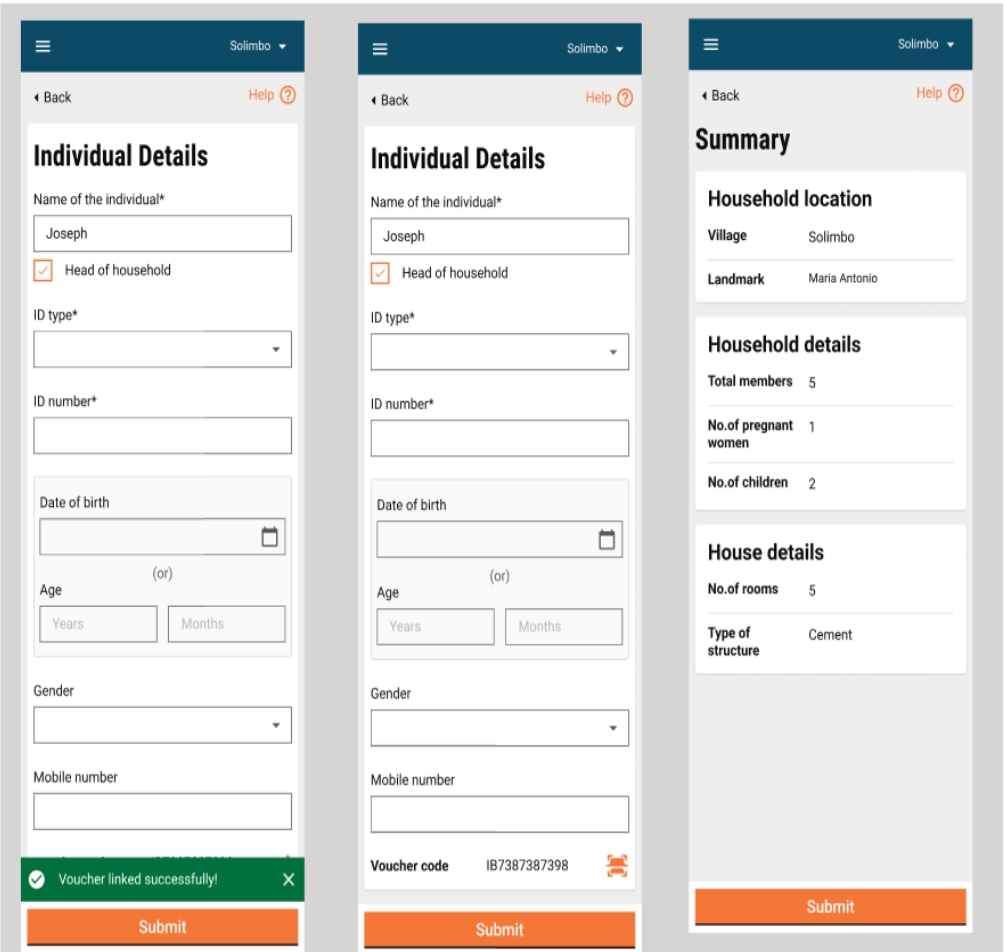
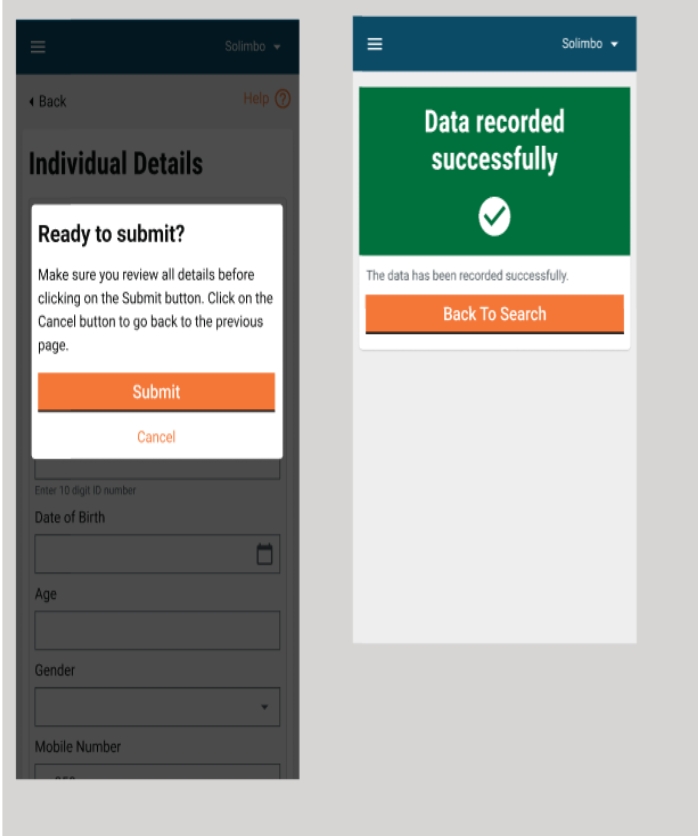
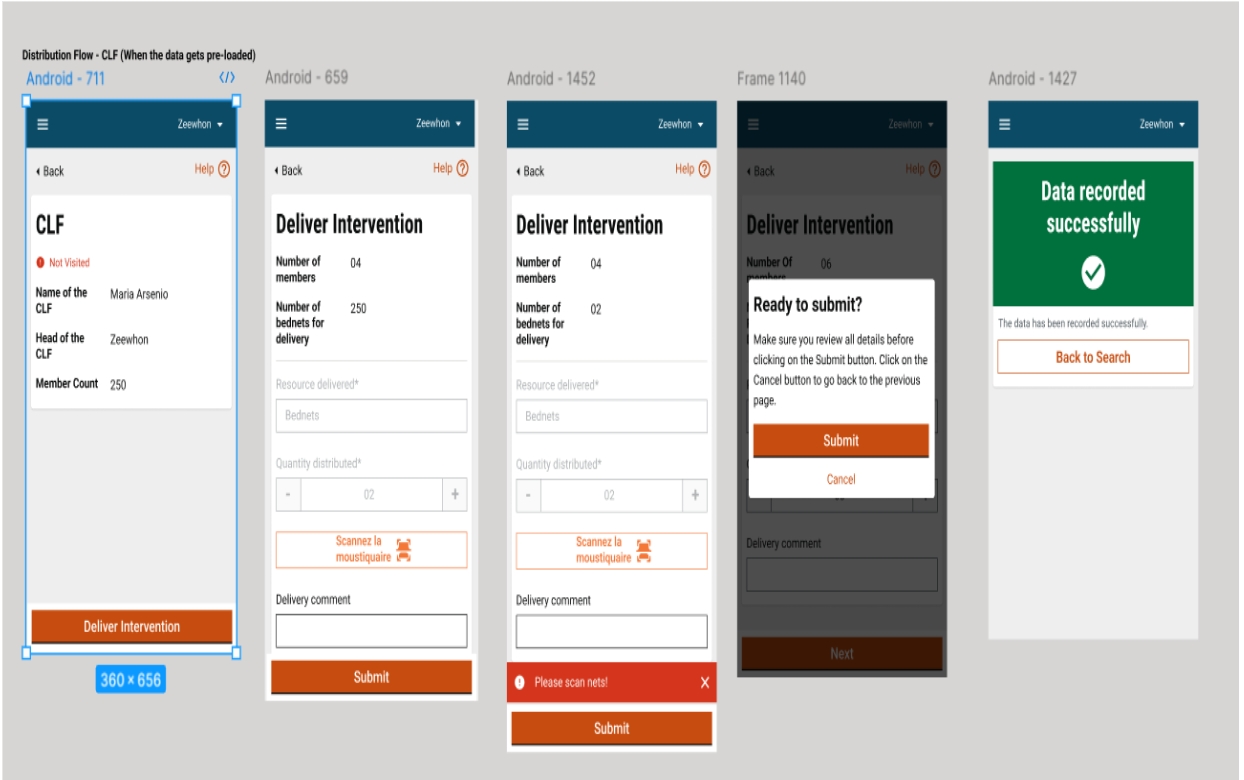
Product variant ID
The product variant that is being transferred.
Mandatory
User
String
2
64
No
Quantity
The number, or quantity, or the count of units of the product variant that are being transacted.
Mandatory
User
Integer
Outputs from the micro-plan.
Yes
Reference ID
The reference entity for which the stock transfer is taking place.
Mandatory
User
String
No
Reference ID type
The entity type that the reference ID refers to. For example, 'Project'.
Mandatory
User
String
2
64
String
No
Transaction type
The kind of transaction that is taking place: Received, dispatched.
Mandatory
User
String
No
Transaction reason
The status of the transaction: Received, returned, loss.
Mandatory
User
String
No
Transacting party ID
The ID of the party from/to which the product variant stock is being transferred.
Mandatory
User
String
2
64
No
Transacting party type
The type of entity that the transacting party ID refers to. For example, 'Warehouse'.
Mandatory
User
String
2
64
The list of warehouses/facilities and their type to be provided by the program/state during impel.
No
Stock reconciliation
Physical count
The count of units of the product variant as a result of a physical count.
Mandatory
User
Integer
No
Calculated count
The count of units of the product variant that is calculated from the stock movements.
Mandatory
User
Integer
No
Facility details
Facility ID
The ID of the facility where the stock of the product variant is being transferred.
Mandatory
System
String
2
64
List of warehouses/facilities and their type to be provided by the programme/state during impel.
No
Facility name
The administration name of the facility.
Mandatory
User
String
2
2000
Yes
Is it permanent?
Whether the facility is permanent or not.
Mandatory
User
Boolean
Yes
Usage
The purpose of the facility: Storage warehouse, medical facility, sewage treatment plant.
Mandatory
User
Dropdown
Yes
Storage capacity
Physical storage capacity of the facility in cubic metres.
Optional
User
Numeric
Yes
Address
Mandatory
User
String
String
2
2000
Mobile No.*
Mobile number of the user.
Mandatory
User
Numeric
2
15
Length validation- Specific to Impel
Current HRMS specs are designed for Indian phone number formats and would need updates.
Yes
Father/Husband's Name*
Name of the user's husband or father.
Mandatory
User
String
2
2000
Yes
Gender*
Gender of the user being registered.
Mandatory
User
String
2
64
Yes
Date of Birth*
Date of birth of the user being registered.
Mandatory
User
Date
10
10
Date of birth cannot be in the future.
Yes
Email ID of the user being registered.
Optional
User
String
8
64
Yes
Correspondence Address*
Address of the user being registered.
Mandatory
User
String
256
Yes
ULB*
ULB assigned to the user where the user is supposed to perform tasks assigned to him/her.
Mandatory
User
String
256
Yes
Role*
Role assigned to the user to enable him/her to carry out his/her tasks and access the required data and services.
Mandatory
User
String
256
Every user must have at least 1 role assignment.
Yes
Employment Type*
The employment types indicate the type of contract which he/she holds with the organisation. This indicates whether he/she is a permanent employee or a contract employee for a short period. Select the relevant employment type: 'Permanent', 'Temporary', “DailyWages” and 'Contract'.
Mandatory
User
String
256
Yes
Current assignment
The current assignment type is to indicate whether the employee is currently assigned to a particular department and designation. A user can be also be assigned multiple assignments to perform his/her function.
Mandatory
User
String
64
Yes
Status*
The status indicates the type of status which he/she holds, whether employed or not within the organisation.
Mandatory
User
String
256
Yes
Hierarchy *
The hierarchy indicates the hierarchy type for the boundary to which he/she is assigned.
Mandatory
User
String
256
Yes
Boundary Type *
The boundary type indicates assigning a city to his/her role within the organisation. A user can be assigned multiple boundary types to perform in different functions. Example: City, zone, block, and locality.
Mandatory
User
String
256
Yes
Boundary *
The boundary indicates assigning a particular city to his/her role wherein they perform the role function of the application for the particular city. A user can be assigned multiple boundaries to perform in a different location. Example: City name, and tenant zone.
Mandatory
User
String
256
User must be assigned to atleast 1 boundary.
Project boundary must take precedence over user boundary assignment.
Yes
Assigned from Date*
The assigned from date indicates the date from which his/her role is assigned to perform the role function assigned.
Mandatory
User
Date
10
Yes
Department*
The department indicates the particular department to which his/her role is assigned to.
Mandatory
User
String
256
Yes
Designation*
The designation indicates a particular designation that is assigned to his/her role.
Mandatory
User
String
256
Not required for HCM.
Yes
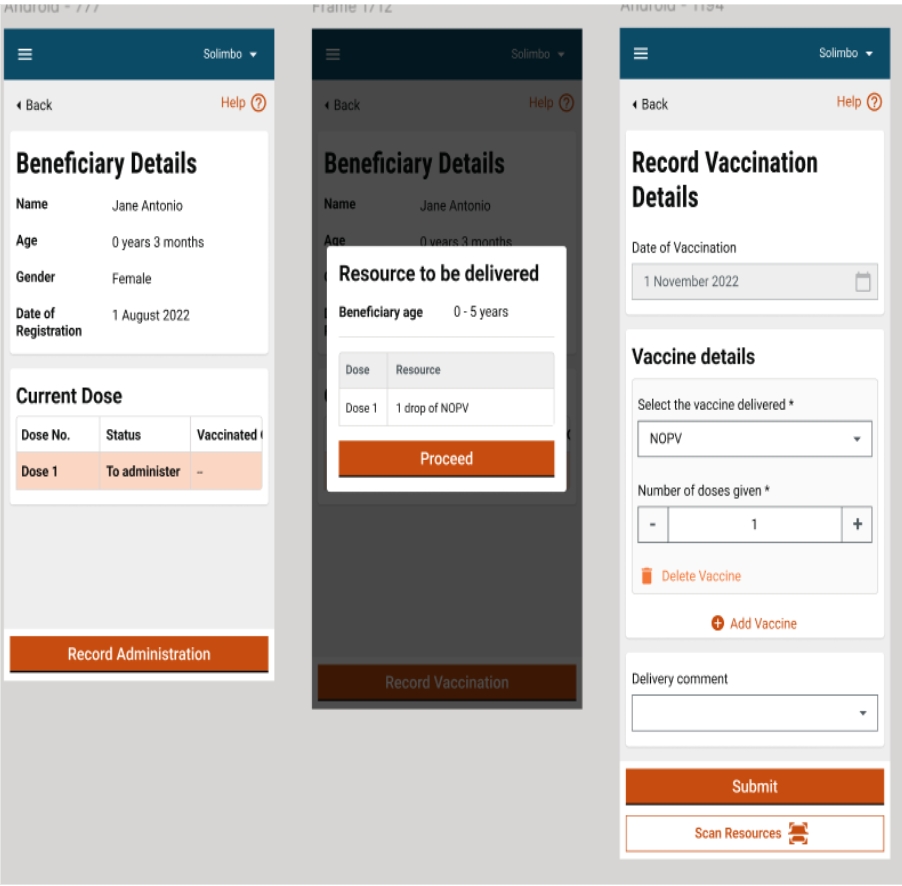

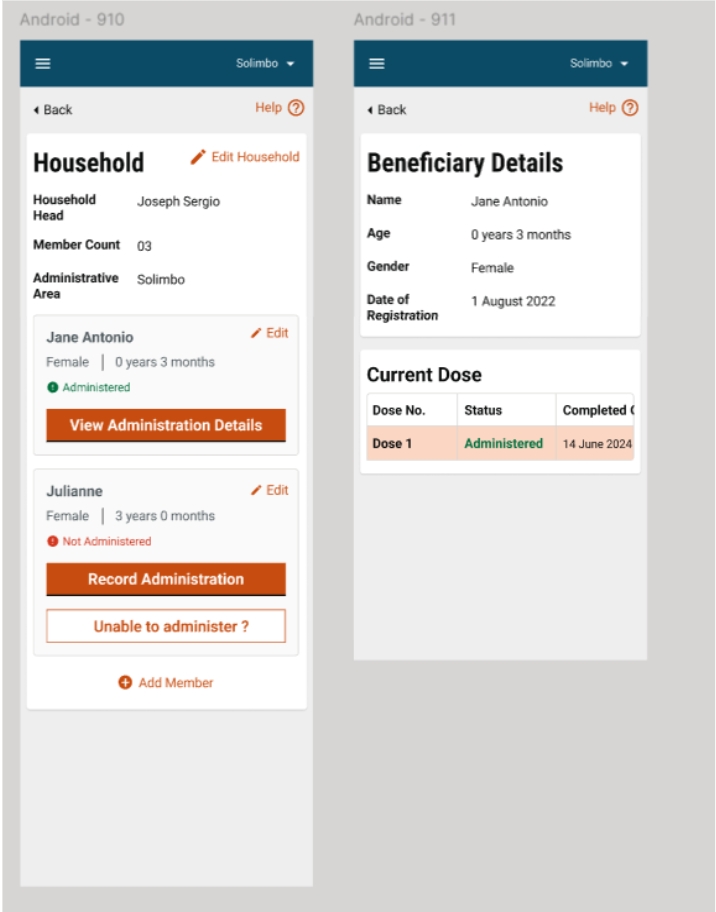
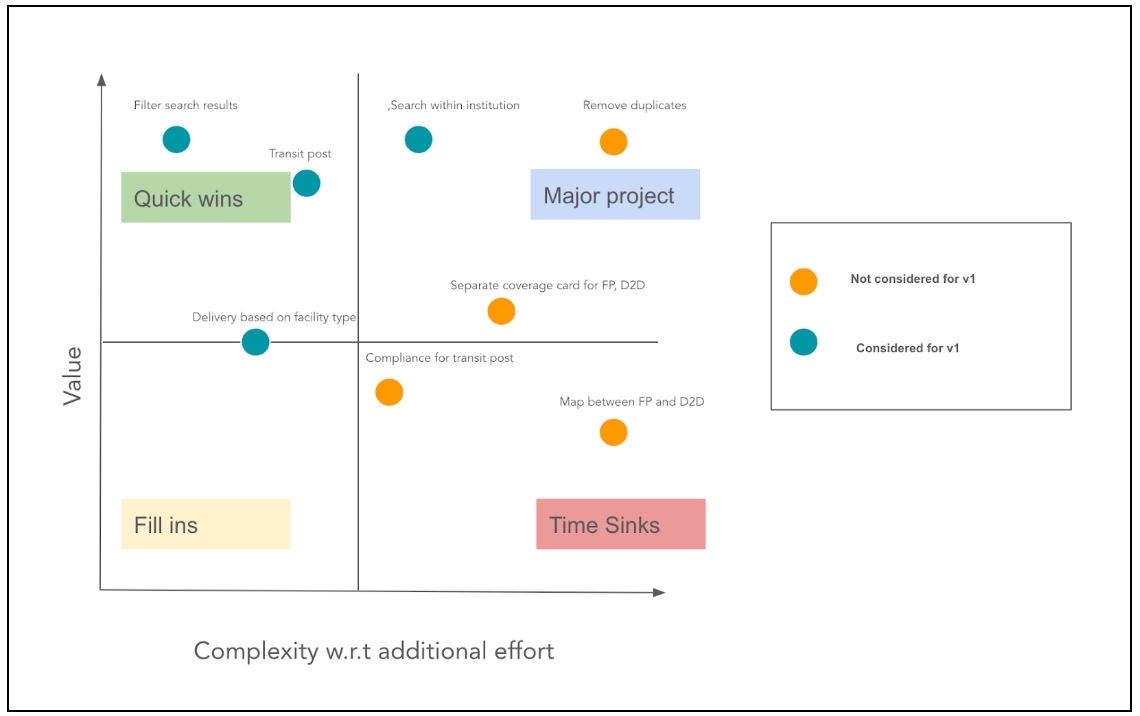

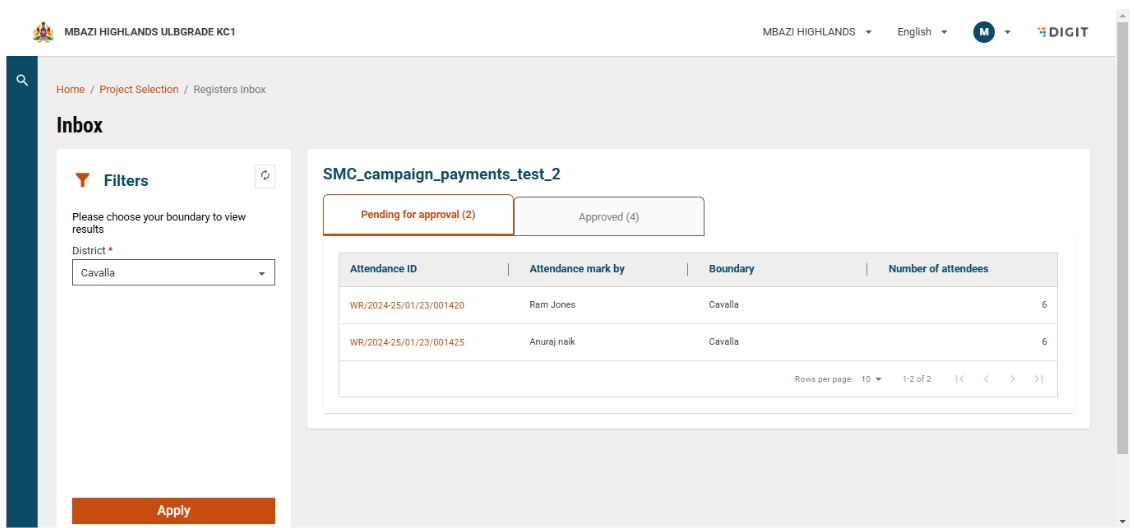
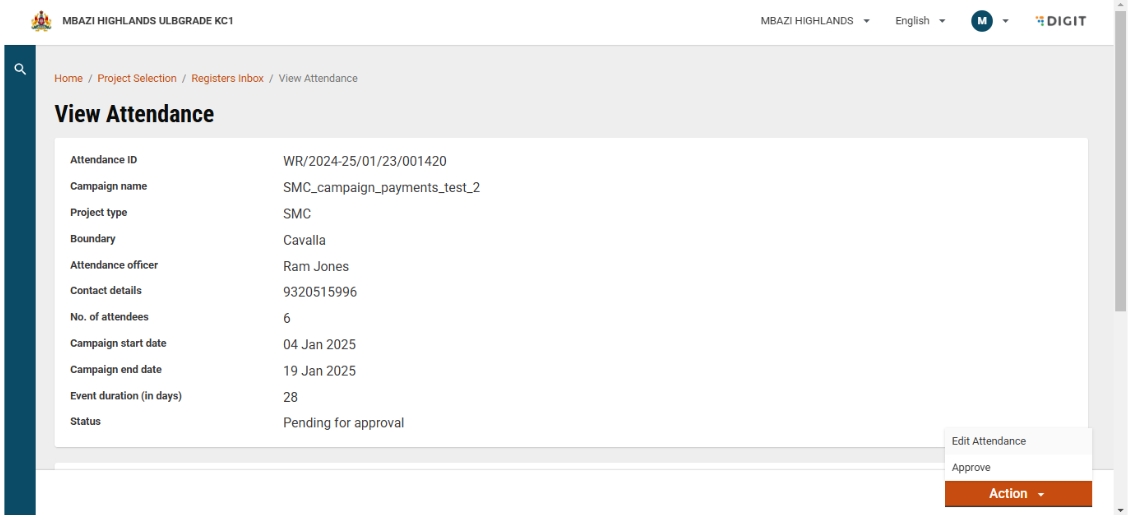
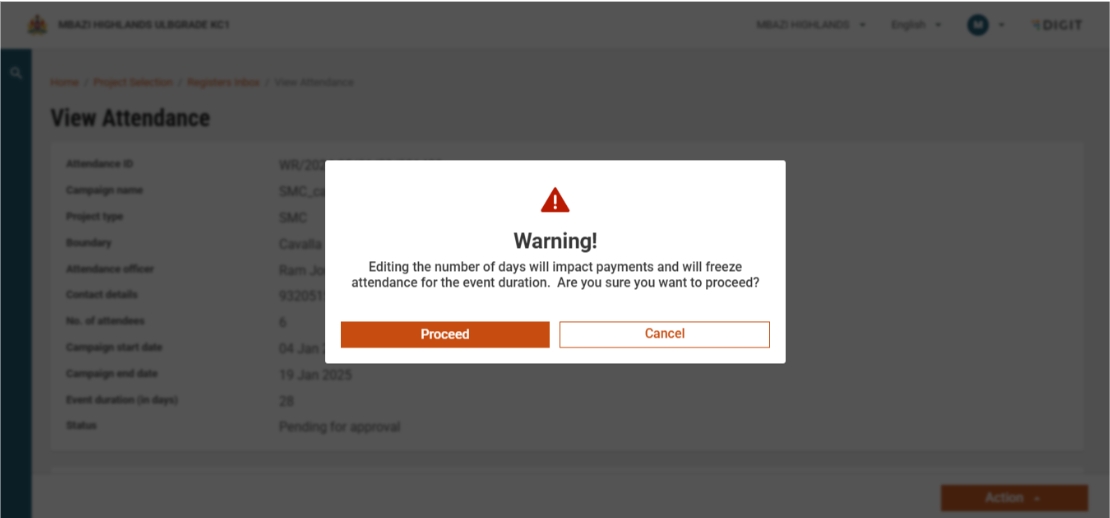
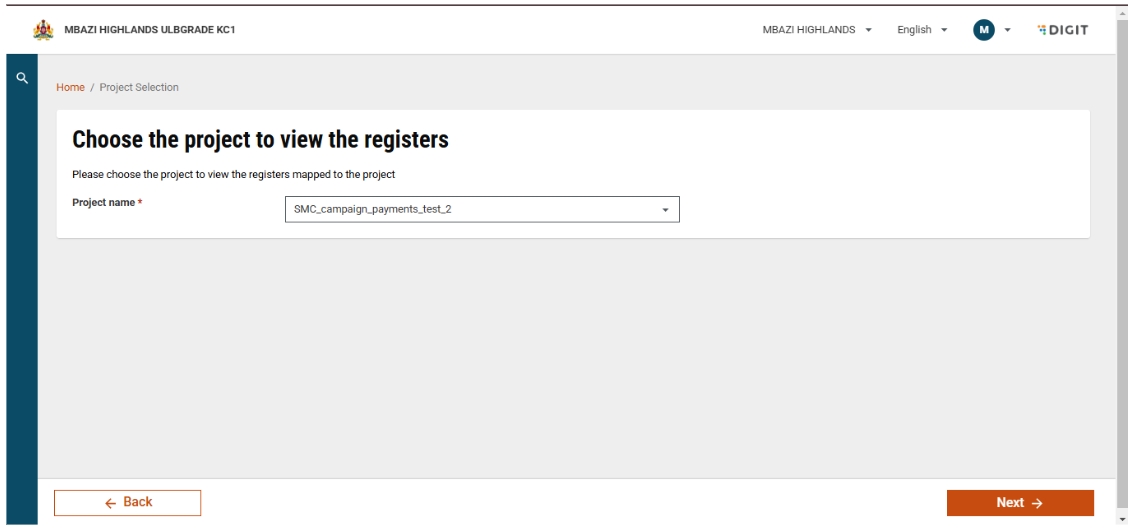
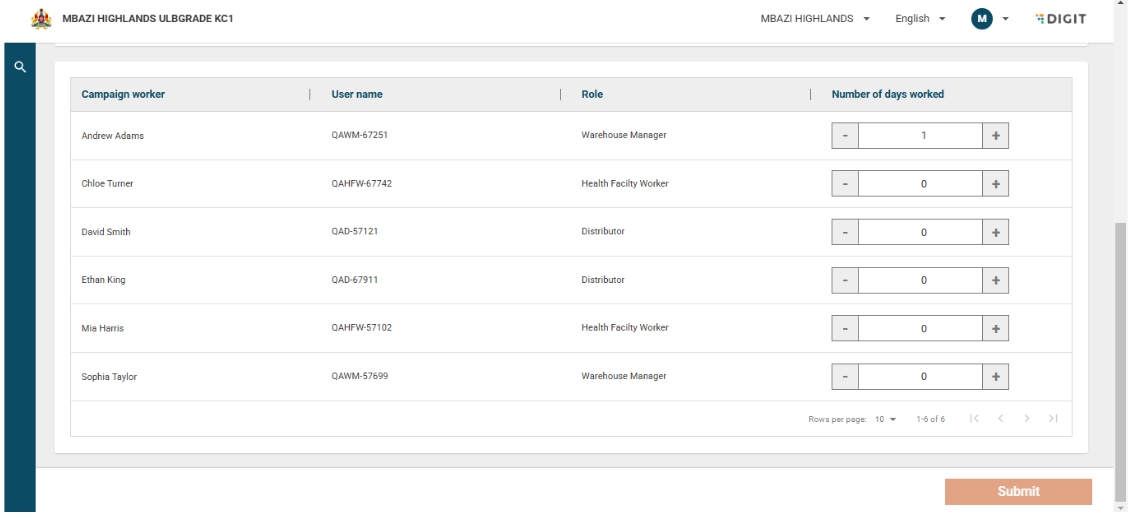

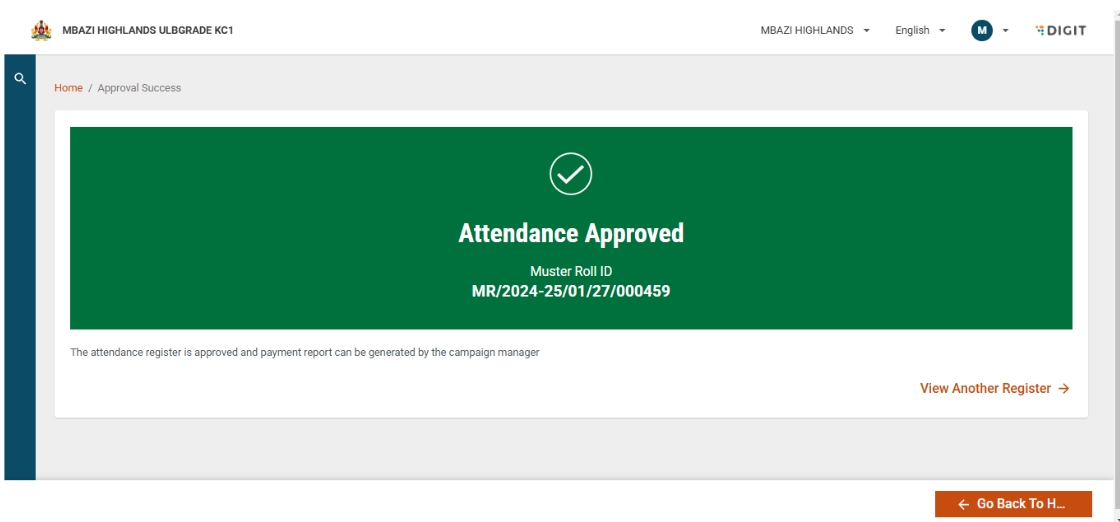
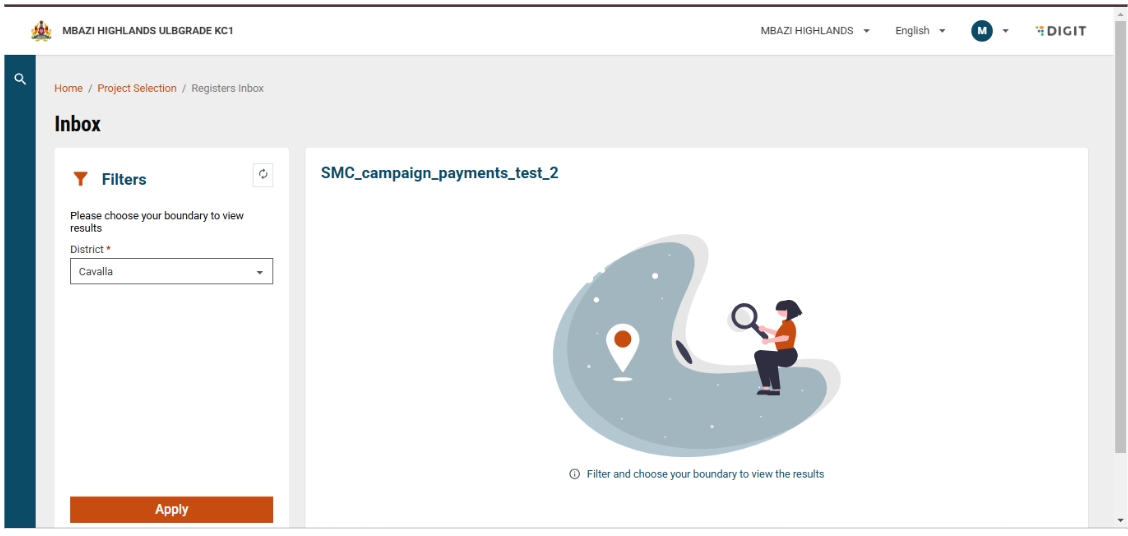
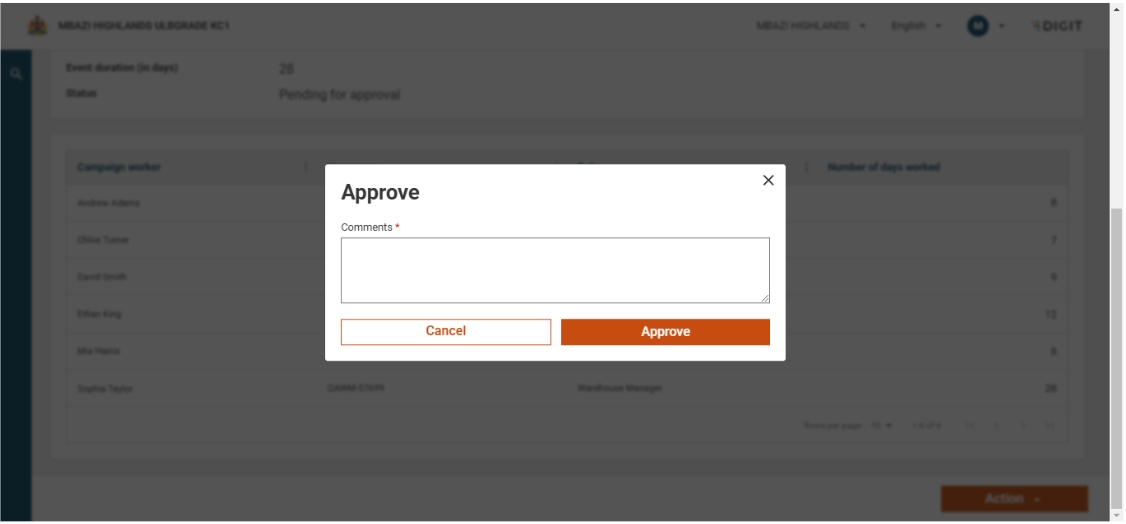

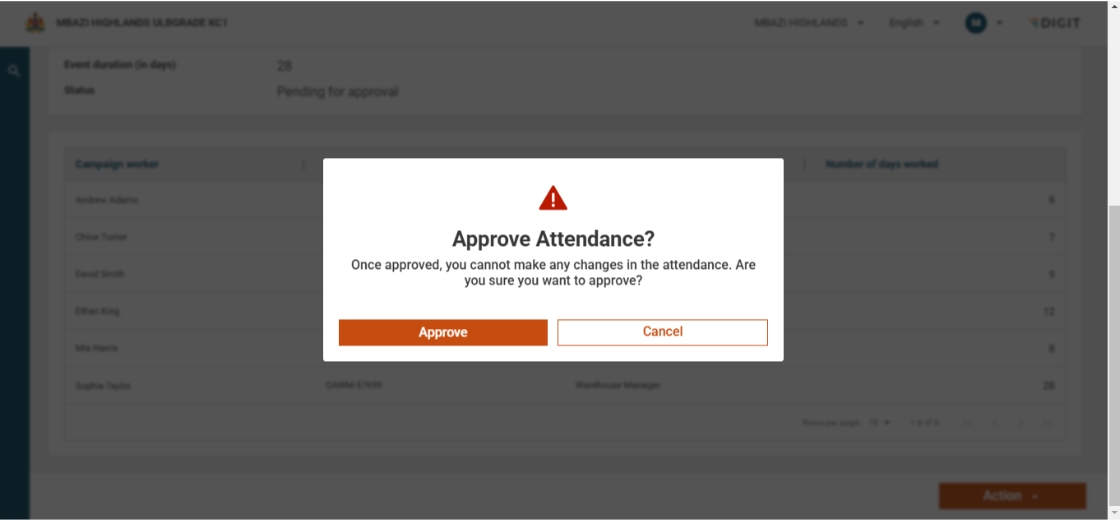

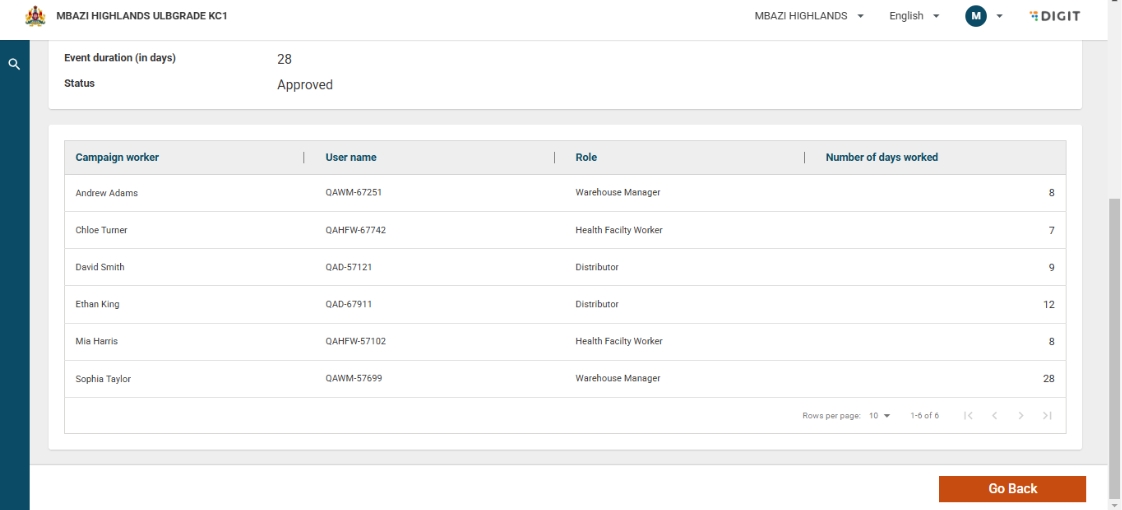

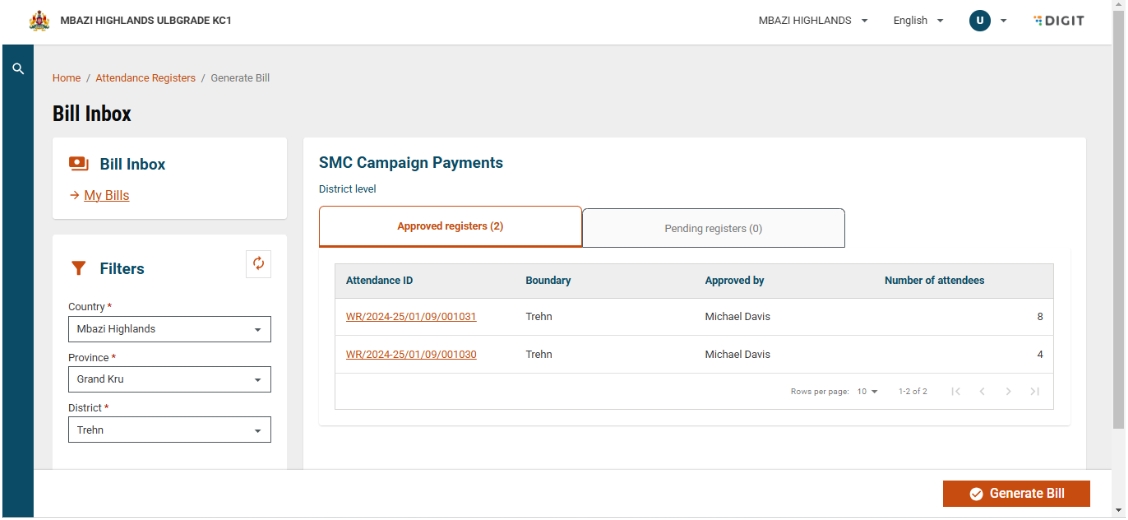
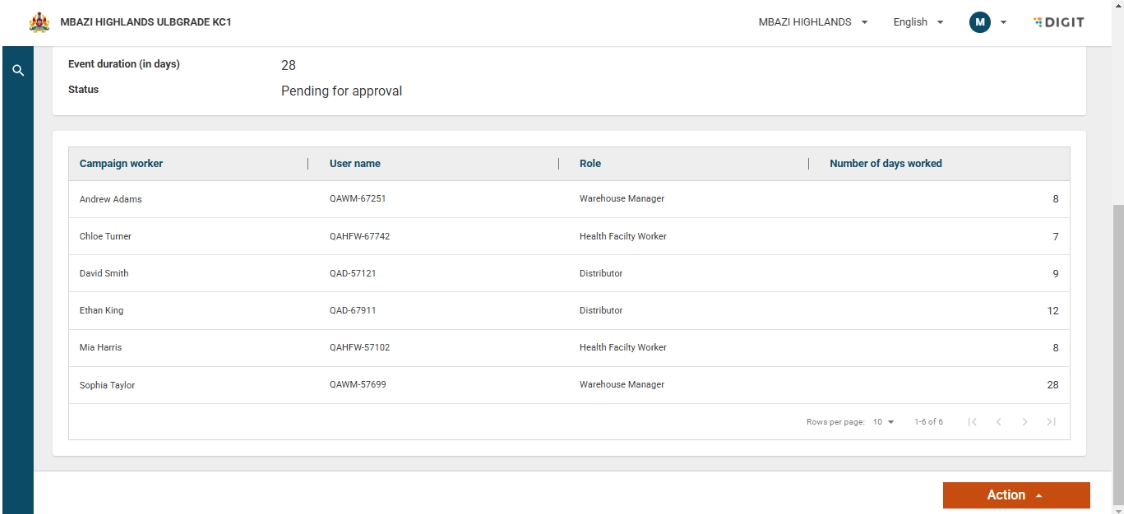

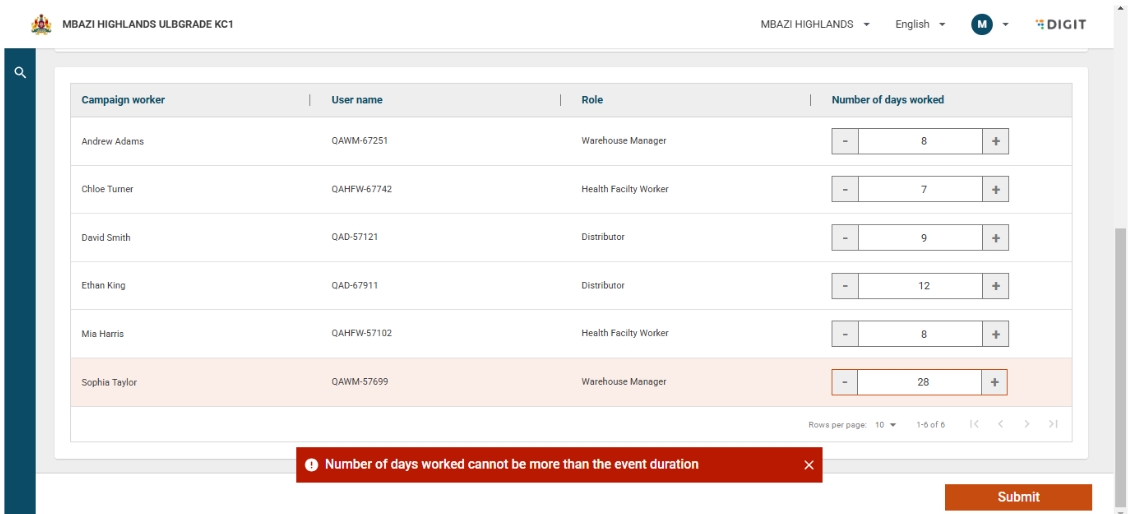
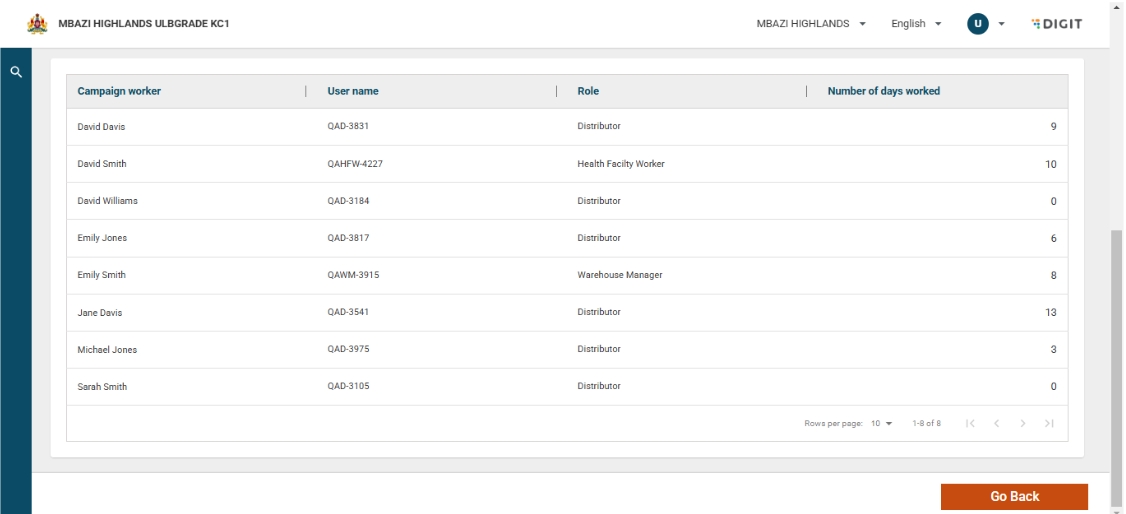
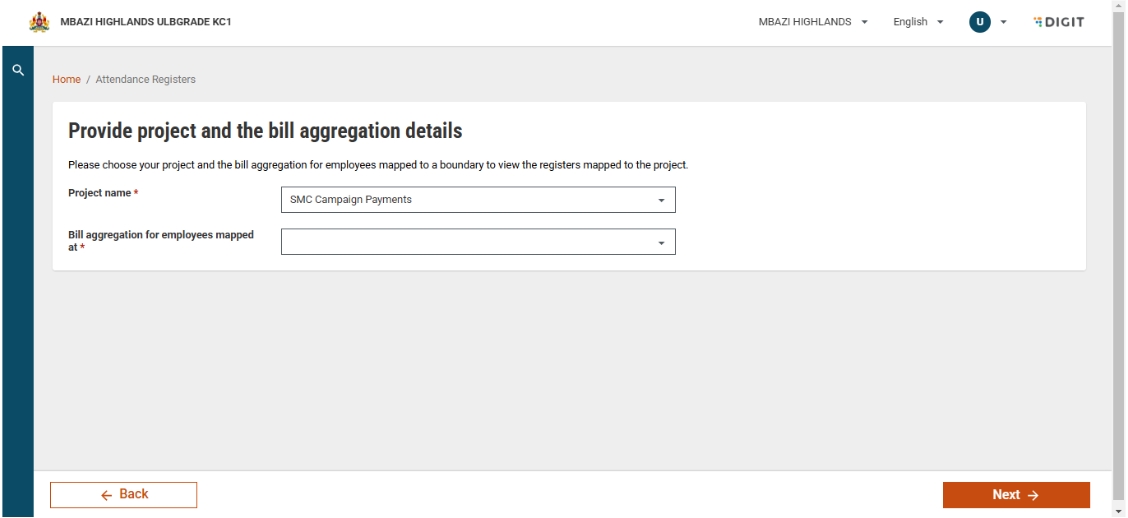
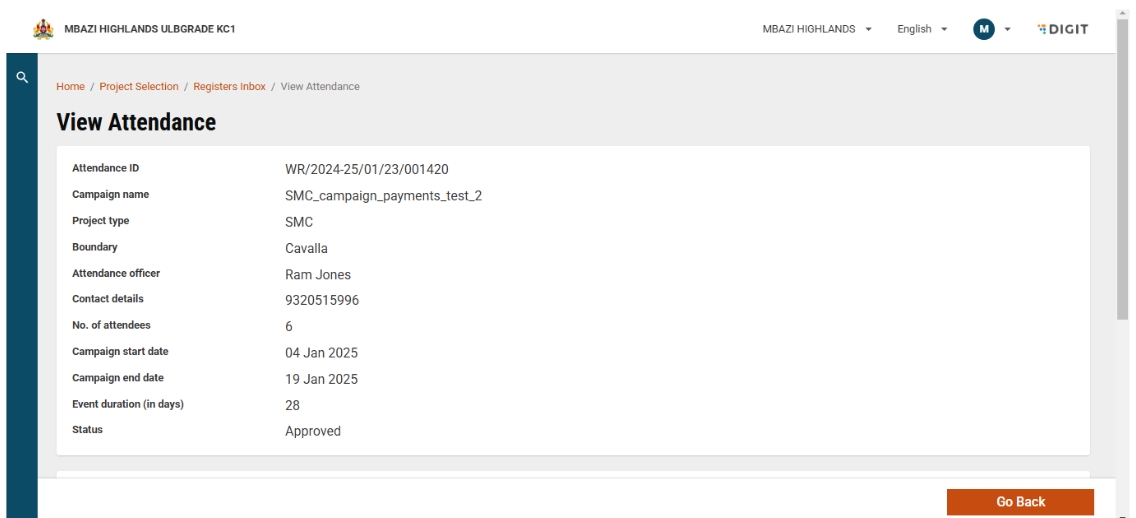
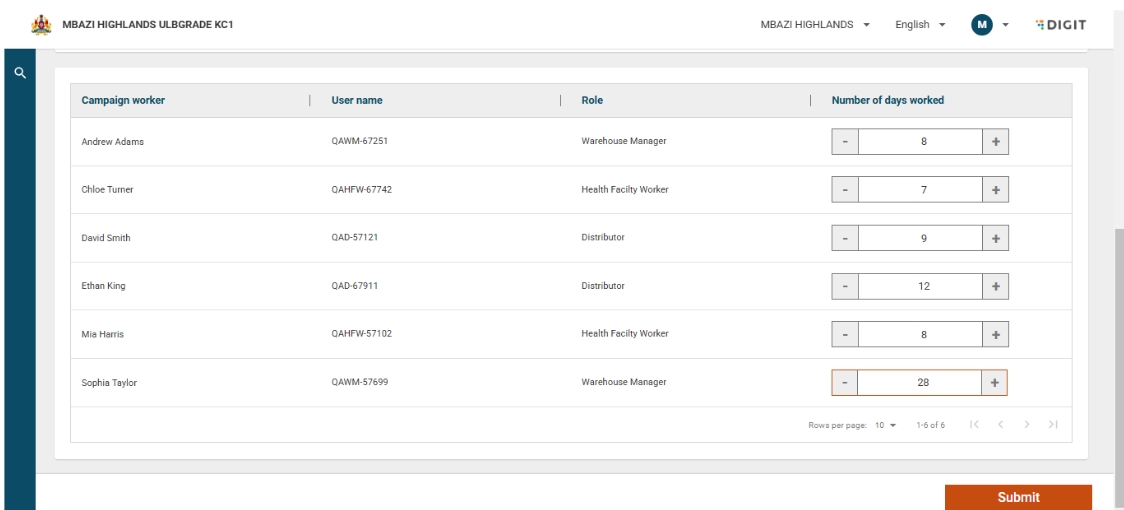
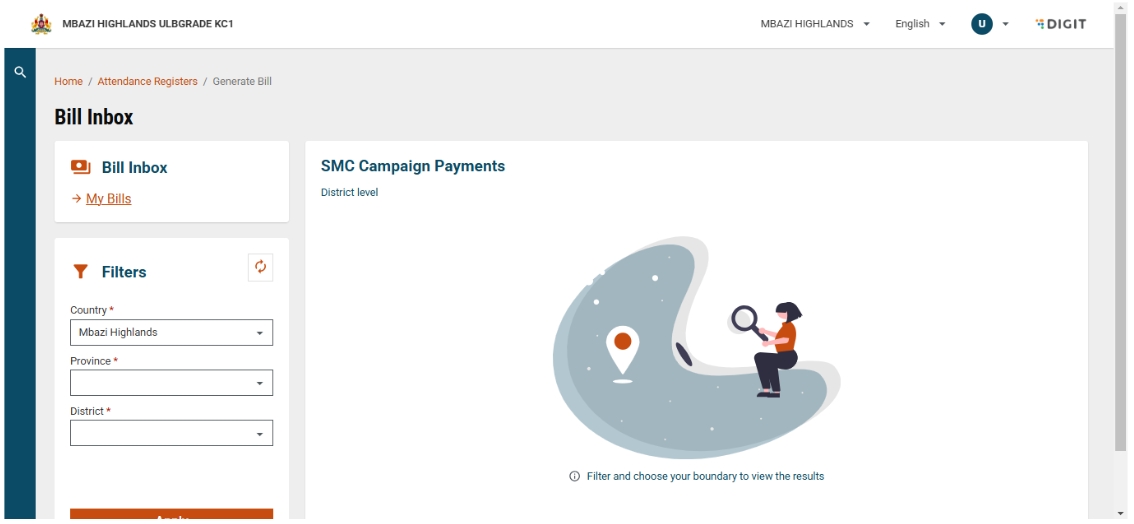
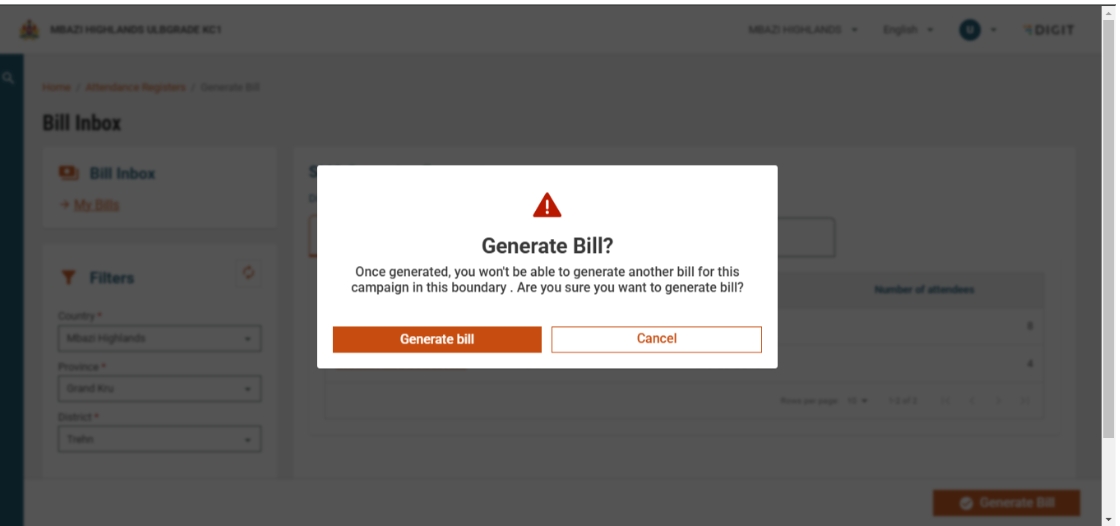
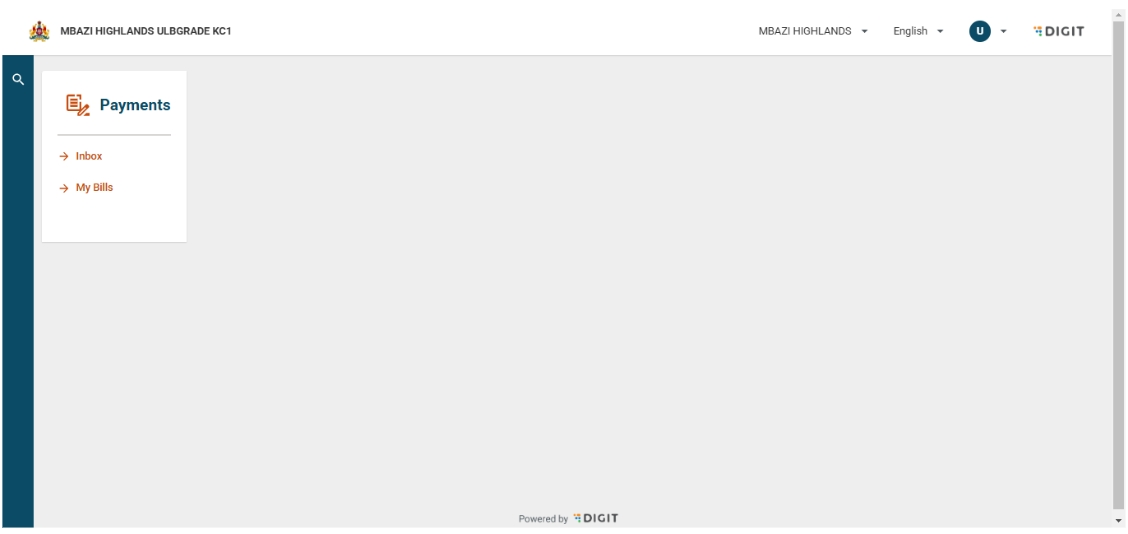

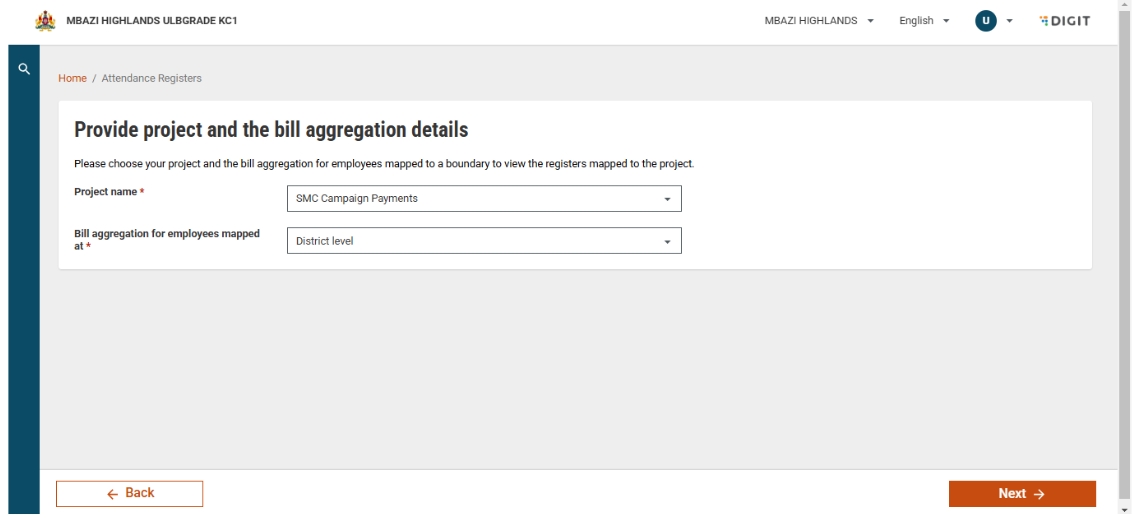
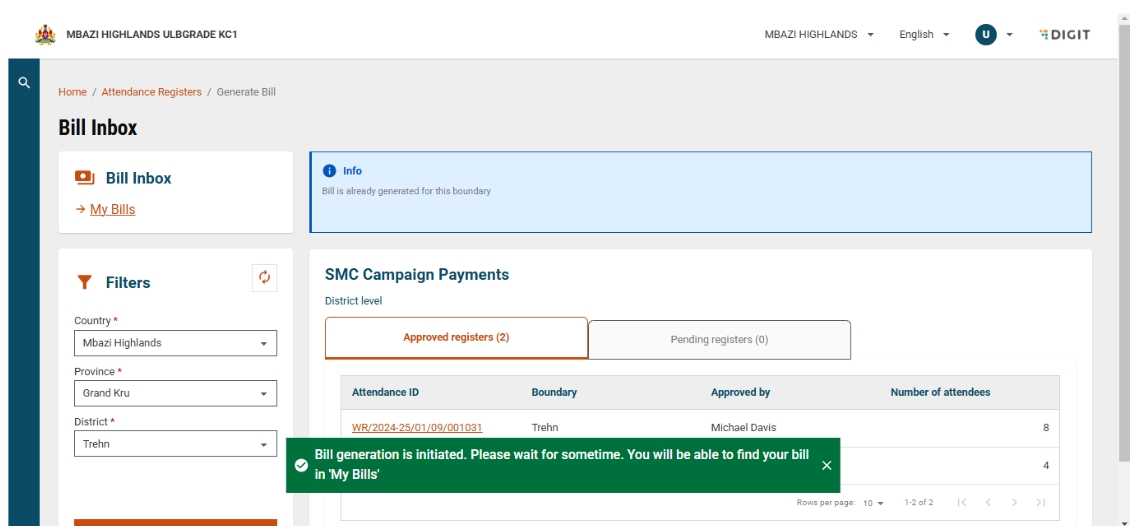

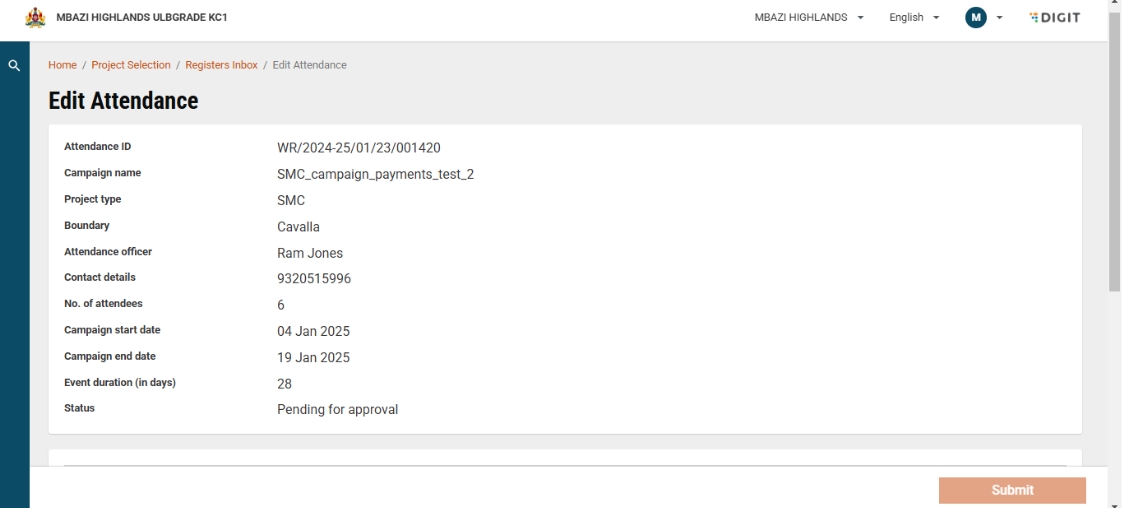


This document serves as a guide to effectively use the Payments module within Health Campaign Management (HCM). It outlines the features and functionalities available to users, clarifying tasks that can be performed and limitations to be aware of. Additionally, it provides essential instructions for critical processes, such as approving attendance and generating payments, including key considerations and best practices. The document also highlights important dos and don'ts to ensure smooth and error-free operations. To enhance understanding, it offers a detailed overview of the Payments module's workflow, supported by illustrative screenshots for better clarity and ease of reference.
HCM: Health Campaign Management - The tool for managing health campaigns, including modules for various functions such as payments, attendance, enumeration, supervision, etc.
Event: Key activities during a campaign where attendance is recorded, such as training, enumeration, and distribution.
Attendance Register: A record of attendance for different campaign events, detailing participant names and attendance dates. Attendance markers use the HCM attendance module to record attendance daily until the event concludes.
Muster Roll: An official report documenting the daily attendance of workers engaged in a specific project or campaign. It includes essential details such as worker names, roles, work locations, attendance dates, and days worked. The muster roll is created after the attendance register is approved and serves as a reference for validating attendance, calculating wages, and generating payment reports.
Editing Attendance Records Post-Event Completion
Authorised personnel, such as proximity supervisors, can modify attendance records after an event concludes to correct errors or omissions made during initial data entry.
Edits include correcting the number of days worked or marking attendance for previously unrecorded participants.
All edits are tracked and documented within the system for audit purposes.
Approval of Attendance Records and Muster Roll Generation
Once attendance records are reviewed and finalised, they are submitted for approval by proximity supervisors.
Approved records are used to automatically generate the muster roll, which contains attendance details for the event.
The muster roll becomes the official document for wage validation and payment processing.
Reviewing Approved Registers
Payment approvers or other authorised stakeholders can access and review attendance registers that have already been approved.
The review process ensures compliance with organisational guidelines and verifies that data matches muster roll records before payment reports are generated.
Viewing Approved and Unapproved Registers
Users with appropriate permissions can view both approved and pending approval attendance registers.
This view allows campaign managers to monitor the status of attendance records for all events within a given boundary.
Filters and search functionalities may be available to help locate specific registers based on event type, date, or boundary.
The following features and functionalities are not included in this version of the Payments module and are considered out of scope. Some may be considered for inclusion in future versions.
Campaign Worker Onboarding: Workers must be onboarded via the HRMS or Console web interfaces, as this is not supported in the app.
Worker Registry Validation: The module does not support checks for:
- Duplicate entries or boundary over-allocations.
- Mobile number authentication (inactive numbers or mismatches).
- Identity verification or validation of mobile money accounts for status and transaction limits.
Approval Workflows: Missing workflows for:
- Payment report approvals
- Muster roll approvals
Attendance Corrections: No provision for:
- Proximity supervisors returning attendance reports to field supervisors for corrections.
- Payment approvers returning attendance reports to proximity supervisors for corrections or rejections.
Worker Payment Configuration: Setting different rates for workers with the same role based on location boundaries is not considered for this version.
Reporting Limitations: Support for generating intermediate reports before event completion is not considered for this version.
Attendance Evidence: The following capabilities are not in scope for this release:
- Photos of workers or ID card
- Signature, QR code, or biometric-based attendance
Financial Integrations: No integration with mobile money operators (MMOs), banks, or financial institutions.
Worker Communication: Automated SMS notifications for payments, attendance tracking, or registrations are not considered for this version.
KYC and Registry Cross-Checks: No automated cross-checking of failed KYC attempts, name mismatches, or duplicates against MMOs and the worker registry in HCM.
Attendance Marker: Responsible for recording attendance at events (e.g., trainings, enumerations). This role may be filled by a field team supervisor or any individual presiding over the event.
Proximity Supervisor: Charged with approving the attendance recorded by the attendance marker. They verify attendance details (often via phone outside HCM) if discrepancies arise and have the authority to edit records after the event concludes. This role typically operates at the district level or higher.
Payment Approver: Oversees the consolidation of attendance records to generate boundary-specific reports. They are responsible for approving the payment report, forwarding it to higher operations for additional approvals, and liaising with financial institutions to process payments.
1. Attendance Marker
Do's:
Mark daily attendance for all assigned registers without fail.
Sync all records to ensure no pending entries remain on the device before the proximity supervisor edits or approves the attendance records for that event.
Raise complaints for issues like adding/removing persons or correcting details of the staff using the complaints module or by contacting the system administrator.
Don’ts:
Submit incorrect attendance—once submitted, corrections are not possible for the attendance marker.
2. Proximity Supervisor
Do's:
Verify with the attendance marker for all the districts that all records are synced before editing or approving attendance.
Make edits as necessary, but ensure all details are accurate before final approval.
Approve all registers systematically, completing one district before moving to the next.
Raise complaints for issues like entry corrections via the complaints module or the system administrator.
Don’ts:
Approve attendance without confirming that all records are synced.
Assume changes can be made after approval—final approvals are irreversible.
3. Payment Approver
Do's:
Double-check all details in the payment report (PDF/Excel) before submission to financial institutions.
Generate payment reports for each boundary systematically, starting with one district and moving to the next, including provincial/national events.
Wait 2-3 minutes for report generation before reporting issues.
Don’ts:
Editing Excel reports after generation is not allowed.
Submit incomplete or inaccurate reports.
4. System Administrator
Do's:
Validate worker information (enumerators, supervisors, etc.) before onboarding them in the system, ensuring correct mobile numbers and IDs.
Confirm no duplicate personnel or mobile numbers exist in the system.
Map workers accurately per the microplan, avoiding over or under-allocations
Verify that mobile and bank account numbers belong to the correct person and not their family members.
Don’ts:
Allow unverified or incorrect data to be entered into the system.
Approve register changes without proper supervisory approval.
Before the Campaign or Related Event Starts
Ensure all workers, including supervisors as per the microplan, are created in the system.
Complete all worker validations as outlined in Section 6.
Confirm that all attendance registers are created and assigned to the appropriate attendance markers and proximity supervisors.
If payment reports need to be generated mid-event, make it as two separate attendance registers for the event: one for the first half and another for the second half.
During the Campaign or Related Event
Mark attendance diligently for each register daily using the HCM application.
Perform routine syncs to ensure no unsynced records remain, particularly upon event completion.
After the Campaign Starts or Ends
Ensure no registers are pending approval by proximity supervisors.
Verify the accuracy of the worker and register details before generating the payment report.
Confirm that payment registers are created for all boundary levels and individual boundaries (e.g., districts, provinces, country).
Overall process flow diagram:
Proximity supervisor workflow
On the language selection screen, select the preferred language from the available options. Select the desired language and click on ‘Continue’ to access the login page.
On the login page, enter the credentials for a proximity supervisor and select the assigned boundary. After reading through the privacy policy statement, select the checkbox to accept the terms and conditions and then click on ‘Continue’ to proceed to the landing page for the proximity supervisor.
On the landing page for a proximity supervisor, the ‘Payments’ label is displayed along with an option to view the "Attendance Registers". Click on the "Attendance Registers" label to access project-specific attendance registers.
Select the desired project name (event name) from the available options in the dropdown and click ‘Next’ to proceed.
Following the selection of the project name, you will be navigated to the ‘Inbox’ screen, where, by default, no attendance registers are shown. To view attendance registers, a desired boundary must be selected through a boundary filter (in this case, ‘District’). Once the desired boundary is selected, click on ‘Apply’ to proceed.
Post selection of a desired boundary, you will be directed to a screen that shows all the "Pending for approval (#)" and ‘Approved (#)’ attendance registers that have been created within that specific boundary, with "Pending for approval (#)" registers being the default viewing option. ‘Approved (#)’ attendance registers can be accessed through toggling. Based on the status type (either pending for approval or approved), further discretised information is provided in a tabular format, which includes the following: Attendance ID, Attendance marked by, Boundary, and Number of attendees.
Clicking on the "Attendance ID" on the ‘Inbox’ page will open the "View Attendance" screen, which will provide all the campaign-related details of the registrant and their attendance summary. The ‘Action’ button present on the bottom right of the screen allows the proximity supervisor to either "Edit Attendance" or ‘Approve’ the submitted data.
On clicking "Edit Attendance", a warning message is displayed informing the proximity supervisor that editing the attendance days data will impact the payments, and the same will be frozen for the entire event duration, followed by a confirmation question. This means that if the field supervisor marks the attendance for any further dates, it will not be updated in the register. The proximity supervisor can decide to either ‘Proceed’ to update the attendance data or select ‘Cancel’ to go back to the "View Attendance" page. Click on ‘Proceed’ to confirm the editing of the attendance data.
Next, the "Edit Attendance" page is displayed, which will allow the proximity supervisor to update the attendance data for each field supervisor with the help of the ‘+/-’ buttons, or they can enter the count directly within the data entry field. The ‘Submit’ button is disabled until the proximity supervisor updates the attendance for at least one field supervisor.
If the "number of days worked" entered exceeds the event duration while updating, an error message will be shown informing the proximity supervisor about it. The system allows marking the number of days as 0, accommodating those who may not have participated for the entire duration of the event.
Once the new attendance data has been entered, click on ‘Submit’ to proceed.
Subsequently, a toast message is displayed indicating that attendance has been updated successfully. The attendance data can be modified as many times as required until it is approved.
Following the successful submission of the new data, the "View Attendance" page will automatically appear, where the updated attendance data is reflected.
Now, click on the ‘Action’ button and then select the ‘Approve’ option. This will open a dialogue box, where mandatory comments should be provided to proceed with the approval process, which is continued by clicking again on ‘Approve’. The approval process can also be cancelled at this stage by clicking on ‘Cancel’.
After submitting the mandatory comments, if the ‘Approve’ option is selected, then a confirmation pop-up will appear with a message highlighting that the data, once approved, cannot be modified.
On clicking again on ‘Approve’, a success screen will be displayed for confirmation, and the muster roll will be generated and displayed on the screen. Following this, any other assigned tasks can be carried out by clicking on "View Another Register" or "Go Back to Home".
On the ‘Inbox’ page, the status of the register can now be seen as approved, and when it is opened, no actions are available, except to "Go Back".
Payments approver workflow
The payment approver is responsible for generating and downloading the final payment bill which is further used to disburse the payments to all the campaign workers.
On the language selection screen, select the preferred language from the available options, and click on ‘Continue’.
Next is the login page, where the credentials for a campaign supervisor are entered and the assigned boundary is selected. After reading through the privacy policy statement, select the checkbox to indicate acceptance. Then click on ‘Continue’ to proceed.
This is the landing page for a campaign supervisor. On this page, a card is displayed for payments with the options to go to the ‘Inbox’ page to generate bills and to "My Bills" to view and download already generated bills. Click on ‘Inbox’ to proceed.
On this page, the project name (event type name) from the available options must be selected, as well as the aggregation boundary details, whether the bill should be aggregated at the national, province/state, or district level. Select the required aggregation boundary level and click on ‘Next’.
Following this, the "Bill Inbox" page will appear, where the specific boundary should be filtered for which the bill has to be generated. Once selected, it will display all the attendance registers, both approved and pending approval, which can be only viewed by the campaign supervisor, along with an option to generate the bill. Click on "Generate Bill".
The campaign supervisor will be able to generate the bill only once for a particular boundary, and this can be done only when all the registers within that boundary have been approved.
On clicking "Generate Bill", a confirmation pop-up is displayed that indicates that the bill cannot be generated again. Click on "Generate Bill" to proceed.
This will initiate the bill generation process along with displaying a toast message highlighting the wait time for completion of the process. Click on "My Bills" to proceed.
Clicking on "My Bills" will display the bill inbox page, where all the generated bills can be found. On this page, bills can be searched by the ‘Bill ID’ or a date range based on the date they were generated. The bills which are still being generated can be identified in the ‘Actions’ column.
Once the bill has been generated successfully, it can be downloaded as either an Excel file or a PDF by clicking on the respective action button. Choose the required format for the report to be downloaded.
An illustration of the PDF report is given below. The report provides the following information: total amount to be processed, details of each individual, different cost heads that are applicable based on the assigned role, and the sum of the amount to be paid based on the number of days attended.
What are the different types of roles available in the HCM payments module Two different types of roles have been made available in the HCM payments module version 1.
a. Proximity Supervisors
They are responsible for making changes in the attendance registers as well as approving them.
b. Payment Approvers
They are responsible for generating the bills and are authorised to download them in Excel/PDF formats for further processing.
What is the workflow of the payments module in the HCM platform? In the HCM platform, the payments module is coupled with the attendance module. The typical workflow diagram is provided in section 8:
How to mark attendance in the HCM platform? There is a dedicated attendance module available in the HCM platform to allow field supervisors to mark the attendance of their team members.
What is an attendance register in the HCM platform? An attendance register is a record-keeping tool that is used to track the count of present or absent campaign workers, along with their activities such as training, registration/distribution, etc.
You can generate the payment report for all the muster rolls that are assigned at a county level.
As a payments supervisor, I have selected a province name. Which muster rolls can I generate the payment report for?
You can generate the payment report for all the muster rolls that are assigned at a province level.
As a payments supervisor, I have selected a district name. Which muster rolls can I generate the payment report for?
You can generate the payment report for all the muster rolls that are assigned at a district level or below the district level.
What is a muster roll in the HCM payments module? A muster roll is a simple document used to keep track of workers and their activities. It records who showed up for work, the hours they worked, and sometimes their pay. It helps employers know who was present and how much work was done. In campaigns, a muster roll can track attendance and ensure workers are paid correctly for their efforts.
What is an event? In the context of attendance for a campaign, an event refers to a specific activity or session where workers or participants are expected to be present. This could include training sessions, daily fieldwork (registration/distribution), or any other scheduled task as part of the campaign.
When should I approve an attendance register? You must wait for the event to be completed to review and approve the attendance register.
No, you cannot regenerate bills. However, you can view the generated bills as well as download them as many times as needed.
How long will it take to generate a bill? The bill generation can take up to 2-3 minutes, depending on the number of registers collated.
How can I aggregate muster rolls into a single bill? Is aggregation mandatory? At what levels can aggregation occur?" Aggregation of muster rolls can be done at different boundary levels, as described below: District Level: Muster rolls from all events created at the district or subordinate levels are aggregated for the selected event type. Example: Aggregating muster rolls for all registration events in the district of Nampula, including those at locality levels within Nampula. Province/State Level: Muster rolls from events across the entire province/state are combined. Example: Aggregating all muster rolls for distribution events across the province of Cabo Delgado. National Level: Muster rolls from events nationwide are collated. Example: Aggregating muster rolls for all master trainer training conducted at the national capital in Mozambique. Aggregation is separated at various levels to ensure there are no duplications of bills generated for the same registers
What should I do if bill generation fails?"
Wait for some time and try generating the bill again.
Check that all attendance registers have been approved.
If the issue persists, contact the system administrator for assistance.
Can I edit the Excel sheet of the payment report? Payment report sheets are protected and cannot be directly edited. If edits are necessary, duplicate the sheet and make the required changes. Ensure that any modifications are made only with the approval of the respective supervisory authority.
How can I change the payment rates for specific roles? If certain roles require different payment rates, you need to define those roles separately and assign individuals accordingly. If people in the same role working across different boundaries need different rates, create distinct roles for each boundary. Ensure any changes are made before generating bills
Can I assign different payment rates to the same role for different boundaries? No, the system currently supports assigning rates based on roles, which must remain consistent across all boundaries.
The Attendance Module enables supervisors to track attendance for their attendees, ensuring accurate records and consistent data for processing payments. This serves as the precursor to the Payments module. For more details, click .
Attendance Marker: The individual responsible for recording event attendance using the HCM mobile app’s attendance module.
Proximity Supervisor: The person authorised to review and, if necessary, edit attendance records submitted by attendance markers. They approve the records for payment processing.
Payment Approver: The person tasked with reviewing generated muster rolls, consolidating them into a single payment report for a specific boundary, and sharing it with financial authorities for payment disbursement.
Boundary: An administrative area used for managing campaigns, such as a province, district, locality, or village. Events and users are assigned to specific boundaries. For instance, a district supervisor assigned to District ABC will oversee district-level training registers created within District ABC.
Ensure mobile numbers are active and unrestricted for receiving payments.
Approve register changes only after supervisory authorisation.
For different wage amounts across specific boundaries for the same role, create separate roles with the appropriate wage amounts and assign workers accordingly.
Verify that all attendance markers and proximity supervisors can log in and view their assigned attendance registers.
How can a proximity supervisor approve an attendance register? User Navigation: Login > Home Page > Attendance Registers > Select Project Name > Select Boundary > Click on Attendance Register in ‘Pending for Approval’ state > View Attendance > Action: Approve > Add Comments and Approve > Confirmation: Approve > Success Screen (Note: Once approved, you cannot take any further action on the register)
What are approved and unapproved registers? Approved registers are those that are marked as approved by the proximity supervisors, and they cannot take any further action on these registers. Unapproved registers are the ones that are submitted by the field supervisors to be approved by the proximity supervisor, and their attendance details can be updated by the proximity supervisor before approval.
How can I select a different type of attendance register? The first step as a proximity supervisor is to select the type of attendance register from the drop-down after logging in to the payments module. There will be multiple types of registers, such as Master Training register, Registration team training, Campaign, etc.
As a proximity supervisor, I have selected one of the districts as a boundary. Which attendance registers can I manage? You can manage only those registers assigned at the selected district or boundary levels below the district.
As a payments supervisor, I have selected the country name. Which muster rolls can I generate the payment report for?
Is it advisable to approve a register before an event is completed? What happens if I edit attendance during an ongoing event? Always approve the attendance register only after the event has fully concluded to ensure data accuracy. Editing attendance during an ongoing event will overwrite the current records, and the system will consider the edited data as final. Additionally, if the attendance register has been edited and approved, attendance markers attempting to record attendance will encounter errors, as there is no downward data flow from the proximity supervisor to the attendance marker
Which formats can I download the payment report in? The reports are available for download in Excel and PDF formats.
How can I view and download the bills I generated? Navigation: Login > Home Page > My Bills > Actions (Download in Excel/PDF)
Can I create bills again for already generated muster rolls?
How can I generate an intermediate payment report before the event is completed? The current version of the module does not support generating intermediate payment reports during an ongoing event


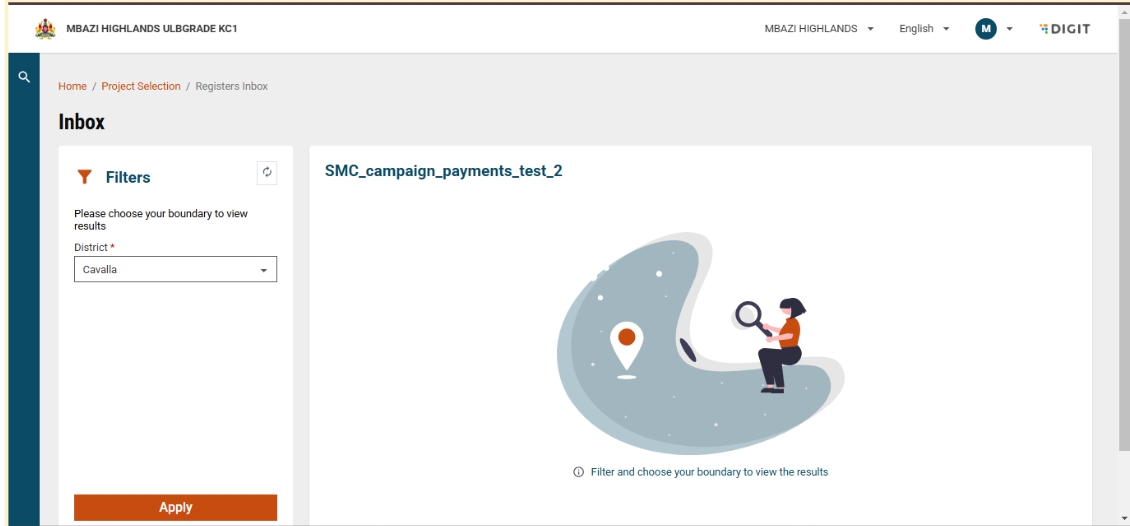

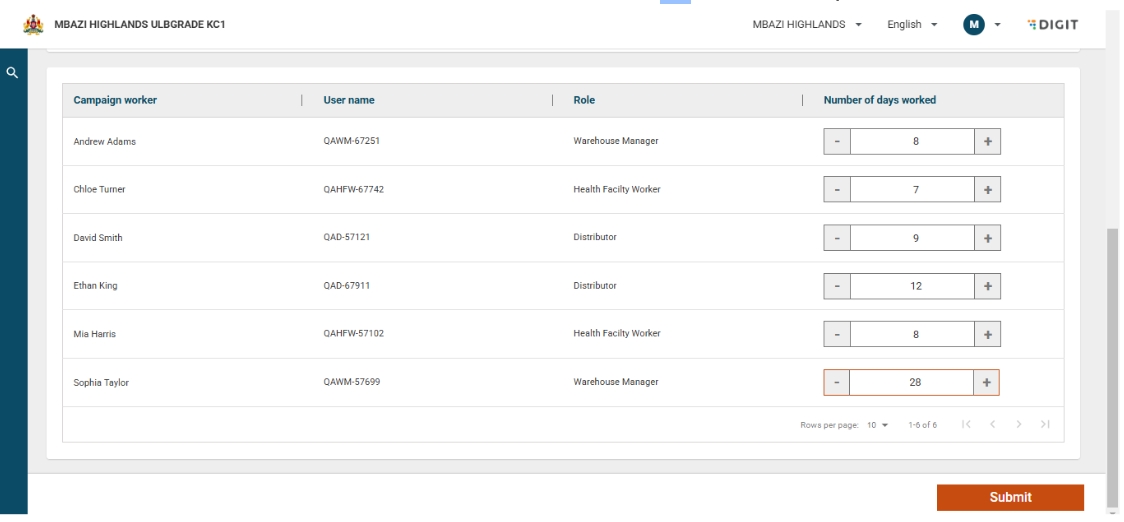
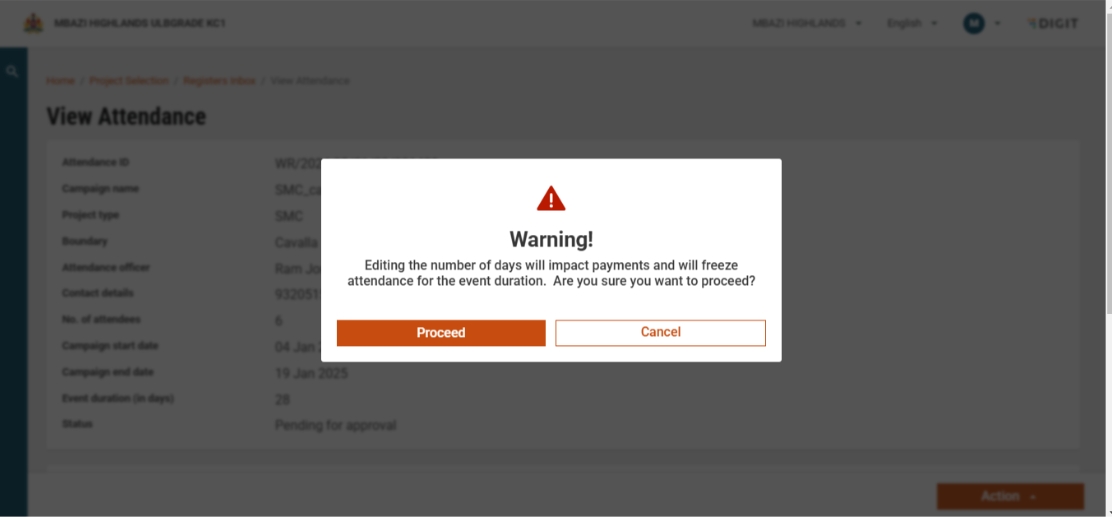

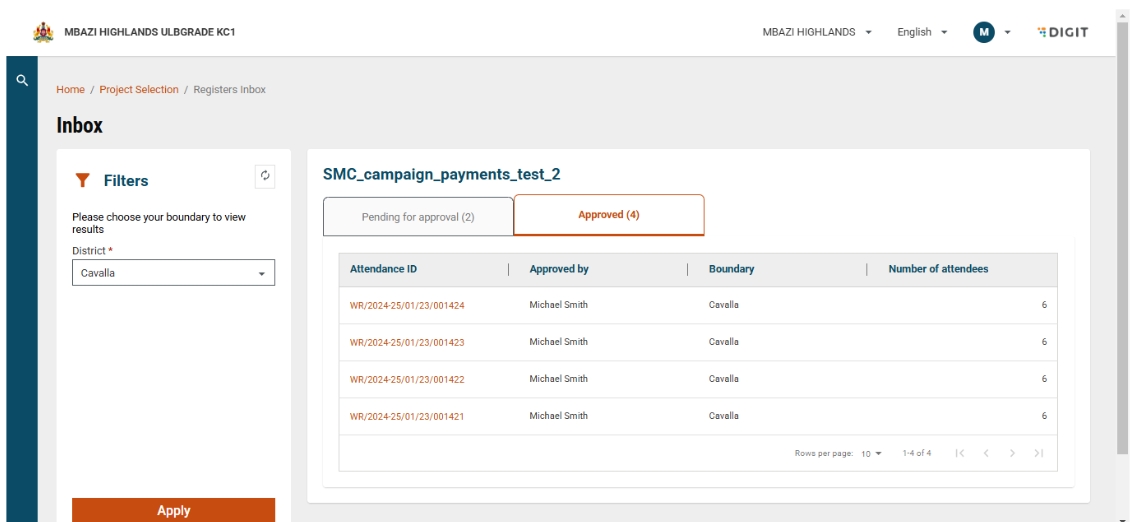
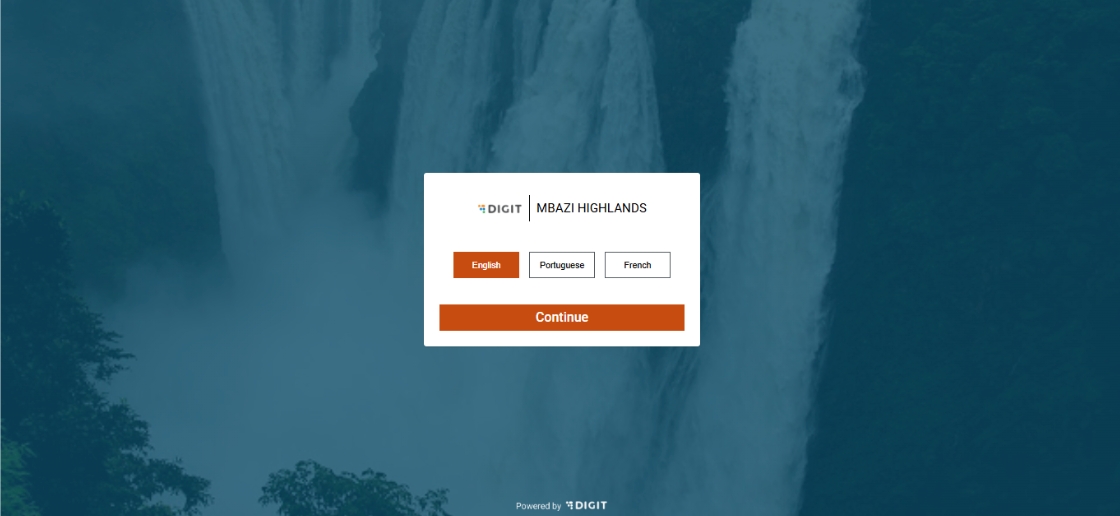
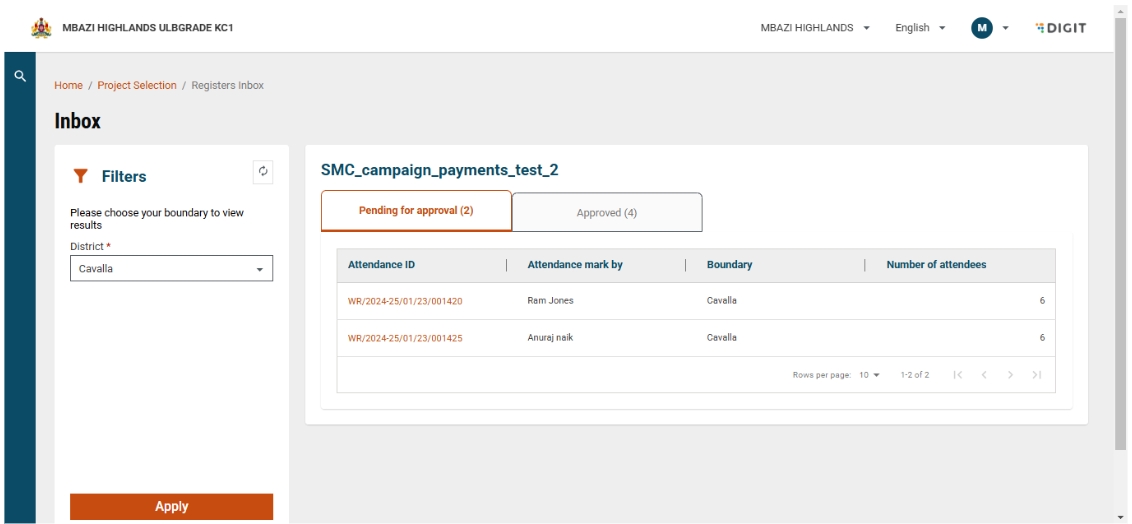
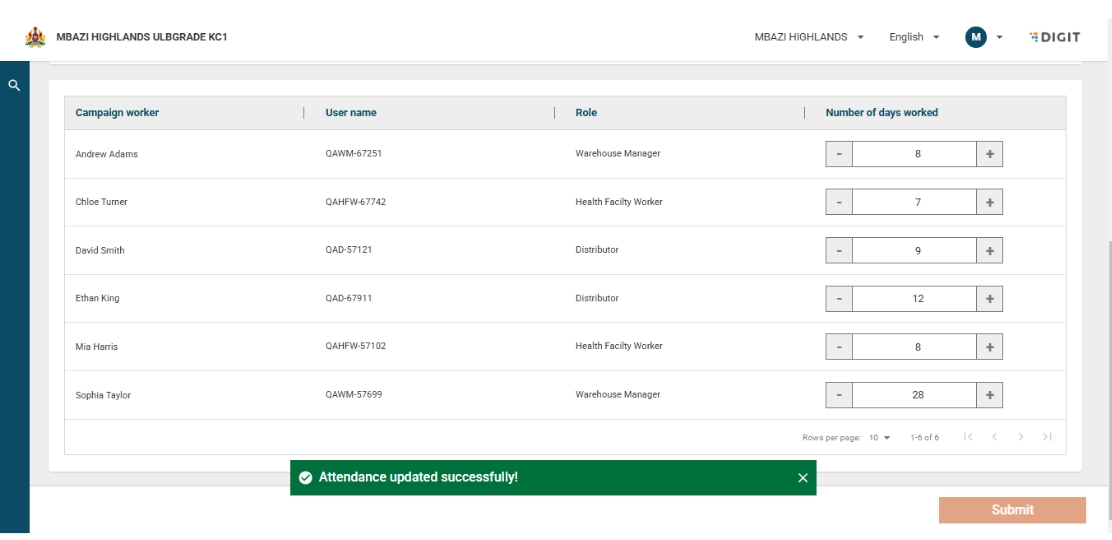

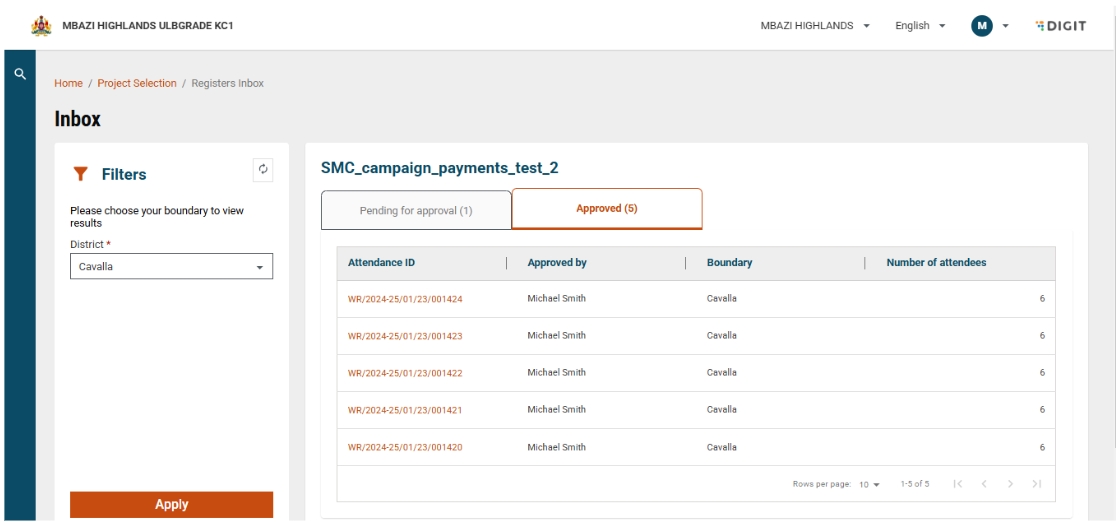
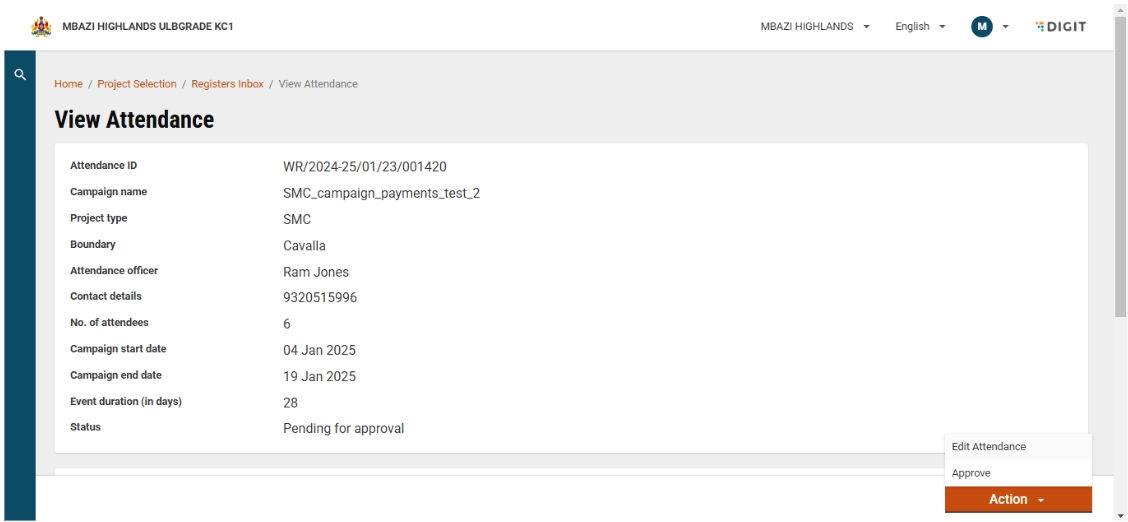
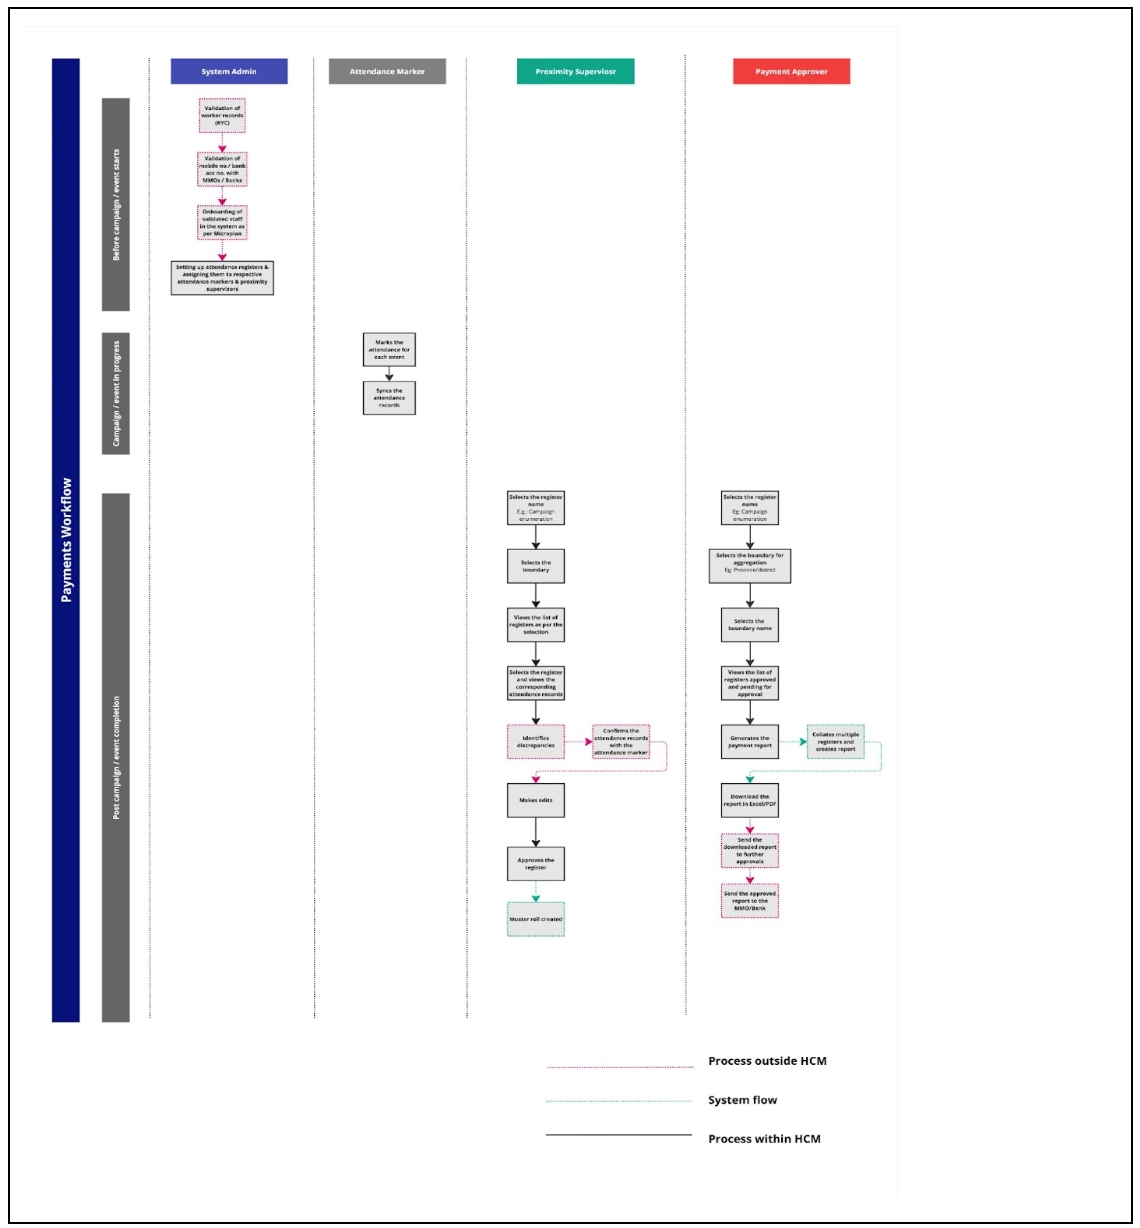
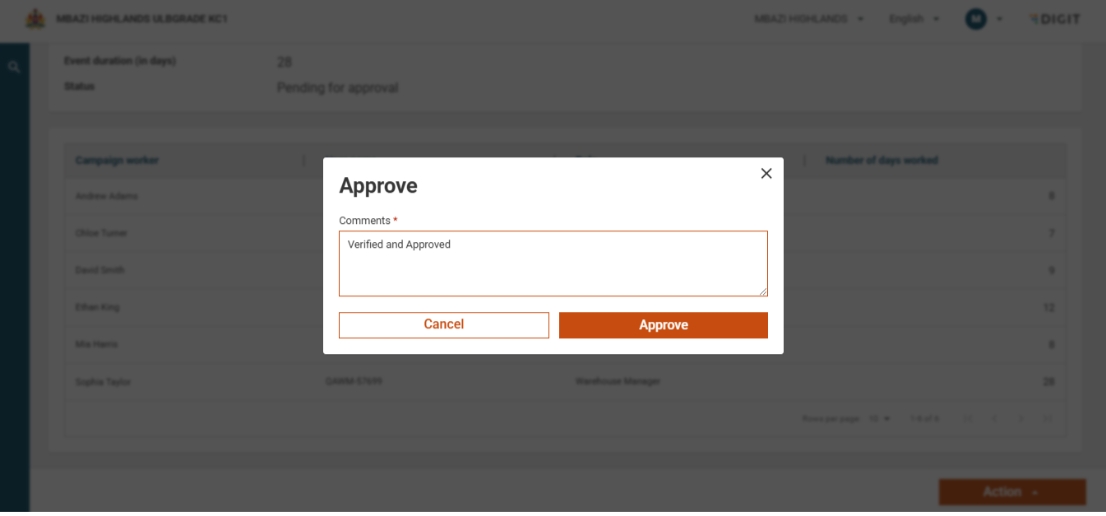
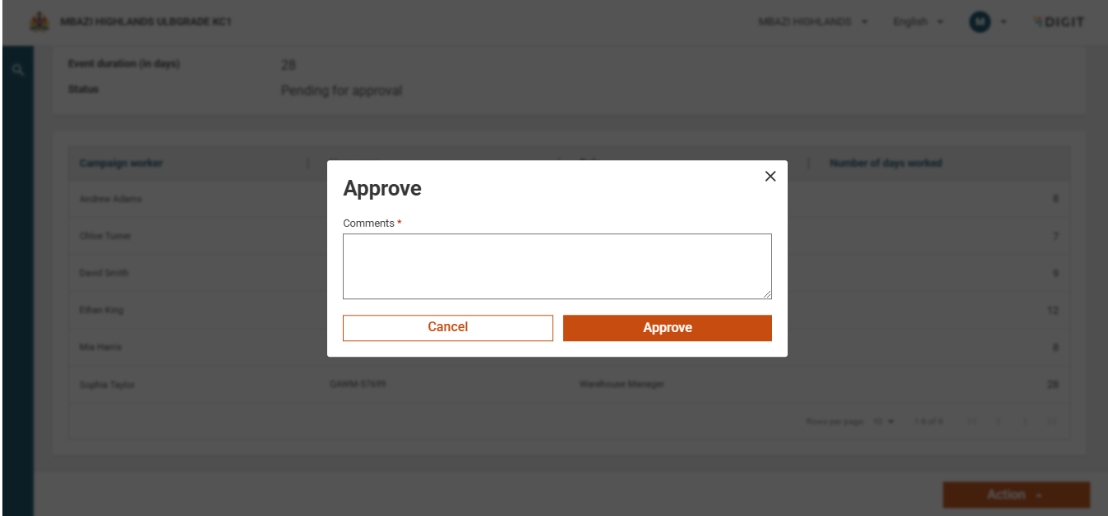
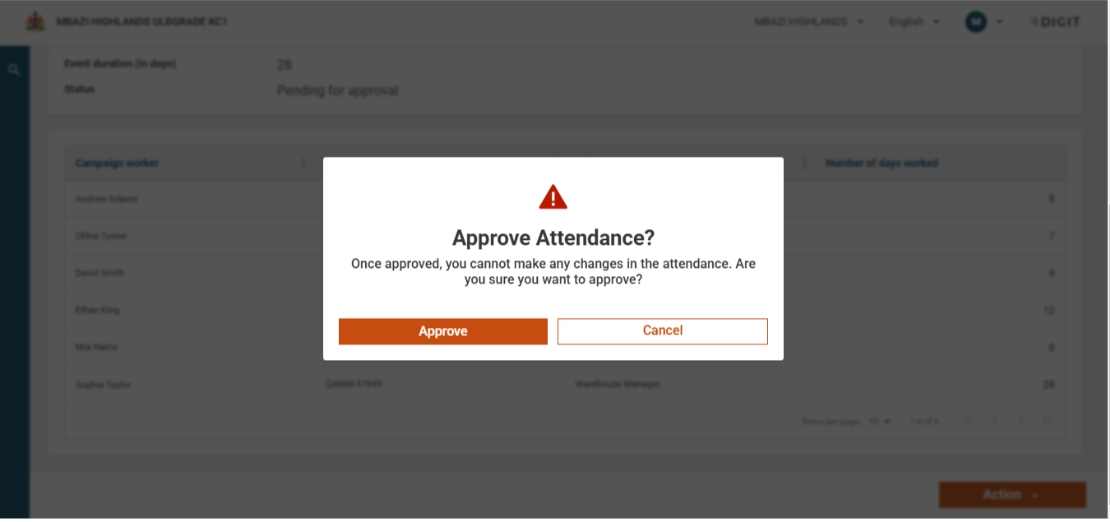
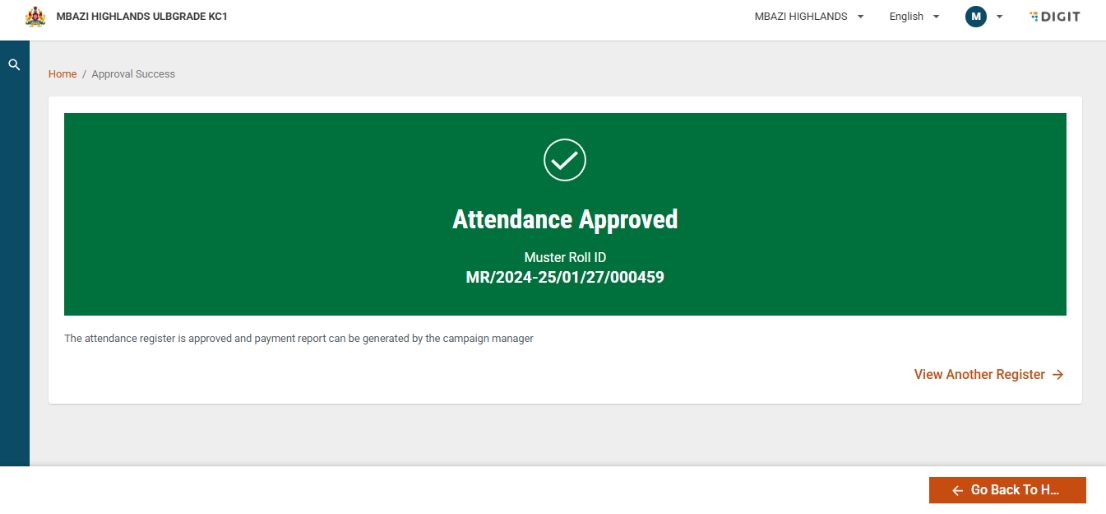
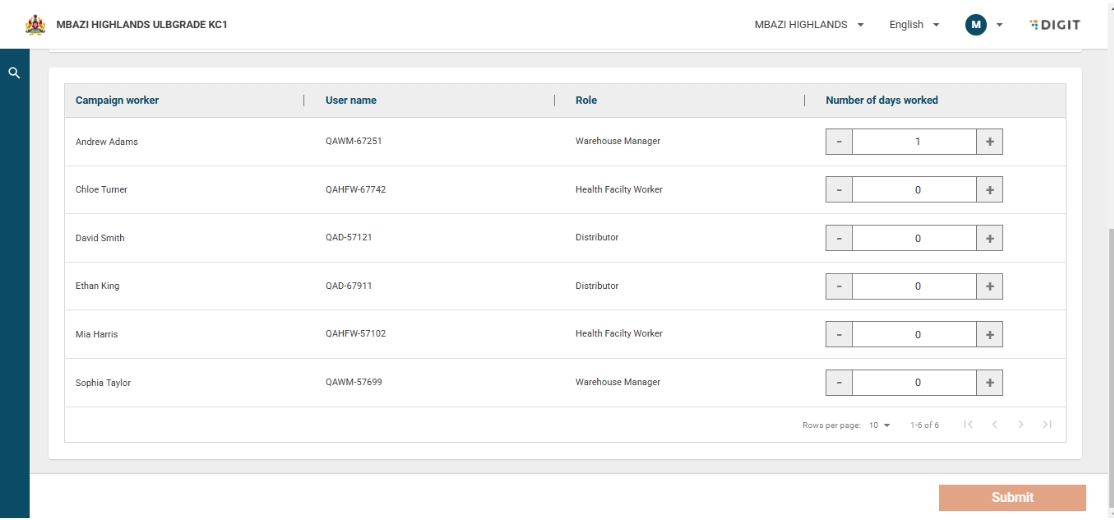
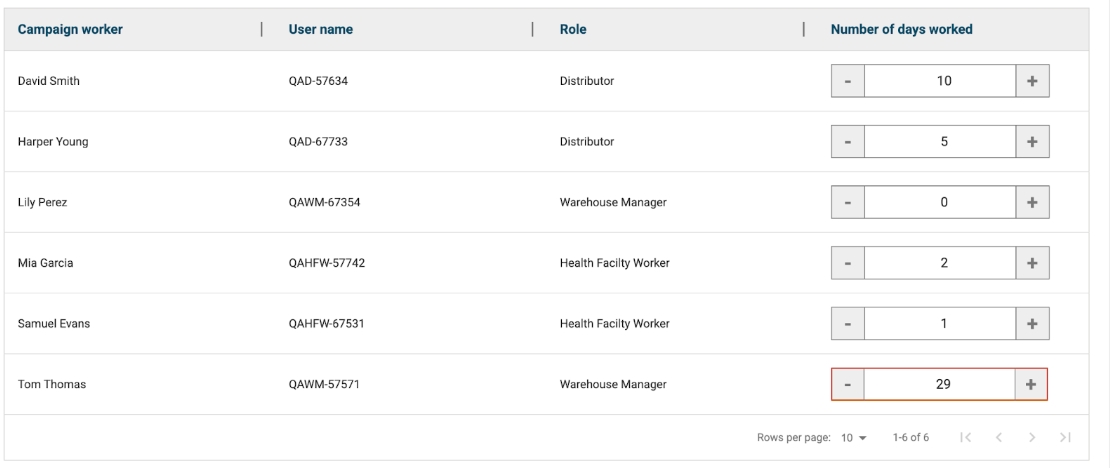
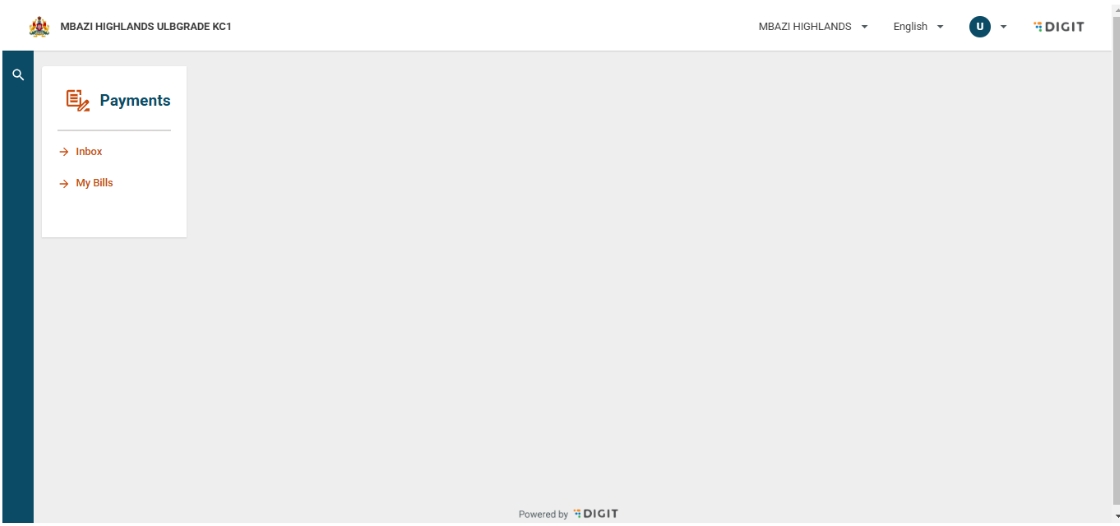
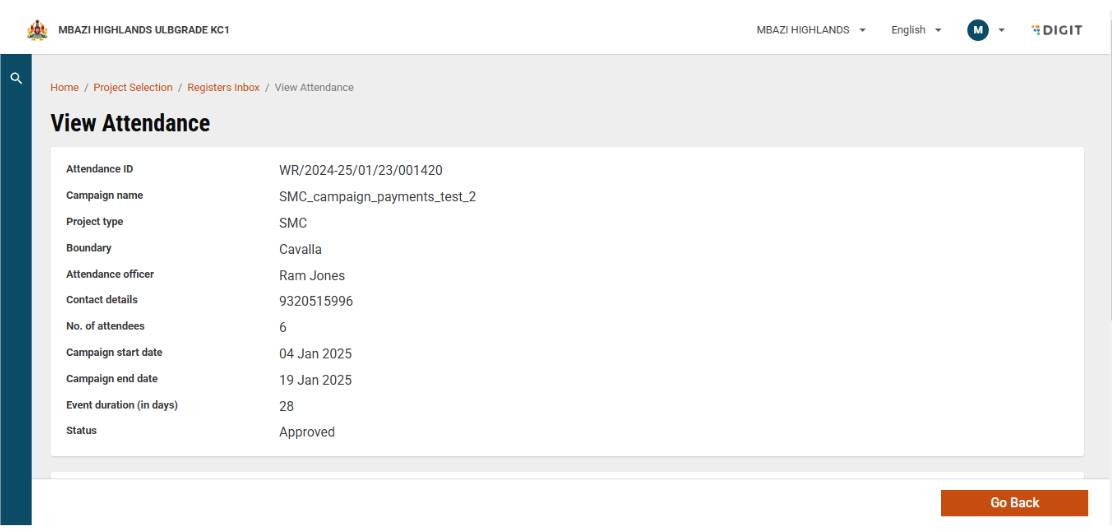
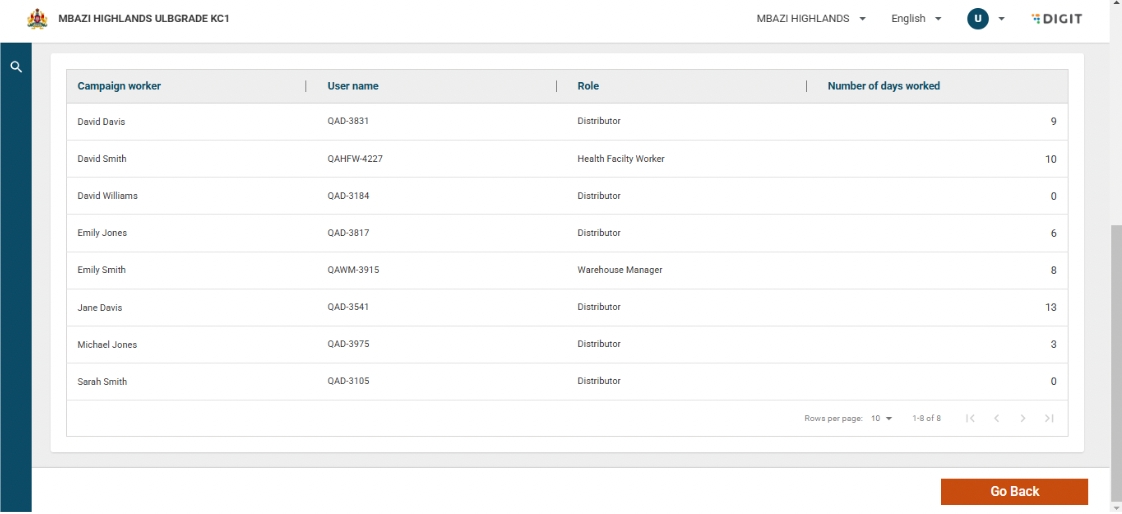
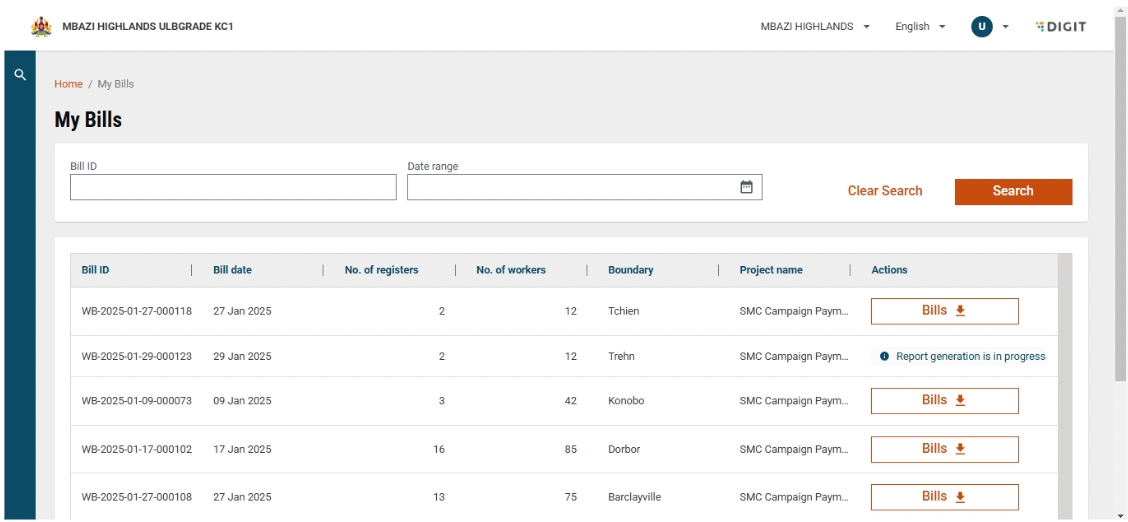
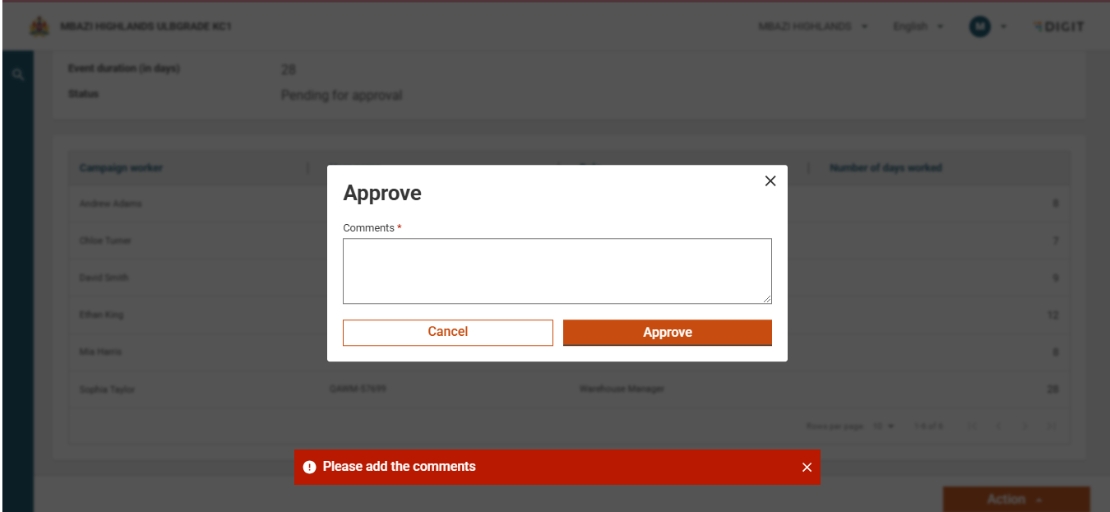
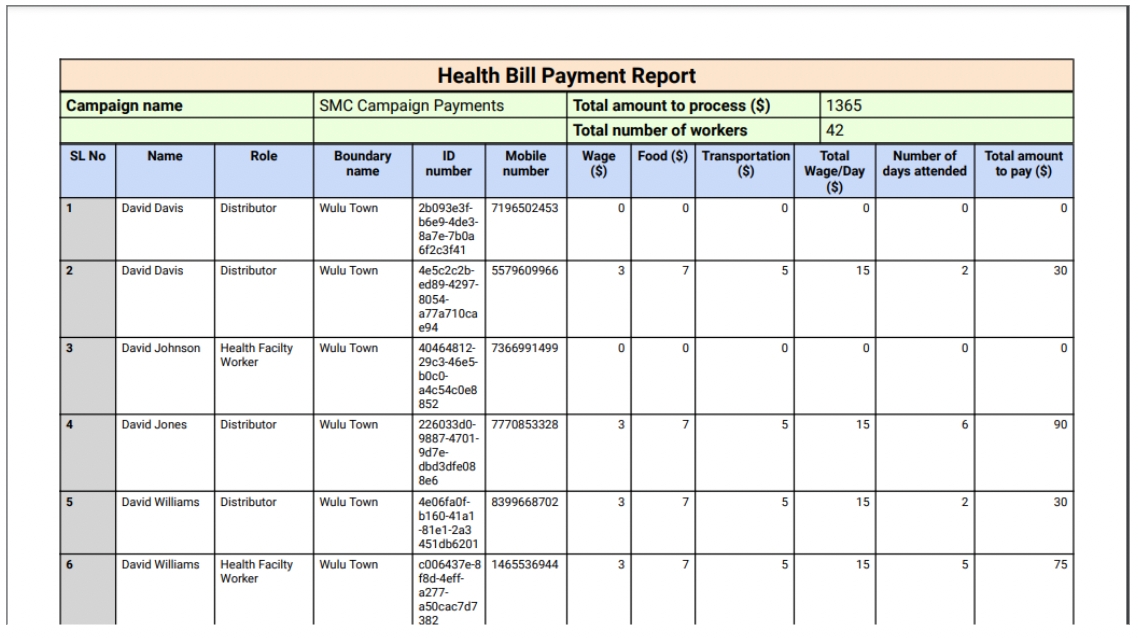


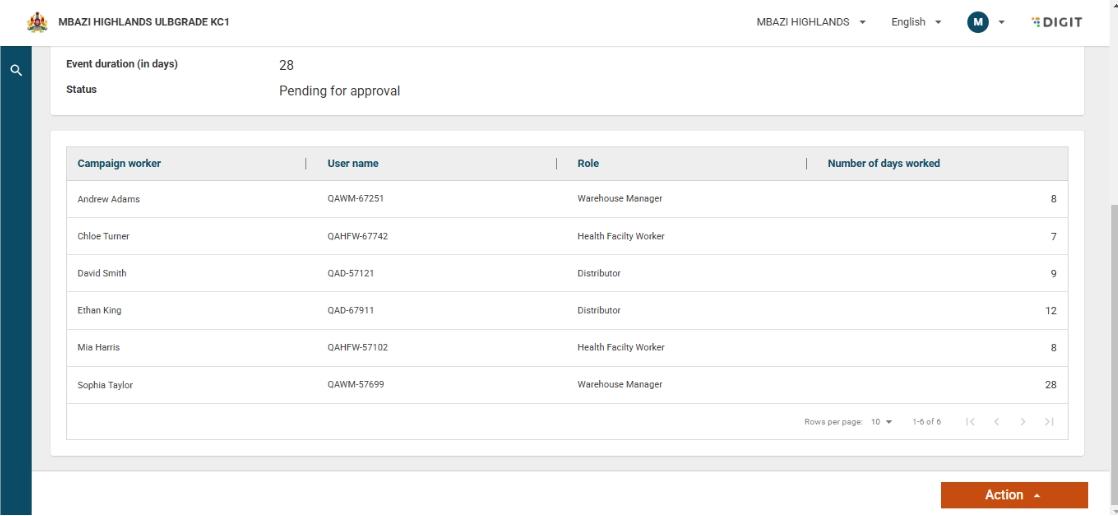

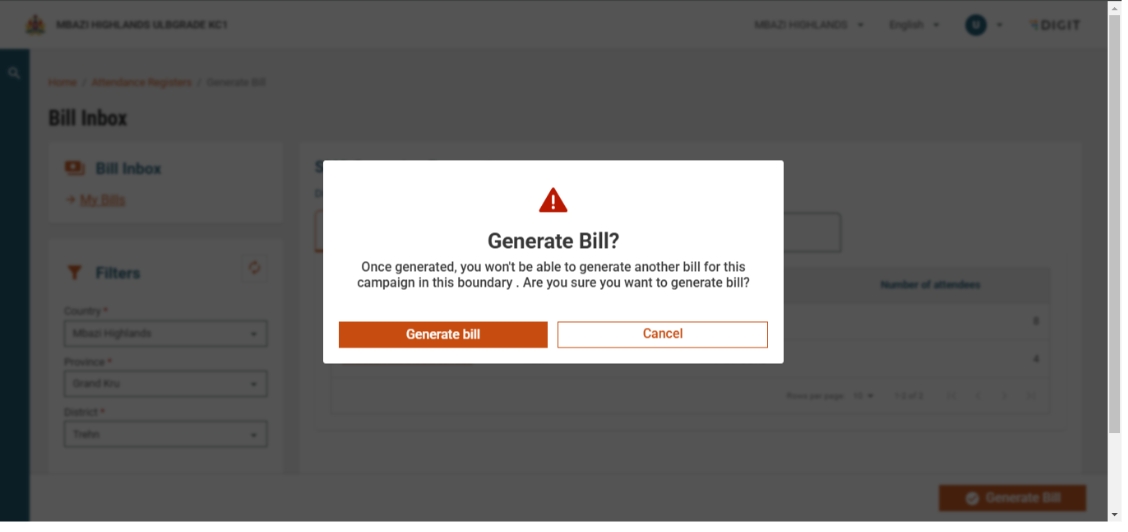
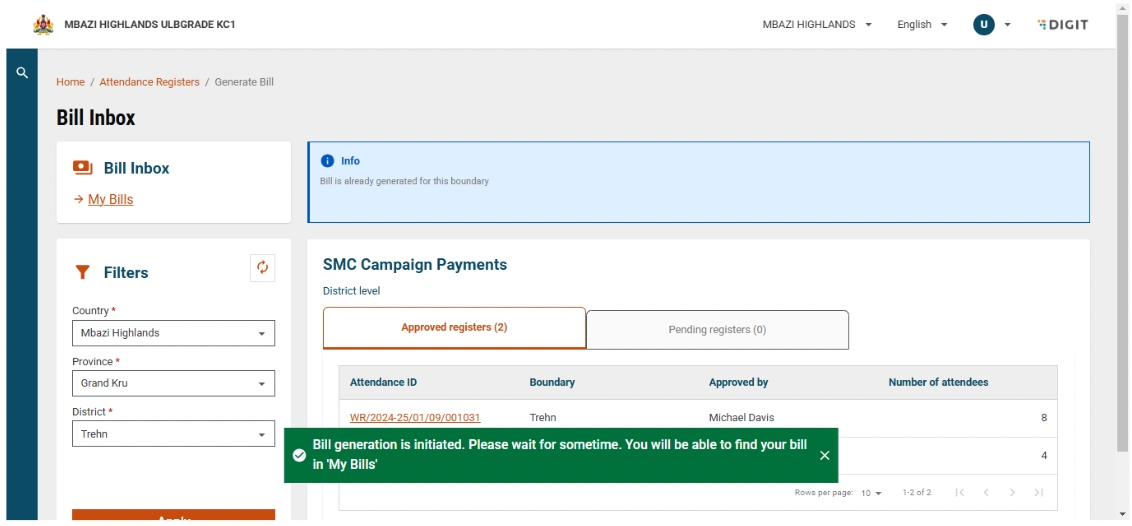

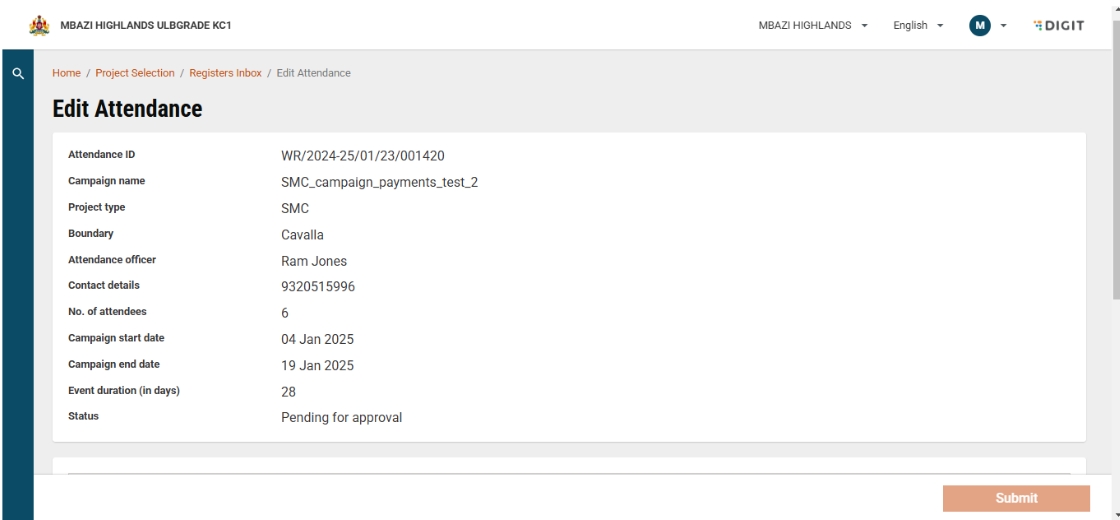
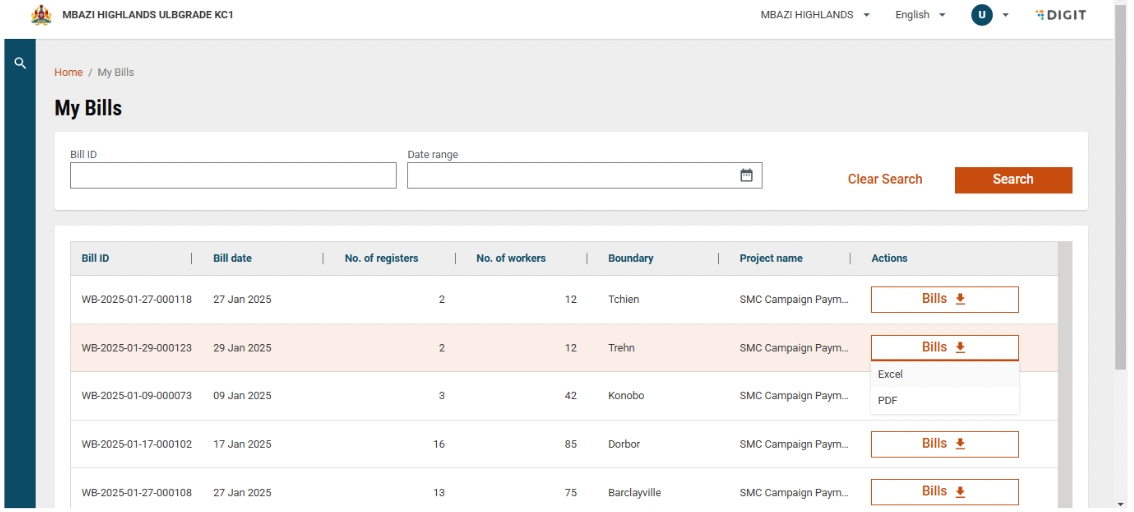
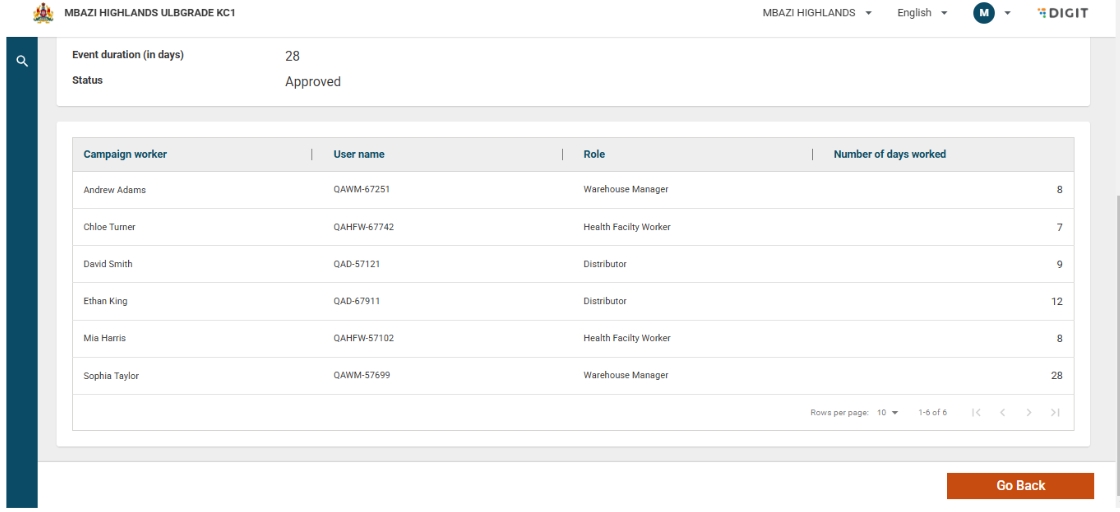
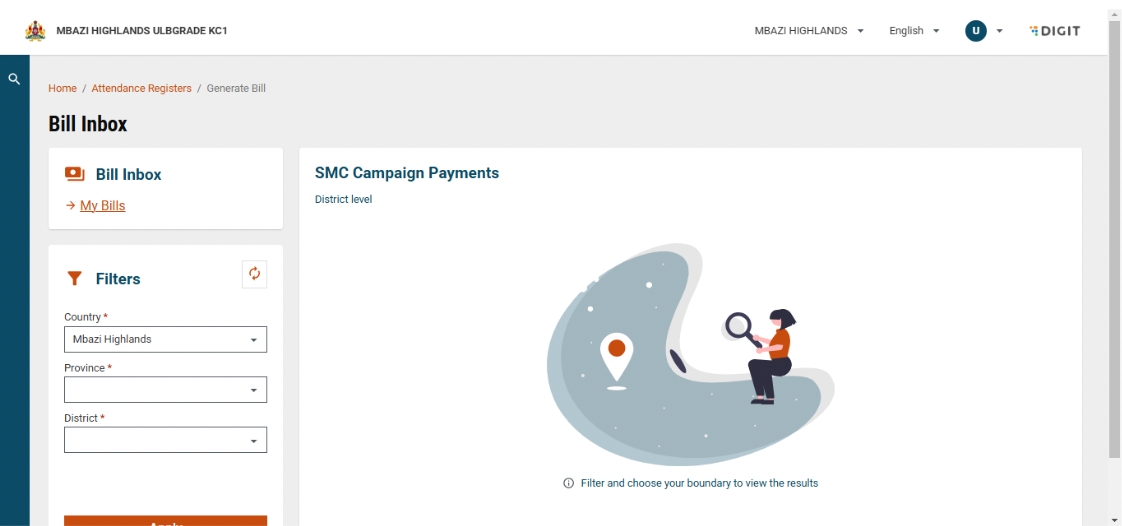
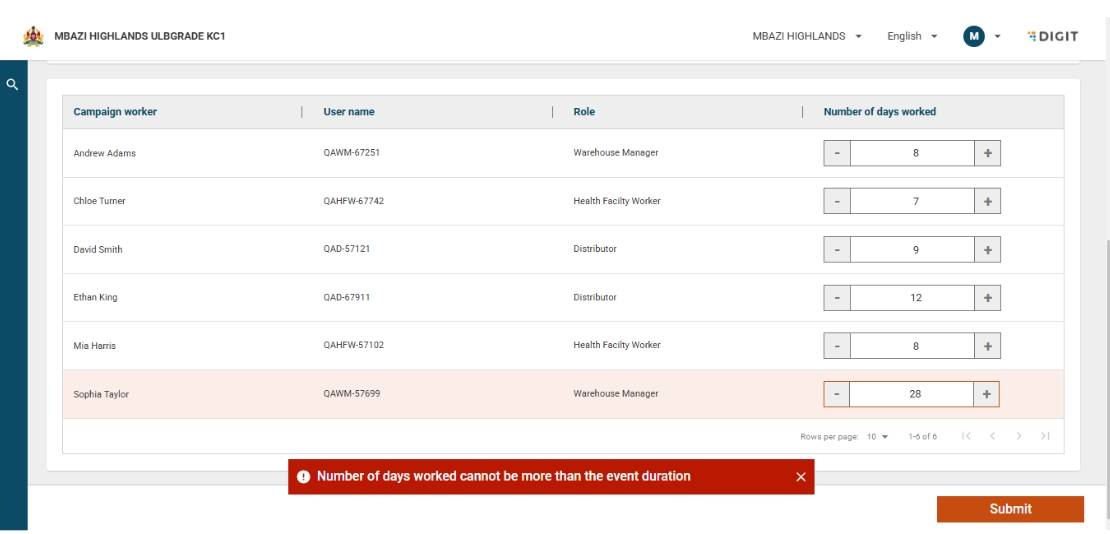
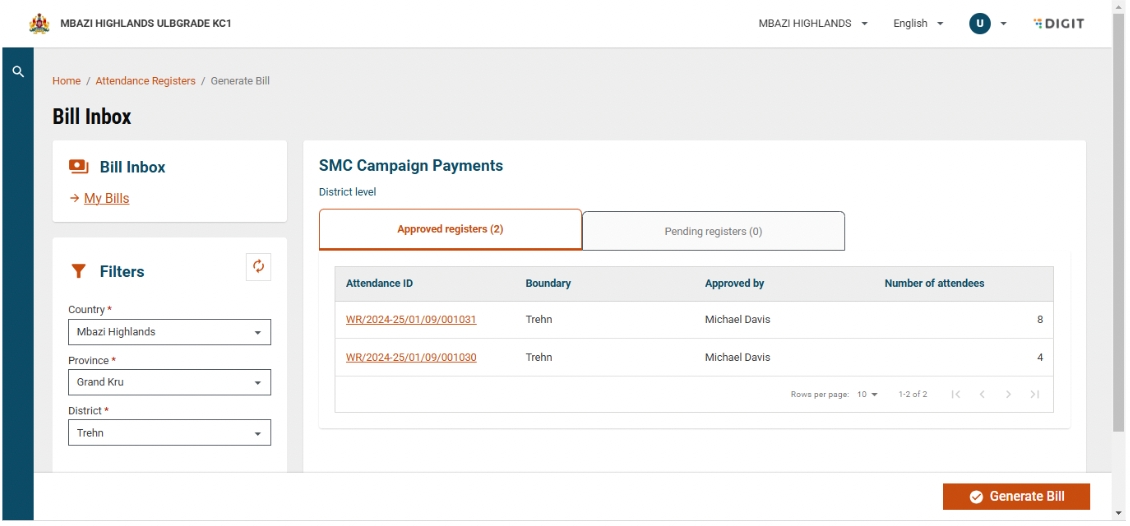


The Campaign Setup feature allows administrators to define the details of a health campaign, including when and where it will be conducted, what services will be offered, and how progress will be tracked. This configuration forms the foundation for how field teams execute and monitor health interventions.
64
No
Tenant ID
Unique tenant of the system
Mandatory
System
String
2
64
No
Campaign Type ID
Unique ID of project type master data
Mandatory
System
String
2
64
No
sub Campaign Type ID
Unique ID of sub project type master data
Mandatory
System
String
2
64
No
Address
Mandatory
User
String
Yes
Door No.
House number or door number
O
User
Numeric
2
64
Latitude
Latitude of the address
O
System
Numeric
-90
90
Longitude
Longitude
O
System
Numeric
-180
180
Location Accuracy
Accuracy of the address latitude and longitude in meters
O
System
Numeric
0
10000
Type
Type of address Permanent, Correspondence, Other
R
User
Drop Down
Address Line 1
Apartment, Block, Street of the address
O
User
String
2
256
Address Line 2
Locality, Area, Zone, Ward of the address
O
User
String
2
256
Landmark
Additional landmark to help locate the address
O
User
String
2
256
City
City of the address. Can be represented by the tenantid itself
R
User
String
2
256
Pincode
PIN code of the address
R
User
String
2
64
Indian pincodes will usually be all numbers.
Building Name
Name of the building
O
User
String
2
256
Street
Street Name
O
User
String
2
256
Locality
Start Date
Campaign start date
Mandatory
User
Date
Yes
End Date
Campaign end date
Mandatory
User
Date
Yes
Parent
Parent Campaign ID
Mandatory
User
String
2
64
No
Targets
Targets will be provided after Microplanning exercise
Yes
Target ID
Unique ID generated by the system
Mandatory
System
String
2
64
No
Beneificiary Type
Mandatory
User
String
2
64
Baseline
Total number of individuals/ households
Mandatory
User
Integer
Yes
Target Number
Total number of individuals/ households targetted from the baseline number
Mandatory
User
Integer
Yes
Department
Project Department
Mandatory
User
String
2
64
Yes
Description
Description of the project
Mandatory
User
String
2
64
Yes
Setup Tasks to be carried out as a part of the campaign
Task
Task ID
Unique ID generated for the system for each task
Mandatory
System
String
2
64
No
Campaign ID
Link task to the project it is a part of
Mandatory
System
String
2
64
No
Resources [ ]
Array of resources that are a part of the campaign
Task Resources
ID
Unique ID generated for the system for each task resource
Mandatory
System
String
2
64
No
Product Variant ID
Link task resource to the product variant ID
Mandatory
System
String
No
Quantity
Capture quantity of resources available for the campaign
Mandatory
System
String
No
Delivery Comment
Capture comments regarding delivery of campaign resources
Mandatory
User
String
Final list of reasons to be given by the state/program during impel
Yes
Planned Start Date
Mandatory
System
Integer
No
Planned End Date
Mandatory
System
Integer
No
Actual Start Date
Mandatory
System
Integer
No
Actual End Date
Mandatory
System
Integer
No
Address
Mandatory
System
String
No
Door No.
House number or door number
O
User
Numeric
2
64
Latitude
Latitude of the address
O
System
Numeric
-90
90
Longitude
Longitude
O
System
Numeric
-180
180
Location Accuracy
Accuracy of the address latitude and longitude in meters
O
System
Numeric
0
10000
Type
Type of address Permanent, Correspondence, Other
R
User
Drop Down
Address Line 1
Apartment, Block, Street of the address
O
User
String
2
256
Address Line 2
Locality, Area, Zone, Ward of the address
O
User
String
2
256
Landmark
Additional landmark to help locate the address
O
User
String
2
256
City
City of the address. Can be represented by the tenantid itself
R
User
String
2
256
Pincode
PIN code of the address
R
User
String
2
64
Indian pincodes will usually be all numbers.
Building Name
Name of the building
O
User
String
2
256
Street
Street Name
O
User
String
2
256
Locality
Status
Status of task Eg. Delivered, Not Delivered, Partial Delivery, Refused, In-sufficient etc
Mandatory
User
String
Final list of task status to be given by the state/ program during impel
Yes
ID
Unique system generated GUID
Mandatory
System
String
2


