Loading...
Loading...
Loading...
Loading...
Loading...
Loading...
Loading...
Loading...
Loading...
Loading...
Loading...
Loading...
Loading...
Loading...
Loading...
Loading...
Loading...
Loading...
Loading...
Loading...
Loading...
Loading...
Loading...
Loading...
Loading...
Loading...
Loading...
Loading...
Loading...
Loading...
Loading...
Loading...
Loading...
Loading...
Loading...
Loading...
Loading...
Loading...
Loading...
Loading...
Loading...
Loading...
Loading...
Loading...
Loading...
Loading...
Loading...
Loading...
Loading...
Loading...
Loading...
Loading...
Loading...
Loading...
Loading...
Loading...
Loading...
Loading...
Loading...
Loading...
Loading...
Loading...
Loading...
Loading...
Loading...
Loading...
Loading...
Loading...
Loading...
Loading...
Loading...
Loading...
Loading...
Loading...
Loading...
Loading...
Loading...
Loading...
Loading...
Loading...
Loading...
Loading...
Loading...
Loading...
Loading...
Loading...
Loading...
Loading...
Loading...
Loading...
Loading...
Loading...
Loading...
Loading...
Loading...
Loading...
Find the service build updates below:
Category (Tag)
Services
Docker Artifact ID
Remarks
Facility
egovio/facility:v1.1.2-3f860f8a31-23
Changed
Household
egovio/household-db:v1.1.5-1f79b92f65-40
Changed
Individual
egovio/individual-db:v1.1.6-1f79b92f65-26
Changed
Project
egovio/project-db:v1.1.6-1f79b92f65-32
Changed
Product
egovio/product:v1.1.0-00a7accbda-38
Changed
Referral Management
egovio/referralmanagement:v1.0.4-6d6c83c41b-75
Changed
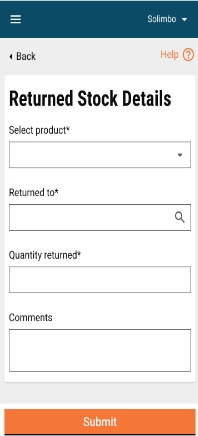
Stock
egovio/stock:v1.1.3-3f860f8a31-44
Changed
Transformer
egovio/transformer:HDDF-1277-149f70deb7-302
Not Changed
HRMS
egovio/egov-hrms-db:v1.3.0-1585e2fcb8-34
Changed
Pgr
egovio/pgr-services-db:v1.1.7-00a7accbda-19
Not Changed
Service-request
egovio/service-request-db:v1.0.1-9dbb1d73f7-40
Changed
Attendance
egovio/attendance-db:v1.1.0-55e92c713-90
Changed
Muster-roll
egovio/muster-roll-db:v1.1.0-8e8f04913-61
Changed
Expense
egovio/expense-db:v1.1.0-55e92c713-118
Changed
Health-expense-calculator
egovio/health-expense-calculator:v1.0.0-172f7e79e-55
Changed
Digit-Ui
egovio/digit-ui:health-dashboard-digit-ui-2f557febef-805
Changed
Health-UI
egovio/health-ui:health-dashboard-product-a2a548030b-808
Changed
Payments UI
payments-ui:console-db3cb62bf5-62
New
Not Changed
Dashboard
egovio/dss-dashboard:v1.8.0-0d70d60e63-53
Unchanged
egovio/dashboard-analytics:analytics-es8-auth-09e437f9f6-67
Changed
egovio/dashboard-ingest:v1.1.4-72f8a8f87b-10
Unchanged
egovio/project-factory:v0.3.1-bed1379aa9-366
Changed
egovio/workbench-ui:v0.3.1-de648bc1d7-61
Changed
egovio/core-ui:v0.3.1-de648bc1d7-10
to use microplan integrated campaign
plan-service:v1.0.1-0678639a52-268
resource-generator:v1.0.1-2ef386f987-80
census-service:v1.0.0-fd9a00f0e7-79
Help countries achieve Health SDGs by building digital public goods that strengthen public health.
Health risks such as infectious diseases generally cannot be addressed at the individual and health worker levels alone. They require intervention at the policy level. This is where public health campaigns come into the picture.
Public health campaigns are specific, time-bound health services that respond to particular challenges and are provided to a target population by dedicated campaign workers. Such campaigns can influence perceptions, attitudes, and behaviors to achieve the desired goal. They can prevent or respond to disease outbreaks, control or eliminate targeted diseases, or achieve other health objectives. According to the World Health Organisation (WHO), two strains of wild poliovirus have “officially been certified as globally eradicated,” and immunisation campaigns have played a key role in this. Over the years campaigns to fight malaria, AIDS and other diseases have not only improved the lives of millions of people in poor and developing countries and disadvantaged communities, but it has also enabled them to lead more productive lives.
In 2019, 534 campaigns were tracked globally, providing vaccines, drugs, vitamins, and preventative tools for malaria, malnutrition, measles, meningitis, NTDs, polio, tetanus, typhoid, and yellow fever. However, by the end of 2020, an estimated 50% of the public health campaigns were postponed, suspended, or canceled due to the COVID-19 pandemic. This left millions of people and children at risk of vaccine-preventable diseases and malnutrition.
As health campaigns catch up on missed vaccinations, drugs, and other preventative measures globally, there is an opportunity to reimagine the way countries can plan and implement campaigns through open-source digital platforms.
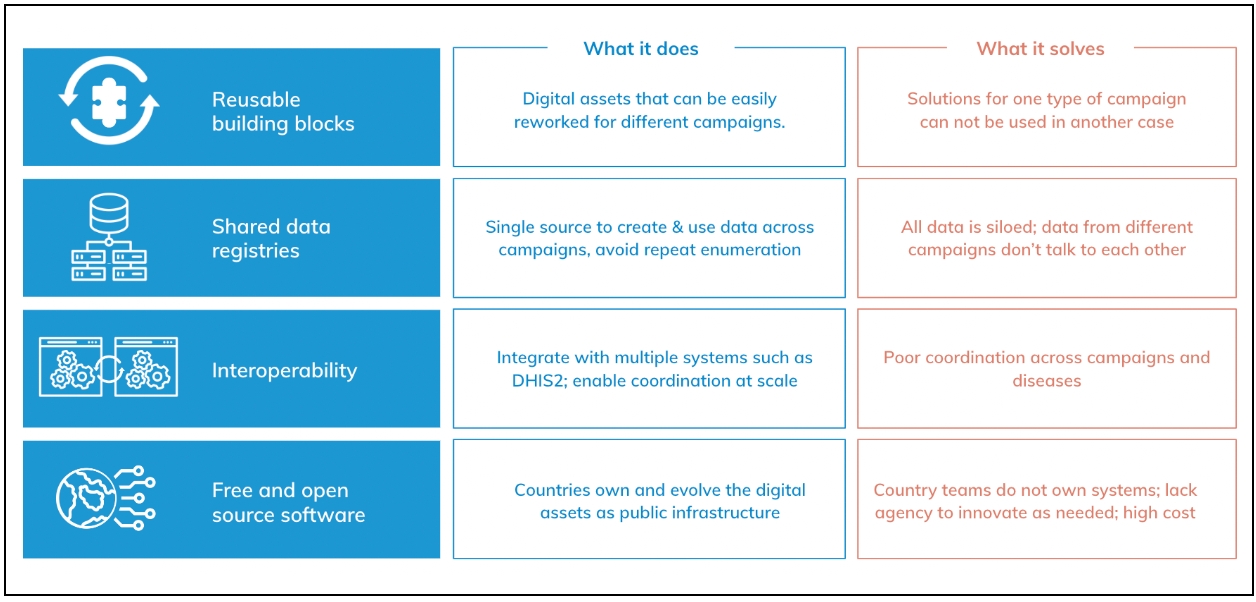
Today, digital tools are either free but not fit for purpose, or they do the job but cost a fortune due to repetitive work adding to the costs. Data is locked in silos and there is no operability between systems. These tools are also difficult to sustain and scale. These realities made it clear that isolated approaches cannot do the job.
Health campaigns require a holistic digital transformation. Health Campaign Management, or HCM, was developed to address these challenges effectively.
HCM is a free, fit-for-purpose, open-source, end-to-end health campaign digitisation product. It covers campaign setup, planning, registration, service delivery, inventory management, and real-time data dashboards, enabling faster and cost-effective health campaigns. HCM is designed to evolve rapidly and adapt to local needs while addressing systemic challenges.
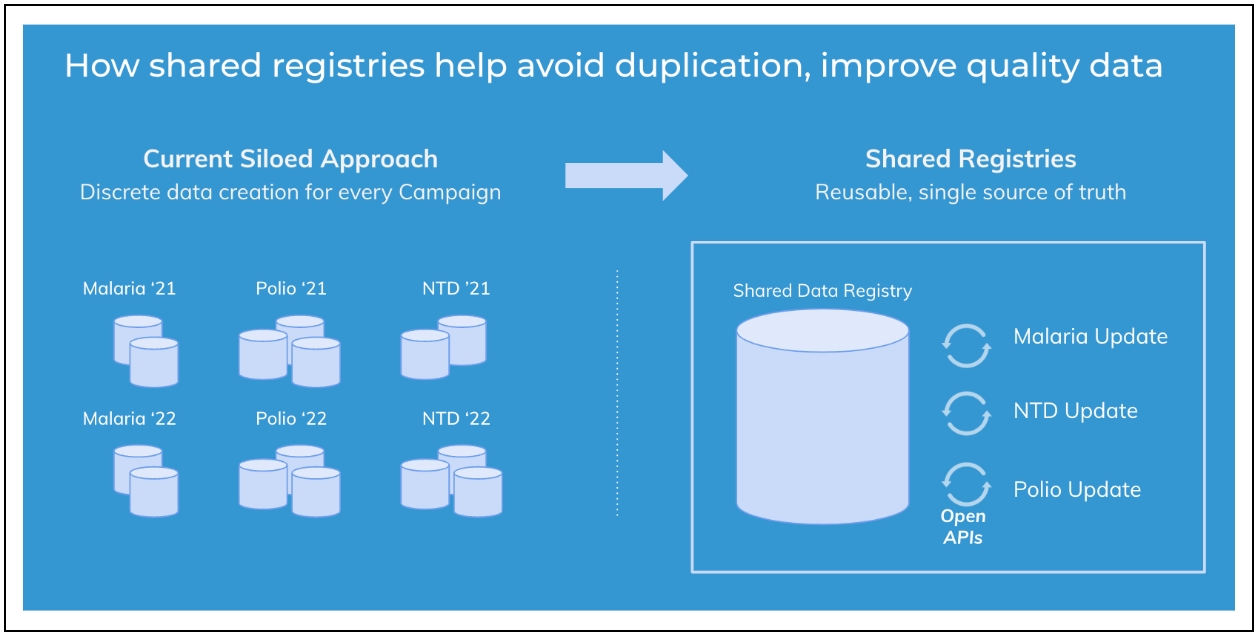
With HCM, all programmes — whether for polio, malaria, or measles — are unified under a single, streamlined interface. This ensures data flows seamlessly across different modules, improving data quality and accessibility.
The shared data repository within HCM guarantees a “single source of truth,” maintaining high data quality. It offers easy integrations and seamlessly operates with open-source products, providing a unified system for health campaign management.
HCM is designed with highly configurable, reusable modular building blocks, enabling rapid reconfiguration of the same product for different health campaigns. These modules can also be repurposed to develop new solutions for routine health, primary healthcare, and other areas.
More than just a product, HCM is a comprehensive solution designed to streamline health campaigns, enhance coordination, and improve outcomes at every level of the health campaign management system.
Admin 0.3.1
Click the links below to learn more:
Attributes:
Each checklist consists of multiple attributes, where each attribute represents a specific question or input field.
Attributes may have associated codes (e.g., SMC1, SMC1.YES.SM1).
Points Mapping:
Each possible response to an attribute (e.g., YES, NO, NOT_SELECTED) is mapped to specific points for different flows.
Precedence Questions:
Some attributes are designated as precedence attributes.
Precedence attributes determine the priority flow when multiple flows are eligible.
Flow Types:
Common flow types include:
- TO_ADMINISTER
- BENEFICIARY_REFUSED
- BENEFICIARY_REFERRED
Define the checklist attributes and associate them with codes.
Map each possible response of an attribute to flow points.
Identify precedence attributes and configure precedence mapping.
Define precedence flow logic (e.g., YES maps to TO_ADMINISTER, NO maps to BENEFICIARY_REFUSED).
"ServiceDefinition": {
"tenantId": "mz",
"code": "SMC Campaign.ELIGIBILITY.DISTRIBUTOR",
"isActive": true,
"additionalFields": {
"schema": "ServiceDefinition",
"version": 1,
"fields": [
{
"key": "precedenceFlow",
"value": "SMC1.YES.SM1"
},
{
"key": "flow",
"value": [
{
"type": "TO_ADMINISTER",
"minScore": 5
},
{
"type": "BENEFICIARY_REFUSED",
"minScore": 3
},
{
"type": "BENEFICIARY_REFERRED",
"minScore": 7
}
]
}
]
},
"attributes": [
{
"tenantId": "mz",
"code": "SMC1",
"dataType": "SingleValueList",
"values": [
"YES",
"NO",
"NOT_SELECTED"
],
"isActive": true,
"required": true,
"order": 1,
"additionalFields": {
"schema": "ServiceAttribute",
"version": 1,
"fields": [
{
"key": "pointsMapping",
"value": {
"YES": {
"TO_ADMINISTER": 0,
"BENEFICIARY_REFUSED": 0,
"BENEFICIARY_REFERRED": 10
},
"NO": {
"TO_ADMINISTER": 2,
"BENEFICIARY_REFUSED": 0,
"BENEFICIARY_REFERRED": 0
}
}
},
{
"key": "helpText",
"value": "SMC1.HELP"
}
]
}
},
{
"tenantId": "mz",
"code": "SMC1.YES.SM1",
"dataType": "SingleValueList",
"values": [
"YES",
"NO",
"NOT_SELECTED"
],
"isActive": true,
"required": true,
"order": 2,
"additionalFields": {
"schema": "ServiceAttribute",
"version": 1,
"fields": [
{
"key": "pointsMapping",
"value": {
"YES": {
"TO_ADMINISTER": 0,
"BENEFICIARY_REFUSED": 0,
"BENEFICIARY_REFERRED": 10
},
"NO": {
"TO_ADMINISTER": 2,
"BENEFICIARY_REFUSED": 0,
"BENEFICIARY_REFERRED": 0
}
}
},
{
"key": "helpText",
"value": "SMC1.YES.HELP"
}
]
}
},
{
"tenantId": "mz",
"code": "SMC2",
"dataType": "SingleValueList",
"values": [
"YES",
"NO",
"NOT_SELECTED"
],
"isActive": true,
"required": true,
"order": 3,
"additionalFields": {
"schema": "ServiceAttribute",
"version": 1,
"fields": [
{
"key": "pointsMapping",
"value": {
"YES": {
"TO_ADMINISTER": 0,
"BENEFICIARY_REFUSED": 0,
"BENEFICIARY_REFERRED": 10
},
"NO": {
"TO_ADMINISTER": 2,
"BENEFICIARY_REFUSED": 0,
"BENEFICIARY_REFERRED": 0
}
}
},
{
"key": "helpText",
"value": "SMC2.HELP"
}
]
}
},
{
"tenantId": "mz",
"code": "SMC3",
"dataType": "SingleValueList",
"values": [
"YES",
"NO",
"NOT_SELECTED"
],
"isActive": true,
"required": true,
"order": 4,
"additionalFields": {
"schema": "ServiceAttribute",
"version": 1,
"fields": [
{
"key": "pointsMapping",
"value": {
"YES": {
"TO_ADMINISTER": 0,
"BENEFICIARY_REFUSED": 0,
"BENEFICIARY_REFERRED": 10
},
"NO": {
"TO_ADMINISTER": 8,
"BENEFICIARY_REFUSED": 0,
"BENEFICIARY_REFERRED": 0
}
}
},
{
"key": "helpText",
"value": "SMC3.HELP"
}
]
}
}
]
}
For each attribute in the checklist:
- Retrieve the user input.
- Generate a unique key (e.g., SMC1_YES) to avoid duplicate processing.
- Check if the input has already been processed to prevent double counting.
For each response:
- Retrieve the corresponding flow points from the points mapping.
- Update the scores for each flow type by adding the mapped points.
If the attribute is a precedence attribute and an input is provided:
- Record the precedence flow answer.
Skip precedence attributes if no input is provided.
Calculate the total scores for all flows based on user inputs.
If there is a tie in scores between flows:
- Check for precedence answers and assign the flow based on the precedence mapping.
- If no precedence answer exists, assign the flow with the highest score.
If no tie exists, directly assign the flow with the highest score.
HCM v1.5 is a product release with upgrades for a new campaign adaptation such as IRS.
Enhancement of DIGIT HCM for managing a new campaign such as IRS.
Enhancement to provide the ability to link downloaded households to new campaigns.
The product has been enhanced to capture information related to house structure, room details, and the number of pregnant women and children present in the house independent of the campaign type.
Enhanced accuracy for geo coordinates capture in the app.
Enhancement of DSS dashboards for new campaign adaption.
Enhancement to provide the ability to view dashboards for District Supervisors in the mobile application.
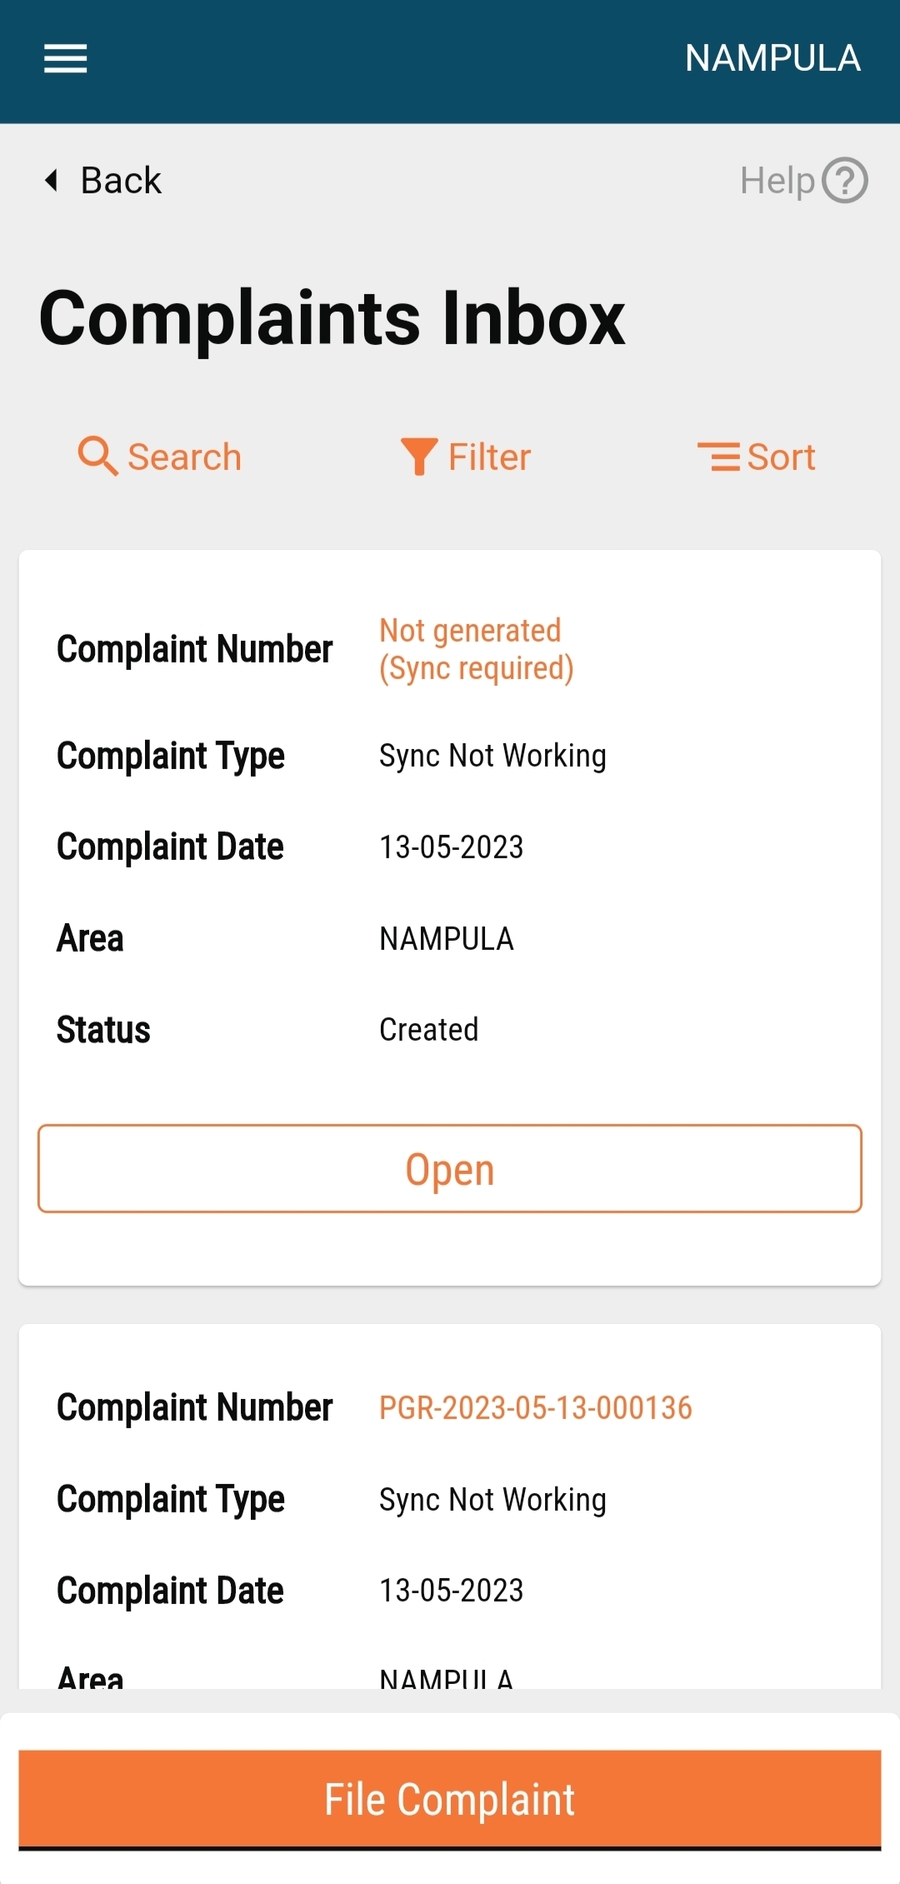
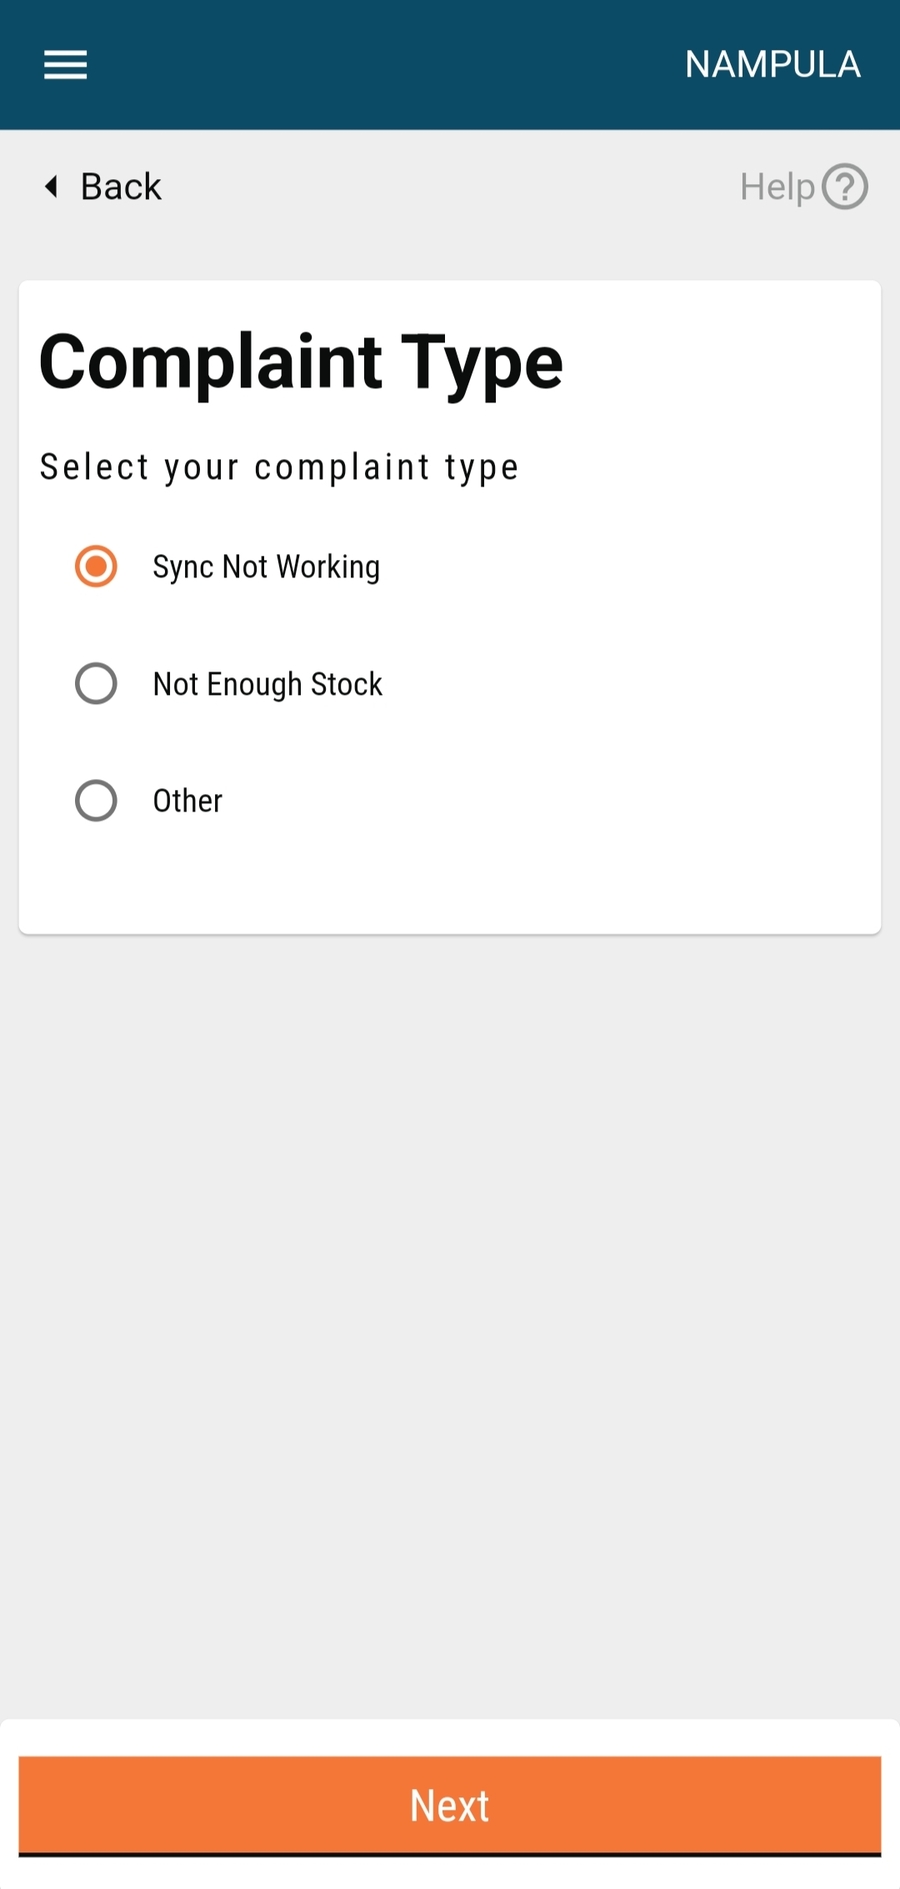
Closed Household: This feature enables data collection on closed households by utilizing the existing registration and delivery package. It allows CDDs (Community Drug Distributors) to revisit households for registry updates efficiently.
Registration and Delivery: Added intermediate screens to enhance registration of households to support new campaigns.
User Action: Full CRUD functionality for project-related actions taken by the field worker that are not tasks related to the beneficiary like:
Refusal of consent for data collection.
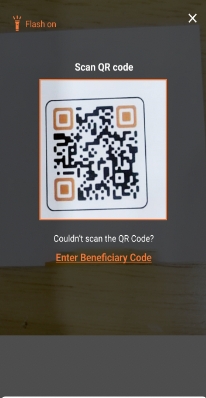
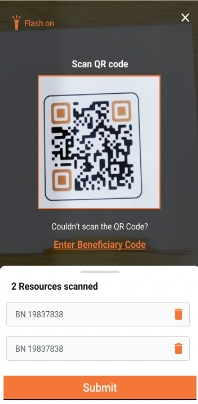
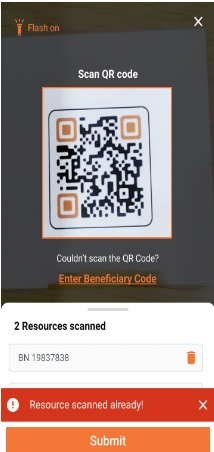
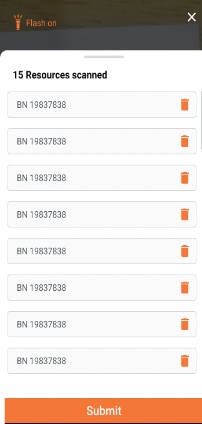
Scanning of resources that will be reused for multiple deliveries.
Marking a transit post-non-compliant (polio).
Marking any incident that doesn't bear relation to the beneficiary.
Location capture of the field worker app.
Dashboard Updates:
Mobile Dashboard: Enabled the mobile dashboard for district supervisors and configured the Digit UI DSS Dashboard to support new campaigns (e.g. IRS).
National Dashboard Enhancements: Introduced support for pie charts and bar charts.
Map Configurations: Moved map configuration data to S3 assets.
Chart Configurations: Added and modified chart configurations for both the Mobile and DSS Dashboards (e.g., IRS), including both new and existing charts.
Tech Debts
Search Query Optimization: Enhanced search queries across the mobile application for improved performance.
Boundary Localizations: Migrated boundary localizations from the ISAR (JSON) database to an SQL database in the mobile application for better efficiency.
Pop-ups have been added to various screens to improve geo-coordinate accuracy within the app. These pop-ups will display a message and temporarily freeze the screen, allowing users to capture a person's geo-coordinates without disruption.
No breaking changes were made.
Configurable Project Dashboard: Previously, project dashboard configurations were hardcoded. Now, they are fully configurable based on boundary v2 and project-type codes.
Removal of Hardcoded Context Paths: All hardcoded context paths have been removed throughout the application, improving flexibility and maintainability.
Map Config Data Moved to S3: Due to the large size of the map configuration data, it could not be loaded into MDMS v2. This data has now been moved to S3 assets for better handling and storage.
Search Query Enhancement: Previously, each entity had its own individual search. Now, we have implemented a unified query builder, which has significantly improved the performance of the search functionality.
The HCM v1.6 release does not require any migration from the 1.5 release.
The HCM v1.5 release does not require any migration from the 1.4 release.
Checklist
Yes/No/Partially
Reference Link/ETA
Owner
Reviewer
Remarks
The development is complete for all the features that are part of the release.
Yes
Payments v0.1: Development was frozen on January 10th, 2025.
CLF: Development was frozen on December 23rd, 2024.
Admin Console v0.3.1: Development was frozen on January 17th, 2025.
Eligibility Checklist: Development was frozen on November 25th, 2025.
Microplanning v0.2: Development was frozen on January 10th, 2025.
Test cases are documented by the QA team, reviewed by product owners, and test results are updated in the test cases sheet.
Yes
The incremental demo of the features showcased during the sprint showcase and feedback is incorporated. If possible, list out the JIRA tickets for feedback.
Yes
December 20-CLF - Impel Handover,
January 7-Payments v1:: Demo
January 8-Incremental Sprint Demo Admin Console January 9⋅Payments v0.1 Demo January 10⋅HCM Payments v1 Impel Handover 10-Feb-2025 Microplanning:: Incremental demo with Product manager on Jan 10 2025 between 3.00 to 3.45 pm
UI/UX audit review is completed along with feedback incorporation for any changes in UI/UX.
Yes
Payments, Eligibility Checklist and CLF 13-02-2025 Microplanning v0.2 12-Feb-2025
QA sign-off is completed by the QA team and communicated to product owners. All the tickets’ QA sign-off status is updated in JIRA.
Yes
UI, and API technical documents are updated for the release along with the configuration documents.
Yes
UAT promotion and regression testing from the QA team is completed. The QA team has shared the UAT regression test cases with the product owners.
Yes
The API backward compatibility testing is completed.
Yes
Ongoing Testing
The communication is shared with product owners for the completion of UAT promotion and regression by the QA team. The product owners have to give a product sign-off within one week of this communication.
Yes
CLF and Eligibility Checklist
11-Feb-2025
Payments v0.1
5-Feb-2025 Console v0.3.1
10-Feb-2025 Microplanning v0.2
12-Feb-2025
The UAT product sign-off communication is received from product owners along with the release notes and user guides (if applicable).
Yes
Payments, CLF and Eligibility Checklist on 14-Feb- 2025 Console v0.3.1 on 11-Feb-2025 Microplanning v0.2 on 31-Jan-2025
The GIT tags and releases are created for the code changes for the release.
Yes
Verify whether the release notes are updated.
Yes
Verify whether all the UAT builds are updated along with the GIT tag details.
Yes
Verify whether all MDMS, configurations, infra-ops configurations are updated.
Yes
Partially
Verify whether all test cases are up-to-date and updated along with the necessary permissions to view the test cases sheet. The test cases sheet is verified by the test lead.
Yes
Verify whether the UAT credentials' sheet is updated with the details of new users and roles, if any.
Yes
Circulated to Product Owners
Verify whether all the localisation data was added in UAT, and updated in the release kits.
Yes
Verify whether the product release notes and user guides are updated and published.
Yes
The demo of the released features is done by the product team as part of a sprint/release showcase.
Yes
Several Demos have been given to Solutions team and PO for all Projects of HCM v1.6
Technical and product workshops/demos are conducted by the engineering and product teams respectively to the implementation team (implementation handover).
Yes
Several Demos have been given to Solutions team and PO for all Projects of HCM v1.7
Architect sign-off and technical quality report.
Yes
Verify Bug Bash has been completed
Yes
12-Feb-2025
Gate 2
Yes
14-Feb-2025
The internal release communication along with all the release artefacts are shared by the engineering/ product teams.
Yes
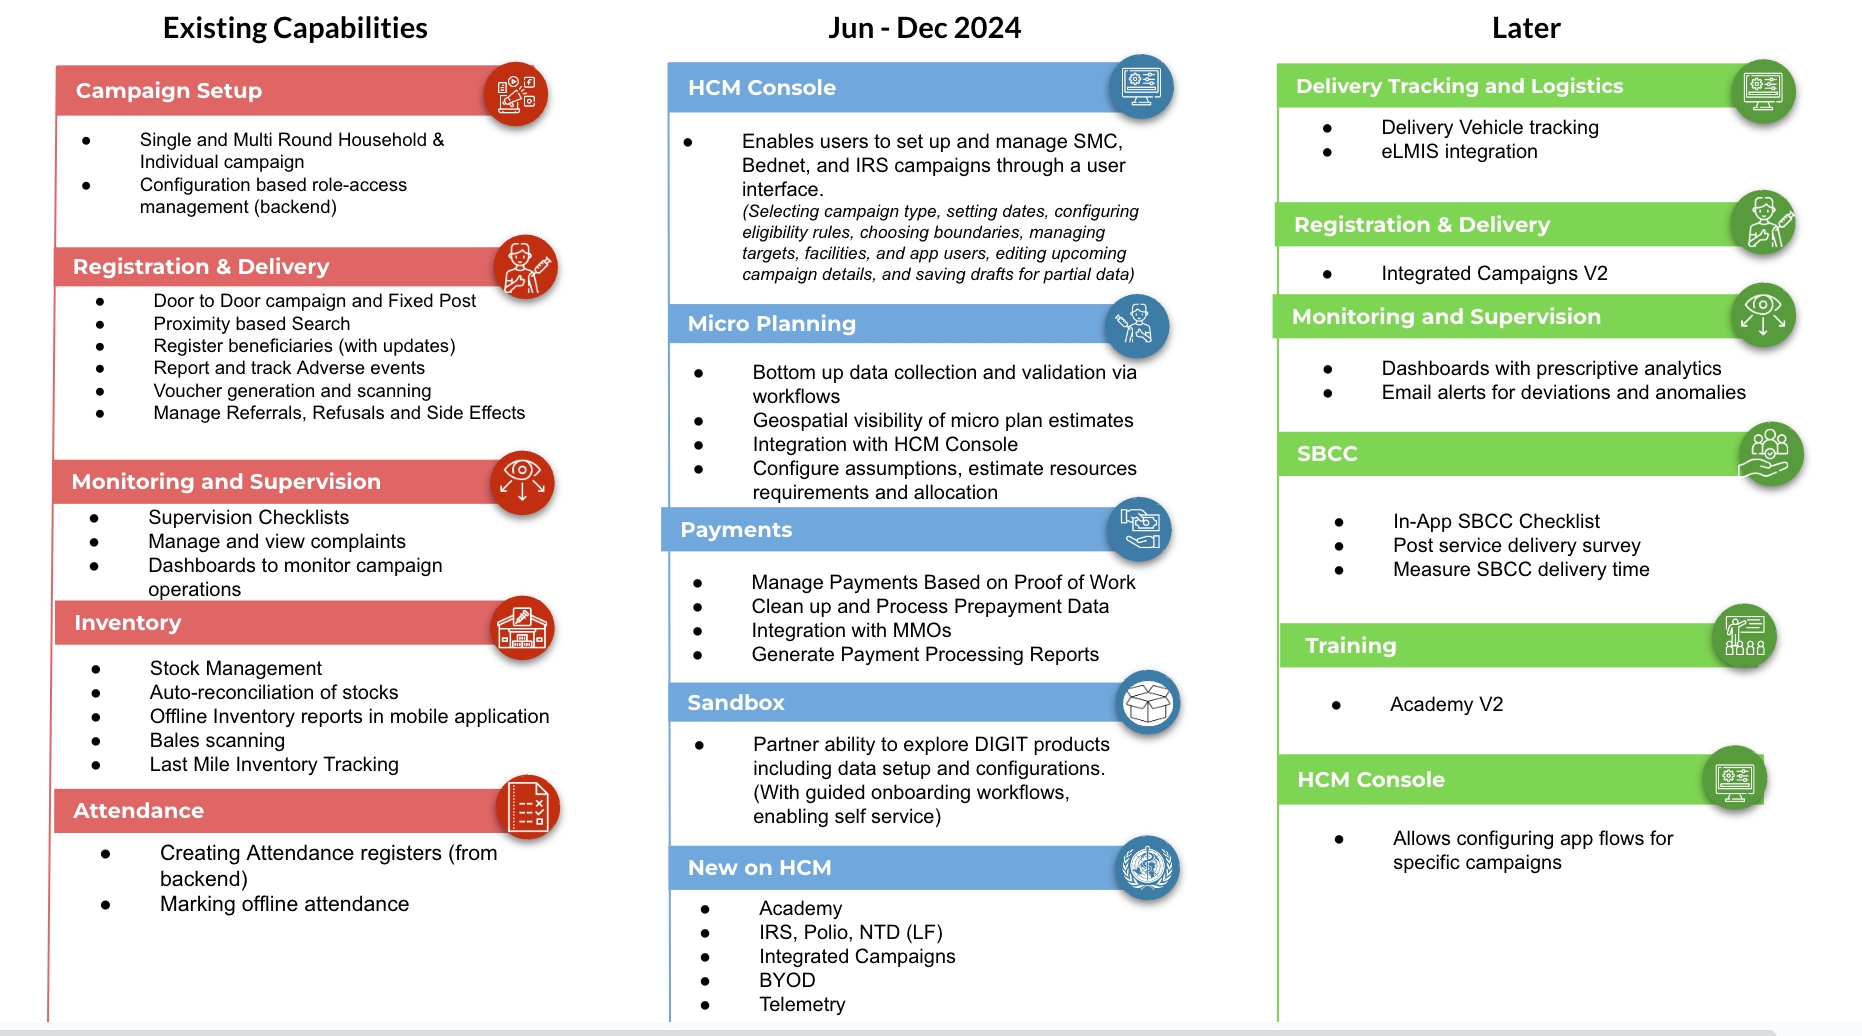
In the HCM 1.6 release, we are excited to introduce several technical improvements and functional enhancements, including two key capabilities:
Micro Planning: This module enables campaign workers to generate precise population estimates and optimize resource allocation, leading to significant time and cost savings in campaign execution.
Admin Console: A streamlined tool for campaign setup, the Admin Console reduces setup time from days to mere minutes, accelerating our ability to support partners across Africa effectively.
It is the process of creating detailed, delivery-level operational plans for reaching target populations with health interventions.
Microplanning helps to know -
Who needs the intervention?
Where is the intervention site?
How many resources (Medical supply, people, commodities, etc.) are needed for the intervention?
In the current version of Microplan module, users can:
Set up and manage microplan: Set up microplan by ingesting boundary population and facilities or distribution points, managing microplan assumptions for resource calculation, and managing user access.
Validate & finalise population data for microplanning: Validate, update, and approve campaign population data to be used for microplan estimations.
Assign facilities or distribution points to catchment areas: Assign the facilities to their catchment areas and finalise the assignment.
Validate & finalise microplan estimations: Validate, update and approve the microplan estimations to be used for campaign execution.
Enhanced Efficiency: Speeds up the microplanning process by automating calculations and resource estimations, reducing planning time.
Improved Accuracy: Minimizes errors in campaign resource estimates, ensuring optimal allocation.
Real-Time Collaboration: Facilitates real-time data validation and approval among stakeholders, improving coordination.
Scalability: Easily adapts to different campaigns with no or minimal changes.
Central system administrators, program managers, and users that are part of campaign microplanning
Multiple validation and process reviewal sessions were conducted with the partners such as CRS, AMP, Malaria consortium, NMCP, CHAI, and WHO. Activities included in the sessions are:
Understanding the workflow of a campaign microplan
Figuring out the key capabilities required in a digital microplan
Product flow walkthrough for validation
Please check out the user-manual here.
Login credentials - Username : MICROADMIN11 Password : eGov@1234
User feedback from the UAT sessions in Moz
Roll-out in other countries and campaigns will further validate the value
Measuring the product metric such as time to create a microplan, population coverage accuracy and resource utilization accuracy.
User adoption and engagement
a. User Registration: The number of microplan users who are registered on the platform.
b. Session Time: The average amount of time users spend on the platform in minutes.
Population coverage accuracy - The total population considered in the microplan vs the total population captured during the campaign execution.
Resource utilization accuracy - The total number of resources (bednets, frontline workers, vehicles, etc.) estimated during the microplanning phase versus the total number of resources utilised during campaign execution.
Operational efficiency - Time required to finalise a microplan from the created time.
Microplan adoption - The number of microplans created concerning countries.
Reusability of Microplans: The frequency with which previous micro plans are reused or adapted for new campaigns.
Adding a new village (with population data) and running the resource calculation for the village
Adding a new facility, assigning the facility to a village, and then running the estimation service
In some scenarios, a country just wants to use our Microplan product and not the Admin console. In that case, the impel team should be able to consume the Microplan Excel output created by the Microplan v0.1 module and create a Microplan using a script or something.
For Mozambique specifically, the impel team needs to add 3 columns in the estimation dashboard - Fixed monitors, Moving monitors, and Number of days. These will be user input (free text) fields. Add the columns and data points to the finalised microplan estimation Excel report.
For Mozambique, the user's 9-digit phone number must be validated when uploading the user's Excel file using the user management module.
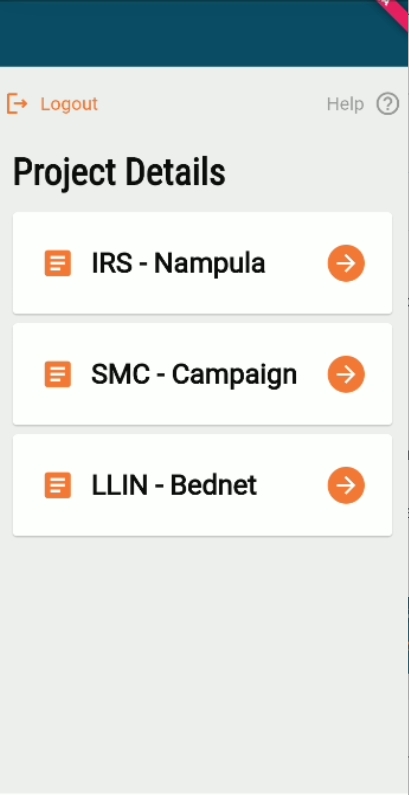
The Console is a critical module within the HCM platform designed for System Administrators and Programme Managers to efficiently set up, configure, and manage health campaigns. With the Console, users can:
Set Up Campaigns: Create campaigns for specific diseases in under three hours.
Configure Campaigns: Tailor HCM Mobile App features to align with country-specific needs within a day
Manage Campaigns: Update or modify campaign data in real-time to adapt to the how the campaign is evolving
What the Admin Console Is Not:
A module that lets you create new features and data models on HCM
A Module that can create new campaign types
Management Dashboard: A centralized view for organizational leaders to oversee multiple campaigns at a strategic level.
Organisational Insights: Provide actionable analytics not just at the campaign level but across the entire organization.
Effort Reduction: Simplifies campaign setup, minimizing coordination and manual effort
Time Savings: Speeds up the campaign setup process
Error Reduction: Decreases the risk of setup errors
Lower Technical Barriers: Allows non-technical users to manage campaigns efficiently
Enhanced Agility: Accommodates last-minute campaign data and app configuration changes without causing delays
System Administrators, Programme Managers, IT Managers, and non-technical personnel familiar with health campaign workflows.
Extensive validations and process reviews were conducted with our partner network. Key activities included:
Feedback sessions during online workshops and field visits in Mozambique.
Insights from ongoing campaigns, particularly from NMCPs and field users.
A webinar showcasing the Admin Console's capabilities is planned.
1. The Login credentials for the App - File
2. The APK
3. The Admin Console link - Link
4. Credentials For Console login:link
User feedback from UAT sessions with partners and Ministry of Health representatives
Usability metrics, such as time taken to set up campaigns and system usability scores
Time required by users to set up, configure, and manage campaigns.
Feedback from user interviews during and after campaigns
Usability lab results to track user efficiency and satisfaction
Localisation: Localizing labels to accommodate country-specific languages and contexts
Known bugs/Issues
None
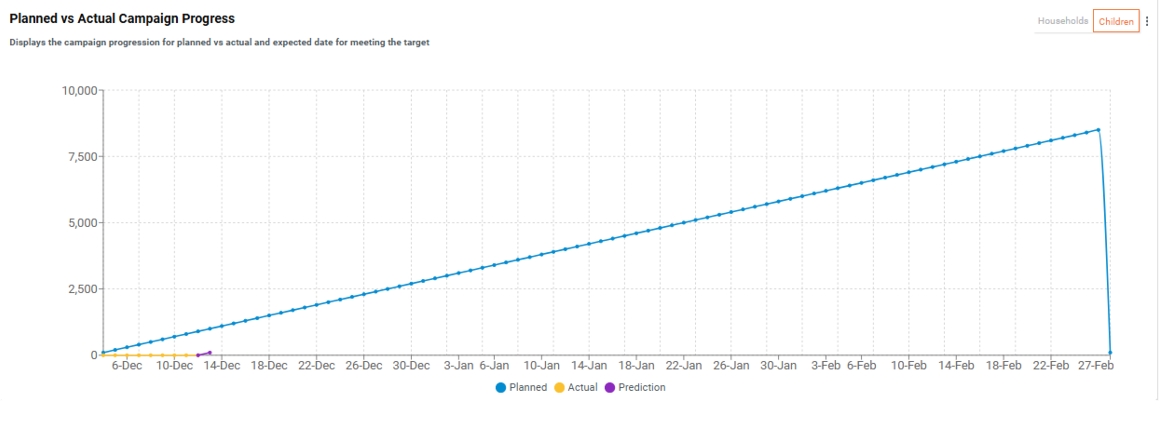
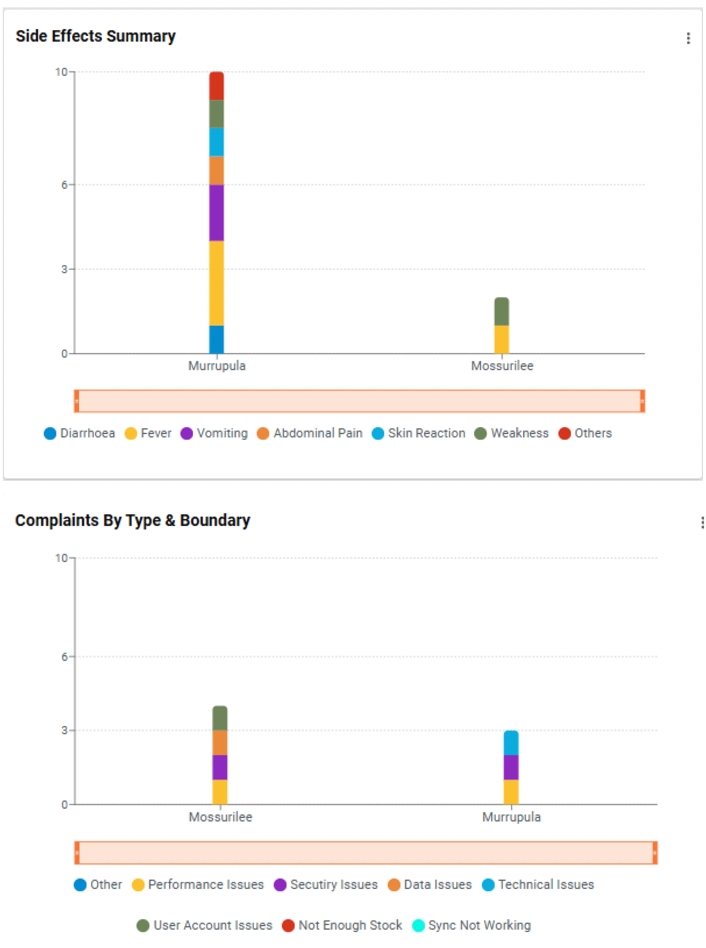
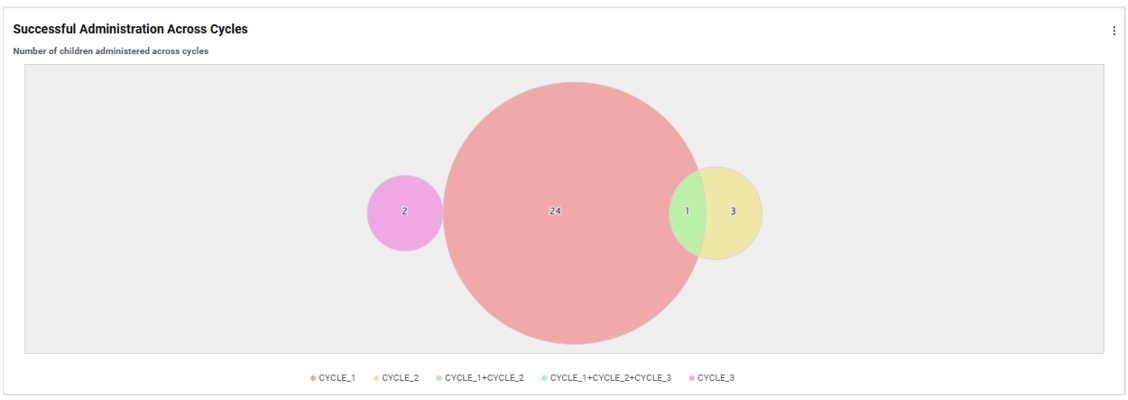
The Seasonal Malaria Chemoprevention (SMC) campaign dashboard within the HCM system has been enhanced to provide greater flexibility, data visualization, and actionable insights. Key improvements include:
Pre-Built Dashboards with Customisation: Out-of-the-box dashboards tailored for various campaign types (ITN, SMC, IRS) with the ability to configure custom charts for specific country/program needs using the open-source ElasticSearch Kibana dashboard.
Data Evaluation Modules: New features to assess data quality, team performance, and attendance.
Expanded Chart Capabilities:
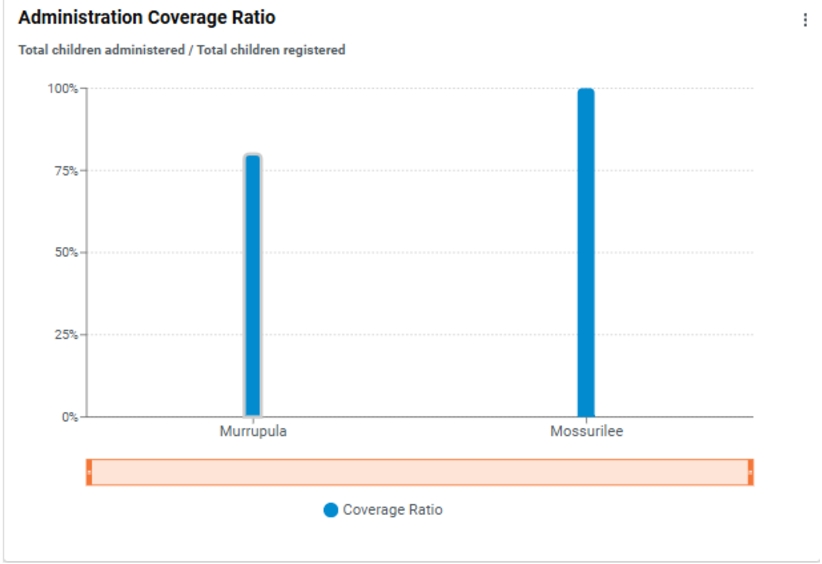
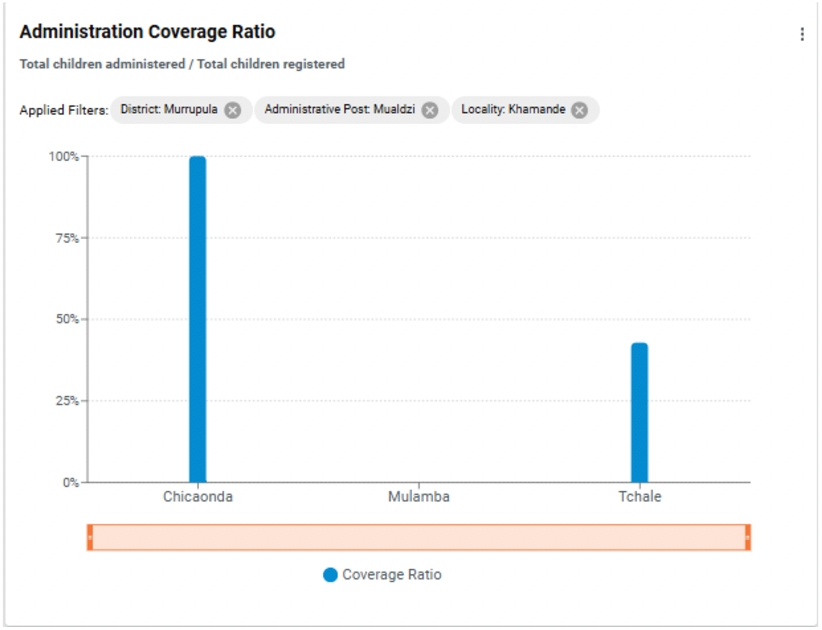
- Venn diagrams for advanced analysis. For example, in SMC campaigns, these charts help evaluate multi-cycle intervention delivery, such as determining how many beneficiaries received medication across all cycles, one cycle, or specific combinations.
- Side-by-side comparison charts for multi-dimensional data with more than two bars.
Customisation Flexibility: Partners and countries can add custom charts to suit specific country requirements integrated into ready-to-use campaign dashboards built in DIGIT’s DSS that have enhanced user experience.
Targeted Insights: Enables evaluation of intervention coverage, such as tracking how many individuals received medication across multiple cycles.
Advanced Visualisation: Multi-dimensional data analysis through side-by-side charts and Venn diagrams. For example, inventory trends across different supply chain stages or intervention outcomes by region.
Campaign managers and supervisors are responsible for monitoring and evaluating campaigns daily
The enhancements were finalized after discussions with key stakeholders, including the Malaria Consortium, Mozambique NMCP, and feedback from the Digital Product Advisory Committee (DPAC).
The URL for the dashboard is linked here
The login credentials for the dashboard are linked here
Usability and impact assessments will be conducted through planned surveys with end users, including Mozambique NMCP, Malaria Consortium, CRS, and CHAI. The pilot rollout for the SMC campaign in Mozambique’s Nampula and Niassa provinces will further validate these features.
SL No
Metric to Monitor
Why?
Target
Notes
1
Number of implementations with customised new charts in Kibana
Test dashboard configurability
≥50% of implementations creates at least one custom chart
Identify common customizations to integrate generically into DSS.
2
System Usability Score (SUS)
Qualitative feedback of the dashboard enhancements from end users
>80
Assess user satisfaction and ease of use
3
% of population targeted that received interventions in all cycles of campaign
Maximise effectiveness of disease prevention initiatives
At least 80% of eligible population should receive SPAQ in all cycles of the campaign.
Triangulate with referrals, refusals, and other ineligibility conditions to assess the reason
Localisation of labels to align with country-specific contexts and languages.
Addition of custom charts not included in the pre-built DSS.
Drill-down capabilities for heatmaps rely on the availability of shapefiles for sub-national boundaries (e.g., districts, localities).
Customisation of logic for charts in the ‘Data quality’ module logic tailored to program/country needs (e.g., identifying suspected fraud or households exceeding 20 members)
The framework used for dashboard development: HCM SMC dashboard metrics design:
Calculations for charts: KPI Calculation: HCM Dashboard SMC:
Known bugs/issues:
None
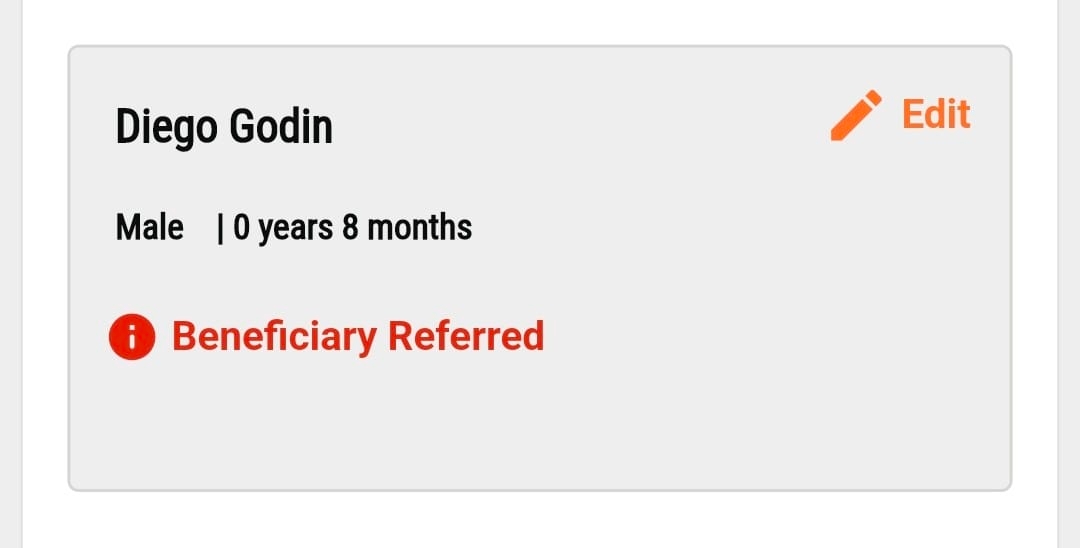
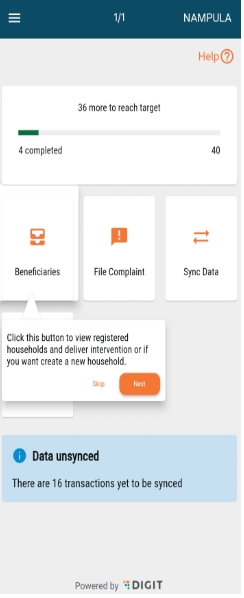
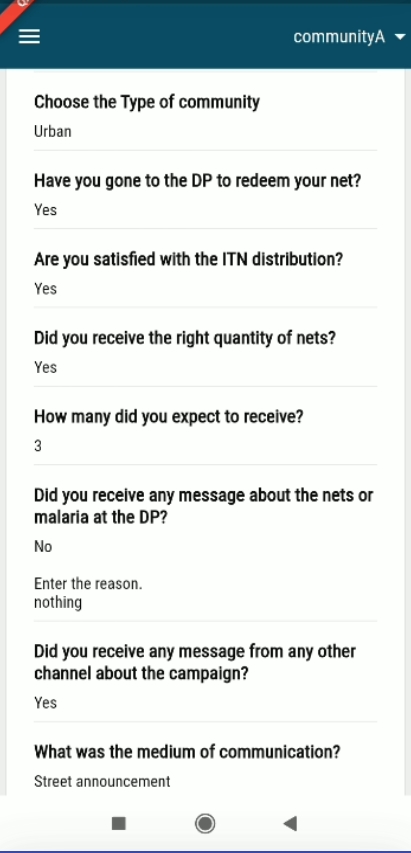
The checklist feature in HCM includes a supportive "Help Text" section designed to provide additional guidance for supervisors. This section can be used to clarify the intent of each question or offer useful hints, ensuring that supervisors understand the context and provide accurate responses. By including detailed explanations or examples in the help text, this feature reduces confusion and promotes consistency in data collection, ultimately improving the quality and reliability of the information gathered.
Contextual Guidance: Provides additional information to clarify the purpose or context of each question
Hints for Accurate Responses: Offers examples or tips to help supervisors choose the correct answers or fill in the required data accurately
Improved Data Quality: Reduces errors and inconsistencies by ensuring supervisors fully understand the questions
Customisable Content: Allows administrators to tailor the help text for specific questions to suit the campaign or data collection needs
Training Support: Serves as an on-the-go reference tool for supervisors, minimizing the need for extensive pre-training
Localized Support: The help text can be written in local languages or customized to fit cultural contexts for better understanding
Supervisors who monitor campaign activities, health facilities in charge for assessing the beneficiaries referred, and distributors assessing the eligibility of beneficiaries for service delivery.
Discovery and validations:
This feature was developed in collaboration with the Malaria Consortium, with multiple validation sessions conducted to finalize the design. The process included:
UI/UX Validation: Assessing the visual design and functionality of the feature
User Navigation Walkthrough: Reviewing the user flow to ensure ease of navigation
UAT Sessions: Conducting User Acceptance Testing to gather feedback and make improvements
User feedback from UAT with the partners and state team representatives
Effectiveness in terms of improvement in the checklist responses to assess the campaign data for the supervision module
The time taken by supervisors to complete and submit the checklist
Insights gathered from user interviews conducted during and after the campaigns
Adoption metrics, including usability scores, to evaluate user efficiency and satisfaction
Localisation of labels to align with country-specific contexts and languages
Content customisation to meet implementation requirements
Console v0.3
Time for campaign configuration for post Intervention flows reduces from 1 week to less than an hour through HCM Admin Console v0.3
With the implementation of the edit feature in the HCM Console v0.3, the dependency by partners/country teams on eGov during the campaign was reduced substantially.
Campaign Targets (Denominators) for DSS are pushed directly from the target sheet uploaded on the console egov's intervention.
All Checklists should be created through the Console with no interventions from the solutions team of eGov.
SMC App Improvement and Dashboard
User Interface enhanced for better user experience
New charts such as Venn Diagram and Side by Side multiple bar charts have been added for visualisation of the dashboard.
Microplanning v0.1
Improved Accuracy in Population Data through Micro Planning v0.1.
Enhanced Resource Allocation and Efficiency through Micro Planning v0.1
Implements robust validation mechanisms, including the ability to approve or reject data updates, fostering trust in the process through Micro Planning v0.1.
Improves accountability by maintaining controlled access for various stages of the microplanning process through Micro Planning v0.1.
Offers downloadable finalised micro plans in Excel format, simplifying data sharing and usage across stakeholders through Micro Planning v0.1.
Ensures better service delivery through precise facility-to-catchment area assignments.
Find the service build updates below:
Category (Tag)
Services
Docker Artifact ID
Remarks
Facility
egovio/facility-db:v1.1.2-00a7accbda-14
Not Changed
Household
egovio/household-db:v1.1.4-a0e714254c-30
Changed
Individual
egovio/individual-db:v1.1.6-a0e714254c-12
Changed
Project
egovio/project-db:v1.1.5-a0e714254c-13
Changed
Product
egovio/product-db:v1.1.0-00a7accbda-31
Not Changed
Referral Management
egovio/referralmanagement-db:v1.0.3-a0e714254c-42
Changed
Stock
egovio/stock-db:v1.1.3-a0e714254c-31
Changed
Transformer
egovio/transformer:HDDF-1277-149f70deb7-302
Changed
HRMS
egovio/egov-hrms-db:v1.2.7-00a7accbda-19
Not Changed
Pgr
egovio/pgr-services-db:v1.1.7-00a7accbda-19
Not Changed
Service-request
egovio/service-request-db:v1.0.1-a0e714254c-18
Changed
Health-attendance
egovio/health-attendance-db:v1.0.2-30824c427-11
Not Changed
Digit-Ui
egovio/digit-ui:health-dashboard-digit-ui-921afc69c7-758
Changed
Health-UI
egovio/health-ui:health-dashboard-product-fb65c5f500-759
Changed
Not Changed
Dashboard
egovio/dss-dashboard:v1.8.0-0d70d60e63-53
Unchanged
egovio/dashboard-analytics:analytics-es8-auth-09e437f9f6-67
Changed
egovio/dashboard-ingest:v1.1.4-72f8a8f87b-10
Unchanged
egovio/project-factory:v0.3.0-c9f5d73e13-233
Changed
egovio/workbench-ui:v0.3.0-b3c48dc663-701
Changed
plan-service-db:v1.0.0-717aeac28f-231
resource-generator:v1.0.0-3f860f8a31-29
census-service:v1.0.0-fd9a00f0e7-77
In the HCM 1.7 release, we are introducing several technical improvements and functional enhancements, including 3 new key capabilities.
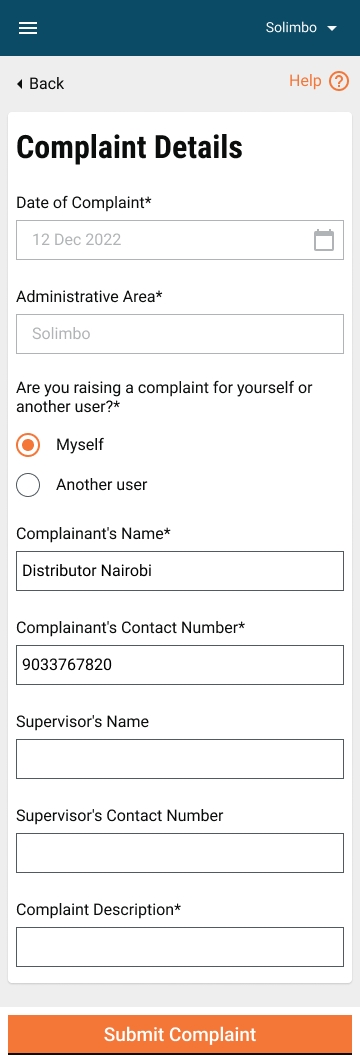
Health campaigns involve multiple events spanning different jurisdiction levels, managed by various supervisors and attended by diverse types of campaign staff, such as healthcare workers, frontline workers, supervisors, etc. These events incur logistical costs and necessitate timely payments, including daily allowances for campaign personnel. However, the lack of a dedicated payment module presents several challenges.
Manual and fragmented payment processes: Payments are often tracked and processed manually, leading to inefficiencies and errors.
Delays in payments: Staff compensation is frequently delayed, impacting motivation, engagement, and retention.
Lack of transparency: The absence of a streamlined payment process results in limited visibility for supervisors and stakeholders regarding payment status.
High administrative costs: Manual reconciliation and payment processes increase operational overheads.
Timely and accurate payments: Automated calculation and disbursement based on attendance ensure prompt compensation to campaign staff.
Enhanced staff satisfaction: Timely payments encourage greater participation and improve workforce morale.
Financial inclusion: Digital payments help bring unbanked staff into formal financial systems, contributing to financial equality.
Cost efficiency: Automated processes reduce administrative expenses and improve resource allocation.
Alignment with Sustainable Development Goals (SDGs): By digitising financial services responsibly, the module advances digital inclusion and promotes financial equality in health campaign operations.
Transparency and accountability: Clear payment tracking fosters trust and provides better visibility for supervisors and stakeholders.
Operational efficiency: Streamlined processes reduce administrative burdens and errors in payment handling.
The discovery of the users, the pain points, and potential solutions were formulated from various discussions with the different stakeholders such as:
NMCP Mozambique workshop
NMEP Burundi workshop
Digital Finance Team, World Health Organisation
Credentials
User feedback from the UAT sessions in Burundi, Mozambique (SUS, CSAT).
Validations and feedback from WHO-DFT.
Validations and feedback with partners.
- Catholic Relief Services
- Malaria Consortium
- Alliance for Malaria Prevention
Payment Processing Efficiency:
The time between campaign event completion and payment report submission to financial providers (MMO/Bank).
The percentage of payments disbursed within the defined timeline. (SLA to be defined by the programme).
Data Accuracy and Quality:
The number of reports requiring edits or corrections after generation.
The error rates in payment data submitted for processing (Edited reports/Total reports).
User Engagement and Experience:
CSAT score from proximity supervisors and payment approvers.
Operational and Cost Efficiency:
Reduction in administrative costs due to digitisation of payment processes.
The time saved per payment processing cycle compared to manual methods (Compare between As is vs To be).
Adoption Rates:
The number of campaigns adopting the payments module.
Financial Inclusion:
The number of users with mobile money accounts onboarded.
The number of people paid out in cash vs mobile money vs bank.
Non-campaign events, such as training sessions, must be created as separate projects. This means that users will need to log out and select the appropriate project to mark attendance for each event.
For example, the following events require attendance tracking:
Training of health facility supervisors at the district level
Training of frontline workers at the district level
Household registration (first half of the campaign)
Household registration (second half of the campaign)
Household distribution (first half of the campaign)
Household distribution (second half of the campaign)
Since these events occur sequentially rather than simultaneously, the supervisor's application will contain six separate projects for attendance marking, along with an additional project for routine campaign activities such as checklists, complaint logging, and supervision. As a result, the project created for campaign activities cannot be used for attendance tracking, and a dedicated project will need to be created specifically for that purpose.
The indicators for monitoring the payment-related activities need to be incorporated in the dashboard depending on the programme requirements. Currently, the following indicators are considered.
Number of attendance registers at the national level created, approved, payment report generated - Number chart.
Number of attendance registers at provincial level created, approved, payment report generated - Number chart.
Number of attendance registers at district level created, approved, payment report generated - Number chart.
Attendance registers created vs approved - by district side-by-side bar chart with drill-down.
Ensure all actors involved in training, registration, and distribution follow the prerequisites outlined in the attached guidelines. (Part of the guidelines attached above).
a. Before the campaign or related event starts:
Ensure all workers, including supervisors as per the microplan, are created in the system.
Complete all worker validations.
Confirm that all attendance registers are created and assigned to the appropriate attendance markers and proximity supervisors.
If payment reports need to be generated mid-event, create two separate registers for the event: one for the first half and another for the second half.
For different wage amounts across specific boundaries for the same role, create separate roles with the appropriate wage amounts and assign workers accordingly.
Verify that all attendance markers and proximity supervisors can log in and view their assigned attendance registers.
b. During the campaign or related event:
Mark attendance diligently for each register daily using the HCM application.
Perform routine syncs to ensure no unsynced records remain, particularly upon event completion.
c. After the campaign starts or ends:
Ensure no registers are pending approval by proximity supervisors.
Verify the accuracy of the worker and register details before generating the payment report
Confirm that payment registers are created for all boundary levels and individual boundaries (For example: districts, province, country).
None
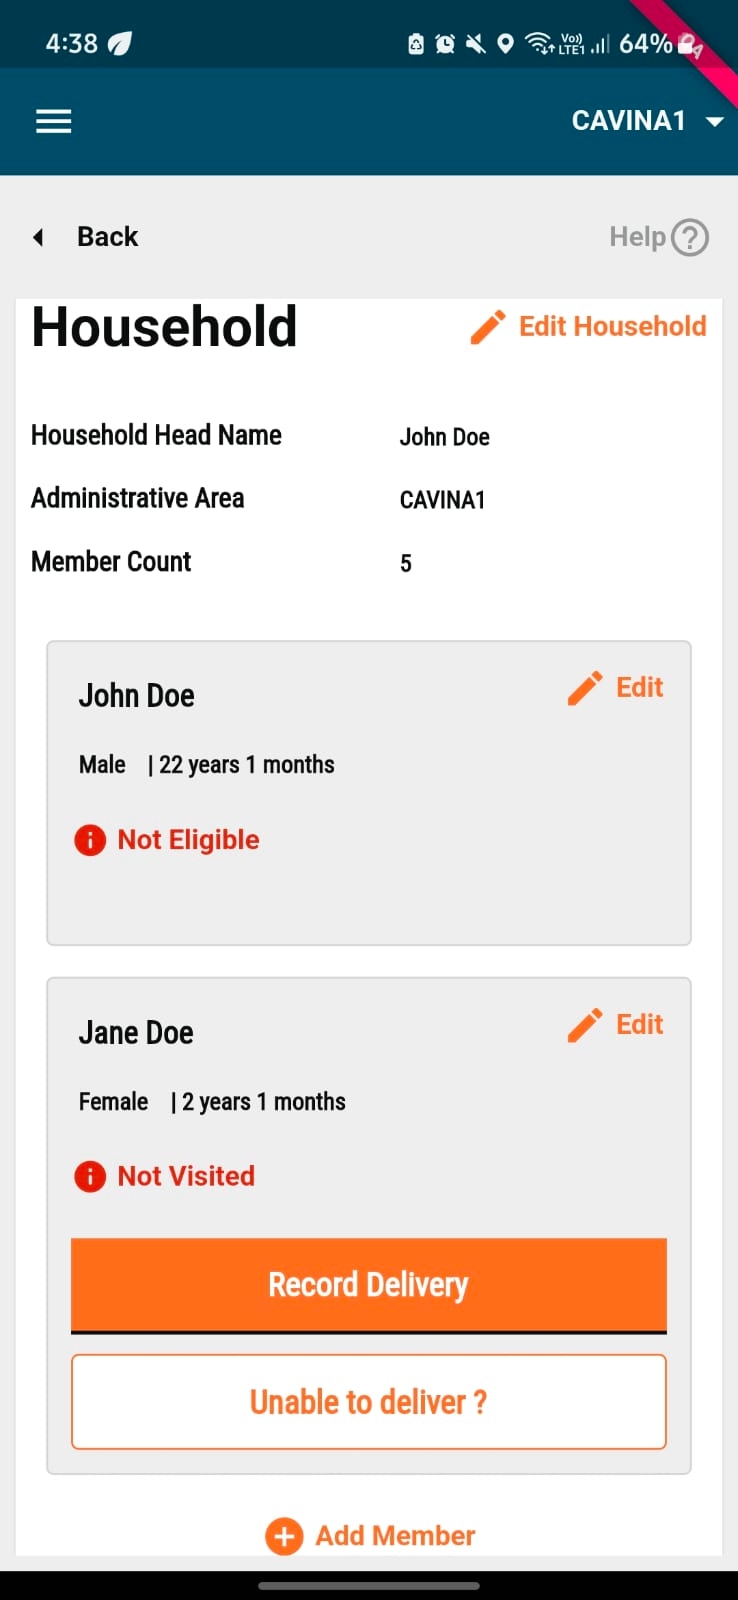
In health campaigns, HCM has primarily supported house-to-house delivery, where the distribution was tied to a specific household or individual. For fixed post mode, HCM has done only household-based campaigns where enumeration was done house-to-house and distribution was done at a fixed post. Even in individual-based campaigns, the beneficiaries were usually part of a household with a limited number of members, with the largest households we’ve encountered being up to 30 members.
During the discussions for the polio campaign in Nigeria, there was a need to administer vaccines in fixed locations like schools, community centers, or in transit settings. In these scenarios, delivery agents are mobile, administering vaccines on the go, such as along roadsides or under trees.
There is now a growing demand for addressing similar alternative delivery modes in other health campaigns. For example, in Nigeria's Schistosomiasis campaign, medicines had to be delivered to children residing in Madrassas (residential schools), where they are permanent residents. Other similar use cases could include:
Nursing homes and long-term care facilities
Orphanages
Military camps
Police camps
Retirement homes
Religious Community living facilities with permanent residents
Refugee camps
Jails
Schools (Residential and Non-residential)
Bus stands / railway stations
As these use cases expand, HCM needs to adapt to cater to these modes of delivery as well and also ensure the HCM Console enables the same.
As a campaign manager, I can configure different modes of delivery (fixed locations or transit points) in HCM, so that I can ensure efficient and adaptable health interventions across diverse settings like schools, refugee camps, or transit locations.
As a field worker, I can easily administer vaccines or medicines on the go using HCM, so that I can reach beneficiaries efficiently in non-household environments, such as roadsides, schools, or community centers.
Frontline workers who are responsible for registering and delivering interventions to community living groups.
The problem discovery and solution were done through discussions with the Burundi NMEP program team and also during the field visit to Kano, Nigeria as part of the discovery for the polio campaign.
Link to download apk:
Credentials
User feedback from the UAT sessions in Burundi, Nigeria (SUS, CSAT).
Adoption & Usage
The number of health campaigns utilising non-household-based delivery.
The percentage of the total health campaigns that use non-household-based delivery.
The average number of beneficiaries served per CLF.
Efficiency & Reach
The percentage of the total beneficiaries covered through non-household-based campaigns.
The average time taken per beneficiary in non-household-based campaigns vs. household-based campaigns.
The number of beneficiaries reached per field worker per day in different delivery modes.
Operational Effectiveness
The percentage of campaigns successfully configured with fixed post and transit delivery modes.
The percentage of frontline workers successfully using HCM for non-household-based delivery.
Impact on Health Outcomes
The percentage increase in service delivery due to non-household-based campaigns.
The percentage of targeted vulnerable populations (for example, refugees, children in schools) reached.
User Experience & System Performance
SUS (System Usability Scale) and CSAT (customer Satisfaction) scores from field workers using HCM for non-household-based campaigns.
The percentage of frontline workers who report ease of use in administering interventions in non-household settings.
The distribution logic — determining the number of interventions based on CLF type — needs to be configured as per implementation requirements. For example, schools may distribute one bednet per child, while refugee camps may allocate one bednet for every two people.
If household registration within a CLF (For example, households within refugee camps) is required, it is not currently supported in the product and will require code adjustments. The Burundi Bednet Campaign 2025 can serve as a reference for such modifications.
Additionally, KPIs and charts specific to CLFs must be customised based on the requirements of different implementations.
None
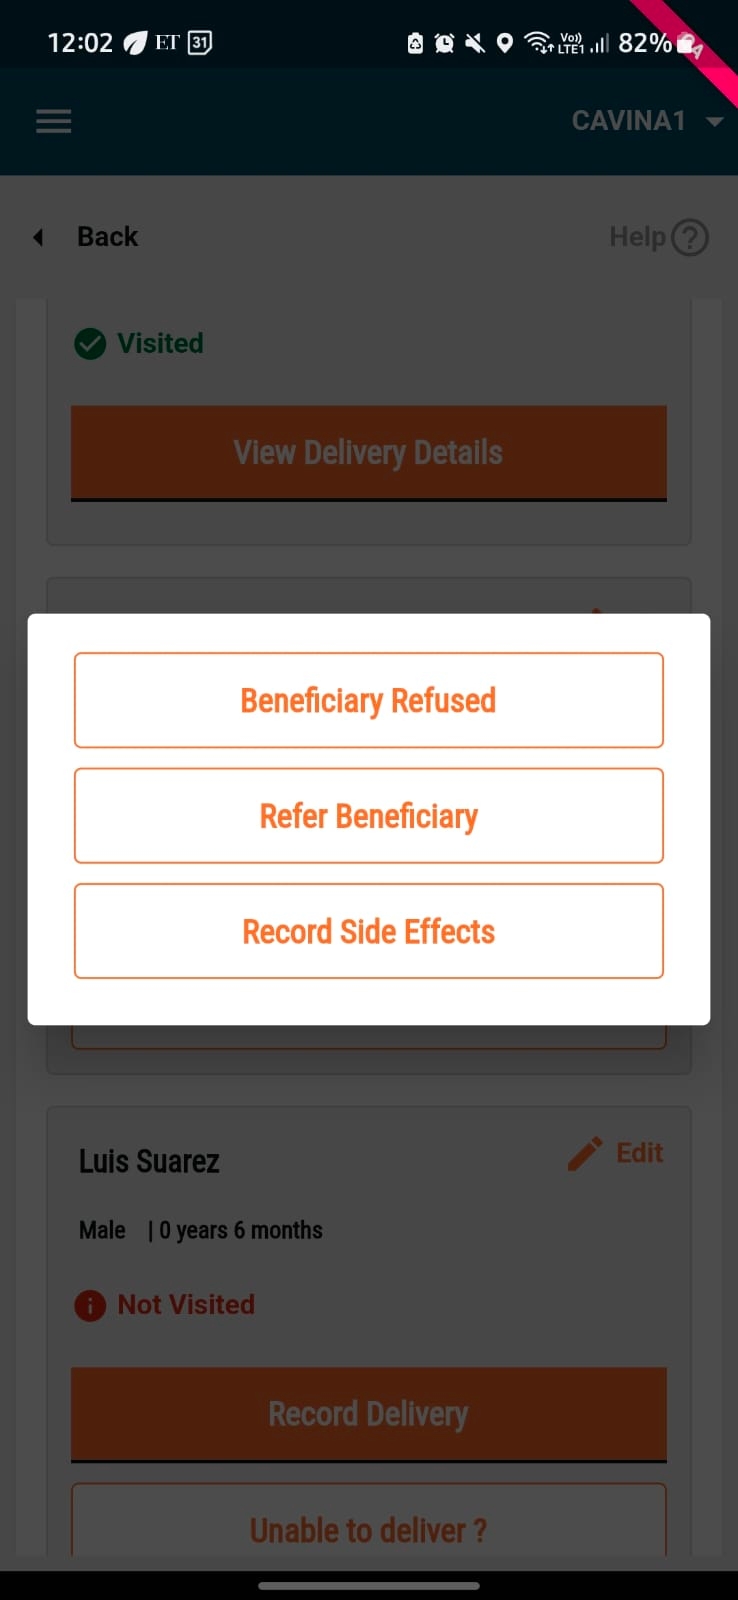
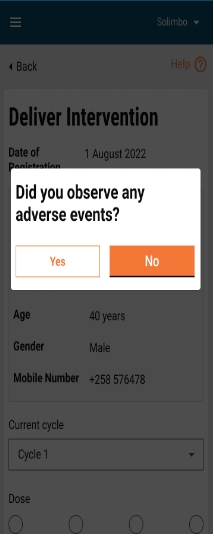
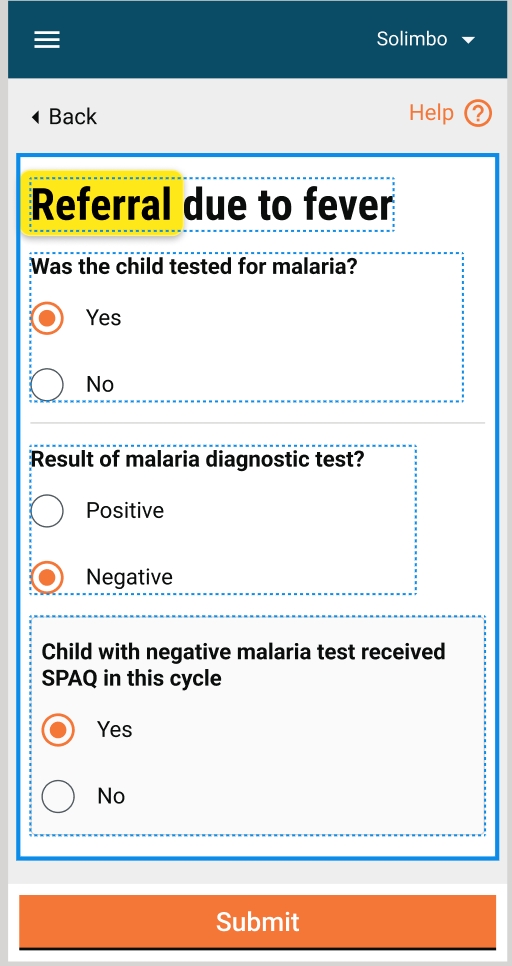
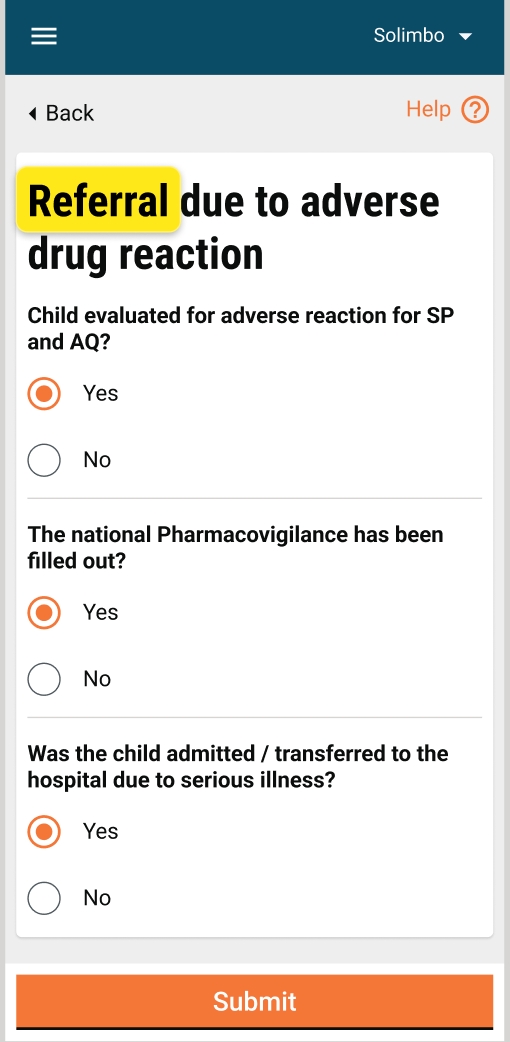
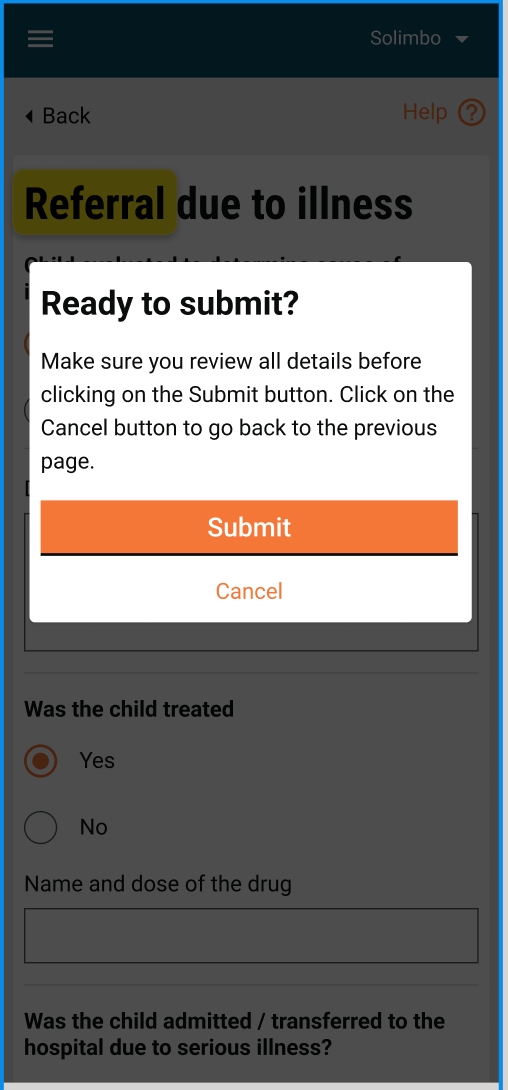
For campaigns like SMC, NTD, or Polio, where medication is administered and specific considerations arise — such as referring a beneficiary, marking side effects, or identifying ineligibility — the decision-making process currently rests with frontline workers in HCM. They assess the child and determine the appropriate flow within the application. However, this approach heavily depends on the efficiency, knowledge, and capacity of frontline workers, making it prone to inconsistencies.
As a pilot, a checklist-based approach was implemented at the solution level for the SMC campaign in Kebbi State, Nigeria. This approach was well received by both the implementation partner and the program, as it reduced the effort required from frontline workers. Based on this success, the feature has now been incorporated into the product offering for SMC, NTD, and similar campaigns.
For frontline workers, the administration and referrals for beneficiaries become faster, allowing for greater coverage of beneficiaries. This approach reduces inconsistencies stemming from varying capabilities and knowledge among workers, ensuring that all beneficiaries receive the appropriate intervention or service based on their health conditions, thereby promoting standardisation.
Frontline workers who are administering medicines for campaigns such as SMC, NTS, and polio.
Discussions with Malaria Control Programme of Kebbi State, Nigeria.
Discussions with Malaria Consortium.
Link to download apk:
Credentials
Through field study for upcoming campaigns in SMC and NTD campaigns in Nigeria and Mozambique, we intend to observe the following:
Efficiency of administration and referrals: Measure the reduction in time taken by frontline workers to administer medicines and refer beneficiaries, as compared to the previous process without the checklist approach. To compare against past campaign data (baseline).
Coverage of beneficiaries: Track the number of beneficiaries covered per frontline worker before and after implementing the checklist approach to gauge the increase in coverage. To compare against past campaign data (baseline).
Stakeholder satisfaction: Collect feedback from implementation partners (like the Malaria Consortium) and frontline workers regarding the ease of use and effectiveness of the checklist-based approach.
Time per beneficiary: The average time taken by a frontline worker to complete the administration and referral process.
Beneficiaries covered per worker: The number of beneficiaries attended to by each frontline worker within a given time frame (for example, per day/campaign).
SUS, CSAT scores: Regularly gather insights from supervisors overseeing the implementation of the checklist, evaluating both worker performance and the overall success of the checklist-based approach.
Training and support effectiveness: Track the number of training sessions provided to frontline workers and the success rate of those workers incorrectly using the checklist.
If a program or implementation prefers not to use a checklist-based approach and instead allows frontline workers to make decisions independently, the checklist should be configured for removal
The logic and navigation flow may vary based on each country's health protocols and must be configured accordingly. Currently, the referral and delivery processes follow the logic outlined in the following document:
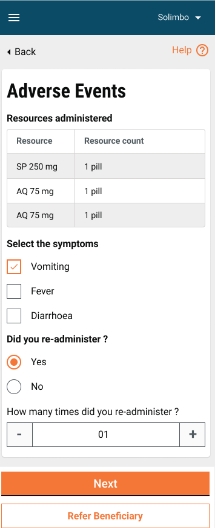
Currently, ineligibility is determined solely based on age, height, and weight as per campaign requirements. Checklist-based ineligibility is not yet supported but will be addressed and released as a patch in an upcoming update.
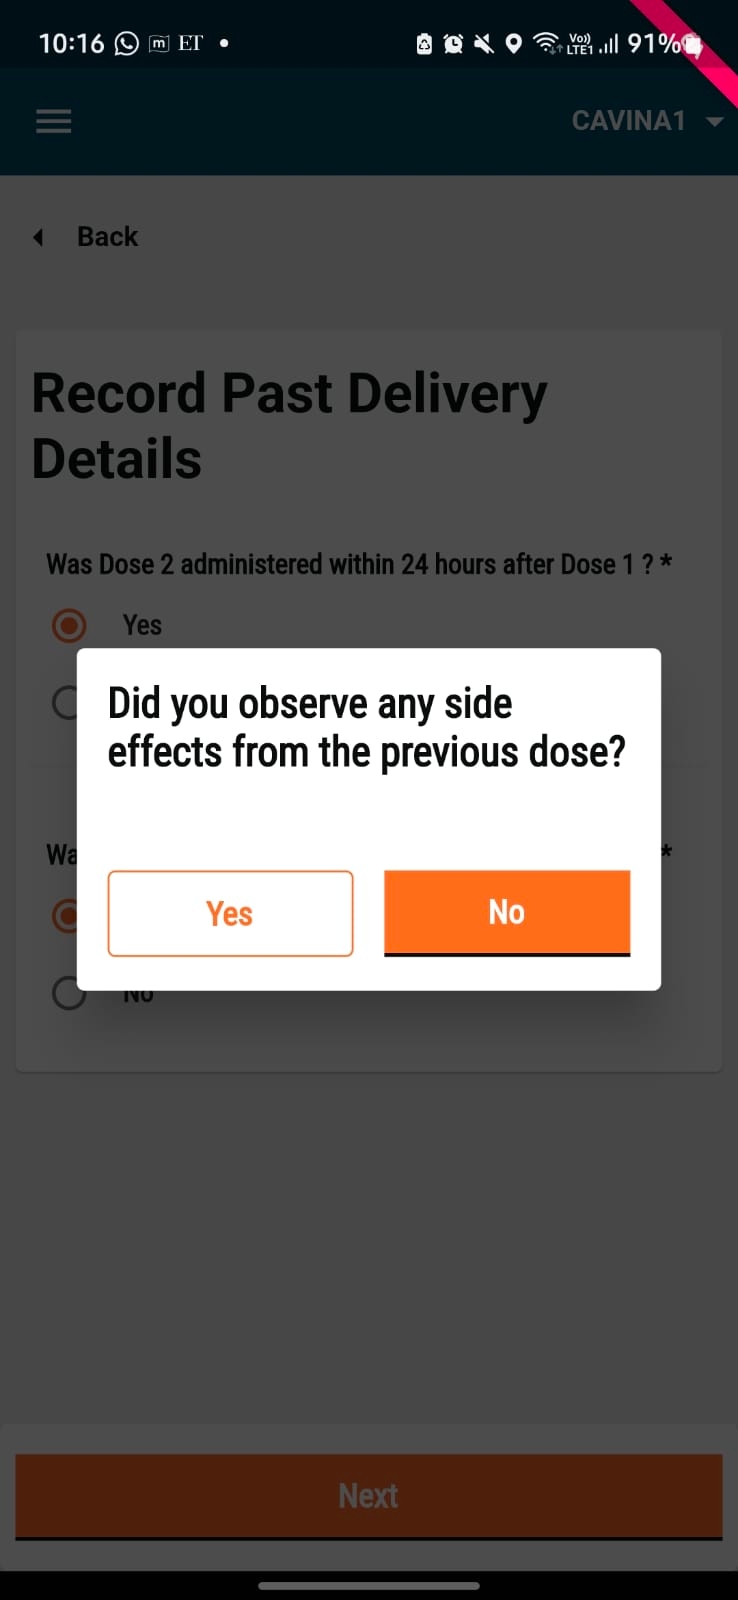
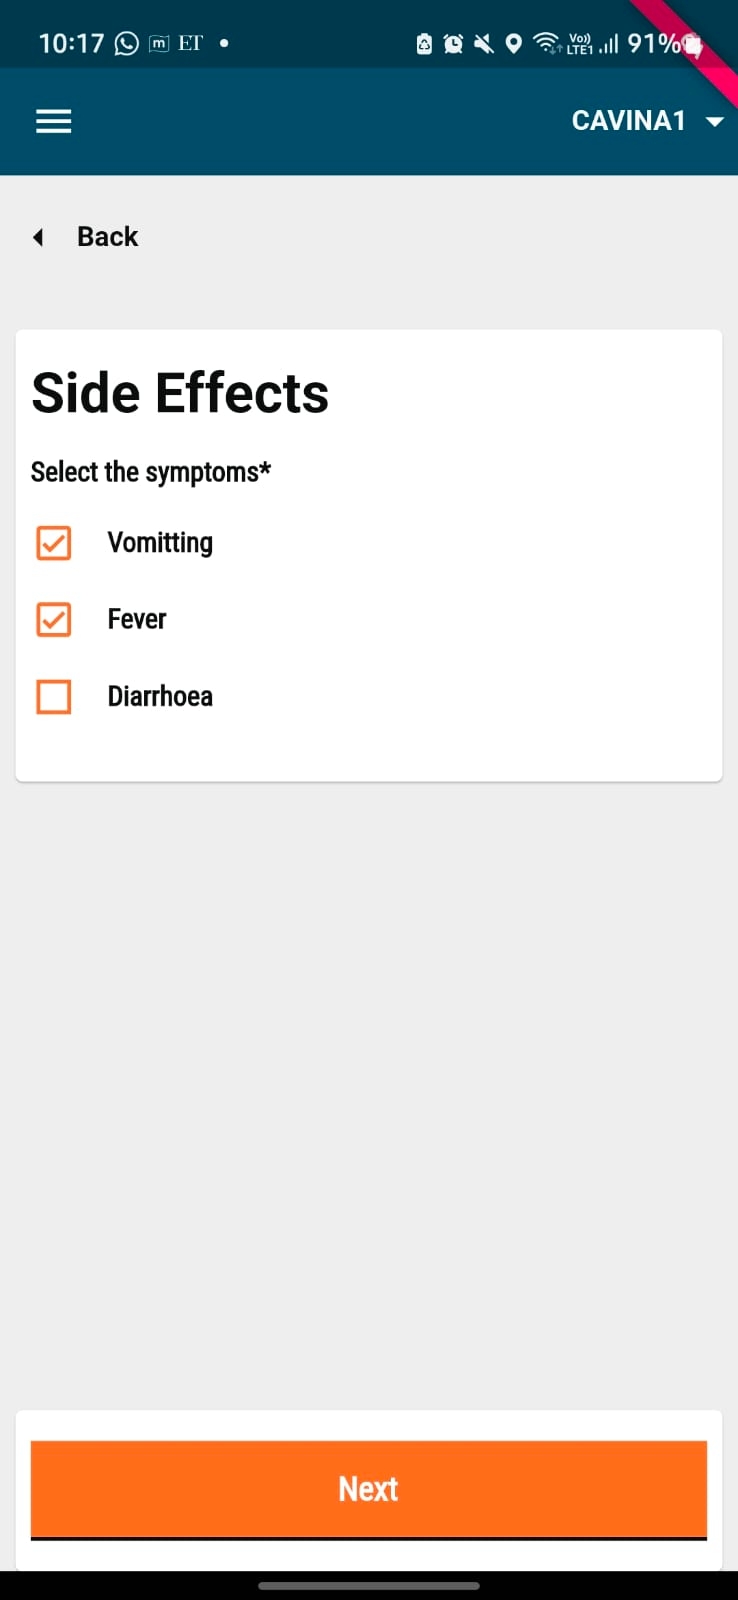
Marking side effects is not included in the checklist-based approach and should be recorded independently by the frontline worker.
The enhancements focus on improving the estimation dashboard, refining microplan estimation reports, optimising facility data handling, and incorporating mixed distribution strategies. These changes aim to enhance usability, data accuracy, and flexibility in microplanning workflows.
Improved usability: Facility and accessibility filters enable better data segmentation.
Data accuracy & flexibility: Editable estimate sheets and facility capacity adjustments improve data handling.
Strategic decision-making: Mixed distribution strategy consideration allows for adaptable service delivery.
Health campaign managers & planners: Managing facility-level microplanning.
User feedback: Identified usability pain points in dashboard filtering and report editing.
Stakeholder input: Validated mixed distribution strategy feasibility for service delivery.
User feedback: Identified usability pain points in dashboard filtering and report editing.
Key metrics to monitor:
N/A
N/A
Configuration of microplan assumptions according to the village’s/settlement’s accessibility or security in the estimation dashboard will not be available.
This version will see HCM Console being enabled with co-delivery as a campaign type where the users can create a multi-round, multi-delivery campaign with different delivery rules using various attributes like age, weight, height, gender, type of structure and number of individuals per bednets. The user can add any resources to be delivered based on their needs.
This release will also show how the Console handles user and facility mapping to boundaries through UI. The user now does not have to manually copy and paste boundary code in mapping facilities and users to boundaries.
Capability to run co-delivery campaigns using the Console.
System admins and programme managers
Validations are done with CHAI, AMP, and CRS
Credentials
The total time to set up a campaign.
The number of campaigns set up by the users.
N/A
N/A
HCM v1.4 is a tech release with only server upgrade to with some additional cleanup.
Digit core LTS integration
MDMS v2 integration
Boundary V2 integration
HCM Admin Console
DIGIT HCM app modules as package extractions
Missing unique validation on client reference ID added in all offline supported services.
Project types have been moved to project additional details from MDMS.
UI modules extracted as packages
Registration and delivery
Referral reconciliation
Inventory management
Attendance management
DIGIT scanner
DIGIT showcase
All core services have been upgraded to core 2.9 LTS barring the services modified for offline use cases.
All data models have been restructured with an "is a relationship" from base eGov model and the base eGov search model.
All data models have been moved to the health common library and duplicates removed.
Removed reflection until code in the health common library that is Incompatible with Java 9 and above.
All the master data for the DIGIT HCM app are separated by functionality from one single master.
Flyway version upgrade to 9.22.3 for LTS upgrade.
Boundary v2 Integration
Find the service build updates below:
Health Campaign Management v1.3: The Frontline Worker’s App includes two new features that enable frontline teams to perform their tasks efficiently even when offline.
To learn more about the DIGIT Health Platform and the Health Campaign Management (HCM) product, click .
The HCM v1.4 release requires migration of the boundary and MDMS data if the server is not a fresh deployment but an existing v1.3 deployment
If the current environment has boundary data in MDMS v1 please follow the steps mention in the document below to migrate to boundary v2.
If the environment is new the one click installer and data loader will by default load the data required.
If the Environment has pre existing data then the MDMS v2 migration tool should be run using the below document:
Following is the code link:
Find the service build updates below:
have given Signoff
Verify whether all docs will be published to by the Technical Writer as part of the release.
Click to access the Payments user manual.
URL
Click to know more.
Link to Microplanning:
Link to HCM Console:
Role
Username
Password
Proximity Supervisor
QAPS-30308
eGov@1234
Payment Approver
CS-3271
eGov@1234
Role
Username
Password
Registrar & Distributor
Reg-1
eGov@123
Registrar & Distributor
Reg-2
eGov@123
Registrar & Distributor
Reg-3
eGov@123
Role
Username
Password
Registrar & Distributor
Reg-1
eGov@123
Registrar & Distributor
Reg-2
eGov@123
Registrar & Distributor
Reg-3
eGov@123
Role
Username
Password
Microplan Admin
MICROADMIN25
eGov@1234
Role
Username
Password
CAMPAIGN MANAGER
ADMINC
eGov@123
Checklist
Yes/No/Partially
Reference Link/ETA
Owner
Reviewer
Remarks
The development is complete for all the features that are part of the release.
Yes
Test cases are documented by the QA team, reviewed by product owners, and test results are updated in the test cases sheet.
Yes
The incremental demo of the features showcased during the sprint showcase and feedback is incorporated. If possible, list out the JIRA tickets for feedback.
Yes
12-June-24
UI/UX audit review is completed along with feedback incorporation for any changes in UI/UX.
Yes
30-May-24
Mail has been communicated to Andrew Jones for UI/UX audit
QA sign-off is completed by the QA team and communicated to product owners. All the tickets’ QA sign-off status is updated in JIRA.
Yes
Lata
UI, and API technical documents are updated for the release along with the configuration documents.
Yes
UAT promotion and regression testing from the QA team is completed. The QA team has shared the UAT regression test cases with the product owners.
Yes
Lata
The API backward compatibility testing is completed.
Yes
No breaking changes are made.
The communication is shared with product owners for the completion of UAT promotion and regression by the QA team. The product owners have to give a product sign-off within one week of this communication.
Yes
4-June 24
As part of admin console product owner sign-off has been completed
The UAT product sign-off communication is received from product owners along with the release notes and user guides (if applicable).
Yes
20-June-24
As part of admin console product owner sign-off has been completed
The GIT tags and releases are created for the code changes for the release.
Yes
Verify whether the release notes are updated.
Yes
Link
Verify whether all the UAT builds are updated along with the GIT tag details.
Yes
Link
Lata
Verify whether all MDMS, configurations, infra-ops configurations are updated.
Yes
Verify whether all docs will be published to http://health.digit.org by the Technical Writer as part of the release.
Partially
Verify whether all test cases are up-to-date and updated along with the necessary permissions to view the test cases sheet. The test cases sheet is verified by the test lead.
Yes
Verify whether the UAT credentials' sheet is updated with the details of new users and roles, if any.
Yes
Link
Verify whether all the localisation data was added in UAT, and updated in the release kits.
Yes
No functional changes were made
Verify whether the product release notes and user guides are updated and published.
No
No product functional changes were made
The demo of the released features is done by the product team as part of a sprint/release showcase.
Yes
20-June-24
Demo has been give as a part of the HCM Console release
Technical and product workshops/demos are conducted by the engineering and product teams respectively to the implementation team (implementation handover).
Yes
Architect sign-off and technical quality report.
Yes
Verify Bug Bash has been completed
Yes
31-May-24
Gate 2
21-Jun-24
The internal release communication along with all the release artefacts are shared by the engineering/ product teams.
Checklist
Yes/No/Partially
Reference Link/ETA
Owner
Reviewer
Remarks
The development is complete for all the features that are part of the release.
Yes
Test cases are documented by the QA team, reviewed by product owners, and test results are updated in the test cases sheet.
Yes
The incremental demo of the features showcased during the sprint showcase and feedback is incorporated. If possible, list out the JIRA tickets for feedback.
Yes
23-July-24 29-July-24 06-Aug-24 25-Sept-24
UI/UX audit review is completed along with feedback incorporation for any changes in UI/UX.
Yes
23-July-24
Mail has been communicated to Andrew Jones for UI/UX audit
QA sign-off is completed by the QA team and communicated to product owners. All the tickets’ QA sign-off status is updated in JIRA.
Yes
Lata
UI, and API technical documents are updated for the release along with the configuration documents.
Yes
UAT promotion and regression testing from the QA team is completed. The QA team has shared the UAT regression test cases with the product owners.
Yes
Lata
The API backward compatibility testing is completed.
Yes
No breaking changes are made.
The communication is shared with product owners for the completion of UAT promotion and regression by the QA team. The product owners have to give a product sign-off within one week of this communication.
Yes
4-June 24
As part of admin console product owner sign-off has been completed
The UAT product sign-off communication is received from product owners along with the release notes and user guides (if applicable).
Yes
20-June-24
As part of admin console product owner sign-off has been completed
The GIT tags and releases are created for the code changes for the release.
Yes
Verify whether the release notes are updated.
Yes
Verify whether all the UAT builds are updated along with the GIT tag details.
Yes
Lata
Verify whether all MDMS, configurations, infra-ops configurations are updated.
Yes
Verify whether all docs will be published to http://health.digit.org by the Technical Writer as part of the release.
Partially
Verify whether all test cases are up-to-date and updated along with the necessary permissions to view the test cases sheet. The test cases sheet is verified by the test lead.
Yes
Verify whether the UAT credentials' sheet is updated with the details of new users and roles, if any.
Yes
Verify whether all the localisation data was added in UAT, and updated in the release kits.
Yes
No functional changes were made
Verify whether the product release notes and user guides are updated and published.
No
No product functional changes were made
The demo of the released features is done by the product team as part of a sprint/release showcase.
No
Demo has been give as a part of the HCM Console release
Technical and product workshops/demos are conducted by the engineering and product teams respectively to the implementation team (implementation handover).
Yes
Architect sign-off and technical quality report.
Yes
Verify Bug Bash has been completed
No
Gate 2
No
The internal release communication along with all the release artefacts are shared by the engineering/ product teams.
Yes
Category (Tag)
Services
Docker Artifact ID
Remarks
Facility
egovio/facility-db:v1.1.2-00a7accbda-14
Not Changed
Household
egovio/household-db:v1.1.4-a0e714254c-30
Changed
Individual
egovio/individual-db:v1.1.6-a0e714254c-12
Changed
Project
egovio/project-db:v1.1.5-a0e714254c-13
Changed
Product
egovio/product-db:v1.1.0-00a7accbda-31
Not Changed
Referral Management
egovio/referralmanagement-db:v1.0.3-a0e714254c-42
Changed
Stock
egovio/stock-db:v1.1.3-a0e714254c-31
Changed
Transformer
transformer:HDDF-1277-2f487e8dc5-256
Changed
HRMS
egovio/egov-hrms-db:v1.2.7-00a7accbda-19
Not Changed
Pgr
egovio/pgr-services-db:v1.1.7-00a7accbda-19
Not Changed
Service-request
egovio/service-request-db:v1.0.1-a0e714254c-18
Changed
Health-attendance
egovio/health-attendance-db:v1.0.2-30824c427-11
Not Changed
Digit-Ui
egovio/digit-ui:health-dashboard-digit-ui-d216162056-686
Changed
Health-UI
health-ui:health-dashboard-product-5bd3650bf2-691
Changed
Not Changed
Dashboard
egovio/dss-dashboard:v1.8.0-0d70d60e63-53
Unchanged
egovio/dashboard-analytics:master-impel-f705ac483a-48
Unchnaged
egovio/dashboard-ingest:v1.1.4-72f8a8f87b-10
Unchnaged
egovio/project-factory:v0.2.0-1ea8b5b5b9-9
Changed
egovio/workbench-ui:v0.2.0-6f08f64238-535
Changed
Category (Tag)
Services
Docker Artifact ID
Remarks
Facility
egovio/facility-db:v1.1.2-00a7accbda-14
Changed
Household
egovio/household-db:v1.1.3-00a7accbda-12
Changed
Individual
egovio/individual-db:v1.1.5-00a7accbda-6
Changed
Project
egovio/project-db:v1.1.4-00a7accbda-5
Changed
Product
egovio/product-db:v1.1.0-00a7accbda-31
Not Changed
Referral Management
egovio/referralmanagement-db:v1.0.2-00a7accbda-14
Changed
Stock
egovio/stock-db:v1.1.3-00a7accbda-18
Changed
Transformer
egovio/transformer:v1.1.2-00a7accbda-19
Changed
HRMS
egovio/egov-hrms-db:v1.2.7-00a7accbda-19
Changed
Pgr
egovio/pgr-services-db:v1.1.7-00a7accbda-19
Changed
Service-request
egovio/service-request-db:v1.0.0-00a7accbda-16
Changed
Health-attendance
egovio/health-attendance-db:v1.0.2-30824c427-11
Changed
Digit-Ui
egovio/digit-ui:health-dashboard-product-3cb11409c9-636
Changed
Dashboard
egovio/dss-dashboard:v1.8.0-0d70d60e63-53
Unchanged
egovio/dashboard-analytics:master-impel-f705ac483a-48
Unchnaged
egovio/dashboard-ingest:v1.1.4-72f8a8f87b-10
Unchnaged
egovio/project-factory:v0.1.0-6caaf2700e-6
Changed
egovio/workbench-ui:v0.1.0-6caaf2700e-16
Changed
Module
Functionality
Attendance Management
This is an offline-first module that allows supervisors who mark attendance for their teams to record their proof of work based on which the on-field workers will get paid.
The Attendance Module supports single-session and double-session attendance marking based on the cadence followed by the programme team.
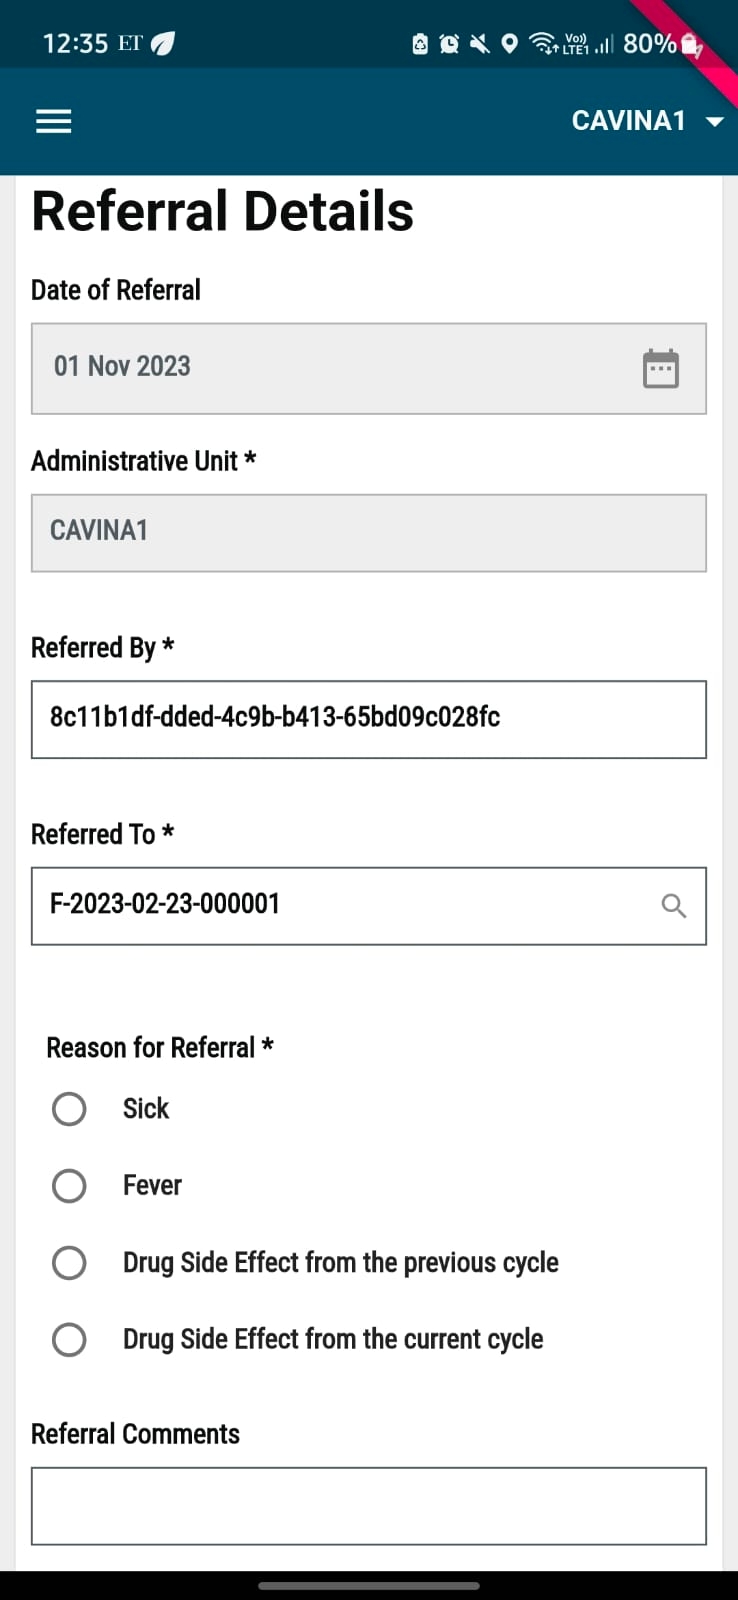
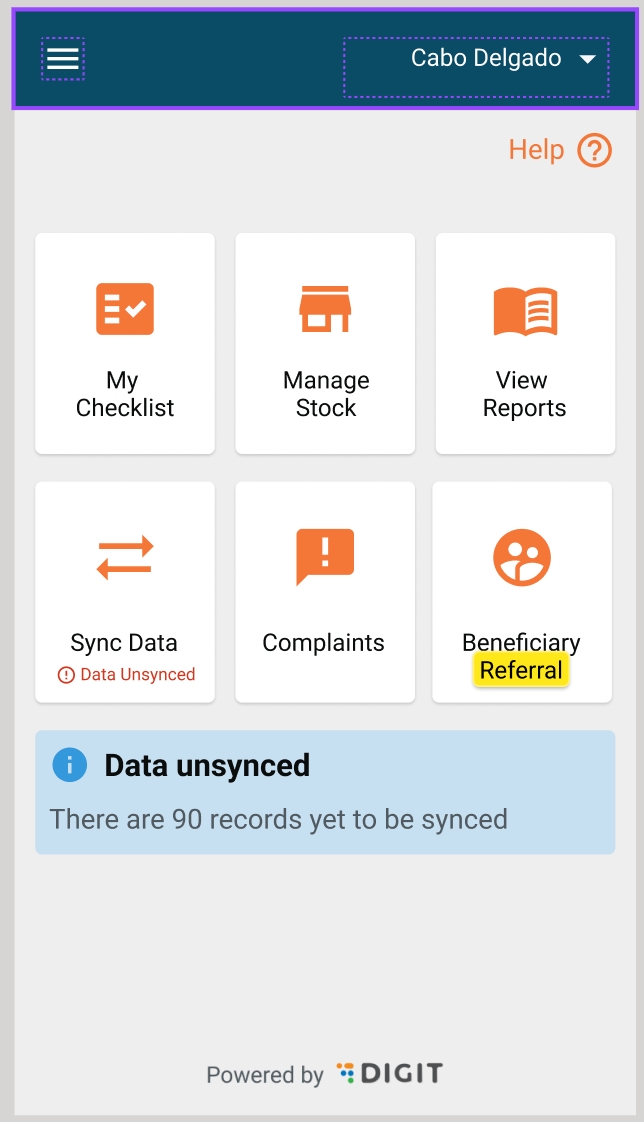
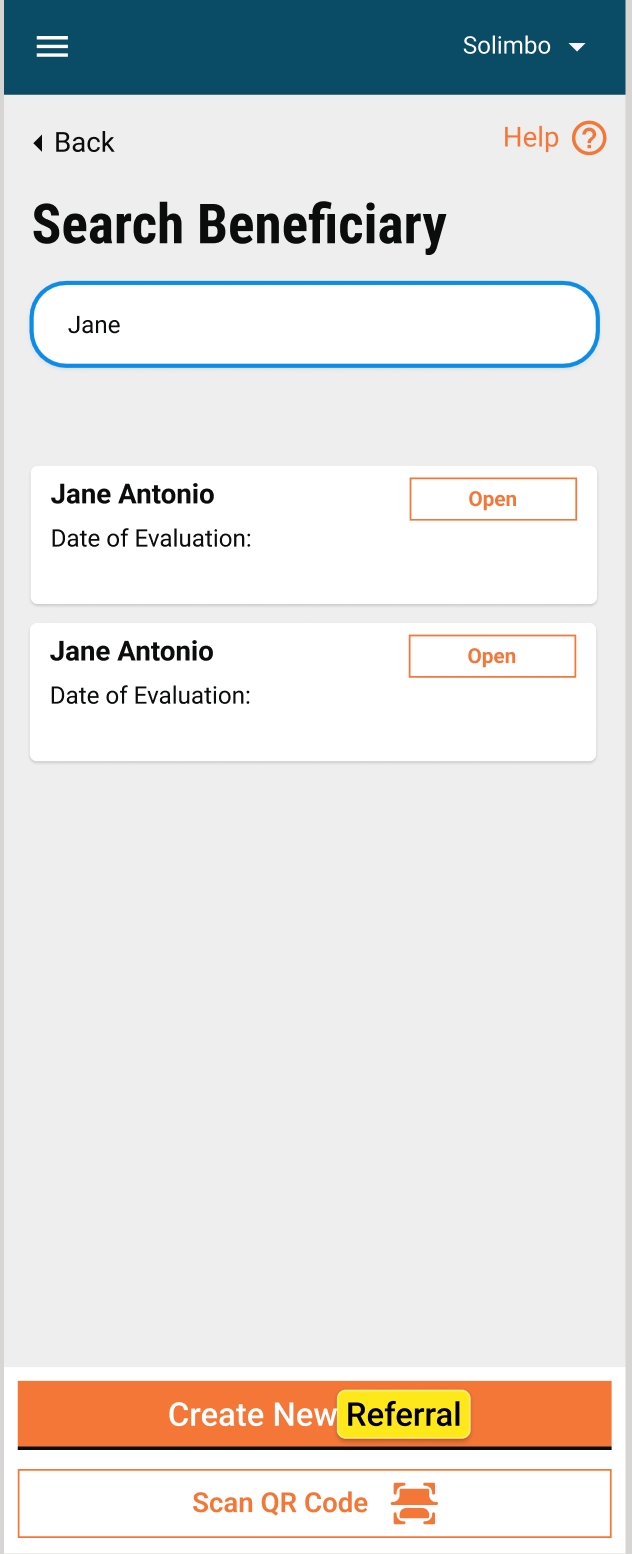
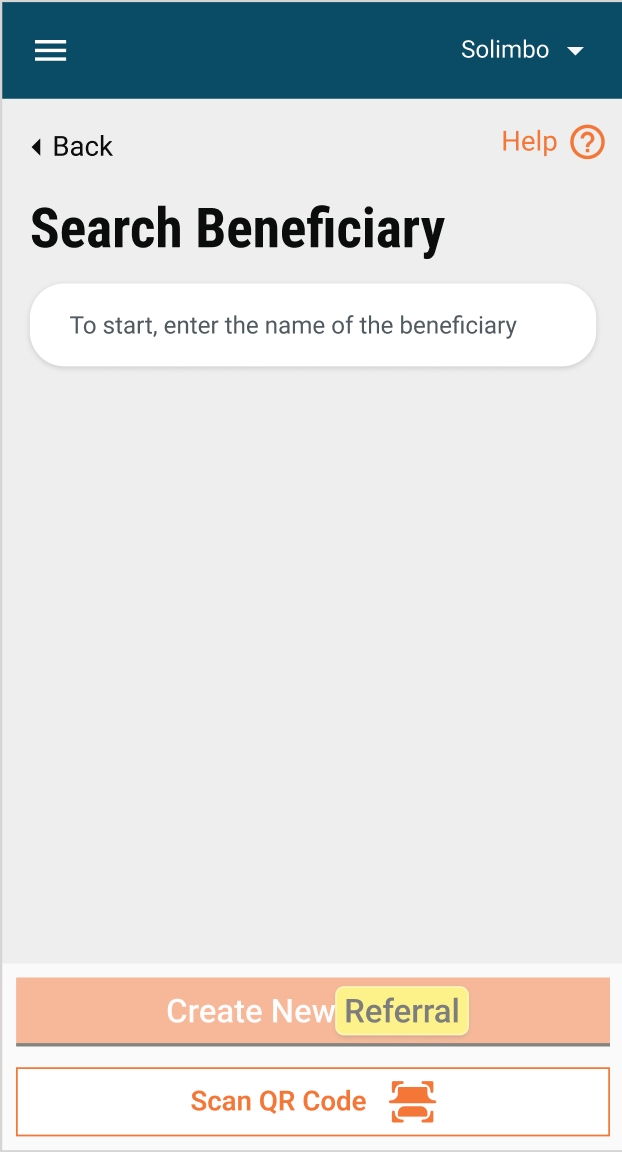
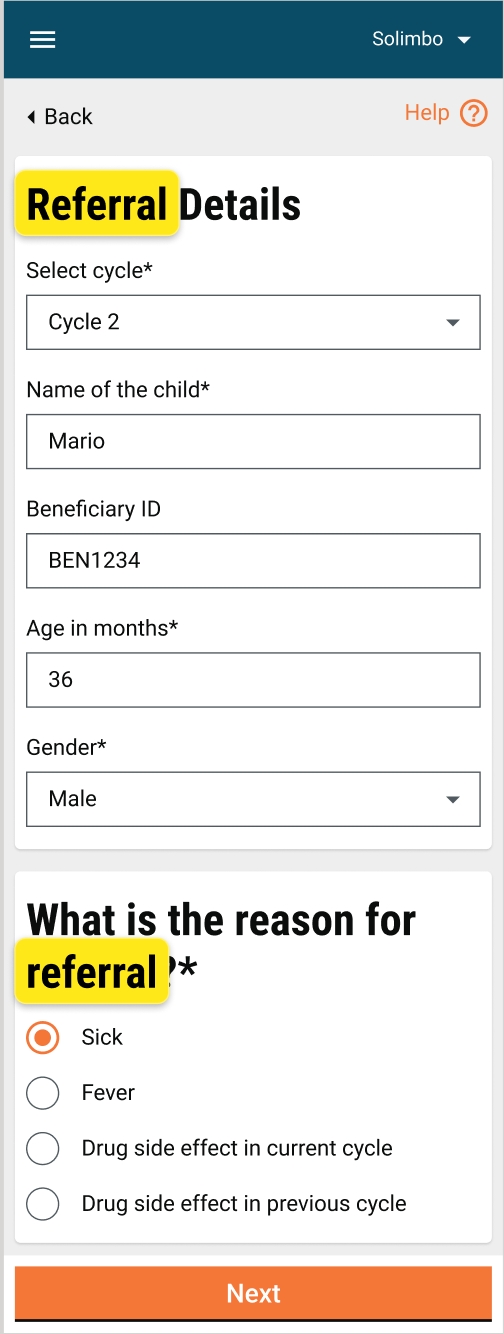
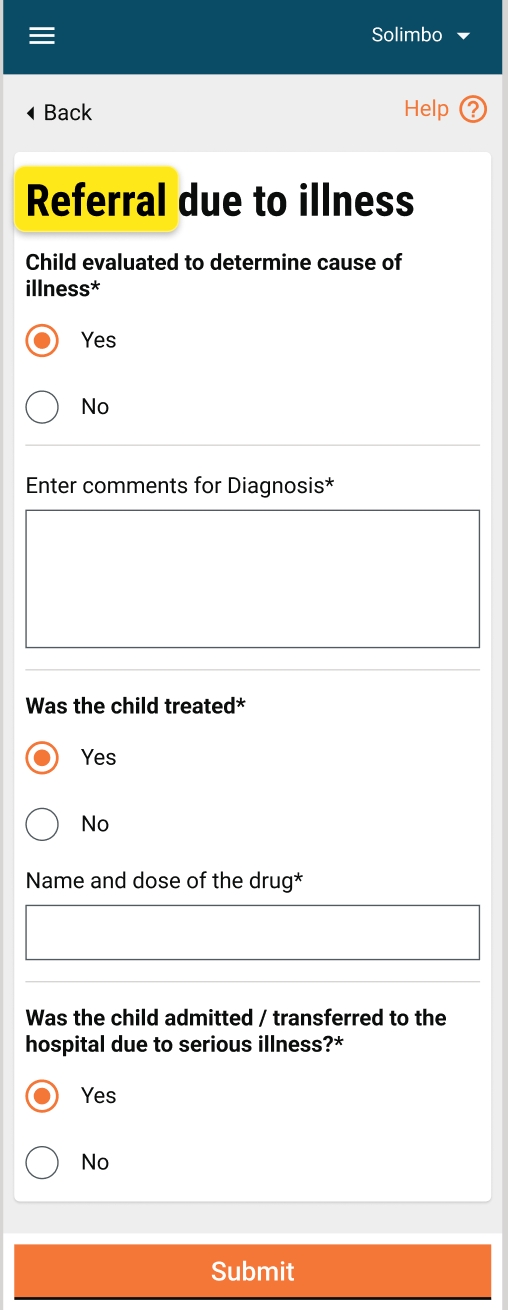
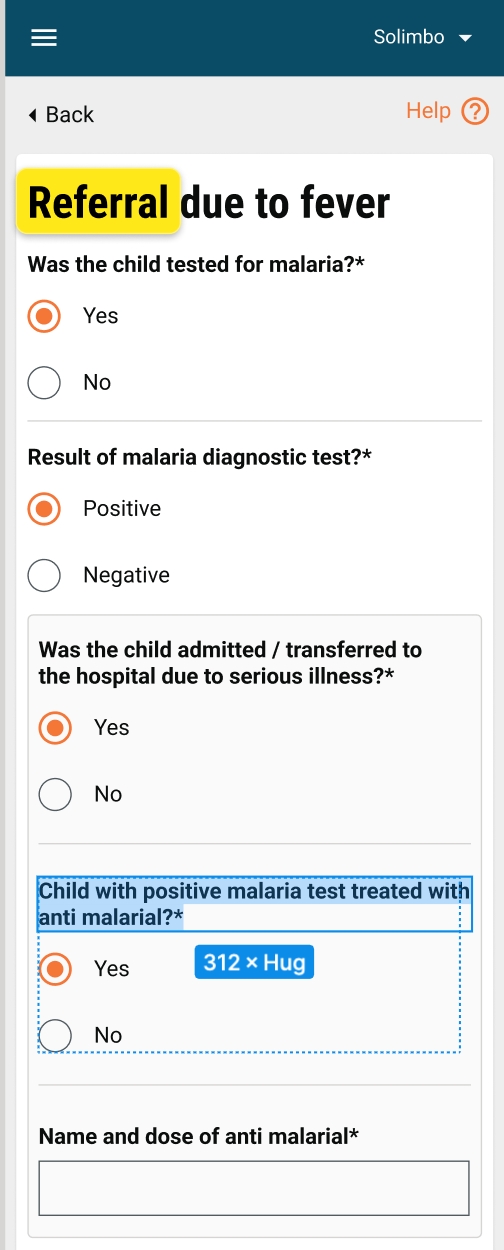
Health Facility Referral
This is an offline-first feature that allows workers working at a given health facility (HF) who will be responsible for giving the diagnosis based on the type of symptoms they observe, then make a diagnosis, and provide the appropriate drugs.
This module provides the health facility workers with the capability to track referrals made by on-field health workers to different health facilities digitally via the Digit HCM app capturing all the cases of:
Beneficiary being referred
Referral details of the beneficiary
Reason for referrals and their diagnosis
Based on the diagnosis chosen, further details, if applicable
Implemented validation for updating the project start date and the end date. Implementing this ensures that any changes made to these critical campaigns adhere to the predefined criteria.
Added the number of sessions field in additional details for the attendance registry, which enhances the system's ability to manage attendance tracking within projects. This field specifically denotes the frequency of attendance-taking sessions for a given project. Each session represents an instance where attendance is recorded, typically within a single day. For instance, if a project requires attendance twice daily (for example, morning and afternoon sessions), the number of sessions field would indicate ‘2’ to reflect this frequency. This information provides crucial context for understanding the attendance requirements and scheduling patterns within the project.
Added the ability to search by user UUID (Universally Unique Identifier) for individual search. This addition expands the search capabilities within the DIGIT-HCM platform, providing users with a more versatile and efficient means of locating specific individuals. A UUID is a unique identifier assigned to each user within the system. This new feature allows users to quickly retrieve information about a particular individual by entering their UUID into the search functionality. By leveraging UUIDs, which ensure each user has a distinct identifier, the search process becomes highly precise and reliable, minimising the risk of ambiguity or confusion, particularly in large datasets.
Health Facility Referral Feature Update
New Feature: HF Referral
DIGIT-HCM now includes a Health Facility Referral (HF Referral) functionality that enhances the platform’s capability to efficiently manage referrals across health facilities. This addition is aimed at improving coordination and communication, ensuring a smoother referral process.
Enhance the inventory flow with the sender ID and the receiver ID added. Including sender and receiver IDs offers flexibility in handling inventory transactions within the DIGIT-HCM platform. Transactions can involve movement between warehouses, from warehouse to staff, from staff to staff, or any combination thereof. This accommodates various scenarios, such as inter-departmental transfers, internal requisitions, or supplier deliveries.
Sender Identification: The sender ID specifies the entity initiating the inventory transaction. This could be a warehouse, indicating that inventory items are being dispatched from a specific storage location. Alternatively, it could represent an individual staff member responsible for authorising the transfer of inventory items.
Receiver Identification: The receiver ID denotes the entity or individual receiving the inventory items. Similar to the sender ID, this could represent either a warehouse where the items are being delivered or an individual staff member who is the designated recipient.
Implemented offline-enabled functionality in the Attendance Module. Implementing this functionality in the attendance module significantly enhances the usability and reliability of the DIGIT-HCM platform, especially in environments where internet connectivity may be intermittent or unavailable.
Health Campaign Management v1.2: The frontline worker’s App includes 8 new features that allow the frontline teams to perform their tasks efficiently even when offline.
Module
Functionality
Registration
Mobile app that enables the field teams to easily register eligible beneficiaries with built-in checks that enforce data collection protocols and validations to avoid data entry errors. The new features added are:
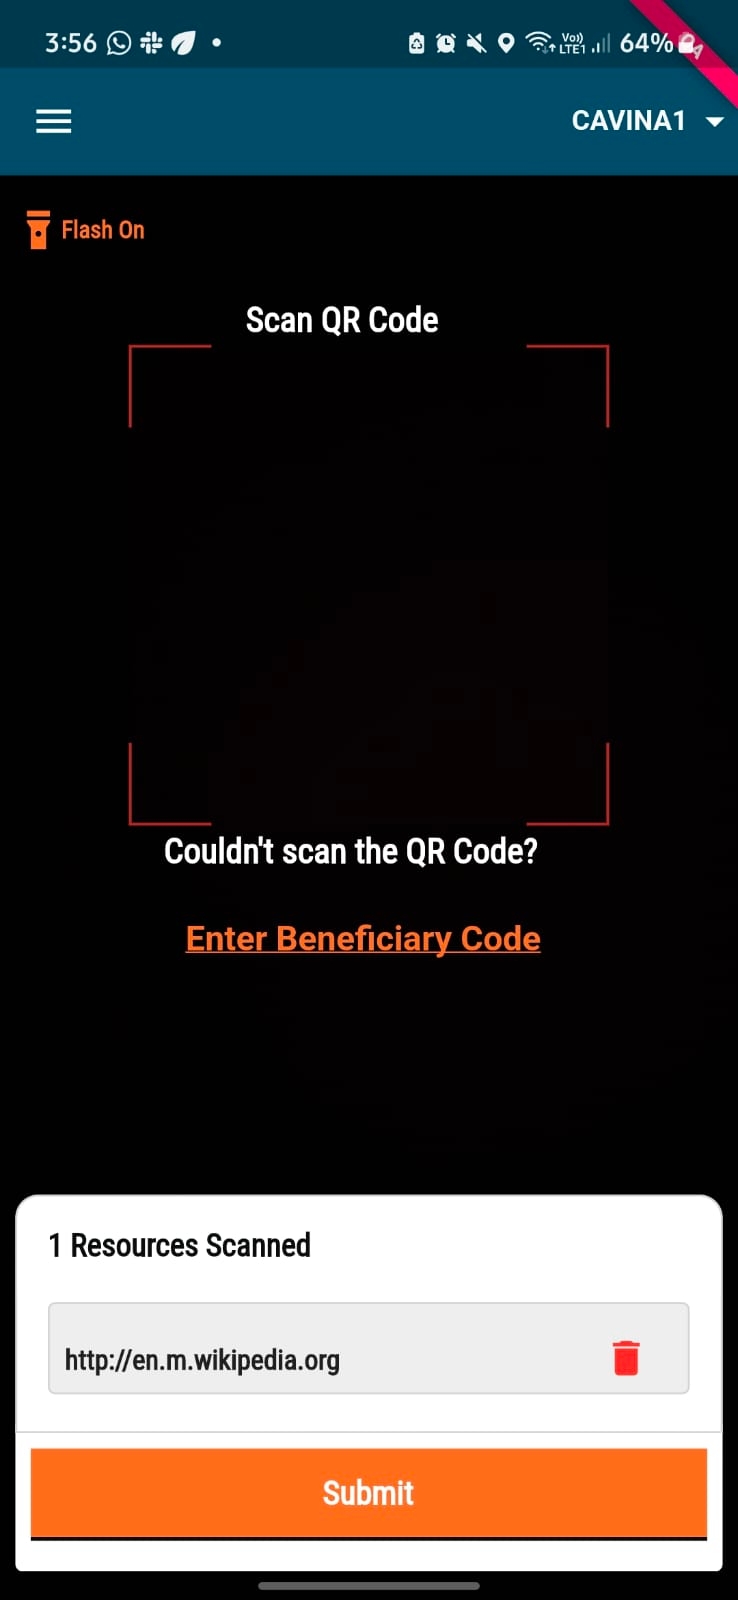
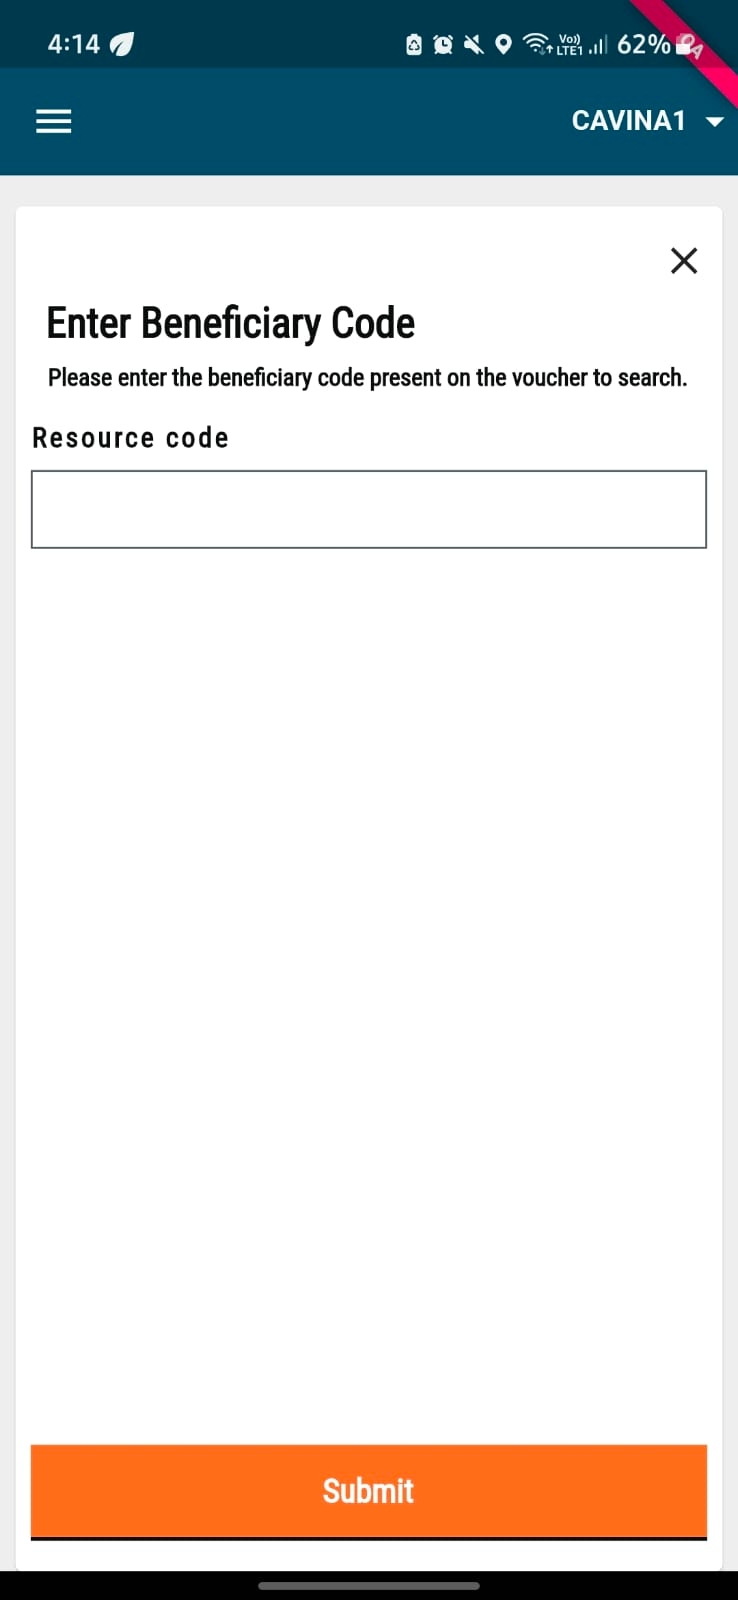
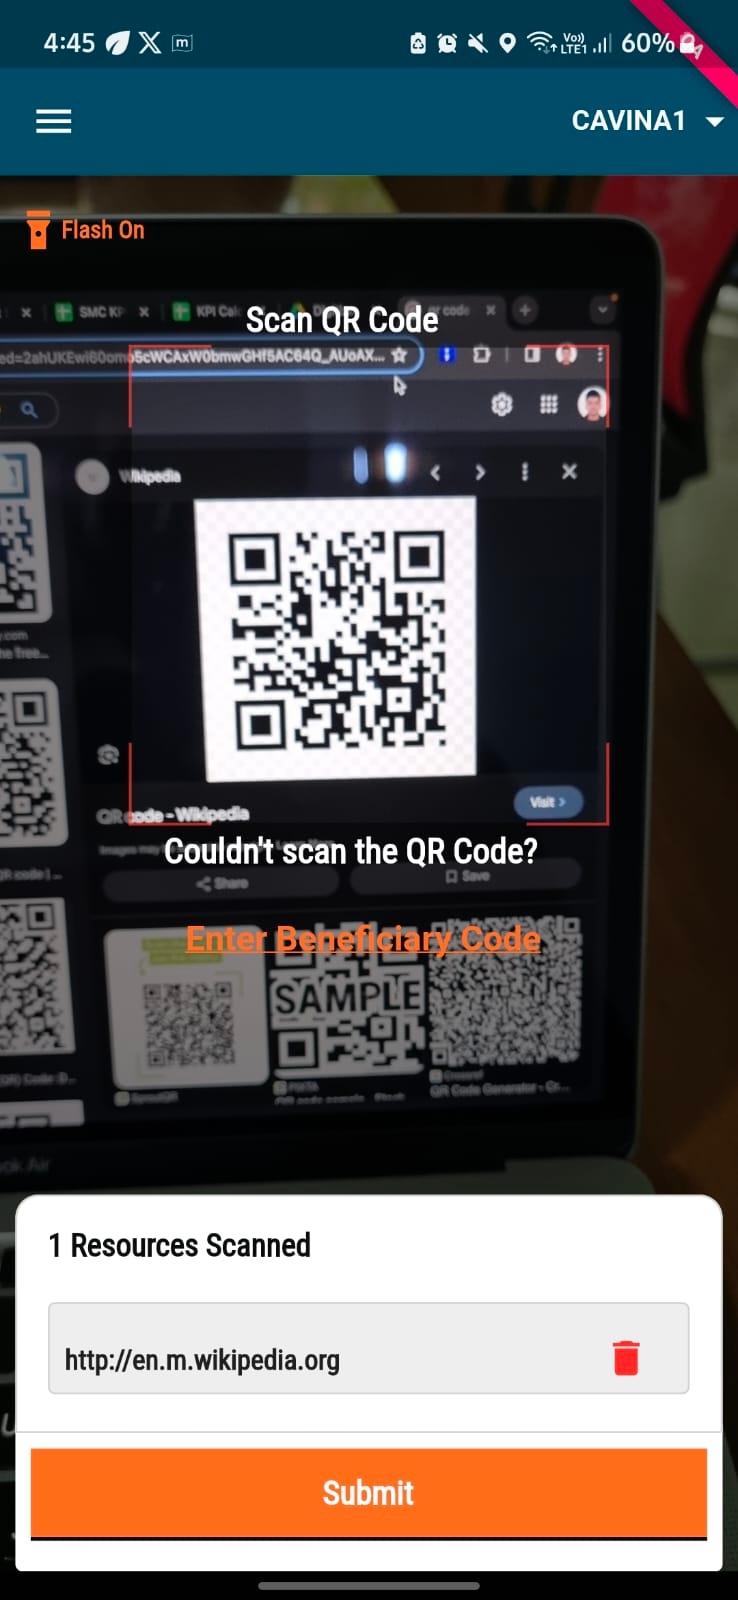
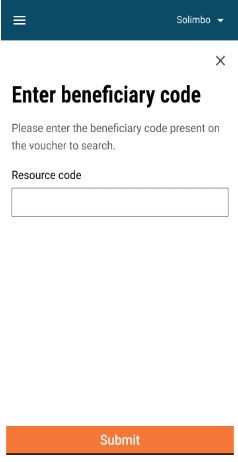
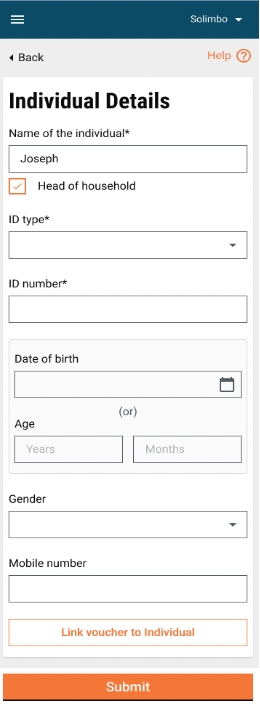
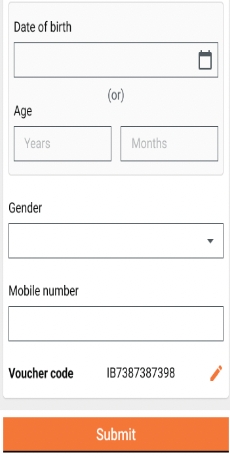
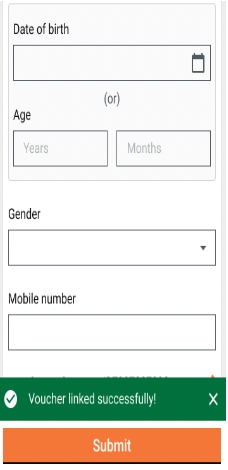
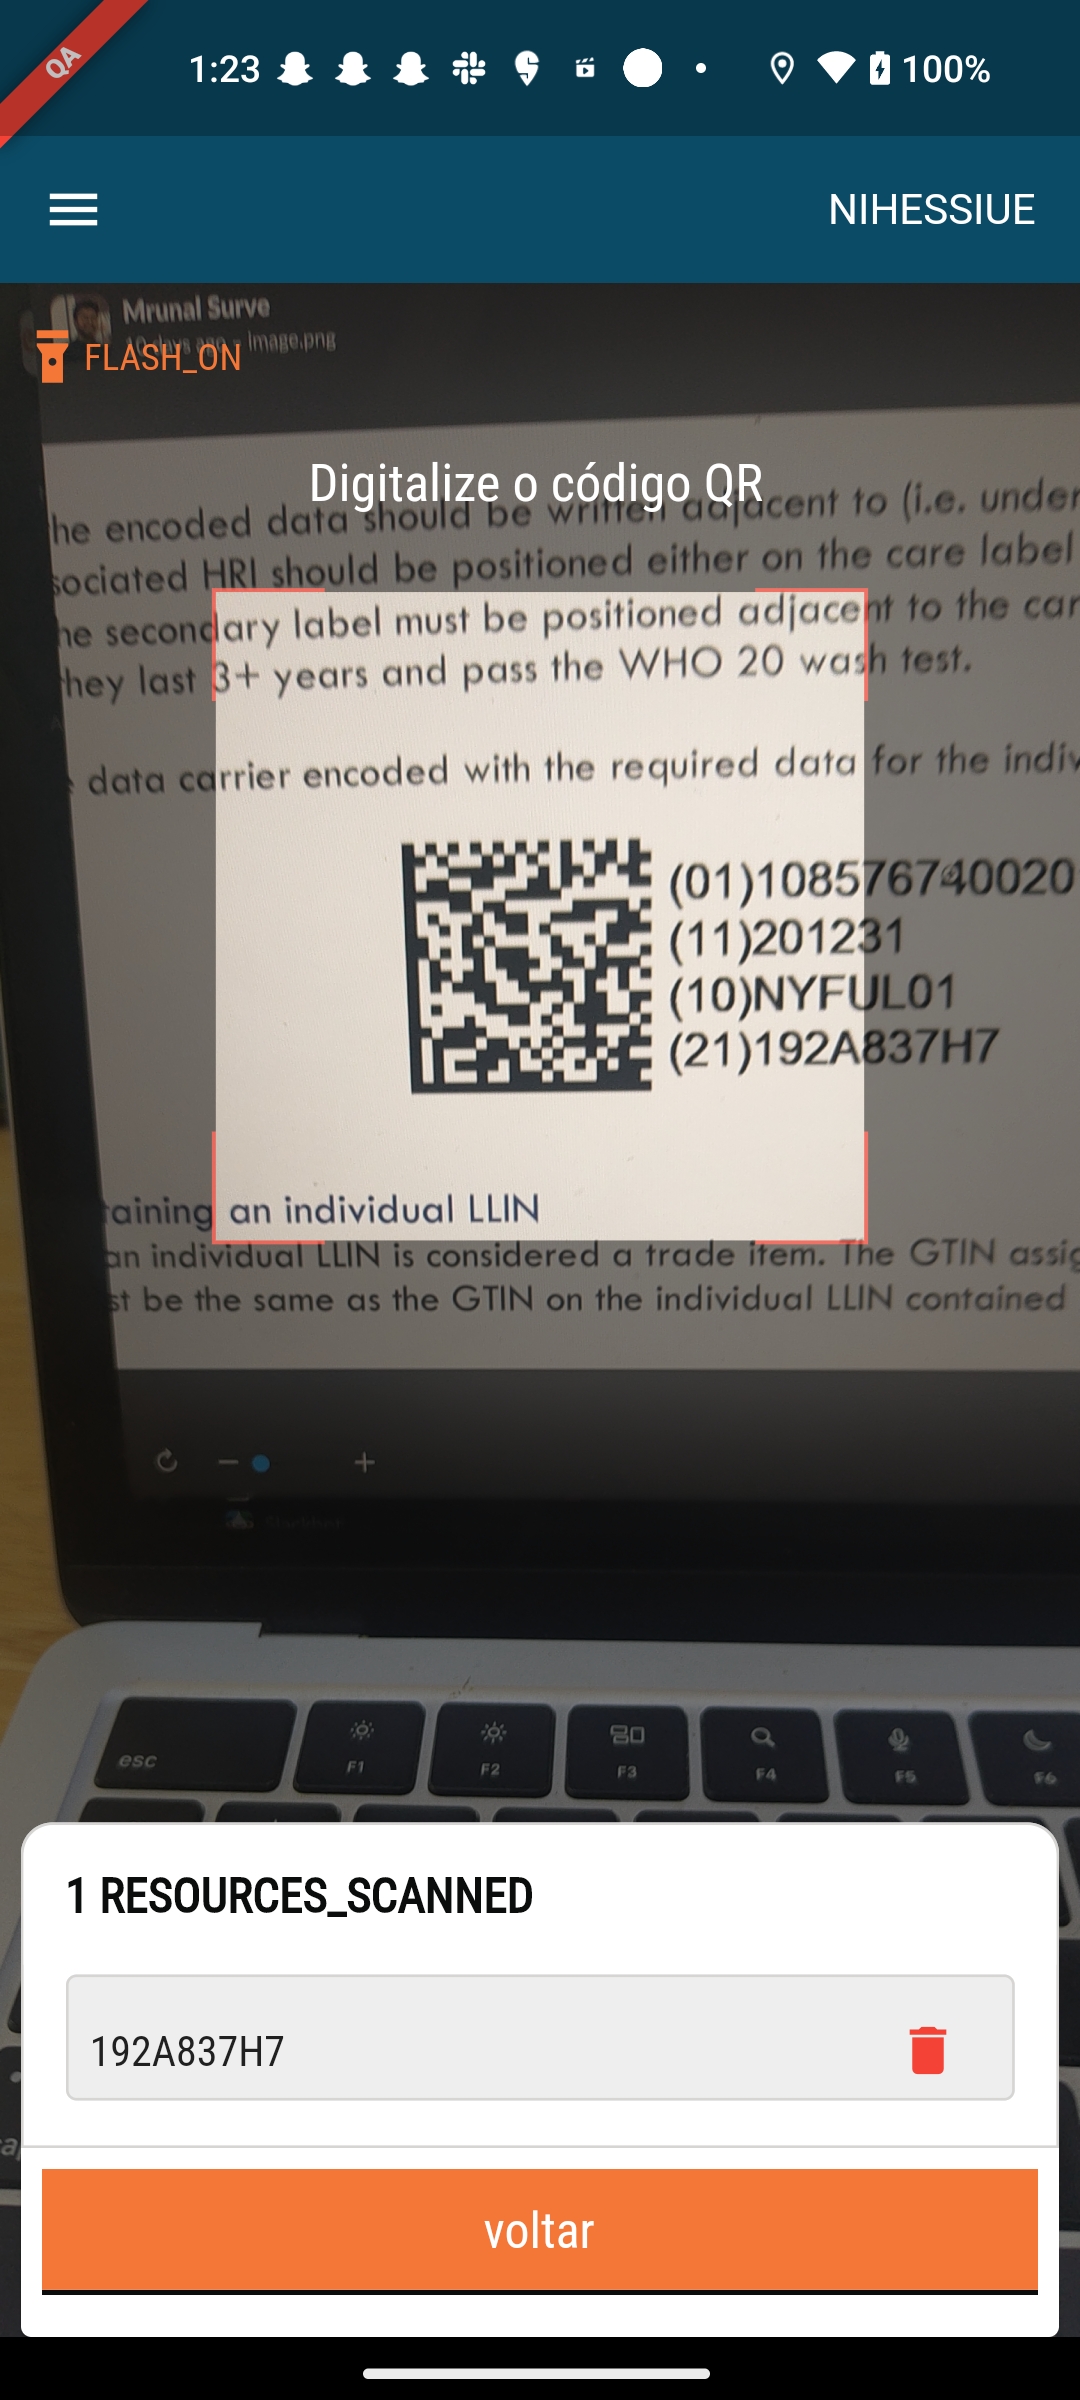
The ability to support voucher-based registration: Users can now scan and link a 2D code voucher to a beneficiary (household or an individual) while registering the beneficiary.
Service Delivery
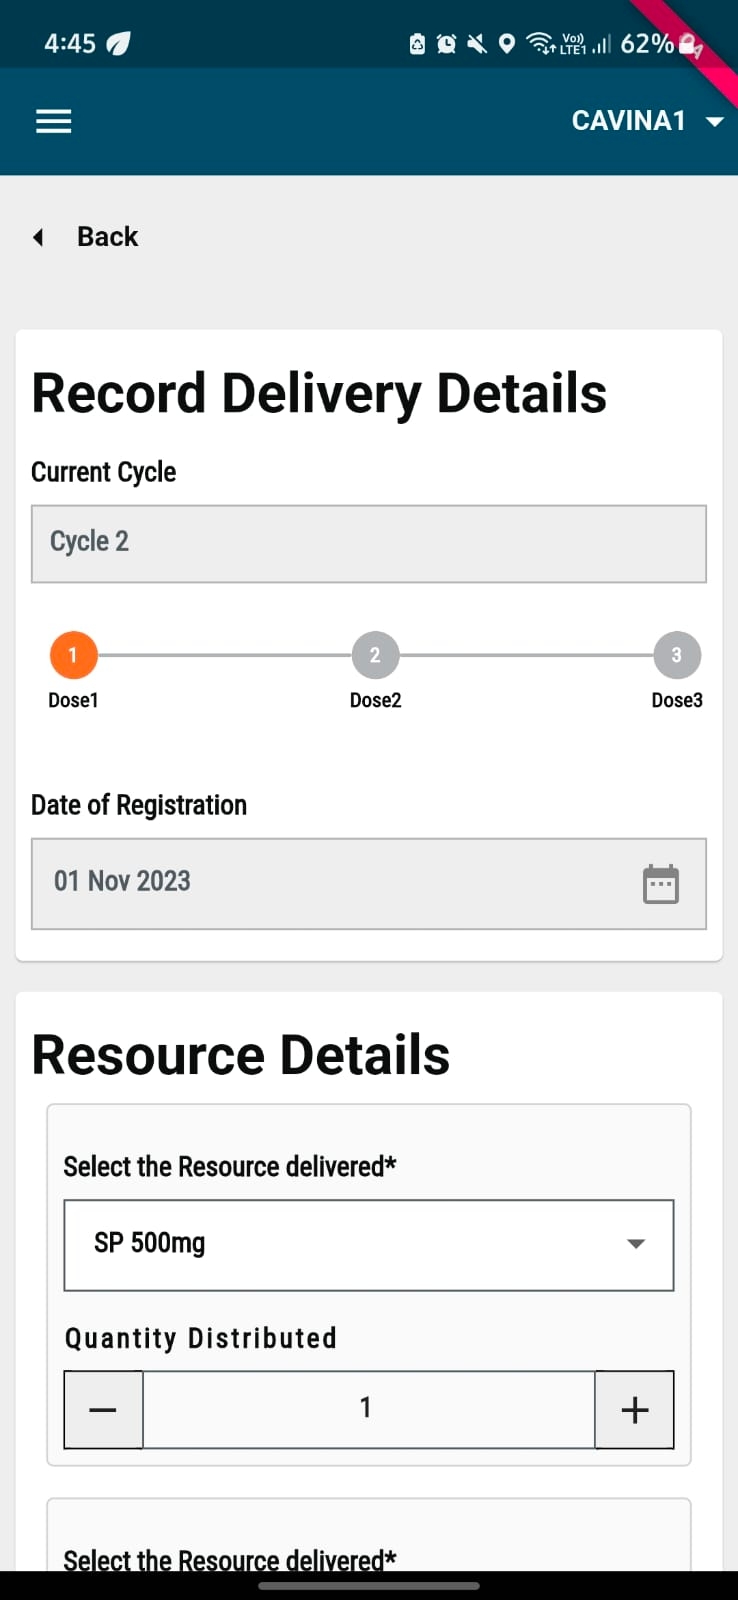
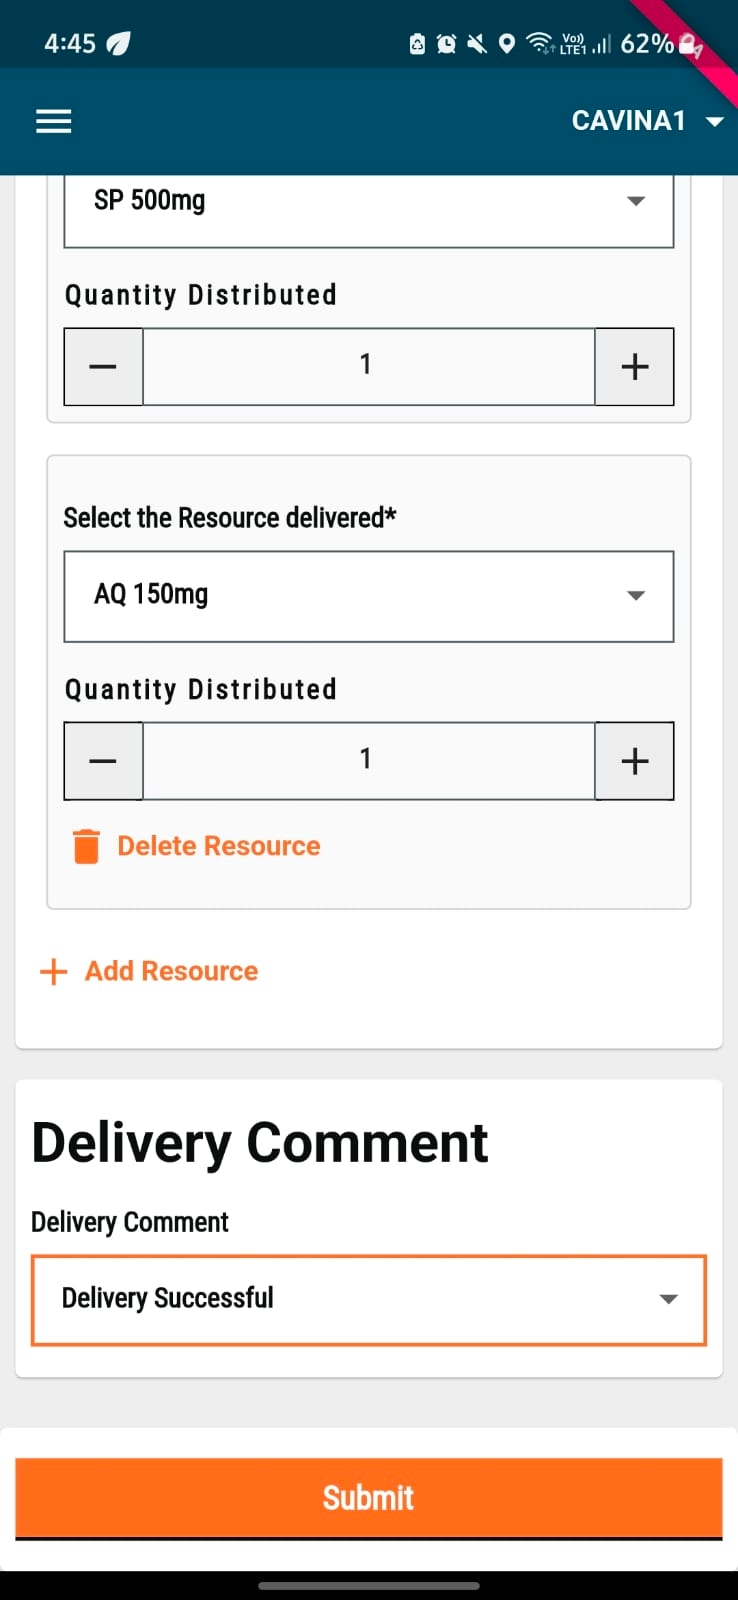
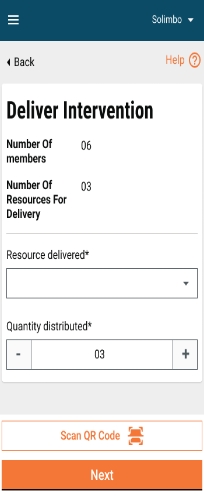
Mobile app to enable the field teams to search for eligible beneficiaries and deliver the healthcare intervention with built in checks that enforce data collection protocols and validations to avoid data entry errors.
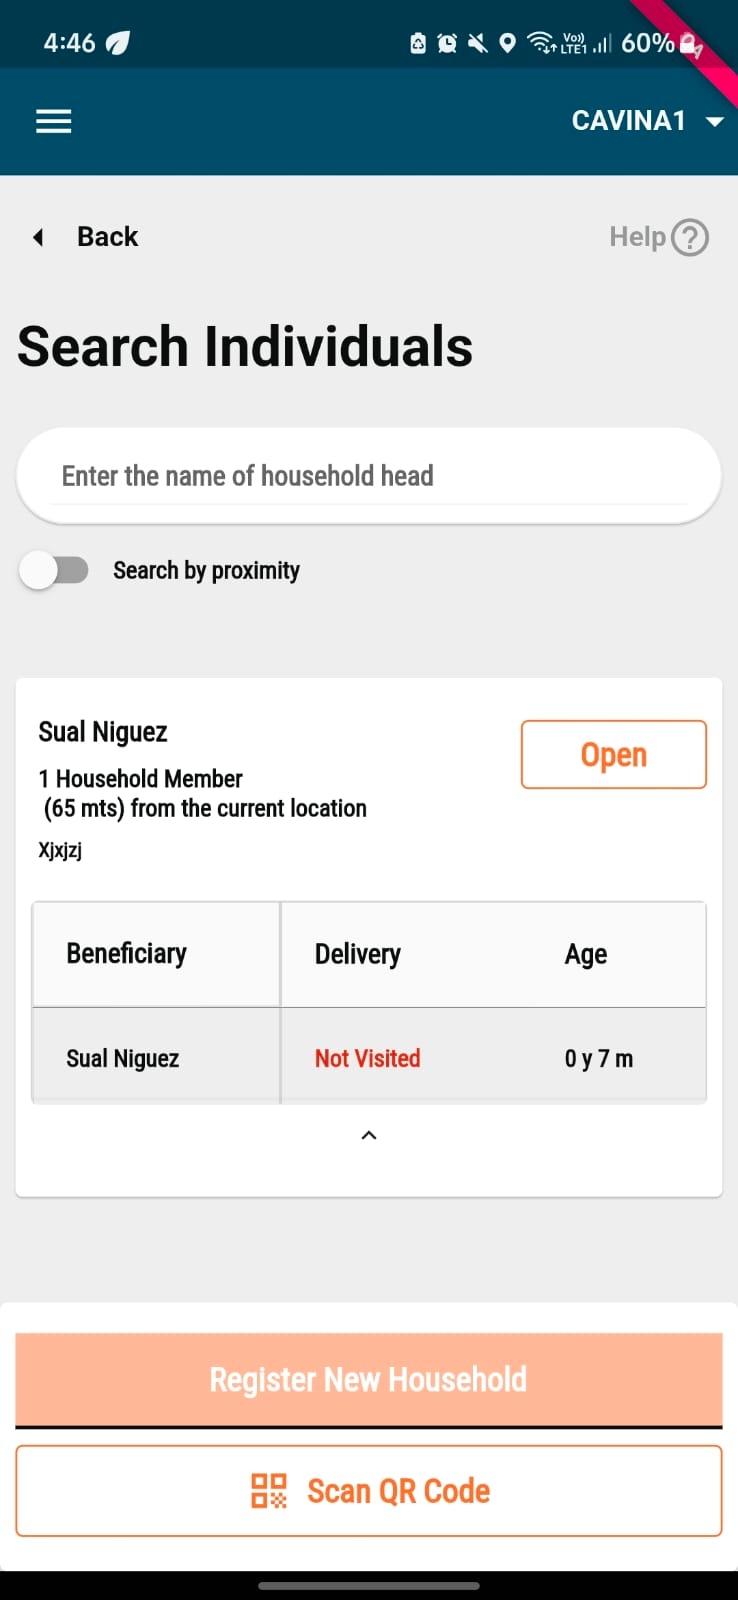
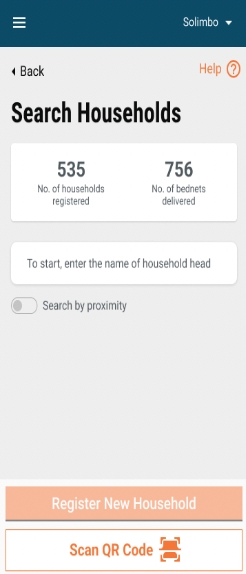
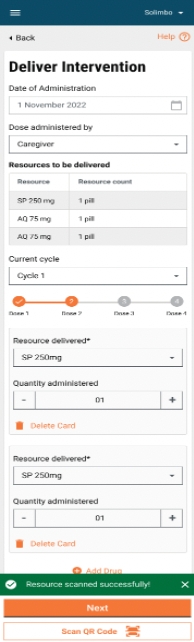
Ability to search registered beneficiaries and deliver benefits (products/services) for a multi round campaign- Supporting the following use cases is now possible:
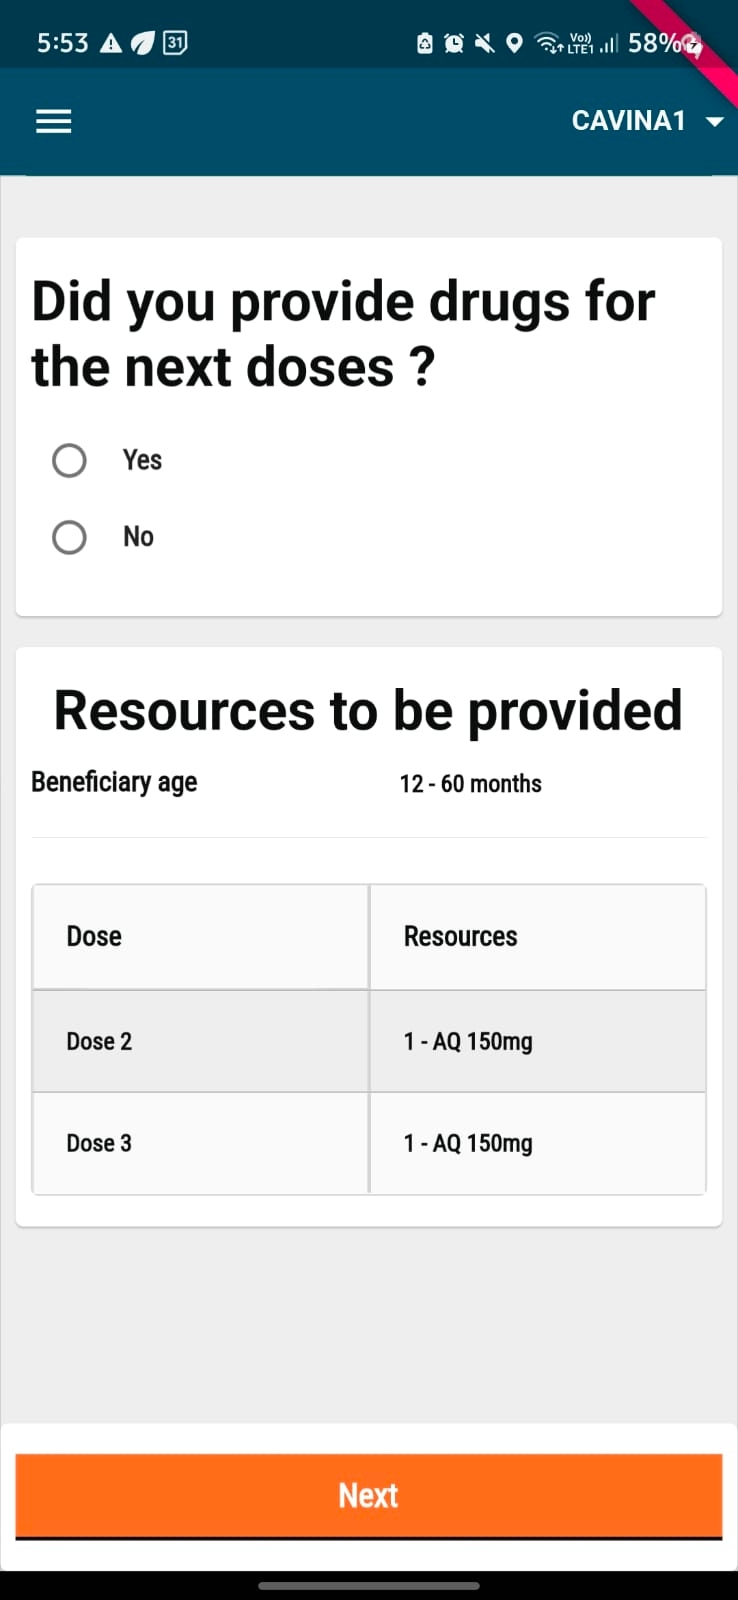
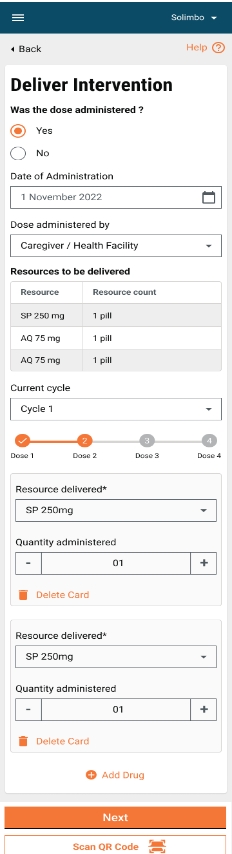
Single Cycle- Single Dose
Single Cycle- Multiple Doses
Multiple Cycles- Single Dose
Multiple Cycle- Multiple Doses
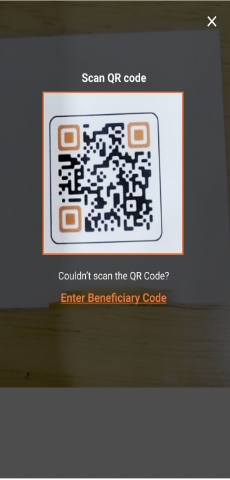
Ability to scan and redeem a voucher during distribution.
Ability to search and filter the beneficiary list based on proximity: Based on distance of the user from the registered beneficiary.
Provide decision support to the use by automatically calculating the number of benefits to be delivered based on configured formula.
Ability to track and record side effects for a campaign beneficiary post resource delivery.
Ability to track and manage beneficiary referrals.
Automated eligibility check for campaign beneficiary: Based on configured parameters, the application determines in the registered individual is eligible for the campaign.
Inventory Management
Mobile app that enables the field staff to capture inflow and outflow of resources received from the warehouse or the supervisors.
Last-mile tracking of resources is now possible and programme supervisors have visibility of stock movement across the supply chain.
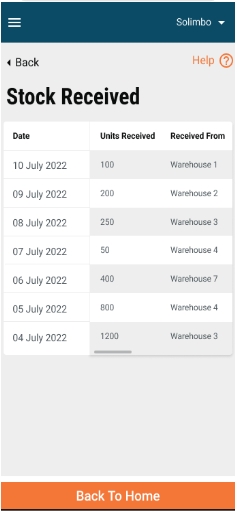
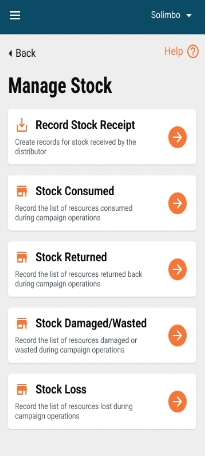
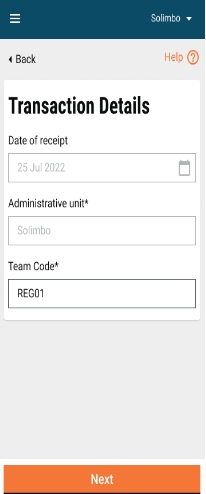
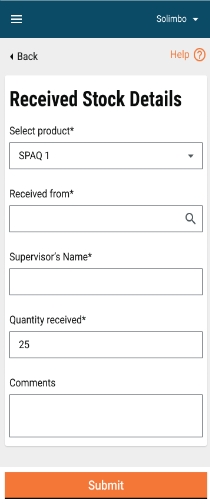
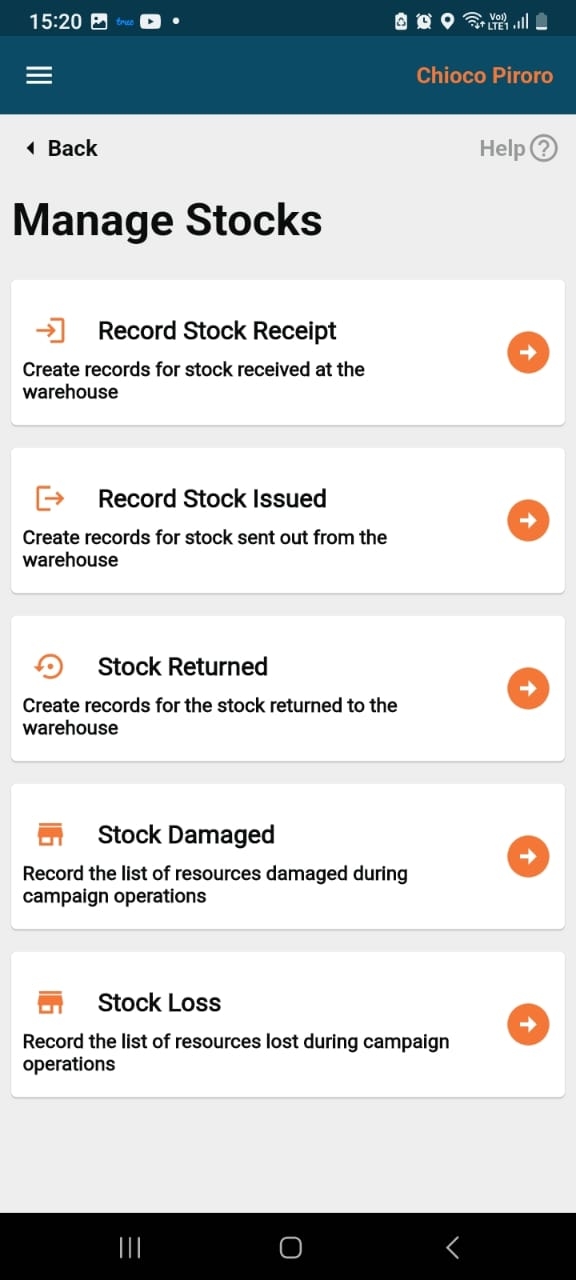
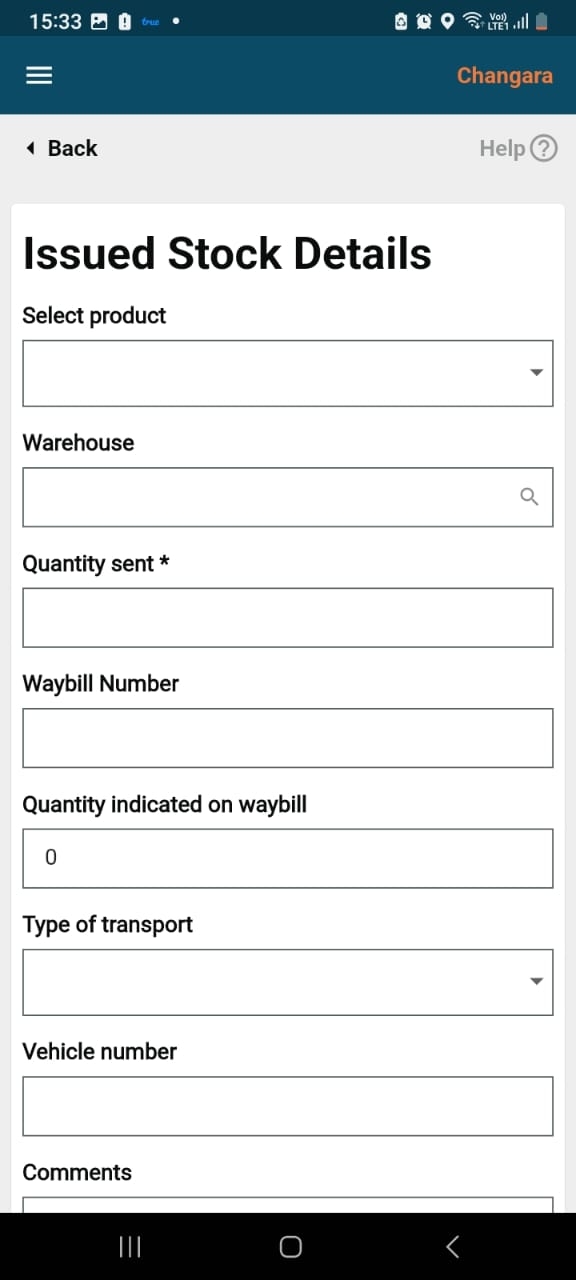
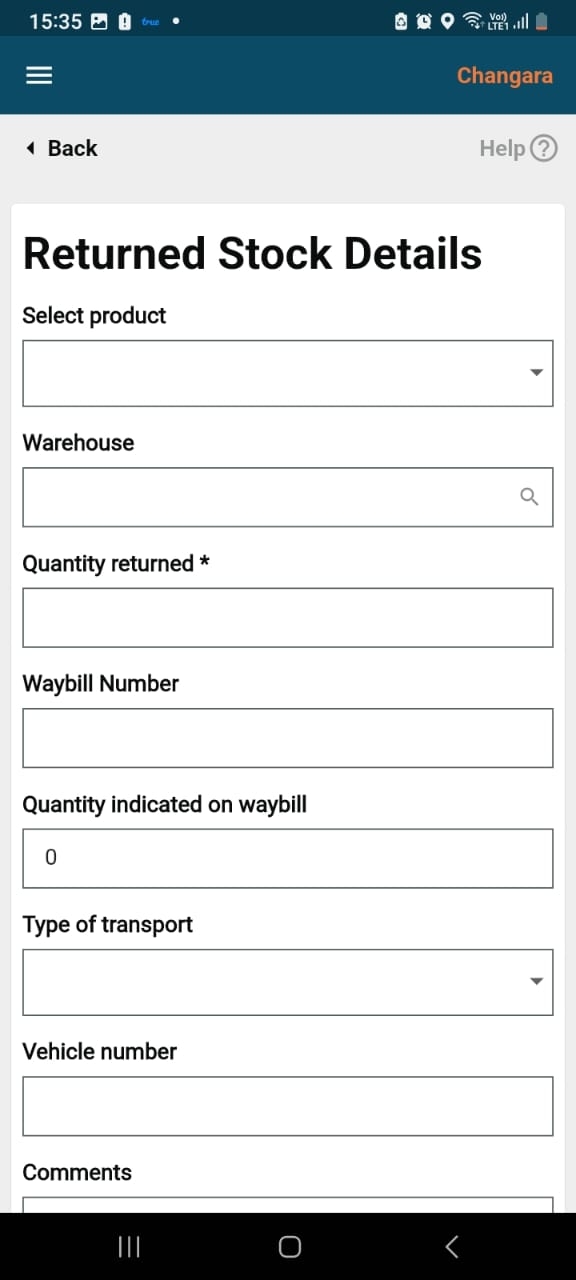
The ability to record stock received from the warehouse/ supervisor as well as issue to other frontline teams.
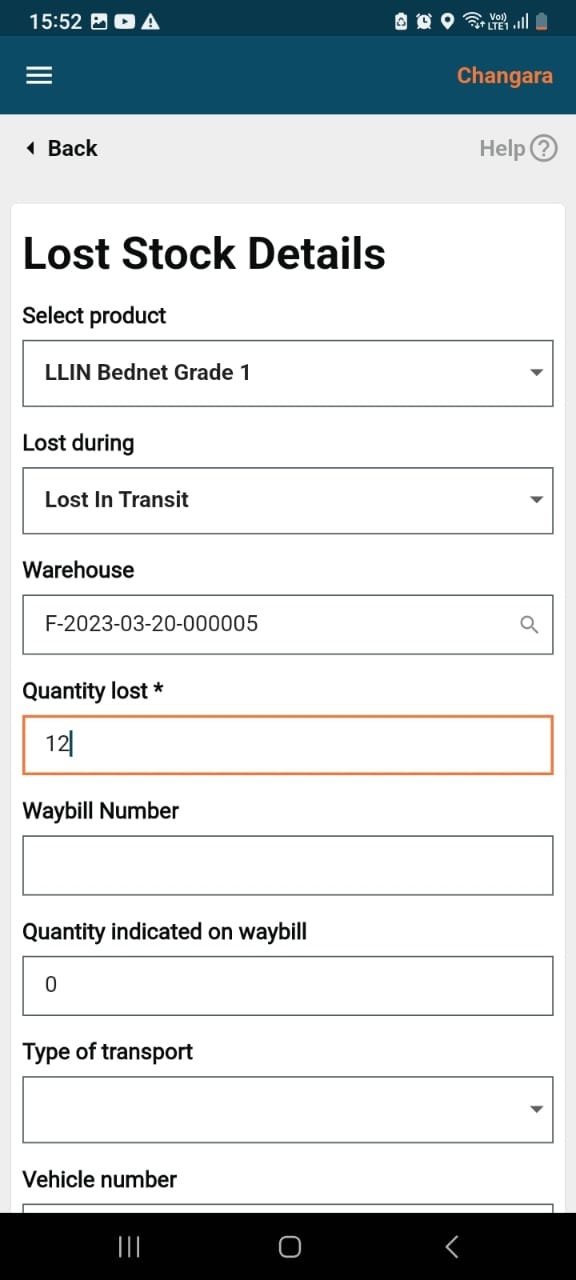
The ability to record stocks that were lost and damaged during field operations.
Sync
Users can now download and reuse beneficiary data synced by other users for one or more boundaries.
The Health Campaign Management V1.0 frontline worker’s app includes four new modules with several features that allow frontline teams to perform their tasks efficiently even when offline. To learn more about the DIGIT Health Platform and the Health Campaign Management (HCM) product, please follow the GitBook link.
Registration
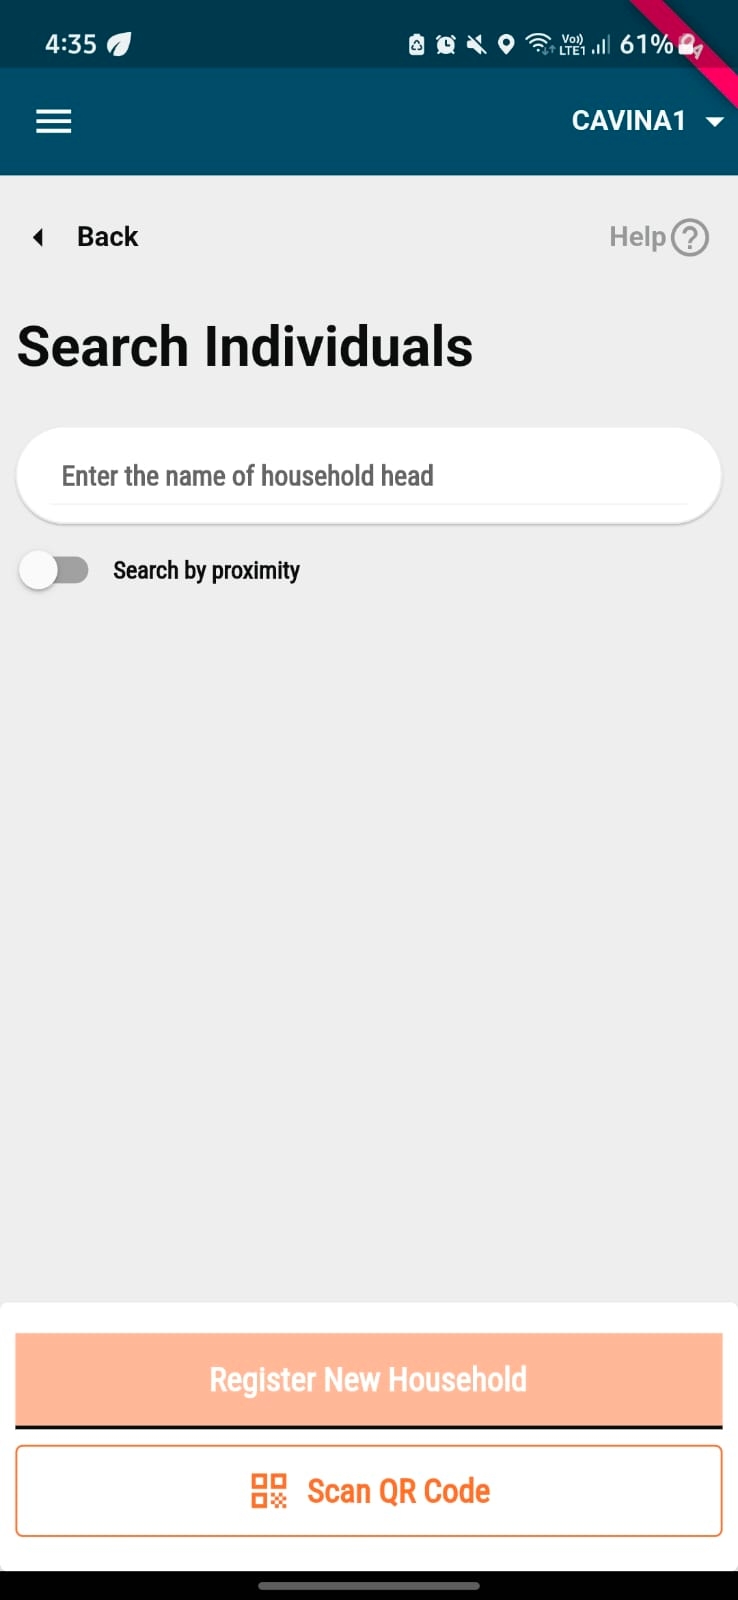
A mobile app that enables the field teams to easily register eligible beneficiaries with built-in checks that enforce data collection protocols and validations to avoid data entry errors. It facilitates the following:
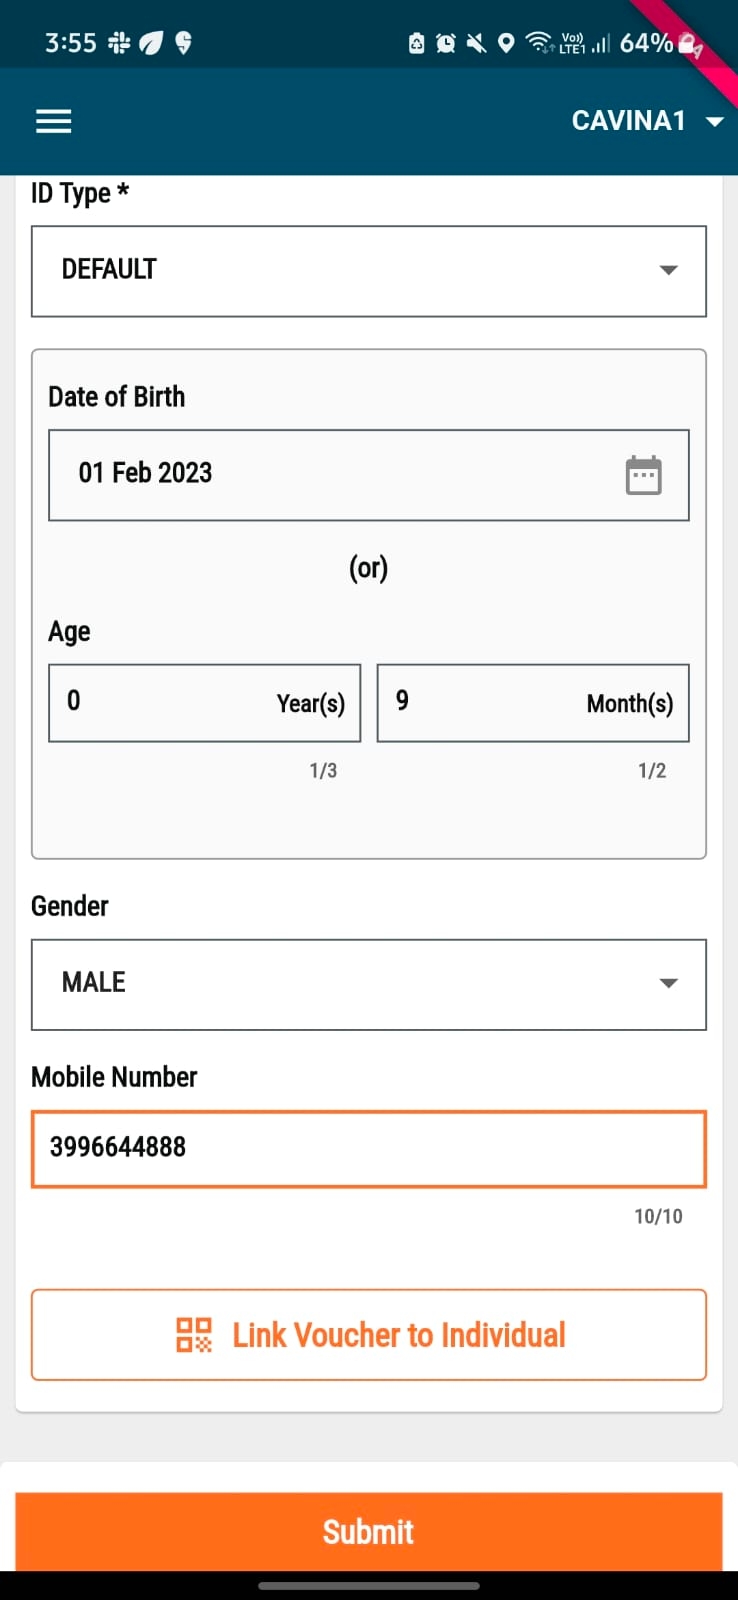
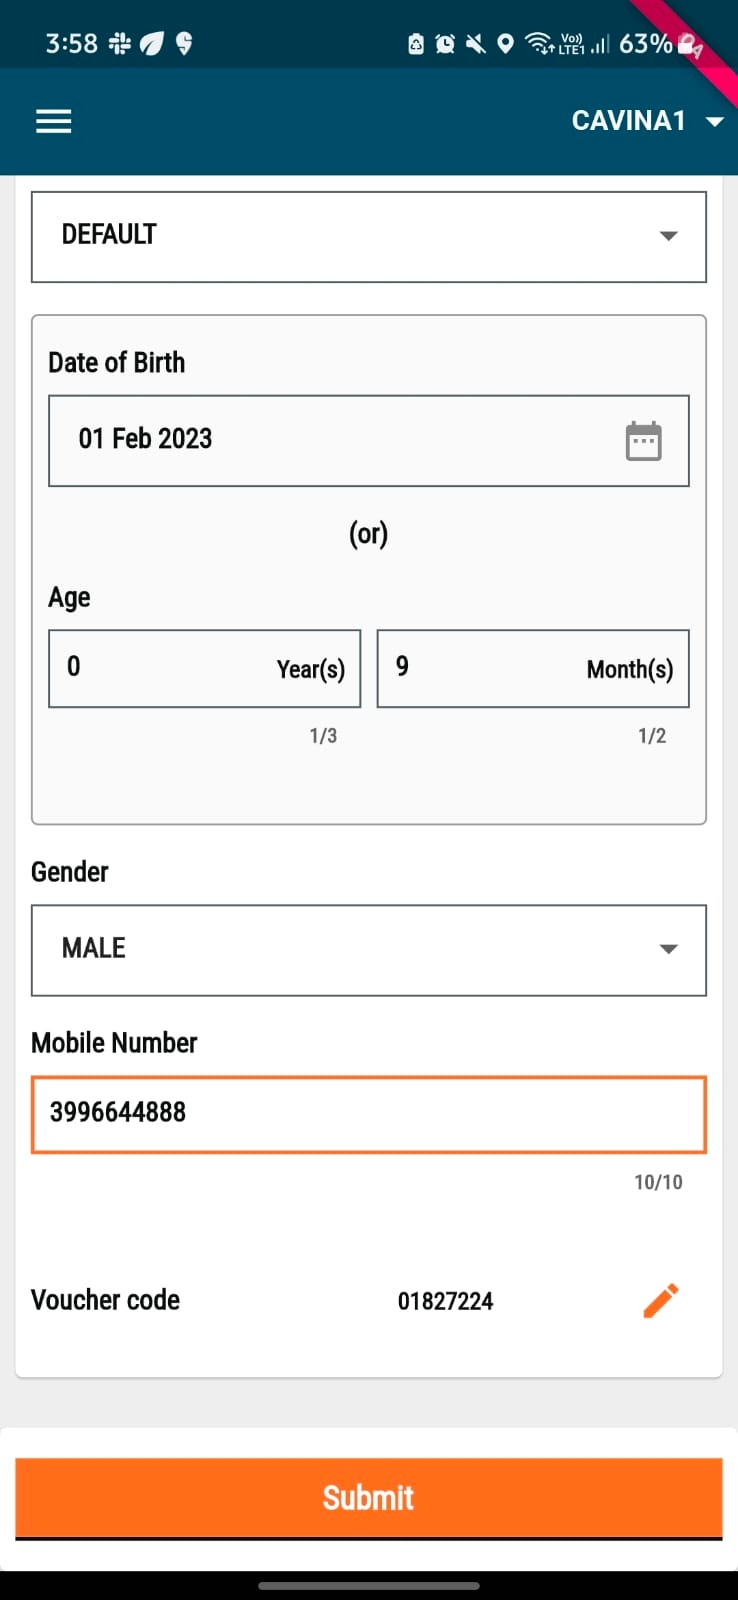
Ability to register new beneficiaries (households and individuals) with the beneficiary’s address along with GPS coordinates, personal details (name, date of birth, gender, ID), and contact details.
Ability to search existing beneficiaries and update details.
Reuse beneficiary data across various health campaigns.
Sync registration data collected while offline on connecting to the internet
Service Delivery
A mobile app to enable the field teams to search for eligible beneficiaries and deliver the healthcare intervention with built-in checks that enforce data collection protocols and validations to avoid data entry errors. It facilitates the following:
Ability to search registered beneficiaries and deliver benefits (products/services) for a single-round campaign.
Ability to configure and deliver multiple products to a beneficiary.
Provide decision support to the user by automatically calculating the number of benefits to be delivered based on the configured formulae
In-app cards with KPI’s to visualise progress against assigned tasks.
Sync registration data collected while offline on connecting to the internet.
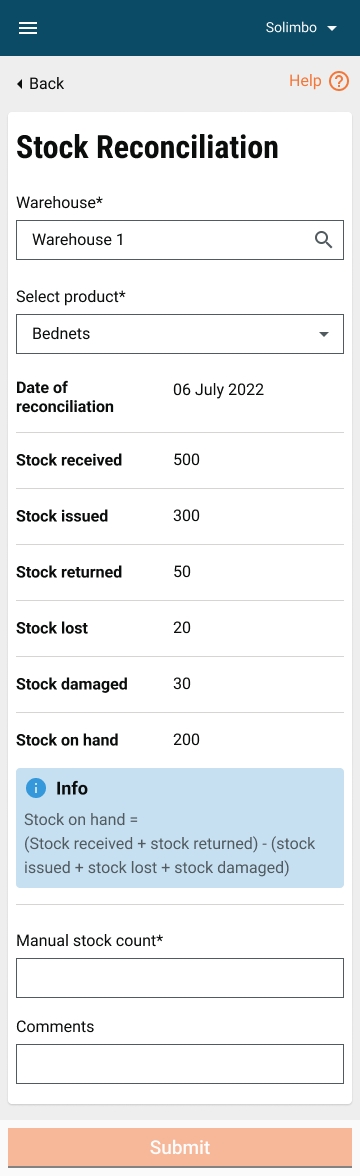
Inventory Management
A mobile app that enables warehouse managers to capture the inflow and outflow of resources from their warehouses to identify potential stockouts, wastage, and fraud, and take corrective action. It facilitates the following:
Ability to record stock received into the warehouse as well as issued to other warehouses or frontline teams.
Ability to record stocks that were lost and damaged either during storage or during transit.
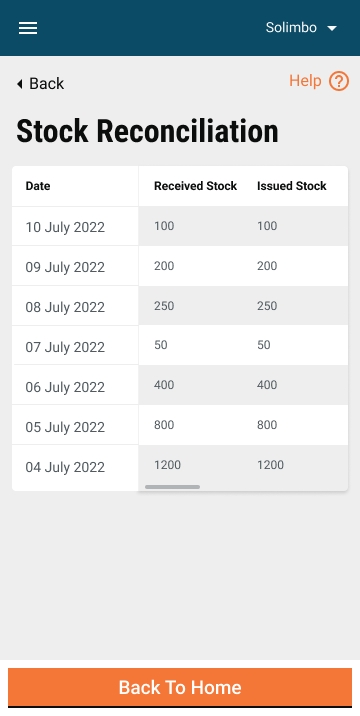
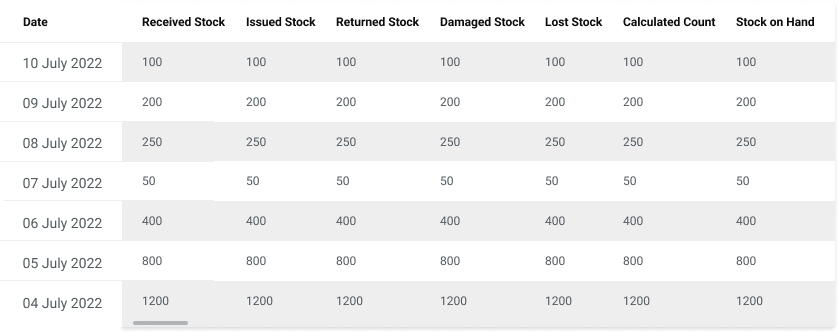
Ability to perform auto-stock reconciliation to provide visibility into available stock on hand.
Sync stock records collected while offline on connecting to the internet.
Supervision (Survey)
A mobile app that enables supervisors to to track the campaign staff's adherence to the campaign’s standard operating protocols, and record observations after the inspection. It facilitates the following:
Ability to configure a checklist with support for the following question types:
- Yes/no type questions (Radio buttons).
- Short answer questions (Text box).
- Long answer questions (Text box).
- Multiple response questions (Checkbox).
Ability to configure basic validations on checklist question.s
Sync checklist responses collected while offline on connecting to the internet.
Click here to access the Jira dashboard.
Field 'type' does not exist or this field cannot be viewed by anonymous users.
The field 'assignee' does not exist or this field cannot be viewed by anonymous users.
A value with ID '10141' does not exist for the field 'project'.
Field 'labels' do not exist or this field cannot be viewed by anonymous users.
The field 'priority' does not exist or this field cannot be viewed by anonymous users.
Not able to sort using field 'priority'.
Click here to view the feedback from the UX audit.
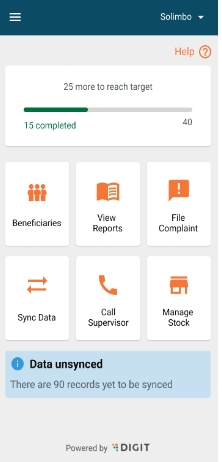
Better user experience for frontline workers leads to better quality data captured in less time, thus facilitating improved efficiency
The ability for frontline workers to access on-demand training, and in-app guided walkthroughs, enabling improved efficiency
Ability to use geospatial tools to analyse and identify missed households. This leads to increased coverage and identification of fraud by frontline workers
Ability to reuse campaign data for planning and executing other campaigns leading to lower costs and lower turnaround time, leading to better estimation and planning
Provide visibility into stock availability and consumption data to enable supervisors to identify leakages/ wastages and avoid potential stock-outs
Track attendance based on task completion – this provides visibility into incentives due based on attendance, reducing ambiguity in payment amounts
Ability to leverage staff registry and attendance tracking to request and release digital payments to campaign staff
Quick setup and launch
The dashboard provides the ability to view better quality data in near real-time that provides actionable insights
Quick and easy integration with existing platforms and systems such as supply chain, HRMS, LMIS, and DHIS2, facilitating interoperability and coordination at scale
Countries own and evolve digit
Here are the articles in this section:
Address
Mandatory
User
Yes
Door number
House number or door number.
O
User
Latitude
Latitude of the address.
O
System
Longitude
Longitude
O
System
Location accuracy
Accuracy of the address, latitude and longitude, in metres.
O
System
Type
Type of address: Permanent, correspondence, other.
R
User
Address Line 1
Apartment, block, street of the address.
O
User
Address Line 2
Locality, area, zone, ward of the address.
O
User
Landmark
Additional landmark to help locate the address.
O
City
City of the address. This can be represented by the tenant ID itself.
R
User
Pincode
Pin code of the address.
R
User
Indian pin codes will usually be all numbers.
Building name
Name of the building.
O
User
Street
Street name.
O
User
Locality
Start date
Campaign start date.
Mandatory
User
Yes
End date
Campaign end date.
Mandatory
User
Yes
Targets
Targets will be provided after the micro-planning exercise
Yes
Beneficiary type
Mandatory
User
Yes
Baseline
The total number of individuals/ households.
Mandatory
User
Yes
Target number
Department
Project department
Mandatory
User
Yes
Description
Description of the project.
Mandatory
User
Yes
Set up tasks to be carried out as a part of the campaign
Tasks
Resources [ ]
Array of resources that are a part of the campaign.
Task resources
Delivery comment
Capture comments regarding the delivery of campaign resources.
Mandatory
User
The final list of reasons to be given by the state/programme during impel
Yes
Status
Status of the task. For example, delivered, not delivered, partial delivery, refused, insufficient, etc.
Mandatory
User
The final list of tasks' status to be given by the state/program during impel.
Yes
Stock details
Product variant ID
The product variant that is being transferred.
Mandatory
User
String
2
64
No
Quantity
The number, or quantity, or the count of units of the product variant that are being transacted.
Mandatory
User
Integer
Outputs from the micro-plan.
Yes
Reference ID
The reference entity for which the stock transfer is taking place.
Mandatory
User
String
No
Reference ID type
The entity type that the reference ID refers to. For example, 'Project'.
Mandatory
User
String
2
64
String
No
Transaction type
The kind of transaction that is taking place: Received, dispatched.
Mandatory
User
String
No
Transaction reason
The status of the transaction: Received, returned, loss.
Mandatory
User
String
No
Transacting party ID
The ID of the party from/to which the product variant stock is being transferred.
Mandatory
User
String
2
64
No
Transacting party type
The type of entity that the transacting party ID refers to. For example, 'Warehouse'.
Mandatory
User
String
2
64
The list of warehouses/facilities and their type to be provided by the program/state during impel.
No
Stock reconciliation
Physical count
The count of units of the product variant as a result of a physical count.
Mandatory
User
Integer
No
Calculated count
The count of units of the product variant that is calculated from the stock movements.
Mandatory
User
Integer
No
Facility details
Facility ID
The ID of the facility where the stock of the product variant is being transferred.
Mandatory
System
String
2
64
List of warehouses/facilities and their type to be provided by the programme/state during impel.
No
Facility name
The administration name of the facility.
Mandatory
User
String
2
2000
Yes
Is it permanent?
Whether the facility is permanent or not.
Mandatory
User
Boolean
Yes
Usage
The purpose of the facility: Storage warehouse, medical facility, sewage treatment plant.
Mandatory
User
Dropdown
Yes
Storage capacity
Physical storage capacity of the facility in cubic metres.
Optional
User
Numeric
Yes
Address
Mandatory
User
String
Checklist
Yes/No/Partially
Reference Link/ETA
Owner
Reviewer
Remarks
The development is complete for all the features that are part of the release.
Yes
Test cases are documented by the QA team, reviewed by product owners, and test results are updated in the test cases sheet.
Yes
The incremental demo of the features showcased during the sprint showcase and feedback is incorporated. If possible, list out the JIRA tickets for feedback.
Yes
23-July-24 Incremental Handover of SMC Dashboard Wednesday, November 27⋅5:30 – 6:15pm
06-Aug-24
SMC Dashboard:: Incremental Demo with Product managers Friday, November 29⋅4:30 – 5:30pm
UI/UX audit review is completed along with feedback incorporation for any changes in UI/UX.
Yes
Admin Console 13-Dec-2024 Microplanning 13-Dec-2024
Andrew Jones have given Signoff
QA sign-off is completed by the QA team and communicated to product owners. All the tickets’ QA sign-off status is updated in JIRA.
Yes
UI, and API technical documents are updated for the release along with the configuration documents.
Yes
UAT promotion and regression testing from the QA team is completed. The QA team has shared the UAT regression test cases with the product owners.
Yes
The API backward compatibility testing is completed.
Yes
Ongoing Testing
The communication is shared with product owners for the completion of UAT promotion and regression by the QA team. The product owners have to give a product sign-off within one week of this communication.
Yes
SMC Dashboard
11-Dec-2024
Micro Planning v0.1
12-Dec-2024
Admin Console v0.3
27-Nov-2024
As part of admin console product owner sign-off has been completed
The UAT product sign-off communication is received from product owners along with the release notes and user guides (if applicable).
Yes
Admin Console v0.3
13-Dec-2024
SMC Dashboard
13-Dec-2024 Microplanning v0.1 15-Dec-2024
As part of admin console product owner sign-off has been completed
The GIT tags and releases are created for the code changes for the release.
Yes
Verify whether the release notes are updated.
Yes
Verify whether all the UAT builds are updated along with the GIT tag details.
Yes
Verify whether all MDMS, configurations, infra-ops configurations are updated.
Yes
Verify whether all docs will be published to http://health.digit.org by the Technical Writer as part of the release.
Partially
Verify whether all test cases are up-to-date and updated along with the necessary permissions to view the test cases sheet. The test cases sheet is verified by the test lead.
Yes
Verify whether the UAT credentials' sheet is updated with the details of new users and roles, if any.
Yes
Verify whether all the localisation data was added in UAT, and updated in the release kits.
Yes
No functional changes were made
Verify whether the product release notes and user guides are updated and published.
Yes
No product functional changes were made
The demo of the released features is done by the product team as part of a sprint/release showcase.
Yes
Several Demos have been given to Solutions team and PO for all Projects of HCM v1.6
Technical and product workshops/demos are conducted by the engineering and product teams respectively to the implementation team (implementation handover).
Yes
Several Demos have been given to Solutions team and PO for all Projects of HCM v1.6
Architect sign-off and technical quality report.
Yes
Verify Bug Bash has been completed
Yes
Gate 2
Yes
16th Dec
The internal release communication along with all the release artefacts are shared by the engineering/ product teams.
Yes
Core
Access control
egov-accesscontrol:v1.1.3-72f8a8f87b-24
Not changed
Encryption service
egov-enc-service-db:v1.1.2-72f8a8f87b-9
Not changed
File store
egovio/egov-filestore:v1.2.4-72f8a8f87b-10
Not changed
Localisation
egov-localization-db:v1.1.3-72f8a8f87b-6
Not changed
ID Gen
egov-idgen-db:v1.2.3-72f8a8f87b-7
Not changed
Indexer
egov-indexer-db:v1.1.7-f52184e6ba-25
Not changed
Location
egov-location-db:v1.1.5-f9271c8-7
Not changed
MDMS
egov-mdms-service:v1.3.2-72f8a8f87b-12
Not changed
Notification mail
egov-notification-mail:health-digit-master-6865af2823-2
Not changed
Notification SMS
egovio/egov-notification-sms:v1.1.3-48a03ad7bb-10
Not changed
OTP
egov-otp-db:v1.2.2-72f8a8f87b-12
Not changed
Persister
egov-persister:v1.1.5-3371bc2-5
Not changed
Searcher
egovio/egov-searcher:v1.1.5-72f8a8f87b-16
Not changed
URL shortening
egov-url-shortening-db:v1.1.2-1715164454-3
Not changed
User
egov-user-db:health-digit-dev-f2ddde9-32
Not changed
User OTP
egovio/user-otp:health-digit-master-6865af2823-3
Not changed
Workflow
egov-workflow-v2-db:v1.2.1-df98ec3c35-2
Not changed
Report
egovio/report:v1.3.4-96b24b0d72-16
Not changed
Document uploader
egov-document-uploader-db:v1.1.0-75d461a4d2-4
Not changed
Audit service
audit-service:audit-heatlh-40b1a4018a-1
Not chnaged
Error handler
error-handler:master-impel-dump-5022b7acff-1
dashboard-analytics
dashboard-analytics:master-impel-f705ac483a-48
dashboard-ingest
dashboard-ingest:v1.1.4-72f8a8f87b-10
Individual
egovio/individual:v1.1.3-69baa2050a-190
Changed
Household
egovio/household:v1.1.1-b78923bee4-103
Not changed
Facility
egovio/facility:v1.1.0-73167482a2-28
Not changed
Product
egovio/product:v1.1.0-73167482a2-12
Not changed
Project
egovio/project:v1.1.2-69baa2050a-199
Changed
Stock
egovio/stock:v1.1.2-69baa2050a-87
Changed
Referral management
egovio/referralmanagement:v1.0.1-69baa2050a-105
Changed
Service request
egovio/service-request:v1.0.0-a51bee1435-7
Not changed
Transformer
egovio/transformer:v1.1.0-73167482a2-38
Not changed
Complaints
pgr-services:v1.1.7-f58e5abb0d-8
Not changed
User management
egov-hrms:v1.2.6-ac8c591238-4
Changed
Attendance
attendance:v1.0.0-2c51c532-54
Changed
Health Campaign Management (HCM) aims to expand capabilities in public health. It covers campaign setup, planning, registration and delivery, inventory management, and real-time data dashboards enabling the establishment of digital public health infrastructure for faster and cost-effective health campaigns. DIGIT HCM is designed to evolve rapidly and adapt to local needs while addressing systematic challenges. It enables decision-makers and programme managers to streamline campaign planning, manage workflows and monitor service delivery in real-time to aid data-driven decision-making.
Health campaigns are a commonly used strategy that helps the routine health system prevent or control diseases by delivering essential healthcare interventions in a time-bound manner.
Health campaign management faces several challenges, which include the inability to fetch accurate population targets or monitor the campaigns in real-time and tune the campaign to the defined population needs. Lack of timely and actionable data is often the primary cause of operational inefficiency. Additional concerns relate to siloed, redundant datasets adding to the implementation costs.
There is a need for a campaign management product that offers:
The goals include:
Increased campaign effectiveness (coverage)
Reduced time to respond to outbreaks
Improved efficiency (lower costs)
Increased transparency and accountability
Watch the video below to find out how Health Campaign Management meets the above goals and more:
Setup campaigns in 3 days
Run hundreds of campaigns simultaneously
Record bednet delivery in 1 minute
Real-time campaign data dashboards
Interoperability with any system
Reusable campaign setup
Data privacy by maintaining control over data from day one
Find the Product Capability Roadmap below:
To see a detailed version of this roadmap, click here.
Role action mapping has only been completed for registrars, distributors, and system administrators to support the development of registration and delivery flows. Other roles are still in progress.
Health
MDMS
Config
Devops
Localisation
Boundary code
This is a code for the sub-classification of a particular boundary. It should be unique across all boundaries defined.
Mandatory
MDMS
String
2
64
Yes
Boundary name* (In English)
The name of the boundary that is being defined in the English language.
Mandatory
MDMS
String
2
256
Yes
Boundary name* (In local language)
The name of the boundary that is being defined in the local language of the state. For example, Portuguese, Hindi, etc.
Mandatory
MDMS
String
2
256
Yes
Parent boundary code*
This is the boundary code of the parent which identifies to which parent the child belongs to.
Mandatory
MDMS
String
2
64
Yes
Boundary type*
The name of the boundary type, that is, ward, zone, etc.
Mandatory
MDMS
String
2
256
Yes
Hierarchy type code*
The code of the boundary hierarchies for which this particular boundary is defined.
Mandatory
MDMS
String
2
64
Yes
Campaign start date
The date when the campaign starts in the respective boundary.
Mandatory
MDMS
Date
Yes
Campaign end date
The date when the campaign is supposed to end in the respective boundary.
Mandatory
MDMS
Date
Yes
Total households
Total households present in the boundary (as per the micro-plan).
Mandatory
MDMS
Numeric
Yes
Targeted households
Total households targeted for the respective boundary (as per the micro-plan).
Mandatory
MDMS
Numeric
Yes
Total individuals
Total individuals present in the boundary (as per the micro-plan).
Mandatory
MDMS
Numeric
Yes
Targeted individuals
Total individuals targeted in the boundary (as per the micro-plan).
Mandatory
MDMS
Numeric
Yes
Bed nets estimated to be delivered
Total bed nets estimated to be delivered in the boundary (as per the micro-plan).
Mandatory
MDMS
Numeric
Yes
Serial number
The sequence number for the list.
Boundary hierarchy type
The meaningful name to define a group of boundaries defined to perform one function.
Mandatory
MDMS
String
2
256
Yes
Code
A code is used to identify a certain classification of the type of boundary hierarchy.
Mandatory
MDMS
String
2
64
Yes
Description
Mandatory
MDMS
String
2
256
Yes
Stock details
Product variant ID
The product variant that is being transferred.
Mandatory
User
String
2
64
No
Quantity
The number, or quantity, or the count of units of the product variant that are being transacted.
Mandatory
User
Integer
Outputs from the micro-plan.
Yes
Reference ID
The reference entity for which the stock transfer is taking place.
Mandatory
User
String
No
Reference ID type
The entity type that the reference ID refers to. For example, 'Project'.
Mandatory
User
String
2
64
String
No
Transaction type
The kind of transaction that is taking place: Received, dispatched.
Mandatory
User
String
No
Transaction reason
The status of the transaction: Received, returned, loss.
Mandatory
User
String
No
Transacting party ID
The ID of the party from/to which the product variant stock is being transferred.
Mandatory
User
String
2
64
No
Transacting party type
The type of entity that the transacting party ID refers to. For example, 'Warehouse'.
Mandatory
User
String
2
64
The list of warehouses/facilities and their type to be provided by the program/state during impel.
No
Stock reconciliation
Physical count
The count of units of the product variant as a result of a physical count.
Mandatory
User
Integer
No
Calculated count
The count of units of the product variant that is calculated from the stock movements.
Mandatory
User
Integer
No
Facility details
Facility ID
The ID of the facility where the stock of the product variant is being transferred.
Mandatory
System
String
2
64
List of warehouses/facilities and their type to be provided by the programme/state during impel.
No
Facility name
The administration name of the facility.
Mandatory
User
String
2
2000
Yes
Is it permanent?
Whether the facility is permanent or not.
Mandatory
User
Boolean
Yes
Usage
The purpose of the facility: Storage warehouse, medical facility, sewage treatment plant.
Mandatory
User
Dropdown
Yes
Storage capacity
Physical storage capacity of the facility in cubic metres.
Optional
User
Numeric
Yes
Address
Mandatory
User
String
Name*
The name of the user who wants access to the system.
Mandatory
User
String
2
2000
Mobile No.*
Mobile number of the user.
Mandatory
User
Numeric
2
15
Length validation- Specific to Impel
Current HRMS specs are designed for Indian phone number formats and would need updates.
Yes
Father/Husband's Name*
Name of the user's husband or father.
Mandatory
User
String
2
2000
Yes
Gender*
Gender of the user being registered.
Mandatory
User
String
2
64
Yes
Date of Birth*
Date of birth of the user being registered.
Mandatory
User
Date
10
10
Date of birth cannot be in the future.
Yes
Email ID of the user being registered.
Optional
User
String
8
64
Yes
Correspondence Address*
Address of the user being registered.
Mandatory
User
String
256
Yes
ULB*
ULB assigned to the user where the user is supposed to perform tasks assigned to him/her.
Mandatory
User
String
256
Yes
Role*
Role assigned to the user to enable him/her to carry out his/her tasks and access the required data and services.
Mandatory
User
String
256
Every user must have at least 1 role assignment.
Yes
Employment Type*
The employment types indicate the type of contract which he/she holds with the organisation. This indicates whether he/she is a permanent employee or a contract employee for a short period. Select the relevant employment type: 'Permanent', 'Temporary', “DailyWages” and 'Contract'.
Mandatory
User
String
256
Yes
Current assignment
The current assignment type is to indicate whether the employee is currently assigned to a particular department and designation. A user can be also be assigned multiple assignments to perform his/her function.
Mandatory
User
String
64
Yes
Status*
The status indicates the type of status which he/she holds, whether employed or not within the organisation.
Mandatory
User
String
256
Yes
Hierarchy *
The hierarchy indicates the hierarchy type for the boundary to which he/she is assigned.
Mandatory
User
String
256
Yes
Boundary Type *
The boundary type indicates assigning a city to his/her role within the organisation. A user can be assigned multiple boundary types to perform in different functions. Example: City, zone, block, and locality.
Mandatory
User
String
256
Yes
Boundary *
The boundary indicates assigning a particular city to his/her role wherein they perform the role function of the application for the particular city. A user can be assigned multiple boundaries to perform in a different location. Example: City name, and tenant zone.
Mandatory
User
String
256
User must be assigned to atleast 1 boundary.
Project boundary must take precedence over user boundary assignment.
Yes
Assigned from Date*
The assigned from date indicates the date from which his/her role is assigned to perform the role function assigned.
Mandatory
User
Date
10
Yes
Department*
The department indicates the particular department to which his/her role is assigned to.
Mandatory
User
String
256
Yes
Designation*
The designation indicates a particular designation that is assigned to his/her role.
Mandatory
User
String
256
Not required for HCM.
Yes
Household details
ID
Unique system-generated GUID.
Mandatory
System
String
2
64
No
Client reference ID
Unique client-generated GUID.
Mandatory
Client generated
String
2
64
No
Household ID
The ID of the household.
Mandatory
User/system
String
2
64
No
Member count
The total number of individuals in a household.
Mandatory
User
Numeric
1
1000
A household can be created only when it has at least 1 individual assigned to the household.
Individual ID
The ID of the individual
Mandatory
User/system
String
2
64
Individual details
ID
Unique system-generated GUID.
Mandatory
System
String
2
64
No
Client reference ID
Unique client-generated GUID.
Mandatory
Client generated
String
2
64
No
Name of the individual
Name of the individual being registered as the given name, family name, and other names.
Mandatory
User
String
2
200
No
Head of the household
Capture if the registered individual is also the head of the household.
Mandatory
User
Boolean
No
Type of ID
Capture the type of ID.
Mandatory
User
Array
The list of IDs to be given by the programme/state during impel. If no forms of ID are allowed, then a system generated ID is to be selected for the ID type.
Identity number
Capture the ID number belonging to the beneficiary.
Mandatory
User
String
2
64
If the individual has no forms of ID, then a unique system generated ID must be assigned.
Validations for specific ID types to be built during impel depending on the list of acceptable IDs.
Date of birth
Date of birth in DD/MM/YYYY format.
Optional
User
String
The DoB cannot be in the future. Error Message: DoB cannot be in the future.
Age
The age of the individual.
Optional
User
Integer
If DoB is not known, allow the user to enter his/her age.
Contact number
The mobile number of the registered individual.
Optional
User
Integer
Any validations on mobile numbers to be built during impel as per country-specific requirements.
Gender
Gender of the registered individual.
Optional
User
String
A product allows three types of genders: male, female and other. Adding/deleting from this list to be done during impel in accordance with country-specific requirements.
System administrator
1. Define the campaign type (project type). 2. Create campaign(s) (projects). 3. Create products. 4. Create product variants. 5. Assign product variants as campaign resources. 6. Create, search, update, and deactivate user accounts. 7. CRUD other system administrator accounts. 8. Create, assign, update, delete role assignments. 9. Create, assign, update, delete campaign assignments. 10. Define MDMS configurations (including the project type). 11. Create localisation. 12. Create, search, edit, and delete checklists. 13. Assign checklists to projects. 14. Edit/delete filled checklists. 15. Boundary setup.
Registrar
Frontline worker (FLW) who is responsible for registering households. The registrar also shares awareness messages (SBCC).
1. Create a new household. 2. Create a new individual. 3. Map individuals to households. 4. Assign household/individual as the beneficiary of a campaign. 5. Read, update, and delete for all actions mentioned above. 6. View offline reports. 7. Create, and view complaints.
Distributor
Frontline worker (FLW) who is responsible for registering households and updating the service delivery details against the registered households. The registrar also shares awareness messages (SBCC).
1. Create a new household. 2. Create a new individual. 3. Map individuals to households. 4. Assign a household/individual as the beneficiary of a campaign. 5. Update service delivery against the beneficiary (household/ individual). 6. Read, update, and delete for all actions mentioned above. 7. View offline reports. 8. Create, and view complaints.
Field supervisor
Responsible for monitoring the field teams. This user is also responsible for training the FLW teams, monitoring the field team's progress during campaign execution, managing stocks at the community warehouse, and performing random inspections during the campaign execution.
1. View assigned checklists. 2. Fill assigned checklists.
National supervisor
Supervisors are responsible for overseeing the campaign operations, conducting random and scheduled inspections, filling supervision checklists, supporting field supervisors to tackle operational issues under their jurisdictions, and training users on campaign SOP and digital tools.
1. View assigned checklists. 2. Fill out assigned checklists. 3. View completed checklists. 4. Create, search, update and deactivate user accounts (except the system admin). 5. Assign, or update, or delete role assignments. 6. Assign, or update, or delete campaign assignments. 7. View the national-level dashboard page. 8. Select and view the dashboard for each province. 9. View indicators and visualisations district-wise for each province. 10. Drill-down charts to view the metrics upto the lowest boundary level (village). 11. Filter dashboard indicators by the date range. 12. Share dashboard pages/visualisations by email/WhatsApp. 13. Download dashboard pages/visualisations as PDF/JPG. 14. View the offline Excel reports at specified intervals. 15. View the checklists completion rate for the country across all levels of supervisors (national, province, district, and field).
Provincial supervisor
Supervisors are responsible for overseeing the campaign operations, conduct random and scheduled inspections, fill supervision checklists, supporting field supervisors to tackle operational issues under their jurisdictions, and training users on campaign SOP and digital tools.
1. View assigned checklists. 2. Fill out assigned checklists. 3. View completed checklists. 4. Create, search, update, and deactivate user accounts (except for the system admin). 5. Assign, or update, or delete role assignments. 6. Assign, or update, or delete campaign assignments. 7. View the province-level dashboard page. 8. View indicators and visualisations district-wise for the province. 9. Drill-down charts to view the metrics upto the lowest boundary level (village). 10. Filter dashboard indicators by the date range. 11. Share dashboard pages/visualisations by email/WhatsApp. 12. Download dashboard pages/visualisations as PDF/JPG. 13. View the offline excel reports at specified intervals. 14. View the checklists completion rate for the assigned province across all levels of supervisors (national, province, district, and field).
District Supervisor
Supervisors are responsible for overseeing the campaign operations, conducting random and scheduled inspections, filling supervision checklists, supporting field supervisors to tackle operational issues under their jurisdictions, and training users on campaign SOP and digital tools.
1. View assigned checklists. 2. Fill out assigned checklists. 3. View completed checklists. 3. Create, search, update, and deactivate user accounts (except for the system admin). 4. Assign/update/delete role assignments. 5. Assign/update/delete campaign assignments. 6. View the district-level dashboard page. 8. View indicators and visualisations, administrative post-wise, for the district. 9. Drill down charts to view the metrics upto the lowest boundary level (village). 10. Filter dashboard indicators by the date range. 11. Share dashboard pages/visualisations by email/WhatsApp. 12. Download dashboard pages/visualisations as PDF/JPG. 13. View offline excel reports at specified intervals. 14. View the checklists completion rate for the assigned district across all levels of supervisors (national, province, district, and field).
Warehouse manager
1. Record stock transactions: Create receipt, issues, and returns. 2. View stock reconciliation (system calculated). 3. Submit the reconciliation form. 4. View offline reports for inventory reconciliation.
Programme manager
This user consumes the data collected and shared by the FLW and takes decisions based on the data present. This user must have access to all dashboards with the default view of the data belonging to their jurisdiction and a level below. For example, a provincial manager must be able to view the aggregated data from the entire province as well as the data for individual districts after logging into the system.
Help desk user
Supports an executive to resolve, routes complaints raised during the campaign. This user also helps in user management requests.
1. Create, view complaints. 2. Resolve complaints, assign complaints, and reject complaints. 3. Create, search, update, and deactivate user accounts (except for the system admin). 4. Assign/update/delete role assignments. 5. Assign/update/delete campaign assignments.
A digital partner for different users such as registrars, frontline workers, and supervisors, this is an easy-to-use app with offline capability, guided user flows, and analytics support. It simplifies routine tasks, has built-in checks to reduce errors, and provides on-call assistance.
The app enables the following:
Register new households and individuals.
Search existing households and individuals
Update details for existing households and individuals.
Record service delivery of healthcare interventions to households and individuals for a single round campaign.
Auto-calculation of resources to be delivered to a household or individuals based on the configured rule.
Record stock movement for a warehouse-stock received, issued, returned, damaged and lost.
Stock reconciliation to automatically calculate the stock on hand available in the warehouse.
Offline reports for viewing all stock transactions and stock counts in the mobile application.
Register complaints on the mobile app with offline support.
Search, sort, and filter complaints based on configured parameters.
Configurable checklists for supervisors for various supervision activities.
Multi-language support.
Track GPS coordinates to record locations with offline support.
Progress bar for monitoring the daily work status of registration and service delivery against the targets assigned.
Reuse beneficiary data from the registries for future campaigns.
Web portal for user management.
In-app notification to prompt users to perform actions that are due.
Click on the links below to learn more about the different features of the app:
Here are the articles in this section:
Public health initiatives intended to address particular health-related concerns within a predetermined timeframe or scope, and in a single round. Click on the link below to learn more:
These are standard features that can be used as-is across any campaign depending on the requirement, with minimal configurations, and can be shared with other products/services as well.
Click on the links below to learn more:
Multi-round campaigns for health initiatives entail registering beneficiaries once, followed by interventions delivered in successive rounds at predefined intervals. Click on the link below to learn more:
Here are the articles in this section:
An illustrative guide to using the Voucher Scanning Module
Supports voucher scanning use cases for Beneficiary Registration, Service Delivery and Bed Net verification use cases.
Enables actors to execute the registration and delivery process efficiently through the use of scanners.
Code scanning capability provides better user experience by auto populating the data, thus reducing the time and effort.
Allows manual entry of codes to ensure maximum data collection, with defined validations.
Prevents duplication of records and monitor resources by linking beneficiaries to their respective codes and reusing it while registering a new beneficiary or distributing resources. One can also monitor the quantity of stock distributed by scanning the code available on the stock.
Allows multiple scanning of resource at once.
Registrars/Distributors
Scan and link vouchers to households during registration
Enter the voucher code manually
Scan and retrieve household details to deliver intervention
Scan the resource code during delivery
Provide direct healthcare services, communicate SBCC information, and support to communities. Usually operate in teams and within a specified boundary.
Warehouse Managers
Scan the stock resource cards while receiving (Can be used for other transactions but is not preferred)
Scan multiple resources at once.
Enter the code manually
A warehouse manager is responsible to manage the stock and record all the transactions that take place within the assigned warehouse/facility.
After logging into the application, the user lands on this screen which displays the daily performance (number of households registered). The progress bar must reset daily at 00:00 hours and start from 0 registrations. The action buttons related to the beneficiary include:
Beneficiaries
View Reports
Sync Data
Call Supervisor
File Complaint
At the bottom, there is a card that shows how many records are unsynced for the user’s convenience to sync data. If all the records are synced, then the card must say: “All records are synced”.
The help button is on every screen of the application. By clicking on it, a user can get a walkthrough of the elements on that screen.
On the top right, the administrative area assigned to the user is displayed which is based on the level of hierarchy. The hamburger button on the top left corner covers some other actions mentioned further.
On this screen, a user can search for a registered beneficiary or register a new one. There are multiple options included to search for a beneficiary: search by name, proximity, and scan a code. The metrics card shows the data for beneficiaries registered and the number of resources delivered, depending on the type of campaign.
Clicking on the scan button on the search household screen opens a scanner that allows a user to scan the voucher code provided to the beneficiary during registration. The user can also enter the code manually by clicking on the “Enter Beneficiary Code” button, if the device is unable to scan.
Based on the campaign type, the beneficiary card is opened with a set of actions for the scanned beneficiary. The user can close the scanner if needed by clicking on the close button.
While creating a beneficiary, the user can link the beneficiary to the voucher card provided during registration by clicking on the “Link Voucher to Individual” button. If the scanner is not able to scan the code, the user can also enter the details manually. Screens for the scanner are same as that for search beneficiary.
On successful scanning, the toast message appears over the individual details screen and the voucher code is displayed. In case the scanned code does not match with the one mentioned in the voucher, the user can click on the edit button and rescan or re-enter the code. The previously scanned value must be overwritten by the latest one (No multiple scanning to be done).
While delivering any resource to the beneficiary, the user must scan the code provided on the packaging of the resource. The scanner must be able to identify duplicate scans and must not scan the same voucher multiple times. The user can perform multiple scans at a time, but the number must not exceed the value provided by the user in the “Quantity Distributed” field.
The scanner screen has an expandable card that provides the list of resources scanned. The card displays the count of resources scanned along with the identification number for each scanned resource. If one is unable to scan, the user can enter the codes manually, but after every code, he/she must click on the enter beneficiary code again and repeat the process. The user can remove any resource by the help of the delete button provided against each resource. Once scanned, the user must click on the submit button which brings him back to the deliver intervention screen. The toast message for successful scan is displayed on the screen.
An illustrative guide to using the Inventory Management module
In health campaigns, it is crucial to keep track of the resources delivered to prevent stock mis-handlings and maximise coverage. This helps to track the resource till the last mile delivery, that is, it captures the stock till it reaches the distributor, and the distributor can record the quantity of stock received along with other stock transactions.
Users can do the following:
Track stock till the last mile.
Capture stock details till the end user to keep track of the transactions that take place.
Record the stock transactions during a campaign.
Ensure the safety of stock.
Keep track of the stock count and verify from both ends (received versus issued) to prevent the misuse of stocks.
After logging into the application, the user lands on this screen which displays daily performance (number of households registered). The progress bar must reset daily at 00:00 hours, and start from 0 registrations. The action buttons related to the beneficiary are present which include:
Beneficiaries
View Reports
Sync Data
Call Supervisor
File Complaint
Manage Stock
On the bottom, there is a card that shows how many records are unsynced for the user’s convenience to sync data. If all the records are synced, then the card must say “All records are synced”.
The help button is on every screen of the application, and by clicking on it, a user can get a walkthrough of the elements on that screen.
On the top right, the administrative area assigned to the user is displayed which will be based on the level of hierarchy.
The hamburger button on the top left corner covers some other actions mentioned further.
This includes all the stock transactions that can be captured by the distributor.
The transaction details are captured on this screen. The date and administrative unit fields are auto-captured by the system and are non-editable. The team code/identifier is captured from the user profile and it must be editable.
The stock-related details are captured on this screen. “Select product” is a dropdown field that includes the resource that has been received. “Received from” is a search-based dropdown field, clicking on which navigates the user to the search facility screen that includes the facilities along with ‘Supervisor’ as the value. If the user selects ‘Supervisor’ then he/she must enter the supervisor’s name. The user must enter the quantity received, and if any additional comments are needed, they can be added.
Once the user clicks on ‘Submit’, the confirmation pop-up appears. If the user clicks on the ‘Submit’ button, the acknowledgement screen appears, and ‘Cancel’ takes the user back to the previous screen.
This screen includes all the fields except for the facility field.
This screen includes all the fields except for the facility field.
Building blocks are individual, independent blocks of solutions, that are assembled to solve large, complex problems. With building blocks, any solution could be evolved to fit the evolving problem as against building a new system from the ground up.
DIGIT HCM is built using modular building blocks that are highly configurable allowing countries to tailor the product to their specific needs, easily. These building blocks are reusable allowing for the creation of new solutions. They facilitate reusable assets for all campaigns, and have the following benefits:
Easy to adapt to local needs (Highly configurable - easy to rework)
One asset for all campaigns (Multiple campaign types, diseases)
Maximise leverage (Additive blocks - Create new solutions)
With these building blocks, one campaign could easily be pivoted to set up another health campaign. For example. a malaria campaign could be pivoted from a cholera campaign to an NTD campaign with minimal effort and time. Beyond campaigns, the same blocks could create solutions for routine health delivery and other health needs.
Data resides in shared open registries enabling the reuse of data and establishing a single source of truth. Interoperability is baked into the design of DIGIT HCM allowing free flow of data across different systems. DIGIT HCM enables countries to set up their digital public infrastructure for health.
From setting up campaigns quickly, to planning, inventory management, registrations, service delivery, and real-time data dashboards, DIGIT HCM covers all elements required to run effective campaigns. The same product can be used for all campaign types across multiple diseases.
An illustrative guide to using the Single-Round Registration & Delivery module
This enables frontline workers to register households and individuals using the HCM application.
Register households
Add/Delete members to/from the households
Edit household/individual details
Delete household
Record delivery of an intervention
Frontline workers
Register households
Add members
Deliver intervention
SBCC
Provide direct healthcare services, communicate SBCC information, and support to communities. Usually operate in teams and within a specified boundary.
Field Supervisors
Train and monitor the field teams
Provide on ground support
May have authority for registration and distribution to support the teams
Organize and direct the activity of frontline staff in health initiatives. Offer direction, assistance, and coordination for effective service delivery, adherence to protocols, and high-quality results.
When field and district supervisors navigate to the home screen, the beneficiaries button is visible to them.
On this page, the following actions can be performed:
You can register a new household only after attempting a search.
Click on the "Register New Household" button to register a household.
After the user clicks on "Register New Household", the page navigates to the "Household Location" page.
The "Administrative Area" is the only mandatory field. "Address Line 1", "Address Line 2", 'Landmark' and "Postal Code" are optional fields.
Clicking on the 'Next' button will take the user to the "Household Details" page where the number of members living in the household can be registered.
Clicking the 'Next' button will take the user the "Individual details" screen.
The first individual added will be the "Head of Household" by default.
The name, ID type, and ID number fields are mandatory. You can enter the date of birth or their age. The date birth will take precedence over age.
When the user clicks on the submit button, a popup appears asking for confirmation.
If the user clicks on ‘Submit’, the household is registered and a confirmation screen is displayed.
The user can click on the "Back to Search" button for editing the household or register new household fields.
Click on the open card to navigate to the detailed page of the household.
There is an "Edit Household" button for editing household details, which navigates the user to the household location screen. The service delivery status is present below the household’s name followed by the administrative area and the number of members.
There are cards for each member, starting from the household head. The card consists of the ‘Edit’ button for individual-level actions.
For adding new members to the household, there is the "Add Member" button below the member cards, which navigates the user to the "Individual Details" screen.
At the bottom, the "Deliver Intervention" button is present which navigates the user to the update delivery screen.
An illustrative guide to using the Multi-Round Campaign Module
This enables distributors to deliver multiple doses for multiple cycles, and record the deliveries for the drugs prescribed for that specific cycle.
Allows a distributor to see the eligible household members for the current cycle under the selected household.
For each eligible household member, the distributor has two options: Record Delivery and Unable To Deliver.
A distributor can record the exact quantity delivered for each drug with a delivery comment.
A distributor can also record if the drugs for the next set of doses in the current cycle are already provided to the beneficiary or not. If the doses for next rounds are already provided, the distributor can mark next doses as 'Delivered' for the next rounds.
Distributor
Register households
Add members
Deliver intervention
The user goes from house-to-house in the specified boundary and delivers the drug assigned for that round of delivery.
Step 1
Once the distributor is on the household details page, he/she can see which beneficiary is eligible for drug delivery in the current cycle. Click on "Record Delivery" or "Unable to Deliver":
Step 2
You are taken to the Record Cycle (X) Dose (Y) screen, where you can see the status of drug delivery for all doses for the current and previous cycles (if available). Click on "Record Cycle (X) Dose (Y)" button at the bottom of the screen to record the drug delivery.
Step 3
You are taken to the "Record Delivery Details" screen. Select the "Quantity Distributed" for each drug to the beneficiary.
Additionally, you can add any new drug if distributed using the "+ Add Resource" button and mark its quantity similar to the drugs added before. You can choose to add a comment which is optional, and then press on the 'Submit' button.
Step 4
You will be directed to the "Data Successfully Recorded" screen.
The screen automatically moves to the next one that will ask if the upcoming set of doses were provided to the beneficiary or not.
Step 5: Once the User Presses on Next Button in the Previous Screen the user is taken to the "Data Recorded Successfully" screen which has 2 buttons. "View Household Details" button would take the user to Household Details page of the household for which the distributor recorded the data. "Back to Search" button will take the Distributor to the "Search Individual" Screen to search for beneficiaries from other families.
You can choose "Yes" or "No" with a table below that shows the dosage to be provided for the upcoming cycles. Click on 'Next'.
In Step 4 of recording the multi-round campaign process, based on the response provided by you for the question "Did you provide Drugs for the next Doses?" the screens for next round of delivery in a given cycle will be as follows:
If you replied Yes: If you replied 'Yes', the next time you visit the beneficiary and click on "Record Delivery" against that beneficiary in the household details page, you will see the following screen:
Once you submit the answers for the above questions, you can record the side-effects for a beneficiary by clicking on 'Yes' If no side-effects were reported, select 'No' to move on to the beneficiary details screen, and the delivery status for all cycles will show as 'Completed'.
If you replied No: If you selected "No" in Step 4, for recording the next dose, you will start again from the household details page. Click on the "Record Delivery" button and follow the same flow as for the first round of drug delivery.
This feature allows the distributors to download all the boundary data along with data for beneficiaries which will be covered by the distributor on a given day of a campaign. For this process, the distributor must select all the levels of boundary data till the lowest level of boundary hierarchy so that he/she only need to download limited data at one go, which would aid for device memory and data bandwidth constraints.
Distributor has to select the boundary hierarchy to the lowest level and then download the latest beneficiary data from the server to start their drug delivery.
Once the data is found, the data can be downloaded and the distributor can choose to download data for other boundaries if they plan to use it.
This feature can only be done in areas where a stable internet connection is available.
Distributor and Registrar
Select the assigned boundary till the lowest level
Download the beneficiary data
Repeat the process to download for multiple boundaries
The user downloads the village-level data from the server which can be used for both registration and drug delivery.
Step 1
When you login to the app, you will arrive on the "Boundary Selection" screen once the micro-planning data is synced. You will have to select all hierarchies of boundary till the last level of boundary hierarchy before you can click on 'Submit' and download any data onto your devices.
Step 2
Once you click on 'Submit', the app checks with the server if the selected boundary has any new data associated with it which needs to be downloaded on to the device. If new data is found, the following screen will appear and you click the 'Download' button or click on "Proceed without downloading" the data.
Step 3
If you click on 'Download' the download will start if the internet is available on the device.
Step 4
Once the download is completed, a success screen with two buttons will be shown. The "Go To Home Screen" button will take you to the app home screen and you can continue with the deliveries. If you click on the "Download More Data" button, you will be taken to the hierarchy selection screen (shown in Step 1) again.
Vector control is pivotal in global efforts to control and eliminate malaria. It is essential for reducing malaria transmission and ultimately halting its spread. Currently, the two primary vector control strategies are long-lasting insecticidal nets (LLINs) and indoor residual spraying (IRS), which together constitute nearly 60% of global investment in malaria control initiatives.
DIGIT HCM for IRS will empower stakeholders involved in the campaign to achieve their objectives seamlessly without disrupting their routine activities. It will facilitate real-time tracking and monitoring of campaign coverage and progress, enabling timely interventions. This will lead to improved campaign reach, enhanced efficiency for campaign workers, and cost savings through better management of inventory and operations.
User Role: Registrar
Home Screen:
This is the home screen for a registrar. You will see the following cards:
Beneficiary: For registration and spraying of households
Sync Data
File Complaint
Dashboard: View key metrics and visualisations
Search Households (Reuse of registry)
You can search for the households that are registered from previous campaigns before registering as a New Household. This page has 2 indicators:
Number of houses sprayed
Number of houses for revisits (closed/refused/ineligible)
There will be 2 filters for the search results:
Search by proximity
Filter for ‘Revisits’
a. The Revisits filter should also show the count in that filter
The households card will show the following additional information on top of what is already available in the product.
Number of pregnant women
Number of children
Number of rooms
By default, the "Register New Household" should be disabled and should be enabled only upon searching (3 chars minimum).
Household Location
The household details page will capture:
The village name (populated based on boundary selection)
Landmark (non-mandatory)
GPS coordinates and accuracy
There will be an info card that tells you to ensure the village name matches the actual one on the field.
Case 1: Reuse of registry
The date of registration should be as per Today’s date
The total number of members living in the HH should be populated from the registry and should be editable
The number of pregnant women in household needs input from the user
Number of children less than 5 years in HH needs input from the user
Info card to make sure the calculations are correct
Case 2: New registrations
The date of registration should be as per Today’s date
The total number of members living in the household needs input from the user
The number of pregnant women in a household needs input from the user
Number of children less than 5 years in household needs input from the user
Info card to make sure the calculations are correct
The edit household/delete household options are available on the household details page.
To capture:
Type of structure
No.of rooms in the house
The type of structure will have clickable cards that can be toggled to select/deselect.
Each type of structure should be tagged to a status:
Eligible
Ineligible
Once you capture the details, click on Next.
Individual Details
Case 1: New registrations
The individual details page will capture:
Name of the individual
Age
Gender
Mobile number
Once you capture all the details, click on Next.
Case 2: Reuse registry from previous campaigns/registrations: This page will be skipped.
This will provide a summary of all data captured so far. Check the details and click on Submit.
Confirmation Screen
It will ask for:
Submit
Cancel
Click on Submit if the correct details have been captured.
You will get a success message. You can click "View Household Details" to check the information.
You will see the following cards:
Beneficiary: For registration and spraying of households
Sync Data
File Complaint
Dashboard: View Key metrics and visualisations
Search Households
You will search for registered households to mark spray details. If a household is not registered and requires to be registered, you should be able to register them by clicking on "Register New Household".
This page captures if the IEC Mobilizer has visited the household or not. If the spray operator is recording data against an existing household, this will be the first screen they should see after searching and selecting the household. If the spray operator is creating a new household, then they will arrive at this screen after the registration flow is complete. Click on 'Yes' or 'No' to record if the IEC Mobilizer has visited the household. Next, click on 'Sprayed' or "Did Not Spray".
If you click on 'Sprayed' in the previous screen, the spray details will be captured, which includes:
The date of spraying
Total no.of rooms sprayed
Type of insecticide used
Check the details and click on Submit.
Success/Failure Screen
You will get a success message.
Spraying Not Done
If you selected "Did Not Spray", then this page should capture
The date of the visit
Reason for not spraying
The incompatible structure card should be auto-selected based on the household structure chosen at the registration flow.
Closed Households
The home screen has a separate icon for marking closed households. Clicking on the icon will take you to the Household details screen.
GPS coordinate
Village name
Coordinate accuracy
Household head name (Optional)
Clicking on Next will take you to the Summary screen.
Success/Failure Screen
You will see the success screen.
On revisits, when the user selects the filter ‘ ‘Closed’, all households with the status as closed should be shown in the results (Within the boundary selected). Opening any card should take the user to the normal flow of registration:
Household location → Household details → Individual details → IEC → Spray/non spray
The status needs to be updated from ‘Closed’ accordingly.
A distributor can record the side-effects experienced by a beneficiary after consuming the drug. The list of side-effects can be configured based on the specific campaign being conducted.
Allows administrators to record side-effects for drugs delivered to the beneficiaries after every dose consumed by the beneficiary.
The distributor can record the side-effects for both direct delivery where all the doses of the drug is administered directly to the beneficiary, as well as for indirect delivery where the beneficiary is provided with all the remaining doses by the distributor at the same time and is asked to administer the drug on their own.
Distributor
Administer drug to the beneficiaries and observe the effect of drug
Record side effects observed due to administration
The user goes from house-to-house for drug administration and records any side-effects observed in the beneficiary for previous doses of drugs for indirect delivery as well as for current dose during direct delivery.
In Step 4 of recording the Multi-Round Campaign delivery process, based on the response provided by the distributor for the question "Did you provide drugs for the next doses?" the screens for recording the side-effects in a given cycle will be as follows:
If you replied 'No' (Recording side-effects when the the distributor does direct delivery for all rounds):
Step 1
After you have completed the delivery for first dose, you will see the list of beneficiaries who are eligible for the next round of drug delivery. If the beneficiary experienced any side-effect, click on the "Unable to Deliver?" button, where you will get 3 options. Here, the last option will be "Record Side Effects".
Step 2
You will be taken to the next screen where you need to record the side-effect experienced by the beneficiary. Once you have selected the relevant side-effect, click on 'Next'.
You will see a success screen that says, "Data recorded successfully".
If you replied 'Yes' (Recording side-effects when the the distributor does indirect delivery for subsequent deliveries):
Step 1
If you replied 'Yes' the next time you visit the beneficiary and click on "Record Delivery" against that beneficiary in the household details page, you will see the following screens:
Step 2
Once you submit the answers, you can record the side-effects for the beneficiary. If no side-effects were reported, select 'No' to move on to the beneficiary details screen, and the delivery status for all cycles will show as 'Completed'.
Step 3
If you select 'Yes', you can record the side effect. Click on 'Next'.
You will see a success screen that says, "Data recorded successfully'. If you select 'No' for side-effects, you will be taken directly to the "Data Recorded Successfully Screen".
Note: If the Distributor answered 'No' on the "Record Past Delivery" page, the delivery status will changed to 'Visited' on the household details page for that specific beneficiary.
An illustrative guide to using the Multi-Round Campaign Module
With the help of Voucher-Based Registration and Distribution, the registrar can use a QR code-based voucher provided by the program to link beneficiaries to the QR code voucher at the time of registration. This will enable distributors to search for beneficiaries at the time of delivery by scanning the QR code vouchers linked to a specific beneficiary.
Allows a registrar to link a QR code voucher provided by the program to the beneficiary by scanning the QR code at the time of registration.
Allows a distributor to search for a beneficiary in the system by scanning the QR code voucher shown by the beneficiary when the Distributor has to deliver the drug.
Registrar
Scan and link voucher to the households during registration
The user goes from house-to-house and links the beneficiaries to the QR code voucher at the time of registration.
Distributor
Scan and retrieve household details for distribution
The user goes from house-to-house, and searches for beneficiaries by scanning the QR code voucher.
Step 1
Once the all the mandatory details for an individual are added on the Individual Details screen, you can link the QR code voucher by clicking on the "Link Voucher To Individual" button.
Step 2
The QR code scanner is launched and you can scan the unique QR code linked to the beneficiary. The "1 Resource Scanned" message will appear below the QR scanning panel.
If the QR code voucher scanning shows an error, you can link the voucher manually by clicking on the "Enter Beneficiary Code". The following screen appears, which lets you add the voucher code manually. Next, click on 'Submit' to link the code successfully to the beneficiary.
Step 3
The voucher will appear on the Individual Details page. If click on the 'Edit' button next to the voucher code, you redo step 2 and link the correct QR code voucher to the beneficiary. Click on 'Submit' after adding the correct voucher code for the beneficiary to link the Voucher to the Beneficiary in the database.
Step 4
You will be directed to the "Data Record Successfully" screen.
After the registrations have been done and the respective QR code vouchers are linked to all beneficiaries, the distributors at the time of delivering the drug can search for beneficiaries using the QR code voucher associated to that beneficiary.
Step 1
Come to the "Search Individual" screen, and click on the "Scan QR Code" button.
Step 2
The QR code scanner will open up. Scan the voucher shown by the beneficiary and click on submit.
Step 3
If there is a user linked to the voucher scanned by the distributor, the details of the beneficiaries will appear on the "Individual Details" page. If not, a message will be shown saying "Match Not Found".
Step 4
If the beneficiary is found after scanning, you can open the record of the beneficiary and add the drug administration as per the regular flow.
An illustrative guide to using the User Management Module
The ability for supervisors/managers to create and manage users and team assignments for their respective boundaries through the user interface.
System administrator
a. Create, search, update, and deactivate user accounts.
- Create, search, update, and deactivate other system administrator accounts.
b. Create, assign, update, and delete role assignments.
c. Create, assign, update, and delete campaign assignments.
A system administrator is a super user, who has complete access to all the features that the product includes.
Supervisors
a. Create, search, update, and deactivate user accounts (except system admin).
b. Assign/update/delete role assignments.
c. Assign/update/delete campaign assignments.
Supervisors are responsible to monitor and guide the teams during the campaign and ensure that the targets are met effectively.
Helpdesk user
a. Create, search, update, and deactivate user accounts (except system admin).
b. Assign/update/delete role assignments.
c. Assign/update/delete campaign assignments.
Helpdesk users are the support team established to provide assistance throughout the campaign.
A landing page must be available to the user to access all available modules.
A user must be able to search for an existing employee using search parameters (name, mobile number, username).
Users must be able to create new users by providing the following details. Refer to the section on specifications.
Allow users to reset the password. Allow users to edit existing information or add information to an existing employee. Refer to the section on specifications for validations and conditions.
Refer to the section on specifications for validations and conditions.
An illustrative guide to using the Proximity Search Module
At time of registration and drug delivery, the product captures the latitudinal and longitudinal data and the distributor can search for the registered beneficiaries based on the distance from their current location. All the registered beneficiaries are populated based on the distance in an ascending order. The search populates all the beneficiaries registered in a 3-km radius from the current location of the distributor.
Enables distributors to search for beneficiaries within a 3-km radius (configurable) from their current location based on the latitudinal and longitudinal data recorded by the product at the time of registration.
The latitudinal and longitudinal data will be recorded by the product for both registration and drug delivery.
Distributor and Registrar
Search registered households using the proximity feature
The user goes from house-to-house and searches for beneficiaries by using proximity scanning.
On the "Search Individual" details page, you can flip toggle switch to populate all the registered beneficiaries, by distance, in an ascending order, available in a 3-km radius.
An illustrative guide to using the Beneficiary Referral Module
This feature allows a distributor to refer a beneficiary to a health worker. The referral can happen before or after the drug administration by the distributor.
Allow a distributor to refer a beneficiary to the correct health facility and mark the correct health facility for the referral.
Referral can be done both before and after drug administration.
Distributor
Refer beneficiaries to the health facilities
The user goes from house-to-house for drug administration and refers beneficiaries, who require treatment, to the health facilities.
Step 1
On the Household Details screen, you can see the list of beneficiaries who are supposed to receive the drug in that cycle. If the beneficiary is experiencing significant discomfort/sickness due to which you cannot administer the drug, you can click on the "Unable To Deliver?" button for that specific beneficiary.
Step 2
Click on "Refer Beneficiary".
Step 3
You will be directed to the "Referral Details" screen.
In the screen above, you will see the following fields:
Date For Referral: This will be a non-editable field and will capture the date of referral which is picked directly from the system.
Administrative Unit: This will be a non-editable field and will be captured based on your user login, which will define the "Administrative Unit".
Referred By: This field will contain the unique ID for the distributor who has referred the beneficiary and is an editable field.
Referred To: This field will have a search ability which can be used by clicking on the search lens icon on the field. The following screen will load where you can search for the ID of the facility where the beneficiary is being referred to.
Reason For Referral: This is a mandatory field which will have all the reasons for referral based on the configuration set for the specific household.
Referral Comment: This is a non-mandatory field that allows you some custom comments regarding the referral being made for the beneficiary.
Step 4
After you populate all the required fields, click on the 'Submit' button which will take you to the "Data Successfully Recorded" screen.
Once the beneficiary is referred successfully, he/she will be marked as "Beneficiary Referred" in the household details screen.
An illustrative guide to using the Adverse Events Module
While administering the dose to a beneficiary (usually children), there can be instances when the beneficiary shows some symptoms against the dose provided. These adverse events need to be recorded and monitored as it helps to take precautionary measures for further doses as well as in future campaigns for that beneficiary. It is helpful for cases when a beneficiary's situation becomes critical and he/she needs to be referred to a healthcare facility. This is also crucial for resource tracking because, in certain campaigns, the beneficiary can be re-administered the dose even after he vomits out the medicine.
Recording adverse events.
Enabling actors to record and track the adverse events observed in a beneficiary after administration of the dose.
Monitoring the data to plan and decide for upcoming doses during the campaign.
The user needs to provide the delivery details for the resources delivered to the beneficiary. The screen is configurable depending upon the campaign type and the auto-calculated resources and quantity are displayed and populated in the fields. The user can edit the fields if required to change the resource administered.
When the user clicks ‘Next’ on the deliver intervention screen, it opens a pop-up that asks: “Did you observe any adverse events?” If the user selects ‘No’, the adverse events screen is skipped, and he/she is directly navigated to the next screen in the flow. If the user selects ‘Yes’, it opens the adverse events form to capture the details. On top the summary of delivered resources is displayed in a tabular form. The list of symptoms must be configurable to include more values if required. It is possible that the beneficiary shows multiple symptoms, thus the user must be able to select multiple values from the list.
If the dose is readministered, then the user must select ‘yes’ and provide the number of times it has been readministered.
The “Refer Beneficiary” button navigates the user to the refer beneficiary flow, in case the beneficiary is critical and requires medical assistance. The ‘Next’ button takes the user to the next screen in the flow.
An illustrative guide to using the Complaints Module (Mobile)
Users can file a complaint using the HCM app. There are a few assumptions:
Not all complaints will be logged using the complaints module. Users may prefer raising complaints on WhatsApp groups/calls, and may not be registered in the system.
Complaints are most likely to be logged by users on behalf of other users (Most common use case: Supervisors raising complaints on behalf of users).
After logging into the application, the user lands on this screen which displays daily performance (number of households registered). The progress bar must reset daily at 00:00 hours and start from 0 registrations. The action buttons related to the beneficiary are present, which include:
Beneficiaries
View reports
Sync data
Call supervisor
Complaints
When the user clicks on the complaints, she is navigated to the “My Complaints” screen, which consists of two actions:
File a complaint (primary action): Clicking on this must open the complaint type screen.
View previously logged complaints.
When the user clicks on file a complaint, the complaint type screen appears. The user must select the type of complaint from the list, which must be configurable (to be configured during implementation as per program requirements).
There is a ‘Next’ button at the bottom of the screen, clicking on which, the user is navigated to the complaint details screen.
Once the user has selected the type of complaint and clicked on ‘Next’, this screen appears, where they need to provide the complaint details.
The date field is auto-captured by the system, which must be non-editable.
The administrative area is also auto-captured but it is editable. It is editable in case the user is creating the complaint on someone’s behalf. The dropdown displays a list of boundaries that are assigned to the user.
The user needs to select whether she is raising a complaint for herself or on behalf of another user.
If the user wants to raise a complaint for herself, then she must provide the following details:
Name (must be populated if already available in the user’s profile else must be blank).
Contact number (must be populated if already available in the user’s profile else must be blank).
Supervisor’s name and contact number.
If the complaint is raised on behalf of another user, then her details must be captured in the above fields. The user has the option to upload images describing the issue along with a text-based description. If the user wants to change the type of complaint, they can click on the ‘Back’ button and return to the previous screen.
After filling in all the details, the user needs to click on the ‘Submit’ button to file the complaint.
When the user clicks on the submit button after providing all the complaint details, the confirmation screen appears, which provides information on whether the complaint has been submitted or not.
If the complaint has been submitted, then it must show the message to sync the data for generating the complaint number. There must be a back to home button below the message. When the user clicks on it, she must be navigated to the home screen.
If the complaint has not been submitted, then there must be two buttons available; Retry and Back to Home.
An illustrative guide to using the Complaints Module (Mobile and Web)
There is a support helpdesk set up by the program which will receive all complaints raised by system users. The support helpdesk is responsible for reviewing all the complaints in the inbox. Depending on the complaint, the helpdesk can either resolve, reject, or assign the complaint to the respective actor Helpdesk users may create complaints on the user’s behalf, which are received over call/WhatsApp messages.
The L1 support helpdesk must be the first point in the complaint management workflow. All complaints created must be first routed to the helpdesk, after which the helpdesk may take appropriate action (mentioned below).
The helpdesk user must be able to do the following :
View the list of complaints in the inbox
File a new complaint
Open a complaint from the inbox and
View complaints status
Resolve a complaint
Reject a complaint
Assign to other roles
The inbox view for other workflow states must be similar and must be able to view complaints assigned to their respective inbox. The user must also have the option to assign the complaint back to the L1 support helpdesk by selecting the value in the “Assign To” field. The users must be able to view complaints that have been assigned to their role. For example, the L1 helpdesk user must not be able to view complaints assigned to the L2 helpdesk and vice versa.
Complaint Type: The user can select the complaint type from the dropdown
Administrative Area: The area of complaint.
Status: Refer to the list of statuses detailed above.
A button to clean all filters must be available at the bottom of the page. An “Apply Filter” button must be available to set the filters and route the user to the inbox and display the filtered complaints.
A user must be able to search for one or more complaints by using the following search parameters (must support passing multiple search parameters):
Complaint Number
Mobile Number
Administrative Area
After providing the appropriate search parameters, the user must click on the “Search” button located at the bottom of the screen and must be routed to the inbox which displays the search-appropriate search results.
A summary screen must be displayed when the user clicks on the ‘Open’ button located on the complaints card.
The “Take Action” button at the bottom of the screen must open a pop-up displaying all possible actions that the user can take. The actions available to address the complaint are as follows:
Resolve Complaint
Assign to P2
Reject Complaint
Close
The close button collapses the overlay and takes the user back to the complaints summary screen.
If the user wants to assign any project to P2, she must click on the assign button which opens this screen. The date of assigning the complaint is user input which can be filled in with the help of the calendar icon within the field.
In the "assigned to" field, the user needs to select the person to whom she wants to assign that complaint. There is an additional comments field in which the user can provide any remarks if she wants. The user can attach any supporting documents such as photos, documents, etc.
At the bottom, there is a cancel button which takes the user back to the complaint summary screen, and an assign button which assigns the complaint to the selected person.
Helpdesk (Desktop View)
When the user clicks on complaints on the home screen, then this screen must appear. On the top left, there is an option to file a new complaint, view reports. Besides, there are search fields for different parameters, such as complaint number and mobile number, and the search button to execute the search action. There is a clear search button below the search one if the user wants to clear the search parameters.
Below the new complaint and reports buttons, there are filters available to apply over the results. The filter parameters are the same as that for the mobile view.
The complaints are displayed in a horizontal format with the same values for mobile view. The user can click on the entire area of a particular complaint.
At the bottom, there are forward, backward, first page, and last page arrow buttons along with the page number information as displayed on the screen.
When the user clicks on a complaint, the details screen appears which provides the entire information of that complaint. The summary includes the same information mentioned in the card along with the additional comments/remarks, and photos provided by the complainant.
There is a "Take Action" button at the bottom. When the user clicks on it, the actions appear above the button as displayed on the screen. The actions include resolve complaint, assign to P2, and reject complaint. If the user clicks on any blank area on the screen, the actions collapse.
If the complaint has been resolved, then the user must click on the "Resolve Complaint" button which opens this screen. There is an "Additional Comments" field in which the user can provide any remarks if he wants. At the bottom, there is a submit button that updates the complaint status as resolved.
If the user has rejected any complaint, then she needs to select the reason for rejection from the dropdown. There is an additional comments field in which the user can provide any remarks if he wants. At the bottom, there is a submit button that updates the complaint status as rejected.
If the user wants to assign any project to P2, she must click on the assign button which opens this screen. The date of assigning the complaint is user input which can be filled in with the help of the calendar icon within the field.
In the assigned to field, the user needs to select the person to whom she wants to assign that complaint.
There is an additional comments field in which the user can provide any remarks if he wants. The user can attach any supporting documents such as photos, documents, etc.
At the bottom, there is a cancel button which takes the user back to the complaints screen, and an assign button which assigns the complaint to the selected person.
When the user clicks on the “New Complaint” button on the complaints screen, then this screen appears. The details captured are the same as that entered by the complainant. When the details are entered, the user needs to click on the submit button which opens the confirmation window over the same screen. If the user clicks on the cancel button, then she is navigated back to the complaints screen
When the user clicks on the submit button, the system confirms whether the complaint has been submitted successfully or not. There is a back to home button placed on both screens, clicking on which will navigate the user to the home screen of the helpdesk.
An illustrative guide to using the Health Facility Referral Module
This will enable the health facility supervisors to track referrals made by on-field health workers to different health facilities digitally via the Digit HCM app
It captures all the cases of:
Beneficiary being referred.
Referral details of the beneficiary.
Reason for referrals and its diagnosis.
Based on the diagnosis chosen further details if applicable.
User Persona: This feature will be used by workers working at a given Health Facility (HF) who will be responsible for giving the diagnosis based on the type of symptoms they observe and then do a diagnosis and provide the appropriate drugs.
Steps for Referral Flows:
Step 1:
Login for a HF worker who will see the home screen options based on the role-action mapping and will see the option which says “Beneficiary Referral“. The options available on the home screen for HF workers apart from the Beneficiary Referral option will be defined based on the role-action mapping provided for them.
Step 2:
When the user clicks on the “Beneficiary Referral” button in the previous screen, the user will be taken to the “Search Beneficiary” screen where he/she can search for a given beneficiary by their name or a QR code voucher provided to the beneficiary.
Search Produces Result: If the user searches for a given beneficiary name and finds a match, he/she can click on the 'Open' button in the card for that beneficiary and view their details.
Search Does Not Produce Result: If the search does not provide any results, the user can click on the “Create New Referral" button to add a new entry under the Referral module.
Step 3:
Once the user creates a new referral or opens an existing one in the previous step, he/she is taken to the Facility Details screen first where he/she needs to enter the details of the health facility they are in to attend the beneficiary. This screen will have the following fields:
Administrative Unit: This field will be auto-filled from the value available from the role-action mapping, and will be non-editable.
Date of Evaluation: This field will be auto-filled with system value and will be non-editable.
Evaluation Facility: This will be a mandatory field for the health facility worker to search and add. It is the ID used for a given health facility.
Name of Health Facility Coordinator: This is a non-mandatory field that will capture the name of the health facility coordinator who is attending the referred beneficiary.
Referred By (CDD Team Code): This is a non-mandatory field that will capture the CDD team code of the field worker who referred the beneficiary.
Once the user has filled all the fields with the relevant information, he/she must click on the 'Next' button.
Step 4:
After the user has clicked on submit, he/she will come to the screen called “Referral Details”. On this screen, the user is supposed to enter details into sections, that is, “Referral Details” and “What is the reason for referral”.
Section 1: Referral Details
In this section, the user must add the details to the following fields:
Select Cycle: This will be a dropdown selector which will have the cycle numbers. This is a mandatory field and cannot be left empty.
Name of the child: The user needs to add the name of the referred beneficiary. This field is mandatory.
Beneficiary ID: This will be added by the user with the beneficiary ID of the referred Beneficiary. This is a mandatory field.
Age in Months: This will be a mandatory field that will capture the age of the beneficiary being referred in months.
Gender: This is a mandatory field with a dropdown having values: Male, Female, Other.
Section 2: Reason for Referral
In this section, the user must capture the data as to why the beneficiary was referred. The field will capture data with the help of the radio button option selector. The options are:
Sick
Fever
Drug side effect in current cycle
Drug side effect in previous cycle
After selecting one of the reasons for referral, the user needs to press 'Next' which will navigate the user to 3 different screens based on what they select in the “Reason for Referral” section.
Step 5:
Based on what the user selects in the previous step in the “Reason for Referral” section, the following 3 flows could be shown to the user:
If “Sick” was chosen as a reason: If the user selects 'Sick' as the reason for eeferral in Step 4, he/she will be taken to “Referral Due to Illness” screen, where he/she will see the following list of questions:
“Child evaluated to determine cause of illness”: This will be a mandatory question to be answered with 2 options in the form of a radio button: Yes or No.
Enter Comment for Diagnosis: The answer to this question should be entered by the user in a free text form which will be a mandatory field.
“Was the Child Treated?”: This question will be answered by the user using a radio button option of 'Yes' or 'No', and it will be a mandatory question
Name and Dose of the Drug: Provide an open text field that will be mandatory.
“Was the child admitted / transferred to the hospital due to serious illness?”: This question will have a Yes/No radio button selection for it. This is a mandatory field.
If “Fever” was chosen as a reason: If the user selects 'Fever' as the reason for referral in Step 4, the user will be taken to the “Referral Due to Fever” screen, where he/she will see the following list of questions:
“Was the child tested for malaria?”: This question will have a Yes/No radio button option. This will be a mandatory field.
“Result of Malaria Diagnostic Test? “: This will be a mandatory field and based on what the user answers to this question the next set of questions for the user will open up as a nested form.
If the user chooses 'Positive' as the answer for “Result of Malaria Diagnostic Test? then he/shewill see the following questions:
Was the child admitted/transferred to the hospital due to serious illness?: This will be answered with a simple Yes/No radio button and will be a mandatory field.
Child with positive malaria test treated with anti-malarial?: This will be answered with a simple Yes/No radio button and will be a mandatory field.
Name and Dose of Anti Malarial: This will be answered with an open text form and will be a mandatory field.
If the user chooses “Negative” for “Result of Malaria Diagnostic Test?, then he/she will see the following questions as a nested fForm:
“Child with negative malaria test received SPAQ in this cycle“: This will be a Yes/No Radio button question, and is a non-mandatory field.
If “Drug side effect in current/previous cycle” was chosen as a reason: If the user selects “Drug side effect in current/previous cycle” as the reason for referral in Step 4, he/she will be taken to the“Referral due to adverse drug reaction” screen, where he/she will see the following list of questions:
Child evaluated for adverse reaction for SP and AQ?: This will be a simple Yes/No radio button in the form and it will not be a mandatory field.
The National Pharmacovigilance has been filled out?: This will be a simple Yes/No radio button in the form, and it will not be a mandatory field.
Was the child admitted/transferred to the hospital due to serious illness?: This will be a simple Yes/No radio button in the form, and it will not be a mandatory field.
Once all the questions in one of these flows are answered, a pop-up frame asking for confirmation will be shown for submission as shown below:
Once the user clicks on submit, he/she will see the ”Data Recorded Successfully” screen, and the option to navigate to the home screen.
Household Details
Edit/Delete Households
House Details
Summary
Success/Failure message screen
User Role: Spray Operator Home Screen:
IEC Details
Spray Details
On this screen, the following details can be captured:
On the summary screen, the details captured so far should be displayed. If the program allows, then you can scan a voucher and encode the details in the QR code. The voucher can then be affixed on the house for scanning during re-visit. The record created should be labeled with the status as ‘Closed’. Click on Submit.
If the complaint has been assigned successfully, then the following screen must appear.
A landing page must be available to the user to access all available modules.
If the complaint has been assigned successfully, then the following screen must appear. If the complaint could not be assigned, then the text must say, “Complaint Not Assigned.”
Registrar
Create and view complaints.
Registrars can raise technical complaints on the application
Field Supervisor
Create and view complaints.
Assist the frontline teams and raise the issues communicated by them on the application
Supervisor
a. Create and view complaints.
b. Resolve complaints, re-assign complaints back to the helpdesk, and reject complaints.
Monitor the overall campaign and provide assistance for the issues raised by the field teams
Helpdesk user
a. Create and view complaints.
b. Resolve complaints, assign complaints, and reject complaints.
Helpdesk users are the support team established to provide assistance throughout the campaign.
Supervisor
a. Create and view complaints.
b. Resolve complaints, re-assign complaints back to the helpdesk, and reject complaints.
Monitor the overall campaign and provide assistance for the issues raised by the field teams
Helpdesk user
a. Create andd view complaints.
b. Resolve complaints, assign complaints, and reject complaints.
Helpdesk users are the support team established to provide assistance throughout the campaign.
Health Facility Supervisor
Record referrals made by field workers
Record data of beneficiaries, reason for referral and diagnosis, and any further details.
Click on the links below to learn more:
Distributor
Record adverse events for beneficiaries
The user goes from house-to-house for drug administration and records the adverse events observed in the beneficiary before administration
When a user clicks on the view reports button on the home screen, he/she is navigated to this page where he/she has the provision to view the following reports:
Stock Received
Stock Issued
Stock Returned
Stock Reconciliation
Users can click on the arrow button placed next to every transaction to open the respective report. The back button will navigate them back to the home screen.
When the user clicks on the “Stock Received” button, the report for stock received appears which provides a tabular representation of the data. The table is scrollable, both vertically and horizontally, to cater to multiple values and columns. The date column is kept frozen and other columns are scrollable. The first column is for the date of the receipt, followed by units received in the second column, and received from (warehouse name) in the third column. The “Back To Home” button is placed at the bottom of the screen which navigates the user back to the home screen.
For the stock reconciliation report, the table consists of the date in the first column and other columns. The “Back To Home” button will navigate users to the home screen.
Scan the resource code to track the resources delivered:
Package utilised to parse the barcode : https://pub.dev/packages/gs1_barcode_parser.
Package utilised to QR code scanner: https://pub.dev/packages/qr_code_scanner
GS1 - standards : https://www.gs1.org/docs/barcodes/GS1_DataMatrix_Guideline.pdf
Package utilised for barcode scanning-
https://pub.dev/packages/google_mlkit_barcode_scanning
Given a field value formatted with the GS1 data matrix standard and a string key from the GS1 application identifiers. The function should look and return the value linked to the provided key.
A well-formatted value would look like:
]d201084700069915412110081996195256 10DXB2005 17220228
The Attendance Module will allow supervisors to mark attendance for their attendees which will, in turn, help the system maintain the authenticity of records and provide consistent data for payments to the attendees.
Enables supervisors to mark attendance for their attendees in an offline-first manner. The attendance can be marked in 2 ways based on the type of attendance structure chosen by the programme team:
Attendance recording once a day.
Attendance recording twice a day (Morning and Evening).
Supervisor
The user will be able to access their attendance register to mark attendance for their attendees.
The user will see the "Mark Attendance" option in the home screen of the app as follows:
When the user clicks on "Manage Attendance", they will see the attendance registers created under the specific user name having the following details:
Campaign Name
Event Type
Start Date
End Date
Staff Count
Status
Attendance Completion (in Days)
Once the user clicks on "Open Register" for one of the available registers, the user will be taken to the "Select Session" screen where the sessions available to be marked in the given attendance register will be seen.
Once the user has selected the desired session and clicks on the "Mark Attendance" button, the user will be taken to the "Mark Attendance" screen where the list of attendees for a given project and a given session will be available.
The user can click on the empty circles in front of every attendee and move the state of the attendance from "Not Marked" to 'Present' to 'Absent' on each click of the circle.
Once all the attendees have their attendance marked in the register, only then the user can click on submit.
If the attendance in a given register is partially marked, the user cannot submit the attendance and will have to click on "Save and Mark Later" which will allow the user to save attendance as a draft for the given register.
This enables a user to verify whether the physical count and calculated stock values are the same or not.
After successful login, a user lands on the home screen, which consists Stock Reconciliation". When the user clicks on the stock reconciliation button on the home screen, he/she is navigated to this screen where they need to verify whether the physical count and calculated stock values are the same or not.
In the select product field, the user needs to select a product from the dropdown. There are warehouse name and administrative area fields as well, all of which are mandatory. The following details are there:
Date of Reconciliation
Received Stock
Issued Stock
Returned Stock
Damaged Stock
Stock Lost
Stock on Hand- The stock on hand is calculated as incoming stock minus outgoing stock. There is a hint icon for how the stock on hand is calculated. The received and returned stocks will be considered incoming stocks. The issued, damaged, and lost stocks will be considered outgoing stocks.
The date of reconciliation is system-generated and non-editable. Other values are calculated based on the data recorded in stock receipts, stock issued, and the stock returned screens. In the manual stock count, the user needs to enter the value for manually counted inventory. If the stock on hand does not match the physical count, then the latter must take precedence, provided the user has submitted the form with a proper reason. In the comments field, the user can add remarks and comments.
User Roles:
Proximity supervisor
Payments approver
First, select the language before you can log in. Currently, three languages are supported:
English
Portuguese
French
Select the desired language and click on ‘Continue’ to access the Login page.
On the login page, enter the credentials for a proximity supervisor and select the assigned boundary. After reading through the Privacy Policy statement, select the checkbox to accept the terms and conditions and then click on ‘Continue’ to proceed to the landing page for proximity supervisor.
On the landing page for a proximity supervisor, ‘Payments’ label is displayed along with an option to view the “Attendance Registers”. Click on the “Attendance Registers” label to access project-specific attendance registers.
Select the desired project name (event name) from the options in the dropdown and click ‘Next’ to proceed.
Following selecting the project name, you will navigate to the ‘Inbox’ screen, where no attendance registers are shown by default. To view attendance registers, a desired boundary must be selected through a boundary filter (in this case ‘District’). Once the desired boundary is selected, click on ‘Apply’ to proceed.
Post selection of a desired boundary, you will be directed to a screen that shows all the “Pending for approval (#)” and ‘Approved (#)’ attendance registers that have been created within that specific boundary, with “Pending for approval (#)” registers being the default viewing option. ‘Approved (#)’ attendance registers can be accessed through toggling. Based on the status type (either pending for approval or approved), further discretised information is provided in a tabular format which includes the following: Attendance ID, Attendance marked by, Boundary, and Number of attendees.
Clicking on the “Attendance ID” on the ‘Inbox’ page will open the “View Attendance” screen, which will provide all the campaign-related details of the registrant and their attendance summary. The ‘Action’ button present on the bottom right of the screen allows the proximity supervisor to either “Edit Attendance” or ‘Approve’ the submitted data.
On clicking “Edit Attendance”, a warning message is displayed informing the proximity supervisor that editing the attendance days data will impact the payments and the same will be frozen for the entire event duration, followed by a confirmation question. This means that if the field supervisor marks the attendance for any further dates, it will not be updated in the register. The proximity supervisor can decide to either ‘Proceed’ to update the attendance data or select ‘Cancel’ to go back to the “View Attendance” page. Click on ‘Proceed’ to confirm the editing of the attendance data.
Next, the “Edit Attendance” page is displayed which will allow the proximity supervisor to update the attendance data for each field supervisor with the help of the ‘+/-’ buttons, or they can enter the count directly within the data entry field. The ‘Submit’ button is disabled until the proximity supervisor updates the attendance for at least one field supervisor.
If the “number of days worked” entered exceeds the event duration while updating, an error message will be shown informing the proximity supervisor.
Once the new attendance data has been entered, click on ‘Submit’ to proceed.
Subsequently, a toast message is displayed indicating that attendance has been updated successfully. The attendance data can be modified as many times as required until it is approved.
Following the successful submission of the new data, the “View Attendance” page will automatically appear, where the updated attendance data is reflected.
Now, click on the ‘Action’ button and then select the ‘Approve’ option. This will open a dialog box, where mandatory comments should be provided to proceed with the approval process which is continued by clicking again on ‘Approve’. The approval process can also be cancelled at this stage by clicking on ‘Cancel’.
After submitting the mandatory comments, if the ‘Approve’ option is selected, then a confirmation pop-up will appear with a message highlighting that the data once approved cannot be modified.
On clicking again on ‘Approve’, a success screen will be displayed for the confirmation, and the muster roll will be generated and displayed on the screen. Following this, any other assigned tasks can be carried out by clicking on “View Another Register” or “Go Back to Home”.
On the ‘Inbox’ page, the status of the register can now be seen as approved, and when it is opened, no actions are available, except to “Go Back”.
The payment approver is responsible for generating and downloading the final payment bill which is further used to disburse the payments to all the campaign workers.
First, select the language before you can log in. Currently, three languages are supported:
English
Portuguese
French
Select the desired language and click on ‘Continue’ to access the login page.
Next is the Login page, where the credentials for a campaign supervisor are entered and the assigned boundary is selected. After reading through the Privacy Policy statement, the checkbox is selected to indicate acceptance. Then click on ‘Continue’ to proceed.
This is the landing page for a campaign supervisor. On this page, a card is displayed for Payments with the options to go to the ‘Inbox’ page to generate bills, and to ‘My Bills’ to view and download already generated bills. Click on ‘Inbox’ to proceed.
On this page, the project name (event type name) from the available options must be selected, as well as the aggregation boundary details; whether the bill should be aggregated at the National, Province/State, or District Level. Select the required aggregation boundary level and click on ‘Next’.
Following this, the “Bill Inbox” page will appear, where the specific boundary should be filtered for which the bill has to be generated. Once selected, it will display all the attendance registers, both approved and pending approval, which can be only viewed by the campaign supervisor, along with an option to generate the bill. Click on “Generate Bill”.
The campaign supervisor will be able to generate the bill only once for a particular boundary, and this can be done only when all the registers within that boundary have been approved.
On clicking “Generate Bill”, a confirmation popup is displayed that indicates that the bill cannot be generated again. Click on “Generate Bill” to proceed.
This will initiate the bill generation process along with displaying a toast message highlighting the wait time for completion of the process. Click on “My Bills” to proceed.
Clicking on “My Bills”, will display the bill inbox page, where all the generated bills can be found. On this page, bills can be searched by the “Bill ID” or a date range based on the date they were generated. The bills still being generated can be identified in the ‘Actions’ column.
Once the bill has been generated successfully, it can be downloaded as either an Excel file or a PDF by clicking on the respective action button. Choose the required format for the report to be downloaded.
Find below an illustration of the PDF report. The report provides the following information: total amount to be processed, details of each individual, different cost heads that are applicable based on the assigned role, and the sum of the amount to be paid based on the number of days attended.
This enables a user to manage stocks, besides facilitating stock reconciliation.
On this page, the following actions can be performed:
After a successful login as a warehouse manager, a user lands on the home screen which consists of "Manage Stock", and "Stock Reconciliation".
This screen consists of the following types of transactions that take place for the the inventory:
Stock Receipt
Stock Issued
Stock Returned
Stock Damaged
Stock Loss
When a user clicks on record stock receipt, the warehouse details screen will appear.
The latitude/longitude captures the geo-location of the warehouse which can be fetched with the help of the location icon within the field.
Clicking on the next button will navigate the user to the "Received Stock" details screen.
The "Receipt Stock Details" form has some mandatory fields: product, received from warehouse, and quantity received.
The optional fields include waybill number, quantity indicated on waybill, transport type, vehicle number, and comments.
Clicking on the submit button will take the user to the success page.
This screen captures the mandatory fields: Product, Issued to warehouse, and the quantity.
The optional fields include waybill number, quantity indicated on waybill, transport type, vehicle number and comments.
Clicking on the submit button will go to the success page.
This screen captures the mandatory fields: Product, returned to warehouse, and quantity returned.
The optional fields are waybill number, quantity indicated on waybill, transport type, vehicle number, and comments.
Clicking on the submit button will take the user to the success page.
This screen captures the mandatory fields: Product, damaged during, received from, and quantity damaged.
The optional fields include waybill number, quantity indicated on waybill, transport type, vehicle number, and comments.
Clicking on the submit button will take he user to the success page.
This screen captures the mandatory fields: Product, lost during, received from, and quantity lost.
The optional fields are wWaybill Number, quantity indicated on waybill, transport type, vehicle number, and comments.
Clicking on the submit button will take the user to the success page.
Click here to learn more about stock reconciliation.
Log in to the HCM app with user ID and password.
Users are redirected to this screen once they select the preferred language in the previous screen.
On this page, the following actions can be performed:
A user can log in to the app by giving the User ID and Password.
The "Forgot Password" button gives a user the option to contact the administrator to reset if he/she has forgotten the password.
Allows users to select their preferred language for the app UI. It enables users to easily switch between the languages, which enhances the user experience.
Select between Portuguese, French, and English languages.
When the user opens the application, it asks them to first select the language. The selected language is highlighted in orange color.
On this page, the following actions can be performed:
A user can switch the language by clicking on Portuguese, French, or English.
A user can click on 'Continue' to navigate to the login screen.
Users are redirected to this screen once they click on the "Forgot Password" button in the language selection screen.
Clicking on the forgot password option in the login page opens a popup message “Please contact your administrator if you have forgotten your password”. This is an informative popup which does not lead to any further action within the application and the user can close the popup by clicking on 'OK'.
There are 3 scenarios
The user is assigned to work at a community living facility.
The user is assigned to work at both a community living facility and house-to-house.
The user is assigned to work at house-to-house.
- Separate navigation for community living facilities/ based delivery, transit post-based delivery, and household-based delivery.
- Clicking on the cards will navigate the user to the respective flows.
- The community living facilities/transit postcards will be available depending on the campaign requirements.
- The progress bar will cater to the number of beneficiaries covered in household + community living facilities (Transit post coverage will be monitored separately since this is not included in the microplan).
Clicking on the community living facilities icon navigates the user to the search page. This screen is as same as we have in the product.
A toggle is enabled to search the nearby CLF.
Search bar: All the loaded CLF from the microplan can be searched from here.
Filter (as same as in product).
There can be multiple categories of Communal living facilities. For example:
Boarding schools
Military camps
Orphans
Retirement home
University campus
Prison
Police camps
Refugee camps
When the user searches for the respective CLF, a card with the name of the CLF along with the proximity is displayed.
There is an action button to open the CLF.
The behavior of the screen remains the same as we have in the product but when searched for a CLF and if a match is not found then it shows the info message related to CLF.
This will be a multi-select filter. These are the filters that need to be added: Administered - intervention given Not Administered - Intervention pending Refused - Beneficiary declined intervention Ineligible -Beneficiary does not meet criteria Referred - Beneficiary directed to another facility or service When clear is clicked, all the selected filters must be removed.
Here we capture the location details of the CLF. This is where we capture geo-coordinates for the respective CLF.
In this screen, the type of structure of the facility is selected using the card layout. The number of rooms in the facility is also captured using the +/- counter.
Capturing these details will help to build the facility details in the registry and the data can be reused for campaigns such as Indoor Residual Spraying.
Name of the individual
ID type
ID number
Date of birth / Age
Gender
Mobile number
Scan voucher / ID
Clicking on the scan voucher will open the camera to scan the QR code on the voucher.
Once the voucher is Linked, clicking on ‘Submit’ will take the user to the Summary screen.
There is a warning pop-up message asking the user if they are ready to submit. Once submitted, a success toast message will be shown.
The data thus captured can be down-synced and used for another campaign in the future and can be also edited or updated if required
Once the beneficiaries are added to a facility, they can be filtered based on the administration status of the intervention. Once the filter is selected and the user clicks on “Apply Filter”, the beneficiaries screen is displayed with the applied filter displayed. The Individual filters can be removed from the same screen when clicking on the cancel button next to the respective applied filters.
The Assess Eligibility screen opens when one clicks on the “Assess Eligibility” button. This screen will have a set of questions to assess the eligibility of the individual - this is particular to an individual campaign.
The beneficiary details screen is opened when one cicks on “Record Delivery” where we record the administration for any type of individual-based campaign. For example: NTDs , SMC, and Polio.
The beneficiary details screen is opened when one clicks on “Record Delivery” where we record the delivery for any type of household-based campaign. For example: Bednet.
Click on the delivery card, and search for the CLF with the name. Since all the data would be pre-loaded, when down-synced, we will get the necessary information for the respective CLFs.
When the data is not pre-loaded from the microplan, then the delivery will depend on the registration, and the delivery screens will remain the same.
- The KPI indicators show the deliveries completed for the current data and cumulative for that user. The following details are captured:
Type of transit post (master data)
Name of transit post (user input)
The resource is scanned using the scanner feature. The scan feature should be configurable such that for interventions where any codes are not available, the screen will jump to the delivery page without scanning.
Enter the resource code if the scan does not work due to any reason.
- The screen shows:
The number of deliveries for the transit post selected
The transit post details
The resource to be delivered
Eligibility conditions
Resource details scanned
Clicking on record delivery will count toward the delivery of one beneficiary. The process is repeated until all beneficiaries are administered. Clicking on close delivery will complete the deliveries for the selected transit post.
Upon successful scan, the user must see a flash acknowledgment screen, which must be available for a configurable duration, and must take the user back to the "Vaccination Details" screen. This process will be repeated until the user closes the delivery.
After logging into the application, the user lands on the home screen of the HCM app, which displays the 'Help' button on the top right.
If the user clicks on the help button, it will give a walkthrough of the entire screen, including the role of each button placed with two buttons:
Skip: If the user wants to skip the walkthrough at any point.
Next: It will proceed to the next action aligned.
The text box appears at the bottom of the button.
Brief Intro
Checklist is a tool that enables supervisors to monitor certain activities and record observations according to defined set of questions.
Allows users to observe the tasks and fill checklists.
View all the submitted responses for the checklists.
User Roles
The "My Checklist" screen allows supervisors to perform random or scheduled inspections, and record observations of the inspection activity.
On this page, the following actions can be performed:
Clicking on "My Checklist," will display the checklists assigned to the user role.
Clicking on any checklist will show a popup with
- Fill Checklist
- View Submitted Checklists
The "Fill Checklist" option will allow the supervisor to fill the checklist against the date and the administrative area.
The "View Submitted Checklists" will show the checklists submitted by the supervisor.
After a user logs into the HCM app, the project selection screen displays all the projects assigned to the user. This will be displayed only when a user is assigned to multiple projects.
On this page, the following actions can be performed:
A user has to select one project.
After selecting a project, the system downloads the data for the selected project only.
After every login action, the system will automatically sync the data with the system.
Since the user will log in only at the start of the day and before going into the field, there must be stable internet connectivity for the device to perform this process.
A “Sync in Progress” window appears on the screen and the user cannot perform any other action until the process is complete.
After clicking on the hamburger button, a list of actions appears on the user screen. The top displays the user name and contact number, followed by other options such as the home button, language select, edit profile, projects, and logout.
If the user clicks on the hamburger button again, it collapses the hamburger menu. The button is available on all screens of the application.
The user can edit his/her name, and phone number, and select the gender. After updating the details, the user needs to click on the save button which opens a prompt stating “saved successfully”.
If the user does not want to make any changes, he/she can click on the back button, which will take them back to the hamburger menu.
Brief Intro
Sync action allows users to sync the data that is recorded in the system so that it reaches the server and the data is secured.
Before going into the field, the user needs to log into the application every day, which will initiate an automatic sync process. For manual sync, there is a "Sync Data" button on the home screen, which allows the user to sync data according to his/her convenience. At the bottom of the screen, there is a card that shows the message “Data unsynced” along with the number of records unsynced.
When the user clicks on the ‘Sync’ button, the sync action starts along with an overlay showing “Sync in Progress” over the home page. The user cannot perform any other action until the sync is complete or there is some error.
Once the data is synced, it will show a popup, stating “Data Synced” along with a ‘Close’ button at the bottom. When the user clicks on 'Close', it navigates him/her to the home screen.
If the data is not synced due to any error, it will show a popup stating “Sync Failed” with two buttons below it:
Retry: If the user wants to retry syncing the data.
Close: Clicking on this will navigate the user back to the home screen.
The Campaign Management Dashboard offers a wide range of features that deliver a comprehensive view of campaign performance. It empowers supervisors to easily monitor their teams, assess campaign progress, and quickly address any obstacles that may arise.
The Dashboard equips campaign supervisors with real-time insights to evaluate their teams' effectiveness and make data-driven decisions for optimising campaign performance. Featuring intuitive visualisations and customisable metrics, supervisors can easily track key performance indicators (KPIs) such as campaign coverage, engagement, and inventory movement. The Dashboard also provides a comprehensive view of team productivity and individual performance, enabling supervisors to identify top performers and areas that may need additional support. With these powerful tools, supervisors can efficiently monitor and manage their teams, ensuring the success of the health campaign.
The Dashboard's intuitive interface makes tracking campaign progression seamless for supervisors. They can effortlessly monitor campaign milestones, goals, and progress against predefined targets, allowing them to assess the campaign's overall health and take corrective actions when necessary. Moreover, the Dashboard offers historical and predictive data, along with trend analysis, enabling supervisors to identify patterns and make data-driven decisions to optimise strategies for future campaigns. With these powerful features, supervisors can effectively analyse campaign performance and continuously refine their approach for maximum impact.
Apart from performance tracking, the dashboard provides campaign supervisors with efficient tools to troubleshoot roadblocks. It promptly highlights any issues or bottlenecks that may impact campaign progress, allowing supervisors to quickly identify and address them. Additionally, supervisors can drill down into specific boundaries, such as villages, to pinpoint areas that require attention and proactively take measures to resolve challenges. With these capabilities, supervisors can effectively overcome obstacles and ensure smooth campaign execution at all levels, from a macro to a micro level, to achieve desired outcomes.
The HCM Dashboard is purposefully designed to be user-friendly, with an intuitive and easy-to-navigate interface that requires minimal training to get started. Its robust features and user-centric design empower campaign supervisors to efficiently monitor, evaluate, and troubleshoot campaign performance. With this powerful tool, supervisors can effectively drive the success of their health campaigns, making informed decisions and taking corrective actions as needed. The HCM Dashboard is a valuable asset for campaign supervisors, ensuring a seamless and effective management of health campaigns.
The following are the features of the HCM Dashboard:
Bar charts with percentage and number toggle.
Brush component for bar charts to zoom in and out for an enhanced view.
Heat maps with zoom-in/out, toggle, and drill-downs to show coverages.
Date range selection through the calendar date picker and toggle buttons to select ‘Today’ and ‘Cumulative’ date ranges.
A new component to display the list of cards based on the chart data, and includes a collection of numeric data and a circular progress bar.
Predictive line graphs to show planned versus actual campaign progression.
Multi-campaign card layout to view campaigns of multiple types happening simultaneously.
Progress bar to show the campaign duration.
Tabular charts with drill-down, search, toggle, and sort functionalities.
Pie charts with the aggregation are shown at the centre.
Stacked bar charts.
Hover definitions and sub-headings to show more details about a specific card.
Download all charts and pages in PDF and JPG formats.
Share all charts and pages in PDF and JPG formats across WhatsApp and email.
Click here to learn more.
This Node.js service acts as a reverse proxy for Kibana, enforcing authentication and access control based on specific rules. It validates requests using DIGIT’s authentication API.The service utilizes express, express-http-proxy, and axios for proxying and API interaction.
The service relies on environment variables defined in envVariables for key configuration. These variables include:
These configurations can be overridden by environment variables, and they include:
SERVER_PORT: The port on which the Node.js service will run.
EGOV_USER_HOST and EGOV_USER_SEARCH: The host and path for the external authentication API.
KIBANA_HOST and KIBANA_BASE_PATH: The Kibana server URL and base path.
KIBANA_ACCEPTED_CONTEXT_UI_PATHS: List of valid context paths for referer validation.
KIBANA_ACCEPTED_DOMAIN_NAME: Domain name allowed for Kibana access.
KIBANA_EXCLUDE_URL_PATTERNS: URL patterns excluded from authentication.
Auth-Proxy : auth-proxy-urlencoded-fix-aad9a5959c-23
The support features enhance user satisfaction, promote ease of use, and contribute to the app's overall effectiveness in facilitating seamless interactions and data management
Click on the links below to learn more:
The primary purpose of this module is to streamline attendance review and payment processing workflows for health campaign workers. It ensures that supervisors can:
Access tools and functionalities tailored to their responsibilities.
Maintain clear separation between proximity- and campaign-specific workflows.
Facilitate accurate, timely payments for healthcare workers based on attendance.
This flow focuses on managing attendance records within a specific boundary assigned to the logged-in proximity supervisor.
Key Actions:
View attendance: Filter, search, and view attendance data.
Edit attendance: Modify attendance entries for accuracy.
Approve attendance: Validate and approve attendance registers for payment processing.
This flow supports campaign-wide bill generation.
Key Actions:
View registers: Access to view registers to generate bills.
Download reports: Export reports in Excel/PDF formats for stakeholder communication.
Generate bills: Create bills based on three boundary levels: Country, Province, and District.
If the boundary is set to a district, all the registers within that district will be consolidated into a single bill.
The DIGIT HCM comes up with an out-of-the-box dashboard that helps the supervisors who manage the campaign to view real-time campaign indicators such as coverage that helps in making data-driven decisions.
Download charts in PDF or JPG format.
Share charts via WhatsApp or email.
A diverse range of charts and graphs for visualising key metrics.
Drill-down functionality for detailed data examination.
Multi-language support.
Geographic boundary-based heat maps.
View data across multiple campaigns via a single dashboard.
Geo-coordinate map to view delivery data at the household level.
Restrict data access based on user hierarchy.
Tab navigation across modules.
Predictive charts to forecast campaign extensions and stock availability.
Custom Excel reports for in-depth analysis.
Filter and sort tables.
Vewi data for custom date ranges or specific campaign cycles.
The dashboard data will be tailored according to the user's hierarchical boundary, ensuring access is aligned with their operational scope. For instance, a national supervisor will oversee campaign operations nationwide, while a district supervisor will solely access data within their designated district, without visibility into other districts.
To access the dashboard, open your browser and enter the URL [ ]. Log in with your credentials and click on submit.
After logging in, you will land on a page listing all campaign dashboards. This page also includes About and FAQ sections, and a link for downloading custom Excel reports.
To view a specific campaign's dashboard, click on the campaign name.
If you are a national-level supervisor, the initial page you see is a national-level view. Here, you can monitor the campaign's progress across various sub-national boundaries, including aggregates of households, population, and service deliveries.
To navigate to a sub-national level dashboard, click on the ‘View Dashboard’ button next to the sub-national boundary name.
The dashboard is divided into several tabs based on campaign modules: Registration & Delivery, Inventory, Complaints, and Supervision.
Registration & Delivery module: Displays indicators related to registration, including coverage metrics and charts for households, population, and service delivery.
Complaints module: Shows the status of various complaints, types, resolution times, and details of each complaint.
Inventory module: Provides insights into stock status across all warehouses and predicts stock-out scenarios.
Supervision module: Evaluates supervisors' performance in monitoring campaigns using checklists.
Date Filters: Each page has filters to view data for a specific date range, today's data, or cumulative data since the campaign's start.
Campaign Progress: A progression line at the top displays the number of days since the campaign began.
Data Completeness: The sync rate chart indicates how many users have synced data so far.
Drill-Down Charts: Double-click on any bar to drill down to sub-boundaries, continuing until the lowest level (e.g., a village). To return to the previous view, click the 'x' button.
Toggle Chart Views: Switch between percentage and absolute values by clicking toggle buttons.
Prediction Line Chart: Estimates how many more days are needed to reach target coverage based on current service delivery rates.
Sortable Tables: Summary tables can be sorted by column in ascending/descending order or alphabetically.
Download Options: Each chart can be downloaded as a PDF or JPG by clicking the kebab button. Charts can also be shared via WhatsApp or email. Tabular charts can be downloaded as Excel files.
Brush Component: Use the brush component below bar charts to expand or contract the view to see all represented boundaries.
Heat Maps: Monitor campaign progression by boundary through interactive, drill-down heat maps.
Geocoordinate maps: To view each household-level service delivery data.
Document Information
Document Title:
Guide to the HCM Payments Module V1
Document Purpose:
To ensure seamless and effective use of the payments module by implementing programs
This document serves as a guide to effectively use the Payments module within Health Campaign Management (HCM). It outlines the features and functionalities available to users, clarifying tasks that can be performed and limitations to be aware of. Additionally, it provides essential instructions for critical processes, such as approving attendance and generating payments, including key considerations and best practices. The document also highlights important dos and don'ts to ensure smooth and error-free operations. To enhance understanding, it offers a detailed overview of the Payments module's workflow, supported by illustrative screenshots for better clarity and ease of reference.
HCM: Health Campaign Management - The tool for managing health campaigns, including modules for various functions such as payments, attendance, enumeration, supervision, etc.
Event: Key activities during a campaign where attendance is recorded, such as training, enumeration, and distribution.
Attendance Register: A record of attendance for different campaign events, detailing participant names and attendance dates. Attendance markers use the HCM attendance module to record attendance daily until the event concludes.
Muster Roll: An official report documenting the daily attendance of workers engaged in a specific project or campaign. It includes essential details such as worker names, roles, work locations, attendance dates, and days worked. The muster roll is created after the attendance register is approved and serves as a reference for validating attendance, calculating wages, and generating payment reports.
Attendance Marker: The individual responsible for recording event attendance using the HCM mobile app’s attendance module.
Proximity Supervisor: The person authorized to review and, if necessary, edit attendance records submitted by attendance markers. They approve the records for payment processing.
Payment Approver: The person tasked with reviewing generated muster rolls, consolidating them into a single payment report for a specific boundary, and sharing it with financial authorities for payment disbursement.
Boundary: An administrative area used for managing campaigns, such as a province, district, locality, or village. Events and users are assigned to specific boundaries. For instance, a district supervisor assigned to District ABC will oversee district-level training registers created within District ABC.
Editing Attendance Records Post-Event Completion
Authorised personnel, such as proximity supervisors, can modify attendance records after an event concludes to correct errors or omissions made during initial data entry.
Edits include correcting the number of days worked, or marking attendance for previously unrecorded participants.
All edits are tracked and documented within the system for audit purposes.
Approval of Attendance Records and Muster Roll Generation
Once attendance records are reviewed and finalised, they are submitted for approval by proximity supervisors.
Approved records are used to automatically generate the muster roll, which contains attendance details for the event.
The muster roll becomes the official document for wage validation and payment processing.
Reviewing Approved Registers
Payment approvers or other authorised stakeholders can access and review attendance registers that have already been approved.
The review process ensures compliance with organisational guidelines and verifies that data matches muster roll records before payment reports are generated.
Viewing Approved and Unapproved Registers
Users with appropriate permissions can view both approved and pending approval attendance registers.
This view allows campaign managers to monitor the status of attendance records for all events within a given boundary.
Filters and search functionalities may be available to help locate specific registers based on event type, date, or boundary.
The following features and functionalities are not included in this version of the Payments module and are considered out of scope. Some may be considered for inclusion in future versions.
Campaign Worker Onboarding: Workers must be onboarded via the HRMS or Console web interfaces, as this is not supported in the app.
Worker Registry Validation: The module does not support checks for:
- Duplicate entries or boundary over-allocations.
- Mobile number authentication (inactive numbers or mismatches).
- Identity verification or validation of mobile money accounts for status and transaction limits.
Approval Workflows: Missing workflows for:
- Payment report approvals
- Muster roll approvals
Attendance Corrections: No provision for:
- Proximity supervisors returning attendance reports to field supervisors for corrections.
- Payment approvers returning attendance reports to proximity supervisors for corrections or rejections.
Worker Payment Configuration: Setting different rates for workers with the same role based on location boundaries is not considered for this version.
Reporting Limitations: Support for generating intermediate reports before event completion is not considered for this version.
Attendance Evidence: The following capabilities are not in scope for this release:
- Photos of workers or ID card
- Signature, QR code, or biometric-based attendance
Financial Integrations: No integration with mobile money operators (MMOs), banks, or financial institutions.
Worker Communication: Automated SMS notifications for payments, attendance tracking, or registrations are not considered for this version.
KYC and Registry Cross-Checks: No automated cross-checking of failed KYC attempts, name mismatches, or duplicates against MMOs and the worker registry in HCM.
Attendance Marker: Responsible for recording attendance at events (e.g., trainings, enumerations). This role may be filled by a field team supervisor or any individual presiding over the event.
Proximity Supervisor: Charged with approving the attendance recorded by the attendance marker. They verify attendance details (often via phone outside HCM) if discrepancies arise and have the authority to edit records after the event concludes. This role typically operates at the district level or higher.
Payment Approver: Oversees the consolidation of attendance records to generate boundary-specific reports. They are responsible for approving the payment report, forwarding it to higher operations for additional approvals, and liaising with financial institutions to process payments.
1. Attendance Marker
Do's:
Mark daily attendance for all assigned registers without fail.
Sync all records to ensure no pending entries remain on the device before the proximity supervisor edits or approves the attendance records for that event.
Raise complaints for issues like adding/removing persons or correcting details of the staff using the complaints module or by contacting the system administrator.
Don’ts:
Submit incorrect attendance—once submitted, corrections are not possible for the attendance marker.
2. Proximity Supervisor
Do's:
Verify with the attendance marker for all the districts that all records are synced before editing or approving attendance.
Make edits as necessary but ensure all details are accurate before final approval.
Approve all registers systematically, completing one district before moving to the next.
Raise complaints for issues like entry corrections via the complaints module or the system administrator.
Don’ts:
Approve attendance without confirming that all records are synced.
Assume changes can be made after approval—final approvals are irreversible.
3. Payment Approver
Do's:
Double-check all details in the payment report (PDF/Excel) before submission to financial institutions.
Generate payment reports for each boundary systematically, starting with one district and moving to the next, including provincial/national events.
Wait 2-3 minutes for report generation before reporting issues.
Don’ts:
Editing Excel reports after generation is not allowed.
Submit incomplete or inaccurate reports.
4. System Administrator
Do's:
Validate worker information (enumerators, supervisors, etc.) before onboarding them in the system, ensuring correct mobile numbers and IDs.
Confirm no duplicate personnel or mobile numbers exist in the system.
Map workers accurately per the microplan, avoiding over or under-allocations
Verify that mobile and bank account numbers belong to the correct person and not their family members.
Ensure mobile numbers are active and unrestricted for receiving payments.
Approve register changes only after supervisory authorisation.
Don’ts:
Allow unverified or incorrect data to be entered into the system.
Approve register changes without proper supervisory approval.
Before the Campaign or Related Event Starts
Ensure all workers, including supervisors as per the microplan, are created in the system.
Complete all worker validations as outlined in Section 6.
Confirm that all attendance registers are created and assigned to the appropriate attendance markers and proximity supervisors.
If payment reports need to be generated mid-event, make it as two separate attendance registers for the event: one for the first half and another for the second half.
For different wage amounts across specific boundaries for the same role, create separate roles with the appropriate wage amounts and assign workers accordingly.
Verify that all attendance markers and proximity supervisors can log in and view their assigned attendance registers.
During the Campaign or Related Event
Mark attendance diligently for each register daily using the HCM application.
Perform routine syncs to ensure no unsynced records remain, particularly upon event completion.
After the Campaign Starts or Ends
Ensure no registers are pending approval by proximity supervisors.
Verify the accuracy of the worker and register details before generating the payment report.
Confirm that payment registers are created for all boundary levels and individual boundaries (e.g., districts, province, country).
Overall process flow diagram:
Proximity supervisor workflow
On the language selection screen, select the preferred language from the available options. Select the desired language and click on ‘Continue’ to access the login page.
On the login page, enter the credential for a proximity supervisor and select the assigned boundary. After reading through the privacy policy statement, select the checkbox to accept the terms and conditions and then click on ‘Continue’ to proceed to the landing page for proximity supervisor.
On the landing page for a proximity supervisor, the ‘Payments’ label is displayed along with an option to view the "Attendance Registers". Click on the "Attendance Registers" label to access project-specific attendance registers.
Select the desired project name (event name) from the available options in the dropdown and click ‘Next’ to proceed.
Following the selection of the project name, you will be navigated to the ‘Inbox’ screen, where by default no attendance registers are shown. To view attendance registers, a desired boundary must be selected through a boundary filter (in this case ‘District’). Once the desired boundary is selected, click on ‘Apply’ to proceed.
Post selection of a desired boundary, you will be directed to a screen that shows all the "Pending for approval (#)" and ‘Approved (#)’ attendance registers that have been created within that specific boundary, with "Pending for approval (#)" registers being the default viewing option. ‘Approved (#)’ attendance registers can be accessed through toggling. Based on the status type (either pending for approval or approved), further discretised information is provided in a tabular format which includes the following: Attendance ID, Attendance marked by, Boundary, and Number of attendees.
Clicking on the "Attendance ID" on the ‘Inbox’ page will open the "View Attendance" screen, which will provide all the campaign-related details of the registrant and their attendance summary. The ‘Action’ button present on the bottom right of the screen allows the proximity supervisor to either "Edit Attendance" or ‘Approve’ the submitted data.
On clicking "Edit Attendance", a warning message is displayed informing the proximity supervisor that editing the attendance days data will impact the payments and the same will be frozen for the entire event duration, followed by a confirmation question. This means that if the field supervisor marks the attendance for any further dates, it will not be updated in the register. The proximity supervisor can decide to either ‘Proceed’ to update the attendance data or select ‘Cancel’ to go back to the "View Attendance" page. Click on ‘Proceed’ to confirm the editing of the attendance data.
Next, the "Edit Attendance" page is displayed which will allow the proximity supervisor to update the attendance data for each field supervisor with the help of the ‘+/-’ buttons, or they can enter the count directly within the data entry field. The ‘Submit’ button is disabled until the proximity supervisor updates the attendance for at least one field supervisor.
If the "number of days worked" entered exceeds the event duration while updating, an error message will be shown informing the proximity supervisor about it. The system allows marking the number of days as 0, accommodating those who may not have participated for the entire duration of the event.
Once the new attendance data has been entered, click on ‘Submit’ to proceed.
Subsequently, a toast message is displayed indicating that attendance has been updated successfully. The attendance data can be modified as many times as required until it is approved.
Following the successful submission of the new data, the "View Attendance" page will automatically appear, where the updated attendance data is reflected.
Now, click on the ‘Action’ button and then select the ‘Approve’ option. This will open a dialog box, where mandatory comments should be provided to proceed with the approval process which is continued by clicking again on ‘Approve’. The approval process can also be cancelled at this stage by clicking on ‘Cancel’.
After submitting the mandatory comments, if the ‘Approve’ option is selected, then a confirmation popup will appear with a message highlighting that the data once approved cannot be modified.
On clicking again on ‘Approve’, a success screen will be displayed for the confirmation, and the muster roll will be generated and displayed on the screen. Following this, any other assigned tasks can be carried out by clicking on "View Another Register" or "Go Back to Home".
On the ‘Inbox’ page, the status of the register can now be seen as approved, and when it is opened, no actions are available, except to "Go Back".
Payments approver workflow
The payment approver is responsible for generating and downloading the final payment bill which is further used to disburse the payments to all the campaign workers.
On the language selection screen, select the preferred language from the available options, and click on ‘Continue’.
Next is the login page, where the credentials for a campaign supervisor are entered and the assigned boundary is selected. After reading through the privacy policy statement, select the checkbox to indicate acceptance. Then click on ‘Continue’ to proceed.
This is the landing page for a campaign supervisor. On this page, a card is displayed for payments with the options to go to the ‘Inbox’ page to generate bills and to "My Bills" to view and download already generated bills. Click on ‘Inbox’ to proceed.
On this page, the project name (event type name) from the available options must be selected, as well as the aggregation boundary details; whether the bill should be aggregated at the national, province/state, or district level. Select the required aggregation boundary level and click on ‘Next’.
Following this, the "Bill Inbox" page will appear, where the specific boundary should be filtered for which the bill has to be generated. Once selected, it will display all the attendance registers, both approved and pending approval, which can be only viewed by the campaign supervisor, along with an option to generate the bill. Click on "Generate Bill".
The campaign supervisor will be able to generate the bill only once for a particular boundary, and this can be done only when all the registers within that boundary have been approved.
On clicking "Generate Bill", a confirmation pop-up is displayed that indicates that the bill cannot be generated again. Click on "Generate Bill" to proceed.
This will initiate the bill generation process along with displaying a toast message highlighting the wait time for completion of the process. Click on "My Bills" to proceed.
Clicking on "My Bills" will display the bill inbox page, where all the generated bills can be found. On this page, bills can be searched by the ‘Bill ID’ or a date range based on the date they were generated. The bills which are still being generated can be identified in the ‘Actions’ column.
Once the bill has been generated successfully, it can be downloaded as either an Excel file or a PDF by clicking on the respective action button. Choose the required format for the report to be downloaded.
An illustration of the PDF report is given below. The report provides the following information: total amount to be processed, details of each individual, different cost heads that are applicable based on the assigned role, and the sum of the amount to be paid based on the number of days attended.
What are the different types of roles available in the HCM payments module There are two different types of roles that have been made available in the HCM payments module version 1.
a. Proximity Supervisors
They are responsible for making changes in the attendance registers as well as approving them.
b. Payment Approvers
They are responsible for generating the bills and are authorised to download them in Excel/PDF formats for further processing.
What is the workflow of the payments module in the HCM platform? In the HCM platform, the payments module is coupled with the attendance module. The typical workflow diagram is provided in section 8:
How to mark attendance in the HCM platform? There is a dedicated attendance module available in the HCM platform to allow field supervisors to mark the attendance of their team members.
What is an attendance register in the HCM platform? An attendance register is a record-keeping tool that is used to track the count of present or absent campaign workers, along with their activities such as training, registration/distribution, etc.
How can a proximity supervisor edit an attendance register? User Navigation: Login > Home Page > Attendance Registers > Select Project Name > Select Boundary > Click on Attendance Register in ‘Pending for Approval’ state > View Attendance > Action: Edit Attendance > Warning Message: Proceed > Edit Attendance > Submit > Success Message. (Note: You can edit the attendance as many times as required till it is approved).
How can a proximity supervisor approve an attendance register? User Navigation: Login > Home Page > Attendance Registers > Select Project Name > Select Boundary > Click on Attendance Register in ‘Pending for Approval’ state > View Attendance > Action: Approve > Add Comments and Approve > Confirmation: Approve > Success Screen (Note: Once approved, you cannot take any further action on the register)
What are approved and unapproved registers? Approved registers are those that are marked as approved by the proximity supervisors, and they cannot take any further action on these registers. Unapproved registers are the ones that are submitted by the field supervisors to be approved by the proximity supervisor, and their attendance details can be updated by the proximity supervisor before approval.
How can I select a different type of attendance register? The first step as a proximity supervisor is to select the type of attendance register from the drop-down after logging in to the payments module. There will be multiple types of registers such as Master Training register, Registration team training, Campaign, etc.
As a proximity supervisor, I have selected one of the districts as a boundary. Which attendance registers can I manage? You can manage only those registers assigned at the selected district or boundary levels below the district.
As a payments supervisor, I have selected the country name. Which muster rolls can I generate the payment report for?
You can generate the payment report for all the muster rolls that are assigned at a county level.
As a payments supervisor, I have selected a province name. Which muster rolls can I generate the payment report for?
You can generate the payment report for all the muster rolls that are assigned at a province level.
As a payments supervisor, I have selected a district name. Which muster rolls can I generate the payment report for?
You can generate the payment report for all the muster rolls that are assigned at a district level or below the district level.
What is a muster roll in the HCM payments module? A muster roll is a simple document used to keep track of workers and their activities. It records who showed up for work, the hours they worked, and sometimes their pay. It helps employers know who was present and how much work was done. In campaigns, a muster roll can track attendance and ensure workers are paid correctly for their efforts.
What is an event? In the context of attendance for a campaign, an event refers to a specific activity or session where workers or participants are expected to be present. This could include training sessions, daily fieldwork (registration/distribution), or any other scheduled task as part of the campaign.
When should I approve an attendance register? You must wait for the event to be completed to review and approve the attendance register.
Is it advisable to approve a register before an event is completed? What happens if I edit attendance during an ongoing event? Always approve the attendance register only after the event has fully concluded to ensure data accuracy. Editing attendance during an ongoing event will overwrite the current records, and the system will consider the edited data as final. Additionally, if the attendance register has been edited and approved, attendance markers attempting to record attendance will encounter errors, as there is no downward data flow from the proximity supervisor to the attendance marker
Which formats can I download the payment report in? The reports are available for download in Excel and PDF formats.
How can I view and download the bills I generated? Navigation: Login > Home Page > My Bills > Actions (Download in Excel/PDF)
Can I create bills again for already generated muster rolls?
No, you cannot regenerate bills. However, you can view the generated bills as well as download them as many times as needed.
How long will it take to generate a bill? The bill generation can take up to 2-3 minutes depending on the number of registers collated.
How can I aggregate muster rolls into a single bill? Is aggregation mandatory? At what levels can aggregation occur?" Aggregation of muster rolls can be done at different boundary levels, as described below: District Level: Muster rolls from all events created at the district or subordinate levels are aggregated for the selected event type. Example: Aggregating muster rolls for all registration events in the district of Nampula, including those at locality levels within Nampula. Province/State Level: Muster rolls from events across the entire province/state are combined. Example: Aggregating all muster rolls for distribution events across the province of Cabo Delgado. National Level: Muster rolls from events nationwide are collated. Example: Aggregating muster rolls for all master trainer training conducted at the national capital in Mozambique. Aggregation is separated at various levels to ensure there are no duplications of bills generated for the same registers
What should I do if bill generation fails?"
Wait for some time and try generating the bill again.
Check that all attendance registers have been approved.
If the issue persists, contact the system administrator for assistance.
Can I edit the Excel sheet of the payment report? Payment report sheets are protected and cannot be directly edited. If edits are necessary, duplicate the sheet and make the required changes. Ensure that any modifications are made only with the approval of the respective supervisory authority.
How can I change the payment rates for specific roles? If certain roles require different payment rates, you need to define those roles separately and assign individuals accordingly. If people in the same role working across different boundaries need different rates, create distinct roles for each boundary. Ensure any changes are made before generating bills
Can I assign different payment rates to the same role for different boundaries? No, the system currently supports assigning rates based on roles, which must remain consistent across all boundaries.
How can I generate an intermediate payment report before the event is completed? The current version of the module does not support generating intermediate payment reports during an ongoing event
The Attendance Module enables supervisors to track attendance for their attendees, ensuring accurate records and consistent data for processing payments. This serves as the precursor to the Payments module. For more details, click here.
Supervisors can use the real-time dashboard to monitor campaign activities and track coverage, enabling them to make informed, data-driven decisions.
Download charts in PDF or JPG format.
Share charts via WhatsApp or email.
A diverse range of charts and graphs for visualising key metrics.
Drill-down functionality for detailed data examination.
Multi-language support.
Geographic boundary-based heat maps.
Geo-coordinate map to view delivery data at the household level.
Restrict data access based on user hierarchy.
Tab navigation across modules.
Predictive charts to forecast campaign extensions.
Filter and sort tables.
View data for custom date ranges or specific campaign cycles.
Side-by-side bar chart visualization for more than 2 variables
Venn diagram for inter-cycle analysis
Filter data by cycles
The dashboard data will be customized based on the user's hierarchical level, ensuring access is aligned with their specific operational scope. For example, a national supervisor will have oversight of the entire campaign at the national level, while a provincial supervisor will have access to data within their assigned province, and a district supervisor will only have access to data within their assigned district, with no visibility into other districts.
To access the dashboard, open your browser and enter the URL [ ]. The language selection screen will appear, select the preferred language and click on ‘Continue’. You will navigate to the ‘Login’ page. Log in with your credentials and click on ‘Continue’.
After logging in, you will land on a page listing all campaign dashboards.
Click on the dashboard. If you are a National Supervisor, the landing page you will see is the national overview page.
To navigate to a sub-national level dashboard, click on the ‘View Dashboard’ button next to the sub-national boundary name.
The dashboard is divided into several tabs based on campaign modules: Registration & Delivery, Inventory, Complaints, Supervision, Team Performance, Data Quality, and Referral and Side Effects.
Date Filters: Each page has filters to view data for a specific date range, today's data, or cumulative data since the campaign's start.
Campaign Progress: A progression line at the top displays the number of days since the campaign began.
Filter by cycle: This allows you to view and analyze data for specific treatment cycles in the seasonal malaria chemoprevention campaign. Since children are treated in multiple cycles, this filter helps you focus on performance and coverage for a particular cycle, making it easier to track progress and identify gaps.
Drill-Down Bar Charts: Click on any bar to drill down to sub-boundaries, continuing until the lowest level (e.g., a village). To return to the previous view, click the 'x' button.
Drill-Down Table Charts: Click on any boundary in the table to drill down to sub-boundaries, continuing until the lowest level (e.g., a village). To return to the previous view, click the 'x' button.
Drill-Down Pie Charts: Click on any slice in the pie chart to drill down to sub-categories or data split across sub-boundaries. To return to the previous view, click the 'x' button.
Prediction Line Chart: Estimates how many more days are needed to reach target coverage based on current service delivery rates.
Geocoordinate maps: To monitor distributor coverage and track supervisor performance, the system uses the geographic coordinates of completed checklists. On a zoomed-out map, the coordinates are grouped into clusters for easier viewing. By clicking on a cluster, users can see details such as the total number of points in the cluster and information about the supervisors who recorded the data. This makes it easy to track performance and coverage across different areas.
Side-by-side comparative bar charts (2 variables): The side-by-side bar charts enable a clear comparative analysis between two distinct variables, making it easier to identify differences and trends. For example, they can be used to compare coverage by gender concerning population distribution. Additionally, side-by-side bar charts can visualize the comparison between expected stock levels and actual stock balance. This provides a clear view of inventory management, helping supervisors determine whether stock levels are in line with the campaign’s needs, or if there are discrepancies that could lead to shortages or overstocking.
Side-by-side bar chart (More than 2 variables): This layout allows supervisors to view multiple relevant variables simultaneously in a single, unified chart. By displaying these indicators next to each other, supervisors can easily compare and analyze the data across different dimensions, such as age categories, referral summary, and stock movements. The ability to view all relevant variables at once enhances efficiency, allowing for quicker identification of trends, patterns, or areas requiring attention.
Stacked bar charts: Stacked bar charts are an effective tool for visualizing the distribution of data across multiple variables, allowing for easy comparison and analysis. For example, a stacked bar chart can display the number of complaints filed within each operational boundary (district), grouped by factors such as the type or status of the complaint (pending, resolved, rejected).
Similarly, the chart can be used to show the types of side effects recorded during the campaign, with the side effect categories stacked vertically for each boundary. This enables stakeholders to easily identify trends, compare performance across regions or cycles, and pinpoint areas that may require further attention or intervention. By clustering data in this way, the chart provides a clear, comparative view that helps drive data-driven decisions and enhance campaign efficiency.
Venn diagram for inter-cycle analysis: The Venn diagram on the dashboard visually represents the overlap and distribution of inter-cycle children administration data. It illustrates the number of children who received treatment across different cycles, highlighting:
Cycle 1: Children treated in the first cycle.
Cycle 2: Children treated in the second cycle.
Overlap: Children who received treatment in both cycles.
This diagram helps identify the extent of coverage across different cycles and ensures that children who need multiple rounds of treatment are properly accounted for. It provides a clear visual of treatment gaps and overlaps, supporting efficient campaign management and decision-making
Supervisors
Fill the checklists
View submitted checklists
Supervisors are responsible to oversee the campaign operations and monitor the activities, and ensure the targets are achieved effectively.
The Geo Json assets files need to be loaded to s3 bucket and the reference urls need to be mapped in map-config.GeoJsonMapping mdms schema data.
map-config
GeoJsonMapping
dss-dashboard
dashboard-config
HCM-PROJECT-TYPES
projectTypes
HCM
dashboardConfig
To configure dashboard links, add the dashboard URLs to the project type in MDMS
For the campaign, the required charts should be added to the dashboard-analytics chart configuration.
The UI configuration can be loaded into the MasterDashboardConfig within the dashboard-analytics.
Master-Dashboard Config
Chart API Config
Click to learn more.
The Proximity Supervisor Flow for managing attendance registers is designed to provide supervisors with a seamless experience for selecting projects, viewing associated attendance records, and managing the details effectively. The flow emphasizes ease of navigation, quick access to project and register information, and actionable steps to edit or approve attendance records.
Project Selection: Enables supervisors to pick a specific project to manage.
Registers Inbox: Displays filtered attendance registers for selected boundaries.
View Attendance: Provides detailed attendance information for campaigns and projects.
Edit Attendance: Allows supervisors to update attendee records.
Approve Attendance: Facilitates approval with clear validation and comment requirements.
Each step in this flow ensures user-friendly interactions and adheres to the necessary validation rules and role-based permissions for supervisors and project managers.
Note: In Payments version 0.1, each user will be associated with only one project.
Allows supervisors to select a project and view or manage attendance registers associated with that project.
Interface Elements:
User Actions Flow:
Select a Project: Choose a project from the dropdown list.
Proceed to Next Screen: Click "Next" to access the registers associated with the project.
Overview: Enables supervisors to view attendance registers filtered by selected boundaries (e.g., district).
Interface Elements:
User Actions Flow:
Select Boundary: Choose a district from the dropdown.
Apply Filter: Click "Apply" to filter results.
View Results: Access filtered attendance registers for the selected district.
API Endpoints:
The Campaign Supervisor Flow is designed to streamline the management of attendance registers and bill generation processes for supervisors overseeing specific projects and boundaries. This flow ensures efficient selection, filtering, and approval of registers and simplifies the generation and tracking of bills. It focuses on clear workflows, actionable feedback, and validation mechanisms to enhance usability and accuracy.
Project and Bill Aggregation Selection: Supervisors select a project and boundary aggregation level to narrow down the scope for attendance registers and billing.
Registers Filtering and Bill Generation: Enables supervisors to filter registers based on boundaries, view attendance data, and generate bills only when all registers are approved.
Bill Management (My Bills): Provides a centralised view of all generated bills, with tools for searching, filtering, and downloading them in preferred formats.
This structured approach empowers supervisors to manage attendance registers and related billing tasks with ease while adhering to necessary validations and role-based permissions.
Clicking on any register ID from the inbox displays detailed information about the attendance register. The screen includes information such as campaign details, attendance officer details, and attendee information. Users can perform two primary actions: Edit and Approve.
Interface Elements
Campaign Details: Displays the campaign name, ID, and dates.
Attendance Officer Details: Name, ID, and contact information.
Attendee Information: Includes register ID, attendee names, and attendance data.
Action Buttons:
Edit Attendance: Allows editing attendance details.
Approve Attendance: Approve the attendance register.
Interface Elements:
Campaign Status:
If the campaign is ongoing, Edit and Approve buttons are disabled, and only a "Back" button is shown.
Administrators can override this behavior through MDMS (configurable settings).
Approved Registers:
If the register is already approved, the action buttons are disabled, and a "Back" button is displayed.
Role-Based Permissions:
Only authorized supervisors can access Edit/Approve features.
Action Flows
a. Step 1: Pop-Up Confirmation
Message: "Editing attendance will affect the number of days for attendees. Do you want to proceed?"
Buttons:
Cancel: Close the pop-up.
Proceed: Navigate to the Edit Attendance screen.
b. Step 2: Edit Attendance Screen
Validation:
Number of days worked must be a positive integer and must not exceed the event duration.
Submit Button Behaviour:
Initially disabled until changes are made.
Upon submission:
Displays a success message: "Attendance updated successfully!"
Displays an error message if the update fails.
Approve Attendance Flow
Step 1: Add Comment
Message: "Please add a comment before approving."
Input Field: Allows users to enter comments (mandatory).
Buttons:
Cancel: Closes the pop-up and returns to the view screen.
Submit: Proceeds to the final warning.
Step 2: Confirmation Pop-Up
Message: "Do you want to approve this attendance register?"
Buttons:
Cancel: Closes the pop-up and remains on the view screen.
Proceed: Opens a Comment Entry Pop-Up.
Step 4: Success Page
Message: "Attendance approved"
Action: view another registers or go back to home.
Endpoint
Purpose
Role
/registers-inbox/v2/filters/_search
Search registers by filter (district)
PROXIMITY_SUPERVISOR
/registers-inbox/v2/registers/{boundary}/_search
Retrieve registers for a selected boundary
PROXIMITY_SUPERVISOR
HCM
paymentsConfig
UI Configs
HCM
WORKER_RATES
Rate Master Configs
common-masters
MusterRoll
Muster Roll and Attendance Configs
Element
Description
Register Details
Displays Attendance ID, Campaign Name, Project Type, Boundary, and other metadata.
Attendee Table
Lists attendee details, including Name, ID, Designation, and Hours Worked.
Action Button
Enables editing or approving attendance (if conditions are met).
Validation Message
Informs users if the campaign is ongoing and actions are disabled.
Campaign Worker
NO
Name of attendee
User Name
NO
Username of attendee
Role
NO
Role of attendee
Number of Days
YES
number of days worked by the attendee
health-attendance/v1/_search
fetch the registers details
health-individual/v1/_search
fetch the attendee and staff details
/health-muster-roll/v1/_update
to update the attendee attendance and approve registers
/health-muster-roll/v1/_estimate
to fetch estimate data of registers
/health-muster-roll/v1/_search
fetch the muster role data for regiter
PROXIMITY_SUPERVISOR
manage attendance registers, approving and editing the attendance data
Project Selection
Dropdown to select the project
Action Buttons
- Back: Navigate to the previous page. - Next: Proceed to the attendance registers for the selected project.
Element
Description
Filters
Boundary selection dropdown (e.g., district) and "Apply" button to filter results.
Results Display
Shows registers with details such as Project Name, Status, Supervisor Name, and Entries.
Status Filters
Groups results by register status (e.g., Pending for Approval, Approved).
CAMPAIGN_SUPERVISOR
aggregate the bill generation, based on district, province or country and download it for further process
This is the initial screen where the user selects:
Project: The specific project they are managing.
Bill Aggregation Level: The boundary level at which the bill should be generated (Country, Province, or District).
Users cannot proceed without filling out these fields.
Interface Elements:
Project Selection
Dropdown menu to select the project.
Bill Aggregation Level
Dropdown menu to select the aggregation level (Country, Province, District).
Action Buttons
- Back: Navigate to the previous screen. - Next: Proceed to view registers mapped to the selected project.
User Actions Flow:
Use the dropdown menu to select the project.
Select one of the available aggregation levels (Country, Province, or District) from the dropdown.
Click the "Next" button to navigate to the register filtering screen.
Validations:
Both fields are mandatory:
If either the Project or Bill Aggregation Level is not selected, an error toast message is displayed if you try to proceed.
The "My Bills" section serves as a centralised dashboard for campaign supervisors to view and manage all bills associated with their assigned projects. By default, the dashboard displays all bills related to the projects under their supervision. Supervisors can search for specific bills or filter them using date ranges or by bill id.
Interface Elements:
Search Filters
Bill ID: Enter a specific Bill ID.
Date Range: Select a start and end date to filter bills within a specific time frame.
Action Buttons:
Search: Filters the results based on the provided criteria.
Clear Search: Resets the filters and shows all assigned bills.
Bill List
A table format displays the bills with the following columns:
Bill ID
A unique identifier assigned to each bill (e.g., WB-YYYY-MM-DD-XXXXX).
Date
The creation date of the bill.
Boundary
The geographic boundary associated with the bill (e.g., District, Province).
Project Name
The name of the project for which the bill was generated.
Workers
The total number of workers covered under the bill.
No of Registers
The total number of registers associated with the bill
Status
The current status of the bill (e.g., Generated, In Progress, Failed).
Status Descriptions
Generated: The bill has been successfully generated. The user can download it in PDF or Excel format.
In Progress: The report is still being generated. The user should wait for completion.
Failed: The report generation failed. The user can:
Retry the process.
Contact support if the issue persists.
API Endpoints:
/health-expense/bills/v1/_search
Search bills by project id
/filestore/v1/files/{id}
Download details of a specific bill
Purpose:
This screen allows Campaign Supervisors to:
Filter attendance registers based on boundaries (Country, Province, and District) tied to the selected project and aggregation level.
View the list of registers within the selected boundary.
Generate bills for the selected boundary if all registers are approved.
Filters Section
no of levels will vary based on the aggregation level selection:
Country: Dropdown menu to select the country (e.g., Mbazi Highlands).
Mandatory Field: Must be selected before applying filters.
Province: Dropdown menu to select the province (e.g., Nampula).
Mandatory Field: Must be selected before applying filters.
District: Dropdown menu to select the district (e.g., Murrupula).
Mandatory Field: Must be selected before applying filters.
Apply Button: Triggers the filter to display attendance registers for the selected boundary.
Register Inbox
Project Name: Displays the selected project name .
Aggregation Level: Displays the selected aggregation level (e.g., District level).
Register Status Summary:
Approved Registers: Shows the count of approved registers (e.g., 18).
Pending Registers: Shows the count of pending registers (e.g., 0).
Registers Table
Displays a tabular list of attendance registers for the filtered boundary, with the following columns:
Register ID
Unique identifier for each attendance register
Boundary
Indicates the boundary associated with the register
Supervisor Name
Displays the name of the supervisor associated with the register
Number of Workers
Displays the total number of workers in the register
Action Section
Generate Bill Button:
Enabled State: If all registers are approved, this button becomes active, allowing users to trigger the bill generation process and bill is not already generated.
Disabled State: If any registers are pending approval, the button remains inactive.
User Actions Flow:
Filter Attendance Registers:
Mandatory Filters: The user must select a Country, Province, and District before clicking "Apply".
After clicking Apply, the attendance registers for the selected boundary are displayed.
View Attendance Registers:
The filtered registers are shown in a tabular format.
Generate Bill:
The Generate Bill button is enabled only if all the registers within the selected boundary are approved and bill is not generated already.
Clicking Generate Bill triggers the bill generation process:
A confirmation pop-up appears with the warning.
Buttons:
Cancel: Returns to the register list.
Proceed: Starts the bill generation process.
A toast message will be shown whether bill generation started or failed. and a info message will be displayed with same.
All If all registers within the selected boundary are approved Approved:
The Generate Bill button is enabled.
Upon clicking Generate Bill, an info message is displayed: "Bill generation in progress. Please wait."
Bill Already Generated:
If all registers within the selected boundary are approved but a bill has already been generated:
An info message is displayed: "Bill has already been generated for this boundary."
Pending Registers:
If some registers within the selected boundary are still pending approval:
An info message is displayed: "Bill cannot be generated until all the registers are approved."
Boundary Selection:
All three boundary levels (Country, Province, and District) are mandatory for filtering attendance registers.
Error toast massage if you click on apply without selecting all mandatory boundaries.
The system verifies the approval status of all registers in the selected boundary before enabling the Generate Bill button.
/health-attendance/v1/_search
Retrieve attendance registers by boundary
/health-expense/bill/v1/_search
Checks if bill is already generated or not
/health-expense-calculator/v1/_calculate
Trigger bill generation for selected boundary