Loading...
Loading...
Loading...
Loading...
Loading...
Loading...
Loading...
Loading...
Loading...
Loading...
Loading...
Loading...
Loading...
Loading...
Loading...
Loading...
Loading...
Loading...
Loading...
Loading...
Loading...
Loading...
Loading...
Loading...
Loading...
Loading...
Loading...
Loading...
Loading...
Loading...
Loading...
Loading...
Loading...
Loading...
Loading...
Loading...
Loading...
Learn how to apply for new trade licence, renew and pay trade licence fee
Citizens represent individuals, communities, or business entities who are the system end-users. The TL module allows business owners to apply for a trade license online or even apply for the renewal of an existing license.
The citizen can also approach the Counter Employee (CE) to submit new TL applications or raise renewal requests for existing licences.
The Citizen or CE role can -
Citizens can renew their existing trade applications on the DIGIT portal. CE can also apply for TL renewal on behalf of the citizens.
An illustrative guide to using the business license issuing module
The module offers citizens and governance bodies a convenient and transparent means of processing trade licenses. A trade licence is permission the local governing bodies issue to carry on a specified business or trading activity within the authorized area. It is a mandatory document required to run a business or commercial activity.
Tip: Click on the links on the flow diagram below to access the docs for the specified action.
Click on the relevant role below to learn more about how to use the trade license solution.
Citizens or CEs can apply for a new trade licence through the DIGIT web portal or the DIGIT mobile app. To apply for a new trade licence click on the Trade Licence card available in the Citizen Services section of the DIGIT home page.
Functional overview for stakeholders
The Local Business License Issuing application provides a digital interface, allowing citizens to apply for the Trade Licence and subsequently make the trade licence fee payment online.
The Local Business License Issuing application enables:
Ease of doing business — Traders can apply for new licences, renewals, amendments, and supplemental licences
Regulatory Tracking — Administrators can track and manage regulatory processes
Shorter Timelines — Streamline and automate business licencing processes and help a business to be set up quickly
Data-driven decision making — The application collates valuable information on the economic activity and employment opportunities in a ULB
The list below summarizes the key features supported by the TL module -
Key capabilities offered by this functional component -
OTP-based login for citizens via Web/Mobile App
OTP-based login for employees via Web/Mobile App
Provision for language selection during registration for both employees and citizens
Provision of creating a personalized profile for citizens and employees on the Web/App
Login credentials for the various hierarchies of employees
Role-based access for performing different actions relating to Trade License modules
Users can apply for a new Trade Licence from the system. They can select the type of license to apply. The user enters trade details, owner details and documents after which the application can be reviewed and submitted. Similarly, a counter employee can also apply for a trade licence on behalf of the citizen. The system has a workflow integration that enables stage-wise approval before issuing the Trade Licence.
Key capabilities offered by this functional component -
Citizens can apply for a new trade licence through mobile app/web
Citizens/CSC can capture trade details, trade units, accessories, owner details, address, purpose, date of issuance, licence number etc.
Citizens/CSC can upload supporting documents
Citizens/CSC can calculate breakup based on selected trade
Citizens/CSC can select multiple accessories for the trade
Citizens/CSC can apply for multiple trade licences
Citizens/CSC can download/print application summary
Citizens/CSC can download/print trade reference number
Citizens/CSC can view the applied licences
The system has the facility to deliver the service online & through SEWA KENDRA.
The portal displays all the information including the processes and documents required for citizen convenience.
The system has the facility to assign a unique identification number based on the licence type, which will be used for all future transactions linked to the licence.
The system has the facility to assign the application to the respective Inspector for survey and verification. After the application is submitted, it goes to the document verifier. The next step after document verification is field inspection. After the field inspector’s approval, the TL is approved by the approver.
Key capabilities offered by this functional component -
Document Verifier - verifies & forwards or rejects the application
Licensing Inspector - verifies and forwards the application
Licensing Inspector - sends back or rejects the application
Licensing Inspector - approves the application
Citizen - pays for the licence post-verification process online or at the CSC
CSC - collects fee post-verification
The system allows the printing of the licence and sending the licence through e-mail.
The system allows SMS alerts to the applicant regarding the date of inspection/visit by the inspector and approval/rejection of the application.
The system allows the inspector to enter the field visit details and a field visit report is generated and automatically routed to the superintendent.
The system has the facility to edit/update the application based on the inspection report against the application.
The system has the facility to provide a hassle-free renewal process for citizens and employees, leading to increased revenues, by reducing unlicensed trades. The system allows the sending of SMS and email notifications and reminders based on the renewal cycle.
Key capabilities offered by this functional component -
The citizen can pay for the licence post-verification process
CSC - collects fees post-verification
The system allows intimating the applicant about the payment of the licence fee through SMS/email
The system allows the generation of receipts for the payment
The payment modes enabled are Card (offline), cash, cheque, DD
Following reports offered by the module -
Cancelled receipt register report
Trade licence collection
Trade licence application status- showing the number of licences approved/rejected.
Trade licence ULB-wise status
State dashboard: View Reports for Total Licences, Licences Issued, Payment Collected, Payment Distribution
Notifications - The system can send notifications to citizens. These notifications can be sent for various steps like - verification completion, payment reminder, and payment confirmation. These notifications can be sent in the language chosen by the ULB through all channels - SMS, WhatsApp, and Email.
Configurable Masters - The system provides the following masters that can be configured as per the State’s requirements:
Charges & calculation: calculation engine, rebate, penalty,
Rate Master
State Masters: Trade Ontology, Documents List, Accessories, Ownership, Employee Data Mapping, Boundary Data Mapping, Fee Matrix (Licence Fees)
System specification in compliance with the Ease of Doing Business (EODB) BRAP 2019
80
Sector Specific
2
Implement an online application system with the following features:
i. Online submission of application without the need to submit physical copy of application
ii. Eliminate physical touchpoint for document submission
iii. Allow option of online payment of application fee
iv. Allow applicant to track status of application online
v. Applicant can download the final certificate online
Already available in the system
Registration, Login, Creation of User Profile
Provision for Language Selection during first-time registration via Mobile/Web app.
OTP Based Login for Citizen/ Employee via Mobile/ Web App
Login Credentials for the various hierarchy of employees
Provision of Personalized Profile for Citizen/ Employee on Web App
Applying for a Trade Licence
Citizen/CSC: Enters Trade Details, Trade Units, Accessories, Owner Details.
Citizen/CSC: Upload Documents
Citizen/CSC: ULB Wise Trade Selection
Citizen/CSC: Calculation Breakup Based on Selected Trade
Citizen/CSC: Multiple Accessories Field Count
Citizen/CSC: Multiple Trade Licence
Citizen/CSC: Download/Print Application Summary
Citizen/CSC: Download/PRINT Trade Reference No
Citizen/CSC: View the applied licences
Citizen: Pays for the licence post-verification
CSC: Collects fee post verification
Issue of trade licence
Document Verifier : Verify & Forward/ Reject the application
Licencing Inspector: Verify and Forward/ Send back/ Reject the Application.
Licencing Officer: Approve/ Send back the Application
Licencing Officer: Reject/ Cancel the Application
Modification to a Trade Licence
Edit/ Update the Application based on the Inspection report against the application.
Renewal of a Trade Licence
Renew trade licence
Payment and Fee
Configurable Workflow Rights : Edit & Payment Collection
Payments & Collection : Various Payment Modes
Dashboards and reports
Cancelled Receipt Register Report
Trade licence collection
Trade licence application status- showing the number of licences approved/rejected
Trade licence ULB-wise status
State Dashboard: View Reports for Total Licences, Licences Issued, Payment Collected, Payment Distribution
General features
Notifications : SMS Notifications
Charges & Calculation : Calculation Engine
Charges & Calculation : Rebate/ Penalty- Date Based
Charges & Calculation : Ad-Hoc Rebate/ Penalty
Charges & Calculation : Exemptions Trade Type & Owner Type
Configuration masters
Configurable Workflow Rights : Edit & Payment Collection
Configurable Verification & Approval
Trade license applications pass through various stages where details are scanned, verified, and inspected before the final approval. The workflows are defined at the State or ULB level and adjusted to meet individual department requirements.
The prescribed stages through which trade license applications are routed include -
Document Verification
Field Inspection
Approval
To renew TL navigate to the home page and click the Trade License option. Click on My Applications. Click on the Renew Trade License option to view the license details for renewal.
The system will display the license details. Click on the Renew button to apply for renewal.
If there are any changes in the trade details, click on the Change button adjacent to the fields before submitting for renewal. Click on the Submit Application button once all changes are done and reviewed.
The Trade License is submitted for renewal.
Click on Apply for Trade License.
The initial application screen displays the list of documents that have to be submitted for trade license registration. Scroll through the list and make sure the required documents are scanned and ready for submission online.
Enter the Trade Name. Click on the Next button.
Click on the Yes or No option to indicate the Structure Type of the trading premises. Yes to indicate the trade will run on an immovable structure. And, No to indicate the trade will run on a movable structure.
Select Pucca or Kutcha option to indicate the Building Type. The Building Type option appears if the selected Structure Type in the previous screen is Immovable.
In the case of Movable structures, the system displays the Structure Sub Type as Vehicle Type. Select Hand Driven Vehicle or Motor-Driven Vehicle option depending on the trading plans.
Enter the Trade Commencement Date. This date indicates the inception or starting date of the trade.
Select the Trade Category as either Goods or Services in the Trade Units screen. Next, select the appropriate Trade Type and Trade Sub Type from the available drop-down list. Click on Add More Trade Units button to append multiple trading units.
Select Yes or No to indicate if you have any trade accessories.
If Yes, select the applicable Accessory from the drop-down list. Enter the Count for the selected Accessory to provide details on the number of accessories required. The system auto-populates the applicable UOM, if any, for the selected accessory. Enter the UOM value. Click on Add More Trade Accessories button to append multiple accessories.
Enable the Location Finder to allow GPS to track the current location. Or, move the pin to the location manually. Alternatively, you can also enter the location in the Search bar.
The Pincode field gets auto-populated if the location is selected on the map. Else, enter the Pincode of the location details manually. Click on Skip and Continue in case you are unable to provide the Pincode details.
City and Locality/Mohalla fields are auto-populated once the Pincode is entered. Else, select the City and applicable Locality/Mohalla from the drop-down list.
Enter the Street Name and Door No. details.
Provide a Landmark to locate the trading premise.
Select either the Single Owner or Multiple Owners option to indicate the type of ownership in the Ownership Details screen.
Enter the Owner Name. Select the applicable Gender and enter the owner’s Mobile Number.
Enter the Owner’s Address. Check the Same as Trade Address box if the owner’s address and trading address are the same. This will auto-populate the trading address provided earlier.
Select Choose File and upload the relevant identity proof document.
Upload the Ownership Document. The supported file formats are jpg, PNG or PDF
Upload the Owner's Photograph.
Validate the information entered in the application summary screen. Click on Change to modify the information if required. Click on the Submit button once the filled-in details are found correct and complete.
The system generates a unique application reference number. Click on the Download Acknowledgement Form to download and print the acknowledgement.
Apply for trade license, ensure compliance with trade safety guidelines, and lots more
The Local Business License Issuing System enables local government bodies to regulate trading establishments. It also serves to protect the interest of the public at large against possible health hazards and inconveniences that any business operation can cause. With the Business License Issuing application traders can obtain the trade certificate in a simplified manner and ensure compliance with rules and safety guidelines issued by the government. The module offers the citizens and governance bodies a convenient and transparent means of processing trade licenses.
The application makes obtaining a trade licence easy, smooth, and transparent. Hence, the module removes the need for manual processing and streamlines the key trade licence management functions to provide a better user experience.
Click on the link below to download the trade licence brochure.
This section contains all docs and information required to understand the Business Licensing module, its key features, functional scope, and configuration details. Click on the links below to learn more about deploying, configuring, customizing, and using the business license issuing module.
Navigation Tips
Click on the embedded links within the content to browse topic details
Use the Contents links available on the right side of the screen to move to a specific heading
Find the list of Related Docs links at the bottom of each page to browse through additional product details
This section illustrates the steps for different employee user roles at the local governance level
Employees can -
My Applications option allows applicants to view their applications and track their status.
Click on Inbox to view the list of applications submitted.
Click on the relevant Application Number hyperlink to open and view the application details.
Scroll down the application and click on the Take Action button. Click on Pay.
Enter the Payment and Payer Details. Click on Collect Payment to process the payment.
The system generates a unique payment Receipt Number. Click on the Print Receipt button to print the receipt. Click on the Go Back to Home Page button to navigate back to the home page.
Log in to the employee portal using your credentials.
Click on the New Application option in the top left corner of the landing page.
An employee can create the application on behalf of citizens over the counter.
Select the applicable Financial Year for which the trade license is to be issued.
Fill in the application details (same as given in the citizen application process).
Click on the Submit button once all details are found complete and accurate.
A unique application reference number is generated. This number is used to access the application and for further processing. The citizen receives a notification along with this application number in the registered mobile number.
Click on the Renew Trade Licence option on the home page.
Click on the relevant Trade Licence Number to renew. Edit the trade license details in the application form as required.
Click on the Take Action button. Click on the Renew Trade Licence option.
The user can renew it without modifying the trade details or it can be modified. If it is modified, it goes into application processing similar to a new TL application. If it is not edited then renewal happens in real time after making payment.
This page provides configuration details for TL master data templates
The Local Business License Issuing application makes the process of obtaining a business license easy, smooth, and transparent. The module removes the need for manual processing and streamlines the key business license management functions to provide a better user experience.
The module enables citizens to -
Apply for a new trade license or renew an existing trade license.
Upload all the relevant documents required for the license.
Make payment for the Trade License (New/Renewal) fee using the online payment gateway.
Receive notifications and alerts by email or SMS for new application status updates and pending renewals.
Download Trade License, Payment & Acknowledgement Receipts online.
The module enables employees to -
Create flexible role-based workflows.
Configure license fee calculation logic.
View custom dashboards for module statistics.
Filter search results using advanced configurable search parameters.
Receipt Register
Application Status
Cancelled Receipt Register
ULBwise Collection Report
ULBwise Application Status
Once the Trade Categories are defined, the next task is to -
Define Trade Types
Map Trade Category to listed Trade Types
The Trade Type can be defined as the next (2nd) level classification of Trade. There can be multiple trade types and the list may vary from one State/ULB to another.
1
TRADE_TYPE_MEDICAL
Hospital
अस्पताल
TC1
2
TRADE_TYPE_HOTEL
Hotels
होटल
TC2
The table above contains sample Trade Type data.
1
Trade Type Code
Alphanumeric
64
Yes
The Code assigned to the Trade Type. Eg: TRADE_TYPE_MEDICAL is assigned to Hospitals
3
Trade Type Name (In English)
Text
256
Yes
Name of the Trade Type in English. Eg: Goods, Services etc.
3
Trade Type Name (In Local Language)
Text
256
Yes
Name of the Trade Type in Local Language (as decided). Eg: Service is described as “सर्विस” in Hindi
4
Trade Category Code
Reference
64
Yes
Download the data template attached to this page.
Refer to the ‘Data Definition’ section of this document to learn more about the template sheet, data type, size, and definitions.
Select the relevant Trade Category Code from the available drop-down list of Trade Category. This will map the listed Trade Type to the corresponding Trade Category.
Enter a unique Trade Type Code to identify the type of trade.
Enter a Trade Type Name (In English).
Enter the Trade Type Name (In Local Language).
The checklist contains a set of activities to be performed once the data is filled into a template to ensure data entry requirements are met. These activities have been divided into 2 groups as given below.
This checklist covers all the activities which are common across the entities.
1
Make sure that each and every point in this reference list has been taken care of
This checklist covers the activities which are specific to the entity.
1
The format of the Trade Type Code defined should be alphanumeric and unique
TRADE_TYPE_MEDICAL
TRADE_TYPE_HOTELS
2
Trade Type Name (in either language) should not contain any special characters
Hospital: [Allowed]
#Hospital! : [Not allowed]
Citizen Users
Apply for a new trade licence or renew an existing trade licence
Upload all the relevant documents required for the licence
Make payment for the Trade Licence (New/Renewal) fee using the online payment gateway
Receive notifications and alerts by email or SMS for new application status updates and pending renewals
Download Trade Licence, Payment & Acknowledgement Receipts online
Employee Users
Create flexible role-based workflows
Configure license fee calculation logic
View custom dashboards for module statistics
Filter search results using advanced configurable search parameters
Click on My Applications.
The screen displays all the applications tagged to the registered mobile number. Click on the View Details button to view the application details.
The Application Timeline displays the selected application's current status and completed actions. For applications pending payment, click on the Make Payment button to make the payment.
Select the applicable Payment Method and click on the Pay button.
Click on the Receipt or Certificate button to download the receipt or the processed trade license certificate. Else, click on the Go Back To Home button to go back to the home page.
Log in with Field Inspector credentials.
The employee landing page displays the list of applications waiting for processing. Use the search filters on the page to find specific applications from the list.
Click on the Application Number hyperlink to open the application.
Scroll through the application details and review the details.
Click on the Take Action button and click on the Verify and Forward option if all details are found complete and satisfactory.
Select the Assignee Name. The application will be forwarded to the selected assignee for approval.
In case, the documents and details are found incomplete or missing, click on Send Back to Citizen option. This will send back the application to the citizen for necessary action.
Click on the Reject option if the application details are found inaccurate. This will reject the application.
Click on Send Back option to send the application back to the previous employee (document verifier in this case) for further action.
Log in with Document Verifier credentials.
The employee landing page displays the list of applications waiting for processing. Use the search filters on the page to find specific applications from the list.
Click on the Application Number hyperlink to open the application.
Scroll through the application details and review the uploaded documents.
Click on the Take Action button and click on Verify and Forward option if all documents are found complete and satisfactory.
Select the Assignee Name. The application will be forwarded to the selected assignee for field inspection.
In case, the documents are found incomplete or missing, click on Send Back to Citizen option. This will send back the application to the citizen for necessary action.
Click on the Reject option if the application details are found inaccurate. This will reject the application.
Log in with Approver credentials.
The employee landing page displays the list of applications waiting for processing. Use the search filters on the page to find specific applications from the list.
Click on the Application Number hyperlink to open the application.
Scroll through the application details and review the details.
Click on the Take Action button and click on the Approve option if all documents and details are found complete and satisfactory. The trade license is approved and a Trade License certificate is issued to the applicant.
Click on the Reject option if the application details are found inaccurate. This will reject the application.
Click on Send Back option to send the application back to the previous employee (field inspector in this case) for further action.
The TL application is approved and the TL Certificate is issued to the applicant. Click on the Download or Print button to download or print the TL Certificate.
The Code assigned to the . Eg: TC1 For Goods, TC2 for Services
UI configuration docs for the local business license issuing module
The structure type is the first level of classification of the premises where the trade has to be established and conducted. This is mostly used as management information in the trade detail.
1
IMMOVABLE
Immovable
अचल
2
MOVABLE
Movable
चल
The table above contains sample data.
1
Code
Alphanumeric
64
Yes
Unique code to identify the records uniquely
2
Structure Type* (In English)
Text
256
Yes
Structure type in English
3
Structure Type* (In Local Language)
Text
256
Yes
Structure type in local language e.g. Hindi, Telugu etc.
Download the data template attached to this page.
Refer to the ‘Data Definition’ section of this document for more details on data type, size, and definitions.
Contact the person who shared this template with you to discuss and clear your doubts.
Enter the relevant structure types.
Verify the data once again by going through the checklist and making sure that each and every point mentioned in the checklist is covered.
The checklist is a set of activities to be performed once the data is filled into a template to ensure data type, size, and format of data is as per specifications. These activities have been divided into 2 groups as given below.
This checklist covers all the activities which are common across the entities.
1
Make sure that each and every point in this reference list has been taken care of
A separate entity-specific checklist is not needed for this entity data template.
Structure sub type is the second level of classification of the premises where the trade has to be established and conducted. This is mostly used as management information in the trade detail.
1
PUCCA
Pucca
पक्का
IMMOVABLE
2
KUTCHA
Kutcha
कच्चा
IMMOVABLE
3
HDV
Hand Driven Vehicle
हाथ चालित वाहन
MOVABLE
4
MDV
Motor-Driven Vehicle
मोटर चालित वाहन
MOVABLE
The table above contains sample data.
1
Code
Alphanumeric
64
Yes
Unique code to identify each and every record uniquely
2
Structure Sub Type* (In English)
Text
256
Yes
Structure sub type in English
3
Structure Sub Type* (In Local Language)
Text
256
Yes
Structure sub type in local language e.g. in Hindi, Telugu etc.
4
Structure Type Code*
Reference
64
Yes
Download the data template attached to this page.
Refer to the ‘Data Definition’ section of this document for more details on data type, size, and definitions.
Contact the person who shared this template with you to discuss and clear your doubts.
Enter the relevant structure sub types with its proper mapping with structure type.
Verify the data once again by going through the checklist and making sure that each and every point mentioned in the checklist is covered.
The checklist is a set of activities to be performed once the data is filled into a template to ensure data type, size, and format of data is as per specifications. These activities have been divided into 2 groups as given below.
This checklist covers all the activities which are common across the entities.
1
Make sure that each and every point in this reference list has been taken care of.
A separate entity-specific checklist is not needed for this entity data template.
Once the Trade Ontology is defined, the next step is to allocate the license fee associated with the Trades.
Dependent on the Trade Classification Level (Types/ Subtypes), the fee allocated might be the same across the Sate or could vary from ULB to ULB. There could be a distinct fee(s) for two different types of applications (new and renewal).
Following are the key tasks to be executed :
Allocate the License Fee according to Trade Classification Level (Types/Subtypes).
Map the License fee with the respective Trade Classification Level.
1
TRADE_SMALL_BAKERY
Small Bakery
2500
2000
Workers
1
20
2
TRADE_SMALL_BAKERY
Small Bakery
3000
2500
Workers
21
30
2
TRADE_MED_BAKERY
Medium Bakery
5000
4500
Workers
1
30
The table above contains sample data.
1
Trade Sub Type Code
Reference
64
Yes
2
Trade Sub Type Name (In English)
Text
256
Yes
Name of the Trade Sub Type in English. Eg: Small Bakery
3
New License Fee
Decimal
(6,2)
Yes
The fee charged when the license applied for the respective trade for the first time.
4
Renewal License Fee
Decimal
(6,2)
Yes
The fee charged when the license applied for the respective trade for the renewal.
5
UOM
Text
64
No
The Units of Measurement” associated with the Trade. Eg: Workers is the UOM associated with the trade “Bakery”
6
UOM From
Integer
6
No
Initial Range from which the “Units of Measurement” is applicable for a Trade
7
UOM To
Integer
6
No
Final Range to which the “Units of Measurement” is applicable to a Trade
Download the data template attached to this page.
Get a good understanding of all the headers in the template sheet, their data type, size, and definitions by referring to the ‘Data Definition’ section of this document.
Identify the “Trade Sub Types” that exists at a ULB/ State level.
Collect the above information and feed it below the “Trade Sub Type Name” column accordingly. The Description of Trade Sub Type Name must be provided as per the language specified in the respective column.
Add the “Trade Sub Type Code” respectively against the identified trade type(s).
Fill in the New License Fee & New Renewal Fee accordingly. The New License Fee & Renewal Fee can be the same as well as distinct, depending on the by-laws/ mandate followed by the State/ULB.
Fill in the fields related to Units of Measurement (UOM Unit, From/To) for the available trades only.
The checklist is a set of activities to be performed once the data is filled into a template to ensure data type, size, and format of data is as per the expectation. These activities have been divided into 2 groups as given below.
This checklist covers all the activities which are common across the entities.
1
Make sure that each and every point in this reference list has been taken care of
This checklist covers the activities which are specific to the entity.
1
Trade Type Name (In either Language) should not contain any special characters
Small Bakery: [Allowed]
#Small_Bakery! : [Not allowed]
This service is used to issue a license to the user after verification. The service is designed in such a way that it can be used to serve different type of licenses. Currently used to issue trade licenses, perform stakeholder registration and issue lockdown pass. The service is integrated with workflow where we can define the steps for approval of the application. Once the application is approved the license is generated.
Before you proceed with the documentation, make sure the following pre-requisites are met -
Java 8
Kafka server is up and running
egov-persister service is running and has tl-services persister config path added in it
PSQL server is running and database is created
Used for license generations in trade licenses, stakeholder registration and issue lockdown pass
Define roles to applicants on successful application to access Building Plan Approval services at the time of stakeholder registration
Generate application number and license number
Support workflows
Provide notification on various status changes for an application
Add MDMS configs required for Trade License and BPA stakeholder registration and restart MDMS service
Deploy the latest version of tl-services service
Add tl-service persister yaml path in persister configuration and restart persister service
Add Role-Action mapping for API’s
Create businessService (workflow configuration) according to trade license and stakeholder registration
Add tl-service indexer yaml path in indexer service configuration and restart indexer service
Following application properties in the Trade License service are configurable.
egov.idgen.tl.applicationNum.format
PB-TL-[cy:yyyy-MM-dd]-[SEQ_EG_TL_APL]
The format of the TL application number
egov.idgen.tl.licensenumber.format
PB-TL-[cy:yyyy-MM-dd]-[SEQ_EG_PT_LN]
The format of the TL license number
egov.idgen.bpa.applicationNum.format
PB-SK-[cy:yyyy-MM-dd]-[SEQ_EG_TL_APL]
The format of the Stake holder application number
egov.idgen.bpa.licensenumber.format
PB-SK-[cy:yyyy-MM-dd]-[SEQ_EG_PT_LN]
The format of the Stake holder license number
egov.tl.max.limit
100
Max number of records to be returned
citizen.allowed.search.params
tenantId, applicationNumber, limit, offset, licenseNumbers
The search parameters on which citizen can search
employee.allowed.search.params
tenantId, applicationNumber, applicationType, status, mobileNumber, fromDate, toDate, licenseNumbers, oldLicenseNumber, limit, offset
The search parameters on which employee can search
persister.save.tradelicense.topic
save-tl-tradelicense
The name of kafka topic on which create request is published
persister.update.tradelicense.topic
update-tl-tradelicense
The name of kafka topic on which update request is published
persister.update.tradelicense.workflow.topic
update-tl-workflow
The name of kafka topic on which update request is published
The trade-license service is currently used to issue trade licenses, perform stakeholder registration and issue lockdown pass.
Provide backend support for the different license registration process.
Mseva and SMS notifications on application status changes.
The elastic search index for creating visualizations and Dashboards.
Bpa Stakeholder registration provides new roles to the user to access the Building Plan Approval system.
Supports workflow which is configurable
To integrate, host of tl-services service should be overwritten in the helm chart.
{servicename}/_create/ _create should be added as the create endpoint for creating any license in the system
{servicename}/_search/ _search should be added as the search endpoint. This method handles all requests to search existing records depending on different search criteria
{servicename}/_update/ _update should be added as the update endpoint. This method is used to update fields in existing records or to update the status of the application based on workflow.
Local Setup
API Swagger Documentation (Trade License)
In all below endpoints if the service name is BPAREG it is treated as a stakeholder registration application and if it is TL or if it is absent then the application is treated as trade license application.
Stakeholder registration APIs:- https://www.getpostman.com/collections/d18b79ccfb69ee8bb526
Trade-License APIs:- https://www.getpostman.com/collections/99f98723c45f97024831
{servicename}/_create, _create
This API is used to create an application for the license in the system. Whenever an application is created an application number is generated and assigned to the application for future reference.
{servicename}/_search, /_search
This API is used to search the applications in the system based on various search parameters like mobile number, the application number, status etc.
{servicename}/_update, _update
The _update API is used to update the application information or to forward the application from one state to another.
In the case of the stakeholder registration if the application reaches the last stage the role depending on the license type is given to the user.
{servicename}/{jobname}/_batch, /_batch
Searches trade licenses that are expiring and send a reminder SMS to owner's of the licenses
Along with the , the Trade License application process does require certain documents as an attachment of proof. The proof can be defined by a set of documents ranging from
Identification Proof (Drivers License/ Voter Card/ Adhaar/ Pan etc.)
Trade Premises Proof (Lease Agreement, Electricity Bills, etc).
Misc Documents (Affidavit, Self- Declaration, etc).
The Number and the Documents required could vary across the State, ULB(s), and might be dependent on Trade Subtypes, all of which are totally configurable on DIGIT.
The table above contains sample data.
Download the data template attached to this page.
Get a good understanding of all the headers in the template sheet, their data type, size, and definitions by referring to the ‘Data Definition’ section of this document.
In case of any doubt, please reach out to the person who has shared this template with you to discuss and clear your doubts.
Collect the above information and feed it below the “Trade Sub Type Name” column accordingly. The Description of Trade Sub Type Name must be provided as per the language specified in the respective column.
Add the “Trade Sub Type Code” respectively against the identified trade type(s).
Fill in the *Document 1 & *Document 2 columns respectively.
The checklist is a set of activities to be performed once the data is filled into a template to ensure data type, size, and format of data is as per the expectation. These activities have been divided into 2 groups as given below.
This checklist covers all the activities which are common across the entities.
This checklist covers the activities which are specific to the entity.
This feature allows the user to edit the application already created under their mobile number. After verifying employee can send the application back to the citizen with remarks on any changes that needed to be done, which can be edited by the user using this flow.
On the Application details page, on the employee side, if the application is marked with “Send Back to Citizen”, the edit option will appear dynamically at the end of the application details page, which the user can navigate through my applications.
After this, On clicking the button, the user can edit the trade license details by going through the Create Flow again. First, it will land on the Summary page, where for each section “change” button is there. Clicking on the Change button, the user will be redirected to the particular content, the only exception here will be the values will be pre-populated from the License object received from Trade License Search API, on completing the flow, Update API will be called and License application will get successfully updated.
Edit Trade License main index can be found in the link given below:
Here the main code consists of the function which results in transforming the License object received in Search API to the object structure which is suitable for citizen Apply flow (owner details, units, accessories etc), as the user needs to go through Apply flow again with pre-populated details and update the value of any accordingly. it also consists of the routing for the pages in the Apply flow.
getTradeEditDetails() function is being used so that the License object which is received from the Trade Search API, is converted to the Apply flow relevant structure so that the values can be pre-populated for the user convenience, on completing the flow, the application is updated. The link for the same can be found below:
Similarly, for owners the method which is used to form the new request param array is gettradeownerarray
It is similar to Accessories and Units - the only difference is in UI. Users can’t select multiple owners and only add one owner, it needs to either add more than one owner or select a single owner in the ownership category and proceed. After the successful update, the application's next action will be “Pending for document verification” as there is an update in the data.
On completing the flow, the same object structure which was being used earlier in the flow gets changed into the request body structure for the update API: /tl-services/v1/_update, for this, the method which gets used is declared inside the Utils folder. Method name: convertToResubmitTrade and it can be found in the below link:
MDMS data that is being used here is the same as the Apply flow only, as the flow structure used for edit trade is the same as the Apply for Trade License. Please refer to the link for detailed MDMS information.
For Edit Trade also, the localisation keys are added to the ‘rainmaker-tl’ locale module. Change, update or add any new localization key is done in the same locale module only.
This feature allows the user to renew any trade license applications, which either has been expired or had to be renewed for current financial year (Approved and Paid), it also had integration with the payment component, in order to complete the flow all together for renewal.
Renewal can be two types:
DIRECT RENEWAL
EDIT RENEWAL
Once the user clicks on Renew Trade License button on the home page, it will redirect to the renewal list page which will display all the applications eligible for renewal corresponding to the mobile number on which the user has logged in. It will show the Trade name, License Number, Owner Name and status whether active or expired.
Once the user clicks on Renew Button, it redirects the user to the summary page just like in edit Trade license, with all the values pre-populated from the search API. The info card will be declared so that the user will understand how to proceed with either direct renewal or edit renewal.
If the user just wants to renew the same application without updating any data, it will cross-verify all the values in the summary page and then click on submit button directly at the end of the page, this will lead the application to the next status as pending for payment and user can go through payment flow from the acknowledgement screen also, by clicking on the Make Payment button.
If the user before renewal needs to update the application, they can do so by clicking on the change button on the summary screen, this will tell that the flow has been changed from direct to edit renewal, and the user will need to follow the same apply flow in order to complete the editing part of it. the values from the application will be pre-populated in the respective screens, to get the details about the edit flow, one can refer to this link. .
Once the user clicks on submit button it will change the current action of the application to pending for document verification as the data has been updated.
Renewal Trade main index can be found in the below-given link:
in this, we are calling the trade license search API, In order to get all the applications, through which the sorting is happened to classify which applications are eligible for renewal for the current financial year.
the hook which has been used for the API is:
The data from here then are sorted into the application which doesn’t have any open renewal application for the current financial year or which has a status of approved or expired. the significant method to get the renewal list of applications is mentioned below:
From here the Trade License List Component has been called which displays the list of the renewal application.
Once the user has completed the flow as required or clicked the submit button directly, the method convertToEditTrade is being called, which re-arranges the data for the request body for the updated API /tl-services/v1/_update.
If it is a direct renewal only one update API is being called which updates the financial year only.
but if it is an edit renewal, two updated API is called after the first API successful call the application status gets changed to Initiated but after the second API call it is changed to applied. with the next action pending for document verification.
the code for these can be found in the utils folder index please refer to the below link for the same:
MDMS data which is being used here is the same as the Apply flow only, as the flow structure used for edit renew trade is the same as the Apply for Trade License. Please refer to the link for detailed MDMS information.
For Renew Trade also, the Localization keys are being added in the ‘rainmaker-tl’ locale module. Change, update or add any new localization key will be done in the same locale module only.
Unique code of structure type to establish the mapping with
The Code assigned to the . Eg: TRADE_SMALL_BAKERY is assigned to Bakery
Identify the “” that exists at a ULB/ State level.
User can delete and add as many accessory or units as it needs but there should be at least one unit to complete the application, to add a new unit or accessory “Add” button is used which is located at the end of the page. A new array is formed with all the updated details or with the old unit/accessory, when the flow is completed, this new array is then compared with the old array of accessories and units, and a new resulting array object is formed for the request body, you can find the respective code in the following method : gettradeupdateaccessories & gettradeupdateunits. this can be found in the below link
The main functionality of converting the License Object received from the API to the object structure for formdata for apply flow, following is done in a similar way as the edit trade, and the same method is being used to convert the response object, to know more details please refer to
1
Make sure that each and every point in this reference list has been taken care of
1
Trade Sub Type Name (In either Language) should not contain any special characters
Small Bakery: [Allowed]
#Small_Bakery! : [Not allowed]
1
TRADE_SMALL_BAKERY
Small Bakery
New
PAN/VOTER ID
LAND LEASE
2
TRADE_SMALL_BAKERY
Small Bakery
Renewal
PAN/VOTER ID
ELEC BILL
1
Trade Sub Type Code
Reference
64
Yes
The Code assigned to the Trade Sub Type. Eg: TRADE_SMALL_BAKERY is assigned to Bakery
2
Trade Sub Type Name (English)
Text
256
Yes
Name of the Trade Sub Type in English Eg: Clinic
3
Application Type
Text
256
Yes
Type of application for which the documents related to trade are configured. It can either be new or renewal
4
Document 1
Reference
256
Yes
The primary document required as a verification parameter. Refer to the Standard Document List
5
Document 2
Reference
256
Yes
The Secondary Document required as a verification parameter. Refer to the Standard Document List
Trade Type can be further sub-classified into Trade Sub Type depending on the trade ontology existing in the ULBs or States. Hence, Hotels can be further classified into Dhabas in North India or Udupis in South India.
Once the Trade Type(s) are defined, the next task is to -
Define Trade Sub Types
Map Trade Types to corresponding Trade Sub Types
1
TRADE_SUBTYPE_CLINIC
Clinic
क्लिनिक
TRADE_TYPE_MEDICAL
2
TRADE_SUBTYPE_DHABA
Dhaba
ढाबा
TRADE_TYPE_HOTEL
The table above contains sample data.
1
Trade Sub Type Code
Alphanumeric
64
Yes
The Code assigned to the Trade Sub Type. Eg: TRADE_TYPE_Dhaba is assigned to Hotels
2
Trade Sub Type Name (In English)
Text
256
Yes
Name of the Trade Sub Type in English. Eg: Clinic
3
Trade Sub Type Name (In Local Language)
Text
256
Yes
Name of the Trade Sub Type in Local Language (as decided). Eg: Dhaba is described as “ढाबा” in Hindi
4
Trade Type Code
Reference
64
Yes
Download the data template attached to this page.
Refer to the ‘Data Definition’ section of this document to learn more about the template sheet, data type, size, and definitions.
Select the relevant Trade Type Code from the Trade Type master data. This will map the listed Trade Sub Type to the selected Trade Type.
Enter a unique value for Trade Sub Type Code.
Enter the English name for Trade Sub Type Name (English).
Enter the local name for the Trade Sub Type Name (Local Language).
The checklist contains a set of activities to be performed once the data is filled into a template to ensure data entry requirements are met. These activities have been divided into 2 groups as given below.
This checklist covers all the activities which are common across the entities.
1
Make sure that each and every point in this reference list has been taken care of
This checklist covers the activities which are specific to the entity.
1
The format of the Trade Sub Type Code defined should be text and unique
TRADE_SUBTYPE_CLINIC
2
Trade Type Name (in either language) should not contain any special characters
Clinic: [Allowed]
#Clinic! : [Not allowed]
The Trade Category List can be defined as the primary or the 1st level classification “head” for trade(s) defined at a ULB/State Level.
1
TC1
Goods
सामग्री
2
TC2
Services
सर्विस
The table above contains sample Trade Category data.
1
Trade Category Code
Alphameric
64
Yes
The Code assigned to the Trade Category. Eg: TC1 For Goods, TC2 for Services
2
Trade Category Name (In English)
Text
256
Yes
Name of the Trade Category in English. Eg: Goods, Services etc.
3
Trade Category Name (In Local Language)
Text
256
Yes
Name of the Trade Category in Local Language (as decided). Eg: Service is described as “सर्विस” in Hindi
Download the data template attached to this page.
Refer to the ‘Data Definition’ section of this document to learn more about the template sheet, data type, size, and definitions.
Enter a unique Trade Category Code for each trade head.
Enter the Trade Category Name. Some trade categories are already defined in the master. Add new categories as required.
Enter the Trade Category Name (Local Language).
The checklist contains a set of activities to be performed once the data is filled into a template to ensure data entry requirements are met. These activities have been divided into 2 groups as given below.
This checklist covers all the activities which are common across the entities.
1
Make sure that each and every point in this reference list has been taken care of
This checklist covers the activities which are specific to the entity.
1
The format of the Trade Category Code defined should be alphanumeric and unique
TC1: Goods
TC2: Services
2
Trade Category Name (In either Language) should not contain any special characters
Goods: [Allowed]
#Goods! : [Not allowed]
Business License Calculator service is used to calculate the Trade license fees/renewal fees based on the defined billing slabs. This service enables the TL admins to create billing slabs with different combinations of license type, trade type, structure type and accessory type. The service is designed in such a way that it can be used to serve different types of licenses.
Before you proceed with the configuration, make sure the following pre-requisites are met -
Java 8
Kafka server is up and running
egov-persister service is running and has tl-calculation-persister & tl-billing-slab-persister config path added in it
PSQL server is running and a database is created to store TL Application data
Following services should be up and running:
egov-perister
egov-mdms
tl-services
billing-service
TL Admin an Employee of ULB with TL_Admin role can create, update billing slab(s)
ULB Employee with TL_CREATOR and TL_ADMIN can search billing slab(s)
TL service internally calls tl-calculator to generate demand.
Deploy the latest version of tl-service and tl-calculator
Add tl-calculation-persister.yml & tl-billing-slab-persister.yml file in config folder in git and add that path in persister . (The file path is to be added in environment yaml file in param called persist-yml-path )
tl-calculator will be integrated with tl-services. tl-services internally invoke the tl-calculator service to calculate and generate demand for the charges.
Tl calculator application is used to calculate the Trade license Fees based on the different billing slabs in the DB that's why the calculation and demand generation logic will be separated out from TL services. So in future, if calculation logic needs to modify then changes can be carried out for each implementation without modifying the TL services.
TL application to call /tl-calculator/v1/_calculate to calculate and generate the demand for the TL application
ULB Employee can create billing slab calling /tl-calculator/billingslab/_create
ULB Employee can update billing slab calling /tl-calculator/billingslab/_update
ULB Employee can search billing slab calling /tl-calculator/billingslab/_search
TBD
(Note: All the API’s are in the same postman collection therefore the same link is added in each row)
The Inbox page contains 4 react components:-
Application Links is a separate component that holds links to other pages of possible navigation from the inbox. This component is common in both mobile and desktop views. Links are conditionally rendered according to the user roles.
The Search Application component is a form-based component, that controls the Table component and the search param for Inbox API, it uses FormComposer HOC to render fields.
Validation of these fields is achieved by using controlled component rules
Any number of search fields can be added but by convention, only mobile numbers and application numbers are provided.
Filters contain input fields to filter the result of API, by sending search params to inbox API.
It contains 3 sections
Assigned to Me/ All - It is a radio component to send the assignedToMe param as true or false.
Locality - Filter result according to the selected locality by sending locality code in module search params in inbox API.
Status - Status filters are achieved by sending the id received from the inbox API response and mapping the name of businessService, status name and count
The table is a react component which uses the React-Table plugin, used in multiple modules
However, in Mobile view are using cards to list all the applications without pagination support.
On Inbox page {env}/inbox/v1/_search?_=1627374959930 is the only API that is called.
API CURL -
All the fields in this flow are the same as the New TL Application. The difference here is that max fields are having pre-populated data (On Loading the page, search is made for that particular application).
Will get the Renew Trade License option, when the application is in an approved state and the same financial year application is not present in the workflow.
File path: digit-ui-internals/ApplicationDetails.js at main · egovernments/digit-ui-internals
When we click on the Renew Trade License application, it will route to Renew screen
Direct Renewal: There is no change in any fields and directly clicks on submitting an application, an update API call is made for the respective application with respective to Direct Renewal (applicationType: RENEWAL, workflowCode: DIRECTRENEWAL, )and it will go into direct renewal flow.
Edit Renewal: If there is any change in any fields and clicks on submitting an application, an update API call is made with respect to edit renewal (applicationType: RENEWAL,workflowCode: EDITRENEWAL )and update the application and it will go into the edit renewal flow.
Units, Accessories, Owners and documents details in case of Edit/Renewal flow
Acknowledgement Screen
After a successful update call, the user is routed to the acknowledgement screen.
EDIT Flow: It is also the same as renewal flow only, but we are passing the action action: RESUBMIT on the update call with all the changes.
Application/ Trade Details: Application Details/Trade Details
TL Create New Application: New Trade License Application
1
/egov-mdms-service/v1/_search
TL_CEMP
954
2
/tl-services/v1/_create
TL_CEMP
1685
3
/tl-services/v1/_update
TL_CEMP
1686
4
/tl-calculator/billingslab/_search
TL_CEMP
1684
Provide employee purpose workflow actions.
The same screen is used for both application details and trade details.
Based on the conditions, we are showing the details here
Example: If the application is not in an approved state and the business Service New TL, then we are showing application details otherwise we are showing trade details.
For workflow action details, please refer to the file below.
The workflow is the same as Old UI only, please refer to the documentation link below.
1
egov-mdms-service/v1/_search
CR_PT
954
2
/tl-services/v1/_update
TL_APPROVER, TL_CEMP, EMPLOYEE, TL_DOC_VERIFIER, TL_FIELD_INSPECTOR
2029
3
/egov-workflow-v2/egov-wf/process/_search
EMPLOYEE
1730
4
/tl-services/v1/_search
EMPLOYEE, TL_APPROVER, TL_CEMP
1687
5
/egov-hrms/employees/_search
TL_APPROVER, TL_CEMP, EMPLOYEE, TL_DOC_VERIFIER, TL_FIELD_INSPECTOR
1752
Users can review the list of applications and their status registered under their mobile numbers in the My Applications tab. Each Application for the initial view displays the Application No, Service Category, Owner Name (Multiple with a comma), status, SLA, and Trade Name with the View Details option. If the status is pending for payment the View Details & Pay button is available that enables the users to look up more details about the application.
Once the user clicks on the View Details or View Details & Pay button, the Application Details Page is displayed with all the necessary information about the application.
The user can download the Application Acknowledgement Form (status - pending for payment ) or TL Certificate or the payment receipt using the Download Link button available at the top right corner of the page.
If the status is Pending for Payment for the application or Action required by a citizen (discussed elaborately here), a button will be visible to pay or edit at the end of the page respectively. On clicking on the Make Payment button it will redirect to the common pay screen through which the user can make the payment.
Timeline Component - timeline component is present at the end of the application details which tells about the current status and history of the application being initiated, Applied, Pending for Document Verification, Pending for Field Inspection, Pending approval, Pending payment, Approved etc.
The link for the Applications and Application Details main code is given below, it can be used to understand the working of the code, Below is the folder link.
The template for My Application List is present under https://github.com/egovernments/digit-ui-internals/blob/main/packages/modules/tl/src/pages/citizen/Applications/Application.js and Application Details page is present inside - https://github.com/egovernments/digit-ui-internals/blob/main/packages/modules/tl/src/pages/citizen/Applications/ApplicationDetails.js .
All the Application lists are retrieved by calling the search API "/tl-services/v1/_search". If the view is set as “bills”, all the application is loaded using the hook useFetchBill which calls the /billing-service/bill/v2/_fetchbill API. SLA value in the Application List Screen is calculated from the data received from workflow API : /egov-workflow-v2/egov-wf/process/_search
Following is the hook used for the trade search API.
To get the Application details in key-value format, in order to make it more compatible, the following hook is being used, which is a common service to be used across modules.
No MDMS data is being used here, all the data is being loaded from Search API/Fetch Bill API.
For My Applications also the localization keys are added in the ‘rainmaker-tl’ locale module same as other parts of the TL module. Change, update or add any new localization key is done in the same locale module only.
Objective: To provide the facility for the user to create a trade license application for the current year by citizen users or counter employees.
Users can apply for a trade license application by clicking on the Apply for Trade License button. Users can add all the information as per the questions asked across the workflow. The summary screen at the end of the flow displays all details for review. Users can click on the submit button after review. The application for a trade license is created for the current financial year.
Apply Flow - The trade license registration screen is displayed after login which helps users identify the documents required to apply for a trade license. A citizen info card at the bottom of the page displays any additional information about the maximum size of the file that can be uploaded.
Trade License Details/Assessment Flow - This flow captures the trade-specific information required for registering the trade.
Trade Name - The user provides the name of the trade. An info card is displayed at the bottom of the screen stating that the license will be issued for the current financial year. The financial year value is retrieved from the MDMS.
Structure Type - The users can select yes or no based on whether the trade has mobility or not. If yes, the next screen prompts you to enter the vehicle type. If no, the next screen moves to the building type page.
Vehicle Type / Building Type - The options for vehicle and building type are fetched from the MDMS. The Building Type screen displays an information card about the pucca or kuccha options.
Commencement Date - It defines the date on which the trade started or will start in the future.
Trade Units - Users must provide the trade category as either goods or services. Based on the selected option the Trade Type is loaded from the MDMS as a drop-down list. The trade sub-type options are loaded based on the selected trade type. The unit of measure and UOM value get pre-populated from the MDMS as per the options selected above.
Users must enter at least one unit to move forward. Clicking on Add More Unit option enables users to enter additional units. Clicking on the delete icon on the top right corner of the unit card removes the unit.
Accessories - The Accessory page inquires if there are any accessories required for the business. Accessories may not be compulsory for all trades. If yes, it will move to the accessory details page. If not, it will skip it altogether and will load the address flow.
Accessory details - The options for accessories are retrieved from the MDMS. The Unit of Measure or UOM is pre-populated and cannot be edited. The users can edit the UOM value and the accessory count. In some cases, these are pre-populated from the MDMS. Clicking on Add More Trade Accessory button allows users to add multiple accessories.
If the citizen selects Movable as the structure type in the previous screens, then the flow will jump to the owner details flow. Here the Same as Property Owner’s check box will not be visible.
If the citizen selects Immovable as the structure type then the user is allowed to add the property details. Once the property is added, the flow will redirect to the owner details flow where the Same as Property Owner check box is displayed. If the user checks it, the following details get auto-populated and the screen skips to the proof of Identity page.
Common PT integration with TL: After entering the trade details, users have the option to either search and integrate the already created property or create new lightweight property data for the trade license. This step can be skipped and users can proceed with the normal address details flow.
Address Details Flow - In the next flow, users have to enter the trade address details. This flow is straightforward, without any conditional routing.
Users can pinpoint the location in the Geo-location map, according to which pin code and city, as well as locality, is auto-filled.
Owner Details Flow - Finally, the users need to enter the trade owner details. Ownership can be Single or Multiple Owners. According to which the details are filled.
In the case of single/multiple owners, the following screen is displayed. The remaining flows remain the same.
Users can add multiple owners by clicking on the add owner button - a similar functionality as in trade units and accessories. The Add Owner button is not visible in case the user selects a single owner on the previous page.
The user must provide the owner's primary address and upload three documents that include address proof, owner identity and owner photograph.
Check Page and Acknowledgement Screen - Users can cross-verify the data entered throughout the flow in the Check page. Clicking on the change option adjacent to the data fields allows users to make any changes or updates to the data. The user is redirected back to a corresponding information page and the entire flow is repeated once again to submit the application.
The Applying of Trade License Create API is called. Create API snippet:1create: "/tl-services/v1/_create"
If the API response is successful, then the Acknowledgement Screen is displayed, otherwise Failed Acknowledgement Screen is displayed.
Clicking on the Download Acknowledgement Form button downloads the PDF copy of the acknowledgement.
On the Trade Units page, values for trade type and trade subtype have been loaded by the following MDMS call:
The following validations have been added for the same :
When users select trade type and then subtype, it is compared with the available billing slab. The hook for this is given below. In case the billing slab is not there it will not allow users to move forward and an error message is displayed.
Once the correct trade type and subtype are added and the correct billing slab is there, the UOM value validation is added. This checks the value in the given range, mentioned in the billing slab object and displays an error if the value is outside of the range.
All screens are developed using the new-UI structure followed previously in FSM, PGR and PT, except for multi-component.
The TL (Trade License) module is segregated into a specified structure. The screen configuration is inside the PageComponent folder, and the configuration for routing of the pages are mentioned under the config folder which is common for both citizen users and employees. Below is the snippet for folder structure and routing configuration.
The pages folder is where the high-level configuration for controlling the whole flow is mentioned, for citizens and employees. Citizen flows include Create, Edit Trade, Renewal, Applications and Search Trade. The index or the starting point of the entire flow is available in this folder.
In the Accessory-details page, the Billing slab search API "/tl-calculator/billingslab/_search" is called. This returns the array list of all the accessories for which the billing slab has been configured. If the response returns an empty array then the options are curated from the MDMS API mentioned in the MDMS data section.
The Utils folder basically contains all the methods used throughout the TL module. Additional common methods can be imported and added to this folder.
For creating an application the Create API from Trade License is called using the React hooks. This is declared in the hooks/elements/TL as TLService.
There are multiple pages within the workflows where data is imported from the MDMS. The table below lists the pages .js files for distinct page components.
React Hooks are used to call MDMS data that is shared across the modules. Below is the code snippet for the MDMS call.
Localisation keys are added to the ‘rainmaker-tl’ locale module. In future, if any new labels are implemented in the Trade License (Citizen) it is pushed to the locale DB in the rainmaker-tl locale module. Below is an example of a few locale labels.
Search Application and Search License pages are used for searching any application/ license that may or may not be relevant to the workflow action of the logged-in users.
Search Application has 2 components.
A search field component is a form which takes inputs and passes them into tl-search API params. It utilizes SearchForm and SearchField components to create and arrange the form.
Result Table uses the Table react component and the result from API is adapted to the table config using a custom hook inside the common parent wrapper and passing the response to individual components.
Search License has a fixed param where the status of the application is “APPROVED”, other than differences in table config
The API end point for searching trade licenses is {env}/tl-services/v1/_search
API CURL -
To onboard a new Urban Local Body (ULB) or tenant for the Local Business License Issuing Service modules, follow the steps given below:
In TL, there are two types of billing slab, one is according to the tradeType and the other way is accessoryCategory.
Add following data in MDMS for billing slab push and restart MDMS:
Provide different combinations of UOM rates - fromUOM and toUOM according to tradeType by taking accessoryCategory as null.
Example - From UOM : 0.00 , To UOM : 10,000.00 – Rate : 500.00
Provide different combinations of UOM rates - fromUOM and toUOM according to accessoryCategory by taking tradeType as null.
Example - From UOM : 0.00 , To UOM : 10,000.00 – Rate : 200.00
Tenants
TL Trade Type
Property Type
Ownership Type
Boundary
Owner Type
TL Billing Slab
This service is used to issue licenses to users after verification. The service is designed in such a way that it can be used to serve different types of licenses. Currently used to issue trade licenses, perform stakeholder registration and issue lockdown passes. The service is integrated with workflow where we can define the steps for application approval. Once the application is approved the license is generated.
Add Role-Action mapping for the APIs in MDMS. Following are the required entries.
MDMS Actions & Role Action Mapping for TL
Trade License Calculator service is used to calculate the Trade license fees/renewal fees based on the defined billing slabs. This service enables the TL admins to create billing slabs with different combinations of license type, trade type, structure type and accessory type.
The service is designed in such a way that it can be used to serve different types of licenses.
Add Role-Action mapping for the API’s in MDMS. Following are the required entries.
MDMS Actions & Role Action Mapping for TL
Add Role-Action mapping for the API’s in MDMS. Following are the required entries.
MDMS Actions & Role Action Mapping for PT
The trade license 'apply' is the major feature in TL Module. It allows Citizens or Counter Employees to create TL Applications for the current financial year.
Every application is a part of the workflow. Once the user login with TL_CEMP role, then the User will get the option for creating a New TL Application in the TL card as well as in the inbox.
Clicking on New Application navigates to the New Trade License Application screen.
Initial MDMS call is being made on page load like old UI.
Data fetch, load and render
Clicking on Submit button, tl-services/v1/_create api is called and create the application, after getting success response, we are calling update API tl-services/v1/_update.
Acknowledgement Screen
After the success of creating and updating calls will route to the acknowledgement screen.
The Code assigned to the Eg: TRADE_TYPE_MEDICAL is assigned to Hospitals
Employee can edit units in both cases, employee can add and delete multiple units, please find the file below reg all use cases: digit-ui-internals/TLTradeUnitsEmployee.js at main · egovernments/digit-ui-internals
Employee cannot edit accessories in both cases, the employee can not add and delete multiple units and all fields are in disable state, please find the file below reg all use cases: digit-ui-internals/TLAccessoriesEmployee.js at main · egovernments/digit-ui-internals
Employee can edit in both cases, expect ownership details, ownership details field is in disable state in both cases. please find the file below reg all use cases: digit-ui-internals/TLTradeUnitsEmployee.js at main · egovernments/digit-ui-internals
Employee can edit the documents in both cases, please find the file below reg all use cases: digit-ui-internals/TLDocumentsEmployee.js at main · egovernments/digit-ui-internals
It is common for all modules, find the path here: digit-ui-internals/ApplicationDetailsContent.js at main · egovernments/digit-ui-internals
Once a property is selected user can see the details of the property on the property details page. Refer to the document for more details.
The link for the Apply Trade License Main Index is given here and it helps understand the starting point of the flow:
After completing the flow the user can download the acknowledgement PDF form of the License created. PDF generation config link:
File path: and
Route:
File Path:
Structure Type and Sub Structure Type field data is fetched from
Trade Category, Trade Type, Trade Sub Type field data is fetched from
Mohalla Data - (For Amritsar)
Accessories -
Type of Ownership and Type of Sub ownership -
documents:
On loading the page, /tl-calculator/billingslab/_search api is called for showing the licence type (File Path: ) and accessories options (File Path: ).
File Path:
TradeLicense
List of documents required for registration
TradeLicense
Documents
SelectTradeName
Current Financial Year
egf-master
FinancialYear
SelectVehicleType
Type of mobility trade
common-masters
StructureType
SelectBuildingType
Type of Steady Trade
common-masters
StructureType
SelectTradeUnits
List of trade category and its corresponding type and sub-type
TradeLicense
TradeType
SelectAccessoriesDetails
Lit of Accessory and its Unit of measure and UOM value
TradeLicense
AccessoriesCategory
TLSelectAddress
List of cities and its corresponding localities
TradeLicense
tenants
SelectOwnerShipDetails
categories imported are single and multiple owner.
common-masters
OwnerShipCategory
SelectOwnerDetails
List of Gender options.
common-masters
GenderType
/egov-mdms-service/v1/_search
954
CITIZEN
/tl-services/v1/_create
1685
CITIZEN
/filestore/v1/files/url
1528
CITIZEN
/billing-service/bill/v2/_fetchbill
1862
CITIZEN
/tl-calculator/billingslab/_search
1684
CITIZEN
/tl-services/v1/_update
1686
CITIZEN
/localization/messages/v1/_search
1531
CITIZEN
Mon - Fri
Sat
Name
Local Name
District Code
District Name
District tenant Code
Region Name
ULB Grade
Longitude
Latitude
Shape File Location
Captcha
Code
DDR Name
Locality Code
Locality Name
ca.alameda
Alameda
null
[14306,14307,14308,14309,14310]
null
CITY
null
null
Web.Info@csd.ca.gov
9.00 AM - 6.00 PM
9.00 AM - 12.00 PM
Alameda
null
null
Alameda
CA_Alameda
null
Municipal Corporation
-122.241638
37.765205
null
null
2131
null
ALM001
East End, West End
9876543210
9876543210
ca.albany
Albany
null
[14306,14307,14308,14309,14310]
null
CITY
null
null
Web.Info@csd.ca.gov
9.00 AM - 6.00 PM
9.00 AM - 12.00 PM
Albany
null
null
Alameda
CA_Alameda
null
Municipal Corporation
-122.241648
37.765215
null
null
2132
null
ALM002
Albany Hill, East Albany
9876543211
9876543209
New
Renewal
Dental Lab Services
GOODS.HEALTHCARE.DENTALLABSERVICES
GROSSUNITS
["OWNERIDPROOF", "OWNERSHIPPROOF", "OWNERPHOTO"]
["OWNERIDPROOF", "OWNERSHIPPROOF", "OWNERPHOTO", "OLDLICENCENO"]
true
TL
null
Clothing Retail
GOODS.RETAIL.CLOTHINGRETAIL
GROSSUNITS
["OWNERIDPROOF", "OWNERSHIPPROOF", "OWNERPHOTO"]
["OWNERIDPROOF", "OWNERSHIPPROOF", "OWNERPHOTO", "OLDLICENCENO"]
null
true
TL
null
BUILTUP.OFFICE_BUILDING
Office Building
BUILTUP.RETAIL_SPACE
Retail Space
BUILTUP.INDUSTRIAL_PROPERTY
Industrial Property
BUILTUP.MIXED_USE_DEVELOPMENT
Mixed-Use Development
BUILTUP.SELF_STORAGE
Self-Storage
BUILTUP.SHOPPING_MALL
Shopping Mall
FEE_SIMPLE_OWNERSHIP
Fee Simple Ownership
LEASEHOLD_OWNERSHIP
Leasehold Ownership
TENANCY_IN_COMMON_(TIC)
Tenancy in Common (TIC)
ALM001
East End, West End
ALM002
Albany Hill, East Albany
ALM003
North Berkeley, South Berkeley
Veterans
VETERANS
Disabled Individuals
DISABLEINDIVIDUALS
Minority Applicants
MINORITYAPPLICANTS
LGBTQ+ Individuals
LGBTQ
Economically Disadvantaged
ECONOMICALLYDISADVANTAGED
Refugees and Asylum Seekers
REFUGEEANDASYLUMSEEKERS
Returning Citizens (formerly incarcerated)
RETURNINGCITIZENS
Native American or Indigenous Peoples
NATIVEAMRERICANS
None of the above
NONE
ca.alameda
PERMANENT
NEW
IMMOVABLE.PUCCA
Goods
Healthcare
Dental Lab Services
GOODS.HEALTHCARE.DENTALLABSERVICES
ACC-1
FLAT
GROSSUNITS
0.00
10,000.00
200.00
ca.alameda
PERMANENT
NEW
IMMOVABLE.PUCCA
Goods
Retail
Clothing Retail
GOODS.RETAIL.CLOTHINGRETAIL
ACC-2
FLAT
GROSSUNITS
0.00
10,000.00
200.00
ca.alameda
PERMANENT
NEW
IMMOVABLE.PUCCA
Goods
Food & Beverage
Packaged Food Products
GOODS.FOOD & BEVERAGE.PACKAGEDFOODPRODUCTS
null
FLAT
GROSSUNITS
0.00
10,000.00
500.00
ca.alameda
PERMANENT
NEW
IMMOVABLE.PUCCA
Goods
Food & Beverage
Beverage Production
GOODS.FOOD & BEVERAGE.BEVERAGEPRODUCTION
null
FLAT
GROSSUNITS
0.00
10,000.00
500.00
Employee
Citizen
HRMS, Superuser
HRMSSU1
Demo@123
Alameda
9999009902
Superuser
SUPERSU
eGov@123
California
9999009900
Citizen
6100000010
123456
Architect
6109981231
123456
Common Role for Employees
Property Tax Counter Employee
TL Creator
TL Counter Employee
Counter Employee
CSR
Demo@123
Alameda
6000000001
Common Role for Employees
Property Tax Counter Employee
Business License Document verifier
Business License field inspector
BPA Services verifier
BPA Field Inspector
BPA NOC Verifier
FireNoc Approver
Airport Authority Approver
FieldEmployee
Demo@123
Alameda
6000000002
Common Role for Employees
Property Tax Counter Employee
TL Approver
Counter Employee
BPA Services Approver
BPAREG doc verifier
BPAREG Approver
OfficeEmployee
Demo@123
Alameda
6000000003
Common Role for Employees
State Administrator
Administrator
Demo@123
Alameda
6000000004
/tl-services/v1/_create
EMPLOYEE,CITIZEN,TL_APPROVER,TL_CEMP
/tl-services/v1/_update
EMPLOYEE,CITIZEN,TL_DOC_VERIFIER,TL_FIELD_INSPECTOR,TL_APPROVER,TL_CEMP
/tl-services/v1/_search
EMPLOYEE,CITIZEN,TL_APPROVER,TL_CEMP,TL_DOC_VERIFIER,TL_FIELD_INSPECTOR
/collection-services/payments/_create
TL_CEMP,SUPERUSER,EMPLOYEE
/inbox/v1/_search
TL_CEMP,TL_DOC_VERIFIER,TL_FIELD_INSPECTOR,TL_APPROVER,AIRPORT_AUTHORITY_APPROVER
/tl-calculator/billingslab/_search
SUPERUSER,EMPLOYEE,TL_APPROVER,TL_CEMP,CITIZEN,TL_DOC_VERIFIER,TL_FIELD_INSPECTOR
/tl-calculator/billingslab/_create
SUPERUSER
/tl-calculator/billingslab/_update
SUPERUSER
tl-calculator/v1/_getbill
EMPLOYEE,TL_APPROVER,TL_CEMP,CITIZEN
/tl-calculator/v1/_calculate
SUPERUSER
/property-services/property/_search
CITIZEN,PT_CEMP,PT_DOC_VERIFIER,PT_FIELD_INSPECTOR,PT_APPROVER,TL_CEMP
/property-services/property/_create
CITIZEN,PT_CEMP,TL_CEMP
/property-services/property/_update
CITIZEN,PT_CEMP,PT_DOC_VERIFIER,PT_FIELD_INSPECTOR,PT_APPROVER,TL_CEMP
/pt-calculator-v2/propertytax/v2/_estimate
PT_CEMP,CITIZEN,TL_CEMP
/property-services/assessment/_create
SUPERUSER,PT_CEMP,CITIZEN,TL_CEMP,CITIZEN
/property-services/assessment/_search
TL_CEMP,SUPERUSER,PT_CEMP,CITIZEN
ISNE-378
TL: Create new application issue when user selects TL owner details from PT
In the code level, it is hardcoded that if ownershipcategory code includes (“SINGLEOWNER”or ”MULTIPLEOWNERS” or “INSTITUTIONAL”) then only it will form the owner object. https://github.com/egovernments/egov-mdms-data/commit/51a50852dd4a312aaea8c1b824864fd7bc7f0c47 https://github.com/egovernments/egov-mdms-data/commit/dc8930811e28f0042b7694bf466870929cd5b483
ISNE-366
TL: Accessory category options not displayed in UI
Accessory category needs to be added to TL billing slab
Property type and Ownership category are required to be having a dot separated value in mdms
ISNE-392
TL: Pop up message to be displayed when user clicks on payment button
Localization updated
ISNE-393
TL: Financial Year hard coded for TL renewal
Need to make it dynamic based on current TL validity period
Financial year was hard coded in the code,so fetched current financial year and from mdms data - validfrom and validto and Removed the hardcoded part of financial year. https://github.com/egovernments/DIGIT-Dev/commit/0971443040d2c192816165a93629f8df93489335
ISNE-389
TL employee randomly gets navigated to citizen login screen
Removed working of isCreateEnabledEmployee variable because it was redirecting to another url without any reason. https://github.com/egovernments/DIGIT-Dev/commit/85bf283f163d0b19e8b981662fe5a8af09ab22b7
1
/egov-mdms-service/v1/_search
TL_CEMP
954
2
/tl-services/v1/_create
TL_CEMP
1685
3
/tl-services/v1/_update
TL_CEMP
1686
4
/tl-calculator/billingslab/_search
TL_CEMP
1684
Title
Link
tl-calculator/billingslab/_create
tl-calculator/billingslab/_search
tl-calculator/billingslab/_update
tl-calculator/v1/_calculate
Tenant Details
To show the tenant at login screen
To enable ulb to create application,add tenant in TL module
Trade Type (Business Units) information
To add Business Units
Create Property
To create new property.From citizen end,in create property screen,provide property Type
Property Ownership Details
To provide type of ownership in create property screen
Property Owner Type
To provide owner type in create property screen
Title
Link
API Swagger Contract
Trade License Document
The computerized and automatic Business License Issuing system offered by eGov facilitates citizens who seek to apply for a business license within any Urban Local Body with a transparent, speedy, hassle-free and user-friendly procedure. Trade License (TL) is one of the components of a smart city that ensures a check on all the trade practices and increases the ease of conducting business within the state. Keeping in mind the benefits associated with the product offered, the proposed system is about to be implemented in 500+ ULBs across the country in 15 states. (For details on product features refer to Section 2)
For the offered product, the implementation process can be divided into seven major distinctive stages. Each stage has predefined entry and exit criteria, roles & responsibilities to assure objective monitoring and decision-making for the overall success of the engagement. The whole implementation lifecycle is typical of 38-42 weeks for the State, keeping in mind the entry and exit criteria defined at the beginning and end of each stage are met on time recommended.
Stage Zero is that of program setup and onboarding which is a pre-requisite for the initiative to kick-off and requires setup of the governance model, implementation Team and decision regarding other significant elements of the initiative like funding and procurement process.
Stage One - requires scoping of the initiative and decisions on the priorities for implementation by the State Implementation Team.
Stage Two - the State Team works on identifying and finding solutions to the significant gaps in the product offered with respect to the need of the State.
Stage Three - involves the Configuration and customization of the product offered. This involves working on various aspects of State-specific needs and incorporating them into the product offered.
Stage Four - is about doing a pilot launch in UAT and including all the necessary feedback on the product.
Stage Five - the roll-out of the product is done at the State level (Go Live) from a couple of ULBs to pan-state coverage in batches.
Stage Six - sustenance and ongoing improvements are worked upon while the product is already functioning in the State. (For details on the implementation plan refer to Section 3)
Implementation of the Trade License (TL) module requires meticulous planning and close coordination between various stakeholders at the centre and State levels. The success of the initiative is dependent upon many factors like strong Program governance, availability of trained resources, financial planning, targeted Implementation Team onboarding, focus on last-mile capacity building and ensuring necessary support to the Urban centre. Achievement of all these factors will provide the most effective and efficient roll-out and adoption of the Trade License System in the State.
The purpose of this document is to give an overview of the Trade License System (TLS). The Trade License product provides a digital interface, allowing citizens to apply for the Trade License and subsequently make the payment online.
The Trade License product enables:
Ease of doing business — Traders can apply for new licenses, renewals, amendments, and supplemental licenses
Regulatory Tracking — Administrators can track and manage regulatory processes
Shorter Timelines — It streamlines and automates the business licensing processes and help a business to be set up quickly
Data-driven decision making — The application collates valuable information on the economic activity and employment opportunities in a ULB
The TL product features can be broadly classified as the following modules:
Registration, Login and Creation of User Profile
Applying for a Trade License
Trade License Issue
Modifications to a Trade License
Renewal of Trade License
Payments and Fee
Dashboards and Reports
General Features
Click here to view module capabilities and product functional specifications.
This section provides an overview of the methodology for State-wide implementation of TL. The Implementation of TL is distributed across seven distinct stages. Each stage has predefined entry & exit criteria and roles & responsibilities. This is to ensure objective monitoring and decision-making for the overall success of the program. Details of each stage are defined in this section.
Note: This document is specific for States that have more than 30 ULBs
TL implementation program is expected to be completed approximately between 38- 42 weeks with the resource deployment by the State and System Integrator (SI) Team (as defined below). However, it is critical that activities and exit criteria set for each stage are achieved to adhere to this timeline.
This is a set of initial critical activities undertaken on receiving a letter of Enrolment or MOU from the State. Successful completion of these activities assures that the program is started with crucial personnel, System Integrator (SI) Teams, and funds.
Duration
4-6 weeks
Entry Criteria
Acceptance Letter/MoU by State
Exit Criteria
Finalise Trade License Program Vision
Finalise funding for the program
Define State-specific procurement process
Trade License Cell appointment (*). Consisting of:
Domain expert
Nodal officer (EO/ Commissioner/ Senior Official)
Program Head
System Integrator (SI) Team sign-up/onboarding
*Details of TL cells are mentioned in section 4 of this handbook
System Integrator and state will agree on program scope, program timelines, and budgeting & resourcing.
This stage envisages the in-person interaction of crucial State officials and implementation System Integrator (SI) Teams to kick-start the program. This stage may require multiple interactions/meetings with different interest groups. The principal objective of these interactions is to identify scope and planning strategies for phasing/ rollout, create an active collaboration & Governance approach and agree on a high-level timeline for the engagement.
Entry Criteria
Program setup (Stage 0) is complete
SI Team signed-up
Key Activities
Project kick-off meeting and consultation from stakeholders
Identify & agree on high-level scope and exclusions
Identify pilot ULBs (using criteria such as business penetration, revenue generated from previous TL systems etc.)
Product Walkthroughs
Define Project Steering Committee structure and Project Governance process
Define phases of Rollout/ Deployment
Agreement on Deployment Priorities and high-level delivery timelines
Identify and study all TL process
Definition of TL as per the municipal governance of the State
State wise conceptualization of trade categories
Citizen services/channels around it
Integration with other Departmental processes (*)
Finalise Program Success Metrics for Rollout, Adoption and Governance adhering to the vision of the program
Internal Capacity Building, program logistics at State and ULBs, as per the current scenario
Collection of baseline data to measure end line target for the product (revenue generated, total properties in ULBs etc.)
Circulation of baseline data collection templates to the state/SI Team
Exit Criteria
Publish the program charter
Implementation plan agreement with priority features and broad timelines
Program Governance Model
Program Success Metrics
Capacity Building
TL Cell formation and appointment (#)
Data preparation/collection kick-off from Pilot ULBs
Cloud Infrastructure procured
Project Office Space allocated
Program Branding (name, logo, tagline etc.)
*Exploration is required to understand the Inter and Intra Departmental Jurisdictions of Local Governments with respect to Trade License.
#Details of TL cell is mentioned in section 4 of this handbook
State Baseline Data: A Baseline Template is provided to collect certain vital information like no. of transactions, revenue collected in the last FYs, collection mode, budget data, etc. This data must be collected pre-rollout
During the Solution design stage, key State officials and members, who are subject matter experts, are expected to share State acts and policies and help interpret the same for the System Integrator (SI) Team. This stage baselines the State-specific product features in the Product Configuration report.
Entry Criteria
Program Charter
TL cell appointment
Key Activities
Standardisation of all TL processes
Initiate policy change if needed, based on the Processes defined
Define criteria for success
Conduct Product familiarisation workshop
Initiate collection of master data from pilot ULBs
Finalise data migration/collection/sync-up approach as per requirement
Finalise data validation approach
Capacity Building for making state team aware about basic usage of tools like MS Office, mails etc.
Dashboard design finalisation for Program Tracking
Exit Criteria
State Sign Off and Publishing of the TL processes, data template/workflows
Finalisation of Roll-out plan (in different phases)
Product Configuration Report Sign Off
Solution agreement for required State- specific product customisations
Program tracking mechanism finalization and sign off by the state
Initial reporting structure
Dashboard KPIs
Sign-off on data approach (Data collection/migration/correction/ sync-up/validation)
Detailed project plan
Pilot ULBs Specific Product Data Configuration: Master data is required from the Product Perspective for going live. For e.g.: Boundary Data, List of Employees etc. A Master Data Template will be provided for the collection of this particular data type.
This stage consists of a series of developments in accordance with the detailed project plan to ensure the smooth functioning of the customised product. Master Data Collection & Environment Setup will be achieved in this phase. Further monitoring and maintenance strategies are put in place.
Entry Criteria
Product Configuration Report has been Signed Off by the state
Sign-off on data approach (Data collection/migration/correction/ sync-up/validation)
State Sign Off and Publishing of the TL processes, data template/workflows
Detailed Project Plan
Key Activities
Setting up development environments
Development/customisation of reports and dashboards
Development/Integration of portal
Third-Party Integrations (Payment gateway, Handheld/pos device)
Updation of user manuals and other key documents
Preparation & execution of Test Cases
Setup monitoring, support & maintenance processes, tools and dashboards
TL Legacy data collection from Pilot ULBs as per the data agreement signoff by the state
Capacity Building for making state team aware about basic usage of tools like MS Office, mails etc.
Identify ULB level nodal officers for day to day support
Migration and verification of Pilot ULB data as per the data agreement signoff by the state
Exit Criteria
Configured/Customized product that is ready for UAT
Set up of Monitoring, support & maintenance of Dashboards
finalization of Initial Reporting and Dashboard KPIs
Identification of participants for UAT session
During this stage, a demonstration of the product followed by a hands-on session is conducted for the ULB officials. Necessary training of ULB officials and resources required for UAT is conducted and identified respectively. The establishment of the State Support Team and required processes are initiated in this stage.
Entry Criteria
Configured/Customized product ready for UAT
Pilot ULB Officials associated with TL are available for UAT & Training
Key Activities
UAT Environment Setup
Issues/bug identification and resolution
Regression UAT and Sign off from Pilot ULBs/ State
Setting up the Production environment
Setting up Support Centre & processes (Help Desk)
Training (Users, trainer)
master trainers identified from ground for simultaneous training
Training the Support Resources
Marketing & promotion activities
Go Live & launch event
Setup of review and monitoring cadence/team
Usage/review/Dashboard/Field Visits
Exit Criteria
UAT Sign-off & Go Live for Pilot ULBs
Setup of review and monitoring cadence
Note: The Nodal Officer is responsible for identifying the ULB officials who are associated with the TL process on the ground and will be working with the technological Product in the respective ULBs
On successful Go-Live in the Pilot ULBs, and further fine-tuning to stabilize the product, the solution will be rolled out to the rest of the ULBs in phases. Guidance and support from the State Team will be required to create the rollout plans and ensure the necessary infrastructure for training and deployment is available at each ULB.
Note: The rollout phase needs to be detailed for iterative activities of onboarding ULBs in batches.
Entry Criteria
A pilot has been successful in the State
there are less than 3 open critical incidents (issues) with respect to product, implementation and data
Key Activities
ULB configurations phase wise as per the Project Plan
Verification and migration of ULB data phase wise as per the Data Agreement Sign Off provided by the State
Establishment of bug ticketing tool for resolving ground level issues by the state team
Training the Users at the district level
Pan State Roll Out - Phase wise
Stabilise product
Exit Criteria
State-wide Rollout in batches:
Adoption tracking & Review Cadence operational
Help Desk Effectiveness assured
Critical Bugs fixed
Program Success Metrics Tracking Kick-started
Note: Only once all the stages are complete in one batch of the rollout of around 30 ULBs, the next batch begin. There are multiple phases of rollout. The second batch begins after the first batch has successfully fulfilled all the criteria of the Rollout Phase. A typical timeline for the closure of rollout in each batch is 5-6 weeks (in a batch of 30 ULBs)
The final stage consists of strategies to ensure the sustenance of the product in the State. Systems are put in place to ensure the continuous tracking of data and provisions are made to improve the product if new data suggest.
Entry Criteria
Rollout Phase 1(First set of ULBs where rollout will happen after Pilot)
Key Ongoing Activities
Adoption Review Meetings as per the vision defined for the program.
Meetings are chaired by the Program Head
Need to be conducted weekly
TL Cell Focuses on Using data for:
tracking field issues and performance data to identify improvements
identify additional Integrations around TL to make processes more robust towards enhancing TL revenues (e.g. Upstream and downstream Processes)
Plans of ongoing Sustenance in Place with respect to:
Funding
IT support
Process Effectiveness and Improvements
This section outlines the activities involved in each stage of the implementation along with the responsibility and accountability of critical stakeholders - State, eGov Team and System Integrator Team onboard.
TL Cell: TL Cell is the government-appointed body chaired by the Principal Secretary/Secretary, Urban Development Department with members from Urban Development Department etc.
Resource requirements for the TL cell required to be formed by the State
Project Head
1
Domain Expert
2
District Nodal Officer
1 per district
MIS Expert
4
Note:
Designations mentioned above are as per designations already driving TLs implementation at the State level.
The description of each designation is explained below.
These are the preferred figures. In the case of Domain Expert, 2 people are subject to the availability
Description of resource persons:
Project Head: Is the Head of the TL Cell who will drive the project from the State’s Side
Domain Expert: A person who is well aware of the on-ground scenario, well versed with the act, GOs passed, Prevalent Business processes, Deviations from the acts, TL Rates/ slabs applicable
Nodal officer (EO/Commissioner/ Senior Official): the project coordinator in each district to drive the project centrally. Monitor usage post Go Live- point of escalation for Implementation Team, Seasoned and worked in Multiple ULBs on various modules and has a good understanding of TL, Facilitates and Tracks data collection Post Go Live, Monitors and facilitates the adoption of the application. point of contact for eGov, SI and at the HQ level.
MIS Expert: Day-to-day tracking of the data specific to ULBs, data entry, reporting and review to senior officials
eGOv Team: eGov Team is the technical partner of the project which will provide all necessary support to the State concerning the implementation, Program Designing etc.
System Integrator (SI)Team: SI Team will be responsible for consulting, program management and the implementation of products in the ULBs in close collaboration with the TL cell, technical partner (eGov) and various other stakeholders.
Guidelines to read the tables below:
Execute - One who owns the accountability to complete the activity
Consult - One who may initiate, guide and in the process, handhold the execution of the activity
Task/Activity
eGov
State Leadership
Appoint of TL Cell
Consult
Execute
Finalise funding for the program
Consult
Execute
Define state -specific procurement process
Consult
Execute
System Integrator(SI) Team sign-up/onboarding
Consult
Execute
Finalise Trade License Program Vision
Consult
Execute
Note: Stage 0 is where the TL cell and SI team is formed, hence there are only two entities playing a role which are that of eGov and the state leadership. Once the TL cell and SI team are finalised, their role begins in the following stages.
Task/Activity
eGov
TL Cell
SI Team
Identify & agree on scope and exclusions
Consult
Consult
Execute
Identify pilot ULBs
Execute
Consult
Project Kickoff - Implementation Methodology Presentation
Consult
Consult
Execute
Product Walkthroughs
Consult
Execute
Define Project Steering Committee structure and Project Governance process
Consult
Consult
Execute
Define phases of deployment/ rollout
Consult
Execute
Agreement on Deployment Priorities and high-level delivery timelines
Consult
Execute
Identify and study all TL process
Consult
Execute
Finalize Program Success Metrics for Adoption and Governance adhering to the vision of the program
Consult
Consult
Execute
Stage 1 - Program kick-off
Task/Activity
eGov
TL Cell
SI Team
Internal Capacity Building, program logistics at State and ULBs, as per the current scenario
Execute
Consult
Collection of baseline data to measure end line target for the product (Revenue generated, total properties in ULBs etc.)
Consult
Execute
Consult
Circulation of baseline data collection templates to the state/SI Team
Execute
Consult
Task/Activity
eGov
TL Cell
SI Team
Standardisation of all TL processes
Consult
Execute
Define criteria for success
Execute
Consult
Initiate policy change, if needed based on Processes defined
Consult
Execute
Consult
Conduct Product familiarisation workshop
Consult
Execute
Initiate collection of master data from pilot ULBs
Consult
Execute
Finalise data migration/collection/sync-up approach
Consult
Execute
Finalise data validation approach
Execute
Consult
Capacity Building for making state team aware about basic usage of tools like MS Office, mails etc.
Execute
Consult
Dashboard design finalisation for Program Tracking
Execute
Consult
Task/Activity
eGov
TL Cell
SI Team
Setting up development environments
Consult
Execute
Development/customisation of reports and dashboards
Consult
Execute
Development/Integration of portal
Consult
Execute
Third-Party Integrations (Payment gateway, Handheld/pos device)
Consult
Execute
Updation of user manuals and other key documents
Consult
Execute
Preparation & execution of Test Cases
Consult
Execute
Setup monitoring, support & maintenance processes, tools and dashboards
Consult
Execute
TL legacy data collection from Pilot ULBs (at least)
Consult
Execute
Capacity Building for making state team aware about basic usage of tools like MS Office, mails etc.
Execute
Consult
Verification and Migration of Pilot ULB data
Consult
Execute
Identification of participants for UAT session
Execute
Consult
Task/Activity
eGov
TL Cell
SI Team
UAT Environment Setup
Consult
Consult
Execute
Issues/bug identification and resolution
Consult
Execute
Regression UAT and sign off from Pilot ULBs/ State
Execute
Consult
Setting up the Production environment
Consult
Execute
Setting up Support Centre & processes (Help Desk)
Execute
Consult
Training user
Execute
Consult
Training Trainer
Consult
Execute
Stage 4 – UAT & Go Live
Task/Activity
eGov
TL Cell
SI Team
Training the Support Resources
Consult
Execute
Marketing & promotion activities
Execute
Consult
Go Live & launch event
Consult
Execute
Execute
Setup of review and monitoring cadence/team
Execute
Consult
Task/Activity
eGov
TL Cell
SI Team
ULB configurations phase wise as per the Project Plan
Consult
Execute
Verification and Migration of ULB data phase wise as per the Data Agreement Sign Off provided by the State
Execute
Consult
Establishment of bug ticketing tool for resolving ground level issues by the state team
Consult
Execute
Training the Users at the district level
Execute
Consult
Pan State Roll Out – Phase wise
Consult
Execute
Execute
Stabilise product
Consult
Execute
Task/Activity
eGov
TL Cell
SI Team
Adoption Review Meetings as per the vision defined for the program
Consult
Execute
Consult
TL Cell Focuses on Using data for:
tracking field issues and performance data to identify improvements
identify additional Integrations around TL to make processes more robust towards enhancing TL revenues (e.g Upstream and downstream Processes)
Execute
Consult
Plans of ongoing Sustenance in Place with respect to:
Funding
IT support (infra, helpdesk, ongoing enhancements)
Process Effectiveness and Improvements
Consult
Execute
Consult
Infrastructure
The actual Infra will be provided based on the questionnaire inputs received from the state
The state will take care of providing necessary project infrastructure and office facilities during the program for all on-site project Team members, which will be confirmed during the initiation phase. This includes workspace, office equipment (e.g., telephone with STD, fax machine, photocopy machine, etc.), stationery, PC/workstation, project LAN and internet access, etc.
The state will provide the necessary administrative support staff to carry out day-to-day project administration tasks, e.g., meeting rooms, Videoconferencing, etc.
The state should provide a Project Office and at least one conference room with speakerphone throughout the Project Duration.
Project Scope
Any new requirements received from State during the implementation phase will be handled through a change management process
State Team
The state will nominate a reasonably sized multifunctional Team from various departments of the State to be responsible for the implementation. The state Team would be required for information, validation, and execution through the implementation cycle and the Team members should be reasonably empowered to take decisions. Any delay in the decision-making process and the non-availability of the State Team may have an impact on the schedule.
The participants from State are expected to have a thorough understanding of the State’s internal processes.
The state will engage internal and external stakeholders required for this engagement and ensure their availability whenever needed.
Documentation
The Tech Implementation Partner will ensure provision of the following:
User education and training documentation delivery as per the default product documentation of the identified product versions.
Product manuals are expected to be shared with the State as part of the user manual.
All documentation in English and the language requirement of the state.
Training
Training to the end-users will be driven by the state Team.
The state will be responsible for providing the necessary infrastructure required for the Training, which includes the following readiness.
Training Rooms (Parallel Training Sessions) with Projector, White Board, Markers, Internet Connection, sufficient seating capacity, Desktop/Laptop for each participant and availability of Network for Trainees to connect to the server.
Implementation
The scope of the implementation will be limited to the services mentioned in Section 2.
eGoc Team will have an identified SPOC for handling the first level of communication with the client unless discussed and agreed.
eGov Team will not be involved in defining the test cases or executing the test cases.
Necessary signoff would be provided by the state upon completion of the defined milestones.
Vision: Defining the time frame to go live, the time frame to scale it pan state, the value proposition of the programme for the state and year-on-year financial targets and adoption targets
Project Plan: A detailed plan of Program schedule/timelines, implementation phases, team structure and ongoing support and maintenance is required.
System Integrator: The Entity/Company collates all the subsystems required for the project and integrates them to achieve the program objective
Program Charter: Outline of implementation plan agreement with priority applications and broad timelines, program governance model, program success metrics and capacity building.
Acceptance Letter/MOU: Formal Acceptance/Sign Off of the Client State with a clear mandate of the Program
Program Success Metrics: Defining the parameters (which are measurable) prior to the program, on which the success of the program is to be measured on the completion of the program
Project steering committee: The key body within the governance structure is responsible for the business issues associated with the project that are essential in ensuring the delivery of the project outputs and the attainment of project outcomes.
Project governance: Set of policies, regulations, functions, processes, procedures and responsibilities that define the establishment, management and control of projects, programmes and portfolios.
Scoping: List of activities measured against the time taken to complete them in accordance with the project goals
Baseline data: Set of information that serves as a foundation to compare other data acquired afterwards
Project Kick-off meeting: Meeting with the project team and the client of the project. This meeting would follow the definition of the base elements for the project and other project planning activities
Fitment Study: GAP Study of the Existing/Required Field Process Vs Product
Data migration: Existing Records of the functional activities need to be moved into the Database of the newly released Application
Data collection: Required data for the roll-out of the applications, which needs to be collected from the existing functional process
Data validation approach: This approach enables the sanctity of the Data with built-in validation by the Design
Data synchronization: The process of establishing consistency among data from a source to a target data storage and vice versa and the continuous harmonization of the data over time.
Pilot Implementation: Any new process is tested out as a pilot in one or two instances before pan implementation
Pilot ULB: The ULBs selected for the pilot implementation are called pilot ULBs.
Roll out: On successful clearance of the Pilot, the Process/Application/Services are implemented across all Offices/ULBs
Deployment: Deployment defines the complete package of Software components set up in a particular environment
Customization: Details of changes to be made in the Product to comply with the needed field process
Configuration: Defining existing content such as Options and Variables based on the requirements on the ground
Product walkthrough: Explaining to the users step-by-step through a set of actions that they need to take to achieve a specific outcome


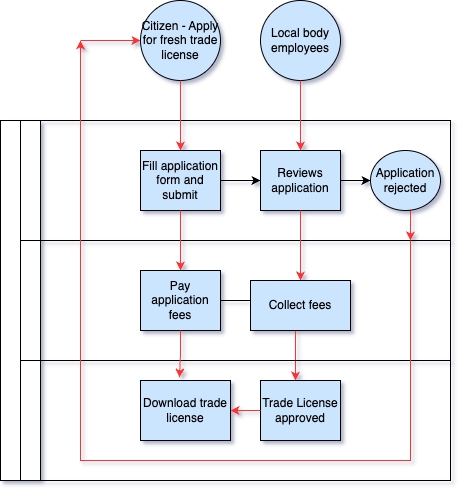
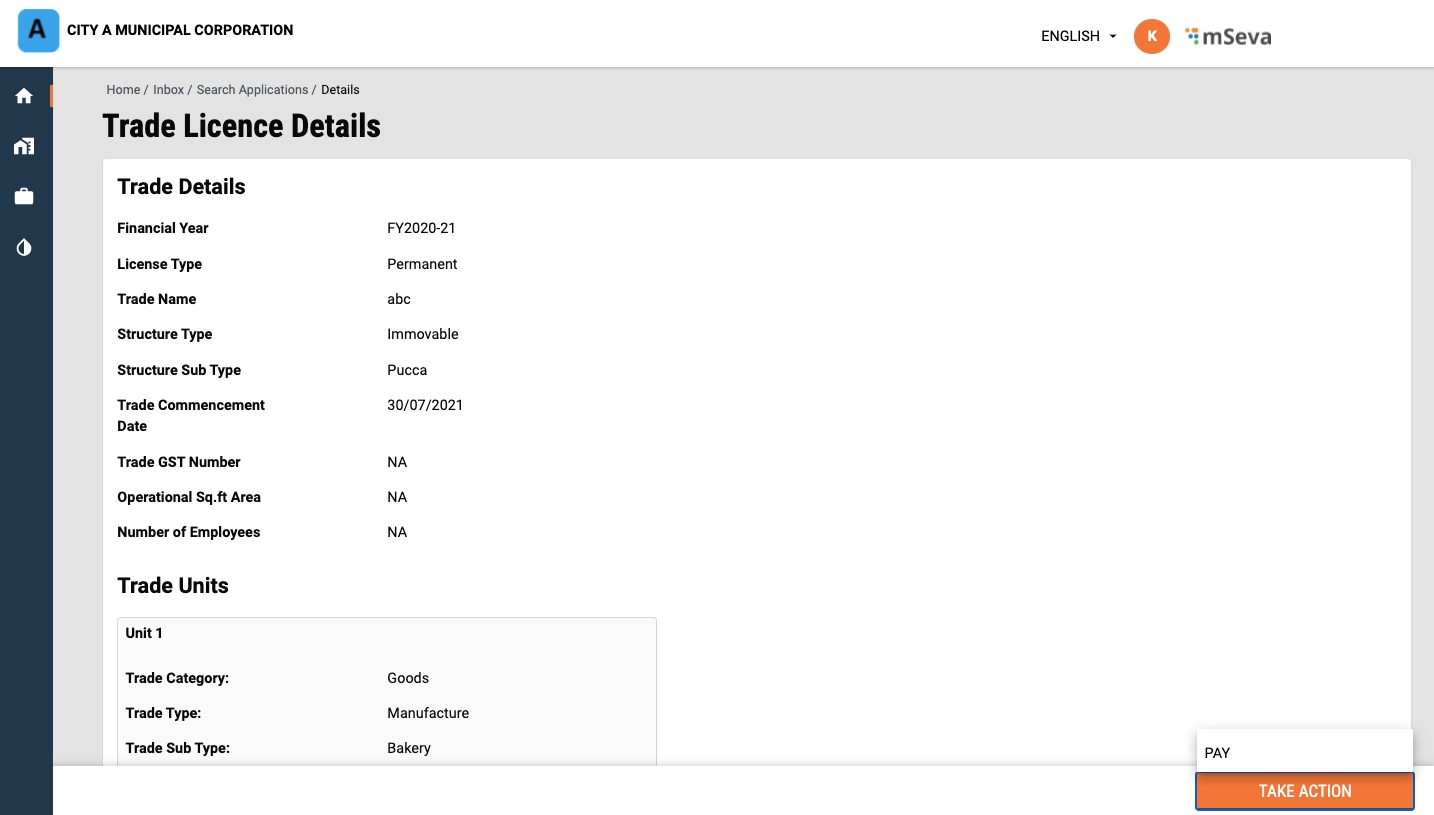
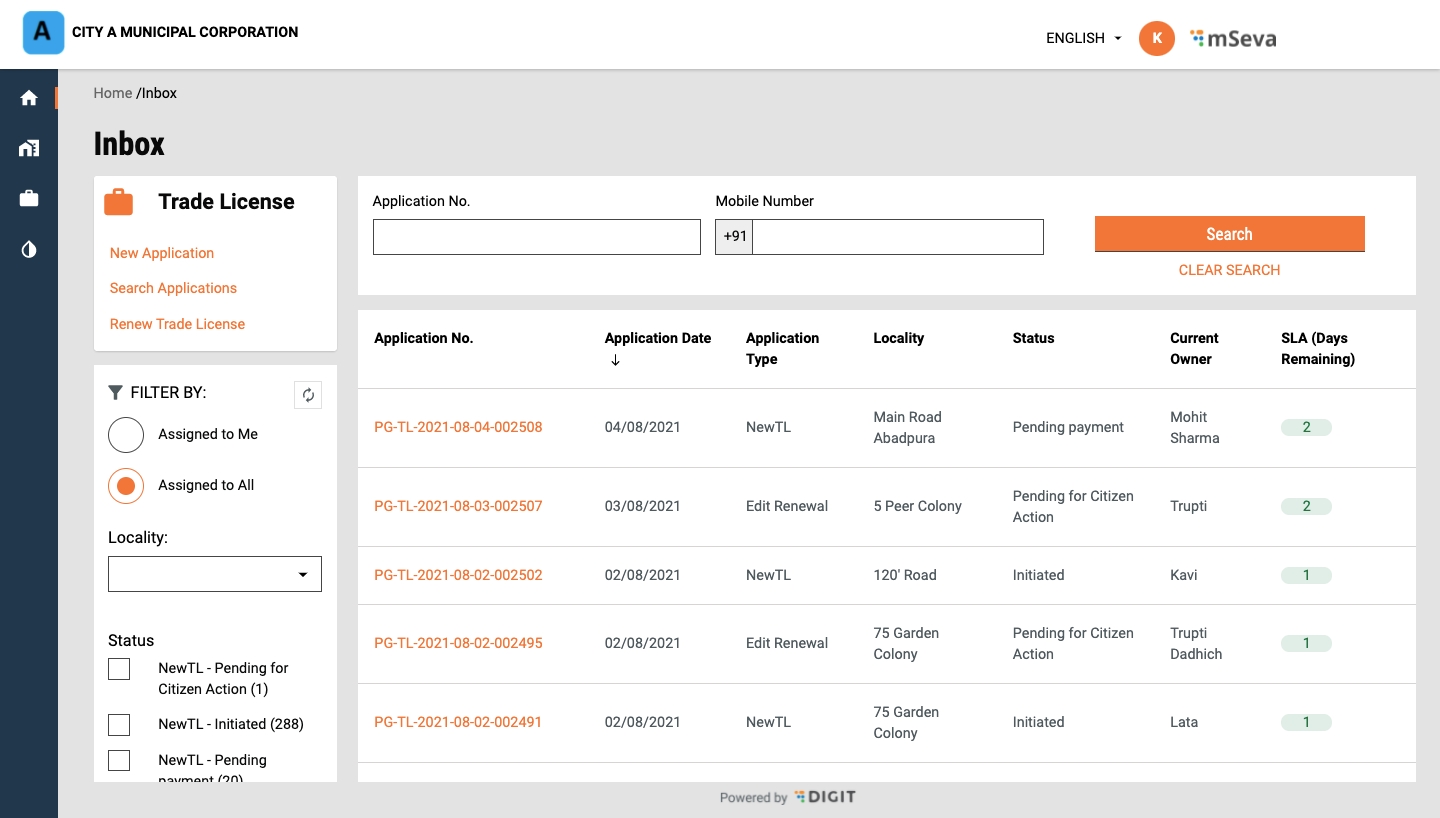
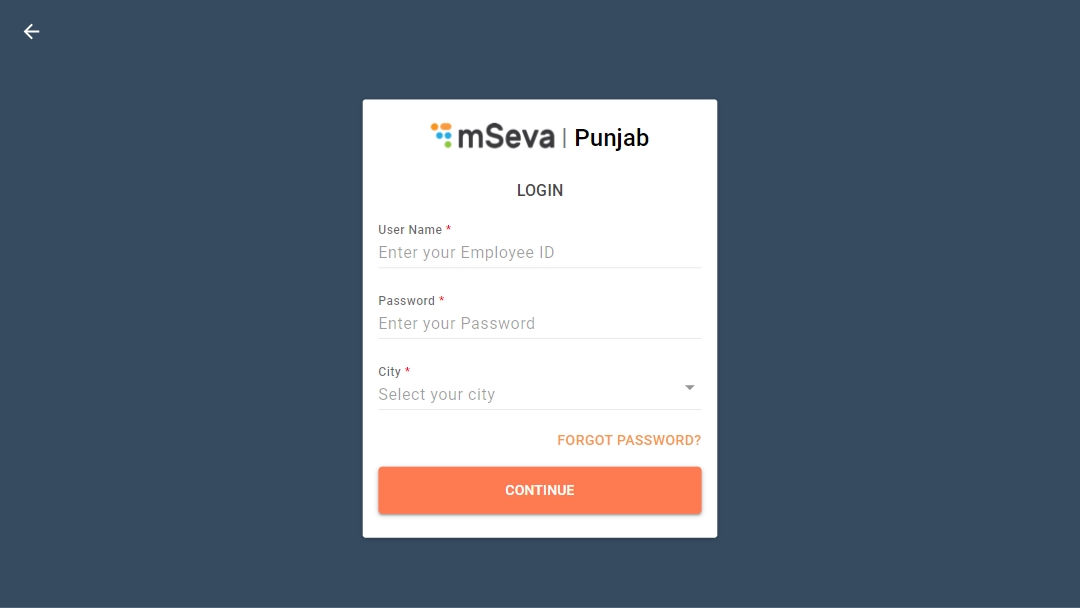
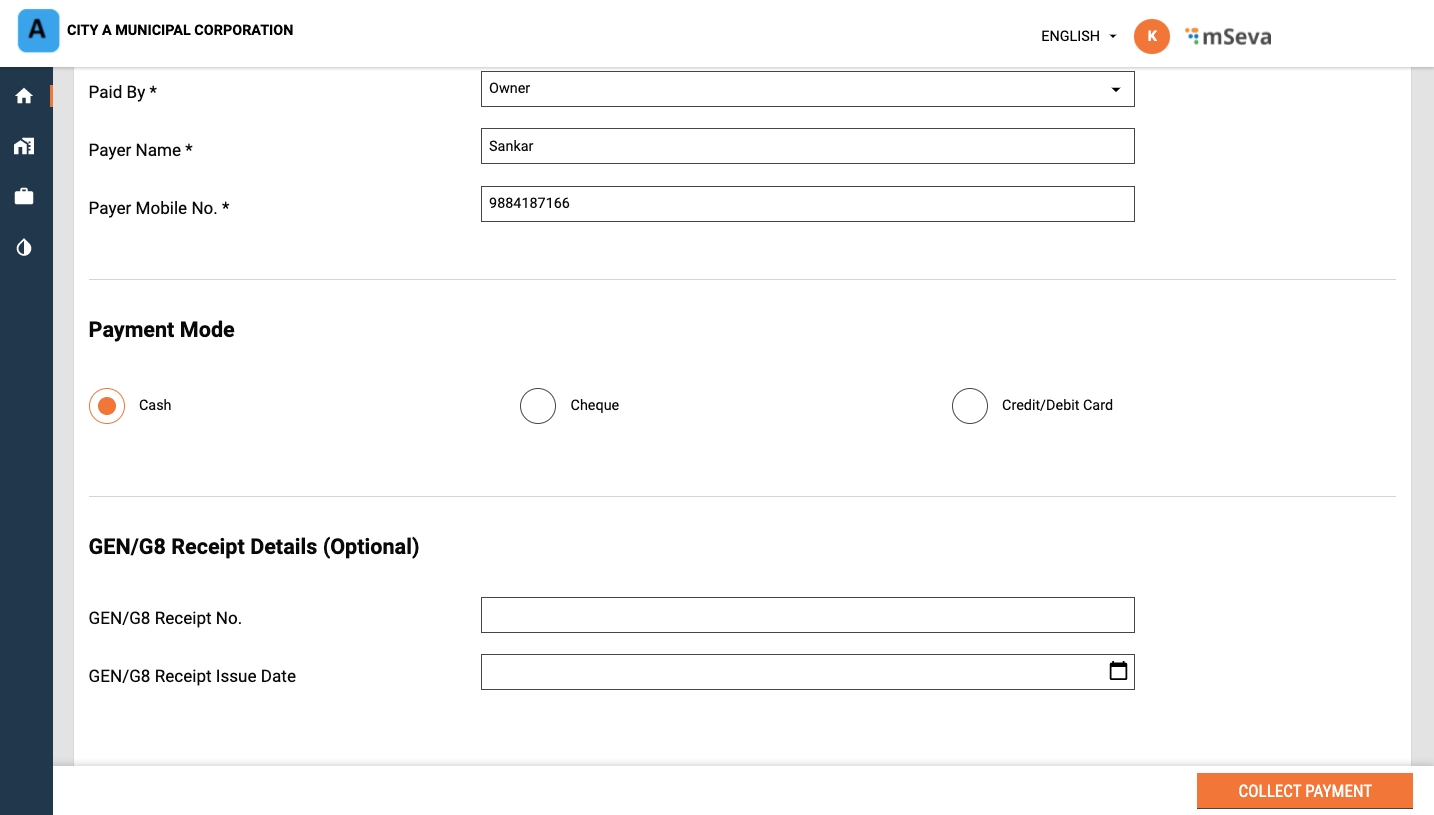
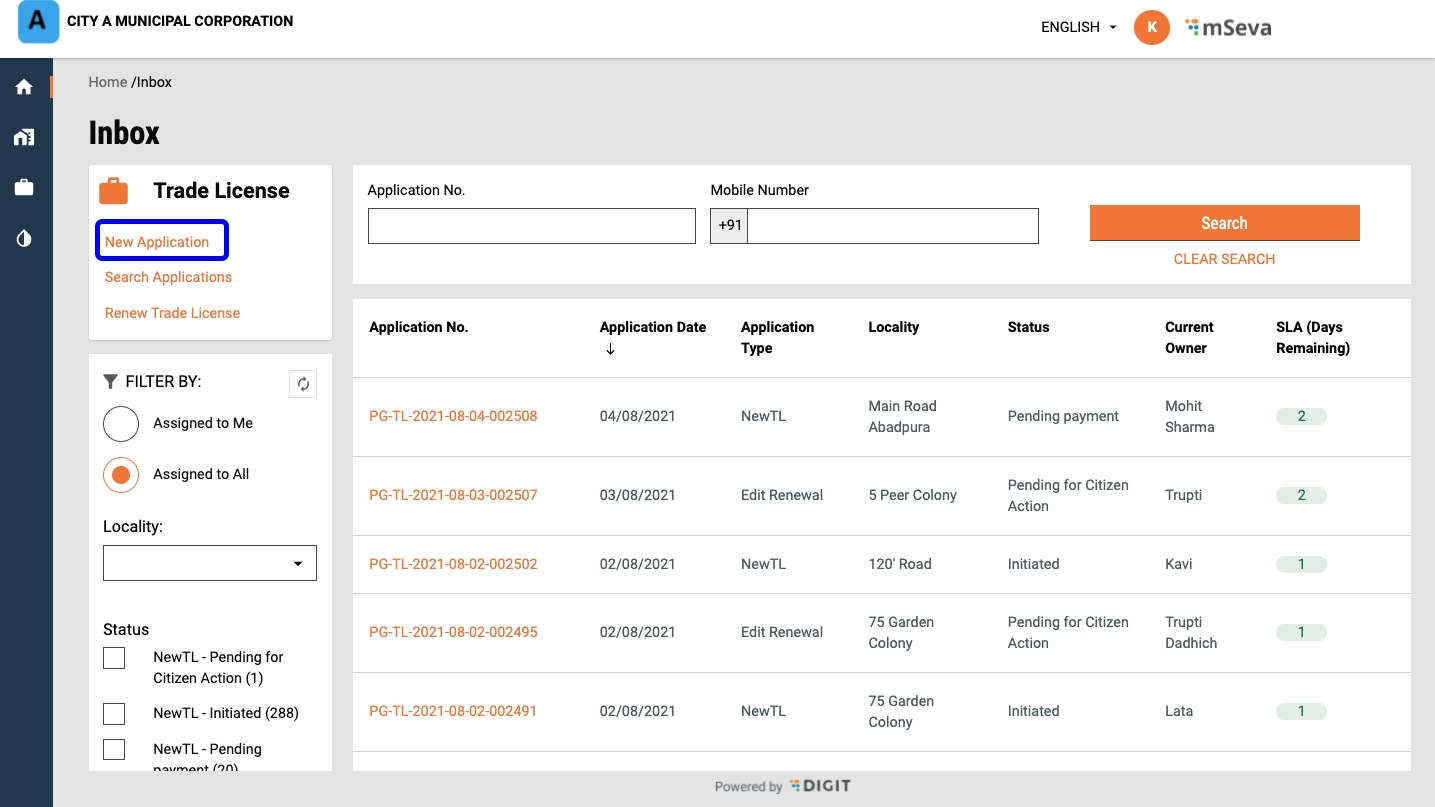


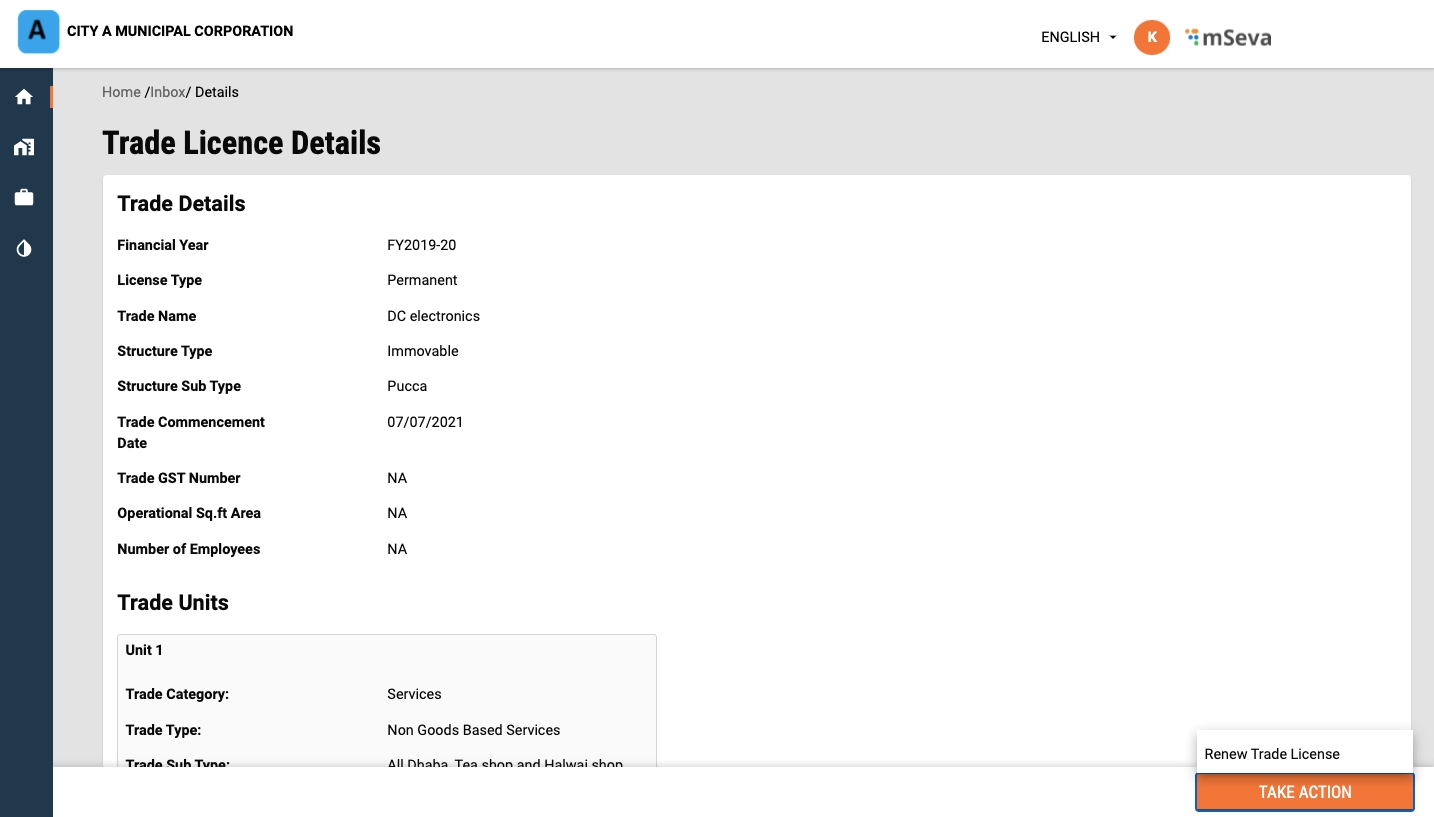
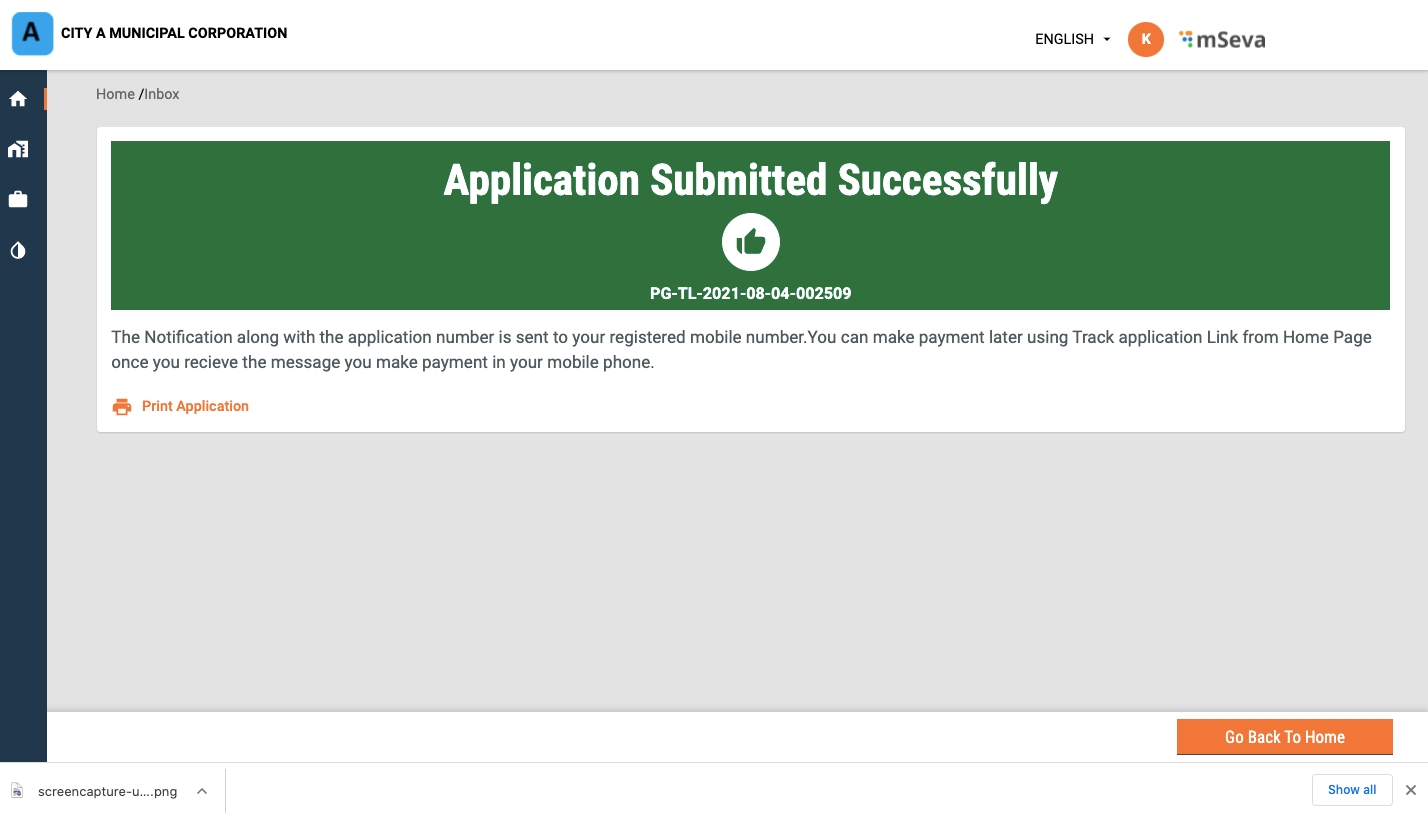

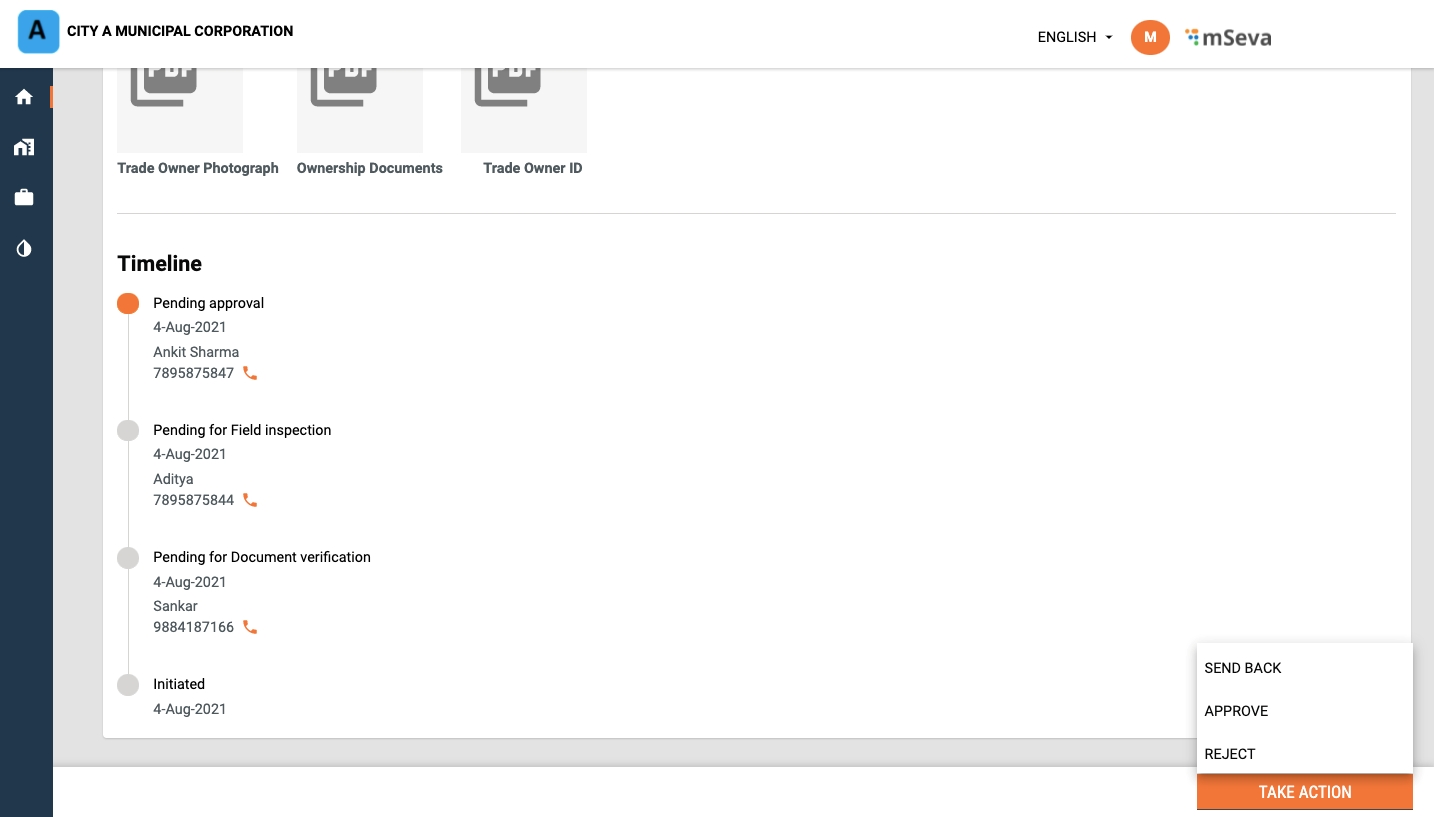
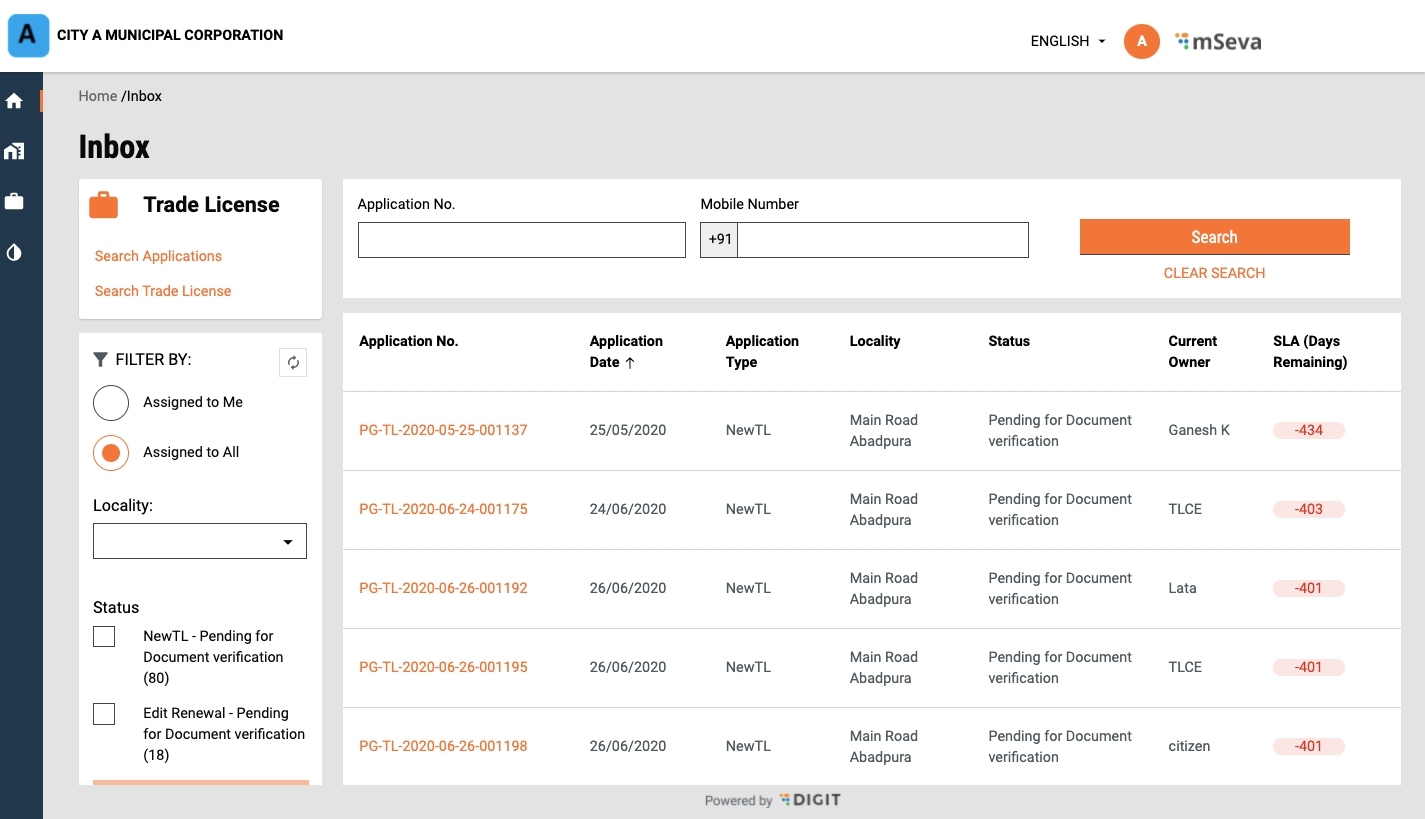
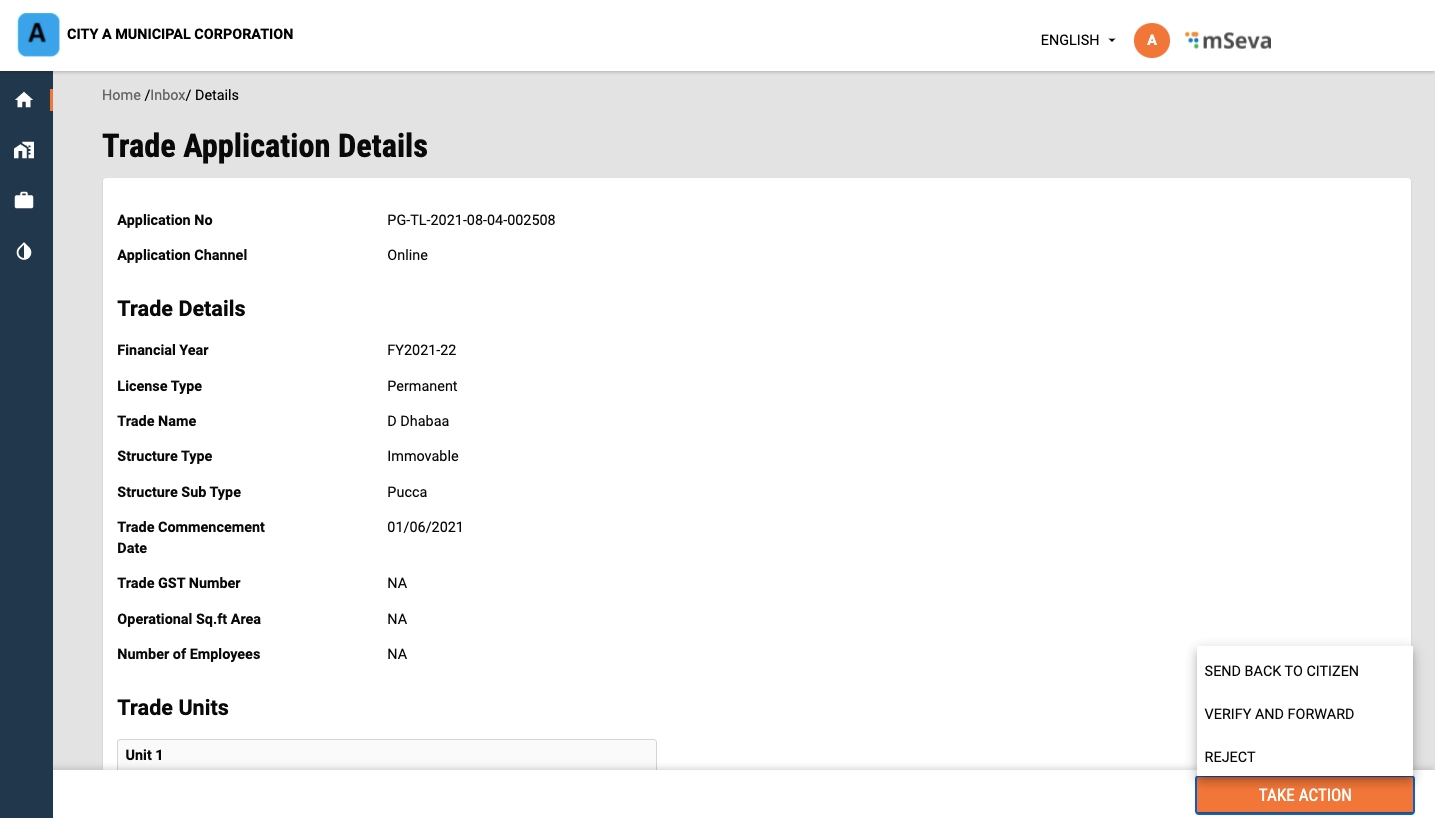
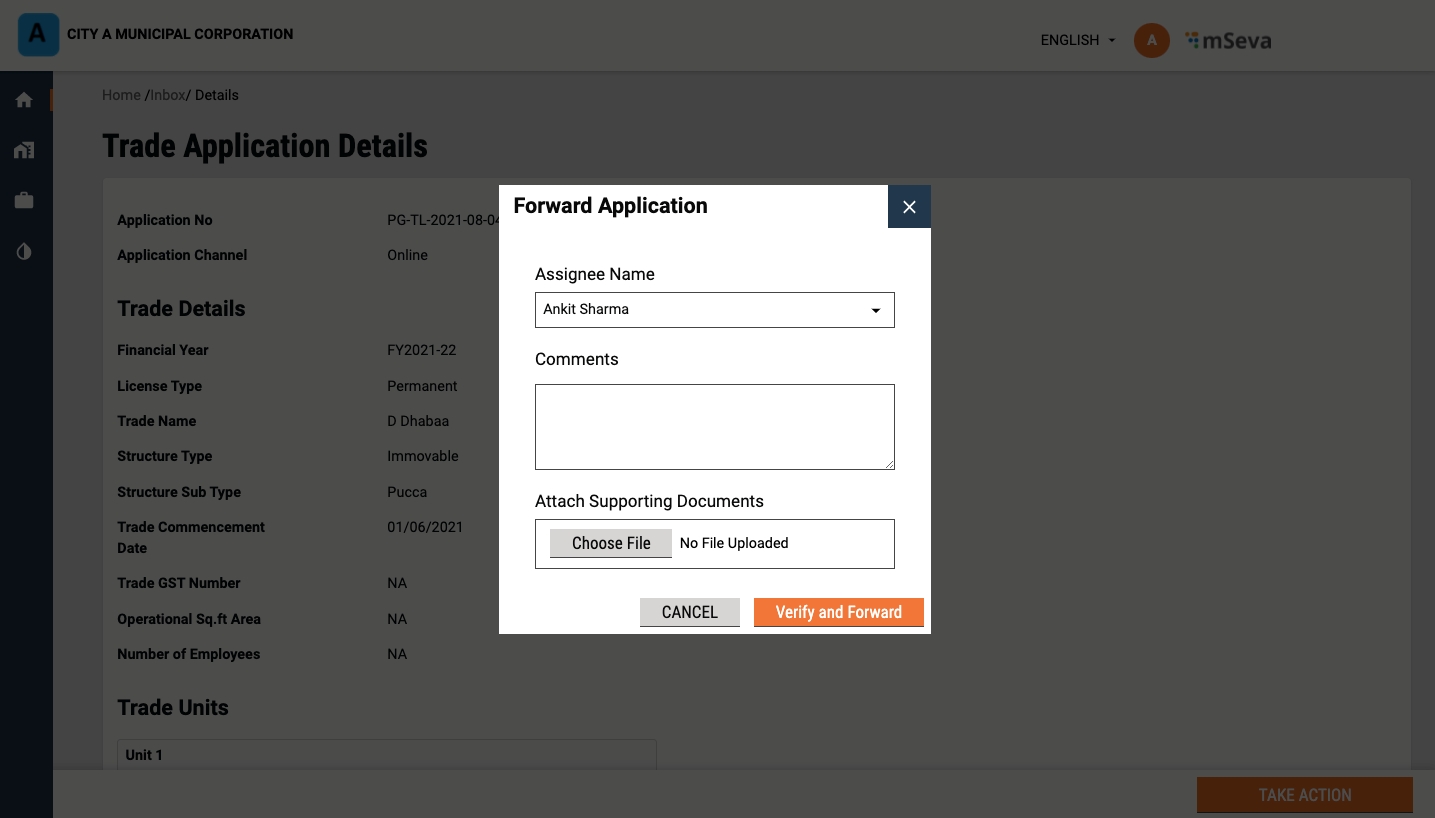
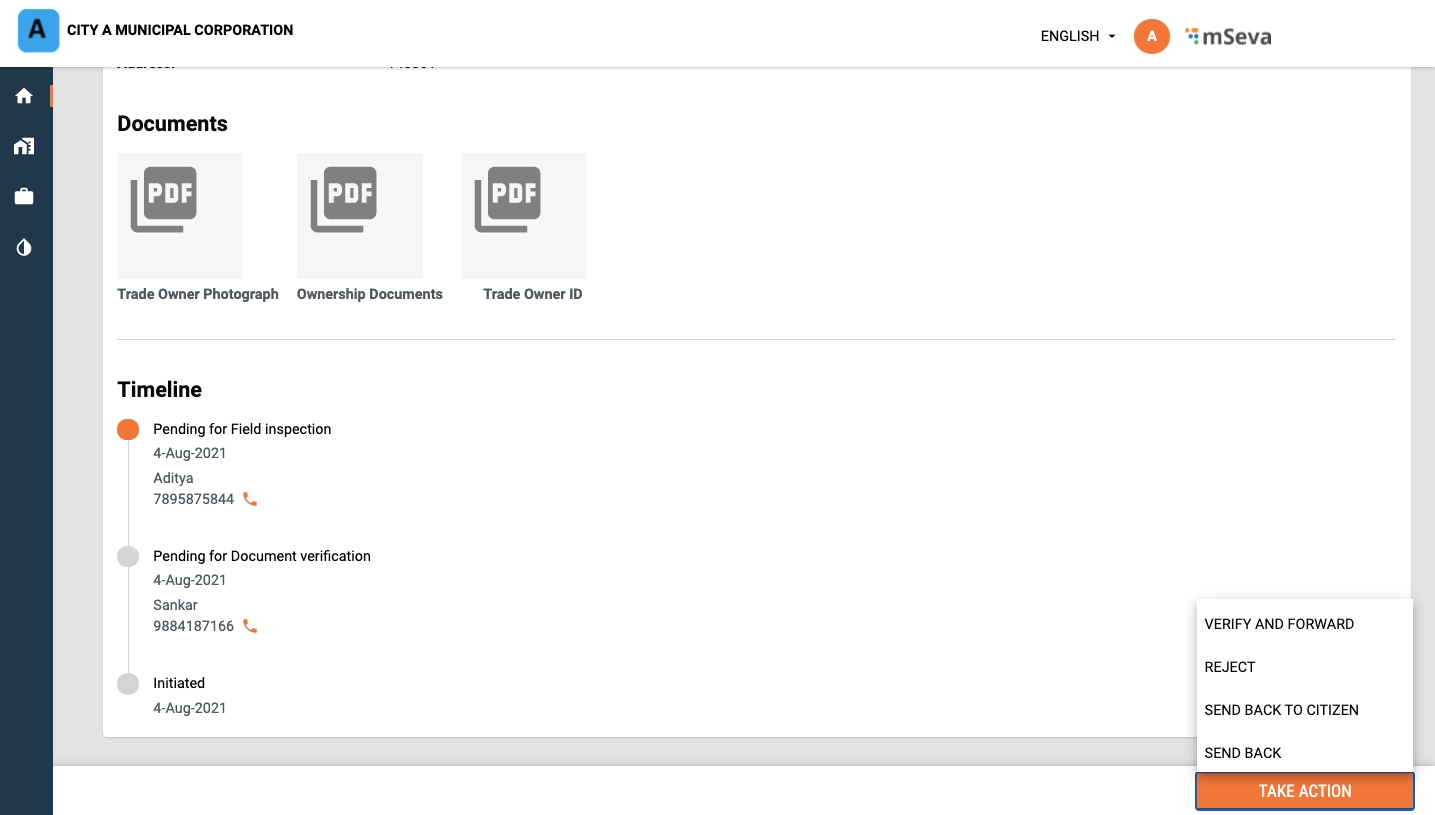
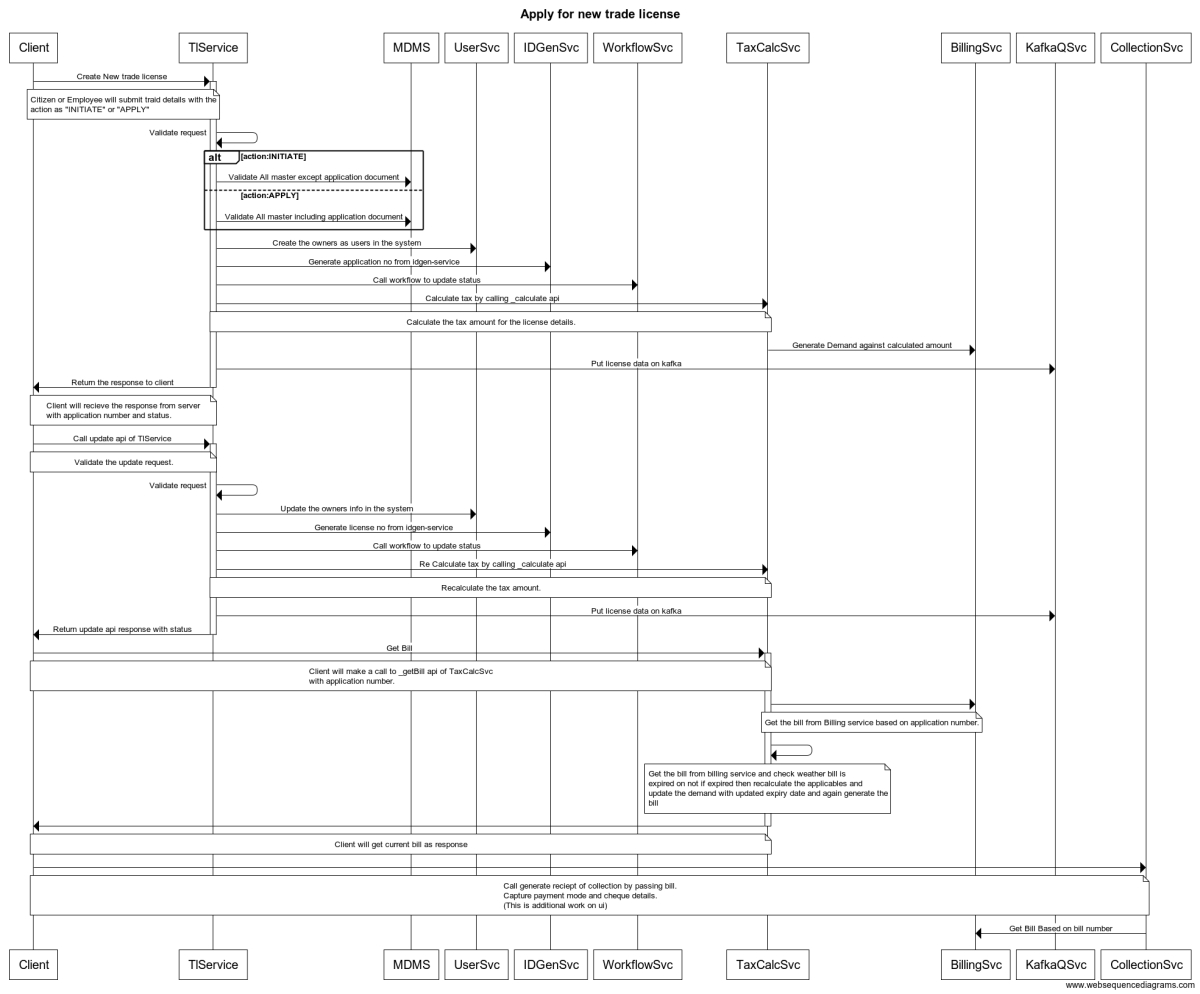
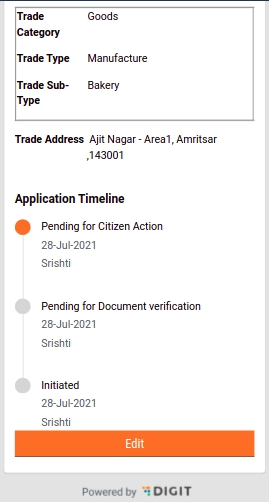
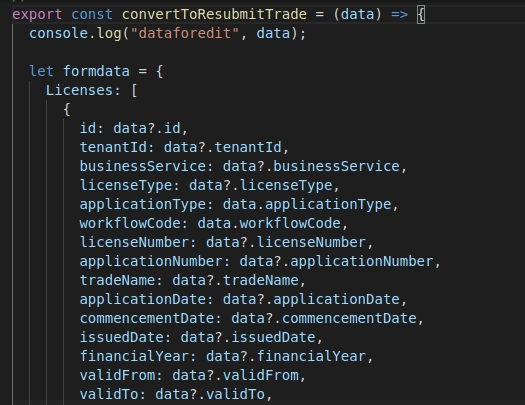
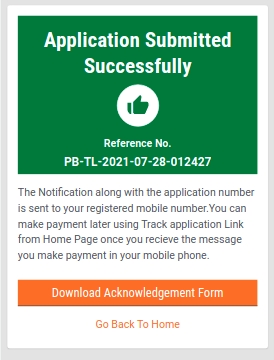
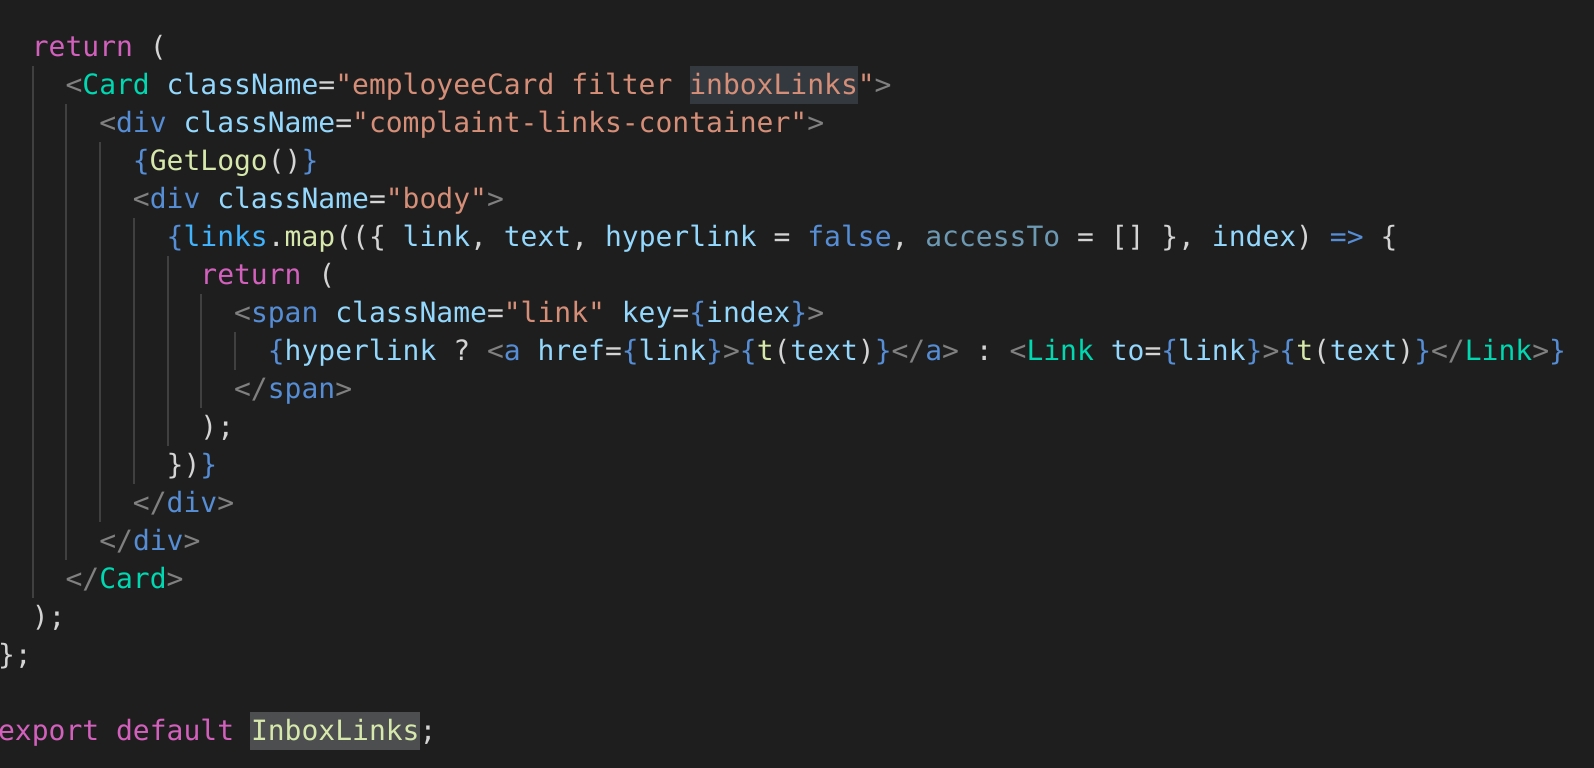
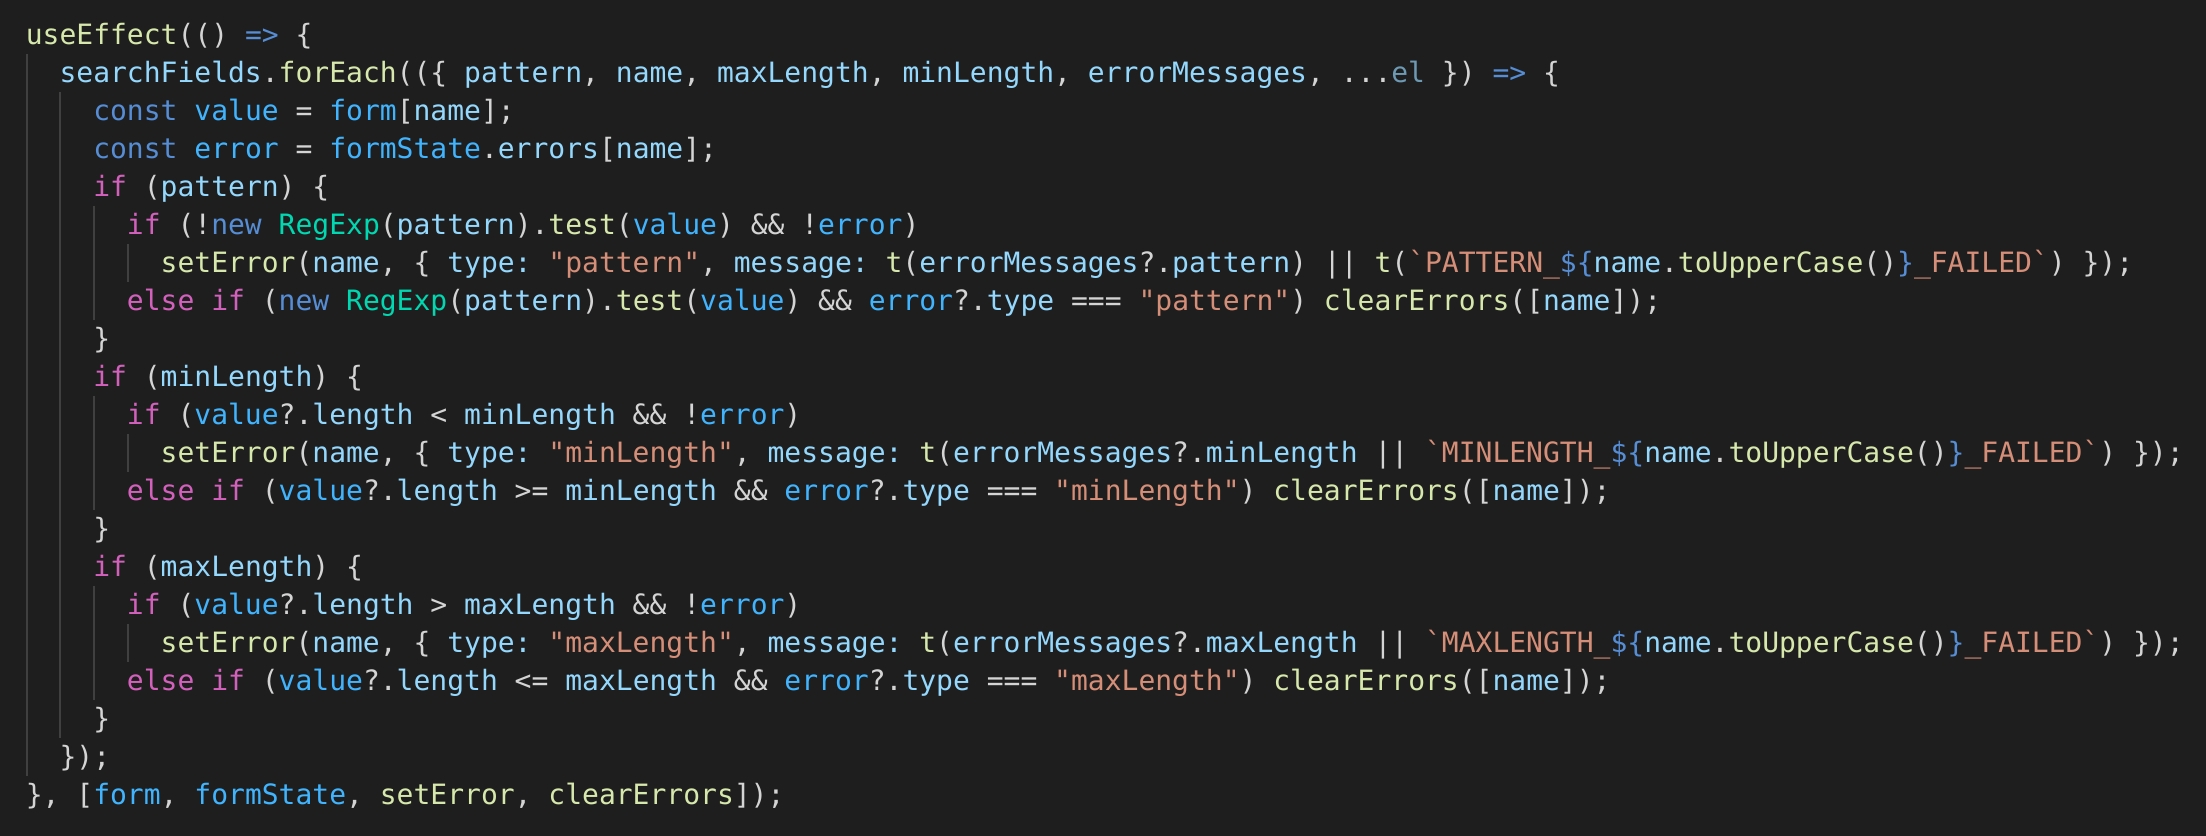
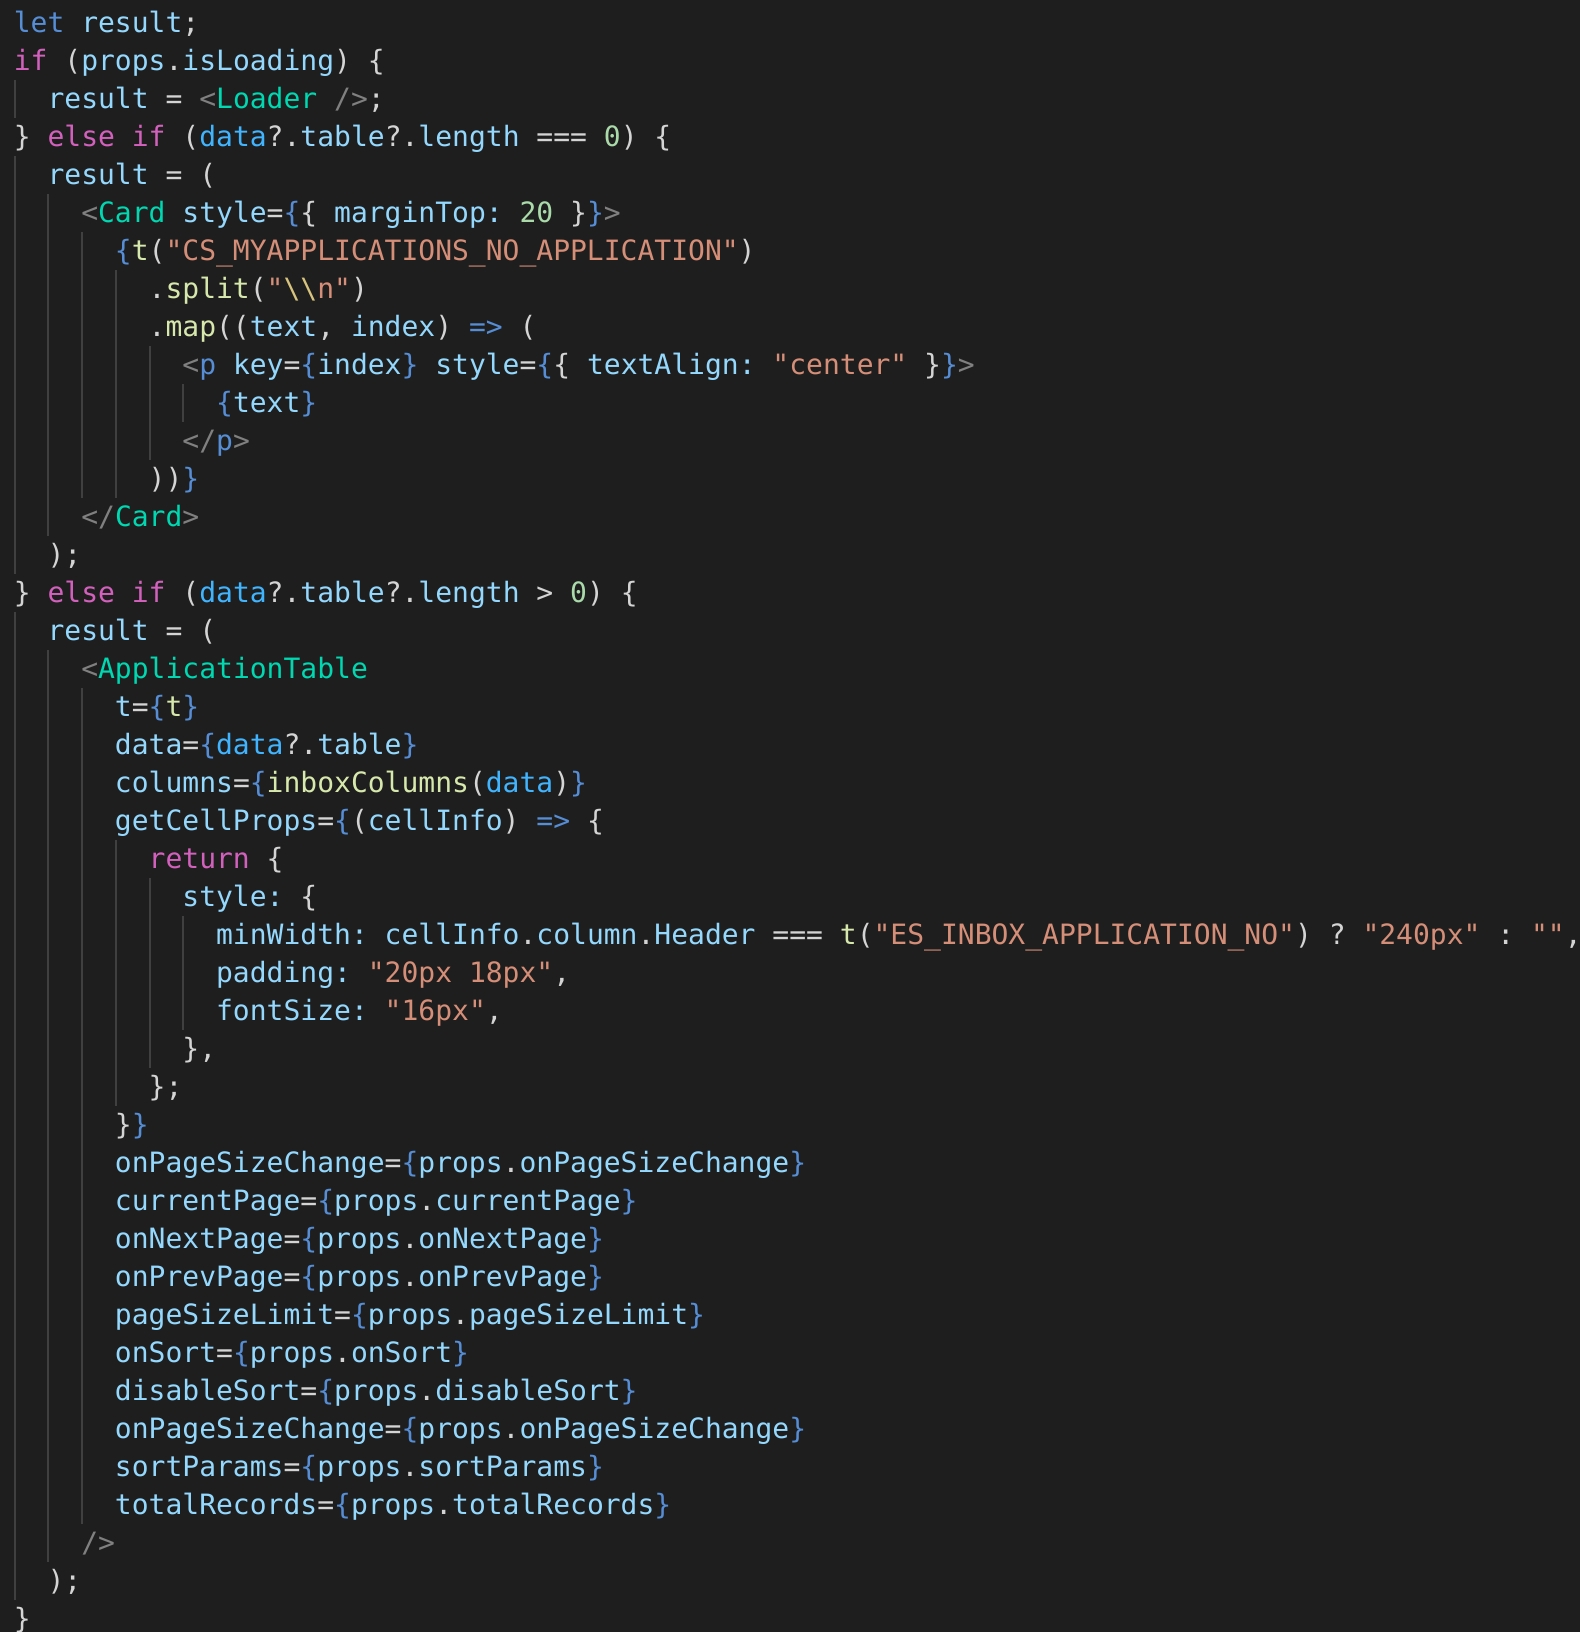
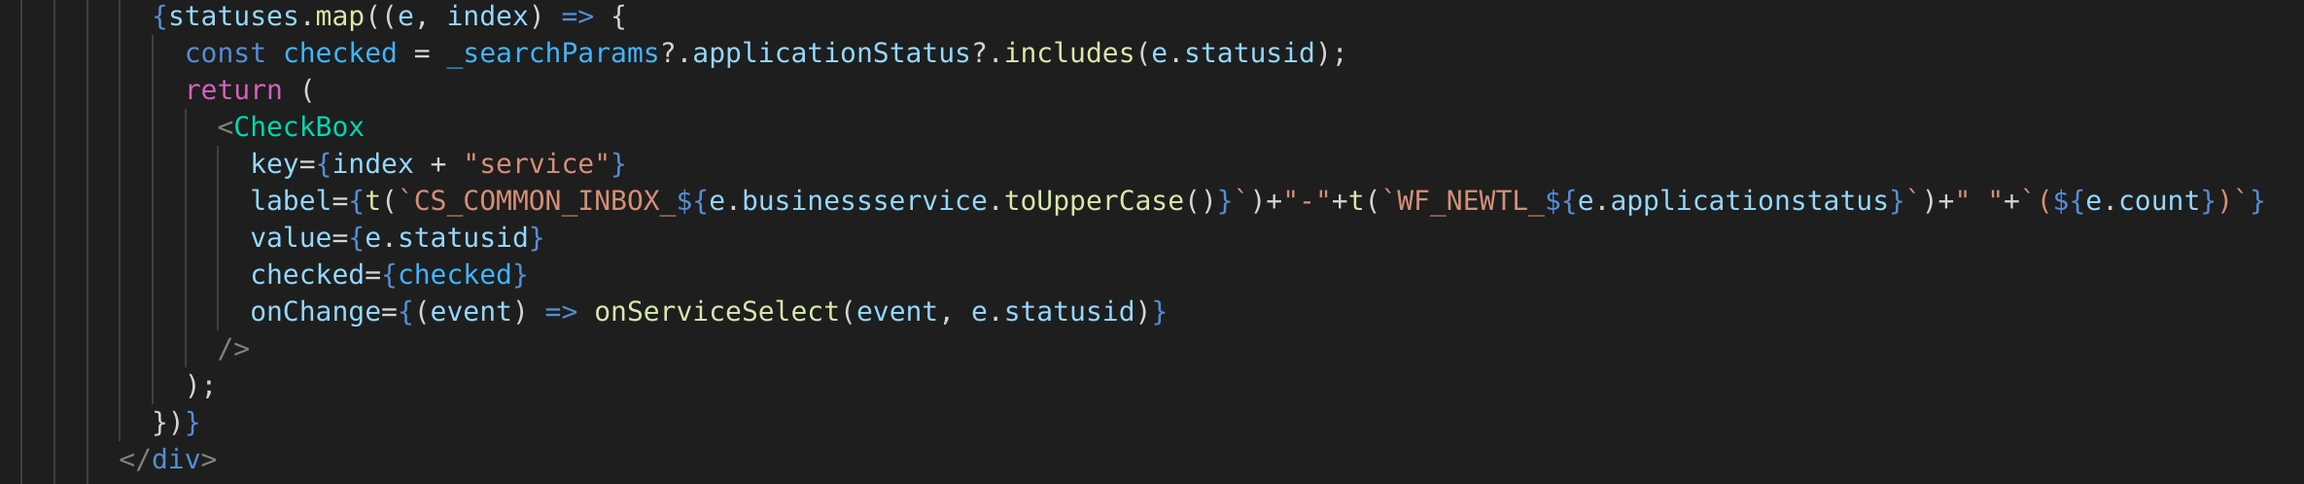
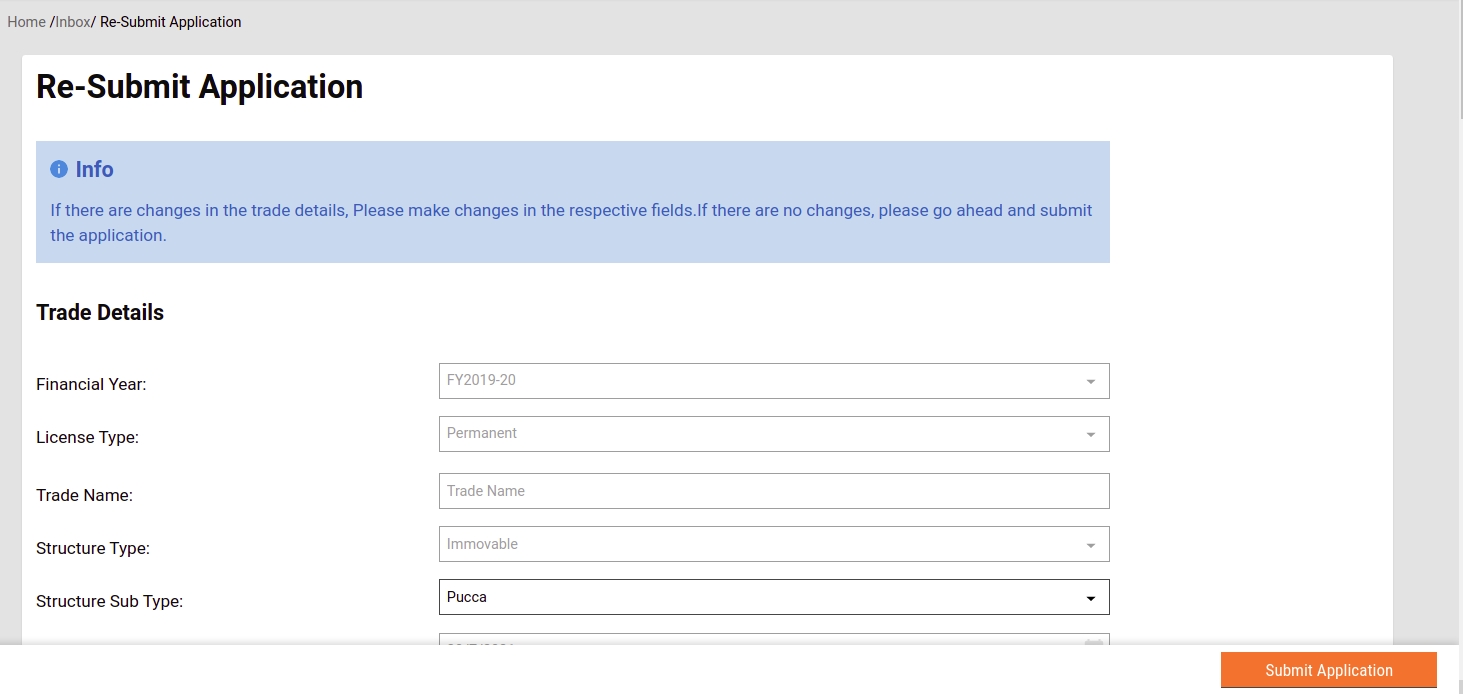
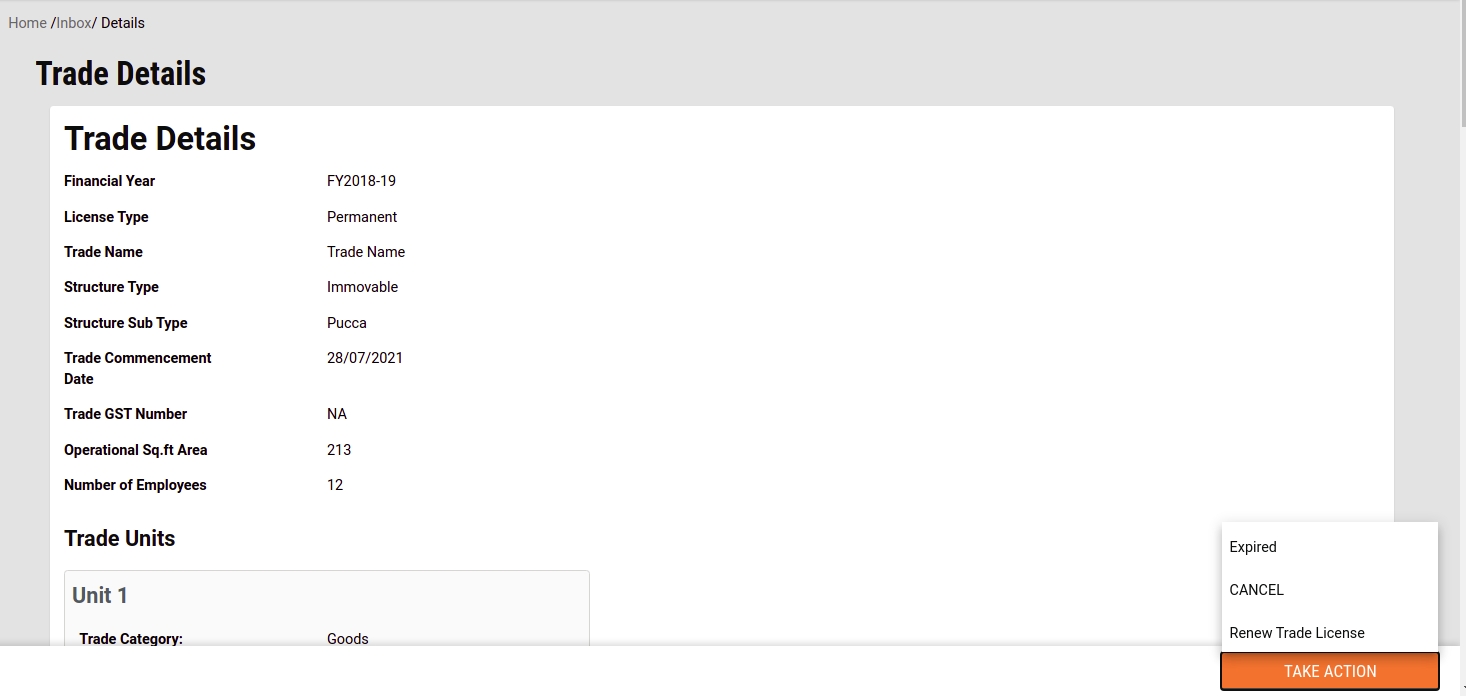
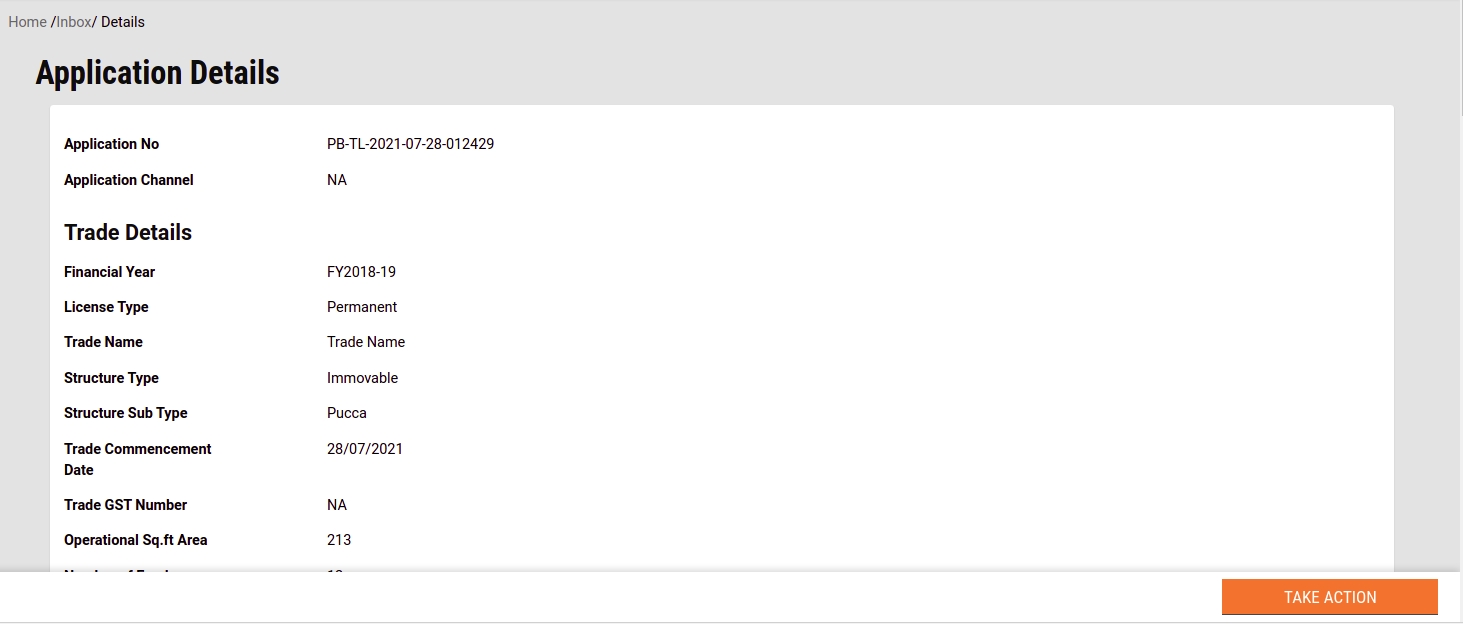
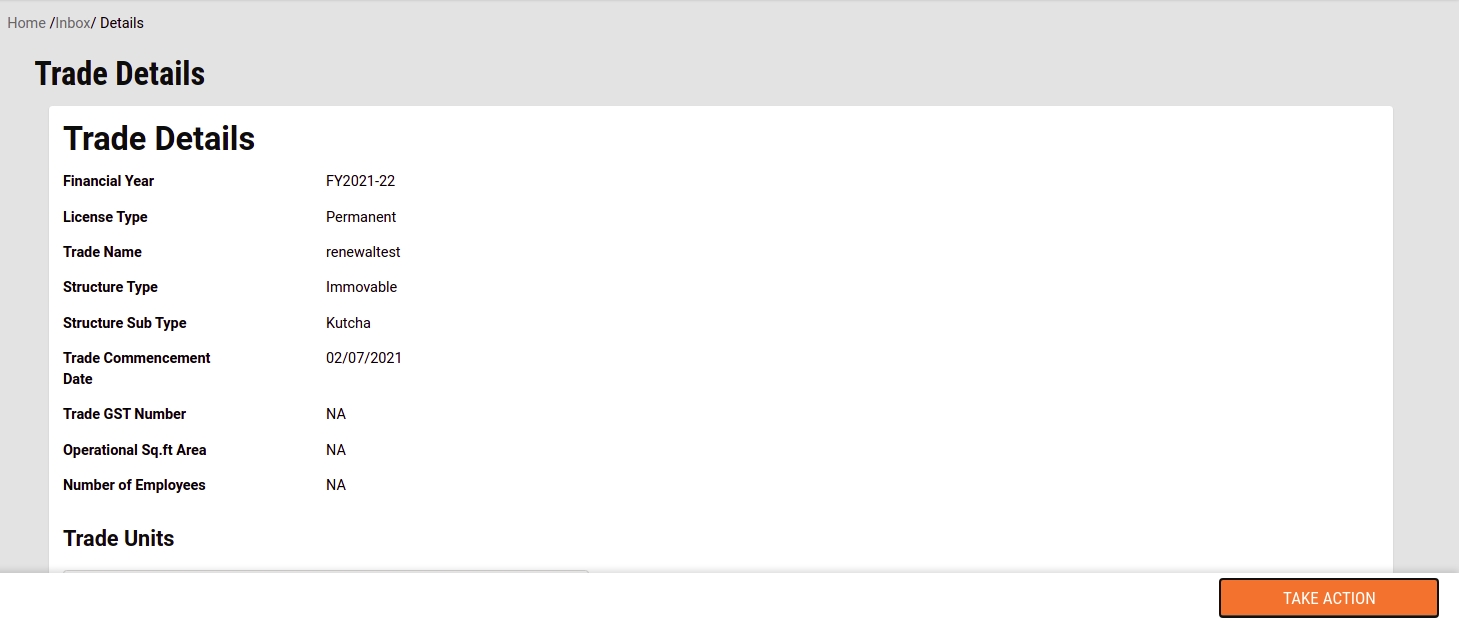
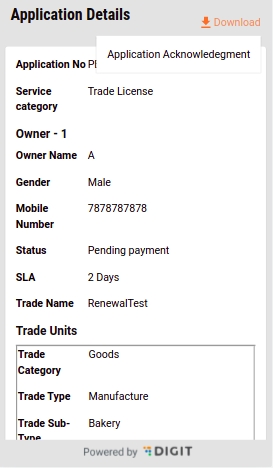
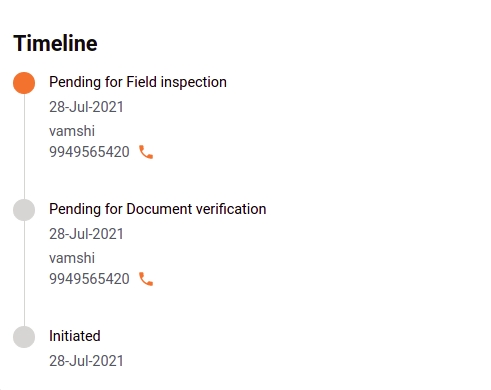
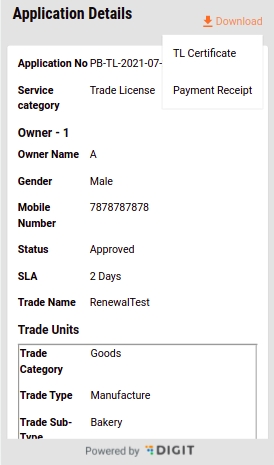
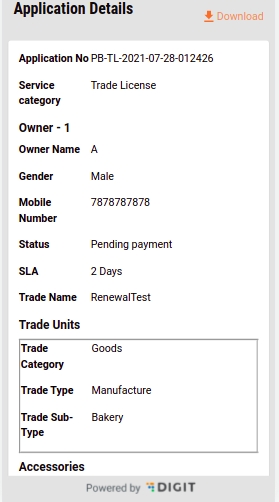
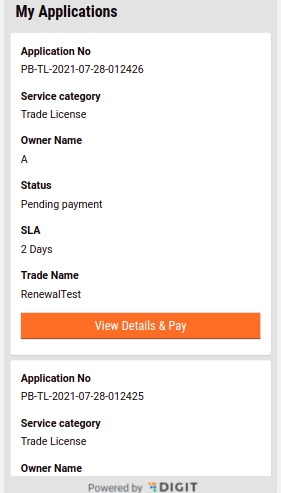
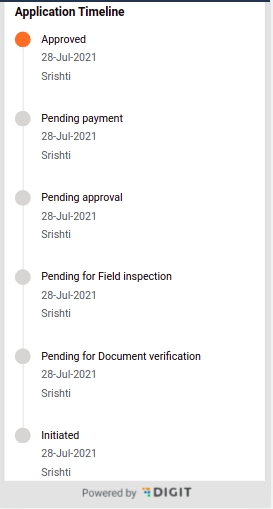
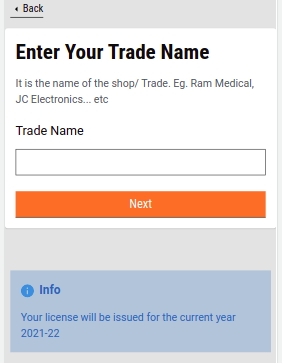

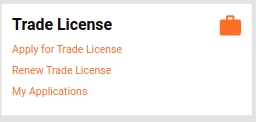
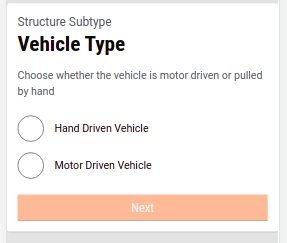
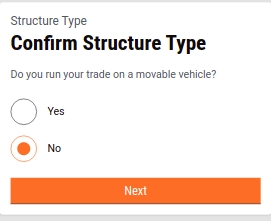
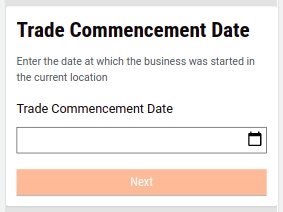
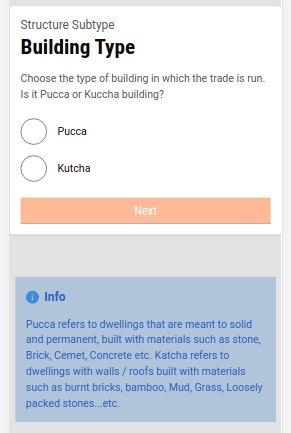
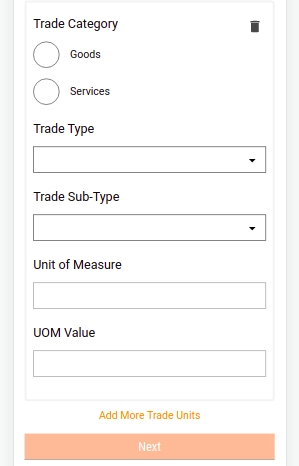
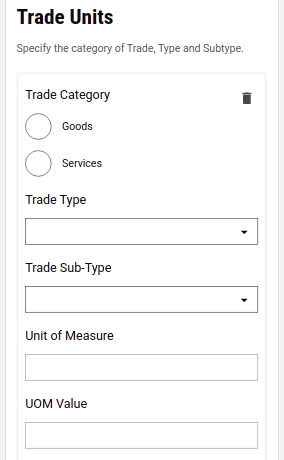
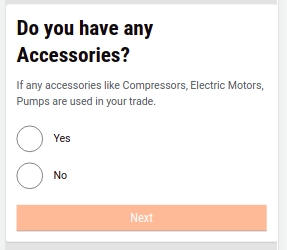
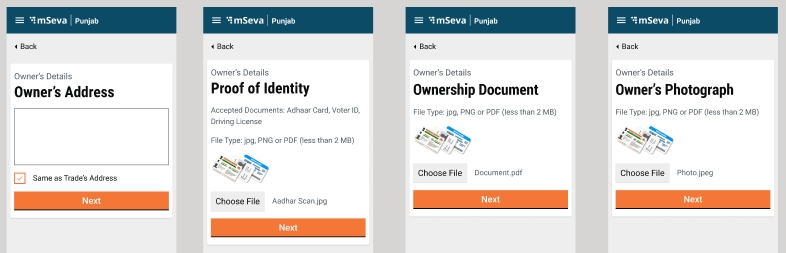
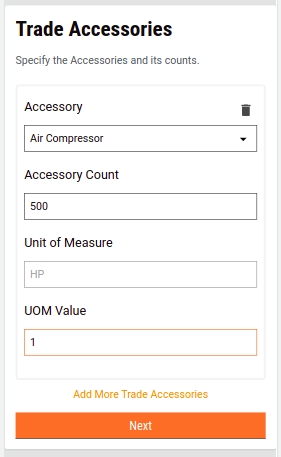
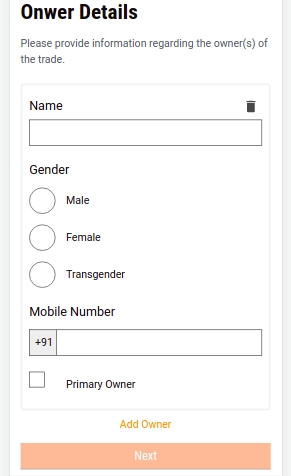
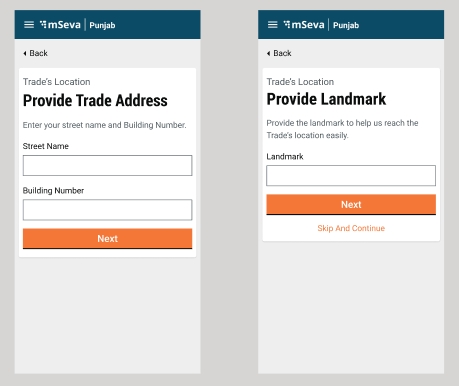
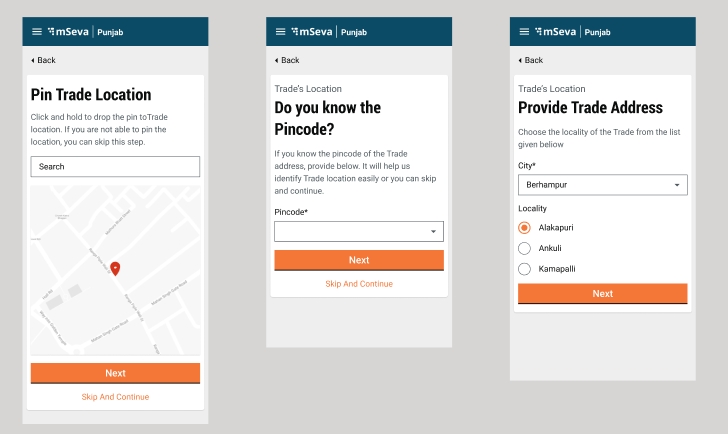
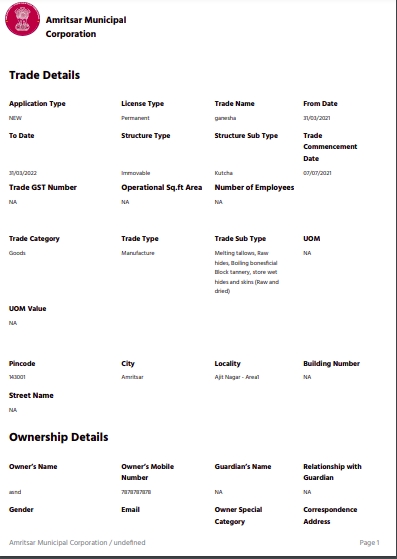
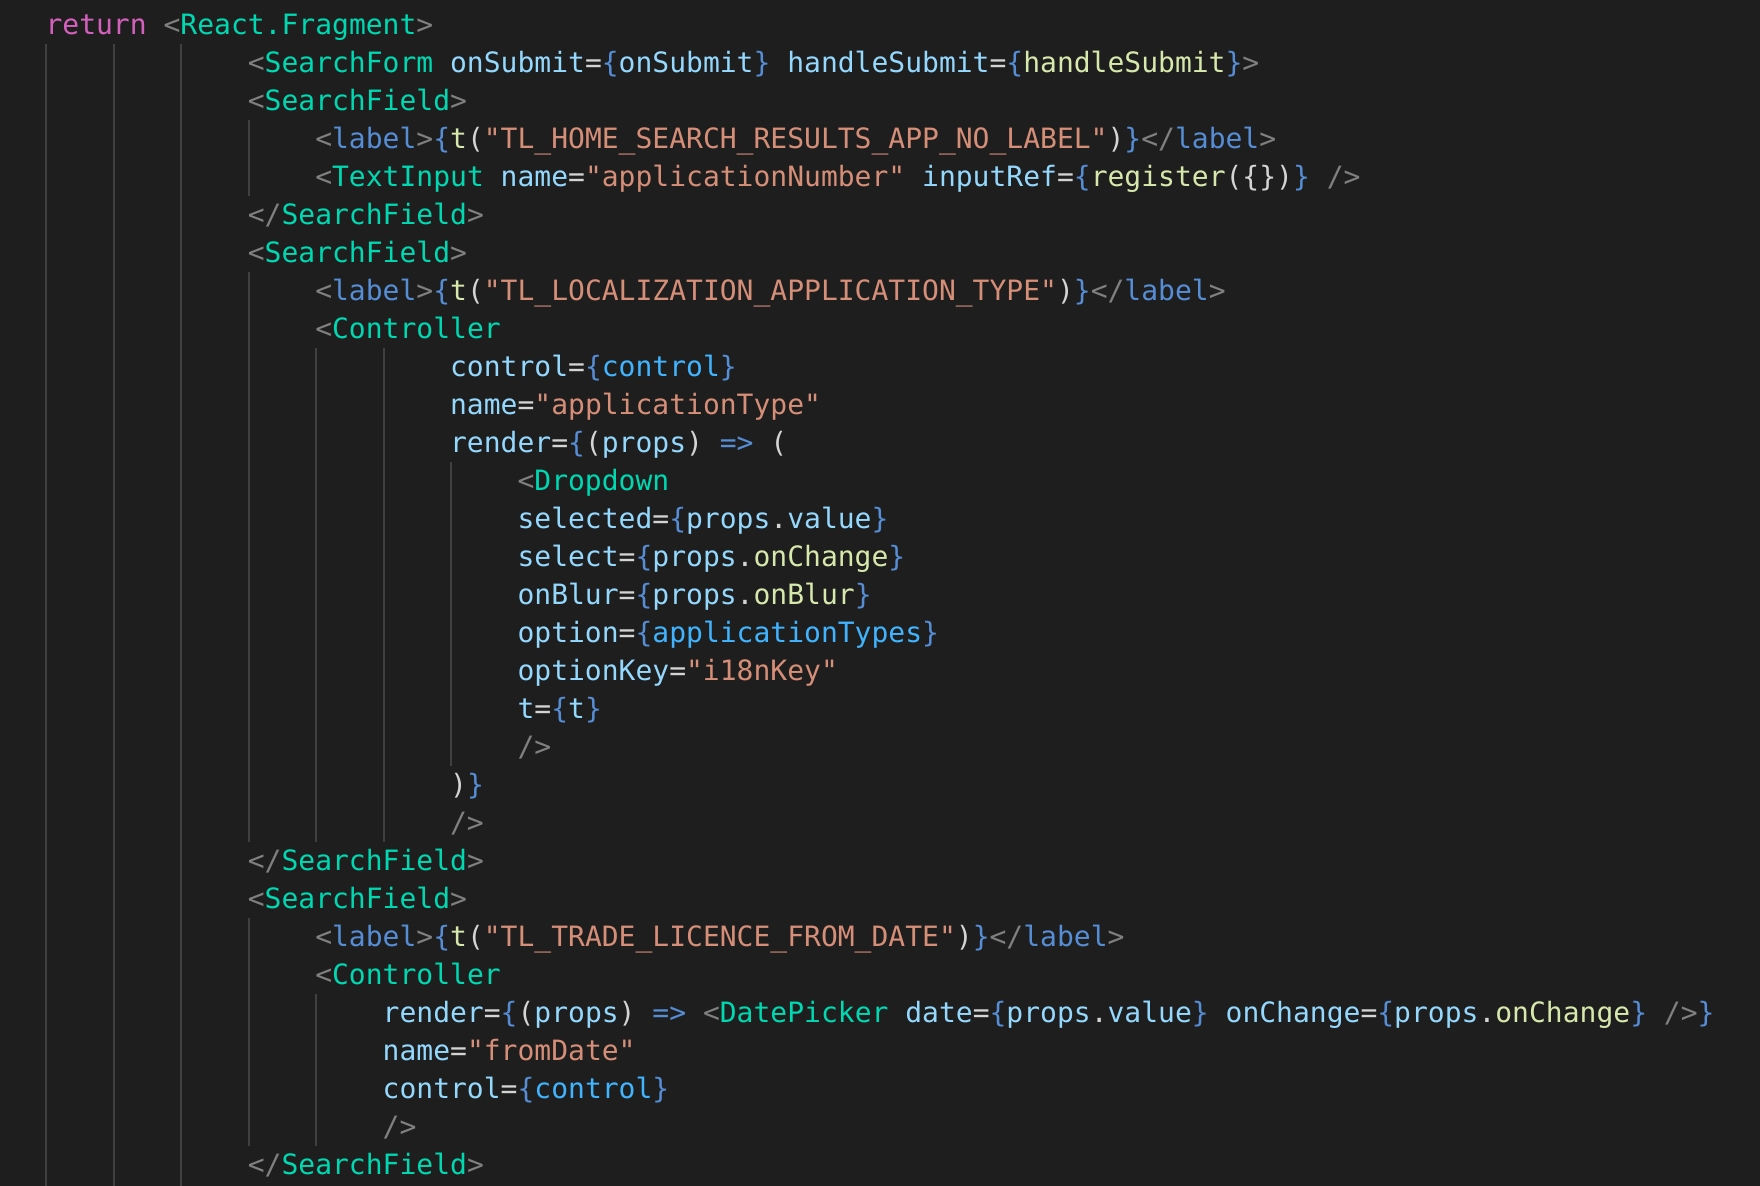
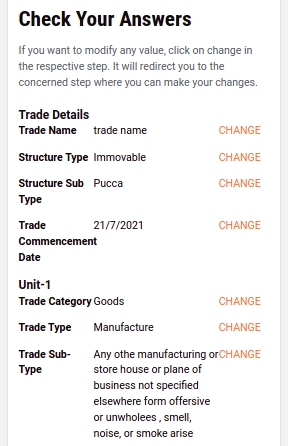
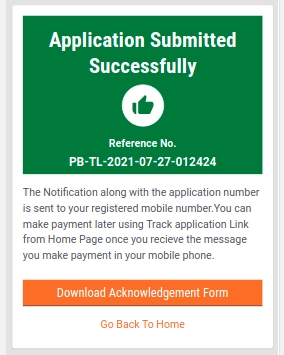
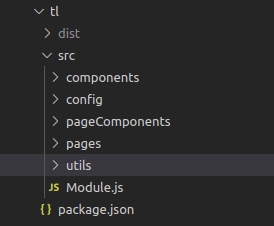
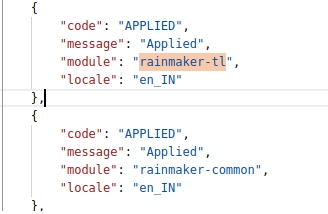
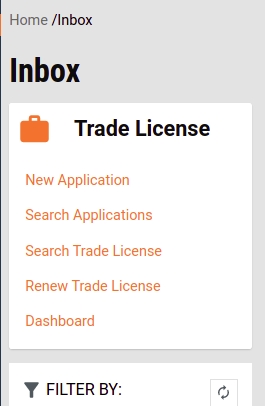
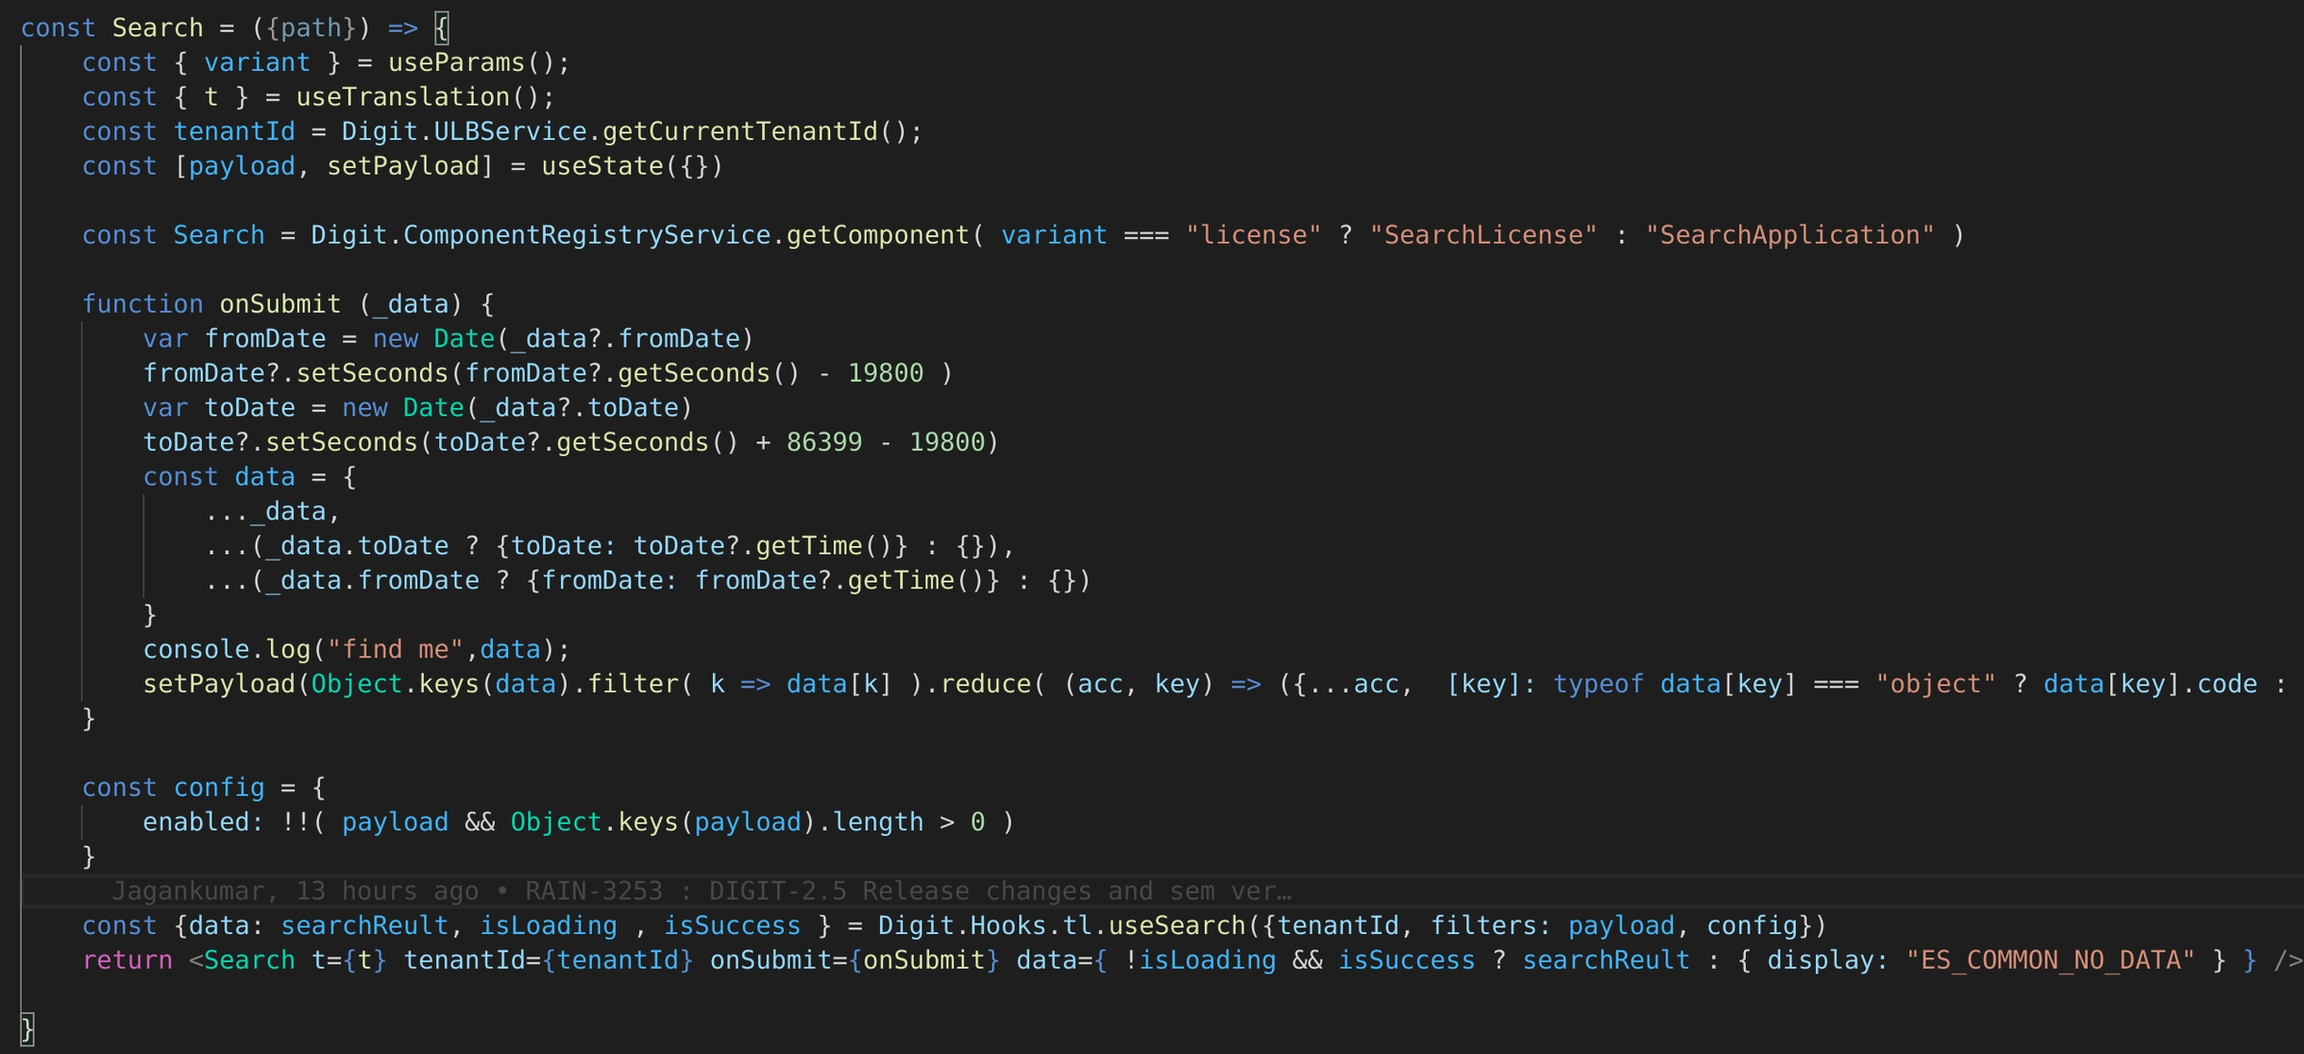
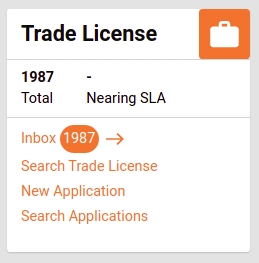
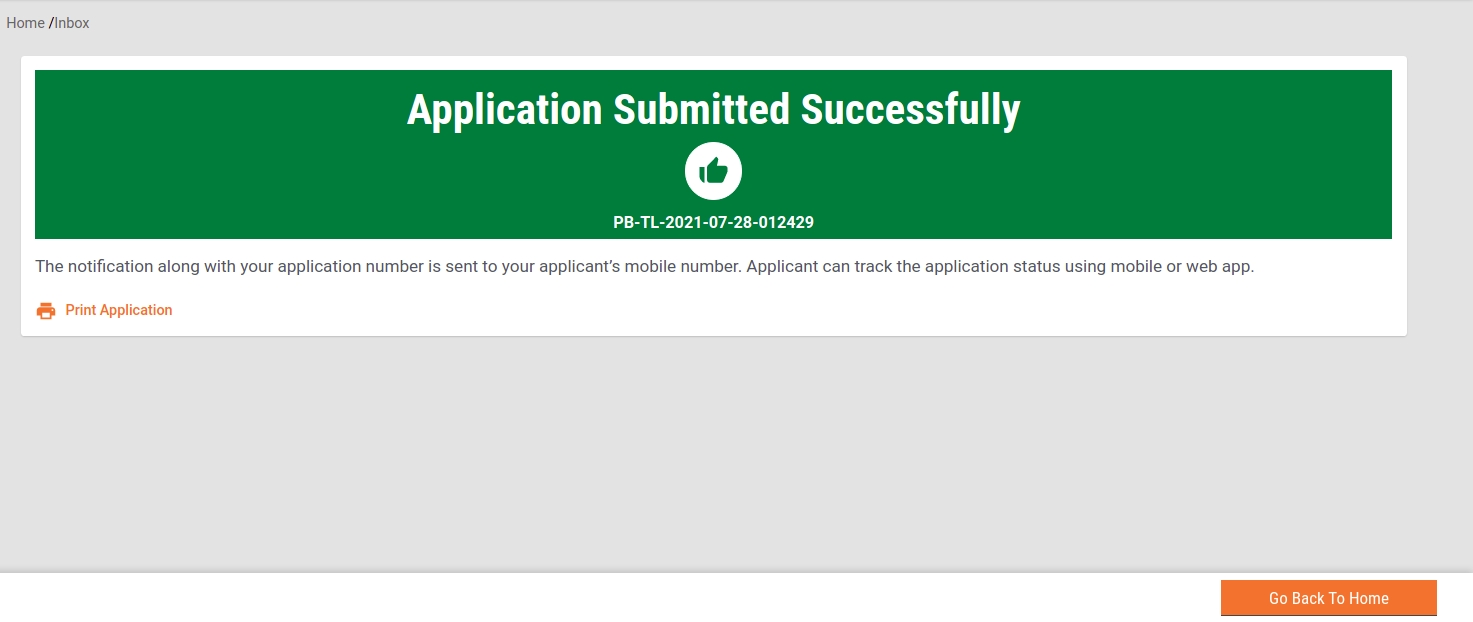
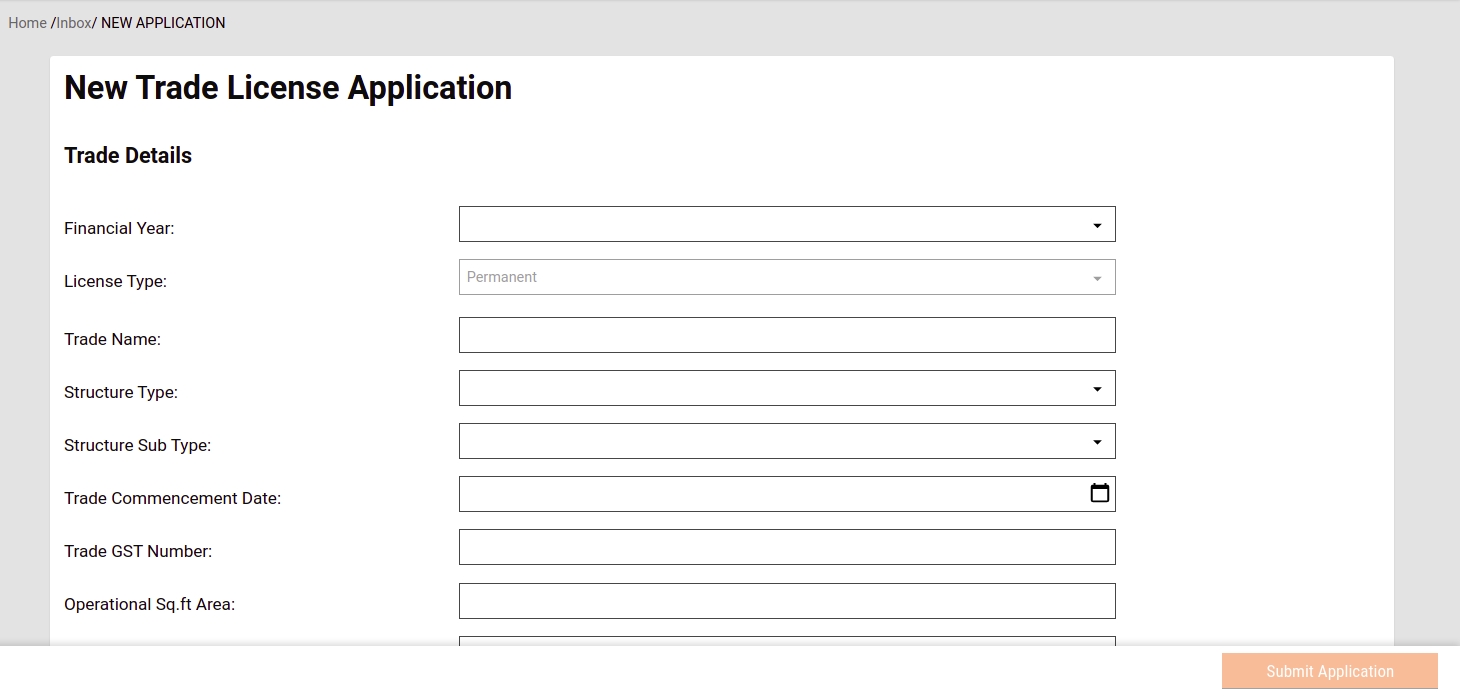
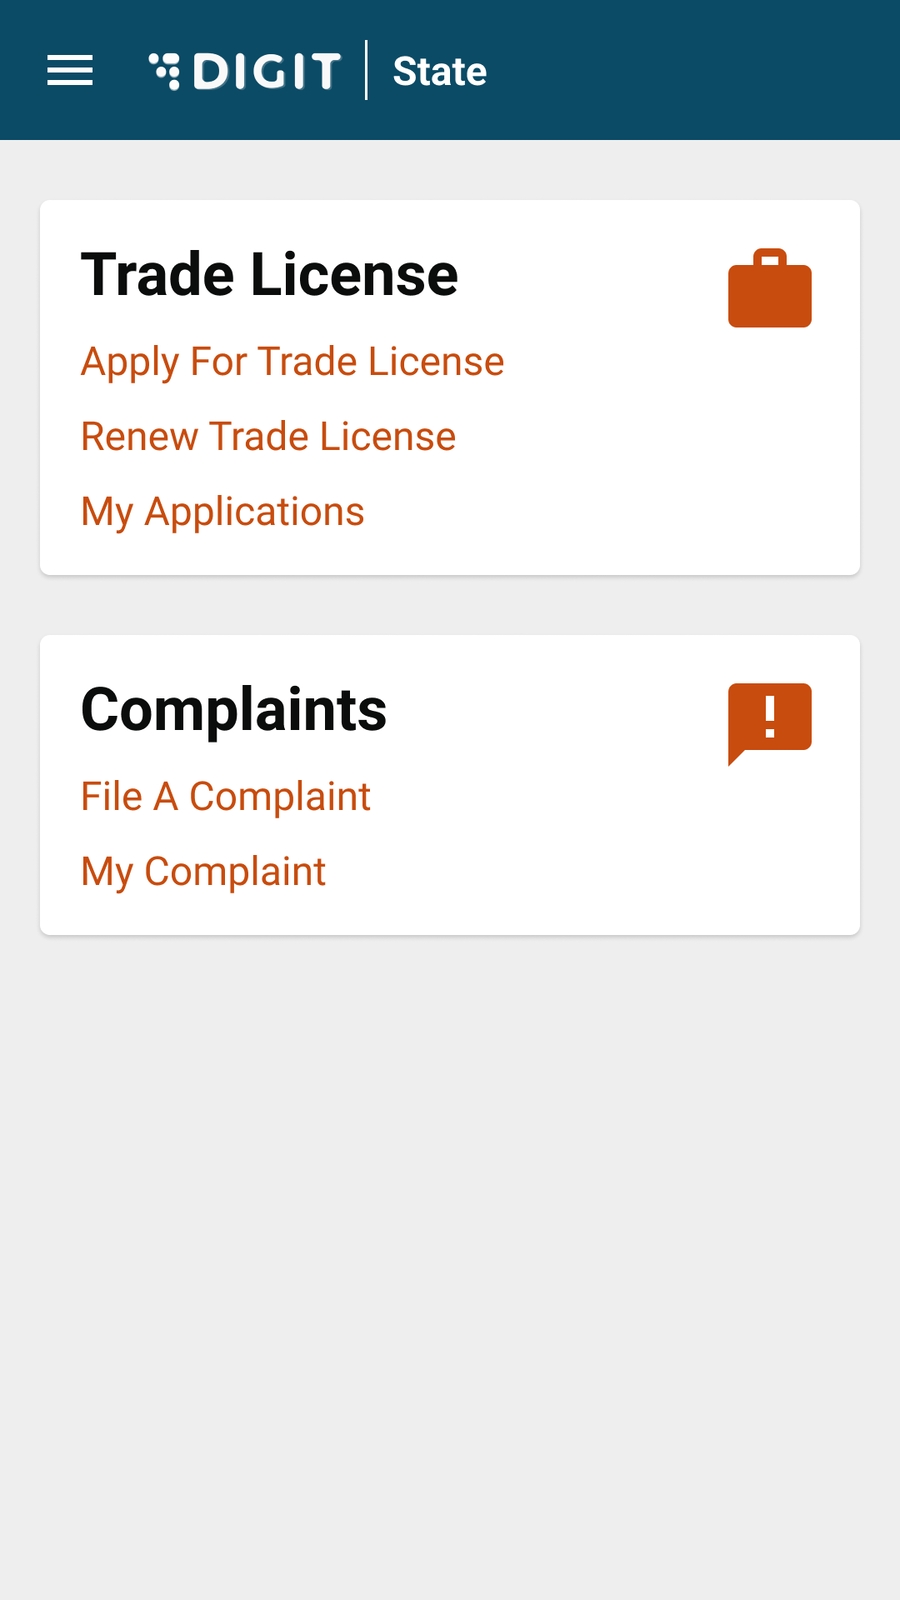


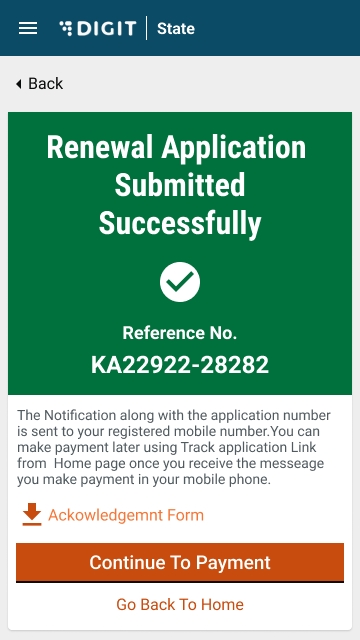
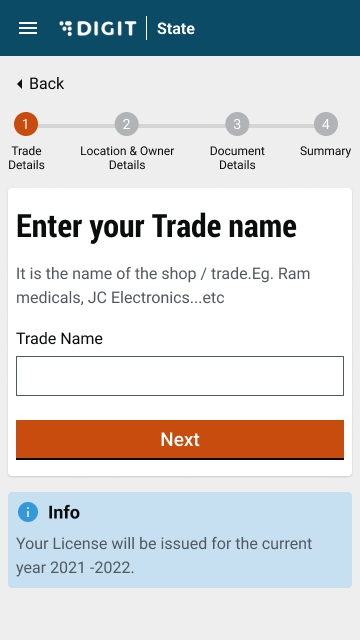
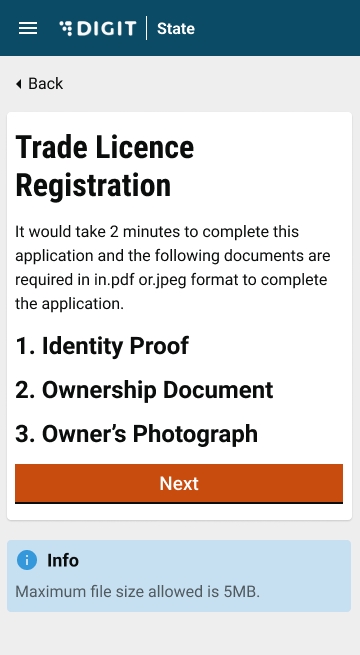
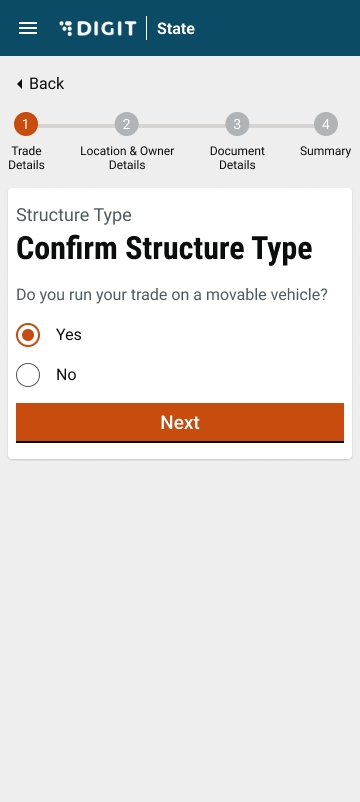
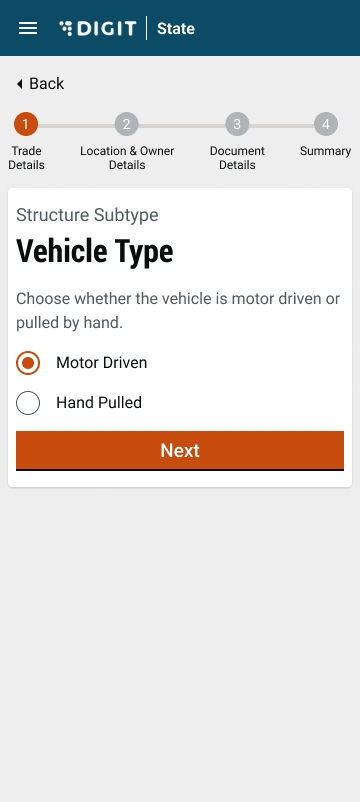
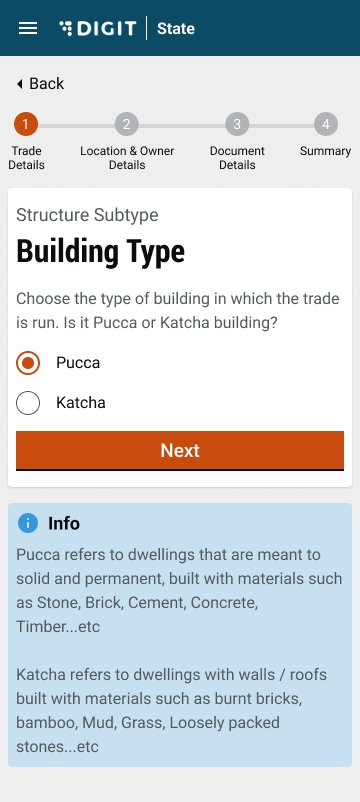
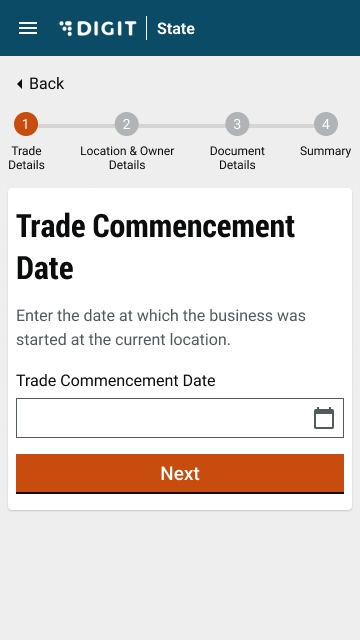
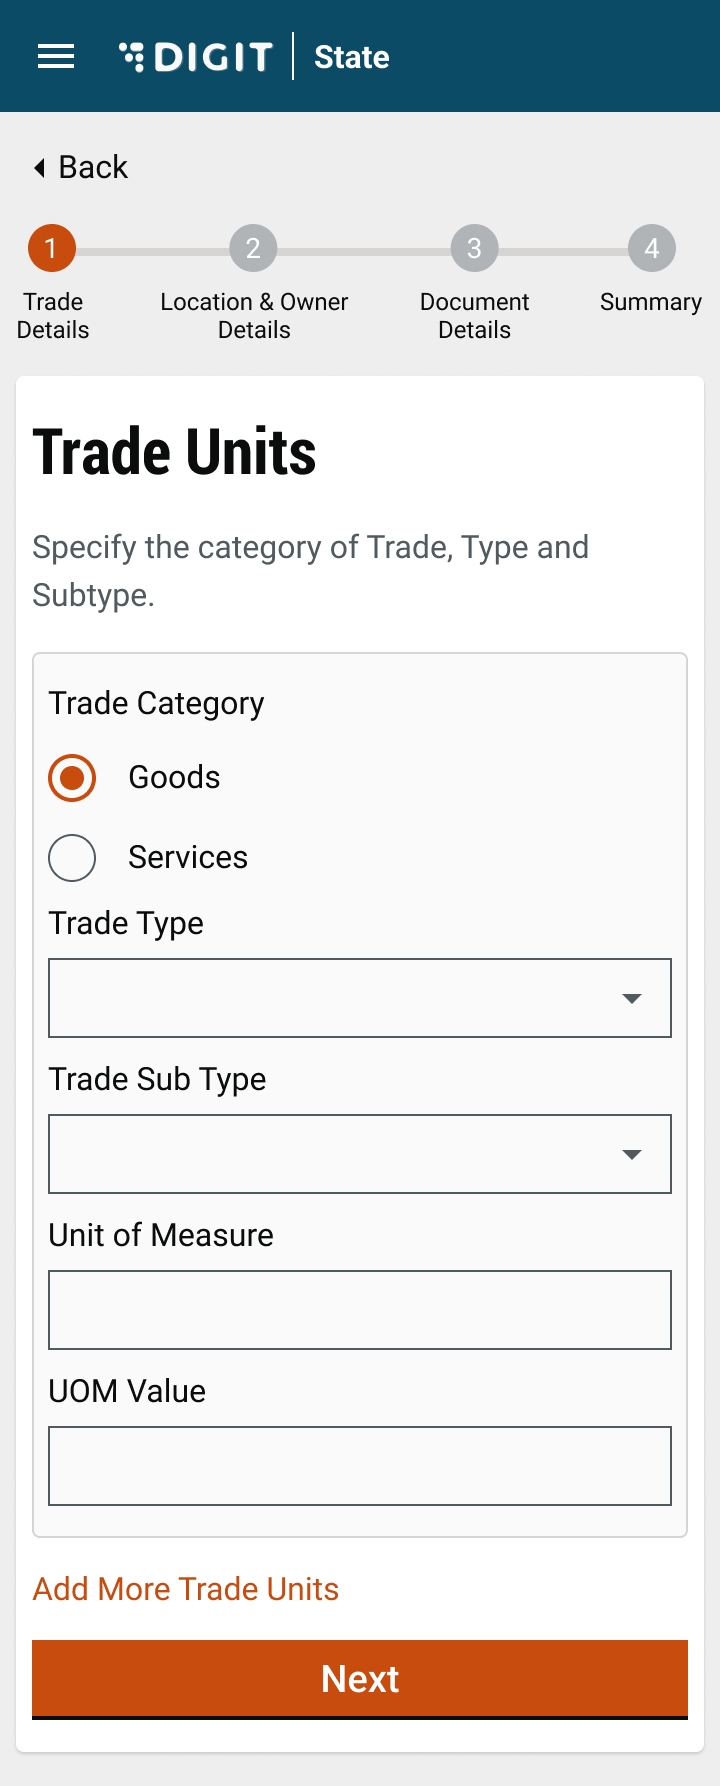
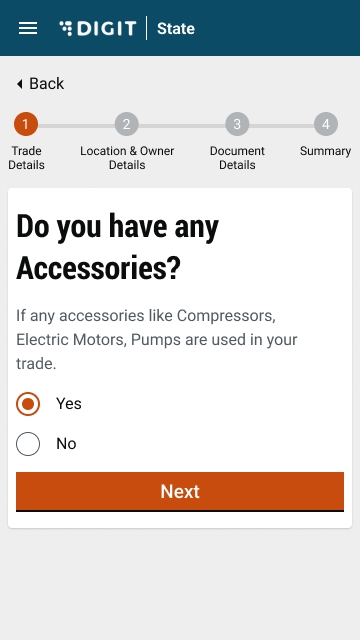
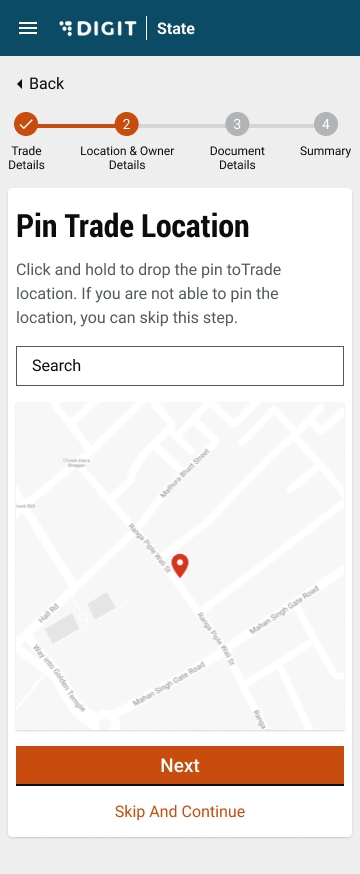
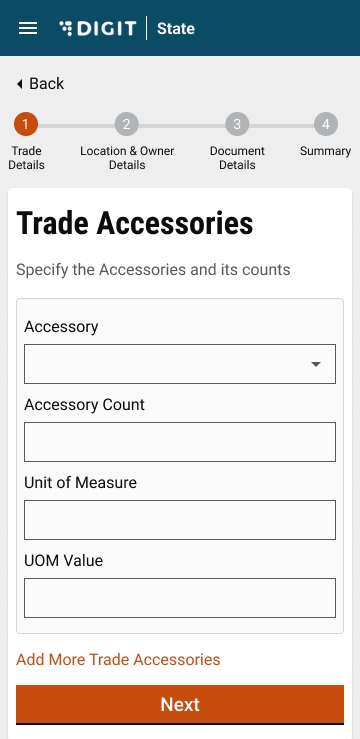
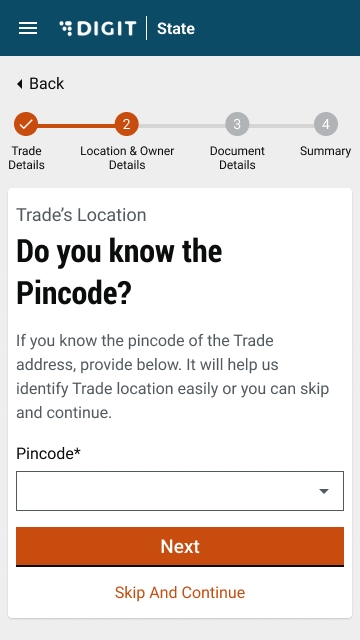
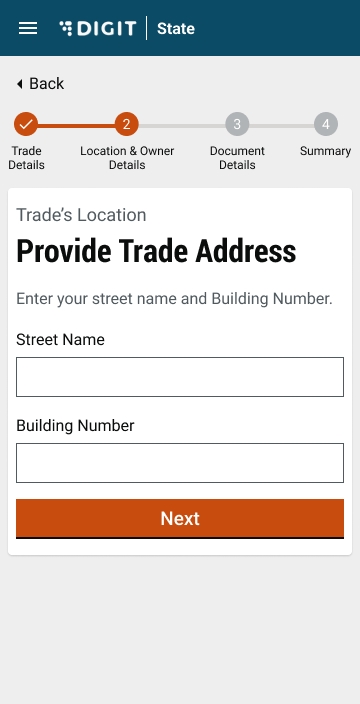
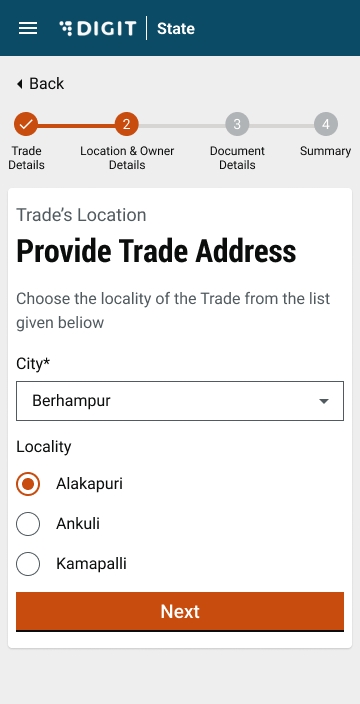
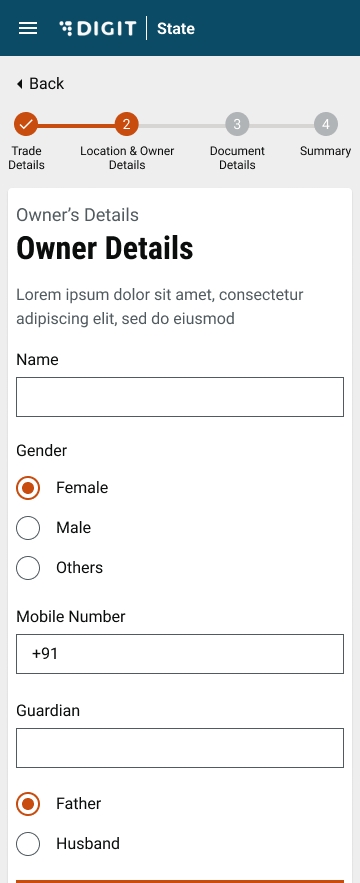
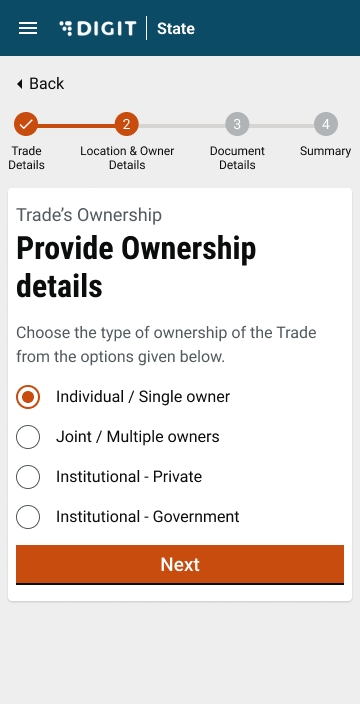
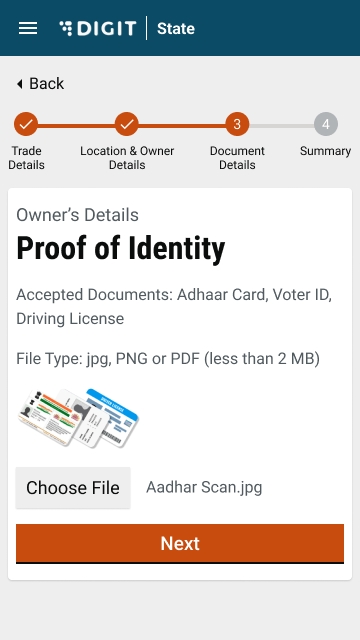
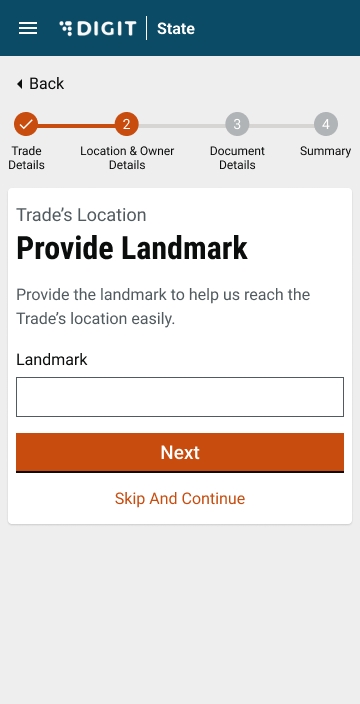
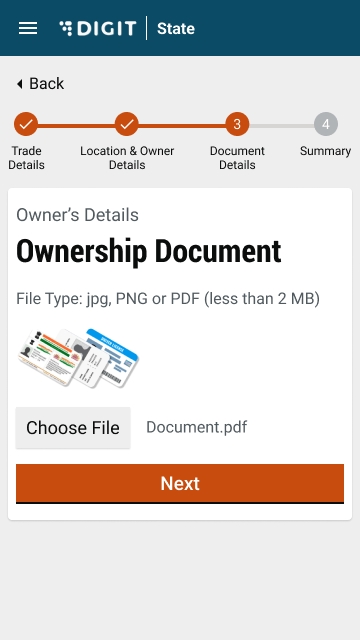
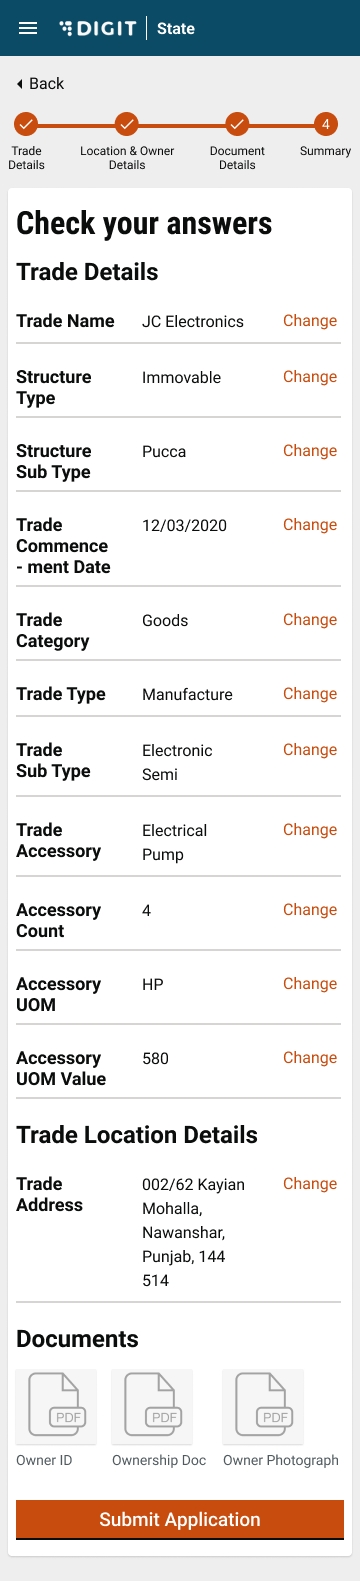
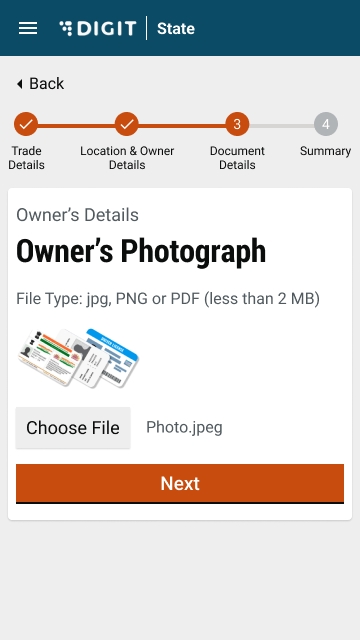
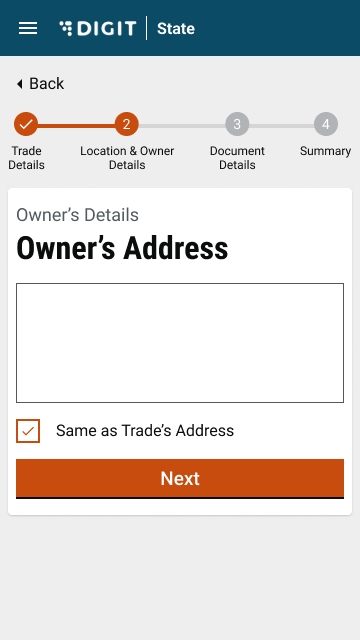

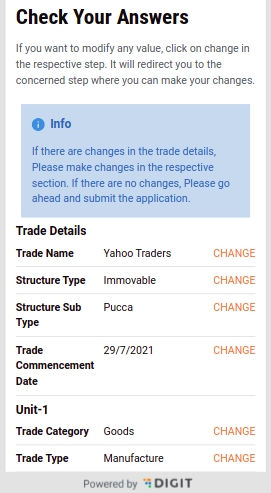
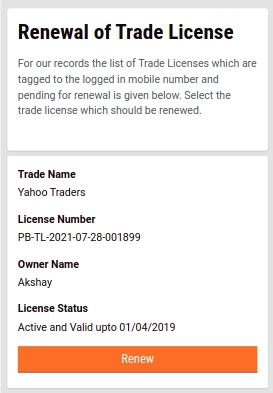
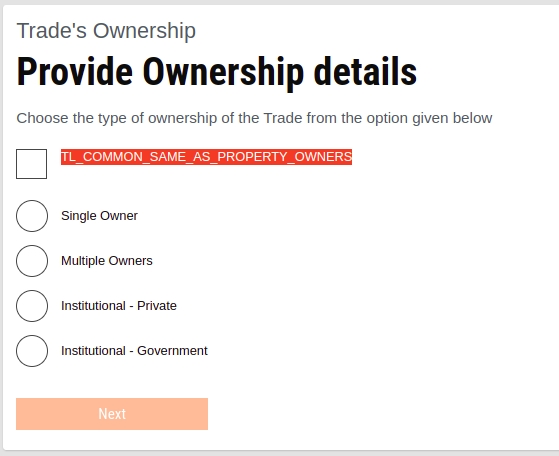
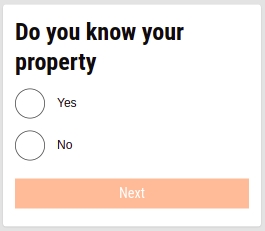
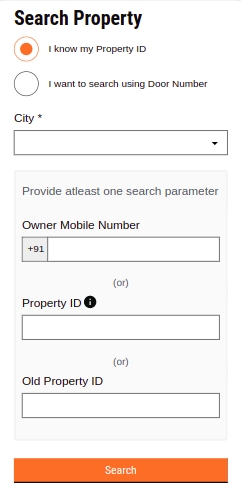
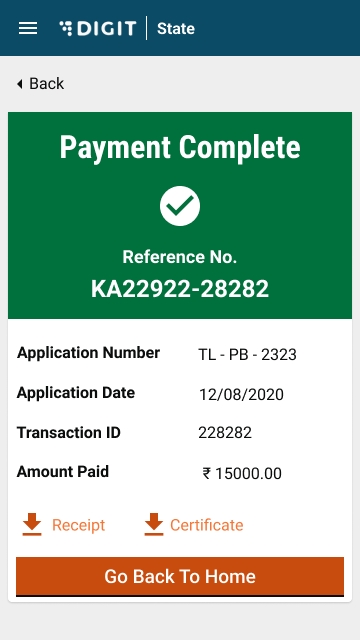
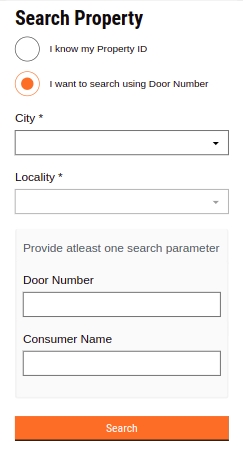
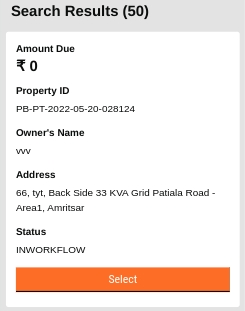
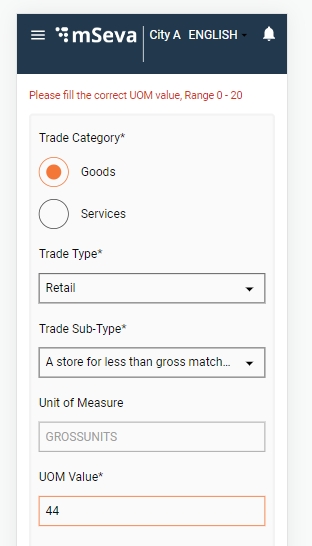
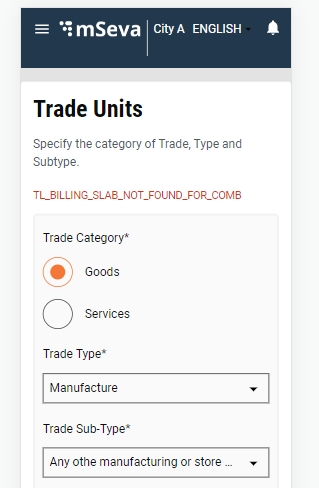

