Loading...
Loading...
Loading...
Loading...
Loading...
Loading...
Loading...
Loading...
Loading...
Loading...
Loading...
Loading...
Loading...
Loading...
Loading...
Loading...
Loading...
Loading...
Loading...
Loading...
Loading...
Loading...
Loading...
Loading...
Loading...
Loading...
Loading...
Loading...
Loading...
Loading...
Loading...
Loading...
Loading...
Loading...
Loading...
Loading...
Loading...
Loading...
Loading...
Loading...
Loading...
Loading...
Loading...
Loading...
Loading...
Loading...
Loading...
Loading...
Loading...
Loading...
Loading...
Loading...
Loading...
Loading...
Loading...
Loading...
Loading...
Loading...
Loading...
Loading...
Loading...
Loading...
Loading...
Loading...
Loading...
Functional overview for stakeholders
The Water and Sewerage Connections module provides a digital interface to apply for water and sewerage connections and, pay the water and sewerage charges for connection/s. It can be used by the citizens, Urban Local Body (ULB) counter employees and field employees, and ULB Administrators to accomplish their specific tasks. It is available as a mobile and web-based application.
The Water and Sewerage product features can be broadly classified as the following modules:
Registration, Login and Creation of User Profile
Applying for a new Water/Sewerage connection
Searching for a Connection
Modifications to a Connection
Entering meter reading of metered connections
Generate Demand
Payment collection and Receipts
Closure of water connection
Dashboards and Reports
This module provides enables the following capabilities
OTP Based Login for Citizens via Web/Mobile App
OTP Based Login for Employees via Web/Mobile App
Provision for language selection during first-time registration for both Employees and citizens
Provision of creating a personalized Profile for Citizens and employees on the Web App
Login Credentials for the various hierarchy of employees
Role-based access for performing different actions relating to the Water & Sewerage Connections module
The system allows the Citizen / ULB user (with an appropriate role in the system) to apply for a New Water/Sewerage connection. The application goes through an approval workflow before it is available for various transactions in the system. The workflow to be followed for a new water/sewerage connection is configurable. In the workflow, the ULB official will generate the estimation notice. Once the payment is made, a work order will be generated.
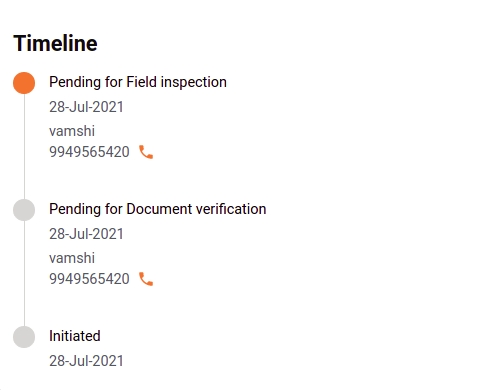
Every time there is a change in the status of an application, the citizen will be intimated through in-app notifications, SMS and email. The citizen and employee can view the history of the various states that an application has been in and the comments added by the employee in each state of the application.
The employee from the Water & Sewerage department will be able to access the feature, to search for water and sewerage connections. They can search for any connection based on parameters such as:
Consumer number
Application number
Owner mobile number
Application status
From date
To date
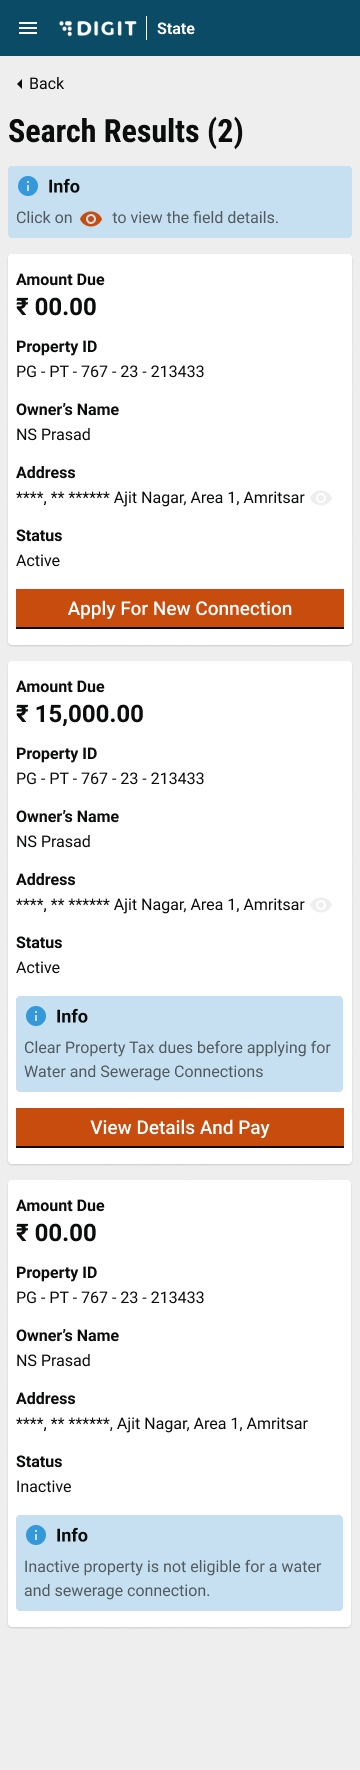
The search result contains the application number, Consumer number, Owner name, Status, Due amount and Pay now option. The Employee can make payment for a connection on the citizen’s behalf using the ‘Pay Now’ option.
Citizens can also search for their connection in the portal. They can search using the owner's mobile number, Property ID, Consumer number etc. The search result yields, the Owner’s Name, Address, Due amount and Pay option.
The system facilitates the title transfer of the water tap connection from one person to the other person. Title transfer of water tap connection directly depends upon Property tax. If title transfer is done in the property tax module then at the time of final approval, the changes will reflect in the W&S module automatically. After the title transfer has been completed successfully, subsequent bills will be generated with the details of the new owner/s.
Water tap change in usage happens when the property type is changed from residential to Non-residential or from Non-residential to residential. Change in usage directly depends on the property tax module. If the property type is changed in the Property tax system then it will automatically reflect in the W&S system. When there is a change in the usage type, the subsequent bills will reflect the rates as per the updated usage category. When there is a change in the usage category in the middle of the billing cycle, pro-rata charges will be applied in the next billing period.
The change in connection category from non-metered to metered and vice-versa is also possible in the W&S system with the appropriate workflow configured to inform all stakeholders of the change and collect any charges (if applicable) from the citizen.
On the Water & Sewerage Connections billing screen, there is a card called ‘Meter reading’. An employee can click on ‘Meter reading’ which redirects the employee to the meter reading landing screen. The employee can search based on the following criteria:
ULB
Boundary Type
Boundary Value
Billing Year
Billing Period
Billing Period Value
Consumer No.
This feature facilitates the employee to search for all results based on desired criteria. The search result yields the following values: consumer number, owner name, meter status, last reading, current reading, date and consumption.
The employee can edit meter status, current reading, date and consumption under certain conditions. Based on this information the employee can generate the bills for connections.
In the system, there is a feature to generate demand under the billing section. Generate demand has a search feature in which, the connections can be searched for which demand has been already generated. An employee can view, also edit those demands based on certain conditions.
The system has the capability to configure the demand generation as an automatic or a manual process. In the automatic process, the demand generation for non-metered connections is automatically done periodically. For a metered connection as soon as the employee enters the meter reading and clicks on ‘SAVE’, the demand is generated.
Any success/ failure to generate demand triggers an automatic notification to the concerned ULB officials via email. Also, the demand generation cycle, demand generation date and officials who should receive the notifications can be configured.
The citizen can pay for dues by searching his/her connection. In search results, the citizen can click on pay, which redirects to the summary page of the dues. After this, the citizen can pay for dues online. An employee can also collect the payment on the citizen’s behalf. After searching for the desired connection, clicking on pay will redirect the employee to the common payment page. The employee can print the receipt after the payment is successfully collected. The citizen is also notified and gets a download receipt link in the notification.
If the Water tap owner has their own water source then the water tap owner can initiate for Water tap connection closure permanently. So, that tap will be closed permanently and demand will not be generated for the connection. Application for the closing of the water tap connection is accepted only with the latest water charges receipt and clearing of old dues.
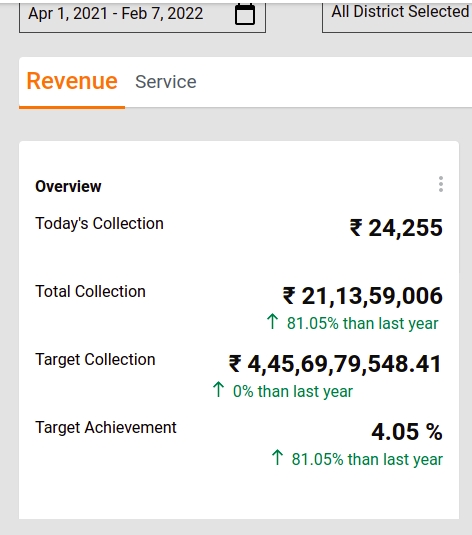
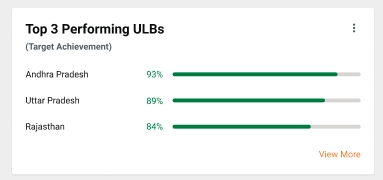
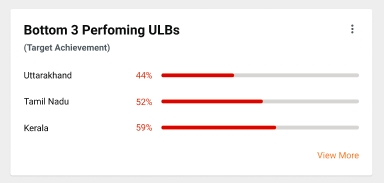
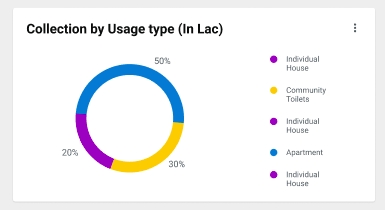
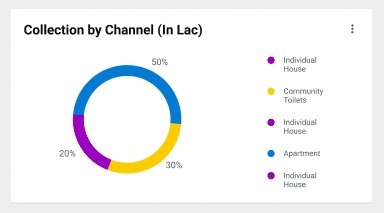
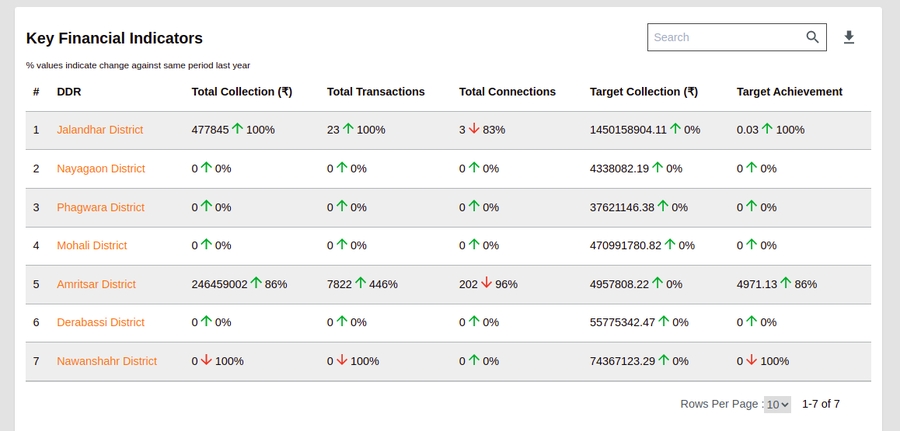
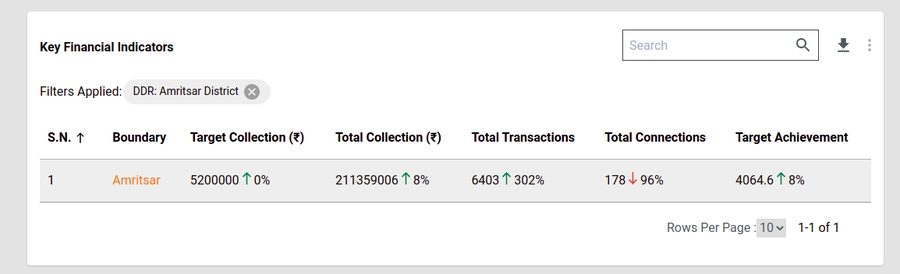
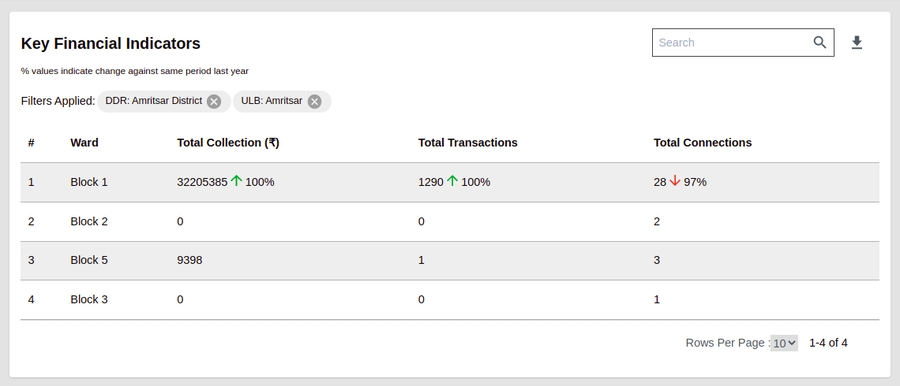
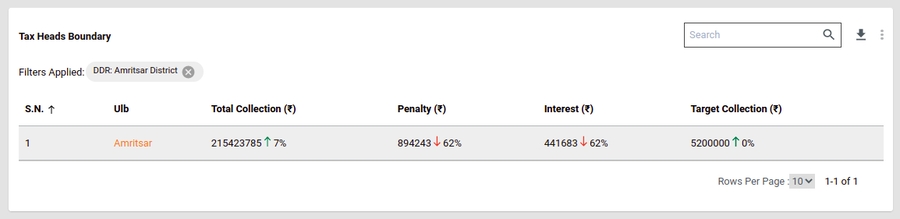
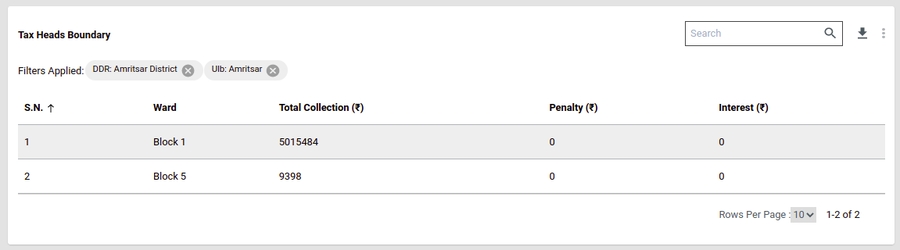
The state-level administrator can keep track of relevant metrics by using dashboards. Dashboards for Water & Sewerage can be accessed by a state-level user under login. The dashboard has these components:
Financial Indicators
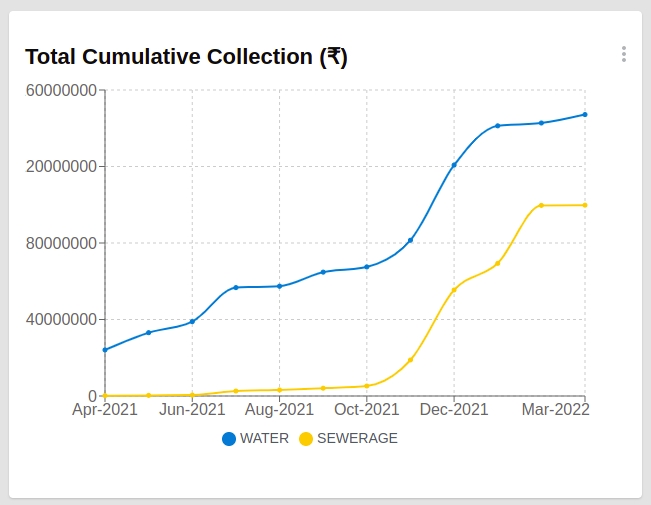
Water & Sewerage Total collections YTD
Water Collection
Sewerage Collection
Water - Demand vs Collection (Monthly trend)
Sewerage - Demand vs Collection (Monthly trend)
Municipal Adoption
W & S: No. Of ULBs Live
W & S: Total Number of ULBs
Water Consumers by Connection Type
W & S Consumers by Usage Type
Total Collections by Source
Total Collections by Mode
W & S Adoption: ULB Wise
Today’s Collections
W&S Total collections: Today
Water Charges - Total collections: Today
Sewerage Charges - Total collections: Today
W&S - Total No. of Receipts: Today
Water - Total No. of Receipts: Today
Sewerage - Total No. of Receipts: Today
Mode-wise W&S collections: Today
W&S ULB wise collections: Today
The table below lists the functionalities supported by the offered product as per the recommendations under the guidelines mentioned under the Ease of Doing Business (EODB) guidelines of 2019.
Obtaining Utility Permits
1
Obtaining Water Connection
Implement an online application system with the following features:
i. Online submission of application without the need to submit a physical copy of the application
ii. Eliminate physical touchpoint for document submission
iii. Allow the option of online payment of application fee
iv. Allow the applicant to track the status of the application online
( Available in DIGIT Platform)
Obtaining Utility Permits
1
Obtaining Water Connection
Display information on tariffs (in Rs. per kL) and notify customers of the change in tariff ahead of the billing cycle (for commercial and industrial users)
( Available in DIGIT Platform)
Obtaining Utility Permits
1
Obtaining Water Connection
Allow users to pay water bills online
( Available in DIGIT Platform)
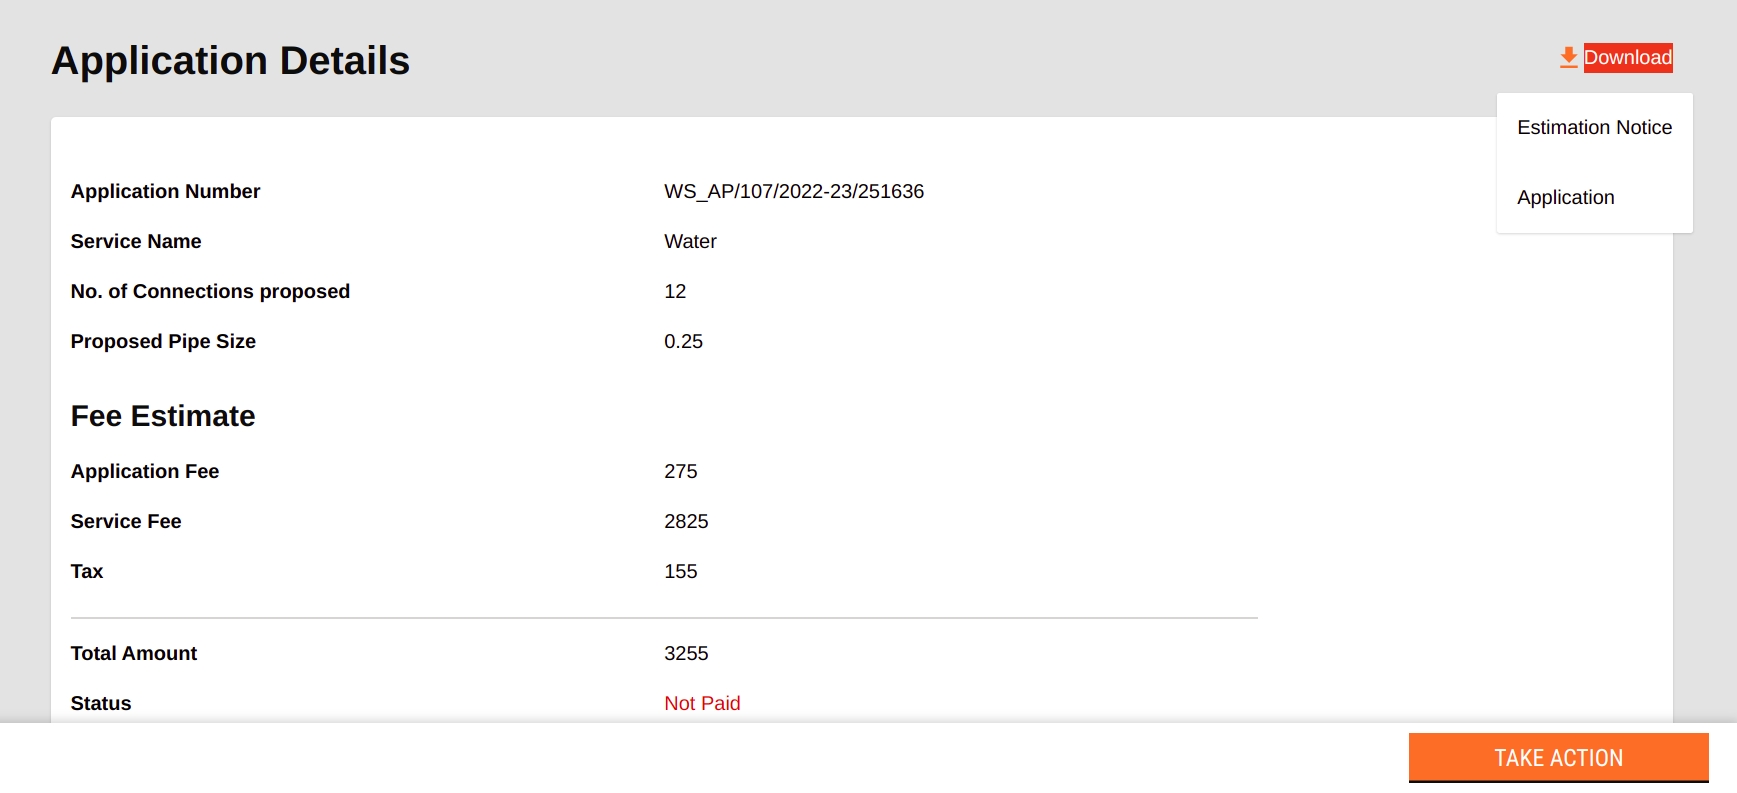
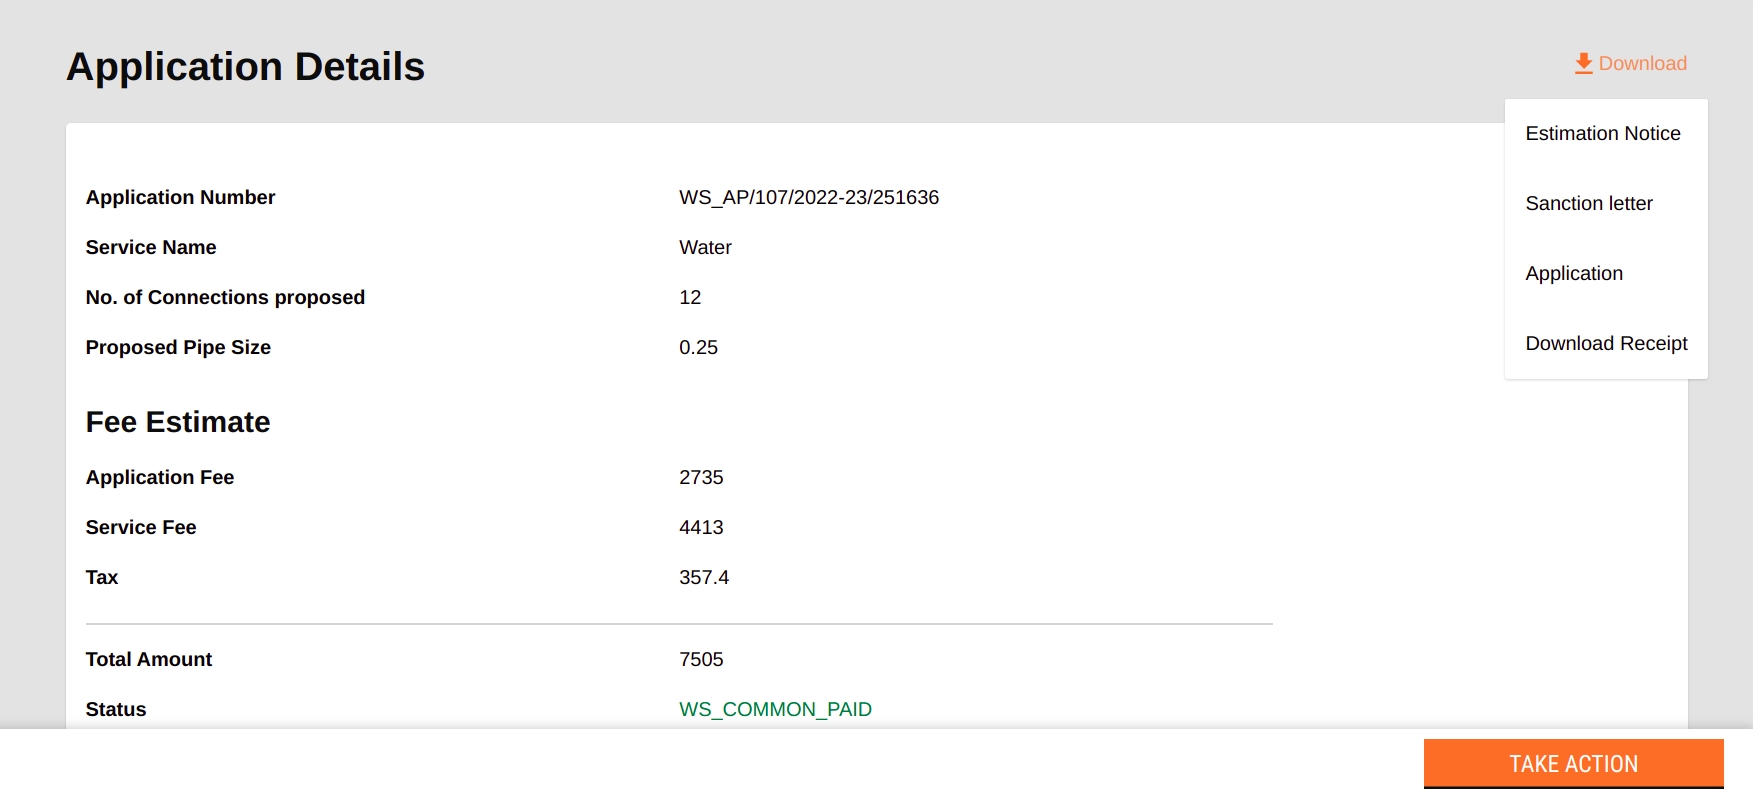
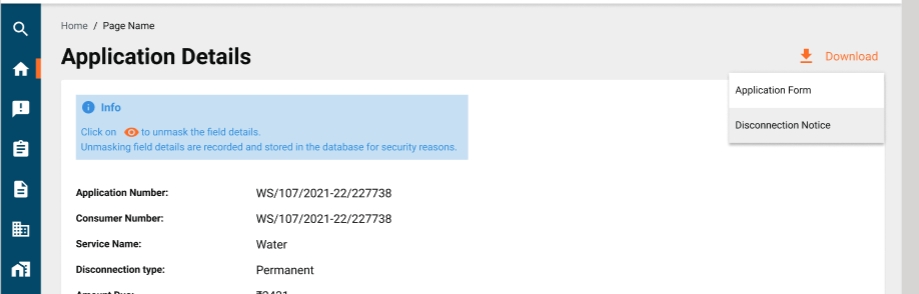
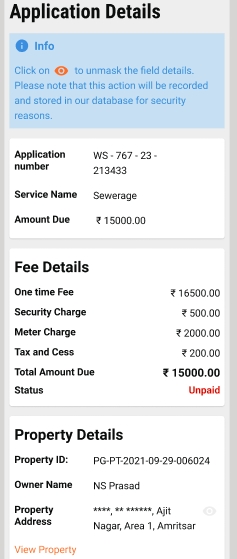
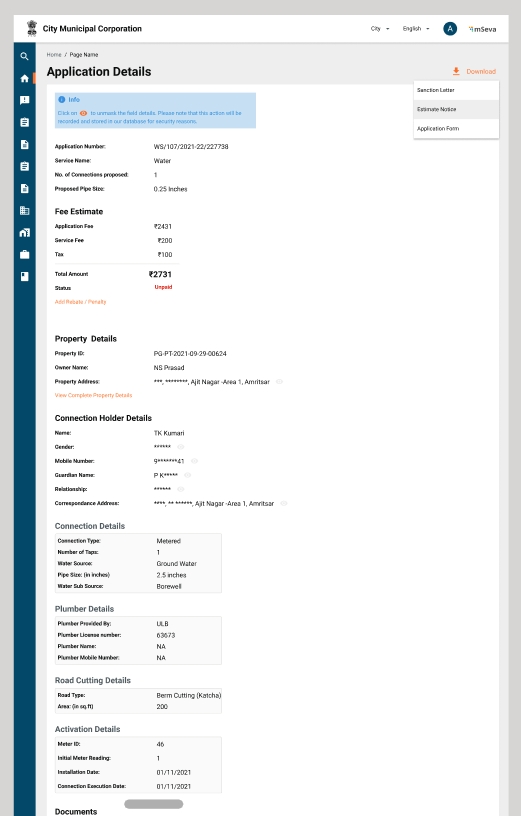
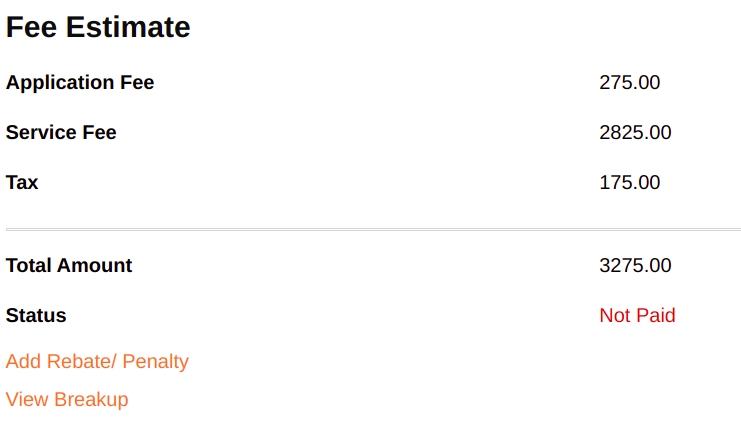
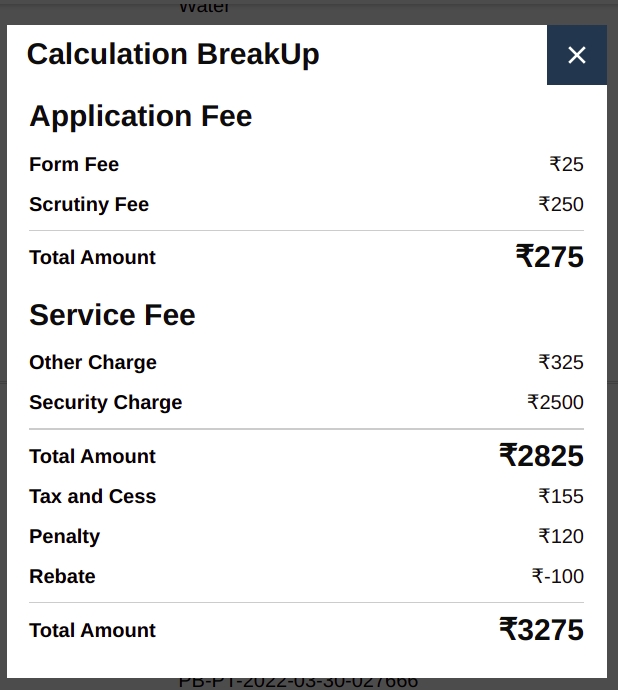
The fee estimate section provides the amount details for applications where payment is pending. The Fee Details displays the amount breakup.
Click on the Make Payment button at the bottom of the application. The Pay option is enabled once the application is in Pending for Payment status.
An illustrative guide to using Water & Sewerage Connections module
The Water & Sewerage Connections module allows citizens to apply for new connections and pay bills online. For employees, this module enables automated processing of new connection requests, editing existing connection details, generating water bills, and facilitating online collection of bill payments.
Tip: Click on the links on the flow diagram below to access the docs for the specified action.
Click on the relevant role below to learn more about how to use the Water & Sewerage Connections solution.
App to facilitate application for new W&S connections, pay bills, activate connections, generate bills
The Water & Sewerage Connections module offers a consolidated platform for managing new and existing water and sewerage connections. The module eliminates the need for manual processing and streamlines the key water or sewerage management functions for operational efficiency. DIGIT Water & Sewerage Connections module enables automated processing of new connection requests, generating water bills, and facilitating online bill payment.
Click on the link below to download the water and sewerage connections module brochure.
This section contains all docs and information required to understand the module, its key features, functional scope, and configuration details. Click on the links below to learn more about deploying, configuring, customizing, and using the Water & Sewerage Connections module.
Navigation Tips
Click on the embedded links within the content to browse topic details
Use the Contents links available on the right side of the screen to move to a specific heading
Find the list of Related Docs links at the bottom of each page to browse through additional product details
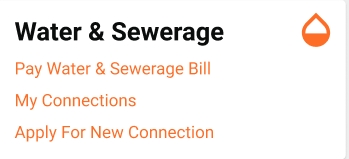
Citizens -
Apply for new sewerage or water connections
Upload documents required for processing new connections
Pay water or sewerage connection charges and bills using an online payment gateway
Receive SMS alerts on application status, bills generated, payment due date, and payment receipt confirmation
Download water or sewerage connection approval letter, payment receipts, and bills online
Employees -
Process applications using customizable workflows
Configure water and sewerage charges, interest, and penalty calculation logic
View custom dashboards for module statistics
Filter search results using advanced configurable search parameters
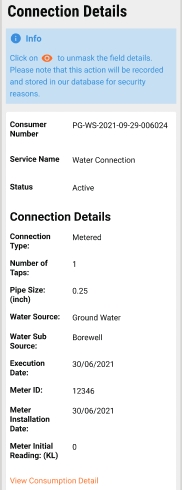
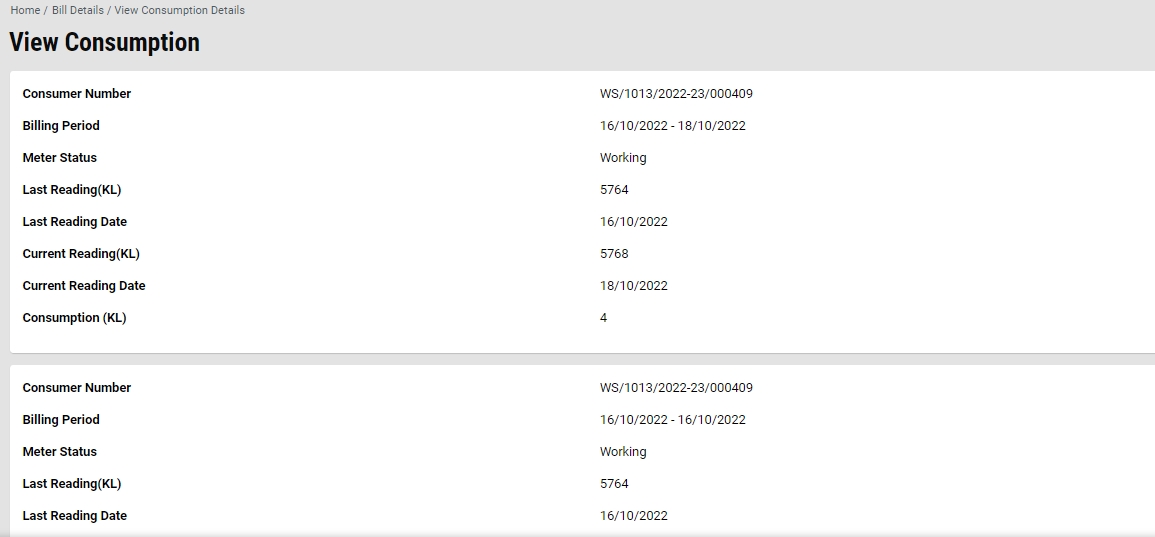
The W&S module allows citizens to check the meter readings in case they have metered connections.
To check meter readings - Click on My Connections to view the registered connections and then open the connection to see the connection details.
Click on the View Consumption Details button available in the Service Details on the Connection Details page. Scroll down the page to view past readings.
The applications that are sent back to citizens for any correction or for the documents to be attached become open for editing at the citizen's end. Applicants have to login into the Citizen Portal to edit the application.
Go to My Applications and scroll down to view the desired application. An application sent back to the citizen for correction will have the option to edit the application.
Click on the Submit button once the required edits are done. This will display the success acknowledgement page. Click on the Print Water Application option to download and print the application.
The Counter Employee (CE) represents the ULB employee responsible for assisting the citizens with water and sewerage connection-related activities. The W&S module provides the CE with the scope to submit applications for new connections on behalf of the citizens or collect payment for the citizen bills at the counter.
The CE can -
The home page below is displayed once the employee logs onto the system.
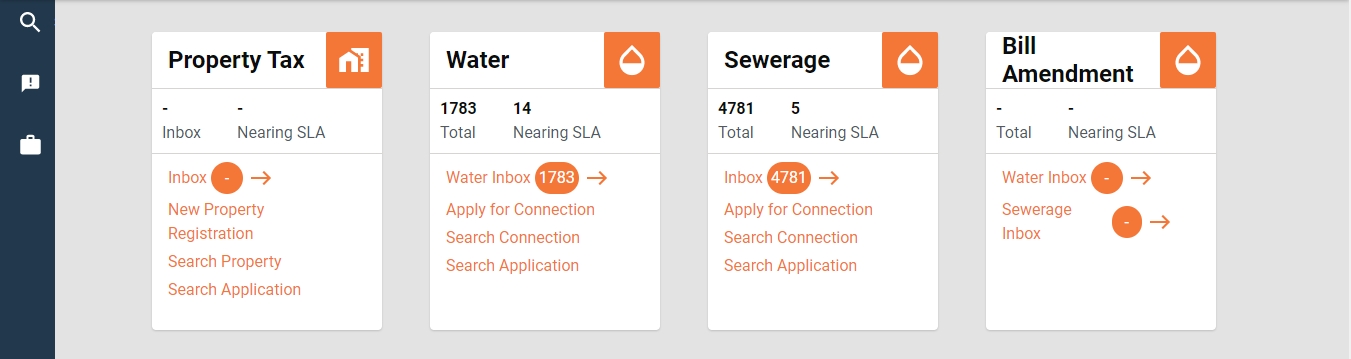
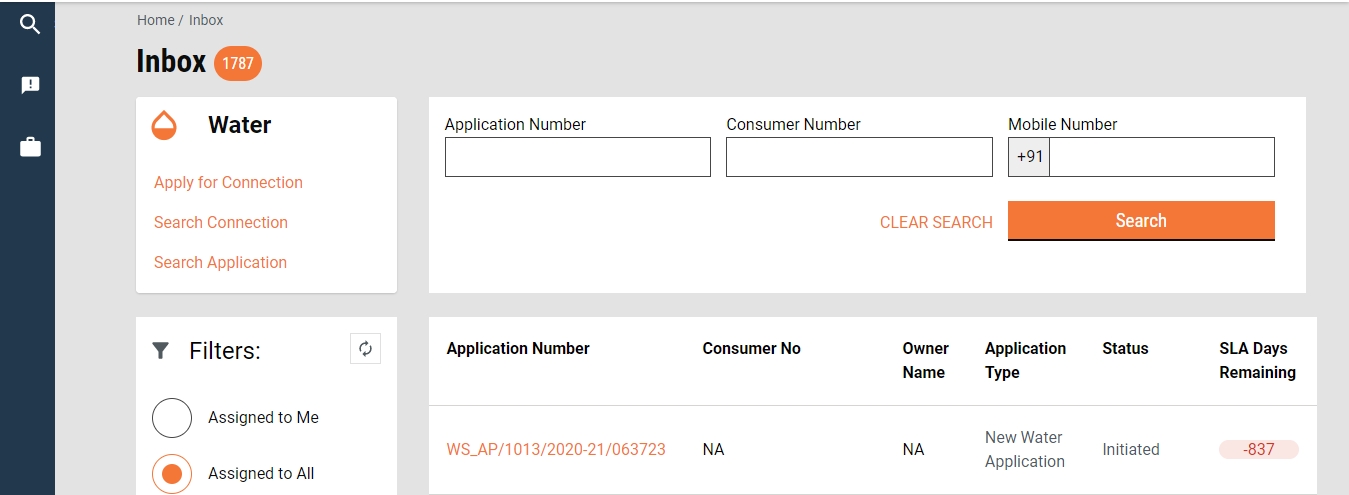
Employee Inbox
Click on the Inbox menu to access the employee inbox.
The top feature menus are displayed on the left side. The filter panel on the left bottom displays the search filters.
Assigned to Me - The only applications assigned to the logged-in user are displayed on the right side window.
Assigned to All - It is default selected and hence the applications assigned to anyone are displayed on the right side window.
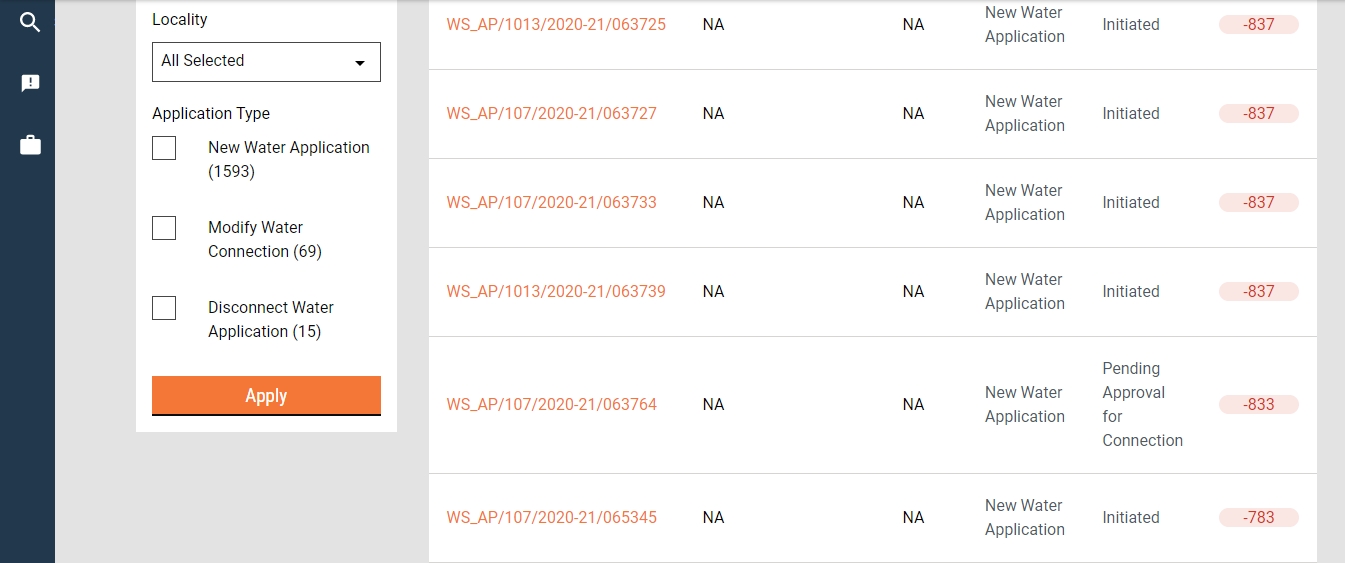
Locality - It filters the application based on the locality selected and then displays the result on the right side window.
Application Type - It filters the application based on the application type selected and then displays the result on the right side window.
Application Status - It appears only when the application type filter is selected and filters the application based on the application status selected and then displays the result on the right side window.
The search parameters are displayed on the top right. This allows users to search the application by Application Number, Consumer Number, and Consumer’s/ Applicant’s Mobile Number.
The window on the bottom right side provides the list of applications based on the default settings or applied filters and search parameters.
The citizen portal lets users view their connection details and pay water or sewerage bills online.
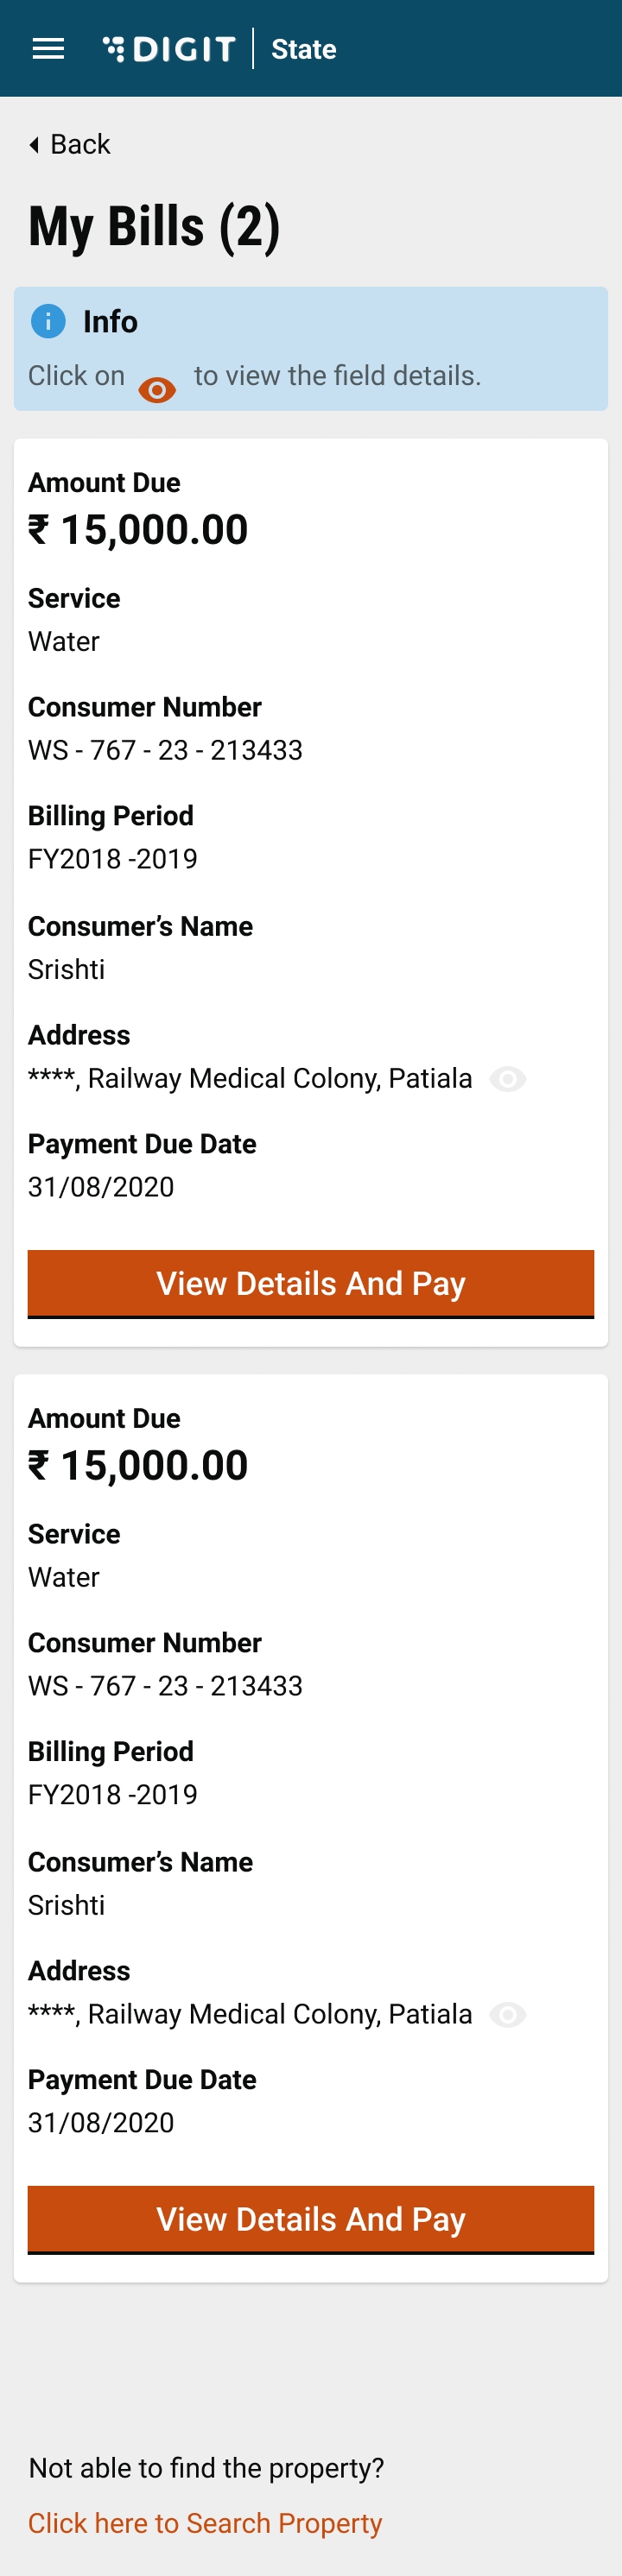
To view and pay bills, click on the My Bills option on the Water and Sewerage service list.
All the water and sewerage charges related bills are listed here which are due for payment. Click on View Details and Pay to make the payment. Follow the steps same as given in .
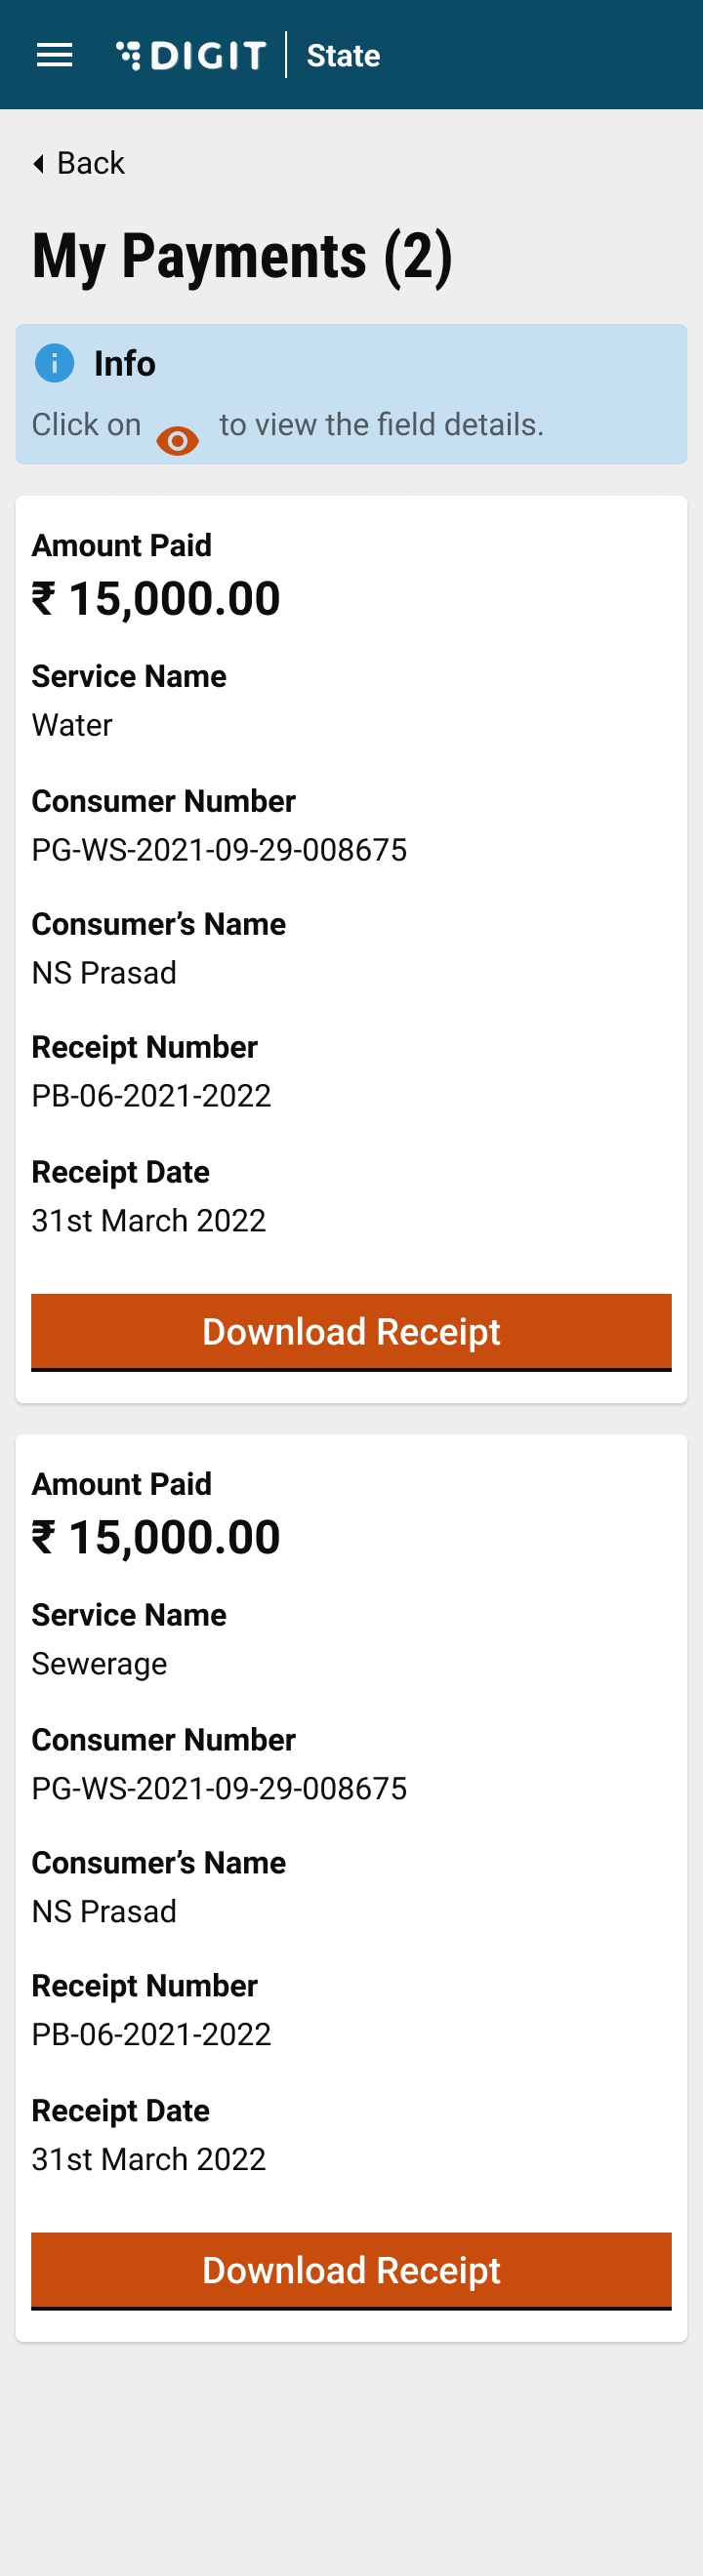
Citizens can view past bill payment details from their portal.
To view past payment details - Click on the My Payments option on the Water & Sewerage service list.
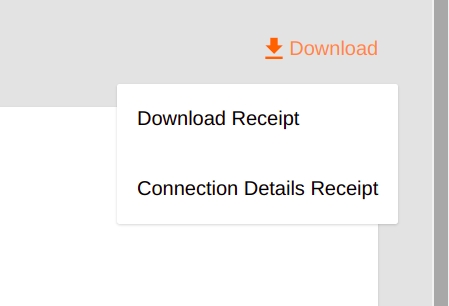
The system displays historic payment details. Scroll down to view all. Click on the Download Receipt button to download the payment receipt.
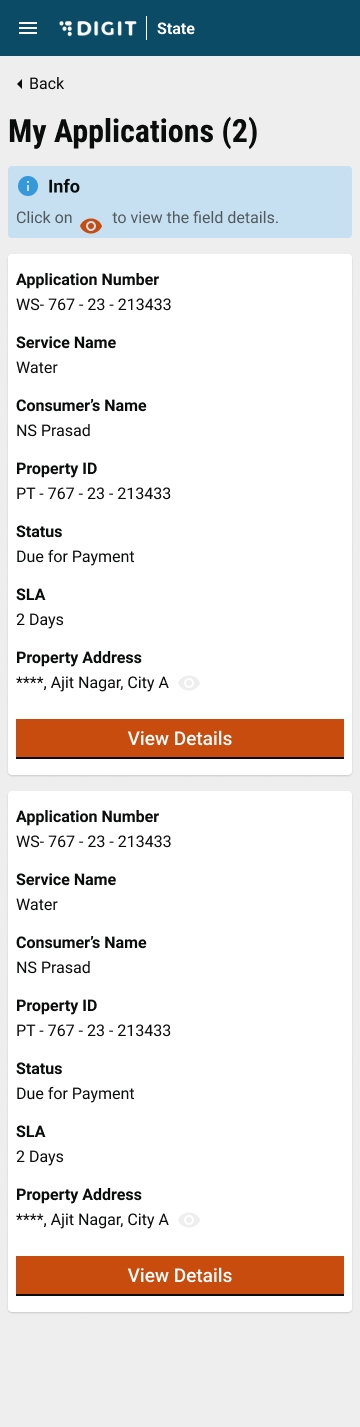
Citizens can view their applications to find status details, pending fees to be paid, or any other notifications linked to the application.
Step 1: To view applications - Click on the My Applications option in the Water & Sewerage service list.
Step 2: Click on the View Details button for the desired application to fetch the details.
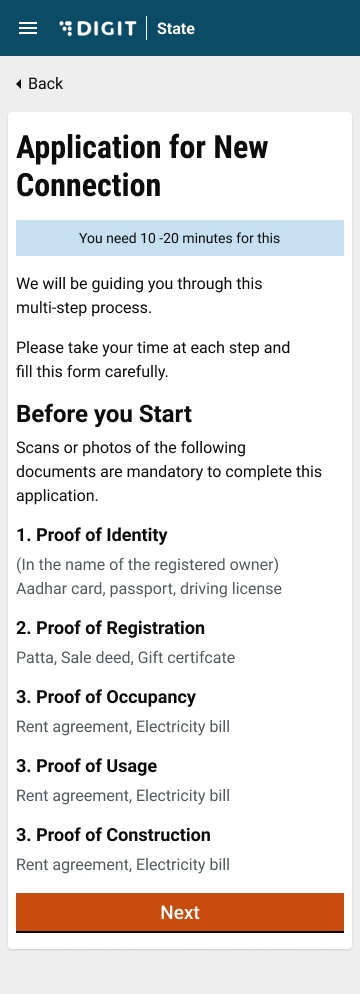
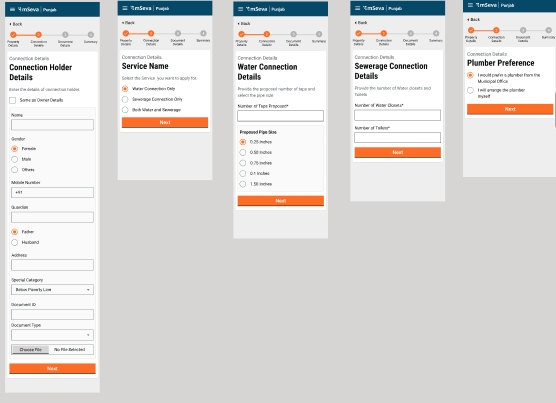
The Apply for New Connection option allows citizens to submit their applications for new water or sewerage connections. Application forms are submitted through the DIGIT Citizen Portal for further processing and approval for new connections by the ULB employees.
To apply click on Apply for new connection option in the Water & Sewerage service list.
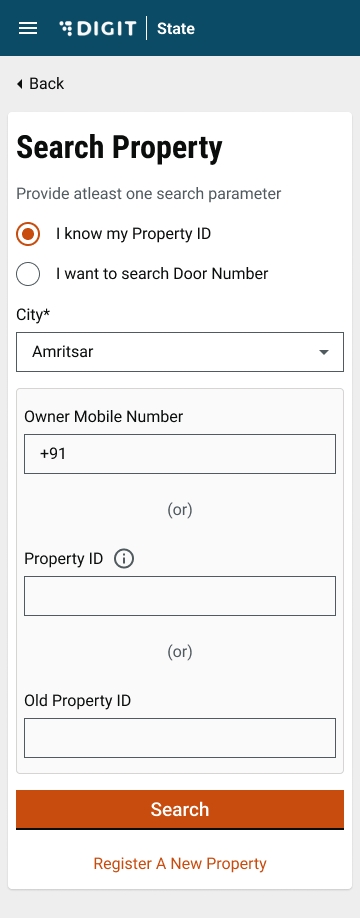
Enter the required parameters in the Search Property page to find the property for which a new connection is to be applied.
Click on the Apply For New Connection button to proceed with a new connection
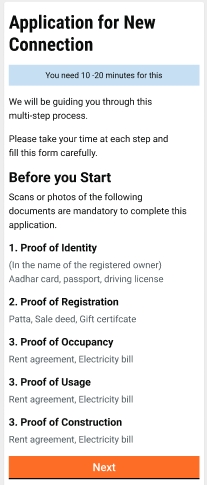
The system displays a page with the information on the documents required to apply for a new connection. Make sure these documents are available before proceeding with the application.
Click on the Next button to move to the application form.
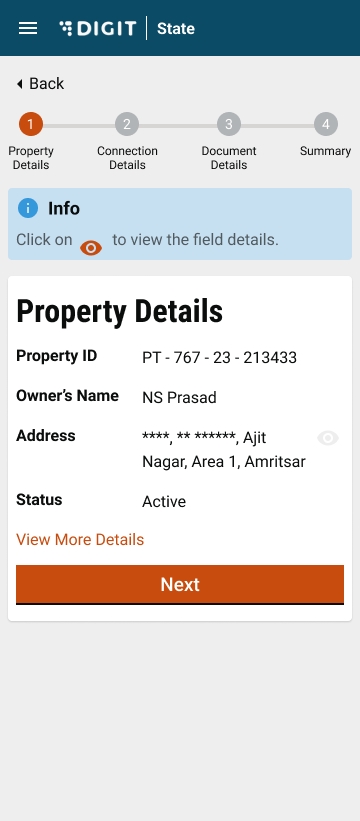
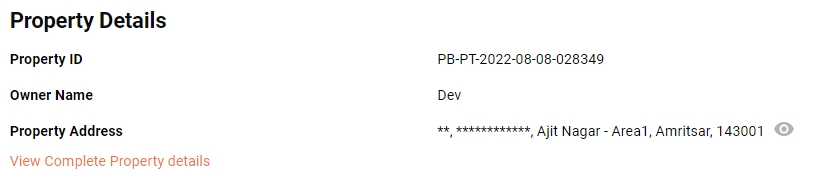
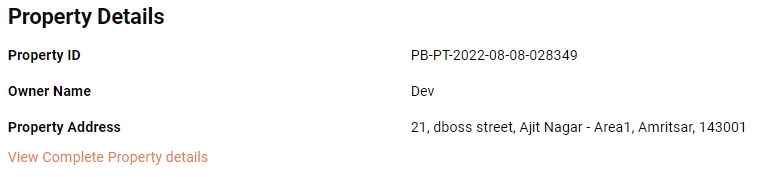
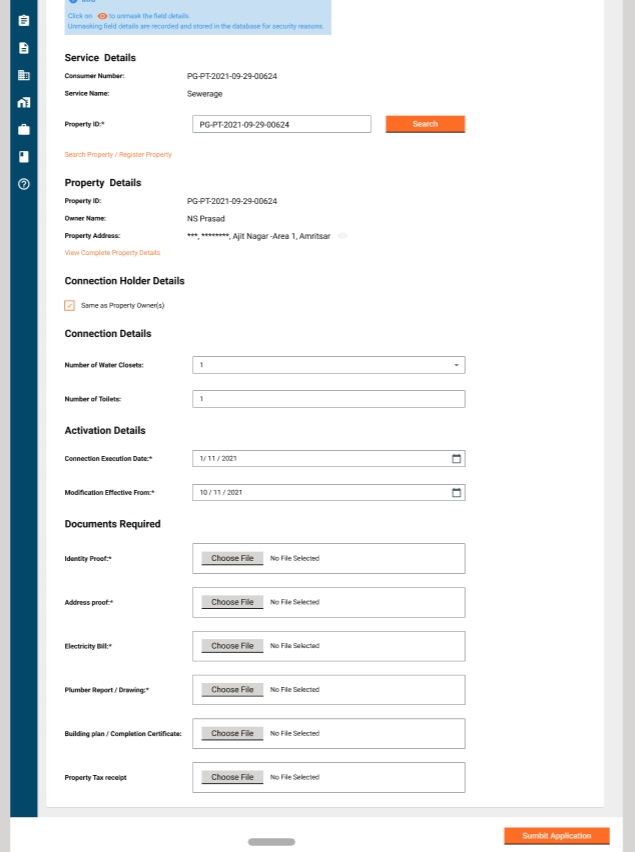
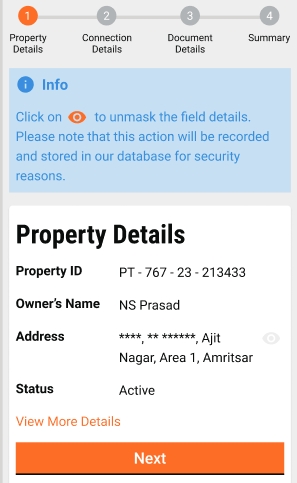
Property Details of the selected property are displayed. Click on View More Details to find additional details.
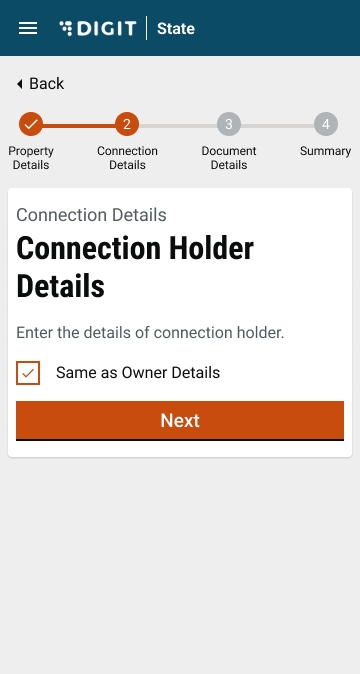
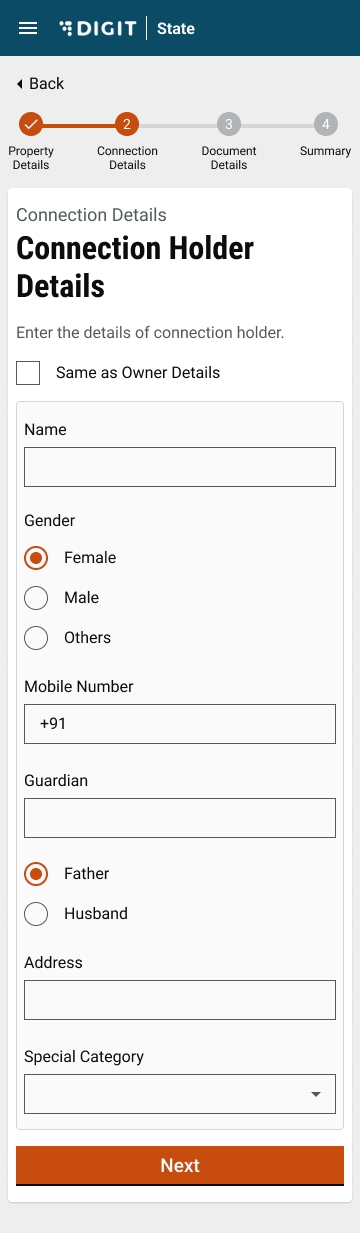
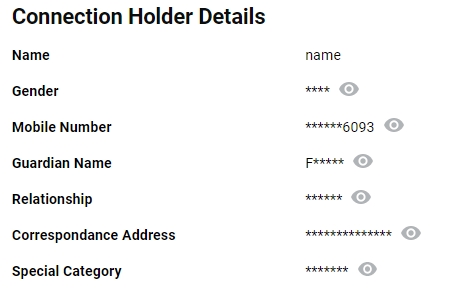
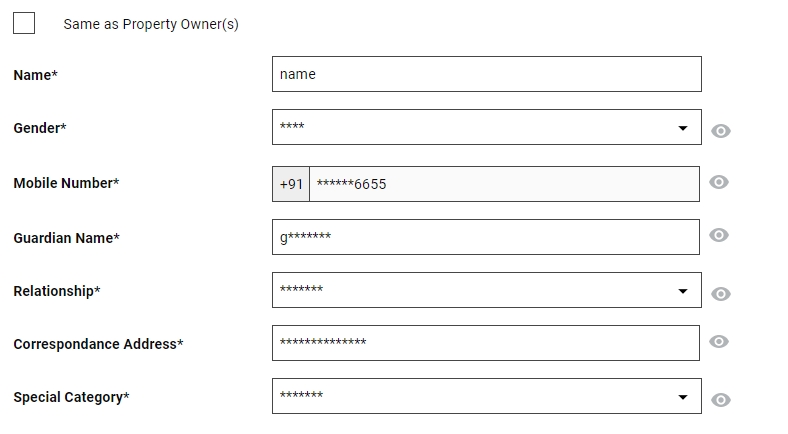
Check the Same as Owner Details box if the connection holder is the same as the property owner. This will auto-fill the owner details in the Connection Holder Details section.
In case the property owner is not the same as the applicant for the connection, enter the Name, Gender, Mobile Number, Guardian Name, Relationship, Address, and Special Category details for the applicant.
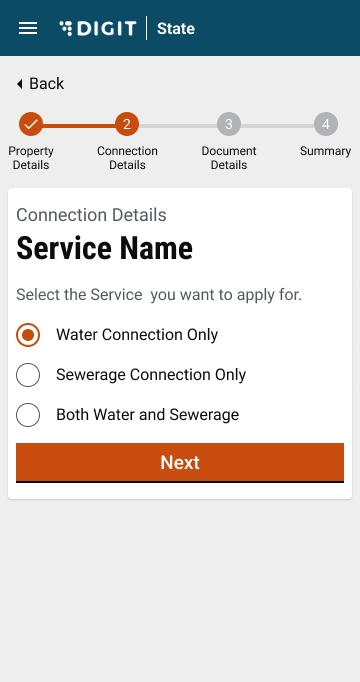
Select the relevant Service Name. Click on the Next button.
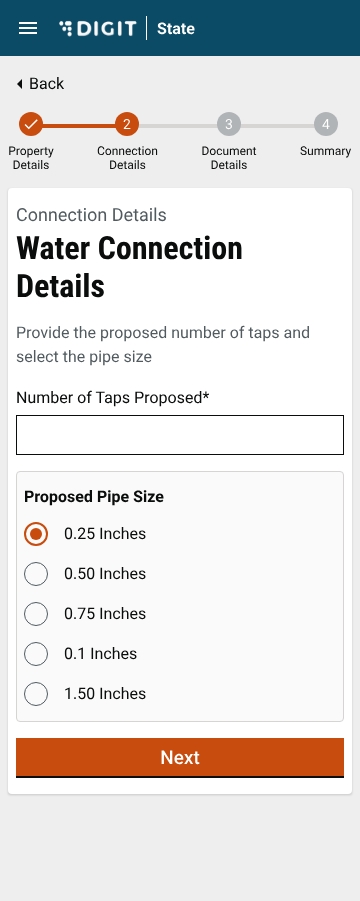
Enter the Water Connection Details as applicable. Click on the Next button to proceed.
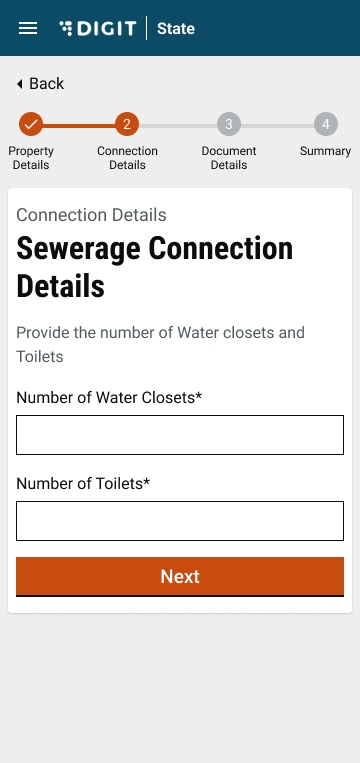
Enter the Sewerage Connection Details as applicable.
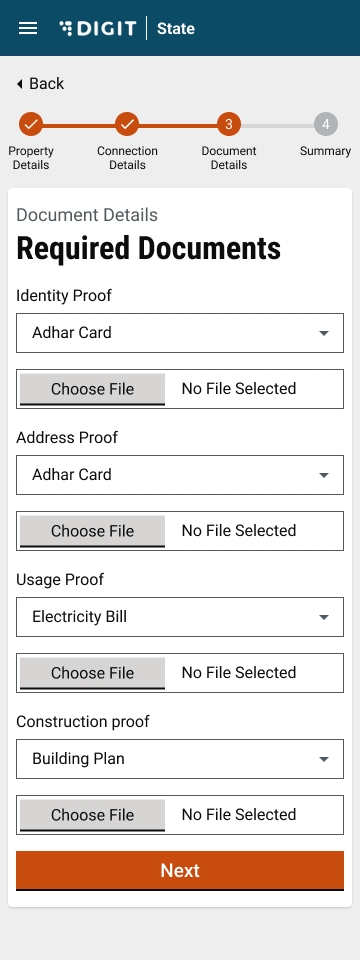
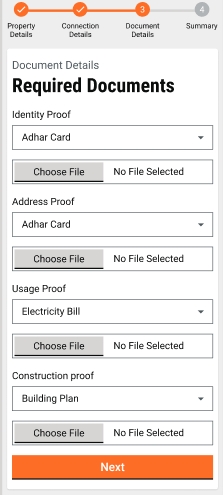
Attach the required documents. Click on the Next button to proceed.
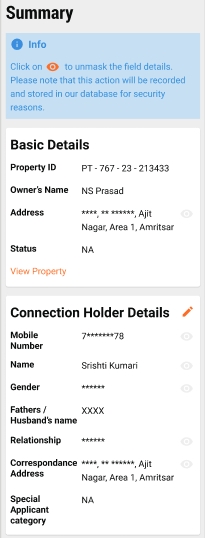
Review the application details on the Summary page before clicking on the Submit button. Click on the edit icon for the relevant section to make any changes.
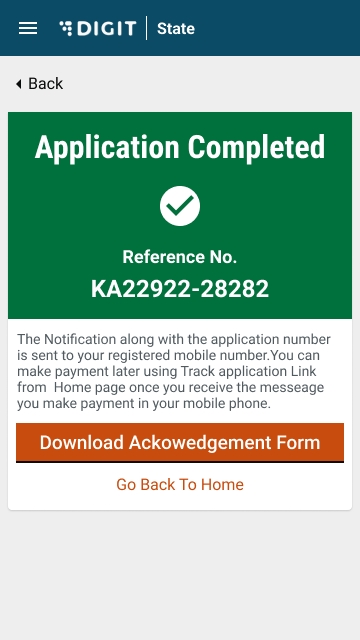
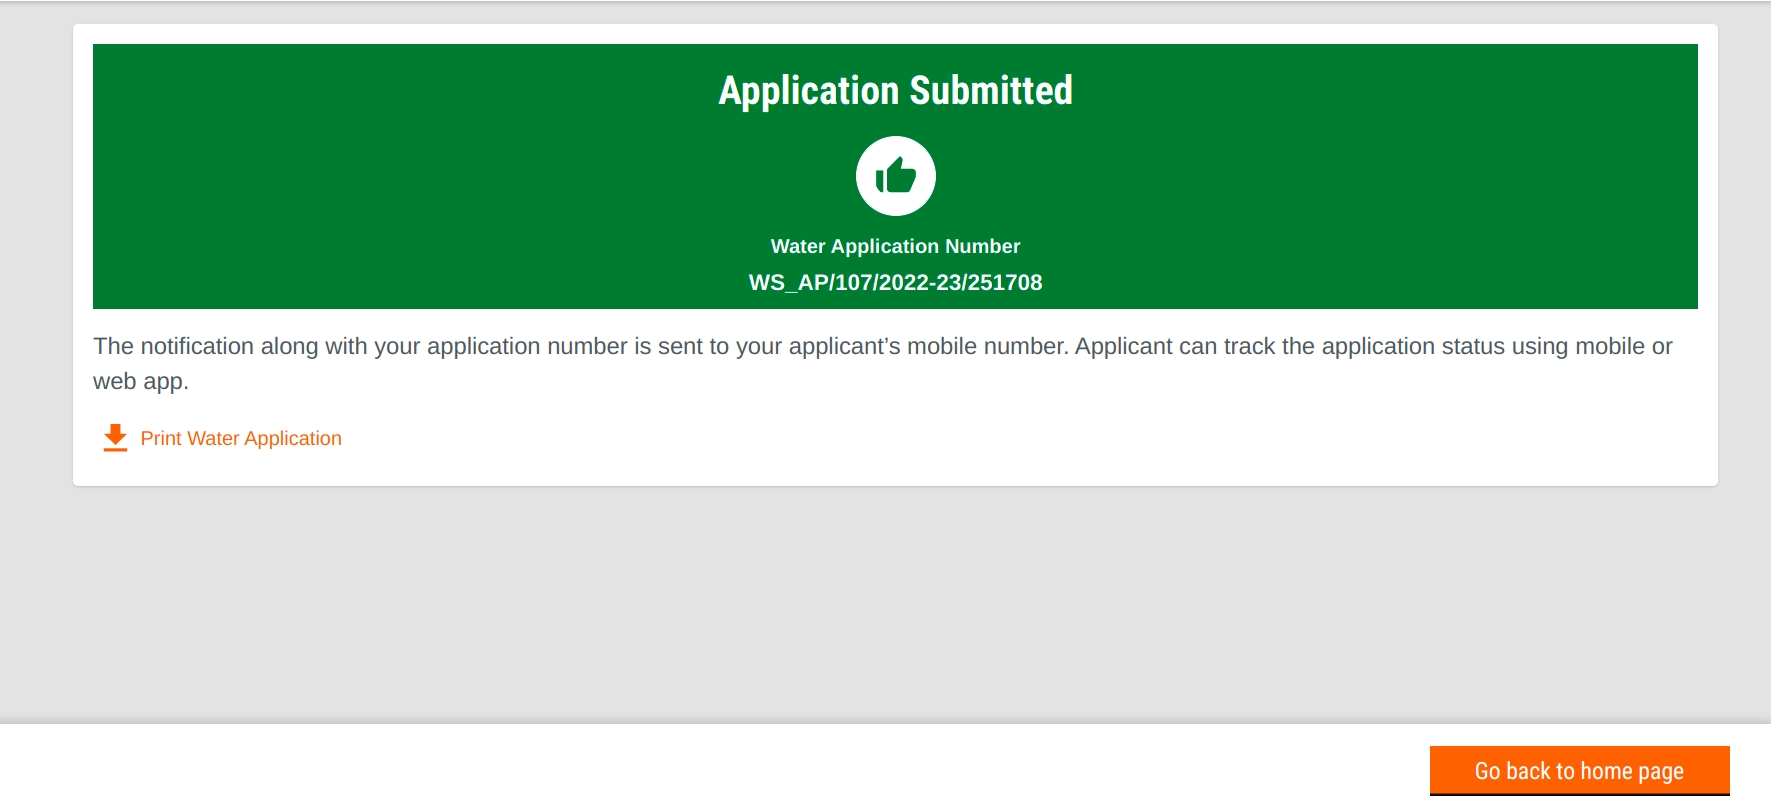
The application is submitted and the success page is displayed. Click on the Print Water Application option to download and print the application.
Note: The application is processed by the ULB employees who verify the attached documents and carry out field inspections before the final approval. The citizen is allotted a unique consumer number once the application is processed and approved.
Learn how to apply for new water or sewerage connections, pay bills
Citizens represent individuals, groups or communities using the W&S module online to manage their water and sewerage connections. The W&S module allows citizens to apply for new connections, pay bills online, and view past payments and connection and application details.
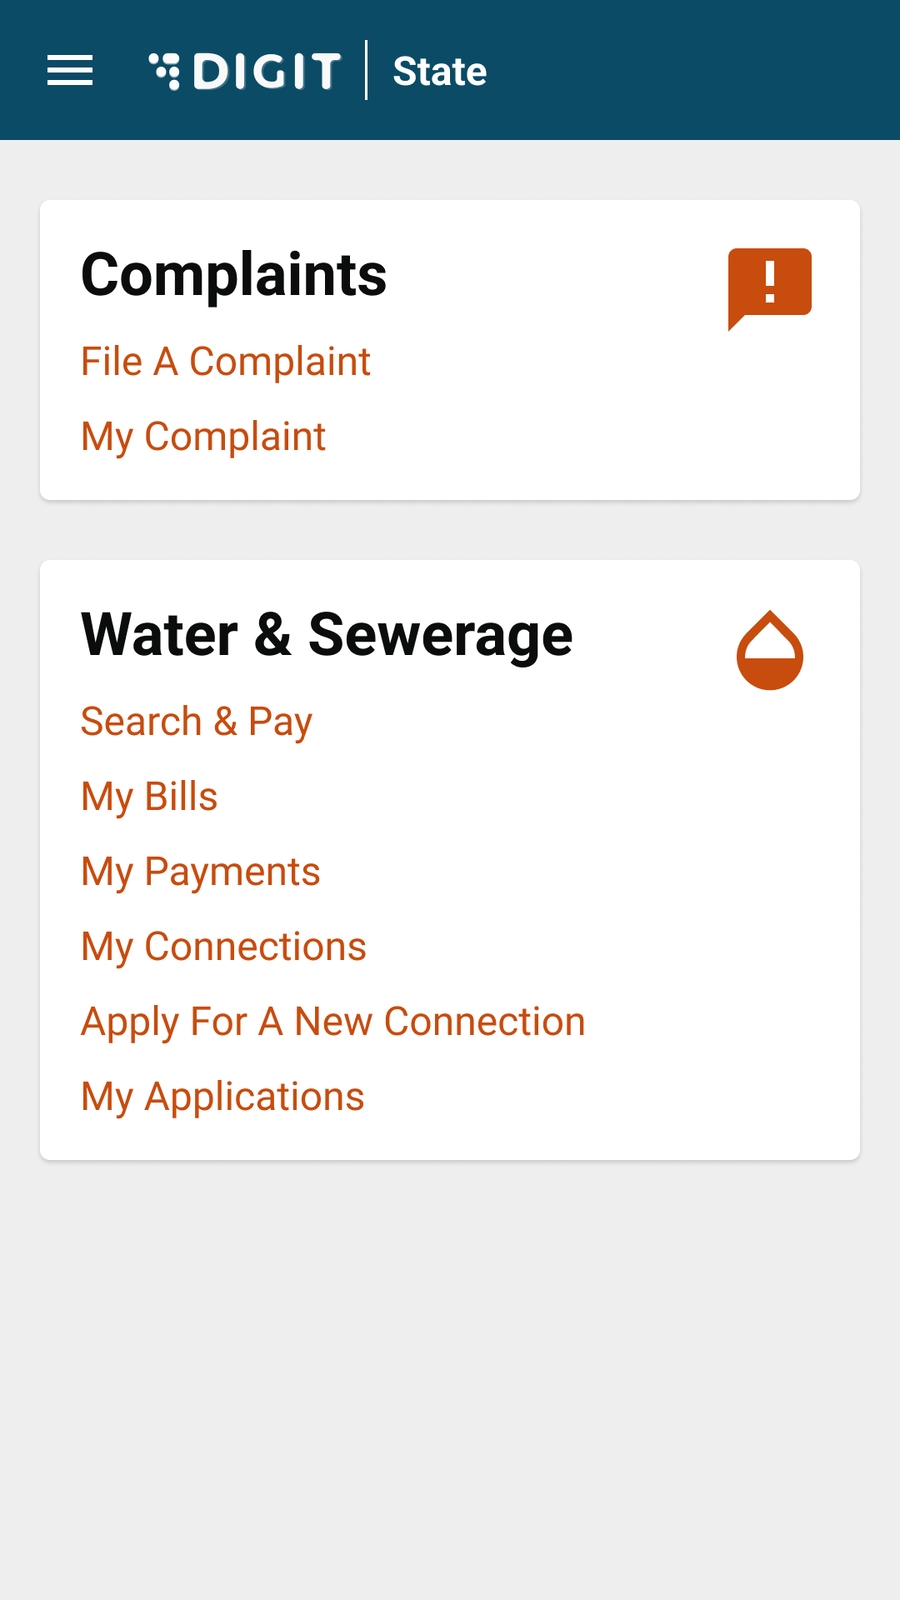
The DIGIT citizen portal lists all citizen-centric services as well as the Information and Updates from the ULBs. Click on the View All button on the card to view the list of available citizen services.
The citizens can -
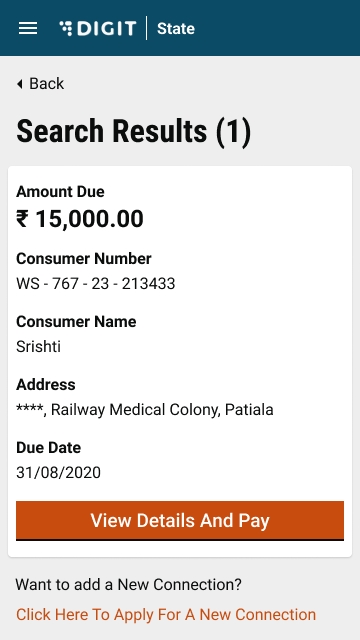
Search and Pay service enables citizens to pay the water and sewerage charges dues without logging into the account.
Consumers can either search and pay their bills or they can access their bills by logging in to their registered account. Follow the steps below to search and pay the bills.
Step 1: Click on the Search & Pay option to search for a connection and pay the bill.
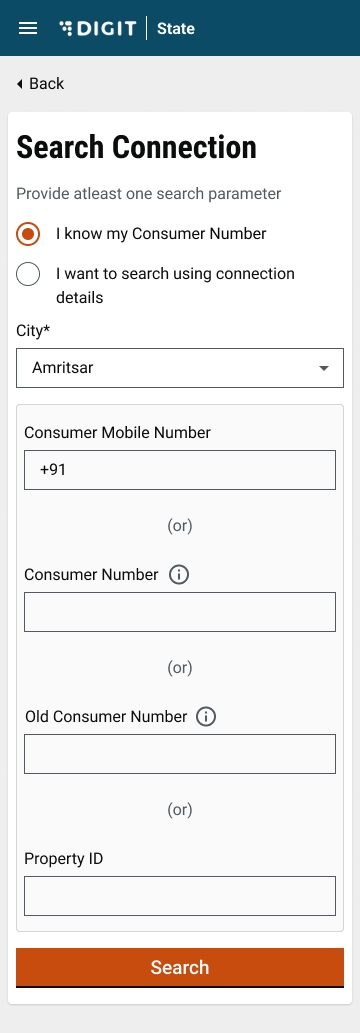
To search for water or sewerage connections using the Consumer Number or the Door Number. Select the applicable option as either -
I know my Consumer Number; or
I want to search using connection details
Step 2: To search by Consumer Number enter at least one of the following parameters:
Consumer Mobile Number
Consumer Number
Old Consumer Number
Property ID
To search using connection details, enter at least one of the following parameters:
Door Number
Consumer Name
Step 3: The search result shows the list of connections filtered based on the entered search parameters. Click on the View Details and Pay button to proceed further. This displays the connection details and the Payment options. The View Details And Pay button is visible only when there is any amount due for the specific connection.
The CEs can apply for new water or sewerage connection applications and submit it on behalf of the citizens.
To apply for new connections -
Click on the Water & Sewerage menu option in the sidebar or the Water & Sewerage card on the DIGIT home page.
Click on the New Application button available on the top right corner of the page. Follow the steps iterated in the for New Connections section to apply for new connections.
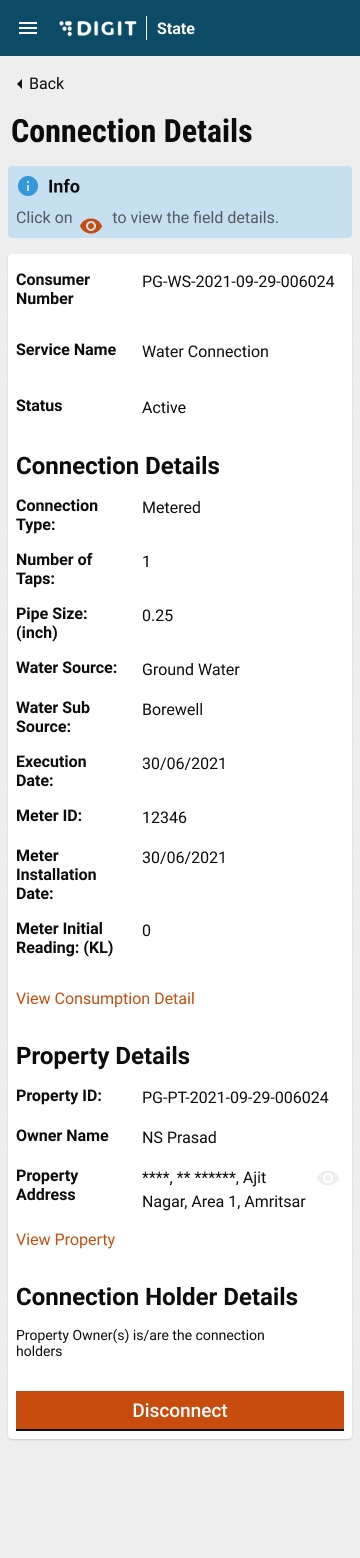
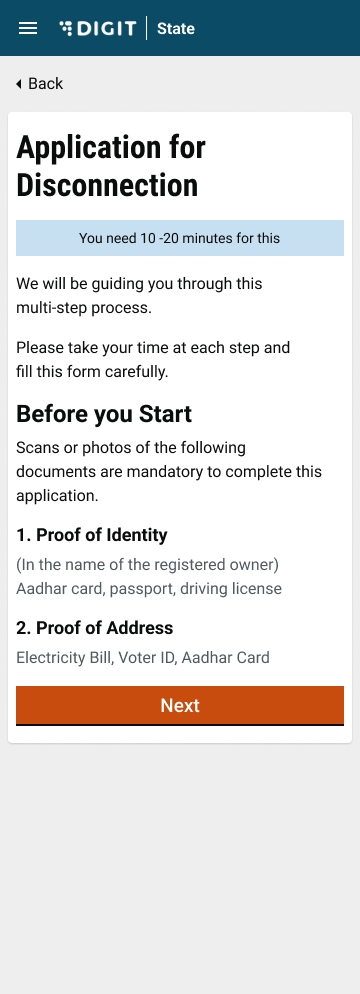
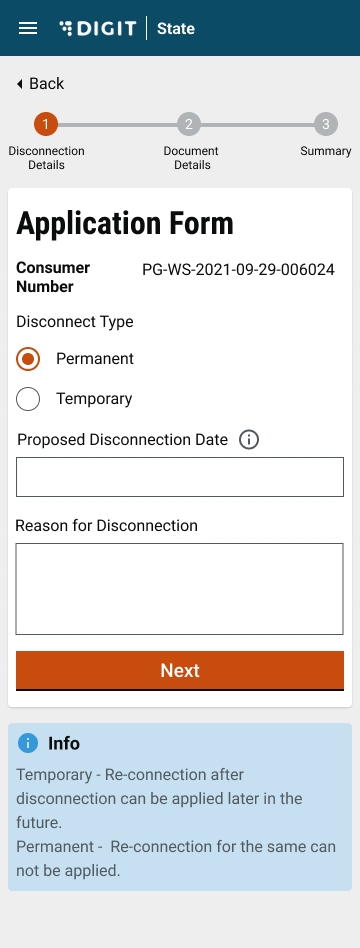
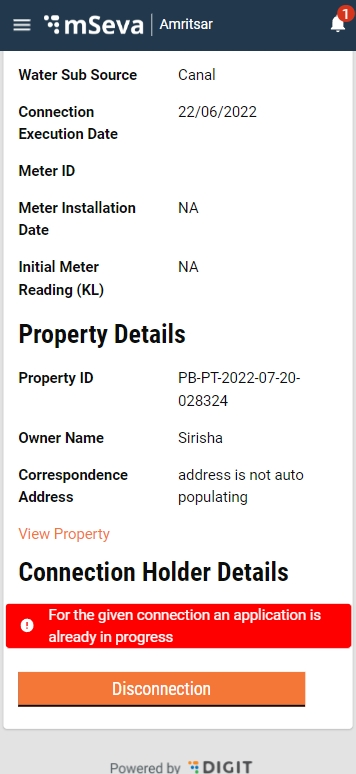
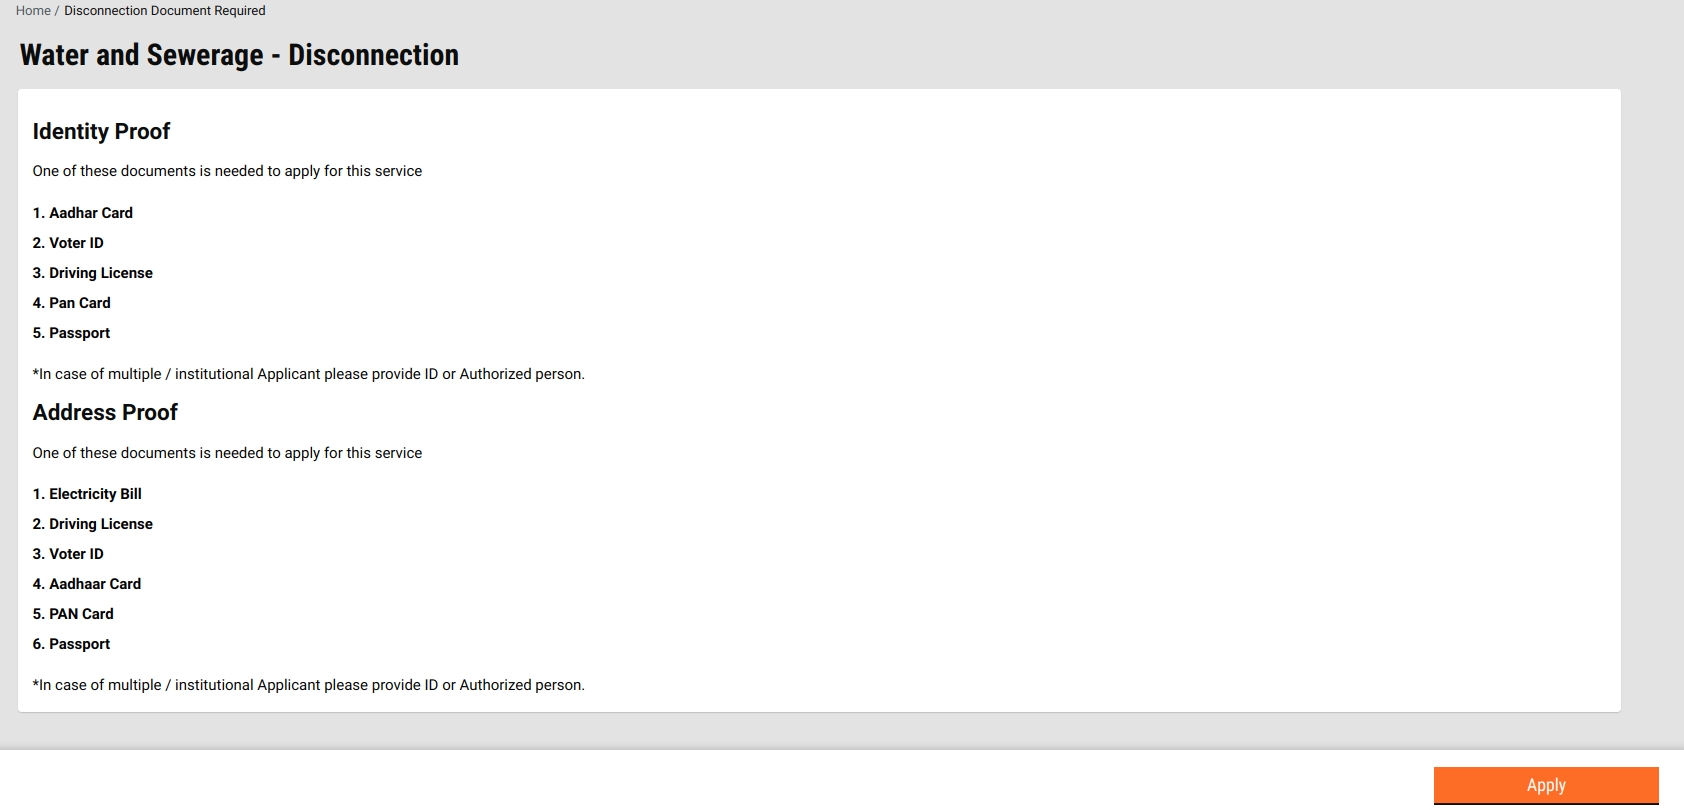
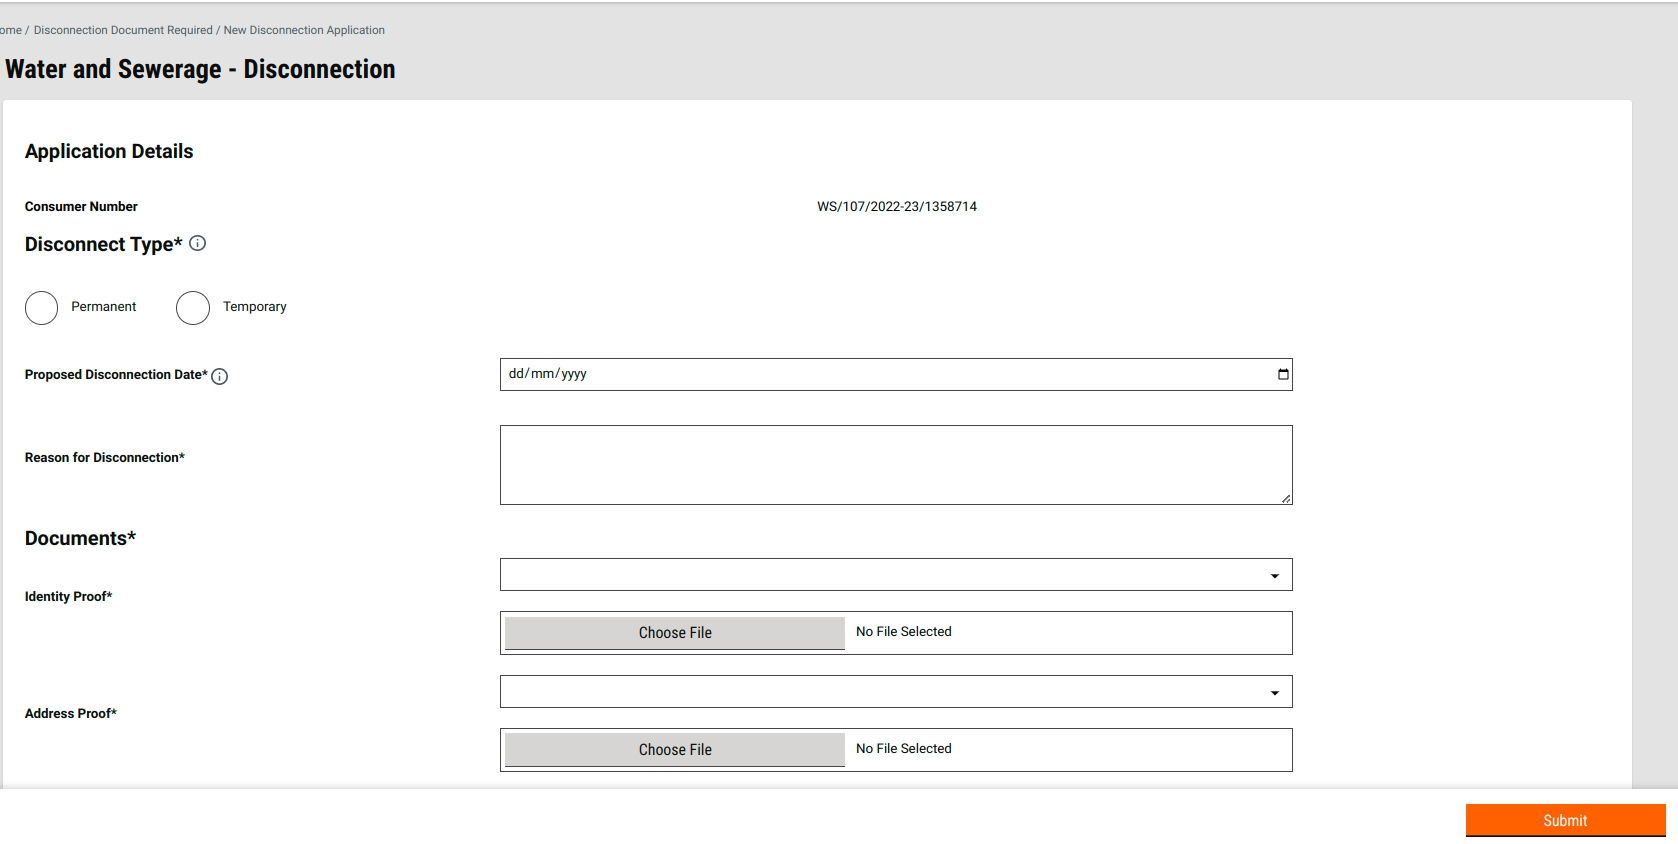
The owner of a water or sewerage connection can apply for disconnection if the service is no longer in use now or due to any other reason.
To apply for disconnection of a service - Click on My Connections service from the Water & Sewerage service list. The existing connections for the logged-in user are shown as the result.
Click on View Details to view the complete details of the connection. Scroll down to find the connection for which the disconnection application is to be created and click on View Details to see the details and apply for disconnection.
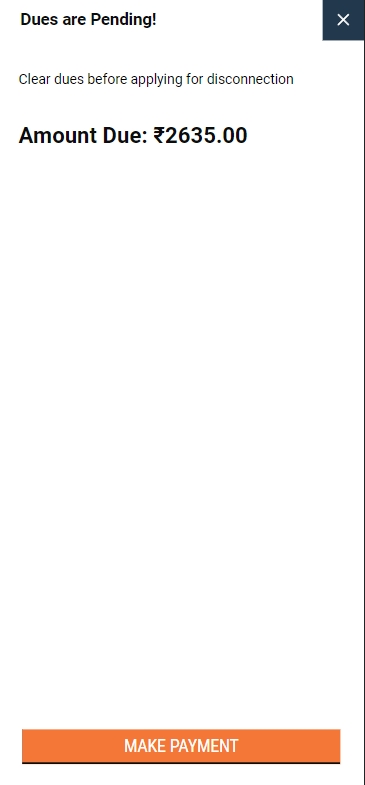
Click on the Disconnect button. In case of any pending dues, the system will prompt you to make the payment before proceeding with disconnection.
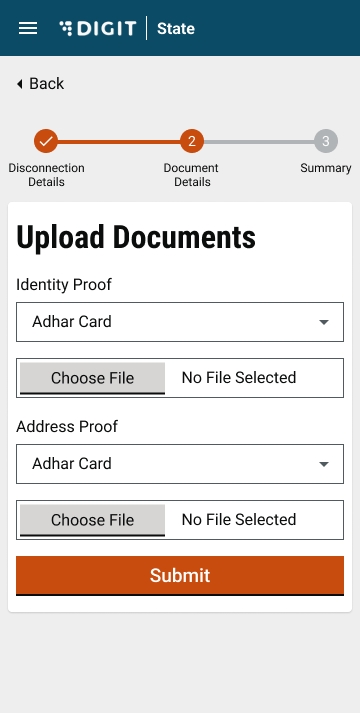
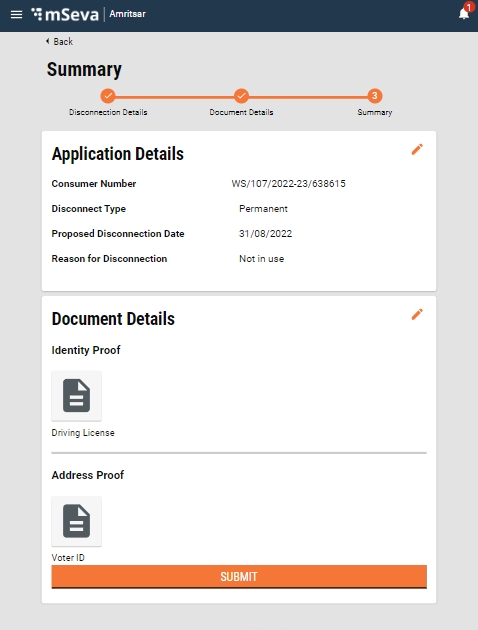
Make a note of the list of documents required for disconnection. Scan these documents to upload with the application.
Fill in the application details and click on Next to attach the documents.
Upload the required documents and click on Next to proceed.
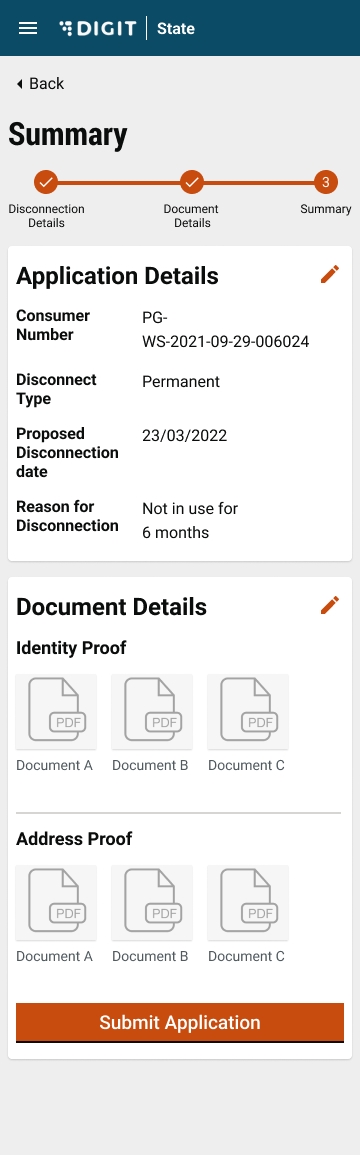
Verify the details in the Summary page, and edit the application if needed. Click on Submit to submit the application.
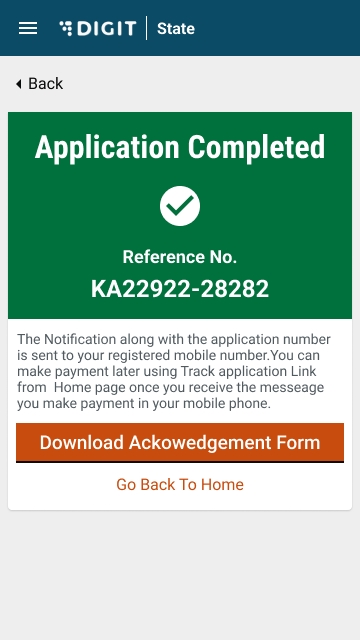
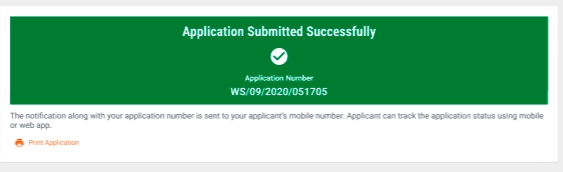
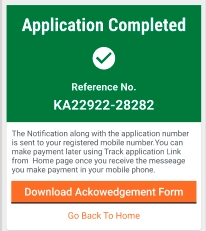
The screen displays the option to Download the Acknowledgement Form. Click on Go back to the home page to navigate back to the home page.
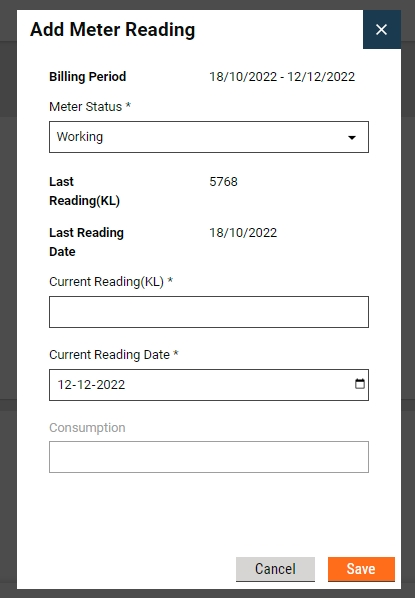
CEs add the meter readings for each connection to generate monthly bills based on the recorded usage.
To add meter readings -
Search for the specific connection using relevant search parameters. Click on the Consumer Number link available for listed connections. Click on View Consumption Details available in the Service Details panel.
Click on the Add Meter Reading button on the top right corner of the Consumption Details page.
The Billing Period by default is set to the last reading date and current reading date.
Select the applicable Meter Status. The meter status can be changed to reflect the current working condition of the meter. Meters can be set to Working, Locked, Breakdown, Non-meter, Reset, or Replacement, as applicable.
Enter the Current Reading on the meter reading page. The system displays the Last Reading and the Last Reading Date. Enter the Current Reading Date. The date field auto-populates the current date by default.
The actual Consumption is automatically calculated by the system. The customer is billed based on the actual consumption.
Click on the Save button to save the reading. This will generate the bill or demand for payment that has to be made by the customer.
The employee user can edit application details on behalf of the applicants.
To edit applications -
The applications Pending for Document Verification are available on the home page. Else, search for the application using the search parameters.
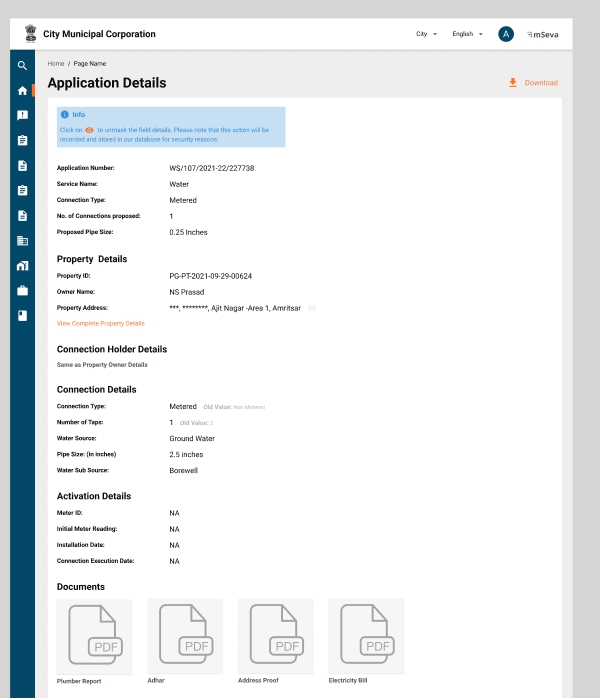
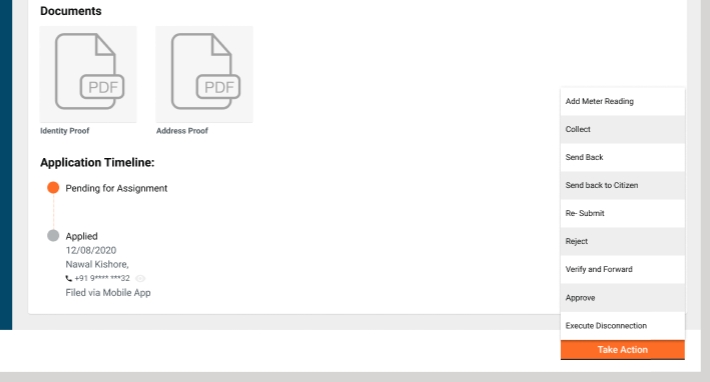
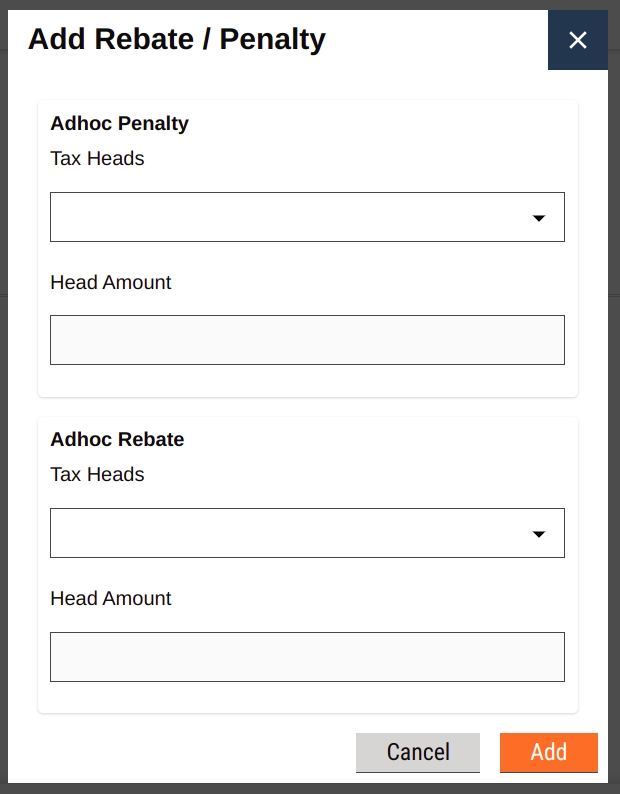
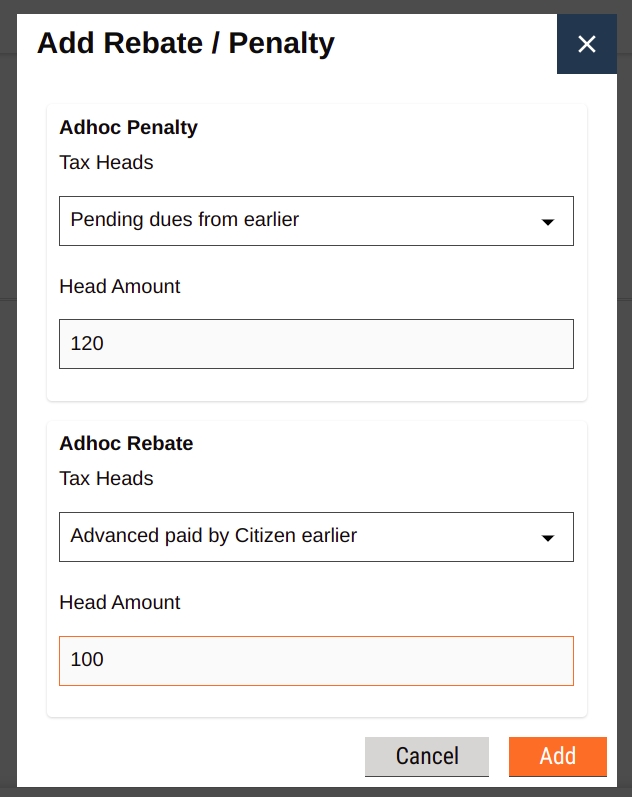
Open the application. Click on the View History button available in the Task Status panel on top to view the list of actions taken on the application so far. Click on the View Breakup button to find the fee breakup details in the Fee Estimate panel.
Click on the Add Rebate/Penalty button to add any ad hoc penalty or rebate amount to the total fee payable. Scroll down the application to review the filled-in details. Click on the View button for each uploaded document to review details.
Click on the Take Action button and then click on Edit to make the required corrections. Review the Connection Details and the list of Documents furnished with the application.
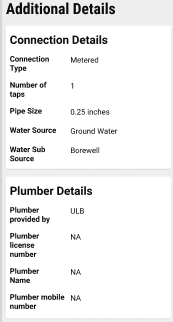
Enter the connection details in the Additional Details section of the application. Select the applicable Connection Type. Enter the Number of Taps, Water Source, Water Sub Source, and Pipe Size details.
Select ULB if the plumber is provided by the ULB. Else, check the Self option. In case the plumber is provided by the ULB enter the Plumber License No., Plumber Name, and Plumber Mobile No. details.
Select the relevant Road Type. Enter the Area (in sq ft) to indicate the length of road cutting required to lay the pipes. Enter the Connection Execution Date. The connection will be activated on the specified date.
Click on Next Step in the Summary section of the application. Review the application details. Complete the changes and click on the Submit button to save the changes.
The W&S portal enables CEs and other ULB employees to search for specific applications or connections using different search parameters.
To search for W&S connections -
Click on the Water & Sewerage menu option in the sidebar or the Water & Sewerage card on the DIGIT home page. The Search Connections tab on the page displays the various search parameters that filter the search for specific connections. Enter the applicable City. This is a mandatory search filter.
Enter the Property ID or Owner Mobile No. or Consumer Number or the Old Consumer Number to filter the view of connections based on the specified parameter. Click on the Search button to view the search results. Click on the Reset button to renew the search using different parameters.
To search for W&S applications -
Click on the Water & Sewerage menu option in the sidebar or the Water & Sewerage card on the DIGIT home page. Click on the Search Applications tab.
Enter the Consumer No. or Application Number or Owner Mobile No. or Application Type to filter the search for applications. The application search can also be filtered by Application Status or by defining a specific period in the From Date and To Date fields. The system fetches the applications created between the specified period or after the specified date.
Click on the Search button to view the search results. Click on the Reset button to renew the search using different parameters.
The employee user can send the application back to the citizen for any corrections or if any vital document has not been uploaded.
To send the application back to the citizen -
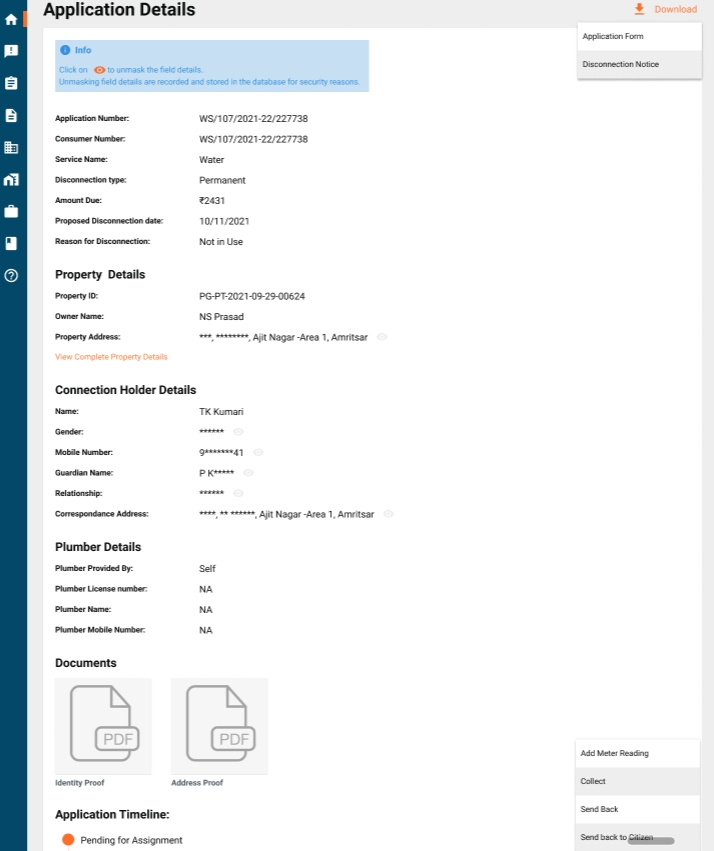
Enter the Application No. or any other search parameter to search for the application. Click on the Application No. link to open the application. Scroll down the application page to review the filled-in details.
Click on the View File button to open the documents uploaded in the application. Click on the Take Action button at the bottom of the application page once the review is complete. Click on the Send Back to Citizen button if the documents do not meet the application requirements or if any document is missing.
State the reasons for sending the application back to the citizen in the Comments section. Click on the Upload Files button to upload any supporting documents. Click on the Send Back button.
The application is placed back in the Citizen queue for required edits.
Once the application for new water or sewerage connection is approved and the citizen has paid the applicable connection charges, the CE is responsible for activating the new connection.
To activate new connections -
Search for the applications that are Pending for Connection Activation. Click on the Application No. to open the application.
Click on the Take Action button and click on the Edit option to enter connection activation details.
Review the Connection Details and the list of Documents furnished with the application.
Enter the connection details in the Additional Details section of the application.
Enter the Connection Execution Date. The connection will be activated on the specified date. For metered connections, enter the Meter ID, Meter Installation Date, and Initial Meter Reading (KL).
Click on Next Step in the Summary section of the application. Review the application details. Click on the Take Action button and then click on the Activate Connection option.
Enter any Comments for activating the connection. Click on the Activate Connection button.
The connection activation success message is displayed on the screen. A system generates a unique Consumer No. to identify the connection.
The employee user verifies and forwards the application if the documents and information provided in the application are found satisfactory and complete.
To verify and forward the application -
Click on the Take Action button at the bottom of the application page once the review is complete. Click on the Verify and Forward button once all documents are verified.
Select the applicable Assignee Name who will carry out the next phase of verification. Provide any additional information for the assignee in the Comments section. Click on the Upload Files button to upload any supporting documents. Click on the Verify and Forward button.
The application is forwarded to the field inspector for further processing.
CEs can pay W&S bills for the citizens. The CEs can add penalties or rebates to the bill amount depending on the applicable penalties or rebates available for the customers.
To pay bills -
Enter the relevant search parameter to filter the view of W&S connections. Click on the Collect button for the specific connection.
The Bill Details panel displays the pending dues details and its breakup.
Click on the Add Rebate/Penalty button to adjust any penalties or rebates applicable for the customer.
Add the Adhoc Penalty Amount or the Adhoc Rebate Amount. Select the Reason For Adhoc Penalty or Reason for Adhoc Rebate from the given drop-down list. Enter any additional information in the Enter Comments section.
Click on the Add button to add the penalty or rebate amount to the total bill amount. Click on the Download Bill button to download the bill. Click on the Pay button.
Select Full Amount or Custom Amount to specify the full or partial payment of the bill. Enter the Amount to Pay if Custom Amount is selected. Click on the applicable payment tab in the Capture Payment panel.
Enter the required payment details and make the payment. Click on the Generate Receipt button to process the payment.
The payment success acknowledgement message is displayed on the screen. Click on the Download or Print button to download or print the payment receipt.
The employee user can reject the application if the documents and information furnished by the citizen do not meet the prescribed guidelines.
To reject the application -
Click on the Take Action button at the bottom of the application page once the review is complete. Click on the Reject button if the documents do not meet the application requirements or the information provided in the application is inaccurate.
State the reasons for rejecting the application in the Comments section. Click on the Upload Files button to upload any supporting documents. Click on the Reject button.
The application is rejected and a notification is sent to the applicant informing the same.
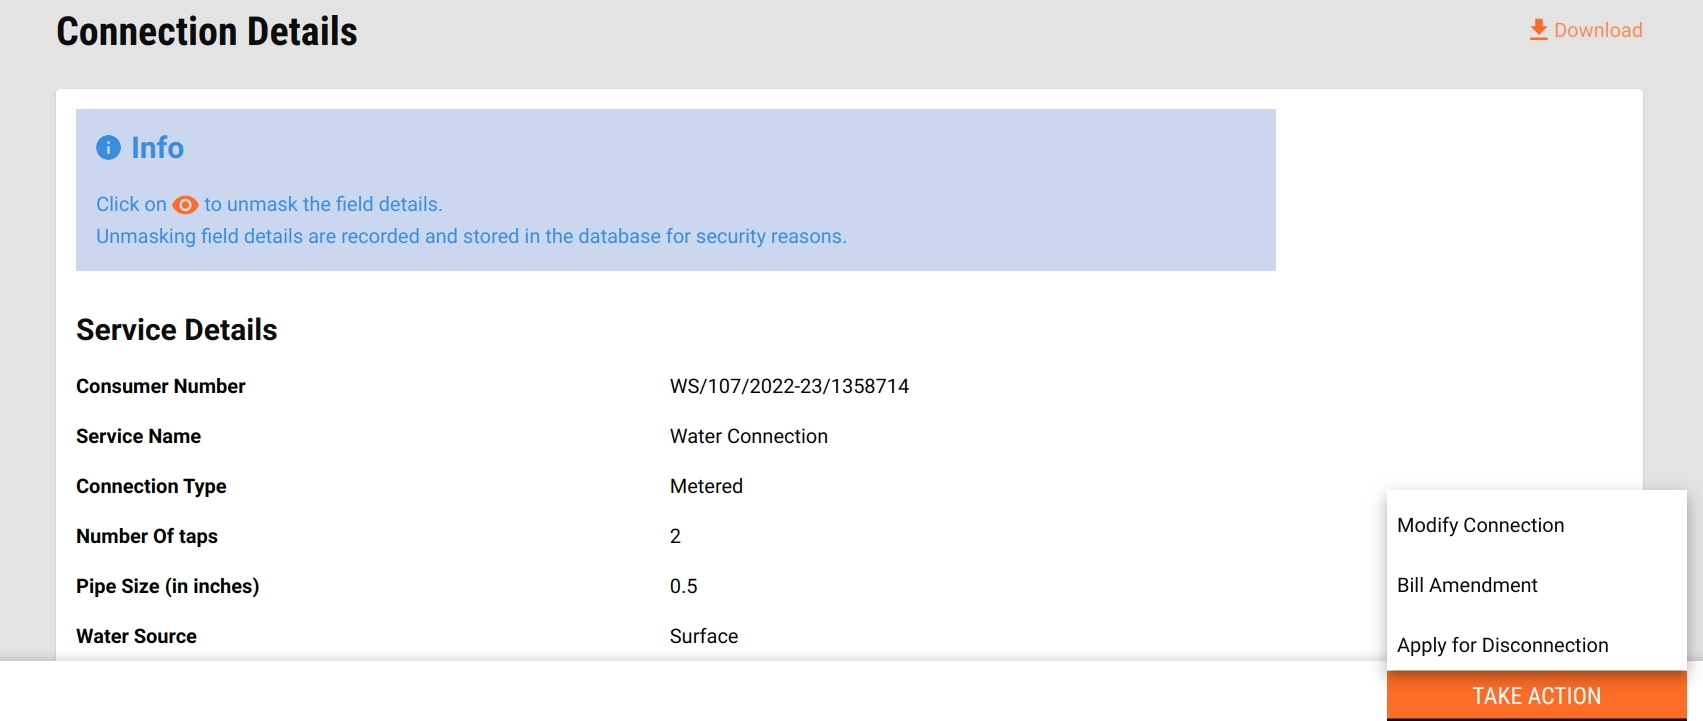
The W&S module enables CEs to make any changes to the existing water or sewerage connection details in a few simple steps. Such changes may reflect any updates in property details or connection details.
To modify connection details -
Search for the specific connection using applicable search parameters. Click on the Consumer Number link to open the connection details page.
Scroll down the page and click on the Take Action button. Click on Modify Connection.
The system does not allow employees to modify connection details in 2 cases
If there are any pending dues for the connection - the owner has to settle the pending dues before making any modifications to the connection details.
If there is already any other modification application pending for approval - the owner can raise another modification request only once the previous application is approved.
The Modify Connection application form contains 4 sections. The Property Details panel displays the existing property details linked to the connection. Click on the Search Property button to replace the existing property details with another property. Select the applicable Property ID. The change request for property details will be forwarded to the Approver for final approval.
Click on the Modify Property button to make any changes to the existing property. This action is integrated with the Property Tax module. So, whatever changes or edits are requested for the listed property will go through the Edit Property workflow for verification and final approval from the Property Tax department.
Click on the Next Step button to move to the Additional Details section.
Change the Connection Details as required on this page. Users can modify the existing Connection Type, Number of Taps, Water Source, Water Sub Source, and applicable Pipe Size details. Change the Activation Details if required. Enter new meter details in the Meter ID and Meter Installation Date fields.
Enter the Modification Effective From date. The requested changes will be reflected on the selected date. Click on the Next Step button to upload supporting documents for the requested changes.
Select the applicable Documents and then click on Upload Files to attach the selected documents to the application.
Click on the Next Step button to move to the Summary page of the application. Scroll down the page to review the modification requests. The existing connection details are available below the requested changes for easy reference.
Click on the Submit button to process the modification requests. The application is sent to the Approver for final approval.
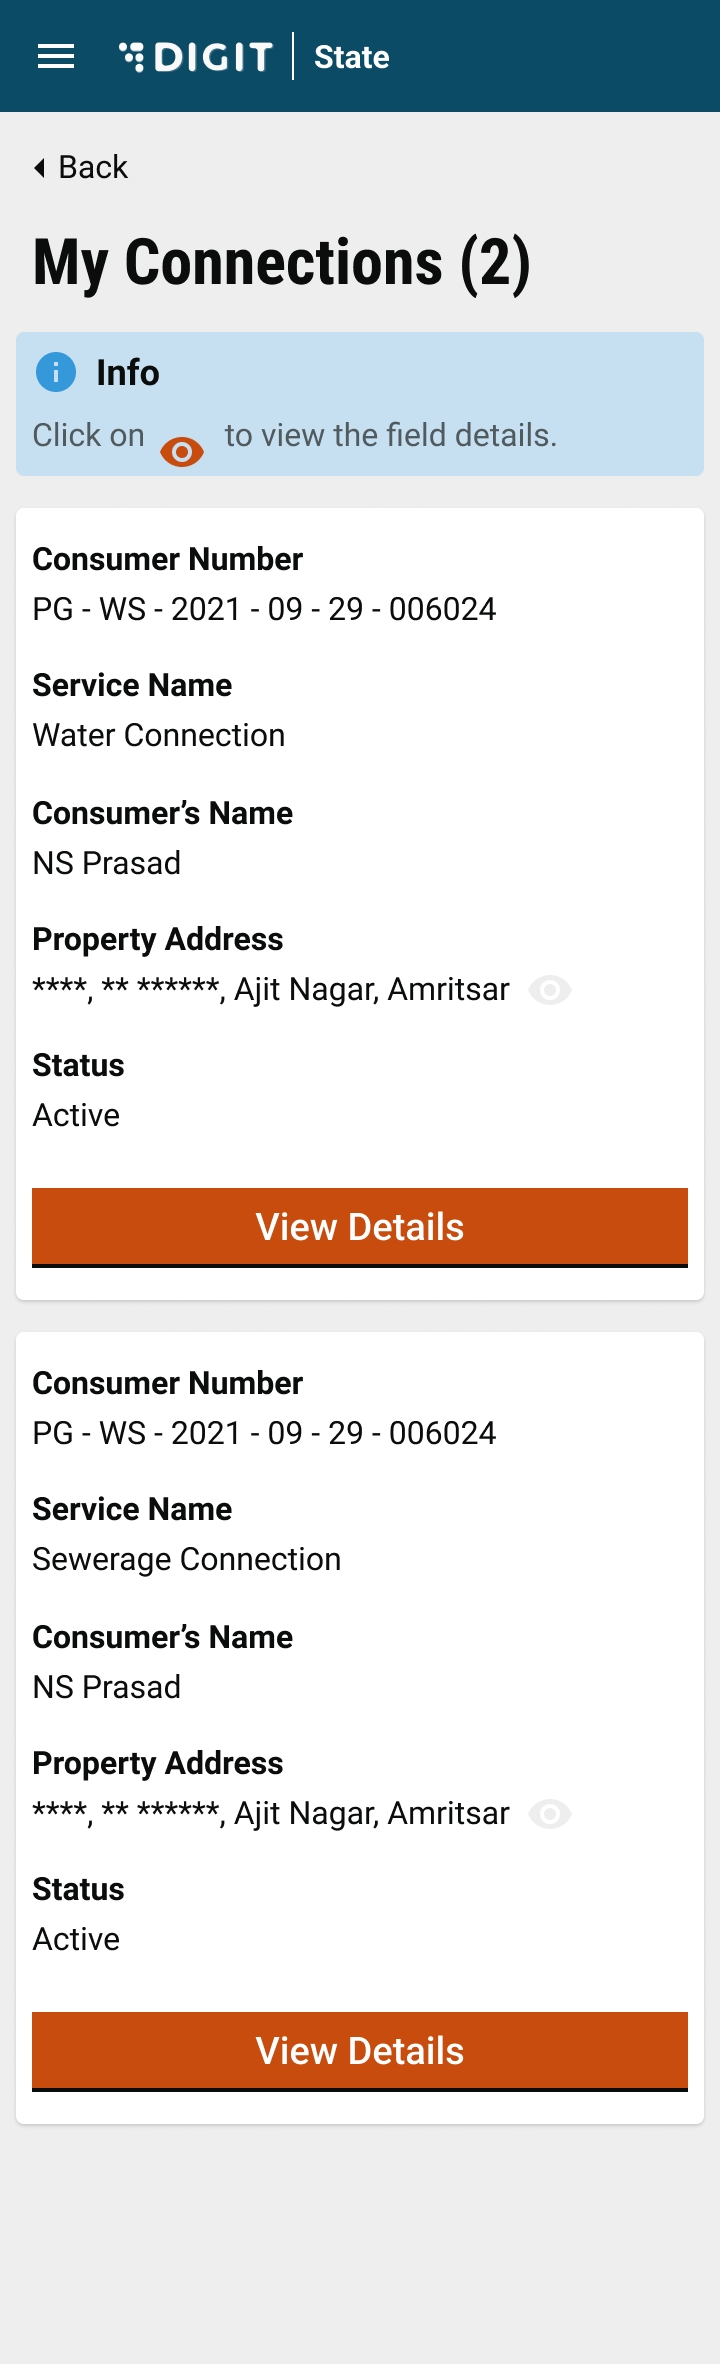
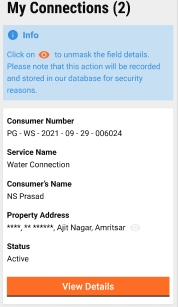
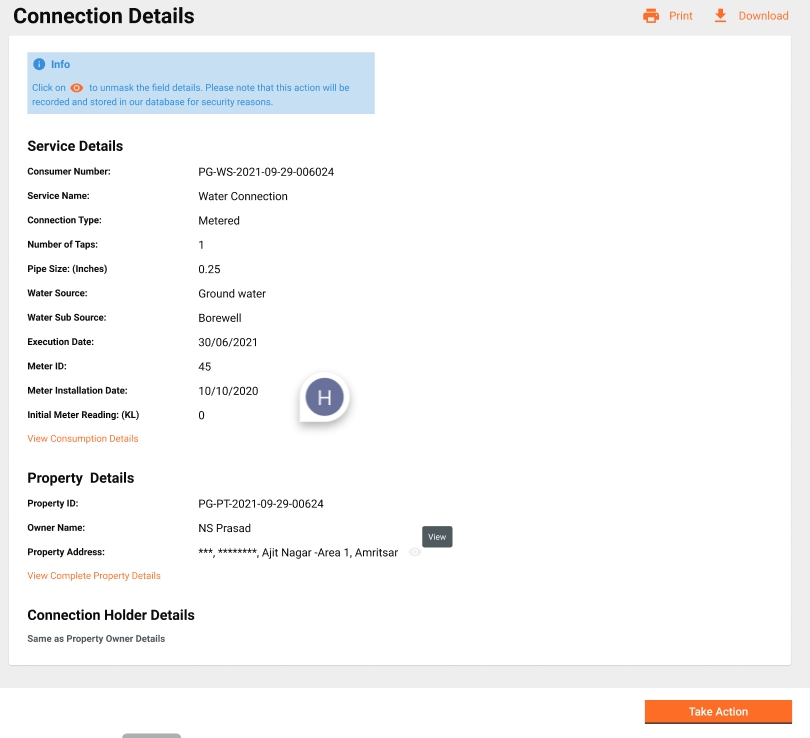
Citizens can view their water or sewerage connection details through the portal.
To view the connection details - Click on My Connections service from the WnS service list. The existing connections for the logged-in user are shown as the result.
Click on the View Details button to access the specific connection details.
The Connection Details page displays the service details with the option to view consumption details, Property Details with the option to View Property details, and Connection Holder’s Details. Scroll down the page to view these details.
The Approver verifies the application and if the documents and information provided in the application are found satisfactory and complete, the connection request is approved.
To approve connections -
Click on the Take Action button at the bottom of the application page once the review is complete. Click on the Approve Connection button once the application is reviewed and verified.
Provide any additional information for the applicant in the Comments section. Click on the Upload Files button to upload any supporting documents. Click on the Approve Connection button.
The application for a new water or sewerage connection is approved. The applicant is allotted a unique Consumer Number. The application is now routed back to the citizen to make the payment towards connection charges. Once the payment is done the connection is activated.
Water Charges are levied for metered connections based on consumption. The rate for calculation of water charges varies widely and is dependent upon various parameters. In the DIGIT W&S module, water charges defined are based on actual consumption and property usage type.
1
Residential
1
150
3
2
Residential
151
300
4
The data given in the table is sample data for reference.
1
Property usage type
Alphanumeric
64
Yes
2
Water consumed value from
Decimal
(5,3)
Yes
From value for water consumed
3
Water consumed value to
Decimal
(5,3)
Yes
To value for water consumed
4
Rate
Decimal
(3,3)
Yes
Consumption charges per unit corresponding to the usage type
Download the data template attached to this page.
Refer to the ‘Data Definition’ section of this document to learn more about the template sheet, data type, size, and definitions.
Please reach out to the person who has shared this template with you to discuss and clear your doubts.
Select the property type from the drop-down list available in the Property Usage Type column.
Enter the Slab (water consumed) range details in the From and To Value for water consumed.
Enter the Rate for the specified slab range and property type.
Verify the data once again by going through the checklist and making sure that each and every point mentioned in the checklist is covered.
The checklist is a set of activities to be performed once the data is filled into a template to ensure data type, size, and format of data is as per the expectation. These activities have been divided into 2 groups as given below.
This checklist covers all the activities which are common across the entities.
1
Make sure that each and every point in this reference list has been taken care of
A separate Entity Specific Checklist is not required for this module data.
Water pipes are available in different sizes. Pipe size is a common parameter used for calculating water charges. The allotted pipe size for new water connections depends on specific service requirements.
1
0.25
Inches
2
0.50
Inches
The data given in the table is sample data for reference.
1
Pipe size
Decimal
(2,2)
Mandatory
Value for Pipe size
2
UOM
Text
256
Mandatory
Unit of measurement for the pipe size value
Download the data template attached to this page.
Refer to the ‘Data Definition’ section of this document to understand the headers in the template sheet, their data type, size, and definitions.
Reach out to the person who shared the template for further details or to clear your doubts. Identify if the State/ULB has a provision for capturing pipe size for connections.
Enter the Pipe Size details.
Enter the corresponding UOM for the specified Pipe Size.
Go through the checklist to verify the data. Make sure that each and every point mentioned in the checklist is covered.
The checklist is a set of activities to be performed once the data is filled into a template to ensure data type, size, and format of data is as per specifications. These activities have been divided into 2 groups as given below.
This checklist covers all the activities which are common across the entities.
1
Make sure that each and every point in this reference list has been taken care of
2
UOM should same for all the values provided pipe size in the template
E.g. If it is given as Inches then it should be inches for all.
A separate entity-specific checklist is not needed for this module data.
This page provides configuration details for W&S master data templates
The Water Charges module offers a consolidated platform for managing new and existing water connections. The module eliminates the need for manual processing and streamlines the key water management functions for operational efficiency. DIGIT Water & Sewerage (W&S) module enables automated processing of new connection requests, generating water bills, and facilitating online payment of bills.
DIGIT Water Charges module enables citizens to -
Apply for new water connections.
Upload documents required for processing new connections.
Pay water connection charges and water bills using an online payment gateway.
Receive SMS alerts on application status, bills generated, payment due date, and payment receipt confirmation.
Download water connection approval letter, payment receipts, and bills online.
DIGIT Water module enables employees at ULB and State level to -
Process applications using customizable workflows.
Configure water charges, interest, and penalty calculation logic.
View custom dashboards for module statistics.
Filter search results using advanced configurable search parameters.
None
None
The penalty is levied on the consumer in case the consumer fails to make the payment for the bill raised before the specified due date. The consumer has to make the full payment before the due date to avoid penalty charges. The number of days after which the penalty is applicable is configurable at the ULB level. The penalty calculation logic may differ from one state or ULB to another.
The penalty can be -
Fixed amount
Percentage: When it is a percentage, it can be levied on
Entire bill amount
Balance pending when partial payments have been made
The data given in the table is sample data for reference.
Download the data template attached to this page.
Refer to the ‘Data Definition’ section of this document to learn more about the template sheet, data type, size, and definitions.
Please reach out to the person who has shared this template with you to discuss and clear your doubts.
Enter an appropriate value for Penalty Based On.
Enter a value for the Grace Period.
Enter the Penalty Flat Amount.
Enter the Penalty value in percent.
Verify the data once again by going through the checklist and making sure that each and every point mentioned in the checklist is covered.
The checklist contains a set of activities to be performed once the data is filled into a template to ensure data entry requirements are met. These activities have been divided into 2 groups as given below.
This checklist covers all the activities which are common across the entities.
Separate Entity Specific Checklist is not required for this module data.
Refer
All content on this page by eGov Foundation is licensed under a Creative Commons Attribution 4.0 International License.
All content on this page by eGov Foundation is licensed under a Creative Commons Attribution 4.0 International License.
All content on this page by is licensed under a .
All content on this page by is licensed under a .
1
Balance Pending
15
40
10
1
Grace period
Integer
2
Yes
After the bill is generated, certain days are provided to the citizen for making the payment
2
Penalty flat amount
Decimal
(3,2)
Yes
If the penalty is not levied on a percentage basis, it is generally a flat fee which is penalty charges amount
3
Penalty based on
Text
64
Yes
The penalty can be a certain percentage of the bill amount or balance pending if partial payments are made against the bill
4
Penalty (%)
Decimal
(3,2)
Yes
The penalty is calculated as a percentage amount based on either Bill amount or Balance pending
1
Make sure that each and every point in this reference list has been taken care of
We are using re-indexing to get all the data to the respective indexer. We have 2 steps for this. The first is to run the connector from the playground. This is followed by a legacy indexer service call from the indexer service, which internally calls the respective plain search service to get the data and send it to the respective indexer.
Access to kubectl of the environment targetted
Postman scripts
Plain search APIs in the respective services
We have two services for water and sewerage
water-services
sewerage-services
Connect to playground pod.
Delete the Kafka connector if already exists with the Kafka connection, using the below command through playground pod.
Run below Kafka connector curl from playground pod:
port forward to egov-indexer pod and run below curl throw postman.
Delete the Kafka connection after all the data has been re-indexed by following the below command through the playground pod.
Alias water-services-enriched as water-services through the Kibana server.
There are two reasons for recording the water source. One is to measure availability vs consumption. And, the other is to monitor the water quality. Each ULB captures this information. Hence, the water source details are configurable at the ULB level. ULBs can configure water source data at two levels - water source and water sub source.
1
Ground
Well
2
Ground
Hand-pump
The data given in the table is sample data for reference.
1
Water source
Text
64
Yes
Water source major category
2
Water sub source
Text
64
Yes
Water source minor category
Download the data template attached to this page.
Refer to the ‘Data Definition’ section of this document for more details on data type, size, and definitions.
Contact the person who shared this template with you to discuss and clear your doubts.
Enter the relevant Water Source.
Enter the corresponding Water Sub Source. This will map the water sub source to the specified water source.
Verify the data once again by going through the checklist and making sure that each and every point mentioned in the checklist is covered.
The checklist is a set of activities to be performed once the data is filled into a template to ensure data entry requirements are met. These activities have been divided into 2 groups as given below.
This checklist covers all the activities which are common across the entities.
1
Make sure that each and every point in this reference list has been taken care of
A separate Entity Specific Checklist is not required for this module data.
Water Charges are recurring charges levied for a pre-defined billing period. The billing period is configurable as per the state or ULB requirement. The rate for calculation of water charges vary widely and is dependent upon various parameters. Charges for water are dependent upon either plot size slab or No. of taps combined with property usage type. In some cases, they can also be solely dependent upon the property usage type.
1
Residential
1
150
1
200
2
Residential
151
200
1
300
The data given in the table is sample data for reference.
1
Property usage type
Alphanumeric
64
Yes
2
Slab (Property size value)
Decimal
(10,2)
Yes
From and to value for property size
3
No. of Taps
Integer
2
Yes
No. of Taps to be recorded for calculation of water charges
4
Rate
Decimal
(3,2)
Yes
Consumption charges per unit corresponding to the usage type
Download the data template attached to this page.
Refer to the ‘Data Definition’ section of this document to learn more about the template sheet, data type, size, and definitions.
Please reach out to the person who has shared this template with you to discuss and clear your doubts.
Select the property type from the drop-down list available in the Property Usage Type column.
Enter the Slab (property size value) range details in the From and To Value for property size.
Enter the value for No. of Taps. The water charges will be calculated on the number of taps.
Enter the Rate or the per-unit water consumption charges that will be applicable for the listed parameters.
Verify the data once again by going through the checklist and making sure that each and every point mentioned in the checklist is covered.
The checklist contains a set of activities to be performed once the data is filled into a template to ensure data entry requirements are met. These activities have been divided into 2 groups as given below.
This checklist covers all the activities which are common across the entities.
1
Make sure that each and every point in this reference list has been taken care of
Separate Entity Specific Checklist is not required for this module data.
Interest is levied from the consumer in case the consumer fails to make the payment of the bill before the specified due date. The consumer has to make the full payment before the due date to avoid interest charges. The number of days after which the interest is applicable is configurable at the ULB level. Interest Rates are calculated essentially on a daily percentage basis.
The interest rate on a daily basis can be levied on -
Entire bill amount
Balance pending when partial payments have been made
1
Bill Amount
15
5
The data given in the table is sample data for reference.
1
Grace period
Integer
2
Yes
After the bill is generated, certain days are provided to the citizen for making the payment
2
Interest-based on
Text
64
Yes
Interest can be levied on either bill amount or balance pending if partial payments are made against the bill.
3
Interest rate
Decimal
(3,2)
Yes
Time-based Interest percentage
Download the data template attached to this page.
Refer to the ‘Data Definition’ section of this document to learn more about the template sheet, data type, size, and definitions.
Please reach out to the person who has shared this template with you to discuss and clear your doubts.
Enter the Grace Period.
Select the relevant Interest-based On parameter.
Enter the Interest Rate.
Verify the data once again by going through the checklist and making sure that each and every point mentioned in the checklist is covered.
The checklist contains a set of activities to be performed once the data is filled into a template to ensure data entry requirements are met. These activities have been divided into 2 groups as given below.
This checklist covers all the activities which are common across the entities.
1
Make sure that each and every point in this reference list has been taken care of
Separate Entity Specific Checklist is not required for this module data.
Interest is levied on the consumer if the consumer fails to make the bill payment before a specified due date. The consumer has to make the full payment before the due date to avoid interest charges. The number of days after which the interest is applicable is configurable at the ULB level. The interest amount is charged to the consumer on a daily basis once the specified grace period is over and till the bill payment is done.
Interest rate: The interest rate on a daily basis can be levied on -
Entire bill amount
Balance pending when partial payments have been made
1
Balance Pending
15
5
Data given in the table is sample data for reference.
1
Grace period
Integer
2
Yes
After the bill is generated, certain days are provided to the citizen for making the payment
2
Interest-based on
Text
64
Yes
Interest can be levied on either bill amount or balance pending if partial payments are made against the bill
3
Interest rate
Decimal
(3,2)
Yes
Time-based Interest percentage
Download the data template attached to this page.
Refer to the ‘Data Definition’ section of this document to learn more about the template sheet, data type, size, and definitions.
Please reach out to the person who has shared this template with you to discuss and clear your doubts.
Enter the applicable Grace Period for calculating interest.
Select the relevant parameter for Interest-Based On to specify if the interest is applied to the bill amount or pending balance.
Enter the applicable percentage value for Interest Rate that will be used to calculate the interest amount.
Verify the data once again by going through the checklist and making sure that each and every point mentioned in the checklist is covered.
The checklist contains a set of activities to be performed once the data is filled into a template to ensure data entry requirements are met. These activities have been divided into 2 groups as given below.
This checklist covers all the activities which are common across the entities.
1
Make sure that each and every point in this reference list has been taken care of
Separate Entity Specific Checklist is not required for this module data.
The Sewerage Charges module offers a consolidated platform for managing new and existing sewerage connections. The module eliminates the need for manual processing and streamlines the key sewerage management functions for operational efficiency. DIGIT Water & Sewerage (W&S) module enables automated processing of new connection requests, generating water bills, and facilitating online payment of bills.
DIGIT Sewerage Charges module enables citizens to -
Apply for new sewerage connections.
Upload documents required for processing new connections.
Pay sewerage connection charges and bills using online payment gateway.
Receive SMS alerts on application status, bills generated, payment due date, and payment receipt confirmation.
Download sewerage connection approval letter, payment receipts, and bills online.
DIGIT Sewerage module enables employees at ULB and State level to -
Process applications using customizable workflows.
Configure sewerage charges, interest, and penalty calculation logic.
View custom dashboards for module statistics.
Filter search results using advanced configurable search parameters.
None
None
Water Calculator Service is used for creating meter reading, searching meter reading, updating existing meter reading, calculation of water charge, demand generation, SMS & email notification to ULB officials on-demand generation and estimation of water charge(one-time cost) which involves cost like road-cutting charge, form fee, scrutiny fee, etc.
Before you proceed with the documentation, make sure the following pre-requisites are met -
Java 8
Kafka server is up and running
egov-persister service is running and has water service persister configs path added in it
PSQL server is running and a database is created to store water connection / application data
Following services should be up and running:
egov-perister
egov-mdms
ws-services
billing-service
Calculate water charge and taxes based on billing slab.
Calculate meter reading charge for water connection
Generate demand
Scheduler for generating the demand(for non metered connection)
Deploy the latest version of ws-service and ws-calculator
Add water-persist.yml & water-meter.yml file in config folder in git and add that path in persister . (The file path is to be added in environment yaml file in param called persist-yml-path )
Criteria :
connection type
building type
calculation attribute
property usage type
If all criteria will match for that water connection this slab will use for calculation.
For application one-time fee, the estimation will return all the related tax head based on criteria. For estimation, all configuration is present in ws-services-calculation.
All the above master configuration is used for estimation.
Following are the exemptions and taxes that are calculated:
Form fee
Scrutiny fee
Meter charge (For metered connection)
Other charges
Road cutting charges
One time fee
Security charges
Tax and cess
Water charge is based on billing slab, for water application charge will be based on slab and tax based on master configuration.
Interest
Below is a sample of master data JSON for interest :
Penalty
Below is a sample of master data JSON for penalty :
Round Off
If the fraction is greater than equal to 0.5 the number is round up else it’s round down. eg: 100.4 will be rounded to 100 while 100.6 will be rounded to 101.
Actions
Role Action Mapping
Once water is sent to the calculator, its tax estimates are calculated. Using these tax head estimates demand details are created. For every tax head, the estimated demand generates function will create a corresponding demand detail.
Whenever _calculate API is called demand is first searched based on the connection no or application no and the demand from and to period. If demand already exists the same demand is updated else new demand is generated with consumer code as connection no or application no and demand from and to a period equal to financial year start and end period.
In the case of an update, if the tax head estimates change, the difference in amount for that tax head is added as new demand detail. For example, if the initial demand has one demand detail with WATER_CHARGE equal to 120
After updating if the WATER_CHARGE increases to 150 we add one more demand detail to account for the increased amount. The demand detail will be updated to:
RoundOff is bill based i.e every time bill is generated round off is adjusted so that the payable amount is the whole number. Individual WS_ROUNDOFF in demand detail can be greater than 0.5 but the sum of all WS_ROUNDOFF will always be less than 0.5.
Description :
For generating the demand for non metered connection we have a feature for generating the demand in batch. The scheduler is responsible for generating the demand based on the tenant.
The scheduler can be hit by scheduler API or we can schedule cron job or we can put config to kubectl which will hit scheduler based on config.
After the scheduler been hit we will search the list of the tenant (city) present in the database.
After getting the tenants we will pick up tenant one by one and generate the demand for that tenant.
We will load the consumer codes for the tenant and push the calculation criteria to Kafka. Calculation criteria contain minimal information (We are not pushing large data to Kafka), calculation criteria contain consumer code and one boolean variable.
After pushing the data into Kafka we are consuming the records based on the batch configuration. Ex:-> if the batch configuration is 50 so we will consume the 50 calculation criteria at a time.
After consuming the record(Calculation criteria) we will process the batch for generating the demand. If the batch is successful so will log the consumer codes which have been processed.
If some records failed in batch so we will push the batch into dead letter batch topic. From the dead letter batch topic, we will process the batch one by one.
If the record is successful we will log the consumer code, If the record is failed so we will push the data into a dead letter single topic.
Dead letter single topic contains information about failure records in Kafka.
Use cases:
If the same job trigger multiple time what will happen?
If the same job triggers multiple times we will process again as mentioned above but at the demand level we will check the demand based on consumer code and billing period, If demand already exists then we will update the demand otherwise we will create the demand.
Are we maintaining success or failure status anywhere?
Currently, we are maintaining the status of failed records in Kafka.
Configuration :
We need to configure the batch size for Kafka consumer. This configuration is for how much data will be processed at a time.1ws.demand.based.batch.size=10
ws-calculator will be integrated with ws-service. ws-services internally invoke the ws-calculator service to calculate and generate demand for the charges.
WS calculator application is used to calculate the water application one time Fees and meter reading charges based on the different billing slabs that's why the calculation and demand generation logic will be separated out from the WS service. So in future, if calculation logic needs to modify then changes can be carried out for each implementation without modifying the WS service.
Once the water connection is activated for metered-connection, employee can add meter reading details using this API - /ws-calculator/meterConnection/_createwhich in-turn will generate the demand. For the Non-Metered connections, the scheduler APIs need to be called periodically to generate the demand.
For the Metered Connection service, to get the previous meter reading /meterConnection/_search API is used.
To Activate the Water Service application, the user needs to pay the ONE_TIME_FEE for the connection. To calculate the ONE_TIME_FEE /waterCalculator/_estimate API is used.
To generate the demand for metered or non-metered water connection /waterCalculator/_calculate API is used.
User can pay partial / full / advance amount for the Metered or Non-Metered connection bill. In these cases, Billing service would call back /waterCalculator/_updateDemandAPI to update the details of the demand generated.
/waterCalculator/_jobscheduler API is use to generate demand for Non-metered connections. This API can be called periodically.
/waterCalculator/_applyAdhocTax API is used to add Rebate or Penalty on any bill and based on that the bill amount will be adjusted.
(Note: All the API’s are in the same postman collection therefore same link is added in each row)
__
__
The penalty is levied on the consumer if the consumer fails to make the payment for the bill raised before a specified due date. The consumer has to make the full payment before the due date to avoid penalty charges. The number of days after which the penalty is applicable should be configurable at the ULB level.
The penalty can be -
Fixed amount; or
Percentage: In case of percentage, it can be levied on either
Entire bill amount; or
Balance pending when partial payments have been made
The data given in the table is sample data for reference.
Download the data template attached to this page.
Refer to the ‘Data Definition’ section of this document to learn more about the template sheet, data type, size, and definitions.
Please reach out to the person who has shared this template with you to discuss and clear your doubts.
Enter the applicable value for the Grace Period.
Enter the corresponding Penalty Flat Amount.
Select the relevant parameter for Penalty Based On to specify if the calculation of the penalty is based on the bill amount or the pending balance.
Enter the applicable percentage value for calculating the Penalty amount.
Verify the data once again by going through the checklist and making sure that each and every point mentioned in the checklist is covered.
The checklist contains a set of activities to be performed once the data is filled into a template to ensure data entry requirements are met. These activities have been divided into 2 groups as given below.
This checklist covers all the activities which are common across the entities.
Separate Entity Specific Checklist is not required for this module data.
Water Calculator Service is used for creating meter readings, searching meter readings, updating existing meter readings, calculation of water charges, demand generation, SMS & email notification to ULB officials on-demand generation and estimation of water charge on basis of meter reading for existing water application until the application is disconnected.
There are no additional billing slabs to be configured for water disconnection, the calculation happens with the meter reading if added and uses existing billing slabs.
Criteria -
connection type
building type
calculation attribute
property usage type
The combination of the above can be used to define the billing slab. Billing Slab is defined in MDMS under ws-services-calculation folder with the . The following is the sample slab.
For the disconnection application fee, the estimation will return all the related tax heads based on the criteria.
Following are the exemptions and taxes that are calculated:
Form fee
Scrutiny fee
Meter charge (For metered connection)
Other charges
Security charges
Tax and cess
The water charge is based on the billing slab, and for water disconnection application charge will be based on the slab and tax based on the master configuration.
Interest
Below is a sample of the master data JSON for interest:
Penalty
Below is a sample of the master data JSON for penalty -
Round Off
If the fraction is greater than equal to 0.5 the number is rounded up else it’s rounded down. eg: 100.4 will be rounded to 100 while 100.6 will be rounded to 101.
Whenever _calculate API is called demand is first searched based on the connection no and the demand from and to period. If demand already exists the same demand is updated else new demand is generated with consumer code as connection no and demand from and to a period equal to the financial year start and end period.
In case of the update, if the tax head estimates change, the difference in amount for that tax head is added as new demand detail. For example, if the initial demand has one demand detail with WATER_CHARGE equal to 120.
After updating if the WATER_CHARGE increases to 150 we add one more demand detail to account for the increased amount. The demand detail will be updated to:
The disconnection charges will be the addition of both demand details taxAmount and we can generate demand until the workflow is in PENDING_FOR_DISCONNECTION_EXECUTION.
Note : if there no pending payment when the connection gets approved then the workflow gets updated from PENDING_APPROVAL_FOR_DISCONNECTION to PENDING_FOR_DISCONNECTION_EXECUTION (it skips payment step in the workflow internally).
Here the disconnection charges will be 120+30 = 150
RoundOff is bill based i.e every time bill is generated round off is adjusted so that the payable amount is the whole number. Individual WS_ROUNDOFF in demand detail can be greater than 0.5 but the sum of all WS_ROUNDOFF will always be less than 0.5.
Final water charges calculation
Final Water Charges = Last Billing Period Amount * Days (Proposed disconnection date - Last Billing Date) / No. of days in last billing period
The additional parameter is being sent in the calculation request for the disconnection application.
disconnectRequest = true if the request is for _calculate API disconnection application.
(Note: All the APIs are in the same postman collection therefore the same link is added in each row)
Water and Sewerage disconnection application for citizen users - technical implementation doc
Objective: To provide user facilities to disconnect an active W&S connection when they are not using the service. So, that they don’t have to pay for any charges
To disconnect, connection should be in ACTIVE state. Connections which are under WORKFLOW or INACTIVE are not eligible for disconnection.
In cases dues are pending, user has to clear the dues before applying for Disconnection.
‘Disconnect’ option itself is not displayed in the action list for the connection which are INACTIVE.
Route
My Connections → View Connection Details → Disconnect
Clicking on Disconnect it navigates to the Water and Sewerage Disconnection Application Document required screen.
File Path:
File Path:
Date Validation
On Clicking on Next button in the document required screen,
if the proposed date is after <slaDays for disconnection> it will route to Application form Water & Sewerage Disconnection, else it will throw an error in the form of toast messgae, “Date should be after <slaDays for disconnection> from application create Date“.
To get the SLA days /egov-workflow-v2/egov-wf/businessservice/_search?businessServices=DisconnectWSConnection API call is made on load of Application Form Page
Technical Implementation Details:
Initial MDMS call is being made on page load
Mdms data :
On Clicking on Next button in the Application Form Screen , it will route to Upload Documents Screen
On Clicking on Next button in the Upload Documents Screen , it will route to Summary Check Page Screen
In Check Page you can edit the entered data for Disconnection.
On Clicking on Submit button in the Check Page Screen , it will make water or sewerage create and update API calls.
Data fetch , load and render :
ws-services/wc/_create
Payload: WaterConnection: {
...data,
isdisconnection : true,
isDisconnectionTemporary: true (if Temporary Disconnection selected else false),
disconnectionReason: ““
},
disconnectRequest: true
sw-services/swc/_create
Payload: WaterConnection: {
...data,
isdisconnection : true,
isDisconnectionTemporary: true (if Temporary Disconnection selected else false),
disconnectionReason: ““
},
disconnectRequest: true
ws-services/wc/_update
Payload: WaterConnection: {
...data,
isdisconnection : true,
isDisconnectionTemporary: true (if Temporary Disconnection selected else false),
disconnectionReason: ““
},
disconnectRequest: true
sw-services/swc/_update
Payload: WaterConnection: {
...data,
applicationType: if(Water Application) "DISCONNECT_WATER_CONNECTION" else (if Sewerage Application) "DISCONNECT_SEWERAGE_CONNECTION",
processInstance: {
...data?.processInstance,
businessService: if(Water Application) "DisconnectWSConnection" else (if Sewerage Application) "DisconnectSWConnection",
action: "SUBMIT_APPLICATION", }
},
After the Success of the Create and Update calls it routes users to the Disconnection Acknowledgement screen.
Clicking on the Download Acknowledgement Form button downloads the Water or Sewerage Disconnection Acknowledgement PDF.
Water & Sewerage my connection feature for citizen users - technical implementation doc
Objective: Provide the UI technical implementation details for the My Connections feature available for citizen users.
Users can review the list of connections and their status registered under their mobile number in the My Connections tab. Each connection in the initial view will display the Consumer No, Service Name, Consumer Name, status, and property Address with the View Details option, through which the User can look up more details about the connection.
Once the user clicks on the View Details button, the Connection Details page is displayed with all the necessary information about the connection.
The link provided in the connection details page is similar to the link provided in the applications details page, eg Consumption details, for more reference
The path for the My Connections and Connection Details common Index is given below. It provides an understanding of the working of the code.
File path - packages/modules/ws/src/pages/citizen/MyConnection/index.js
The template for My Connection is present within packages/modules/ws/src/pages/citizen/MyConnection/WSConnection.js. The Connection Details page is available within packages/modules/ws/src/pages/citizen/MyConnection/ConnectionDetails.js. The Connection list is retrieved by calling the search API "/ws-services/wc/_search" & "/sw-services/swc/_search" using the searchType as CONNECTION for the filter params.
Hooks used for fetching the connections for Water and Sewerage are:
The code to the linked page, Consumption Details is available in the file: packages/modules/ws/src/pages/citizen/MyConnection/ConsumptionDetails.js
No MDMS data is used here. All data is loaded from the Search API.
For My Applications, the localization keys are added in the ‘rainmaker-ws’ locale module same as My connections and create. Changes, updates or addition of any new localization key is done in the same locale module only.
After connection activation or legacy connection, the user can choose to disconnect the connection either temporarily or permanently. This process is based on a defined workflow. Any action is based on defined roles on the action level.
For disconnecting the connection, the user needs to send extra parameters as below :
disconnectionReason - to add the reason for disconnection
isDisconnectionTemporary - Whether the disconnection is temporary or permanent (if the disconnection is temporary then isDisconnectionTemporary will be true else false)
disconnectRequest - This will always be true for disconnection applications.
disconnectionExecutionDate - This is the date when the application is disconnected.
and also user needs to upload some supporting documents and mandatory info.
URLs for the external API references
eGov mdms: egov.mdms.host = /
eGov -idGen: egov.idgen.host = /
localization service: egov.localization.host = /
idGen Id formats : egov.idgen.wdcid.name=waterservice.disconnection.id egov.idgen.wdcid.format=WS_AP/[CITY.CODE]/[fy:yyyy-yy]/DC-[SEQ_WS_APP_[TENANT_ID]]
This new feature is developed using the same existing base APIs for new and modified connections. The changes for disconnection follow a similar approach as that of New Connection. The config and persister changes required are mentioned below.
Persister configuration
Some changes are required in the existing persister files which can be referred to from the following links:
Workflow config for edit connection
Create businessService (workflow configuration) using the /businessservice/_create. Following is the product configuration for editing the water connection.
Disconnection notifications will be sent to the property owners and connection holders based on different application states.
We can add connection holders to the water connection which will be the owner of the connection. We can fill in the connection holders' details or we can just make the property owner as the connection holder. It goes the same for disconnection applications.
The connection holder will get a notification based on a different state of the application. We are pushing the data of the connection holders in the user service too.
To integrate, the host of ws-service module should be overwritten in the helm chart.
/ws-services/wc/_create should be added as the create endpoint for creating water application/connection in the system
/ws-services/wc/_search should be added as the search endpoint. This method handles all requests to search existing records depending on different search criteria
/ws-services/wc/_update should be added as the update endpoint. This method is used to update fields in existing records or to update the status of applications based on workflow.
(Note: All the APIs are in the same postman collection therefore the same link is added in each row)
Sewerage Charges are recurring charges levied for a pre-defined billing period. The billing period is configurable as per the state or ULB requirement. The rate for calculation of sewerage charges can vary widely and is dependent upon various parameters. For instance, they can be dependent either upon plot size slab combined with property usage type or solely dependent upon property usage type. In some cases, sewerage charges can also be levied as a percentage of water charges.
The data given in the table is sample data for reference.
Download the data template attached to this page.
Refer to the ‘Data Definition’ section of this document to learn more about the template sheet, data type, size, and definitions.
Please reach out to the person who has shared this template with you to discuss and clear your doubts.
Select the relevant Property Usage Type from the available drop-down list.
Enter the From and To value for property size to specify the range applicable for the selected property.
Enter the Flat Fee applicable for the selected property and Slab.
Enter the applicable Percentage of Water Charges value. The sewerage charges will be calculated as a percentage of the water charges.
Enter the corresponding consumption Rate per unit.
Verify the data once again by going through the checklist and making sure that each and every point mentioned in the checklist is covered.
The checklist contains a set of activities to be performed once the data is filled into a template to ensure data entry requirements are met. These activities have been divided into 2 groups as given below.
This checklist covers all the activities which are common across the entities.
Separate Entity Specific Checklist is not required for this module data.
All content on this page by eGov Foundation is licensed under a Creative Commons Attribution 4.0 International License.
Specifies the
All content on this page by eGov Foundation is licensed under a Creative Commons Attribution 4.0 International License.
All content on this page by eGov Foundation is licensed under a Creative Commons Attribution 4.0 International License.
All content on this page by eGov Foundation is licensed under a Creative Commons Attribution 4.0 International License.
All content on this page by is licensed under a .
The combination of the above can be used to define the billing slab. Billing Slab is defined in MDMS under ws-services-calculation folder with the . The following is the sample slab.
All content on this page by is licensed under a .
All content on this page by is licensed under a .
Documents:
Disconnection Type:
File Path:
File Path:
File Path:
All content on this page by is licensed under a .
1
Balance Pending
15
40
10
1
Grace period
Integer
2
Yes
After the bill is generated, certain days are provided to the citizen for making the payment
2
Penalty flat amount
Decimal
(3,2)
Yes
If the penalty is not levied on a percentage basis, it is generally a flat fee which is penalty charges amount
3
Penalty based on
Text
64
Yes
The penalty can be a certain percentage of the bill amount or balance pending if partial payments are made against the bill
4
Penalty (%)
Decimal
(3,2)
Yes
The penalty is calculated as a percentage amount based on either Bill amount or Balance pending
1
Make sure that each and every point in this reference list has been taken care of
Title
Link
/ws-calculator/meterConnection/_create
/ws-calculator/meterConnection/_search
/waterCalculator/_estimate
/waterCalculator/_calculate
/waterCalculator/_updateDemand
/waterCalculator/_jobscheduler
/waterCalculator/_applyAdhocTax
Link
/ws-calculator/meterConnection/_create
/ws-calculator/meterConnection/_search
/waterCalculator/_calculate
/waterCalculator/_updateDemand
egov-workflow-v2/egov-wf/process/_search
PTCEMP,FI,APPROVER,DV
1730
/ws-services/wc/_search
PTCEMP,FI,APPROVER,DV
/sw-services/swc/_search
PTCEMP,FI,APPROVER,DV
/egov-workflow-v2/egov-wf/businessservice/_search
PTCEMP,FI,APPROVER,DV
1743
/filestore/v1/files/url
PTCEMP,FI,APPROVER,DV
1528
Link
/ws-services/wc/_create
/ws-services/wc/_update
/ws-services/wc/_search
1
Residential
1
150
30
200
5
2
Residential
151
300
40
500
10
1
Property usage type
Text
64
Yes
Refer to property usage type
2
Slab (Property size value)
Decimal
(10,2)
Yes
From and to value for property size
3
Flat fee
Decimal
(3,2)
Yes
Flat sewerage charges collected based on property usage type
4
Percentage of water charges
Decimal
(3,2)
Yes
Percent value
5
Rate
Decimal
(3,2)
Yes
Consumption charges per unit corresponding to the usage type
1
Make sure that each and every point in this reference list has been taken care of
Title
Link
API Swagger Contract
Water Service Document
Water service is the eGov application, which helps and gives flexibility to municipalities and citizens to handle the water service like applying for the water connection and searching for water connections. The application goes through different stages that the states identify for given roles. If that role takes the action then the application goes to the next state. Based on the state, a citizen gets a notification (SMS and in-app ). Citizens also can pay for application fees or employees can collect the fee for the application.
Before you proceed with the documentation, make sure the following pre-requisites are met -
Java 8
The Kafka server is up and running
egov-persister service is running and has a water service persister config path added to it
PSQL server is running and a database is created to store water connection/application data
knowledge of eGov-mdms service, eGov-persister, eGov-idgen, eGov-sms, eGov-email,eGov-user, eGov-localization, eGov-workflow-service will be helpful.
Apply for a water connection.
Searching for water connections.
Apply for property creation.
Can take different actions based on state (Workflow)
Notification based on the application state.
egov.waterservice.createwaterconnection
This variable contains the kafka topic name which is used to create new water connection application in the system.
egov.waterservice.updatewaterconnection
This variable contains the kafka topic name which is used to update the existing water connection application in the system.
egov.waterservice.updatewaterconnection.workflow.topic
This variable contains the kafka topic name which is used to update the process instance of the water connection application.
egov.idgen.wcapid.name
This variable contain the idgen format name for water application
egov.idgen.wcapid.format
This variable contain the idgen format for water application ex:- WS/[CITY.CODE]/[fy:yyyy-yy]/[SEQ_EGOV_COMMON]
egov.idgen.wcid.name
This variable contain the idgen format name for water connection
egov.idgen.wcid.format
This variable contain the idgen format for water connection ex:- WS_AP/[CITY.CODE]/[fy:yyyy-yy]/[SEQ_EGOV_COMMON]
To Do
Table UML diagram
master-config.json for water service
Property creation through WNS module https://github.com/egovernments/egov-mdms-data/blob/DEV/data/pb/PropertyTax/PTWorkflow.json
https://github.com/egovernments/configs/blob/DEV/egov-persister/water-persist.yml https://github.com/egovernments/configs/blob/master/egov-persister/water-meter.yml
Actions
Role Action Mapping
Create businessService (workflow configuration) using the __/businessservice/_create. Following is the product configuration for the water service.
Workflow for property creation through Water and Sewerage module
The indexer provides the facility for indexing the data to elastic search. https://github.com/egovernments/configs/blob/DEV/egov-indexer/water-service.ymlhttps://github.com/egovernments/configs/blob/DEV/egov-indexer/water-services-meter.yml
Setup
Write the configuration for the water service. https://github.com/egovernments/configs/blob/DEV/egov-indexer/water-service.ymlhttps://github.com/egovernments/configs/blob/DEV/egov-indexer/water-services-meter.yml
Provide the absolute path of the checked-in file to DevOps, to add it to the file-read path of egov-indexer. The file will be added to the egov-indexer's environment manifest file for it to be read at the start-up of the application.
Run the egov-indexer app, Since it is a consumer, it starts listening to the configured topics and indexes the data.
Modify connection
After connection activation or legacy connection, we can edit the connection. This process is based on a defined workflow. Any action is based on defined roles on the action level. For the edit connection, we need to upload some supporting documents and mandatory info.
Workflow config for edit connection
Create businessService (workflow configuration) using the __/businessservice/_create. Following is the product configuration for editing the water connection.
Notification
Notification will be sent to the property owners and connection holders based on different application states.
Capturing connection holders
We can add connection holders to the water connection who will be the owner of the connection. We can fill in the connection holders' details or we can just make the property owner to the connector holder.
The connection holder will get a notification based on a different state of the application. We are pushing the data of the connection holders in the user service too.
Multiple Road Type Support We can add road-cutting details of multiple roads to the water connection. For each road that goes undercutting process, we have to fill in their road type details and road cutting area. Based on this information, the application one-time fee estimate is calculated.
Add MDMS configs required for water connection registration and restart MDMS service.
Deploy the latest version of ws-services service.
Add water-service and water-services-meter persister yaml path in persister configuration and restart persister service.
Add role-action mapping for APIs.
Create businessService (workflow configuration) accordingly for trade water connection, modify water connection
Add ws-service indexer yaml path in indexer service configuration and restart indexer service.
This ws-service module is used to manage water service connections against a property in the system.
Provide backend support for the different water connection registration processes.
Mseva and SMS notifications on application status changes.
Elastic search index for creating visualizations and Dashboards.
Supports workflow which is configurable
To integrate, a host of ws-service modules should be overwritten in the helm chart.
/ws-services/wc/_create should be added as the create endpoint for creating water application/connection in the system
/ws-services/wc/_search should be added as the search endpoint. This method handles all requests to search existing records depending on different search criteria
/ws-services/wc/_update should be added as the update endpoint. This method is used to update fields in existing records or to update the status of the application based on workflow.
API Swagger Documentation
Water Calculator Service
/ws-services/wc/_create
/ws-services/wc/_update
/ws-services/wc/_search
(Note: All the APIs are in the same postman collection therefore the same link is added in each row)
Migration Document for Bill Amendment W&S
This document contains the steps to create new workflow configs specific to WS and SW modules for Bill Amendment.
Create the new Workflow configs in the same tenant-Id as the one you want to replace in the applications. New configs for WS and SW bill amendment are as follows:
Curl for WS Bill Amendment Config:
Curl for SW Bill Amendment Config:
eg:--
List all the states from the process instances of the old workflow(business service) config. select uuid,state from eg_wf_state_v2 where businessserviceid=(select UUID from eg_wf_businessservice_v2 where businessservice='BS.AMENDMENT' and tenantid='pb');
List the states from the new business service created for replacement using this query SELECT UUID, state FROM eg_wf_state where businessService='WS.AMENDMENT' AND business='WS' AND tenantid='pb'
SELECT UUID, state FROM eg_wf_state where businessService='SW.AMENDMENT' AND business='SW' AND tenantid='pb'
Replace the state-ids of the old workflow in the eg_wf_processinstance table with stateids of the new workflow.
Write an update query (one for each state UUID) to rewrite the process-instance table, as shown above - update eg_wf_processinstance_v2 set status={new state uuid} AND businessservice={WS.AMENDMENT} and modulename={WS} where businessservice={BS.AMENDMENT} and status={old state uuid} and businessid like '%WS%';
update eg_wf_processinstance_v2 set status={new state uuid} AND businessservice={SW.AMENDMENT} and modulename={SW} where businessservice={BS.AMENDMENT} and status={old state uuid} and businessid like '%SW%';
Note: businessid like '%SW% or businessid like '%WS% will be used depending on the New businessService that you are using. moduleName in the above query would take WS or SW in sync with the new businessService
The status and businessservice columns should be set to the new values from the newly created business-service master create based on the old status and id of the process-Instance.
Rename or delete the old business service (BS.AMENDMENT) to avoid any of the applications using it wrongly in future. {update eg_wf_businessservice set businessservice='BS.AMENDMENT-deprecated' where businessservice='BS.AMENDMENT'}
UI/BACKEND will have to replace their configs to fetch the workflow configs for WS and SW. Changes required from UI: Bill Amendment Workflow _create and _update APIs - replace businessservice BS.AMENDMENT with WS.AMENDMENT/SW.AMENDMENT and moduleName BS with WS/SW as per the requirement. Bill Amendment Inbox - replace businessservice BS.AMENDMENT with WS.AMENDMENT/SW.AMENDMENT as per the requirement.
This is one of the major application of the egov stack which helps municipal and citizens to handle sewerage services like creating sewerage connection, searching sewerage connection, sewerage connection, also creating property if it doesn't exist and creating and updating workflow were depending on different roles of the logged-in user he/she can perform various actions like editing or perform document verification and many more specified in workflow documentation and SMS & email notification sent to the owner for various actions performed in the workflow.
Before you proceed with the documentation, make sure the following pre-requisites are met -
Java 8
Kafka server is up and running
egov-persister service is running and has sewerage service persister config path added in it
PSQL server is running and a database is created to store sewerage connection / application data
knowledge of eGov-mdms service, eGov-persister, eGov-idgen, eGov-sms, eGov-email,eGov-user, eGov-localization, eGov-workflow-service will be helpful.
The sewerage service provides multiple functionalities starting from serving as a central repository where one can create sewerage connection, update sewerage connection, search for a particular sewerage connection based on different criteria like mobile number, sewerage connection nos etc. and also creating property if it doesn't exist, creating and updating workflow were depending on different roles of the logged-in user he/she can perform various actions like editing or perform document verification and many more specified in workflow documentation and SMS & email notification sent to the owner for various actions performed in the workflow. The different services provided by the sewerage services are
Creating sewerage connection
Updating sewerage connection
Apply for Property creation.
Searching sewerage connection based on a few criteria mentioned in swagger documentation later
Creating property if it doesn't exist
Creating and updating workflow.
To Do
Table UML Diagram
****
MDMS configuration
master-config.json for sewerage service
Actions & Role Action Mapping
Actions
Role Action Mapping
Workflow business service config
Create businessService (workflow configuration) using the __/businessservice/_create. Following is the product configuration for sewerage service
Workflow for property creation through Water and Sewerage Module
Indexer config for sewerage-service
Setup
Provide the absolute path of the checked-in file to DevOps, to add it to the file-read path of egov-indexer. The file will be added to the egov-indexer's environment manifest file for it to be read at the start-up of the application.
Run the egov-indexer app, Since it is a consumer, it starts listening to the configured topics and indexes the data.
Modify connection
After connection activation or legacy connection, we can edit the connection. This process based on a defined workflow. Any action is based on defined roles on the action level. For edit connection, we need to upload some supporting documents and mandatory info.
Workflow config for edit connection
Create businessService (workflow configuration) using the __/businessservice/_create. Following is the product configuration for editing sewerage connection.
1{ 2 "RequestInfo": { 3 "apiId": "Rainmaker", 4 "action": "", 5 "did": 1, 6 "key": "", 7 "msgId": "20170310130900|en_IN", 8 "requesterId": "", 9 "ts": 1513579888683, 10 "ver": ".01", 11 "authToken": "{{Auth_Token}}" 12 }, 13 "BusinessServices": [ 14 { 15 "tenantId": "pb", 16 "businessService": "ModifySWConnection", 17 "business": "sw-services", 18 "businessServiceSla": 259200000, 19 "states": [ 20 { 21 "sla": null, 22 "state": null, 23 "applicationStatus": null, 24 "docUploadRequired": false, 25 "isStartState": true, 26 "isTerminateState": false, 27 "isStateUpdatable": false, 28 "actions": [ 29 { 30 "action": "INITIATE", 31 "nextState": "INITIATED", 32 "roles": [ 33 "SW_CEMP" 34 ] 35 } 36 ] 37 }, 38 { 39 "sla": null, 40 "state": "INITIATED", 41 "applicationStatus": "INITIATED", 42 "docUploadRequired": false, 43 "isStartState": false, 44 "isTerminateState": false, 45 "isStateUpdatable": true, 46 "actions": [ 47 { 48 "action": "SUBMIT_APPLICATION", 49 "nextState": "PENDING_FOR_APPROVAL", 50 "roles": [ 51 "SW_CEMP" 52 ] 53 } 54 ] 55 }, 56 { 57 "sla": 86400000, 58 "state": "PENDING_FOR_APPROVAL", 59 "applicationStatus": "PENDING_FOR_APPROVAL", 60 "docUploadRequired": false, 61 "isStartState": false, 62 "isStateUpdatable": true, 63 "isTerminateState": false, 64 "actions": [ 65 { 66 "action": "APPROVE_CONNECTION", 67 "nextState": "APPROVED", 68 "roles": [ 69 "SW_APPROVER" 70 ] 71 }, 72 { 73 "action": "REJECT", 74 "nextState": "REJECTED", 75 "roles": [ 76 "SW_APPROVER" 77 ] 78 }, 79 { 80 "action": "SEND_BACK", 81 "nextState": "INITIATED", 82 "roles": [ 83 "SW_APPROVER" 84 ] 85 } 86 ] 87 }, 88 { 89 "sla": null, 90 "state": "REJECTED", 91 "applicationStatus": "REJECTED", 92 "isStateUpdatable": false, 93 "docUploadRequired": false, 94 "isStartState": false, 95 "isTerminateState": true 96 }, 97 { 98 "sla": null, 99 "state": "APPROVED", 100 "applicationStatus": "APPROVED", 101 "isStateUpdatable": false, 102 "docUploadRequired": false, 103 "isStartState": false, 104 "isTerminateState": true 105 } 106 ] 107 } 108 ] 109} 110
Notification
Notification will be sent to the property owners and connection holders based on different application states.
Capturing connection holders
We can add connection holders to the sewerage connection which will be the owner of the connection. We can fill in the connection holders' details or we can just make the property owner to the connection holder.
The connection holder will get a notification based on a different state of the application. We are pushing the data of the connection holders in the user service too.
Multiple Road Type Support We can add road cutting details of multiple roads to the sewerage connection. For each road which goes under cutting process we have to fill their road type details and road cutting area. Based on this information, application one time fee estimate is calculated.
This sw-service module is use to manage sewerage service connections against a property in the system.
Provide backend support for the different sewerage connection registration process.
Mseva and SMS notifications on application status changes.
Elastic search index for creating visualisations and Dashboards.
Supports workflow which is configurable
To integrate, the host of sw-service module should be overwritten in helm chart.
/sw-services/swc/_create should be added as the create endpoint for creating sewerage application/connection in the system
/sw-services/swc/_search should be added as the search endpoint .This method handles all requests to search existing records depending on different search criteria
/sw-services/swc/_update should be added as the update endpoint. This method is used to update fields in existing records or to update the status of the application based on workflow.
(Note: All the API’s are in the same postman collection therefore same link is added in each row)
__
__
Water and Sewerage modify create application feature for employees - technical implementation doc
Objective: The Apply and Modify feature in the WS module allows counter employees to create or modify Water and Sewerage applications.
Every application is a part of the workflow.
Once a new application connection is activated, the system generates the consumer code. This code is used to route users to the connection details screen from the search/connection screen. Clicking on the Take Action button displays multiple options based on conditions. Clicking on the Modify Connection option routes users to the modify screen.
To disconnect, the connection should be in an ACTIVE state. Connections which are under WORKFLOW or INACTIVE are not eligible for Modify.
Connection details: Employee: Water and Sewerage Connection Details
Creating an application on the water and sewerage module generates an acknowledgement form that can be downloaded by users. Processing the applications pending field inspection and user payment generates the Estimation Letter and Sanction Letter respectively. Find the configuration details for enabling the download of these documents.
Acknowledgement Download
Users can download the acknowledgement after submitting the W&S Create application.
Data fetch, load and render:
ws-services/wc/_create
sw-services/swc/_create
Case 1: In the case of Water connections:
Clicking on the Submit button calls the ws-services/wc/_create API and creates the application. The update API ws-services/is called after getting a successful response on creating the application.
Case 2: In the case of Sewerage connections:
Clicking on Submit button calls the sw-services/swc/_create API and creates the application. The update API sw-services/swc/_updateis called after getting a successful response on creating the application.
Successful create and update calls routes users to the acknowledgement screen.
For the application PDF, all related code is written to the W&S folder in the below-mentioned file.
/egov-mdms-service/v1/_search
WS_CEMP, SW_CEMP
954
/ws-services/wc/_create
WS_CEMP, SW_CEMP
1899, 1917
/sw-services/swc/_create
WS_CEMP, SW_CEMP
1899, 1917
/ws-services/wc/_update
WS_CEMP, SW_CEMP
1899, 1917
/sw-services/swc/_update
WS_CEMP, SW_CEMP
1899, 1917
/filestore/v1/files/url
EMPLOYEE
Water & Sewerage create applications feature for citizen users - technical implementation doc
Objective: Provide the UI technical implementation details for the Create applications feature available for citizen users.
To provide user facilities to add new W&S connection applications and view the details of the connection and application currently on their number. It also allows the users to update the connection or edit the application.
Water & Sewerage Create
Users can add new connections using the Apply For New Connection button. The workflow adds valid information, as per the question asked. At the end of the flow, a Check page is displayed on which the user can cross-verify the information entered. The application is created upon submission.
Water & Sewerage Create Flow:
WNS information screen is displayed after login, which helps the user to understand the necessary documents needed to complete the new registration for a new connection.
Property Details Flow:
Users can either add the property details by using the property search of commonPT or can choose to create a lightweight property using the commonPT create. Both screens lead users to the property details page, which displays a summary of the property selected or created.
Connection Details Flow:
Here users can either select to go with the owners of the property or can choose to add connection holder details. Users have 3 options to choose from in context to the type of connection required:
Water Connection
Sewerage Connection
Water and Sewerage Connection
Based on the selection, the create API is called.
Document Details:
Users can upload all documents related to the data entered. The list of documents is controlled by the MDMS data and hence can be modified as per requirements.
Check Page & Acknowledgement Screens:
Users can cross-verify the data entered throughout the flow on the Check page. If any changes or updates are required to the data users can do this by clicking on the Edit option available in front of the section header. This routes them to the specific page where data needs to be changed and then the whole flow needs to be repeated again in order to submit the application.
For the final Initiation of the application Update API is being called, which is used to particularly send the data of document details:
If the API response is successful, then the Acknowledgement Screen is displayed. Else, the Failed Acknowledgement Screen is displayed.
The structure followed here is the same as in the previous modules. The path for the WNS Main Index is given below and can be used to understand the starting point of the flow:
/DIGIT-Dev/frontend/micro-ui/web/micro-ui-internals/packages/modules/ws/src/pages/citizen/WSCreate/index.js
The module had been segregated into a specified structure. The screen configuration is inside the PageComponent Folder, and the configuration for routing of the pages is mentioned in the config folder which is common for both citizen users as well as employees.
The Create API is called based on the service selected on the Connection Details page. The following hook call can be found on the respective pages :
/DIGIT-Dev/frontend/micro-ui/web/micro-ui-internals/packages/modules/ws/src/pageComponents/WSSewerageConnectionDetails.js
/DIGIT-Dev/frontend/micro-ui/web/micro-ui-internals/packages/modules/ws/src/pageComponents/WSWaterConnectionDetails.js
After the check page, the Update API is called and this is available on the Acknowledgement page:
/DIGIT-Dev/frontend/micro-ui/web/micro-ui-internals/packages/modules/ws/src/pages/citizen/WSCreate/WSAcknowledgement.js
After completing the flow, the users can download the acknowledgement PDF form of the application created and the config for the PDF generation is available in the link given below:
/DIGIT-Dev/frontend/micro-ui/web/micro-ui-internals/packages/modules/ws/src/utils/getWSAcknowledgementData.js
Throughout the flow, a few of the page data is imported from the MDMS. Following is the list of pages using MDMS data. The pages .js files are available in the page component column.
WSDocsRequired
List of documents required for each category
ws-services-masters
Documents
WSConnectionHolderDetails
Gender List
common-masters,
PropertyTax
GenderType,
OwnerType
WSWaterConnectionDetails
Pipe Size
ws-services-calculation
PipeSize
WSDocumentDetails
List of documents to be uploaded
ws-services-masters
Documents
For calling the MDMS data React Hooks are used so that it could be shared throughout the modules. Below is the little code snippet for the call used for MDMS.
The localization keys are added under the ‘rainmaker-ws’ locale module. In future, if any new labels are implemented in the Water and Sewerage they should also be pushed in the locale DB within the rainmaker-ws locale module.
/egov-mdms-service/v1/_search
CITIZEN
954
/ws-services/wc/_create
CITIZEN
1899, 1917
/sw-services/swc/_create
CITIZEN
1899, 1917
/ws-services/wc/_update
CITIZEN
1899, 1917
/sw-services/swc/_update
CITIZEN
1899, 1917
/filestore/v1/files/url
CITIZEN
Water and Sewerage modify application feature for employees - technical implementation doc
Objective: Provide employees with specific workflow actions.
The same screen is used for both application details and to modify application details. The page provides the details of these workflows based on the conditions.
Clicking on the Application Number in the inbox/search screen/connection search routes users to the application details screen. A search call is made before rendering the screen and details are populated based on the search response.
Modify Application Details Screen
Timeline View:
Water & Sewerage Workflow Table
Role
Action
Next State
Status
Citizen/ Counter Employee/WS_CEMP/ SW_CEMP
INITIATE
INITIATED
INITIATED
WS_APPROVER / SW_APPROVER
VERIFY &FORWARD
PENDINGAPPROVAL
Pending for APproval
WS_APPROVER / SW_APPROVER
APPROVE
Approved
Approved
WS_APPROVER / SW_APPROVER
REJECT
Rejected
Rejected
Hook details for application details search:
It is common for all modules, find the path here: https://github.com/egovernments/DIGIT-Dev/blob/develop/frontend/micro-ui/web/micro-ui-internals/packages/modules/templates/ApplicationDetails/index.js
Method Reference:
const applicationDownloadObject = { order: 3, label: t("WS_APPLICATION"), onClick: handleDownloadPdf, };
Localisation keys are added in the ‘rainmaker-ws’ locale module.
Water & Sewerage Workflow:
Role
Action
Next State
Status
Citizen/ Counter Employee/WS_CEMP/ SW_CEMP
INITIATE
INITIATED
INITIATED
WS_APPROVER / SW_APPROVER
VERIFY &FORWARD
PENDINGAPPROVAL
Pending for APproval
WS_APPROVER / SW_APPROVER
APPROVE
Approved
Approved
WS_APPROVER / SW_APPROVER
REJECT
Rejected
Rejected
12
/ws-calculator/waterCalculator/_estimate and /sw-calculator/sewerageCalculator/_estimate
1966,
1967
WS_CEMP,WS_DOC_VERIFIER,WS_FIELD_INSPECTOR,WS_APPROVER,WS_CLERK
SW_CEMP,SW_DOC_VERIFIER,SW_FIELD_INSPECTOR,SW_CLERK
1
/access/v1/actions/mdms/_get
870
13
/egov-hrms/employees/_search
1752
4
/egov-workflow-v2/egov-wf/businessservice/_search
1743
EMPLOYEE
9
/filestore/v1/files/url
1528
EMPLOYEE
3
/localization/messages/v1/_search
1531
7
/property-services/property/_search
1897
PT_CEMP,PT_DOC_VERIFIER,PT_FIELD_INSPECTOR,PT_APPROVER
6
/sw-services/swc/_search
1940
SW_CEMP,SW_DOC_VERIFIER,SW_FIELD_INSPECTOR,SW_CLERK
11
/sw-services/swc/_update
1939
SW_CEMP,SW_DOC_VERIFIER,SW_FIELD_INSPECTOR,SW_CLERK
2
/user/_search
604
5
/ws-services/wc/_search
1900
WS_CEMP,WS_DOC_VERIFIER,WS_FIELD_INSPECTOR,WS_APPROVER,WS_CLERK
10
/ws-services/wc/_update
1901
WS_CEMP,WS_DOC_VERIFIER,WS_FIELD_INSPECTOR,WS_APPROVER,WS_CLERK
Technical Doc
DSS has two sides to it. One is the process in which the data is pooled into ElasticSearch and the other is the way it is fetched, aggregated, computed, transformed and sent across.
As this revolves around a variety of data sets, there is a need for making this configurable. So that, tomorrow, given a new scenario is introduced, then it is just a configuration away from getting the newly introduced scenario involved in this process flow.
This document explains the steps on how to define the configurations for the analytics side of DSS for W&S.
What is analytics?
Analytics: Micro Service which is responsible for building, fetching, aggregating and computing the data on ElasticSearch to a consumable data response. This is later used for visualizations and graphical representations.
Analytics Configurations: Analytics contains multiple configurations. We need to add the changes related to Water & Sewerage(W&S) in this dashboard analytics. Here is the location: configs/egov-dss-dashboards/dashboard-analytics at qa · egovernments/configs Below is a list of configurations that need to be changed to run W&S successfully.
Chart API Configuration
Master Dashboard Configuration
Role Dashboard Mappings Configuration
Each visualization has its own properties. Each visualization comes from different data sources (Sometimes it is a combination of different data sources). In order to configure each visualization and its properties, we have a chart API configuration document.
In this, visualization code, which happens to be the key, will be having its properties configured as a part of the configuration and are easily changeable.
Here is the sample ChartApiConfiguration.json data for the W&S.
Click here to check the complete configuration
Master dashboard configuration is the main configuration which defines the dashboards to be painted on the screen.
It includes all the visualizations, their groups, the charts which come within them and even their dimensions as what should be their height and width.
Click here for the complete configuration
Master Dashboard Configuration which was explained earlier contains the list of dashboards which are available. Given the instance where Role Action Mapping is not maintained in the Application Service, this configuration will act as Role - Dashboard Mapping Configuration.
In this, each role is mapped against the Dashboard which they are authorised to see. This was used earlier when the Role Action Mapping of eGov was not integrated.
Later, when the Role Action Mapping started controlling the dashboards to be seen on the client side, this configuration was just used to enable the dashboards for viewing.
Click here to check the configuration
common-masters/uiCommonConstants.json
Click here to check the complete configuration
roleaction.json
Click here to check the complete configuration
Action test.json
Click here to check the complete configuration
W&S-DSS consists of multiple graphs which represent the data of W&S. Each graph has its own configuration which will describe the chart and its type.
DSS consists of the following charts in W&S:
Revenue Tab
Overview
Total Cumulative Collection
Top ULB By Performance
Bottom ULB by Performance
W&S Collection by Usage Type
W&S Collection by Channel Type
W&S Key Financial Indicators
W&S Tax Heads
Service Tab
Overview
Total Cumulative Connection
Water Connection By Usage
Sewerage Connections By Usage
Connection By Channel
W&S Connection Ageing
Overview
The overview graph contains multiple data information as below in the selected time period.
Today’s Collection: This represents today’s collection amount for Water and Sewerage Application Fee + Consumption Charges.
Total Collection: This represents the total collection amount for Water and Sewerage Application Fee + Consumption Charges.
Target Collection: This represents the target collection amount for the Water and Sewerage connections.
Target Achievement: This represents the target achieved in percentage. This is calculated by the formula- (Total Collection/Target Collection)*100%
This Graph contains the Water and Sewerage collection amount information on a monthly basis as a cumulative line graph for each water and sewerage collection separately. This will change as per the denomination amount filter selection.
line - this graph/chart is data representation on date histograms or date groupings.
This graph represents the ULBs based on the Target achieved in bar chart representation with the % of target achieved in descending order.
This graph represents the ULBs based on the target achieved in bar chart representation with the % of target achieved in ascending order.
W&S Collection by Usage Type
This graph shows the collection amount based on the usage/property type and this amount will change as per the denomination filter change.
This graph shows the collection amount based on the collection channel type(eg-online, counter, etc) and this amount will change as per the denomination filter change.
This tabular chart representation graph shows multiple W&S information like Target Collection, Total Collection, Total Transactions, Total Connections and Target Achievement (in %). And this table shows the data at the district level and also has the drill-down chart for each district to ulb and from ulb to ward level data for the same.
xtable type allows to the addition of multiple computed fields with the aggregated fields dynamically added.
To add multiple computed columns, computedFields [] where actionName (IComputedField<T> interface), fields [] names as in exist in query key, newField as name to appear for computation must be defined.
On click of any district name will enter into drill-down charts, which will represent that specific District data.
On click of the ULB will navigate to wards under that specific ULB and each ward shows the specific data regarding that ward.
This tabular chart representation graph shows multiple W&S information like Total Collection, Penalty, Interest and Target Collection. And this table shows the data at the district level and also has the drill-down chart for each district to ulb and from ulb to ward level data for the same.
table type allows to addition of multiple aggregated fields.
On click of any district name will enter into drill-down charts, which will represent that specific District data.
On click of the ULB will navigate to wards under that specific ULB and each ward shows the specific data regarding that ward.
Overview
The overview graph contains multiple data information as below in the selected time period.
Total Applications: This represents the total number of applications for new, modify, and disconnection requests.
SLA Compliance: This represents the total SLA achieved in percentage.
Total Active Connections: This represents the total active water and sewerage connections.
Water-Metered Connections: This represents the total active metered water connections.
Water-Non Metered Connections: This represents the total active non-metered water connections.
Sewerage Connections: This represents the total active sewerage connections.
Total Cumulative Connections
This Graph contains the Water and Sewerage connections information on a monthly basis as a cumulative line graph for each water and sewerage connection separately.
line - this graph/chart is data representation on date histograms or date groupings.
This graph shows the active Water connections based on the usage/property type.
Sewerage Connections by Usage Type
This graph shows the active Sewerage connections based on the usage/property type.
This graph shows the active water and sewerage connections by channel type(eg-online, counter, etc).
W&S Connection Ageing
This tabular chart representation graph shows W&S applications that have been submitted and have been pending to be worked on. Information like Pending from 0 to 3 days, Pending from 3 to 7 days, Pending from 7 to 15 days, Pending for more than 15 days, and Total Pending Applications is shown in the chart. And this table shows the data at the district level and also has the drill-down chart for each district to ulb and from ulb to ward level data for the same.
xtable type allows the addition of multiple computed fields with the aggregated fields dynamically added.
To add multiple computed columns, computedFields [] where actionName (IComputedField<T> interface), fields [] names as in exist in query key, newField as name to appear for computation must be defined.
On click of any district name will enter into drill-down charts, which will represent that specific District data.
On click of the ULB will navigate to wards under that specific ULB and each ward shows the specific data regarding that ward.
isRoundOff: This property is introduced to round off the decimal values. Ex: if the value is 25.43 by using isRoundOff property in the configuration we will get it as 25. if the value is 22.56 round of value will be 23. This can be used for insights configuration as well for overview graphs.
Key(eg: fsmTotalrequest): This is the Visualization Code. This key will be referred to in further visualization configurations.
This is the key which will be used by the client application to indicate which visualization is needed for display.
chartName: The name of the Chart which has to be used as a label on the Dashboard. The name of the Chart will be a detailed name.
In this configuration, the Name of the Chart will be the code of Localization which will be used by the Client Side.
queries: Some visualizations are derived from a specific data source. While some others are derived from different data sources and are combined together to get a meaningful representation.
The queries of aggregation which are to be used to fetch the right data in the right aggregated format are configured here.
queries.module: The module/domain level, on which the query should be applied on. Water and sewerage are W&S.
queries.indexName: The name of the index upon which the query has to be executed is configured here.
queries.aggrQuery : The aggregation query in itself is added here. Based on the Module and the Index name specified, this query is attached to the filter part of the complete search request and then executed against that index
queries.requestQueryMap: Client Request would carry certain fields which are to be filtered. The parameters specified in the Client Request are different from the parameters in each of these indexed documents.
In order to map the parameters of the request to the parameters of the ElasticSearch Document, this mapping is maintained.
queries.dateRefField: Each of these modules have separate indexes. And all of them have their own date fields.
When there is a date filter applied against these visualizations, each of them has to apply it against their own date reference fields.
In order to maintain what is the date field in which index, we have this configured in this configuration parameter.
chartType: As there are different types of visualizations, this field defines what is the type of chart/visualization that this data should be used to represent.
Chart types available are:
metric - this represents the aggregated amount/value for records filtered by the aggregate es query
pie - this represents the aggregated data on grouping. This is can be used to represent any line graph, bar graph, pie chart or donut
line - this graph/chart is data representation on date histograms or date groupings
perform - this chart represents groping data as performance-wise.
table - represents a form of plots and values with headers as grouped on and a list of its key, values pairs.
xtable - represents an advanced feature of the table, it has additional capabilities for dynamic adding header values.
valueType: In any case of data, the values which are sent to the plot, might be a percentage, sometimes an amount and sometimes it is just a count.
In order to represent them and differentiate the numbers from the amount from the percentage, this field is used to indicate the type of value that this Visualization will be sending.
action: Some of the visualizations are not just aggregations of data sources. There might be some cases where we have to do a post-aggregation computation.
For Example, in the case of the top 3 Performing ULBs, the Target and Total Collection are obtained and then the percentage is calculated. In these kinds of cases, the action that has to be performed on the data obtained is defined in this parameter.
documentType: The type of document upon which the query has to be executed is defined here.
drillChart: If there is a drill down on the visualization, then the code of the Drill Down Visualization is added here. This will be used by Client Service to manage drill-downs.
aggregationPaths: All the queries will be having Aggregation names in them. In order to fetch the value out of each Aggregation Response, the name of the aggregation in the query will be an easy bet. These aggregation paths will have the names of Aggregation in it.
insights: It is to show the data with the comparison of last year with arrow symbols, it will show the data in how much % is increased or decreased.
_comment: In order to display information on the “i” symbol of each visualization, Visualization Information is maintained in this field.
Postman collection for W&S-dss: https://www.getpostman.com/collections/f346eea97268ac94888b,
Water & Sewerage my applications feature for citizen users - technical implementation doc
Objective: Provide the UI technical implementation details for the My Applications feature available for citizen users.
Users can review the list of applications and their status registered under their mobile numbers in the My Applications tab. Each application for the initial view displays Application No., Service Name, Consumer Name, Property Id, Status, SLA and Property Address with the View Details option, through which the user can look up more details about the application.
Once the user clicks on the View Details button, the Application Details page is displayed with all the necessary information about the application.
There are two links provided in the application details screen. One is for Property Details which allows users to see the in-depth details of the property associated with the application. The other is available on the Connection Details page to view the Additional Details of the connection for the application.
Timeline Component
The Timeline component is present at the end of the application details which tells about the current status and history of the application (open to edit, approve, reject, or closed).
The file path for the My Applications and Application Details common Index is given below. It provides an understanding of the working of the code.
File path: packages/modules/ws/src/pages/citizen/WSMyApplications/index.js
The template for My Application is available within packages/modules/ws/src/pages/citizen/WSMyApplications/ws-application.js. The Application Details page is available within packages/modules/ws/src/pages/citizen/WSApplicationDetails.js. The Application list is retrieved by calling the search API "/ws-services/wc/_search" & "/sw-services/swc/_search"
Hooks used for fetching the applications for Water and Sewerage are:
No MDMS data is used here. The data is loaded from the Search API.
For My Applications, the Localization keys are added to the ‘rainmaker-ws’ locale module same as My connections and Create. Changes, updates or addition of any new localization key is done in the same locale module only.
egov-workflow-v2/egov-wf/process/_search
PTCEMP,FI,APPROVER,DV
1730
/ws-services/wc/_search
PTCEMP,FI,APPROVER,DV
/sw-services/swc/_search
PTCEMP,FI,APPROVER,DV
/egov-workflow-v2/egov-wf/businessservice/_search
PTCEMP,FI,APPROVER,DV
1743
/filestore/v1/files/url
PTCEMP,FI,APPROVER,DV
1528
Water and Sewerage employee application UI technical implementation doc
Objective: Provide employees with purposeful workflow actions.
The same screen is used for both Application Details and Modify Application Details workflows. The details are provided below for the applicable scenarios.
Clicking on the application number from the inbox/search screen/connection search, routes to the application details screen. A search call is made before rendering the screen and details are populated based on the search response.
Application Details Screen
Refer to Employee: Ad-hoc Rebate/Penalty and View Breakup in application details
Once the Pending for Field Inspection stage is complete (if the status is pending approval) an Estimation Letter is generated.
Once the payment stage is complete (and the status is pending for connection activation), the Sanction letter and receipt are generated.
Role
Action
Next State
Status
Citizen/ Counter Employee/WS_CEMP/ SW_CEMP
INITIATE
INITIATED
INITIATED
Citizen/Counter Employee/WS_CEMP / SW_CEMP
EDIT
EDIT/ DOCUMENTVERIFICATION
Pending for Document Verification
Citizen/Counter Employee/WS_CEMP / SW_CEMP
Send Back to Citizen
Pending for Citizen Action
Pending for Citizen Action
WS_DOC_VERIFIER / SW_DOC_VERIFIER
VERIFY &FORWARD
FIELDVERIFICATION
Pending for Field Verification
WS_FIELD_INSPECTOR / SW_FIELD_INSPECTOR
VERIFY &FORWARD
PENDINGAPPROVAL
Pending for APproval
WS_APPROVER / SW_APPROVER
APPROVE
PENDINGPAYMENT
Pending for Payment
Citizen/Counter Employee/WS_CEMP / SW_CEMP
PAY
Approved
Approved
WS_APPROVER / SW_APPROVER
REJECT
Rejected
Rejected
WS_CLERK/SW_CLERK
Activate Connection
Connection activated
Connection activated
Application Details File Path: https://github.com/egovernments/DIGIT-Dev/blob/develop/frontend/micro-ui/web/micro-ui-internals/packages/modules/ws/src/pages/employee/ApplicationDetails.js
Hook details for application details search:
The timeline view is common for all modules. File path: https://github.com/egovernments/DIGIT-Dev/blob/develop/frontend/micro-ui/web/micro-ui-internals/packages/modules/templates/ApplicationDetails/index.js
const applicationDownloadObject = { order: 3, label: t("WS_APPLICATION"), onClick: handleDownloadPdf, };
const wsEstimateDownloadObject = { order: 1, label: t("WS_ESTIMATION_NOTICE"), onClick: () => getFiles([applicationDetails?.applicationData?.additionalDetails?.estimationFileStoreId], stateCode), };
Sanction Fee Method Reference:
const sanctionDownloadObject = { order: 2, label: t("WS_SANCTION_LETTER"), onClick: () => getFiles([applicationDetails?.applicationData?.additionalDetails?.sanctionFileStoreId], stateCode), };
Receipt Method Reference:
const appFeeDownloadReceipt = { order: 4, label: t("DOWNLOAD_RECEIPT_HEADER"), onClick: () => getRecieptSearch(applicationDetails?.applicationData?.tenantId ? applicationDetails?.applicationData?.tenantId : Digit.ULBService.getCurrentTenantId(), reciept_data?.Payments?.[0], applicationDetails?.applicationData?.applicationNo, receiptKey ), };
Localisation keys are added in the ‘rainmaker-ws’ locale module.
/access/v1/actions/mdms/_get
870
/user/_search
604
/localization/messages/v1/_search
1531
/egov-workflow-v2/egov-wf/businessservice/_search
1743
EMPLOYEE
/ws-services/wc/_search
1900
WS_CEMP,WS_DOC_VERIFIER,WS_FIELD_INSPECTOR,WS_APPROVER,WS_CLERK
/sw-services/swc/_search
1940
SW_CEMP,SW_DOC_VERIFIER,SW_FIELD_INSPECTOR,SW_CLERK
/property-services/property/_search
1897
PT_CEMP,PT_DOC_VERIFIER,PT_FIELD_INSPECTOR,PT_APPROVER
/ws-services/wc/_create
1899
WS_CEMP
/filestore/v1/files/url
1528
EMPLOYEE
/ws-services/wc/_update
1901
WS_CEMP,WS_DOC_VERIFIER,WS_FIELD_INSPECTOR,WS_APPROVER,WS_CLERK
/sw-services/swc/_update
1939
SW_CEMP,SW_DOC_VERIFIER,SW_FIELD_INSPECTOR,SW_CLERK
/ws-calculator/waterCalculator/_estimate and /sw-calculator/sewerageCalculator/_estimate
1966,
1967
WS_CEMP,WS_DOC_VERIFIER,WS_FIELD_INSPECTOR,WS_APPROVER,WS_CLERK
SW_CEMP,SW_DOC_VERIFIER,SW_FIELD_INSPECTOR,SW_CLERK
/egov-hrms/employees/_search
1752
Employee Roles and Credentials - The credentials and details are available in the document attached below:
Water and Sewerage connection details feature for employees - technical implementation doc
Objective: Provide the details of the connection to the employees and citizens.
The Connection Details page provides the details about the connection, the property which is used to create the connection and the owner details of the property. The same can be downloaded as a PDF file or printed directly from the page.
Employees will be able to open the “View Consumption Details” page from the “Connection Details” page for the Metered Reading Connection. The Consumption Details page will provide more options like adding details of the consumed water charges.
Users have the option to add new meter readings. Clicking on it displays a pop-up, where the user can fill in the asked details and click on submit to add a new meter reading for the connection.
The hook used for fetching connection details -
Connection Details File Path: https://github.com/egovernments/DIGIT-Dev/blob/master/frontend/micro-ui/web/micro-ui-internals/packages/modules/ws/src/pages/employee/connectionDetails/ConsumptionDetails.js
Meter Reading File Path: https://github.com/egovernments/DIGIT-Dev/blob/develop/frontend/micro-ui/web/micro-ui-internals/packages/modules/ws/src/pages/employee/connectionDetails/connectionDetails.js
Hook details for connection details search and others:
Downloads File Path: https://github.com/egovernments/DIGIT-Dev/blob/develop/frontend/micro-ui/web/micro-ui-internals/packages/modules/ws/src/pages/employee/connectionDetails/connectionDetails.js
Download Receipt Method:
Connection Details Receipt Method:
Localisation keys used on this page are added under “rainmaker-ws” locale module and the same should be used if any new keys are added to this page.
/ws-calculator/meterConnection/_search
1913
EMPLOYEE
/billing-service/bill/v2/_fetchbill
1862
EMPLOYEE
/ws-services/wc/_search
1900
WS_CEMP,WS_DOC_VERIFIER,WS_FIELD_INSPECTOR,WS_APPROVER,WS_CLERK
/sw-services/swc/_search
1919
WS_CEMP,WS_DOC_VERIFIER,WS_FIELD_INSPECTOR,WS_APPROVER,WS_CLERK
/property-services/property/_search
1897
EMPLOYEE
View breakup, ad-hoc rebate and penalty details in applications feature for employees - technical implementation doc
Objective: Provide the UI screens and configuration details for the ad-hoc rebate or penalty feature and the view breakup option available in water and sewerage applications.
The Water and Sewerage ad-hoc Rebate/Penalty is a feature in WS Module. It allows employees to add rebates or penalties for Water and Sewerage Applications.
Clicking on the Add Rebate/Penalty option opens the popup with the fields.
Clicking on the Add button on the pop-up screen closes the pop-up window and the filled-in data is updated in the Fee Estimate card.
Note: After adding add rebate/penalty, we must perform at least one action, then only it will save the data in WS/SW service. Estimated API will give the results based on the data, presently we are saving the data in the additional details of the WS/SW service.
The View Breakup feature in the WS module allows employees to view the details of tax heads for water and sewerage applications.
After logging in with Water and sewerage employee roles the user gets the option to view the breakup in the new WS/SW Application in the Fee Estimate card in the WS/SW application details.
WS/SW Application details: Employee: Water and Sewerage Application Details
Clicking on the View Breakup option opens the popup with the updated data.
Once the user logs in with "WS_APPROVER", "WS_FIELD_INSPECTOR", "SW_FIELD_INSPECTOR", "SW_APPROVER". If the roles and actions buttons are visible on the screen, then the user gets the option to add Ad-hoc Rebate/Penalty to a new WS/SW application in the Fee Estimate card in the WS/SW application details.
WS/SW Application details: Employee: Water and Sewerage Application Details
Fee Estimation File Path: https://github.com/egovernments/DIGIT-Dev/blob/develop/frontend/micro-ui/web/micro-ui-internals/packages/modules/templates/ApplicationDetails/components/WSFeeEstimation.js and the initial data and logic is from the Application details in https://github.com/egovernments/DIGIT-Dev/blob/develop/frontend/micro-ui/web/micro-ui-internals/packages/libraries/src/services/molecules/WS/Search.js
Fee Estimation Pop-up functionality is present in the https://github.com/egovernments/DIGIT-Dev/blob/develop/frontend/micro-ui/web/micro-ui-internals/packages/modules/templates/ApplicationDetails/components/WSFeeEstimation.js
View Breakup File Path: https://github.com/egovernments/DIGIT-Dev/blob/develop/frontend/micro-ui/web/micro-ui-internals/packages/modules/templates/ApplicationDetails/components/ViewBreakup.js and the initial data and logic is from the Application details in https://github.com/egovernments/DIGIT-Dev/blob/develop/frontend/micro-ui/web/micro-ui-internals/packages/libraries/src/services/molecules/WS/Search.js
View Breakup pop-up functionality is present in the https://github.com/egovernments/DIGIT-Dev/blob/develop/frontend/micro-ui/web/micro-ui-internals/packages/modules/templates/ApplicationDetails/components/ViewBreakup.js
Localisation keys are added under the ‘rainmaker-ws’ locale module.
/localization/messages/v1/_search
1531
/ws-calculator/waterCalculator/_estimate and /sw-calculator/sewerageCalculator/_estimate
1966,
1967
WS_CEMP,WS_DOC_VERIFIER,WS_FIELD_INSPECTOR,WS_APPROVER,WS_CLERK
SW_CEMP,SW_DOC_VERIFIER,SW_FIELD_INSPECTOR,SW_CLERK
/billing-service/bill/v2/_fetchbill
1862
EMPLOYEE
collection-services/payments/{businessService}/_search/
EMPLOYEE
/egov-mdms-service/v1/_search
954
Water and Sewerage disconnection application details feature for employees - technical implementation doc
Objective: The Water and Sewerage 'Apply Disconnection' is the major feature in WS Module. It allows Counter Employees to create Water and Sewerage Applications.
Every application is a part of the workflow.
Once a new application connection is activated, the system generates a consumer code. This code is used to route users to the connection details screen from the search/connection screen.
Clicking on the Take Action button displays multiple options based on conditions. Clicking on the Apply for Disconnection option routes users to the Disconnect Document Required screen.
To disconnect, the connection should be in an ACTIVE state. Connections which are under WORKFLOW or INACTIVE are not eligible for disconnection.
In cases dues are pending, the user has to clear the dues before applying for Disconnection.
The Disconnect option itself is not displayed in the action list for the connection which is INACTIVE.
Connection details:Employee: Water and Sewerage Connection Details
Clicking on the Apply button routes users to the Disconnection apply screen.
Acknowledgement screen
Successful create and update calls routes users to the acknowledgement screen.
Users get the acknowledgement form once they have created and submitted their application successfully. Processing of applications pending field inspection and user payment enables the download of the estimation letter and the sanction letter respectively. The section below provides the configuration for the document downloads.
Users can download the acknowledgement after submitting the W&S Create Application.
Data fetch, load and render
ws-services/wc/_create
sw-services/swc/_create
Case 1: In the case of Water connections:
Clicking on Submit button calls the ws-services/wc/_create API and creates the application. The update API ws-services/wc/_updateis called after getting a successful response on creating the application.
Case 2: In the case of Sewerage connections:
Clicking on Submit button calls the sw-services/swc/_create API and creates the application. The update API sw-services/swc/_update is called after getting a successful response on creating the application.
The code for the application PDF is written in the below-mentioned file.
1
/egov-mdms-service/v1/_search
WS_CEMP, SW_CEMP
954
2
/ws-services/wc/_create
WS_CEMP, SW_CEMP
1899, 1917
3
/sw-services/swc/_create
WS_CEMP, SW_CEMP
1899, 1917
4
/ws-services/wc/_update
WS_CEMP, SW_CEMP
1899, 1917
5
/sw-services/swc/_update
WS_CEMP, SW_CEMP
1899, 1917
6
/filestore/v1/files/url
EMPLOYEE
This document provides the steps for configuring water & sewerage reports. There are 3 Water & Sewerage reports that can be generated:
Receipt Register Report
Collection Register Report
Defaulter Report
To configure the Water & Sewerage report, follow the steps below:
In action-test.json:
Above is the sample for Defaulter Report, in a similar way other reports can also be configured.
Title
Link
report config folder
Report service
Water and Sewerage disconnection application details feature for employees - technical implementation doc
Objective: Provide employees with specific workflow actions.
This page provides the workflow details and actions for water and sewerage disconnection application details.
Clicking on the Application Number in the inbox/search screen routes users to the disconnection application details screen. A search call is made before rendering the screen and details are populated based on the search response.
Application Details Screen
Application Form
Disconnection Notice
Water & Sewerage Disconnection Workflow Table
#
Action
Role
From State
To State
1
Initiate Application
Citizen/ Counter Employee
Initiated
2
Submit Application
Citizen/ Counter Employee
Initiated
Pending for document verification
3
Verify and Forward
Document Verifier
Pending for document verification
Pending for field inspection
4
Verify and Forward
Field Inspector
Pending for field inspection
Pending approval for disconnection
5
Send Back
Document Verifier
Pending for document verification
Pending for counter employee action
6
Send Back
Field Inspector
Pending for Field inspection
Pending for document verification
7
Send Back
Approver
Pending approval for disconnection
Pending for field inspection
8
Send Back To Citizen
<roles having access>
<Current Status>
Pending for citizen action
9
Re-submit
Citizen/ Counter Employee
Pending for citizen action
OR
Pending for counter employee action
<To the status application was sent back to citizen>
12
Approve
Approver
Pending approval for disconnection
Pending for payment
13
Reject
<roles having access>
<Current Status>
Rejected
14
Payment/ Collection
Citizen/ Counter Employee
Pending for payment
Pending for disconnection execution
15
Execute Disconnection
Clerk
Pending for disconnection execution
Disconnection Executed
Application Details File Path: https://github.com/egovernments/DIGIT-Dev/blob/develop/frontend/micro-ui/web/micro-ui-internals/packages/modules/ws/src/pages/employee/ApplicationDetails.js
Hook details for application details search:
Disconnection Notice Download File Path: https://github.com/egovernments/DIGIT-Dev/blob/develop/frontend/micro-ui/web/micro-ui-internals/packages/modules/ws/src/pages/employee/DisconnectionDetails.js
Application Form Download File Path: https://github.com/egovernments/DIGIT-Dev/blob/develop/frontend/micro-ui/web/micro-ui-internals/packages/modules/ws/src/pages/employee/DisconnectionDetails.js
The timeline view is common for all modules. Timeline view file path: https://github.com/egovernments/DIGIT-Dev/blob/develop/frontend/micro-ui/web/micro-ui-internals/packages/modules/templates/ApplicationDetails/index.js
Localisation keys are added in the ‘rainmaker-ws’ locale module.
1
/access/v1/actions/mdms/_get
870
2
/user/_search
604
3
/localization/messages/v1/_search
1531
4
/egov-workflow-v2/egov-wf/businessservice/_search
1743
EMPLOYEE
5
/ws-services/wc/_search
1900
WS_CEMP,WS_DOC_VERIFIER,WS_FIELD_INSPECTOR,WS_APPROVER,WS_CLERK
6
/sw-services/swc/_search
1940
SW_CEMP,SW_DOC_VERIFIER,SW_FIELD_INSPECTOR,SW_CLERK
7
/property-services/property/_search
1897
PT_CEMP,PT_DOC_VERIFIER,PT_FIELD_INSPECTOR,PT_APPROVER
8
/ws-services/wc/_create
1899
WS_CEMP
9
/filestore/v1/files/url
1528
EMPLOYEE
10
/ws-services/wc/_update
1901
WS_CEMP,WS_DOC_VERIFIER,WS_FIELD_INSPECTOR,WS_APPROVER,WS_CLERK
11
/sw-services/swc/_update
1939
SW_CEMP,SW_DOC_VERIFIER,SW_FIELD_INSPECTOR,SW_CLERK
12
/ws-calculator/waterCalculator/_estimate and /sw-calculator/sewerageCalculator/_estimate
1966,
1967
WS_CEMP,WS_DOC_VERIFIER,WS_FIELD_INSPECTOR,WS_APPROVER,WS_CLERK
SW_CEMP,SW_DOC_VERIFIER,SW_FIELD_INSPECTOR,SW_CLERK
13
/egov-hrms/employees/_search
1752
Objective: To provide the facility of abstraction of private details of users. It will also help in masking sensitive details and unmasking the information by authorized roles whenever needed.
Masking / Un-Masking of Data
Particular entries of an object from the search API will appear masked if it is enabled in the MDMS (mentioned in the technical implementation section below). This is based on roles and if the value is masked in UI, the eye icon will be available adjacent to it. Clicking on this icon allows users to unmask it.
Once the user clicks on the eye icon, the corresponding search API is called with plainAccessRequestobject in the request info. This allows the data to be unmasked in the response object and leads to the refreshing of values and the whole data is visible. The eye icon will not be visible anymore.
The masking of data and its dependency on roles is defined in the following MDMS file: egov-mdms-data/SecurityPolicy.json at develop · egovernments/egov-mdms-data (github.com)
Let us take an example of an object in the MDMS file i.e. WnSConnection
Here the unique identifier is defined as applicationNo, so from UI plain request object which is sent in Search API contains recordId as applicationNo. Similarly, the list of attributes mentioned here is received as masked by default in the response object from the Search API. The roles mentioned in the roles array defines the roles for which these attributes were to be masked.
Masking in details Page
In the UI code repository, If any particular data has to be masked then we have to send a Privacy object along with corresponding data to ApplicationDetailsTemplate
Example:
For water application details the connection holder details have to be masked. The privacy object is passed from the applicationdetails hook.
Relationship object of connection holder details below:
Here uuid is the record id which we have to send for a particular model; fieldName is the name defined in the MDMS as well as the exact param which we receive in the response object; model is the model from SecurityPolicy MDMS; showValue is sent as true if we want to append any data with the newly unmasked data. Usually, this is used for property address and loadData is an object in which we sent the body and params for the API call that must be made in order to get the unmasked data. Refer code - DIGIT-Dev/Search.js at 090ef18028a50f38222e426ec59ab9f123833af0 · egovernments/DIGIT-Dev (github.com)
ApplicationDetailsTemplate has the eye icon already integrated with Row Component, which can be enabled by passing the above privacy object. Refer code - DIGIT-Dev/StatusTable.js at 090ef18028a50f38222e426ec59ab9f123833af0 · egovernments/DIGIT-Dev (github.com)
UnMaskComponent is the main component which handles all the unmasking action through the eye icon. The following component must be integrated if the eye icon needs to be implemented in any given place.
This loads the MDMS data and filters it out as per the specified model for which the unmaskComponent is being called. Next, it calls the checkprivacy obejct to verify if privacy is enabled for that particular role and model (refer to below code for privacy check).
If the checkprivacy is returned true, the eye icon is visible and clicking on it calls the updateprivacy method defined in useprivacycontext hook: Refer - DIGIT-Dev/usePrivacyContext.js at 090ef18028a50f38222e426ec59ab9f123833af0 · egovernments/DIGIT-Dev (github.com)
This triggers the search hook called again with plainAccessRequest (mentioned in the above picture), but for that privacy object has to be sent in the hook for re-triggering.
For all methods related to privacy, refer to the document here: DIGIT-Dev/privacy.js at develop · egovernments/DIGIT-Dev (github.com)
Unmasking in Edit Details page
For enabling the eye icon in the text field similar steps have to be followed :
The search API Hook used to prefill the data in the edit screen should have a privacy object being sent in it.
Unmask component has to be defined with the corresponding component.
Refer: Index page for edit details: DIGIT-Dev/index.js at develop · egovernments/DIGIT-Dev (github.com)
SecurityPolicy.json is used to handle all privacy-related action
List of Privacy object and roles associated to it
DataSecurity
SecurityPolicy
Detailed steps to configure privacy in W&S module
To make sure that after enabling privacy, the system works as expected, we will require some configurations to be made in the environment. This document contains all the steps to ensure successful implementation and working of the Water & Sewerage module.
The following are the changes required to move the water and sewerage application to other environments:
Add a new role for REINDEXING so as to push encrypted data in the index in and files. Reference for these file changes can be taken from the following commit: (Please pick the changes for the required files- roleactions.json and roles.json only)
Add a copy of the existing water-service index with a different topic name(update-ws-encryption and update-sw-encryption) for the encryption process.
Reference:
Some changes need to be made for existing indexes in the water-service and sewerage-service indexer files. The changes with respect to these files can be referred to from the following commit:
Restart the indexer.
Add the following json mappings in the existing mappings (parallel to water-services and sewerage-services key) for water-services and sewerage-services in kibana so that the PII data is not visible during search(The data do remain in the index and also search with respect to this happens as is).
Sample index at the bottom
Update the path of these files in the DevOps repo in the specific environment file.
Restart the persister
Deploy new ws-service and sw-service builds.
Port-forward the ws-service and sw-service pods and hit the curl to start encryption. The curls can be referred from here:
Water-encryption curl:
Sewerage-encryption curl:
In the params list in both the above curls, “tenantIds” param can either be provided with a single tenantId or a list of tenantIds for encrypting the data with respect to the provided tenantIds. However, to encrypt the data for all tenantIds in the system, tenantIds param itself should be removed.
To validate if the encryption is completed, you can check with the following dB queries:
select * from eg_ws_enc_audit order by createdtime desc;
select count(*) from eg_ws_id_enc_audit;
This query can validate whether all records are there or not. The count should match the total count of records in the eg_ws_connection table.
select * from eg_ws_id_enc_audit;
This can help you check what all properties have been updated so far. This table contains the id, applicationnumber, connectionnumber and tenantid.
Sample Index for point 5:
TheSewerage Calculator Service is used for creating meter readings, searching meter readings, updating existing meter readings, calculating sewerage charges, demand generation, SMS & email notification to ULB officials on-demand generation and estimation of sewerage charges on basis of meter reading for existing sewerage application until the application is disconnected.
There are no additional billing slabs to be configured for sewerage disconnection, the calculation happens with the meter reading if added and uses existing billing slabs.
Criteria
connection type
building type
calculation attribute
property usage type
The combination of the above can be used to define the billing slab. Billing Slab is defined in MDMS under ws-services-calculation folder with the . The following is the sample slab (Same as the water connection).
For the disconnection application fee, the estimation will return all the related tax heads based on the criteria.
Following are the exemptions and taxes that are calculated:
Form fee
Scrutiny fee
Other charges
Security charges
Tax and cess
The sewerage charge is based on the billing slab, and for sewerage disconnection application charge will be based on the slab and tax based on the master configuration.
Interest
Below is a sample of the master data JSON for interest:
Penalty
Below is a sample of the master data JSON for penalty:
Round Off
If the fraction is greater than equal to 0.5 the number is rounded up else it’s rounded down. eg: 100.4 will be rounded to 100 while 100.6 will be rounded to 101.
Whenever _calculate API is called demand is first searched based on the connection no and the demand from and to period. If demand already exists the same demand is updated else new demand is generated with consumer code as connection no and demand from and to a period equal to the financial year start and end period.
In case of the update, if the tax head estimates change, the difference in amount for that tax head is added as new demand detail. For example, if the initial demand has one demand detail with SEWERAGE_CHARGE equal to 120.
After updating if the SEWERAGE_CHARGE increases to 150 we add one more demand detail to account for the increased amount. The demand detail will be updated to:
The disconnection charges will be the addition of both demand details taxAmount and we can generate demand until the workflow is in PENDING_FOR_DISCONNECTION_EXECUTION.
Note: if there is no pending payment when the connection gets approved then the workflow gets updated from PENDING_APPROVAL_FOR_DISCONNECTION to PENDING_FOR_DISCONNECTION_EXECUTION (it skips the payment step in the workflow internally).
Here the disconnection charges will be 120+30 = 150
RoundOff is bill based i.e every time bill is generated round off is adjusted so that the payable amount is the whole number. Individual SW_ROUNDOFF in demand detail can be greater than 0.5 but the sum of all SW_ROUNDOFF will always be less than 0.5.
Final sewerage charges calculation
Final Sewerage Charges = Last Billing Period Amount * Days (Proposed disconnection date - Last Billing Date) / No. of days in last billing period
The additional parameter is being sent in the calculation request for the disconnection application.
disconnectRequest = true if the request is for _calculate API disconnection application.
(Note: All the APIs are in the same postman collection therefore the same link is added in each row)
After connection activation or legacy connection, the user can choose to disconnect the connection either temporarily or permanently. This process is based on a defined workflow. Any action is based on defined roles on the action level. For disconnecting the connection, the user needs to send extra parameters in the RequestBody as below :
disconnectionReason - to add the reason for disconnection
isDisconnectionTemporary - Whether the disconnection is temporary or permanent (if disconnection is temporary then isDisconnectionTemporary will be true else false)
disconnectRequest - This will always be true for disconnection applications.
disconnectionExecutionDate - This is the date when the application is disconnected.
and also user needs to upload some supporting documents and mandatory info.
URLs for the external API references:
eGov mdms: egov.mdms.host = /
eGov -idGen : egov.idgen.host = /
localization service: egov.localization.host = /
idGen Id formats: egov.idgen.sdcid.name=sewerageservice.disconnection.id egov.idgen.sdcid.format=SW_AP/[CITY.CODE]/[fy:yyyy-yy]/DC-[SEQ_SW_APP_[TENANT_ID]]
This new feature is developed using the same existing base APIs for new and modified connections. The changes for disconnection follow a similar approach as that of New Connection. The config and persister changes required are mentioned below.
Persister configuration
Workflow config for edit connection
Create businessService (workflow configuration) using the /businessservice/_create. Following is the product configuration for editing the water connection.
Disconnection notifications will be sent to the property owners and connection holders based on different application states.
We can add connection holders to the water connection which will be the owner of the connection. We can fill in the connection holders' details or we can just make the property owner to the connection holder this goes to the disconnection application.
The connection holder will get a notification based on a different state of the application. We are pushing the data of the connection holders in the user service too.
To integrate, the host of sw-service module should be overwritten in the helm chart.
/sw-services/swc/_create should be added as the create endpoint for creating sewerage application/connection in the system
/sw-services/swc/_search should be added as the search endpoint. This method handles all requests to search existing records depending on different search criteria
/sw-services/swc/_update should be added as the update endpoint. This method is used to update fields in existing records or to update the status of applications based on workflow.
(Note: All the APIs are in the same postman collection therefore the same link is added in each row)
Put the indexer config file into the config repo under egov-indexer folder. (egovernments/configs )
__All content on this page by eGov Foundation is licensed under a Creative Commons Attribution 4.0 International License.
``
Property creation through WNS module
Persister configuration:
The indexer provides the facility for indexing the data to elastic search.
Write the configuration for sewerage service.
Put indexer config file to the config repo under egov-indexer folder. ( )
All content on this page by is licensed under a .
Employee Roles and Credentials: The login credentials and details are available in the document here:DIGIT Login Credentials
Employee Roles and Credentials: The login credentials and details are available in the document here:DIGIT Login Credentials
Route: mSeva
Route: mSeva
Employee Roles and Credentials: The employee roles and credentials are available in the document here: DIGIT Login Credentials
file
Find the login credentials and details in the document here: DIGIT Login Credentials
Add 2 new persister files responsible for managing old data encryption. and .
Link
/sw-calculator/sewerageCalculator/_calculate
/sw-calculator/sewerageCalculator/_updateDemand
Link
/sw-services/swc/_create
/sw-services/swc/_update
/sw-services/swc/_search
uuid
state
94055bb3-210c-4184-93ac-99e288ab00d9
b0fc6007-8b02-4753-8e50-1fdb29e559da
APPROVALPENDING
b9ea9101-09ff-4a8e-97c1-d43b3311af73
REJECTED
ea5668ee-d8db-4c16-839b-64299e12f8fc
APPROVED
468ce854-e19d-4a0f-97a0-66745f2034af
PENDING_FOR_CITIZEN_ACTION
uuid
state
New uuid
New uuid
APPROVALPENDING
New uuid
REJECTED
New uuid
APPROVED
New uuid
PENDING_FOR_CITIZEN_ACTION
Environment Variables
Description
egov.sewarageservice.createconnection
This variable contains the kafka topic name which is used to create new sewerage connection application in the system.
egov.sewarageservice.updateconnection
This variable contains the kafka topic name which is used to update the existing v connection application in the system.
egov.sewerageservice.updatesewerageconnection.workflow.topic
This variable contains the kafka topic name which is used to update the process instance of the sewerage connection application.
egov.idgen.scapid.name
This variable contain the idgen format name for sewerage application
egov.idgen.scapid.format
This variable contain the idgen format for sewerage application ex:- WS/[CITY.CODE]/[fy:yyyy-yy]/[SEQ_EGOV_COMMON]
egov.idgen.scid.name
This variable contain the idgen format name for sewerage connection
egov.idgen.scid.format
This variable contain the idgen format for sewerage connection ex:- WS_AP/[CITY.CODE]/[fy:yyyy-yy]/[SEQ_EGOV_COMMON]
Title
Link
API Swagger Documentation
Sewerage Calculator Service
Title
Link
/sw-services/swc/_create
/sw-services/swc/_update
/sw-services/swc/_search

Backend technical documentation
This document highlights the changes that need to be done in a Water and Sewerage module to support the privacy feature.
Prior knowledge of Java/J2EE
Prior knowledge of Spring Boot
MDMS service
Encryption service
The Security Policy MDMS file must have the model configuration for fields to be encrypted/decrypted. The following models have been used for W&S in the SecurityPolicy.json file:
Also, add the following under roleBasedDecryptionPolicy of User model(already existing):
Refer to the SecurityPolicy.json file for full reference.
For modules, there is no such hard rule or pattern for naming the model, but it should be related to that service. ex: 1.) For user service we have two security policy models User which is used when a user tries to search other user data. The PII data will be available in masked, plain or encrypted form depending on the visibility set for an attribute in the MDMS. The other model is UserSelf which is used when a user tries to search their own data. The data is available as per the configuration set there.
For report and searcher config the model name should be similar to the value that we are setting in the field decryptionPathId. ex:- Employee Report. Employee Report Security Model.
2.) For W&S we have 2 models -WnSConnection and WnSConnectionOwner which are meant for ConnectionHolderDetails.
2 different models for connectionHolder data are required since some data for connectionHolder comes from the W&S tables and the remaining is fetched from the User table. So to maintain consistency we had to have 2 different models.
For an attribute where its firstLevelVisibility is set as "Masked" whenever the respective search API is called without the plain Access Request, the masked value is returned as the API response for that attribute. for ex:- if for mobile number attribute’s firstLevelVisibility is masked and its plain value is 9089243280 then in response, the value is displayed as ******3280. The masking pattern is defined in the MaskingPattern MDMS file and the pattern is picked up based on the patternId. Similarly, if the firstLevelVisibility is set as "ENCRYPTED" we will get the encrypted value of that plain data (which is present in DB) in response.
NOTE: For adding of new attribute for encryption, the following things need to be kept in mind:
We do not have a direct approach to it, but a workaround is as follows:
We need to make sure which property has to be encrypted and what is the path of the property in the Request/Response object of W&S. If PII data is for connectionholder and is coming from WnS tables directly, then with the Proper name and path of the object we can add a new Property in existing model WnSConnection.
The inclusion of any new attribute here would need encryption of the old data for this new property.
For that, in MDMS, we will have to replace the existing model attributes with only new attributes and hit the _encryptOldData API. Once old data encryption is done, we can put back all the required attributes (old and +new) in the model.
Also, before starting the encryption of old data, we will have to check the latest record of the table eg_ws_enc_audit / eg_sw_enc_audit / eg_pt_enc_audit(for PT) . If the latest record has offset and record count value other than 0 then insert a random record with offset and record count as 0 and createdtime and encryptiontime as a current timestamp in millis in utc.
Any data other than that of connectionHolder would need a new model to be created and changes at the code level as well. For old data encryption of new property other than that of connectionHolder, we will have to have code changes as well.
For further info about adding models refer here.
Upgrade services-common library version.
Upgrade the tracer library version.
Add enc-client library
In ws-services encryption and decryption endpoints should be declared as follows:
In sw-services encryption and decryption endpoints should be declared as follows:
EncryptionDecryptionUtil.java
We need an interfacing file for handling the encryption and decryption of attributes and for interacting with the enc-client library directly. For reference follow the below code snippet:
You may find the file here in the repo.
UnmaskingUtil.java
UnmaskingUtil.java file helps in extracting the plain data of the Owner from the User service. This file also contains a method that swaps the PlumberInfo in a similar manner.
For reference follow the below code snippet:
You may find the file here in the repo.
The following method is added in WaterServiceImpl.java for encrypting the entire data
Method to decrypt the water/sewerage data:
The following method is added in WaterServiceImpl.java for decrypting the entire data
_search API Changes
During the search call the PII data needs to be masked in the response received. For this, the searchCriteria needs to be encrypted before fetching details and eventually the data retrieved needs to be decrypted and then returned to the user.
Following changes need to be made in WaterServiceImpl.java
You may find the file here in the repo.
If you want to get all the PII data in the plain format then in the search request add the search param “isInternalCall“ as “true”
If the user wants only specific fields to be unmasked then add the plainAccessRequest in the RequestBody in the following format:
plainAccessRequest contains :
1. recordId which will take the uuid of the user as an input for which PII data has to be unmasked, and
2. plainRequestFields will take an array of attributes that need to be unmasked. These attributes should comply with the attributes used in the Mdms SecurityPolicy.json’s models created.
For unmasking PlumberInfoMobileNumber, recordId will take the applicationno as value.
_create and _update API Changes
In _create and _update API calls the data needs to be encrypted before the data for application/connection is pushed to respective topics.
A sample code line for encrypting data in these calls is as follows:
A sample code line for decrypting data in these calls is as follows:
The entire method for create call can be found here: create method
and update call can be found here: update method
Before using the privacy feature in any environment, the encryption of existing data in the dB should be done.
An API for the same is written in the service and needs to be triggered by port-forwarding the respective service pod.
The data encryption API uses the existing plainSearch method and the encryption shall take place tenantId-wise. If tenantId is not specified then all the tenants are picked from the MDMS repository and the encryption happens for all the tenants. However, if the tenantId is specified, then the encryption happens only for that tenantId.
The following method is added to execute the oldDataEncryption
In WaterController.java
n WaterEncryptionService.java This service is solely for old data encryption and can be referred from here: https://github.com/egovernments/DIGIT-Dev/blob/8ec8592b73470c6dcdb1508caa1e6b1cf8ebb2ca/municipal-services/ws-services/src/main/java/org/egov/waterconnection/service/WaterEncryptionService.java A new persister file needs to be added for keeping track of progress of oldDataEncryption. Refer this ws-enc-audit-persister.yml and sw-enc-audit-persister.yml for the same.
Here is the Postman collection for all property, water and sewerage services for old Data encryption : https://www.getpostman.com/collections/b3858ec2020462a6407d
There is no need to re-index the base indexes(viz. water-services/ sewerage-services) once the API for old data encryption is executed as this will happen during the API execution itself. For any new data getting created, the new data will get saved in the encrypted format only in the indexes.
There are some changes in the Indexer file that need to be made for W&S to get the encrypted data from the external service like Property-service.
To enable or disable decryption in privacy, we need to make changes to only the privacy variable present in the environment file in DevOps.
For enabling, its value should be “true” else “false”.
For water-services variable is as follows:
For sewerage-services:
For user-service:
The variable can be found in the file here.
Note: Privacy decryption means: For any new application creation/ old application updation Internal data will be stored in the encrypted form itself, just that during decryption disabled it would give PLAIN text rather than masked one.
All the above changes need to be done for sw-services as well.
For detailed steps to configure the above changes refer to document: Detailed Steps to configure privacy in W&S module
Sewerage Calculator Service is one of the major business logic services which is used for calculation of sewerage charge, generating demand, update existing demand, SMS & email notification to the ULB officials on-demand generation and also triggering demands(job scheduler) at some intervals and estimation of sewerage charge(one-time cost) which involves cost like road-cutting charge, form fee, scrutiny fee etc.
Before you proceed with the documentation, make sure the following pre-requisites are met -
Java 8
Kafka server is up and running
egov-persister service is running and has sewerage service persister configs path added in it
PSQL server is running and a database is created to store sewerage connection / application data
Following services should be up and running:
egov-perister
egov-mdms
sw-services
billing-service
Sewerage calculator services present in municipal services provide multiple functionalities like calculating sewerage charges, generating demands for a particular sewerage connection, updating demands, SMS & email notification to the ULB officials on-demand generation and also triggering demands(job scheduler) at some intervals and estimation of sewerage charge(one-time cost) which involves cost like road-cutting charge, form fee, scrutiny fee etc. The different functionalities provided by sewerage calculator services are:
Sewerage charge calculation
Demand generation(here as its always non-metered demand will be generated based on time period)
Sewerage charge estimation (one-time cost which involves cost like road-cutting charge, form fee, scrutiny fee etc.)
Deploy the latest version of sw-service and sw-calculator
Add sewerage-persist.yml file in config folder in git and add that path in persister . (The file path is to be added in environment yaml file in param called persist-yml-path )
Criteria :
connection type
building type
calculation attribute
property usage type
The combination of the above can be used to define the billing slab. Billing Slab is defined in MDMS under sw-services-calculation folder with the SCBillingSlab. The following is the sample slab.
If all criteria will match for that sewerage connection this slab will use for calculation.
For application one-time fee, the estimation will return all the related tax head based on criteria. For estimation, all configuration is present in sw-services-calculation.
All the above master configuration is used for estimation.
Following are the exemptions and taxes that are calculated:
Form fee
Scrutiny fee
Other charges
Road cutting charges
One time fee
Security charges
Tax and cess
Sewerage charge is based on billing slab, for sewerage application charge will be based on slab and tax based on master configuration.
Interest
Below is a sample of master data JSON for interest :
Penalty
Below is a sample of master data JSON for penalty**:**
Round Off
If the fraction is greater than equal to 0.5 the number is round up else it’s round down. eg: 100.4 will be rounded to 100 while 100.6 will be rounded to 101.
Role Action Mapping
Once sewerage is sent to the calculator, its tax estimates are calculated. Using the tax head estimates demand details are created. For every tax head, the estimated demand generates function will create a corresponding demand detail.
Whenever _calculate API is called demand is first searched based on the connection no or application no and the demand from and to period. If demand already exists the same demand is updated else new demand is generated with consumer code as connection no or application no and demand from and to a period equal to financial year start and end period.
In the case of an update, if the tax head estimates change, the difference in amount for that tax head is added as new demand detail. For example, if the initial demand has one demand detail with SEWERAGE_CHARGE equal to 120
After updating if the SEWERAGE_CHARGE increases to 150 we add one more demand detail to account for the increased amount. The demand detail will be updated to:
RoundOff is bill based i.e every time bill is generated round off is adjusted so that the payable amount is the whole number. Individual SW_ROUNDOFF in demand detail can be greater than 0.5 but the sum of all SW_ROUNDOFF will always be less than 0.5.
For generating the demand for non metered connection we have a feature for generating the demand in batch. The scheduler is responsible for generating the demand based on the tenant.
The scheduler can be hit by scheduler API or we can schedule cron job or we can put config to kubectl which will hit scheduler based on config.
After the scheduler been hit we will search the list of the tenant (city) present in the database.
After getting the tenants we will pick up tenant one by one and generate the demand for that tenant.
We will load the consumer codes for the tenant and push the calculation criteria to Kafka. Calculation criteria contain minimal information (We are not pushing large data to Kafka), calculation criteria contain consumer code and one boolean variable.
After pushing the data into Kafka we are consuming the records based on the batch configuration. Ex:-> if the batch configuration is 50 so we will consume the 50 calculation criteria at a time.
After consuming the record(Calculation criteria) we will process the batch for generating the demand. If the batch is successful so will log the consumer codes which have been processed.
If some records failed in batch so we will push the batch into dead letter batch topic. From the dead letter batch topic, we will process the batch one by one.
If the record is successful we will log the consumer code, If the record is failed so we will push the data into a dead letter single topic.
Dead letter single topic contains information about failure records in Kafka.
Use cases
If the same job trigger multiple time what will happen?
If the same job triggers multiple times we will process again as mentioned above but at the demand level we will check the demand based on consumer code and billing period, If demand already exists then we will update the demand otherwise we will create the demand.
Are we maintaining success or failure status anywhere?
Currently, we are maintaining the status of failed records in Kafka.
Configuration
We need to configure the batch size for Kafka consumer. This configuration is for how much data will be processed at a time.1sw.demand.based.batch.size=10
sw-calculator will be integrated with sw-service. sw-services internally invoke the sw-calculator service to calculate and generate demand for the charges.
SW calculator application is used to calculate the sewerage application one time Fees and connection charges based on the different billing slabs that's why the calculation and demand generation logic will be separated out from SW service. So in future, if calculation logic needs to modify then changes can be carried out for each implementation without modifying the SW service.
To Activate the Sewerage Service application, the user needs to pay the ONE_TIME_FEE for the connection. To calculate the ONE_TIME_FEE sw-calculator/sewerageCalculator/_estimate API is use.
To generate the demand for non-metered sewerage connection /sw-calculator/sewerageCalculator/_calculate API is use.
User can pay partial / full / advance amount for the Non-Metered connection bill. In these cases, Billing service would call back /sw-calculator/sewerageCalculator/_updateDemandAPI to update the details of the demand generated.
/sw-calculator/sewerageCalculator/_jobscheduler API is use to generate demand for Non-metered connections. This API can be called periodically.
/sw-calculator/sewerageCalculator/_applyAdhocTax API is used to add Rebate or Penalty on any bill and based on that the bill amount will be adjusted.
Title
Link
API Swagger Contract
Sewerage Service Document
Title
Link
/sw-calculator/sewerageCalculatorr/_estimate
/sw-calculator/sewerageCalculator/_calculate
/sw-calculator/sewerageCalculator/_updateDemand
/sw-calculator/sewerageCalculator/_jobscheduler
/sw-calculator/sewerageCalculator/_applyAdhocTax
(Note: All the API’s are in the same postman collection therefore same link is added in each row)
__
__
Access to clean and safe water is one of the basic needs of citizens. Each Urban local body has been mandated with catering to the water and sanitation needs of its citizens. The computerized and automatic Water and Sewerage system offered by eGov enables citizens who seek to apply and pay for water and sewerage connections within any Urban Local Body with a transparent, speedy, hassle-free and user-friendly procedure. The ULB officials can now sanction connections, generate bills and collect payments for water and sewerage connections more efficiently. (For details on product features refer to Section 2)
For the offered product, the implementation process can be divided into six major distinctive stages. Each stage has predefined entry and exit criteria, roles & responsibilities to assure objective monitoring and decision-making for the overall success of the engagement. The whole implementation lifecycle is typical of 23-27 weeks for the State/UT keeping in mind the entry, and exit criteria defined at the beginning and end of each stage are met on time recommended.
Stage Zero-program setup and onboarding is a pre-requisite for the initiative to kick off and requires setup of the governance model, implementation team and decision regarding other significant elements of the initiative like funding and procurement process. Stage One of the initiative requires scoping the initiative and deciding on the priorities for implementation by the State/UT Implementation Team. In Stage Two, the W&S team is appointed and its processes are standardized. In Stage Three, the State/UT Team will work on identifying and finding solutions to the significant gaps in the product offered w.r.t. to the need of the State/UT. Configuration and customization of the product is the primary objective of Stage Four. This involves working on various aspects of UT-specific needs and incorporating them into the product suite offered. In Stage Four and Five, post doing UAT and including all the necessary feedback on the product, the roll-out of the product is done at the State/UT level(Go Live) from a couple of ULBs to pan State/UT coverage. In Stage Six of sustenance and ongoing improvement, key activities are adoption and governance tracking with the planning of ongoing sustenance. (For details on the implementation plan refer to Section 3).
Implementation of Water and Sewerage (W&S) requires meticulous planning and close coordination between various stakeholders at the centre and State/UT levels. The success of the initiative is dependent upon many factors like strong Program governance, availability of trained resources, financial planning, targeted implementation Team onboarding, focus on last-mile capacity building and ensuring necessary support to the urban centre. Achievement of all these factors will provide the most effective and efficient roll-out and adoption of the Water and Sewerage Implementation System in the UT.
The Water and Sewerage (W&S) module provides a digital interface to apply for water and sewerage connections and pay the water and sewerage charges for connection/s. The citizens can use it, Urban Local Body (ULB) counter employees and field employees, and ULB Administrators to accomplish their specific tasks. It is available as a mobile and web-based application. The W&S product features can be broadly classified as the following modules:
Registration, Login and Creation of User Profile
Application for new Water/Sewerage connection
Searching for a Connection
Modifications to a Connection
Entering meter readings of metered connections
Generate Demand
Payments collection and Receipts
Dashboards and Reports
This module provides enables the following capabilities:
OTP-based login for citizens via Web/Mobile App
OTP-based login for employees via Web/Mobile App
Provision for language selection during first-time registration for both employees and
citizens
Provision of creating a personalized profile for citizens and employees on the Web App
Login credentials for the various hierarchy of employees
Role-based access for performing different actions relating to the W&S module
The system allows the Citizen / ULB user (with an appropriate role in the system) to apply for a New Water/Sewerage connection. The application goes through an approval workflow before it is available for various transactions in the system. The workflow to be followed for a new water/sewerage connection is configurable. In the workflow, the ULB official will generate the estimation notice. Once the payment is made, a work order will be generated.
Every time there is a change in the status of an application, the citizen will be intimated through in-app notifications, SMS and email. The citizen and employee can view the history of the various states that an application has been in and the comments added by the employee in each state of the application.
Only employees from the W&S department will be able to access the feature, to search for water and sewerage connections. They can search for any connection based on parameters such as:
Consumer number
Application number
Owner mobile number
Application status
From date
To date
The search result contains the Application number, Consumer number, Owner name, Status, Due amount and the Pay now option. The Employee can make payment for a connection on the citizen’s behalf using the ‘Pay Now’ option.
Citizens can also search for their connections in the portal. They can search using the Owners mobile number, Property ID, Consumer number etc. The search result yields, the Owner’s Name, Address, Due amount and Pay options.
The system facilitates the title transfer of the water tap connection from one person to the other person. Title transfer of water tap connection directly depends upon Property tax. If title transfer is done in the property tax module then at the time of final approval, the changes will reflect in the W&S module automatically. After the title transfer has been completed successfully, subsequent bills will be generated with the details of the new owner/s.
Water tap change in usage happens when the property type is changed from residential to Non-residential or from Non-residential to residential. Change in usage directly depends on the property tax module. If the property type is changed in the Property tax system then it will automatically reflect in the W&S system. When there is a change in the usage type, the subsequent bills will reflect the rates as per the updated usage category. When there is a change in the usage category in the middle of the billing cycle, pro-rata charges will be applied in the next billing period.
The change in connection category from non-metered to metered and vice-versa is also possible in the W&S system with the appropriate workflow configured to intimate all stakeholders of the change and collect any charges (if applicable) from the citizen.
On the W&S billing screen, there is a card called ‘Meter reading’. An employee can click on Meter reading which redirects the employee to the meter reading landing screen. The employee can search based on the following criteria:
ULB
Boundary Type
Boundary Value
Billing Year
Billing Period
Billing Period Value
Consumer No.
This feature facilitates the employee to search for all results based on desired criteria. The search result yields the following values: consumer number, owner name, meter status, last reading, current reading, date and consumption.
The employee can edit meter status, current reading, date and consumption under certain conditions. Based on this information the employee can generate the bills for connections.
In the system, there is a feature to generate demand under the billing section. Generate demand has a search feature in which the connections can be searched for which demand has been already generated. An employee can view, also edit those demands based on certain conditions.
The system has the capability to configure the demand generation as an automatic or a manual process. In the automatic process, the demand generation for non-metered connections is automatically done periodically. For metered connection as soon as the employee enters the meter reading and clicks on ‘SAVE’, the demand is generated.
Any success/ failure to generate demand triggers an automatic notification to the concerned ULB officials via email. Also, the demand generation cycle, demand generation date and officials who should receive the notifications can be configured.
The citizen can pay for dues by searching his/her connection. In search results, the citizen can click on pay, which redirects to the summary page of the dues. After this, the citizen can pay for dues online. An employee can also collect the payment on the citizen’s behalf. After searching for the desired connection, clicking on pay will redirect the employee to the common payment page. The employee can print the receipt after the payment is successfully collected. The citizen is also notified and gets a download receipt link in the notification.
If the Water tap owner has got his own water source then the water tap owner can initiate for Water tap connection closure permanently. So, that tap will be closed permanently and demand would not be generated for the connection. Application for the closing of the water tap connection is accepted only with the latest water charges receipt and clearing of old dues.
The state-level administrator can keep track of relevant metrics by using dashboards. Dashboards for W&S can be accessed by a state-level user under login.
The dashboard has these components:
Financial Indicators
W&S Total collections YTD
Water Collection
Sewerage Collection
Water - Demand vs Collection (Monthly trend)
Sewerage - Demand vs Collection (Monthly trend)
Municipal Adoption
W & S: No. Of ULBs Live
W & S: Total Number of ULBs
Water Consumers by Connection Type
W & S Consumers by Usage Type
Total Collections by Source
Total Collections by Mode
W & S Adoption: ULB Wise
Today’s Collections
W&S Total collections: Today
Water Charges - Total collections: Today
Sewerage Charges - Total collections: Today
W&S - Total No. of Receipts: Today
Water - Total No. of Receipts: Today
Sewerage - Total No. of Receipts: Today
Mode-wise W&S collections: Today
W&S ULB wise collections: Today
This section provides an overview of the methodology for the State-wide implementation of W&S. The Implementation of W&S is distributed across seven distinct stages. Each stage has predefined entry & exit criteria and roles & responsibilities. This is to ensure objective monitoring and decision-making for the overall success of the program. Details of each stage are defined in this section.
Note: This document is specific for States that have more than 30 ULBs.
W&S implementation program is expected to be completed approximately between 38- 42 weeks with the resource deployment by the State and System Integrator (SI) Team (as defined below). However, it is critical that activities and exit criteria set for each stage are achieved to adhere to this timeline.
There is a set of initial critical activities that are undertaken upon receiving a letter of enrollment from the State/Union Territory. Successful completion of these activities assures that the program is started with crucial personnel, System Integrator(SI) teams and funds.
Duration
4-6 weeks
Entry Criteria
Acceptance Letter/MoU by State
Exit Criteria
Finalize Water and Sewerage Program Vision
Finalize funding for the program
Define State/Union Territory -specific procurement process
Water and Sewerage Cell appointment. Consisting of :
Domain expert
Nodal officer (EO/ Commissioner/ Senior Official)
Program Head
System Integrator(SI) Team sign-up/onboarding
Define the value proposition of the programme for the state
Define the time frame within which the state needs to:
Go live
Scale pan-state
Define Year-on-Year(YoY) Financial Targets
System Integrator(SI) Sign-up:
System Integrator and state will agree on program scope, program timelines, and budgeting & resourcing.
This stage envisages the in-person interaction of crucial State/UT officials and implementation System Integrator(SI) Teams to kick-start the program. This stage may require multiple interactions/meetings with different stakeholders. The principal objective of these interactions is to identify scope, plan strategies for phasing/rollout (in pilot ULBs/Pan State) and create an active collaboration & Governance approach and agree on a high-level timeline for the engagement.
Duration
4-6 weeks
Entry Criteria
Program setup (Stage 0) is complete
SI Team signed-up
Key Activities
Project kick-off meeting and stakeholders consultation
Identify & agree on scope and exclusions
Finalize the approach on obtaining the W&S Connection Legacy Data (At least from the Pilot ULBs)
Identify pilot ULBs
Product Walkthroughs
Define Project Steering Committee Structure and Project Governance process
Define phases of rollout/ deployment
State Baseline Data (As per the Module)
Pilot ULBs Specific Product Data Configuration
Agreement on Product Feature Priorities and high-level delivery timelines
Assessment of all on ground W&S process along (1) citizen services/channels around it (2) Integration with other Department process
Finalize Program Success Metrics for Rollout and Adoption and Governance adhering to the vision of the program
Internal Capacity Building, program logistics at State and ULBs, as per the current scenario
Exit Criteria
Publish the program charter
Implementation plan agreement with priority applications and broad timelines
Program Governance Model
Program Success Metrics
Capacity Building
W&S Cell formation and appointment
Finalizing the strategy for W&S Connections Legacy Data
Master Data preparation/collection kickoff from Pilot ULBs
Cloud Infrastructure procured
Project Office Space allocated
Program Branding( Name, Logo, Tagline etc.)
Note
1) State Baseline Data (As per the Module): A Baseline Template is provided to collect certain vital information like no. of transactions, revenue collected in the last FYs, collection mode, budget data, etc. This data is vital for various analyses at the state level. This data must be collected pre-rollout. The baseline data collection templates will be provided to the state/SI Team.
2) ULBs Specific Product Data Configuration: This Master data is required from the Product Perspective to go live. For eg: Connection Legacy Data, Boundary Data, List of Employees, Rates etc. Master Data Template will be provided for the collection of this particular data type.
During the Solution design stage, key State/UT officials and members, who are subject matter experts, are expected to share State/UT acts and policies and help interpret the same for the System Integrator (SI) Team. This stage baselines the State/UT-specific product features in the Product Configuration report.
Duration
4-6 weeks
Entry Criteria
Program Charter
W&S Cell appointment
Key Activities
Standardization of all W&S processes, if needed
Initiate policy change and Process Re-engineering, if needed based on identified improvements
Conduct Product familiarization workshop
Initiate collection of Master Data (Legacy & Product Based) from pilot ULBs
Finalize data migration/collection/sync-up approach (State needs to provide a signoff)
Finalize data validation approach (State needs to provide a signoff)
Building capacity for basic understanding of resources and tools required to be used
Exit Criteria
Publish the W&S processes, data template/workflows (State needs to provide a signoff)
Finalization of Roll-out plan(in different phases)
Solution agreement for required state/UT-specific customisations
Finalization of Initial Reporting and Design (State needs to provide a signoff)
Finalization of Dashboard KPIs (State needs to provide a signoff)
Sign-off on data approach( Data collection/migration/correction/sync-up/validation) from the state
Detailed project plan
This stage consists of a series of developments in accordance with the detailed project plan to ensure the smooth functioning of the customised product. Preparation for the testing and data collection of the product UAT is complete. Further monitoring and maintenance strategies are put in place.
Duration
6-8 weeks
Entry Criteria
Product Configuration Report has been Signed Off by the State/UT
Detailed Project Plan set up in accordance with master data collection and environment setup
Key Activities
Setting up development environments
Development/customization of reports and dashboards
Development/Integration of portal
Third-Party Integrations (Payment gateway, Handheld/pos device)
Updation of user manuals and other key documents
Preparation & execution of Test Cases
Setup monitoring, support & maintenance processes and tools
W&S and Legacy data collection from Pilot ULBs (at least)
Training for basic understanding of resources and tools required to be used (system-related)
identify ULB level nodal officers for day to day support
Legacy Data Validation signoff from the state on Data Validation
Post this migration exercise will be taken up for water/sewerage connections
Migration and verification of Pilot ULB data as per data provided by the State
Exit Criteria
Data Validation Signoff by the state, post which the Legacy Data will be uploaded to UAT
Configured/Customized product that is ready for UAT
Monitoring, support & maintenance of Dashboards
finalization of Initial Reporting and Dashboard KPIs
During this stage, a demonstration of the product followed by a hand on session is conducted for the ULB officials. Necessary training of ULB officials and resources required for UAT is conducted and identified respectively. The establishment of the State/UT support Team and required processes are initiated in this stage.
Duration
2-3 weeks
Entry Criteria
Configured/Customized product ready for UAT
Pilot ULB Officials (Associated with W&S) are available for UAT & Training
Key Activities
UAT Environment Setup
Sign off from Pilot ULBs on the Migrated Connection Legacy Data during UAT
Issues/bug identification and resolution
Regression UAT and Sign off from Pilot ULBs/ State
Setting up the Production environment
Setting up Support Center & processes (Help Desk)
Training (Users, trainer)
master trainers identified from the ground for simultaneous training
Training the Support Resources
Marketing & promotion activities
Go Live & launch event
Setup of review and monitoring cadence/team
Usage/review/Dashboard/Field Visits
Exit Criteria
UAT Sign-off & Go Live for Pilot ULBs
Setup of review and monitoring cadence
On successful Go-Live in the Pilot ULBs, after further configurations to stabilize the product, the solution will be rolled out to the rest of the ULBs in multiple phases. Guidance and support from the State/UT Team will be required to create the rollout plans and assure the necessary infrastructure for training and deployment is available at each ULB.
Note: The rollout phase needs to be detailed out for iterative activities of onboarding ULBs in batches.
Duration
5-6 weeks
Entry Criteria
The pilot has been successful in the State/UT
there are less than 3 open critical incidents (issues) with respect to product, implementation and data
Key Activities
ULB configurations phase-wise as per the Project Plan
Phase wise migration and verification of ULB data (as per the Data Agreement signoff, provided by the State)
Logistics planning for training
Establishment of bug ticketing tool for resolving ground-level issues by the state team
Training the Users at the district level
Pan State Roll-Out - Phase wise
Stabilise product
Exit Criteria
State/UT wide Rollout in batches:
Adoption tracking & Review Cadence operational
Help Desk Effectiveness assured
Critical Bugs fixed
Program Success Metrics Tracking Kick-started
Note: Only once all the stages are complete in one batch of the rollout of around 30 ULBs, the next batch begins. There are multiple phases of rollout. The second batch begins after the first batch has successfully fulfilled all the criteria of the Rollout Phase. Typical timelines for closure of rollout in each batch is 5-6 weeks (in a batch of 30 ULBs).
The final stage consists of strategies to ensure the sustenance of the product in the State/UT. Systems are put in place to ensure the continuous tracking of data and provisions are made to improve the product if new data suggest.
Duration
Ongoing process
Entry Criteria
Rollout Phase 1( First set of 30 ULBs where rollout will happen after Pilot)
Key Ongoing Activities
Adoption Review Meetings as per the vision defined for the program
W&S Cell Focuses on Using data for:
tracking field issues and performance data to identify improvements
identify additional Integrations around W&S to make processes more robust towards enhancing W&S revenues (e.g Upstream and downstream Processes)
Conduct Weekly Review Meeting between ULBs, State Team for feedback on the system, which must be chaired by the Program Head
Plans of ongoing Sustenance in Place with respect to :
Funding
IT support (infra, helpdesk, ongoing enhancements)
Process Effectiveness and Improvements
This section outlines the activities involved in each stage of the implementation along with the responsibility and accountability of critical stakeholders - UT, NUS Team and System Integrator Team onboard.
W&S Cell: W&S Cell is the government-appointed body chaired by the Principal Secretary/Secretary, Urban Development Department with members from Urban Development Department etc.
Resource requirements for the W&S cell required to be formed by the UT
Project Head
1
Domain Expert
2
Nodal Officer
2
MIS Expert
4
Note: The designation mentioned above is as per designations known to drive W&S implementation at the State/UT level (explained below). These are the preferred figures in the case of Domain Expert, 2 people are subject to availability.
Project Head: Is the Head of the W&S Cell who will drive the project from the State/UT Side
Domain Expert: A person who is well aware of the on-ground scenario, well versed with the act, GOs passed, Prevalent Business processes, Deviations from the acts, Rates/ slabs applicable
Nodal officer (EO/Commissioner/ Senior Official): the product coordinator to drive the project centrally; monitors usage post Go Live; point of escalation for Implementation Team; seasoned and worked in multiple ULBs on various modules and has a good understanding of W&S; facilitates and tracks data collection post-go-live; monitors and facilitates the adoption of the application; point of contact for eGov, SI and at the HQ level.
MIS Expert: Day-to-day tracking of the program, data entry, reporting and review to senior officials
eGov Team: eGov Team is the technical partner of the project which will provide all necessary support to the State/UT concerning the implementation, Program Designing etc.
System Integrator (SI) Team: SI Team will be responsible for the rollout of the initiative in the UT, providing end-to-end support to the State/UT w.r.t. The implementation of the products in the ULBs.
Guidelines to read the table are mentioned on the next page:
Execute - One who owns the accountability to complete the activity
Consult - One who may initiate, guide and in the process, handhold the execution of the activity
Task/Activity
eGov
State Leadership
Appoint W&S Cell
Consult
Execute
Finalize funding for the program
Consult
Execute
Define state/UT-specific procurement process
Consult
Execute
System Integrator(SI) Team sign-up/onboarding
Consult
Execute
Finalize Water and Sewerage Program Vision
Consult
Execute
Note: Stage 0 is where the W&S cell and SI team are formed, hence there are only two entities playing a role which are that of eGov and the state leadership. Once the W&S cell and SI team are finalized, their role begins in the following stages.
Task/Activity
eGov
W&S Cell
SI Team
Identify & agree on scope and exclusions
Consult
Consult
Consult
Identify pilot ULBs
Execute
Consult
Project kick-off meeting and stakeholders consultation
Execute
Consult
Product Walkthroughs
Consult
Execute
Define Project Steering Committee structure and Project Governance process
Consult
Consult
Execute
Define phases of deployment/ rollout
Consult
Consult
Execute
Agreement on Product Feature Priorities and high-level delivery timelines
Consult
Execute
Assessment of all W&S process along
(1) citizen services/channels around it
(2) Integration with other department processes
Consult
Execute
Finalize Program Success Metrics for Adoption and Governance adhering to the vision of the program
Consult
Execute
Internal Capacity Building, program logistics at State and ULBs, as per the current scenario
Execute
Consult
Task/Activity
eGov
W&S Cell
SI Team
Standardisation of all W&S processes, if needed
Consult
Execute
Initiate policy change and Process Re-engineering, if needed based on identified improvements
Consult
Execute
Consult
Conduct Product familiarization workshop
Consult
Consult
Execute
Initiate collection of master data from pilot ULBs
Consult
Execute
Finalize data migration/collection/sync-up approach
Consult
Execute
Finalize data validation approach
Execute
Consult
Building capacity for basic understanding of resources and tools required to be used
Execute
Consult
Task/Activity
eGov
W&S Cell
SI Team
Setting up development environments
Consult
Execute
Development/customization of reports and dashboards
Consult
Execute
Development/Integration of portal
Consult
Execute
Third-Party Integrations (Payment gateway, Handheld/pos device)
Consult
Execute
Updation of user manuals and other key documents
Consult
Execute
Preparation & execution of Test Cases
Consult
Execute
Setup monitoring, support & maintenance processes, tools and dashboards
Consult
Execute
Data Migration for Pilot ULBs(at least)
Consult
Execute
Training for basic understanding of resources and tools required to be used (system-related)
Execute
Consult
Legacy Data Validation signoff from the state on Data Validation
Execute
Consult
Task/Activity
eGov
W&S Cell
SI Team
UAT Environment Setup
Consult
Consult
Execute
UAT Testing
Consult
Execute
Issues/bug resolution
Consult
Execute
UAT Sign off from Pilot ULBs
Execute
Consult
Setting up the Production environment
Consult
Execute
Setting up Support Center & processes (Help Desk)
Execute
Consult
Training (Users, trainer)
Execute
Consult
Training the Support Resources
Consult
Execute
Marketing & promotion activities
Execute
Consult
Go Live & launch event
Execute
Consult
Setup of review and monitoring cadence/team Usage/ review/Dashboard/Field Visits
Execute
Consult
Task/Activity
eGov
W&S Cell
SI Team
ULB configurations
Consult
Execute
Phase wise Migration and verification of ULB data
Execute
Consult
Logistics planning for training
Execute
Consult
Training the Users at the district level
Execute
Consult
Roll Out - All Locations
Consult
Execute
Execute
Stabilize product
Consult
Execute
Task/Activity
eGov
W&S Cell
SI Team
Adoption Review Meetings as per the vision defined for the program
Consult
Execute
Consult
W&S Cell Focuses on Using data for:
tracking field issues and performance data to identify improvements
identify additional Integrations around W&S to make processes more robust towards enhancing W&S revenues (e.g Upstream and downstream Processes)
Execute
Consult
Conduct Weekly Review Meeting between ULBs, State Team for feedback on the system, which must be chaired by the Program Head
Execute
Consult
Plans of ongoing Sustenance in Place with respect to :
Funding
IT support
Process Effectiveness and Improvements
Consult
Execute
Consult
Infrastructure
The actual Infra will be provided based on the questionnaire inputs received from the state
The state will take care of providing necessary project infrastructure and office facilities during the program for all on-site project Team members, which will be confirmed during the initiation phase. This includes workspace, office equipment (e.g., telephone with STD, fax machine, photocopy machine, etc.), stationery, PC/workstation, project LAN and internet access, etc.
The state will provide the necessary administrative support staff to carry out day-to-day project administration tasks, e.g., meeting rooms, Videoconferencing, etc.
The state should provide a Project Office and at least one conference room with a speaker phone throughout the Project Duration.
Project Scope
Any new requirements received from the State during the implementation phase will be handled through a change management process
State Team
The state will nominate a reasonably sized multifunctional Team from various departments of the State to be responsible for the implementation. The state Team would be required for information, validation, and execution through the implementation cycle and the Team members should be reasonably empowered to take decisions. Any delay in the decision-making process and the non-availability of the State Team may have an impact on the schedule.
The participants from State are expected to have a thorough understanding of the State’s internal processes.
The state will engage internal and external stakeholders required for this engagement and ensure their availability whenever needed.
Documentation
User education and training documentation will be delivered as per the default product documentation of the identified product versions.
The product manuals are expected to be shared with the State as part of the user manual.
All documentation would be in English only.
Training
Training to the end-users will be driven by the state Team.
The state will be responsible for providing the necessary infrastructure required for the Training, which includes the following readiness.
Training Rooms (Parallel Training Sessions) with Projector, White Board, Markers, Internet Connection, sufficient seating capacity, Desktop/Laptop for each participant and availability of Network for Trainees to connect to the server.
Implementation
The scope of the implementation will be limited to the services mentioned in Section 2.
eGov Team will have an identified SPOC for handling the first level of communication with the client unless discussed and agreed upon.
eGov Team will not be involved in defining the test cases or executing the test cases.
Necessary signoff would be provided by the state upon completion of the defined milestones.
Vision: Defining the time frame to go live, the time frame to scale it pan state, the value proposition of the programme for the state and year-on-year financial targets and adoption targets
Project Plan: A detailed plan of program schedule/timelines, implementation phases, team structure and ongoing support and maintenance required.
System Integrator: The entity/company which collates all the subsystems required for the project and integrates them to achieve the program objective
Program Charter: Outline of implementation plan agreement with priority applications and broad timelines, program governance model, program success metrics and capacity building.
Acceptance Letter/MOU: Formal acceptance/sign-off of the client state with a clear mandate of the program
Program Success Metrics: Defining the parameters (which are measurable) prior to the program, on which the success of the program is to be measured on the completion of the program
Project steering committee: The key body within the governance structure which is responsible for the business issues associated with the project that are essential in ensuring the delivery of the project outputs and the attainment of project outcomes.
Project governance: Set of policies, regulations, functions, processes, procedures and responsibilities that define the establishment, management and control of projects, programmes and portfolios.
Scoping: List of activities measured against the time taken to complete them in accordance with the project goals
Baseline data: Set of information that serves as a foundation to compare other data acquired afterwards
Project Kick-off meeting: Meeting with the project team and the client of the project. This meeting would follow the definition of the base elements for the project and other project planning activities
Fitment Study: GAP study of the existing/required field process vs product
Data migration: Existing records of the functional activities need to be moved into the database of the newly released application
Data collection: Required data for the roll-out of the applications, which needs to be collected from the existing functional process
Data validation approach: This approach enables the sanctity of the data with built-in validation by design
Data synchronization: The process of establishing consistency among data from a source to a target data storage and vice versa and the continuous harmonization of the data over time.
Pilot Implementation: Any new process is tested out as a pilot in one or two instances before pan implementation.
Pilot ULB: The ULBs selected for the pilot implementation are called pilot ULB.
Roll out: On successful clearance of the pilot, the process/application/services are implemented across all Offices/ULBs.
Deployment: Deployment defines the complete package of software components set up in a particular environment.
Customisation: Details of changes to be made in the product to comply with the needed field process.
Configuration: Defining existing content such as options and variables based on the requirements on the ground
Product walkthrough: Explaining the users step-by-step through a set of actions that they need to take to achieve a specific outcome.
So, in the URL mentioned above in apiRequest, change the role from EMPLOYEE to REINDEXING_ROLE.
Reference for changes :
[UM-4382]- Updated indexer for water service by hinamakhija-eGov · Pull Request #2342 · egovernments/configs
[UM-4382]-Updated indexer for sewerage by hinamakhija-eGov · Pull Request #2345 · egovernments/configs
This role is a newly defined role in MDMS as already mentioned in the changes at the top.
This Role helps in getting the Encrypted data in accordance to firstLevelVisibilty defined for it.
For W&S, we need encrypted MobileNumber in the index because W&S inbox uses Elastic search and we require mobileNumber search for the same hence owner MobileNumber has to be there mandatorily in the index for search.
The changes need to be made in all the topics for W&S indexes. For more details find the changes here.
__All content on this page by eGov Foundation is licensed under a Creative Commons Attribution 4.0 International License.
All content on this page by eGov Foundation is licensed under a Creative Commons Attribution 4.0 International License.