
Loading...
Loading...
Loading...
Loading...
Loading...
Loading...
Loading...
Loading...
Loading...
Loading...
Loading...
Loading...
Loading...
Loading...
Loading...
Loading...
Loading...
Loading...
Loading...
Loading...
Loading...
Loading...
Loading...
Loading...
Loading...
Loading...
Loading...
Loading...
This section contains docs that walk you through the various steps required to configure DIGIT urban services.
Details coming soon...
In this document, we are coming to learn how to upload APK to the play store and make it available to the end user to download and use it from the play store.
Before starting the process of uploading the apk to the play store the following requirements are a must.
Make sure that the signed apk (signed apk has a key generated, which is used to release different versions of the apk) is generated for the application that you want to upload to the play store.
Make sure that you have a Google Play account and agree to the stated terms and conditions. The payment must be completed for the account before it is ready for uploading an apk to the play store.
two screenshots of your app and they must be at least 320 pixels wide and be in a PNG or JPEG format.
You must also add your high-resolution app icon. It must be 512 by 512 pixels and it must be in 32-bit PNG format. This icon will be visible on the Google Play app’s page and in search results.
Upload a feature graphic image, that will be visible at the top of the Google Play app’s page. This image must be 1024 by 500 pixels, and maybe in JPEG or 24-bit PNG format.
Also, prepare a small description of the app in four to five lines.
The use of deploying the apk to the play store is to enable the user to download the apk from the play store and use it whenever needed. By uploading the apk to the play store our app will be available to all end-users around the world at their fingertips.
Now, we are going to learn step by step procedure of uploading apk to the play store.
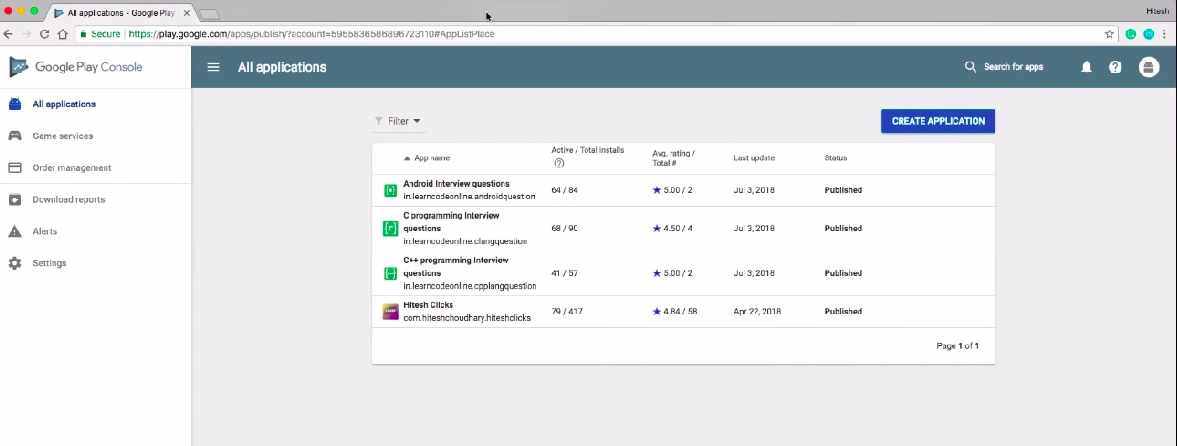
Open the Google Play console by entering the URL (https://play.google.com/apps/publish/) and log in with the user credentials.
After login in the following screen can be seen.
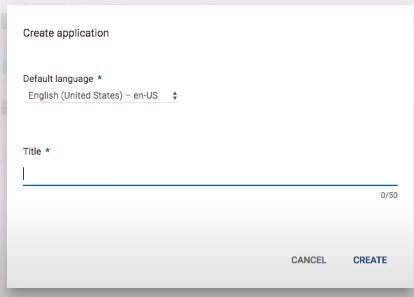
Now on the top-right click on the Create Application button and you get a popup to enter the title of the apk. Refer to the screenshot below and click on create.
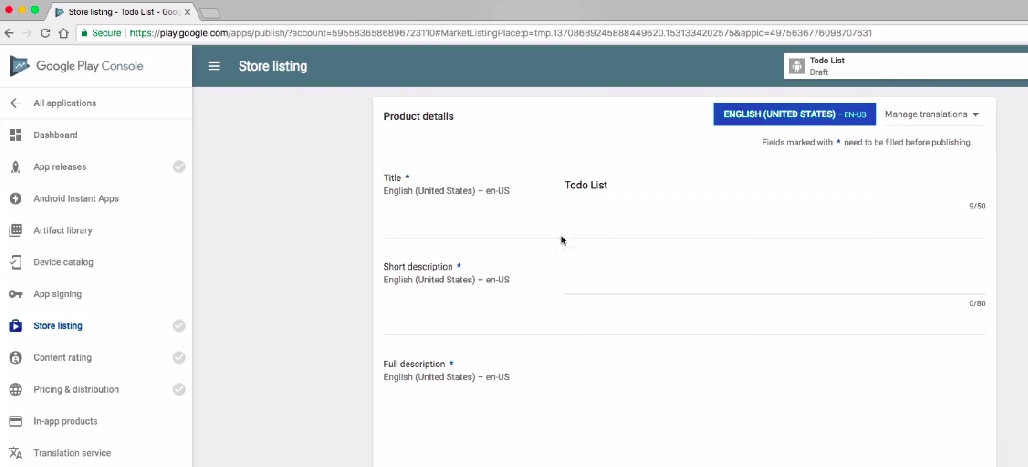
After clicking the create you will be redirected to the page where we need to enter the product details, graphics assets, categorization ..etc
Under the Product Details section, enter the description that we have prepared in the beginning.
Under the assets section, we need to attach at-least two screenshots of the application, a high-resolution thumbnail icon and a feature graphic image.
Under categorization, select the application type and category.
Coming to the contact section, add the website URL, email and also phone number if you wish to add one.
After next comes the privacy policy section where you can enter the link to the privacy and policy page and save it as a draft.
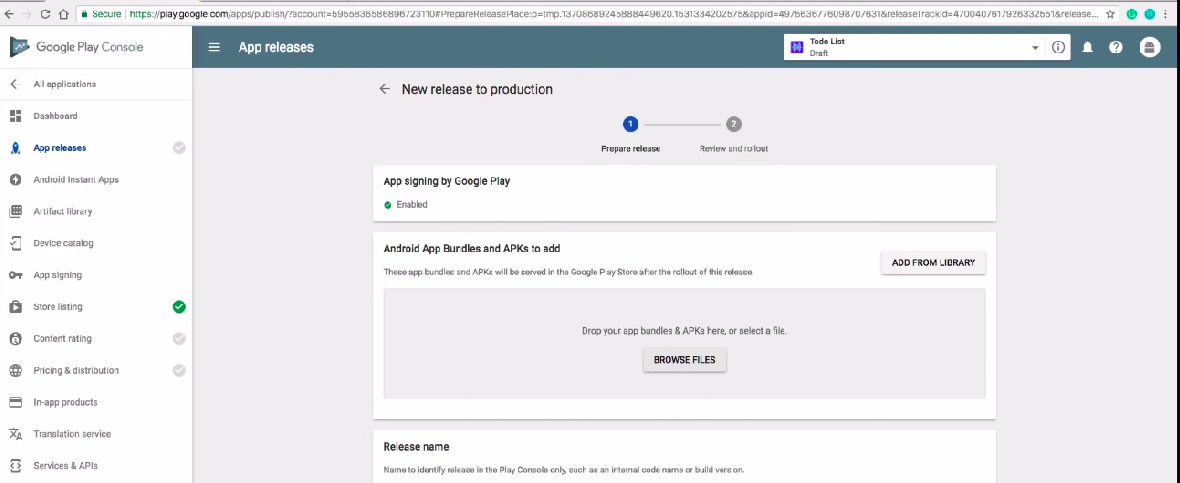
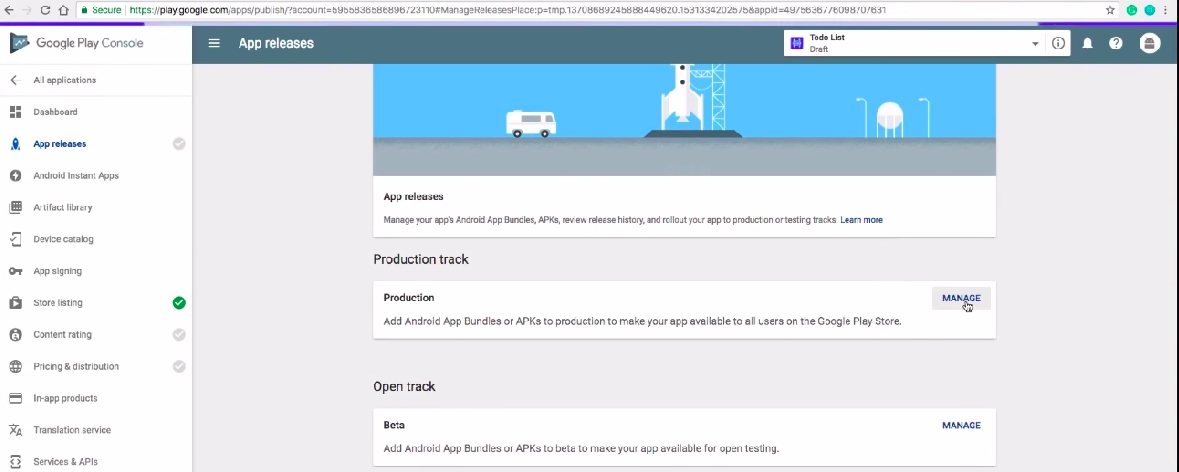
After saving as a draft on the “right side menu” select the option “App Release”. In the app release page under the “production track” click on Manage. Click on create a release on the next screen. Click on Continue on the next page under the “ App signing by google play”.
In the next page, under android app bundles and APK to add section add your APK generated also enter the release name and add the description inside the <en-US> tag related to that APK and save the entered data.
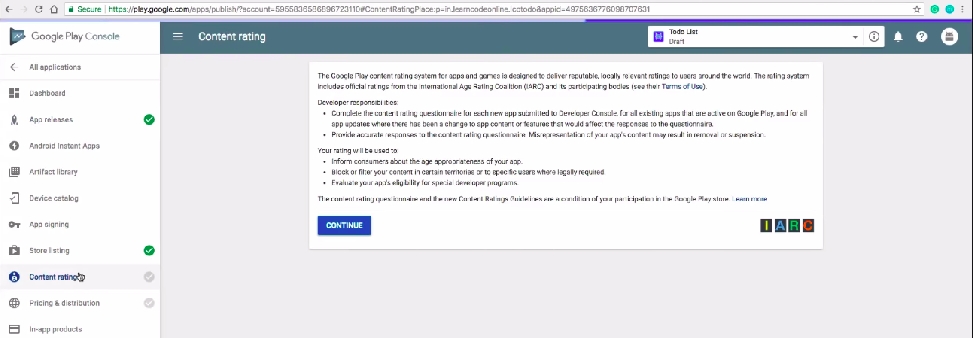
After that click on the “calculate Rating” then in the click “apply Rating Button”.
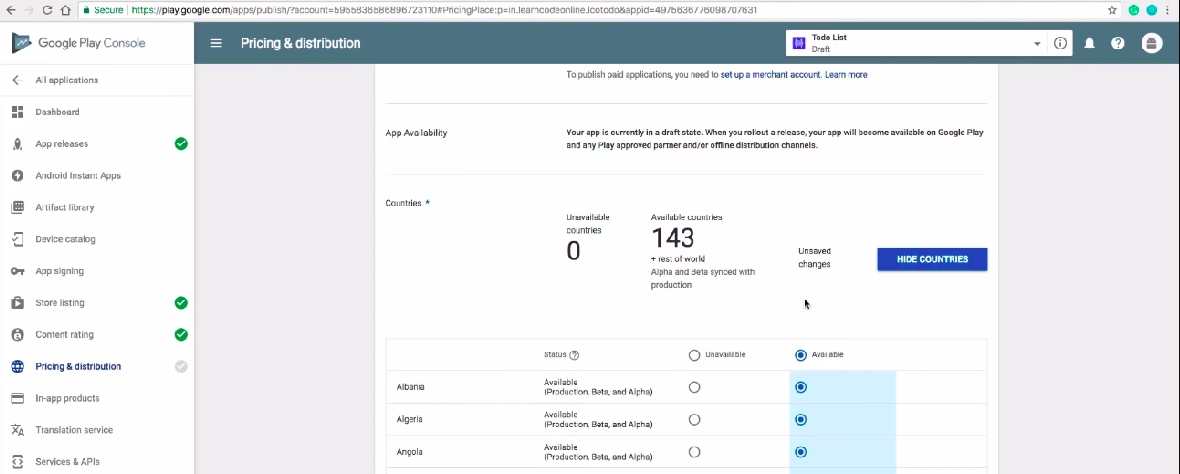
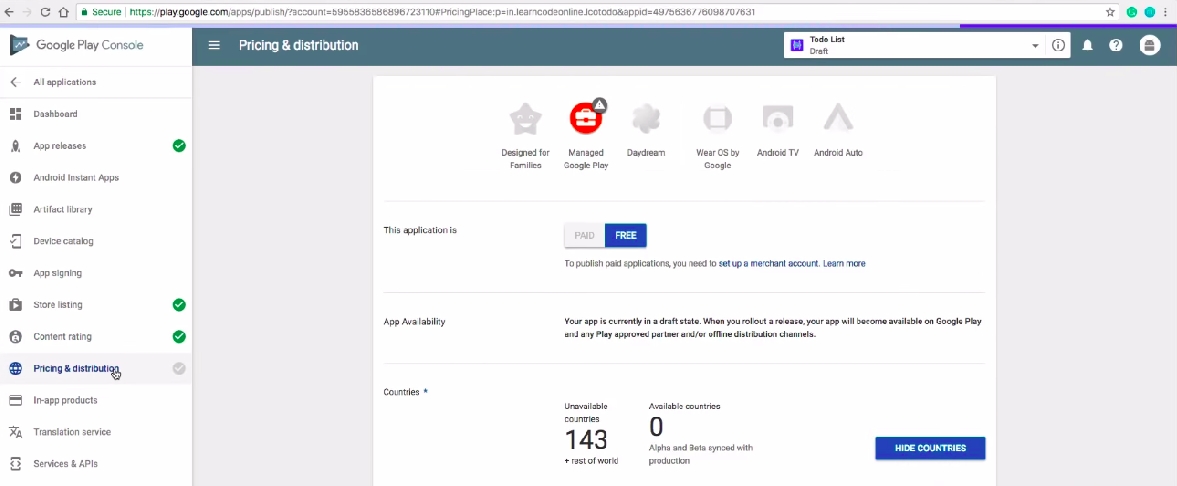
Next will be the “Pricing and Distribution” in the “Right side Menu”. In this page we have the option to select the cost of APK to download or free, also select the countries app needs to be available and also answer the questionnaires that are asked and click on the save Drafts.
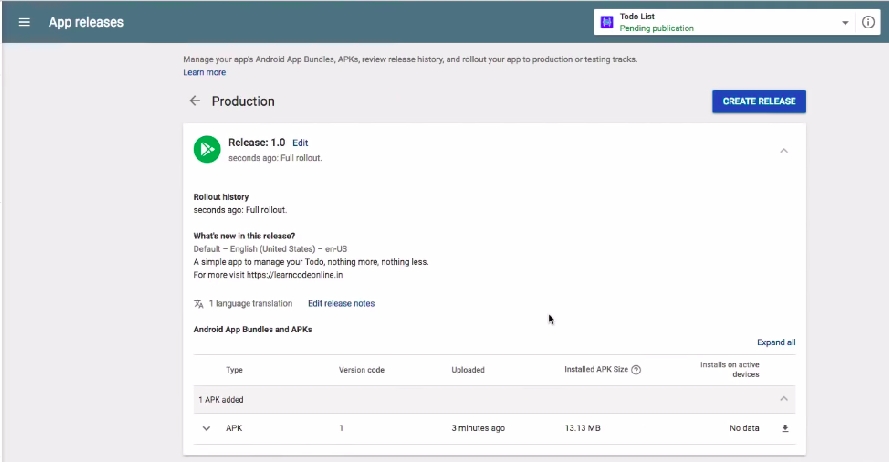
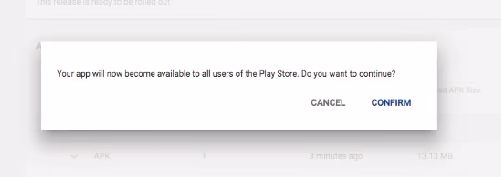
Finally, again go the “App Release” in the right side menu and click on the “ Edit Release” button in the Production Track section and save the details and at the end click “Start role out to production” and click confirm.
The following screen acknowledges your process is ended.
That is all about uploading APK to the play store. You can check the status of the application on the right side menu under the “ All Application”. It takes some hours to appear in the play store. Wait for the APK to appear in the play store. We can also check the details of the APK in the Dashboard.
UI build preparation details for central instance
This page offers comprehensive instructions on preparing the UI build for the central instance. Follow the steps outlined in the respective sections below to successfully configure this setup.
Code Path: egovernments/DIGIT-Dev
A global configuration file should be generated for each instance. Example: UAT instance s3 bucket file Path: https://s3.ap-south-1.amazonaws.com/egov-uat-assets/globalConfigs.js
Add the below content to this file.
In this file -
Change the “stateTenantId” value as per instance; in this instance, it should be ‘pg’.
Change the “finEnv” value based on the specific instance; in this instance, it should be ‘uat’.
Change the “footerBWLogoURL” value as per instance requirements; in this instance, it should be ‘'https://s3.ap-south-1.amazonaws.com/egov-uat-assets/digit-footer-bw.png'’ (this is s3 link for footer image).
Change the “footerLogoURL” value as per instance requirements; for this instance, it is ‘'https://s3.ap-south-1.amazonaws.com/egov-uat-assets/digit-footer.png'’ (this is the s3 link for footer image).
Modify the "digitHomeURL" according to the instance requirements; in this instance, it should be set to "Coming Soon."
Change the "assetS3Bucket" value based on the specific instance; in this case, it should be set as "pg-egov-assets."
To modify the Google Maps key, you should make the necessary changes in the "gmaps_api_key" field.
If the "centralInstanceEnabled" parameter is configured as "false," the default behaviour of the logic will be active in the UI. Conversely, if the "centralInstanceEnabled" parameter is configured as "true," the central instance logic will come into effect.
Roles define the permissions of a user to perform a group of tasks. The tasks are created as API calls to do certain actions when a request for those calls is sent by the system. For example, the key tasks for a Trade License application include initiate/apply, forward, approve or payment. For Trade License initiate two API calls, “create” and “update” is required. Create API creates and saves the application in the database and returns an application number. Update API saves the required attached documents in the file store and returns the success acknowledgement message of the application created. These create and update API access permission is granted to the roles named Citizen and TL counter employee.
Access permission is granted by mapping roles with APIs. Users assigned with the citizen or TL counter employee roles can initiate/apply the Trade License application.
Before proceeding with the configuration, make sure the following pre-requisites are met -
Knowledge of DIGIT applications is required.
Users should be aware of transactional steps in the DIGIT application.
Knowledge of json and how to write a json is required.
Knowledge of MDMS is required.
User with permission to edit the git repository where MDMS data is configured.
In mapping roles with APIs, permission to perform a certain task can be restricted based on the requirement. For example, only the user with Role TL Counter Employee or Citizen can initiate the Trade License applications.
After mapping roles with APIs, the MDMS service needs to be restarted to read the newly added data.
APIs are added in actions-test.json and termed as action. In MDMS, file actions-test.json, under ACCESSCONTROL-ACTIONS-TEST folder APIs are added. API Sample:
APIs are added as action array elements with the request URL and other required details for the array "actions-test"
Each action is defined as a key-value pair:
id
Numeric
Yes
A unique id that identifies an action.
name
Text
No
A short narration provided to the action.
url
Text
Yes
It is the request URL of API call.
displayName
Text
No
It is the display name.
enabled
boolean
Yes
To enable or disable display in UI.
servicecode
Text
No
Code of the service to which API belongs.
Roles are added in roles.json In MDMS, file roles.json, under ACCESSCONTROL-ROLES folder roles are added. More about roles can be checked in the below link: Adding roles to System
Mapping of roles and APIs/actions is added in roleactions.json, under the folder ACCESSCONTROL-ROLEACTIONS. Sample mapping:
Role and API/action mapping is added as an array element under array roleactions. Each mapping is defined with key-value pairs. keys are rolecode, actionid, actioncode and tenantId.
rolecode
Yes
The unique code of the role which is defined in roles.json and which required mapping for API.
actionid
Yes
The unique id of the API/action which is defined in actions-test.json and which is required to be mapped with the role.
actioncode
No
The code of the API/action which is defined in actions-test.json and which is required to be mapped with the role.
tenantid
Yes
tenant id of state.
Sample actions-test.json
Sample roles.json
Sample roleactions.json Roles APIs mapping
Roles define the permissions of a user to perform a group of tasks. For example for a Trade License application initiate, forward, approve or payment are tasks that require permission. Users assigned to the citizen or counter-employee role can perform initiation and payment. TL Document Verifier can forward the application and the only user assigned with the role named TLApprover can approve the application.
Before proceeding with the configuration, make sure the following pre-requisites are met -
Knowledge of DIGIT applications is required.
Users should be aware of transactional steps in the DIGIT application.
Knowledge of json and how to write a json is required.
Knowledge of MDMS is required.
User with permission to edit the git repository where MDMS data is configured.
Roles provide users with permission to perform certain tasks and restrict too based on the requirement. For example, only users with Role TLApprover can approve the Trade License-initiated application.
While creating an employee in the system from HRMS Admin, the roles can be assigned to the employees based on the requirement. The roles added in MDMS will show in the “roles drop down” in the employee create screen.
In the DIGIT system workflow for a module is implemented based on roles. For example, the roles for the Trade License module in a Trade License application workflow are - CounterEmployee/Citizen>TLDocVerifier>TLApprover>CounterEmployee/Citizen. The table below lists the Trade License application workflows based on the defined roles.
CounterEmployee
Initiates the TL application for Citizen from counter. Initiated TL application goes to TLDocVerifier inbox.
Citizen
Initiates the TL application. Initiated TL application goes to TLDocVerifier inbox.
TLDocVerifier
User with role TLDocVerifier can forward or reject the TL application after verifying the initiated application. The rejected application shows for re-submission in initiator inbox. The forwarded application goes to TLApprover inbox.
TLApprover
TLApprover can approve or reject based on the requirement. The rejected application goes back to TLDocVerifer for re-verification. The approved application shows for payment pending in initiator inbox.
CounterEmployee
Once the initiated application is approved by the user with role TLApprover, CounterEmployee can do the payment and download the receipt.
Citizen
Once the initiated application is approved by the user with role TLApprover, Citizen can do the payment and download the receipt.
After adding the new role, the MDMS service needs to be restarted to read the newly added data.
Roles are added in roles.json In MDMS, file roles.json, under ACCESSCONTROL-ROLES folder roles are added. Sample roles:
A role is added as an array element under the array named “roles”.
Each role is defined with three key-value pairs. keys are “code”, ”name” and “description”.
code
Alphanumeric
64
Yes
A unique code that identifies the user role name.
name
Text
256
Yes
The Name indicates the User Role while creating an employee a role can be assigned to an individual employee.
description
Text
256
No
A short narration provided to the user role name.
Localization needs to be pushed for all the roles added in roles.json
Sample Localization for roles In English:
In Hindi:
code "code": "ACCESSCONTROL_ROLES_ROLES_TL_CEMP", is the localization key for role.
The key has three parts:
a) ACCESSCONTROL_ROLES: It is the folder and module name of MDMS, file roles.json in which roles are added. The hyphen (- ) in the name "ACCESSCONTROL-ROLES" is replaced with an underscore ( _ ).
b) ROLES: It is the role.json file name and array name under which roles as array elements are added.
c)TL_CEMP: It is the unique role code.
If localization is not pushed for the roles then the key will appear in UI.
Sample roles.json
Reference link
The objective of PDF generation service is to bulk generate pdf as per requirement.
Before you proceed with the documentation, make sure the following pre-requisites are met -
All required data and format file path is added in the environment yml file
pdf-service is up and running
Provide functionality to download and print PDF’s
Provide functionality to download and print bulk PDF’s
Create data config and format config for a PDF according to product requirement.
Add data config and format config files in PDF configuration
Add the file path of data and format config in the environment yml file
Deploy the latest version of pdf-service in a particular environment.
For Configuration details please refer to the Customizing PDF Receipts & Certificates document in Reference Docs
The PDF configuration can be used by any module which needs to show particular information in PDF format that can be printed/downloaded by the user.
Functionality to generate PDFs in bulk
Avoid regeneration
Support QR codes and Images
Functionality to specify a maximum number of records to be written in one PDF
Uploading generated PDF to filestore and return filestore id for easy access
The following are the steps for integrating TL certificate in UI.
In footer.js file which is present in /frontend/web/rainmaker/dev-packages/egov-tradelicence-dev/src/ui-config/screens/specs/tradelicence/applyResource , Create two object (download and print object) in footerReview function.
Example
In tlCertificateDownloadObject give the proper label name and key for the pdf. In the link function get the object whose mapping is required for PDF, in this case, we want a license object. Call the function downloadCertificateForm (details about this function is described in the next step). Add icon details which we want to use in UI to represent that option. The same thing for tlcertificatePrintObject only difference is we have to call generateReceipt function. Again create the same two object with similar content in downloadPrintContainer function.
Mention the function name “downloadCertificateForm“ and “generateReceipt“ in import , because the functions is define in /frontend/web/rainmaker/dev-packages/egov-tradelicence-dev/src/ui-config/screens/specs/utils/index.js and /frontend/web/rainmaker/dev-packages/egov-tradelicence-dev/src/ui-config/screens/specs/utils/receiptPDF.js
In index.js define the function which is responsible for calling the Create API of PDF service to create respective PDF. In that function, you have to mention the tenant ID and proper key value which is the same as the key mentioned in the data and format config. Also mentioned the URL : /pdf-service/v1/_create and action as get and also call the function downloadReceiptFromFilestoreID which is responsible to call filestore service with filestoreid and return the URL for pdf.
Example of function downloadCertificateForm
Example of function generateReceipt
(Note: All the API’s are in the same postman collection therefore the same link is added in each row)
__
SMS and Email communicate the necessary information/updates to the users regarding the multiple transactions on DIGIT applications. For example, when a Trade License application is initiated or forwarded or approved or payment is done in the DIGIT system, the applicant and payer (if the payer is other than the applicant) are informed about the status of the Trade License application through SMS/Email. The language for SMS and Email can be set as per requirement/choice.
Before proceeding with the configuration, make sure the following pre-requisites are met -
Knowledge of DIGIT applications is required.
User should be aware of transactional steps in the DIGIT application.
Users can receive Emails and SMS with necessary information/updates in the decided language.
The language can be decided by the end-users (citizens or employees). End-users can select the language before logging in or after logging in from the inbox page.
If the language is not chosen by the end-user, then SMS/Email is received in the language of, State requirement-based state-level configured language.
Sms and Email localization are pushed to the database through the endpoints for all the languages added to the system. Localization format for SMS/Email
Sample of SMS localisation for Trade License application initiation English localization
Hindi localization
The placeholder <1>,<2>,<3> are replaced by the actual required value which gives important information to the applicant. For example**,** the message will be received by the applicant as: Dear Kamal, Your Trade License application number for Ramjhula Provisional Store has been generated. Your application no. is UK-TL-2020-07-10-002058 You can use this application number….
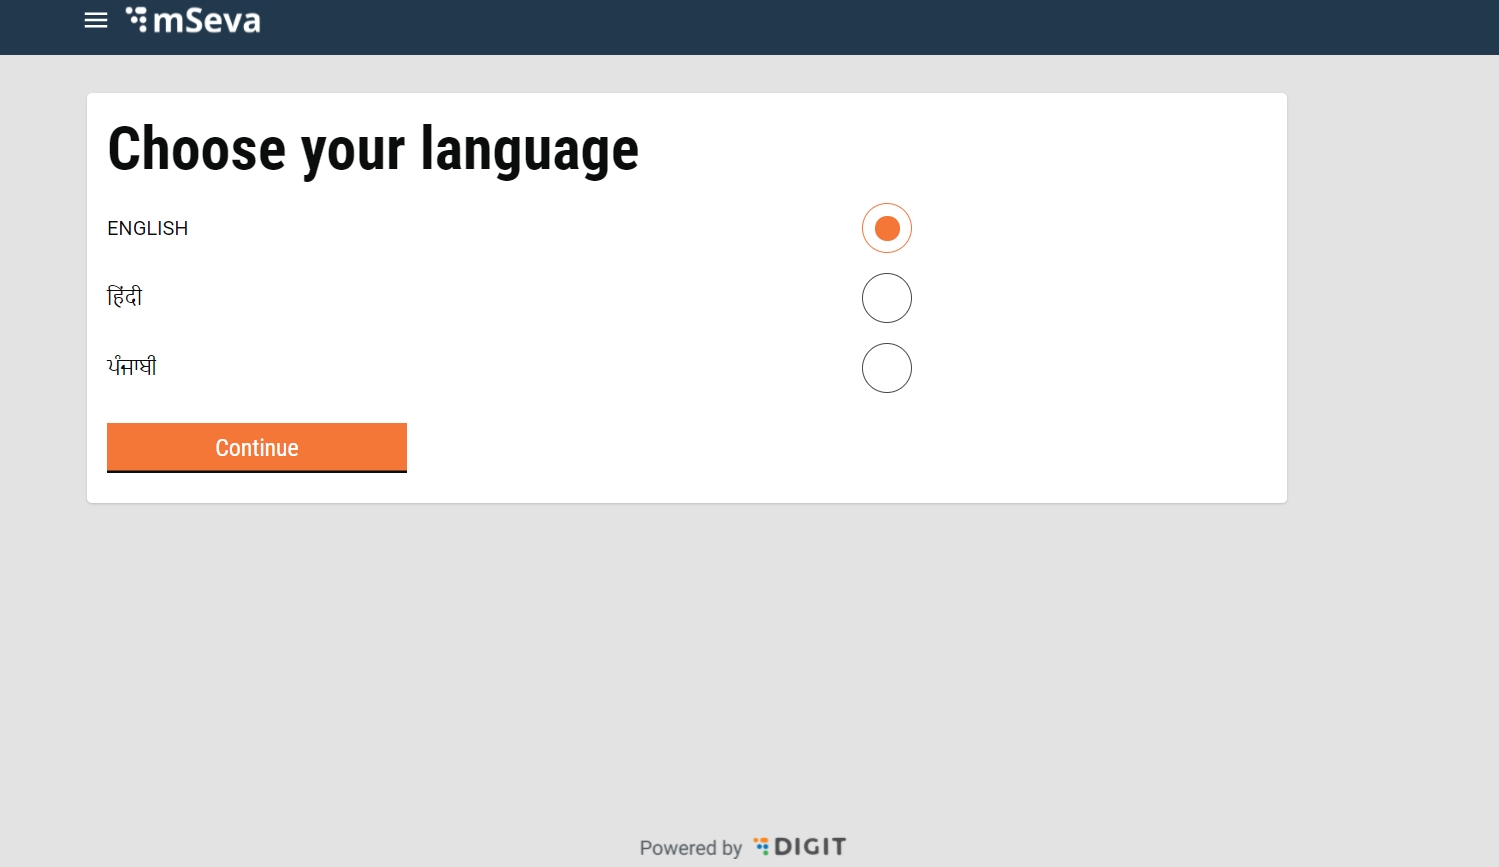
The default language for SMS and Email can be set by
Clicking on the preferred language from the available language button, on the language selection page, which opens before the login page.
On the citizen or employee inbox page, the language can be selected from the drop-down, available in the right corner of the inbox title bar.
If the language is not chosen by the citizen or employee, then SMS/Email is received in the default configured language. For example, Hindi, English and Kannada are added as three languages in the system for a specific state. In case the state decides that out of these three languages, Kannada should be configured as the default language. In such case Kannada is set as the default language in the MDMS. So when the end-user does not choose any language then SMS/Email is sent in the Kannada language.
The selected language key is sent as a parameter along with other required transaction parameters to the back-end code.
In the back end, to send SMS/Email logic, the language key is checked and based on the language key and SMS unique key, the message is fetched from the database.
The DIGIT system supports multiple languages. To add a new language, it should be configured in the MDMS.
Before you proceed with the configuration, make sure the following pre-requisites are met -
Knowledge of json and how to write a json is required.
Knowledge of MDMS is required.
User with permission to edit the git repository where MDMS data is configured.
Users can view the web page of the DIGIT application in the language of their choice by selecting it from the available languages.
SMS and Emails of information about the transactions on the DIGIT application can be received in languages based on the selection.
After adding the new language, the MDMS service needs to be restarted to read the newly added data.
A new language is added in StateInfo.json In MDMS, the file StateInfo.json, under common-masters folder holds the details of the language to be added.
The label’s text is displayed in UI for language selection. The value text is used as the key to refer to the language.
Language is added as an array element under the array named “languages”. Each language element is a label and value pair. By default English language is added. Other languages can be added as an additional/new language which the system will support. System to support multiple ie., more than one language, those languages are added in StateInfo.json as below.
"हिंदी" and "ಕನ್ನಡ",”language3” are more than one language (Hindi, Kannada, some language) added other than "ENGLISH".
In UI the labels and master values that populate in dropdown or textboxes are added as a key for localization. For eg., when a user logs in, at the top of the inbox page, a welcome message in the English language shows as “Welcome User name“. The text “Welcome” in English localization for the Key “CS_LANDING_PAGE_WELCOME_TEXT”.
For all the labels or master value keys, localization should be pushed to the database through the endpoints for all the languages added to the system. The SMS/Email are also added as keys for which values are pushed in all the languages to the database.
Localization format for keys
Sample of localization
In the Hindi language
In the English language
For the languages added in the system if values are not pushed to the database then for the labels or master data, the key will appear in UI. If values for SMS/Email are not pushed, the SMS/Email will not be received.
Any one language from the multiple added language can be set as default. For example, if English, Hindi and Kannada are three languages added in the StateInfo.json and Kannada has to be set as the default language. Set the language key in the text "defaultLanguage" in the StateInfo.json as the value.
Configuration of the notification messages for a business service based on the channel for the same event.
For a specific action of the user, he/she will get an SMS and email as an acknowledgement.
Users can get SMS, Event, and email based on different channels.
The application allows one to either send different messages across all channels based on their actions.
To have this functionality for different business services, a channel names file was created and added to the MDMS data.
It contains information about the combination of different actions and channels for a particular business service. Example -
The different channels are
SMS: ID (Mobile Number)
Event
Email: ID (Email ID)
This feature enabled the functionality which would first check for the channels present in the file and send the notification accordingly.
For the SMS event, it would send the SMS notification and log “Sending SMS Notification”. For Event it would log, “Event Notification Sent”, and for Email, it logs “Email Notification Sent”.
Follow the steps below to enable/disable channels for a particular business service
To add/delete any particular channel for a business service
Restart egov-mdms-service to apply the changes.
Configure your business service with the steps mentioned below to
The objective of PDF generation service is to bulk generate pdf as per requirement. This document contains details about how to create the config files which are required to generate new pdf.
Before you proceed with the configuration, make sure the following pre-requisites are met -
Prior knowledge of JavaScript.
Prior knowledge of Node.js platform.
JSONPath for filtering required data from json objects.
Provide flexibility to customise the PDF as per the requirement.
Supports localisation.
Provide functionality to add an image, Qr Code in PDF.
Provide functionality to call external service for creating PDF with external service response
Create data config and format config for a PDF according to product requirement.
Add data config and format config files in PDF configuration
Add the file path of data and format config in the environment yml file
Deploy the latest version of pdf-service in a particular environment.
Config file: A json config file which contains the configuration for pdf requirement. For any pdf requirements, we have to add two configs file to the service.
PDF generation service read these such files at start-up to support PDF generation for all configured module.
Sample structure of variable definition in data config
Example to show date in PDF
Example of external API calling to MDMS service
Example of adding Qr Code
For adding Qr code there is separate mapping with the name “qrcodeConfig“ in data config. This mapping can use variables defined in “direct” and “external“ mappings along with the ****static text. The information on the QR Code scan will be defined as value. The variable defined in this mapping can directly be used in the ****format config as an image. ex:-
Data Config for Qr Code:
Example of adding footer in PDF (adding page number in the footer)
Example of adding Qr Code
Format Config for Qr Code
For Integration with UI, please refer to the links in Reference Docs
(Note: All the API’s are in the same postman collection, therefore, the same link is added in each row)
__
This section walks you through the steps to adding a new language or setting up the default language on the DIGIT system.
All content on this page by eGov Foundation is licensed under a Creative Commons Attribution 4.0 International License.
Technical Configuration Doc
eGov-User-Events service provide a common point to manage all the events generated for the users in the system. Events include updates from multiple applications like PT, PGR, TL; events created by the employee addressing the citizen etc. This service provides the users with APIs to create , update and search the events.
Before you proceed make sure the following pre-requisites are met -
Java 8
Kafka server is up and running
egov-persister service is running and has egov-user-events persister config path added in it
PSQL server is running and database is created
Provide a common platform to create, manage and notify events
Events can be created either by an API call or by pushing records to the Kafka queue
Add the MDMS configs required for egov-user-events
Add the Role-Action mapping details for APIs
Deploy the latest version of egov-user-events
Add egov-user-events file in config folder in git and add that path in the persister . (The file path should be added in environment yaml file in param called persist-yml-path )
Add master data in MDMS service with the module name as mseva. The sample master data for the service is given below: Event Categories
Event Types
Use /localization/messages/v1/_upsert to add localisation (templates) for notification messages to be sent. The product notification templates are given below:
Configurable Properties
The following properties are configurable in the application.properties file in egov-user-events service.
Property
Value
Remarks
kafka.topics.persister.save.events
save-user-events
This is the persister topic onto which user-events pushes records for persistence. This is for creating events.
kafka.topics.persister.update.events
update-user-events
This is the persister topic onto which user-events pushes records for persistence. This is for updating events.
kafka.topics.lat.details
user-events-lat
This is the persister topic onto which user-events pushes records for persistence. This is for storing last-access-time / last-login-time of the user.
kafka.topics.save.events
persist-user-events-async
Topic to which the user-events consumer is subscribed. Producers willing to create events must push records to this topic.
kafka.topics.update.events
update-user-events-async
Topic to which the user-events consumer is subscribed. Producers willing to update events must push records to this topic
mseva.notif.search.offset
0
Default pagination offset.
mseva.notif.search.limit
200
Default pagination limit.
Entities
Events: Model to capture the events information. This object captures all event details that is either created or updated.
EventDetails: Captures details of the event such as organiser, location, time etc are captured here. This is the child object to the Events object. This holds significance only if the type of the event is ‘EVENTSONGROUND’.
Action: This captures the user-actions involved in the event. For instance, the pay now option, reopen option, download certificate option etc.
Recipient: Every event is addressed to a crowd to which a notification for the same is sent. This model captures information about the recipients of the notification of this event or can also be framed as details of the addressee of the event.
Event Type: Events are divided into multiple types as follows:
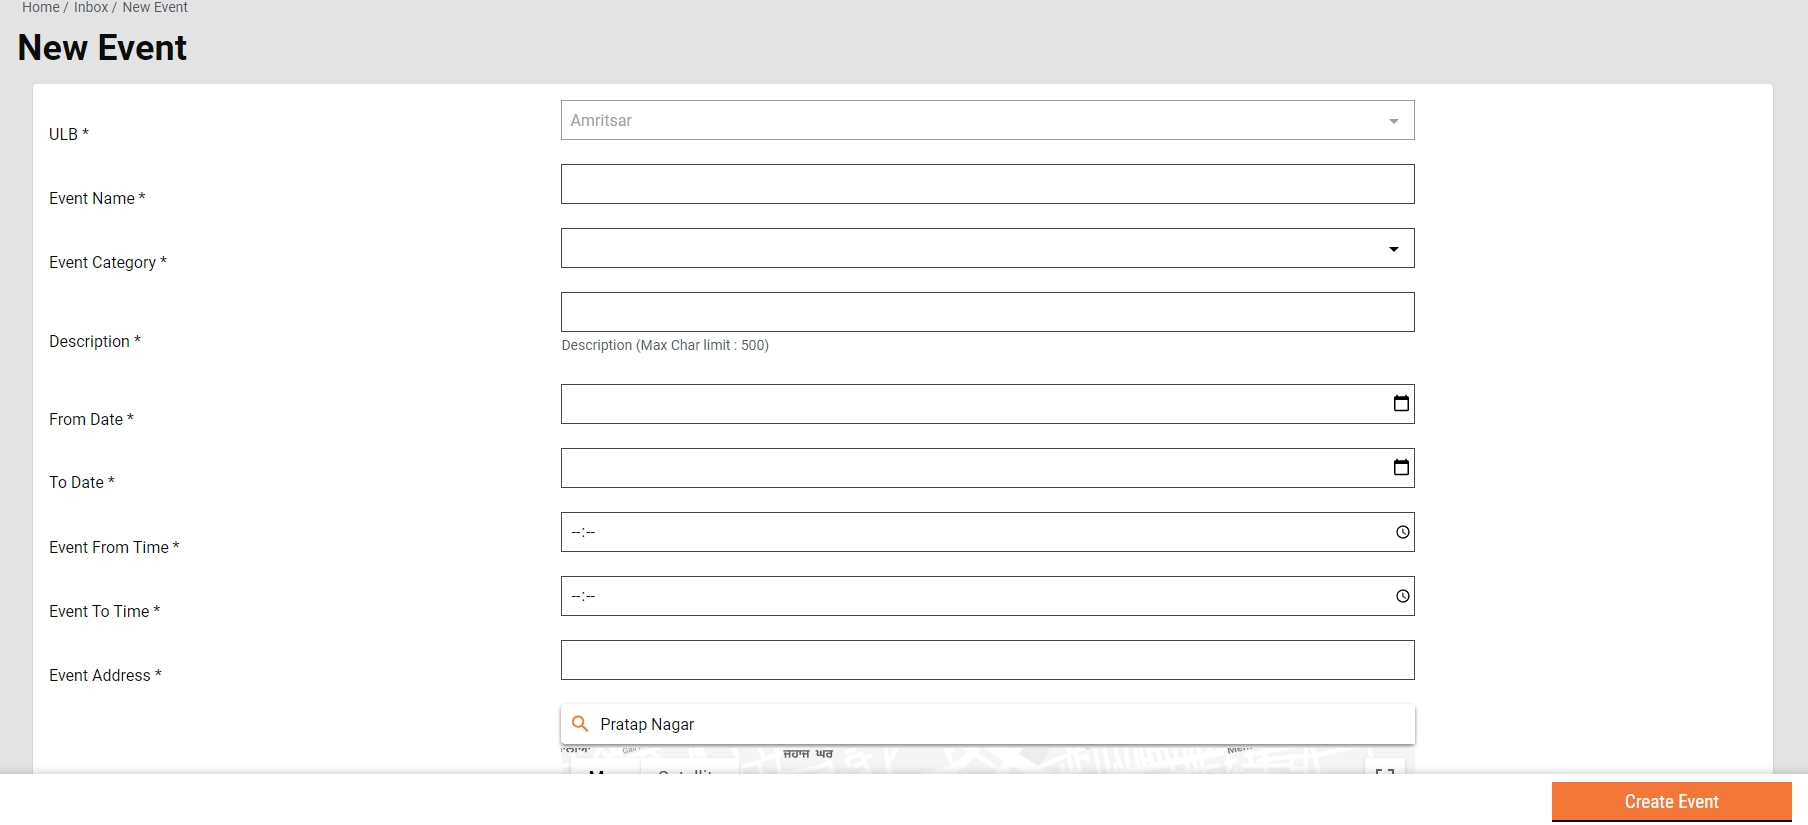
BROADCAST - These are messages broadcasted addressing a group of people. For instance, “There’s road blockage near the bus stand, please use a different route”
EVENTSONGROUND - These are events organised by a group of people addressing another group of people. Usually, it is the ULB organising events for the citizens. It can be any activity like a 10K Marathon, Polio Drive, Property Tax collection drive etc.
SYSTEMGENERATED - These events are generated by different systems on the egov platform like PT, TL, PGR etc addressing a group of people. For instance, “Dear Citizen, Your TL has been approved please proceed to pay <PAY_NOW>”
OTHERS - Events that don’t belong to the types mentioned above.
The following are configured in MDMS.
Event Category: Events are categorised into the following:
PUBLICHEALTH - Events related to public health
CULTURAL - Cultural events
WARDCOMMITEEMEETING - Events for recurring meetings of the ward committee
These event categories are mapped to event types internally. The categories mentioned here are for EVENTSONGROUND type. These are configured in MDMS.
How does it work
This service manages user events on the egov-platform, which means all the events about which the user (essentially citizen) has to be notified are stored and retrieved through this service. Events can be created either by an API call or by pushing records to the Kafka queue.
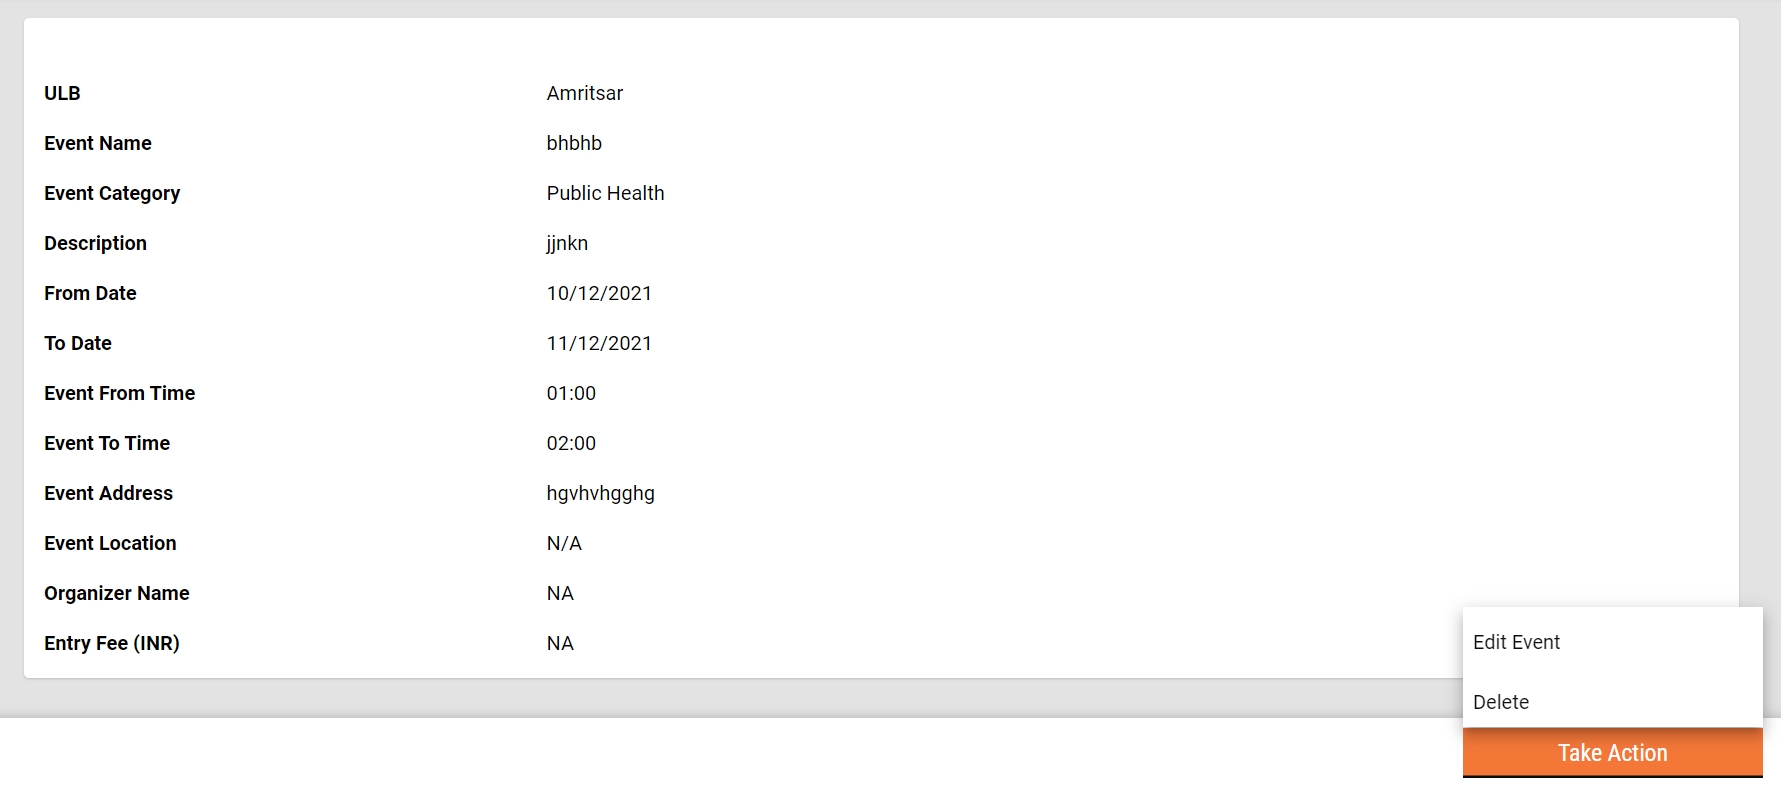
Every event contains information about the event type, event category, event name, description, recipient, actions, event details etc. Based on the type of event, the list of mandatory fields varies.
Once the event is sent for creation, the service validates all the required fields and assigns a recipient list to that event. An event can be addressed to a particular person, group of people, a user type and also roles. Events like updates on the TL application are addressed to the TL owners while events like Polio drive are addressed to the entire ULB. Some events like mass Bill generation are addressed only to those who are required to pay those bills. A recipient list is generated based on the request and stored in the system.
When an event is updated a counter-event is generated. Counter events are of 2 types: Counter event on Delete and Counter event on Update. When an event in ACTIVE status is made INACTIVE or CANCELLED, counter-event on delete is generated. When details of an event are updated irrespective of the status a counter-event on update is generated. These counter-events are stored along with the actual events in the system. However, when a counter-event on delete is generated, its corresponding actual event is marked INACTIVE.
One of the important aspects of this service is the search API. Searching for the events stored in the user-events system is different for different roles. When citizens search, all the events addressed to the citizens are retrieved. The events that contain corresponding counter-events are deduplicated and only the latest ACTIVE events are returned.
We have a use case where past events have to be marked INACTIVE. This applies to all the BROADCAST and EVENTSONGROUND types of events which are time-capped. If a BROADCAST event is active from 1/Jan to 10/Jan, it will be marked inactive post 10/Jan, after which the citizens stop receiving any updates to that event. This change of status of the events is achieved by a lazy-update technique instead of a cron-job. Due to this, the search API not only returns the events but also updates the status of events before returning it to the user based on whether it has expired.
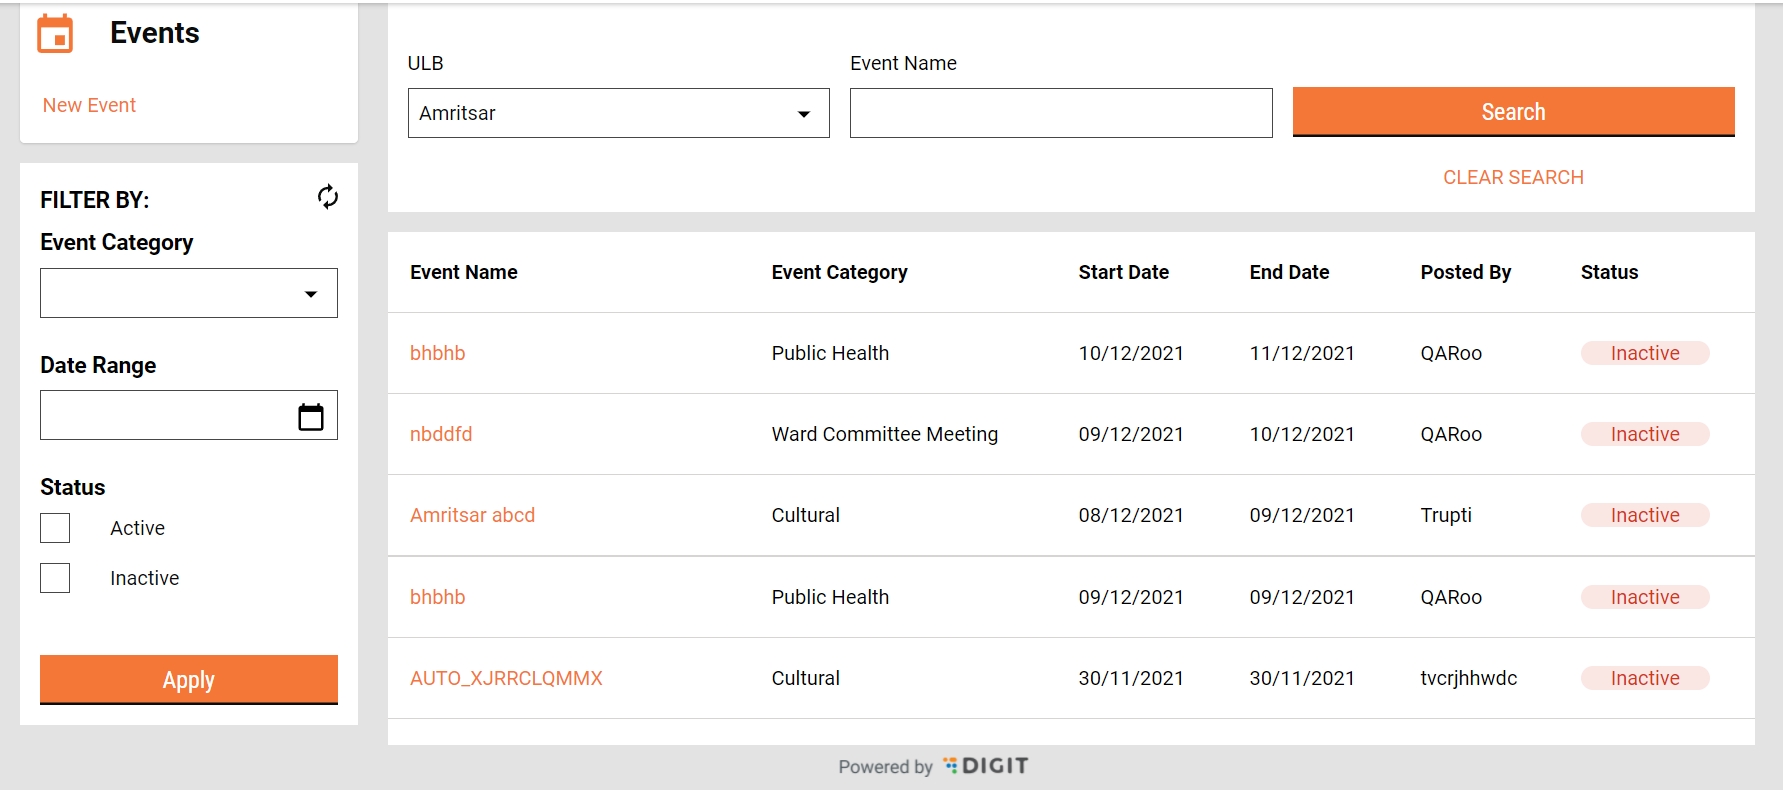
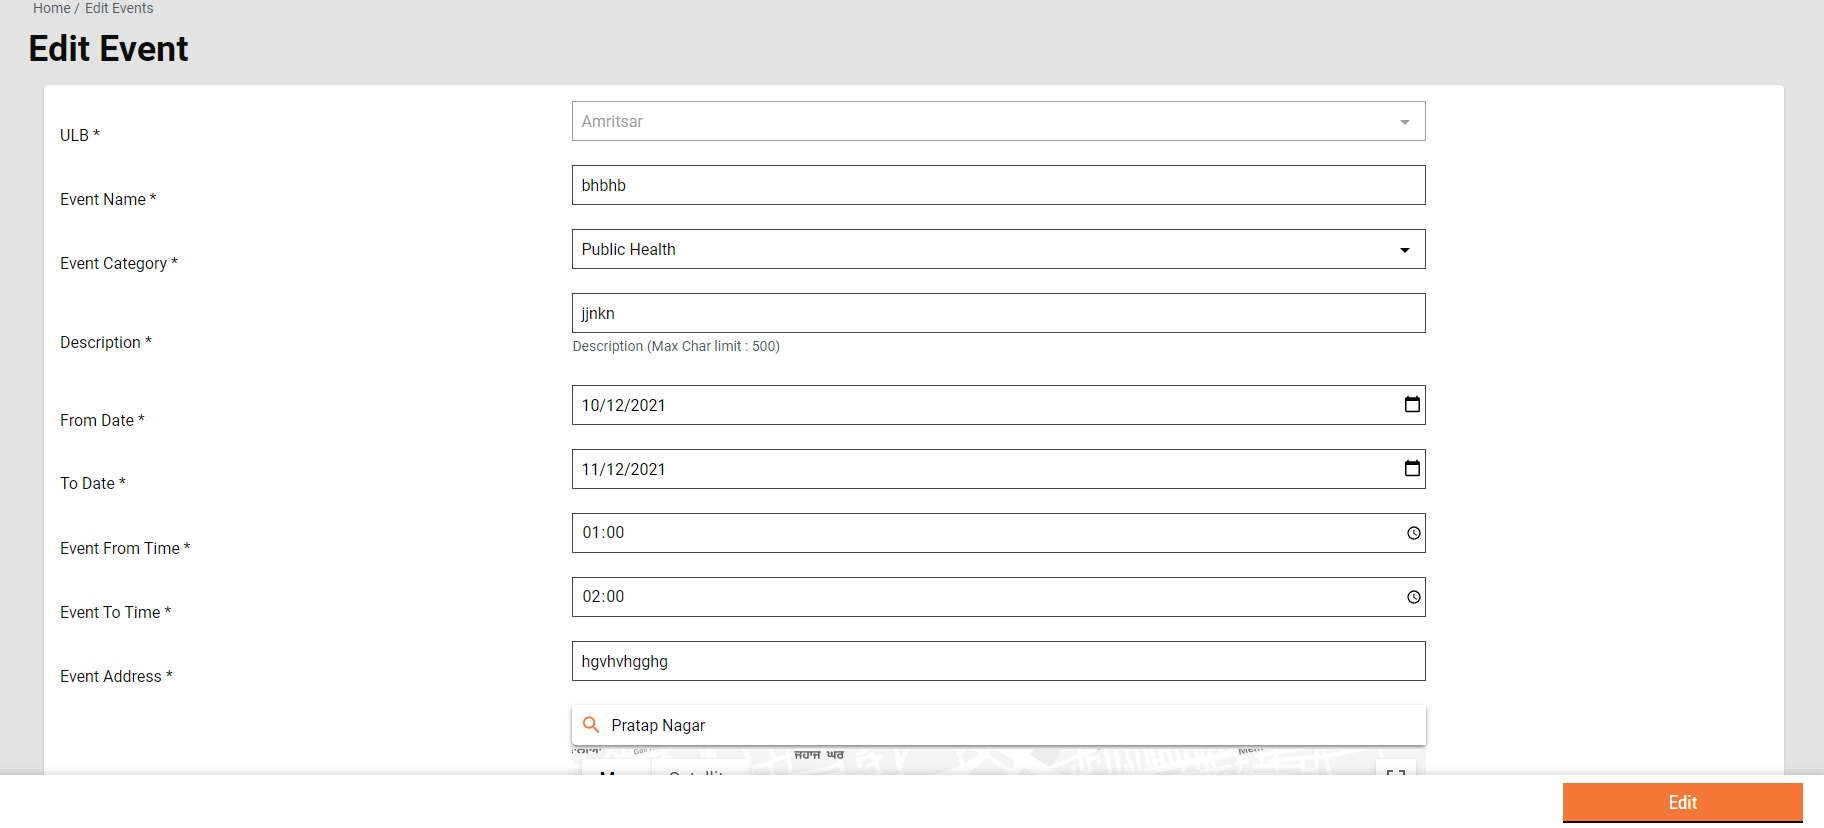
When an employee searches, all the EVENTSONGROUND posted in the particular ULB are returned by default irrespective of the status. Once the actions are performed on the events that are active, the notifications are triggered to the citizens.
Employees can search for events based on the date range. The events created or last modified in that range are displayed in the search response. So, to get the details about event in a particular date range pass the value in fromDate and toDate field of search criteria.
fromDate and toDate fields accept epoch values only.
And to get details about the Delete event, pass Status as CANCELLED. To get details about the Broadcast event pass eventType as BROADCAST.
Review the code and descriptions for every method to understand the use-cases and flow-of-logic in a better way.
eGov-user-events can be integrated with any organisation or system which wants to send the events generated for the user in the system
Easy management of user events on the system - which means all the events about which the user (essentially citizen) has to be notified are stored and retrieved through this service.
Employees can create events in the system using /egov-user-event/v1/events/_create endpoint
Employees can update events in the system using /egov-user-event/v1/events/_update endpoint
Events are searched in the system using /egov-user-event/v1/events/_search endpoint
/egov-user-event/v1/events/notifications/_count API is used to fetch the count of the total unread and read notifications.
/egov-user-event/v1/events/lat/_update API is used to update the last-login-time of the user. We store the last-login-time of the user through this API thereby deciding which notifications have been read.
Title
Link
API Swagger Documentation
(Note: All the APIs are in the same postman collection therefore the same link is added in each row)
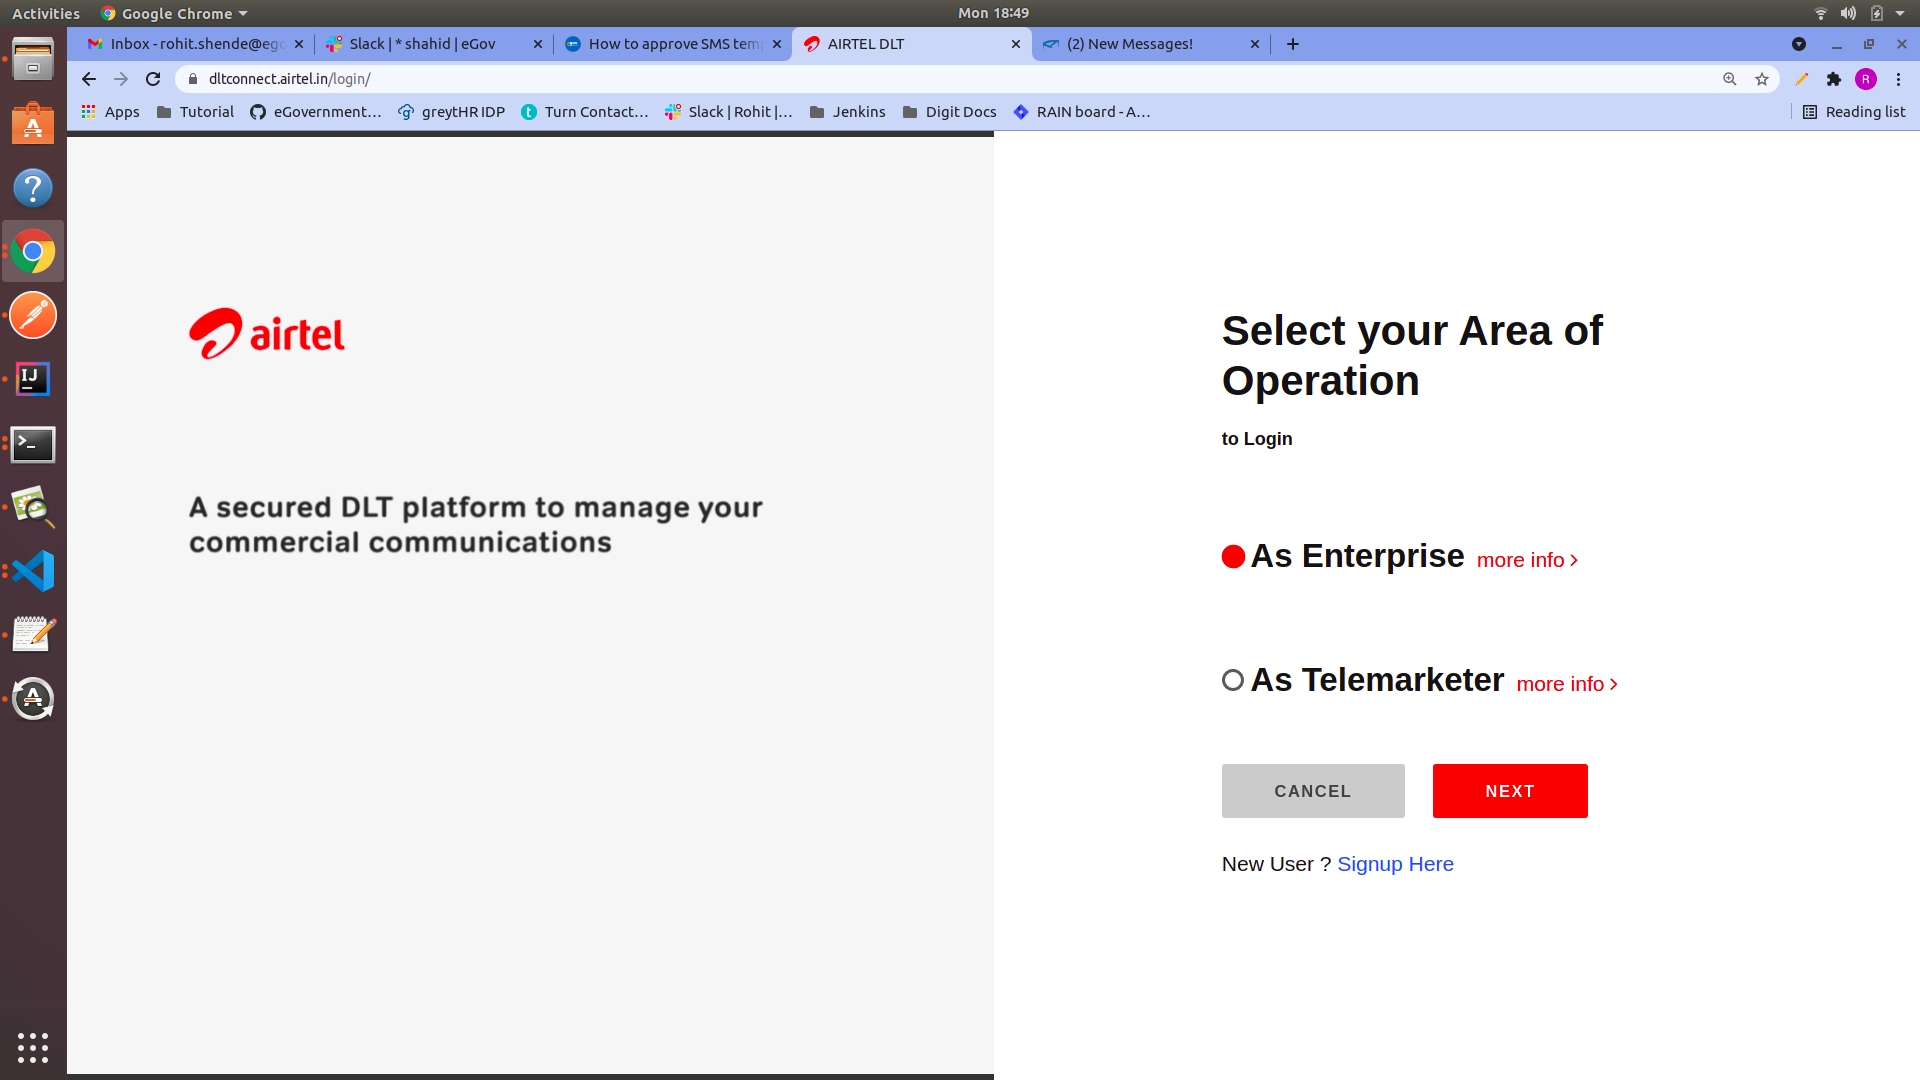
According to TRAI’s regulation on unsolicited commercial communication, all telecoms must verify every SMS content before delivering it (Template scrubbing). For this, all the businesses using SMS need to register Entities, SenderIDs, SMS templates in a centralised DLT portal. Below are the steps to register the SMS template in a centralised DLT portal and to add the template in the SMS country portal (Service provider).
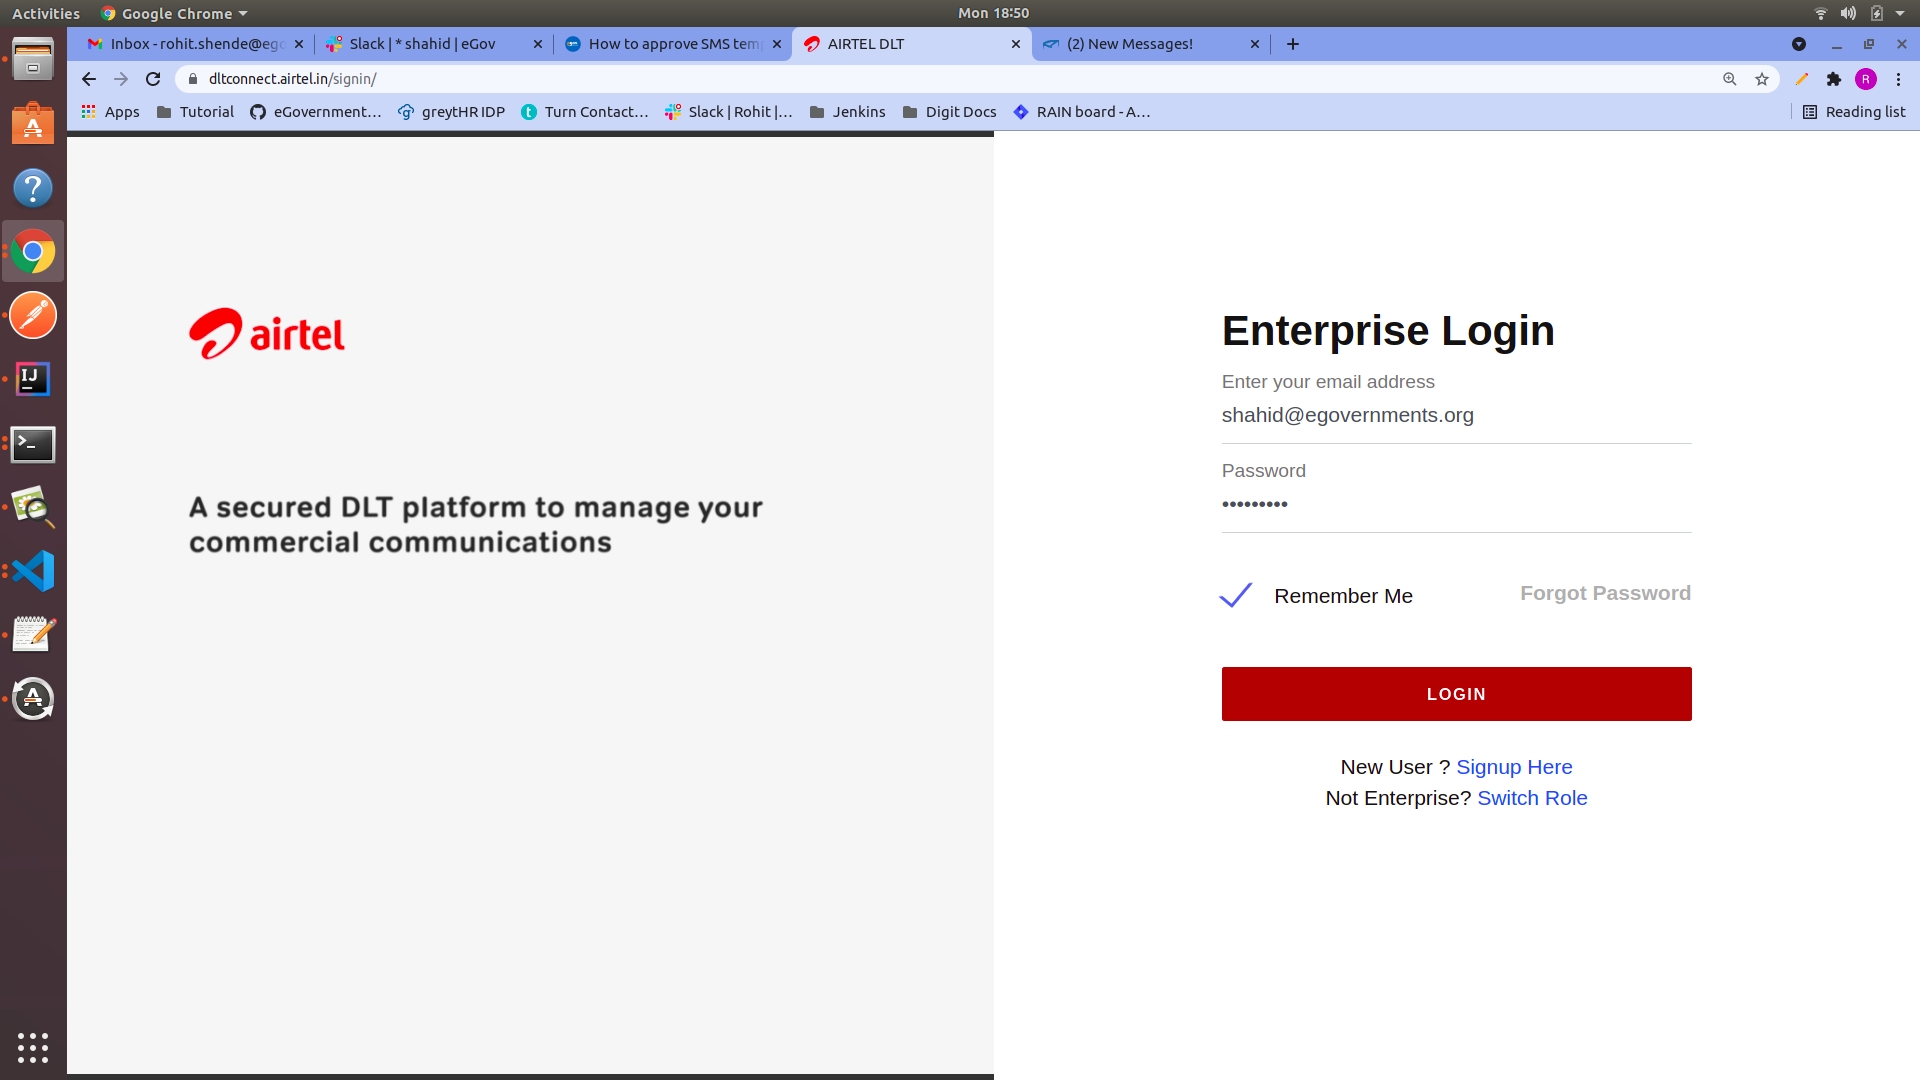
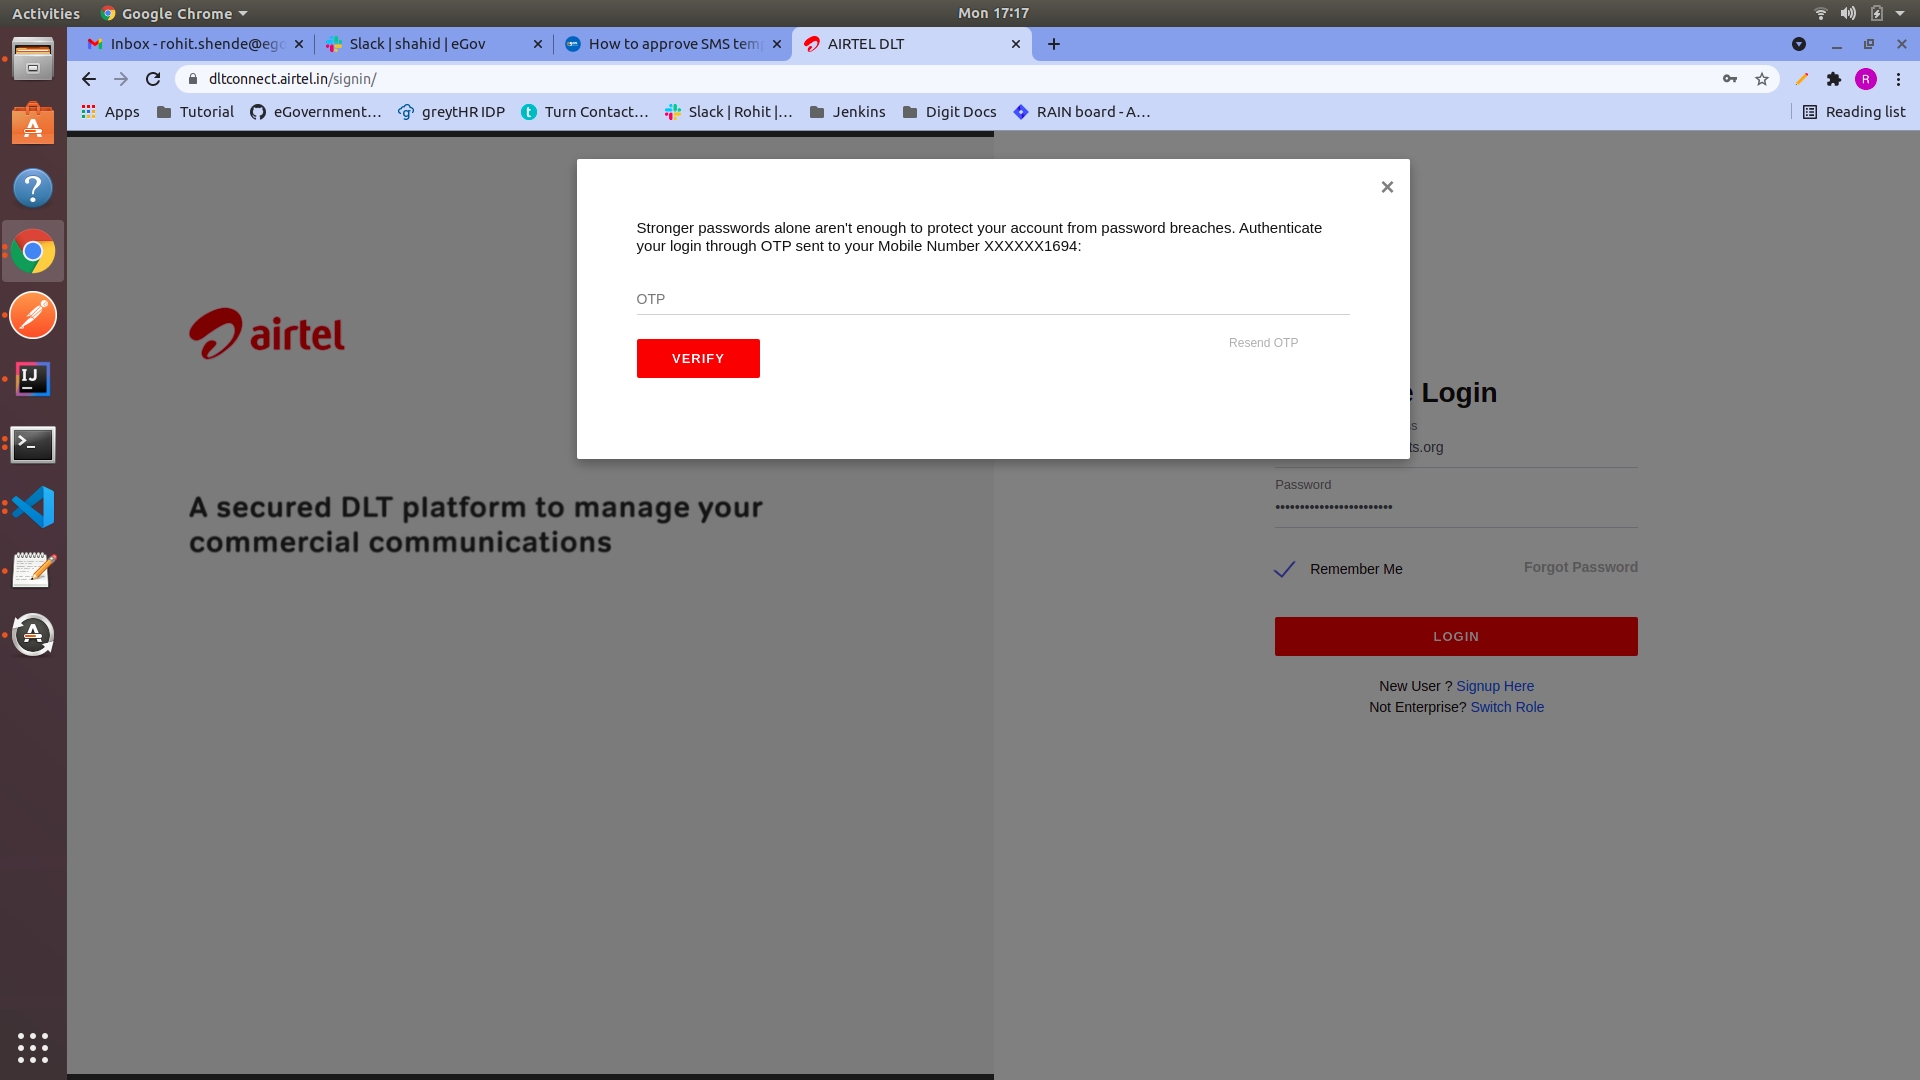
Step 1: Visit the Airtel DLT portal( ) and select your area of operation as Enterprise then click on next.
Step 2: Login into the portal by entering the proper credentials and OTP.
Please contact the HR manager for the credentials and the OTP.
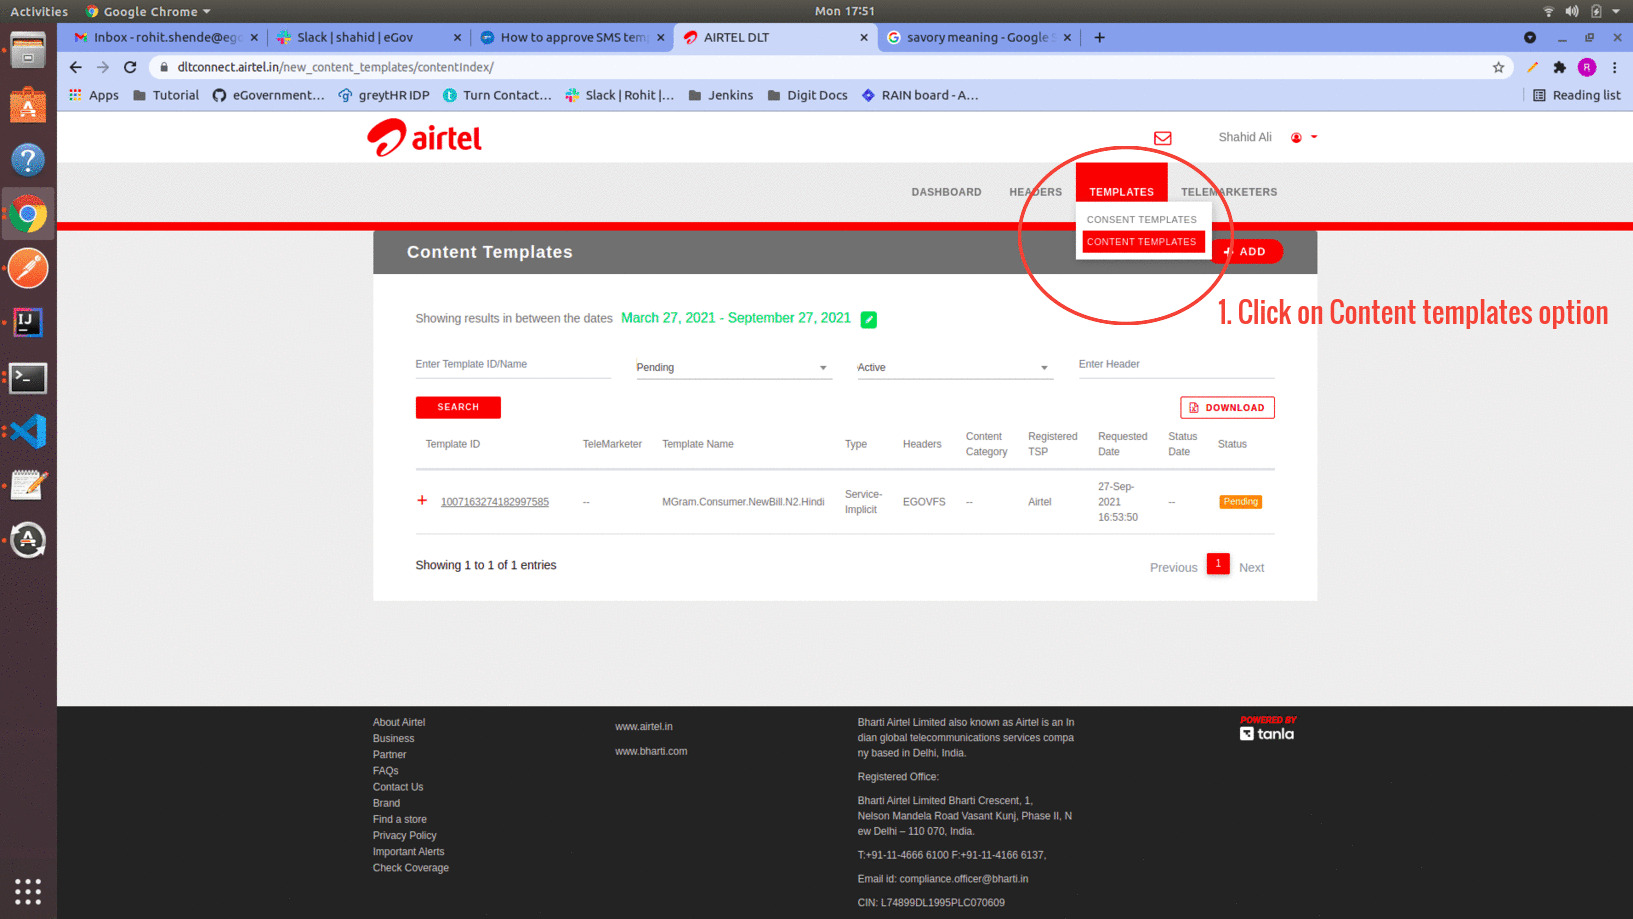
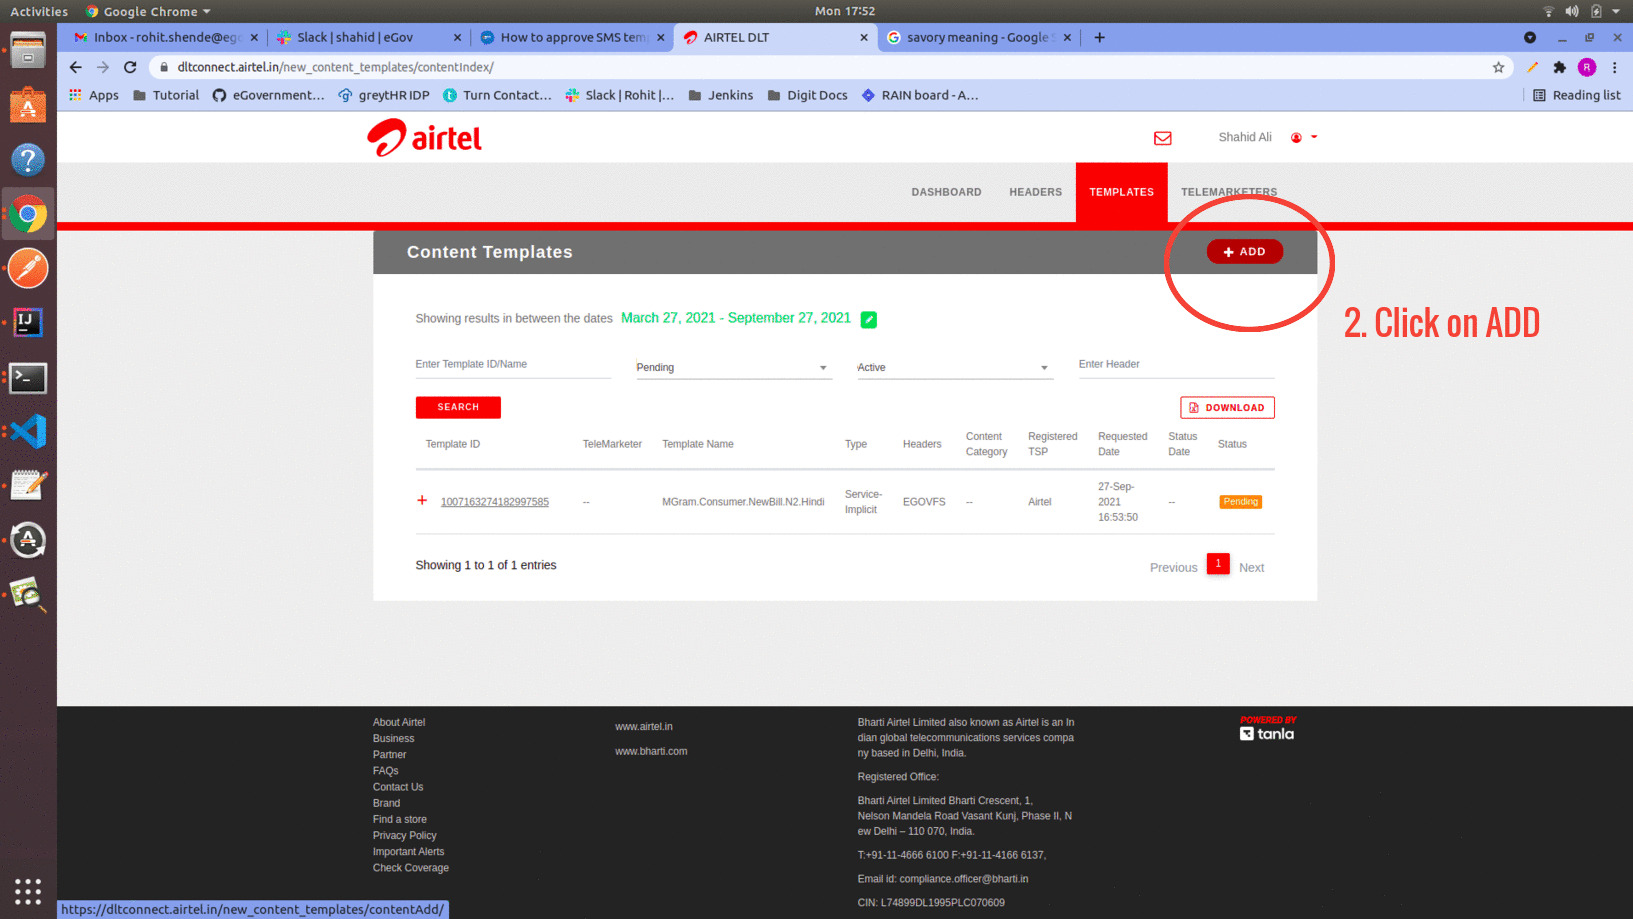
Step 3: Now select the Template from option and then click on content templates.
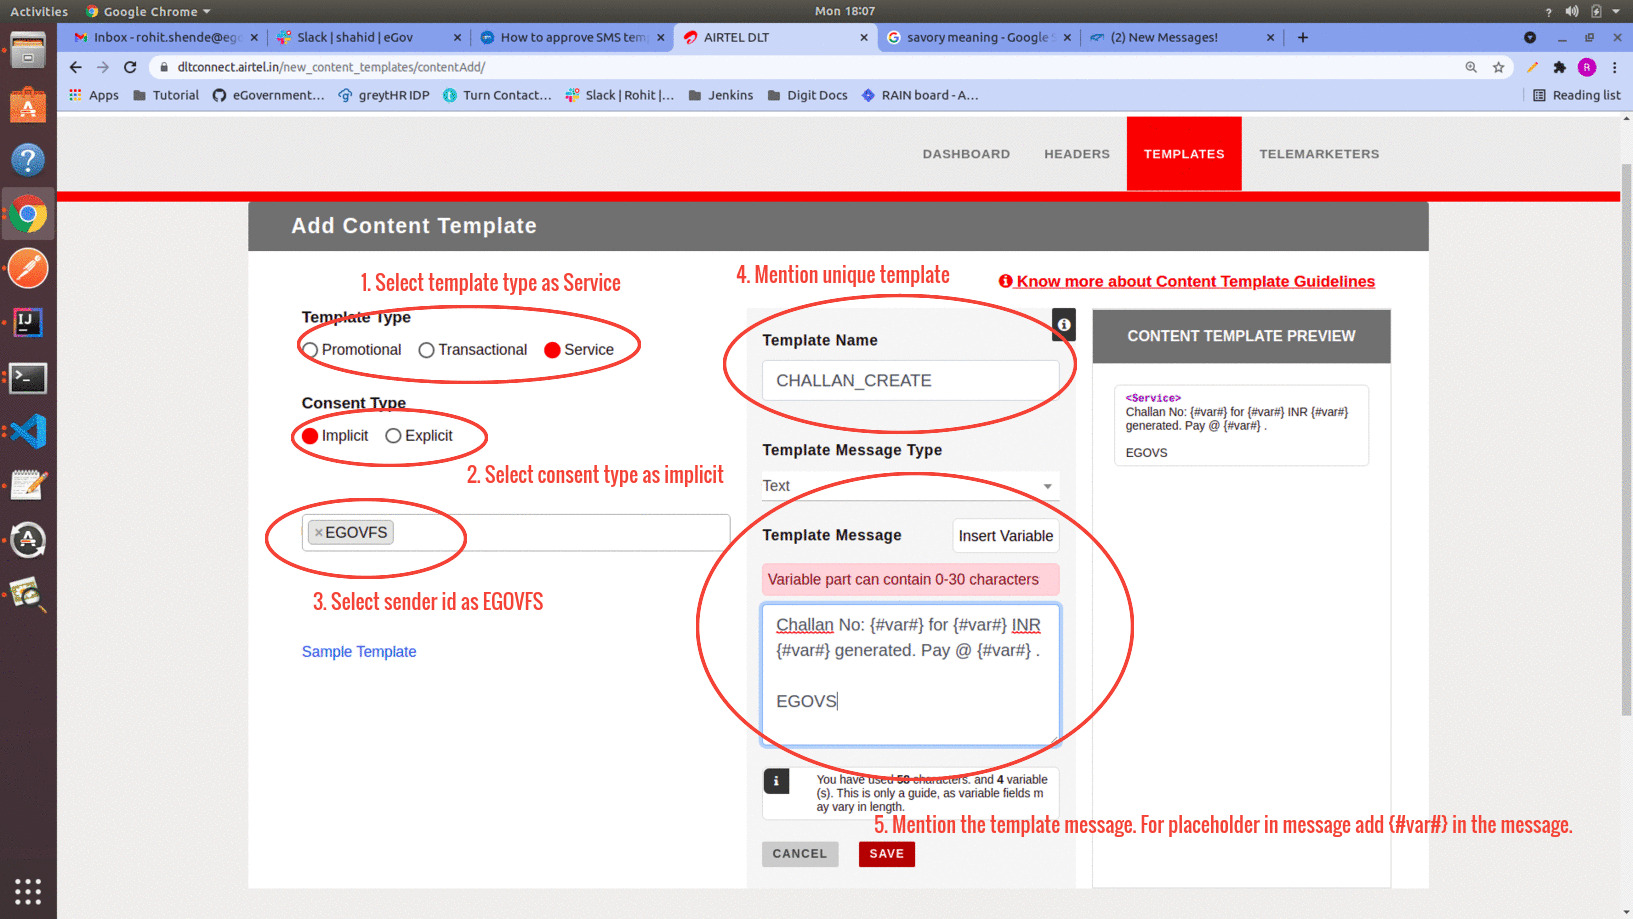
Now click on Add button to go to the next section.
Step 4: Select the option mentioned in the image below.
Note: a) For placeholder text (dynamic text in message) mention {#var#} in the message. Each {#var#} can contains 0-30 character. If dynamic text is supposed to go more than 30 characters in length, then two {#var#} have to mention side by side. Now the dynamic text can be up to 60 characters. Example:- Hi Citizen, Click on this link to pay the bill {#var#}{#var#} EGOVS b) It is mandatory to mention EGOVS at the end of every message. c) Select Template message Type as Regional if the message is in another language rather than English.
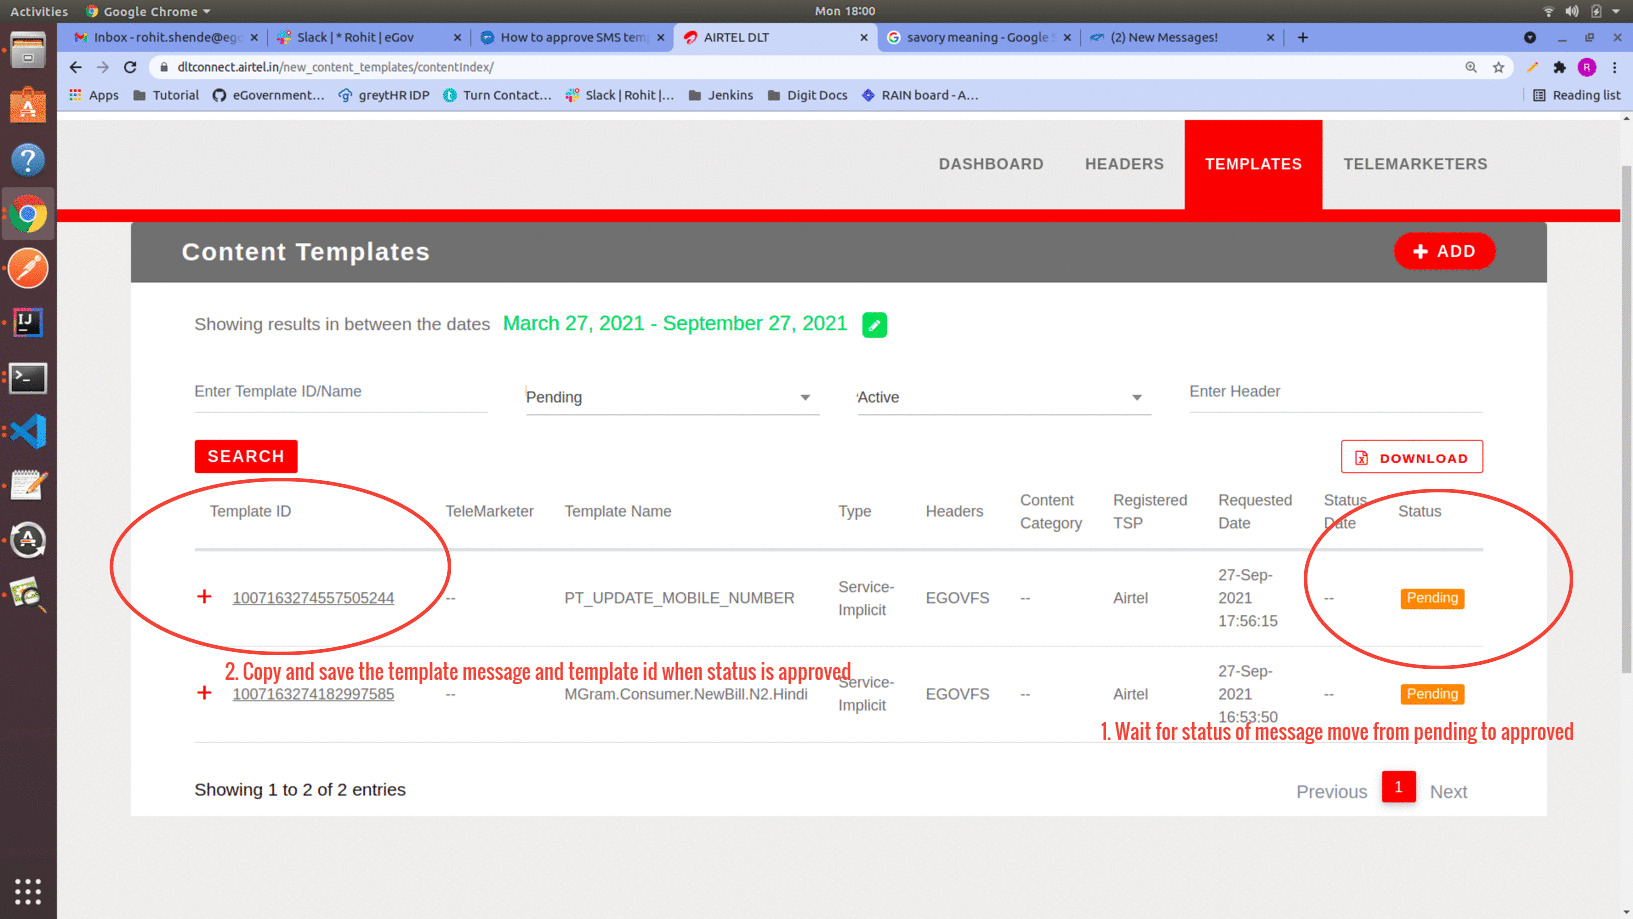
After clicking on the Save button, the template is added to the portal, Now wait for the approval of the template. Once the template gets approved save the template id and the message.
Step 5: Repeat process from Step 3 to Step 4 to register template in DLT portal.
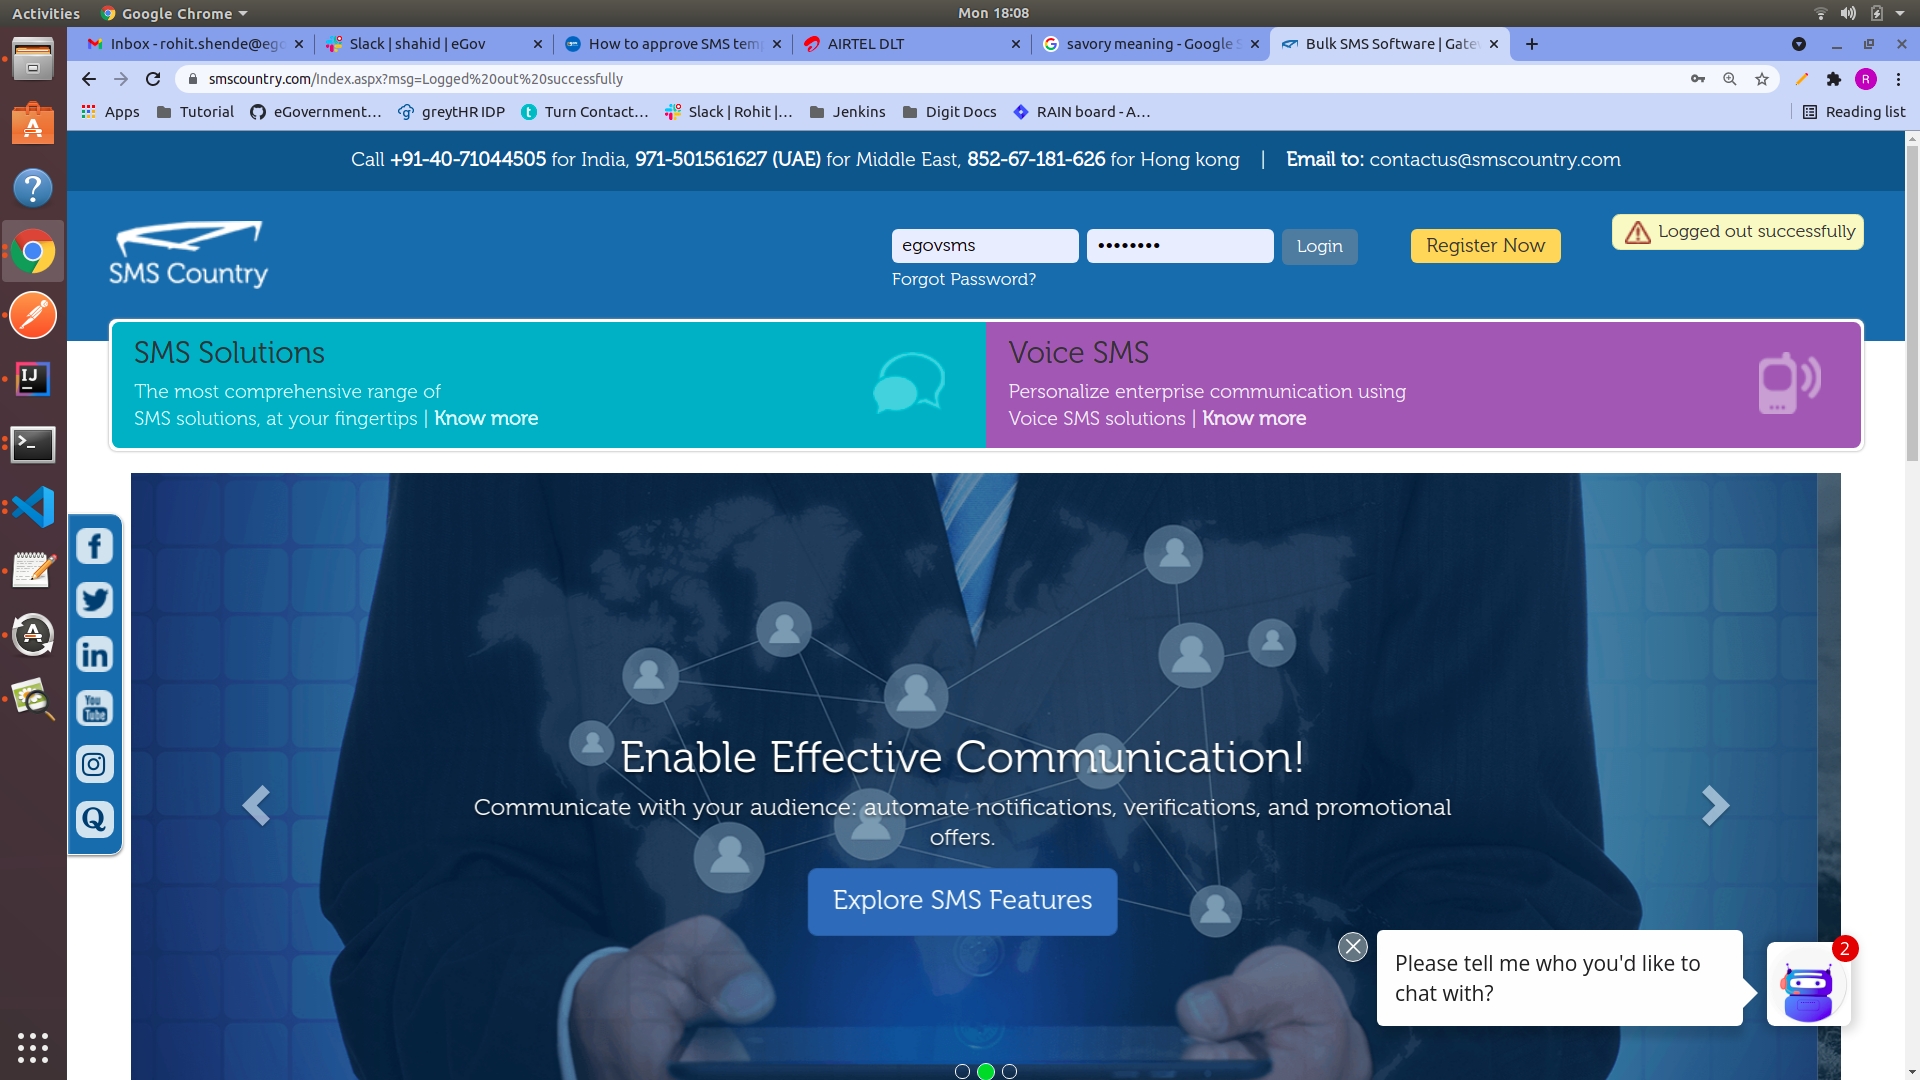
Note: The below steps are to add approved templates in the SMS Country web portal. These steps might be different for other service providers but the data required for any service provider would be the same.
Please contact the HR manager for the credentials.
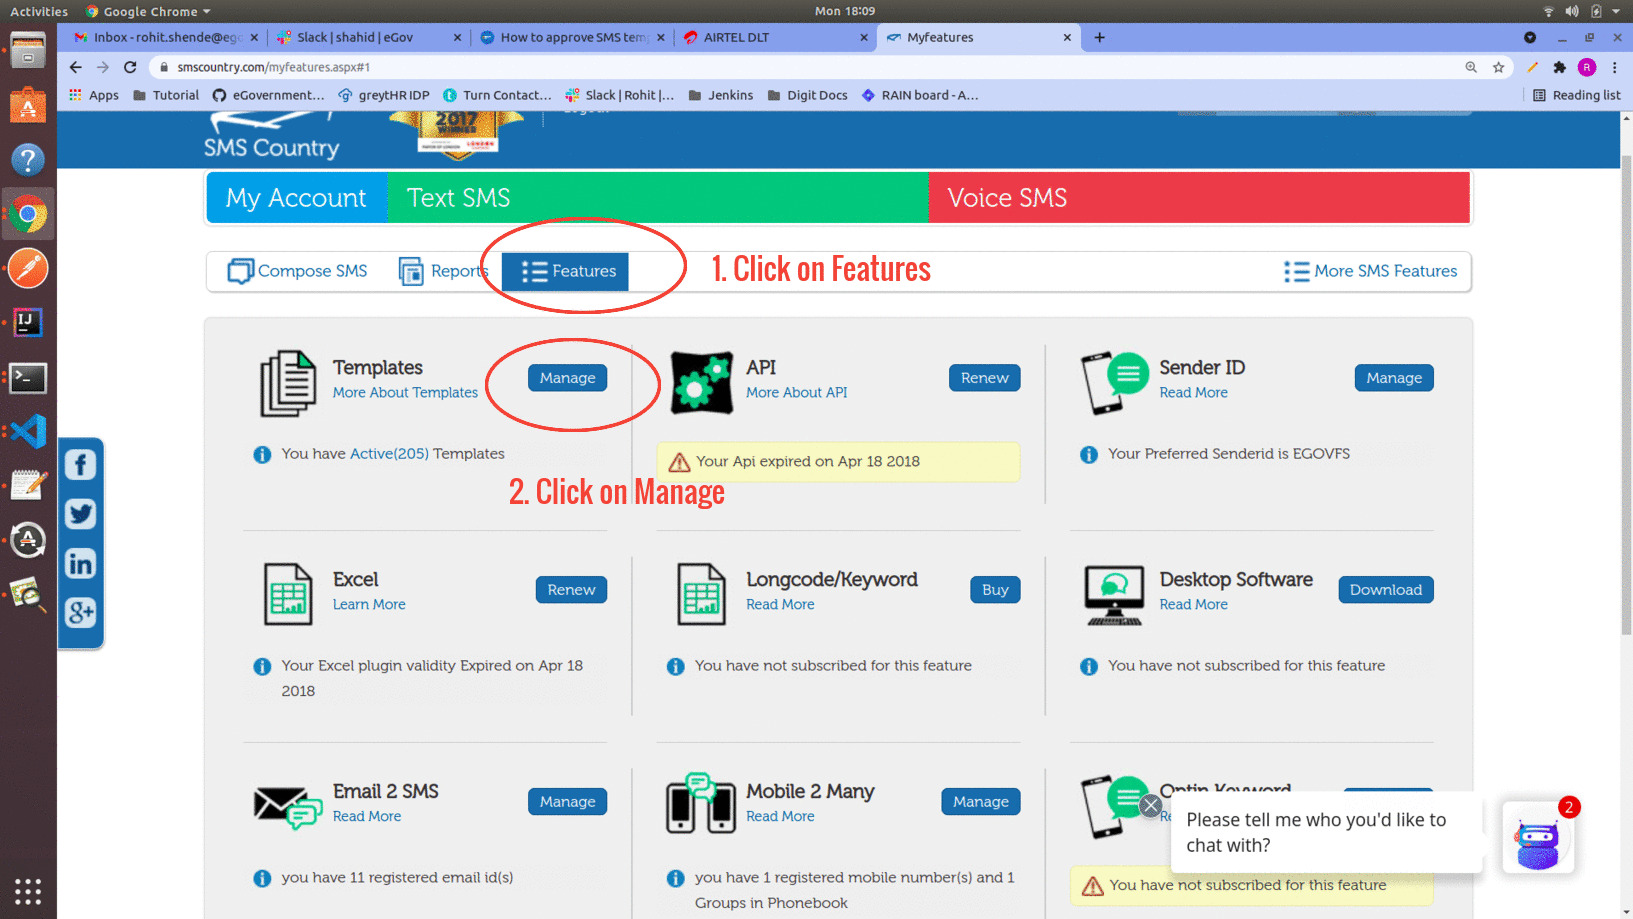
Step 7: Select option Features, then click on Manage button under Template section.
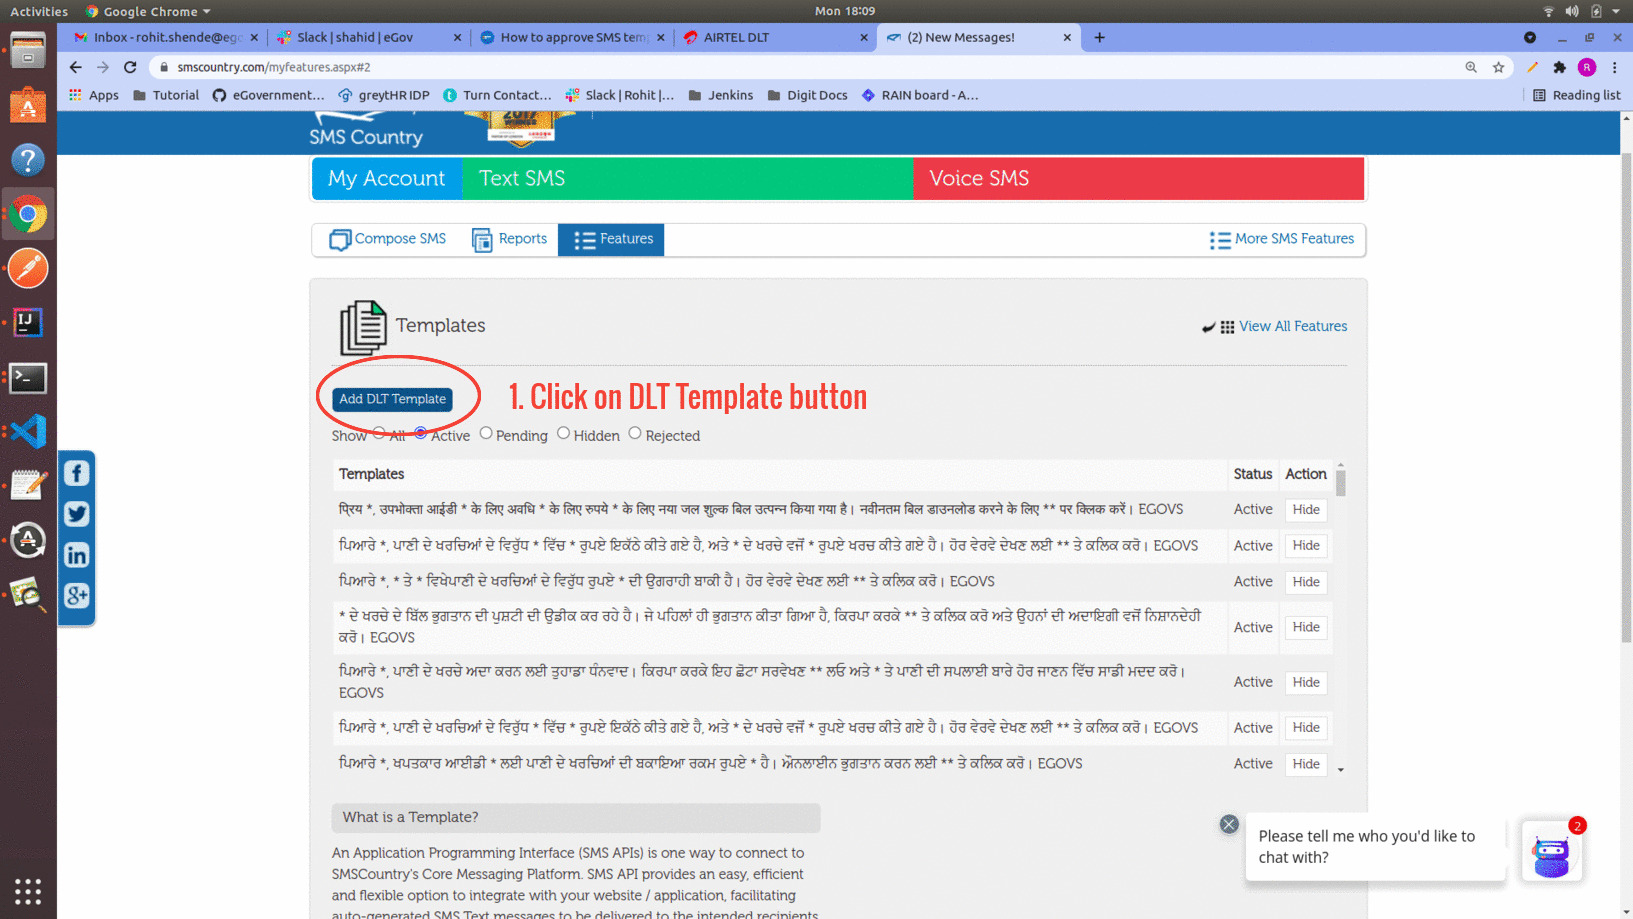
Then click on Add DLT Template button.
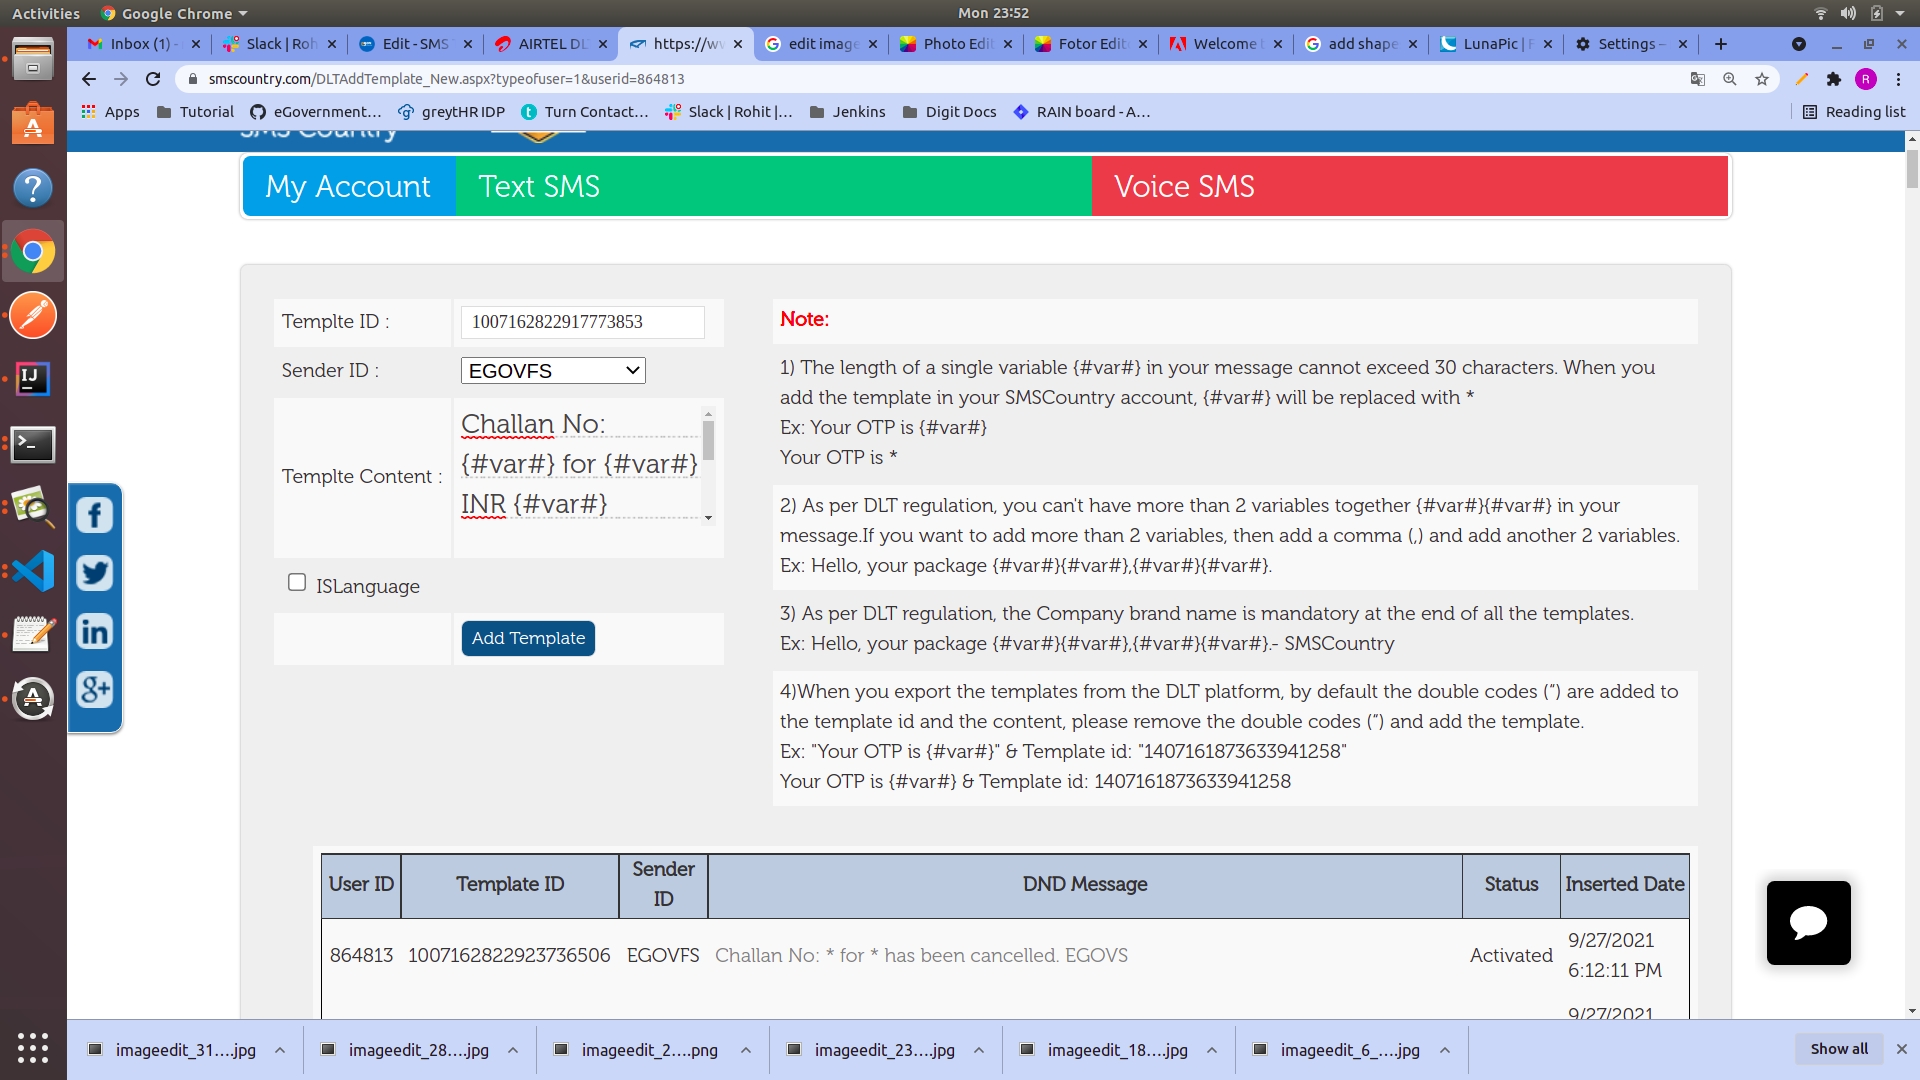
Step 8: Mention the template id and message of the approved template which we have saved earlier in step 4. And select sender id as EGOVFS.
After adding all the above details click on Add Template button. Now the DLT approved template get added into SMS Country portal and it is ready to use.
Select ISLanguage check box if the message is in any other language other than English.
Step 9: Repeat process from Step 7 to Step 8 to add approved template in SMS Country portal.
Roles define the permissions of a user to perform a group of tasks. The tasks are created as API calls to do certain actions when a request for those calls is sent by the system. Access permission is grated by mapping roles with API. User assigned with the roles to provide access for the API
Before proceeding with the configuration, make sure the following pre-requisites are met -
Knowledge of DIGIT applications is required.
User should be aware of transactional steps in the DIGIT application.
Knowledge of json and how to write a json is required.
Knowledge of MDMS is required.
Knowledge on how to create a new API.
APIs developed on digit follow certain conventions and principles. The aim of this document is to provide some do’s and don’ts while following those principles
APIs path should be standardised as follows:
/{service}/{entity}/{version}/_create: This endpoint should be used to create the entity
/{service}/{entity}/{version}/_update: This endpoint should be used to edit an entity which is already existing
/{service}/{entity}/{version}/_search: This endpoint should be used to provide search on the entity based on certain criteria
/{service}/{entity}/{version}/_count: This endpoint should be provided to give a count of entities that match a given search criteria
Always use POST for each of the endpoints
Take most search parameters in POST body only
For further more information about how new API is developed could be referred in this link
Adding New APIs(actions) and Mapping Roles with that APIs provides permission to perform certain task can be restricted based on the requirement.
After mapping Roles with APIs, the MDMS service needs to be restarted to read the newly added data.
APIs are added in actions-test.json and called as action. In MDMS, file actions-test.json, under ACCESSCONTROL-ACTIONS-TEST folder APIs are added.
API Sample -
APIs are added as action array element with the request url and other required details for the array "actions-test"
Each action is defined as a key-value pair:
Mapping of Roles and APIs/action is added in roleactions.json, under the folder ACCESSCONTROL-ROLEACTIONS. Sample mapping:
Role and API/action mapping is added as an array element under array roleactions. Each mapping is defined with key-value pairs. keys are rolecode, actionid, actioncode and tenantId.
Steps for setting up the environment and running the script file to get a fresh copy of the required Datamart CSV file.
(One Time Setup)
Install Kubectl Step 1: Go through the Kubernetes documentation page to install and configure the kubectl. Following are useful links:
After installing type the below command to check the version install in your system1 kubectl version
Step 2: Install aws-iam-authenticator
Step 3: After installing, you need access to a particular environment cluster.
Go to $HOME/.Kube folder
1cd 2cd .kube
Open the config file and replace the content with the environment cluster config file. (Config file will be attached)1gedit config
Copy-paste the content from the config file provided to this config file opened and save the file.
2. Exec into the pod1kubectl exec --stdin --tty playground-584d866dcc-cr5zf -n playground -- /bin/bash
(Replace the pod name depending on what data you want.
Refer to Table 1.2 for more information)
3. Install Python and check to see if it installed correctly1apt install python3.8 2python --version
4. Install pip and check to see if it installed correctly1apt install python3-pip 2pip3 --version
5. Install psycopg2 and Pandas1pip3 install psycopg2-binary pandas
Note: If this doesn’t work then try this command1pip3 install --upgrade pip
and running the #5 command again
(Every time you want a datamart with the latest data available in the pods)
1. Sending the python script to the pod1tar cf - /home/priyanka/Desktop/mcollect.py | kubectl exec -i -n playground playground-584d866dcc-cr5zf -- tar xf - -C /tmp
Note: Replace the file path (/home/priyanka/Desktop/mcollect.py) with your own file path (/home/user_name/Desktop/script_name.py)
Note: Replace the pod name depending on what data you want.
(Refer to Table 1.2 for more information on pod names)
2. Exec into the pod1kubectl exec --stdin --tty playground-584d866dcc-cr5zf -n playground -- /bin/bash
(Note: Replace the pod name depending on what data you want.1kubectl exec --stdin --tty <your_pod_name> -n playground -- /bin/bash
Refer to Table 1.2 for more information)
3. Move into tmp directory and then move into the directory your script was in1cd tmp 2cd home/priyanka/Desktop
for example :1cd home/<your_username>/Desktop
4. List the files there1ls
(Python script file should be present here)
(Refer Table 1.1 for the list of script file names for each module)
5. Run the python script file1python3 ws.py
(name of the python script file will change depending on the module)
(Refer Table 1.1 for the list of script file names for each module)
6. Outside the pod shell, In your home directory run this command to copy the CSV file/files to your desired location1kubectl cp playground/playground-584d866dcc-cr5zf:/tmp/mcollectDatamart.csv /home/priyanka/Desktop/mcollectDatamart.csv
(The list of CSV file names for each module will be mentioned below)
7. The reported CSV file is ready to use.
Watch this video
OR
Follow these steps ->
(One Time Setup)
Install Python and check to see if it installed correctly
1apt install python3.8 2python --version
Install pip and check to see if it installed correctly1apt install python3-pip 2pip3 --version
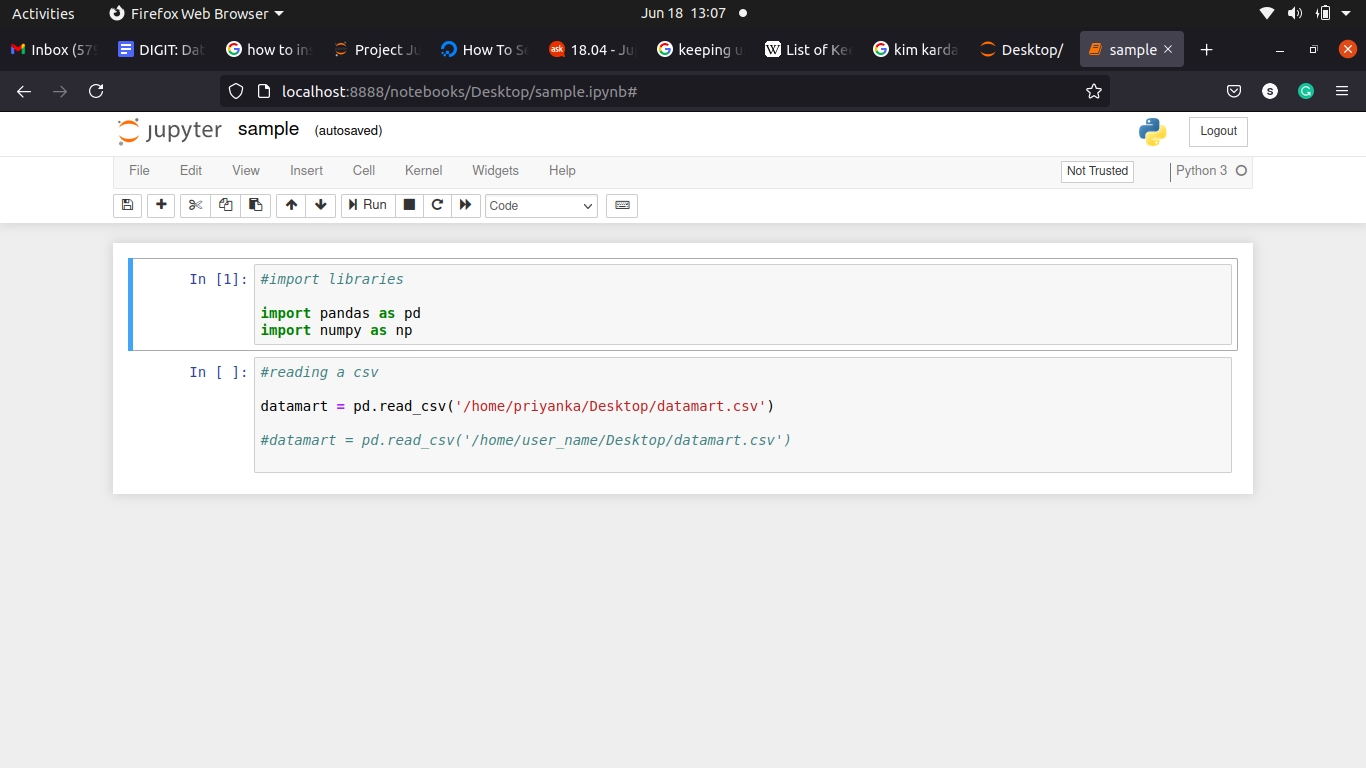
3. Install jupyter1pip3 install notebook
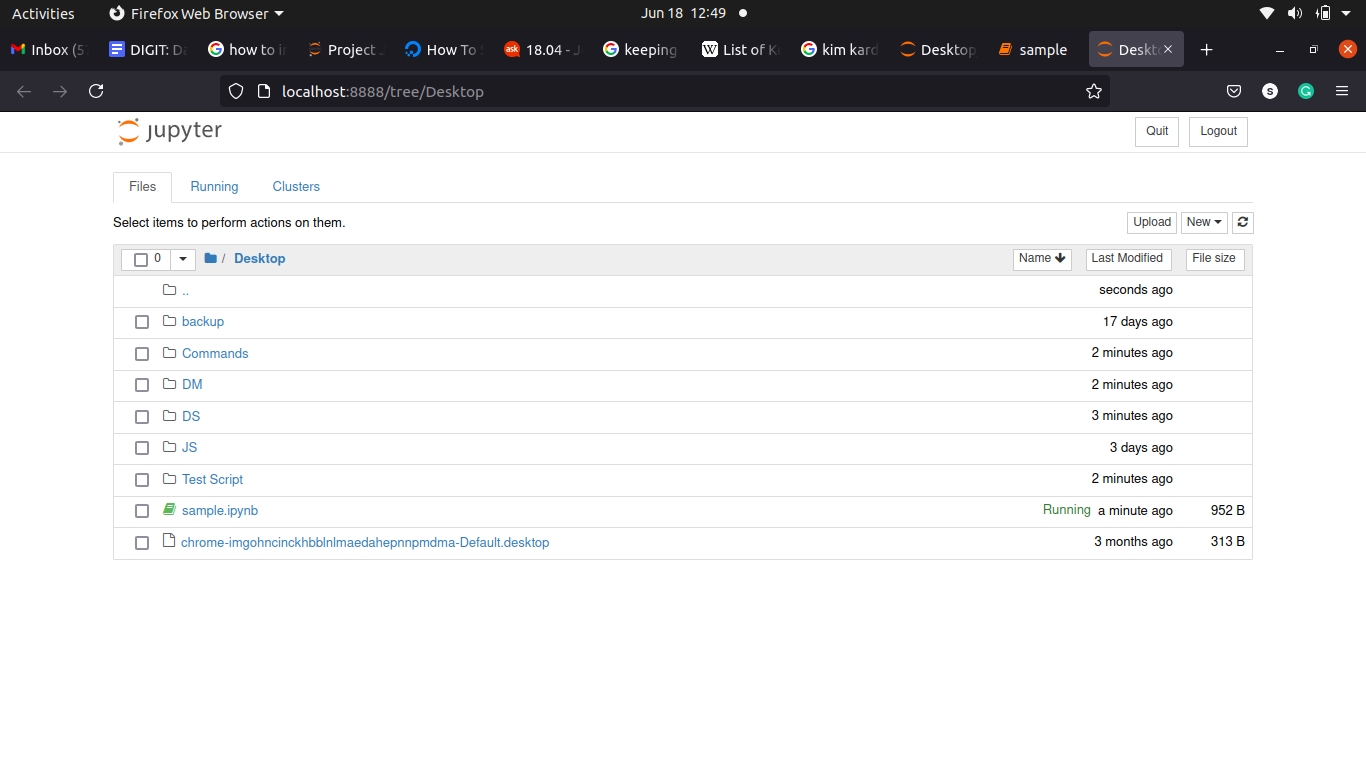
(Whenever you want to run Jupyter lab)
To run jupyter lab
1jupyter notebook
2. To open a new notebook
New -> Python3 notebook
3. To open an existing notebook
Select File -> Open
Go to the directory where your sample notebook is.
Select that notebook (Ex: sample.pynb)
Opening an existing notebook
After opening
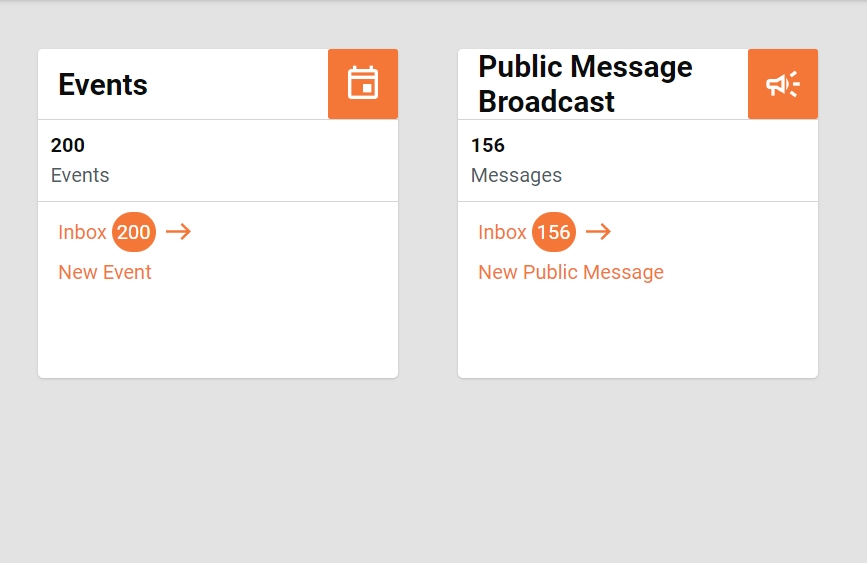
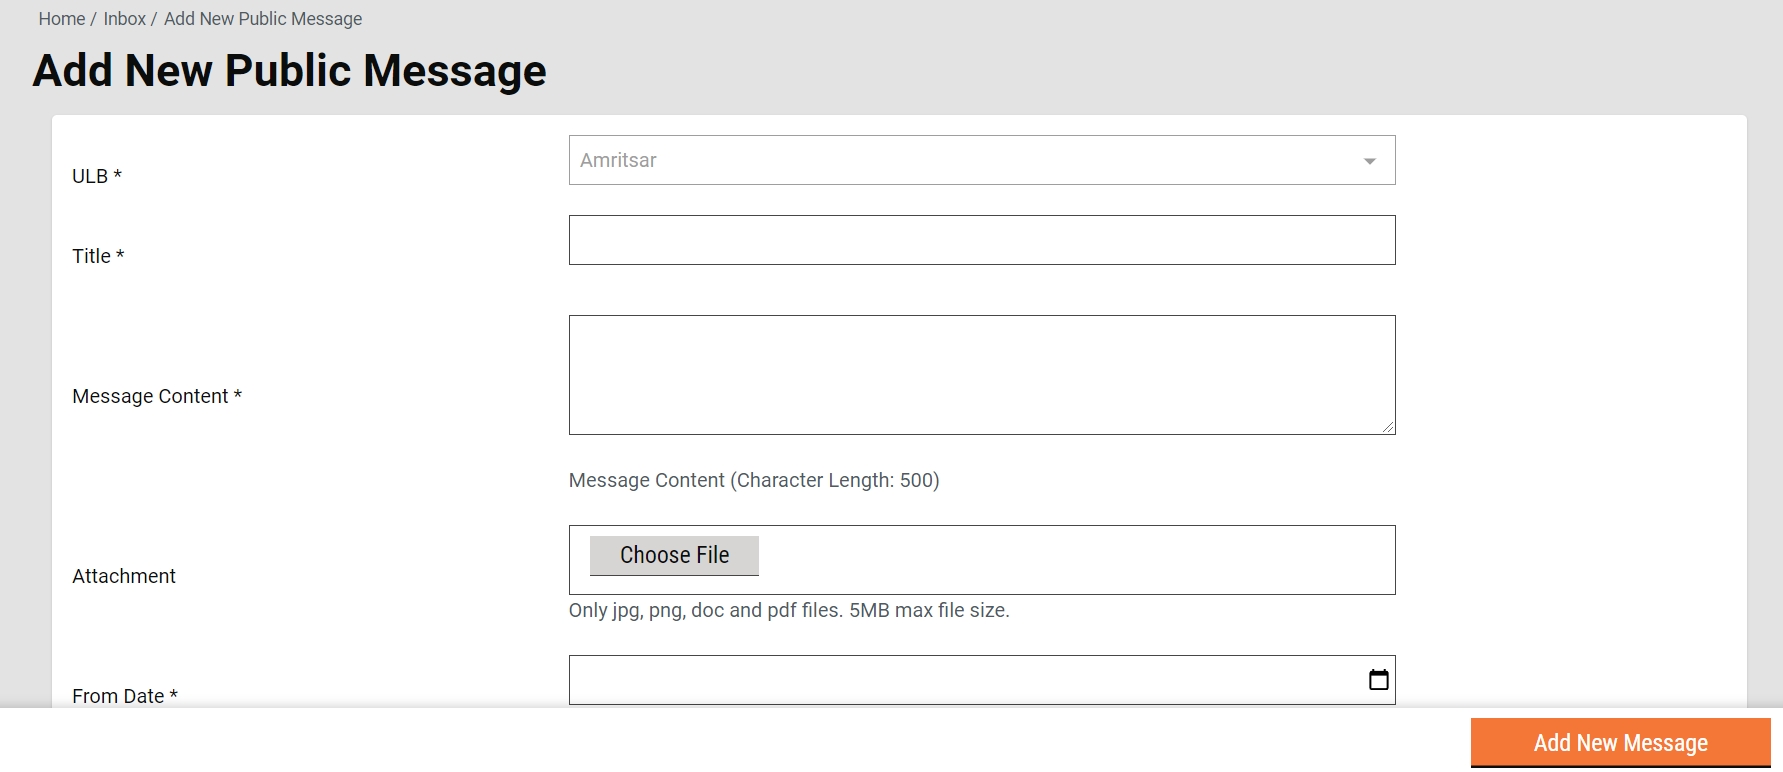
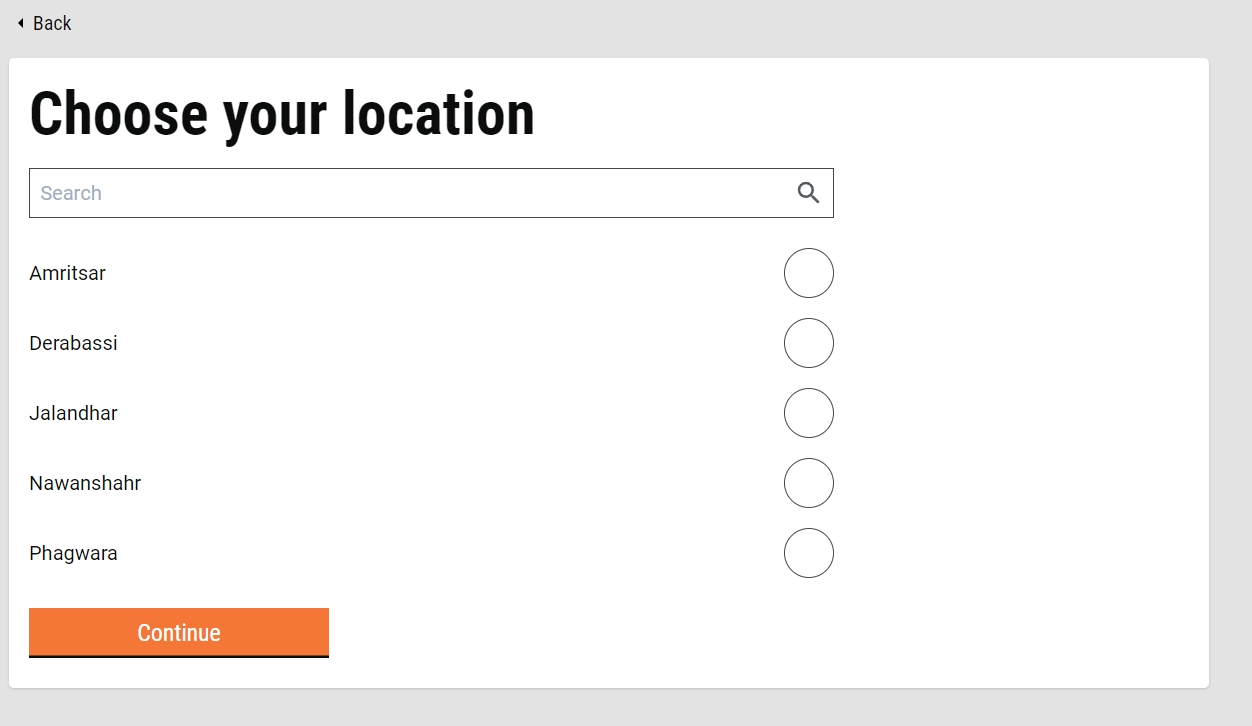
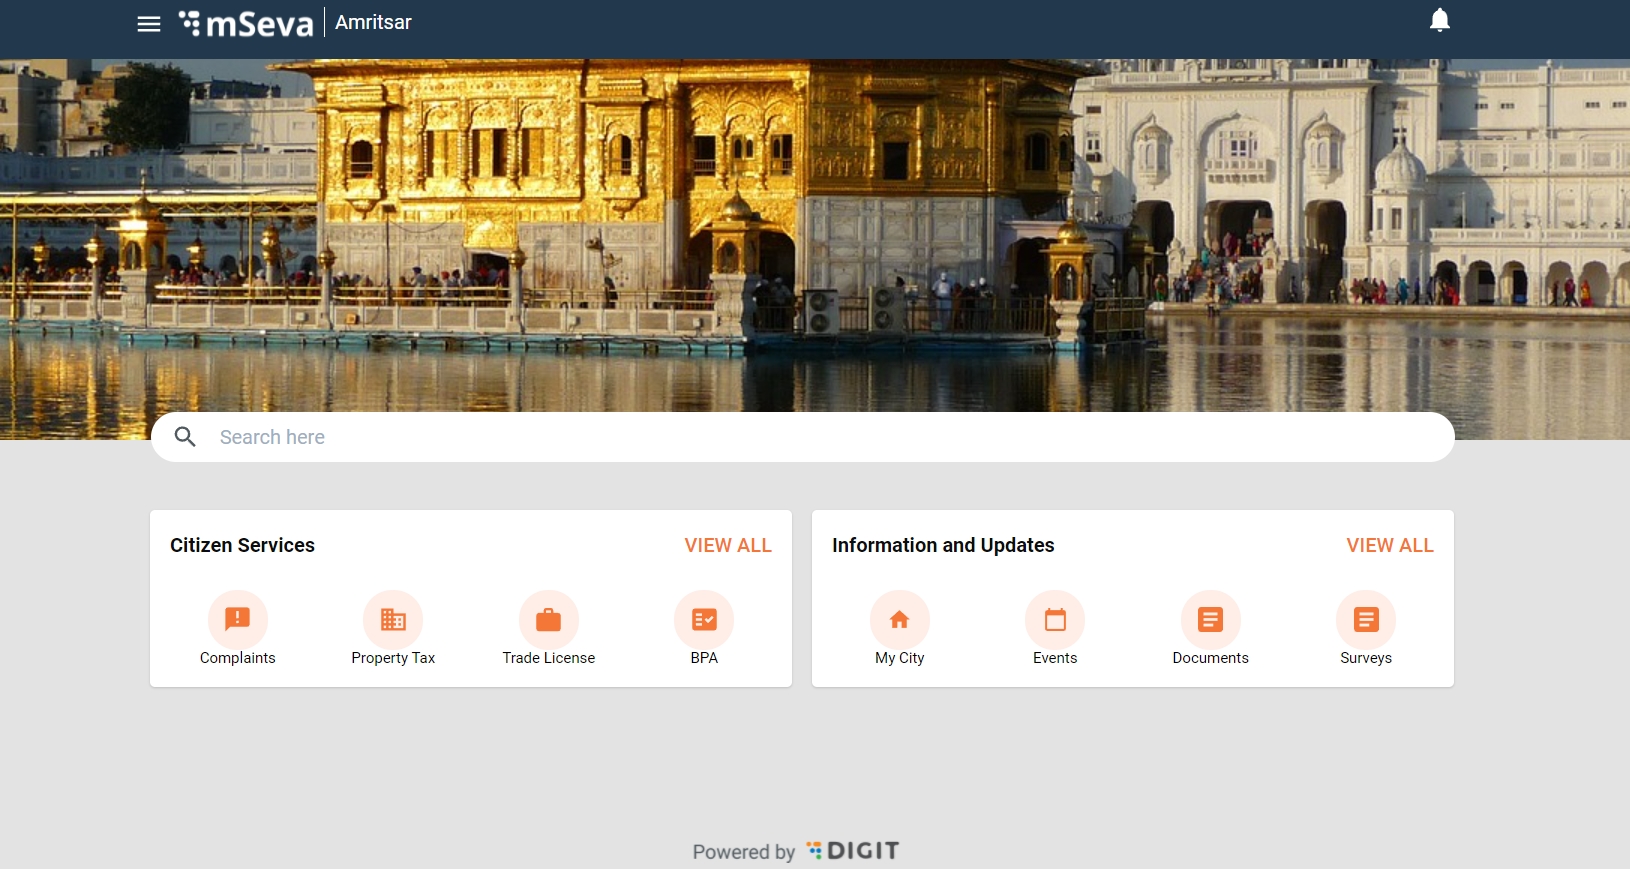
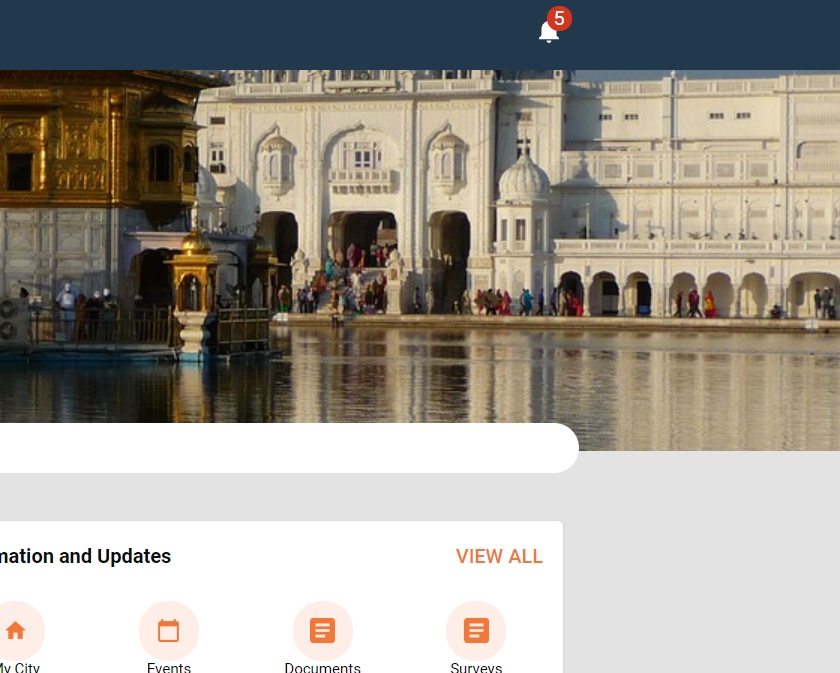
Notifications and the citizen home screen are part of the core module.
Screen flow for the citizen home
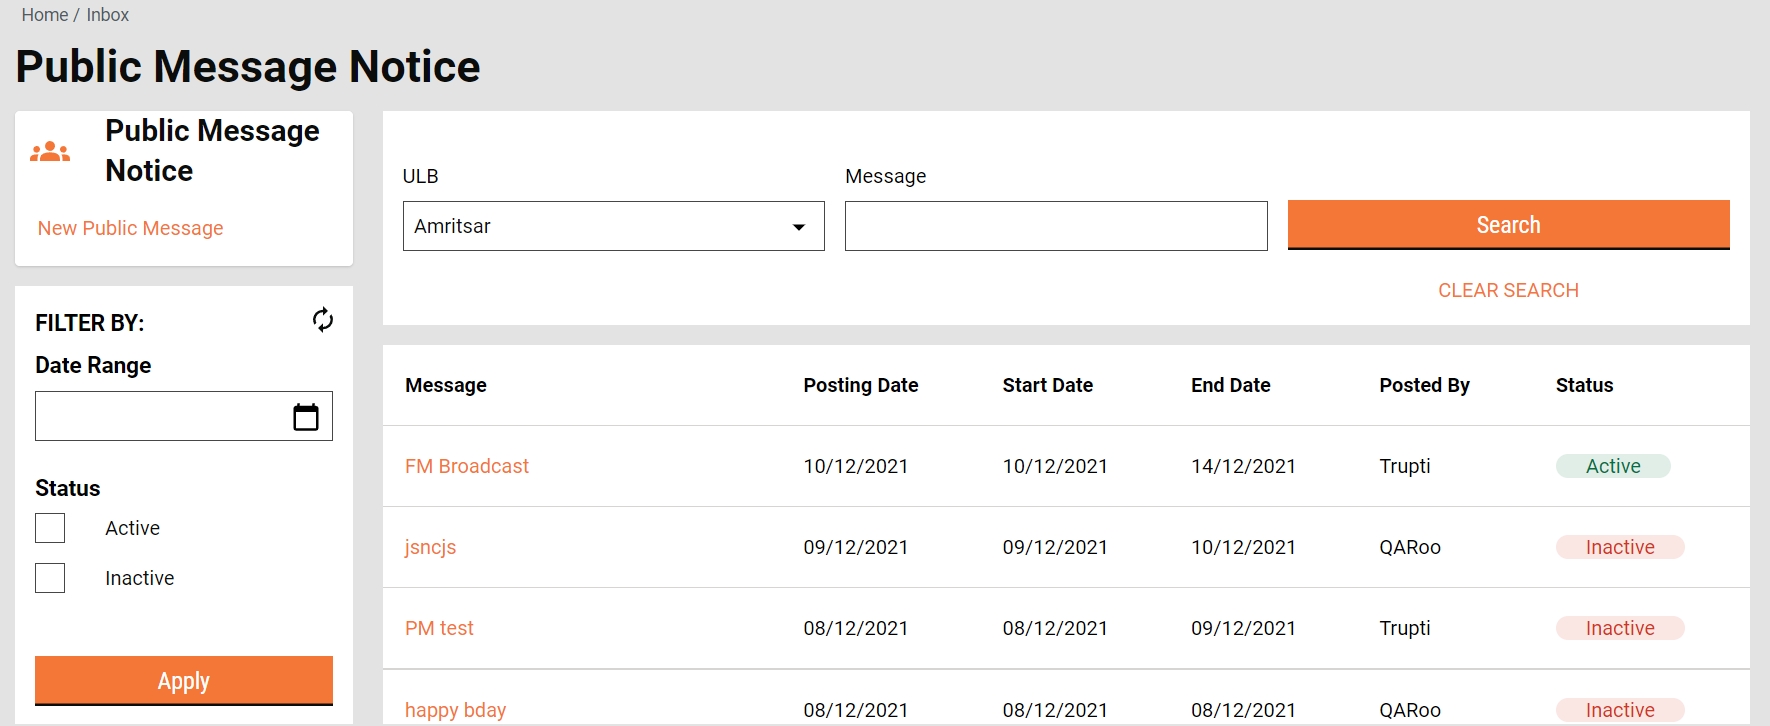
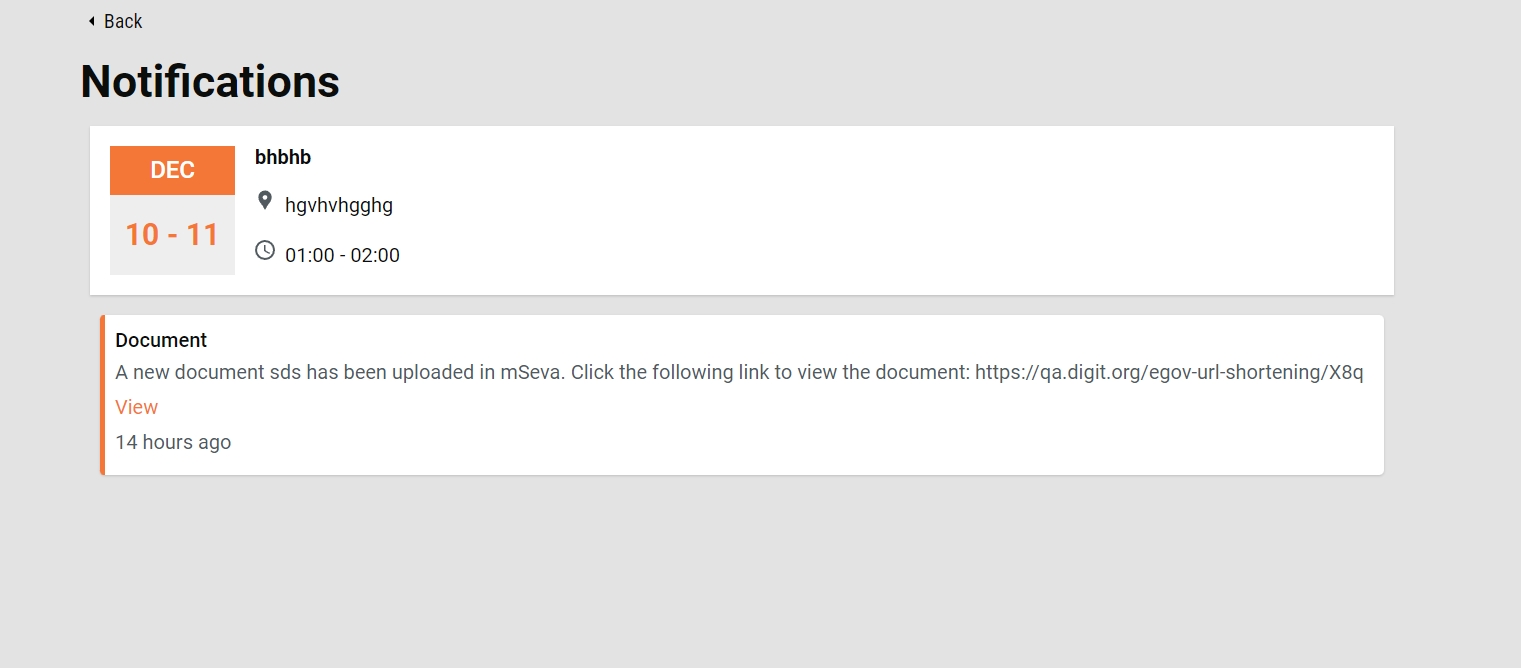
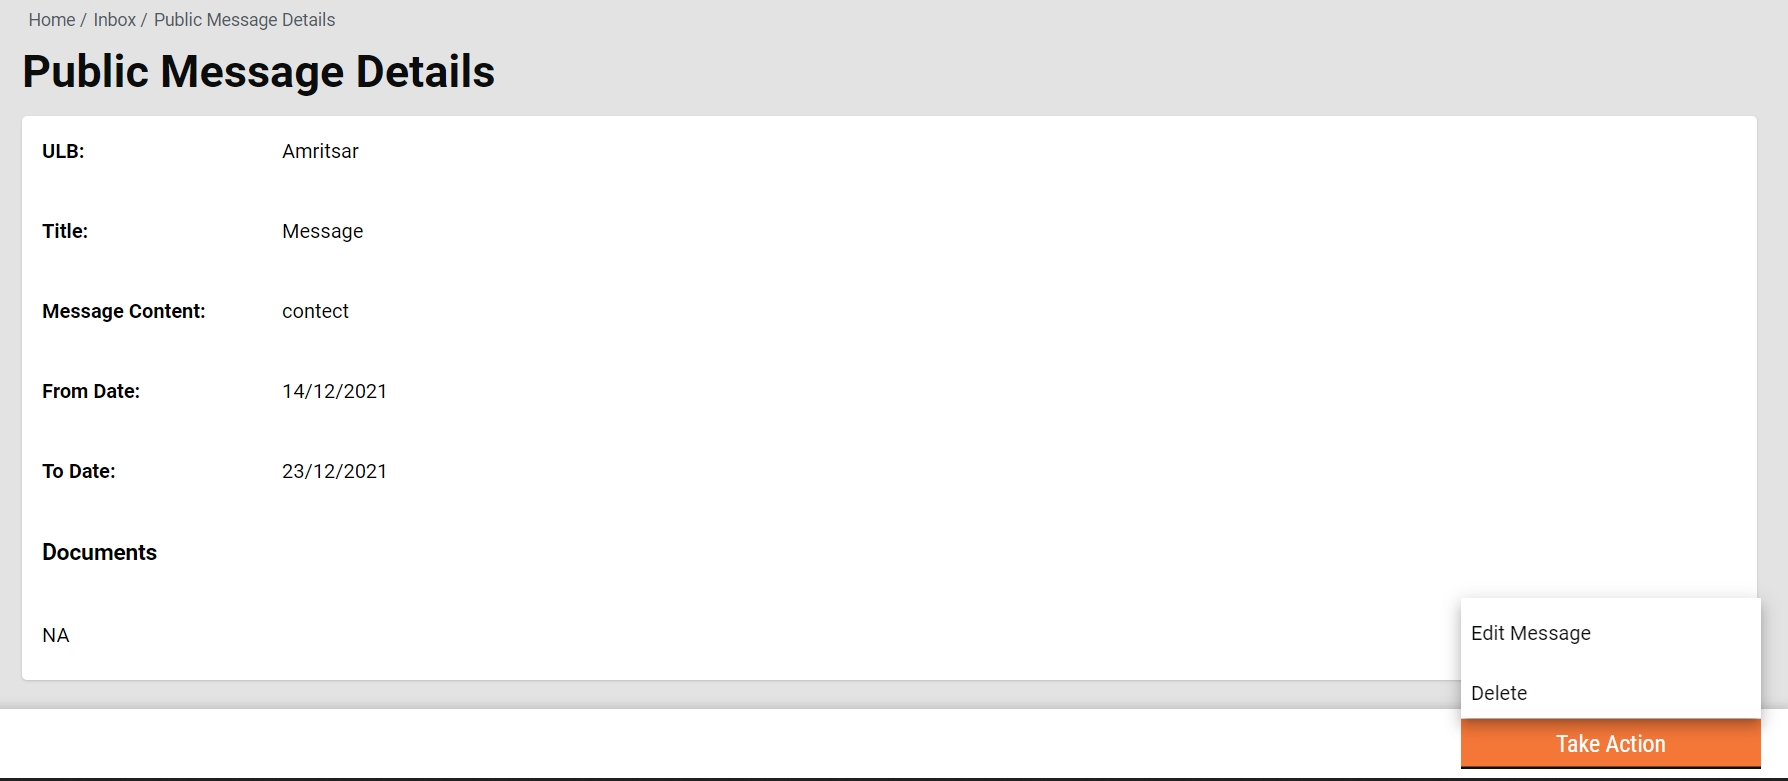
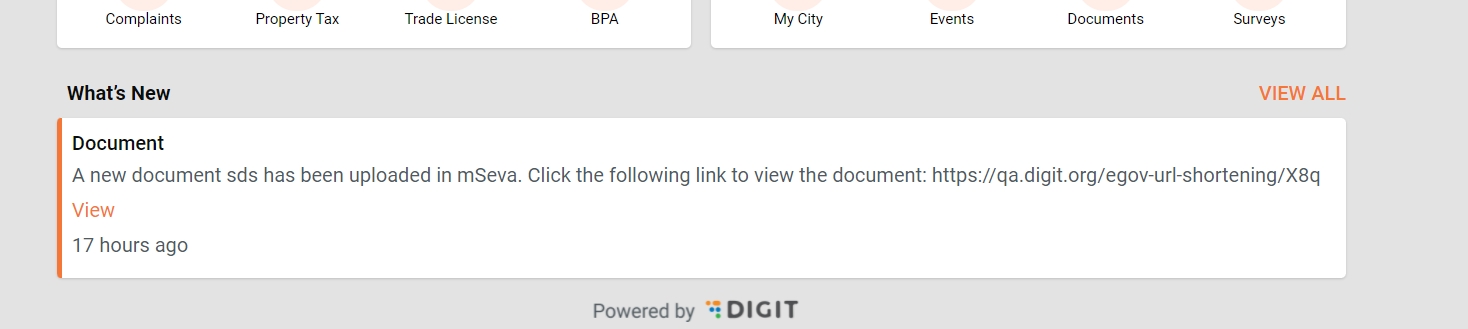
The notifications screen is a part of the user engagement module and shows all the active events, messages and broadcast messages.
For Event notifications, we are using OnGroundEventCard component
For What's new notification, we are using WhatsNewCard component
For Broadcast messages, we are using BroadcastWhatsNewCard component
All these screens are accessible without logging in.
cURL for notification API -
However, after logging in notification count becomes available to use and the system displays the unread notification count as a ticker on the notification icon.
Notification count cURL -
Notification count update cURL -
Events are also a part of the Engagement module. Only active events are displayed on the events list page.
Events API cURL -
Since not all modules are in the new UI, and the user has access to modules in both the new and old UI, navigating between them creates confusion. So framework needs to be designed to avoid this confusion.
The default landing page will be that of the new UI home screen for a user
When the user is on a module that is in old UI (eg: Fire NOC) and clicks on the {{Home}} screen button from the sidebar, then the screen should be navigated to the New UI Home screen
When the user is on a module that is in the new UI, then clicking on the {{Home}} button should redirect to the new UI home screen.
There will be no changes in the side panel and it will remain the same for the respective new UI or old UI
This change will be applicable to both citizen-side and employee-side interfaces
As per the Requirement, the changes were made in both old and new UIs such that always Home/ Landing screen will be New UI Landing Screen. (This is applicable in both citizen and employee Screens )
So the old UI Home screen will be always redirected to New UI.
To access the Old UI Modules, you can access them through Sidebar navigation links. Check this link to add a sidebar link for navigation and
To configure any sidebar link to navigate to Old UI citizen as follow
and employees as follows:
The following commit has to be added
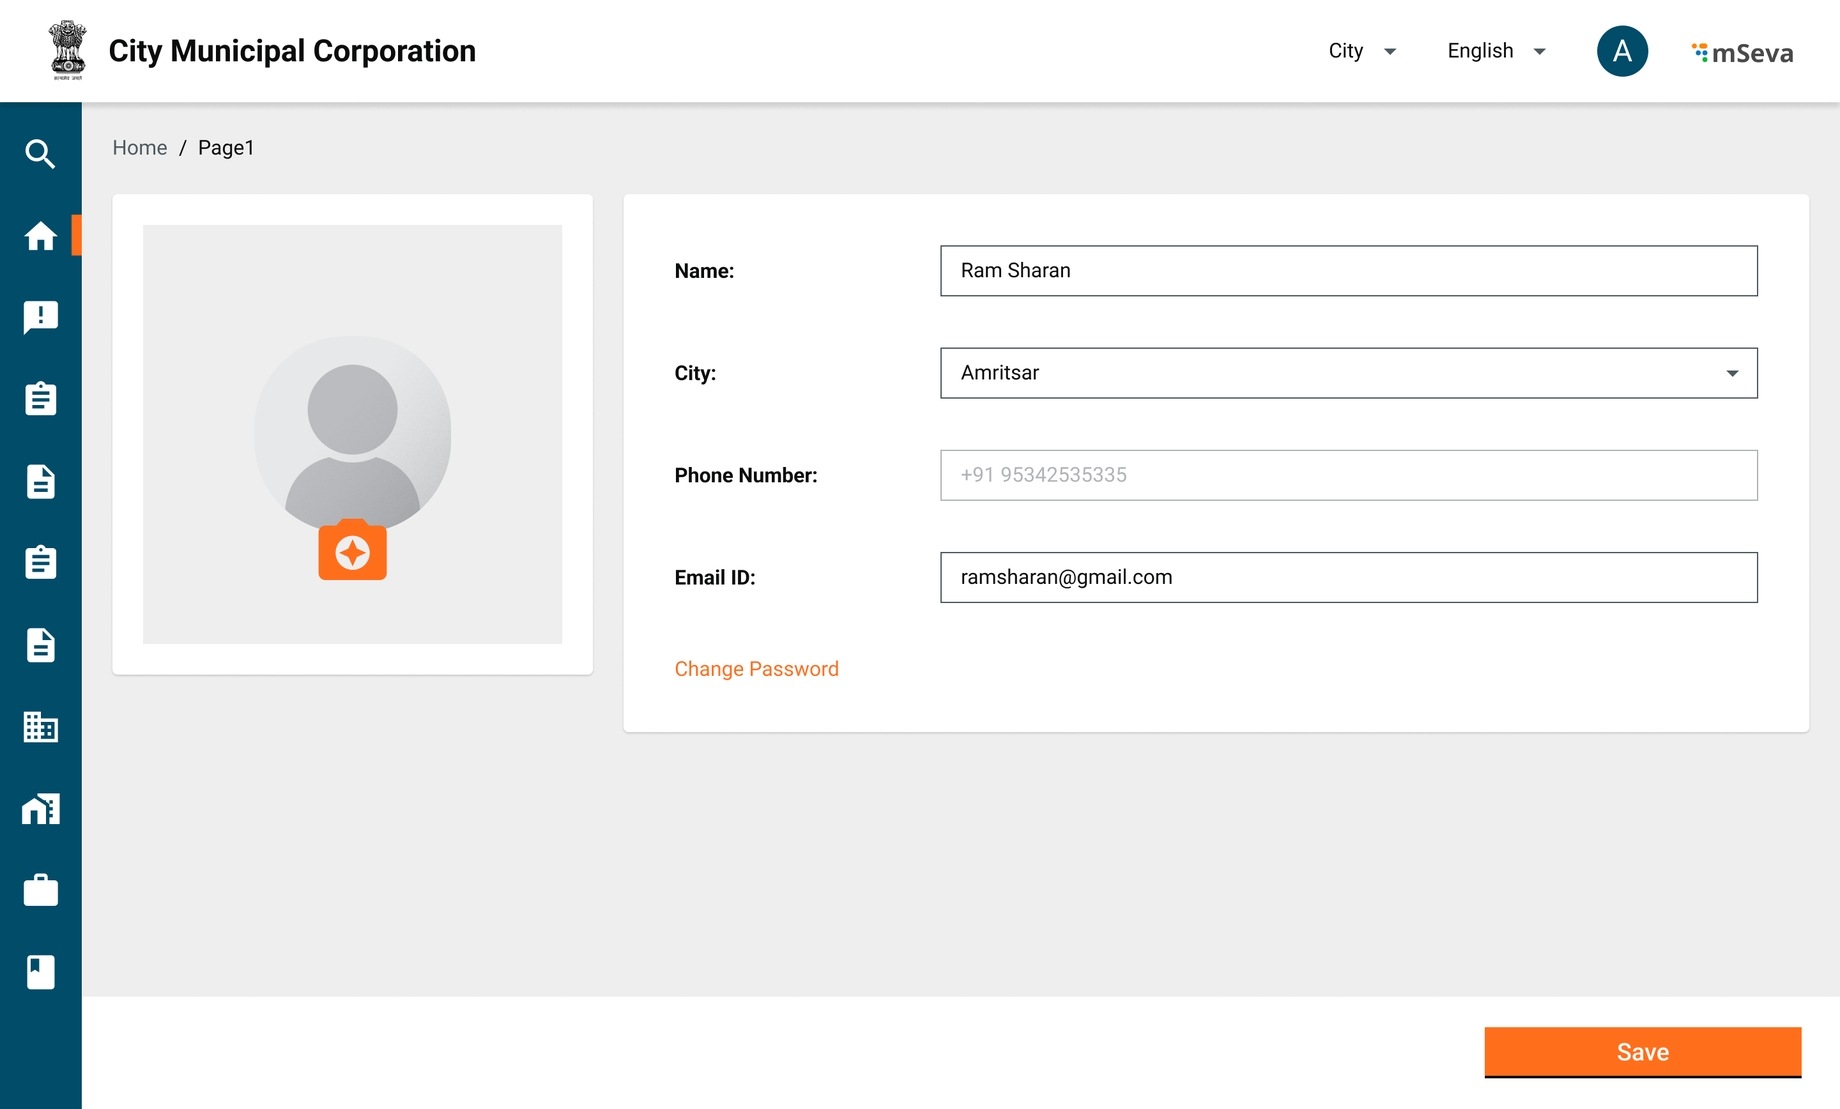
Objective: The User Profile page is used to view or update user details like name, gender, email, phone number, and profile pic.
A user profile is created when the user registers the application for the first time.
Citizen: A citizen is a basic user who uses the application to perform basic tasks including
creating applications, properties, etc
viewing all applications, properties, etc
payments
Employee: An employee is a user linked to the organization and is more privileged than the citizen and can perform the following tasks
creating applications, properties, etc
viewing all applications, properties, etc
payments
and many more
Technical Implementations of the user profile code link:
User manual for common UI/UX revamp for employee screens
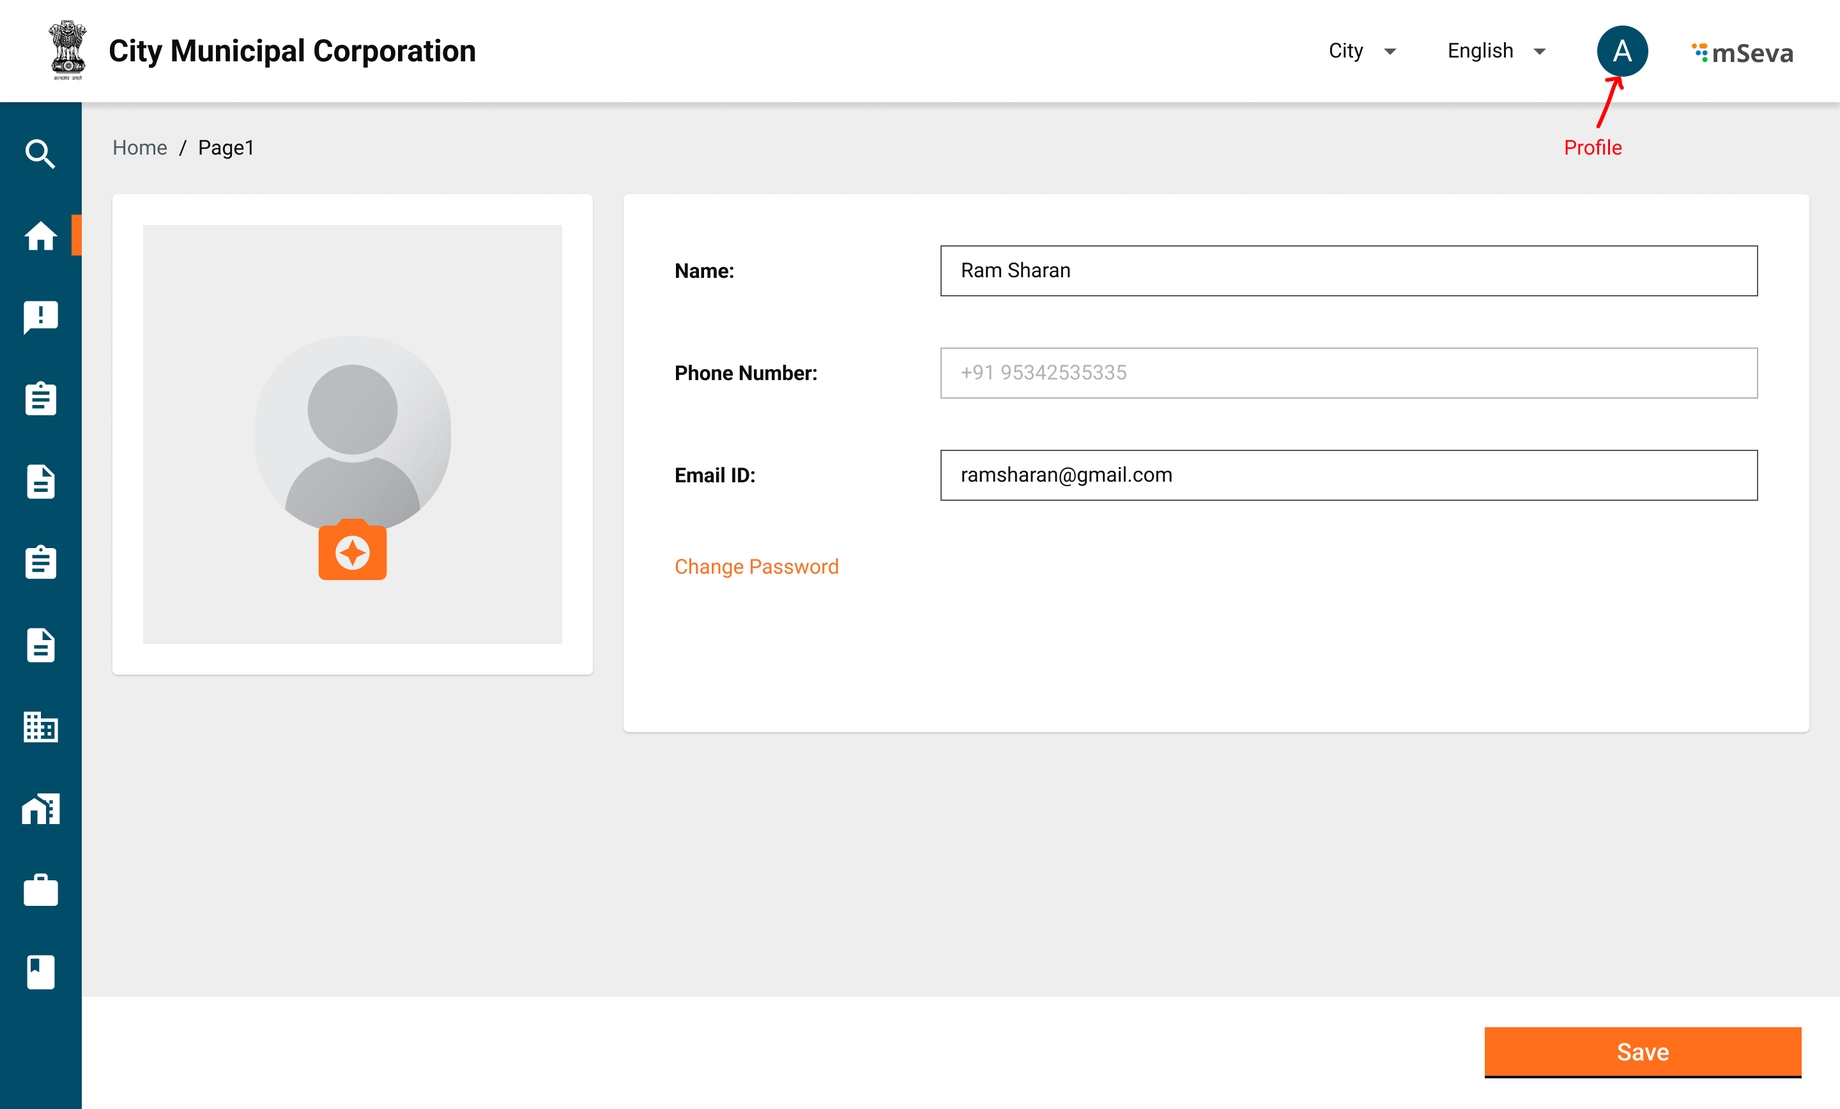
The user profile page allows users to manage user information. Users can add their own profile picture and can update their password from this page. The User Profile page provides common functionalities for both citizens and employees with some differences.
Employees can access the User Profile page by clicking on the Edit Profile icon at the top app bar.
Below are the fields employees can edit as per the given validation.
User manual for common UI/UX revamp for employee city change screens
Objective: To provide users with additional information on the error messages on UI.
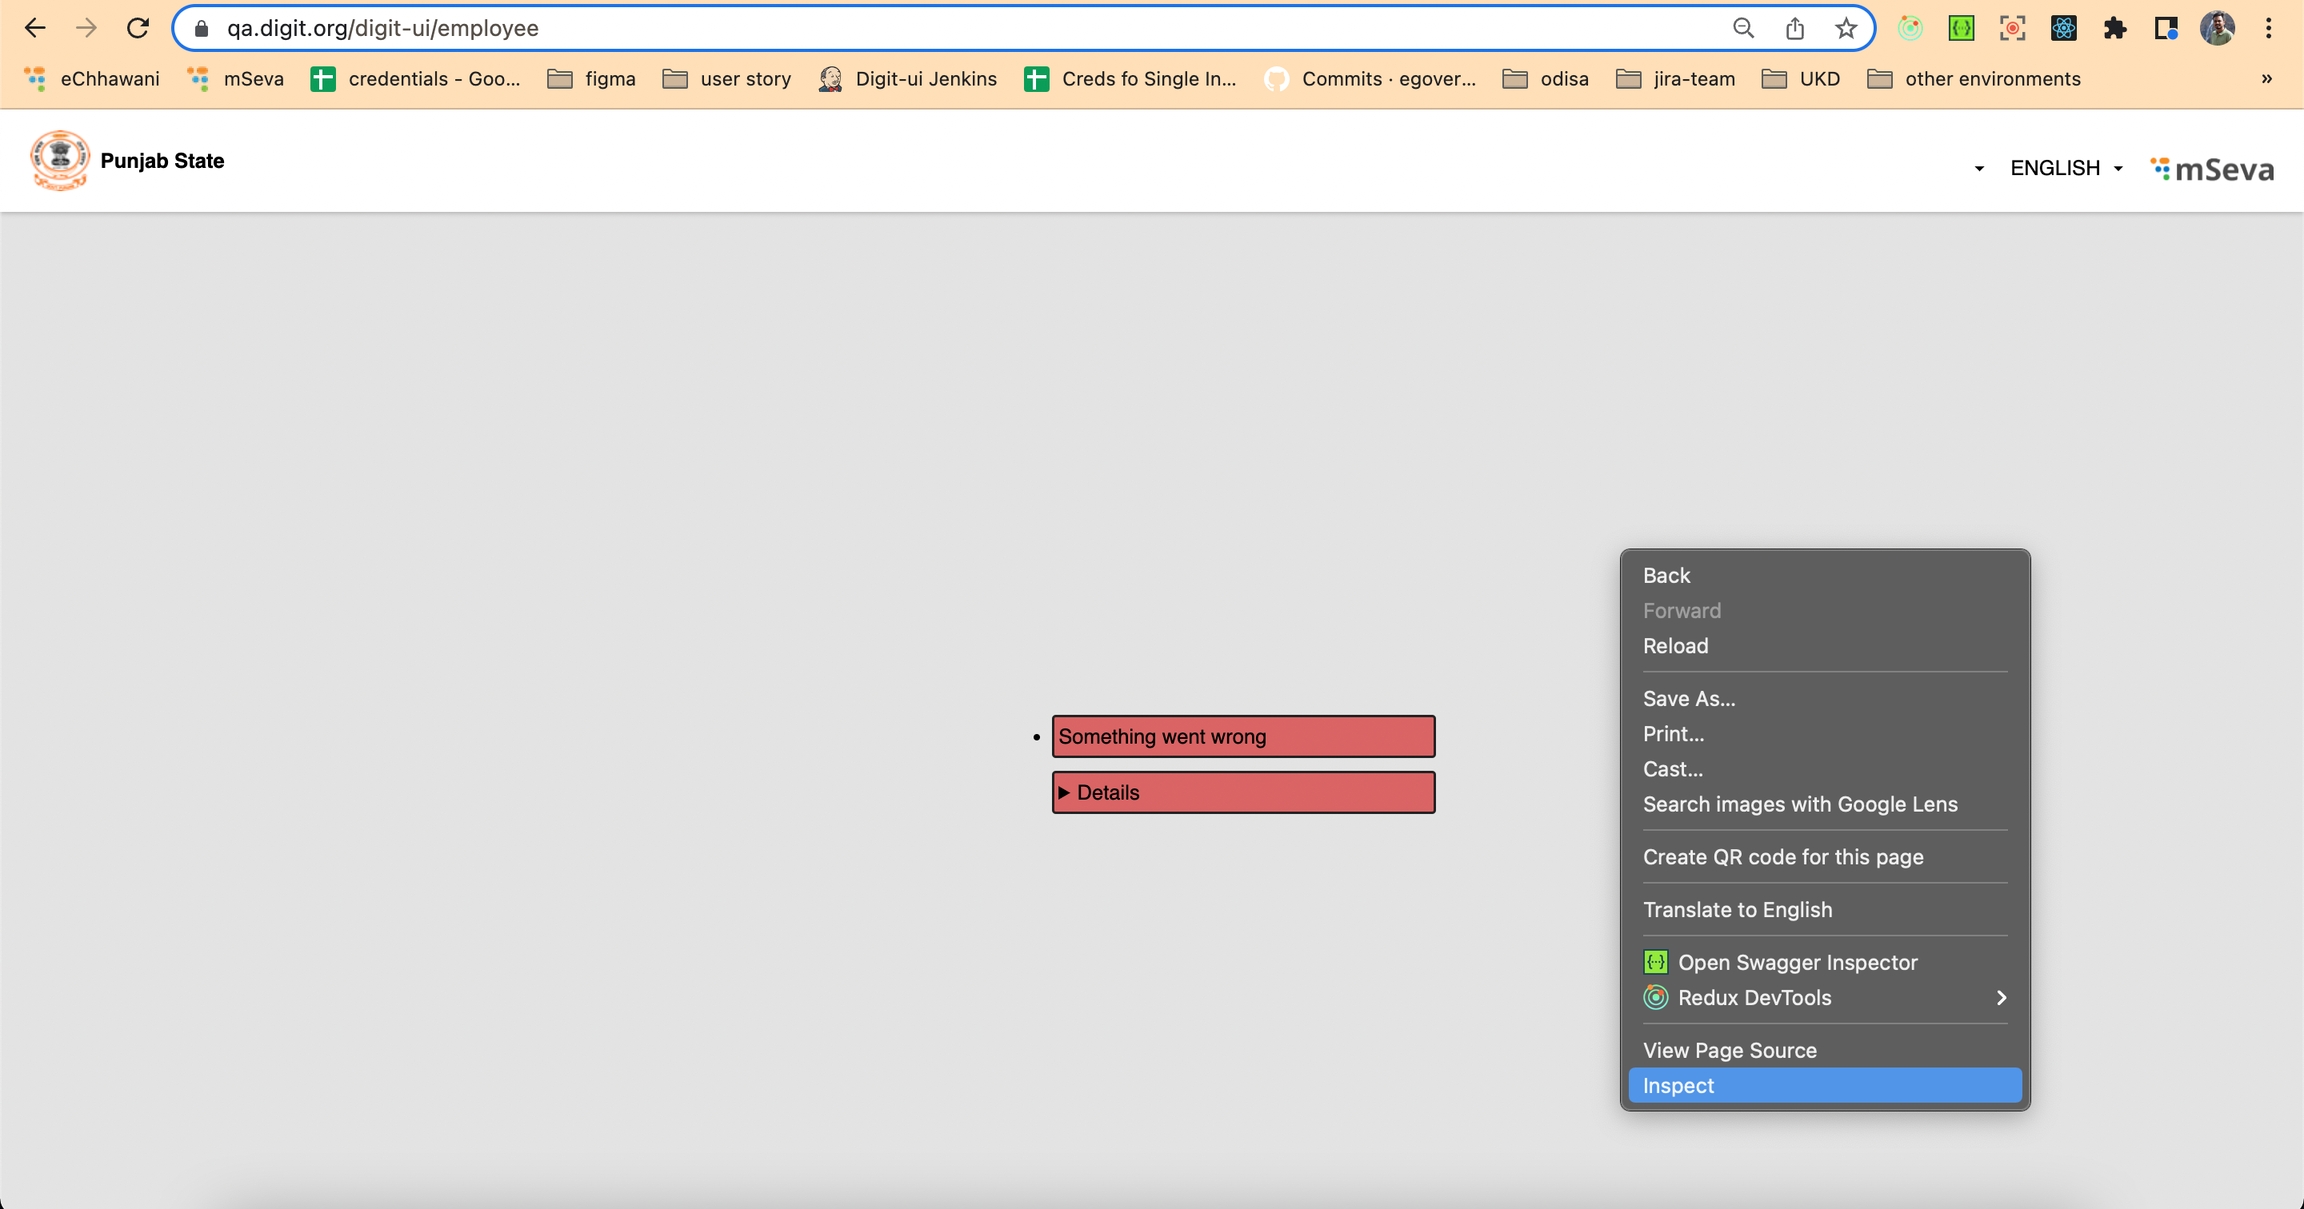
Generic error messages may appear on the UI while using the application and performing some action. For instance, Something went wrong / Please try again or contact support.
Despite trying again, the same error message pops back up. What else could go wrong? The Network tab provides users with more information about the error.
The steps below provide detailed information on using the Network Tab.
Step 1: Inspect the Page On the page with the error message, right-click anywhere on the page. Click on Inspect in the dropdown menu.
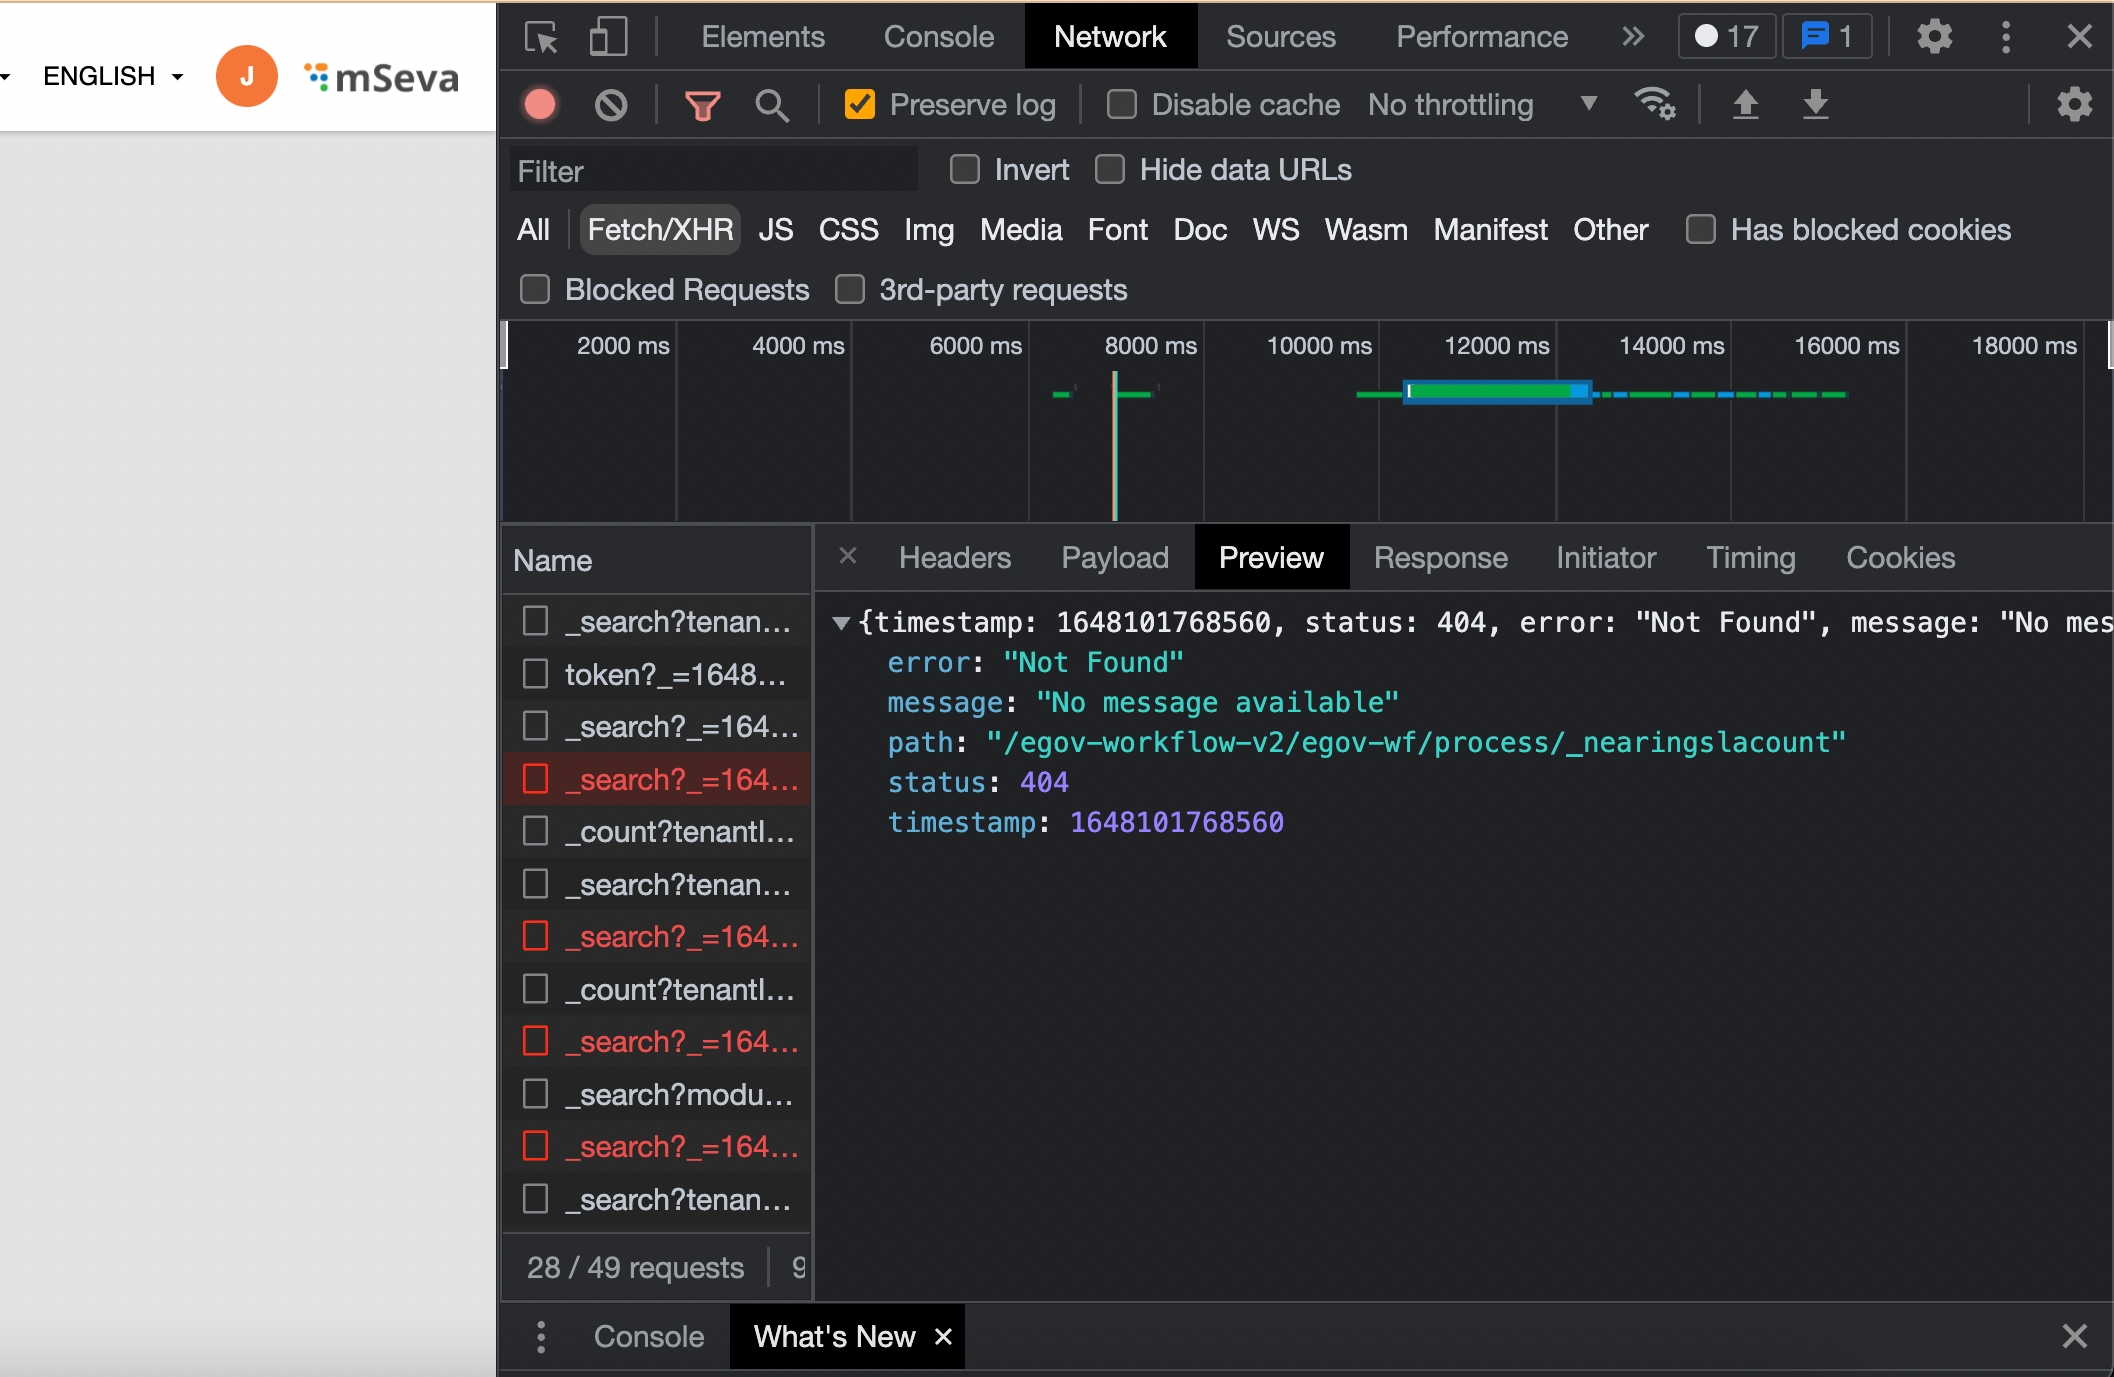
Step 2: Select the Network Tab The browser’s network tab offers a way to look directly at what’s happening behind the scenes of a page. It offers not only the type of data being requested and passed as we interact with the page, but also provides information on any actions that are failing. After selecting Inspect, a new window pops up. Click on the Network tab on this window. Select the XHR filter option. This hides everything except API requests.
Step 3: Refresh the Page Click the Refresh button on your browser. Since the Network tab displays the requests that occur after the tab has been opened, refreshing the page enables users to view the error as it occurs. The various API request details appear on the page as it reloads.
Step 4: Re-create the Error The error needs to be re-created to understand what is causing it. This is done by repeating the steps that led to the error. For instance, clicking on Update re-creates the error and the panel pinpoints the request that is causing the issue.
Step 5: Find the Red-Line Item in the Network Panel The line item appearing in red is the error. The status reflected on the image above is 404, which is the error code for a bad request. If the status is 200, it means the code is OK and there is nothing wrong with these requests.
Step 6: Preview the Error Details Click on the red-line item to see the error details. Clicking on that line item opens a new frame on the right-hand side. The tabs in this frame include Headers, Preview, Response, Cookies, and Timing. Click on Preview since this contains the basic information.
Step 7: View the Error Message
There is no specific message in some cases. In this instance, the following message is displayed:
Thanks to the network panel, it allows users to diagnose the issue and apply a fix.
Objective: To facilitate users update invalid or inactive mobile numbers in the owner records.
Reminds ULB users about the invalid mobile numbers existing in the owner's record and facilitates updating those in an easy way.
Enables ULB users to update the mobile numbers in a request from the property owner(s).
Enables property owner(s) to update the mobile number in their record by way of login into the system.
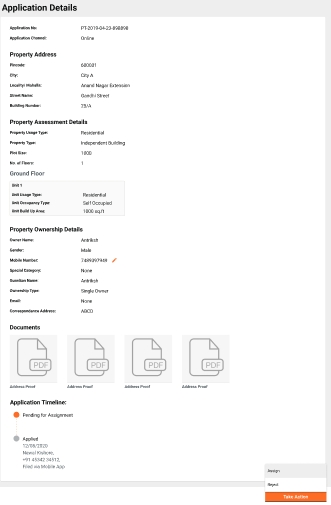
Users can update the mobile number from the application details page by clicking on the assign button at the workflow level.
This opens a pop-up window where users can enter the respective details required to update the mobile number.
Click on the Update button once the details are entered.
Following actions take place on successful updates -
Mobile number is updated in the owner’s record and a success message is displayed.
View Property page is refreshed to reflect the updated mobile number.
SMS is sent to both (old and new) mobile numbers intimating about the change in the mobile number in the owner’s record.
The following actions take place on failure to update -
Failure message is displayed.
User remains on the View Property page.
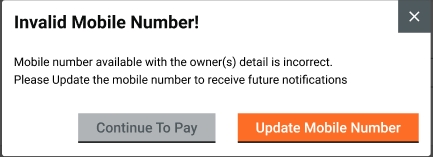
Property is searched to collect the tax and the search result is displayed.
Clicking on the Collect Tax button displays an alert dialogue box communicating the following details:
Mobile number associated with owner(s) detail is incorrect. Update the correct mobile number to receive future notifications. - Text message.
Continue to Collect- action button
Update Mobile Number - action button
Continue to Collect - The user is taken to the collection page and the collection process is completed.
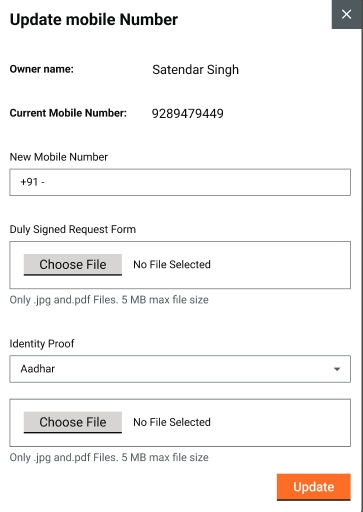
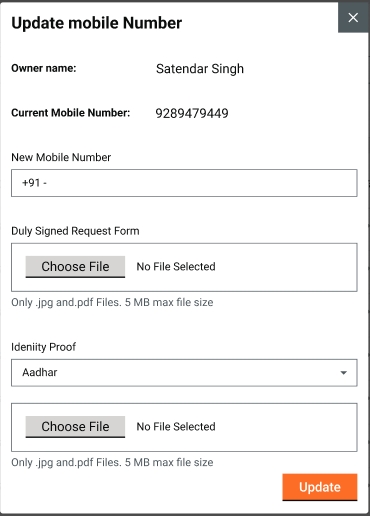
Update Mobile Number - Users must provide the below details to update the mobile number:
Owner’s name - displays the owner name.
Current mobile number - displays the existing mobile number of the owner.
New mobile number - a text box to enter the new mobile number. The mobile number validations are applicable as per the DIGIT standard mobile number validation.
Documents required - provision to upload necessary documents as attachments. This is optional and includes -
Duly Signed Change Request Form
Identity Proof (Aadhar Card, Voter ID)
Document Name - Drop-down with the list of documents considered as identity proof.
Choose File - File picker to upload the file.
Update - action button to update the mobile no.
The remaining process is the same as in the application details edit page.
Assignment code:
A mobile number is invalid if it doesn't match the pattern defined in the MDMS config file or if the number of digits is invalid.
MDMS Config
Response:
MDMS
The MDMS is used to check any invalid number. This data is present in the technical implementation part.
The localization keys for update mobile number and invalid number are added to the ‘rainmaker-pt’ locale module. Any changes, updates or addition of any new localization key are done in the same locale module.
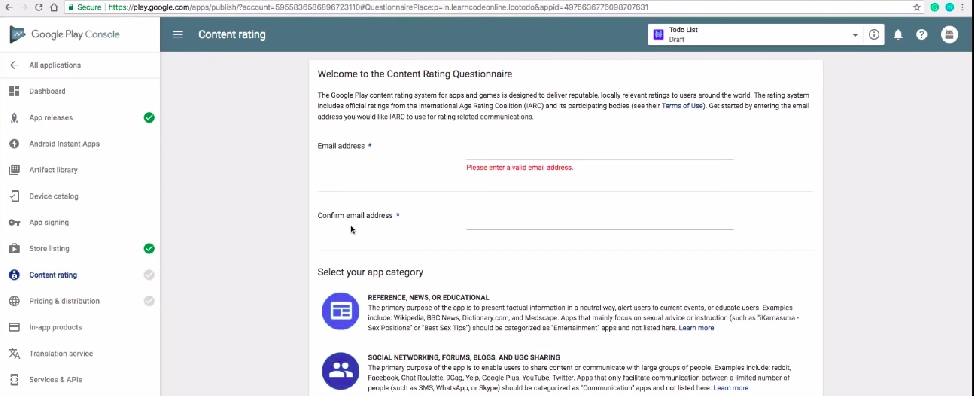
Now in the right side menu to the “content rating” and click on continue button which will redirect to “Welcome to the Content Rating Rating Questionnaire page”, where we need to enter the email id and also select your app category in provided categories and fill all the Questionnaire in the form that comes after selecting the app category and click on the “save Questionnaire”, you will receive an email after clicking on the “save Questionnaire”.
All content on this page by eGov Foundation is licensed under a Creative Commons Attribution 4.0 International License.
The DevOps team generates this file as part of the new instance creation process. Finally, the file path is incorporated into the environment folder within the DevOps repository. Example: DIGIT UI repo path: egovernments/DIGIT-DevOps UAT File Path: uat.yaml These details are essential for the creation of a new instance build.
Activate the modules by utilizing the MDMS configuration, toggling the parameters to either "true" or "false." MDMS file path of UAT: citymodule.json
All content on this page by eGov Foundation is licensed under a Creative Commons Attribution 4.0 International License.
All content on this page by eGov Foundation is licensed under a Creative Commons Attribution 4.0 International License.
All content on this page by is licensed under a .
All content on this page by is licensed under a .
All content on this page by is licensed under a .
Update channelNames array in the file and add/delete the channel you want a business service’s action to have.
Format Config file: This config file define the format of PDF. In format config, we define the UI structure ex: css, layout etc. for pdf as per PDFMake syntax of pdf. In PDF UI, the places where values are to be picked from the request body are written as “{{variableName}}” as per ‘mustache.js’ standard and are replaced by this templating engine. ex:
Data Config file: This file contains a mapping to pick data from request body, external service call body if there is any and the variable which defines where this value is to be replaced in format by the templating engines (mustache.js). The variable which is declared in the format config file must be defined in the data config file. ex:
If the format field is not specified in date variable declaration then in PDF date is shown with the default format of DD/MM/YYYY. For more details refer this page
The position of page number in the footer is configurable. For more detail refer this document
All content on this page by is licensed under a .
MDMS configurations file link: egov-mdms-data/data/pb/mseva at master · egovernments/egov-mdms-data
All content on this page by eGov Foundation is licensed under a Creative Commons Attribution 4.0 International License.
Step 6: Now, login into SMS Country portal ( ) by entering proper credentials.
All content on this page by is licensed under a .
Roles are added in roles.json In MDMS, file roles.json, under ACCESSCONTROL-ROLES folder roles are added. More about roles can be checked in the below link:
All content on this page by is licensed under a .
All content on this page by is licensed under a .
All content on this page by is licensed under a .
All content on this page by is licensed under a .
All content on this page by is licensed under a .
All content on this page by is licensed under a .
All content on this page by is licensed under a .
All content on this page by is licensed under a .
Update and invalid mobile number code link:
Popup component code link:
Title
Link
PDF Generation service technical documentation
Customizing PDF Receipts & Certificates
API Swagger Documentation
Link
pdf-service/v1/_create
pdf-service/v1/_createnosave
pdf-service/v1/_search
StateInfo.json
1
id
Numeric
Yes
A unique id that identifies action.
2
name
Text
No
A short narration provided to the action.
3
url
Text
Yes
It is the endpoint of API or type like url or card.
4
displayName
Text
No
It is the display name.
5
orderNumber
Numeric
Yes
A number to represent order to display in UI
6
parentModule
Text
No
Code of the service referred to as parent
7
enabled
boolean
Yes
To enable or disable display in UI.
8
serviceCode
Text
No
Code of the service to which API belongs.
9
code
Text
No
10
path
Text
No
11
navigationUrl
Text
Yes
Url to navigate in UI
12
leftIcon
Icon
No
13
rightIcon
Icon
No
1
rolecode
Yes
The unique code of the role which is defined in roles.json and which required mapping for API.
2
actionid
Yes
The unique id of the API/action which is defined in actions-test.json and which is required to be mapped with the role.
3
actioncode
No
The code of the API/action which is defined in actions-test.json and which is required to be mapped with the role.
4
tenantid
Yes
tenant id of state.
Title
Link
Sample actions-test.json
Sample roles.json
Sample roleactions.json Roles APIs mapping
Jupyter
Excel
Using jupyter will be command-based.
Will take some time getting used to it.
Ease of Use with the Graphical User Interface (GUI). Learning formulas is fairly easier.
Jupyter requires python language for data analysis hence a steeper learning curve.
Negligible previous knowledge is required.
Equipped to handle lots of data really quickly. With the bonus of ease of accessibility to databases like Postgres and Mysql where actual data is stored.
Excel can only handle so much data. Scalability becomes difficult and messy.
More Data = Slower Results
Summary:
Python is harder to learn because you have to download many packages and set the correct development environment on your computer. However, it provides a big leg up when working with big data and creating repeatable, automatable analyses, and in-depth visualizations.
Summary:
Excel is best when doing small and one-time analyses or creating basic visualizations quickly. It is easy to become an intermediate user relatively without too much experience dueo its GUI.
Module Name
Script File Name (With Links)
Datamart CSV File Name
Datamart CSV File Name
PT
ptDatamart.csv
W&S
waterDatamart.csv
sewerageDatamart.csv
PGR
pgrDatamart.csv
mCollect
mcollectDatamart.csv
TL
tlDatamart.csv
tlrenewDatamart.csv
Fire Noc
fnDatamart.csv
OBPS (Bpa)
bpaDatamart.csv
Module Name
Pod Name
Description
PT
playground-865db67c64-tfdrk
Punjab Prod Data in UAT Environment
W&S
playground-584d866dcc-cr5zf
QA Data
PGR
Local Data
Data Dump
mCollect
playground-584d866dcc-cr5zf
QA Data
TL
playground-584d866dcc-cr5zf
QA Data
Fire Noc
playground-584d866dcc-cr5zf
QA Data
OBPS (Bpa)
playground-584d866dcc-cr5zf
QA Data
Attribute
Description
key
The key for the pdf, it is used as a path parameter in URL to identify for which PDF has to generate.
baseKeyPath
The json path for the array object that we need to process.
entityIdPath
The json path for the unique field which is stored in DB. And that unique ****field value is mapped to file-store id, so we can directly search the pdf which was created earlier with the unique field value and there will be no need to create PDF again.
Direct Mapping
In direct mapping, we define the variable whose value can be fetched from the array object which we extracted using baseKeyPath.
ExternalApi Mapping
The externalApi mapping is used only if there is a need for values from other service response. In externalApi mapping, API endpoint has to be set properly with the correct query parameter.
Derived mapping
In derived mapping, the estimation of variable characterized here is equivalent to the esteem acquired from the arithmetic operation between the direct mapping variable and externalApi mapping variable.
Qr code Config mapping
This mapping is used to draw QR codes in the PDFs. The text to be shown after scan can be a combination of static text and variables from direct and externalApi mappings.
Attribute
Description
key
The key for the pdf, it is used as a path parameter in URL to identify the PDF that has to be generated.
Content
In this section, the view of pdf is set. What has to appear on pdf is declared here, it is just like creating a static HTML page. The variable which is defined in data config is declared here and place in position as per the requirement. We can also create a table here and set the variable as per requirement.
Style
This section is used to style the component, set the alignment and many more. Basically, it's like a CSS to style the HTML page.
Title
Link
PDF Generation service technical documentation
Steps for Integration of PDF in UI for download and print PDF
API Swagger Documentation
Link
pdf-service/v1/_create
pdf-service/v1/_createnosave
pdf-service/v1/_search
API
ACTION ID
ROLES
/filestore/v1/files
PTCEMP, CITIZEN
/user/profile/_update
PTCEMP, CITIZEN
user/password/_update
ObOPTCEMP, CITIZEN
Field
Mandatory (Y/N)
Validation
Comments
Name
Yes
Only text characters are allowed. Max limit 60 characters
Currently citizen name is collected while signing up as well.
Clicking on this field allows users to edit the name. Citizen can change the name and click on the save button to update.
This field can be edited in the future as well.
Gender
No
Male
Female
Transgender
Others
Citizen can update gender. Click on the dropdown and select gender to update.
This field is editable in future as well.
No
Standard Email validation to be in place.
@ is mandatory
This field is editable as user starts clicking on email field.
Users can click on save to make changes.
This field can be edited in future as well.
Profile Picture
No
Max Size 1 MB
Recommended resolutions 110*110 or 180*180
Users can upload image from gallery or open front camera to click pitcure and upload.
Uploading picture replaces the image icon of the user.
Phone Number
NA
Non Editable
Non Editable
Change Password
NA
Password validation as per existing platform standards
User can change password by entering current password, new password and confirming new password.
egov-workflow-v2/egov-wf/process/_search
All Roles
1730
/property-services/property/_search
All Roles
1897
/egov-workflow-v2/egov-wf/businessservice/_search
All Roles
1743
/filestore/v1/files/url
All Roles
1528
property-services/property/_update
All Roles
1896
User manual for common UI/UX revamp for citizen screens
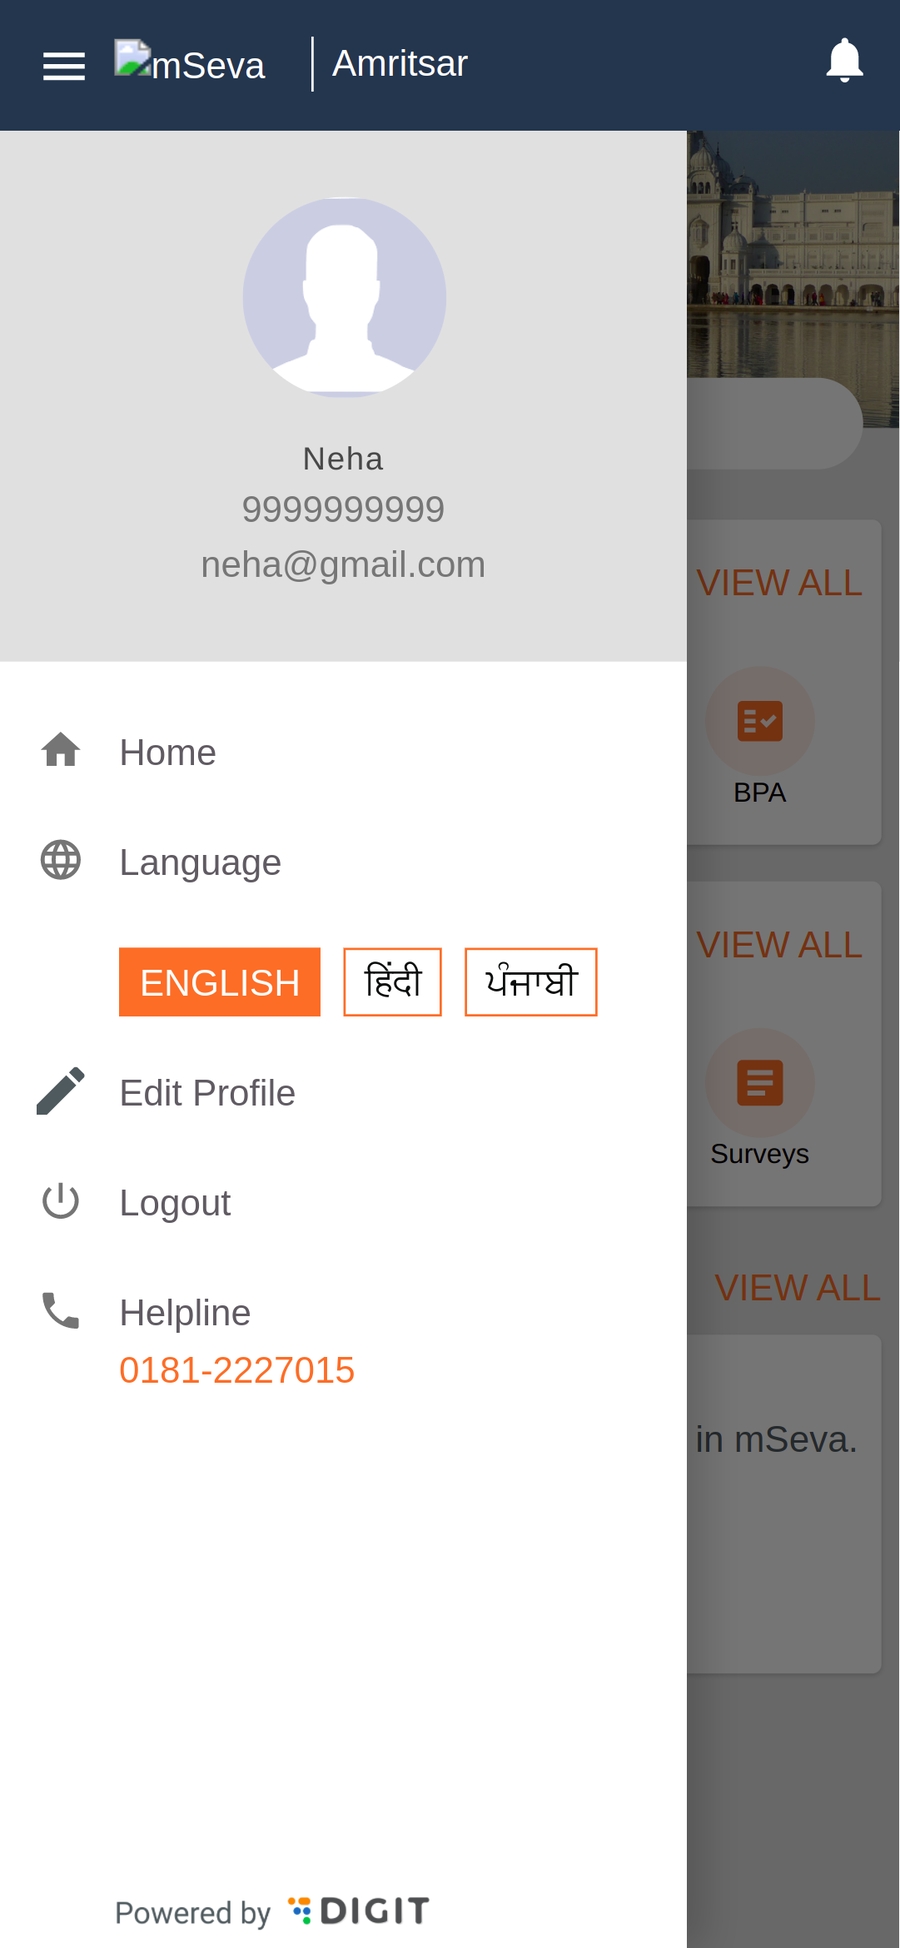
The User Profile page for citizens can be accessed by clicking on the Edit Profile icon in the app drawer. Click on the hamburger menu in the top bar on the app to open the app drawer.
Upload or remove profile picture
A user can upload or remove their profile picture by clicking on the camera icon available over the profile thumbnail.
Clicking on the camera icon displays the bottom drawer. Select the upload photo from the gallery or remove the profile picture option as required.
The user can upload a new photo or remove the old photo.
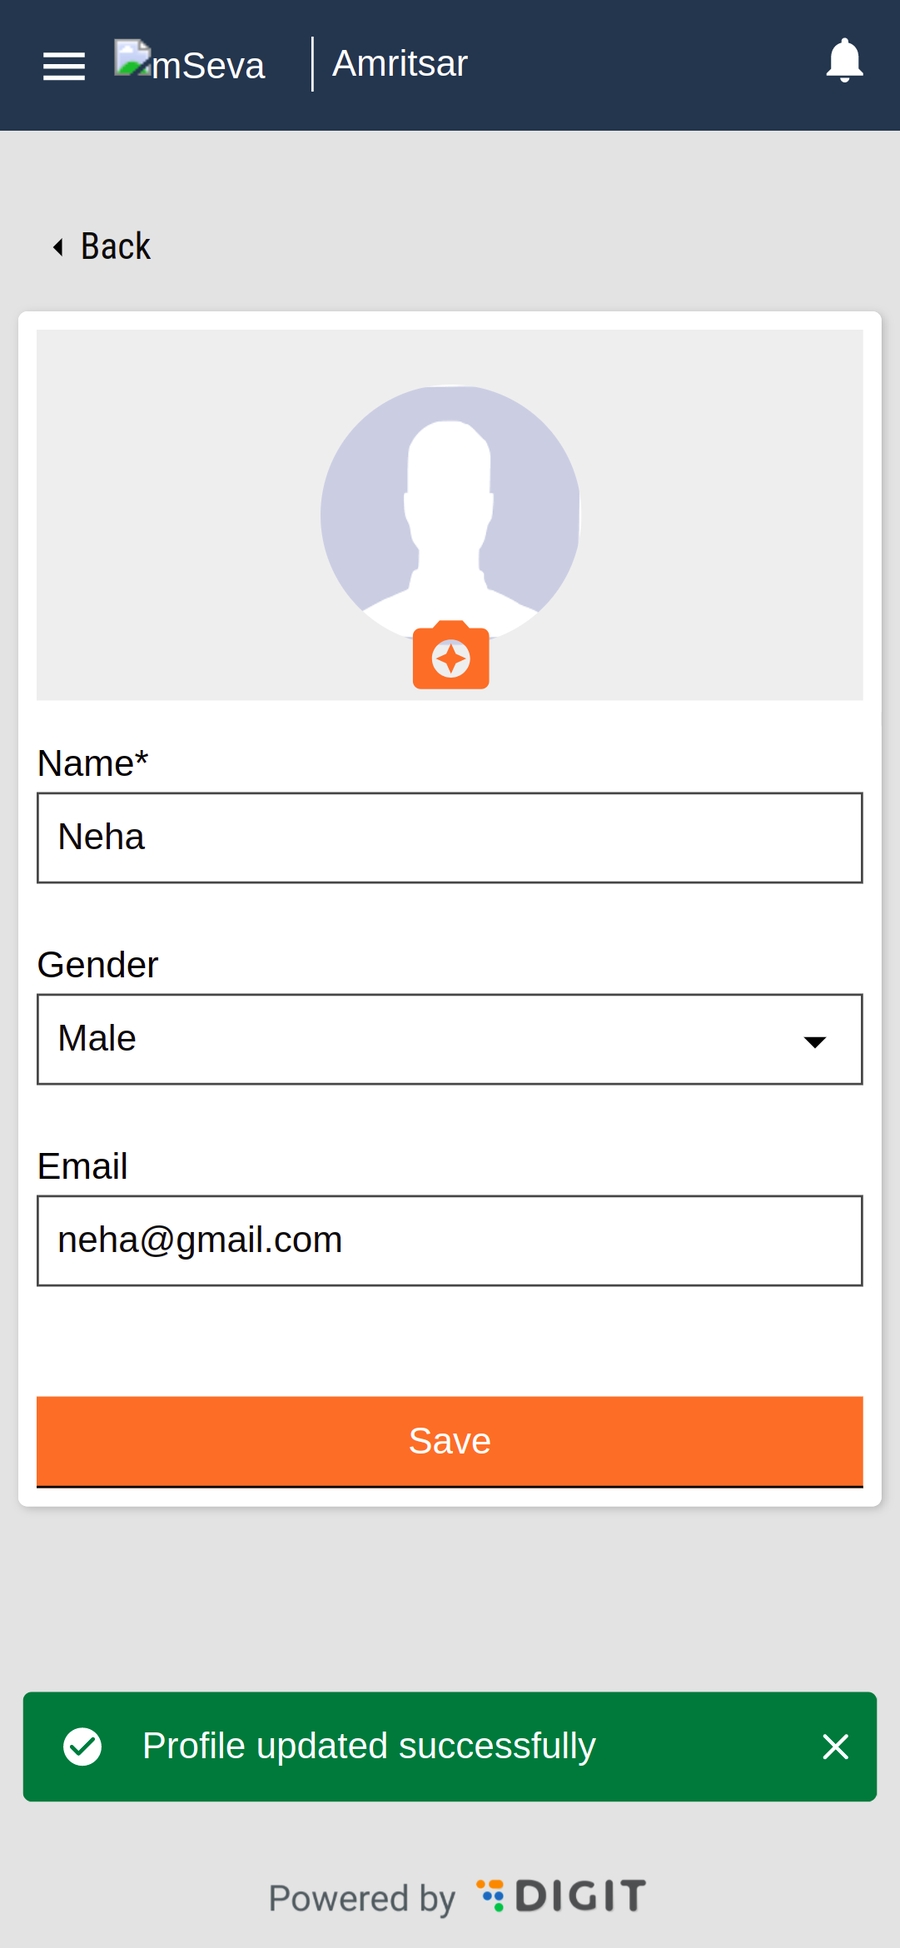
Update user details
Users can update their details by editing the required text fields on the User Profile page.
Values entered by the user must be valid.
Update user password (Only for employee users)
Users can also change the current password by providing
current password
new password
confirm password (must be same as new password entered)
Save changes
All changes are updated when the Save button is clicked.
Saving changes validates the fields and the status is shown in the toast messages.
User details are updated successfully.
All content on this page by eGov Foundation is licensed under a Creative Commons Attribution 4.0 International License.